

Page 1

VIETA DVD-3
Draft
Operation Manual
1
Page 2

WARNING
- TO PREVENT FIRE OR SHOCK HAZARD, DO NOT USE THIS PLUG WITH AN EXTENSION CORD,
RECEPTACLE OR OTHER OUTLET UNLESS THE BLADES CAN BE FULLY INSERTED TO PREVENT
BLADE EXPOSURE.
- TO PREVENT FIRE OR SHOCK HAZARD, DO NOT EXPOSE THIS APPLIANCE TO RAIN OR MOISTURE.
- TO AVOID ELECTRICAL SHOCK, DO NOT OPEN THE CABINET. REFER SERVICING TO QUALIFIED
PERSONAL ONLY.
The lightning flash with arrowhead symbol, within an equilateral triangle, is intended to alert
the user to the presence of
uninsulated dangerous voltage
within the products enclosure
that may be of sufficient magnitude to constitute a risk of electric shock to persons.
WARNING: TO REDUCE THE RISK
OF ELECTRIC SHOCK, DO NOT
REMOVE COVER (OR BACK) NO
USERSERVICEABLE PARTS INSIDE. REFER SERVICING TO
QUALIFIED SERVICE PERSONNEL.
The exclamation point within an equilateral triangle is intended to alert
the user to the presence of important operating and maintenance (servicing) instructions in the literature
accompanying the appliance.
IMPORTANT SAFETY INSTRUCTION
1) Read these instructions.
2) Keep these instructions.
3) Heed all warnings.
4) Follow all instructions.
5) Do not use this apparatus near water.
6) Clean only with dry cloth.
7) Do not block any ventilation openings. Install in accordance with the manufacturer's instructions.
8) Do not install near any heat sources such as radiators, heat registers, stoves, or otherapparatus(including
amplifiers) that produce heat.
9) Do not defeat the safety purpose of the polarized or grounding-type plug. A polarized plug has two blades
with one wider than the other. A grounding type plug has two blades and a third grounding prong. The wide
blade or the third prong are provided for your safety. If the provided plug does not fit into your outlet, consult
an electrician for replacement of the obsolete outlet.
10) Protect the power cord from being walked on or pinch particularly at plugs, convenience receptacles, and
the point where they exit from the apparatus.
11) Only use attachments/accessories specified by the manufacturer.
12) Unplug this apparatus during lightning storms or when unused for long periods of time.
13) Refer all servicing to qualified service personnel. Servicing is required when the apparatus has been dam-
aged in any way, such as power-supply cord or plug is damaged, liquid has been exposed to rain or
moisture, does not operate normally, or has been dropped.
14) This appliance shall not be exposed to dripping or splashing water and that no object filled with liquid such
as vases shall be placed on the apparatus.
2
Page 3

ImporImpor
Impor
ImporImpor
tant Saftant Saf
tant Saf
tant Saftant Saf
ee
guarguar
e
guar
ee
guarguar
ds and Prds and Pr
ds and Pr
ds and Prds and Pr
ecautionsecautions
ecautions
ecautionsecautions
Power Cord Protection
To avoid any malfunctions of the unit, and to protect against
electric shock, fire or personal injury, please observe the fol-
lowing:
• Hold the plug firmly when connecting or disconnecting the
AC power cord.
• Keep the AC power cord away from the heating appli-
ances.
• Never put any heavy object on the AC power cord.
• Do not attempt to repair or reconstruct the AC power cord
in any way.
Location and Handing
• Air vents are provided in the cabinet to prevent excessive
temperatures inside the unit. Do not place this unit in closed
spaces, cover it, or otherwise block the vents.
• Do not place this unit in direct sunlight, or near heat sources.
• Keep this unit away from strong magnetic objects.
• Do not insert or drop anything into this unit through the air
vents as this could cause serious damage, possibly result-
ing in fire.
• Do not place any object containing water or other liquids on
this unit. In the event that liquid should enter the cabinet,
unplug this unit immediately and contact the retailer or ser-
vice centre immediately.
• Do not remove the cabinet. Touching parts inside the cabi-
net could result in electric shock and / or damage to the
unit.
• Do not use the unit in a car. The operation can not guaran-
teed.
Nonuse Periods
• When the unit is not being used, turn the unit off.
• When left unused for a long period of time, the unit should
be unplugged from the house hold AC outlet.
No Fingers or Other Objects Inside
• Do not put any foreign object on the disc tray.
Stacking
• Place the unit in a horizontal position, and do not place
anything heavy on it.
On adjusting volume
• Do not turn up the volume while listening to a portion with
very low level inputs or no audio signals. If you do, the
speakes may be damaged when a peak level portion is
played.
If There is Noise Interference on the TV While a Broad-
cast is being Received
Depending on the reception condition of the TV, interference
may appear on the TV monitor while you watch a TV broad-
cast and the unit is left on. This is not a malfunction of the unit
or the TV. To watch a TV broadcast, turn off the unit.
Service
• Do not attempt to service the unit yourself.
• Please refer any service to the nearest service centre.
Copyright
Audio-visual material may consist of copyrighted works
which must not be recorded without the authority of the
owner of the copyright. Please refer to relevant laws in your
country.
Copy protection
This DVD player supports Macrovision copy protection.
On DVD discs that include a copy protection code, if the
contents of the DVD disc are copied using a VCR, the copy
protection code prevents the videotape copy from playing
normally.
Recommended Measures for Optimum Picture Ex-
cellence
This unit is a precision device that is constructed using ex-
tremely accurate technology.
Soiling or friction affecting the pickup lens or disc drive can
impair the image quality. At the worst, neither video nor audio
will be played back. To obtain optimum picture quality, the
player should be checked (cleaning and replacement of some
parts) every 1,000 hours. Note that this period varies de-
pending on the environment (temperature, humidity, dust,
ect.) in which the player is used.
Do not attempt to clean the pickup lens yourself.
Condensation
Moisture may form on the pickup lens in the following condi-
tions:
• Immediately after a heater has been turned on.
• In a steamy or very humid room.
• When the unit is suddenly moved from a cold environment
to a warm one.
If moisture forms inside this unit, it may not operate properly. In
this case, turn on the power and wait about one hour for the
moisture to evaporate.
3
Page 4

TT
aa
bb
T
TT
a
aa
b
bb
le ofle of
le of
le ofle of
Contents Contents
Contents
Contents Contents
General Information
Features .............................................................................. 5
DVD region codes ...............................................................5
Glossary of disc terms ........................................................ 5
Conventions about this manual ........................................... 5
Notes on disc ....................................................................... 6
Inserting batteries into the remote control .......................... 6
Special Function
Picture CD disc playback .................................................. 18
Setting the sleep timer .......................................................19
Angle selection .................................................................. 19
Picture Zoom ......................................................................19
Selecting subtitle language ............................................... 19
Function Overview
Front panel ........................................................................... 7
Back panel ........................................................................... 7
Remote control .................................................................... 8
Connections
Connecting to TV and additional components .................... 9
Basic Setup
GENERA L SETU P ........................................................... 10
Setting the TV display ....................................................... 10
Setting the TV system .......................................................10
Setting vedio ouput ............................................................ 10
Slecting the on screen display (OSD) language .............. 10
SETTING THE SPEAKERS ............................................. 10
Downmix ............................................................................ 10
AUDIO SETUP ................................................................. 11
Digital output setup ............................................................ 11
Selecting the dynamic range ............................................. 11
PREFERENCES SETUP ................................................. 11
Selecting the Audio language........................................... 11
Selecting the disc menu language .................................... 12
Selecting the parental control ........................................... 12
Change the parental control password ............................ 13
Returning to the original factory default settings ............. 13
Playing Discs
General operation .............................................................. 14
Basic playback ......................................................... 14~15
Fast search .......................................................................14
Slow motion playback .......................................................14
Repeat playback ................................................................ 14
A-B repeat playback .........................................................15
Playing video CDs with PBC ..............................................15
Playing MP3 with PBC ........................................................15
Using the menu for each DVD .......................................... 15
Checking the information using display ............................ 16
Selecting the start time ......................................................17
Program play ......................................................................17
Selecting audio mode for karaoke music ..........................17
Troubleshooting ................................................ 20
Electrical Specifications .............................21
Page 5

General Information
Features
DVD player built-in Dolby Digital decorder.
•
• Conforming DVD, VCD(1.0/2.0), SVCD,CDR,CDRW, CD, MP3,
DISC, JPEG CD discs.
• DVD navigation and SVCD, VCD PBC controlling functions.
• VFD front panel display and OSD menu display.
• Full function remote control.
DVD region codes
DVD players and discs are designed with region numbers which
dictate the region (printed on the rear panel). If the region num-
ber does not match the region number in your DVD player, you
will not be able to play the disc. If you try to play the DVD, the
message “WRONG REGION” will appear on OSD.
The region number for this DVD player is 2.
Glossary of disc terms
Title (DVD)
•
The longest sections of a picture or a music piece on a
DVD; a movie, ect., for a picture piece on a video software;
or an album, etc., for a music piece on a audio software.
Each title is assigned a title number enabling you to locate
the title you want.
Conventions about this manual
Instructions in this manual describe the controls on the
•
system. You can also use the controls on the remote con-
trol if they have the same or similar names as those on the
system.
• The types of functions and operations that can be used for
a particular disc vary depending on the features of that
disc. In some cases, these functions and operations may
differ from the descriptions given in this Operations Manual.
In this event, follow the instructions given on the screen.
This Operations Manual only covers basic disc operations.
• For some operations, the icon may appear on the
screen. This indicates that the operation described in this
Operations Manual is not permitted for the current disc.
• The drawings about the TV screen and front panel display
used in this Operations Manual are purely for the purposes
of explanation. The actual displays may differ slightly from
what are shown here.
• Chapter (DVD)
Sections of a picture or a music piece that are smaller than
titles. A title is composed of several chapters. Each chapter
is assigned a chapter number enabling you to locate the
chapter you want. Depending on the disc, no chapters
may be recorded.
• Track (Video or audio CD)
Sections of a picture or a music piece on a VIDEO or a CD.
Each track is assigned a track number enabling you to
locate the track you want.
Page 6

GenerGener
Gener
GenerGener
al Infal Inf
al Inf
al Infal Inf
oror
or
oror
mama
ma
mama
tiontion
tion
tiontion
Notes on disc
Disc handling precautions
• To keep the disc clean, handle the disc by its edge. Do not
touch the surface.
• Do not stick paper or tape on the disc.
If there is glue (or a similar substance) on the disc, remove the
glue completely before using the disc.
• Do not expose the disc to direct sunlight or sources such
as hot air ducts, or leave it in a car parked in direct sunlight
as there can be considerable rise in temperature inside the
car.
• After playing, store the disc in its case.
• Do not write on the label side with a ball-point pen or other
writing utensils.
• Be careful not to drop or bend the disc.
Disc cleaning precautions
• Before playing, clean the disc with a cleaning cloth. Wipe
the disc from the center out.
Inserting batteries into the remote con-
trol
You can control the system using the supplied remote control.
Insert two AA batteries (not included) by matching the + and -
on the batteries. When using the remote control, point it at the
remote sensor on the front panel of this system.
Note
• Do not leave the remote in an extermely hot or humid place.
• Do not use a new battery with an old one.
• Do not drop any foreign object into the remote casing, par-
ticularly when replacing the batteries.
• Do not expose the remote sensor to direct sunlight or light-
ing apparatuses. Doing so many cause a malfunction.
• If you will not use the remote for an extended period of
time, remove the batteries to avoid possible damage from
battery leakage and corrosion.
• Do not use solvents such as benzine, thinner, commercially
available cleaners or anti-static spray intended for viny1
LPs.
Disc installing precautions
• Do not install more than 1 disc on disc tray.
• Do not place the disc on the tray up-side down.
• Do not try to close the disc tray when the disc is not in-
stalled properly.
6
Page 7
Function OvFunction Ov
V
Function Ov
Function OvFunction Ov
Front panel
POWER
1
erer
er
erer
vievie
vie
vievie
ww
w
ww
4
5
6
7
OLUME
PHONE
2
3
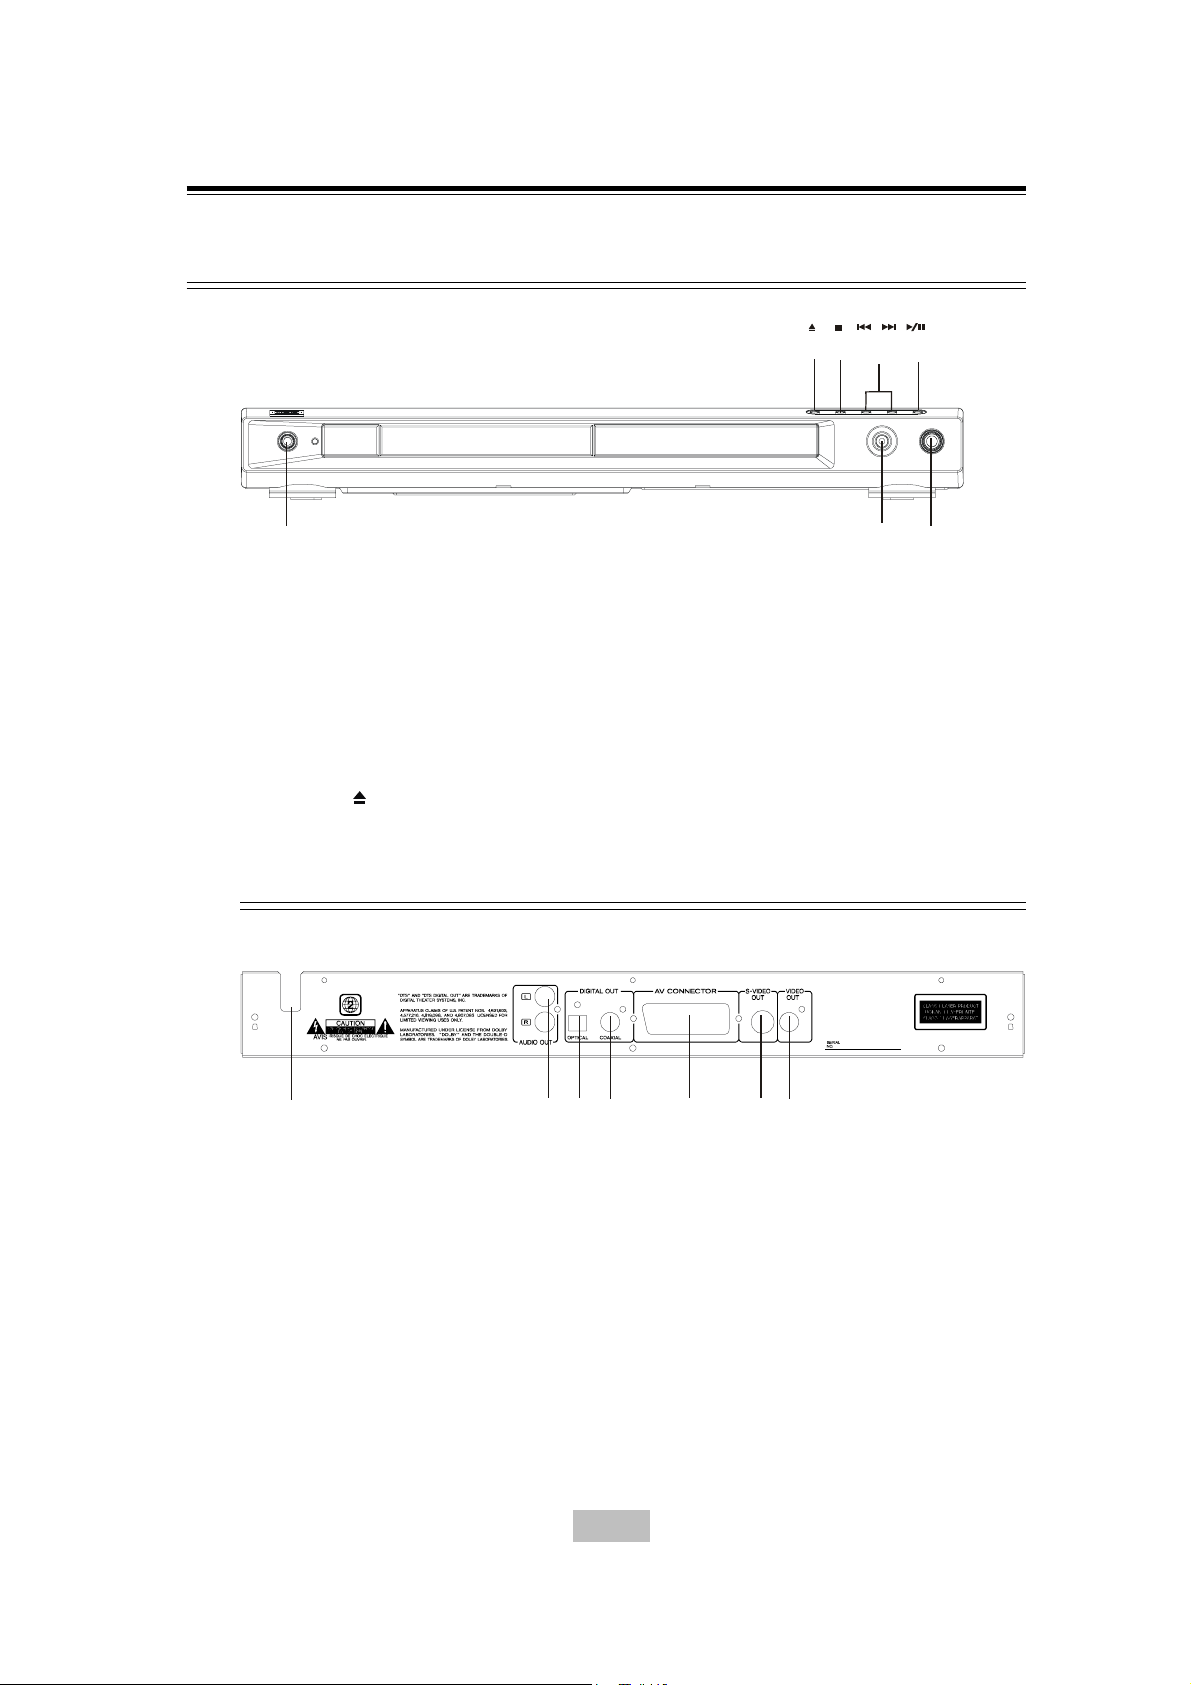
1 POWER switch
To turn or and off the main power of the system.
2 PHONE
Connect to headphone or earphone.
3 VOLUME
Increase or decrease the master volume level.
4 OPEN /CLOSE
To open or close the disc tray.
Back panel
1
1 AC POWER CORD
Connect to a standard AC outlet.
2 AUDIO OUT JACK
Connect to the audio input of an external recording
device or amplifier.
3 DIGTIAL OUT - OPTICAL
Connect to audio equipment with digital-optical audio
input.
4 DIGITAL OUT - COAXIAL
Connect to audio equipment with digital-coaxial au-
dio input.
5 STOP
6
7 PLAY /PAUSE
2
4
3
5 SCART OUT connector
Connect to the TV scart input terminals.
6 S-VIDEO JACK
7 VIDEO JACK
To stop playing a disc.
/
In disc mode, press to skip to next or previous track
/
To start or interupt disc playback.
56
Connect to a TV S-video input connector.
Connect to TV video input connector.
7
7
Page 8
Function OvFunction Ov
Function Ov
Function OvFunction Ov
Remote control
erer
er
erer
vievie
vie
vievie
ww
w
ww
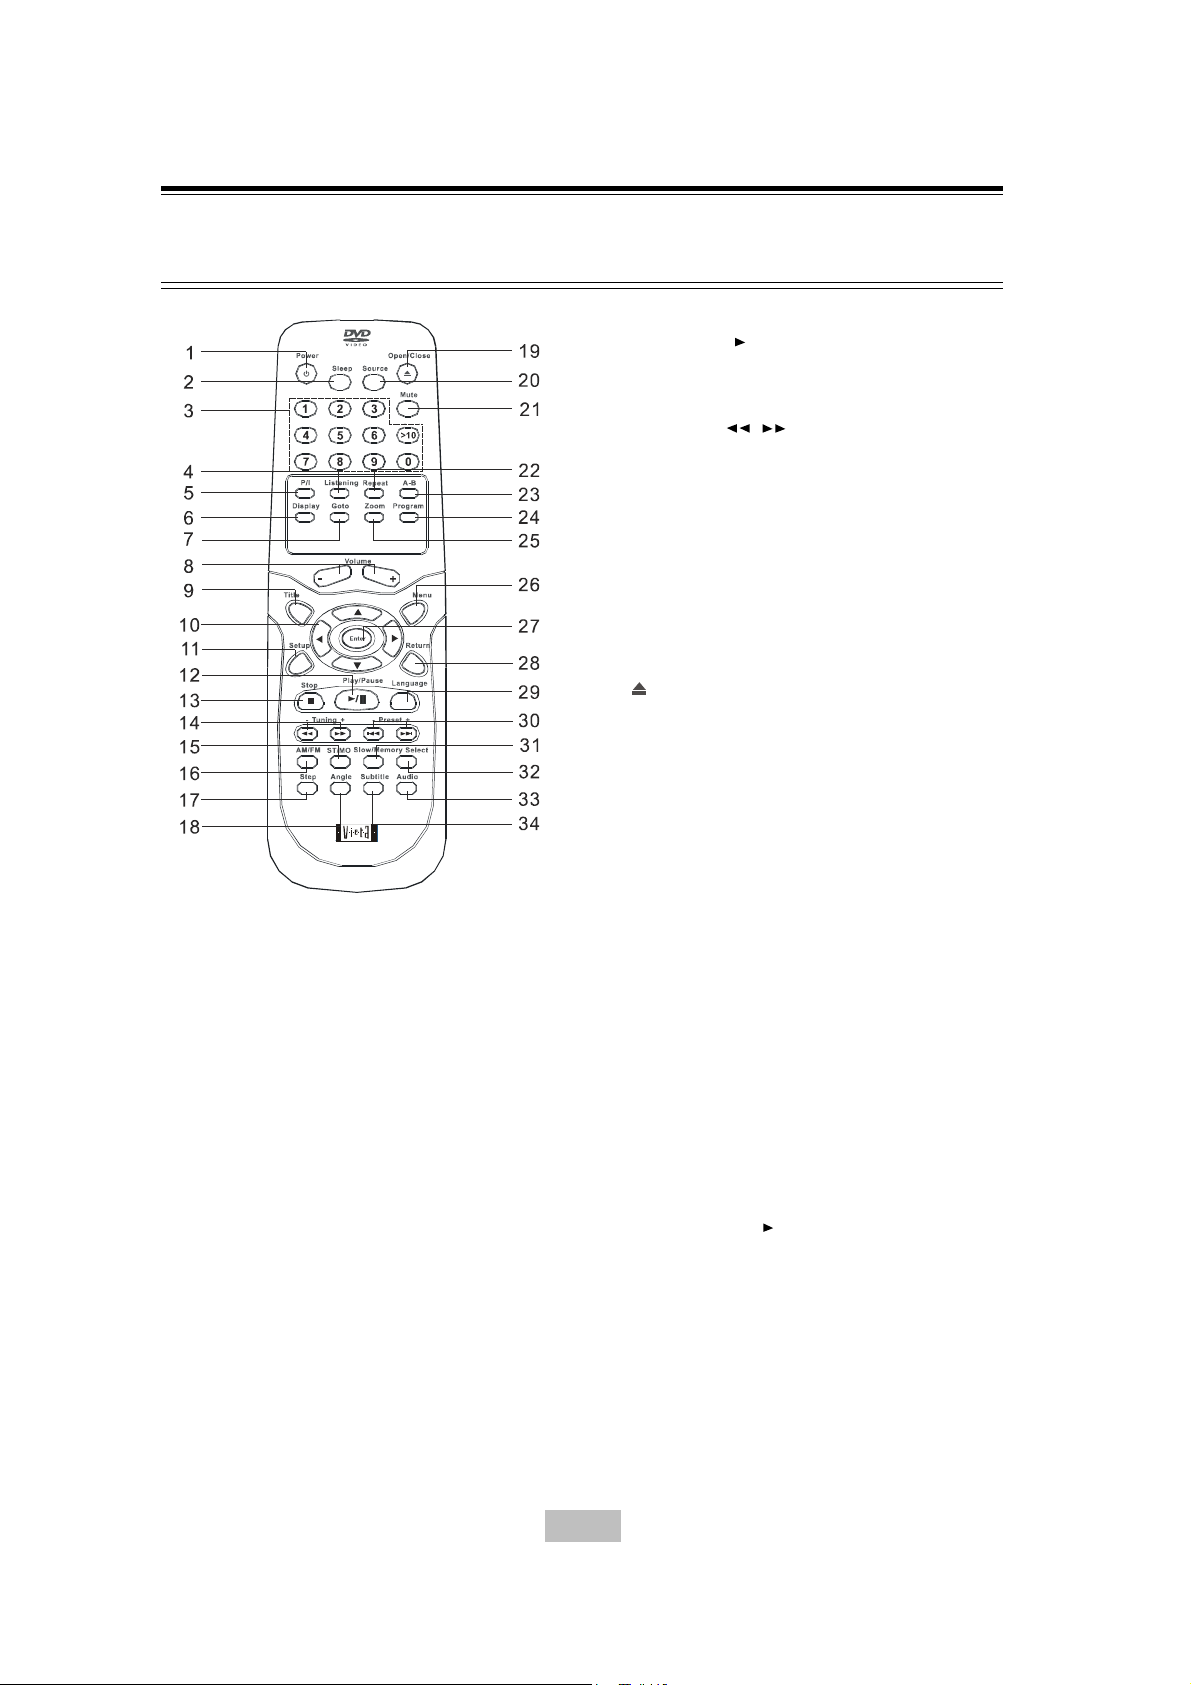
1. POWER
Turn the system POWER ON or STANDBY.
2. SLEEP
Activates the sleep timers.
3. NUMBER buttons (0~9 / >10)
Select the track or title directly.
4. LISTENING
No function.
5. P/I
No function.
6. DISPLAY
Display the information about the playing disc.
7. GOTO
Select desired title/chapter or timing to start playback.
8. VOLUME (+ / -)
Increase or decrease the master vollume level.
9. TITLE
Display the title menu.
10. /// ENTER Buttons
Select and move the screen cursor to a desired option.
11. SETUP
Enter or exit the setup menu.
12. PLAY / PAUSE (
Press to start or stop temporarily playback.
13. STOP
Stop the playback.
14. TUNNING +/- ( / )
In disc mode, press to skip to next or previous track.
In tuner mode, press to tuning the lower or higher fre-
quency.
15. ST/MO Button
No function.
16. AM/FM Button
No function.
17. STEP
Press to see the picture slowly.
18. ANGLE
Press to change the angles.
19.
OPEN/CLOSE
Open or close the disc tray.
20. SOURCE
No function.
21. MUTE Button
Shut off all of the sound.
22. REPEAT
Press to select variations of continuous play.
23. A-B
Specify a section and play if repeatedly.
24. PROGRAM
Press to play the disc in a programable order.
25. ZOOM
Enlarge the picture.
26. MENU
Switch to set the PBC function on or off.
27 . ENTER
Confirm and execute the highlighted item.
28 . RETURN
Press return back the menu
29. LANGUAGE
No function.
30. +PRESET- Buttons
Press to play a disc in fast forward / reverse mode.
In tuner mode, press to select the preset stations.
31. SLOW / MEMORY (l
In Disc mode, press to do slow-motion.
NO memory function.
32. SELECT
No function.
33. AUDIO
Press to select a desired audio language.
34. SUBTITLE
Press to select a desired subtitle language.
/ll)
)
8
Page 9
ConnectionsConnections
A
X
A
Connections
ConnectionsConnections
Connecting to TV and Additional Components
AUDIO IN
VIDE O IN
O
R
OR
AUDIO IN
SCAR T IN
O
R
O
R
O
CO
OR
P
T
I
C
A
I
L
LIN
I
N
S-VIDEO IN
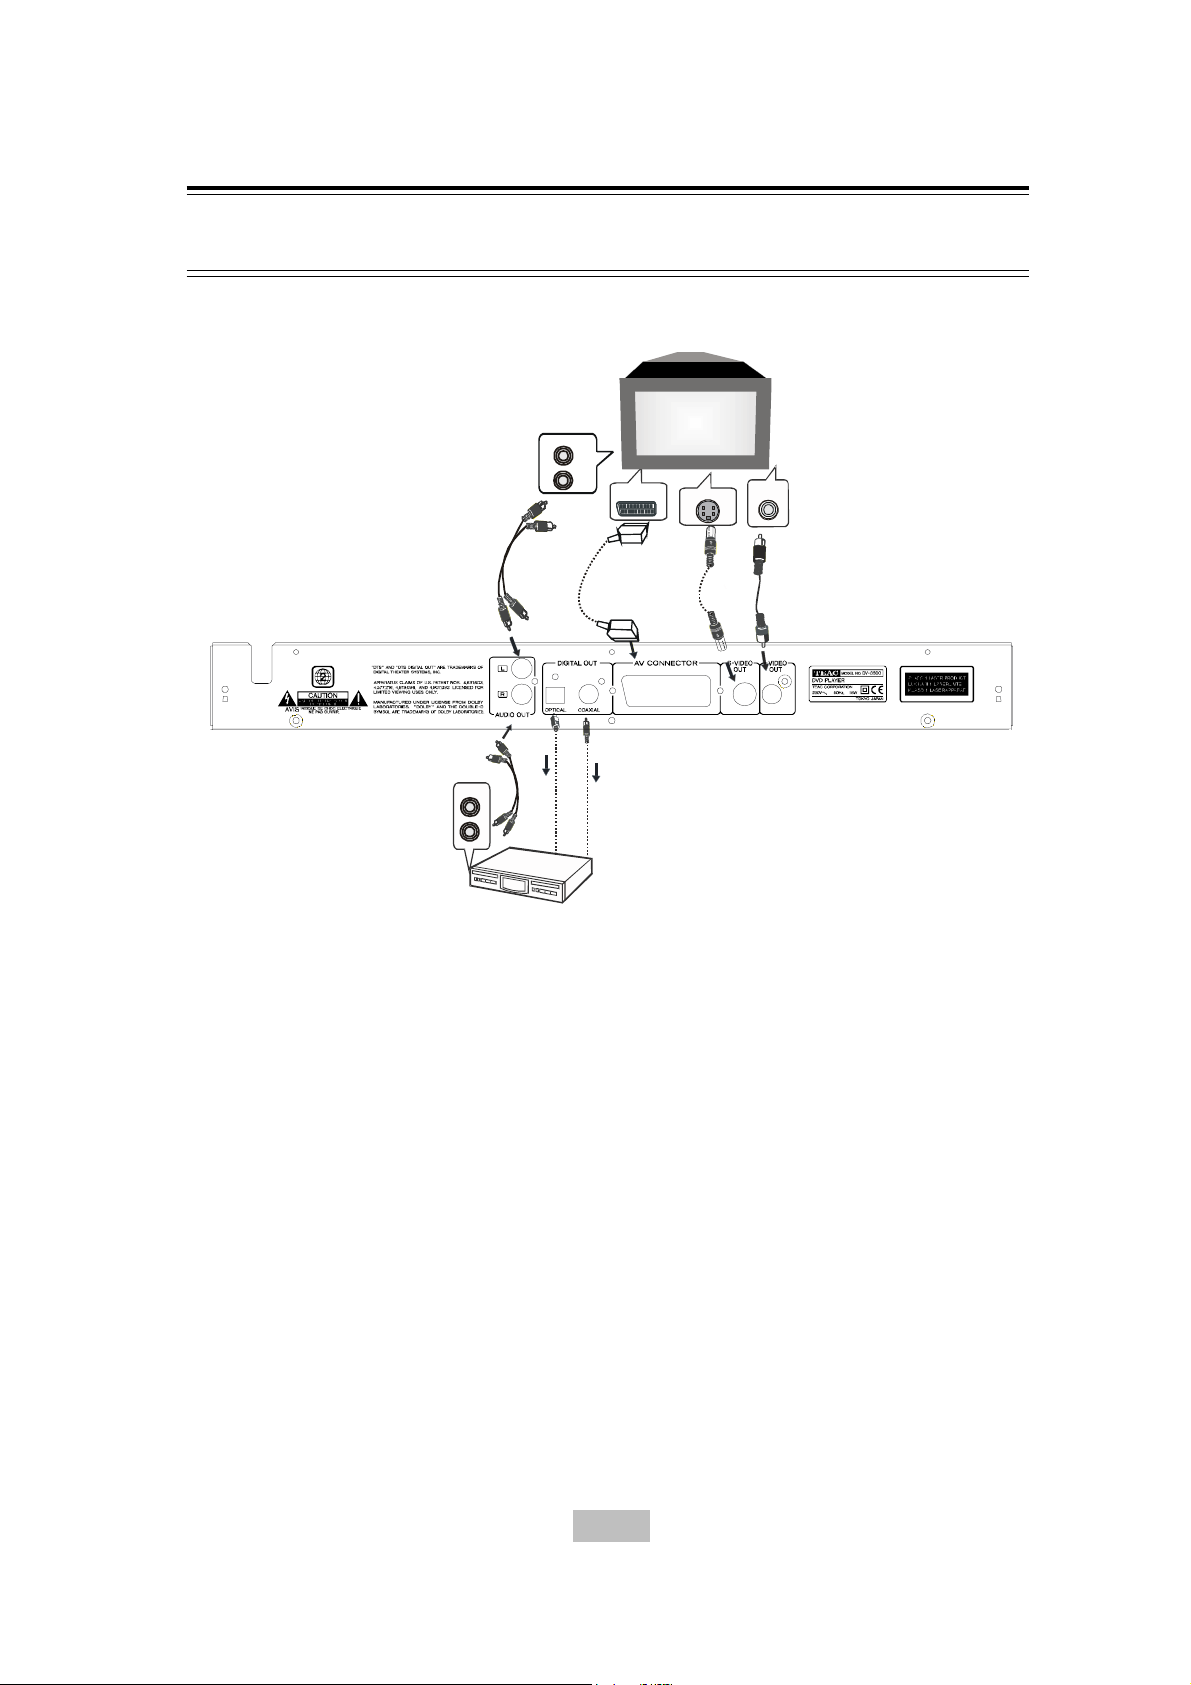
You must connect a TV to the DVD system in order to use DVD player. You can connect other audio and audio / visual components
to the DVD system in order to use the Home Cinema Audio system’s surround sound capabilities.
Important!
- There are various ways to connect the system to a TV (as shown in the illustration). You only need to make one
of these connections.
- Always refer to the instruction manual of the connected equipment to make an optical connection
1 Use the audio cables to connect AUDIO OUT jacks to the corresponding AUDIO IN jacks on the TV or other audio/visual
components (supplied).
2 Use the Scart cable to connect SCART OUT jacks to the corresponding SCART VIDEO IN jack on a TV. (not supplied)
If your TV is not equipped with SCART video input jacks, you can select one of the following alternative connections:
Option 1
Connect the S-VIDEO OUT jack to the S-Video input jack on the TV using a S-Video cable. (not supplied).
Option 2
Connect the VIDEO OUT jack to the video input jack on the TV using a video cable (supplied).
Use the AUDIO OUT jacks
- For connecting to an amplifier, audio system or TV with analog audio inputs.
- For connecting to a CD or some type of recoder to make an analog recording.
Use the OPTICAL or COAXIAL jacks
- You can connect the OPTICAL or COAXIAL output to another amplifier with DTS, Dolby Digital decoder. (not supplied)
9
Page 10
Basic SetupBasic Setup
Basic Setup
Basic SetupBasic Setup
General setup
Initial settings
This system is designed with a user-friendly setup menu. Use
the section to take you through the system and disc setup
options and recommendations.
Using the SETUP menu
Press SETUP on your remote control unit to display the setup
menu. Use the /// buttons to select your preferred
option, and press ENTER to confirm a highlighted selection. To
exit setup menu, press SETUP.
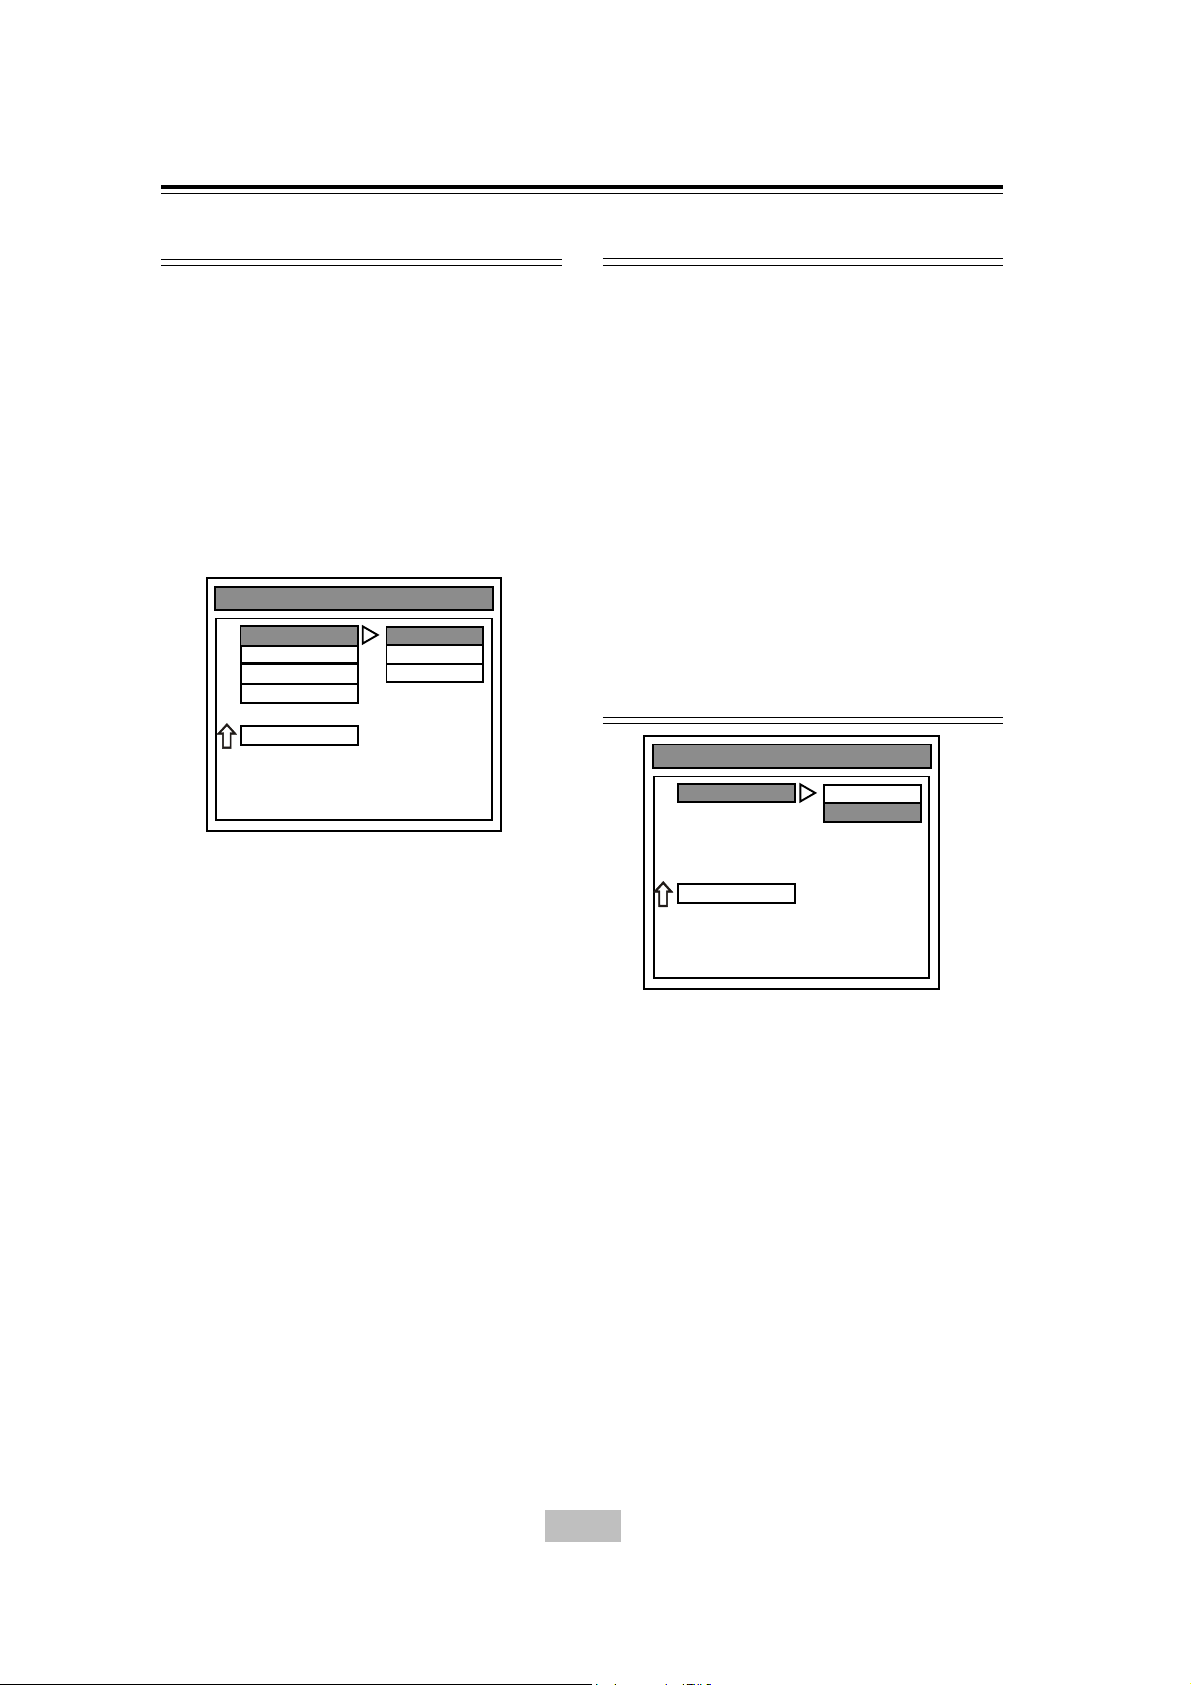
Setting the TV displaySetting the TV display
Setting the TV display
Setting the TV displaySetting the TV display
You can select the aspect ratio of the TV to be connected.
-- GENERAL PAGE --
TV DISPLAY
TVSYSTEM
VIDEO OUTPUT
OSD LANG
MAIN PAGE
SET TV DISPLAY MODE
NORMAL/PS
NORMAL/LB
WIDE
General setup
Setting the video outputSetting the video output
Setting the video output
Setting the video outputSetting the video output
Selects the video output terminals.
The default setting is S-VIDEO.
Option: S-VIDEO,SCART.
• S-VIDEO
Select this setting when VIDEO OUT or S-VIDEO is con-
nected.
• SCART
Select this setting when SCART is connected.
Selecting the on screen display (OSD) lan-Selecting the on screen display (OSD) lan-
Selecting the on screen display (OSD) lan-
Selecting the on screen display (OSD) lan-Selecting the on screen display (OSD) lan-
guageguage
guage
guageguage
This function allows you to select the desired language.
The default setting is ENGLISH.
Option: ENGLISH, FRENCH, GERMAN, ITANISH, SPANISH, DUTCH.
Setting the speakers
-- SPEAKER SETUP PAGE --
DOWNMIX
LT/RT
STEREO
The default setting is NORMAL/PS.
• NORMAL/PS
If you have a conventional TV set and your DVD is not
formatted for widescreen viewing, use this setting. A wide
picture is displayed on the whole TV screen with a portion
automatically cut off.
• NORMAL/LB
If you have a conventional TV set and your DVD is format-
ted for widescreen viewing, use this setting. Wide bands
will be displayed on the upper and lower portions of the TV
screen.
• WIDE
If you have a widescreen TV set, use this setting (you
must also set your widescreen TV to “full size”)
Selecting the TV SYSTEMSelecting the TV SYSTEM
Selecting the TV SYSTEM
Selecting the TV SYSTEMSelecting the TV SYSTEM
This function allows you to select the color system matching
the connected TV set.
The initial setting is PAL.
Option:PAL, NTSC, MULT.
MAIN PAGE
SET DOWNMIX MODE
DownmixDownmix
Downmix
DownmixDownmix
Select the DOWNMIX for LT/RT,STEREO.
The default setting is STEREO.
• LT/RT(LEFT TOTAL/ RIGHT TOTAL)
A two-channel delivery format for Dolby surround four chan-
nels ( audio left,center, right and surround ) are matrix
encoded two channels. The terms refer to a Dolby sur-
round compatible downmix.
• STEREO
All sound is reproduced and played through the front left
and
right speakers. This enables standard stereo reproduction.
Note
• LT: Only matrix encoded audio left, center, and surround
RT: Only matrix encoded audio right center and surround.
10
Page 11
Basic SetupBasic Setup
Basic Setup
Basic SetupBasic Setup
Audio setup
Digital output setupDigital output setup
Digital output setup
Digital output setupDigital output setup
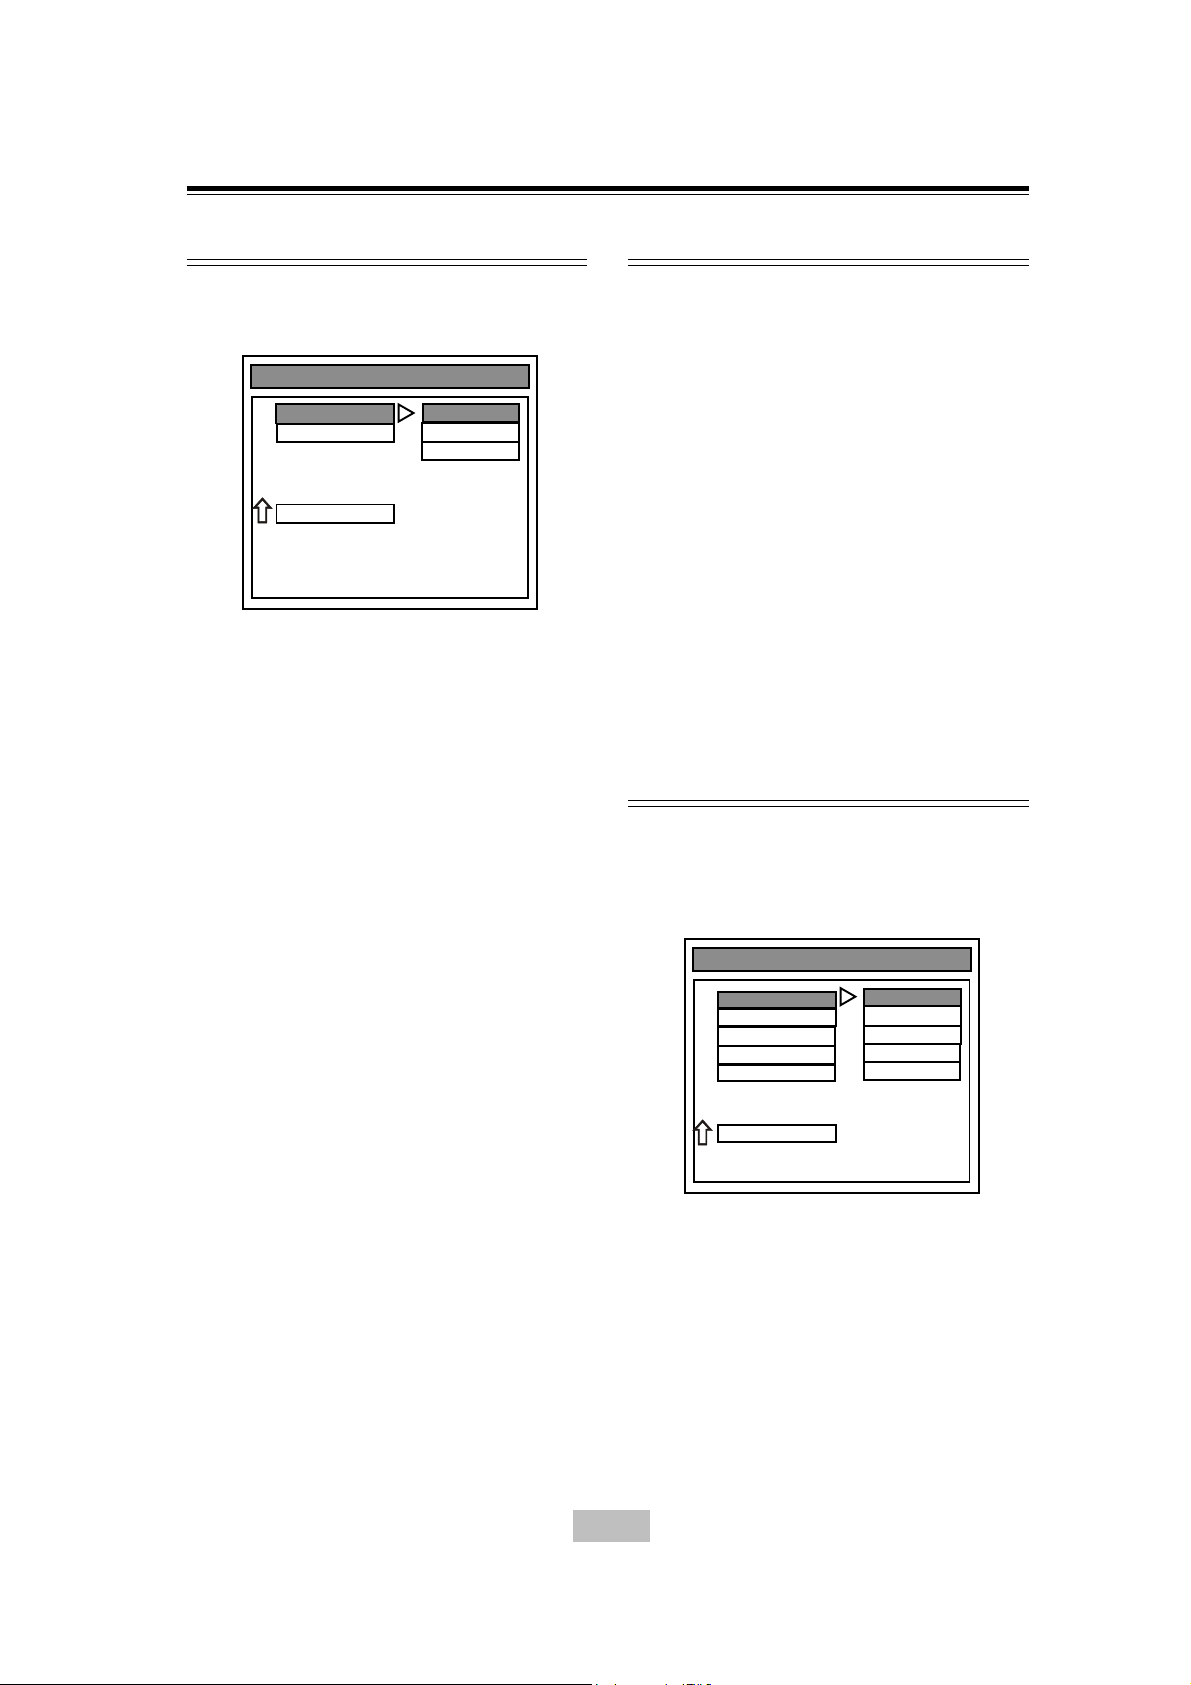
Select the preferred language for audio.
-- AUDIO SETUP --
AUDIO OUTPUT
COMPRESSION
MAIN PAGE
AUDIO RELATED
SPDIF/RAW
SPDIF/PCM
ANALOG
Audio setup
Selecting the dynamic rangeSelecting the dynamic range
Selecting the dynamic range
Selecting the dynamic rangeSelecting the dynamic range
In many listening situations, it is objectionable to allow the sound
to become very loud, and thus the loudest sounds must be
compressed downwards in level. Likewise, the very quiet
sounds would be inaudible and must be brought upwards in
level to be heard. Dolby Digital satisfies these needs through
the dynamic range controlling.
Selects the dynamic range compression to fit the individual
listening situation of the audience. The variable range is from
FULL, 7/8 to 1/8, or OFF.
The default setting is OFF.
• FULL: Audio with fully compressed dynamic range.
• 7/8~1/8: Audio with partially compressed dynamic range.
• OFF: Audio with uncompressed dynamic range.
The default setting is SPDIF/ PCM
• SPDIF/ RAW
If the optical or coaxial output on the rear panel is connected with a receiver built-in Dolby Digital, DTS or MPEG
decoder, select this item.
• SPDIF/ PCM
If the optical or coaxial output is connected with a receiver
which accepts PCM audio signal, select this item.
• ANALOG
If the optical or coaxial output is connected with any equip-
ment, select this item.
Notes
• If the ANALOG is selected, the optical or coaxial will not
have audio outputs.
• If the DIGITAL/RAW is selected and the audio source is
LPCM
(DVD), the outputs in the optical or coaxial is PCM.
• If the DIGITAL/PCM is selected and the audio source is
audio
CD, the outputs in the optical or coaxial is PCM.
Notes
• The Dual Mono and Dynamic Range settings only support
Dolby Digital programs.
• The higher the setting selected will result in audio with a
more fully compressed dynamic range.
Preferences setup
You can access PREFERENCES PAGE only in STOP sta-
•
tus.
Selecting the audio languageSelecting the audio language
Selecting the audio language
Selecting the audio languageSelecting the audio language
Select a desired audio language for a DVD disc that has audio
data recorded in multiple-languages.
-- PREFERENCES PAGE --
AUDIO
DISC MENU
PARENTAL
PASSWORD
DEFAULTS
MAIN PAGE
PREFERRED AUDIO LANGUAGE
The default setting is ENGLISH.
Note
ENGLISH
FRENCH
GERMAN
ITALISH
SPANISH
• When you select a preferred language that is not recorderd
on the DVD, one of the recorded language is automatically
selected.
• You can select any recorded language for audio by press-
ing AUDIO button when playing a DVD disc.
11
Page 12
Basic SetupBasic Setup
Basic Setup
Basic SetupBasic Setup
Preferences setup
Selecting the disc menu languageSelecting the disc menu language
Selecting the disc menu language
Selecting the disc menu languageSelecting the disc menu language
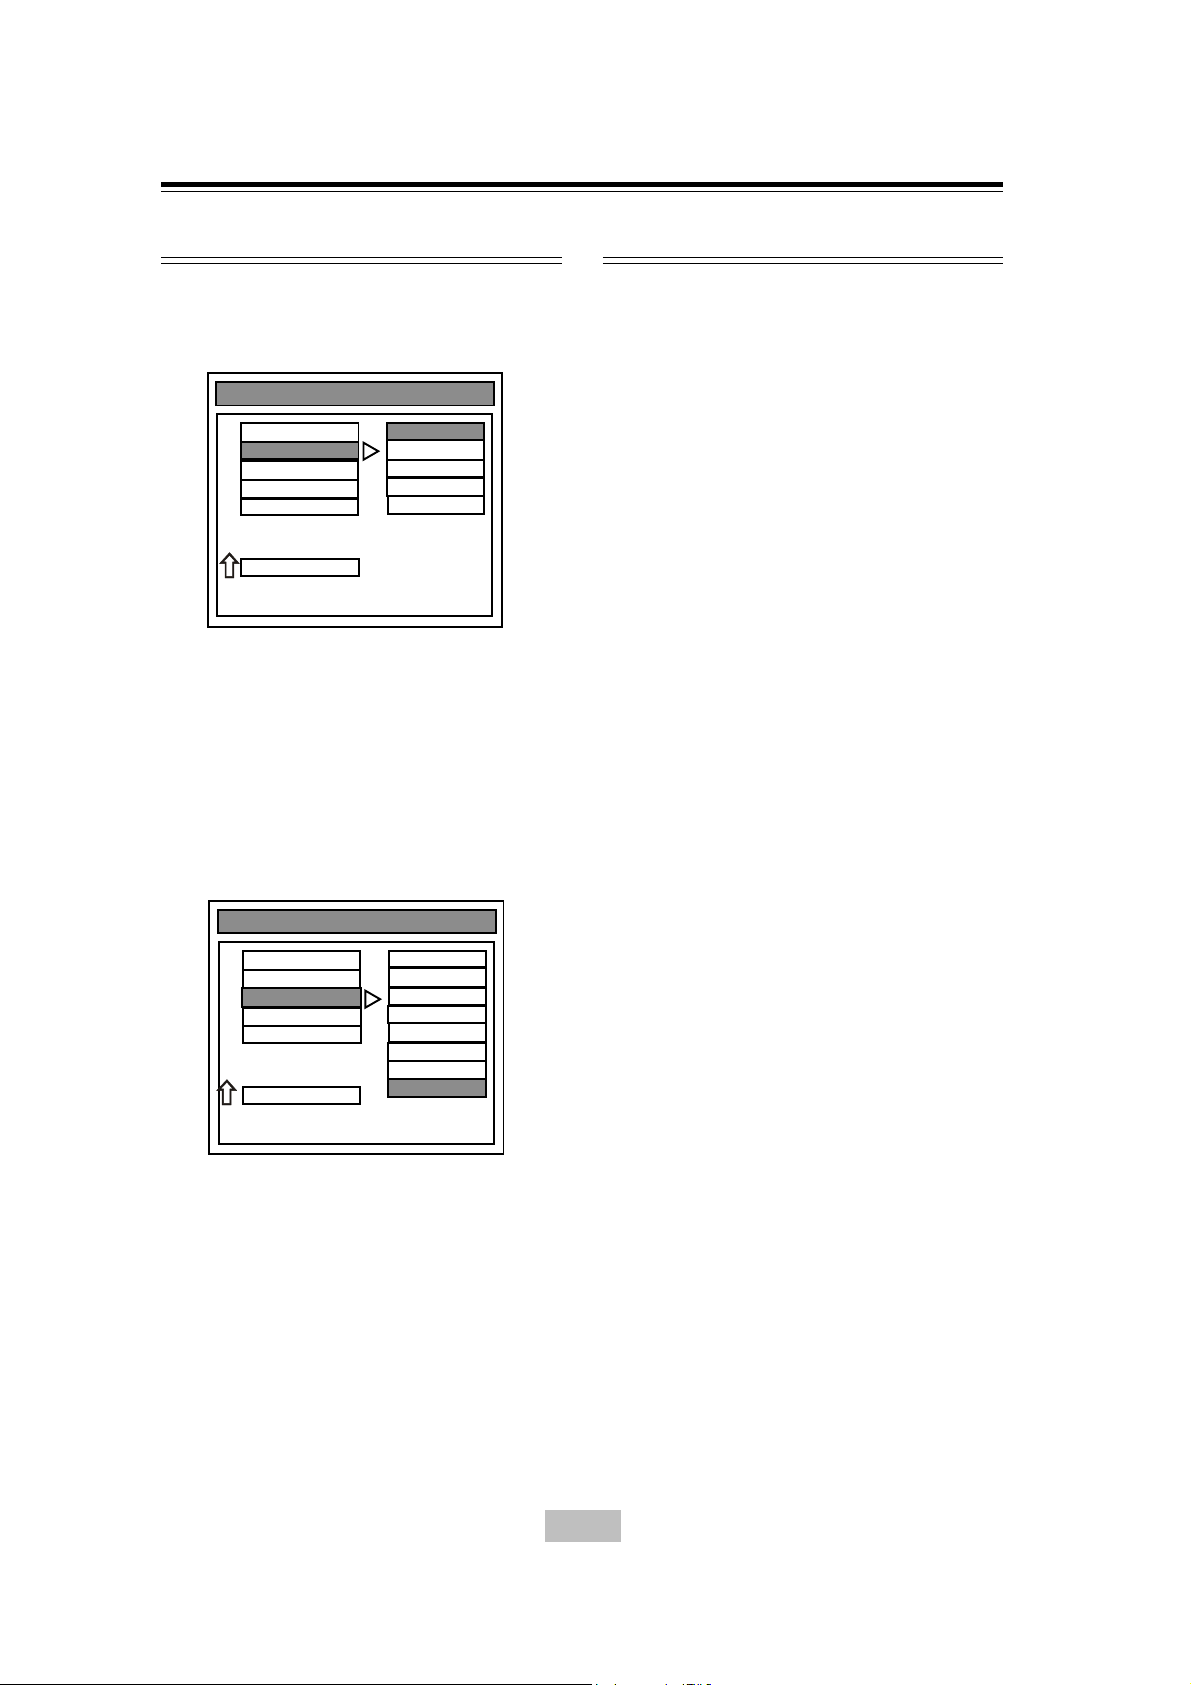
Select a desired language when playing a DVD disc that has
menu data recorded in multiple-languages.
-- PREFERENCES PAGE --
AUDIO
DISC MENU
PARENTAL
PASSWORD
DEFAULTS
MAIN PAGE
PREFERRED MENU LANGUAGE
The default setting is ENGLISH.
Note
ENGLISH
FRENCH
GERMANITALISH
SPANISH
• When you select a preferred language that is not recorderd
on the DVD, one of the recorded language is automatically
selected.
Selecting the parental controlSelecting the parental control
Selecting the parental control
Selecting the parental controlSelecting the parental control
This function allows to set playback limitation level. Playing
someDVD discs can be limited depending on the age of the
user
Preferences setup
message, and refuse to play this disc.
• Before change the parental control level, you must enter
the preset password(4-digits) to unlock this function, if the
entered password is incorrect, you will not be able to
change the level.
• Some DVD discs are not encoded with a rating though the
movie rating is printed on the disc jacked. The parental lock
function does not work for such discs.
-- PREFERENCES PAGE --
AUDIO
DISC MENU
PARENTAL
PASSWORD
DEFAULTS
MAIN PAGE
SET PARENTAL CONTROL
The default setting is NO-PARENTAL.
Press / buttons to select the desired parental level, press
Enter button to enter password.
Notes
I G
2 G
3 PG
4 PG 13
5 PG-R
6 R
7 NC-17
NO PARENTAL
• The lower the value is, the more strict the limitation.
• If the parental control level of the loading DVD disc is lower
than the setting level, OSD will show “ Parental Violation ”
12
Page 13
Basic SetupBasic Setup
Basic Setup
Basic SetupBasic Setup
Preferences setup
Preferences setup
Change the parental control passwordChange the parental control password
Change the parental control password
Change the parental control passwordChange the parental control password
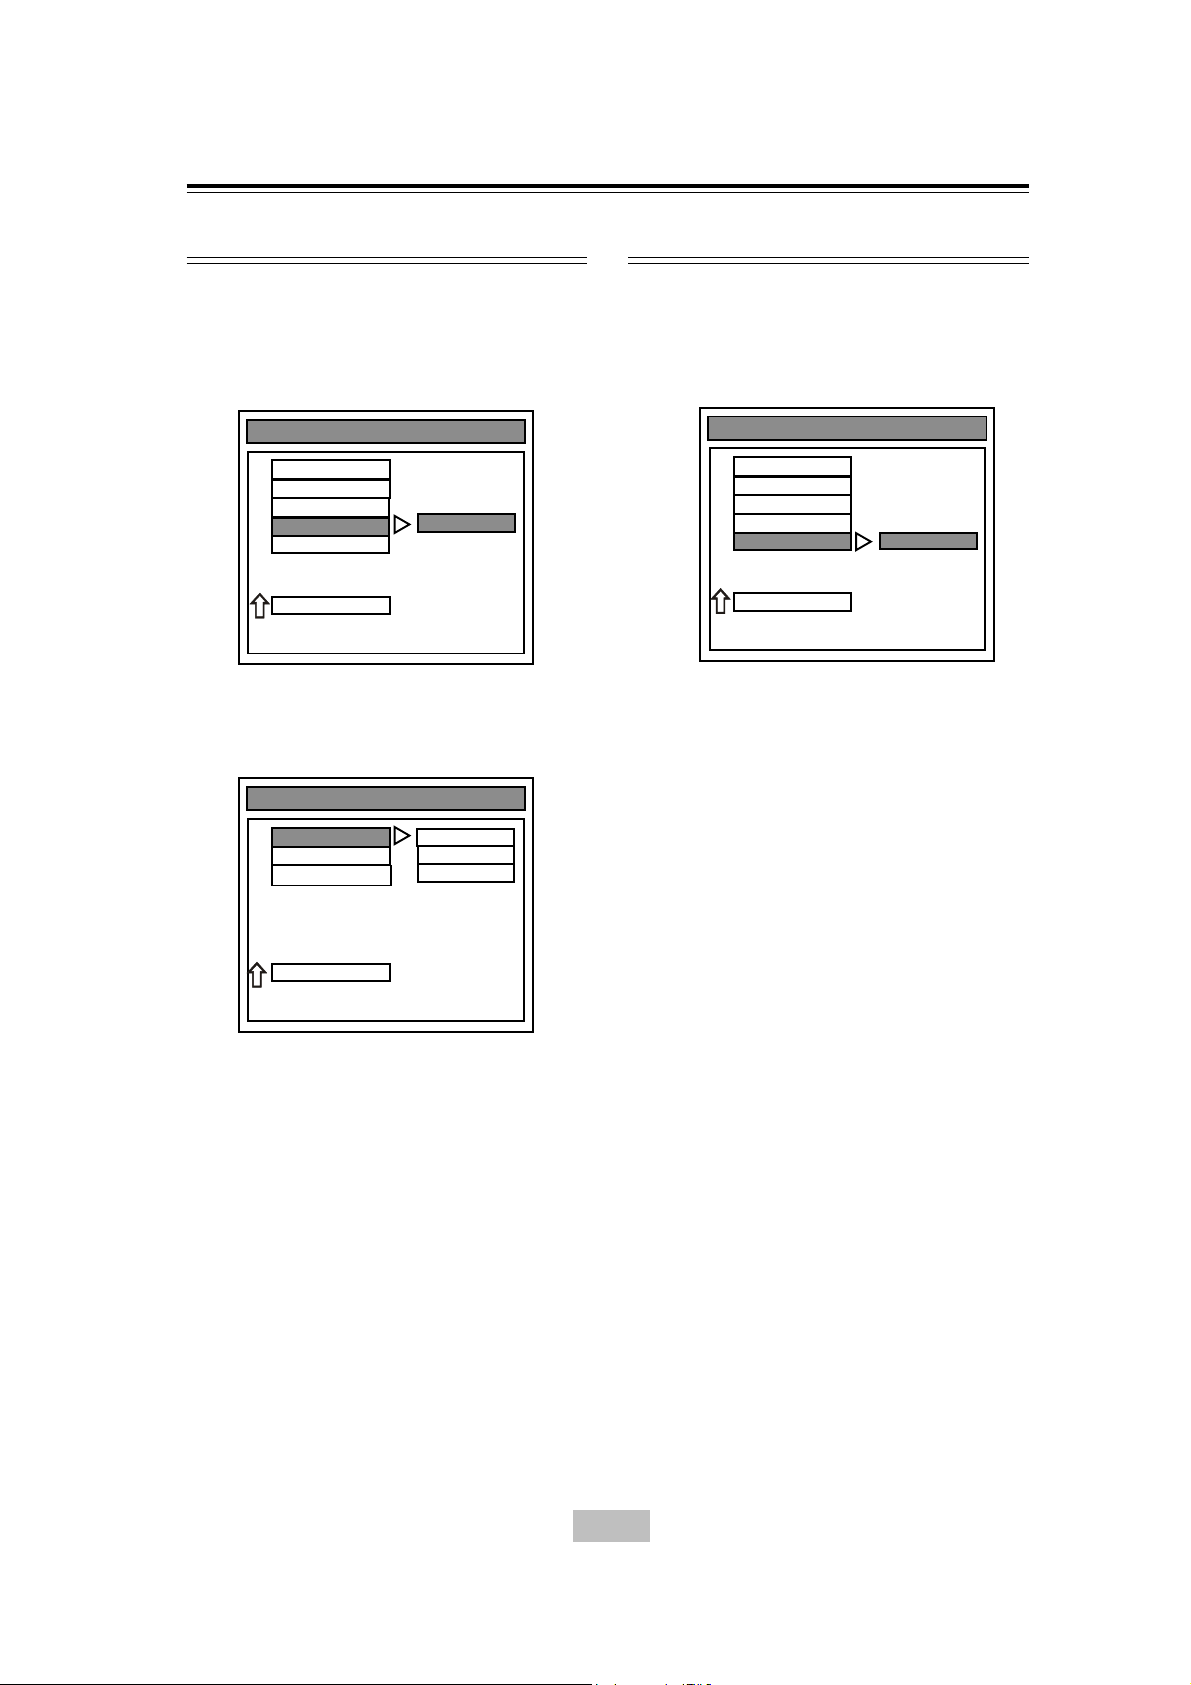
To change the parental control password use the SETUP menu,
select PREFERENCES to access the password menu. Press
ENTER to enter the old password “ 3308 ” . (“ XXXX ” will
appear as you enter the numbers).
-- PREFERENCES PAGE --
AUDIO
DISC MENU
PARENTAL
PASSWORD
DEFAULTS
MAIN PAGE
CHANGE PASSWORD
When prompted to enter a new password, enter a 4-digit
code and enter it again when prompted to confirm password.
Press ENTER once more to change the password from “ 3308
” to the new 4-digit password you have entered.
-- PREFERENCES PAGE --
OLD PASSWORD
NEW PASSWORD
CONFIRM
ENGLISH
CHANGE
ENGLISH
RR
eturetur
ning to the original fning to the original f
R
etur
ning to the original f
RR
eturetur
ning to the original fning to the original f
settingssettings
settings
settingssettings
To return all settings to the factory defaults, use the SETUP
menu, select PREFERENCES to access the defaults menu as
shown:
-- PREFERENCES PAGE --
AUDIO
DISC MENU
PARENTAL
PASSWORD
DEFAULTS
MAIN PAGE
LOAD FACTORY SETTINGS
Select and press ENTER to return the system to its original
factory settings.
IMPORTANT: The parental control level and the
password will not be reset.
actoractor
actor
actoractor
ENGLISH
RESET
y defy def
y def
y defy def
aultault
ault
aultault
MAIN PAGE
PLEASE ENTER OLD PASSWORD
Notes
• This password is used to unlock the parental control level
reset function. So, select a password you can easily re-
member.
• The disc must be recorded with a parental lock, for this
feature to function. Some DVD discs are not encoded with
a rating though the movie rating is printed on the disc jacket.
The parental lock function does not work for such discs.
• If you forget the new password code, press ZOOM four
times when prompted for the password and the system
will return to the default password.
13
Page 14
Playing DiscsPlaying Discs
Playing Discs
Playing DiscsPlaying Discs
General operation
IMPORTANT: Please note that some DVD movie discs may
not have all the features described in this chapter. For
example, older movies may not allow you to select multiple
camera angles. Refer to the instructions or liner notes that are
included with each disc to determine what features and
operations are available on that particular disc.
1. Turn your television set’ s power on, and set the channel
.
to the video input.
2. Press POWER on the front panel to turn on the main power
of this system. The front panel display lights up, and the
DVD logo screen appears on the television screen.
3. Press OPEN/CLOSE, and place a disc on the disc tray.
Press it again to close the tray.
Note
• Load the disc placing the label side face up, and using the
disc tray as a guide for proper alignment. When playing a
double-sided DVD disc, load it with the desired playing
side face down.
4. Use the master VOLUME (+/-) buttons to increase or de-
crease the volume level.
5. Press MUTE to shut off the sound. To restore the volume,
press it again.
6. To start playback, press /ll . To interrupt or pause play-
back, press /ll again.
Note
• Some discs will start playing automatically, and others will
display a menu on the television screen. Use the ///
or the number (0 ~ 9, >10) buttons to select desired a track/
chapter and then press ENTER to start playback.
7. To stop playback, press STOP .
8. To skip to the next or previous track / chapter press l
/ l repeatedly during playback.
Basic playback
Fast searchFast search
Fast search
Fast searchFast search
1 Press / to fast reverse or fast forward.
- For DVD / MP3 discs
FF(fast forward):FFX2 --> FFX4 --> FFX6 --> FFX8 -->
PLAY
FF(fast reverse) : FRX2 --> FRX4 --> FRX6 --> FRX8 -->
PLAY
Basic playback
- For VCD / CD discs
FF(fast forward) : FFX1 --> FFX2 --> FFX3 --> FFX4 -->
PLAY
FR(fast reverse) : FRX1 --> FRX2 --> FRX3 -->FRX4--
>PALY
2 To resume normal play, press PLAY/PAUSE /ll.
Slow motion playbackSlow motion playback
Slow motion playback
Slow motion playbackSlow motion playback
To view playback in slow-motion, press SLOW on the remote
control unit during playback.
When playing DVD discs:
Press SLOW repeatedly to select the slow motion speed and
direction as follows:
SF ( slow forward) , SR (slow reverse) .
SFX2
SLOW OFF.
When playing CVD, SVCD or VCD discs:
Press SLOW repeatedly to select the slow motion speed as
follows:
SFX1 SFX2 SFX3 SLOW OFF.
Notes
• The smaller the number, the slower the speed.
• This function is not available for CD or MP3 discs.
• On some discs, the slow-motion playback function is not
Repeat playback
Use this function to set the player to repeat individual tracks
on CD or Video CD discs, chapters or titles on DVD discs, an
entire disc, or all the discs loaded in the player.
When playing DVD discs:
Press REPEAT repeatedly to select the following:
CHAPTER REPEAT ON TITLE REPEAT ON REPEAT OFF
When playing CVD, SVCD, CD and MP3 discs
Press REPEAT repeatedly to select the following:
REPEAT ONE REPEAT ALL REPEAT OFF
When playing MP3 discs (In menu mode):
Press REPEAT repeatedly to select the following:
REPEAT ONE REPEAT ONE ALBUM REPEAT ALL
REPEAT OFF
Notes:
• Use the repeat function with the programming mode to
• This function is only available when playback is selected.
• When playing CVD and SVCD discs, set the PBC (playback
• The front panel display will display “ REP 1 ” when
SFX4 SFX8 SRX2 SRX4 SRX8
available.
repeat tracks or chapters.
control) mode to OFF to use this function.
chapter repeat mode is selected; and “ REP ALL” when
repeat mode is selected.
14
Page 15

Playing DiscsPlaying Discs
Playing Discs
Playing DiscsPlaying Discs
Basic playback
A-B repeat playback
Use this function to play a specific portion in a chapter or
track repeatedly. This is useful to memorize lyrics or watch a
portion of a disc over and over.
1. Press A-B at the beginning of the selection you want to
repeat. The “ A ” indicator will be displayed.
2. Press A-B again at the end of the selection. The “ A-B
” indicator will be displayed, and this section will now
repeat continuously.
3. Press A-B again to cancel and resume normal playback.
Notes
• When using this function with DVD discs, both the start
and end point of the repeat must be in the same title.
• To repeat a section of a disc just once, press A-B at the
beginning of the section, then press PLAY/PAUSE at the
end. The playback will jump back to the start point.
• This function is only available when playback mode is
selected.
• The A-B repeat function is canceled when you stop the
playback, open the disc tray, or turn the power off.
Playing Video CDs with PBC
When playing Video CDs (Version 2.0) with PBC functions, you
can enjoy simple interactive operations, operations with search
functions, etc.
PBC playback allows you to play Video CDs interactively, fol-
lowing the menu on the TV screen.
1 When the player read a SVCD or VCD Disc, the system will
set the PBC function to ON automatically, and automatically
play disc with PBC menu.
2 Use NUMBER buttons to select the item you want.
3 Press ENTER button to execute your selection.
4 Follow the instructions on the menu screen for interactive
operations.
Refer to the instructions supplied with the disc, as the
operating procedure may differ according to the Video CD.
Note
• While playing a disc in PBC ON mode, you couldn’ t use the
number buttons to select the item you want. In PBC off mode
you can.
To cancel PBC playback function and play a Video CD
without PBC menu.
1 Press the MENU button . “PBC OFF” will appear on the TV
screen. If a disc is playing, the playback will stop.
2 Press the
beginning or use number button to select track you like.
3 Use the number button to select track you like, then you
press ENTER to confirm it.
to start (or restart) playing the disc from the
Playing MP3 with PBC
1 When playing a MP3 disc, press MENU button to switch
MP3 menu ON.
2 Then use/// cursor to select the song or JPEG
picture that you want, press PLAY/ENTER button to start
playback.
3 Press MENU again to switch MENU OFF.
Using the menu for each DVD
Using the TITLE menu
1 Press TITLE while playing a DVD disc.
The “TITLE MENU” will be shown on TV screen for two
seconds, and then the title menu appears. The contents of
the menu vary from disc to disc.
2 Use///buttons to select the title (or chapter) you
want to play. Depending on the disc, you can use the num-
ber buttons (0~9 / >10) to select the title (or chapter). Then
press PLAY to play.
Notes
• Depending on the DVD disc, you may not be able to select
the title or chapter.
• Depending on the DVD disc, a “title menu” may simply be
called a “menu” or “title” in the instructions supplied with the
disc.
• For some DVD disc, when you press the TITLE, the play-
back will restart from the beginning of the disc.
• Some DVD disc have no TITLE recorded , pressing this
button will restart the disc play.
Using the ROOT menu
1 When playing a DVD disc, press RETURN button The “ROOT
MENU” will be shown on TV screen for a moment, and then
the root menu appears. The contents of the menu vary
from disc to disc.
2 Use///buttons to select the title (or chapter) you
want to play.
Depending on the disc, you can use the number buttons
(0~9 / >10) to select the title (or chapter).
3 Then press PLAY to play.
4 When playing a CVD, SVCD or VCD2.0 disc with PBC func-
tion set to ON, use this button to go back to the PBC menu
of disc. “ GO BACK TO MAIN PAGE ” will display on the
OSD .
Notes
• Depending on the DVD disc, you may not be able to enter
the root menu.
• For some DVD disc, when you press the RETURN , the
playback will restart from the beginning of the disc.
15
Page 16
Playing DiscsPlaying Discs
Playing Discs
Playing DiscsPlaying Discs
Checking the information using display
You can check information about the disc, such as the total
number of titles or chapters or tracks or time, using the
Display function. The information you want appears on the
TV screen or and on the front panel display.
When playing back a DVD
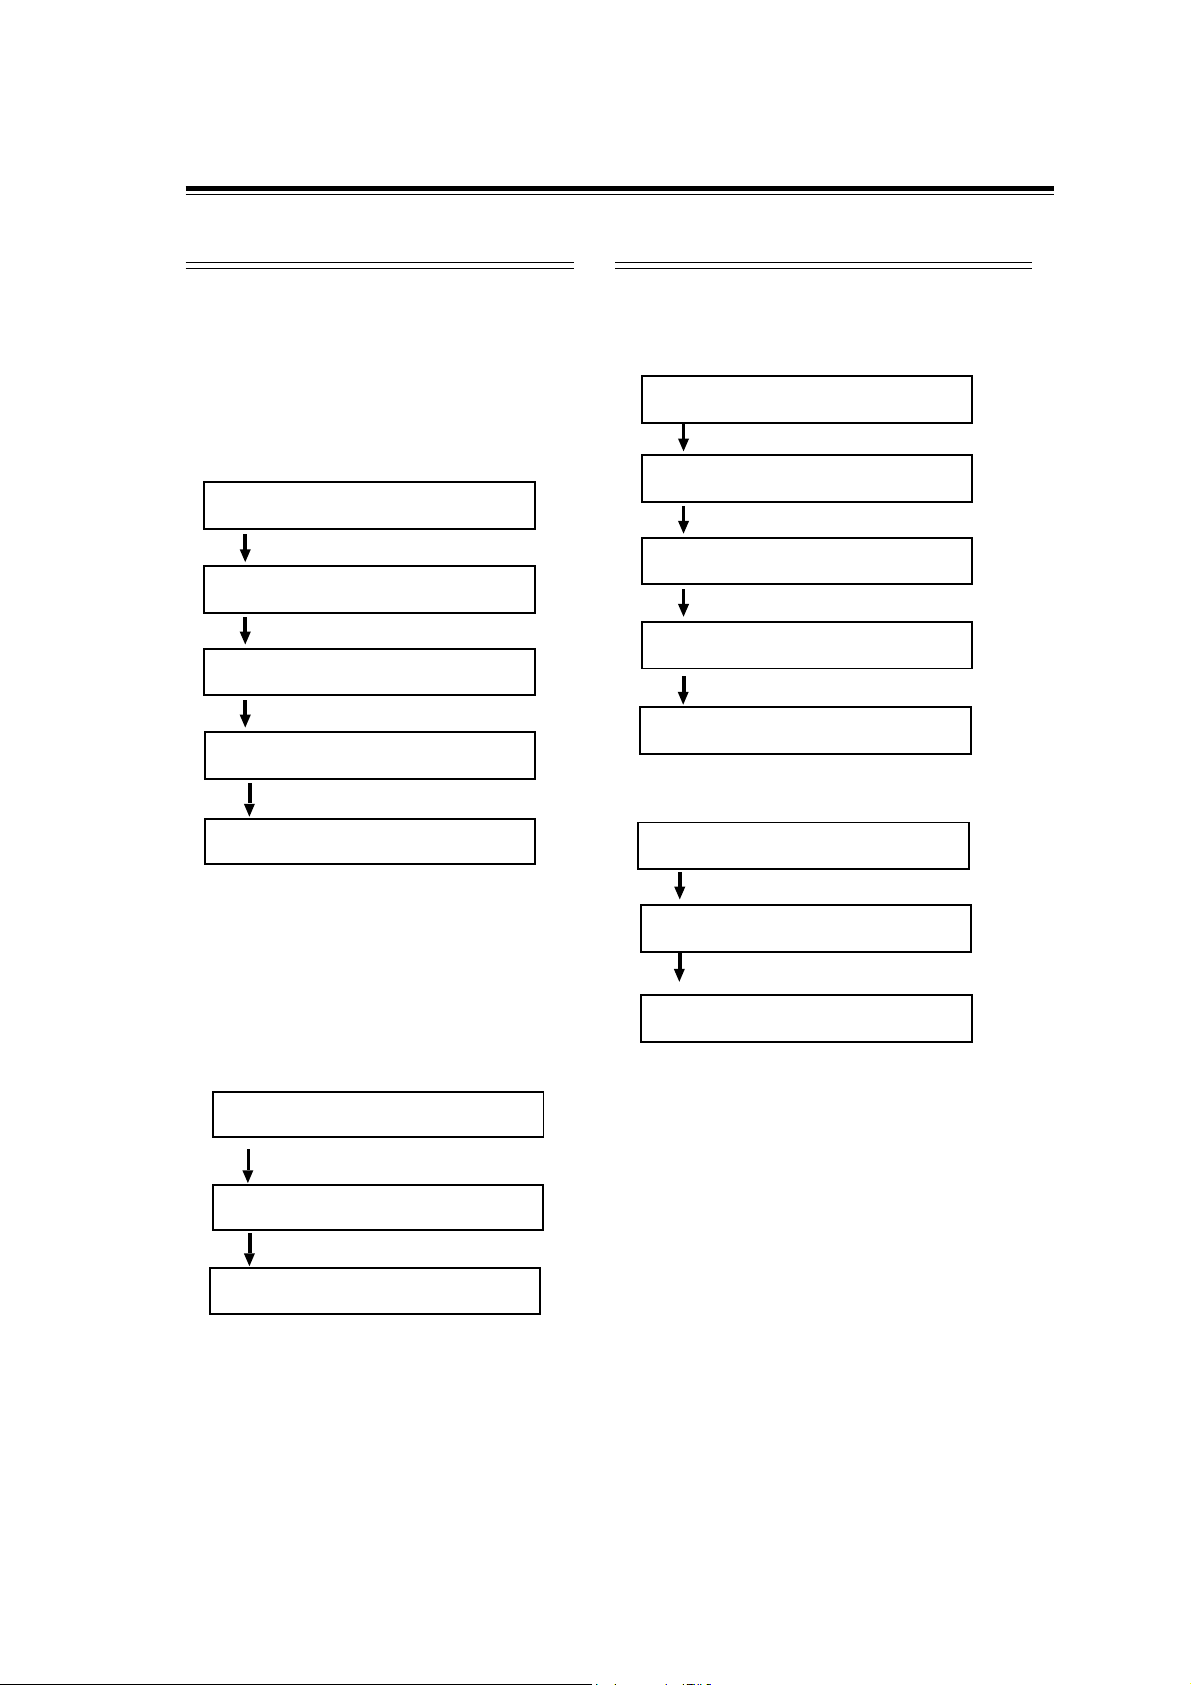
1 Press DISPLAY repeatedly to show on TV screen as the
following:
TITLE 02 / 05 CHAPTER 001 / 006
00 : 34 : 56
TITLE REMAIN
00 : 34 : 56
CHAPTER ELAPSED
00 : 01 : 23
CHAPTER REMAIN
00 : 03 : 21
OFF
00 : 03 : 40
The display will disapear after a few seconds.
Note
• When stop the playback. the display function will be set
to off automatically.
Checking the information using display
When playing back a Video CD or CD
1 Press DISPLAY repeatedly to show on TV screen as the
following:
SINGLE ELAPSED
00 : 01 : 23
SINGLE REMAIN
00 : 03 : 21
TOTAL ELAPSED
00 : 12 : 34
TOTAL REMAIN
00 : 54 : 32
OFF
00 : 54 : 40
For Video CD, SVCD if PBC is set to on.
SINGLE ELAPSED
00 : 01 : 23
SINGLE REMAIN
00 : 03 : 21
When playing MP3 discs
1 Press DISPLAY repeatedly to show on TV screen as the
following :
CHAPTER ELAPSED 00 : 01 : 23
CHAPTER REMAIN 00 : 03 : 21
OFF 00 : 03 : 30
The display will disappear after a few seconds.
OFF
00 :03 : 40
The display will disappear after a few seconds.
Notes
• When playing CD disc, track and time information will appear
on the front panel display.
• Some VCD discs will display the time information on the televi-
sion screen.
• When playback stops, the display function automatically re-
sets to off.
Page 17
Playing DiscsPlaying Discs
Playing Discs
Playing DiscsPlaying Discs
Selecting the start time
This function allows you to start playing at any chosen time on
the disc.
When playing DVD disc
1 Press GOTO repeatedly, the following menu appears on
the TV screen.
TITLE 02 / 05 CHAPTER 001 / 006
TITLE 02 / 05 TIME - - : - - : - -
2 Use the
number, and press ENTER / PLAY to start playback from
that selection.
TITLE 02 / 05 CHAPTER 001 / 006
TITLE 02 / 05 CHAPTER 001 / 006
3 Use the number buttons (0~9 />10) to input the title or chap-
ter number you want. The time you enter must be less than
the total time of the disc.
4 Press ENTER/ PLAY to start playback from your selection.
When playing Video CD and CD disc.
1 Press GOTO, the following menu appears on the TV screen.
GOTO : - - : - -
2 Use the number buttons (0~9 / >10) to input the time you
want.
The time you enter must be less than the total time of the
disc.
GOTO: 12:34
3 Press ENTER/PLAY to start playback from the point of se-
lect time.
Notes
buttons to select desired title or chapter
or
• This function is not available for MP3.
• When playing VCD with PBC ON status, this function is
ineffective.
Program play
You can play the contents of the disc in the order you want by
programming the order of the tracks to be played. UP to 99
tracks can be stored.
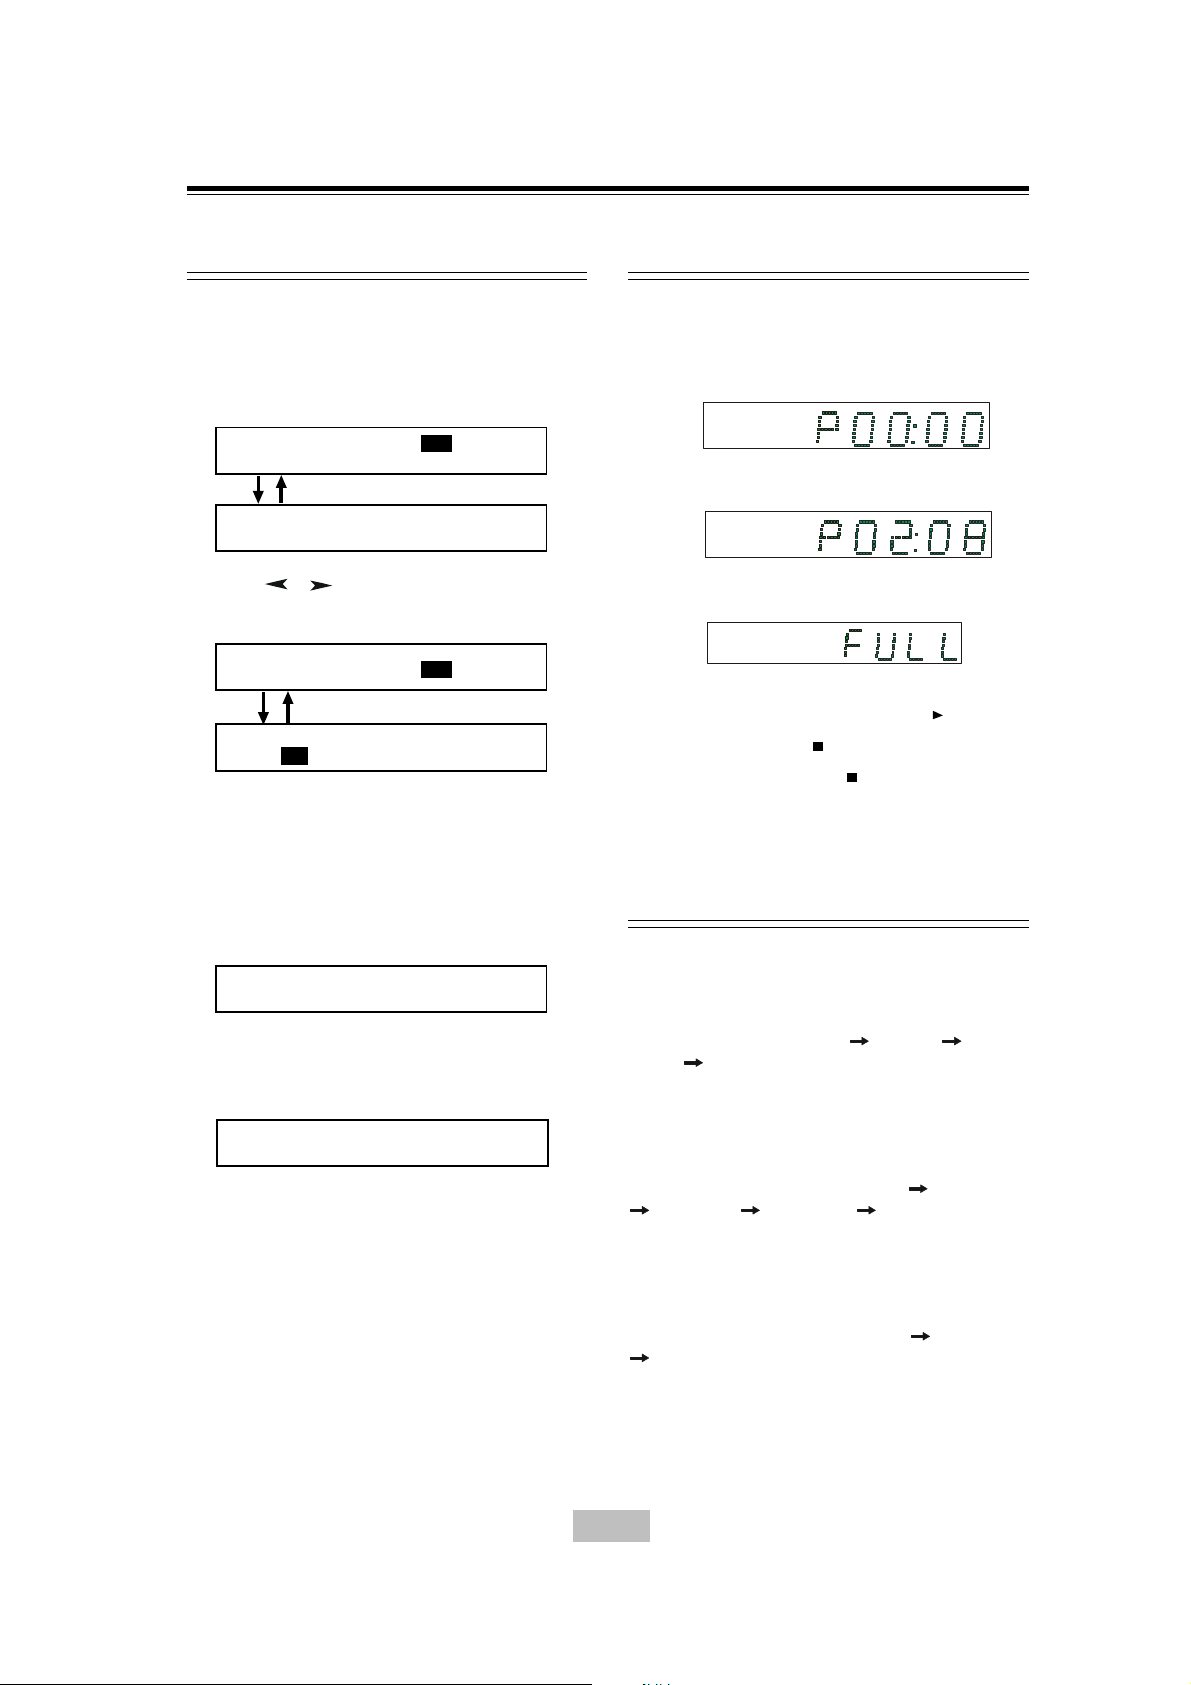
1 While playback is stopped, select or press PROGRAM to
enter program mode.
PGM
VCD
2 Use the number buttons (0~9/>10) to input the track num-
ber in the order you want.
PGM
VCD
If you attempt to program more than 99 tracks, the FULL will
be displayed.
VCD
3 Repeat step 2 to store other tracks.
4 To start program play, press PLAY/PAUSE /ll.
5 To stop playback, press
6 To cancel the program, press
Note
once.
again.
PGM
• This function is not available for DVD and MP3 disc.
Selecting audio mode for karaoke mu-
sic
When playing karaoke or similarlyWhen playing karaoke or similarly
When playing karaoke or similarly
When playing karaoke or similarlyWhen playing karaoke or similarly
ff
oror
mama
tted Dtted D
f
or
ma
ff
oror
mama
audio, or either right or left channel depending on the disc.
Press AUDIO repeatedly during playback to switch the audio
output mode as follows: AUDIO 1
VOCAL AUDIO 2 VOCAL.
When playing karaoke or similarlyWhen playing karaoke or similarly
When playing karaoke or similarly
When playing karaoke or similarlyWhen playing karaoke or similarly
ff
oror
mama
f
or
ma
ff
oror
mama
or either right or level channel mono depending on the disc.
Press AUDIO repeatedly during playback to switch to the
audio output mode as follows: LEFT VOCAL RIGHT VOCAL
MONO LEFT MONO RGHT STEREO.
When playing karaoke or similarlyWhen playing karaoke or similarly
When playing karaoke or similarly
When playing karaoke or similarlyWhen playing karaoke or similarly
ff
oror
mama
f
or
ma
ff
oror
mama
either right or level channel mono depending on disc.
Press AUDIO repeatedly during playback to switch to the
audio output mode as follows: MONO LEFT MONO RIGHT
STEREO.
Note
• This system does not support CD-G formatted discs.
VD discsVD discs
tted D
VD discs, it is possible to select vocal
tted Dtted D
VD discsVD discs
AUDIO 2 AUDIO 1
tted tted
VV
CD discsCD discs
tted
V
CD discs
tted tted
VV
CD discsCD discs
tted CD discstted CD discs
tted CD discs, it is possible to select stereo, or
tted CD discstted CD discs
,,
, it is possible to select stereo,
,,
17
Page 18
Special FunctionSpecial Function
Special Function
Special FunctionSpecial Function
Picture CD disc playback
This system allows you to view Kodak and JPEG formatted
Picture CD discs on your television screen. Load the disc with
the lable side up. It may take a few moments for the system to
read the contents before beginning playback.
Viewing Kodak Picture discs
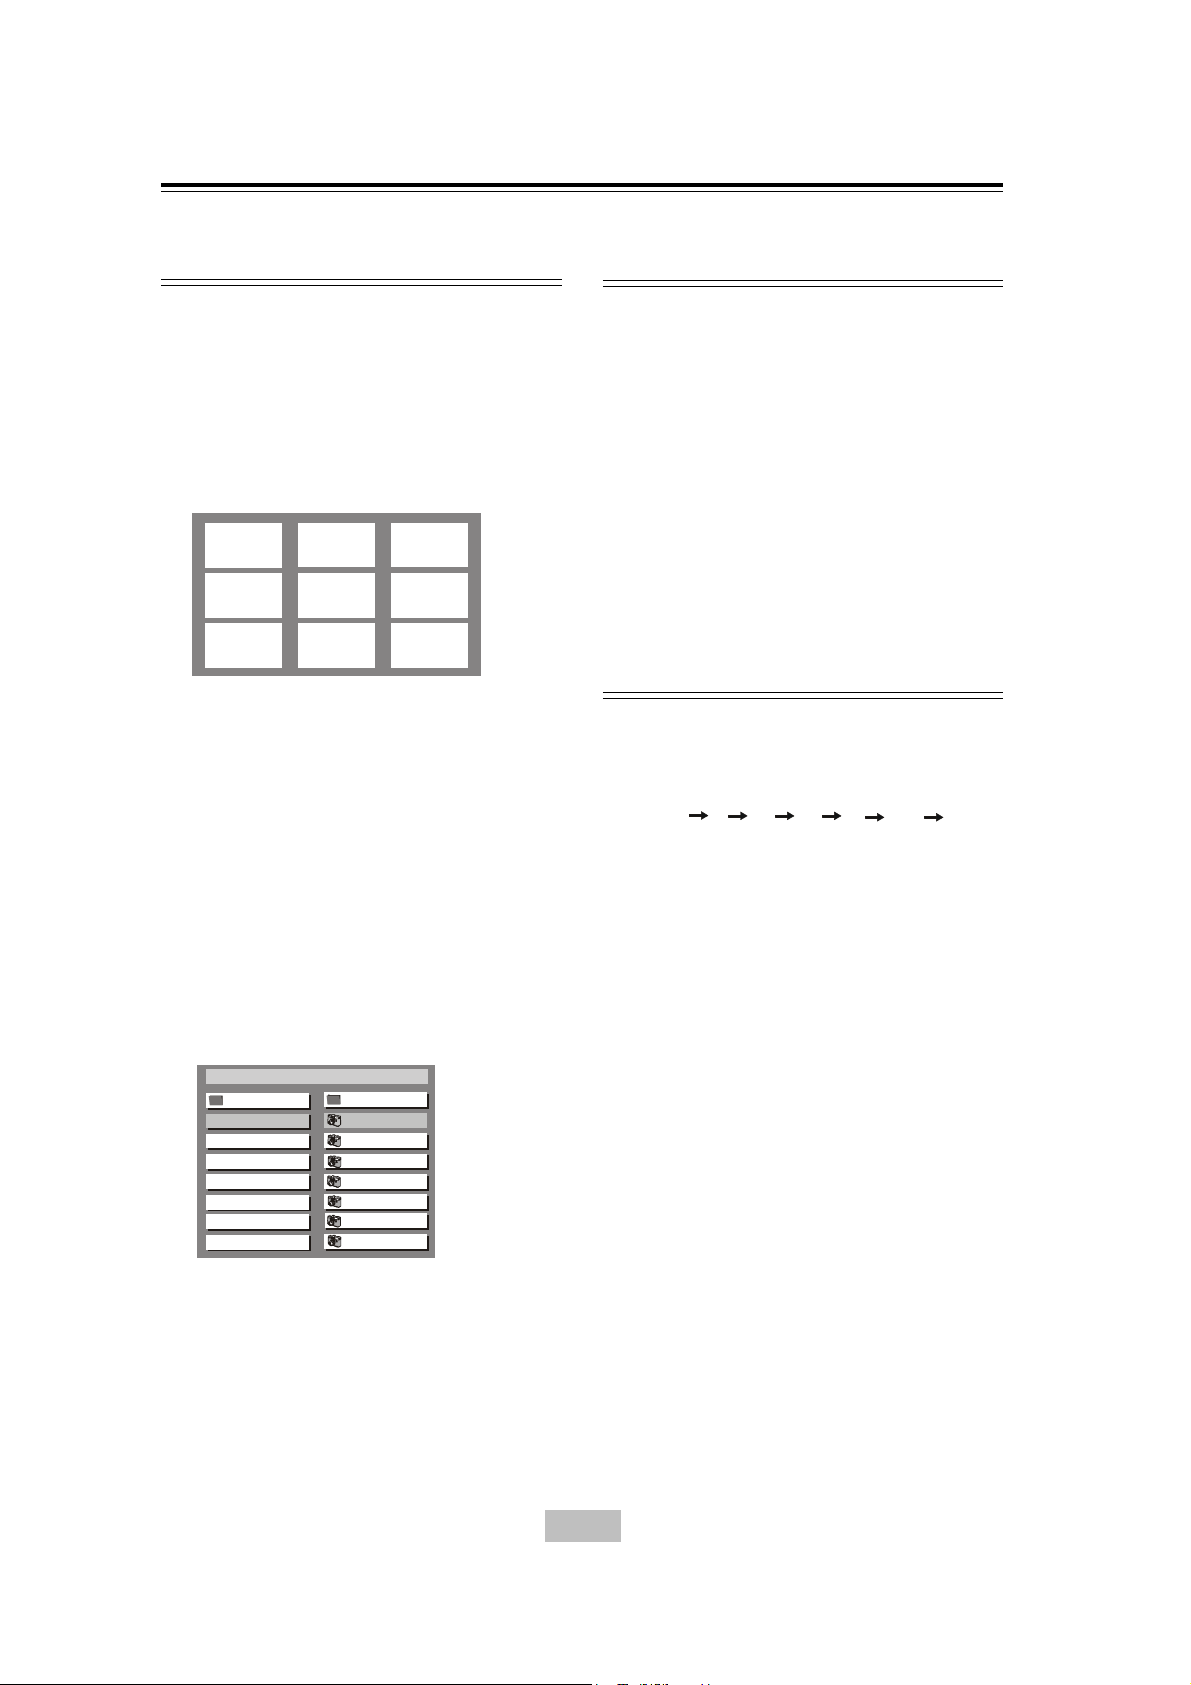
Kodak Picture CD disc menus will be displayed automatically on
the television screen with up to 9 thumbnail pictures at a time,
and continue as a slide show until all photos are previewed.
1
4
7
Use the /// buttons to select a picture, and press
ENTER to enlarge it to fill the television screen, or use the or
buttons in the menu to view the previous / next page (if
available).
During playback you can:
- Press /// on the remote to rotate / flip the picture
files.
- Press
- Press to stop playback, and return to the 9 thumbnail
menu.
Viewing JPEG formatted discs
To begin playback, press MENU on the remote control unit.
Picture CD discs with JPEG format menus will be displayed as
a list of albums / titles menu on the television screen.
/
to pause / resume playback.
Root
2
5
8
DATE CD MENU
ROOT 0
TITLE NAM E1 1
TITLE NAM E2 2
TITLE NAM E3 3
TITLE NAM E4 4
TITLE NAM E5 5
TITLE NAM E6 6
TITLE NAM E7 7
3
6
9
Picture CD disc playback
In the menu use the /// buttons to select the desired
albums / titles and press ENTER . A slideshow will begin from
this point.
During playback you can:
- Press or to select another title / picture in the current
folder.
- Press /// on the remote to rotate / flip the picture
files.
- Press
- Press to stop playback.
Note
• Some files on Kodak or JPEG discs may be distorted during
playback due to the configuration and characteristics of
the disc.
/
to pause / resume playback.
Setting the sleep timer
Use this function to program the system to turn off automatically
after a specified amount of time. Press SLEEP repeatedly, to
select the following time intervals in minutes:
15
30 45 60 90 120 OFF
- When you have selected the specified time, the “ SLEEP ”
indicator lights on the television screen and front panel
display.
- To reset the time, press SLEEP again to make another
selection.
- To check the remaining time before the system turns off,
press SLEEP. The remaining time will be displayed on the
television screen and front panel for a few seconds.
- To cancel the sleep function, press SLEEP until it reaches
OFF.
18
Page 19
Special FunctionSpecial Function
Special Function
Special FunctionSpecial Function
Angle selection
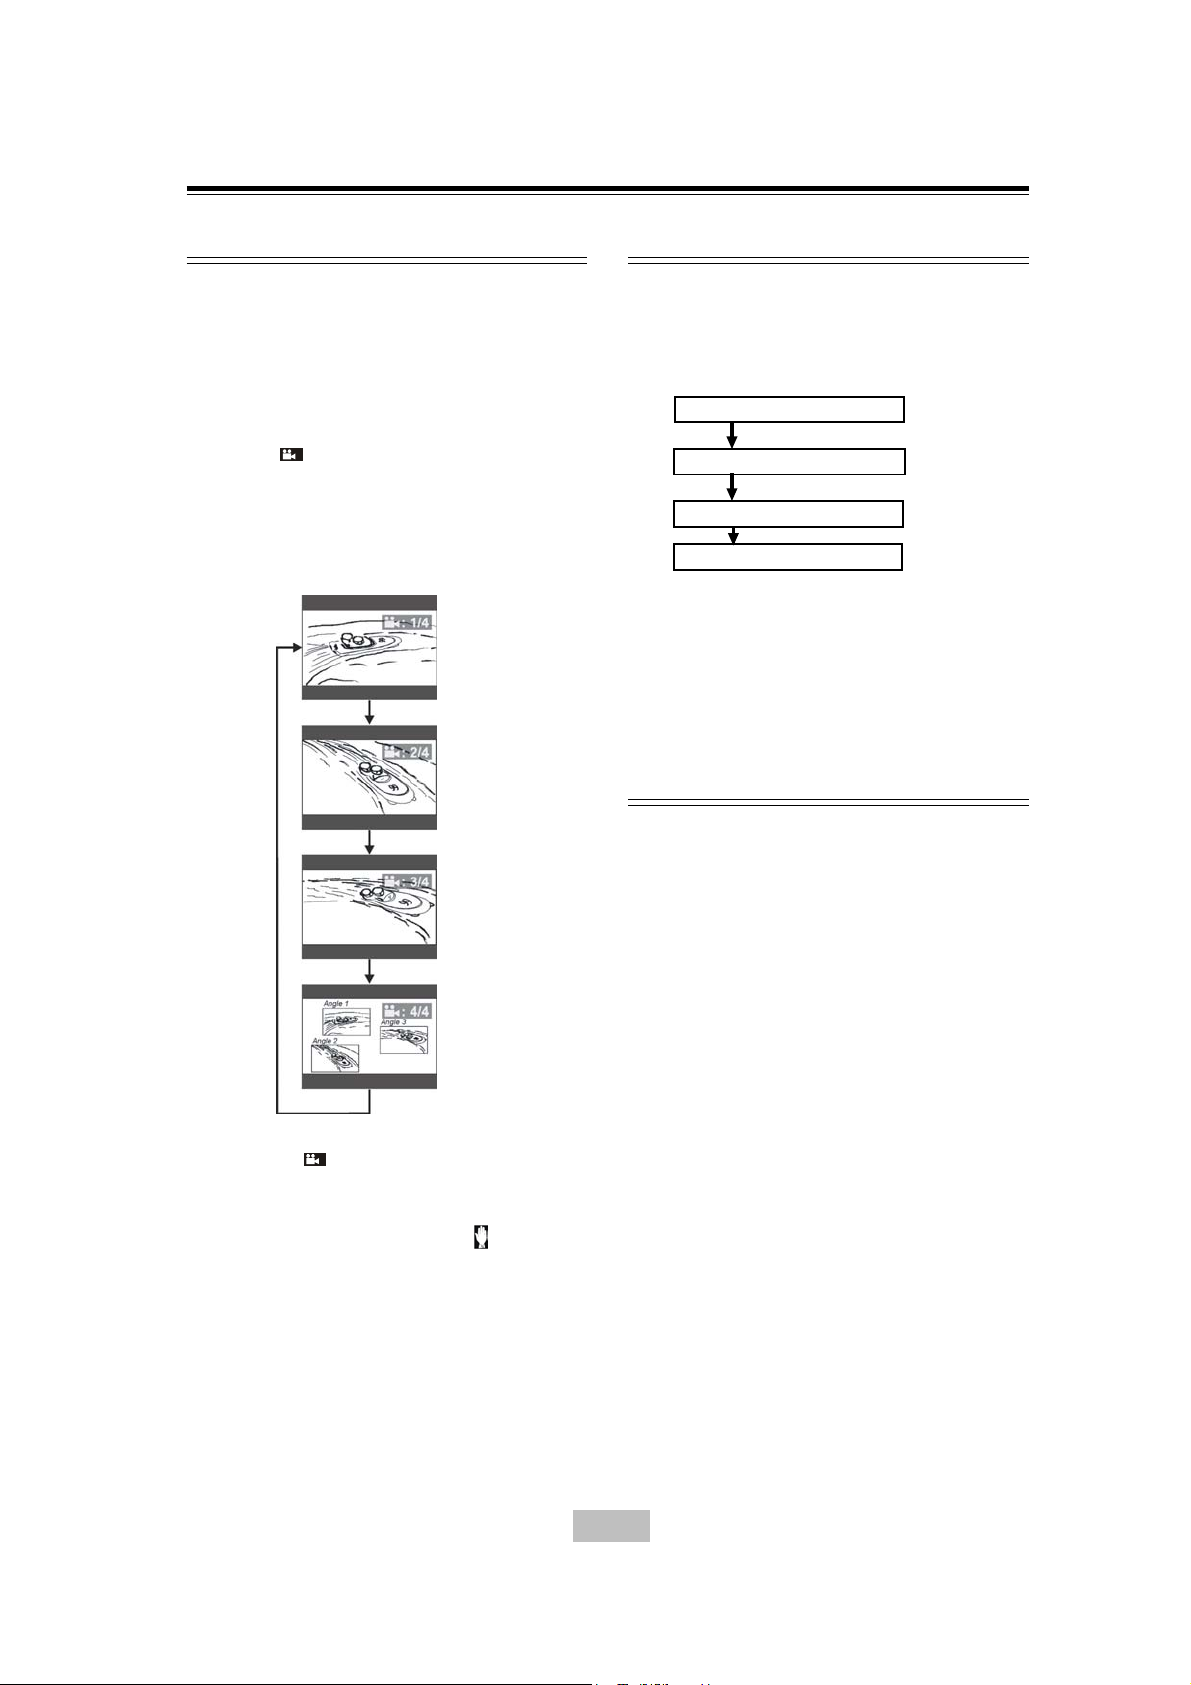
Some DVD discs contain scenes which have been shot simul-
taneously from a number of different angles. For these discs,
the same scenes can viewed from each of the different angles.
(The recorded angles differ from disc to disc).
1. Set the angle function to ON by pressing ANGLE on the
remote control during playback.
2. As scenes recorded with multiple angles begin to play, the
angle icon : will appear on the television screen.
3. Press ANGLE repeatedly to view the scene from different
angles.
For example: 1/4, 2/4, 3/4, 4/4.
Picture zoom
The zoom function allows you to enlarge the picture on the
television screen and to pan through the enlarged image.
1. Press ZOOM on the remote control unit repeatedly to se-
lect the following magnification factors:
ZOOM x 1.5
ZOOM x 2
ZOOM x 3
ZOOM OFF
2. Press /// to pan through the enlarged image
Notes
• This function is only available during playback.
• This function is not available when playing CD or MP3 discs.
• This setting will be cancelled automatically when the disc
tray is opened or the power is turned off.
Selecting the subtitle language
Notes
• The angle icon : will disapear imediately when you press
ANGLE on the remote control, or after five seconds.
• This function is only available when the disc has been recorded with scenes shot from more than one angle.
• If after pressing ANGLE , the inhibit icon
the television screen, this indicates that the angle function
is not available for the disc.
is displayed on
This function is available for DVD discs recorded with subtitles
in multiple languages. To display the current language selection
press SUBTITLE once during playback. Continue pressing to
select other subtitle languages. Press ENTER to continue
playback with the desired subtitle language.
Notes
• Some DVD discs are recorded with subtitles that cannot
be turned off.
• Subtitles may not appear immediately after you have turned
them on.
• Some DVD discs allow you to change subtitle selections
only via the disc menu. Use the /// buttons to select
the desired language or turn the subtitles ON or OFF and
then press ENTER .
• Use the SETUP menu to select a preferred subtitle language.
• The maximum number of subtitle languages stipulated by
the manufacturer is 32.
19
Page 20

TT
rr
ouboub
T
r
oub
TT
rr
ouboub
If you experience any of the following difficulties while using
the system, use this troubleshooting guide to help you remedy
the problem. Should any problem persist, consult your nearest
service center.
leshootingleshooting
leshooting
leshootingleshooting
The sound loses stereo effect when you play a Video
CD or a CD
• Set the Audio mode to “STEREO” in the SETUP menu.
• Make sure you connect the system appropriately.
No power
• Is the power cord firmly plugged into the power outlet?
• One of the safety mechanisms may be operating. In this
event, unplug the player from the power outlet briefly and
then plug it in again.
No picture
• Check that the system is connected securely.
• The video connecting cord is damaged. Replace it with a
new one.
• Make sure you connect the system to video input connec-
tor on the TV.
• Make sure you turn on the TV.
• Make sure you select the video input on the TV so that you
can view the pictures from this system.
The picture noise appears
• Clear the disc.
• If video from this system has to go through your VCR to get
to your TV, the copy-protection applied to some DVD pro-
grams could affect picture quality. If you still experience
problems after checking your connections, please try con-
necting your DVD system directly to your TV’s S-Video
input, if your TV is equipped with this input.
The aspect ratio of the screen cannot be changed even
though you set “TV DISPLAY” in the SETUP menu when
you play a wide picture.
• The aspect rate is fixed on your DVD disc.
• If you connect the system with the S-Video cable, connect
directly to the TV. Otherwise, you may not change the
aspect rate.
• Depending on the TV, you may not change the aspect rate.
The surround effect is difficult to hear when you are
playing a Dolby Digital sound track
• Check the speaker connections.
• Depending on the DVD disc, the output signal may not be
the entire 5.1 channel but monaural or stereo even if the
sound track is recorded in Dolby Digital format.
No sound or only a very low-level sound is heard from
the rear speakers
• Make sure the Rear is set to “ON” in SETUP menu.
• Adjust the speaker volume.
The language for the subtitles cannot be changed when
you play a DVD
• Multilingual subtitles are not recorded on the DVD.
• Changing the language for the subtitles is prohibited on the
DVD.
The subtitles cannot be turned off when you play a DVD
• Depending on the DVD, you may not be able to turn the
subtitles off.
The angles cannot be changed when you play a DVD
• Multi-angles are not recorded on the DVD.
• Change the angles when the angle mark appears on the
TV screen.
• Changing the angles is prohibited on the DVD.
The system does not operate properly
• Static electricity, etc., may affect the system’ s operation.
Press the POWER button to turn off, then press again to
turn on.
Severe hum or noise is heard
• Check that the speakers and components are connected
securely.
• Check that the connecting cords are away from a trans-
former or motor, and at least 3 meters away from a TV set
or fluorescent light.
• Move your TV away from the audio components.
• The plugs and jacks are dirty. Wipe them with a cloth slightly
moistened with alcohol.
• Clear the disc.
20
Page 21

Electrical SpecificationElectrical Specification
Electrical Specification
Electrical SpecificationElectrical Specification
DVD Player
Pickup .................................................................................................................................... Semiconductor laser, Wavelength 650 nm
Video signal horizontal resolution .................................................................................................................................. 480 lines (DVD)
Video signal-to-noise ratio ................................................................................................................................................... 50 dB (DVD)
Audio frequency response (at 2 CH stereo mode) ................................................................ DVD (PCM): 20 Hz ~ 20 kHz (+/- 3.0 dB)
............................................................................................................................................................... CD: 20 Hz ~ 20 kHz (+/- 3.0 dB)
Audio signal-to-noise ratio .............................................................................................................................................................. 60 dB
Dynamic range ................................................................................................................................................. DVD : 80 dB ; CD: 80 dB
Video outputs
CVBS Video .................................................................................................................................................................... 1 Vp-p 75 ohms
S-video ...................................................................................................................................................................... Y: 1 Vp-p 75 ohms
........................................................................................................................... C: PAL 0.3 Vp-p 75 ohms / NTSC 0.286 Vp-p 75 ohms
Scart out ......................................................................................................................................................................... 1 Vp-p 75 ohms
Optical and Coaxial out ................................................................................................................................................... 1 Vp-p 75 ohms
Audio line outputs
Audio.L/R ....................................................................................................................................................................... 2 Vrms, 1k ohms
Main Unit
Power supply........................................................................................................................................................110~230V AC 60Hz
Hz
power consumption.......................................................... ............................................................................................... 15W maximum
Dimensions ...................................................................................................................................................... W 435 x H48x D 278 mm
Weight ............................................................................................................................................................................................... 2.4kg
Operation Temperature................................................................................................................................. 32 F ~19.4 F (0°C ~ 40°C)
Operation Humidity .................................................................................................................................................................... 15 ~ 75%
Design and specifications are subjected to change without notice. Weight and dimensions are approximate.
21
 Loading...