

Viega Programmable Heat/Cool Thermostat Product Instructions
Product
Instructions
Viega® Programmable Heat/Cool Thermostat
The Viega programmable heat/cool thermostat is easy
to install, easy to wire and easy to program. It can be
used for single stage heating and cooling applications,
making it ideal for many different applications. Installation
instructions can be found below.
Thermostat applications guide
Mon
AM
Description
Gas or Oil Heat Yes
Electric Furnace Yes
Heat Pump (No Aux. or Emergency Heat) Yes
Heat Pump (with Aux. or Emergency Heat) No
Multi-stage Systems No
Heat Only Systems Yes
Cool Only Systems Ye s
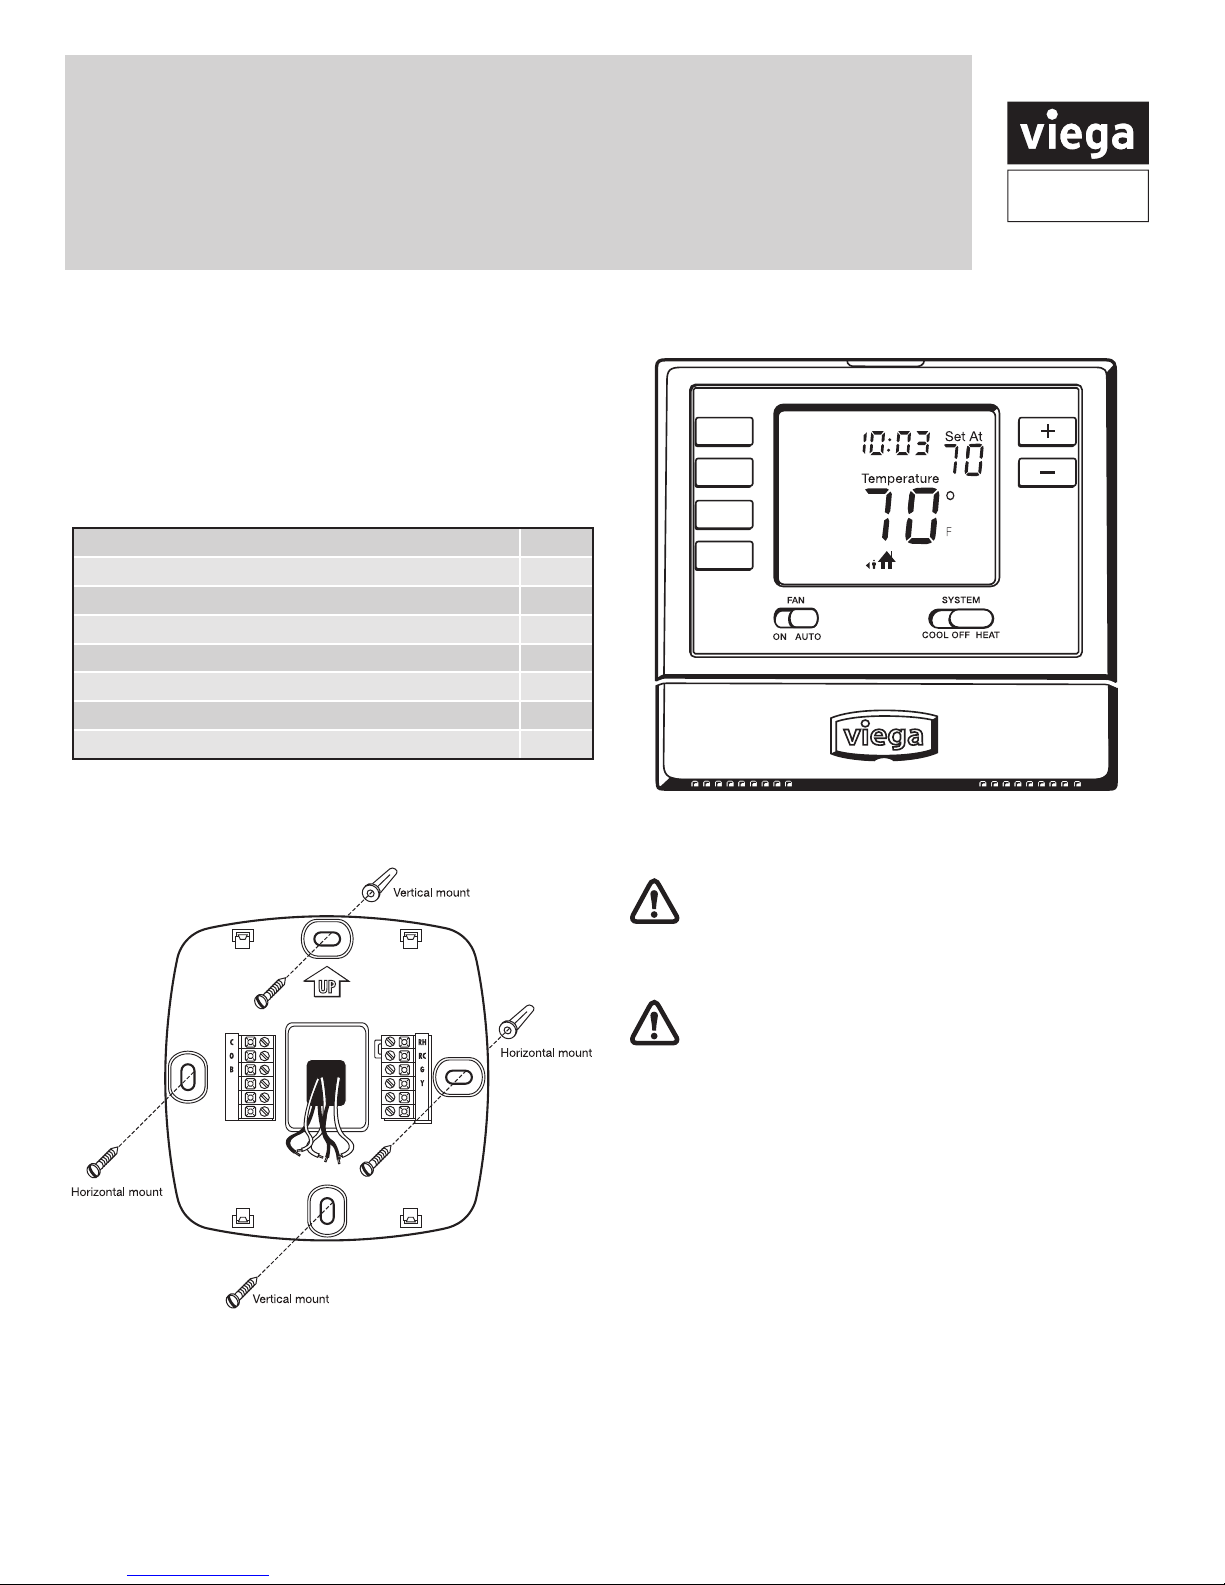
Mounting the subbase
W
Menu
LEAVE
Part Number 15117
Caution: Electrical Hazard
Failure to disconnect the power before beginning
to install this product can cause electrical shock or
equipment damage.
Mercury Notice:
All of our products are mercury free. However, if the
product you are replacing contains mercury, dispose of it
properly. Your local waste management authority can give
you instructions on recycling and proper disposal.
For vertical mount put one screw top and one screw bottom.
For horizontal mount put one screw left and one screw right.
The thermostat can be mounted directly to the wall or it can
be mounted to a wall box. Use the vertical mounting screw
location to attach to a wall box.
Viega LLC, 301 N. Main, 9th Floor • Wichita, KS 67202 • Ph: 800-976-9819 • Fax: 316-425-7618
PI-PR 566440 0114 (Programmable Heat-Cool Thermostat)
A trained, experienced technician must install this
product.
damage this product or cause a hazardous condition if
you fail to follow these instructions.
Carefully read these instructions. You could
1 of 13

Product
Instructions
Installation tips
Wall locations
The thermostat should be installed approximately 4 to 5 feet above the
oor. Select an area with average temperature and good air circulation.
Do not install thermostat in locations:
• Close to hot or cold air ducts
• That are in direct sunlight
• With an outside wall behind the thermostat
• In areas that do not require conditioning
• Where there are dead spots or drafts (in corners or
behind doors
• Where there might be concealed chimneys or pipes
Viega LLC, 301 N. Main, 9th Floor • Wichita, KS 67202 • Ph: 800-976-9819 • Fax: 316-425-7618
PI-PR 566440 0114 (Programmable Heat-Cool Thermostat)
NOTE: Pick an installation location that is easy for the
user to access. The temperature of the location should be
representative of the building
2 of 13
Product
Instructions
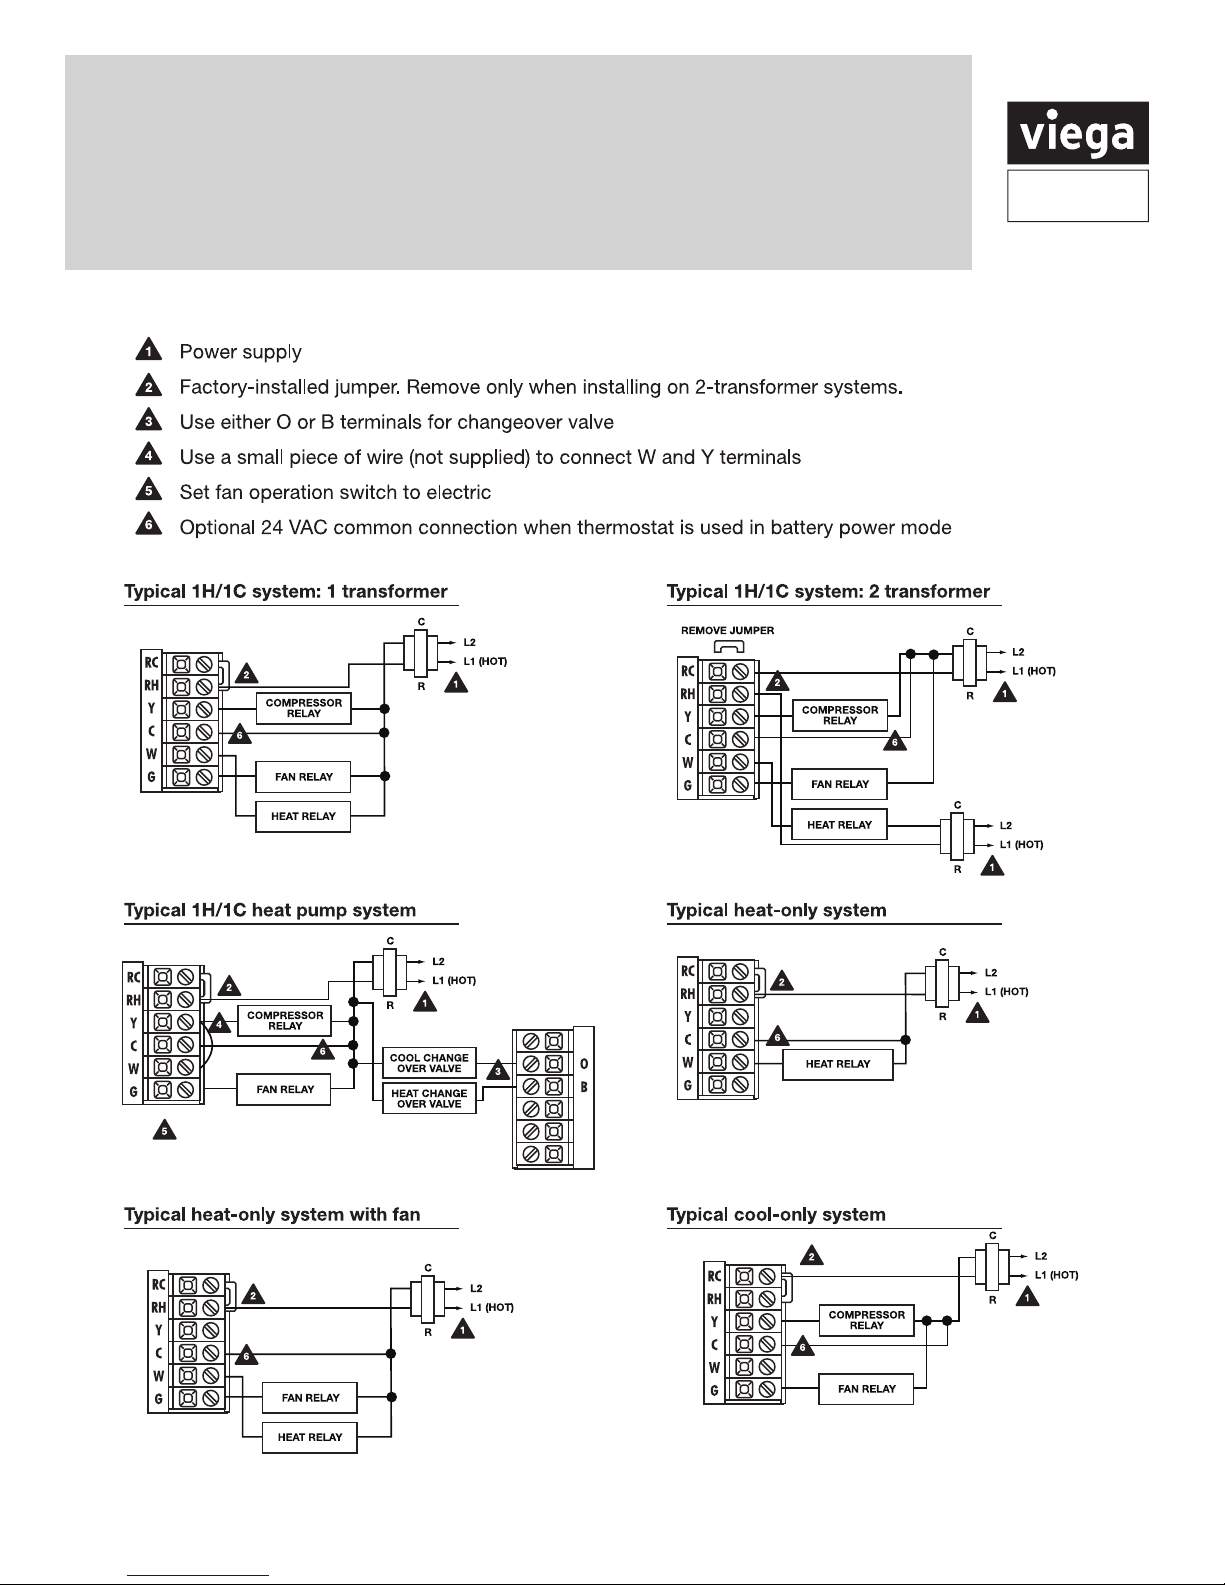
Thermostat wiring
1. If you are replacing a thermostat, make note of the
terminal connections on the thermostat that is being
replaced. In some cases the wiring connections will
not be color coded. For example, the green wire
may not be connected to the G terminal.
2. Loosen the terminal block screws. Insert wires then
retighten terminal block screws.
Viega thermostat terminal conversion
Thermostat
15118
RH
C
W/E
Power type
• 3 wire
• 3 wire with battery backup
• 2 wire with battery
Thermostats
15116
15117
RH
C
W
Zone Control
18060
18062
18050
R
C
W
Zone Control
18032
Thermostat
18029
L
N
Terminal designations
W - Heat relay
Y - Compressor relay
G - Fan relay
O - Heat pump changeover valve energized in cooling
RC - Transformer power for cooling
RH - Transformer power for heating
B - Heat pump changeover valve energized in heating
C - Common wire from secondary side of cooling
system transformer
Wiring tips:
RH & RC terminals
For single transformer systems, leave the jumper wire in
place between RH and RC. Remove jumper wire for two
transformer systems.
Heat pump systems
If wiring to a heat pump, use a small piece of wire (not
supplied) to connect terminals W and Y.
C terminal
The C (common wire) terminal does not have to be
connected when the thermostat is powered by batteries.
Wire specifications
Use shielded or non-shielded 18-22 gauge thermostat wire.
Caution: Electrical hazard
Failure to disconnect the power before beginning
to install this product can cause electrical shock or
equipment damage.
Viega LLC, 301 N. Main, 9th Floor • Wichita, KS 67202 • Ph: 800-976-9819 • Fax: 316-425-7618
PI-PR 566440 0114 (Programmable Heat-Cool Thermostat)
Warning:
All components of the control system and the
thermostat installation must conform to Class II circuits
per the NEC Code.
3 of 13
Product
Instructions
Typical industry wiring diagrams
. See page 8.
Viega LLC, 301 N. Main, 9th Floor • Wichita, KS 67202 • Ph: 800-976-9819 • Fax: 316-425-7618
PI-PR 566440 0114 (Programmable Heat-Cool Thermostat)
4 of 13
 Loading...