

Page 1

Urinal flush plate for Prevista
Visign for More 200 infrared flush actuation
Instructions for Use
for urinal flushing systems
Model Year built:
8620.2 from 03/2019
en_INT
Page 2

Urinal flush plate for Prevista Visign for More 200 infrared flush actuation 2 from 27
Page 3

Table of contents
1 About these instructions for use 4
Table of contents
1.1
1.2
1.3
Target groups 4
Labelling of notes 4
About this translated version 5
2 Product information 6
2.1
2.2
2.2.1
2.2.2
2.3
2.3.1
2.3.2
2.3.3
2.3.4
Standards and regulations 6
Intended use 6
Areas of use 6
Maintenance 6
Product description 7
Overview 7
Technical data 7
Operating mode 9
Setting options 10
3 Handling 12
3.1
3.1.1
3.2
3.2.1
3.2.2
3.2.3
3.3
3.3.1
3.4
3.5
3.5.1
3.5.2
3.6
Assembly information 12
Mounting conditions 12
Assembly 13
Inserting the magnet valve 13
Mounting the power pack 15
Mounting the flush plate 17
Commissioning 20
Setting the flush 20
Errors, faults and remedy 22
Care and maintenance 23
Care tips 23
Cleaning the magnet valve 24
Disposal 27
Urinal flush plate for Prevista Visign for More 200 infrared flush actuation 3 from 27
Page 4
About these instructions for use
1 About these instructions for use
Trade mark rights exist for this document; for further information, go to
viega.com/legal.
1.1 Target groups
The information in this instruction manual is directed at the following
groups of people:
n Heating and sanitary professionals and trained personnel
n Qualified electricians
n Operators
n Consumers
1.2
Individuals without the abovementioned training or qualification are not
permitted to mount, install and, if required, maintain this product. This
restriction does not extend to possible operating instructions.
The installation of Viega products must take place in accordance with
the general rules of engineering and the Viega instructions for use.
Labelling of notes
Warning and advisory texts are set aside from the remainder of the text
and are labelled with the relevant pictographs.
DANGER!
This symbol warns of possible life-threatening injury.
WARNING!
This symbol warns of possible serious injury.
CAUTION!
This symbol warns of possible injury.
NOTICE!
This symbol warns of possible damage to property.
Urinal flush plate for Prevista Visign for More 200 infrared flush actuation 4 from 27
Page 5

1.3 About this translated version
This instruction for use contains important information about the choice
of product or system, assembly and commissioning as well as intended
use and, if required, maintenance measures. The information about the
products, their properties and application technology are based on the
current standards in Europe (e.g. EN) and/or in Germany
(e.g. DIN/DVGW).
Some passages in the text may refer to technical codes in Europe/
Germany. These should serve as recommendations in the absence of
corresponding national regulations. The relevant national laws, stand‐
ards, regulations, directives and other technical provisions take priority
over the German/European directives specified in this manual: The
information herein is not binding for other countries and regions; as said
above, they should be understood as a recommendation.
About these instructions for use
This symbol gives additional information and hints.
Urinal flush plate for Prevista Visign for More 200 infrared flush actuation 5 from 27
Page 6

2 Product information
2.1 Standards and regulations
The following standards and regulations apply to Germany / Europe and
are provided as a support feature.
Regulations from section: Fields of application / Mounting conditions
Scope / Notice Regulations applicable in Ger‐
Product information
many
2.2 Intended use
2.2.1 Areas of use
Viega Hygiene+ function
Protection area for installation of
the power pack in shower and
bath rooms
Regulations from section: Technical data
Scope / Notice Regulations applicable in Ger‐
Flush flow DIN 3265
Noise class DIN 4109
The urinal flush plate is intended for the contact-free actuation of
flushes in urinals.
Flushes can be actuated at certain times via the Viega Hygiene+ func‐
tion to prevent stagnation in the potable water pipelines.
VDE 0100-701
many
2.2.2
Urinal flush plate for Prevista Visign for More 200 infrared flush actuation 6 from 27
Maintenance
The magnet valve should be cleaned once a year to ensure fault-free
operation. See Ä Chapter 3.5.2 „Cleaning the magnet valve“ on page 24
Page 7

2.3 Product description
2.3.1 Overview
Product information
Fig. 1: Scope of delivery
1 flush plate
2 Magnet valve
3 valve adapter
4 retaining bolt
5 Power pack
6 silicon grease (2 x 2 g)
7 clamps
8 installation frame
2.3.2 Technical data
The product has the following technical data:
Urinal flush plate for Prevista Visign for More 200 infrared flush actuation 7 from 27
Page 8

Product information
Operating voltage Primary 100–240 V AC, 50–60 Hz,
180 mA
Secondary 6 V DC/SELV
Magnetic coil 6 V
Flow pressure 0.05–0.5 MPa (0.5–5 bar)
Calculated flow 0.3 l/s
Flush flow, see Ä „Regulations
from section: Technical data“
on page 6
Noise class, see Ä „Regulations
from section: Technical data“
on page 6
0.3–0.7 l/s
2
Urinal flush plate for Prevista Visign for More 200 infrared flush actuation 8 from 27
Page 9
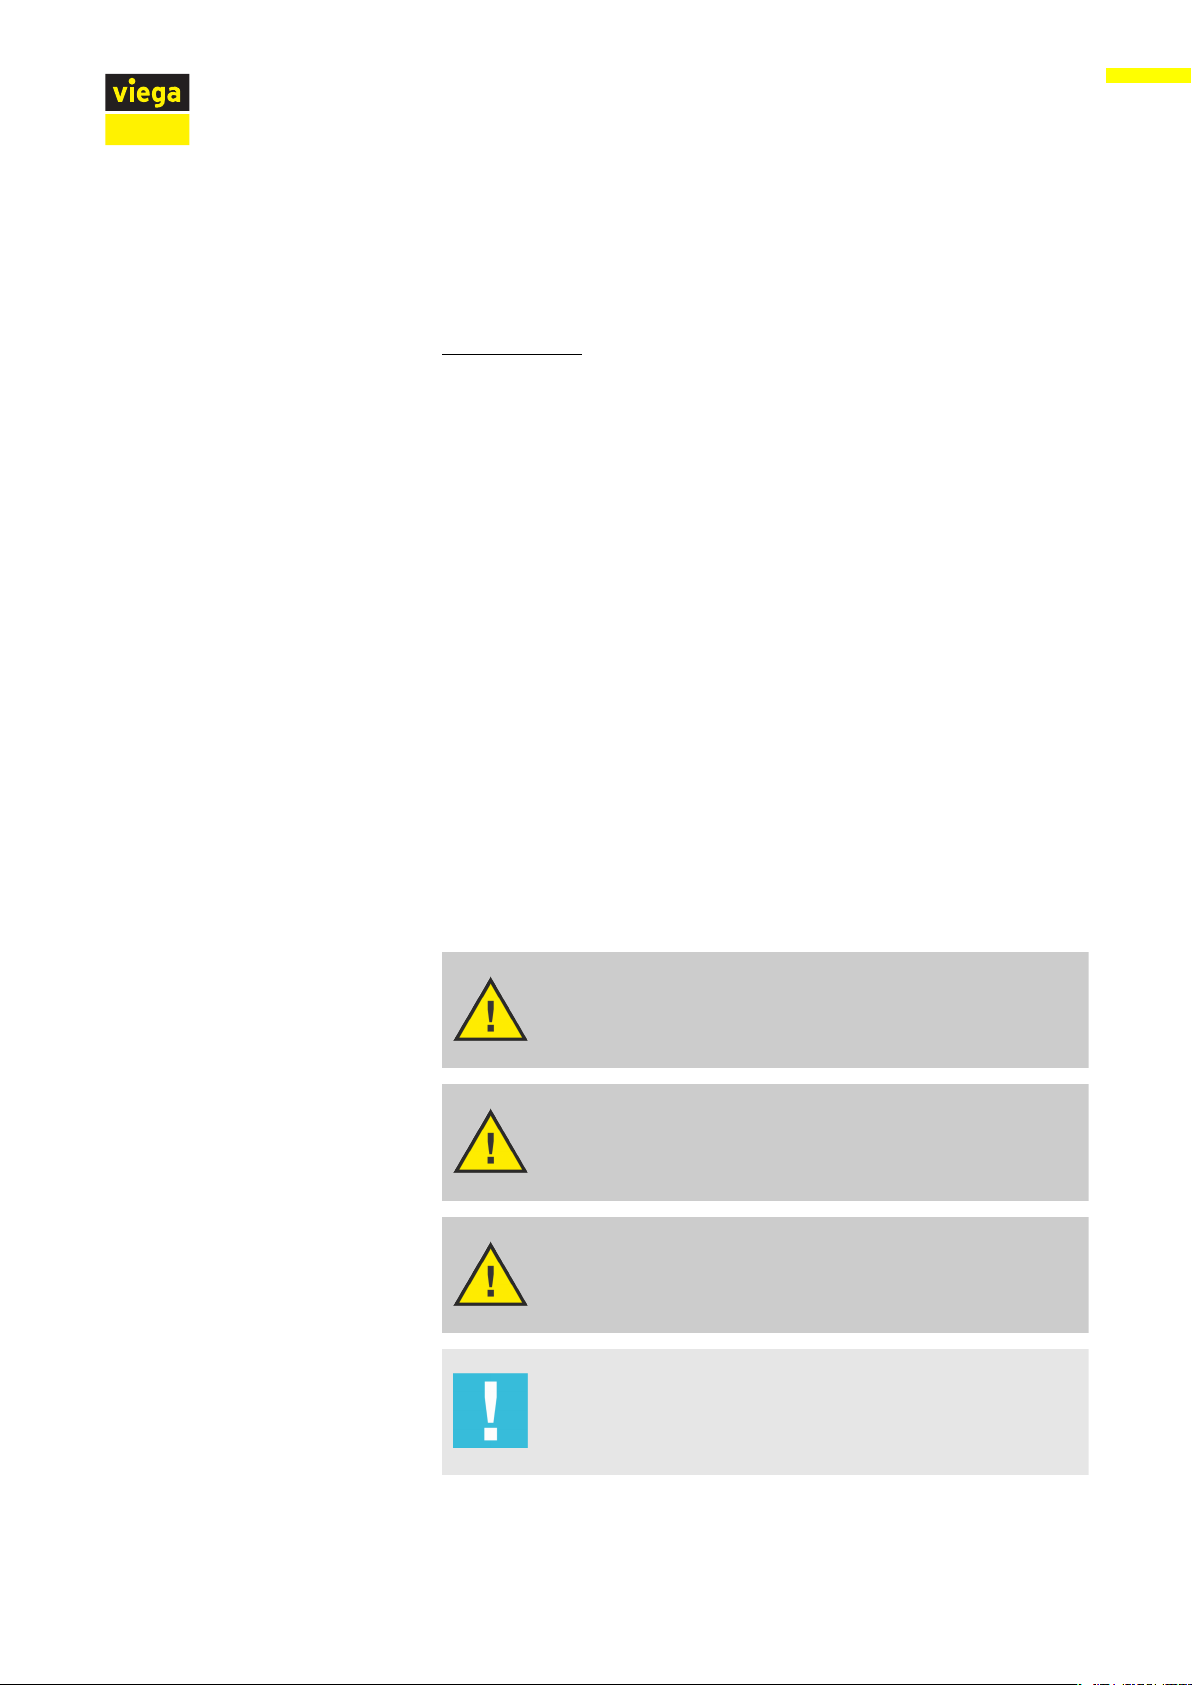
2.3.3 Operating mode
Infrared actuation
Product information
Flush actuation takes place without contact via an infrared sensor on
the flush plate.
The flush volume can be set in four stages.
In order to actuate a flush, a person must be within the detection area of
the infrared sensor for at least 8 seconds.
If a person leaves the detection area, a flush is automatically actuated.
Depending on the setting, the flush duration is between 2 and 15 sec‐
onds.
A flush cycle can also be manually actuated by placing a hand briefly in
front of the sensor.
Urinal flush plate for Prevista Visign for More 200 infrared flush actuation 9 from 27
Page 10

Viega Hygiene+ function
24
Product information
Stagnation can lead to the build up of germs (e.g. legionella) in potable
water pipelines. It is important to rinse the pipeline regularly to prevent
the build up of bacteria. The Viega Hygiene+ function was developed for
this reason.
If no actuation was carried out during the set period of time, the Viega
Hygiene+ function automatically actuates a hygiene flushing.
The interval for the hygiene flushing can be set in five levels.
2.3.4 Setting options
Settings for the infrared sensor
Flush settings
Range of the infrared sensor
The close range is set at 0 to 3 cm.
The far range can be set as follows:
n Close range (approx. 400 mm), so that the flush cannot be inadver‐
tently actuated.
n medium range (approx. 450 mm, factory setting)
n Far range (approx. 490 mm), so that the automatic flush actuation
also works at a greater distance from the urinal.
Lid in front of sensor
This function is intended for the case that an open lid covers the sensor.
The function is deactivated in the factory settings. If the function is acti‐
vated, a flush cycle is actuated as soon as the lid is removed from the
sensor zone.
Viega recommends however to make sure during planning that the lid is
not placed in front of the sensor in order to guarantee perfect function‐
ality.
Flush duration
The flush duration can be set in four levels. Using the guide values from
the table below, you can determine the flush volume on the basis of
flow pressure and flush duration:
Urinal flush plate for Prevista Visign for More 200 infrared flush actuation 10 from 27
Page 11

Product information
Flow pres‐
flush dura‐
tion
flush dura‐
tion
flush dura‐
tion
flush dura‐
tion
sure
2 seconds
5 seconds
10 seconds
15 seconds
0.1 MPa
0.5 l 0.9 l 2.2 l 3.5 l
(1 bar)
0.2 MPa
0.9 l 1.8 l 4.0 l 5.6 l
(2 bar)
0.3 MPa
1.0 l 2.2 l 4.5 l 6.8 l
(3 bar)
0.4 MPa
1.2 l 2.7 l 5.2 l 7.6 l
(4 bar)
0.5 MPa
1.3 l 2.9 l 5.7 l 9 l
(5 bar)
Hygiene flushing
The setting determines if respectively how long after non-use a hygiene
flushing is actuated.
The following settings are possible:
n Hygiene+ function deactivated
n Hygiene flush 1 hour after the last use
n Hygiene flush 12 hours after the last use
n Hygiene flush 24 hours after the last use (factory setting)
n Hygiene flush 72 hours after the last use
n Hygiene flush 168 hours after the last use
Urinal flush plate for Prevista Visign for More 200 infrared flush actuation 11 from 27
Page 12
3 Handling
3.1 Assembly information
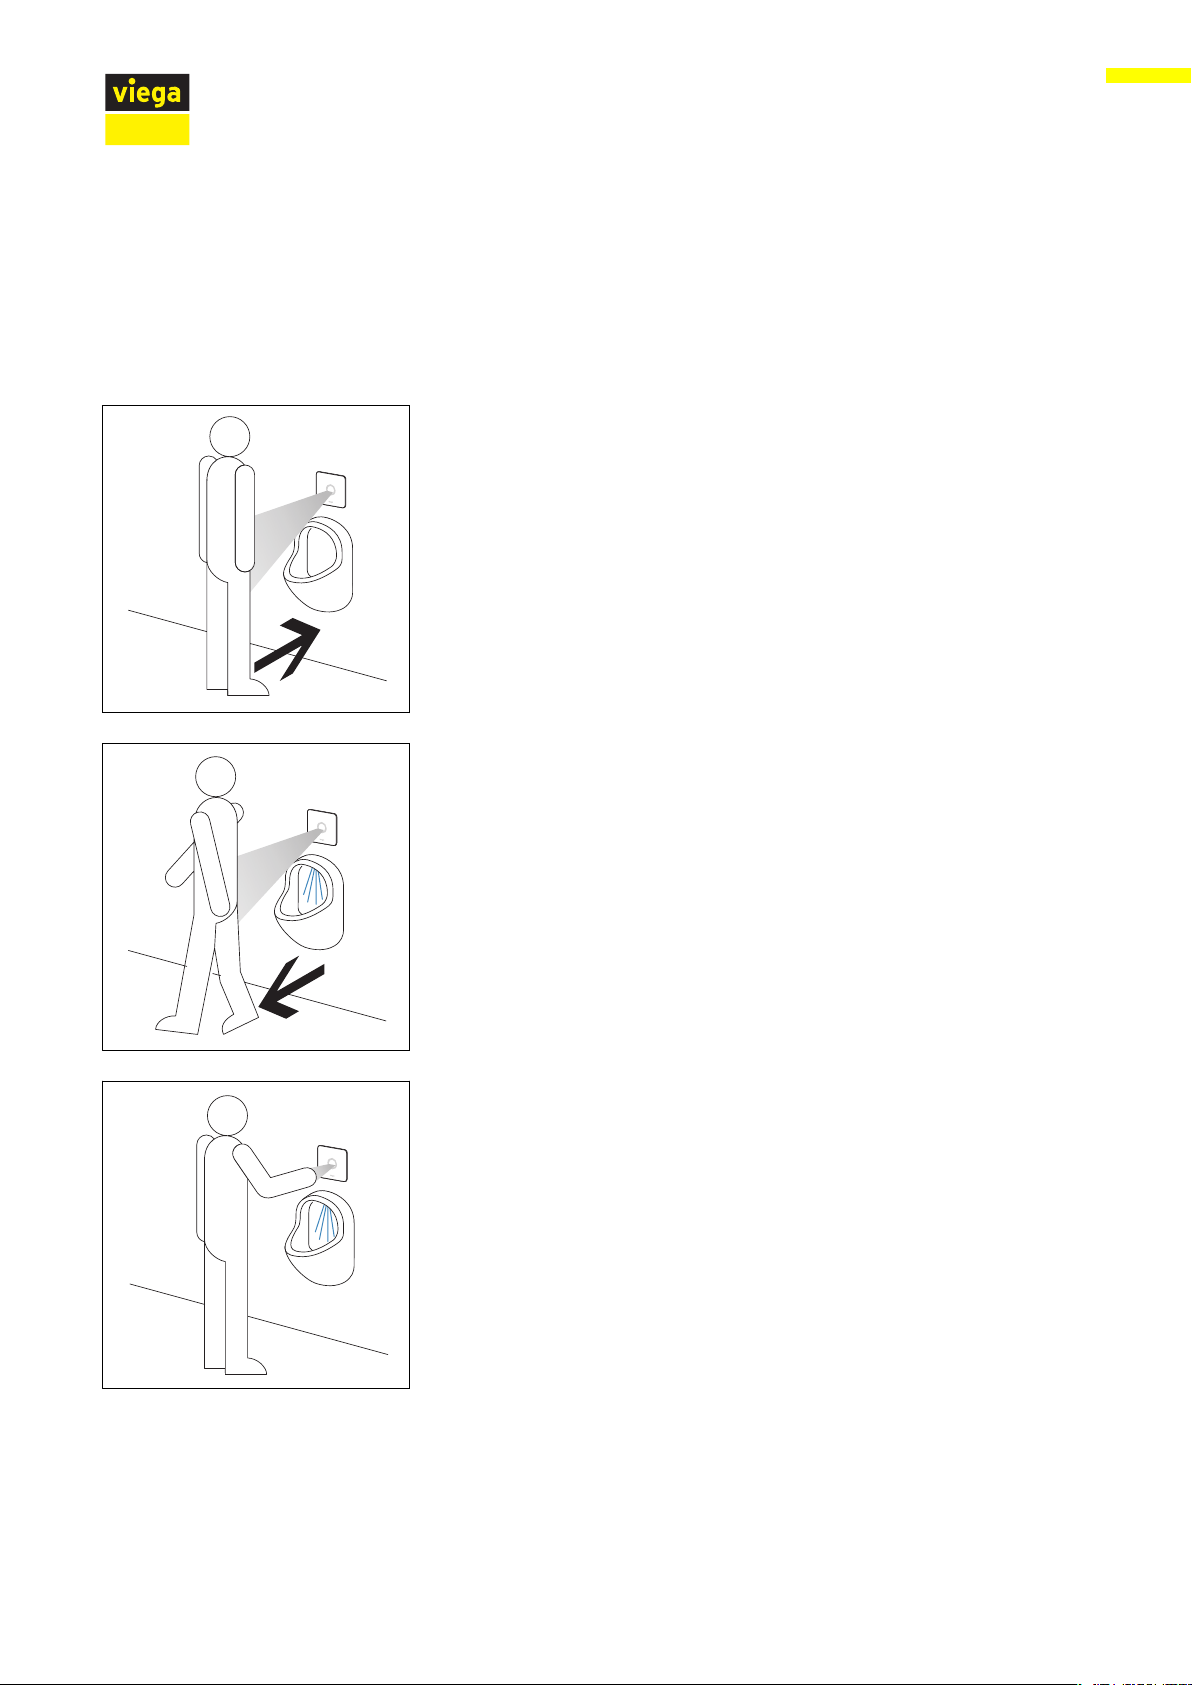
3.1.1 Mounting conditions
Minimum intervals
The following minimum distances must be complied with to ensure the
infrared sensor works perfectly:
n A minimum distance of 1000 mm must be maintained to the oppo‐
n If high-gloss wall claddings (polished tiles, mirrors, etc.) are situated
Handling
site walls.
opposite, increase the minimum distance to 1500 mm.
n A minimum distance of 1500 mm must be maintained to urinals situ‐
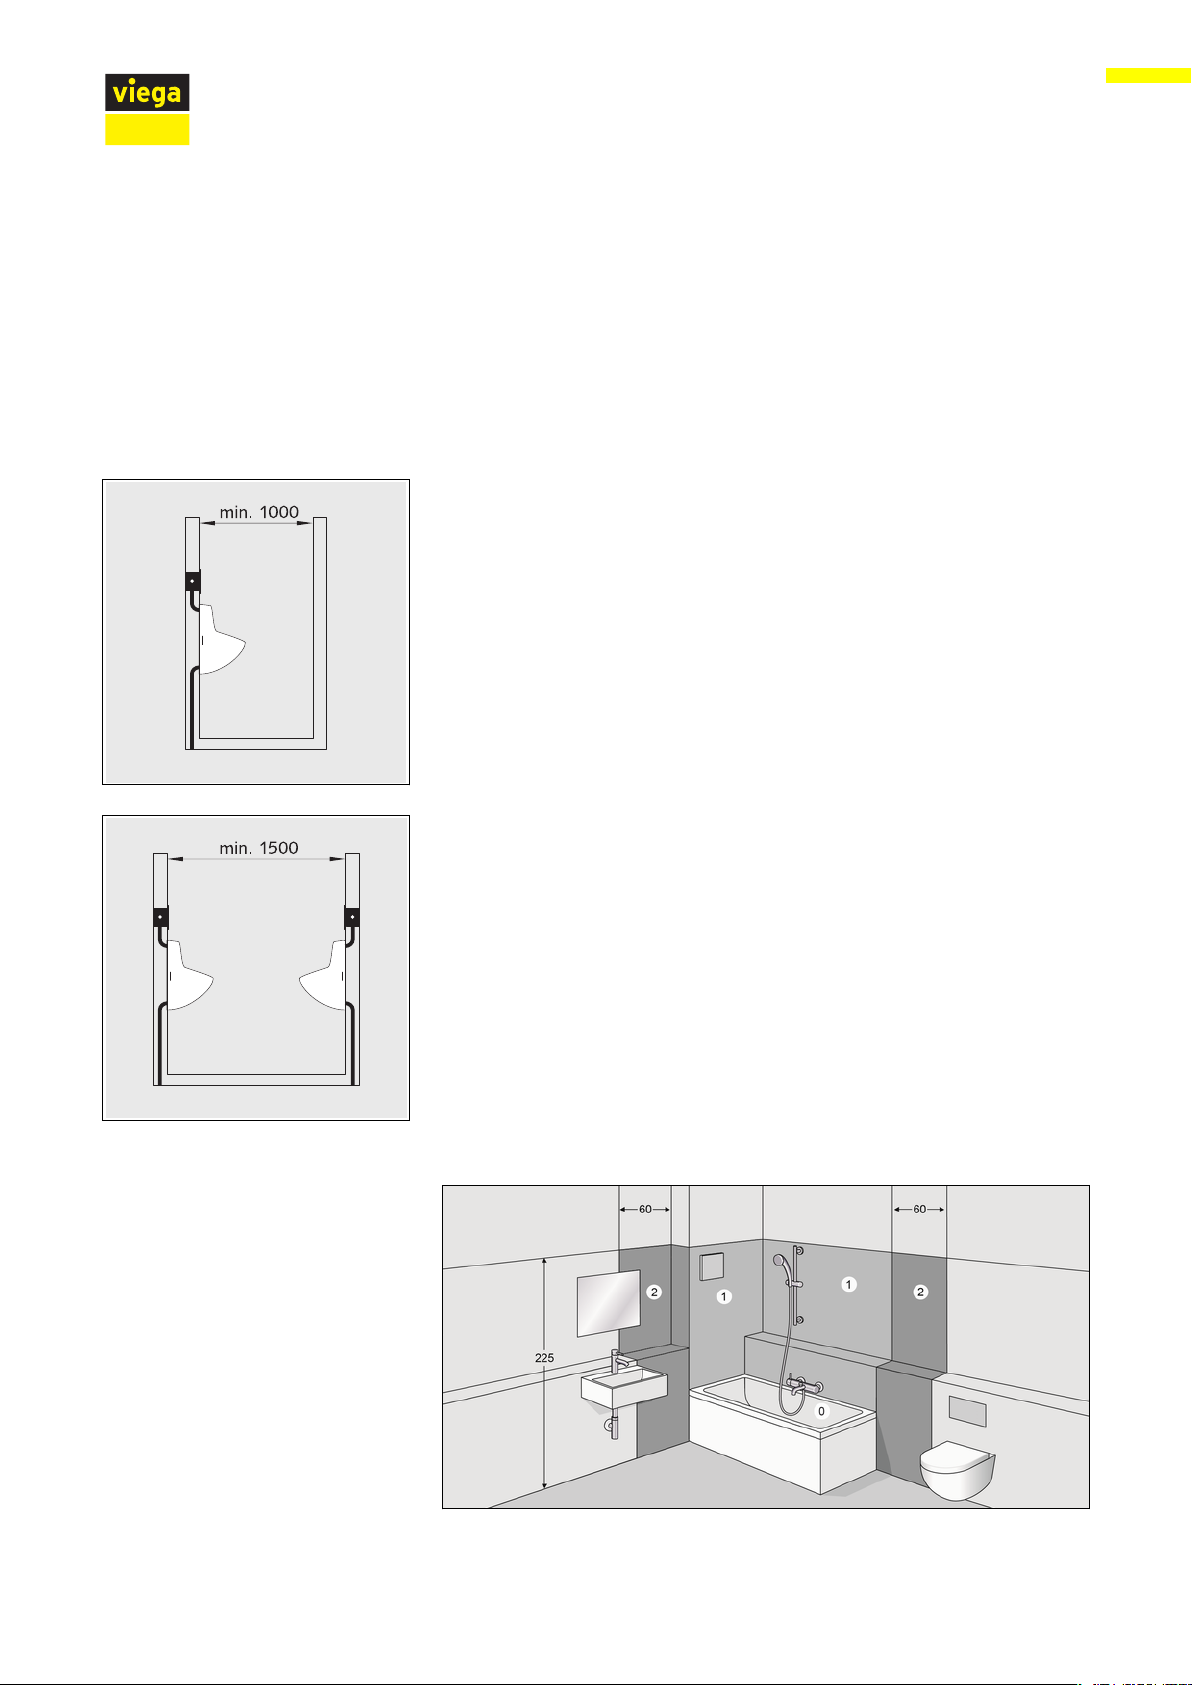
Installation position of the power pack
ated opposite with infrared sensors.
Fig. 2: Protected zones
Urinal flush plate for Prevista Visign for More 200 infrared flush actuation 12 from 27
Page 13

According to the applicable regulations, installation of the power pack in
the protected zones 0 and 1 of shower rooms and bathrooms is not per‐
mitted, see Ä „Regulations from section: Fields of application /
Mounting conditions“ on page 6.
Viega recommends installing the power pack outside of the protected
zones 0–2.
3.2 Assembly
3.2.1 Inserting the magnet valve
Requirements:
n The pre-wall element has been mounted.
n The tiling work is completed.
n The revision opening is freely accessible.
n The urinal ceramic has been mounted.
Handling
Cut into the sticky tape of the shaft cover.
Remove the shaft cover.
Urinal flush plate for Prevista Visign for More 200 infrared flush actuation 13 from 27
Page 14

Y
5 s
Handling
Cut into the corners of the revision shaft.
Fold the sides of the revision shaft outwards up to the tile level and
snap them off.
Open the shut-off with a screwdriver for a few seconds to rinse the
pipeline.
Re-close the shut-off.
Remove the seal.
Grease the sealing elements.
Place the valve adapter on the magnet valve.
NOTICE! Ensure that the sealing element sits in the groove.
Urinal flush plate for Prevista Visign for More 200 infrared flush actuation 14 from 27
Page 15

3.2.2 Mounting the power pack
/N
Handling
Place the magnet valve on straight and carefully screw in as far as it
will go (fine thread).
Screw in the magnet valve (size 27).
max. torque: 1 Nm
DANGER!
Danger due to electrical current
An electric shock can lead to burns and serious injury and
even death.
– Only allow electrical work to be carried out by qualified
electricians.
– Always de-energise the connection cable before work is
commenced.
Urinal flush plate for Prevista Visign for More 200 infrared flush actuation 15 from 27
Page 16

Handling
Requirements:
n A 230 V mains connection is available on site.
n The installation position of the power pack complies with the require‐
ments in acc. with Ä „Installation position of the power pack“
on page 12.
n The connection cable is de-energised.
Push the cables into the terminals.
Push the power pack into the revision opening.
Position the power pack, battery compartment and terminals.
Urinal flush plate for Prevista Visign for More 200 infrared flush actuation 16 from 27
Page 17

3.2.3 Mounting the flush plate
Handling
Put on the installation frame.
Insert the retaining bolts.
Turn the retaining bolts by 90° in a clockwise direction.
Urinal flush plate for Prevista Visign for More 200 infrared flush actuation 17 from 27
Page 18

Handling
Align the installation frame.
To fix the retaining bolts, turn safety rings in a clockwise direction.
Connect the magnet valve cable to the control.
Connect the power pack to the control.
INFO! Stand to the side of the panel so that you are not in the
sensor’s detection area.
Open the shut-off valve.
Replace the flush plate.
Urinal flush plate for Prevista Visign for More 200 infrared flush actuation 18 from 27
Page 19

The infrared sensor is calibrated (approx. 60 seconds); the
60 s
ð
flush plate emits red light during this time.
The flush plate is operative. The calibration of the flush plate
may take up to 5 additional minutes. During this time, the flush
plate lights up every 10 seconds.
Handling
Urinal flush plate for Prevista Visign for More 200 infrared flush actuation 19 from 27
Page 20

3.3 Commissioning
"#%$
3.3.1 Setting the flush
Handling
The range, flush duration, hygiene flushing and "Lid before sensor"
parameters are set via the DIP switches of the IR control.
A Range
B flush duration
C "Lid in front of sensor"
D Hygiene flushing
0 DIP switch position: OFF
1 DIP switch position: ON
Assignment of the DIP switches:
n The switches 1—2 determine the range of the infrared sensor.
n The switches 3—4 determine the flush duration.
n Switch 5 activates the "Lid before sensor" function.
n The switches 6—8 determine the interval of the hygiene flushing.
Urinal flush plate for Prevista Visign for More 200 infrared flush actuation 20 from 27
Page 21

Setting the range (A)
Range (in mm) Position of switches 1—2
1 2
400 0 1
450 (factory setting) 0 0
490 1 0
450 1 1
Setting the flush duration (B)
Flush duration (in seconds) Position of switches 3—4
3 4
Handling
2 0 1
5 1 0
10 (factory setting) 0 0
15 1 1
Setting "Lid in front of sensor" (C)
"Lid in front of sensor" Position of switch 5
5
OFF (factory setting) 0
ON 1
Setting the hygiene flushing (D)
Interval (in hours) Position of switches 6—8
6 7 8
1 0 0 1
12 0 1 0
24 (factory setting) 0 0 0
72 0 1 1
168 1 0 0
OFF 1 1 1
Urinal flush plate for Prevista Visign for More 200 infrared flush actuation 21 from 27
Page 22

3.4 Errors, faults and remedy
Error Cause Remedy
Handling
The urinal does not
flush.
No supply voltage. Check the plug con‐
nections.
The shut-off valve
closed.
The sensor field dirty
or damaged.
The magnet valve is
dirty or damaged.
The control is defec‐
tive.
The red LED flashes
quickly during the first
minute after commis‐
sioning, although
there is no-one in the
sensor detection area.
Open the shut-off
valve.
Clean the cover plate,
replace it if necessary.
Clean the magnet
valve, replace if
required.
Ä
Chapter 3.5.2
„Cleaning the magnet
valve“ on page 24
Replace the base
frame.
Reduce the range of
the infrared sensor.
Ä
„Setting the range
(A)“ on page 21
The range of the
infrared sensor is set
too large.
The red LED flashes
in the first minute
after commissioning.
The flashing does not
become quicker even
though there is
someone in the
detection area.
The range of the
infrared sensor is set
too small.
The flush is too weak. The shut-off valve is
not open far enough.
The flow pressure is
too low.
The flush duration is
too short.
Increase the range of
the infrared sensor.
Ä
„Setting the range
(A)“ on page 21
Open the shut-off
valve.
Maximum flow pres‐
sure 0.5 MPa (5 bar)
Set the flush duration.
Ä
„Setting the flush
duration (B)“
on page 21
Urinal flush plate for Prevista Visign for More 200 infrared flush actuation 22 from 27
Page 23

Error Cause Remedy
Handling
The urinal flush runs
through.
The red LED flashes
all the time.
The magnet valve is
dirty or damaged.
The components have
been connected in the
wrong order.
The magnet valve is
dirty or damaged.
The control is defec‐
tive.
The battery is weak. Replace the battery.
Clean the magnet
valve, replace if
required.
Ä
Chapter 3.5.2
„Cleaning the magnet
valve“ on page 24
Separate the plug
connections and wait
10 seconds. Re-con‐
nect the magnet valve
and then the power
supply.
Clean the magnet
valve, replace if
required.
Ä
Chapter 3.5.2
„Cleaning the magnet
valve“ on page 24
Replace the base
frame.
3.5 Care and maintenance
3.5.1 Care tips
Use normal soap or a mild cleaning agent for regular care and preven‐
tion of lime scale on the flush plate. Under no circumstances should
scouring agent or scratching objects be used.
Strong stains can be removed using typical household cleaner. Rinse
the detergent thoroughly with clear water after the prescribed exposure
time. There should be no residue on the components.
Cleaning mode
Urinal flush plate for Prevista Visign for More 200 infrared flush actuation 23 from 27
Page 24

Hold your hand for 10 seconds in front of the flush plate.
10 s 5 min
INFO! During cleaning mode, the flush plate flashes every
second.
No flush is actuated for five minutes.
3.5.2 Cleaning the magnet valve
Clean the magnet valve if required. Proceed as follows:
Handling
Remove the flush plate from the installation frame.
Disconnect the magnet valve from the control.
Disconnect the power pack from the control.
Urinal flush plate for Prevista Visign for More 200 infrared flush actuation 24 from 27
Page 25

Turn the safety rings 90° anti-clockwise.
Turn the retaining bolts 90° anti-clockwise.
Handling
Turn the sleeve 90° clockwise to unlatch it.
Loosen the installation frame.
Urinal flush plate for Prevista Visign for More 200 infrared flush actuation 25 from 27
Page 26

Close the shut-off.
Unscrew the magnet valve.
Handling
Rinse the magnet valve under running water.
Remove coarse dirt with a soft brush.
Re-mount the magnet valve and the flush plate in accordance with
Ä
Chapter 3.2.1 „Inserting the magnet valve“ on page 13.
Urinal flush plate for Prevista Visign for More 200 infrared flush actuation 26 from 27
Page 27

3.6 Disposal
Handling
Separate the product and packaging materials (e. g. paper, metal,
plastic or non-ferrous metals) and dispose of in accordance with valid
national legal requirements.
Electronic components and batteries must not be put in the domestic
waste but must be disposed of appropriately in conformity with the
WEEE guideline 2012/19/EU.
Urinal flush plate for Prevista Visign for More 200 infrared flush actuation 27 from 27
 Loading...