

Page 1
Viega Flushing Systems
Installation Manual
The global leader
in plumbing, heating
and pipe joining systems
Page 2

Viega products are designed to be installed by licensed and trained plumbing and mechanical professionals
who are familiar with Viega products and their installation. Installation by non-professionals may void
Viega LLC’s warranty.
2
IM-FT 591480 0318
Page 3

Contents
1 Instructions for Use
1.1 Intended use ..................................................................4
1.2 Construction height .............................................................4
1.3 WC ceramic bowls. . . . . . . . . . . . . . . . . . . . . . . . . . . . . . . . . . . . . . . . . . . . . . . . . . . . . . . . . . . . . . 4
2 Overview
2.1 Model 8180US .................................................................5
2.1.1 Dimensions ...............................................................6
2.1.2 Flush volume .............................................................6
2.2 Model 8108.1US ...............................................................7
2.2.1 Dimensions ...............................................................8
2.2.2 Flush volume .............................................................8
3 Mounting
3.1 Framing and mounting WC carrier .................................................9
3.1.1 Required tools ............................................................9
3.2 Mounting WC carrier Model 8180US ...............................................9
3.2.1 Suitable walls .............................................................9
3.2.2 Steel stud mounting ........................................................9
3.2.3 Wood stud mounting ......................................................11
3.3 Mounting WC carrier Model 8108.1US ............................................12
3.3.1 Suitable walls ............................................................12
3.3.2 Steel stud mounting .......................................................12
3.3.3 Wood stud mounting ......................................................14
4 Bowl Installation .................................................................15
5 WaterSense Compatible Toilet Bowl Models
5.1 WaterSense EPA high efciency
Compatible wall-hung toilet bowl models ...........................................16
5.2 Other compatible wall-hung toilet bowl models ......................................17
6 Warranty ........................................................................19
IM-FT 591480 0318
3
Page 4
1 Instructions for Use
1.1 Intended use
• The Viega Eco Plus WC carrier is suitable for
mounting in wood or steel stud walls
• The WC carrier may only be mounted on even
wall surfaces
1.2 Construction height
• All references to construction height should be
measured from the nished oor. If measuring
from unnished oor, the thickness of the oor
covering should be added.
Model Part No Product description
8180US 52700 Viega Eco Plus WC carrier
2x6
For Visign flush plates, manual or touchless actuation
Flush actuation from the front, dual flush technology, adjustable ceramic height, barrierfree
Components
Powder-coated steel frame, concealed cistern, 3½" PP drain elbow, fernco coupling,
mounting hardware for 2x6 wood or metal studs, bowl mounting kit, trim guards
Cistern components
Pre-mounted angle stop with ½" NPT supply connection, fill valve, flush valve
Technical Data
sm. flush vol. factory setting approx. 0.8 gallon
sm. flush vol. setting approx. 0.8 - 1 gallon
full flush vol. factory setting approx. 1.6 gallon
810 8 .1U S 52710 Viega Eco Plus WC carrier
2x4
For Visign flush plates, manual or touchless actuation
Flush actuation from the front, dual flush technology, adjustable ceramic height, barrierfree
Components
Powder-coated steel frame, concealed cistern, 3½” PP drain elbow, fernco coupling,
mounting hardware for 2x4 wood or metal studs, bowl mounting kit, trim guards
Cistern components
Pre-mounted angle stop with ½" NPT supply connection, fill valve, flush valve
Technical Data
sm. flush vol. factory setting approx. 0.8 gallon
sm. flush vol. setting approx. 0.8 - 1 gallon
full flush vol. factory setting approx. 1.6 gallon
1.3 WC ceramic bowls
• The Viega WC carrier can only be used in
combination with compatible wall-hung bowls
(for threaded rods spacing of 7⅛" or 9" (180 or
230 mm)
4
IM-FT 591480 0318
Page 5
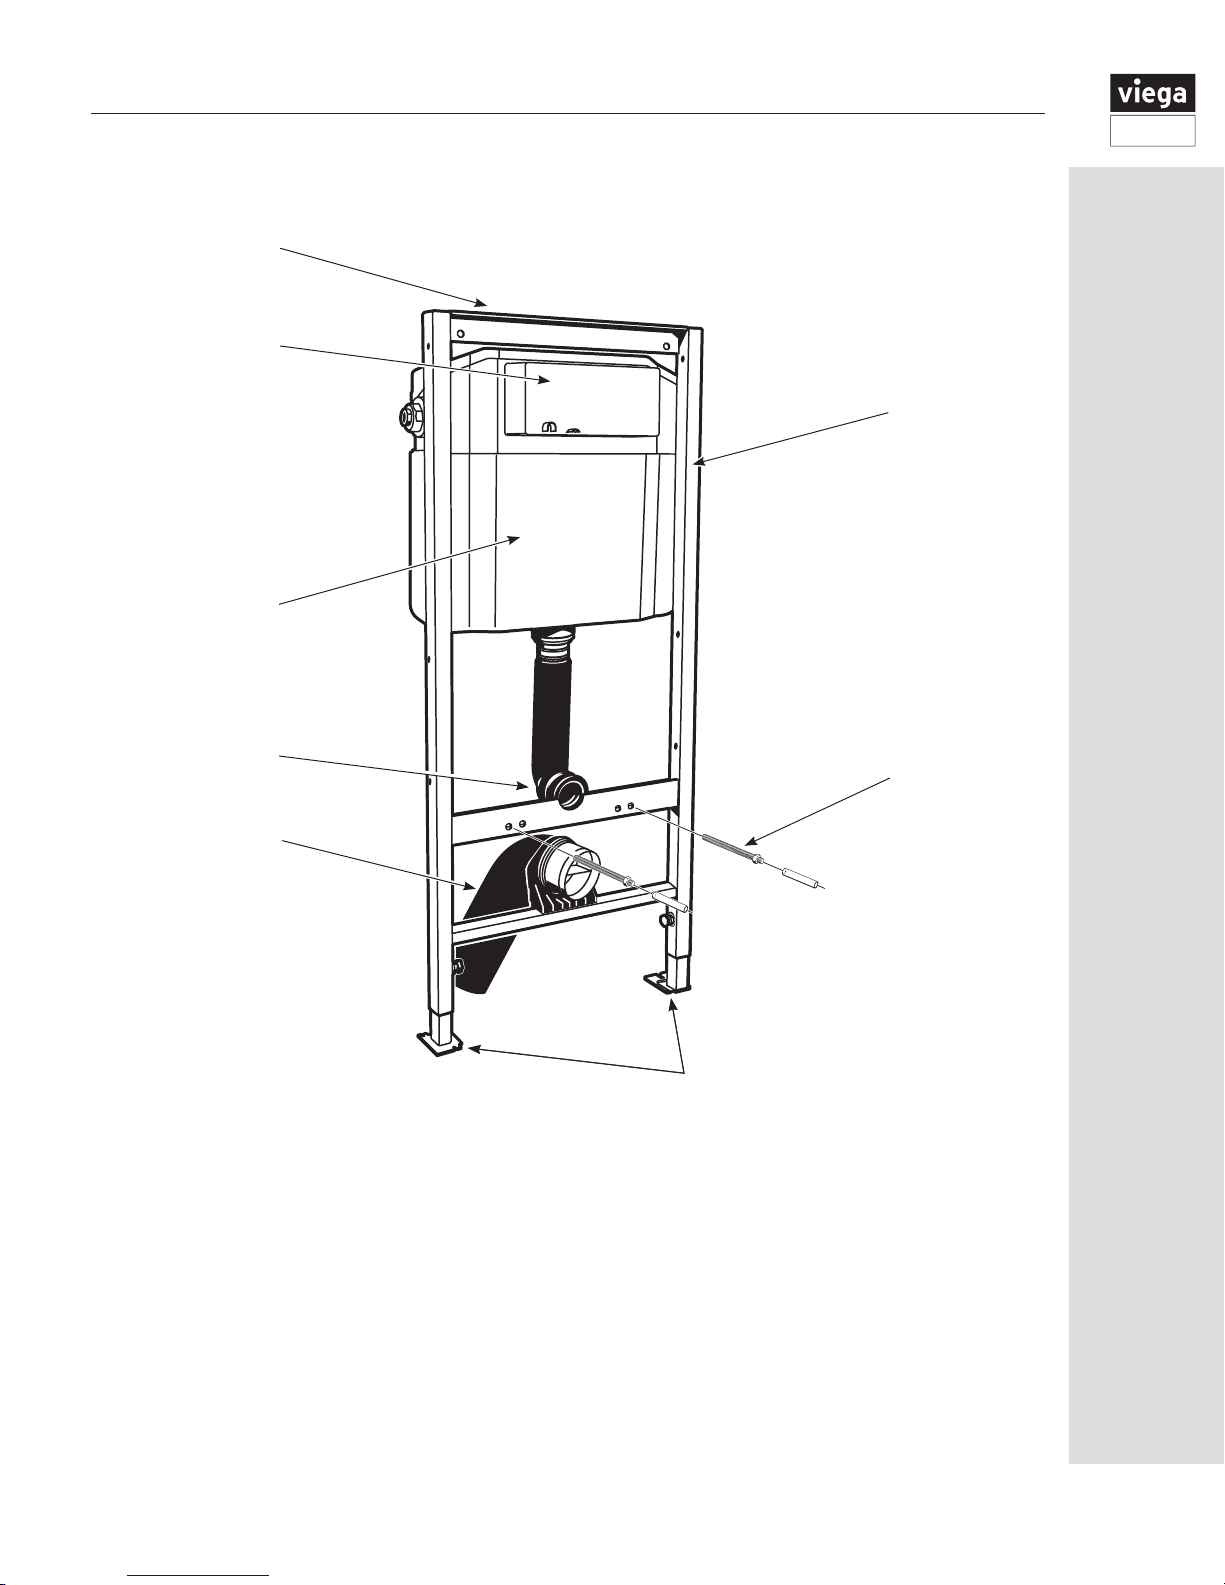
2.1 Model 8180US
2 Overview
8
7
1
6
5
4
1. Viega Flushing System WC carrier
2. Threaded rods for mounting ceramic bowls
Gauges for bore hole 7⅛" or 9"
(180 or 230mm)
3. Adjustable feet
4. Drain elbow
2
3
5. Water outlet to bowl
6. Concealed tank
7. Trim guard
8. Water supply ½" NP T
IM-FT 591480 0318
5
Page 6
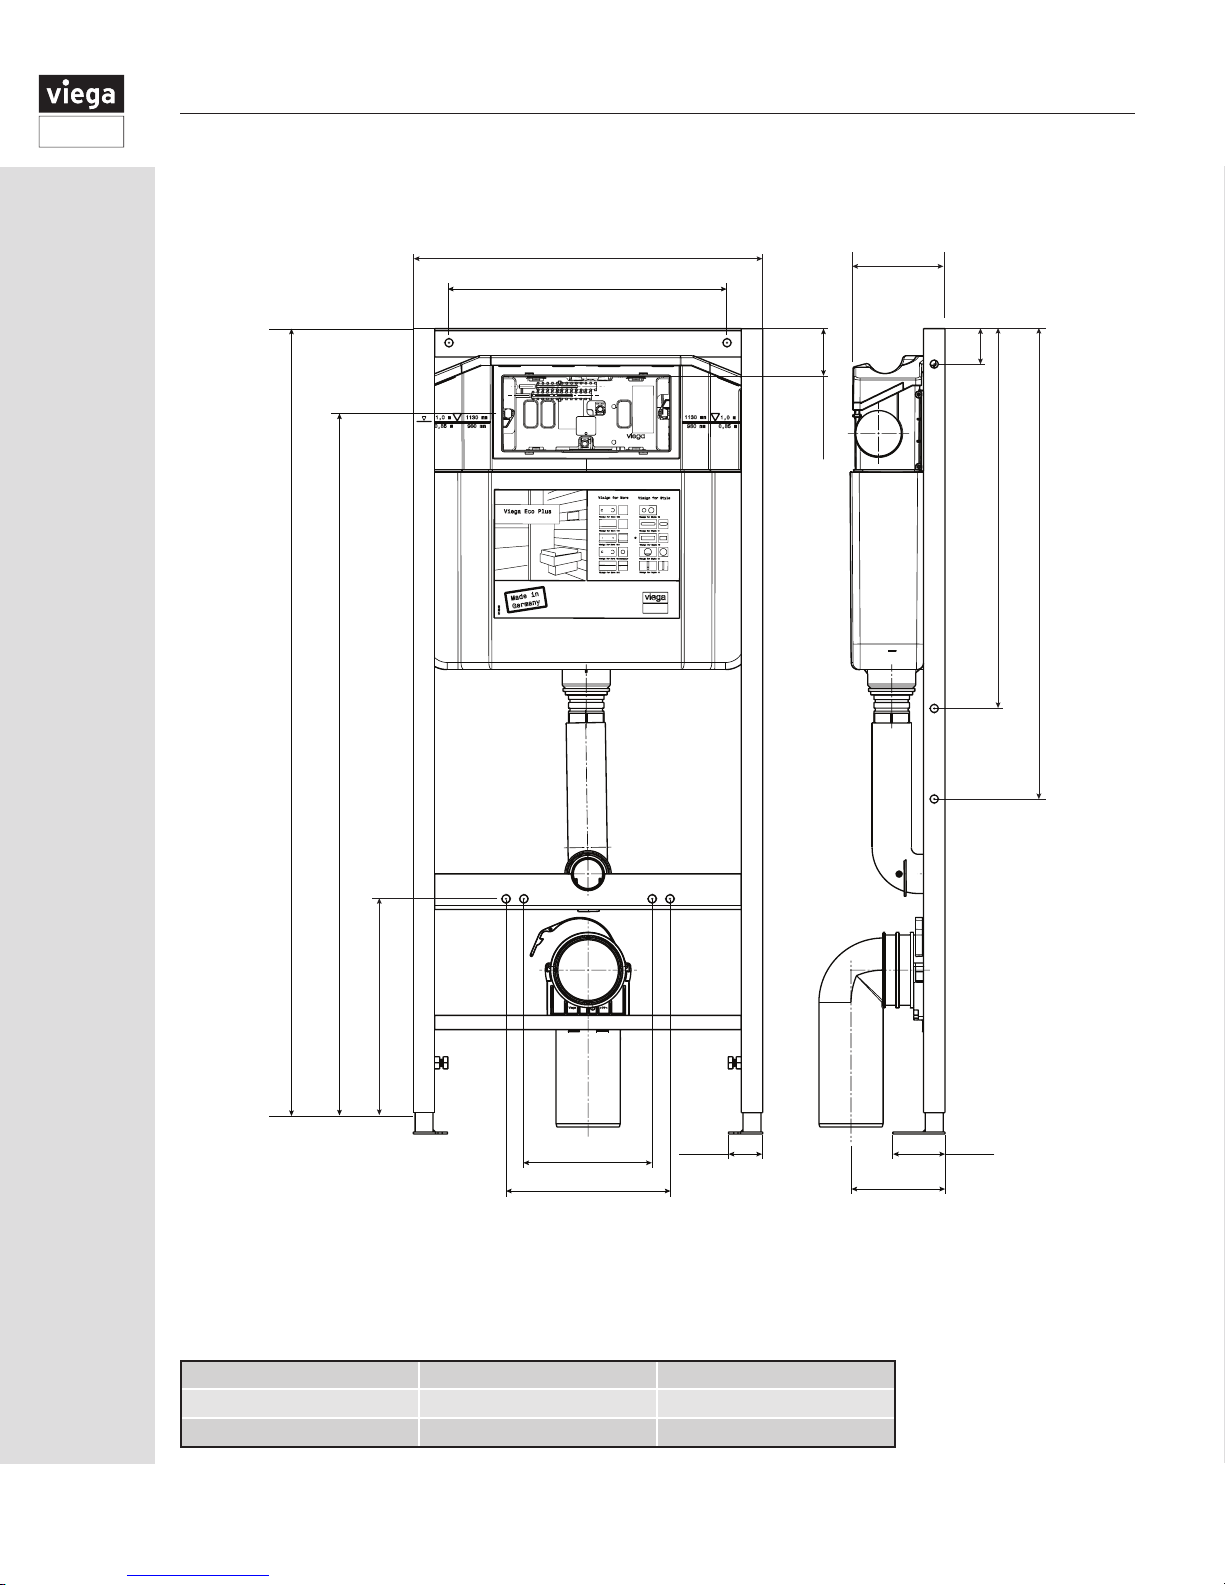
2.1.1 Dimensions
19¼"
44½"
15⅜"
2½"
5¼"
2"
21"
26"
39⅞"
2.1.2 Flush volume
13"
7⅛"
9"
1⅞"
3⅝" - 5
2⅞"
5
16
/
Small flush volume Factory setting approx. 0.8 gpf (3 lpf)
Large flush volume Factory setting approx. 1.6 gpf (6 lpf)
6
Setting range approx. 0.8 - 1 gpf (3-4 lpf)
IM-FT 591480 0318
Page 7

2.2 Model 8108.1US
8
7
6
5
1
2
4
1. Viega Flushing System WC carrier
2. Threaded rods for mounting ceramic bowls
Gauges for bore hole 7⅛" or 9"
(180 or 230mm)
3. Adjustable feet
4. Drain elbow
3
5. Water outlet to bowl
6. Concealed tank
7. Trim guard
8. Water supply ½" NP T
IM-FT 591480 0318
7
Page 8

24½"
44½"
2.2.1 Dimensions
38⅜"
20⅝"
3⅜"
2"
29"
36"
1½"
13"
7⅛"
0 - 7⅞"
9"
1⅞"
2.2.2 Flush volume
Small flush volume Factory setting approx. 0.8 gpf (3 lpf)
Setting range approx. 0.8 - 1 gpf (3-4 lpf)
Large flush volume Factory setting approx. 1.6 gpf (6 lpf)
8
2⅞"
IM-FT 591480 0318
Page 9

3.1 Framing and mounting WC carrier
X1
90°
X2
½"
3.1.1 Required tools
The following tools are required for the mounting:
• Drill with ⅜", ¼" drill bit
• Ratchet with sockets ½", ⅝", ¾"
3.2 Mounting WC carrier Model 8180US
3.2.1 Suitable walls
The WC carrier can be mounted on the following walls:
• Standard or structural 2 x 6 steel studs, minimum 25 gauge
• Standard 2 x 6 wooden studs (actual 1½" x 5½"), 19" apart.
3.2.2 Steel stud mounting
X1
0
X2
1
3
6x
Ø ⅜"
2
6x
4
⅝"
3 Mounting
1. If necessary, adjust (premounted) foot depth from 3"
(75 mm) to 2" (50 mm). Pull
the foot out and turn 90° if
necessary.
2. Determine construction height
based on desired bowl height,
and mark wall 39" above
surface of the finished floor.
Tighten bolts on feet with ⅝"
wrench.
x1 = 39"(1000 mm)
x2 = 0" (0 - 200 mm)
Note: Bowl height is
dependent on the bowl.
Review the bowl’s bolt height
requirements to ensure bowl
is positioned at the required
height.
3. Mark holes for floor supports.
4. Mark holes for side support at
studs. Align carrier to vertically
level with front of stud wall.
5. Drill ⅜" holes. Measurements
above finished floor height.
x1 = 8½" (216 mm)
x2 = 15½" (393 mm)
x3 = 42½" (1080 mm)
6. Secure WC carrier to floor
with supplied lag screws (½"
wrench).
X3
X2
X1
Ø ⅜"
5
IM-FT 591480 0318
6
9
Page 10

7. Attach WC carrier to the
6x
½"
¾"
studs using the supplied lag
screws or bolts for steel and
½" wrench. Align carrier to
vertically level with front of
stud wall.
8. Clip in drain elbow. Insert
click
and rotate threaded rods
inner holes for 7⅛" mounting
(180 mm), outer holes for 9"
mounting (230 mm). Attach
drain elbow to drain pipe with
7
8
supplied coupler.
9. Install mud guards on
activation, WC supply, WC
drain and threaded rods.
10. Connect to water supply.
11. 1" of mortar board (2 - ½"
boards are acceptable) or
green board suitable for tile.
9
11
10
10
IM-FT 591480 0318
Page 11

3.2.3 Wood stud mounting
6x
½"
1
6x
Ø ¼"
X3
X2
X1
Ø ¼"
1. Mark holes for floor supports.
Mark holes for side support at
studs. Align carrier to vertically
level with front of stud wall.
Drill ⅜" holes. Measurements
above finished floor height.
Don’t drill through the
complete wood stud.
x1 = 8½" (216 mm)
x2 = 15½" (393 mm)
x3 = 42½" (1080 mm)
2
2. Attach WC carrier to the
studs using the supplied lag
screws or bolts for steel and
½" wrench. Align carrier to
vertically level with front of stud
wall.
3. 1" of mortar board (2 - ½"
boards are acceptable) or
green board suitable for tile.
3
IM-FT 591480 0318
11
Page 12

3.3 Mounting WC carrier Model 8108.1US
X1
90°
X2
6x
½"
3.3.1 Suitable walls
The WC carrier can be mounted on the following
walls:
• Standard or structural 2 x 4 steel studs,
minimum 25 gauge
• Standard 2 x 4 wooden studs (actual 1½" x
3½"), 19" apart.
3.3.2 Steel stud mounting
X1
0
X2
1
2
⅝"
1.
If necessary, adjust (premounted)
(75 mm) to 2" (50 mm). Pull
the foot out and turn 90° if
necessary.
2. Determine construction
height, based on desired
bowl height, and mark wall
39" above surface of the
finished floor. Tighten bolts
on feet with ⅝" wrench.
x1 = 39"(1000 mm)
x2 = 0" (0 - 200 mm)
3. Mark holes for floor supports.
4. Mark holes for side support
at studs. Align carrier to
vertically level with front of
stud wall.
5. Drill ⅜" holes. Measurements
above finished floor height.
x1 = 8½" (216 mm)
x2 = 15½" (393 mm)
x3 = 42½" (1080 mm)
foot depth from 3"
3
X3
X2
X1
5
12
4
6x
Ø ⅜"
Ø ⅜"
6
IM-FT 591480 0318
Page 13

6x
½"
¾"
6. Secure WC carrier to floor
with supplied lag screws (½"
wrench).
7. Attach WC carrier to the
studs using the supplied lag
screws or bolts for steel and
½" wrench. Align carrier to
vertically level with front of
click
7
8
stud wall.
8. Clip in drain elbow. Insert
and rotate threaded rods
inner holes for 7⅛" mounting
(180 mm), outer holes for 9"
mounting (230 mm). Attach
drain elbow to drain pipe with
supplied coupler.
9. Install mud guards on
activation, WC supply, WC
drain and threaded rods.
10. Connect to water supply.
11. 1" of mortar board (2 - ½"
boards are acceptable) or
green board suitable for tile.
9
11
10
IM-FT 591480 0318
13
Page 14

3.3.3 Wood stud mounting
6x
½"
X3
Ø ¼"
X2
X1
1
6x
Ø ¼"
1. Mark holes for floor supports.
Mark holes for side support
at studs. Align carrier to
vertically level with front of
stud wall.
Drill ⅜" holes. Measurements
above finished floor height.
Don’t drill through the
complete wood stud.
x1 = 8½" (216 mm)
x2 = 15½" (393 mm)
2
x3 = 42½" (1080 mm)
2. Attach WC carrier to the
studs using the supplied lag
screws or bolts for steel and
½" wrench. Align carrier to
vertically level with front of
stud wall.
3. 1" of mortar board (2 - ½"
boards are acceptable) or
green board suitable for tile.
3
14
IM-FT 591480 0318
Page 15

1 2
3
5
4 Bowl Installation
1. Insert pipes fully into water
outlet and drain connection.
Mark a line at the connection
or finished wall, whichever is
furthest out from the carrier.
2. Now fully insert the pipes,
with their gaskets, into the
bowl. Use a strait edge to
mark the pipe on the same
plane as the back edge of the
china bowl.
3. Measure the distance
between the two lines. This
is the distance that needs to
be cut from the end of the
pipe. Mark this distance from
the end of the pipe and cut to
correct length.
4. Debur the cut end inside and
out. File around the outside
edge of the pipe to create an
angle to help easily insert the
pipe.
5. Apply plumbers grease to
the gaskets on the pipe and
4
to the gaskets on the carrier.
Insert the pipes into the bowl
and slide bowl into place with
pipes and threaded rods.
6. Secure bowl tightly to wall.
Note: some connections may
be different depending on the
bowl manufacturer. Refer to
the manufacturer's installation
instructions for alternate bowl
mounting techniques. Caulk
around bowl if desired or if
recommended by the bowl
manufacturer.
6
IM-FT 591480 0318
15
Page 16

5 WaterSense Compatible Toilet Bowl Models
5.1 WaterSense EPA high efficiency
Compatible wall-hung toilet bowl models
Manufacturer Model Number Model Name
Duravit 22170900921
2226090092
22260900921
2533090092
2537090092
2542090092
2544090092
2550090092
22200900921
Kohler K-6299 Veil
Toto CT418FG Aquia
CT486FG Maris
Note: Tank model numbers may have suffix.
xx.x, where xx.x denotes shipping information.
*Consult toilet manufacturers for up-to-date model numbers and availability.
**Floor standing bowl
Duravit wall mounted toilet
Duravit wall mounted toilet
Duravit wall mounted toilet
Duravit wall mounted toilet
Duravit wall mounted toilet
Duravit wall mounted toilet
Duravit wall mounted toilet
Duravit wall mounted toilet
Duravit wall mounted toilet
16
IM-FT 591480 0318
Page 17

5.2 Other compatible wall-hung toilet bowl models
Manufacturer Model
Model Name
Number
Blu Bathworks LW6008 Coco
LW6020A Metrix
LW6030A Coco
Duravit 18209 1930 Series
nd
222009 2
Floor
017509 Bathroom_Foster
015609 Caro
221109 D-Code
222809 D-Code
253509 D-Code
254409 Darling New
254509 Darling New
255709 Darling New
018509 Duraplus
254709 Duraplus
253609 DuraStyle
253709 DuraStyle
253809 Durastyle
253909 DuraStyle
254009 DuraStyle
254109 DuraStyle
254209 DuraStyle
255109 DuraStyle
255209 DuraStyle
255909 DuraStyle
256209 DuraStyle
222109 Happy D.2
222209 Happy D.2
255009 Happy D.2
252809 ME by Stark
252909 ME by Stark
253009 ME by Stark
256109 P3 Comforts
221909 Puravida
Manufacturer Model
Model Name
Number
Duravit (cont.) 021009 Starck 1
253309 Starck 2
253409 Starck 2
220309 Starck 3 extra long
222509 Starck 3
222529 Starck 3
222609 Starck 3
222709 Starck 3 compact
222659 Starck 3
252709 Starck 3
221709 Vero
Duravit wall
mounted toilet
Seagram
DXV
D2557090092
D29001000.415
Icera C-6610 Clarity
C-2340 Metro
C-2370 Piano
Kallista P70361-00 Pléo
Lacava 5051WC Giulia
4278 Piazza
6058 Suave
Laufen 820978 Alessi One
820908 Alessi One
820808 Palomba
820338 Kartell
820439 Living
820688 LB3
820708 Palace
820963 Laufen Pro S
820950 Laufen Pro
820969 Laufen Pro
820661 HiJet
Mirabelle MIRED220WH Edenton
MIRWH220WH
MIRBD220WH
Winter Haven
Bradenton
Neo-Metro 8951 Euro-Urban
Contour
8957 Metaal
8952 miniLoo
IM-FT 591480 0318
17
Page 18

Manufacturer Model
Number
Porcher 47010-11 Solutions
ROCA 346768 Armani
346518 Dama Senso
346468 Giralda
346628 Hall
346568 Happening
Villeroy & Boch 5684-U1-01 Architectura
4688-UR-01 Architectura-
5627-U1-R1 La Belle
5628-U1-XX Memento
6661-U0-R1 Strada
5600-U0-XX Subway
5614-UR-XX Subway-Rimless
4609-UR-XX Subway-
6600-U1-XX Subway-D-shape
Model Name
Elongated
Elongated-Rimless
Note: Tank model numbers may have suffix.
xx.x, where xx.x denotes shipping information.
*Consult toilet manufacturers for up-to-date model
numbers and availability.
**Floor standing bowl
18
IM-FT 591480 0318
Page 19

6 Warranty
Viega provides the following limited warranties
on its ushing system products to the original
purchaser, installed in a residential application.
Flushing system products must be installed in
accordance with local plumbing and building
codes. Viega does not extend this warranty to (nor
imply) local code compliance.
A limited lifetime warranty is provided to the original
purchaser on the carrier and tank shell to be
free from manufacturing defects in materials and
workmanship under normal use.
A ten-year limited warranty is provided to the
original purchaser on the ushing mechanism (ll
and discharge valves) to be free from manufacturing
defects in materials and workmanship under normal
use.
A one year limited warranty is provided to the
original purchaser on the actuator plate.
At Viega’s discretion, any part that proves to be
defective in material and/or workmanship under
normal installation, use, and service will be repaired
or replaced.
To obtain warranty repair or replacement, the faulty
part or product is to be sent along with proof of
purchase (original Sales Receipt) from the original
consumer purchaser to:
Viega LLC
Attention: Quality Assurance
2211 Viega Ave., McPherson KS 67460
1-800-976-9819
This limited warranty is extended to the original
consumer owner, but does not cover installation
or other labor changes and shall not apply to any
products or parts of products which have been:
A) Repaired by unqualied persons or not
using original Viega spare parts or altered in
any manner unless previously authorized in
writing by Viega; or
B) Damaged as a result of misuse, negligence,
accident, or faulty installation or
maintenance; or
C) Installed or used in a manner contrary to
Viega’s printed instructions; or
D) Damaged by the effects of dirt, lime scale,
or aggressive cleaners.
E) Use of in-tank toilet cleaners will void the
warranty.
THIS IS THE EXCLUSIVE WARRANTY BY
VIEGA, WHICH DOES NOT MAKE ANY OTHER
WARRANTY OF ANY KIND. VIEGA SPECIFICALLY
EXCLUDES THE IMPLIED WARRANTY OF
MERCHANTABILITY AND FITNESS FOR A
PARTICULAR PURPOSE.
This warranty excludes all industrial, commercial,
and business usage whose purchasers are
extended a one (1) year limited warranty from
the date of purchase, with all other terms of this
warranty. (See following for commercial products.)
Commercial Products: Viega warrants its products
installed in a commercial application to be free
from manufacturing defects for a period of one (1)
year from the date of acquisition by original owner.
Replaced products or parts are warranted only for
the period remaining under the initial warranty.
THIS WARRANTY IS LIMITED SOLELY TO
THE ABOVE AND THIS WARRANTY AND ANY
WARRANTIES IMPLIED BY STATE LAW WILL
APPLY ONLY FOR THE APPLICABLE PERIOD
SPECIFIED HEREIN. ALSO, VIEGA WILL NOT BE
LIABLE FOR ANY LOSS, DAMAGE, EXPENSE, OR
INCIDENTAL OR CONSEQUENTIAL DAMAGES OF
ANY KIND, WHETHER BASED ON WARRANTY,
CONTRACT, OR NEGLIGENCE AND ARISING
IN CONNECTION WITH SALE, USE, OR REPAIR
OF THE PRODUCT. SOME STATES DO NOT
ALLOW THE EXCLUSION OR LIMITATION OF
CONSEQUENTIAL DAMAGE OR LIMITATIONS
ON HOW LONG AN IMPLIED WARRANTY LASTS,
SO THE ABOVE LIMITATIONS OR EXCLUSIONS
MAY NOT APPLY. THIS WARRANTY GIVES YOU
SPECIFIC LEGAL RIGHTS AND YOU MAY ALSO
HAVE OTHER RIGHTS WHICH VARY FROM STATE
TO STATE. UNLESS OTHERWISE CONTRARY
TO STATE LAW GOVERNING THE PURCHASE,
VIEGA’S LIABILITY WILL NOT EXCEED THE
CONTRACT PRICE FOR THE PRODUCT CLAIMED
TO BE DEFECTIVE OR UNSUITABLE.
IM-FT 591480 0318
19
Page 20

Viega LLC
12303 Airport Way, Ste. 395
Broomeld, CO 80021
Phone: 1-800-976-9819
Fax: 1-800-976-9817
www.viega.us
This document subject to updates. For the most current Viega technical literature please visit www.viega.us.
©2018, Viega®, ProPress®, MegaPress®, SeaPress®, Smart Connect®, ManaBloc®,
GeoFusion®, FostaPEX®, Radiant Wizard®, Climate Panel®, Climate Mat®, and
Climate Track® are registered trademarks of Viega GmbH & Co. KG. SmartLoop® and
Viega Eco Plus® are registered trademarks of Viega Holding GmbH & Co. ViegaPEX™
is a trademark of Viega GmbH & Co. KG. Zero Lead™ and PolyAlloy™ are trademarks
of Viega LLC. Eco Brass® is a registered trademark of Mitsubishi Shindoh Co., LTD.
RIDGID® is a registered trademark of RIDGID, Inc. LoopCAD® is a registered trademark
of Avenir Software Inc. Radel® is a registered trademark of Solvay Advanced Polymers,
LLC.
IM-FT 591480 0318
 Loading...