

Page 1
Advantix plug-in drain
Instructions for Use
for non-sealed floor construction
Model Year built:
4937.2 from 01/2010
en_INT
Page 2

Advantix plug-in drain 2 from 14
Page 3

Table of contents
1 About these instructions for use 4
Table of contents
1.1
1.2
1.3
Target groups 4
Labelling of notes 4
About this translated version 5
2 Product information 6
2.1
2.2
2.2.1
2.2.2
2.2.3
2.3
2.3.1
2.3.2
2.4
2.4.1
Standards and regulations 6
Intended use 6
Areas of use 6
Media 6
Drainage capacity 6
Product description 7
Overview 7
Technical data 7
Information for use 8
Installation variations 8
3 Handling 9
3.1
3.1.1
3.1.2
3.2
3.2.1
3.3
3.3.1
3.3.2
3.4
Assembly information 9
Important note 9
Installation dimensions 9
Assembly 10
Connecting the drain 10
Care 12
Care tips 12
Cleaning the drain 13
Disposal 14
Advantix plug-in drain 3 from 14
Page 4
About these instructions for use
1 About these instructions for use
Trade mark rights exist for this document, further information can be
found at
1.1 Target groups
The information in this instruction manual is directed at the following
groups of people:
n Heating and sanitary professionals and trained personnel
n Consumers
It is not permitted for individuals without the abovementioned training or
qualification to mount, install and, if required, maintain this product. This
restriction does not extend to possible operating instructions.
viega.com/legal
.
1.2 Labelling of notes
The installation of Viega products must take place in accordance with
the general rules of engineering and the Viega instructions for use.
Warning and advisory texts are set aside from the remainder of the text
and are labelled with the relevant pictographs.
DANGER!
This symbol warns against possible life-threatening injury.
WARNING!
This symbol warns against possible serious injury.
CAUTION!
This symbol warns against possible injury.
NOTICE!
This symbol warns against possible damage to property.
Notes give you additional helpful tips.
Advantix plug-in drain 4 from 14
Page 5

1.3 About this translated version
This instruction for use contains important information about the choice
of product or system, assembly and commissioning as well as intended
use and, if required, maintenance measures. The information about the
products, their properties and application technology are based on the
current standards in Europe (e. g. EN) and/or in Germany
(e. g. DIN/DVGW).
Some passages in the text may refer to technical codes in Europe/
Germany. These should serve as recommendations in the absence of
corresponding national regulations. The relevant national laws, standards, regulations, directives and other technical provisions take priority
over the German/European directives specified in this manual: The
information herein is not binding for other countries and regions; as said
above, they should be understood as a recommendation.
About these instructions for use
Advantix plug-in drain 5 from 14
Page 6

2 Product information
2.1 Standards and regulations
The following standards and regulations apply to Germany / Europe.
National regulations can be found on the relevant web site of your
country at
Regulations from section: Media
Scope / Notice Regulations applicable in Ger-
Typical domestic wastewater DIN 1986-3
viega.com/standards
Product information
.
many
2.2 Intended use
2.2.1 Areas of use
2.2.2 Media
The drain is suitable for pushing into HT, PVC or cast-iron pipes and
sleeves with a nominal width of DN 100. It is intended for use in floor
constructions without sealing – e. g. terraces whose slabs are laid
directly onto the soil or cellars in which small amounts of wastewater
occur at irregular intervals.
Technical information, see
The drain is intended for draining of household-type wastewater in constant operation, see
n
The short-term temperature of the wastewater may reach up to
95° C. The temperature must be considerably lower in constant
operation.
n The pH value must be higher than 4 but lower than 10.
It is not permitted to introduce wastewater which would damage the
product material.
Ä Chapter 2.3.2 „Technical data“ on page 7
Ä „Regulations from section: Media“ on page 6
.
.
2.2.3 Drainage capacity
Drainage capacity at an accumulation height of 35 mm above the grate:
0.65 l/s
Advantix plug-in drain 6 from 14
Page 7

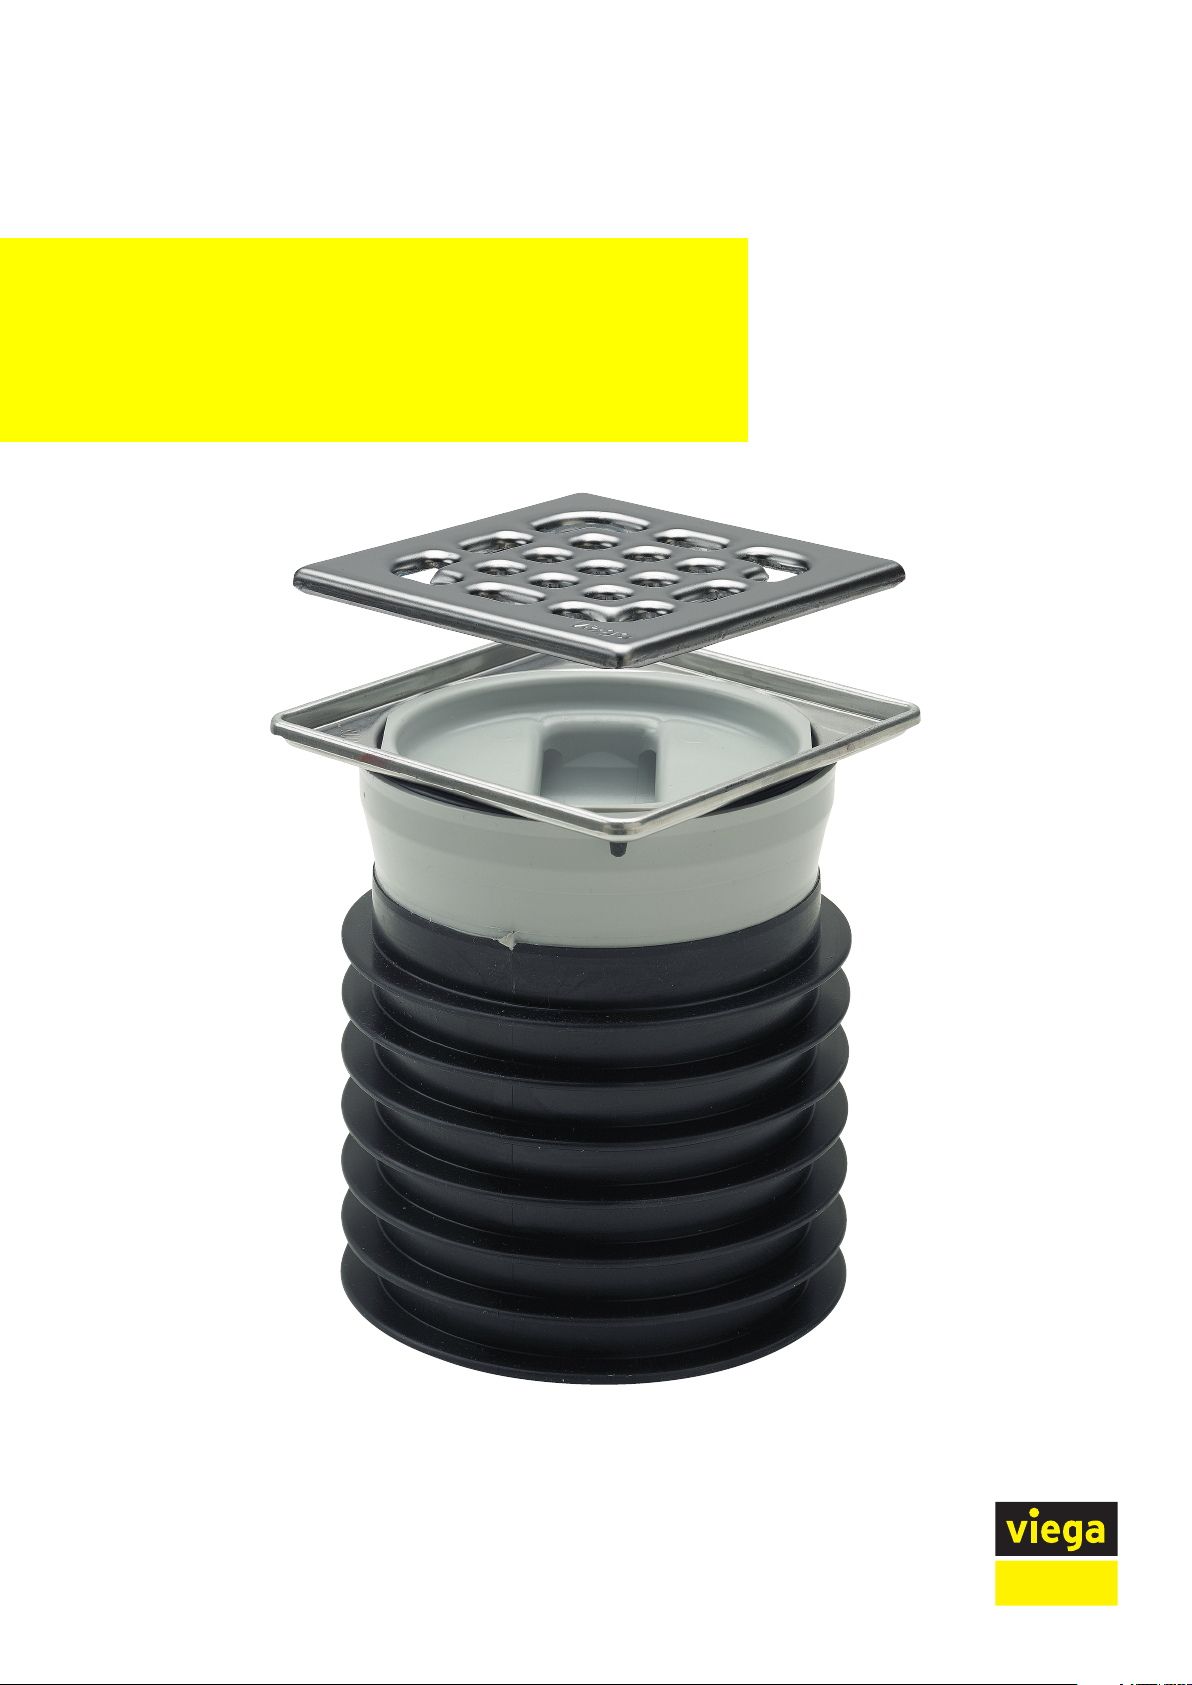
2.3 Product description
2.3.1 Overview
Product information
2.3.2 Technical data
Fig. 1: Model 4937.2
1 - stainless steel grate
2 - O-ring
3 - odour barrier with 2 shutter valves, frost proof
4 - stainless steel frame
5 - drain casing with multiple lip seal
Nominal width [DN] (drain
socket)
Drainage capacity
100
Ä Chapter 2.2.3 „Drainage capacity“
on page 6
Dimensions and installation height
Load class K = 300 kg
Ä Chapter 3.1.2 „Installation dimensions“ on page 9
Advantix plug-in drain 7 from 14
Page 8

2.4 Information for use
2.4.1 Installation variations
Product information
The drain is placed into a pipe (nominal width DN 100). The drain itself is
integrated into the floor at the height of the grate.
Fig. 2: Mounting example
Advantix plug-in drain 8 from 14
Page 9

3 Handling
3.1 Assembly information
3.1.1 Important note
Before assembly:
n Check if the drainage capacity of the drain is sufficient for the arising
n Check if the installation height of the drain corresponds with the
n Ensure that the required connection line is installed with the neces-
During assembly:
n Observe installation dimensions.
water volume
planned floor construction.
sary incline to the planned installation location.
Ä Chapter 2.2.3 „Drainage capacity“ on page 6
Handling
.
3.1.2 Installation dimensions
Fig. 3: Dimensional drawing
As at least three sealing lips must be inside the pipe, the following
installation heights occur:
Fig. 4: Minimum installation height
Advantix plug-in drain 9 from 14
Page 10

Fig. 5: Maximum installation height
Handling
3.2 Assembly
3.2.1 Connecting the drain
Mounting the drain
Coat lip seal with lubricant and push the drain into the drainpipe. At
least 3 sealing lips should seal the drain in the pipe.
INFO! If the drain is used in a pipe with a coupling, the sealing
lips cannot seal inside the coupling. Therefore, a pipe section
must be inserted into the coupling beforehand.
Insert stainless steel grate.
Advantix plug-in drain 10 from 14
Page 11

Apply protective sticker.
Lay tiles.
Handling
Close the gap between grate and tiles with silicone.
Remove protective sticker.
Advantix plug-in drain 11 from 14
Page 12

Remove stainless steel grate.
Insert odour trap.
Handling
3.3
Care
3.3.1 Care tips
Insert stainless steel grate.
Normal soap or a mild cleaning agent can be used for regular care and
prevention of lime scale on the grate and frame. Under no circumstances should scouring agent or scratching objects be used.
Strong stains, even around the drain unit and the siphon, can be
removed using typical household cleaner. It should be noted that the
cleaning agent should be rinsed off after the prescribed soaking time.
There should be no residue on the components.
Advantix plug-in drain 12 from 14
Page 13

3.3.2 Cleaning the drain
Handling
We recommend using a mild cleaning agent and a washing-up brush for
cleaning.
Remove and clean grate.
Remove and clean odour trap.
Clean drain.
Replace odour trap.
Re-insert grate.
Advantix plug-in drain 13 from 14
Page 14

3.4 Disposal
Handling
Separate the product and packaging materials (e. g. paper, metal,
plastic or non-ferrous metals) and dispose of in accordance with valid
national legal requirements.
Advantix plug-in drain 14 from 14
 Loading...