

Page 1
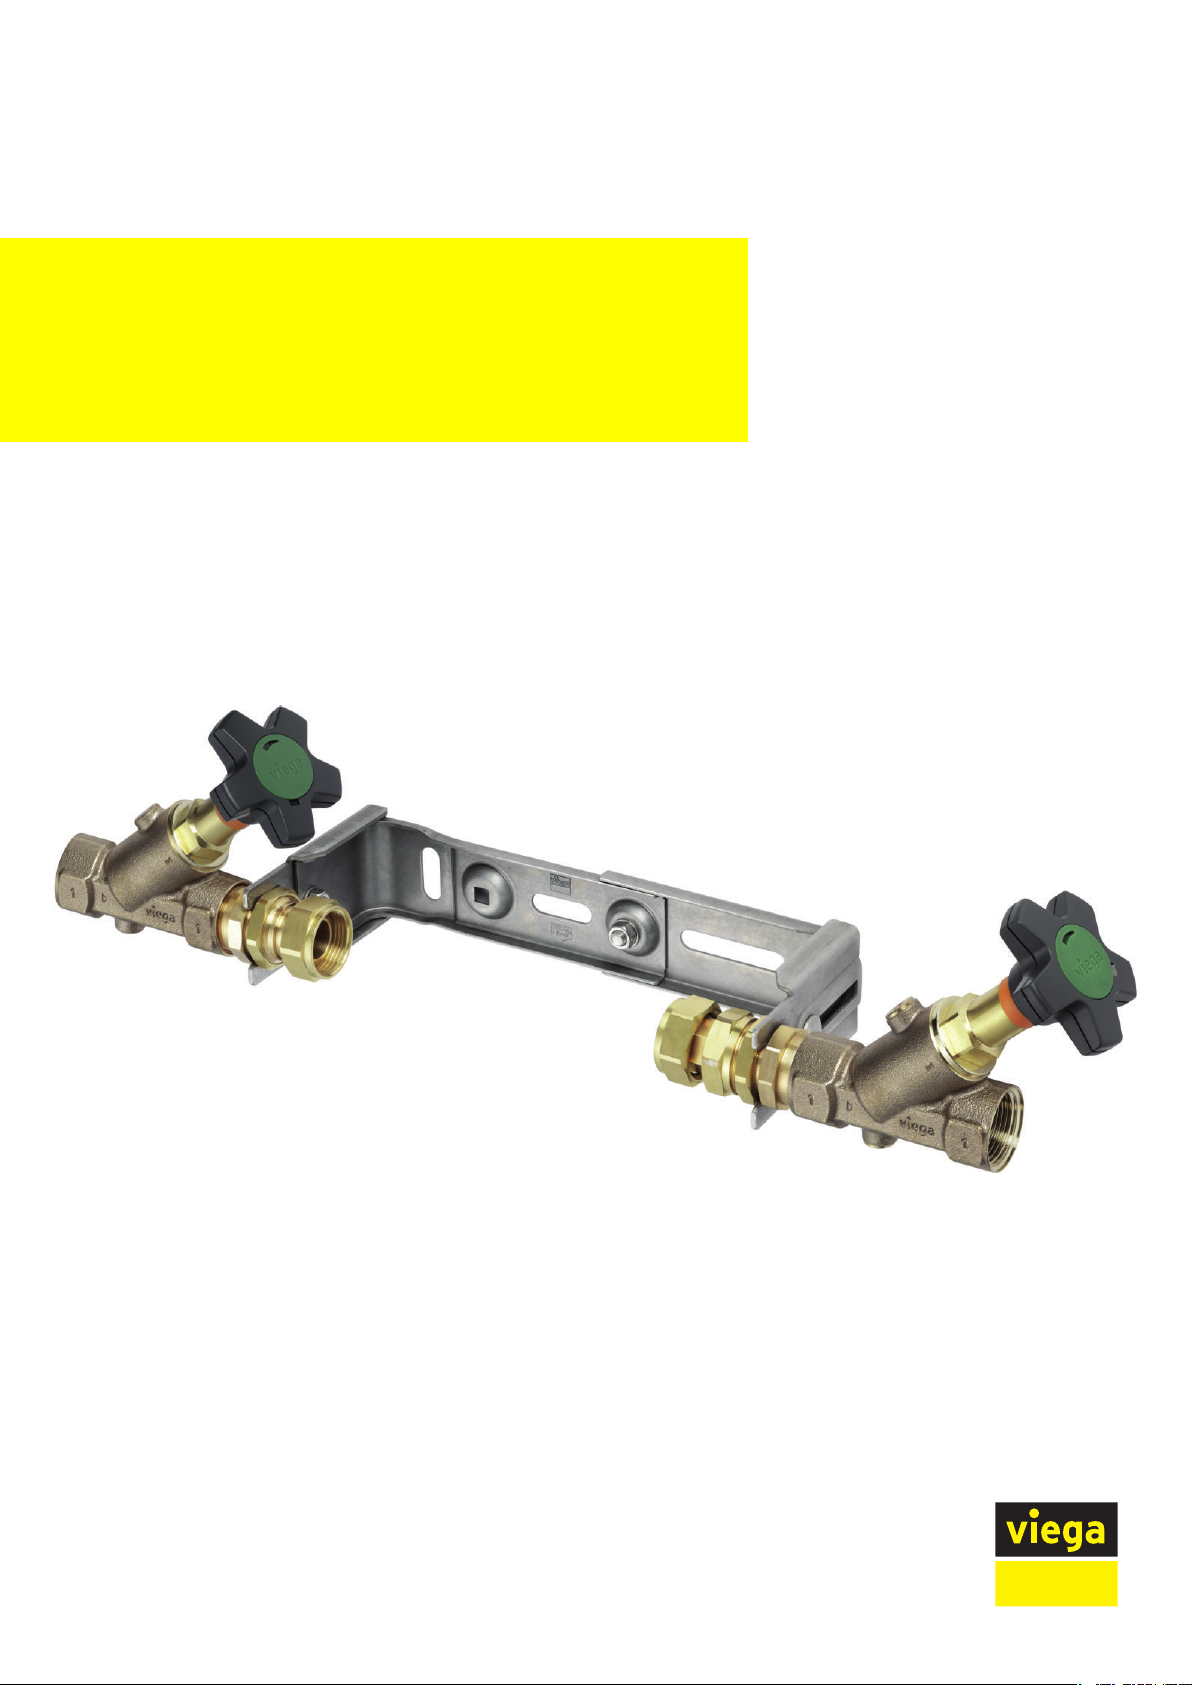
Easytop mounting unit with SC-Contur
Instructions for Use
for water meters
Model Year built:
2230.12 from 02/2008
en_INT
Page 2

Easytop mounting unit with SC-Contur 2 from 24
Page 3
Table of contents
1 About these instructions for use 4
Table of contents
1.1
1.2
1.3
Target groups 4
Labelling of notes 4
About this translated version 5
2 Product information 6
2.1
2.2
2.2.1
2.2.2
2.3
2.3.1
2.3.2
2.3.3
2.3.4
2.3.5
2.3.6
2.3.7
2.4
2.4.1
Standards and regulations 6
Intended use 9
Areas of use 9
Media 9
Product description 9
Overview 9
Press connection with SC-Contur 10
Sealing elements 11
Threaded connection 12
Markings on components 12
Compatible components 12
Technical data 13
Information for use 13
Corrosion 13
3 Handling 14
3.1
3.1.1
3.1.2
3.1.3
3.2
3.2.1
3.2.2
3.2.3
3.2.4
3.2.5
3.2.6
3.2.7
3.3
3.4
Easytop mounting unit with SC-Contur 3 from 24
Assembly information 14
Permitted exchange of sealing elements 14
Mounting instructions 14
Required tools 15
Assembly 16
Replacing the sealing element 16
Shortening the pipes 16
Pressing the connection 17
Mounting preparation 19
Horizontal installation 19
Vertical installation 22
Leakage test 23
Maintenance 23
Disposal 24
Page 4
About these instructions for use
1 About these instructions for use
Trade mark rights exist for this document; for further information, go to
viega.com/legal.
1.1 Target groups
The information in this manual is directed at heating and sanitary pro‐
fessionals and trained personnel.
Individuals without the abovementioned training or qualification are not
permitted to mount, install and, if required, maintain this product. This
restriction does not extend to possible operating instructions.
The installation of Viega products must take place in accordance with
the general rules of engineering and the Viega instructions for use.
1.2
Labelling of notes
Warning and advisory texts are set aside from the remainder of the text
and are labelled with the relevant pictographs.
DANGER!
This symbol warns of possible life-threatening injury.
WARNING!
This symbol warns of possible serious injury.
CAUTION!
This symbol warns of possible injury.
NOTICE!
This symbol warns of possible damage to property.
This symbol gives additional information and hints.
Easytop mounting unit with SC-Contur 4 from 24
Page 5

1.3 About this translated version
This instruction for use contains important information about the choice
of product or system, assembly and commissioning as well as intended
use and, if required, maintenance measures. The information about the
products, their properties and application technology are based on the
current standards in Europe (e. g. EN) and/or in Germany
(e. g. DIN/DVGW).
Some passages in the text may refer to technical codes in Europe/
Germany. These should serve as recommendations in the absence of
corresponding national regulations. The relevant national laws, stand‐
ards, regulations, directives and other technical provisions take priority
over the German/European directives specified in this manual: The
information herein is not binding for other countries and regions; as said
above, they should be understood as a recommendation.
About these instructions for use
Easytop mounting unit with SC-Contur 5 from 24
Page 6
2 Product information
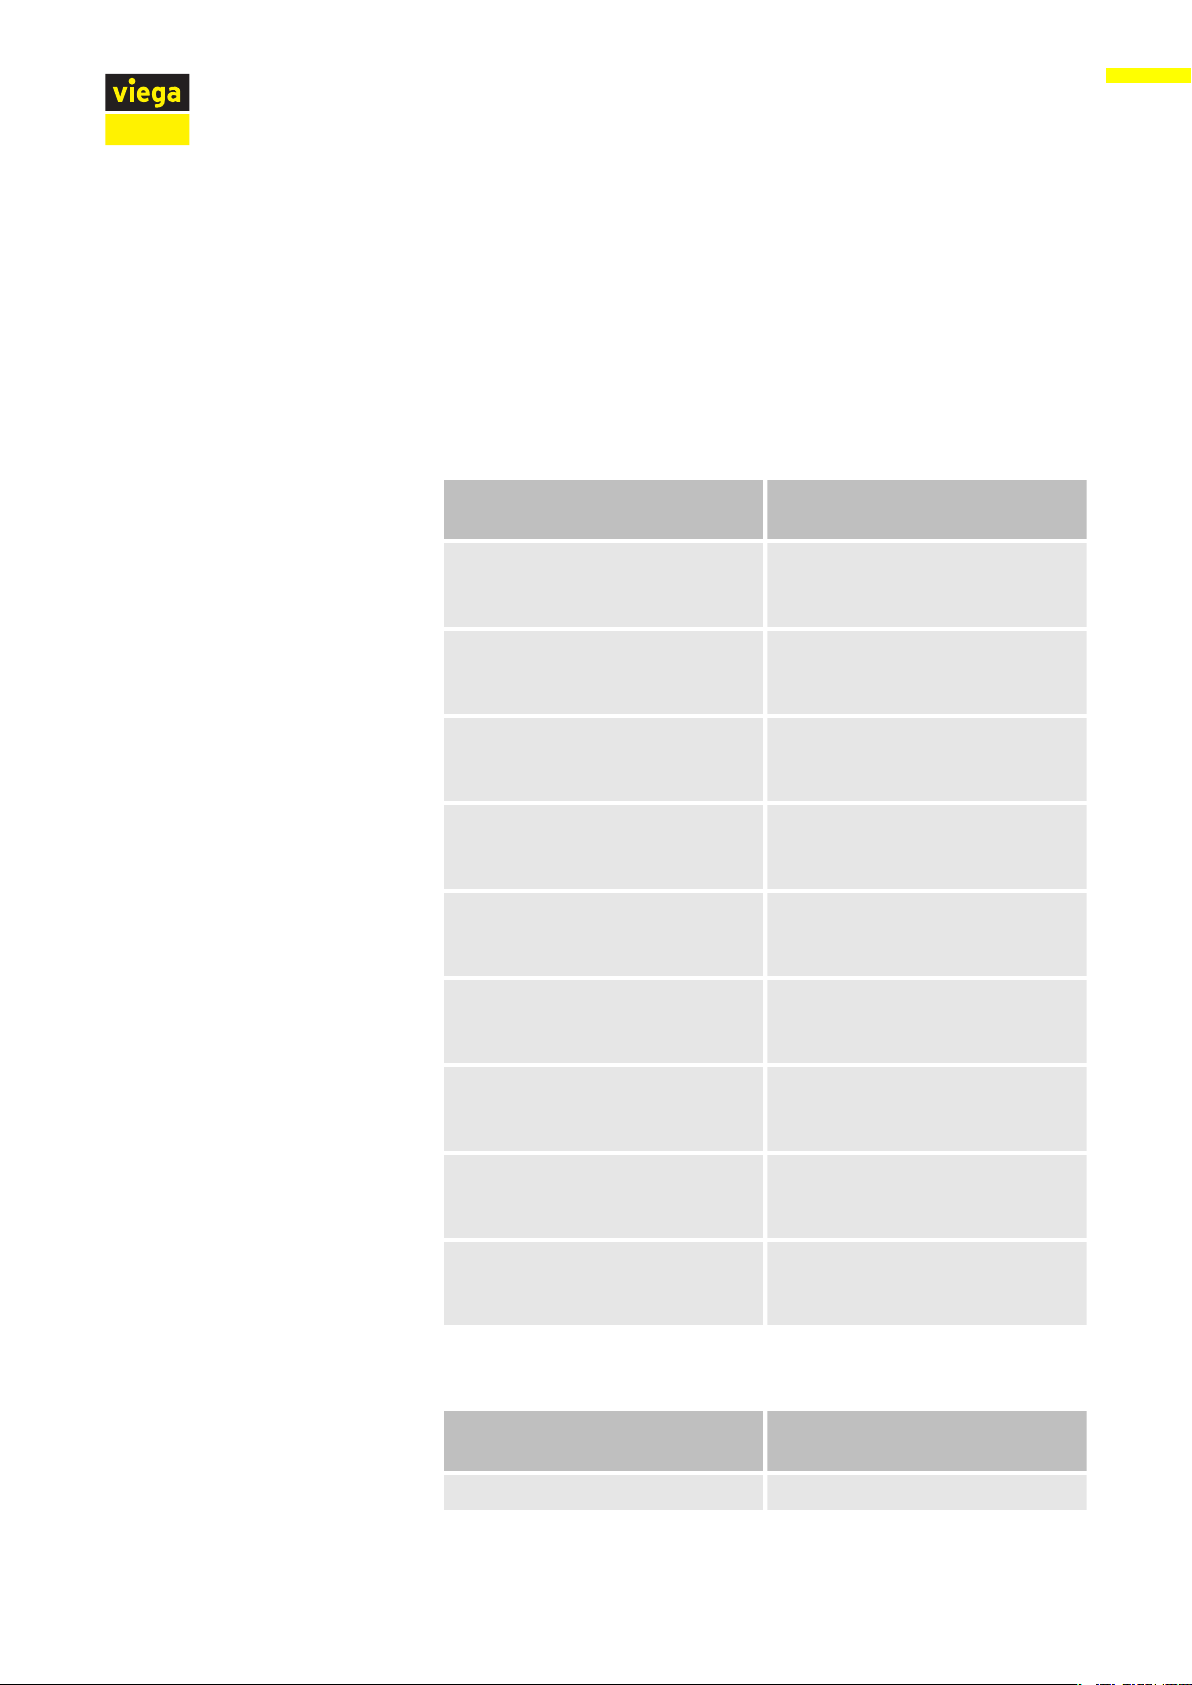
2.1 Standards and regulations
The following standards and regulations apply to Germany / Europe and
are provided as a support feature.
Regulations from section: Fields of application
Scope / Notice Regulations applicable in Ger‐
Product information
many
Planning, execution, operation
and maintenance of potable water
installations
Planning, execution, operation
and maintenance of potable water
installations
Planning, execution, operation
and maintenance of potable water
installations
Planning, execution, operation
and maintenance of potable water
installations
Planning, execution, operation
and maintenance of potable water
installations
Planning, execution, operation
and maintenance of potable water
installations
Planning, execution, operation
and maintenance of potable water
installations
DIN EN 806, part 1
DIN EN 806, part 2
DIN EN 806, part 3
DIN EN 806, part 4
DIN EN 806, part 5
DIN EN 1717
DIN 1988
Planning, execution, operation
and maintenance of potable water
installations
Planning, execution, operation
and maintenance of potable water
installations
Regulations from section: Media
Scope / Notice Regulations applicable in Ger‐
Suitability for drinking water Trinkwasserverordnung (TrinkwV)
Easytop mounting unit with SC-Contur 6 from 24
VDI/DVGW 6023
Trinkwasserverordnung (TrinkwV)
many
Page 7
Regulations from section: Product description
Scope / Notice Regulations applicable in Ger‐
Product information
many
Suitability for drinking water
installations
Suitability for drinking water
installations
Requirements in plastic compo‐
nents in drinking water installa‐
tions
Regulations from section: Overview
Scope / Notice Regulations applicable in Ger‐
Compliance with the inspection
requirements (fittings group I)
Regulations from section: Threaded connection
Scope / Notice Regulations applicable in Ger‐
Threaded pair DIN EN 10226-1
Trinkwasserverordnung (TrinkwV)
DIN 50930-6
DVGW-Arbeitsblatt W270
many
DIN EN 1213
many
Permitted sealants DIN 30660
Permitted sealants DIN EN 751-2
Regulations from section: Marking on components
Scope / Notice Regulations applicable in Ger‐
Designation noise class I DIN EN 1213
EA marking for classification DIN EN 1717
many
Easytop mounting unit with SC-Contur 7 from 24
Page 8

Regulations from section: Compatible components
Scope / Notice Regulations applicable in Ger‐
Permitted pipe types DVGW-Arbeitsblatt W 534
Permitted copper pipes DVGW-Arbeitsblatt GW 392
Permitted copper pipes DIN EN 1057
Permitted stainless steel pipes DVGW-Arbeitsblatt GW 541
Permitted stainless steel pipes DIN EN 10312
Permitted stainless steel pipes DIN EN 10088
Regulations from section: Corrosion
Product information
many
Scope / Notice Regulations applicable in Ger‐
External corrosion protection DIN EN 806-2
External corrosion protection DIN 1988-200
External corrosion protection DKI-Informationsdruck i. 160
Regulations from section: Leakage test
Scope / Notice Regulations applicable in Ger‐
Leakage test for potable water
installations
Leakage test for potable water
installations
Regulations from section: Maintenance
many
many
DIN EN 806, part 4
ZVSHK-Merkblatt
„Dichtheitsprüfungen von Trink‐
wasserinstallationen mit Druckluft,
Inertgas oder Wasser‟
Scope / Notice Regulations applicable in Ger‐
many
Operation and maintenance of
DIN EN 806-5
potable water installations
Easytop mounting unit with SC-Contur 8 from 24
Page 9

2.2 Intended use
2.2.1 Areas of use
Product information
Coordinate the use of the model for areas of use and media
other than those described with the Viega Service Center.
Use is possible in the following areas among others:
n Drinking water installations
The general rules of engineering and the applicable regulations must be
observed for planning, execution, operation and maintenance potable
water installations, see Ä „Regulations from section: Fields of applica‐
tion“ on page 6.
2.2.2 Media
2.3 Product description
2.3.1
Overview
The model is also suitable for the following media, amongst others:
n Drinking water without limitations acc. to the applicable directives,
see Ä „Regulations from section: Media“ on page 6
n maximum chloride concentration 250 mg/l pursuant to applicable
regulations, see Ä „Regulations from section: Media“ on page 6
According to the applicable regulations, Easytop system fittings can be
used for all types of potable water and are DVGW certified, see Ä „Reg‐
ulations from section: Product description“ on page 7. Their plastic
components comply with the KTW recommendation and the require‐
ments pursuant to the applicable regulations.
The Easytop system fittings comply with the test require‐
ments specified in the applicable regulations, see Ä „Regu‐
lations from section: Overview“ on page 7.
Sound protection Lap ≤ 20 dB(A)
The Easytop mounting unit is suitable for the horizontal and vertical
mounting of water meters.
Easytop mounting unit with SC-Contur 9 from 24
Page 10

Backflow preventer
Product information
The model is equipped as follows:
n water meter bow made of stainless steel, stainless, depth and
length-adjustable
n water meter screw connection, inlet side sealable, outlet side length-
adjustable
n inlet side Easytop slanted seat valve model 2230.52
n outlet side Easytop CRV slanted seat valve model 2230.92
n all parts that come into contact with water are made of gunmetal/
silicon bronze
n fixing material
The model is fitted with a backflow preventer.
Backflow preventers only allow flowthrough in one direction (in the
direction of flow). If the direction of flow changes, e.g. due to back suc‐
tion, the backflow preventers close automatically.
The model is available in the following dimensions:
Q3 4
Qn 2.5
d 28
Rp 1
2.3.2 Press connection with SC-Contur
Fig. 1: Press connection using a press connector as an example
The press connection has a circumferential bead in which the sealing
element lies. The connector is deformed upstream and downstream of
the bead and permanently connected to the pipe during pressing. The
sealing element is not deformed during pressing.
Easytop mounting unit with SC-Contur 10 from 24
Page 11

SC-Contur
Product information
Fig. 2: SC-Contur
Viega press connections are equipped with the SC-Contur. The SCContur is a safety technology that is certified by the DVGW and ensures
that the connection is guaranteed to be leaky in an unpressed state. In
this way, unpressed connections are noticed immediately during a
leakage test.
Viega guarantees that unpressed connections are visible during a
leakage test:
n with wet leakage test in the pressure range from 0.1 hPa–0.65 MPa
(1.0 mbar–6.5 bar)
n with dry leakage test in the pressure range from 22 hPa–0.3 MPa
(22 mbar–3.0 bar)
2.3.3 Sealing elements
Area of use of the EPDM sealing element
The model is factory-fitted with an EPDM sealing element.
NOTICE!
Only EPDM sealing elements are approved in potable water
installations. The use of other sealing elements is not per‐
mitted.
Area of use Potable water
Operating temperature [T
Operating pressure [P
max
max.
]
]
20 °C
1.6 MPa (16 bar)
Comments see notes Ä Chapter 2.2.2
„Media“ on page 9
Easytop mounting unit with SC-Contur 11 from 24
Page 12

2.3.4 Threaded connection
Prerequisite for a threaded connection, which seals via a thread, is a
threaded pair in accordance with applicable regulations, see Ä „Regula‐
tions from section: Threaded connection“ on page 7. Pursuant to these
regulations, a permitted threaded pair comprises a conical external
thread and a cylindrical internal thread, e.g. R ¾ and Rp ¾.
Only use commercially available and chloride-free, DVGW approved
sealant in accordance with the applicable regulations to seal threads,
see Ä „Regulations from section: Threaded connection“ on page 7.
2.3.5 Markings on components
Product information
The model is marked as follows:
n flow direction indicator
n noise class I pursuant to applicable regulations, see Ä „Regulations
n dimension
n DVGW writing
n position indicator below the handwheel
n green dot for potable water
n Easytop CRV slanted seat valve with CRV writing and EA marking for
2.3.6 Compatible components
The model is suitable for the mounting of water meters sizes Qn 2.5 and
Q3 4.
The model is equipped with press connections and compatible with the
Profipress, Sanpress and Sanpress Inox system.
from section: Marking on components“ on page 7
classification in accordance with applicable regulations, see Ä „Reg‐
ulations from section: Marking on components“ on page 7
Pipes
The press connections are tested and approved according to the appli‐
cable regulations with the following pipe types:
n Copper pipes
– see Ä „Regulations from section: Compatible components“
on page 8
n Stainless steel pipes (material 1.4401 / 1.4521)
– see Ä „Regulations from section: Compatible components“
on page 8
Easytop mounting unit with SC-Contur 12 from 24
Page 13

2.3.7 Technical data
Product information
Should you have any questions on this subject, please contact the
Viega Service Center.
Observe the following operating conditions for the installation of the
model:
2.4 Information for use
2.4.1 Corrosion
Operating temperature [T
Operating pressure [P
] 20 °C
max
] 1.6 MPa (16 bar)
max
Overground pipelines and fittings in rooms do not normally require
external corrosion protection.
There are exceptions in the following cases:
n Contact with aggressive building materials such as nitrite or mate‐
rials containing ammonium
n in aggressive surroundings
If external corrosion protection is required, observe the pertinent guide‐
lines, see Ä „Regulations from section: Corrosion“ on page 8.
Easytop fittings made of gunmetal/silicon bronze are suit‐
able for all types of potable water.
The chloride concentration in the medium must not exceed
a maximum value of 250 mg/l.
This chloride is not a disinfectant, but in fact pertains to the
content in sea and table salt (sodium chloride).
Easytop mounting unit with SC-Contur 13 from 24
Page 14

3 Handling
3.1 Assembly information
3.1.1 Permitted exchange of sealing elements
Important instruction
With their material-specific qualities, sealing elements in
press connectors are adapted for use with the corre‐
sponding media and/or the areas of use of the piping sys‐
tems and are generally only certified for them.
The exchange of a sealing element is generally permitted.
The sealing element must be exchanged for a designated
spare part for the intended application Ä Chapter 2.3.3
„Sealing elements“ on page 11. The use of other sealing ele‐
ments is not permitted.
Handling
3.1.2 Mounting instructions
Checking system components
During assembly
Do not remove the model from the packaging until immedi‐
ately before use.
System components may, in some cases, become damaged through
transportation and storage.
n Check all parts.
n Replace damaged components.
n Do not repair damaged components.
n Contaminated components may not be installed.
Observe the following when mounting:
n flow direction indicator
n use suitable tools
Choose the place of installation so that the Easytop
mounting unit is easy to access and to operate and the
water meter can be mounted without any problems.
Easytop mounting unit with SC-Contur 14 from 24
Page 15

Laying and fixing pipes
Length expansion
3.1.3 Required tools
Handling
For information, refer to the instructions for use of the Profipress, San‐
press and Sanpress Inox systems.
For information, refer to the instructions for use of the Profipress, San‐
press and Sanpress Inox systems.
The following tools are required for production of a press connection:
n pipe cutter or a fine-toothed hacksaw
n deburrer and coloured pen for marking
n press machine with constant pressing force
n Press jaw or press ring with corresponding hinged adapter jaw, suit‐
able for the pipe diameter and suitable profile
Fig. 3: Press jaws
Recommended Viega press machines:
n Pressgun 5
n Pressgun Picco
n Pressgun 4E / 4B
n Picco
n Type PT3-AH
n Type PT3-H / EH
n Type 2 (PT2)
Easytop mounting unit with SC-Contur 15 from 24
Page 16

3.2 Assembly
3.2.1 Replacing the sealing element
Removing the sealing element
Remove the sealing element from the bead.
Handling
Do not use pointed or sharp-edged objects to remove the
sealing element. These could damage the sealing element or
bead.
Inserting the sealing element
3.2.2
Shortening the pipes
Insert a new, undamaged sealing element into the bead.
Ensure that the complete sealing element is in the bead.
NOTICE!
Leaky press connections due to damaged material!
Press connections can become leaky due to damaged
pipes or sealing elements.
Observe the following instructions to avoid damage to pipes
and sealing elements:
– Do not use cutting discs (angle grinders) or flame cutters
when cutting to length.
– Do not use grease or oils (e. g. cutting oil).
For information about tools, also see Ä Chapter 3.1.3 „Required
tools“ on page 15.
Easytop mounting unit with SC-Contur 16 from 24
Page 17

3.2.3 Pressing the connection
Handling
Cut the pipe properly using a pipe cutter or fine-toothed hacksaw.
Avoid grooves on the pipe surface.
NOTICE!
Leaky press connections due to pipes being too short
If two press connectors are to be mounted onto a pipe
without an interval, the pipe must not be too short. If the
pipe is not inserted up to the prescribed insertion depth in
the press connector during pressing, the connection may
become leaky.
With pipes with a diameter of d 15–28 mm, the length of the
pipe must be at least as long as the total insertion depth of
both press connectors.
Easytop mounting unit with SC-Contur 17 from 24
Page 18

Requirements:
n The pipe end is not bent or damaged.
n The pipe is deburred.
n The correct sealing element is in the press connector.
EPDM = polished black
n The sealing element is undamaged.
n The complete sealing element is in the bead.
Push the press connector onto the pipe as far as it will go.
Handling
Mark the insertion depth.
Place the press jaw onto the press machine and push the retaining
bolt in until it clicks into place.
INFO! Observe the press tool instruction manual.
Open the press jaw and place at a right-angle onto the connector.
Check the insertion depth using the marking.
Ensure that the press jaw is placed centrally on the bead of the
press connector.
Easytop mounting unit with SC-Contur 18 from 24
Page 19

Carry out the pressing process.
Open and remove the press jaw.
Connection is pressed.
ð
Handling
3.2.4 Mounting preparation
3.2.5 Horizontal installation
Assembly steps
Mounting is demonstrated with the example model 2230.15.
NOTICE!
The supplied fixing set is designed for installation on a solid
wall.
Adapt the fixing material to the ground and the ambient
conditions.
Attach the water meter bow to the wall.
Set the required distance to the wall for the water meter.
Easytop mounting unit with SC-Contur 19 from 24
Page 20

Handling
Inlet:
Screw the water meter screw connection into the Easytop slanted
seat valve. Sealing is achieved using an O-Ring.
INFO! Use the adapters supplied with article 717902. Sealing
is achieved using an O-Ring.
Outlet:
Screw the water meter screw connection into the Easytop CRV
slanted seat valve. Sealing is achieved using an O-Ring.
INFO! Use the adapters supplied with article 717902. Sealing
is achieved using an O-Ring.
Secure the Easytop slanted seat valve on the water meter bow.
NOTICE! Observe the flow direction!
Screw the lock nut finger-tight against the water meter bow.
Easytop mounting unit with SC-Contur 20 from 24
Page 21

Handling
Secure the Easytop CRV slanted seat valve on the water meter bow.
NOTICE! Observe the flow direction!
Screw the lock nut finger-tight against the water meter bow.
Tighten the lock nuts of the water meter screw connection.
Loosen the fixing nut of the slide and push in the slide.
Easytop mounting unit with SC-Contur 21 from 24
Page 22

Handling
Place the water meter with seal on the inlet screw fitting and tighten
finger-tight.
Push the slide with seal back to the water meter and tighten the
screw fitting finger-tight.
Tighten the water meter screw connections.
Tighten the fixing nut of the slide.
3.2.6 Vertical installation
Assembly steps
n Use the water meter for vertical mounting.
n Carry out the assembly steps as with the horizontal installation.
Easytop mounting unit with SC-Contur 22 from 24
Page 23

Handling
Tighten the lock nuts of the water meter screw connection.
Loosen the fixing nut of the slide and push in the slide.
Place the water meter with seal on the inlet screw fitting and tighten
finger-tight.
Push the slide with seal back to the water meter and tighten the
screw fitting finger-tight.
Tighten the water meter screw connections.
Tighten the fixing nut of the slide.
3.2.7 Leakage test
3.3
Maintenance
The installer must perform a leakage test before commissioning.
Carry out this test on a system that is finished but not yet covered.
Comply with the general rules of engineering and the applicable direc‐
tives, see Ä „Regulations from section: Leakage test“ on page 8.
Document the result.
NOTICE!
Inform your customer or the operator of the drinking water
installation that the system has to be maintained on a reg‐
ular basis.
Observe the applicable regulations for the operation and maintenance
of drinking water installations, see Ä „Regulations from section: Mainte‐
nance“ on page 8.
Easytop mounting unit with SC-Contur 23 from 24
Page 24

Replacing the valve top
When the valve tops need to be replaced, use the models 2237.22 and
2238.22.
Replace water meter screw connection
When the water meter screw connection needs to be replace, use the
model 2230.71.
Handling
Viega recommends actuating the fitting regularly and
checking its function.
3.4
Disposal
Separate the product and packaging materials (e. g. paper, metal,
plastic or non-ferrous metals) and dispose of in accordance with valid
national legal requirements.
Easytop mounting unit with SC-Contur 24 from 24
 Loading...