

Vidyo VidyoRoom HD-200, VidyoRoom HD-100 User Manual

VidyoRoom™: Users Guide
TM
HD-200 & HD-100
Version 1.4

Table of Contents
1 Document Overview
2 Definitions
4 Overview of the VidyoRoom Remote Control
6 Overview of VidyoRoom On-Screen Icons
7 Overview of Input Modes
8 Initial VidyoRoom Setup for HD-200
10 Initial VidyoRoom Setup for HD-100
13 Initial VidyoRoom Setup
15 Overview of the VidyoRoom Homepage
18 Using the VidyoRoom During a Meeting
19 Overview of the Browse Meetings & Users Page
20 Managing Speed Dials
22 Settings
31 Product Specifications
33 System Specifications
35 Installation Safety Appendix
©2009 Vidyo, Inc. All rights reserved.
TM1TM
Welcome to Vidyo
Video conferencing solutions that just
work. Simply. Intuitively. Reliably.
Inexpensively. From anywhere.
Document Overview
All traditional video conferencing vendors oer high-definition room systems,
but do you know of any that are capable of delivering up to 60 fps encoding?
The VidyoRoom HD-200 and HD-100 do just that. The VidyoRoom HD-200
delivers 60 fps encoding as well as decoding and displaying multiple HD
participants, while the VidyoRoom HD-100 encodes 30 fps and supports
dual monitors to display conference participants on one monitor and shared
applications on the other — all at a level of video quality unequaled by
systems that require dedicated bandwidth to perform at their best. Even
more significant is that the VidyoRoom was specifically designed for use with
general-purpose IP networks.
The VidyoRoom system also is simple to use, easy to configure, and voiceactivated with continuous presence. Flexible conference control options make it
a snap to manage, using either the VidyoPortal™ or a remote control device.
And because video conferencing ought to be a natural extension of the
way people normally work, the VidyoRoom interoperates seamlessly with
VidyoDesktop™ clients, making it possible for people to join a conference from
their home oce or wherever else they might happen to be. This guide details
how to use the features of the VidyoRoom. As a VidyoRoom user, you may:
Start your own meeting
Join a meeting
Place a direct call to any user in the system
Easily search for any user by typing the name or extension in the form field
Browse meetings and users
Separate guides are available for the administrator portal and end user
VidyoPortal.
1
TM
Definitions
As a new Vidyo user, it is helpful to have a basic understanding of the
following terms that are used throughout this document:
DESTINATIONS
Places where you may interact with the VidyoConferencing System:
VidyoPortal — The Web interface of the VidyoConferencing System
VidyoDesktop — The Vidyo software client running on your local computer,
enabling a user to participate in a conference
VidyoRoom — The dedicated Vidyo endpoint appliance for use in a physical
conference room
USERS
Anyone who uses the system. There are five types of users:
Admin — Has administrative privileges. Can add, delete, manage users,
set up public rooms, and set up groups (define maximum participants and
bandwidth for users).
A PIN Code is a 3- to 10-digit
number that meeting participants
must enter before being admitted to
the meeting room. It can be set and
changed by the admin and user.
Operator — Can manage meeting rooms and normal users. The operator
has the same rights as the administrator except an operator cannot change
any system settings.
Normal — Can join meetings, control own meeting, and place direct calls.
Can change own password, set own PIN number.
VidyoRoom — The dedicated Vidyo endpoint appliance. Has the same rights
as a normal user. This guide is targeted toward such end users.
VidyoGateway — End user for portal. Has no personal room.
There is also a provision for guest users. Guest users are users you may invite to
a meeting who are not registered with the system. To invite users, simply send
them a link to your meeting. The guest user will follow that link and enter their
name to be able to join. Guest users only have the ability to join a conference.
They do not have the ability to login to the system or receive incoming calls.
MEETING ROOMS
Meeting rooms are virtual rooms where users of the Vidyo system can gather for
Vidyo conferences. There are two types of meeting rooms:
Personal — Each user is automatically assigned his or her own personal
room. This is the equivalent of a “personal oce” in the physical world.
Public — Common public spaces may also be created by the operator and
administrator only. These are the equivalent of conference rooms in the
2

TM3TM
Definitions
physical world.
MEETING ROOMS OF EITHER TYPE OFFER ATTRIBUTES
Set by the administrator — such as “maximum bandwidth” and “maximum
number of participants.” Rooms may be locked/unlocked and/or PIN-protected.
A PIN-protected room requires the meeting invitees to enter the specified PIN in
order to be admitted to the room.
GROUPS
Groups are created by the admin in order to manage a common set of privileges
and attributes for rooms and users. These attributes include the maximum
number of participants and maximum bandwidth. If you need your max
participants or max bandwidth adjusted, please contact your admin.
DIRECT CALL
You may directly call a specific user in a point-to-point call. As its name
suggests, a point-to-point call involves just two users; no additional users can
join. A direct call is dierent than a meeting, in which more than two users can
join. Note that if you are already in a call, you cannot attend a meeting or place
a call until you end your current call.
MEETING
A meeting is an audio and video connection of a meeting room with two or more
users interacting and sharing their video streams/presentations.
MEETING STATUS
A meeting room may be empty, full, locked, or PIN-protected. The following
icons are used to indicate meeting room status:
Empty
Full
Locked
PIN-Protected
USER STATUS
The user status may show:
to whether they can be reached for a direct call.
online, oine,
or
in a meeting
In a meeting
. Online/oine refers
refers to whether
they are connected to a meeting room or on a call.
3
TM
SELFVIEWMUTE
TM
,@-
123
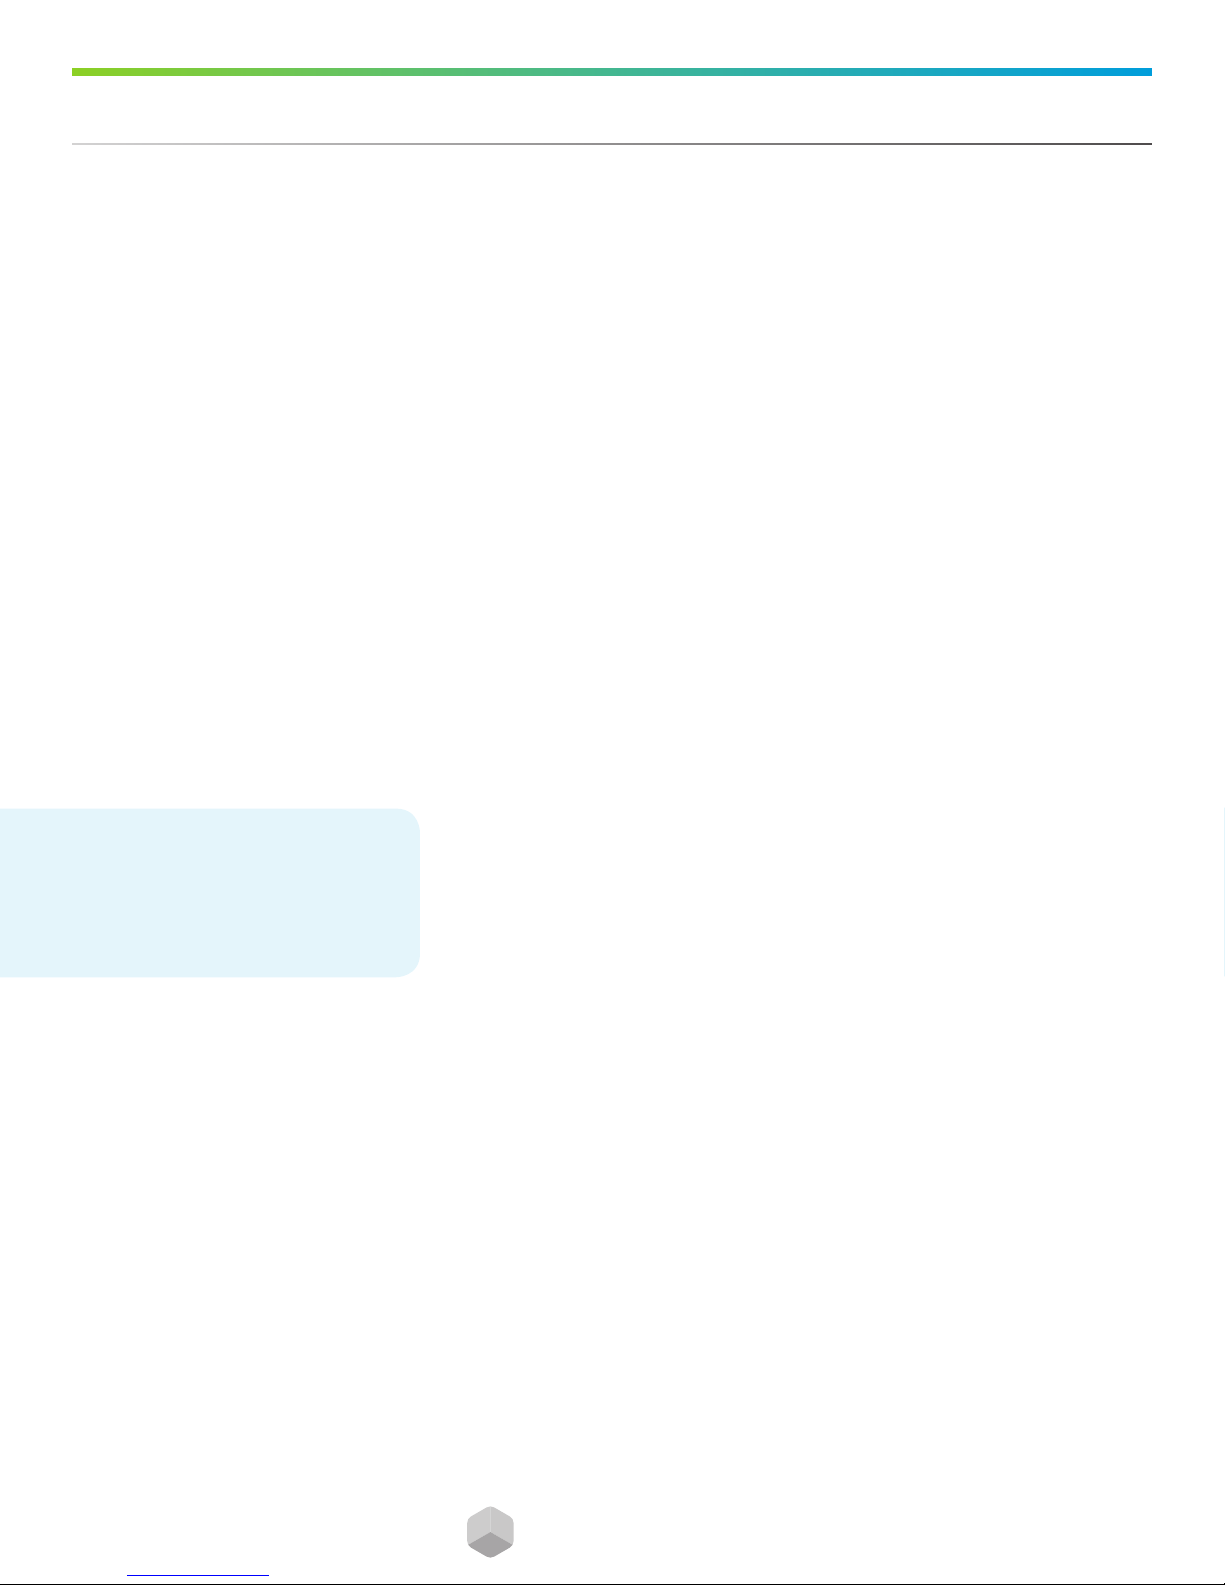
Overview of the VidyoRoom Remote Control
The VidyoRoom comes with a remote control allowing quick key shortcuts to
frequent VidyoRoom activities. It also provides the input mode/keyboard for
typing information.
Not In Conference
CONNECT
Starts meeting from the homepage.
ARROWS / OK
Use the arrow keys to navigate on-screen. The option you navigate to will be highlighted
in green when activated. Press the OK key on the remote to select the option on-screen.
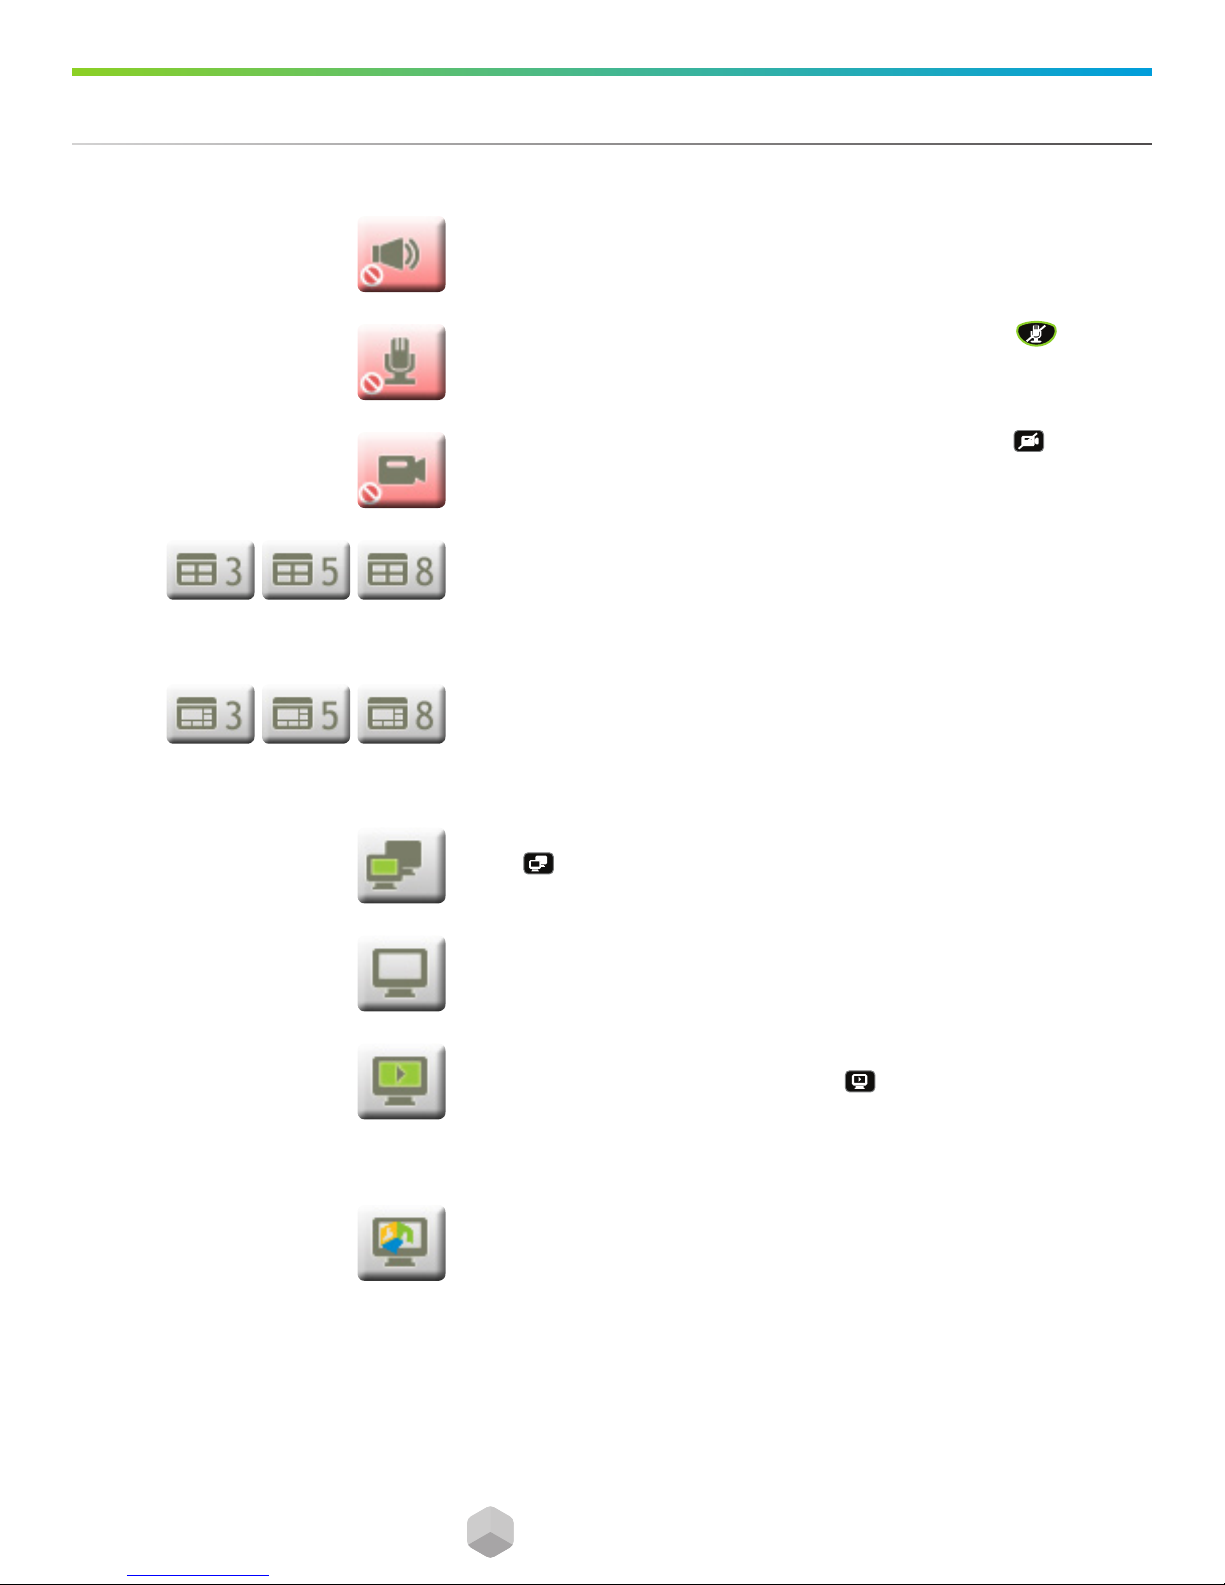
VOLUME / MUTE / SELFVIEW / ZOOM
Volume — adjusts the sound level
Mute — mutes your microphone
Selfview —
Single Screen Mode — shows preview
Dual Screen Mode — shows help screen on the first monitor and turns control to the
camera while preview is shown on the second monitor
Zoom — acts as a page up/page down for scrolling through search results on-screen
7
.:/_
MANAGE
[
ALPHANUMERIC KEYPAD
Use these keys in conjunction with the input modes on-screen to key in user names,
passwords, speed dials, and search terms.
CONTROL KEYPAD
Back — takes you to the previous screen in the VidyoRoom interface
Manage — brings up the remote control Help screen
Home — takes users to the home screen in the VidyoRoom interface
Delete — acts as a backspace when typing in a form field
Settings — brings up the Settings screen
Toggle — refreshes the GUI
A — multifunction key
B — multifunction key
C — multifunction key
D — multifunction key
4
4
TM
SELFVIEWMUTE
TM
,@-
123
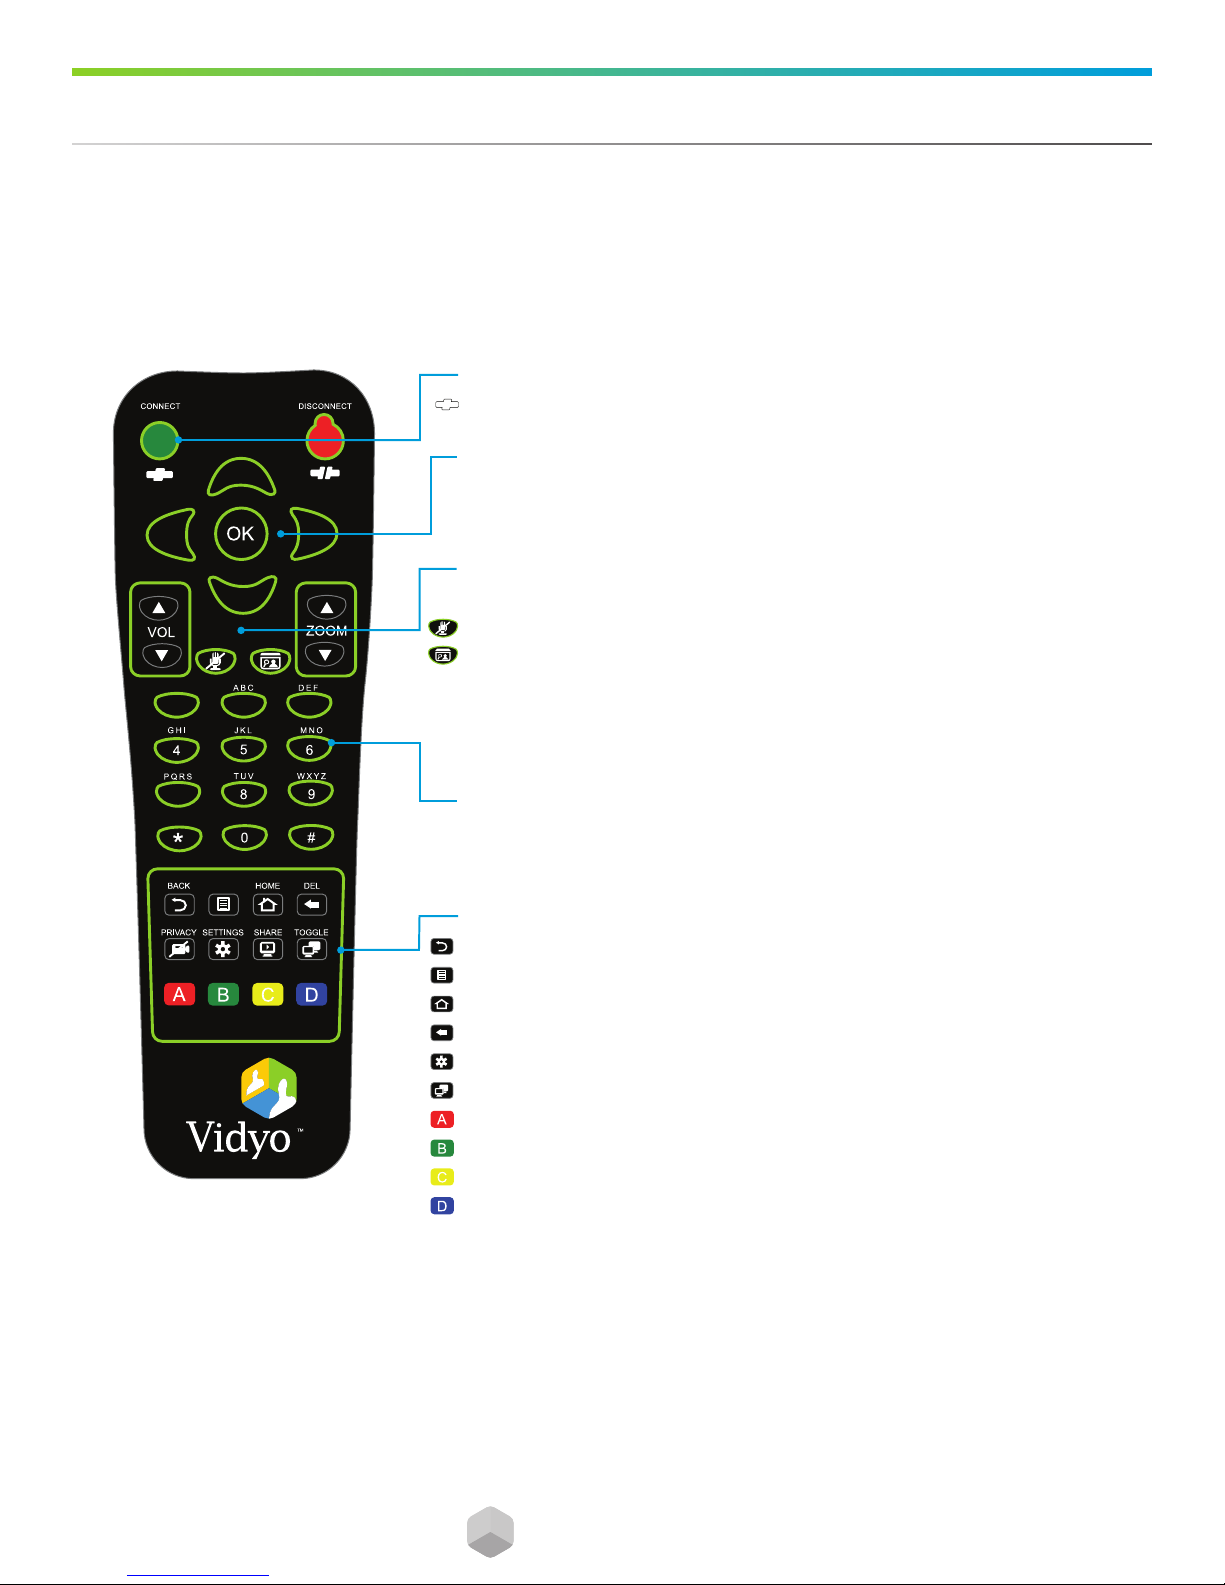
Overview of the VidyoRoom Remote Control
In Conference
DISCONNECT
Ends meeting
ARROWS / OK
Left/Right – pans camera
Up/Down – tilts camera
VOLUME / MUTE / SELFVIEW / ZOOM
Volume — adjusts the sound level
Mute — mutes your microphone or recording source
Selfview — cycles through Selfview modes
Single Screen Mode — picture-in-picture, docked, full screen and o
Dual Screen Mode — picture-in-picture, docked and o
Zoom — zooms your camera In/Out
7
.:/_
MANAGE
ALPHANUMERIC KEYPAD
[
1-8 — sets the number of participants viewed
0 — sets the number of participants back to auto
CONTROL KEYPAD
Manage — brings up the remote control Help screen
Home — resets Camera Pan, Tilt, and Zoom to default position (if VISCA connected)
Privacy — toggles Privacy mode, so that no one in the conference can see your video
Share — toggles sharing on and o when using VGA2USB device
Toggle — cycles through shared sources, including none
A — swaps displays when using Dual Screen mode (HD-200 only)
D — toggles between Preferred/Non-Preferred mode
5
5
TM
Overview of VidyoRoom On-Screen Icons
TM
Speaker Mute — Displayed when local speakers are muted (volume turned all
the way down via remote control).
Microphone Mute — Displayed when local microphone is muted via
remote control.
Privacy — Displayed when local camera is muted (Privacy mode enabled
via remote control).
Participants in Non-Preferred Mode — Displayed when number of participants
selected via remote control (number will change based on the number of
participants selected on the remote control, 1-8; 0 selects all participants and
icon disappears).
Participants in Preferred Mode — Displayed when number of participants
selected via remote control (number will change based on the number of
participants selected on the remote, 1-8; 0 selects all participants and icon
disappears).
Remote Share — Displayed when a remote participant Share is available,
Select on the remote control to view the available share. It is also displayed
after a local Share is enabled using the VGA2USB Adapter.
Share Error — Displayed when the VGA2USB Adapter is connected but an error
has occurred and the Share in not available.
Share Ready — Displayed when the VGA2USB Adapter is connected and the
Share has successfully synchronized. Press on the remote control to then
share the desktop connected to the adapter (once the Share is activated this
icon will scroll away and you will see the Remote Share icon indicating that the
Share is available to view).
Share with VGA2USB — Not currently used. For future use with
VGA2USB Adapter.
6
6
TM
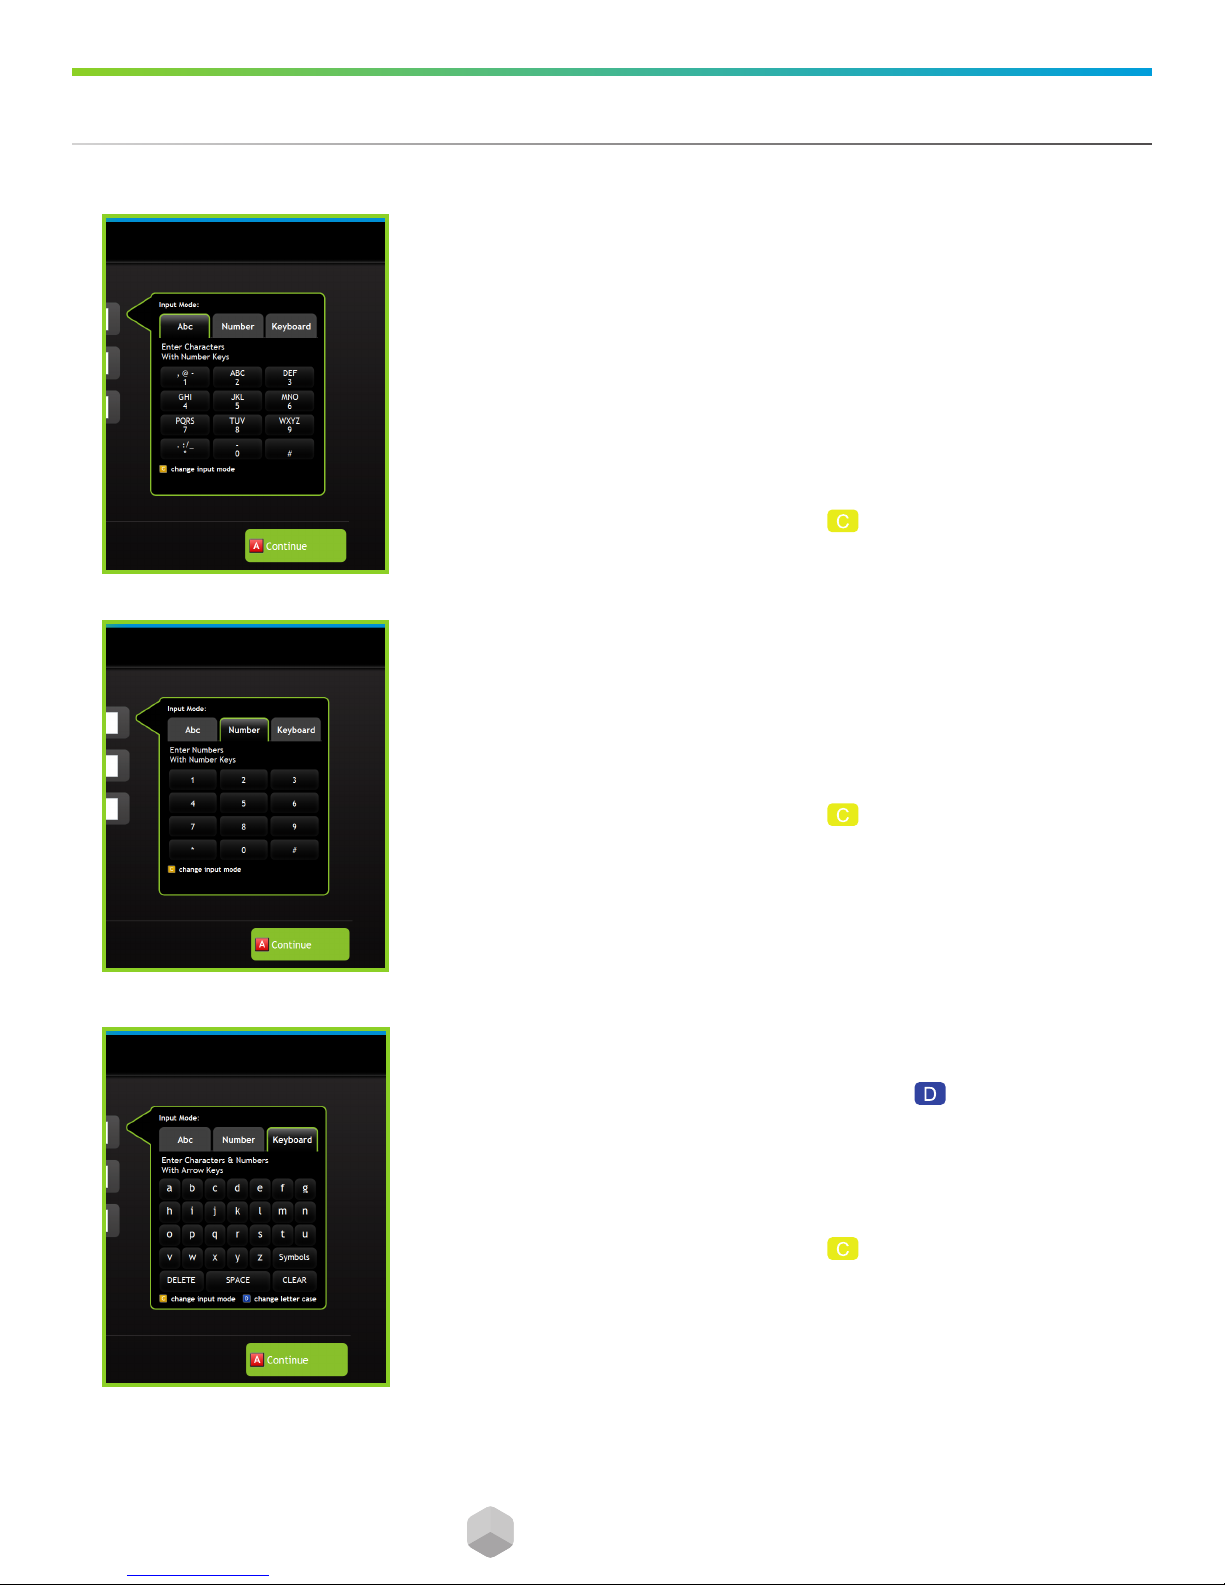
Overview of Input Modes
TM
ABC Mode
ABC input mode features the numbers 0 through 9, the pound sign, and the
asterisk, along with corresponding symbols and letters, in a layout similar
to a touch-tone phone. Selecting the button once enters the first superscript
character or alpha letter into the form field. Selecting it a second time brings in
the second superscript character or alpha letter into the form field. Selecting it
a third time moves on to the third superscript character or alpha letter, and so
on until you get to the numeral, then cycles again. This input mode corresponds
to the buttons on your remote control, so when in this mode, you can either
press the buttons on the remote control or key around on-screen.
To change input modes at any time, press on the remote control.
Number Mode
Number input mode features the numbers 0 through 9, the pound sign, and
the asterisk, in a layout similar to a touch-tone phone. This input mode is the
default mode for entering extensions, PIN numbers, and speed dials. Arrow
through the numbers to select the ones you want. If you make a mistake, you
can press the Delete button on the remote control, which acts as a backspace.
To change input modes at any time, press on the remote control.
Keyboard Mode
The default presentation of the keyboard input mode is lowercase letters in
four rows from a to z. To change to uppercase, press on the remote control.
To enter symbols (including: comma, at symbol, hyphen, period, colon, slash,
underscore, and bracket), arrow over to the Symbols button. Arrow to the Alpha
button to return to the letters. Arrow to the Delete button to delete a single
character at a time or to the Clear button to clear the entire form field entry.
To change input modes at any time, press on the remote control.
7
7
TM
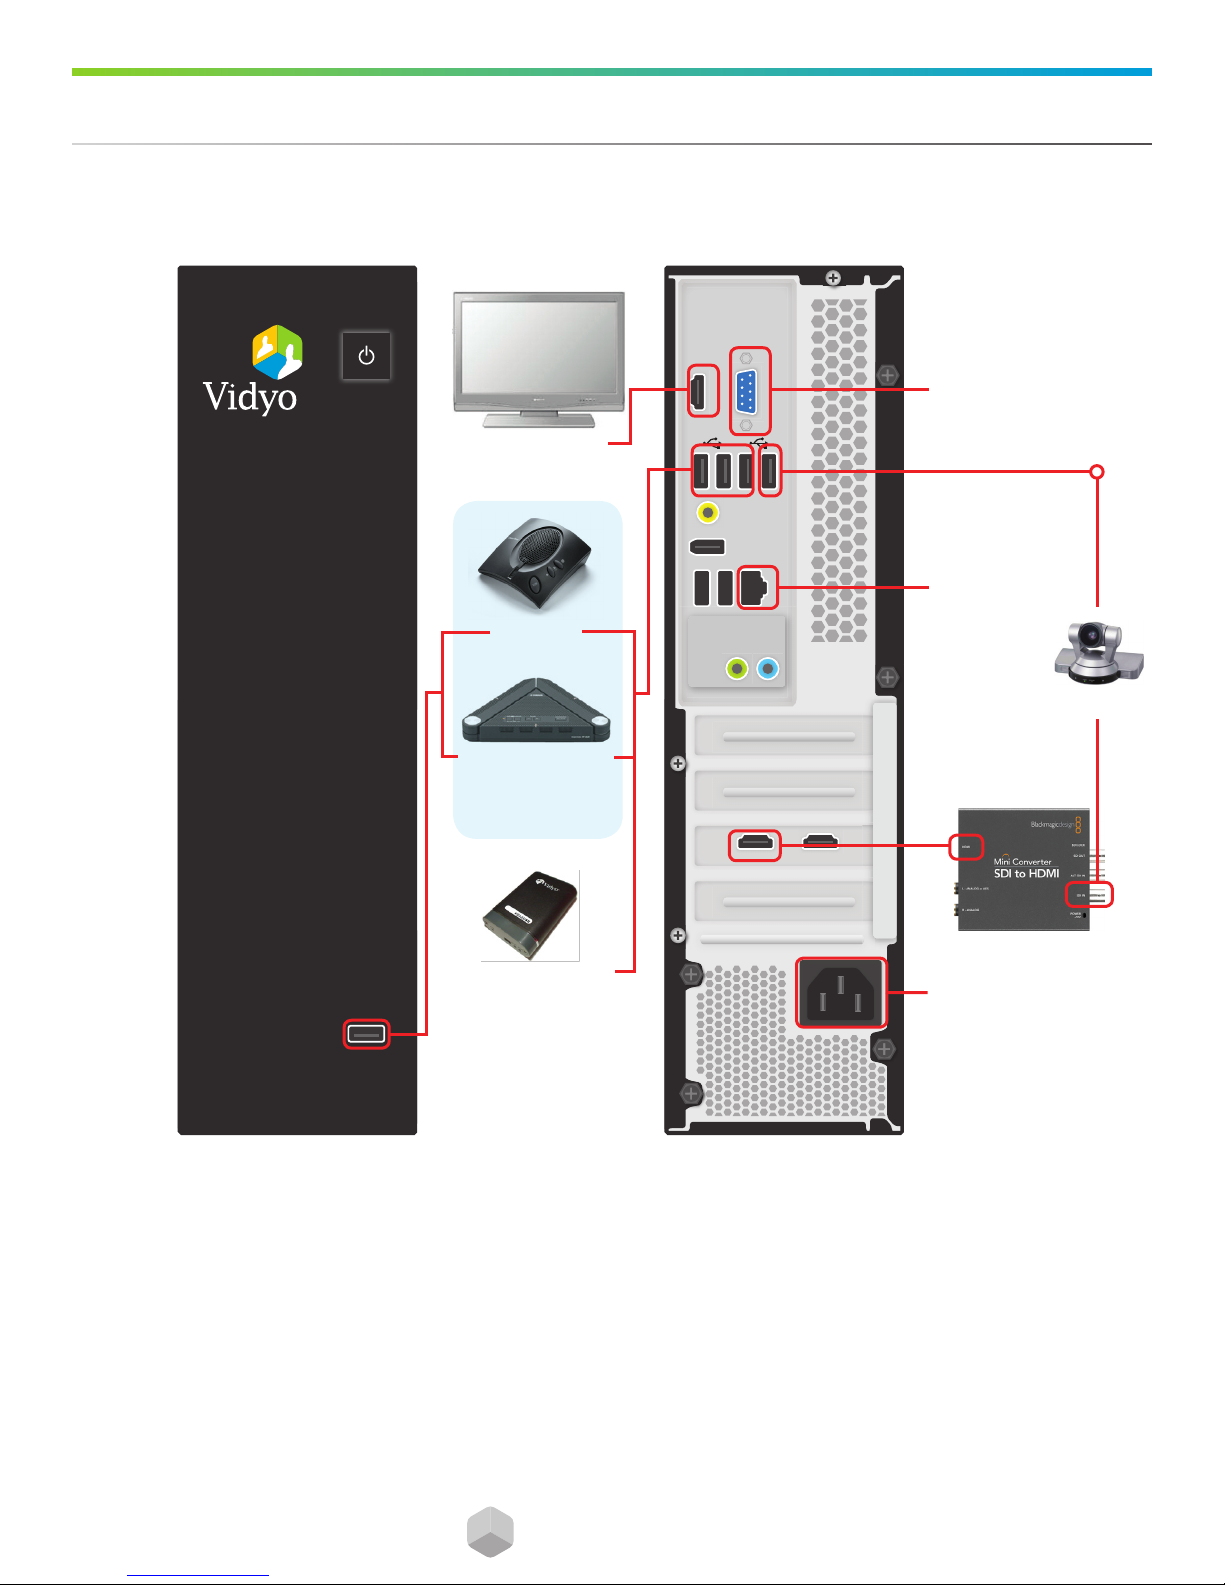
Front
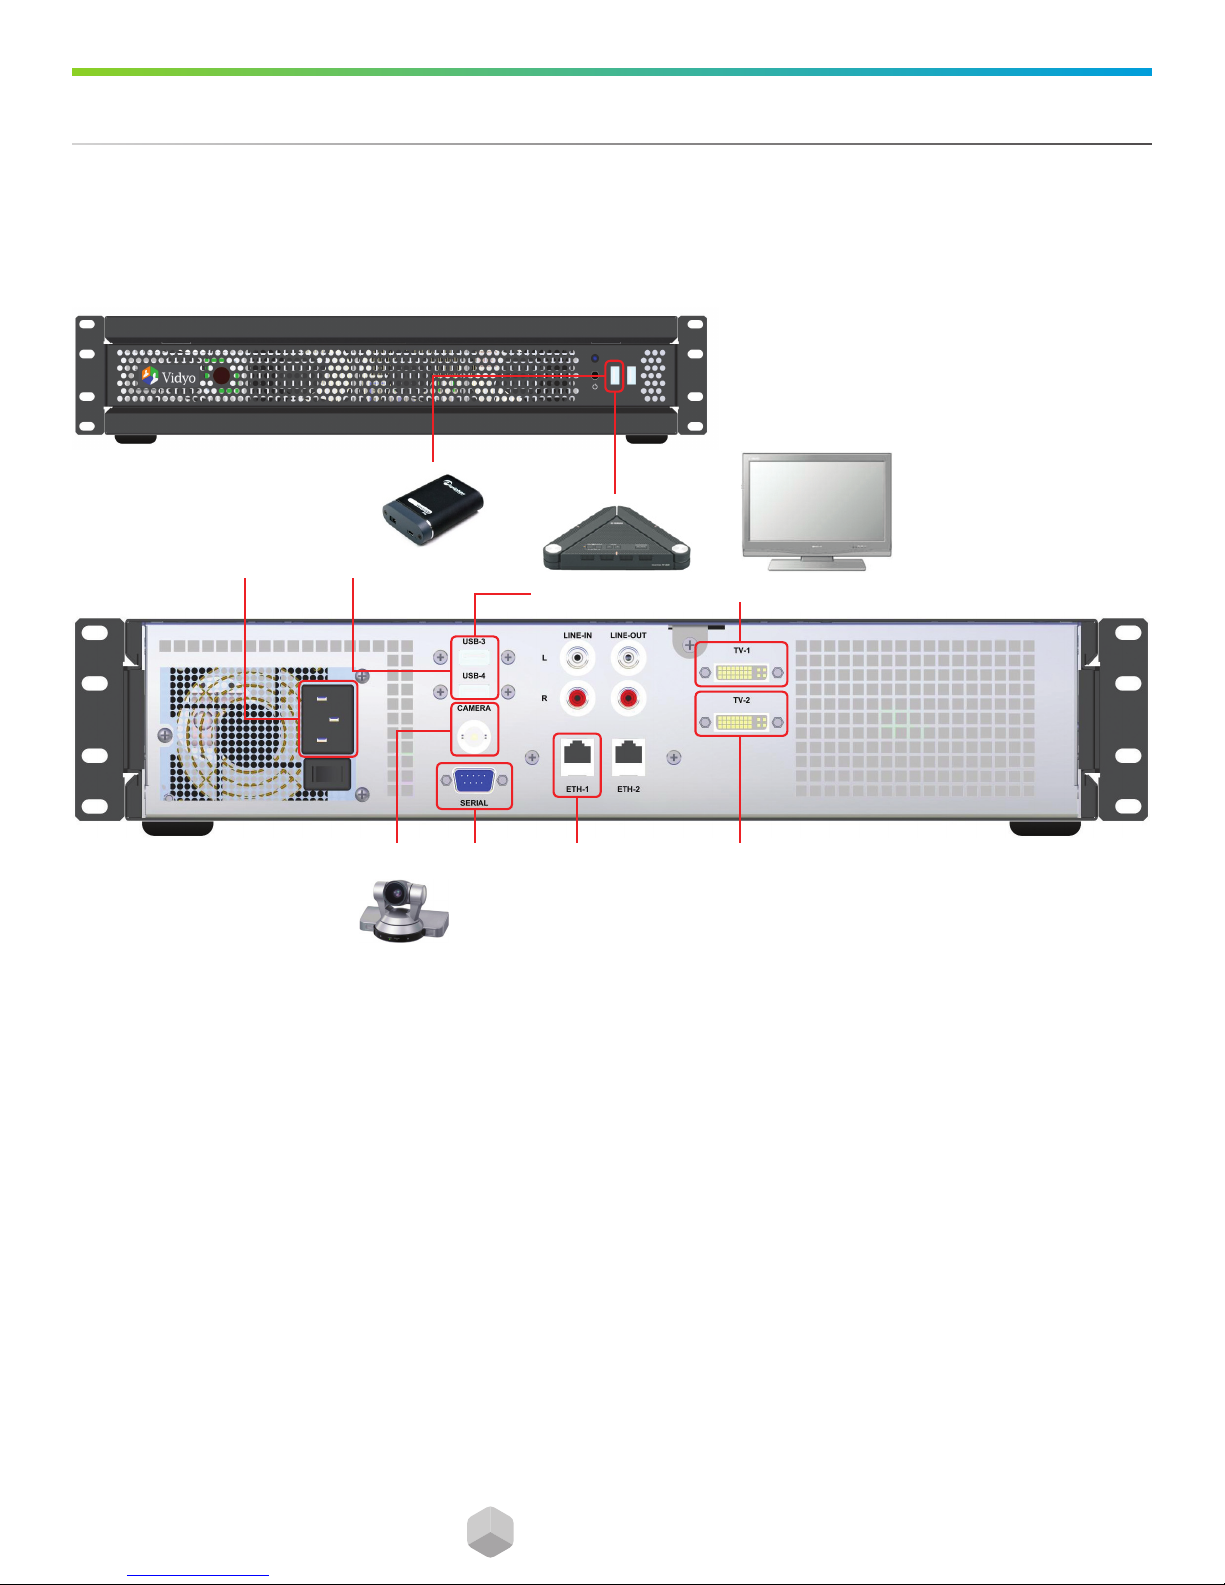
Initial VidyoRoom Setup for HD-200
Connecting Your VidyoRoom for Your HD-200 System
Back
1. Power
7. VGA2USB (optional)
4. Camera
5. VISCA
1. Connect Power cable.
2. Connect Ethernet cable to ETH-1 and to your network.
3. Connect to TV using DVI to HDMI cable on TV-1. A second screen can be
connected to TV-2.
4. Connect HD Camera using BNC Coax HD-SDI cable to CAMERA.
(See illustration on page 9.)
2. Ethernet
3. Primary Display6. Yamaha PJP-25UR
3. Secondary Display
5. Connect VISCA cable to camera VISCA port and to SERIAL
(if applicable).
6. Connect Yamaha PJP-25UR to any USB port.
7. Connect VGA2USB (optional) to any USB port.
8
TM
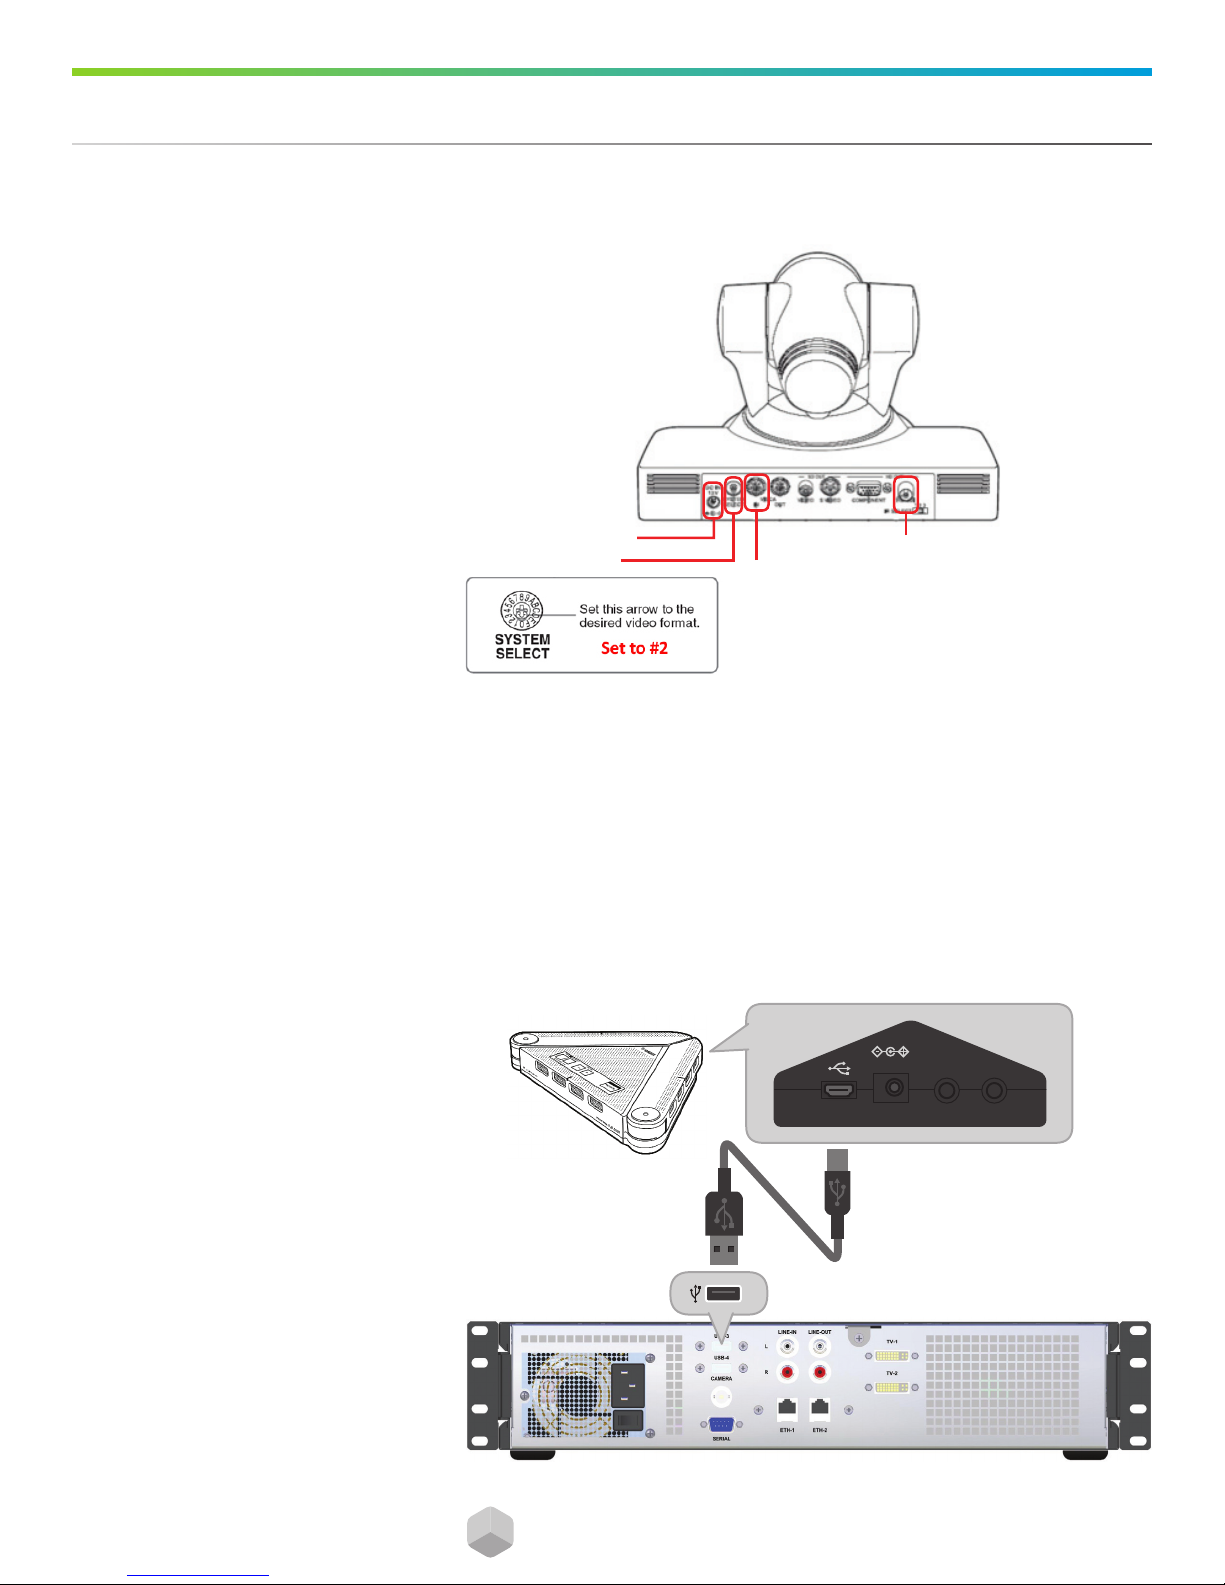
HD Camera Kit Setup
DC IN 5V
AUDIO
OUT IN
Initial VidyoRoom Setup for HD-200
Power Supply
System Select
VISCA Serial Cable
In order for the Sony EVI-HD1 Camera to Sync with your
VidyoRoom HD-200, you need to set the System Select
POT screw on the rear of the camera to #2.
Connect Power Supply to power input.
Connect VISCA cable to VISCA IN.
Connect HD-SDI BNC Coax cable to HD OUT.
Audio Connection Using Yamaha PJP-25UR
BNC Coax HD-SDI
9
TM
Initial VidyoRoom Setup for HD-100
CAMERA
ETH0
LINE IN
LINE OUT
VGA
SERIAL / USB
CABLE
HDMI to TV
TM
Connecting Your VidyoRoom for Your HD-100 System
HDMI
3. Primary Display
3. Secondary Display
DCONNECTION
USB TO SERIAL
VISCA
2. Ethernet
5. Chat 50
OR
4. Camera
5. Yamaha PJP-25UR
Use only one audio device
between the above two
VGA2USB (optional)
HDMI
1. Power
SDI
Front Back
1. Connect Power cable.
2. Connect Ethernet cable to ETH-0 and to your network.
3. Connect to TV using HDMI to HDMI cable on HDMI-to-TV.
NOTE: A second screen can be connected to the VGA port
(2nd display is for Data Share viewing only).
4. Connect HD Camera using HD Camera Kit Set.
(See illustration on page 11.)
NOTE: Do not power on HD-100 unit until camera is fully connected.
5. Connect USB SpeakerPhone cable to open USB port.
10
 Loading...