

Page 1

VidyoRoom™ and
Quick User Guide
VidyoPanorama™ 600
Product Version 3.3
Document Version F
February, 2017
© 2017 Vidyo, Inc. all rights reserved. Vidyo’s technology is covered by one or more issued or pending United States patents, as more fully
detailed on the Patent Notice page of Vidyo's website http://www.vidyo.com/about/patent-notices/, as well as issued and pending
international patents. The VIDYO logotype is a registered trademark of Vidyo, Inc. in the United States and certain other countries, and is a
trademark of Vidyo, Inc. throughout the world. VIDYO and the Vidyo family of marks are trademarks of Vidyo, Inc. in the United States and
throughout the world.
Page 2

TABLE OF CONTENTS
1. About this Guide ........................................................................................................................... 1
2. Using the Infrared Remote Control or the Radio Frequency Remote Control ................................ 2
Understanding the Buttons on the Infrared Remote Control or the Radio Frequency Remote
Control ................................................................................................................................................ 2
The Infrared Remote Control .................................................................................................. 3
The Radio Frequency Remote Control .................................................................................. 5
Configuring System Settings ............................................................................................................. 6
Pre-Call ............................................................................................................................................... 8
Viewing the Pre-Call Menu ..................................................................................................... 8
Joining a Contact’s Room or Calling a Contact Directly ....................................................... 9
Calling a User on a Different VidyoPortal or an H.323/SIP Endpoint .................................. 10
Using the VidyoRoom Calendar ........................................................................................... 10
Understanding the Status Icons ........................................................................................... 14
Projecting Content in Your System ...................................................................................... 15
In-Call ............................................................................................................................................... 16
Viewing the In-Call Menu ...................................................................................................... 16
Becoming the Moderator ..................................................................................................... 18
In-Call Viewing Modes .......................................................................................................... 20
Pinning Participants to Specific Screens ............................................................................. 20
Sharing Content to a Conference ........................................................................................ 21
Adjusting Your Content Source to Avoid Cropping ............................................................. 22
3. Using the VidyoRemote 3 for iOS App ........................................................................................ 23
Downloading the VidyoRemote 3 for iOS App ................................................................................ 23
Adding VidyoRooms ........................................................................................................................ 23
Pairing VidyoRemote 3 for iOS with Your VidyoRoom System ....................................................... 25
Configuring System Settings ........................................................................................................... 27
Pre-Call ............................................................................................................................................. 32
Viewing the Pre-Call Menu ................................................................................................... 32
Joining a Contact’s Room or Calling a Contact Directly ..................................................... 33
Calling a User on a Different VidyoPortal or an H.323/SIP Endpoint .................................. 34
Using the VidyoRoom Calendar ........................................................................................... 35
Understanding the Status Icons ........................................................................................... 38
Projecting Content in Your System ...................................................................................... 39
Managing Missed Call Notifications .................................................................................... 39
In-Call ............................................................................................................................................... 40
Viewing the In-Call Menu ...................................................................................................... 40
Becoming the Moderator ..................................................................................................... 42
In-Call Viewing Modes .......................................................................................................... 43
Pinning Participants to Specific Screens ............................................................................. 43
i
Page 3

TABLE OF CONTENTS
Sharing Content to a Conference ........................................................................................ 44
Adjusting Your Content Source to Avoid Cropping ............................................................. 45
Unpairing VidyoRemote 3 for iOS from Your VidyoRoom System ................................................. 46
4. Using the VidyoRemote 3 for Android App ................................................................................. 47
Downloading the VidyoRemote 3 for Android App ......................................................................... 47
Adding VidyoRooms ........................................................................................................................ 48
Pairing VidyoRemote 3 for Android with Your VidyoRoom System ................................................ 49
Configuring System Settings ........................................................................................................... 51
Pre-Call ............................................................................................................................................. 56
Viewing the Pre-Call Menu ................................................................................................... 56
Joining a Contact’s Room or Calling a Contact Directly ..................................................... 57
Calling a User on a Different VidyoPortal or an H.323/SIP Endpoint .................................. 58
Using the VidyoRoom Calendar ........................................................................................... 58
Understanding the Status Icons ........................................................................................... 61
Projecting Content in Your System ...................................................................................... 63
Managing Missed Call Notifications .................................................................................... 63
In-Call ............................................................................................................................................... 64
Viewing the In-Call Menu ...................................................................................................... 64
Becoming the Moderator ..................................................................................................... 66
In-Call Viewing Modes .......................................................................................................... 67
Pinning Participants to Specific Screens ............................................................................. 68
Sharing Content to a Conference ........................................................................................ 68
Adjusting Your Content Source to Avoid Cropping ............................................................. 69
Unpairing VidyoRemote 3 for Android from Your VidyoRoom System .......................................... 70
5. Licensing Attribution ................................................................................................................... 71
ii
Page 4

1. About this Guide
VidyoRoom and VidyoPanorama 600 software allows you to use your VidyoRoom and
VidyoPanorama 600 hardware to join Vidyo conference calls, make point-to-point calls, display
appointments from a connected calendar account, invite others to appointments, and control your
Vidyo conferencing experience all from a single application with an intuitive user interface.
When the VidyoRoom and VidyoPanorama 600 software starts up, you should be automatically
logged in to the system based on information configured by your system administrator.
You can control the VidyoRoom using the handheld infrared remote control or the handheld radio
frequency remote control that was shipped with your VidyoRoom system. Alternatively, you can
control your system using VidyoRemote™ 3 for iOS. VidyoRemote 3 is a native iPad® application
for controlling VidyoRoom version 3.3.7 and later systems. It is available on the Apple® App Store.
For information about how to perform system tasks using the infrared remote control or the
radio frequency remote control, see 2. Using the Infrared Remote Control or the Radio
Frequency Remote Control.
For information about how to perform system tasks using the VidyoRemote 3 for iOS app, see
3. Using the VidyoRemote 3 for iOS App.
For information about how to perform system tasks using the VidyoRemote 3 for Android app,
see 4. Using the VidyoRemote 3 for Android App.
Note Do not plug both the infrared receiver and the radio frequency transceiver into your system.
Both VidyoRoom handheld remote controls cannot be used on your system at the same
time. However, you can use VidyoRemote 3 for iOS in conjunction with either of the handheld
remote controls.
If you have a Logitech CC3000e, many of the handheld remote functions also work with controls
on the CC3000e base console and remote control. For more information, refer to
Logitech CC3000e with VidyoRoom Systems Technical Note
.
Using the
1
Page 5

2. Using the Infrared Remote Control or
the Radio Frequency Remote Control
This chapter describes how to perform pre-call and in-call tasks with your VidyoRoom system
when you are using either the infrared remote control or the radio frequency remote control.
Understanding the Buttons on the Infrared Remote Control
or the Radio Frequency Remote Control
This section describes the buttons on the hand-held infrared remote control and the buttons on the
hand-held radio frequency remote control. It also includes information about the Lucky Clover
remote control keypad, which is an alphanumeric character input method for your VidyoRoom
infrared remote control.
2
Page 6
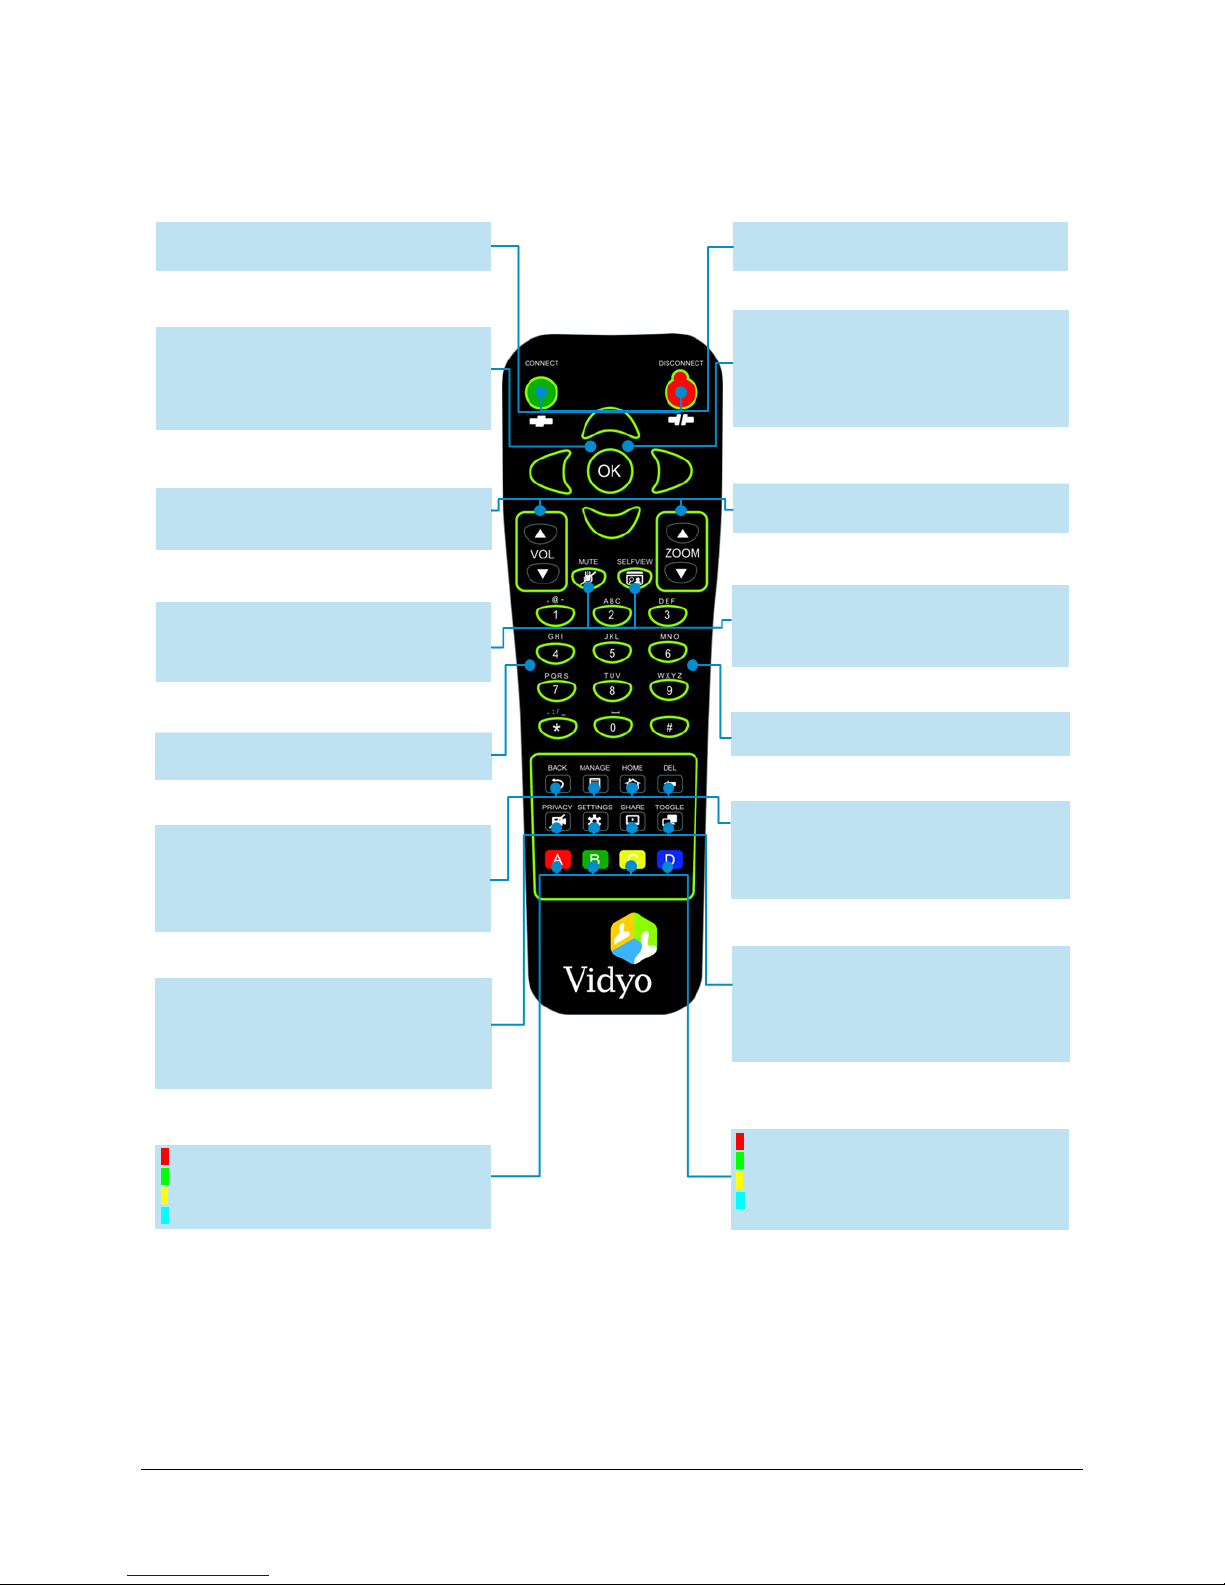
The Infrared Remote Control
CONNECT: Not applicable.
DISCONNECT: Not applicable.
CONNNECT: Not applicable.
DISCONNECT: Ends the meeting.
ARROWS: Use the arrow keys to navigate and highlight
options for selection. After hiding the Pre-Call menu,
supported cameras may be controlled as follows: left
and right buttons pan; up and down buttons tilt.
OK: Press to select a highlighted option.
ARROWS: Use the arrow keys to navigate and highlight
options for selection. Supported cameras may be
controlled after using the Self-View button as follows:
left and right buttons pan; up and down buttons tilt.
OK: Press to select a highlighted option.
VOLUME: Adjusts the speaker sound level.
ZOOM: After hiding the Pre-Call menu, zooms in and out
for supported cameras.
VOLUME: Adjusts the speaker sound level.
ZOOM: Zooms in and out for supported cameras.
SELF-VIEW: Turns your own video on and off. When on,
allows you to control supported cameras using the Zoom
and Arrow keys.
MUTE: Not applicable.
SELF-VIEW: Turns your own video on and off. When on,
allows you to control supported cameras using the Zoom
and Arrow keys.
MUTE: Mutes the audio source.
ALPHANUMERIC KEYPAD: Use the keys to enter field
values on menus.
ALPHANUMERIC KEYPAD: Use the keys to enter field
values on menus.
BACK: Takes you to the previous field or menu.
MANAGE: Turns the Pre-Call menu off and on. Displays
connected content Shares in Projection Mode.
HOME: Shows the Pre-Call menu.
DELETE: Acts as a backspace when typing in a field.
BACK: Takes you to the previous field or menu.
MANAGE: Turns the In-Call menu on and o ff.
HOME: Press to reset supported cameras to the initial
(home) position.
DELETE: Acts as a backspace when typing in a field.
PRIVACY: Not applicable.
SETTINGS: Turns the Settings menu on. Press Back to
return to the Pre-Call menu.
SHARE: Not applicable.
TOGGLE: Not applicable.
A: Swaps your displays when running dual screens.
B: Not applicable.
C: Turns Caps Lock on and off.
D: Not applicable.
A: Swaps your displays when running dual screens.
B: Enables DTMF dialing.
C: Turns Caps Lock on and off.
D: Depending on your display size, turns the remote
participant layout from stretch to letterbox.
PRIVACY: Turns your video feed off and on.
SETTINGS: Press once to show the In-Call menu. Press
twice to show the Pre-Call Settings menu.
SHARE: Turns connected Share sources on and off.
TOGGLE: Cycles through your shared sources, including
none.
Pre-Call Functions
In-Call Functions
VidyoRoom™ and VidyoPanorama™ 600 Quick User Guide
3
Page 7
VidyoRoom™ and VidyoPanorama™ 600 Quick User Guide
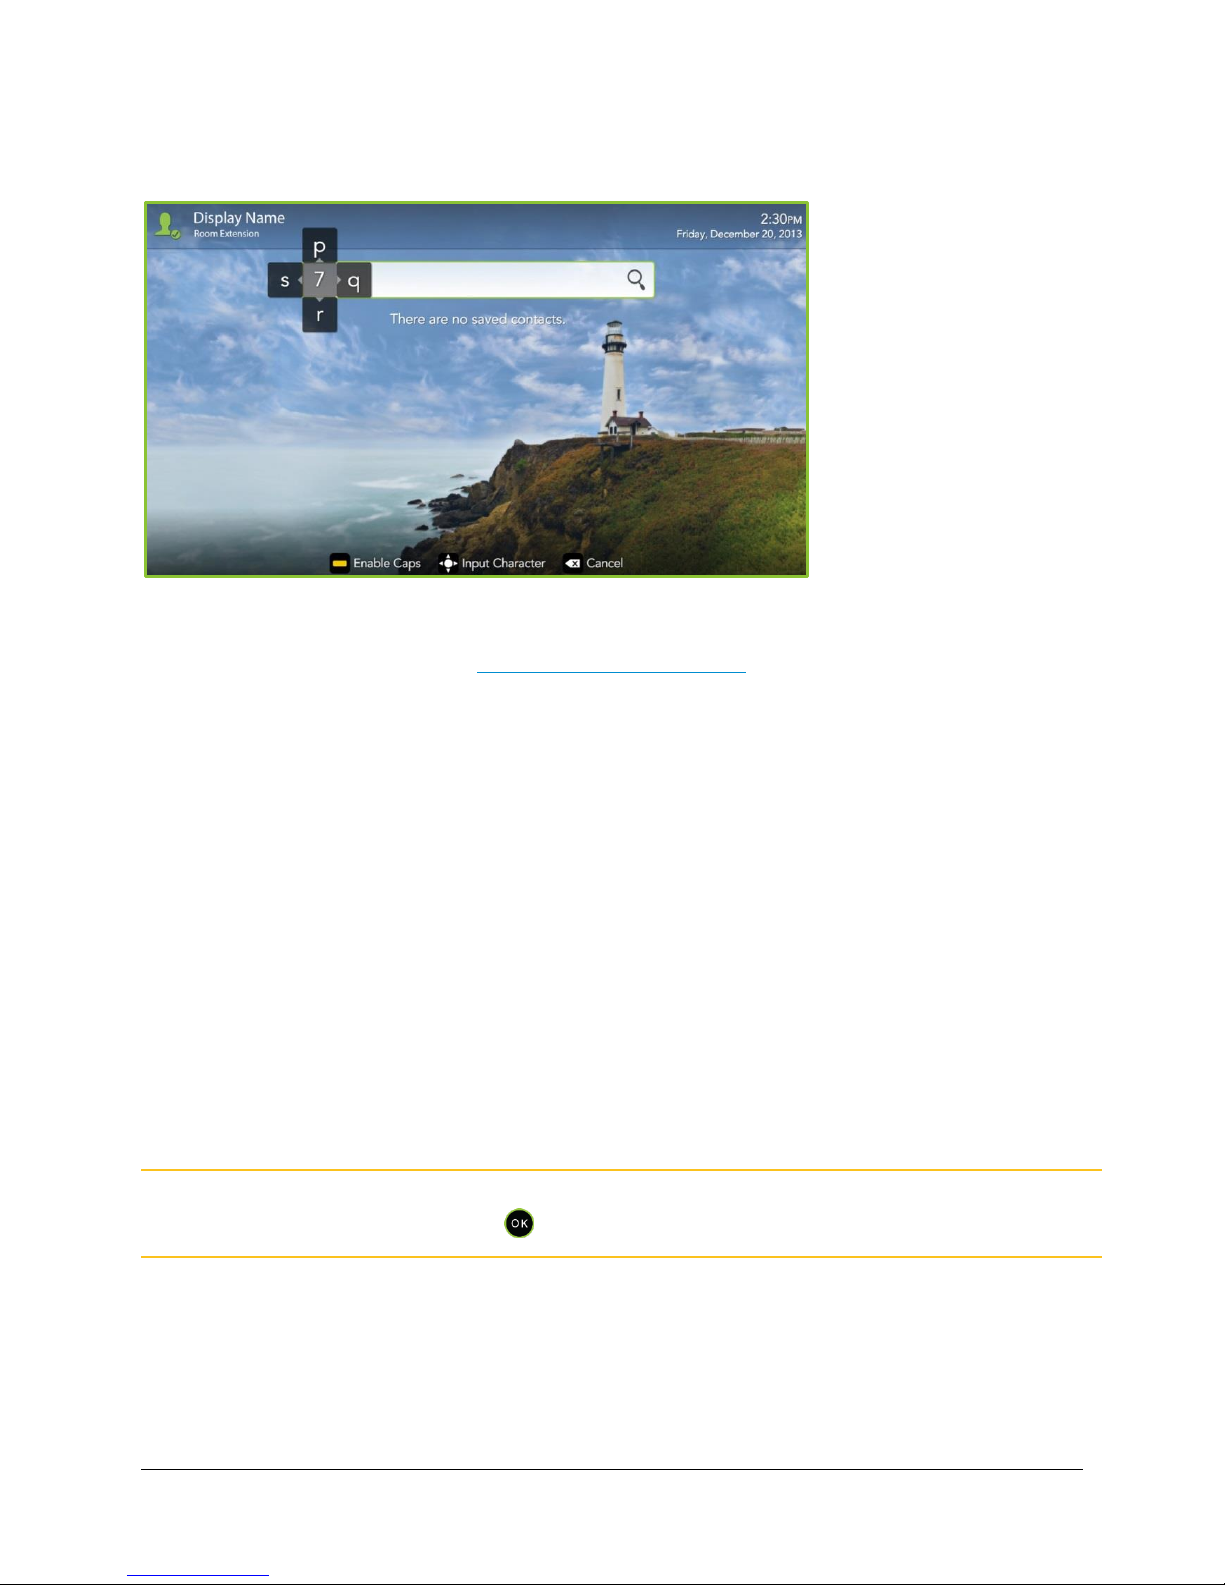
The Lucky Clover Remote Control Keypad
The Lucky Clover remote control keypad is an alphanumeric character input method for your
VidyoRoom handheld infrared remote control. Enabled by default, the feature can be disabled, if
desired. For more information, see Configuring System Settings.
To disable the Lucky Clover remote control keypad:
1. Press the Settings button on the remote control.
2. The Settings menu displays with the
3. Use the arrow buttons to navigate to the
4. Press the down arrow key to the Lucky Clover Keypad field, then the right arrow key to turn
it OFF.
To use the Lucky Clover remote control keypad:
1. When in applicable text fields, press any button on the alphanumeric keypad.
The corresponding number is shown in the text field. Alphanumeric options for the selected
number are presented in a surrounding, clockwise clover format starting from the top.
2. Use the arrow keys to select the options presented from top, right, bottom, or left (where
applicable).
Note Characters are automatically selected when either an arrow key is pressed; an alphanumeric
character is pressed again, or is pressed.
Account
Advanced
tab selected by default.
tab.
Tip: When available, remote control hints display on the lower part of the screen.
4
Page 8
VidyoRoom™ and VidyoPanorama™ 600 Quick User Guide
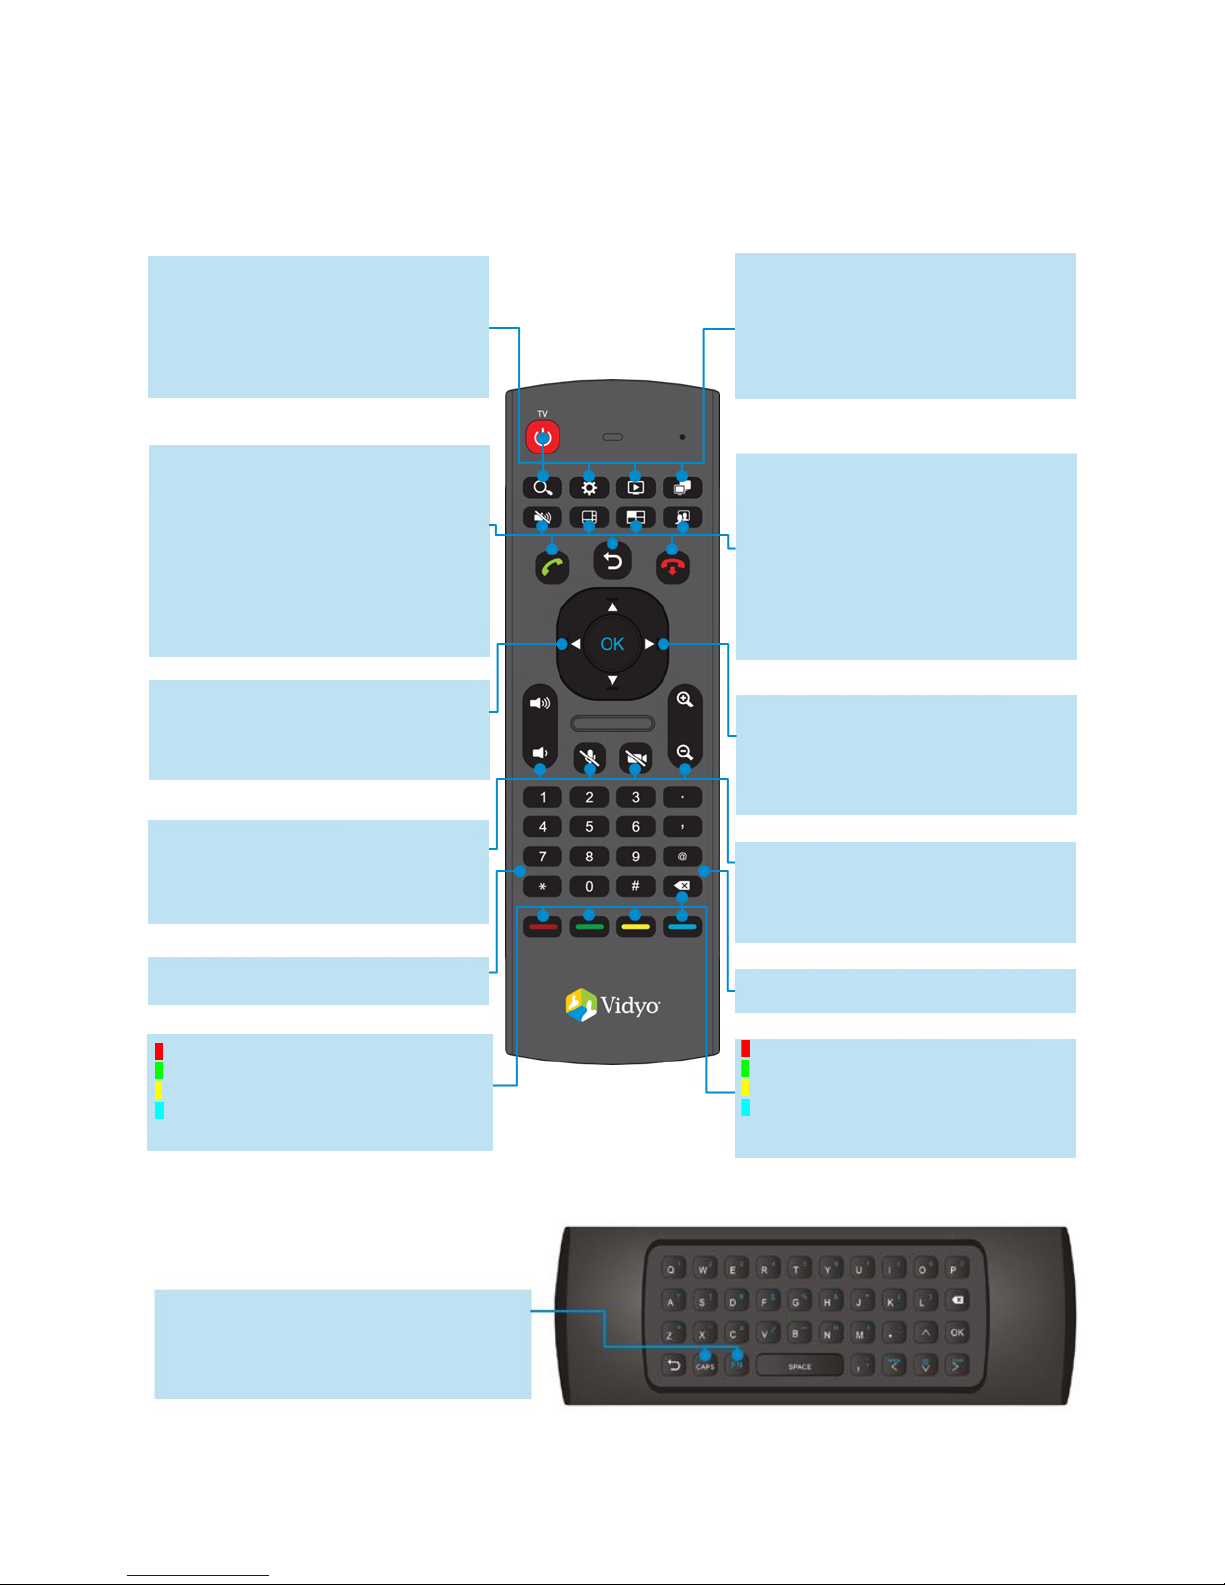
Pre-Call Functions
In-Call Functions
TV: Turns supported televisions on and off.
SEARCH: Puts the cursor in the Search field on the Pre -
Call menu.
SETTINGS: Turns the Settings menu on. Press Back to
return to the Pre-Call menu.
SHARE: Not applicable.
TOGGLE: Not applicable.
TV: Turns supported televisions on and off.
SEARCH: Not applicable.
SETTINGS: Press once to show the In-Call menu. Press
twice to shown the Pre-Call Settings menu.
SHARE: Turns connected Share sources on and off.
TOGGLE: Cycles through your shared sources, inclu ding
none.
MUTE: Mutes the sound level when showing a video using
Projection mode.
LAYOUT: Not applicable.
PRE-CALL MENU: Turns the Pre-Call menu off and on.
Displays connected content Shares in Projection Mode.
SELF-VIEW: Turns your own video on and off. When on,
allows you to control supported cameras using the Zoom
and Arrow keys.
CONNECT: Not applicable.
BACK: Takes you to the previous field or menu.
DISCONNECT: Not applicable.
MUTE: Mutes the audio source.
LAYOUT: Turns Preferred mode (showing the speaker in the
main tile) on and off (known as Non-Preferred mode).
IN-CALL MENU: Turns the In-Call menu on and off.
SELF-VIEW: Turns your own video on and off. When on,
enables you to control supported cameras using the Zoom
and Arrow keys.
CONNECT: Not applicable.
BACK: Takes you to the previous field or menu.
DISCONNECT: Ends the meeting.
ARROWS: Use the arrow keys to navigate and highlight
options for selection. After hiding the Pre-Call menu,
supported cameras may be controlled as follows: left and
right buttons pan; up and down buttons tilt.
OK: Press to select a highlighted option.
ARROWS: Use the arrow keys to navigate and highlight
options for selection. Supported cameras may be
controlled after using the Self-View button as follows:
left and right buttons pan; up and down buttons tilt.
OK: Press to select a highlighted option.
VOLUME: Adjusts the sound level.
MUTE MICROPHONE: Not applicable.
PRIVACY: Not applicable.
ZOOM: Zooms in and out for supported cameras after
hiding menus or when using self-view.
VOLUME: Adjusts the sound level.
MUTE MICROPHONE: Turns your microphone on and
off.
PRIVACY: Turns your video feed off and on.
ZOOM: Zooms in and out for supported cameras.
ALPHANUMERIC KEYPAD: Use the keys to enter field
values on menus.
ALPHANUMERIC KEYPAD: Use the keys to enter field
values on menus.
A: Swaps your displays when running dual screens.
B: Not applicable.
C: Turns Caps Lock on and off.
D: Not applicable.
DELETE: Acts as a backspace when typing in a field.
A: Swaps your displays when running dual screens.
B: Enables DTMF dialing.
C: Turns Caps Lock on and off.
D: Depending on your display size, turns the remote
participant layout from stretch to letterbox.
DELETE: Acts as a backspace when typing in a field.
CAPS: Turns Caps Lock on and off.
FN: Turns the Function Keys on and off.
Note: Press the CAPS or FN button once to enable the desired
mode. Press the same button again to disable the mode.
The Radio Frequency Remote Control
QWERTY Keyboard CAPS and Function Keys
5
Page 9

VidyoRoom™ and VidyoPanorama™ 600 Quick User Guide
Icon
Description
Enables you to enter values for the VidyoPortal, username, and
password.
Enables you to turn your proxy ON or OFF and specify UDP Range
values as desired.
Your VidyoRoom or VidyoPanorama 600 is set to Use DHCP by default.
This enables it to automatically obtain its IP address.
If you want to change the disabled network settings, turn DHCP OFF
and provide values for IP Address, Subnet, Gateway, and DNS.
Enables you to select a microphone, adjust the microphone level, select
from available speakers, adjust the speaker volume, turn join and exit
sounds or navigation sounds ON or OFF, and turn echo cancellation ON
or OFF.
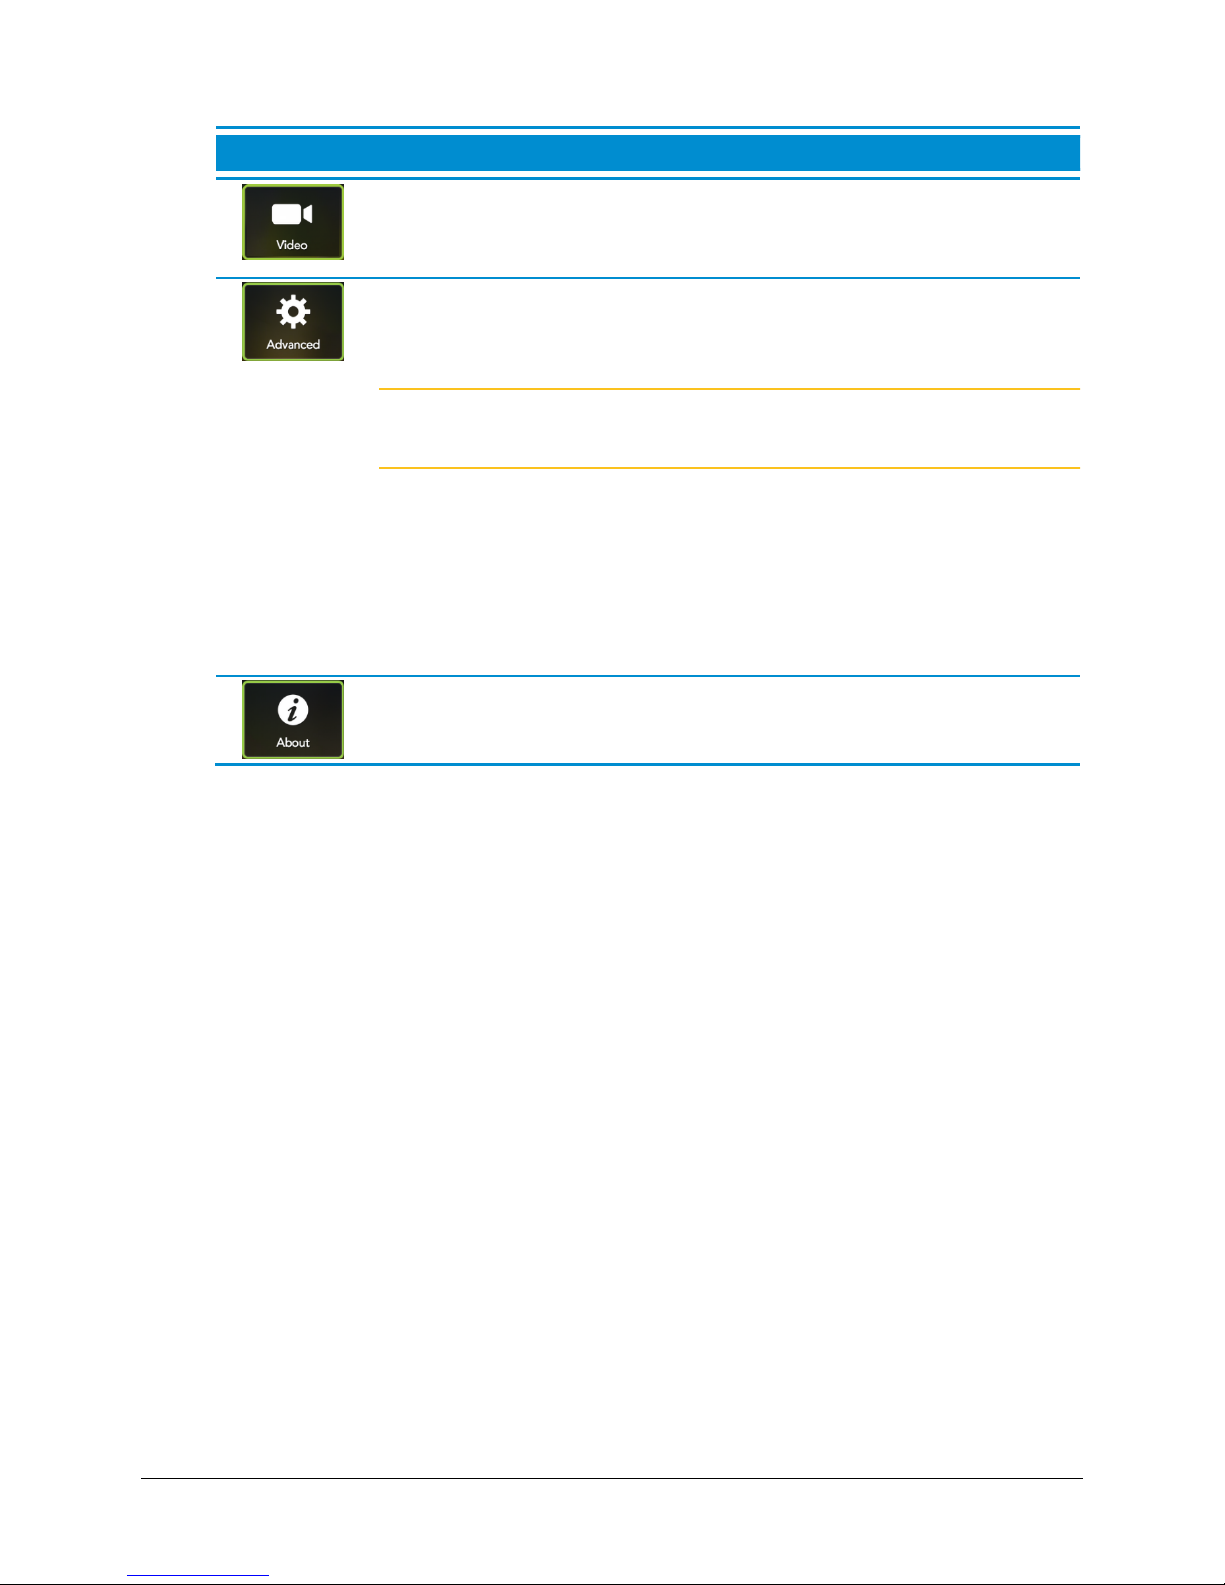
Configuring System Settings
The Settings menu enables the VidyoRoom or VidyoPanorama 600 system administrator to
configure the system and can be accessed anytime (pre-call or in-call).
To configure the system settings:
1. Press Settings on your remote control (press twice if you are in a call).
The Settings menu displays.
2. Select any of the following icons on the Settings menu to access the settings for that
screen:
6
Page 10
VidyoRoom™ and VidyoPanorama™ 600 Quick User Guide
Icon
Description
Enables you to select a camera source, select the video quality, select a
shared content source, turn the backlight ON or OFF, and reset the
camera position.
Enables you to select whether to automatically answer incoming calls,
automatically share connected devices, allow remote users to control
your camera, and turn the Lucky Clover keypad ON or OFF.
Note If your VidyoRoom does not detect an IR remote, it automatically
turns OFF the Lucky Clover keypad.
You can also set your Room’s PIN, configure your system with an
access code to PIN-protect your VidyoRoom or VidyoPanorama 600
settings, upload background images for display on the Settings menu,
and set the language and time zone.
You can also select Reboot System on this screen to reboot your
machine.
Displays the VidyoRoom or VidyoPanorama 600 version being used, the
Vidyo company description, and the copyright statement.
7
Page 11

Pre-Call
1 2 3
4 6 5
Viewing the Pre-Call Menu
VidyoRoom™ and VidyoPanorama™ 600 Quick User Guide
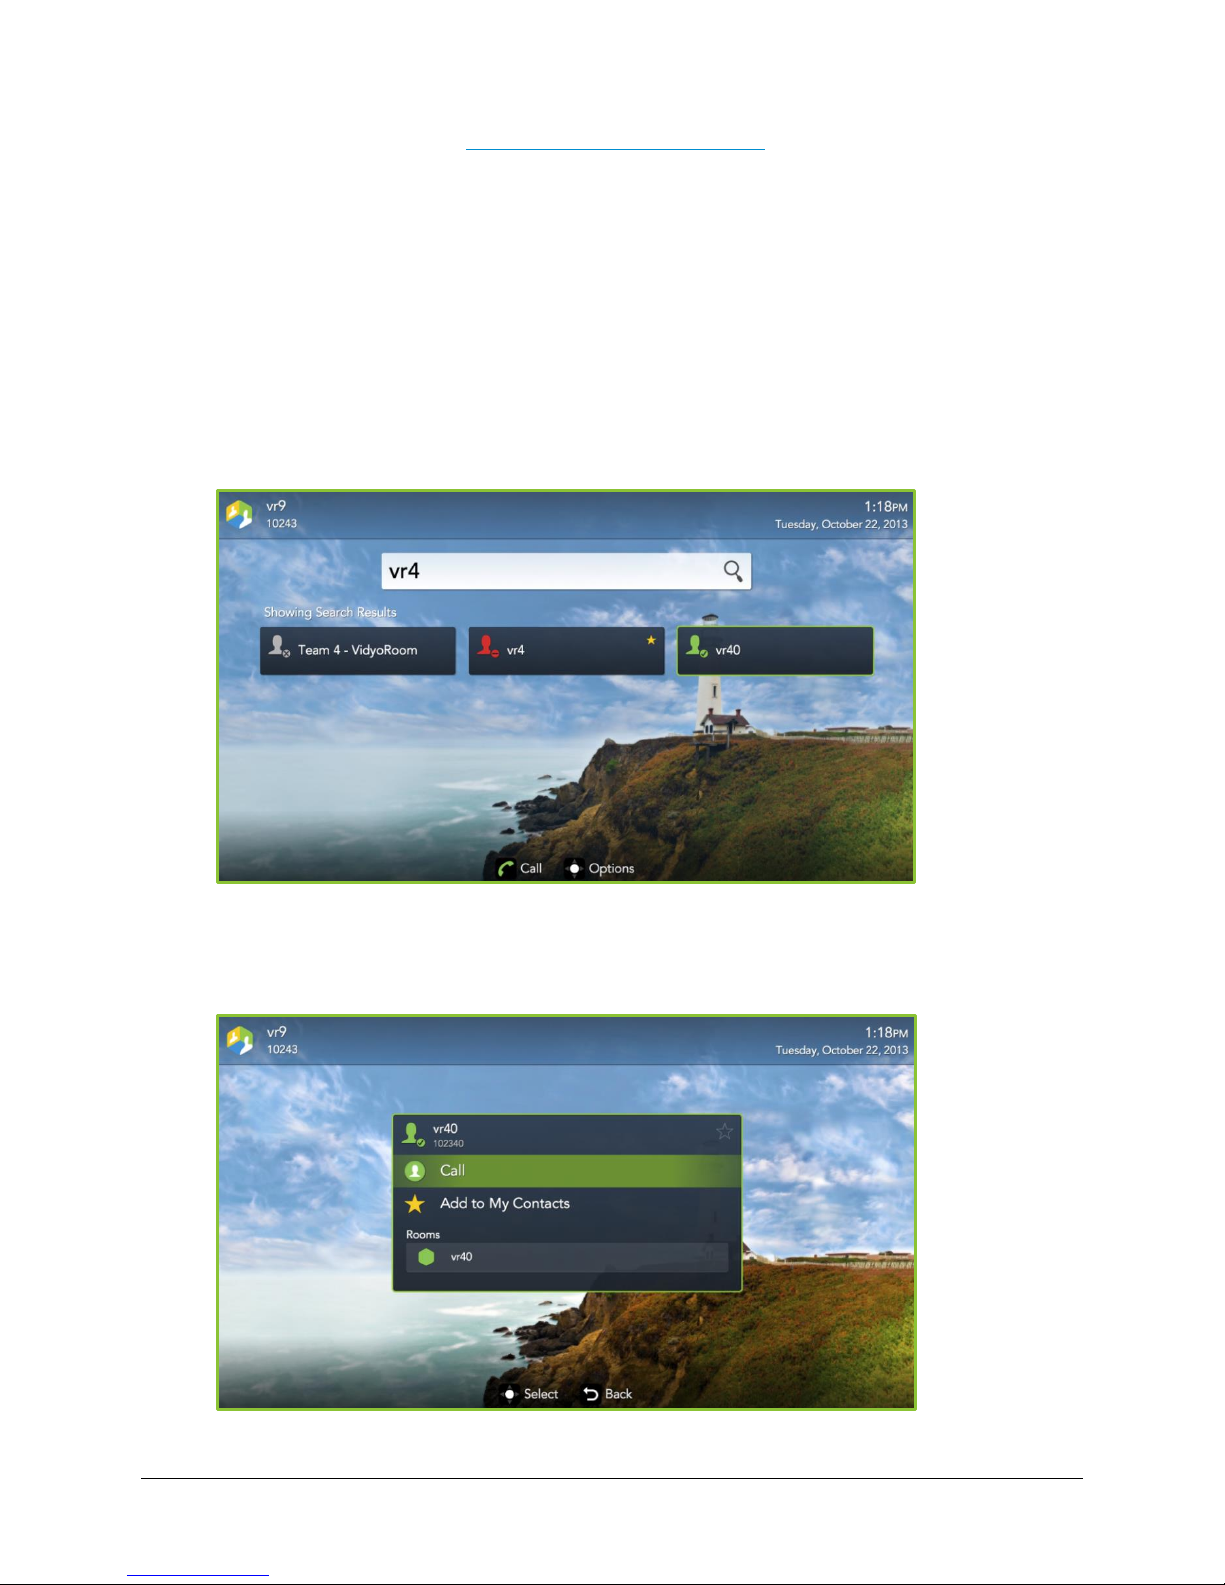
1. The name and extension of your VidyoRoom or VidyoPanorama 600 is based on the
information stored in the VidyoPortal to which you are connected. The current VidyoRoom
or VidyoPanorama 600 system time and date also displays.
2. The search box where you can enter a name to search for a contact or room.
As soon as you begin typing in this box, search results display.
3. The three most recent appointments from a calendar (if your system administrator has
synchronized your VidyoRoom or VidyoPanorama 600 system with a Microsoft Exchange™
calendar, a Google Calendar™, or another supported calendar).
8
Page 12
VidyoRoom™ and VidyoPanorama™ 600 Quick User Guide
For more information, see Using the VidyoRoom Calendar.
4. The list of your contacts.
5. The number of pages of contacts.
You can navigate through additional pages using your remote control arrow keys.
6. Hints about how to use your handheld remote control.
Joining a Contact’s Room or Calling a Contact Directly
To join a contact’s room or call a contact directly:
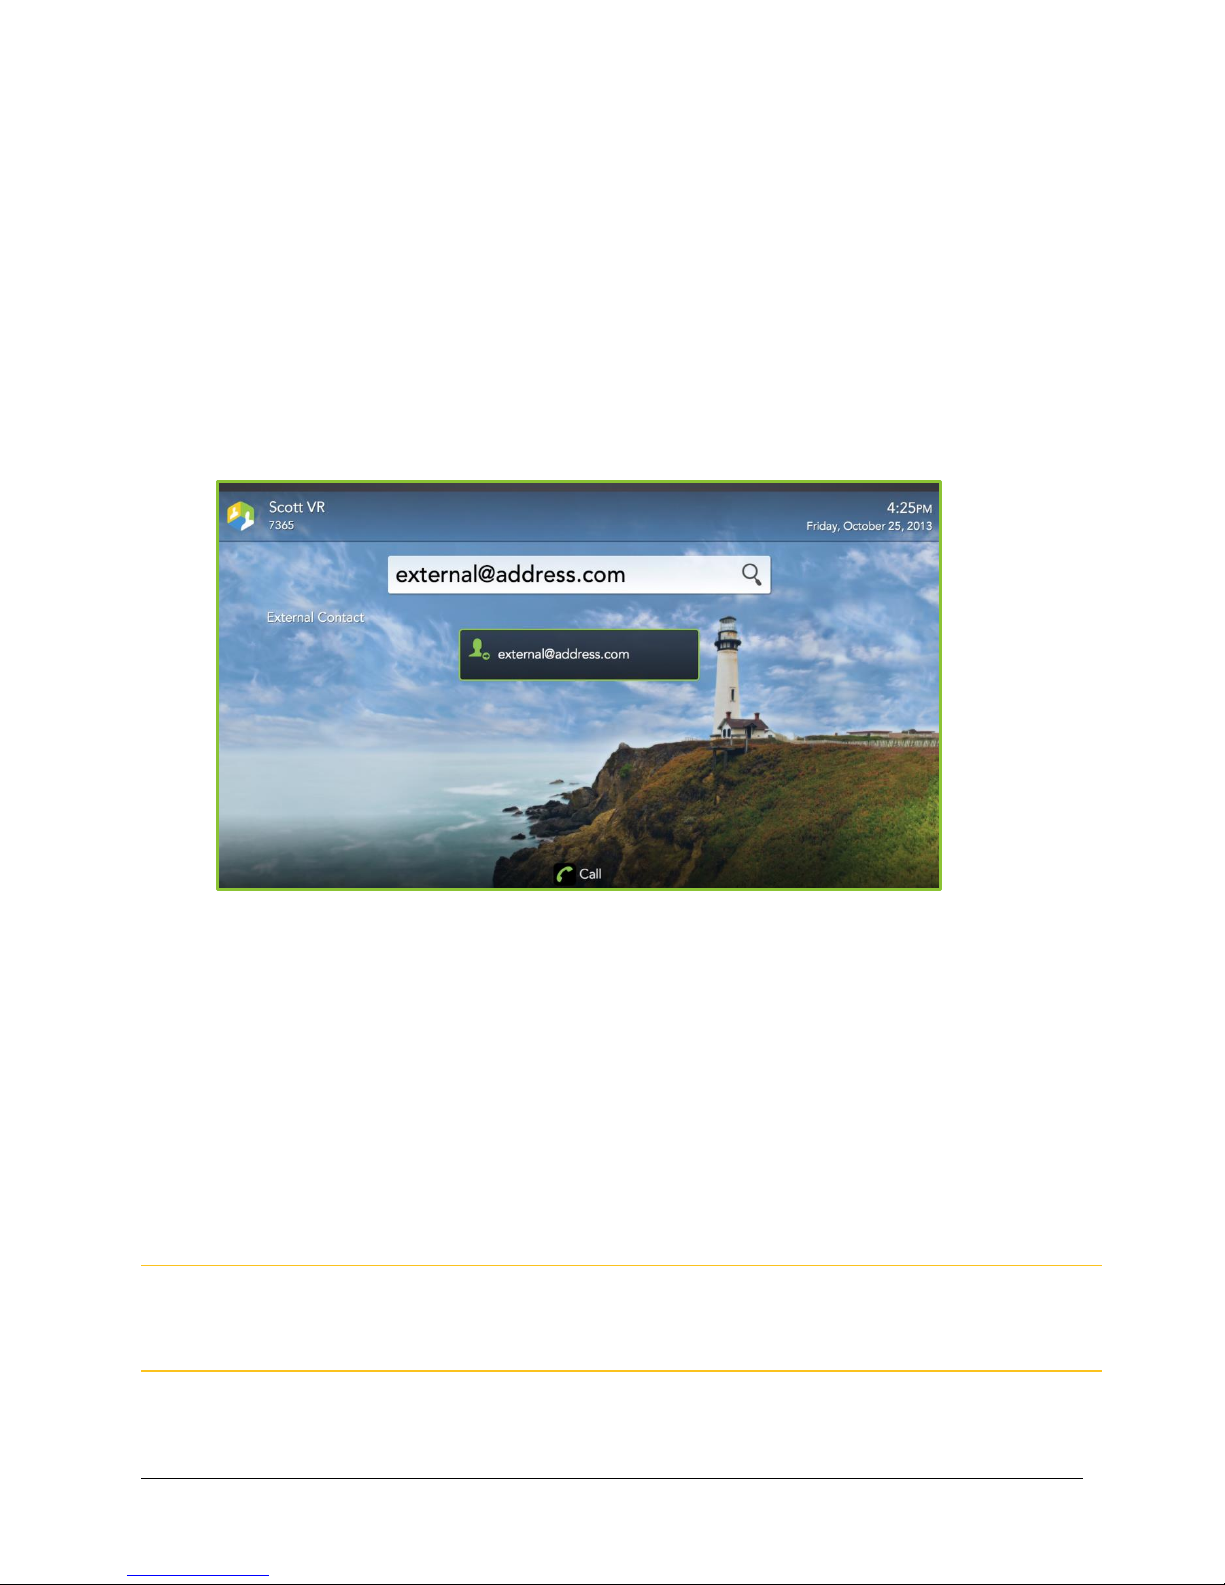
1. Enter a name to search.
2. Use the arrow keys on your remote control to move down from the search box and
highlight the desired contact from the search results.
3. Select OK.
9
Page 13
VidyoRoom™ and VidyoPanorama™ 600 Quick User Guide
4. Use the arrow keys on your remote control to navigate to the following options:
Select Call to make a direct call.
Select Add to My Contacts to add the selected contact to your list.
Select a room to join that contact’s room.
Calling a User on a Different VidyoPortal or an H.323/SIP Endpoint
To call a user on a different VidyoPortal or an H.323/SIP endpoint:
1. Enter the address of the contact that is on a different VidyoPortal or on an H.323/SIP
endpoint.
2. Use the arrow keys on your remote control to move down from the search box and
highlight your contact.
3. Select Call.
Using the VidyoRoom Calendar
The calendar integration feature enables the VidyoRoom to display upcoming scheduled meetings
from a Google Calendar, a Microsoft Exchange calendar, or another supported calendar specified
by your system administrator. This feature enables the system to display meetings that are taking
place up to three hours in the future and up to one hour in the past, as well as display or hide
meeting details.
Note If meeting participants use calendar software other than the one configured for your
VidyoRoom by your system administrator, some tags and notifications may not display
correctly when viewed in different mail and calendar clients.
10
Page 14
Viewing Meeting Details
1 3 4
2
VidyoRoom™ and VidyoPanorama™ 600 Quick User Guide
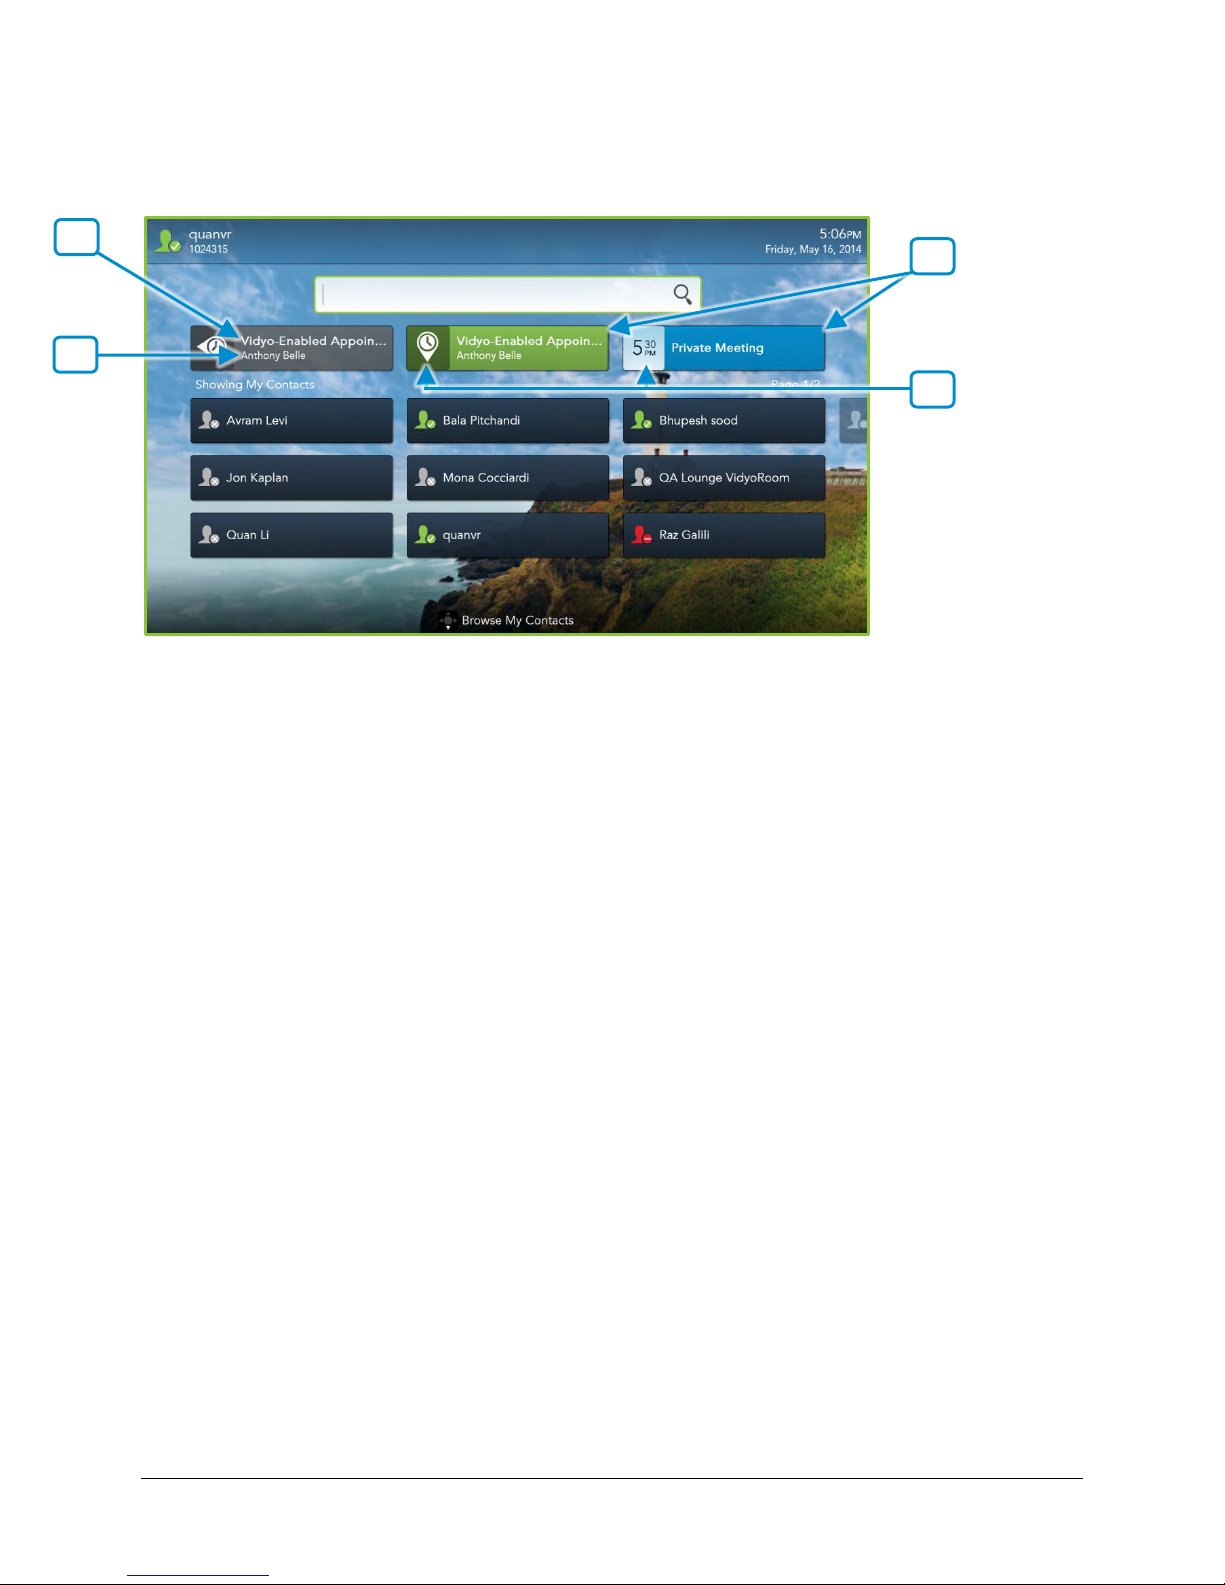
The On Screen UI displays meetings as tiles below the search box on the
The following information is displayed about each meeting:
1. The subject of the meeting (unless marked as “Private”).
2. The name of the meeting organizer (unless marked as “Private”).
Pre-Call
screen.
3. Whether the meeting is Vidyo-enabled:
Vidyo-enabled meetings display as green tiles; they remain on the screen as gray tiles
for an hour after the scheduled start time.
Non-Vidyo-enabled meetings display as blue tiles; they disappear from the screen right
after the scheduled start time.
11
Page 15
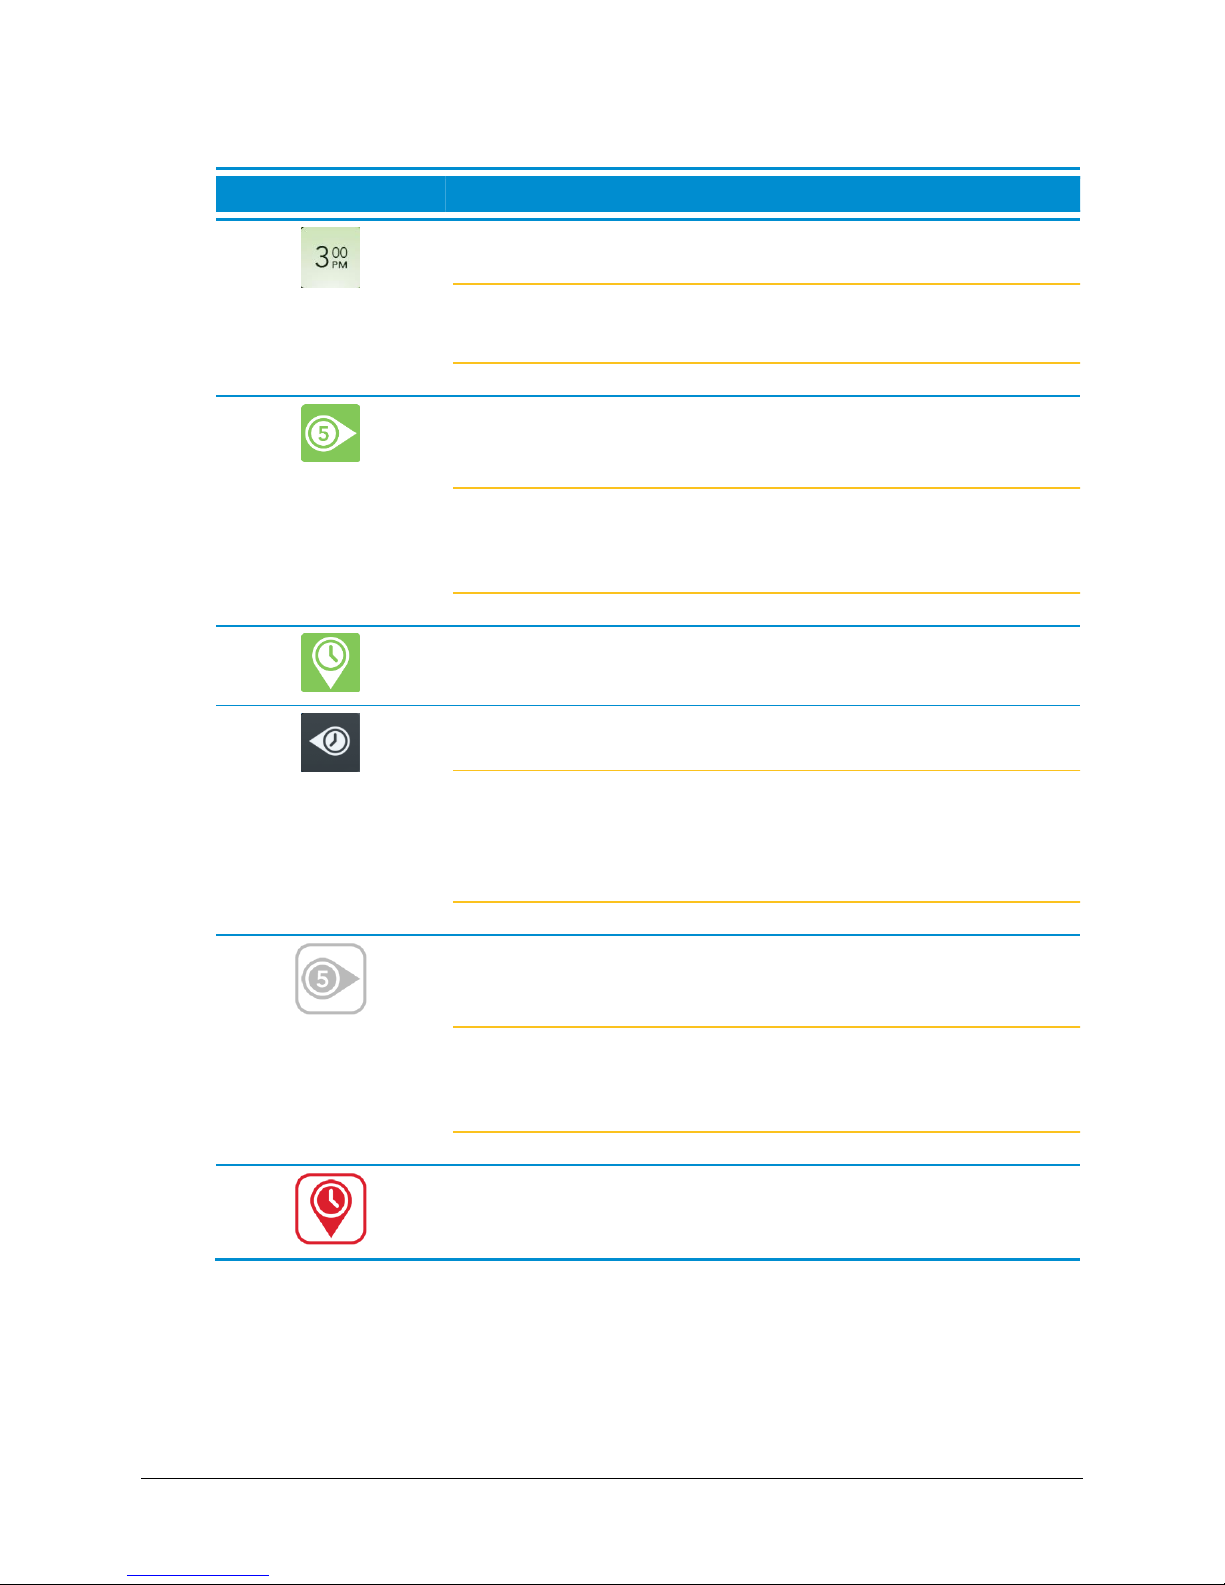
4. The meeting status indicator:
Icon
Description
The time of the upcoming scheduled meeting.
Note Only appointments scheduled up to three hours in the
future display on the screen.
The number of minutes that remain before the scheduled
meeting begins.
Note Starting from five minutes before the meeting, the indicator
begins counting down each minute until the meeting
begins.
The appointment is occurring now.
The meeting has taken place in the past.
Note Only Vidyo-enabled meetings remain on the screen for an
hour after the scheduled start time and display as a gray
tile. Non-Vidyo-enabled meetings disappear from the
screen right after the scheduled start time.
If you are in a meeting, this icon shows how many minutes
remain before the next scheduled meeting begins.
Note Starting from five minutes before the meeting, the indicator
begins counting down each minute until the next meeting
begins.
If you are in a meeting, this icon shows that the next scheduled
meeting has begun.
VidyoRoom™ and VidyoPanorama™ 600 Quick User Guide
To view appointment details:
1. Use the arrow keys on your remote control to move down from the search box and
highlight the desired meeting tile.
12
Page 16
VidyoRoom™ and VidyoPanorama™ 600 Quick User Guide
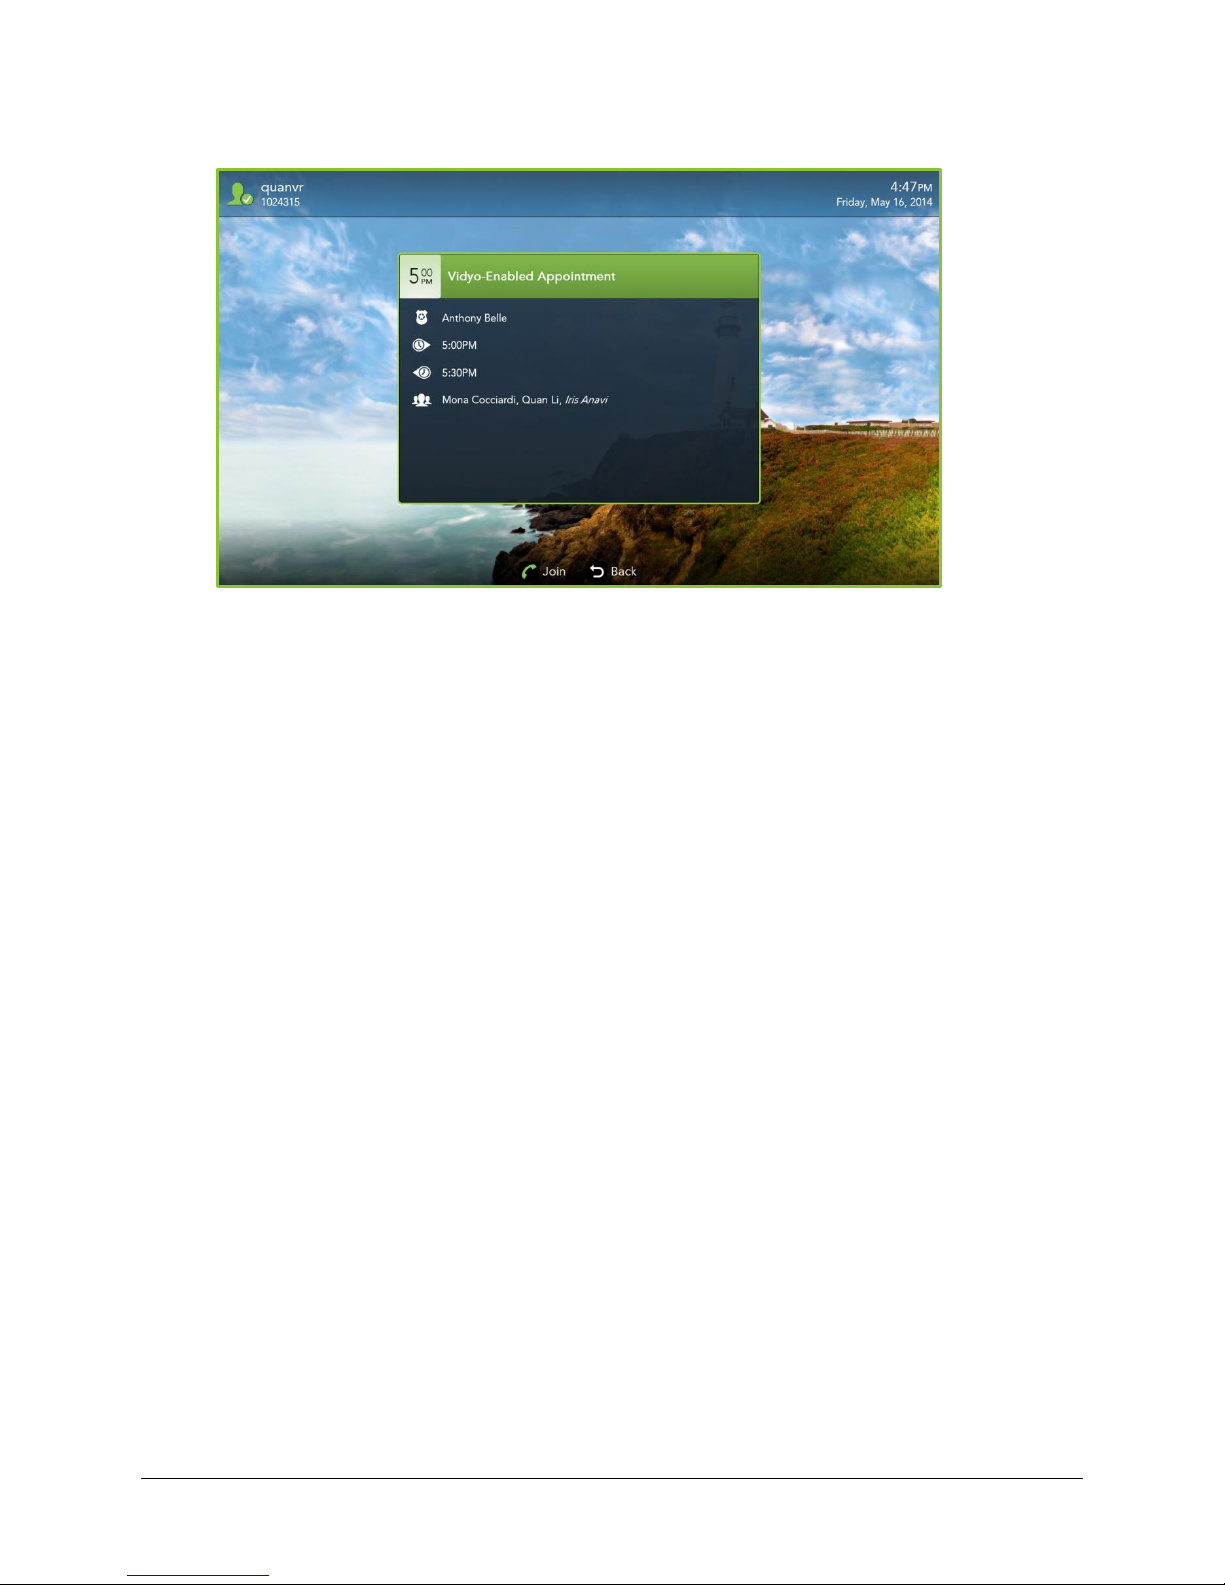
2. Select Details.
The meeting details dialog box displays showing the following details:
The name of the meeting organizer.
The meeting start time.
The meeting end time.
The meeting attendees.
Required attendee names display with a regular font, while optional attendees are
italicized.
Joining Vidyo-Enabled Meetings
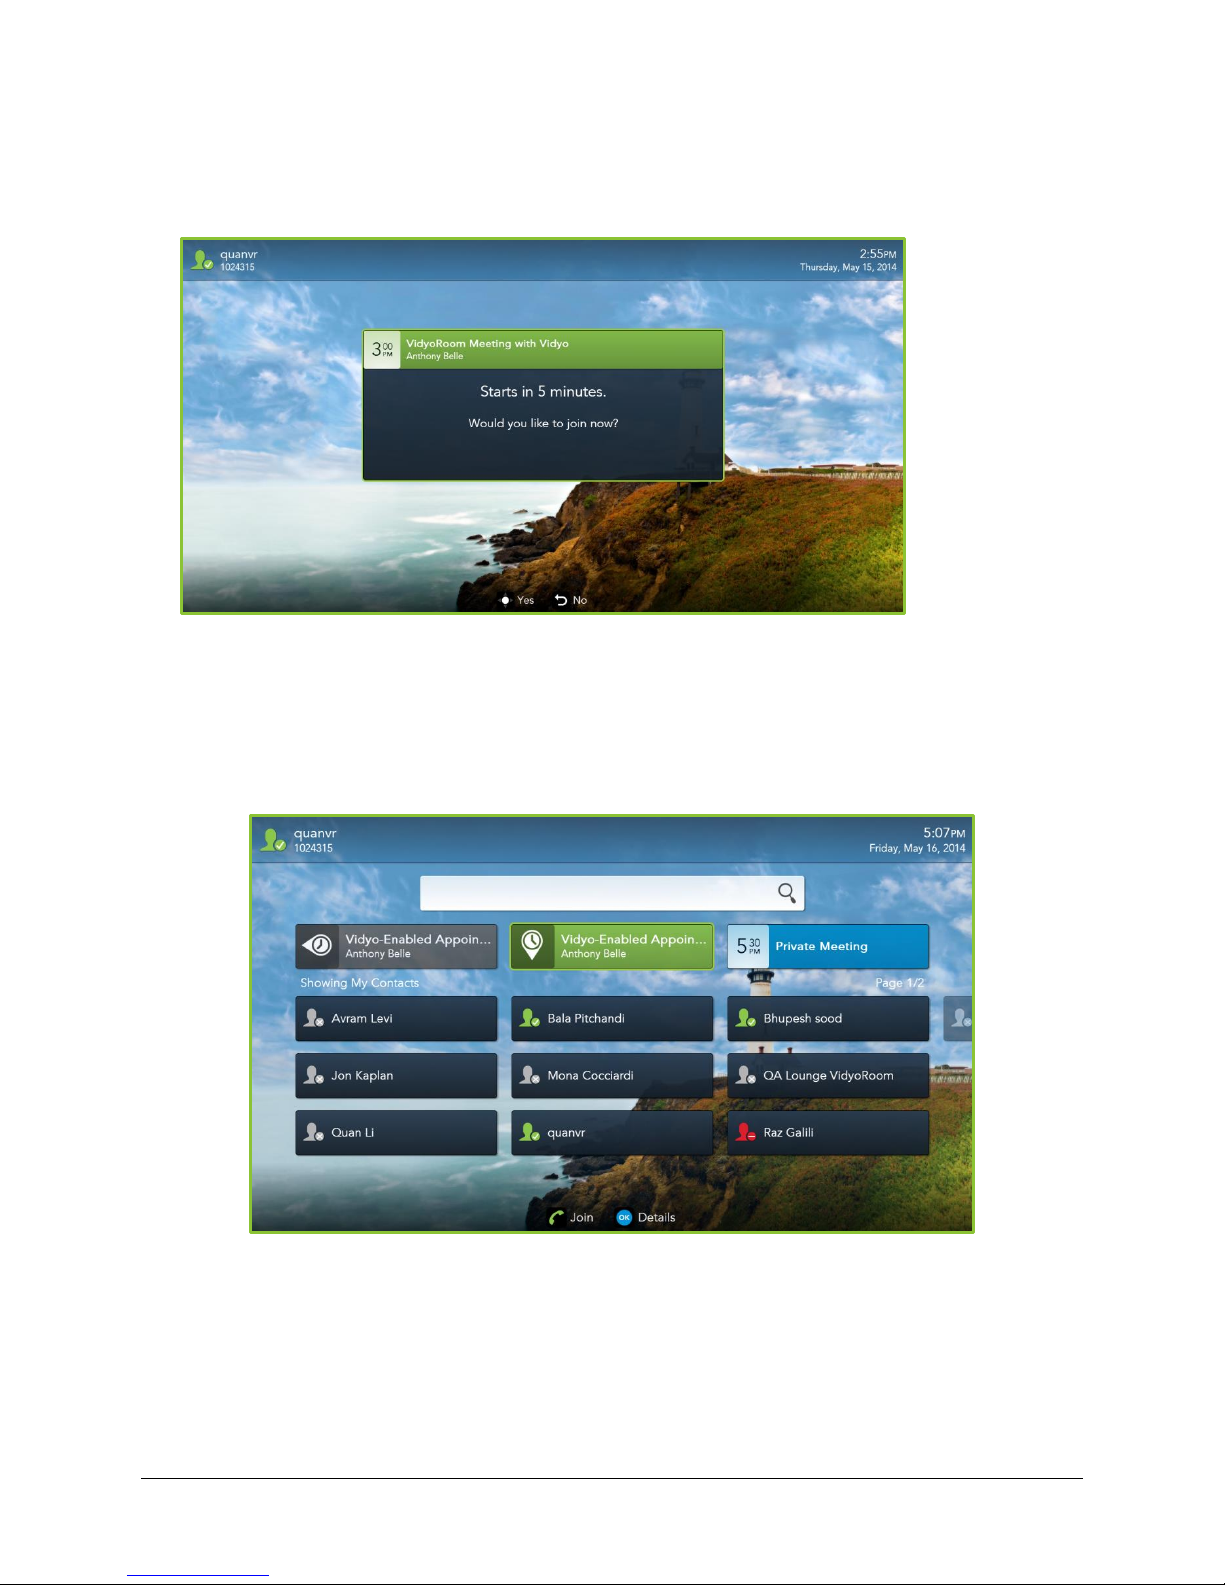
Five minutes before the scheduled Vidyo-enabled meeting begins, a dialog box displays reminding
you of the upcoming meeting. You can join the meeting directly from this dialog box, or
alternatively, you can manually join a meeting.
13
Page 17
VidyoRoom™ and VidyoPanorama™ 600 Quick User Guide
To join a Vidyo-enabled meeting:
If a dialog box displays reminding you of an upcoming meeting, select Yes if you want to join
the meeting or select No if you do not want to join the meeting.
The dialog box remains on the screen indicating “Starts in X minutes” or “Started X minutes
ago” for one hour after the ending time of your Vidyo-enabled meeting or until acknowledged.
If you want to manually join an upcoming meeting, do the following:
1. Use the arrow keys on your remote control to move down from the search box and
highlight the desired meeting tile.
2. Select Join.
Understanding the Status Icons
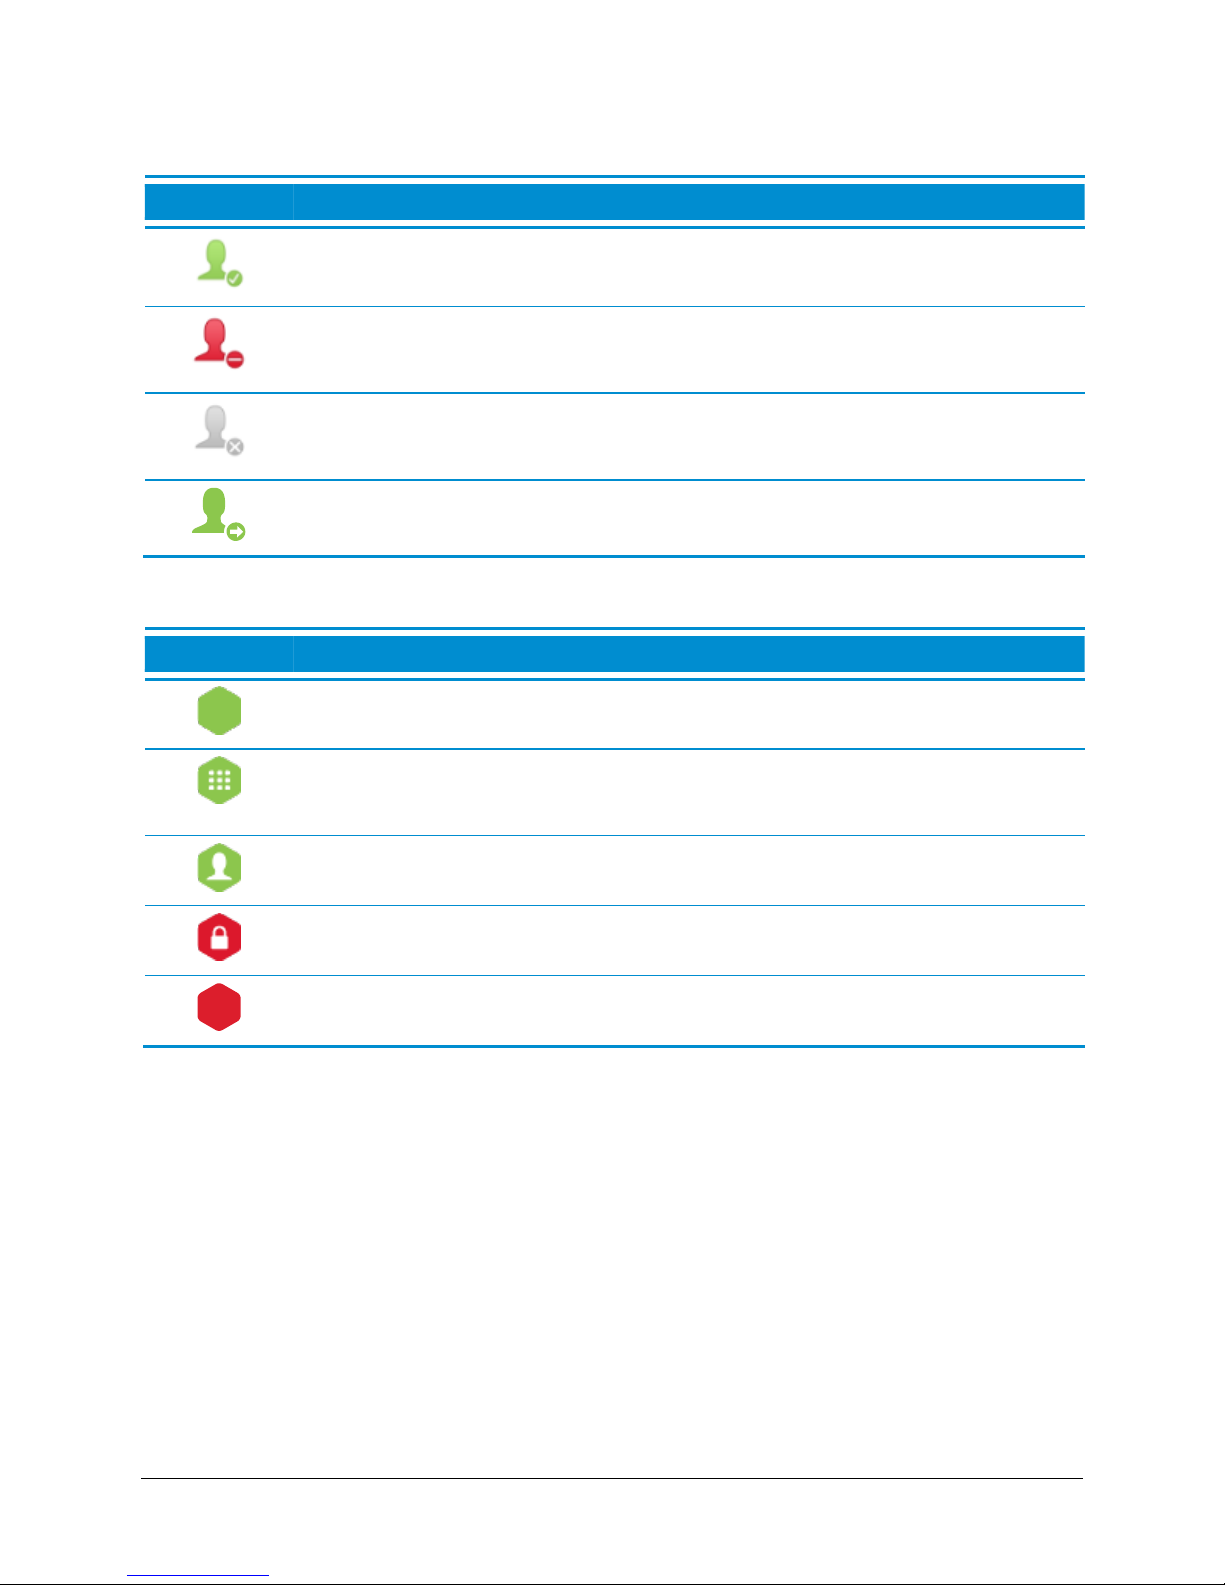
The following tables provide status icons and explanations as they display in your system.
14
Page 18
Contact Status
Icon
Description
The contact is online and available to receive incoming calls.
The contact is online but is currently in a call. You cannot make a direct call to
this contact; however, you can join the contact’s room.
The contact is offline (not logged into the VidyoPortal). You cannot make a direct
call to this contact; however, you can join the contact’s room.
The contact is connected to another VidyoPortal or is an H.323/SIP endpoint.
Icon
Description
The room is available and empty, so you can enter the room.
The room is available and PIN-protected. If you attempt to join the room, you will
be asked to enter a PIN.
The room is occupied but available to enter.
The room is locked, so you cannot enter it.
The room is full, so you cannot enter it.
Room Status
VidyoRoom™ and VidyoPanorama™ 600 Quick User Guide
Projecting Content in Your System
To project content on your local system when you are not in a call:
1. Connect a compatible content-sharing device to your laptop and your VidyoRoom system.
The system does the following:
a. If you are using more than a single display, your Share automatically displays on your
second display.
b. If you are using a single display, press MANAGE on your handheld infrared remote
control or press PRE-CALL MENU on your radio frequency remote control to project
your Share on your single display.
15
Page 19
VidyoRoom™ and VidyoPanorama™ 600 Quick User Guide
We refer to this as Projection Mode as the content is only displayed on your local
VidyoRoom system.
For information about sharing to the entire conference while in-call, see Sharing Content to
a Conference.
In-Call
Viewing the In-Call Menu
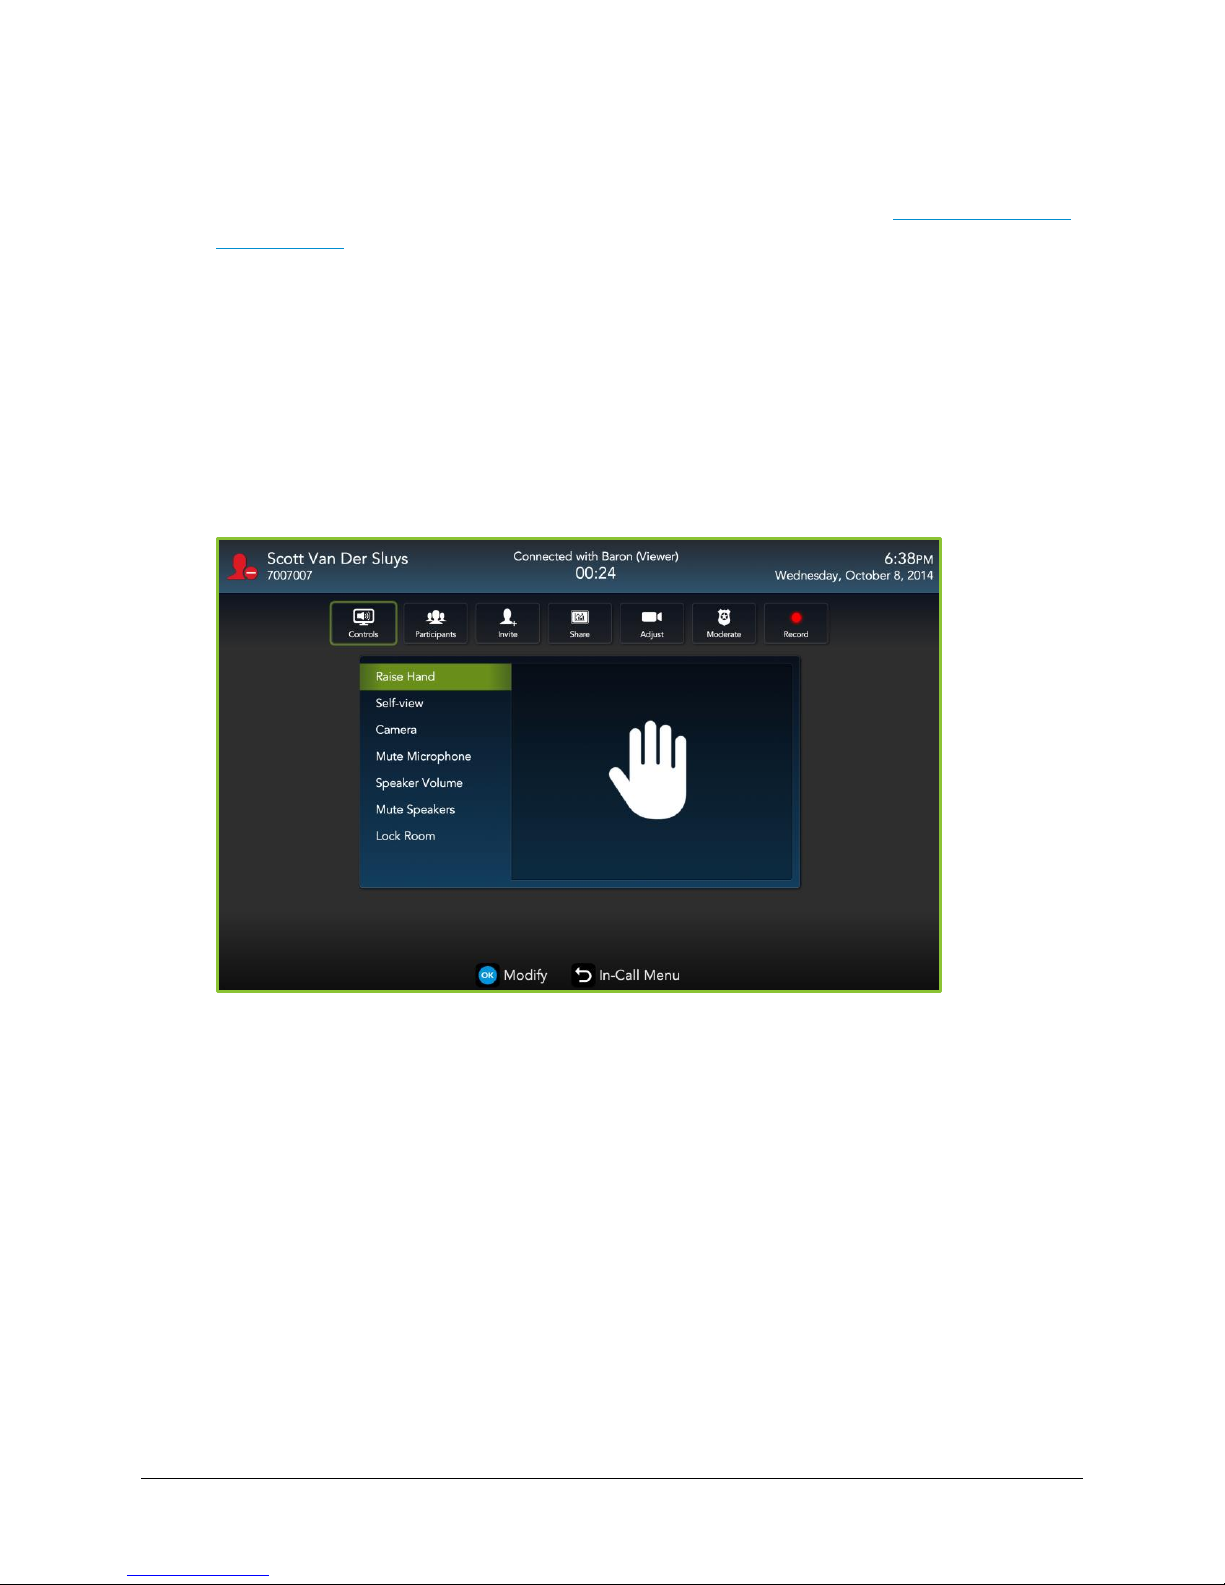
To view the In-Call menu:
1. Press MANAGE on your handheld infrared remote control or press PRE-CALL MENU on
your radio frequency remote control.
16
Page 20
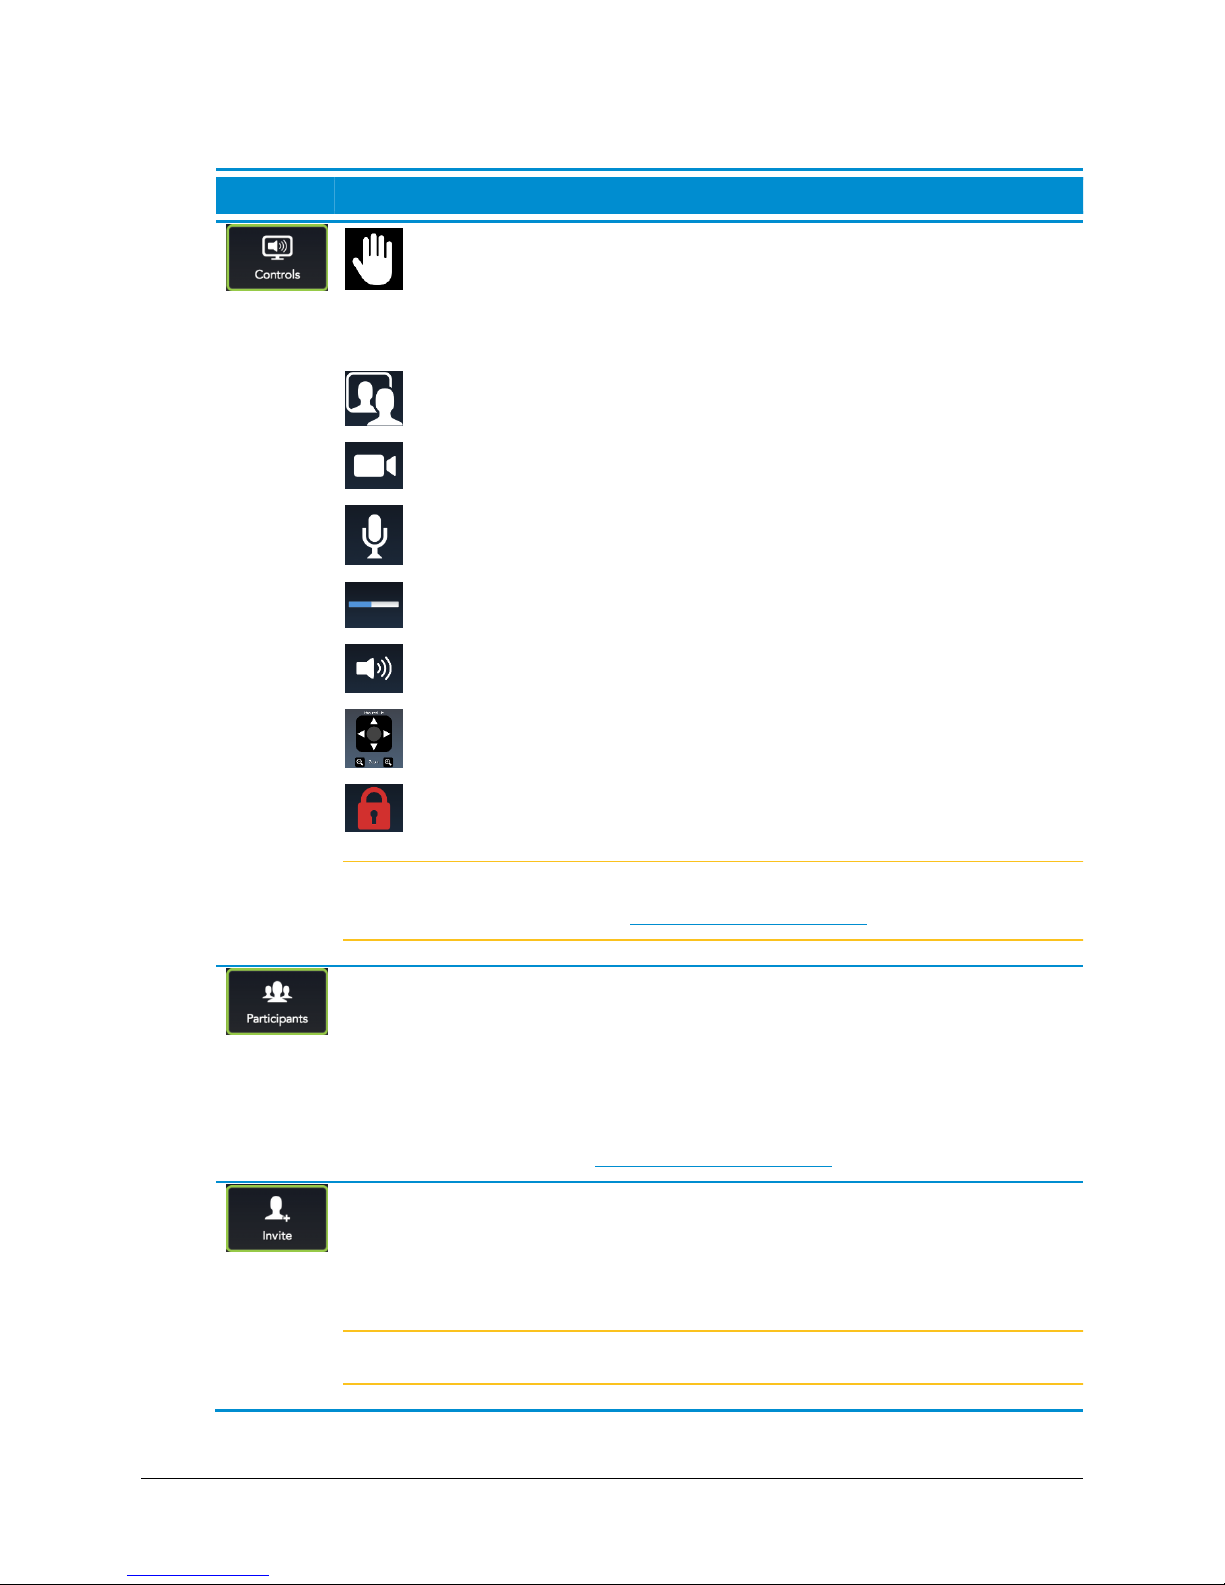
2. Select any of the following:
Icon
Description
Signal the meeting moderator that you have raised your hand when
participating in conferences that are using the Presenter Mode feature.
For more information, refer to the
VidyoDesktop Quick User Guide
.
Toggle your self-view preference.
Show or hide the video feed from your camera.
Mute, unmute, and control your microphone volume.
Control your speakerphone volume.
Mute and unmute your speakerphone volume.
Pan, tilt, and zoom your camera.
Lock and unlock your meeting room.
Note This function only displays when you’re the moderator of the room. For
more information, see Becoming the Moderator.
You can view conference participants, add them to your My Contacts list, pin
them to specific system screens, view a participant’s Share, and pan, tilt,
and zoom their cameras.
Moderators can also mute, unmute, hide video, show video, and remove a
selected participant or all participants from the conference.
For more information, see Becoming the Moderator.
Enter a name in this text box to search for a contact.
As soon as you begin typing, search results display.
Use the arrow keys on your remote control to move down from the search
box and highlight a desired contact from the search results.
Note This option only displays when you’re the moderator of the room.
VidyoRoom™ and VidyoPanorama™ 600 Quick User Guide
17
Page 21
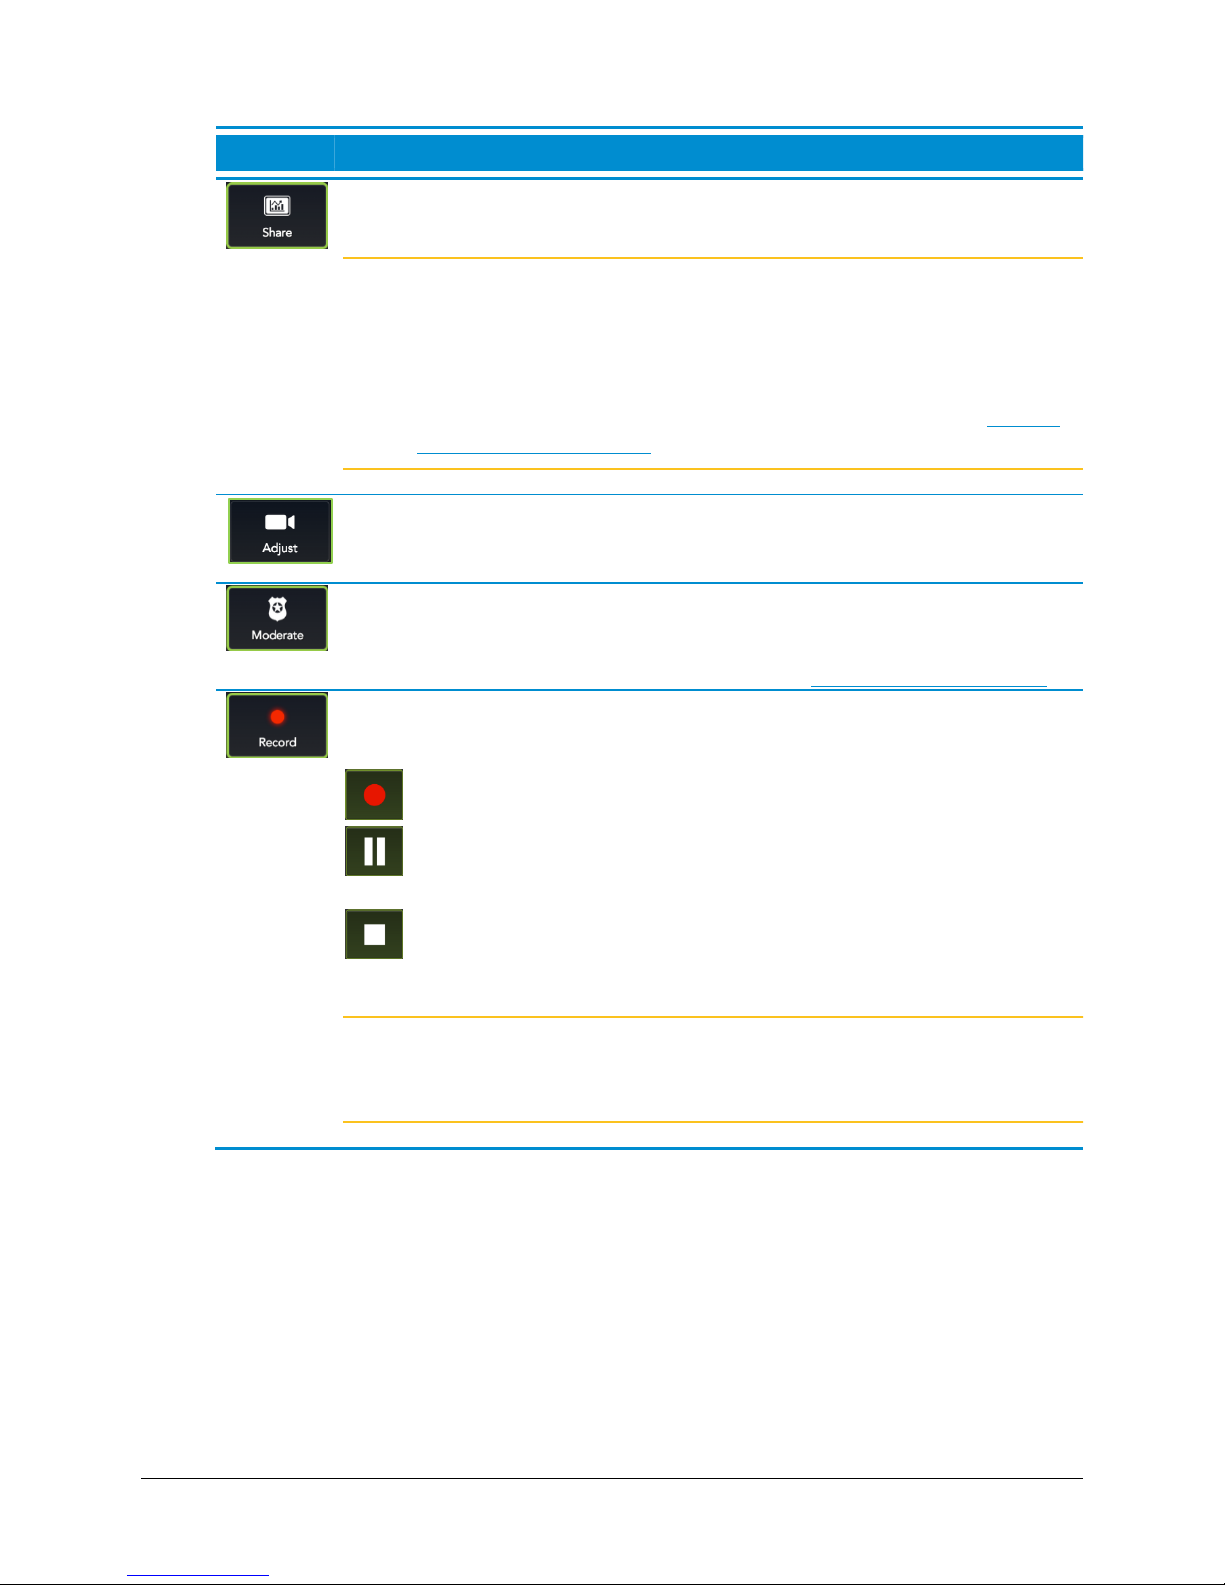
VidyoRoom™ and VidyoPanorama™ 600 Quick User Guide
Icon
Description
Use the arrow keys on your remote control to move down and highlight a
desired Share available for viewing in the conference.
Note The Start Sharing My Content button only displays when using
compatible content-sharing devices with your VidyoRoom system.
The shared content source should be selected automatically, but you
can manually select it from the “Configuring System Settings” menu
as described on page 6. For information about sharing, see Sharing
Content to a Conference.
Use the arrow keys on your remote control to move down and highlight a
desired Camera on the lower-left of the screen, and then select Pan, Tilt, and
Zoom preferences.
Use the arrow keys on your remote control to move down and enter the
Moderator PIN and become an additional moderator of the conference.
Becoming a moderator allows you to use call control functions including
recording capabilities. For more information, see Becoming the Moderator.
Select your desired Recording Profile for recording VidyoRoom or
VidyoPanorama 600 conferences. If no Recording Profiles are configured,
contact your system administrator.
The Vidyo conference is being recorded.
The recording is paused. Pausing while recording results in a single
recording file stored in the .flv format on your VidyoPortal.
The recording is stopped. Stopping while recording results in
separate recorded files stored in the .flv format on your VidyoPortal.
Note This option is only enabled if your organization has VidyoReplay and
when you’re the moderator of the room. For more information, contact
your Vidyo sales representative.
Becoming the Moderator
Becoming a moderator allows you to use call control functions, such as muting and unmuting the
conference participants and recording the conference.
If you want to become the conference moderator, you must first enable a Moderator PIN for the
conference room. To do so, you must:
Ask your VidyoPortal Administrator to set up the Moderator PIN on a specific conference room
via the Admin portal.
18
Page 22
VidyoRoom™ and VidyoPanorama™ 600 Quick User Guide
Set the Moderator PIN via VidyoDesktop or via the VidyoPortal User portal. For more
information, refer to the
Guide.
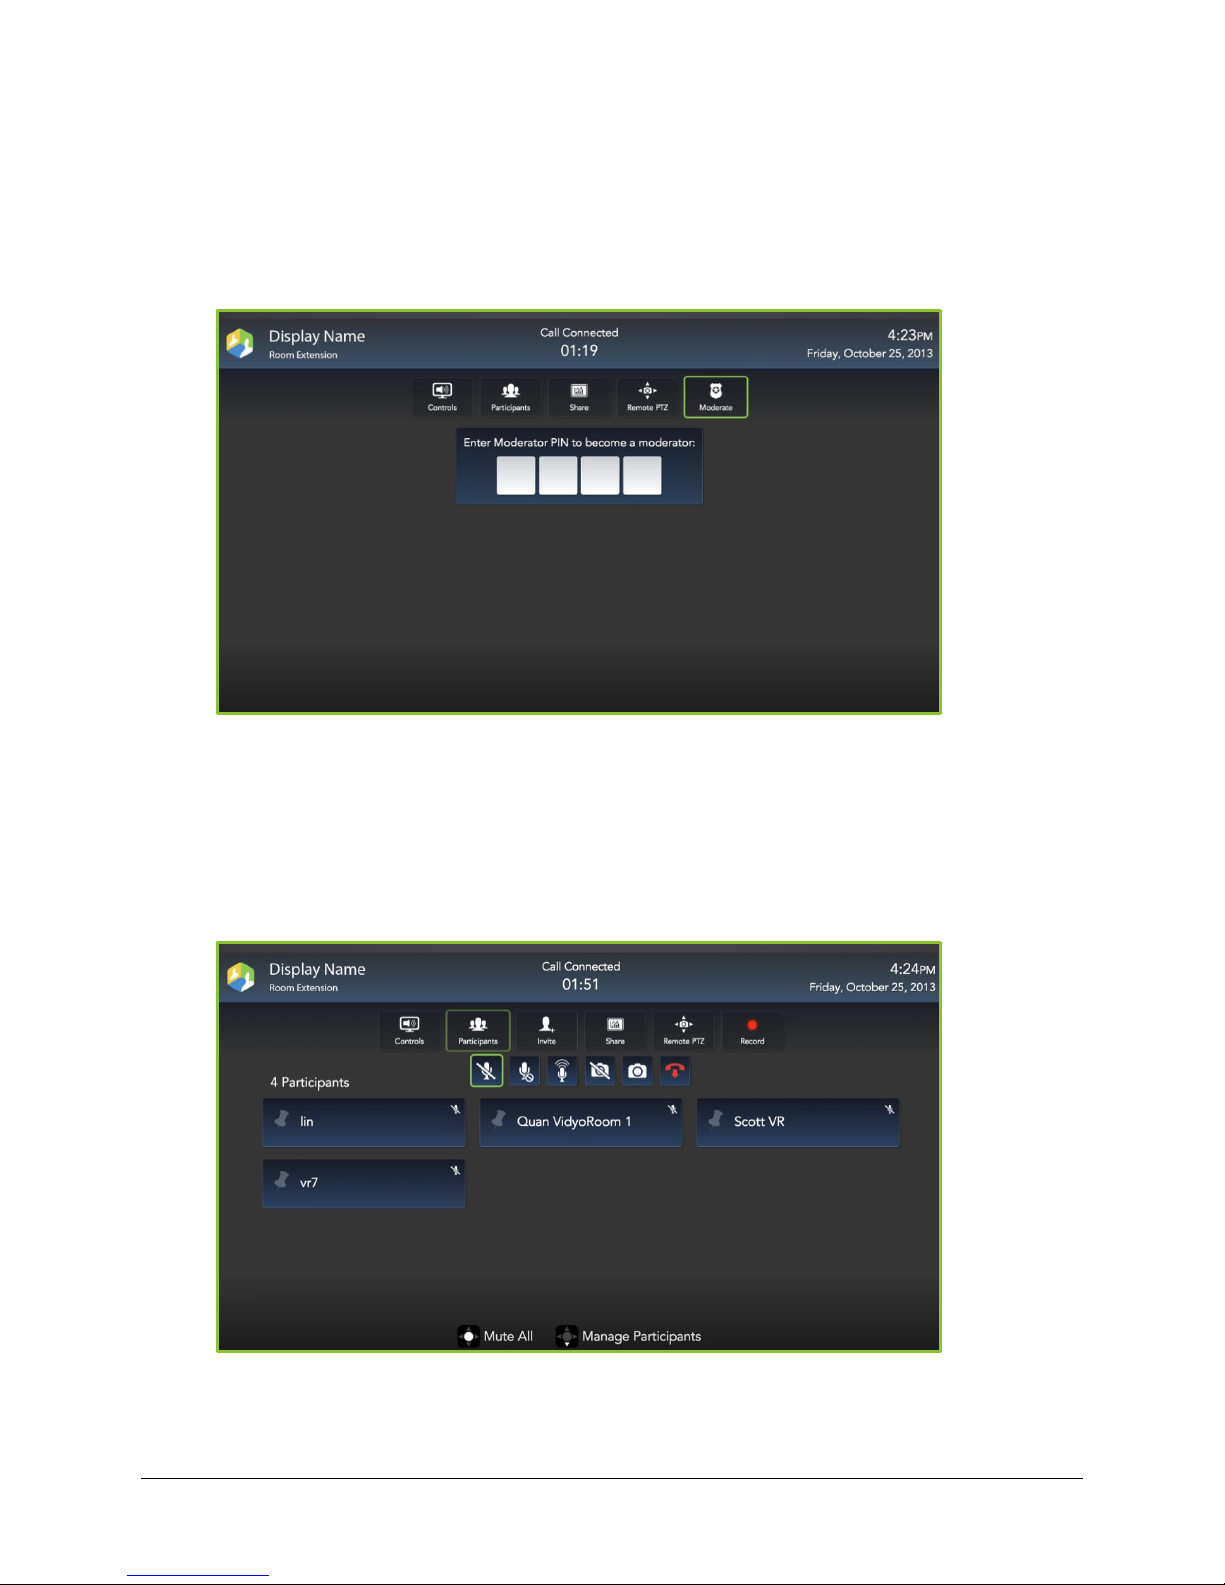
To become the moderator:
1. Press the MANAGE button on your handheld remote control.
VidyoDesktop Quick User Guide
or the
VidyoPortal Administrator
2. Select Moderate.
3. Enter the Moderator PIN.
You then become the conference moderator and the conference moderation functions,
such as Mute, Unmute, Hide Video, Show Video, and Remove, display on the
screen while you are in the call. For more information refer to the “Controlling a Meeting
Room” section in the
VidyoConferencing Administrator Guide
.
Participants
19
Page 23
VidyoRoom™ and VidyoPanorama™ 600 Quick User Guide
In-Call Viewing Modes
When in a conference, participants can easily modify the layout for a variety of viewing
experiences. Some of the more popular ones include the following:
Pinning participants to specific viewing screens. For more information, see Pinning Participants
to Specific Screens.
The following viewing methods are also available:
Toggle the conference participants from Non-Preferred mode to Preferred mode by
pressing # on your remote control.
Toggle the Share from Preferred mode to Full-Screen mode by pressing * on your remote
control.
Note This only applies when viewing content Shares on a single display (hybrid screen)
configuration. Otherwise, the Share is shown full-screen on the second (content) display.
Pinning Participants to Specific Screens
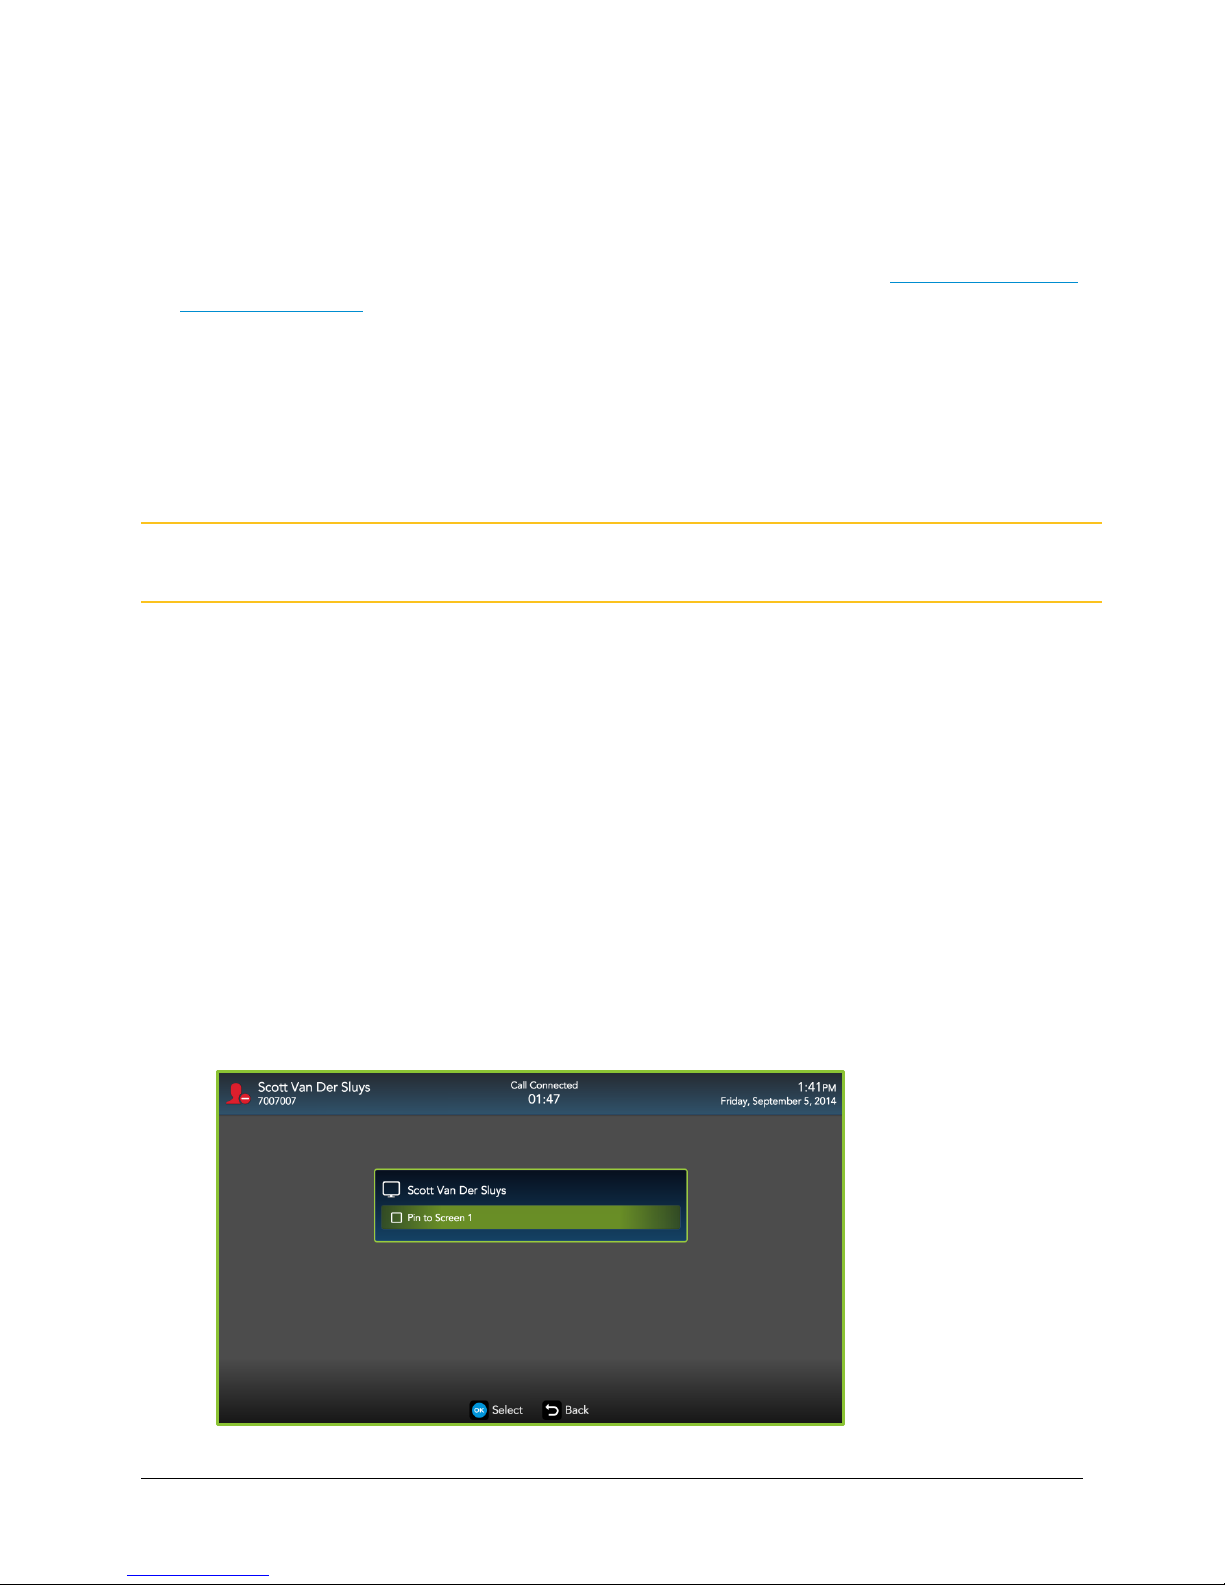
To pin participants to specific screens:
1. Press the MANAGE button on your handheld remote control.
The In-Call menu displays.
2. Use the arrow keys on your remote control to move right and select the
3. Use the arrow keys on your remote control to move down and highlight the conference
participant you wish to pin to a specific screen.
4. Select OK.
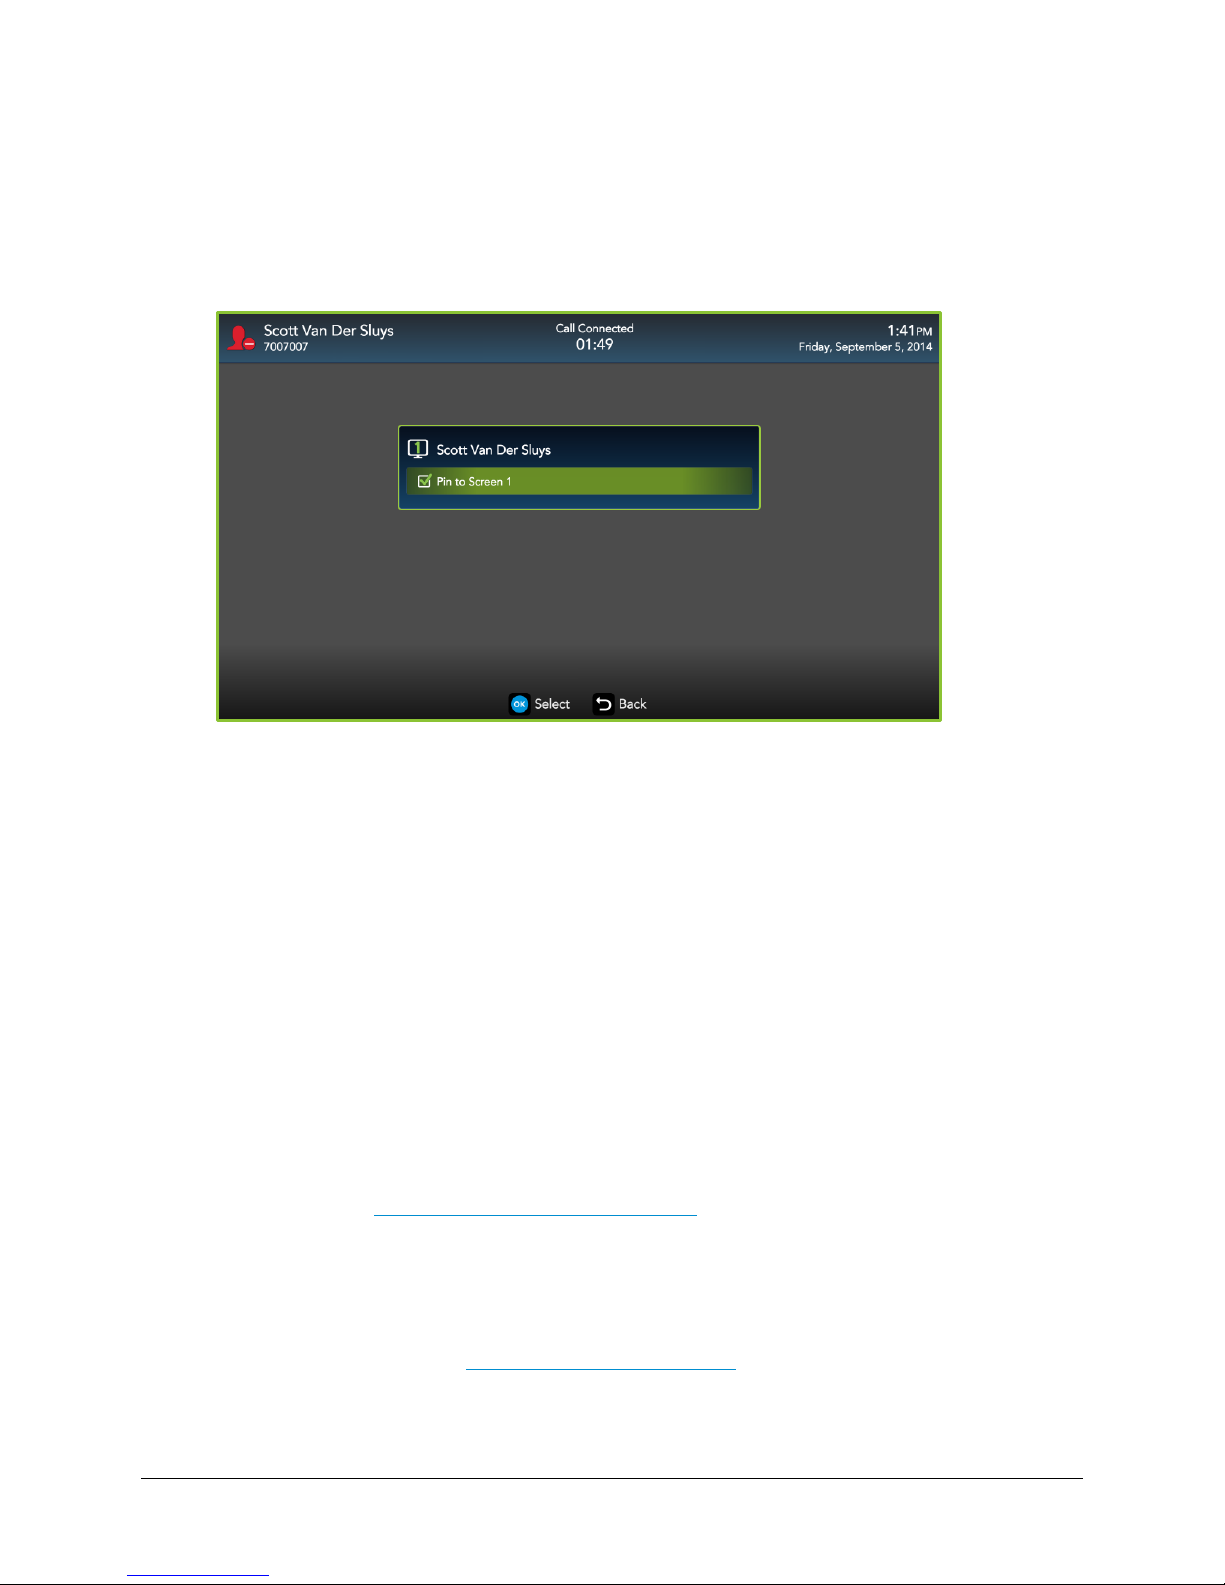
The conference participant is then shown along with the list of available screens. The
number of available screens depends on the number of screens you have connected to
your VidyoRoom or VidyoPanorama 600 system.
Participants
tab.
20
Page 24
VidyoRoom™ and VidyoPanorama™ 600 Quick User Guide
5. Use the arrow keys on your remote control to move down and highlight the specific screen
to which you wish to pin the conference participant.
6. Select OK.
The corresponding screen number now displays on the icon shown to the left of the
conference participant’s name, and the screen checkbox is selected.
The participant is now pinned to the selected screen and remains there regardless of
loudest speaker settings.
To move a participant to a different screen, repeat steps 3 through 6 but select a different
screen.
To unpin the participant and revert back to automatic layout, repeat steps 3 through 6, but
select the screen to which the participant is pinned and remove the check mark from that
screen.
Sharing Content to a Conference
To share content to a conference while in a call:
1. Connect a compatible content-sharing device to your laptop and your VidyoRoom system.
While your content now displays on the video screen of your VidyoRoom system, it is not
shared to the participants in your conference. This is called Projection Mode. For more
information, see Projecting Content in Your System.
The Content Share Encode Status icon displays in gray on the upper-right of the screen.
2. Select from your available content sources in the Content Source settings under the
Settings > Devices
tab.
For more information, see Configuring System Settings.
3. Press the Share button.
21
Page 25

VidyoRoom™ and VidyoPanorama™ 600 Quick User Guide
For more information, see The Infrared Remote Control, The Radio Frequency Remote
Control, Viewing the In-Call Menu, and Configuring System Settings.
Adjusting Your Content Source to Avoid Cropping
Some VidyoRoom systems may crop content you share from your computer screen. Other
computers default to a mirrored or duplicated multiple display output setting when connected to a
VidyoRoom system as a shared device. This section describes how to adjust your computer as
needed.
Note The following information is not applicable when using an Epiphan device.
Adjusting a Computer that Crops Content
To adjust a computer that crops content:
On a PC:
1. Select
2. Select 720p in the Resolution drop-down.
Control Panel > Display > Screen Resolution
.
On a Mac:
1. Select
2. Select the Scaled option.
3. Select 720p.
Display > Preferences
.
On all other platforms:
1. Select
2. Select the Maintain Display Scaling option.
Display > Advanced Settings
.
Adjusting a Computer that Defaults to a Mirrored Display Output Setting
To adjust a computer that defaults to a mirrored or duplicated multiple display output setting:
On all platforms:
1. Select Extend display from the Multiple Display field.
2. Select 720p for the resolution of your second display.
22
Page 26
3. Using the VidyoRemote 3 for iOS App
This chapter describes how to perform pre-call and in-call tasks with your VidyoRoom or
VidyoPanorama 600 system when you are using the VidyoRemote 3 for iOS app.
Downloading the VidyoRemote 3 for iOS App
Before downloading the VidyoRemote 3 for iOS app, ensure that the following requirements have
been met:
You must have an Apple iPad running iOS 7.1 or higher.
The VidyoRoom system must be reachable by the VidyoRemote 3 over the Wi-Fi network.
TCP ports 8090 and 443 http must be opened (bi-directional) to allow communication between
the VidyoRemote 3 and the VidyoRoom. TCP port 80 must also be opened for VidyoRoom SE;
however, it is not required for other VidyoRoom models.
For more information, contact your system administrator.
To download the VidyoRemote 3 for iOS app:
1. Download and install VidyoRemote 3 for iOS from the App Store.
2. Open VidyoRemote 3 for iOS on your device.
Adding VidyoRooms
To add VidyoRooms:
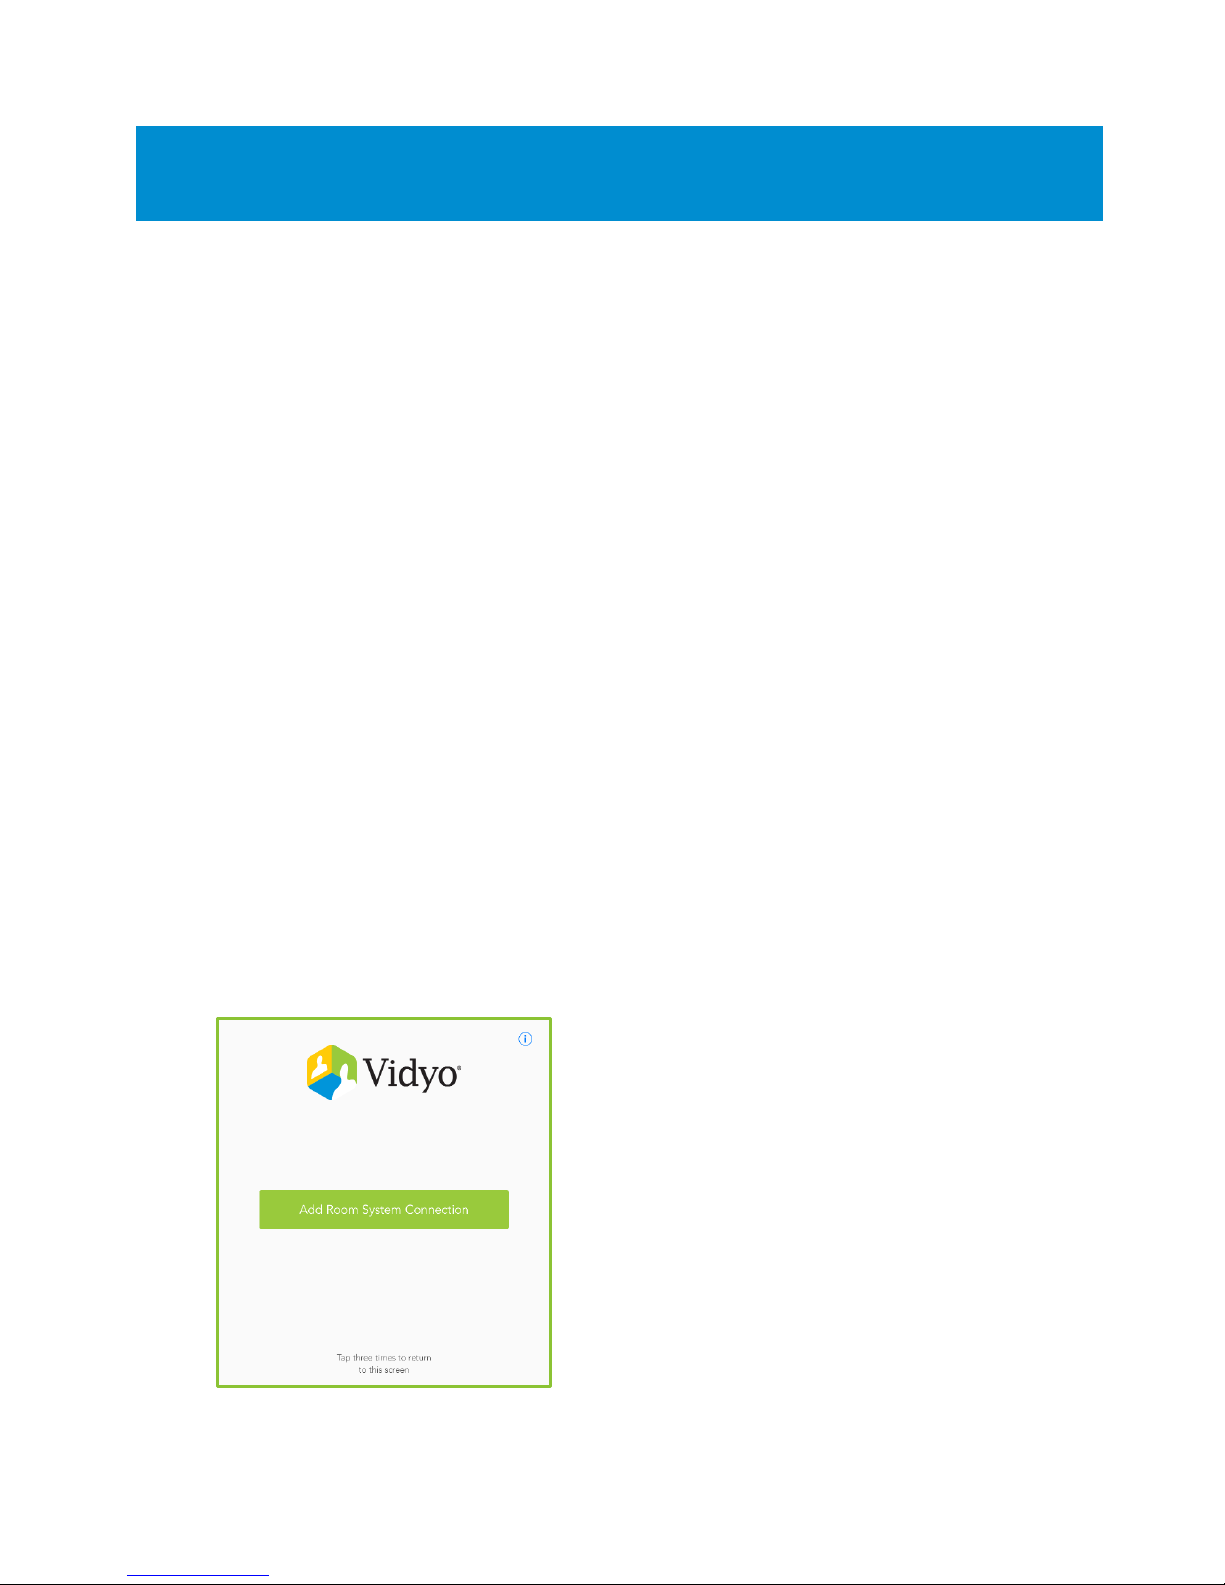
1. Click Add Room System Connection.
23
Page 27
VidyoRoom™ and VidyoPanorama™ 600 Quick User Guide
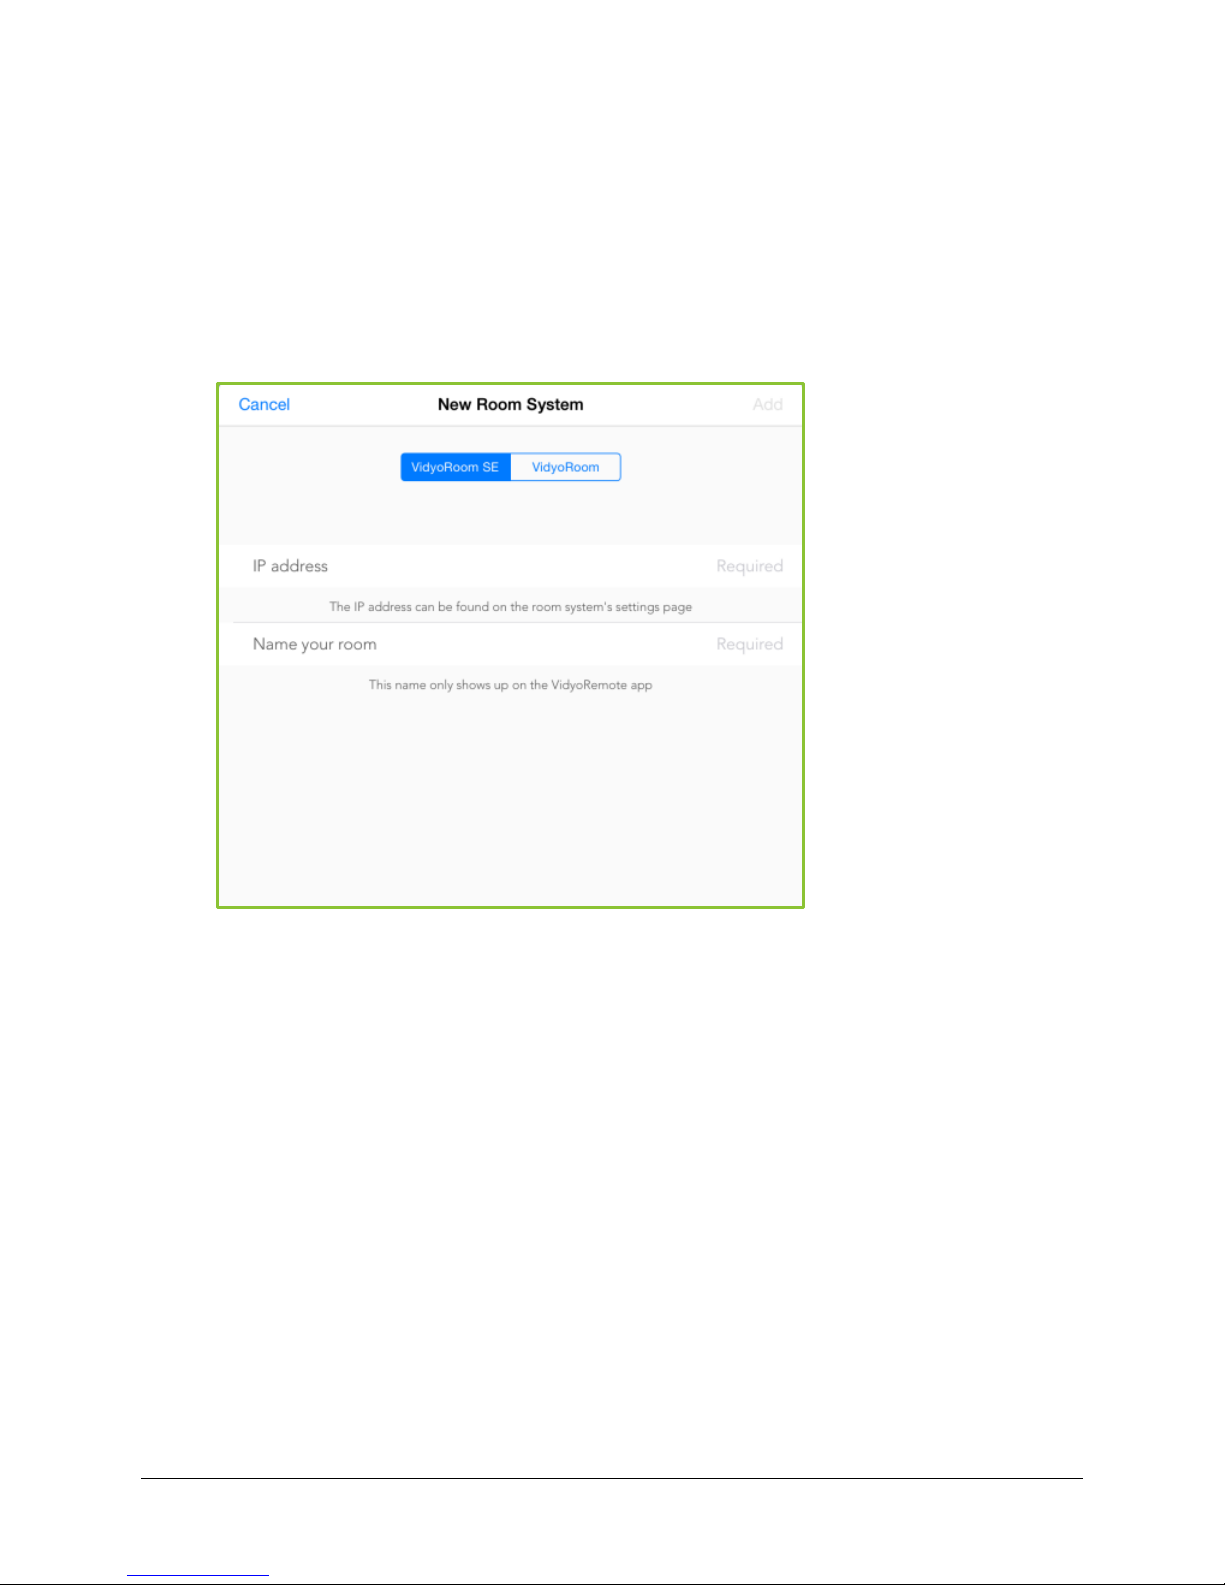
2. Click the VidyoRoom SE or VidyoRoom button depending on the type of VidyRoom system
that you are adding.
Select the VidyoRoom SE button if you are adding a software edition room system that you
want to deploy using your own hardware. Select the VidyoRoom button if you are adding a
VidyoRoom or VidyoPanaroma system.
3. Enter the IP Address for the VidyoRoom system.
4. Enter a name for the VidyRoom system.
The Add button becomes active.
5. Click the Add button.
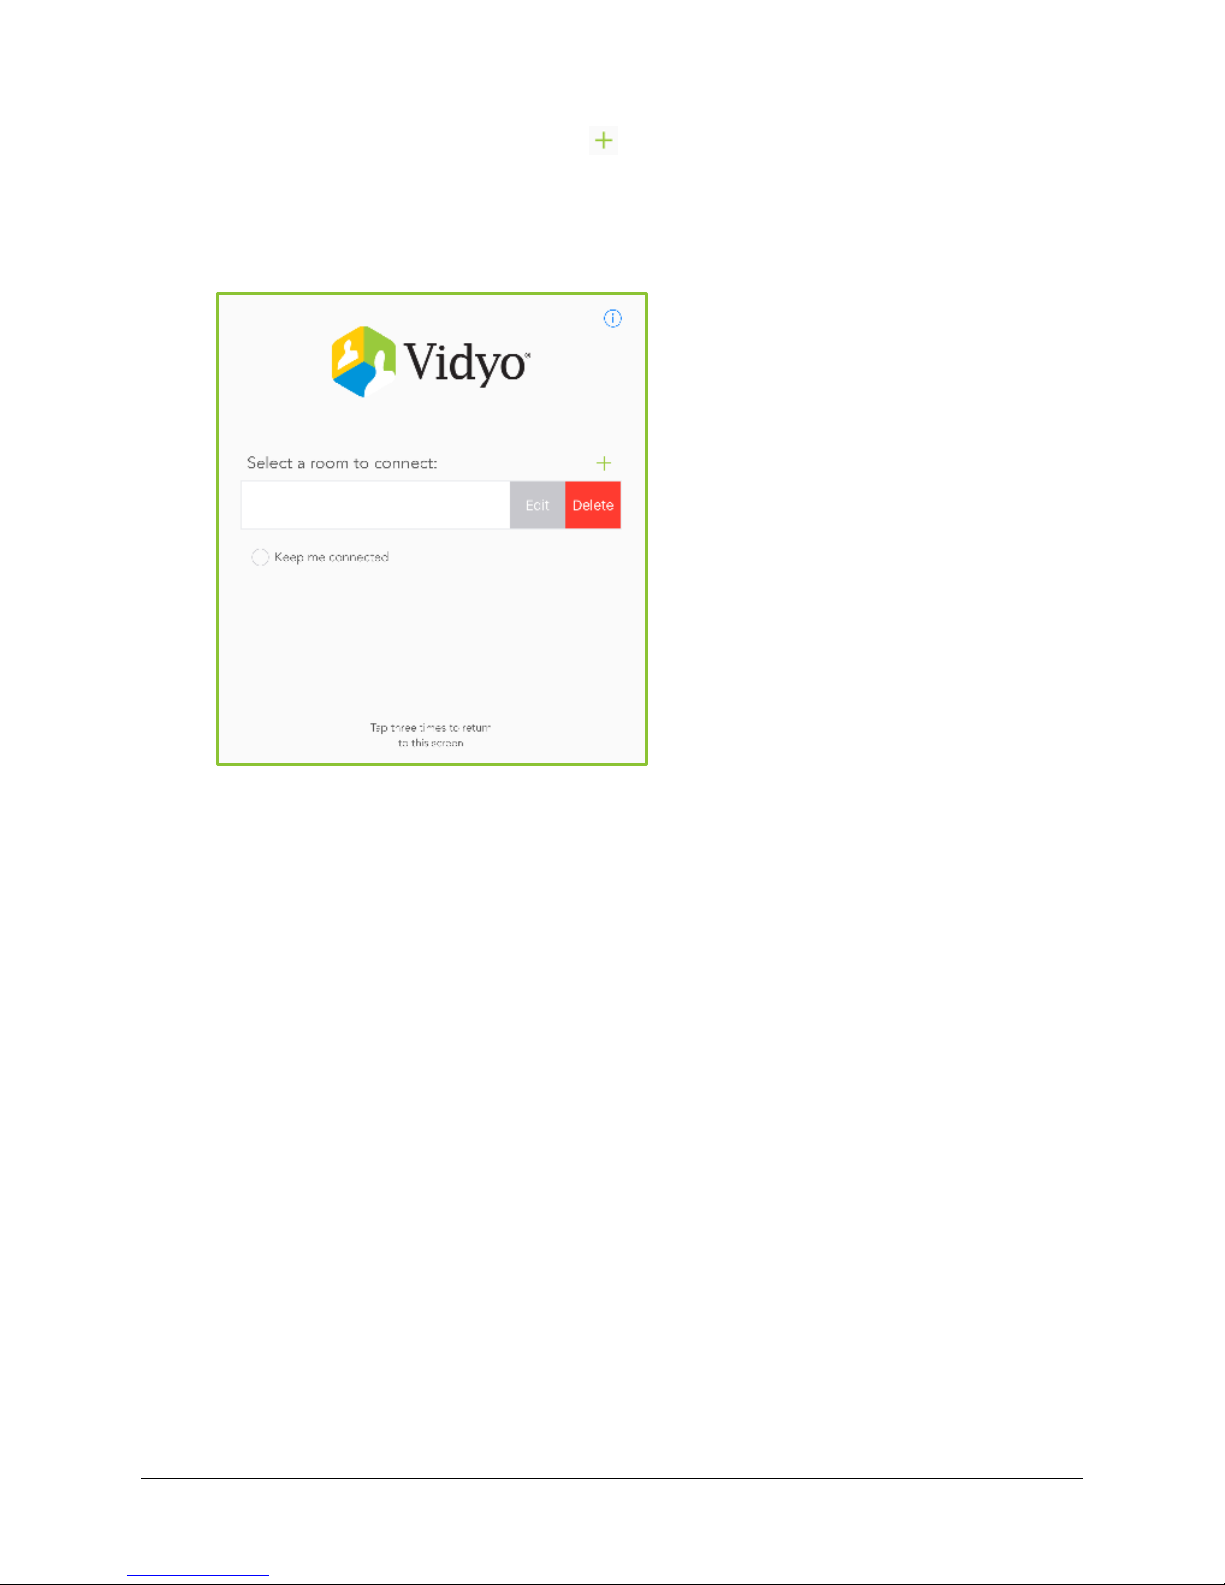
The room is added to the list of rooms on the main screen.
24
Page 28
VidyoRoom™ and VidyoPanorama™ 600 Quick User Guide
To add more VidyoRooms, click on the button on the main screen. To edit or delete a
room, swipe your finger from right to left over the VidyoRoom's name that you wish to edit
or delete. Once you pair successfully and start navigating to in-call/pre-call screens, tap
the screen three times to return to this screen to add, delete, or modify any rooms when
necessary.
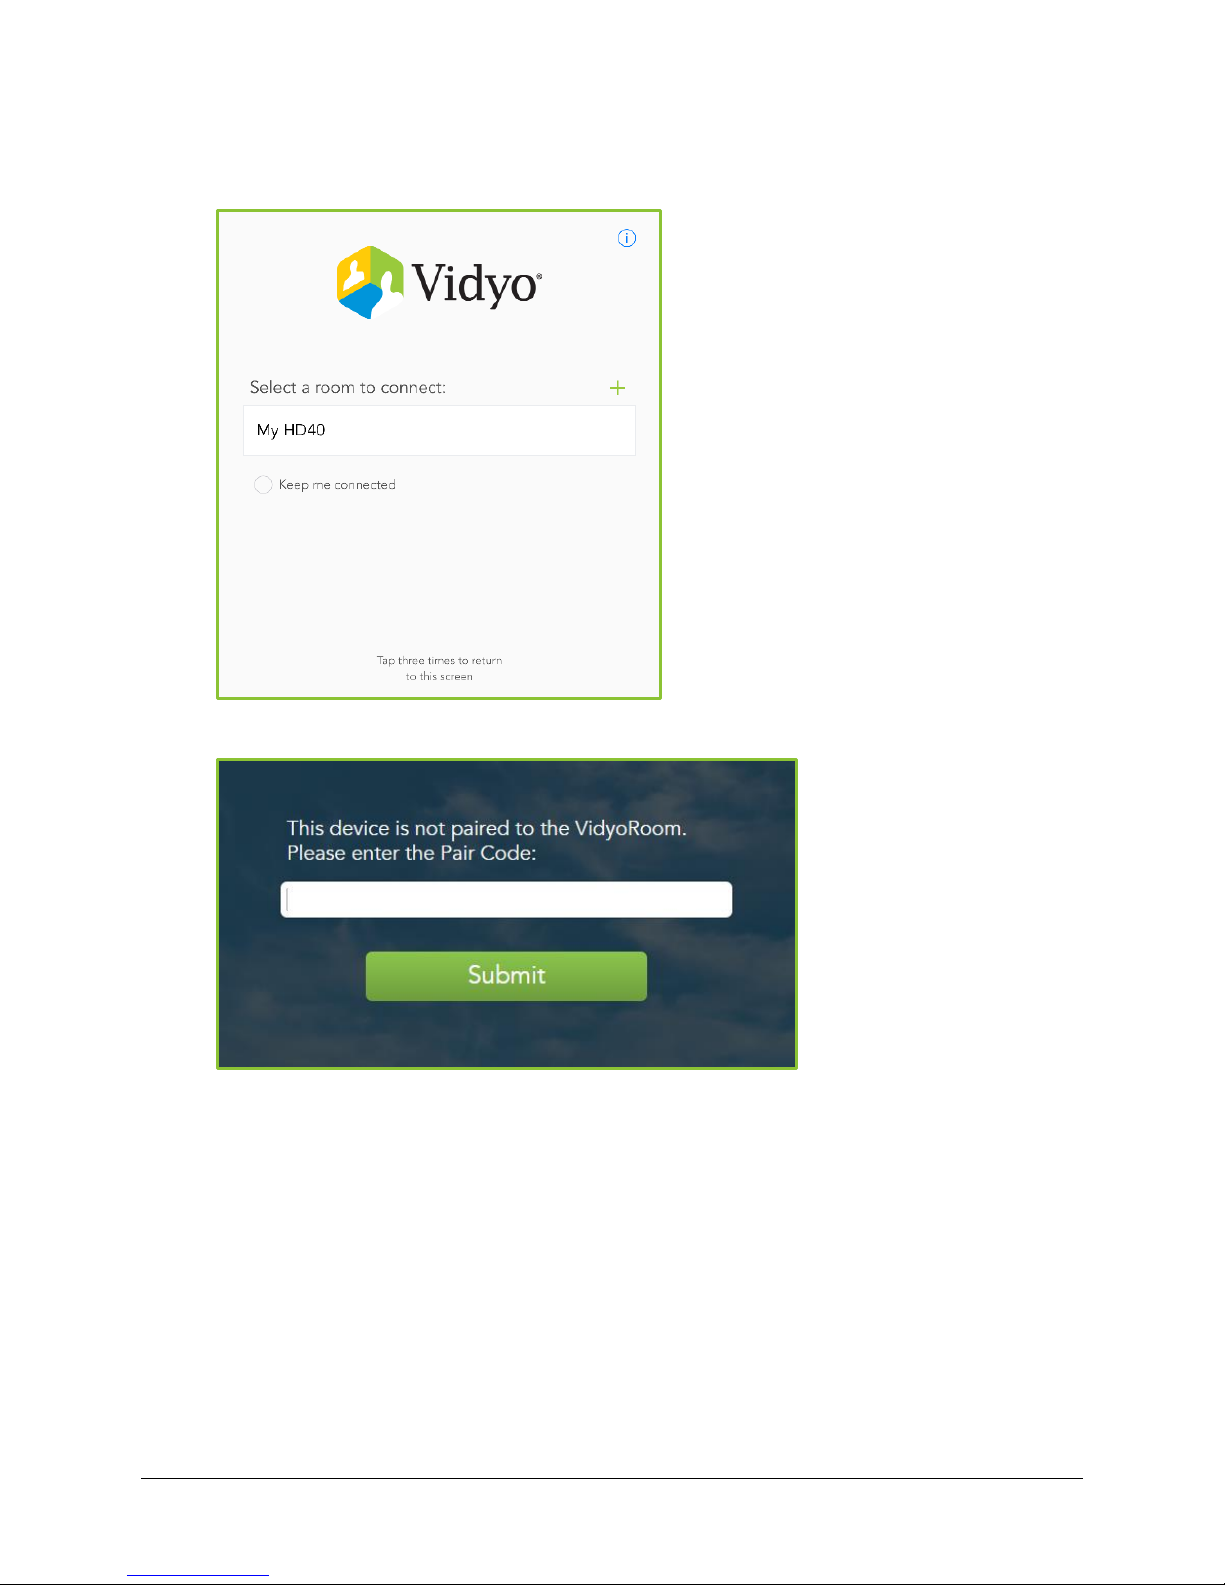
Pairing VidyoRemote 3 for iOS with Your VidyoRoom System
After logging in to a VidyoRoom system, you are immediately prompted for a pair code if one has
been set in the Admin UI. The pair code enables you to connect your device with your VidyoRoom
system. If you need to obtain the pair code, contact your system administrator. For more
information, see the “Configuring the Remote Control Interface” section in the
VidyoPanorama600 Administrator Guide
.
VidyoRoom and
25
Page 29
VidyoRoom™ and VidyoPanorama™ 600 Quick User Guide
To pair VidyoRemote 3 for iOS with your VidyoRoom system:
1. Click the name of the room from the Select a room to connect field.
2. Enter the Pair Code.
3. Tap Submit.
The system pairs your device.
26
Page 30
VidyoRoom™ and VidyoPanorama™ 600 Quick User Guide
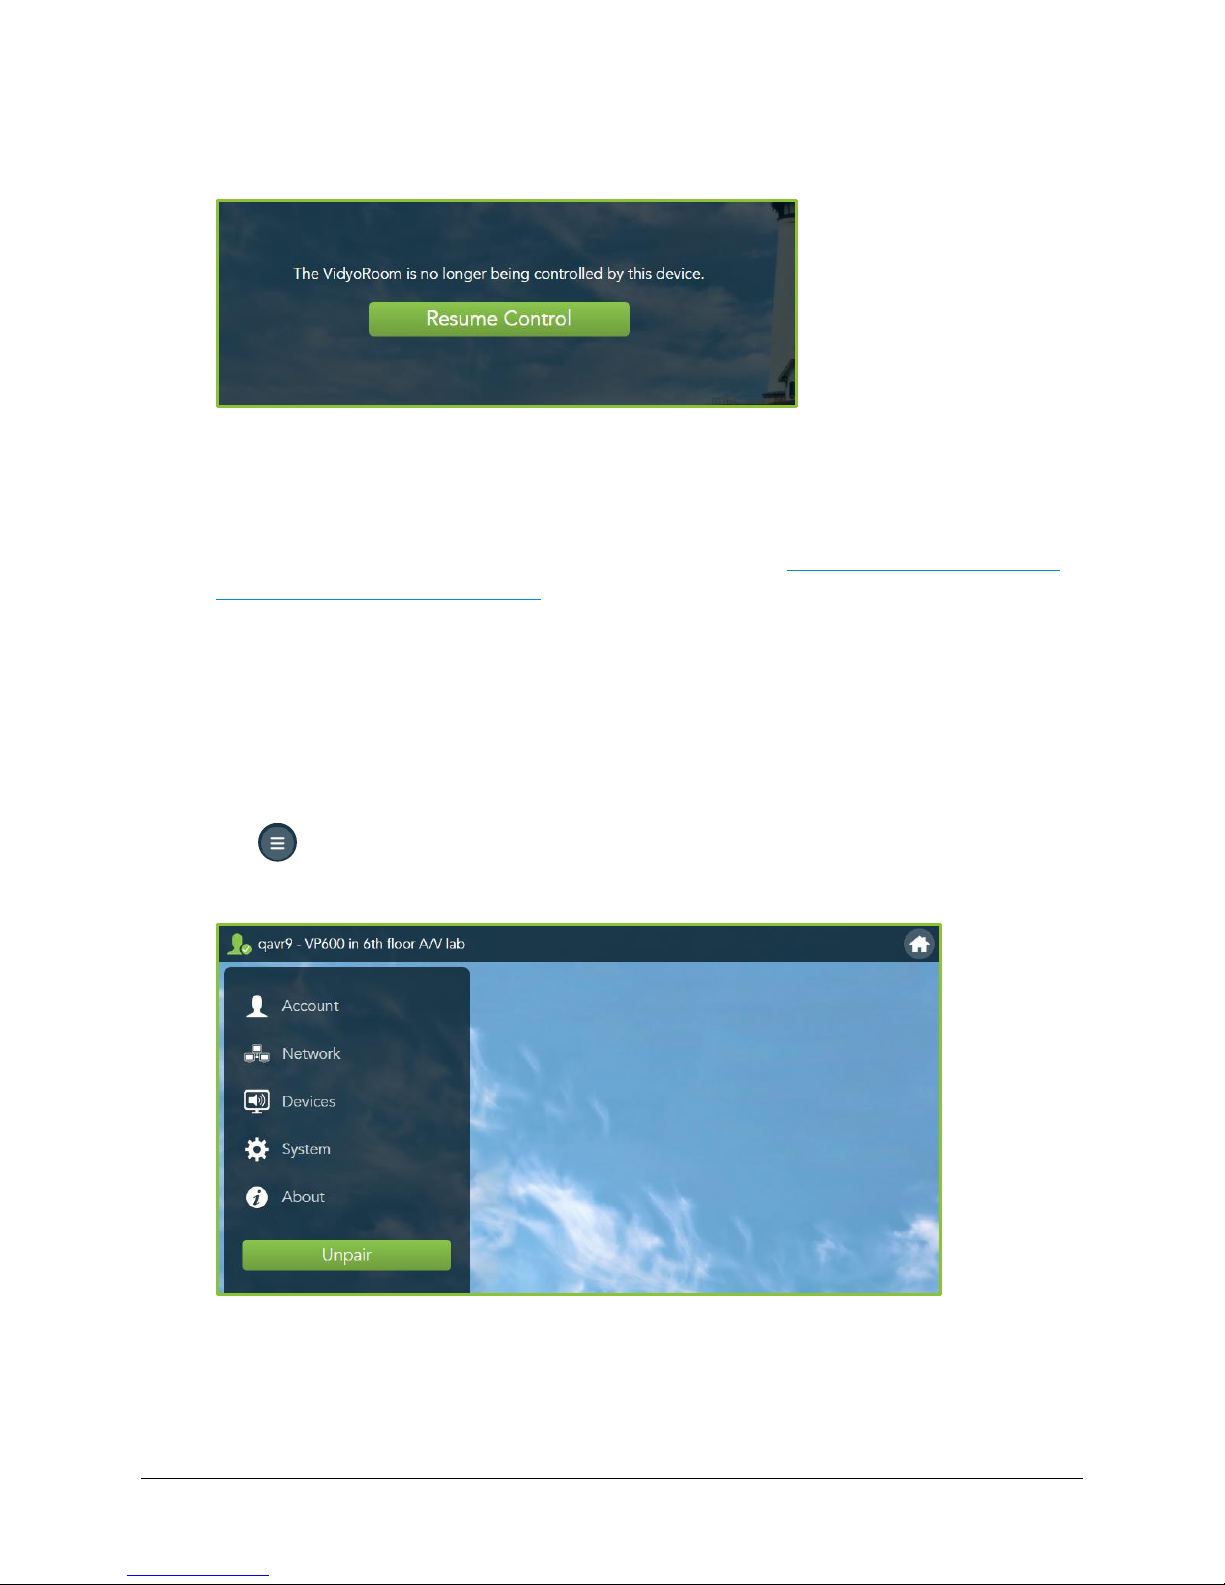
4. If another handheld remote control or VidyoRemote device is used to operate your system,
the following message displays:
a. Click Resume Control.
b. Re-enter the Pair Code.
c. Tap Submit.
For information about unpairing VidyoRemote 3 for iOS, see Unpairing VidyoRemote 3 for
iOS from Your VidyoRoom System.
Configuring System Settings
The Settings menu enables the VidyoRoom or VidyoPanorama 600 system administrator to
configure the system and can be accessed anytime (pre-call or in-call).
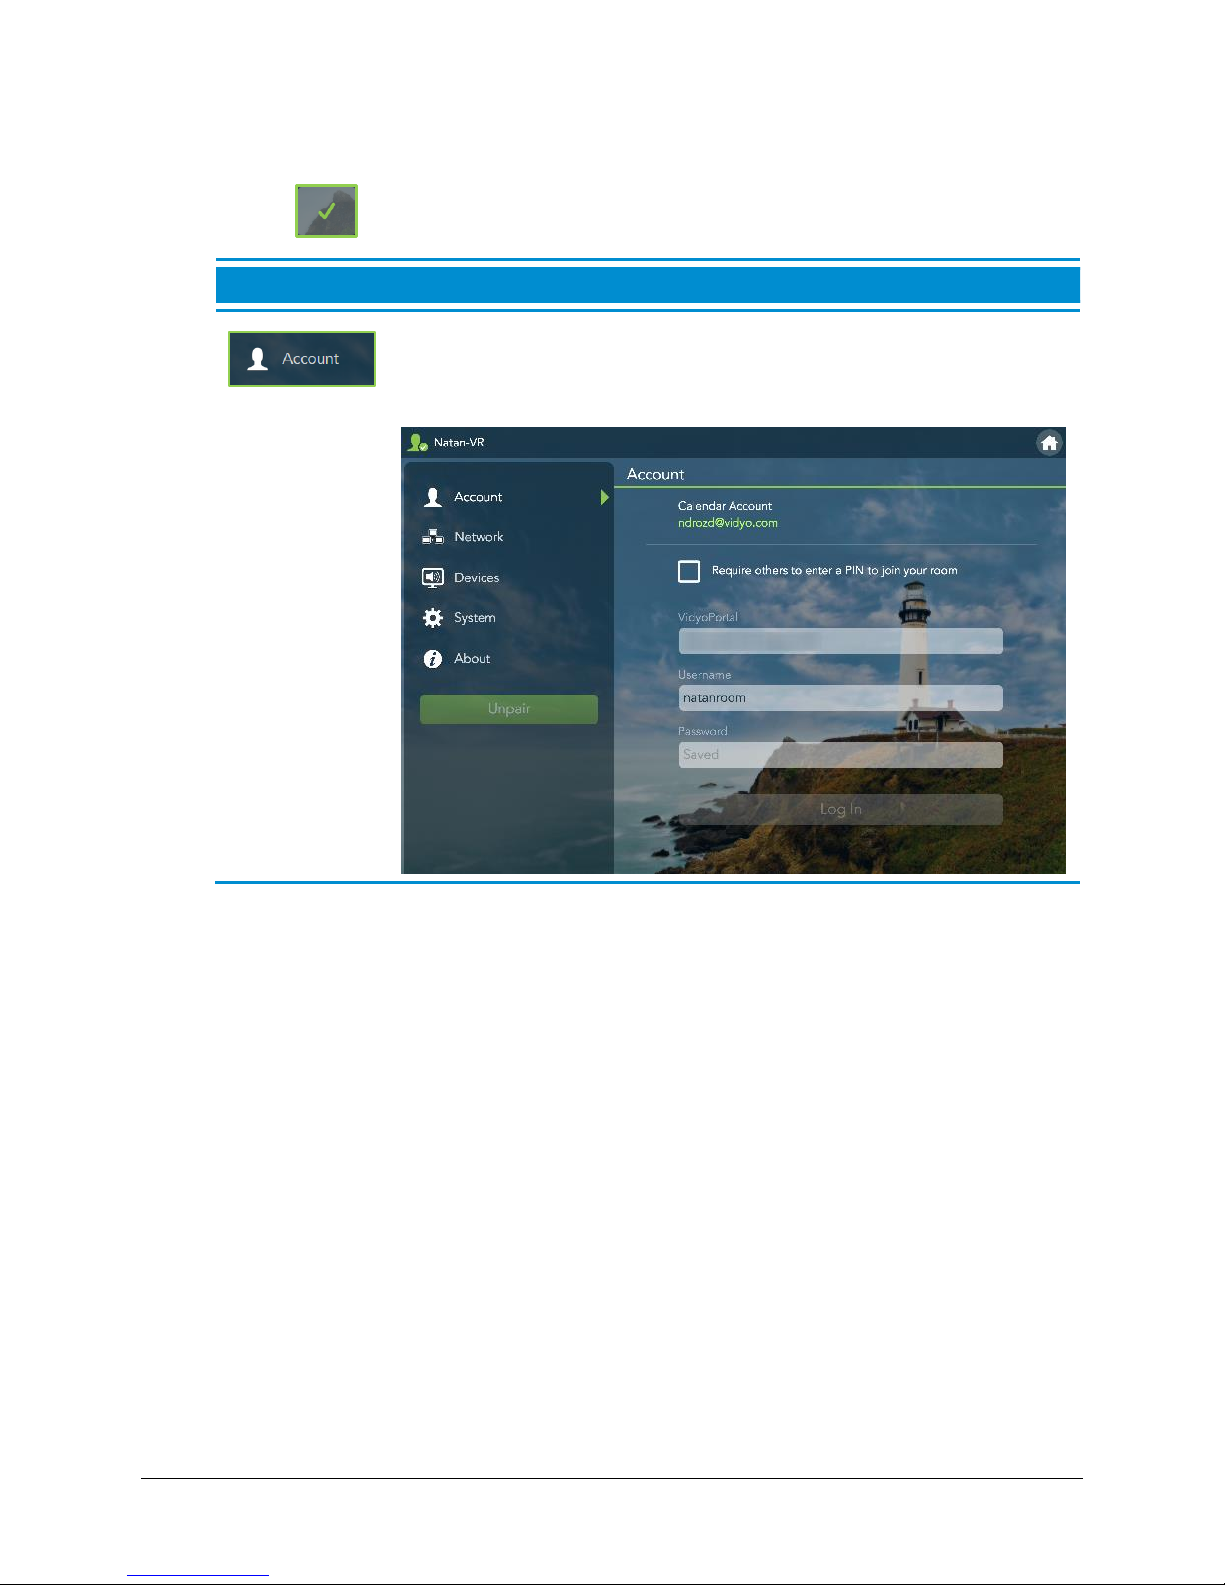
To configure the system settings:
1. Tap on the upper-right corner of any screen.
The Settings menu displays.
2. Tap any of the following items on the left menu to access the settings for that screen.
27
Page 31
VidyoRoom™ and VidyoPanorama™ 600 Quick User Guide
Icon
Description
Enter values for the VidyoPortal, username, and password and click
Log In to connect to your VidyoPortal.
Click Set Your Room PIN to PIN-protect your room.
If the Setting menus are protected with an access code you will be prompted by the app to
enter the access code when you try to modify a protected settings, enter your access code
and tap .
28
Page 32
VidyoRoom™ and VidyoPanorama™ 600 Quick User Guide
Icon
Description
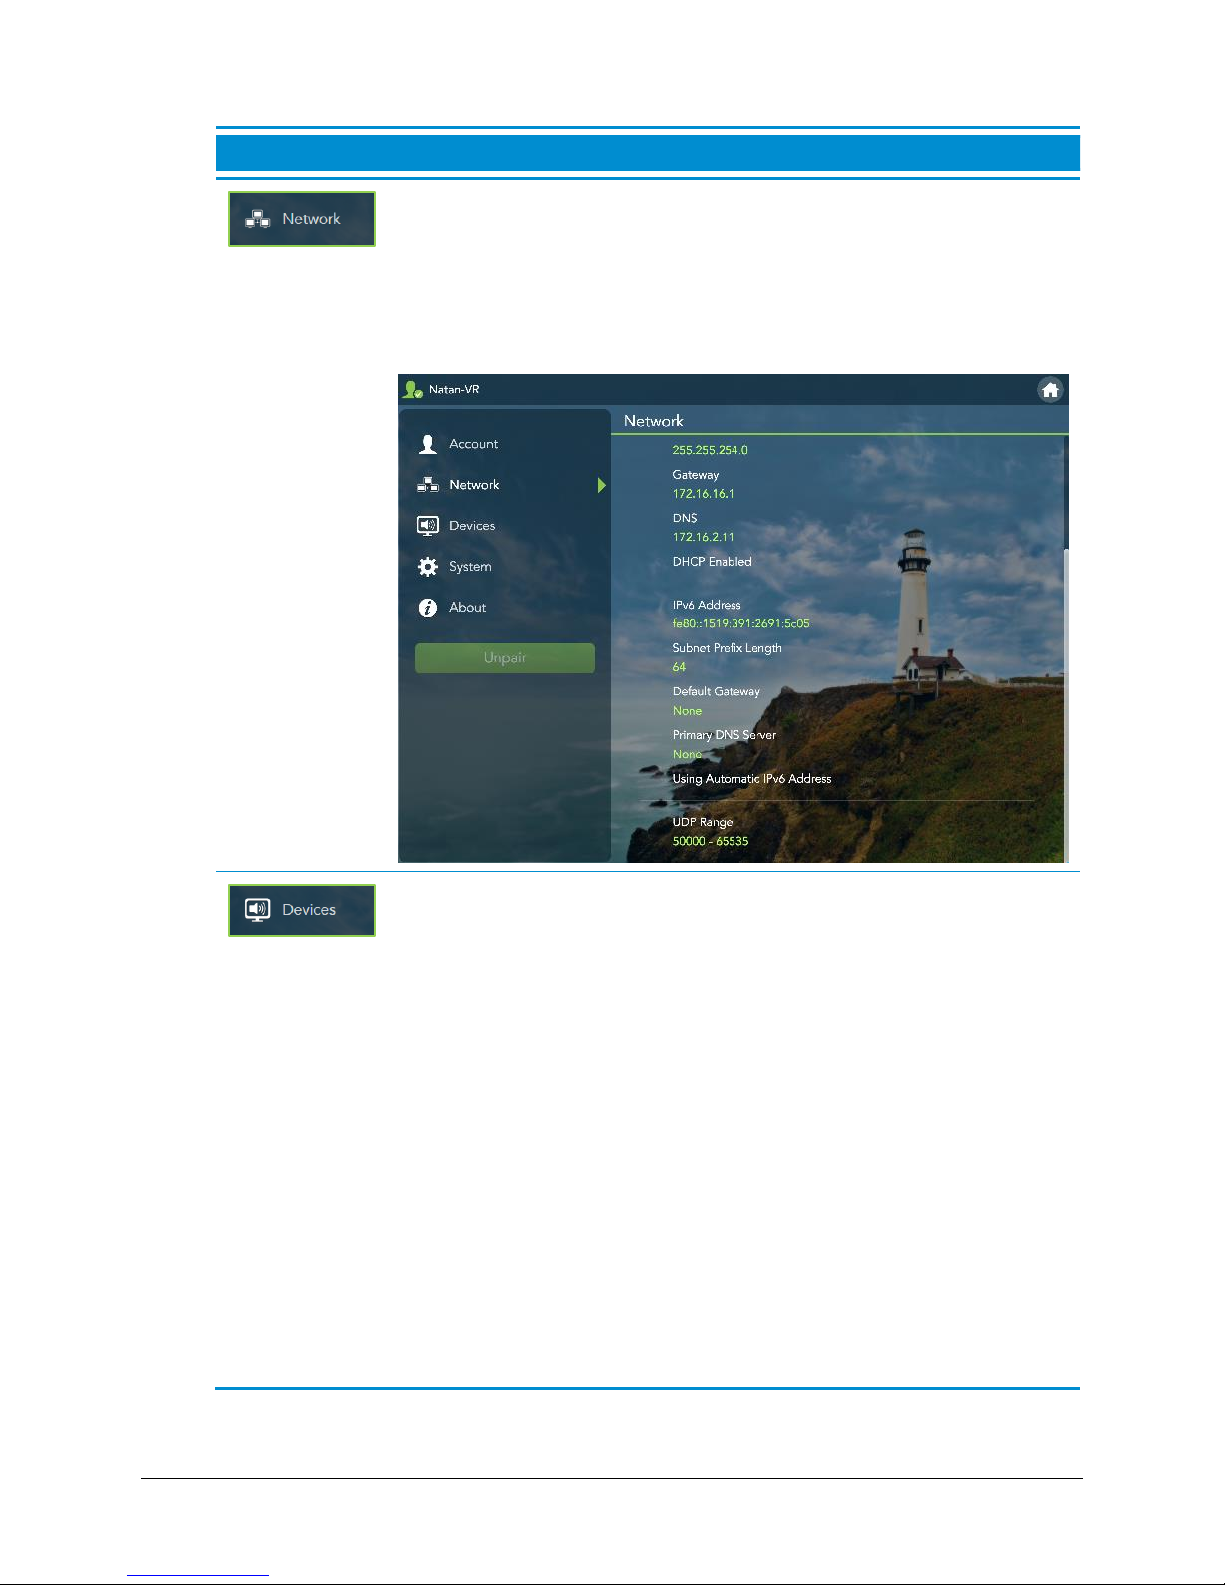
Network settings made by your system administrator display for
viewing only (read-only) on this screen and include your MAC address,
whether or not VidyoProxy is enabled, and specific UDP range values.
IPv4 and IPv6 (if configured) settings also display showing the IP
address, subnet, gateway, DNS, and whether or not your system is set
to use DHCP and automatically obtain its IP address.
Select Microphone, Speaker, Camera, and Content Source settings:
For the Microphone settings, you can adjust the microphone level,
select from available microphones, and enable or disable echo
cancellation.
For the Speakers settings, you can adjust the speaker volume and
select from available speakers.
For the Camera settings, you can enable or disable the video feed,
turn self-view on or off, and turn the backlight setting on or off. You
can also select your camera input, the resolution, pan, tilt or zoom
adjust your camera, and select if participants are allowed to pan,
tilt, or zoom adjust your camera.
For the Content Source settings, you can select from available
content sources, select whether to automatically share content to
conferences when you join then, and/or preview your share locally
to review your automatic share before sending it to conferences.
29
Page 33
VidyoRoom™ and VidyoPanorama™ 600 Quick User Guide
Icon
Description
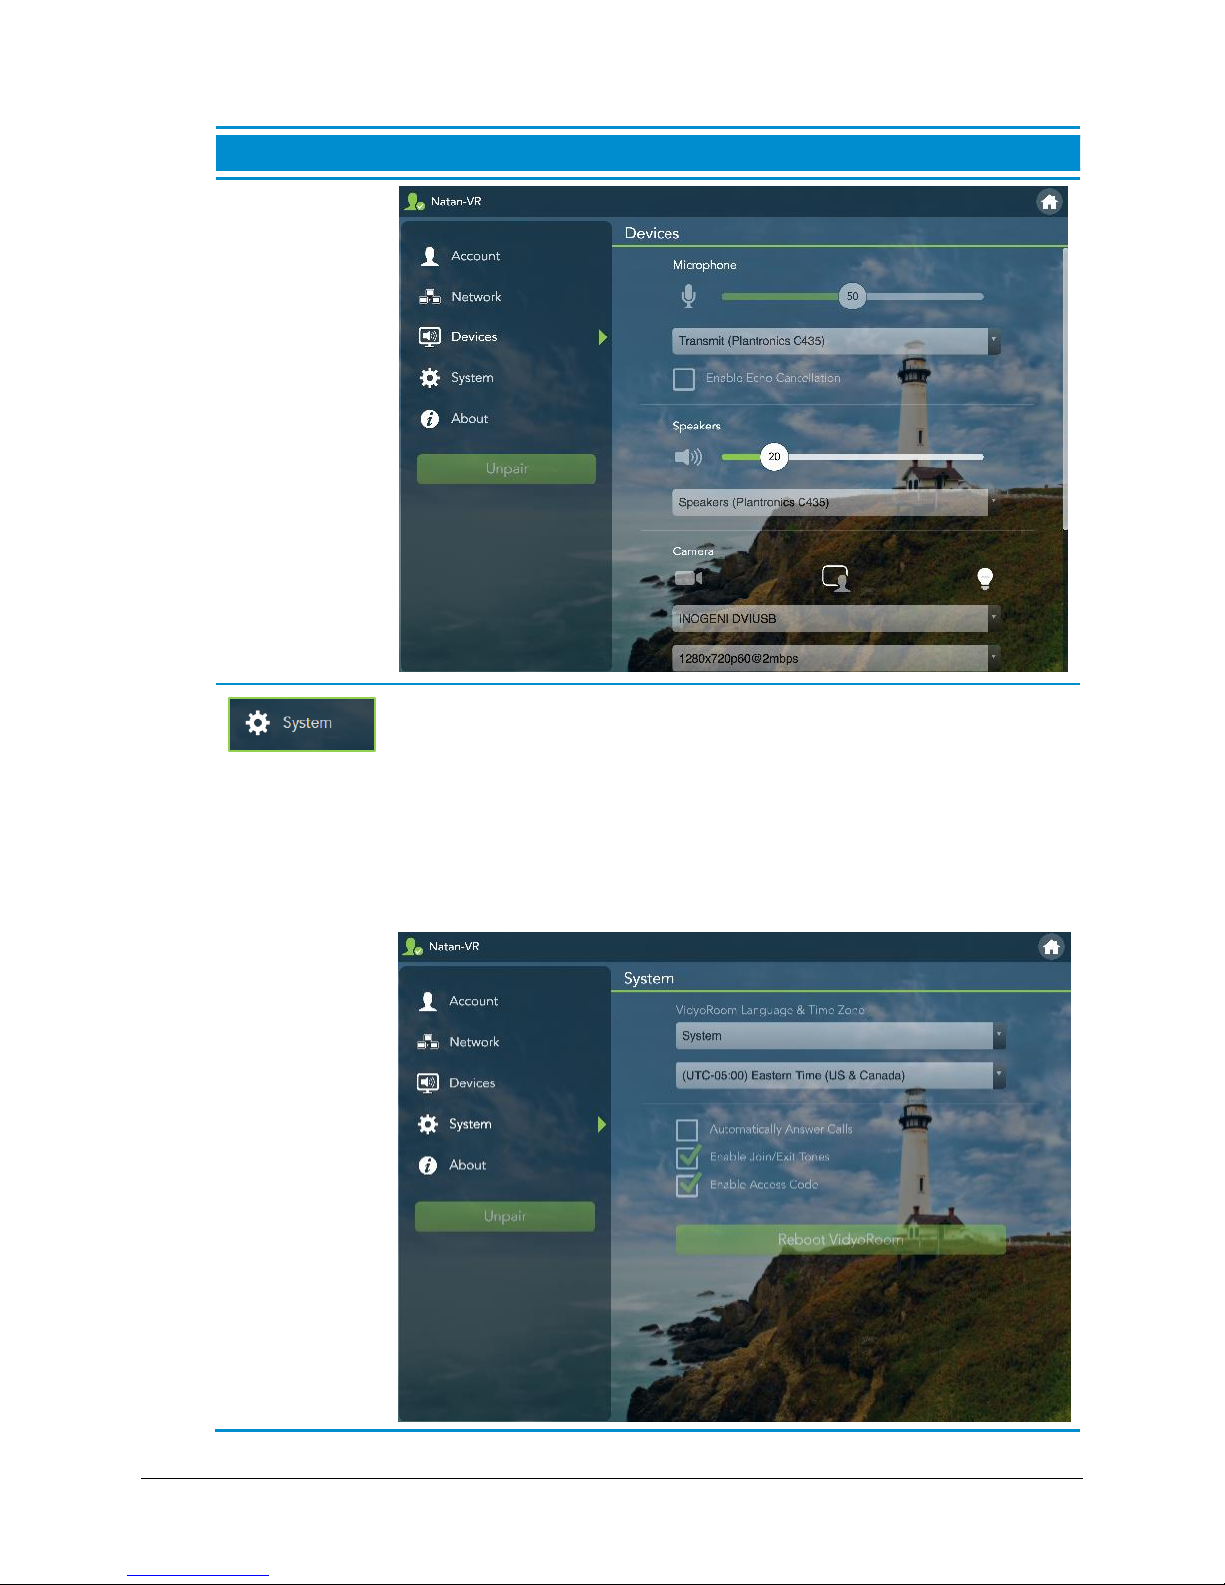
Select the language and time zone of the VidyoRoom, select whether
to automatically answer incoming calls, enable the system to play
tones when participants join or exit conferences, and enable an
access code. If you enable an access code, users will have to enter
the code in order to make changes to various screens or fields, such
as the
Account
and
Network
screens.
You can also tap Reboot VidyoRoom on this screen to reboot your
machine.
30
Page 34
VidyoRoom™ and VidyoPanorama™ 600 Quick User Guide
Icon
Description
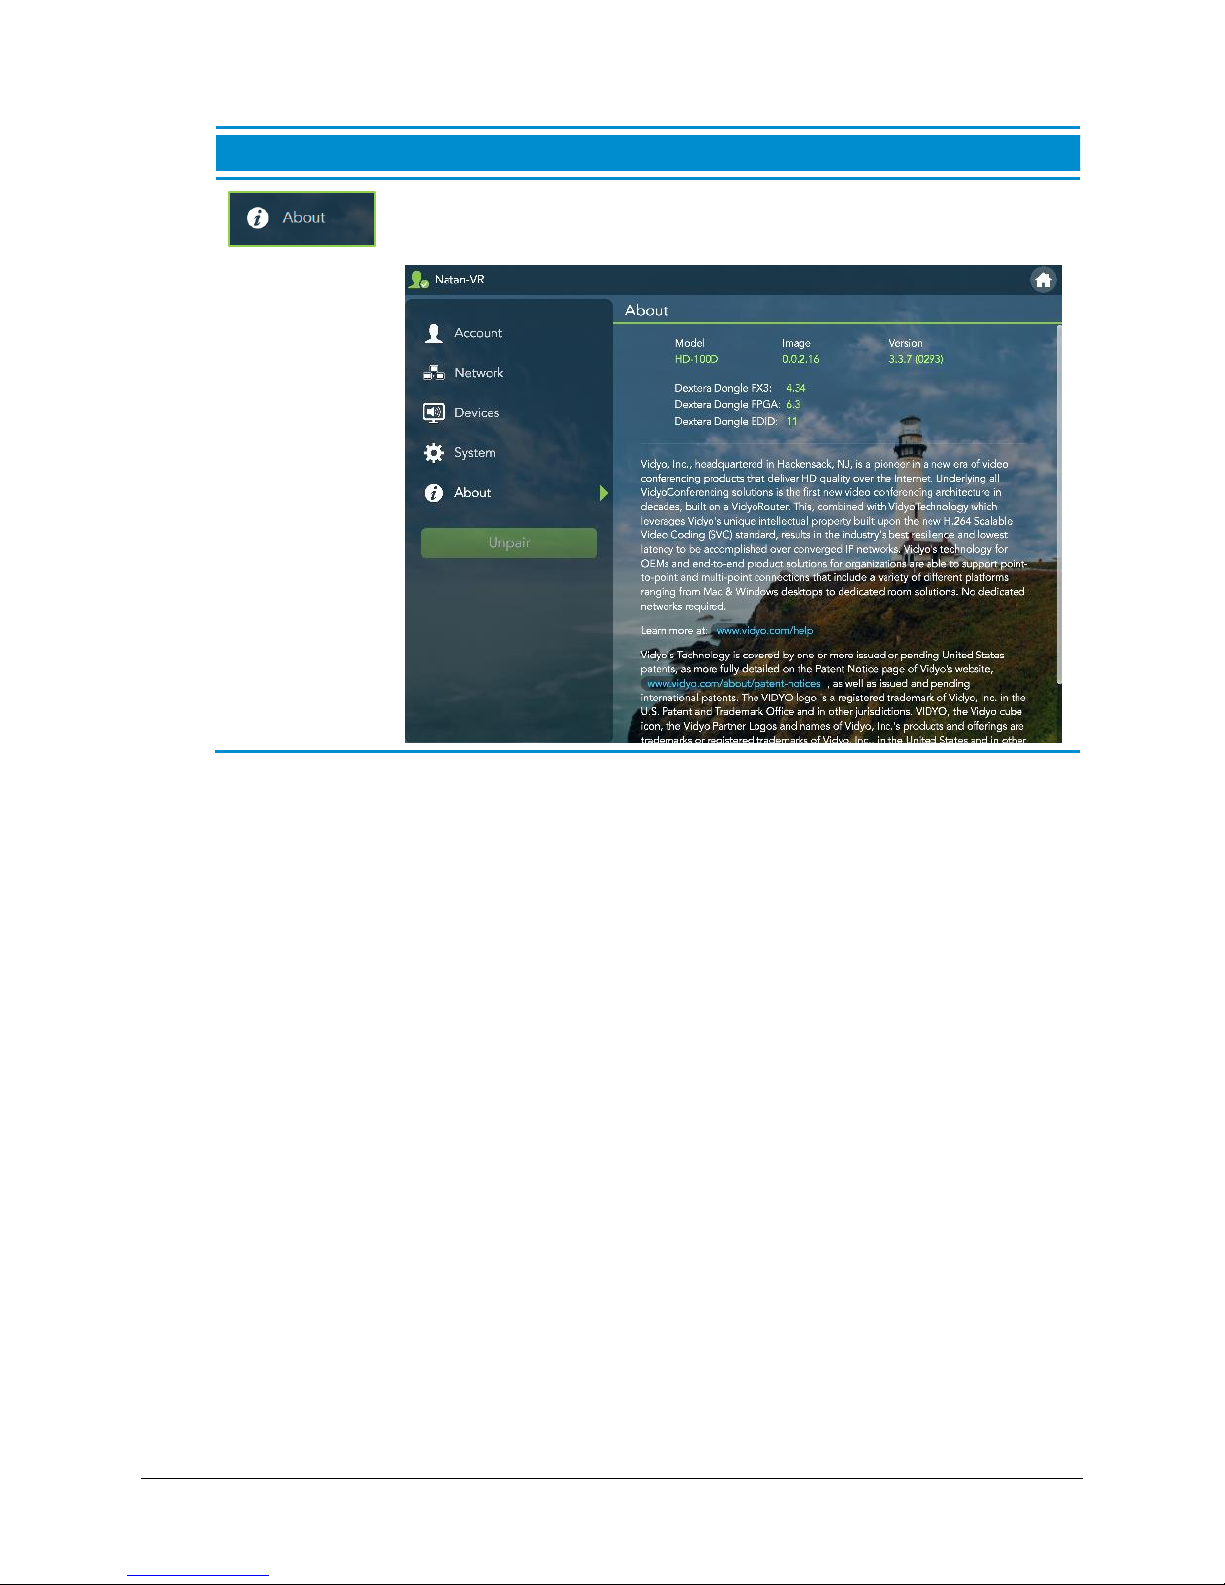
View the VidyoRoom or VidyoPanorama 600 model, image, version
being used, the Vidyo company description, INOGENI, and the
copyright statement.
31
Page 35
Pre-Call
2 3 7 6 1 8 4
5
Viewing the Pre-Call Menu
VidyoRoom™ and VidyoPanorama™ 600 Quick User Guide
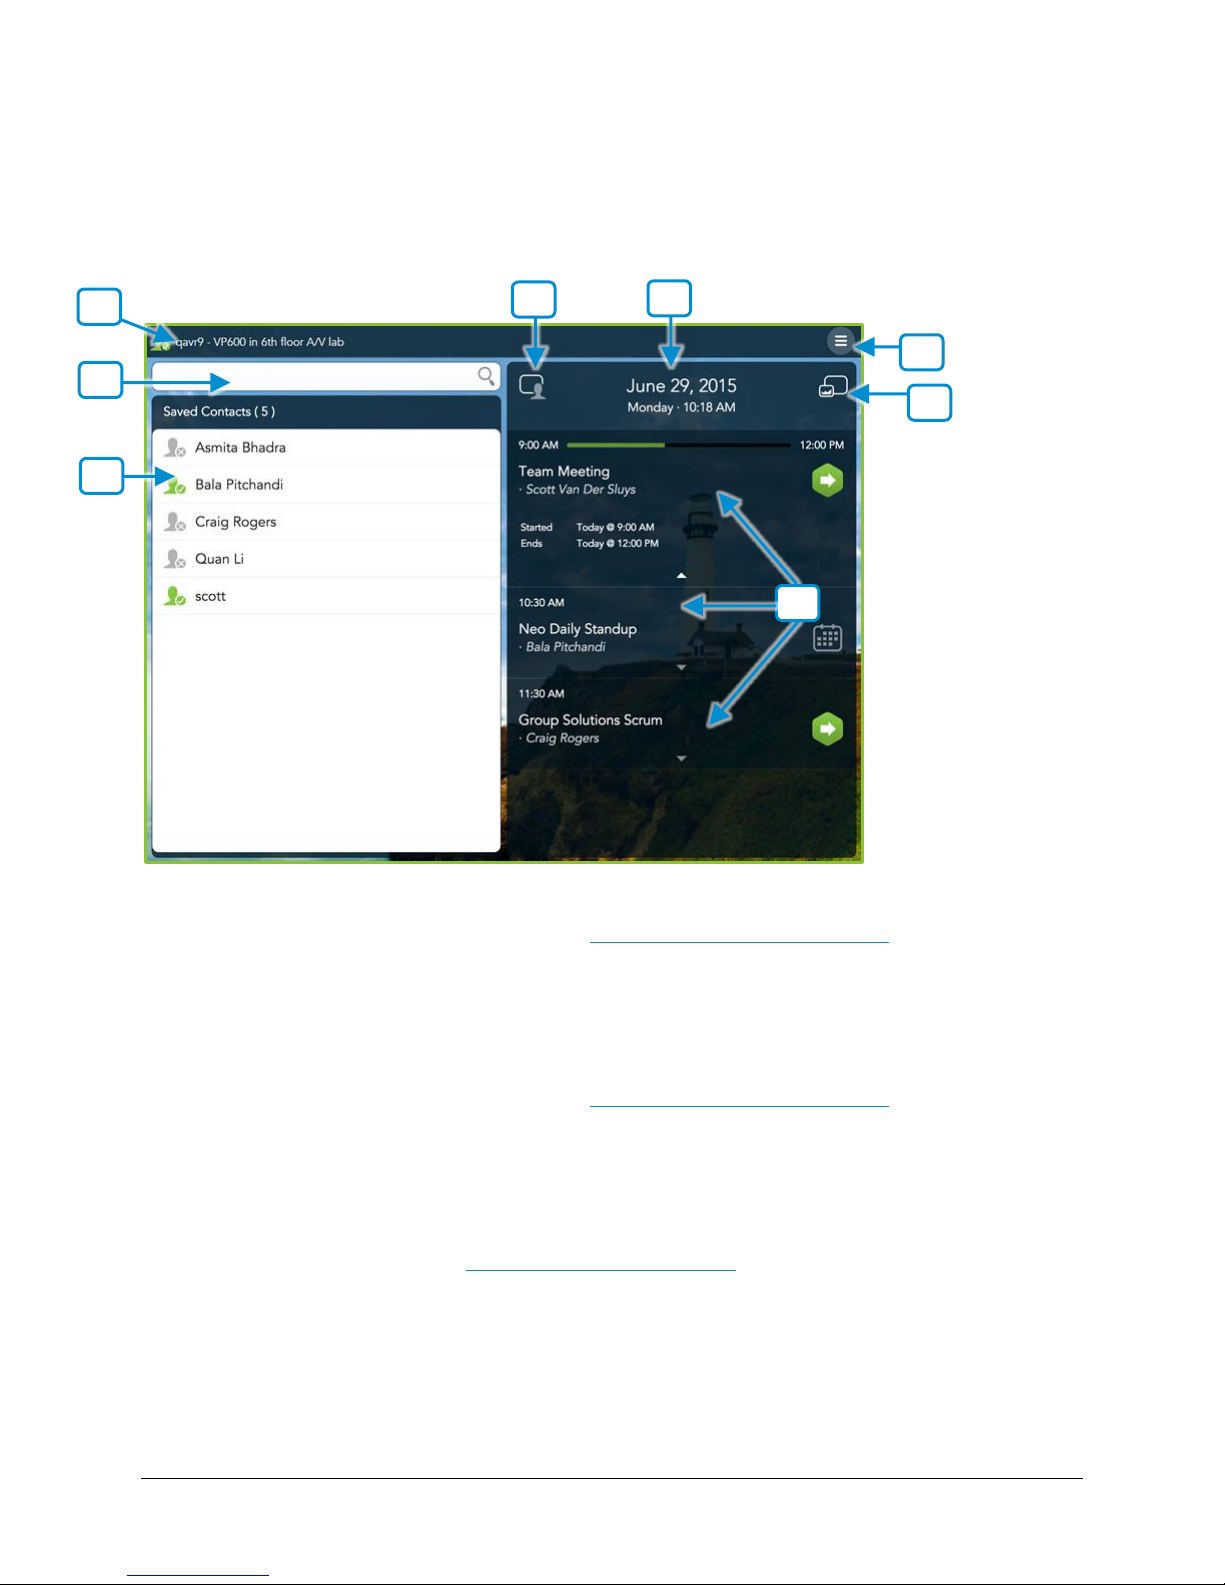
1. The status and name of your VidyoRoom.
For more information about status, see Understanding the Status Icons.
2. The search box where you can enter a name to search for a contact or room.
As soon as you begin typing, search results display in the Directory.
3. The list of your contacts and their status.
For more information about status, see Understanding the Status Icons.
4. Icon that toggles self-view.
5. The VidyoRoom or VidyoPanorama 600 system date and time.
6. The System Settings button.
For more information, see Configuring System Settings.
7. Icon that toggles local share preview (Projection).
8. A list of upcoming appointments from your calendar (if your system administrator has
synchronized your VidyoRoom or VidyoPanorama 600 system with a Microsoft Exchange™
calendar, a Google Calendar™, or another supported calendar).
32
Page 36
VidyoRoom™ and VidyoPanorama™ 600 Quick User Guide
For more information, see Using the VidyoRoom Calendar.
Joining a Contact’s Room or Calling a Contact Directly
To join a contact’s room or call a contact directly:
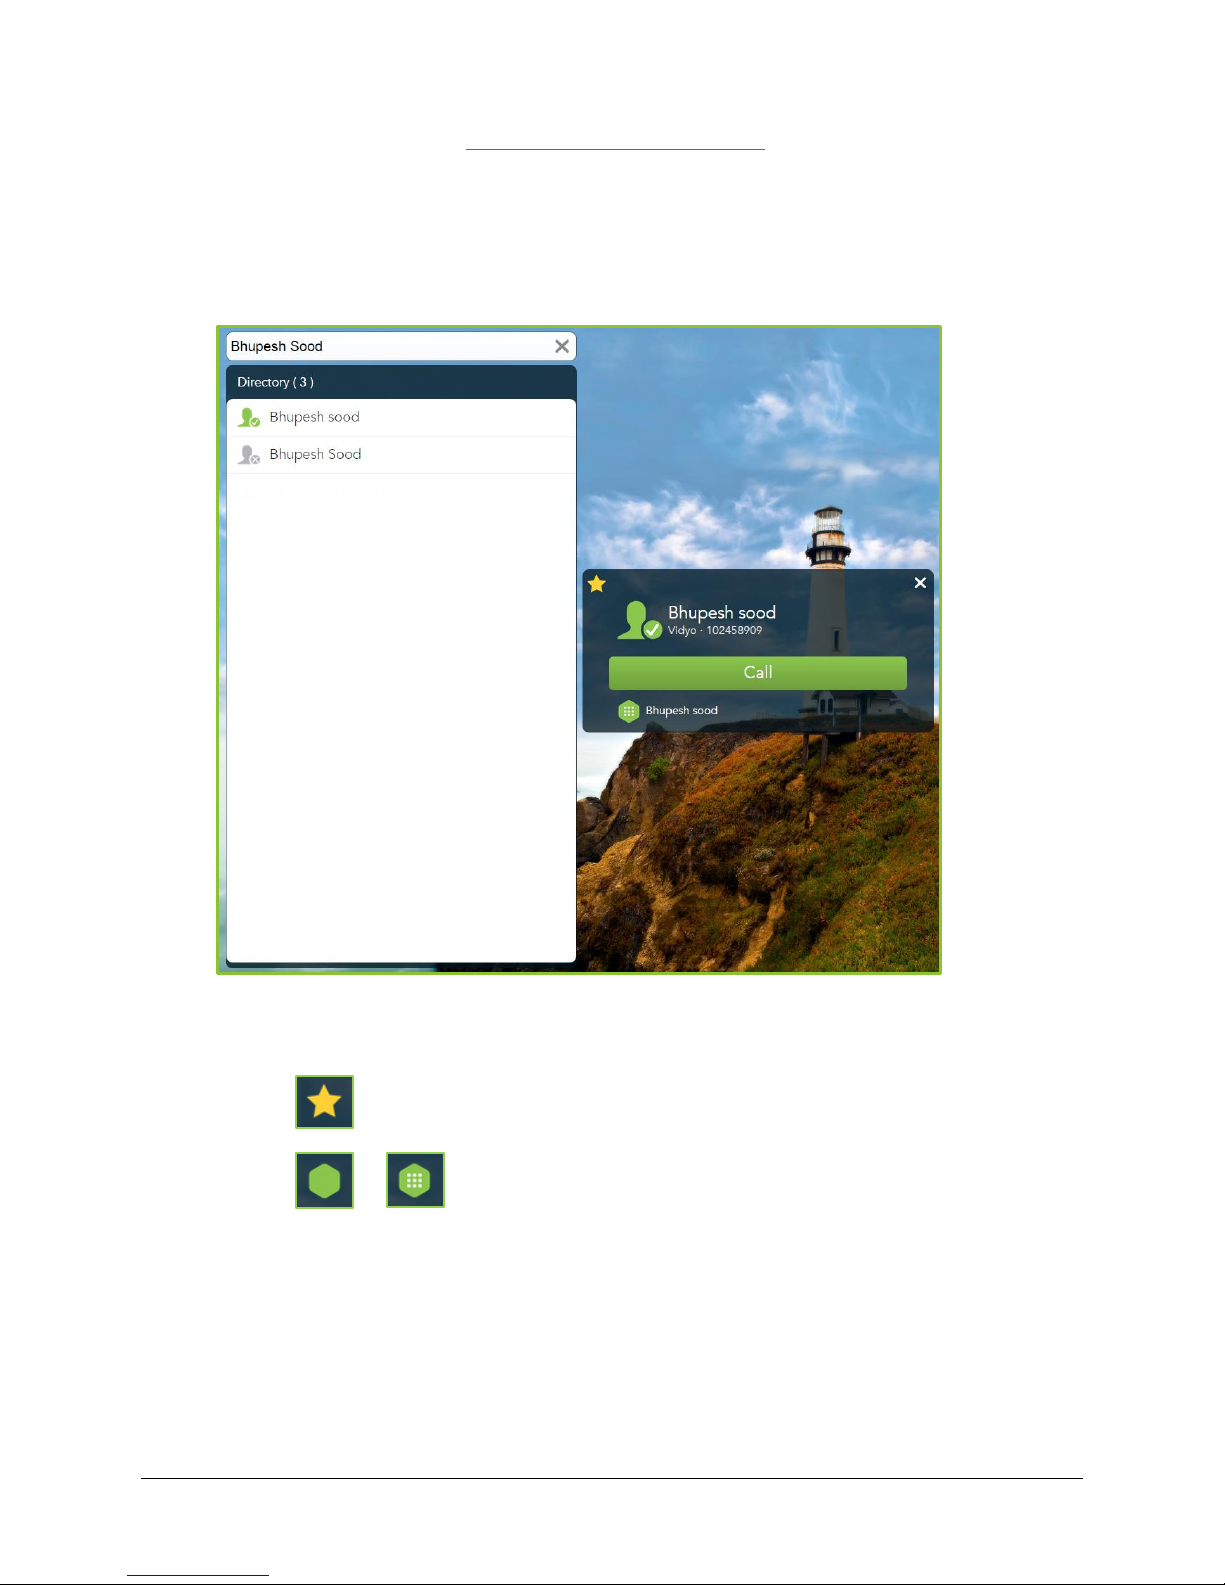
1. Tap the name of the desired contact in My Contacts or the Directory.
2. Tap any of the following options:
Tap Call to make a direct call.
Tap to add the selected contact to your list.
Tap or (if the room is PIN-protected) to join the contact’s room.
33
Page 37
VidyoRoom™ and VidyoPanorama™ 600 Quick User Guide
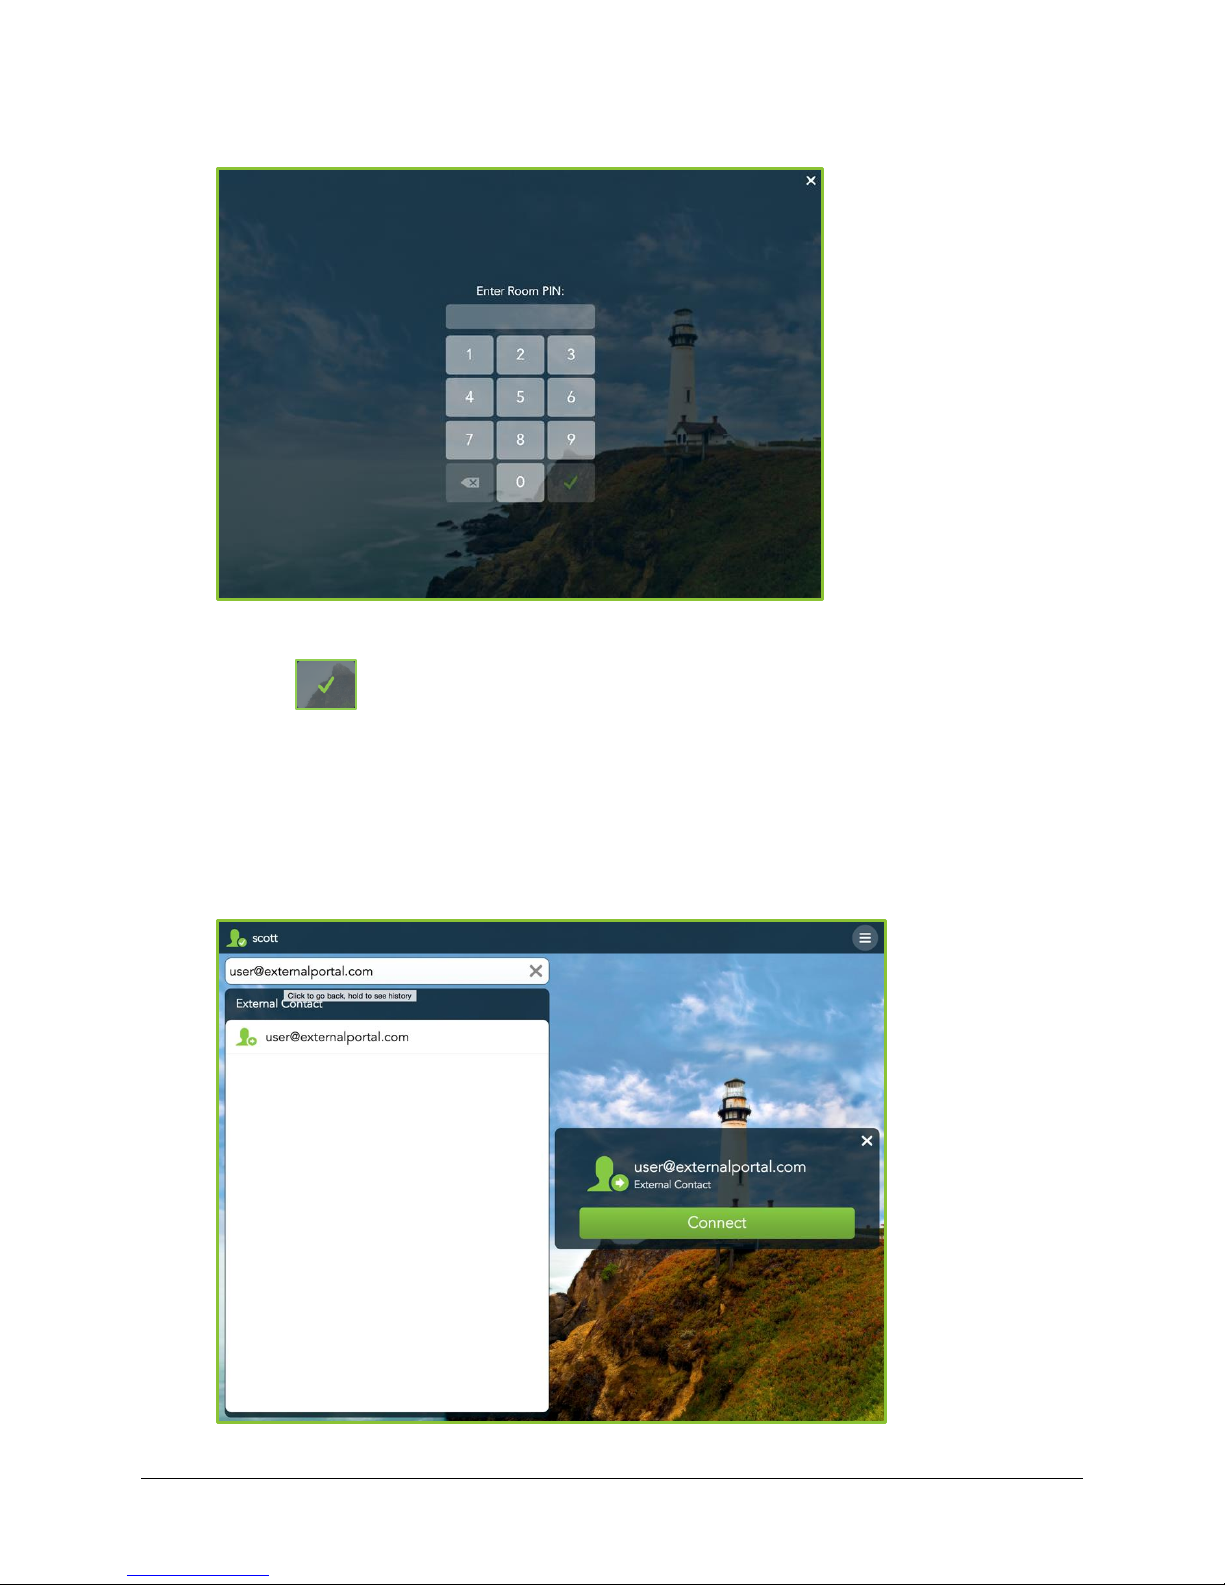
If the room is PIN-protected, do the following:
a. Enter your PIN number.
b. Tap .
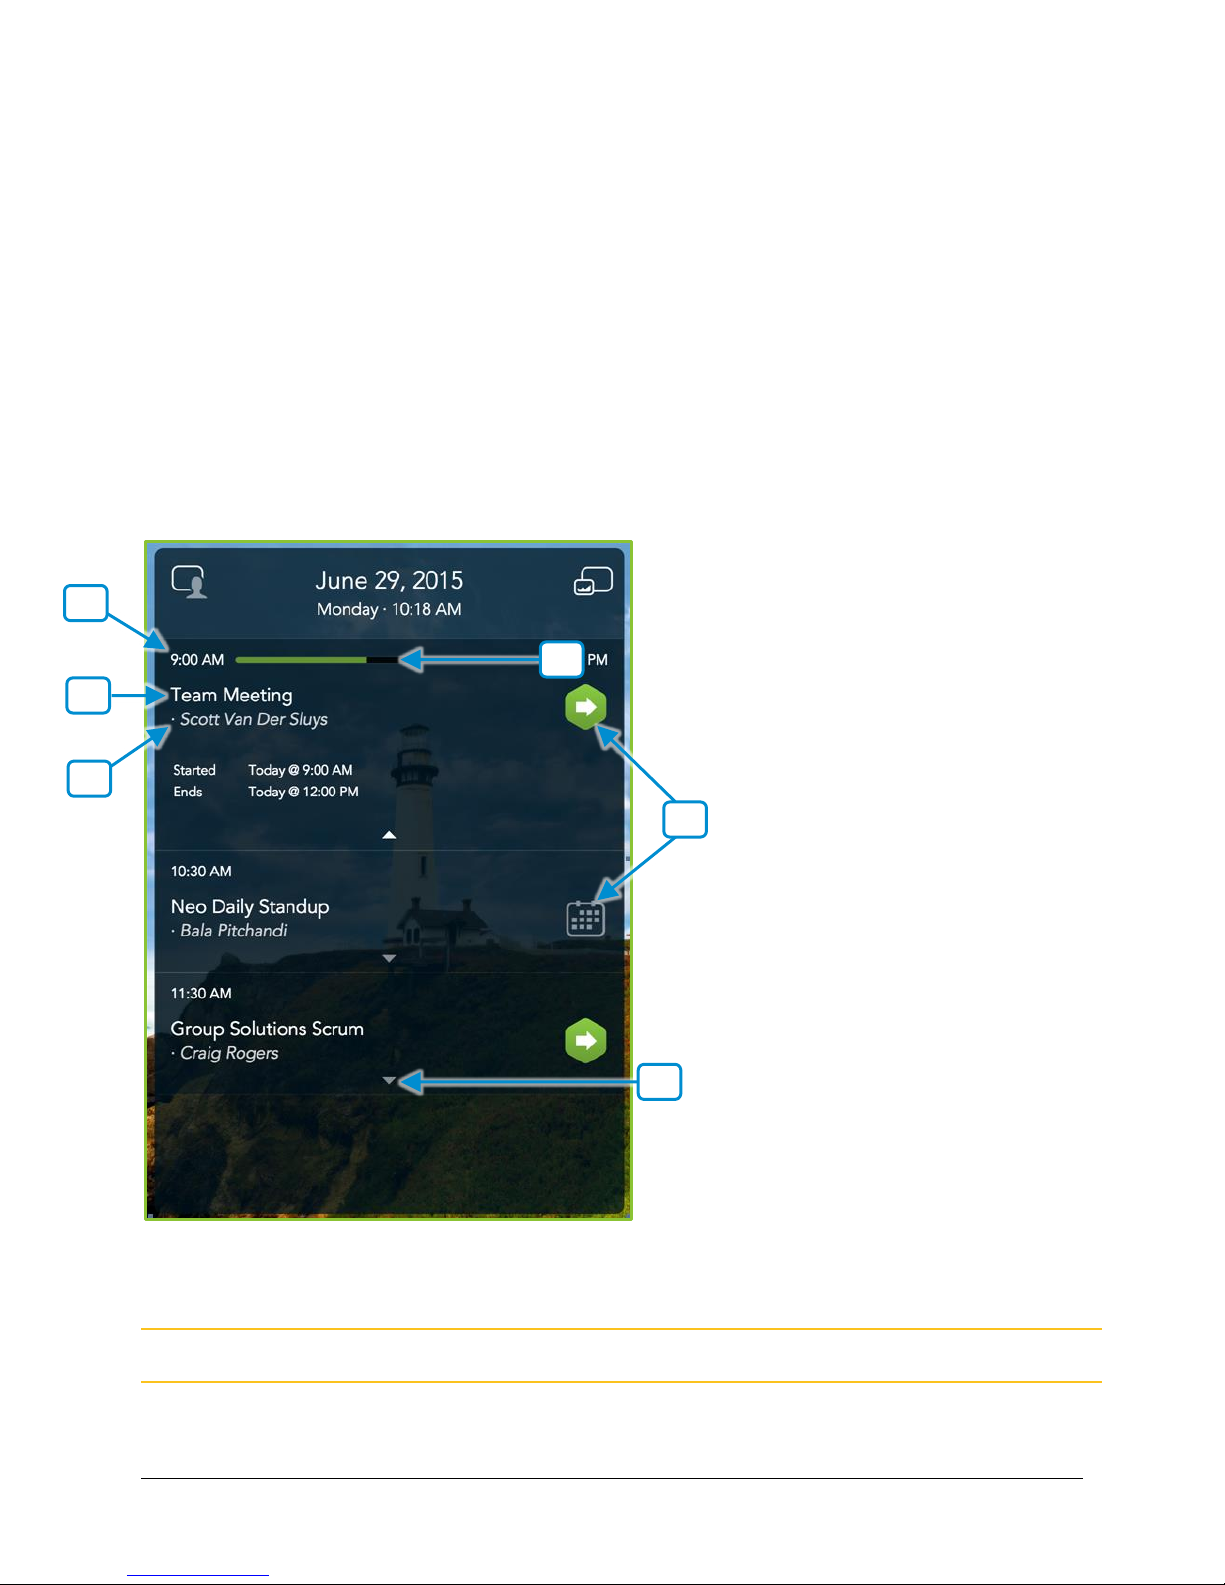
Calling a User on a Different VidyoPortal or an H.323/SIP Endpoint
To call a user on a different VidyoPortal or an H.323/SIP endpoint:
1. Enter the address of the contact that is on a different VidyoPortal or on an H.323/SIP
endpoint.
34
Page 38
VidyoRoom™ and VidyoPanorama™ 600 Quick User Guide
5
4 6 2 3 1
2. Tap the contact that displays in the External Contact list.
3. Tap Connect.
Using the VidyoRoom Calendar
The calendar integration feature enables the VidyoRoom to display upcoming scheduled meetings
from a Google Calendar, a Microsoft Exchange calendar, or another supported calendar specified
by your system administrator. This feature enables the system to display meetings that are taking
place up to three hours in the future and up to one hour in the past, as well as display or hide
meeting details.
Viewing Meeting Details
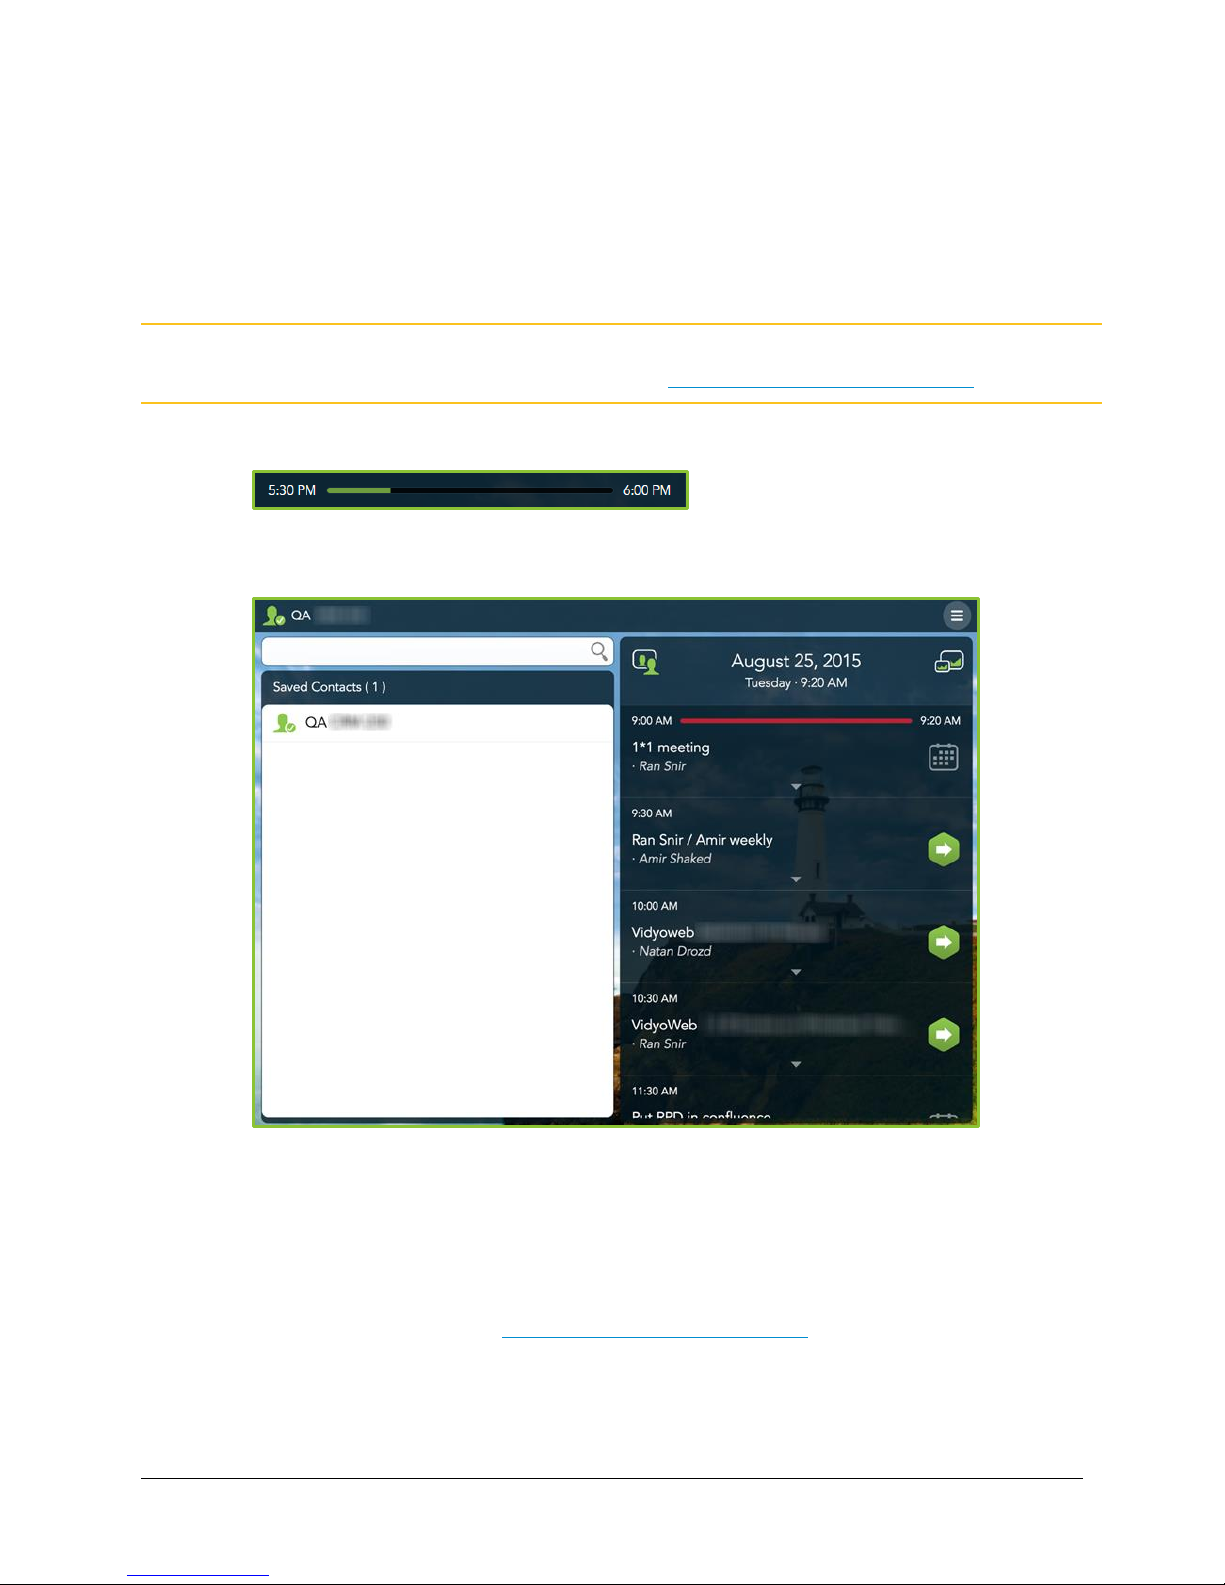
Meetings are displayed as tiles on the right side of the
Pre-Call
screen.
The following information is displayed about each meeting:
1. The time the meeting is scheduled to begin.
Note Only appointments scheduled up to three hours in the future display on the screen.
2. The subject of the meeting.
35
Page 39
VidyoRoom™ and VidyoPanorama™ 600 Quick User Guide
3. The name of the meeting organizer.
4. The following meeting status details display in the meeting status region five minutes
before, during, and one hour after your meeting:
If it’s five minutes before your meeting, a timer displays and counts down your meeting
time.
Note The system also asks you if you want to join or ignore the meeting both five minutes prior and
during your meeting. For more information, see Joining Vidyo-Enabled Meetings.
If your meeting is taking place, a green progress bar displays.
If your meeting is complete, a red progress bar displays for one hour after the ending
time of your meeting, and then the meeting tile disappears from your calendar.
5. Whether the meeting is Vidyo-enabled:
Vidyo-enabled meetings display with green hexagonal icons on the right of the tile.
When the meeting ends, the red progress par displays and the meeting remains on the
screen for one hour after the ending time of your meeting, and then the meeting tile
disappears from your calendar.
For more information, see Joining Vidyo-Enabled Meetings.
Non-Vidyo-enabled meetings display with gray calendar icons on the right of the tile;
they disappear from your calendar right after the scheduled start time.
36
Page 40
VidyoRoom™ and VidyoPanorama™ 600 Quick User Guide
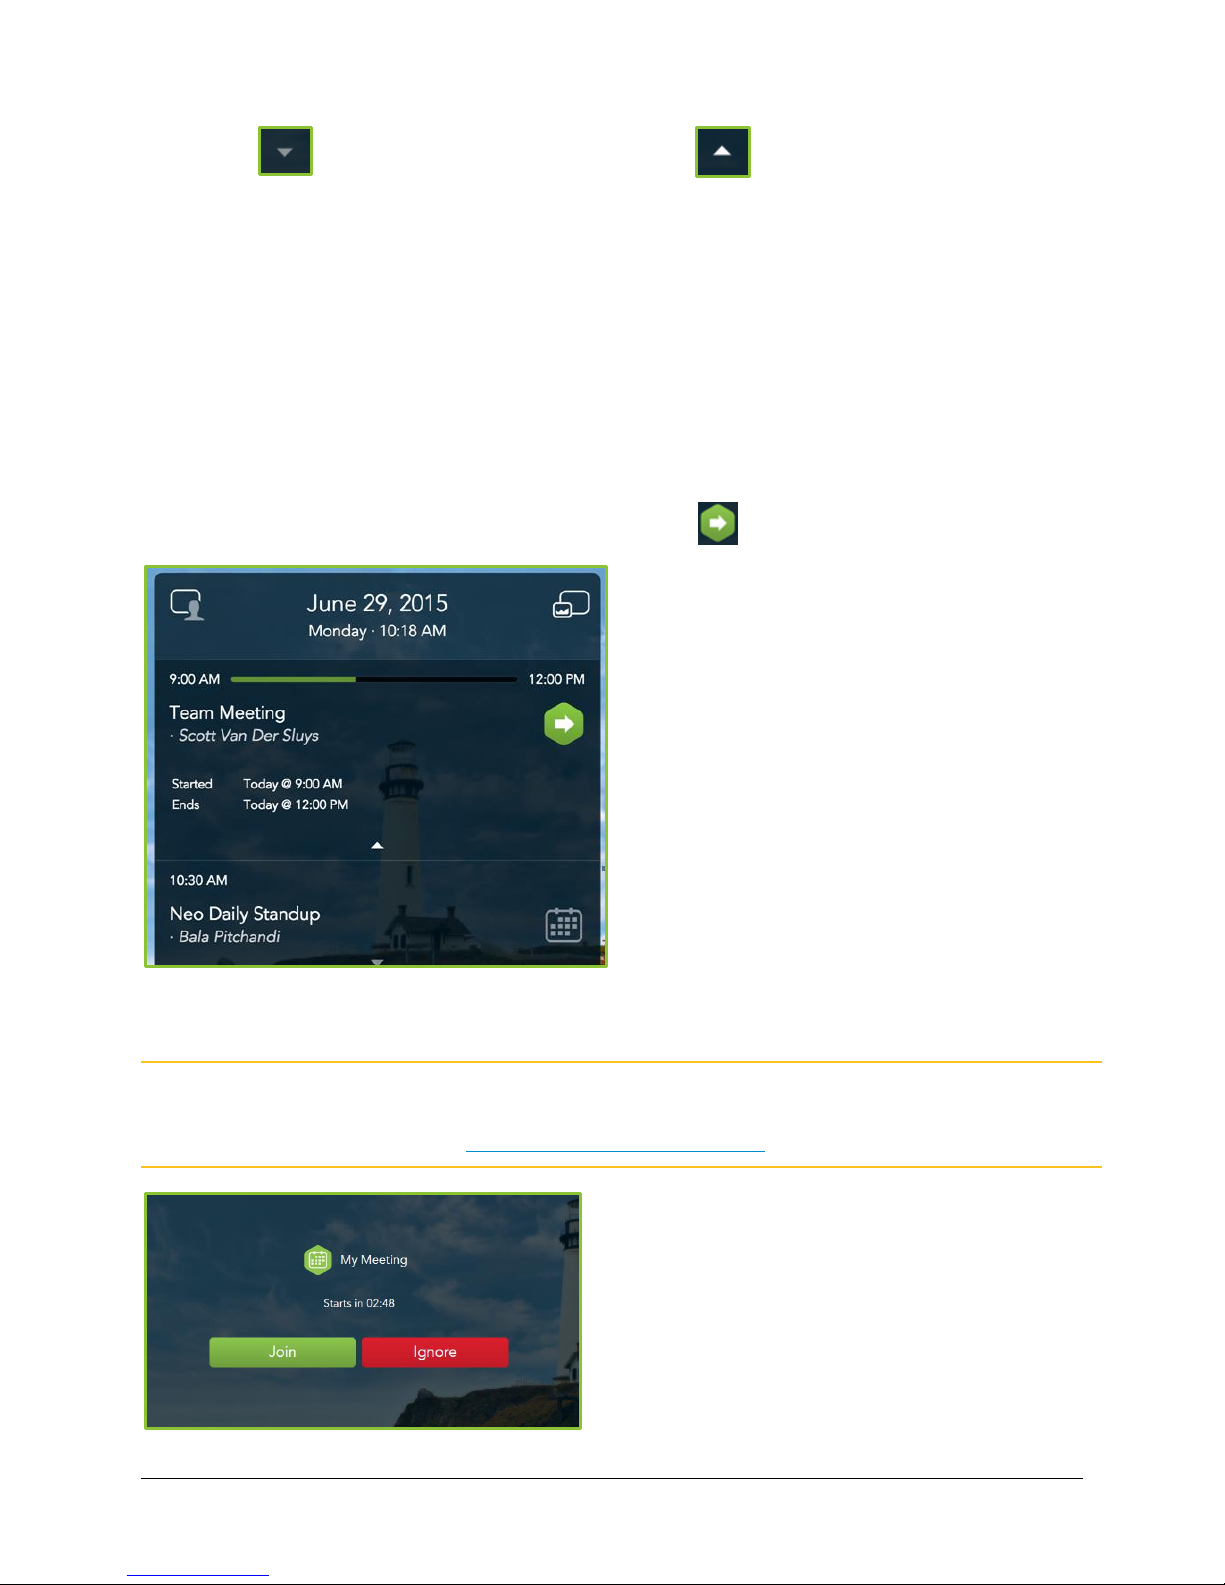
6. Tap to expand your meeting details and tap to collapse them.
The details include the following:
The meeting start time.
The meeting end time.
The required meeting attendees.
The optional meeting attendees.
Joining Vidyo-Enabled Meetings
To join a Vidyo-enabled meeting:
If you want to manually join an upcoming meeting, tap on the right of the meeting tile.
If a dialog box displays reminding you of an upcoming meeting, tap Join if you want to join the
meeting or tap Ignore if you do not want to join the meeting.
Note This dialog box displays if your system administrator has synced up a Google Calendar, a
Microsoft Exchange calendar, or another supported calendar with your VidyoRoom system.
For more information, see Using the VidyoRoom Calendar.
37
Page 41
VidyoRoom™ and VidyoPanorama™ 600 Quick User Guide
Icon
Description
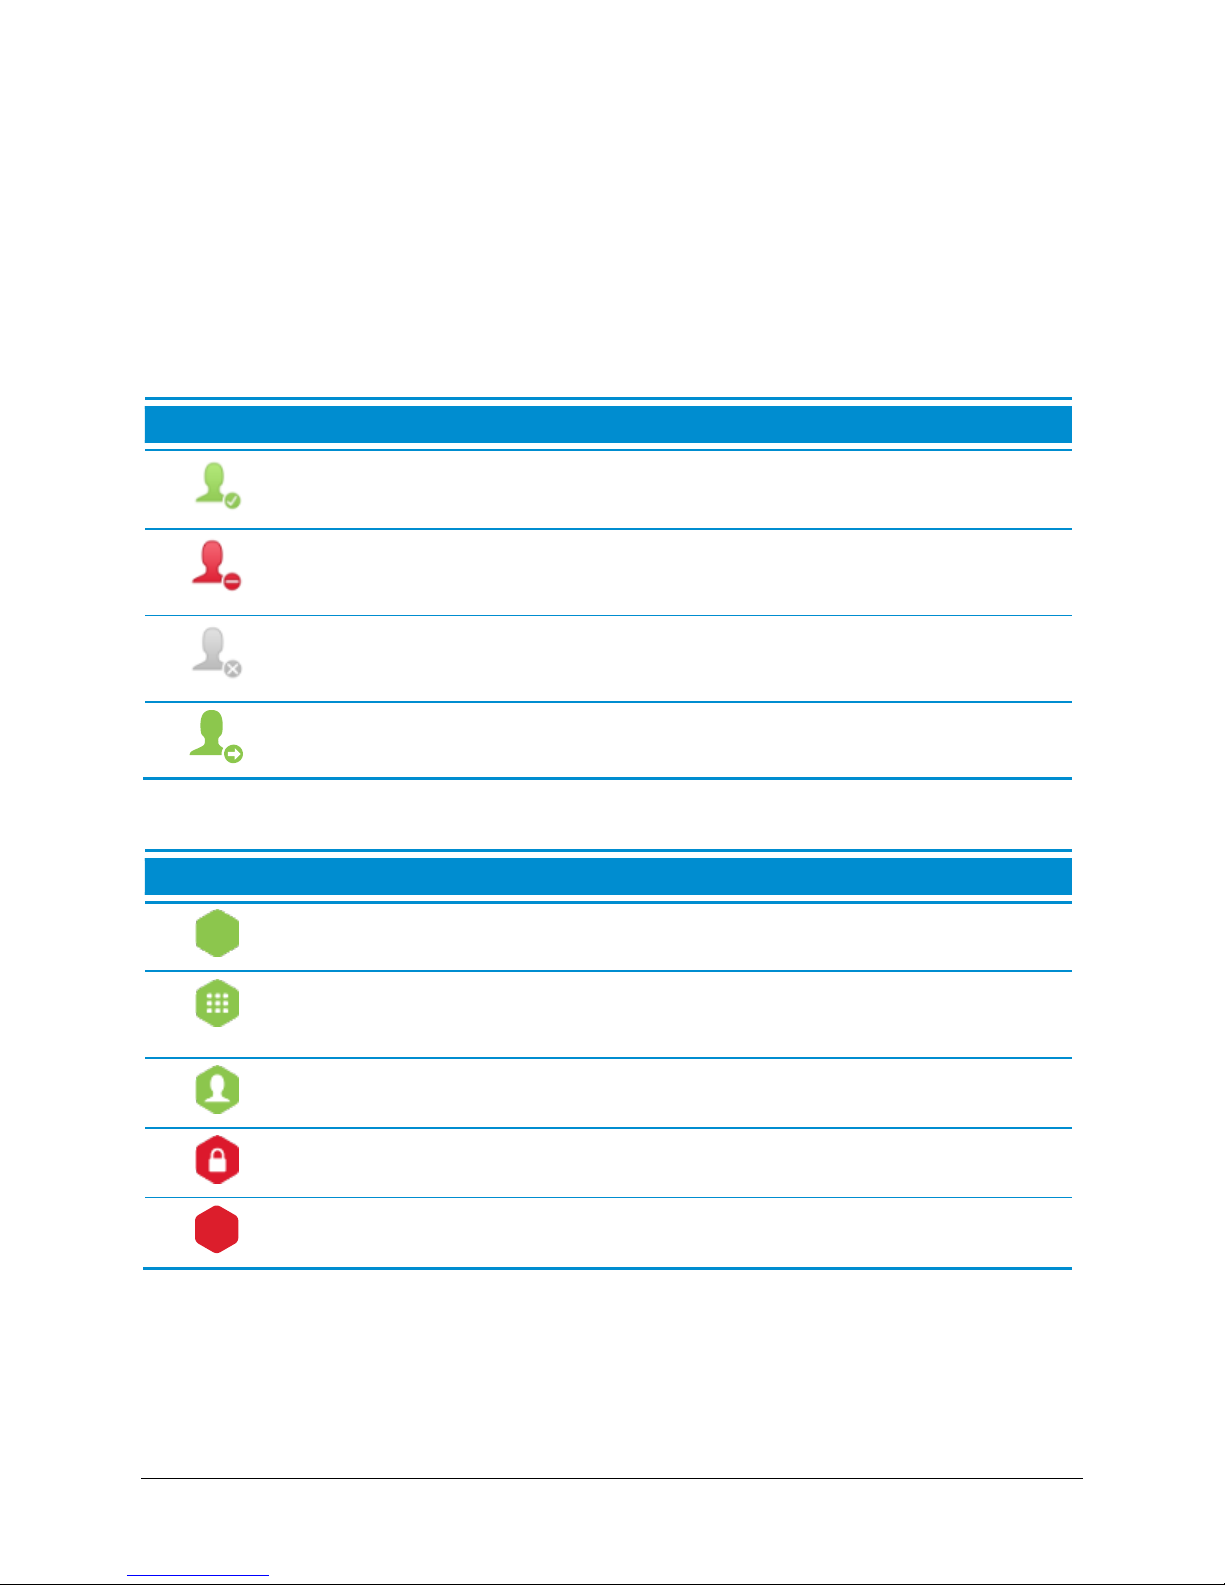
The contact is online and available to receive incoming calls.
The contact is online but is currently in a call. You cannot make a direct call to
this contact; however, you can join the contact’s room.
The contact is offline (not logged in to the VidyoPortal). You cannot make a
direct call to this contact; however, you can join the contact’s room.
The contact is connected to another VidyoPortal or is an H.323/SIP endpoint.
Icon
Description
The room is available and empty, so you can enter the room.
The room is available and PIN-protected. If you attempt to join the room, you will
be asked to enter a PIN.
The room is occupied but available to enter.
The room is locked, so you cannot enter it.
The room is full, so you cannot enter it.
The dialog box remains on the screen indicating “Starts in XX:XX” or “Active for XX:XX” for one
hour after the ending time of your Vidyo-enabled meeting or until acknowledged.
Understanding the Status Icons
The following tables provide status icons and explanations as they display in VidyoRemote 3 for
iOS.
Contact Status
Room Status
38
Page 42
VidyoRoom™ and VidyoPanorama™ 600 Quick User Guide
Projecting Content in Your System
To project content on your local system when you are not in a call:
1. Connect a compatible content-sharing device to your laptop/pc or your VidyoRoom
system.
The content will be displayed on the screen of your VidyoRoom system if the Preview Local
Content checkbox is selected in the
Projection Mode as the content is locally displayed on your VidyoRoom system.
In addition, this will also depend upon the selected settings in the VidyoRemote 3
application.
For information about sharing to the entire conference while in-call, see Sharing Content to
a Conference.
Settings
tab of the Admin User Interface. This is called
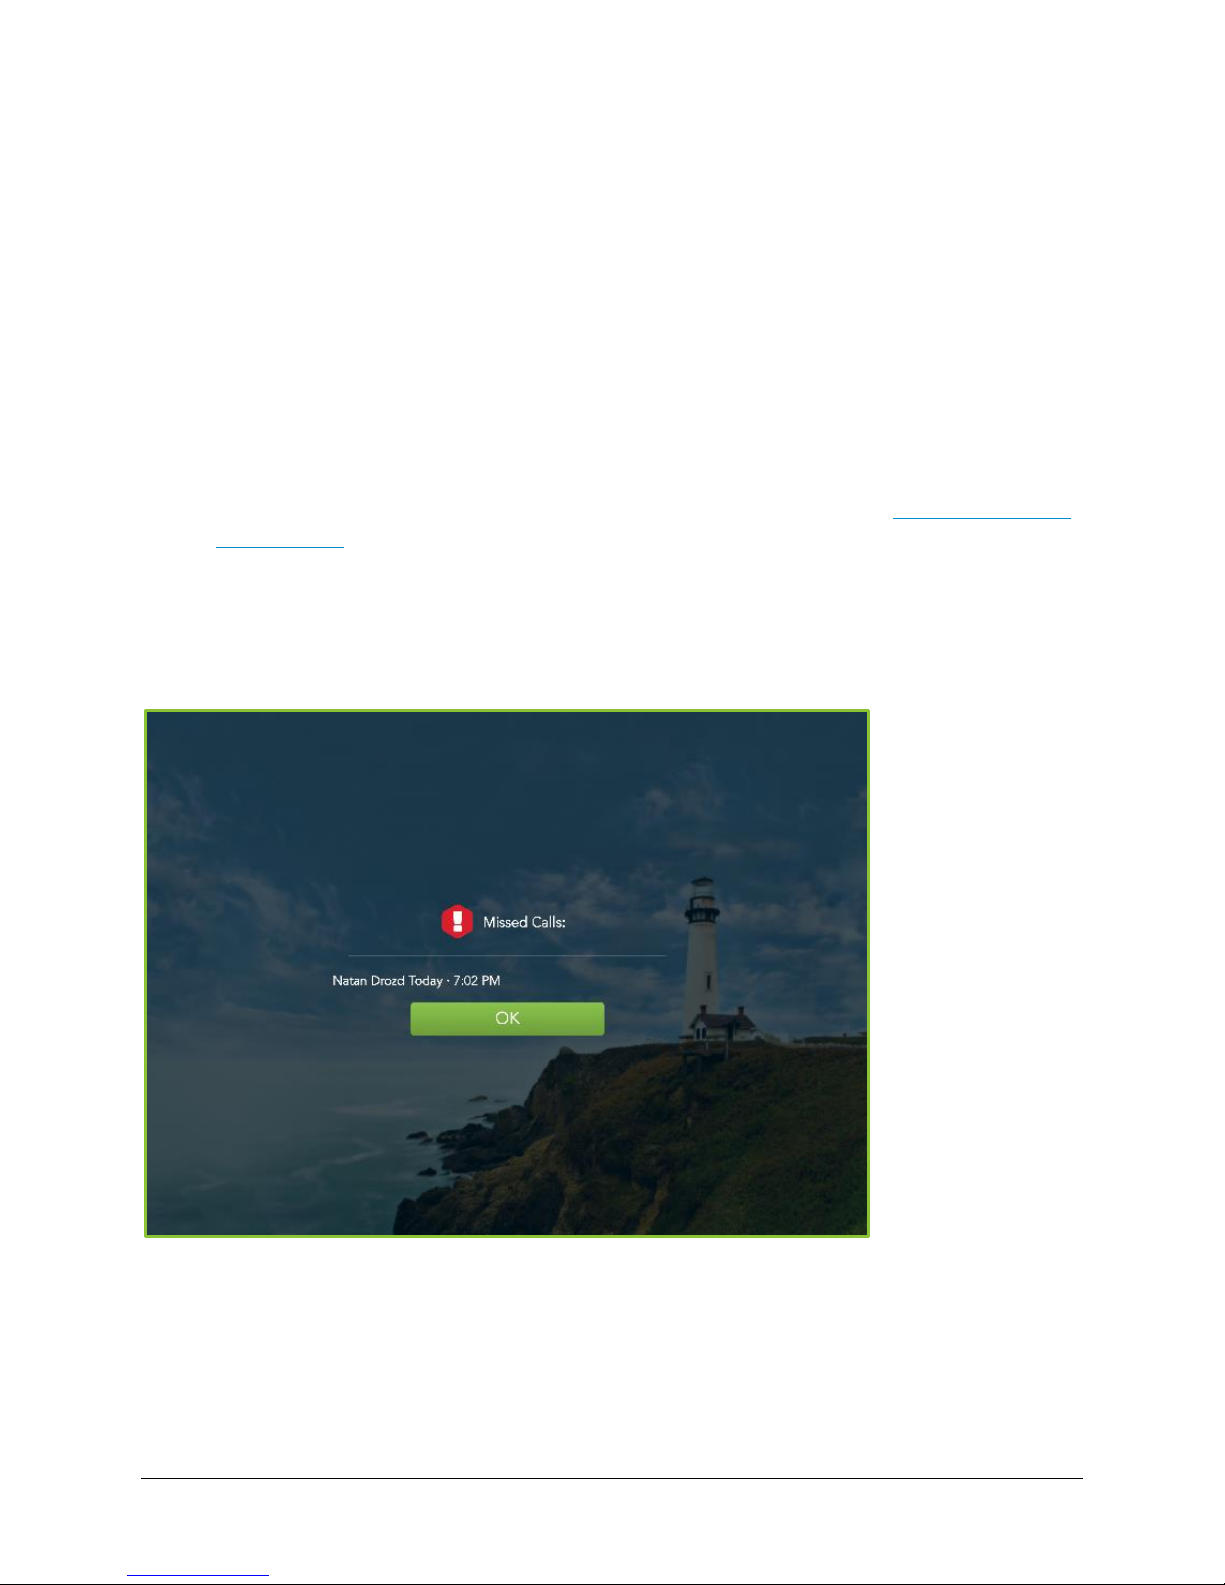
Managing Missed Call Notifications
If an incoming call is not answered, a list of current and previous missed calls displays. Click OK
and the list will disappear.
39
Page 43
In-Call
2 3 4
1
5
Viewing the In-Call Menu
VidyoRoom™ and VidyoPanorama™ 600 Quick User Guide
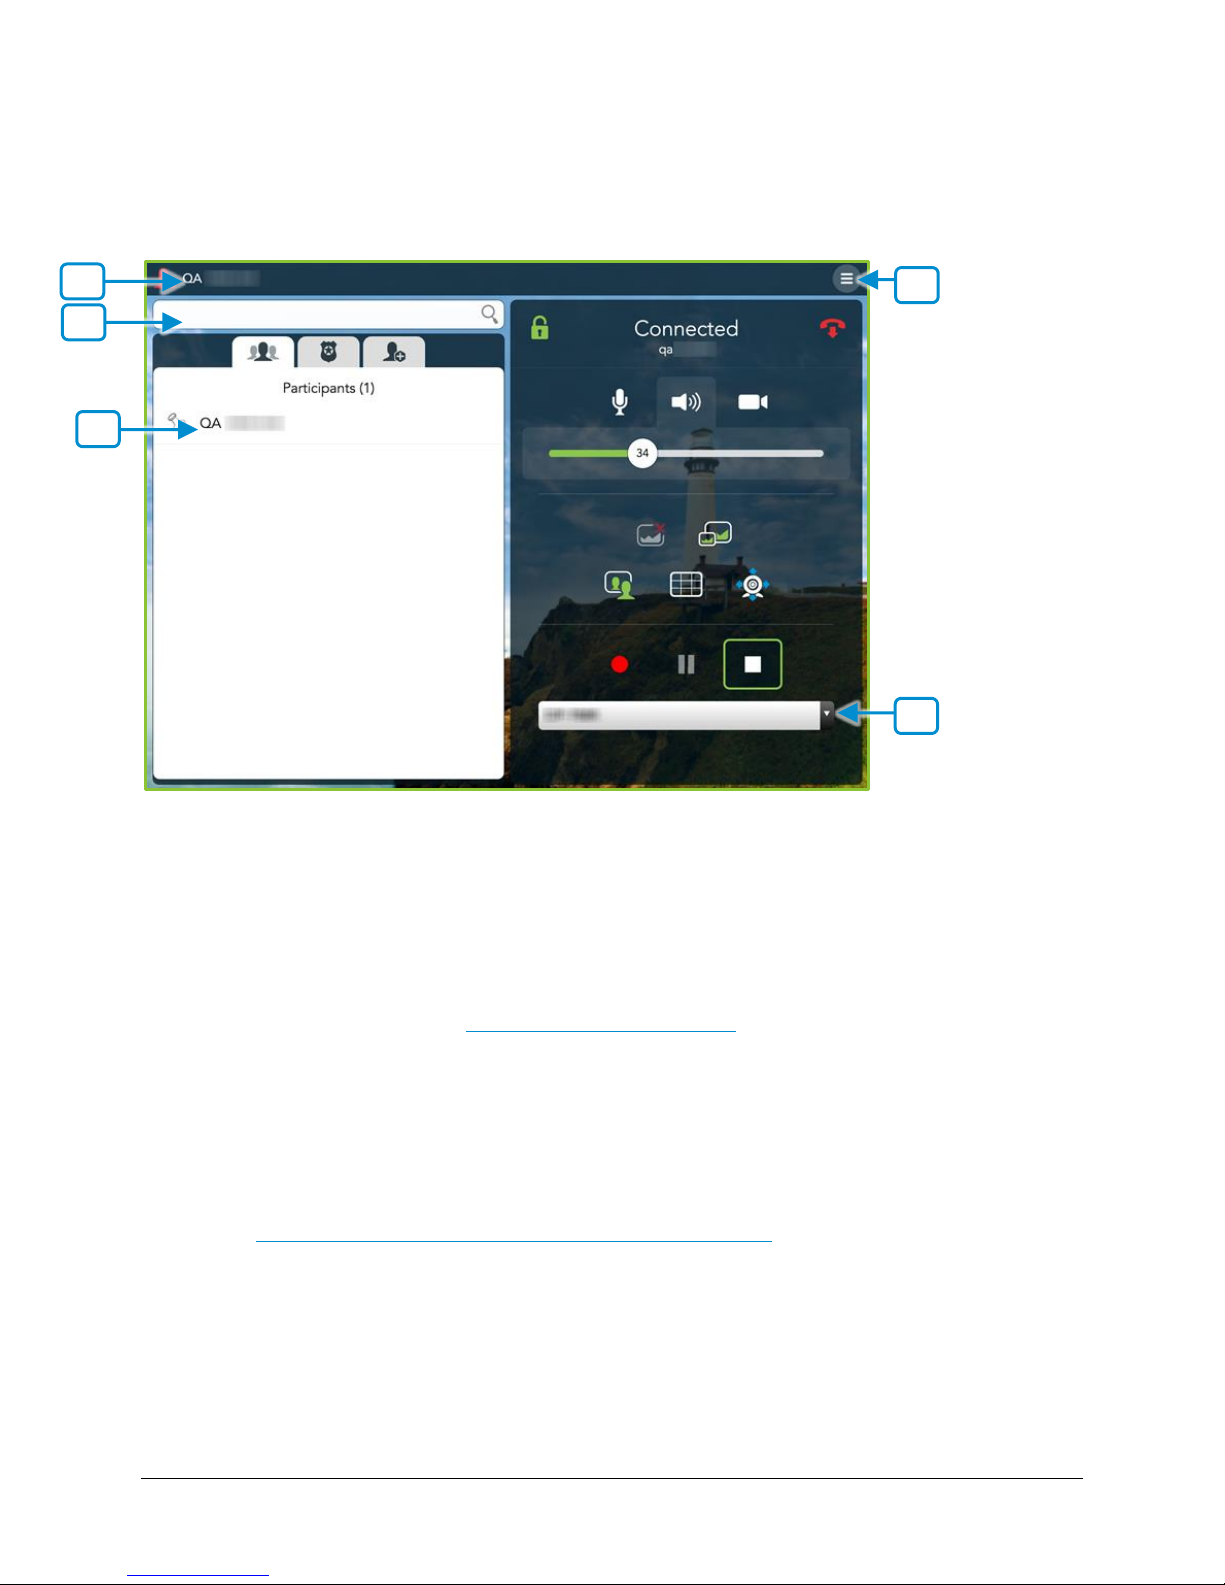
1. The name of your VidyoRoom.
2. The search box where you can filter through all active participants on the call.
As soon as you begin typing, search results display in the Directory.
3. The list of participants currently in the call.
4. The System Settings button.
For more information, see Configuring System Settings.
5. Drop-down that displays available profiles from the VidyoRecorder so that the call can be
recorded.
This drop-down is available only if you join your own room or if you are the room
moderator.
Once you are connected to a conference, the In Call Menu displays. For more information,
see Joining a Contact’s Room or Calling a Contact Directly.
40
Page 44
VidyoRoom™ and VidyoPanorama™ 600 Quick User Guide
Icon
Description
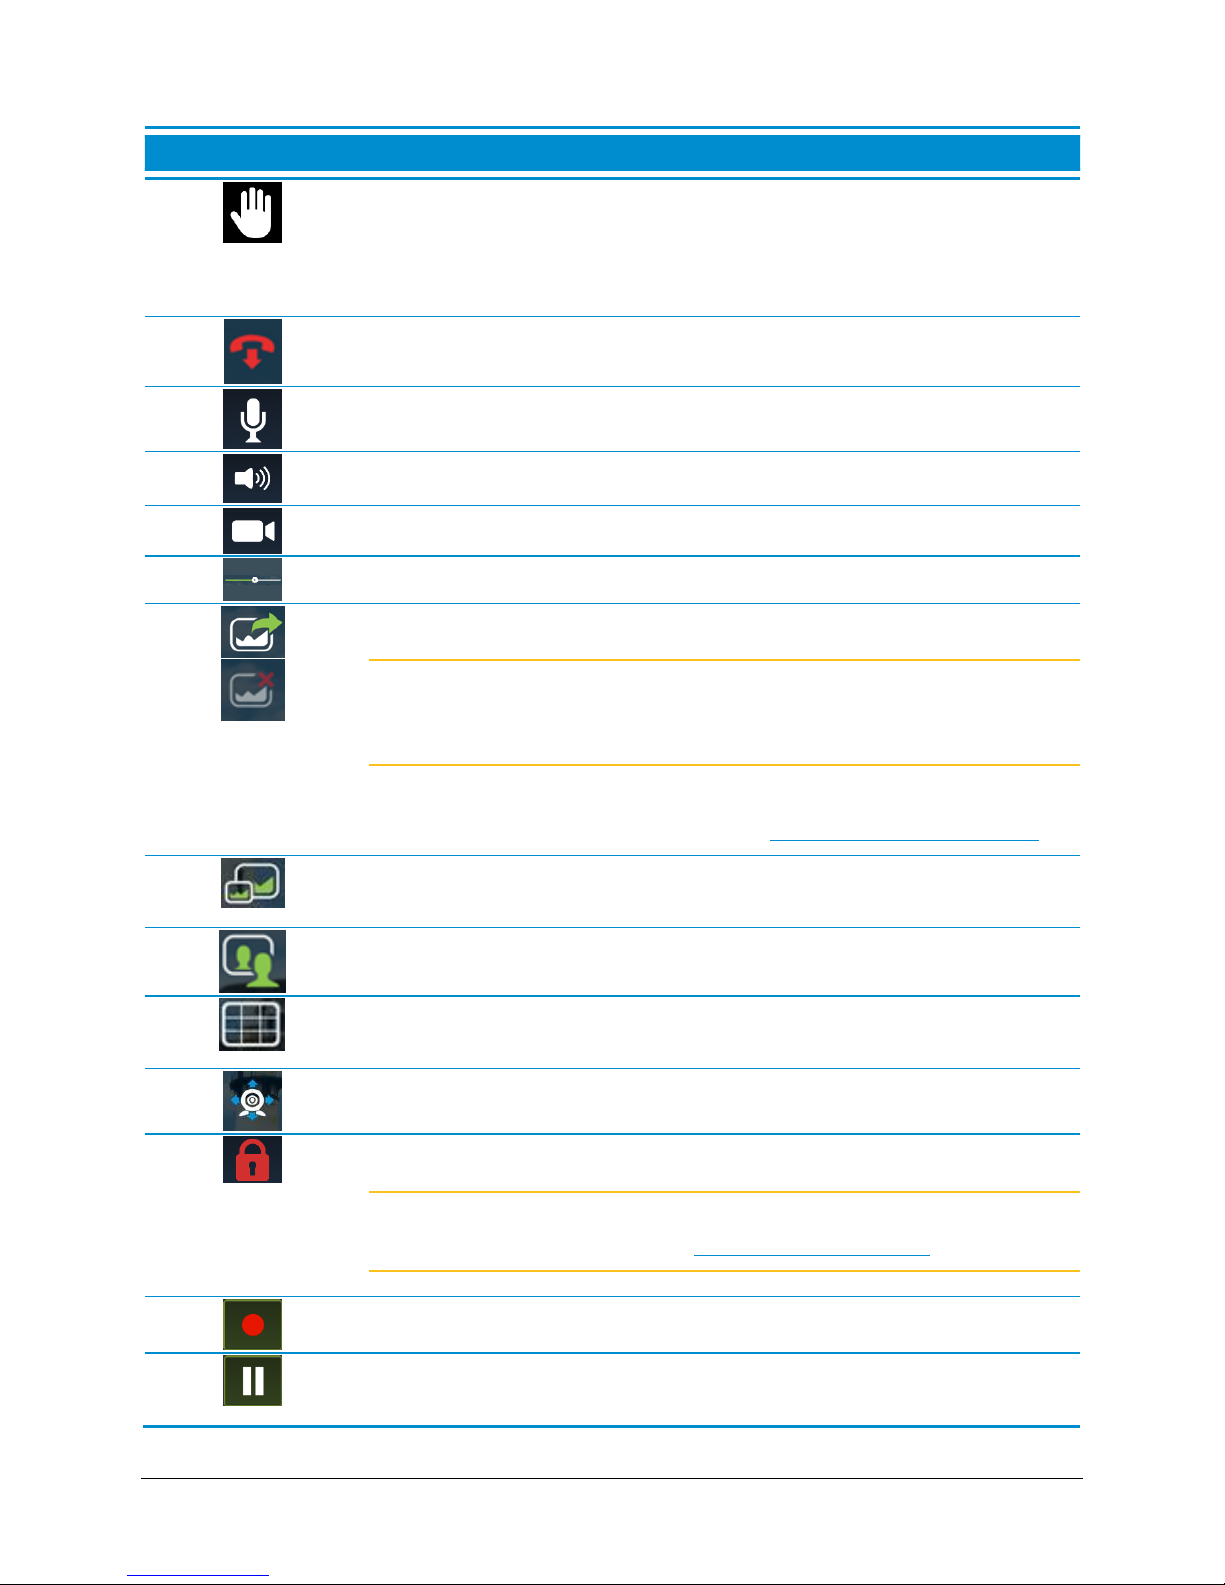
Click to signal the meeting moderator that you have raised your hand
when participating in conferences that are using the Presenter Mode
feature.
For more information, refer to the
VidyoDesktop Quick User Guide
.
Click to end the conference.
Click to mute, unmute, and control your microphone volume.
Click to mute and unmute your speakerphone volume.
Click to show or hide the video feed from your camera.
Control your speakerphone volume.
Click to toggle sharing to the conference.
Note This icon is transparent when no share device is connected to your
system, opaque when one is connected and not yet shared, and
green when the share device is sharing to a conference.
Configure your shares in the Content Source settings under the
Settings
> Devices
tab. For more information, see Configuring System Settings.
Click to display content on the VidyoRoom screen without sharing to
participants.
Click to toggle your self-view preference.
Click to select how to view the participants’ video windows during the
conference.
Click to pan, tilt, and zoom your camera.
Click to lock and unlock your meeting room.
Note This function only displays when you’re the moderator of the room.
For more information, see Becoming the Moderator.
The Vidyo conference is being recorded.
The recording is paused. Pausing while recording results in a single
recording file stored in the .flv format on your VidyoReplay.
41
Page 45
VidyoRoom™ and VidyoPanorama™ 600 Quick User Guide
Icon
Description
The recording is stopped. Stopping while recording results in separate
recorded files stored in the .flv format on your VidyoReplay.
Select your desired Recording Profile for recording VidyoRoom or
VidyoPanorama 600 conferences. If no Recording Profiles are configured,
contact your system administrator.
Note The record, pause, stop, and select recording profile options are
only enabled if your organization has VidyoReplay and when you’re
the moderator of the room. For more information, contact your
Vidyo sales representative.
Tap the
Participants
tab to view conference participants and pin them to
specific system screens, view a participant’s Share, and pan, tilt, and
zoom their cameras.
Tap the
Moderator
tab and enter the Moderator PIN and become an
additional Moderator of the conference.
Moderators can also mute, unmute, hide video, show video, and remove
a selected participant or all participants from the conference. For more
information refer to the “Controlling a Meeting Room” section in the
VidyoConferencing Administrator Guide
.
For more information, see Becoming the Moderator.
By tapping this icon you will be able to invite participants to join the call if
you are the meeting room owner or can moderate the meeting.
Becoming the Moderator
Becoming a moderator allows you to use call control functions, such as muting and unmuting the
conference participants and recording the conference.
If you want to become the conference moderator, you must first enable a Moderator PIN for the
conference room. To do so, you must:
Ask your VidyoPortal Administrator to set up the Moderator PIN on a specific conference room
via the Admin portal.
Set the Moderator PIN via VidyoDesktop or via the VidyoPortal User portal. For more
information, refer to the
Guide.
VidyoDesktop Quick User Guide
42
or the
VidyoPortal Administrator
Page 46
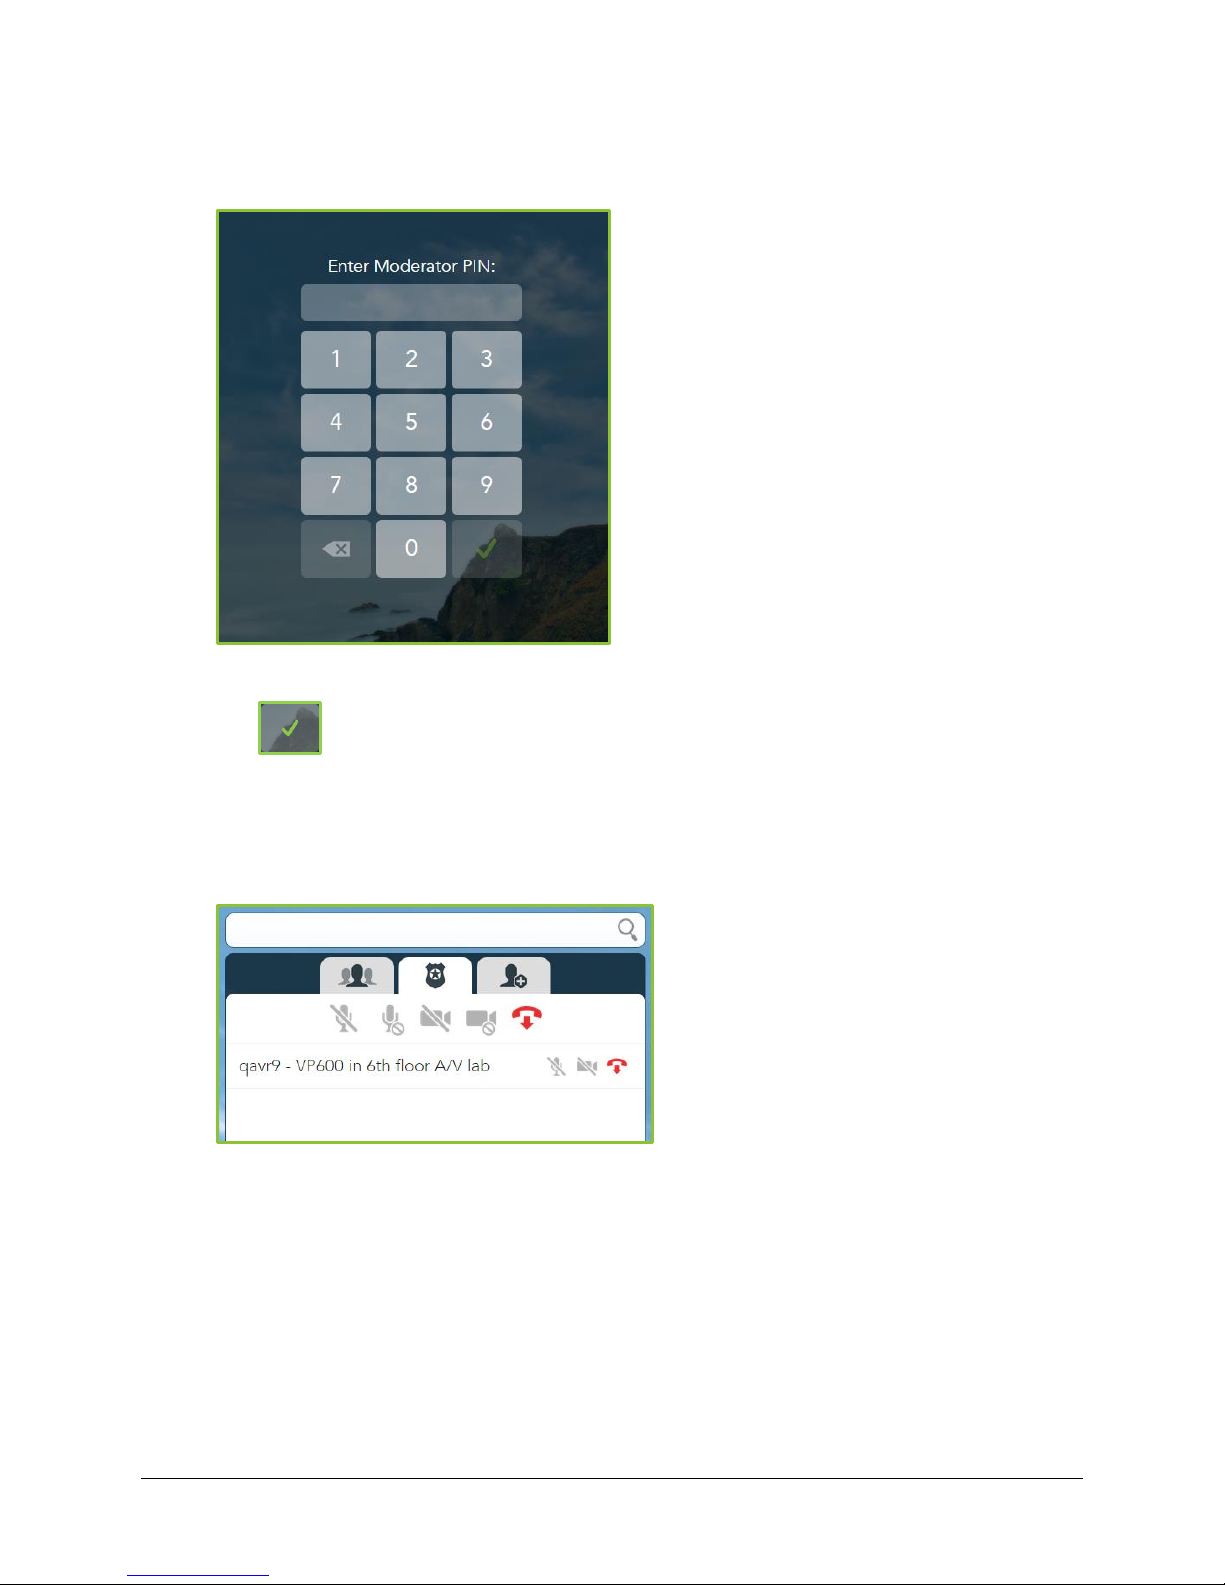
To become the moderator:
VidyoRoom™ and VidyoPanorama™ 600 Quick User Guide
1. Tap the
2. Enter the Moderator PIN.
3. Tap .
Moderator
tab.
You then become the conference moderator and the conference moderation functions,
such as Mute, Unmute, Hide Video, Show Video, and Remove, display on the
tab while you are in the call. For more information, refer to the “Controlling a Meeting
Room” section in the
VidyoConferencing Administrator Guide
.
Moderator
In-Call Viewing Modes
When in a conference, participants can easily modify the layout for a variety of VidyoRoom viewing
experiences. When using VidyoRemote 3 for iOS, you can pin participants to specific viewing
screens as explained in the following section.
Pinning Participants to Specific Screens
To pin participants to specific screens:
43
Page 47
VidyoRoom™ and VidyoPanorama™ 600 Quick User Guide
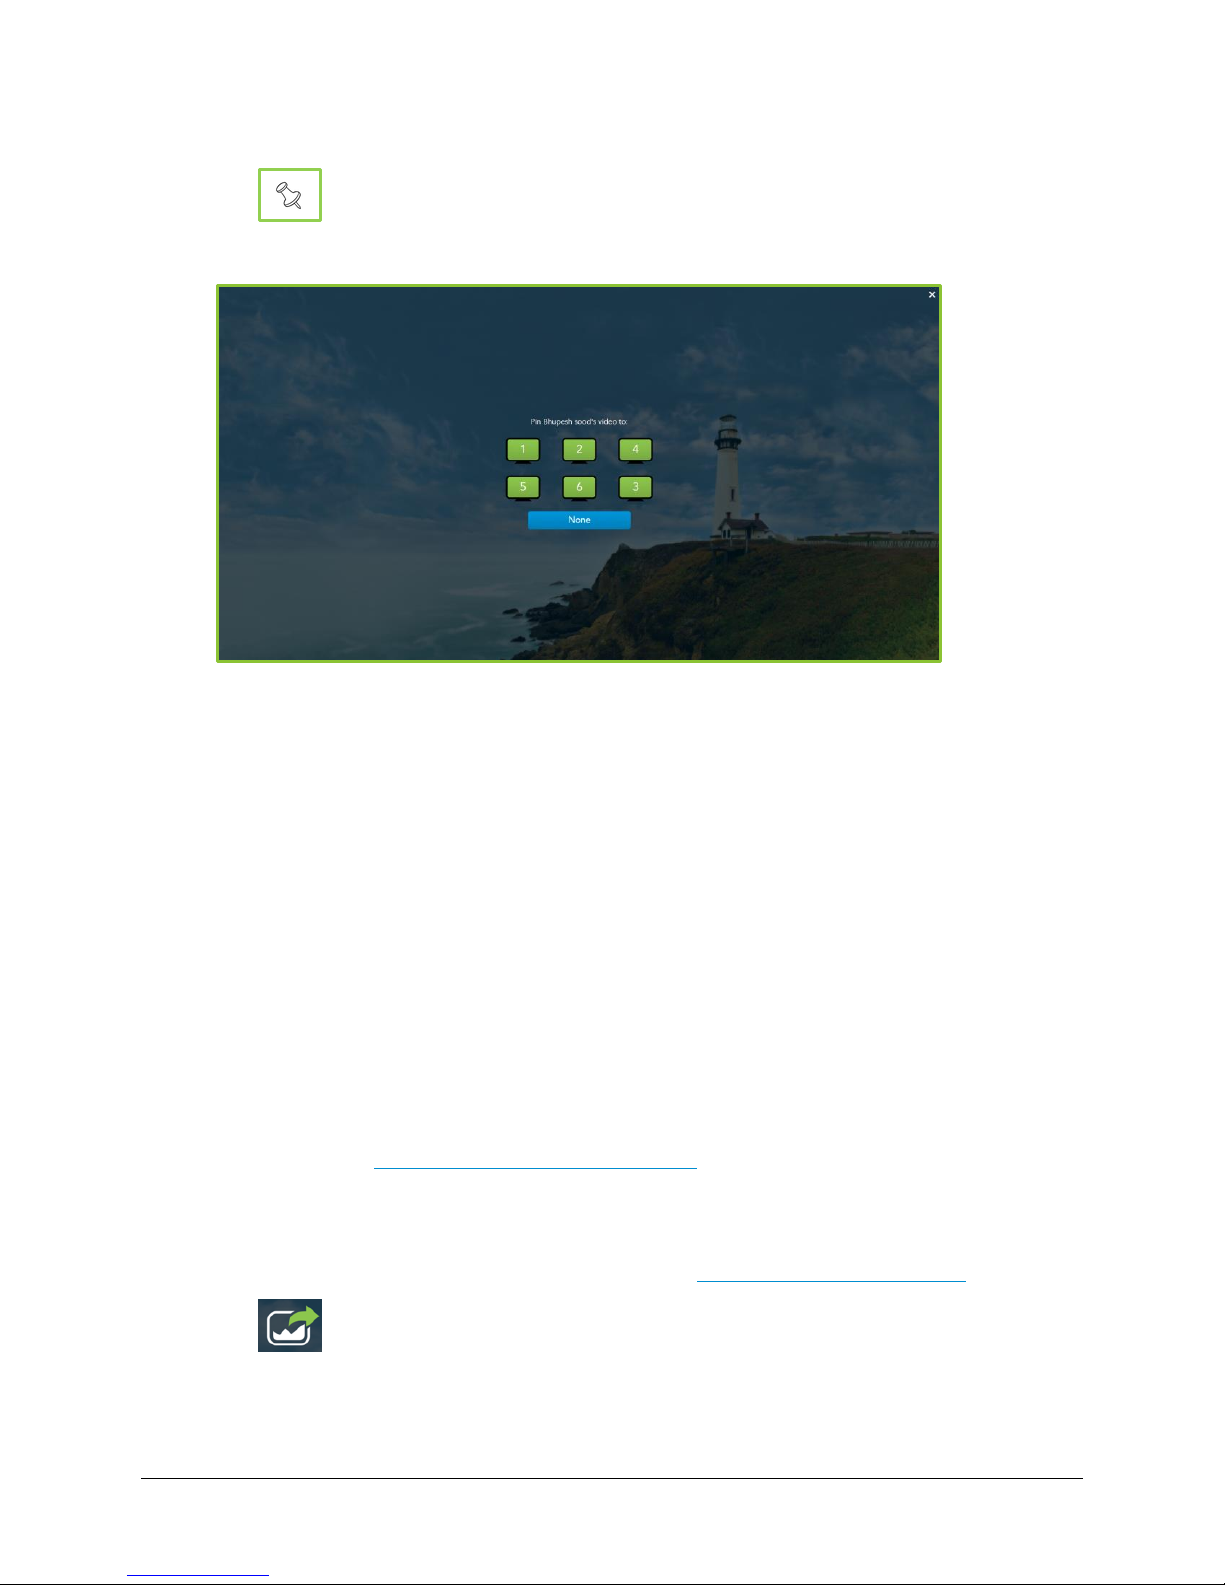
1. Tap the
2. Tap next to your desired contact.
The
3. Tap the numbered screen in your system to which you want the contact pinned.
Conference Participants
Pin Video to Monitor
tab.
screen displays.
The participant is now pinned to the selected screen and remains there regardless of the
loudest speaker settings.
To move a participant to a different screen, repeat steps 1 and 2 but select a different
screen.
To unpin the participant and revert back to the automatic layout, repeat steps 1 and 2, and
select None.
Sharing Content to a Conference
To share content to a conference while in a call:
1. Connect a compatible content-sharing device to your laptop and your VidyoRoom system.
While your content now displays on the video screen of your VidyoRoom system, it is not
shared to the participants in your conference. This is called Projection Mode. For more
information, see Projecting Content in Your System.
The Content Share Encode Status icon displays in gray on the upper-right of the screen.
2. Select from your available content sources in the Content Source settings under the
Settings > Devices
tab. For more information, see Configuring System Settings.
3. Tap .
44
Page 48

VidyoRoom™ and VidyoPanorama™ 600 Quick User Guide
Note This icon is transparent when no share device is connected to your system, opaque when
one is connected and not yet shared, and green when the share device is sharing to a
conference.
For more information, see Viewing the In-Call Menu and Configuring System Settings.
Adjusting Your Content Source to Avoid Cropping
Some VidyoRoom systems may crop content you share from your computer screen. Other
computers default to a mirrored or duplicated multiple display output setting when connected to a
VidyoRoom system as a shared device. This section describes how to adjust your computer as
needed.
Note The following information is not applicable when using an Epiphan device.
Adjusting a Computer that Crops Content
To adjust a computer that crops content:
On a PC:
1. Select
2. Select 720p from the Resolution drop-down.
Control Panel > Display > Screen Resolution
.
On a Mac:
1. Select
2. Select the Scaled option.
3. Select 720p.
Display > Preferences
.
On all other platforms:
1. Select
2. Select the Maintain Display Scaling option.
Display > Advanced Settings
.
Adjusting a Computer that Defaults to a Mirrored Display Output Setting
To adjust a computer that defaults to a mirrored or duplicated multiple display output setting:
On all platforms:
1. Select Extend display from the Multiple Display field.
2. Select 720p for the resolution of your second display.
45
Page 49
VidyoRoom™ and VidyoPanorama™ 600 Quick User Guide
Unpairing VidyoRemote 3 for iOS from Your VidyoRoom
System
To unpair VidyoRemote 3 for iOS from your VidyoRoom system:
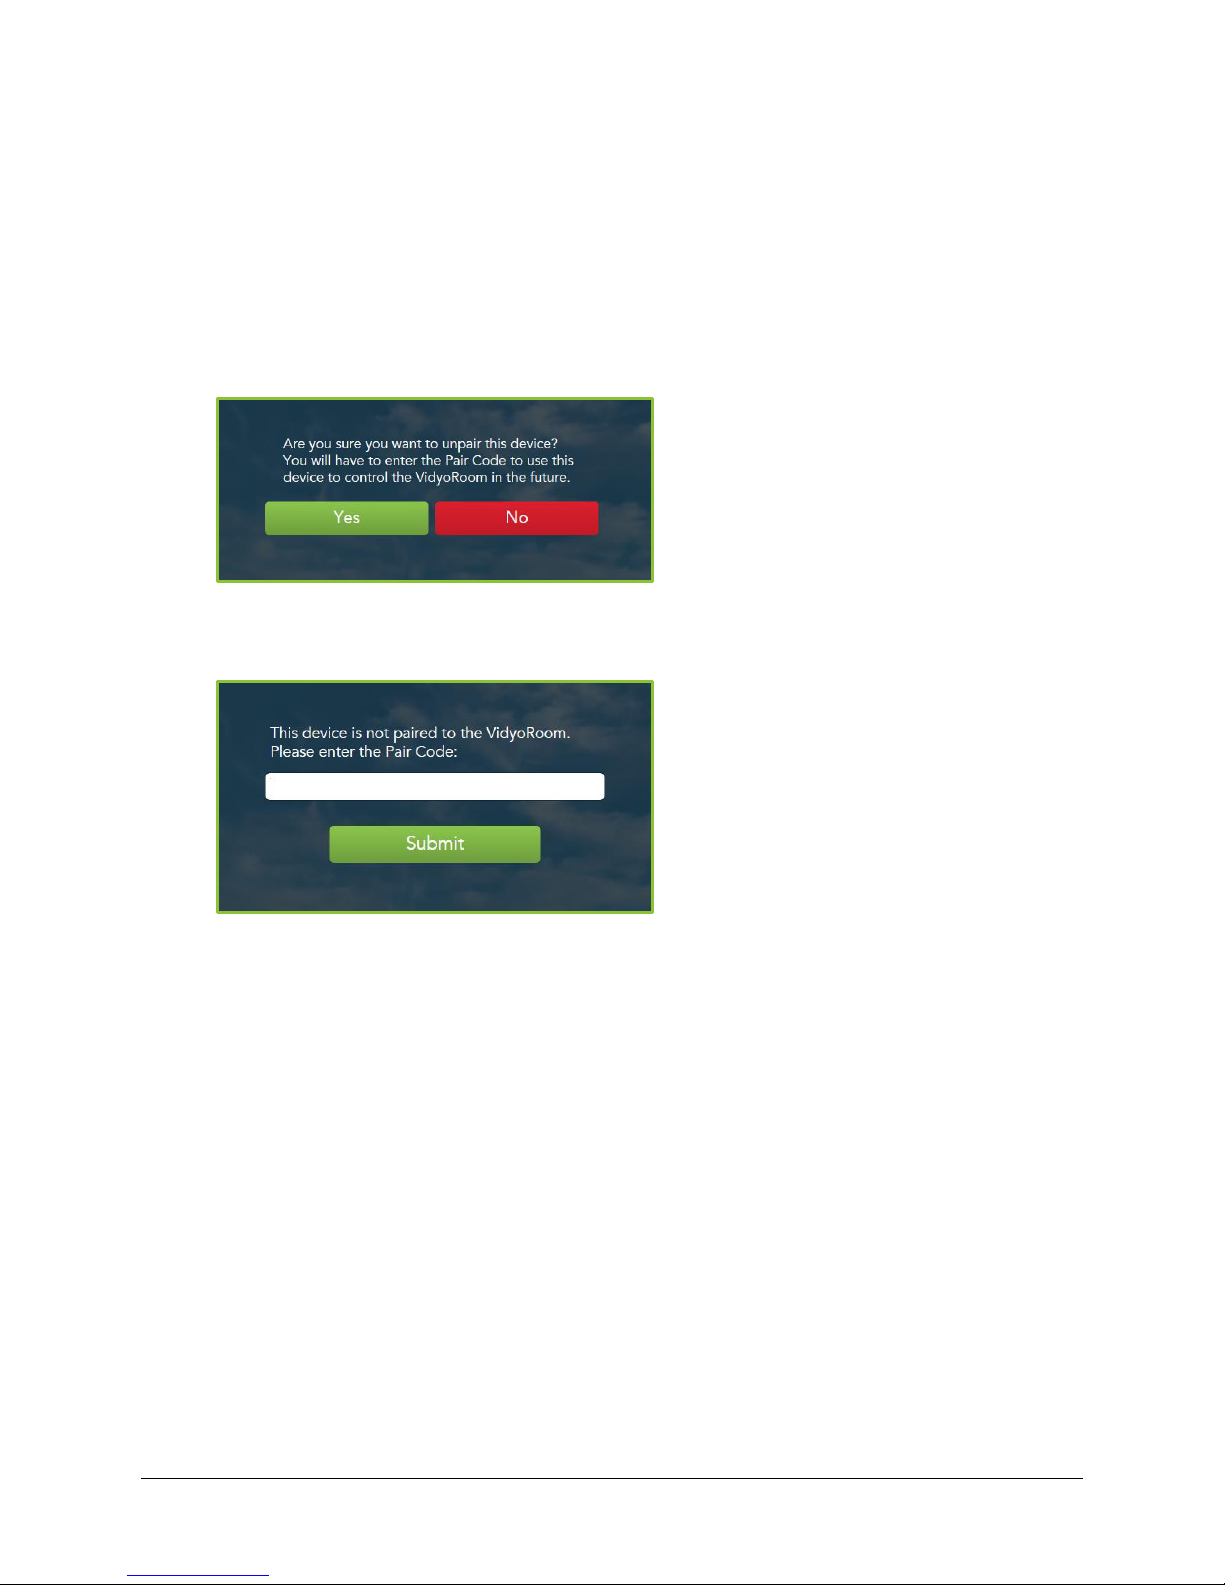
1. Tap Unpair.
The system asks if you are sure you want to unpair your device and displays a warning that
you will have to enter the Pair Code to use the device to control the system in the future.
2. Tap Yes.
The system unpairs your device and the prompt for the Pair Code displays.
46
Page 50

4. Using the VidyoRemote 3 for Android
App
This chapter describes how to perform pre-call and in-call tasks with your VidyoRoom or
VidyoPanorama 600 system when you are using the VidyoRemote 3 for Android app.
Downloading the VidyoRemote 3 for Android App
Before downloading the VidyoRemote 3 for Android app, ensure that the following requirements
have been met:
You must have an Android tablet running Android version 5.1.1 or higher.
The VidyoRoom system must be reachable by the VidyoRemote 3 over the Wi-Fi network.
TCP ports 8090 and 443 http must be opened (bi-directional) to allow communication between
the VidyoRemote 3 and the VidyoRoom. TCP port 80 must also be opened for VidyoRoom SE;
however, it is not required for other VidyoRoom models.
For more information, contact your system administrator.
To download the VidyoRemote 3 for Android app:
1. Download and install VidyoRemote 3 for Android from the Google Play Store.
2. Open VidyoRemote 3 for Android on your device.
47
Page 51
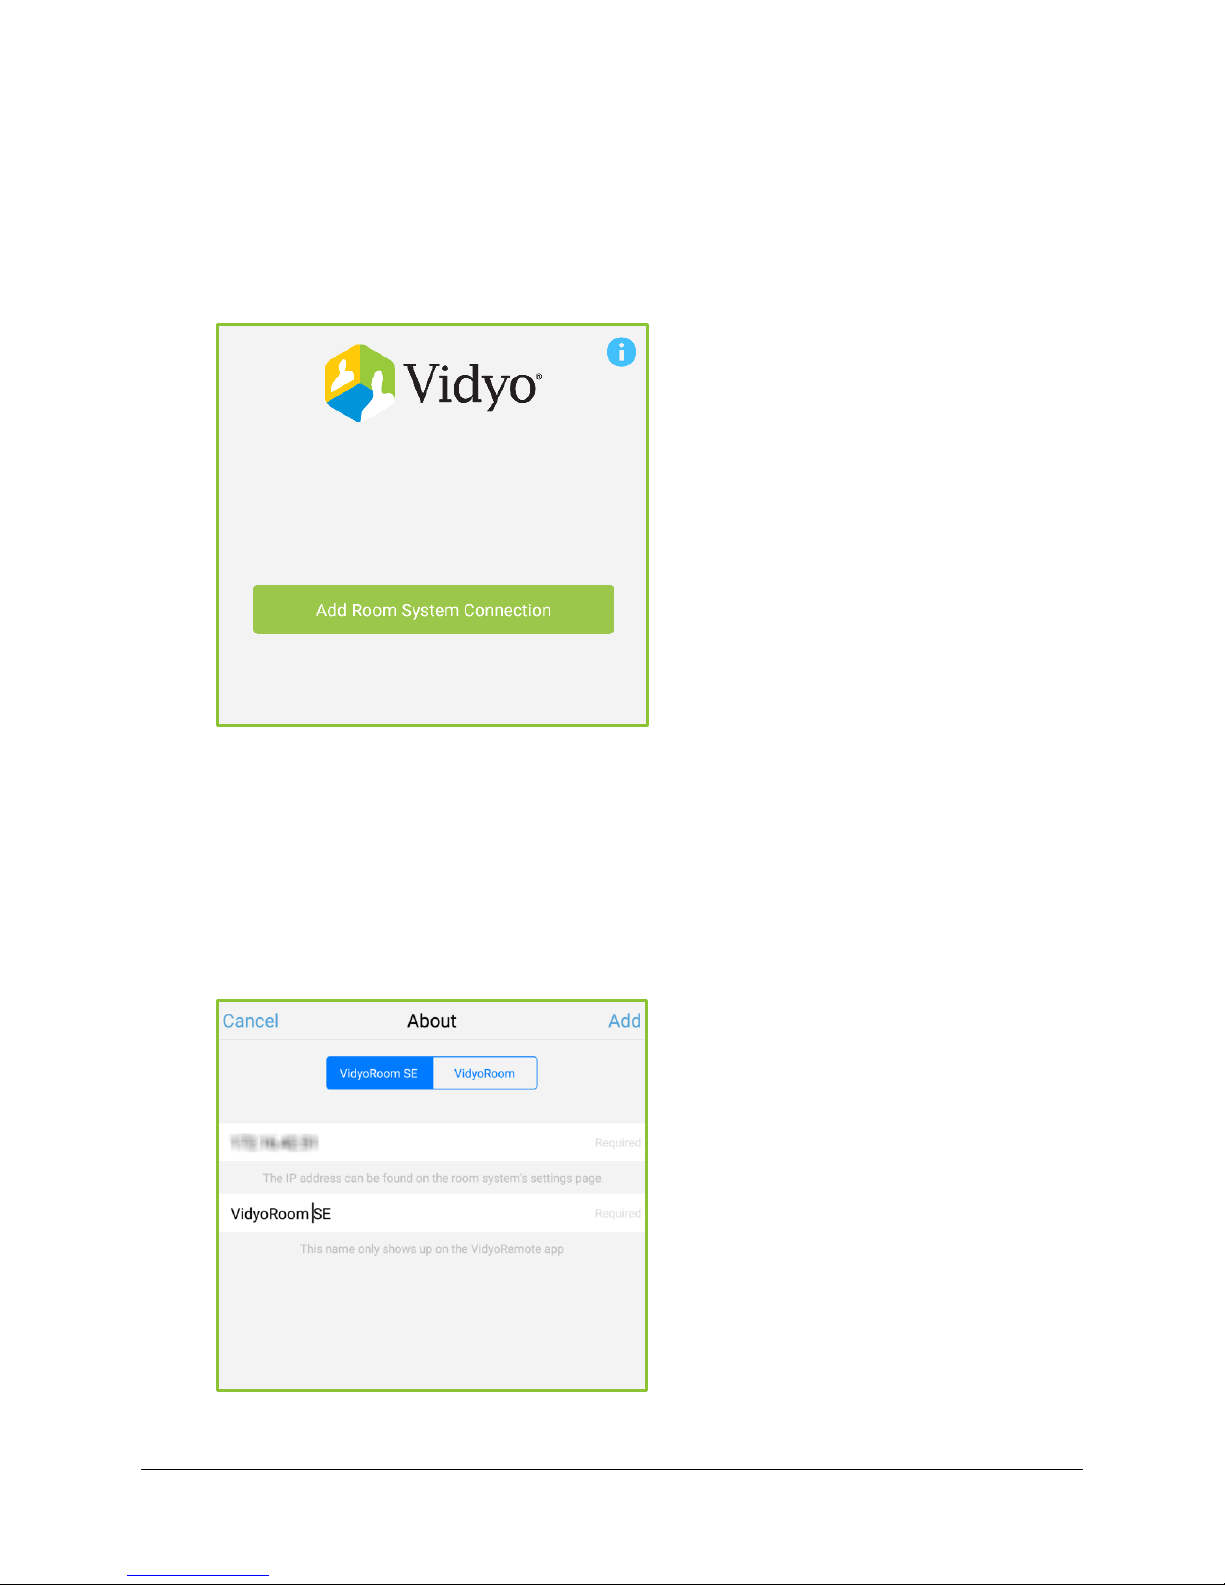
Adding VidyoRooms
To add VidyoRooms:
1. Click Add Room System Connection.
VidyoRoom™ and VidyoPanorama™ 600 Quick User Guide
2. Click the VidyoRoom SE or VidyoRoom button depending on the type of VidyRoom system
that you are adding.
Select the VidyoRoom SE button if you are adding a software edition room system that you
want to deploy using your own hardware. Select the VidyoRoom button if you are adding a
VidyoRoom or VidyoPanaroma system.
3. Enter the IP Address for the VidyoRoom system.
4. Enter a name for the VidyRoom system.
The Add button becomes active.
48
Page 52
VidyoRoom™ and VidyoPanorama™ 600 Quick User Guide
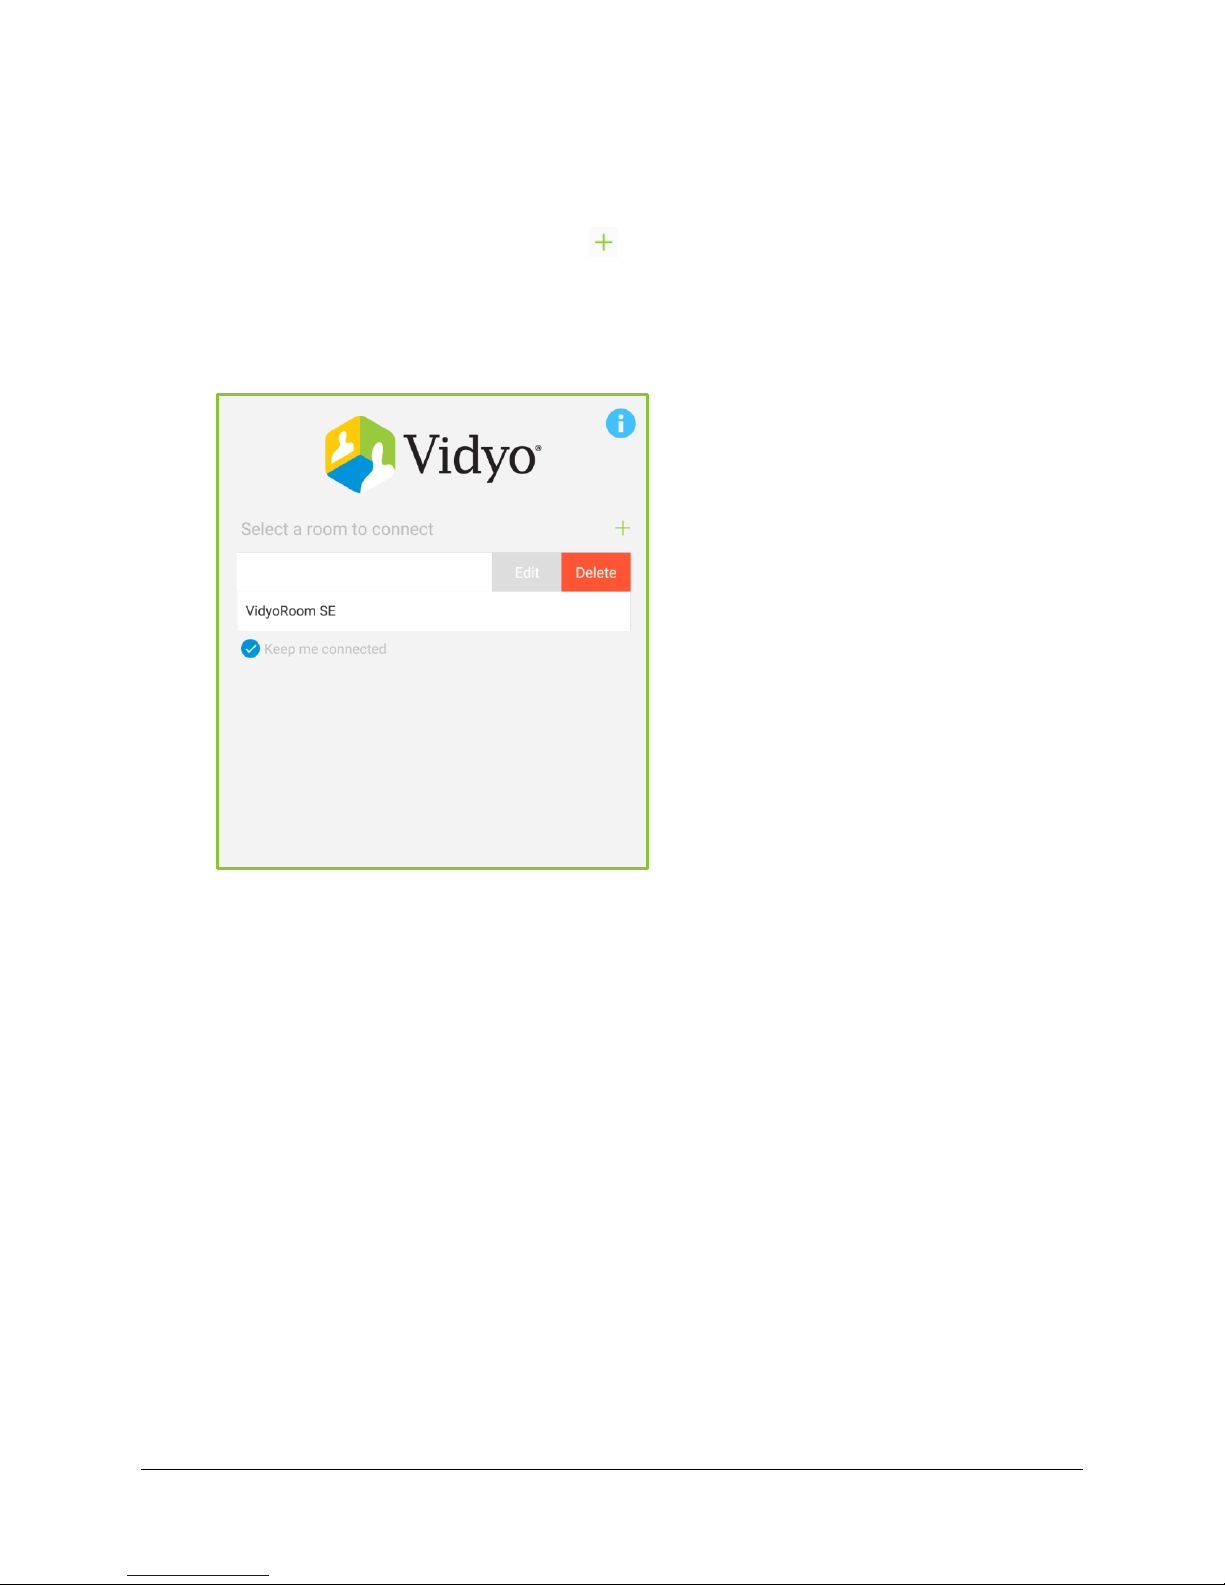
5. Click the Add button.
The room is added to the list of rooms on the main screen.
To add more VidyoRooms, click on the button on the main screen. To edit or delete a
room, swipe your finger from right to left over the VidyoRoom's name that you wish to edit
or delete. Once you pair successfully and start navigating to in-call/pre-call screens, tap
the screen three times to return to this screen to add, delete, or modify any rooms when
necessary.
Pairing VidyoRemote 3 for Android with Your VidyoRoom
System
After logging in to a VidyoRoom system, you are immediately prompted for a pair code if one has
been set in the Admin UI. The pair code enables you to connect your device with your VidyoRoom
system. If you need to obtain the pair code, contact your system administrator. For more
information, see the “Configuring the Remote Control Interface” section in the
VidyoPanorama600 Administrator Guide
.
VidyoRoom and
49
Page 53
VidyoRoom™ and VidyoPanorama™ 600 Quick User Guide
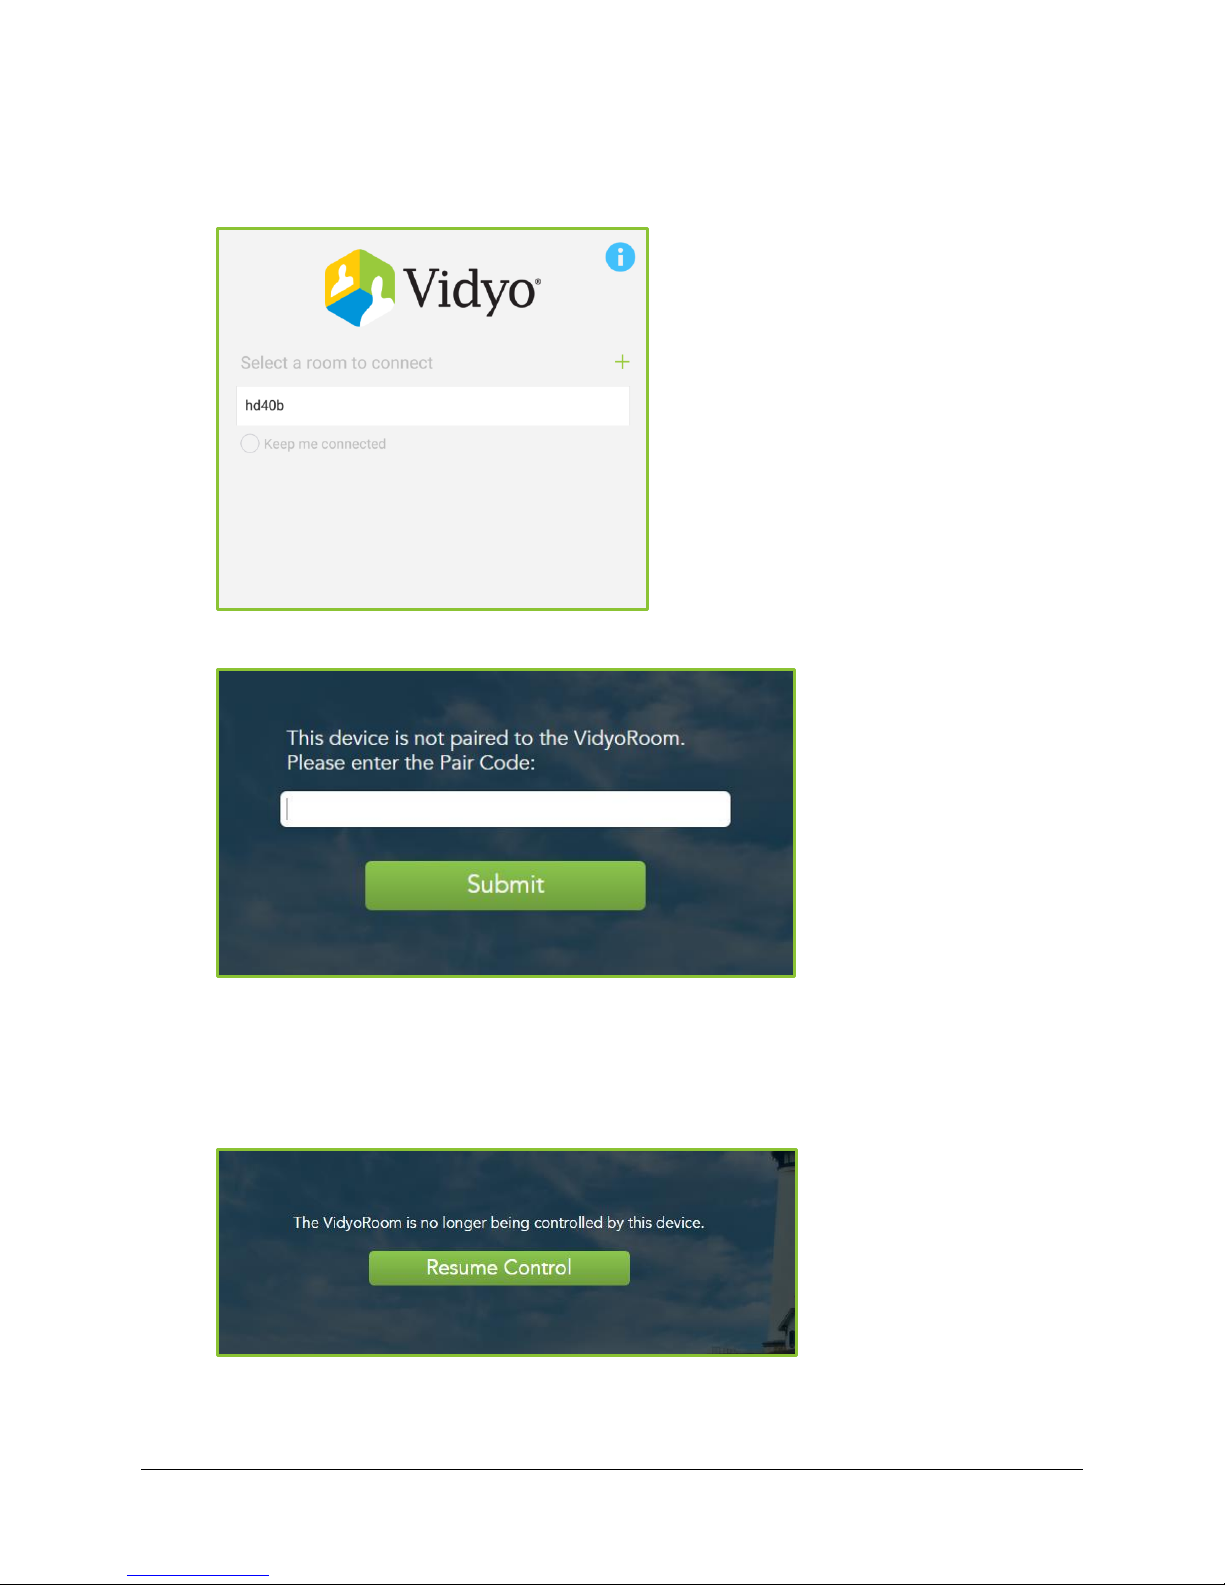
To pair VidyoRemote 3 for Android with your VidyoRoom system:
1. Click the name of the room from the Select a room to connect field.
2. Enter the Pair Code.
3. Tap Submit.
The system pairs your device.
4. If another handheld remote control or VidyoRemote device is used to operate your system,
the following message displays:
a. Click Resume Control.
b. Re-enter the Pair Code.
50
Page 54
VidyoRoom™ and VidyoPanorama™ 600 Quick User Guide
Icon
Description
Enter values for the VidyoPortal, username, and password and click
Log In to connect to your VidyoPortal.
Click Set Your Room PIN to PIN-protect your room.
c. Tap Submit.
For information about unpairing VidyoRemote 3 for Android, see Unpairing VidyoRemote 3
for Android from Your VidyoRoom System.
Configuring System Settings
The Settings menu enables the VidyoRoom or VidyoPanorama 600 system administrator to
configure the system and can be accessed anytime (pre-call or in-call).
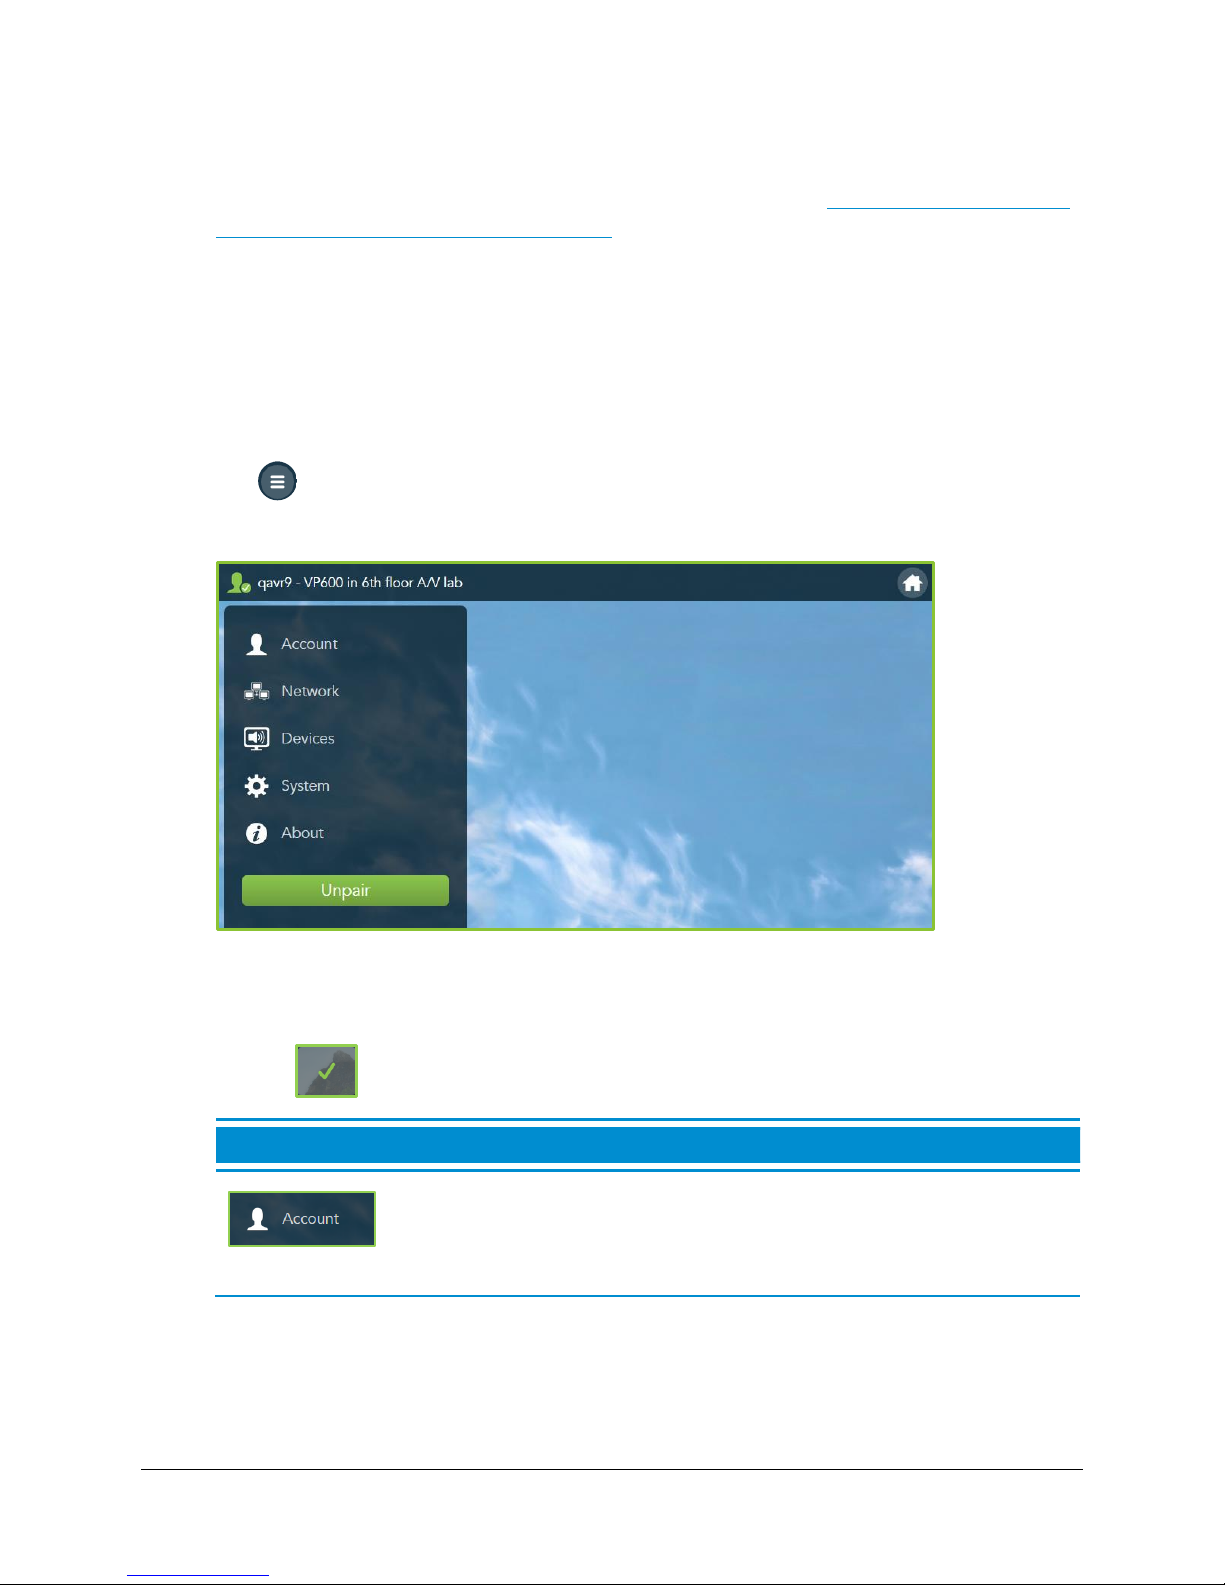
To configure the system settings:
1. Tap on the upper-right corner of any screen.
The Settings menu displays.
2. Tap any of the following items on the left menu to access the settings for that screen.
If the Setting menus are protected with an access code you will be prompted by the app to
enter the access code when you try to modify a protected settings, enter your access code
and tap .
51
Page 55
VidyoRoom™ and VidyoPanorama™ 600 Quick User Guide
Icon
Description
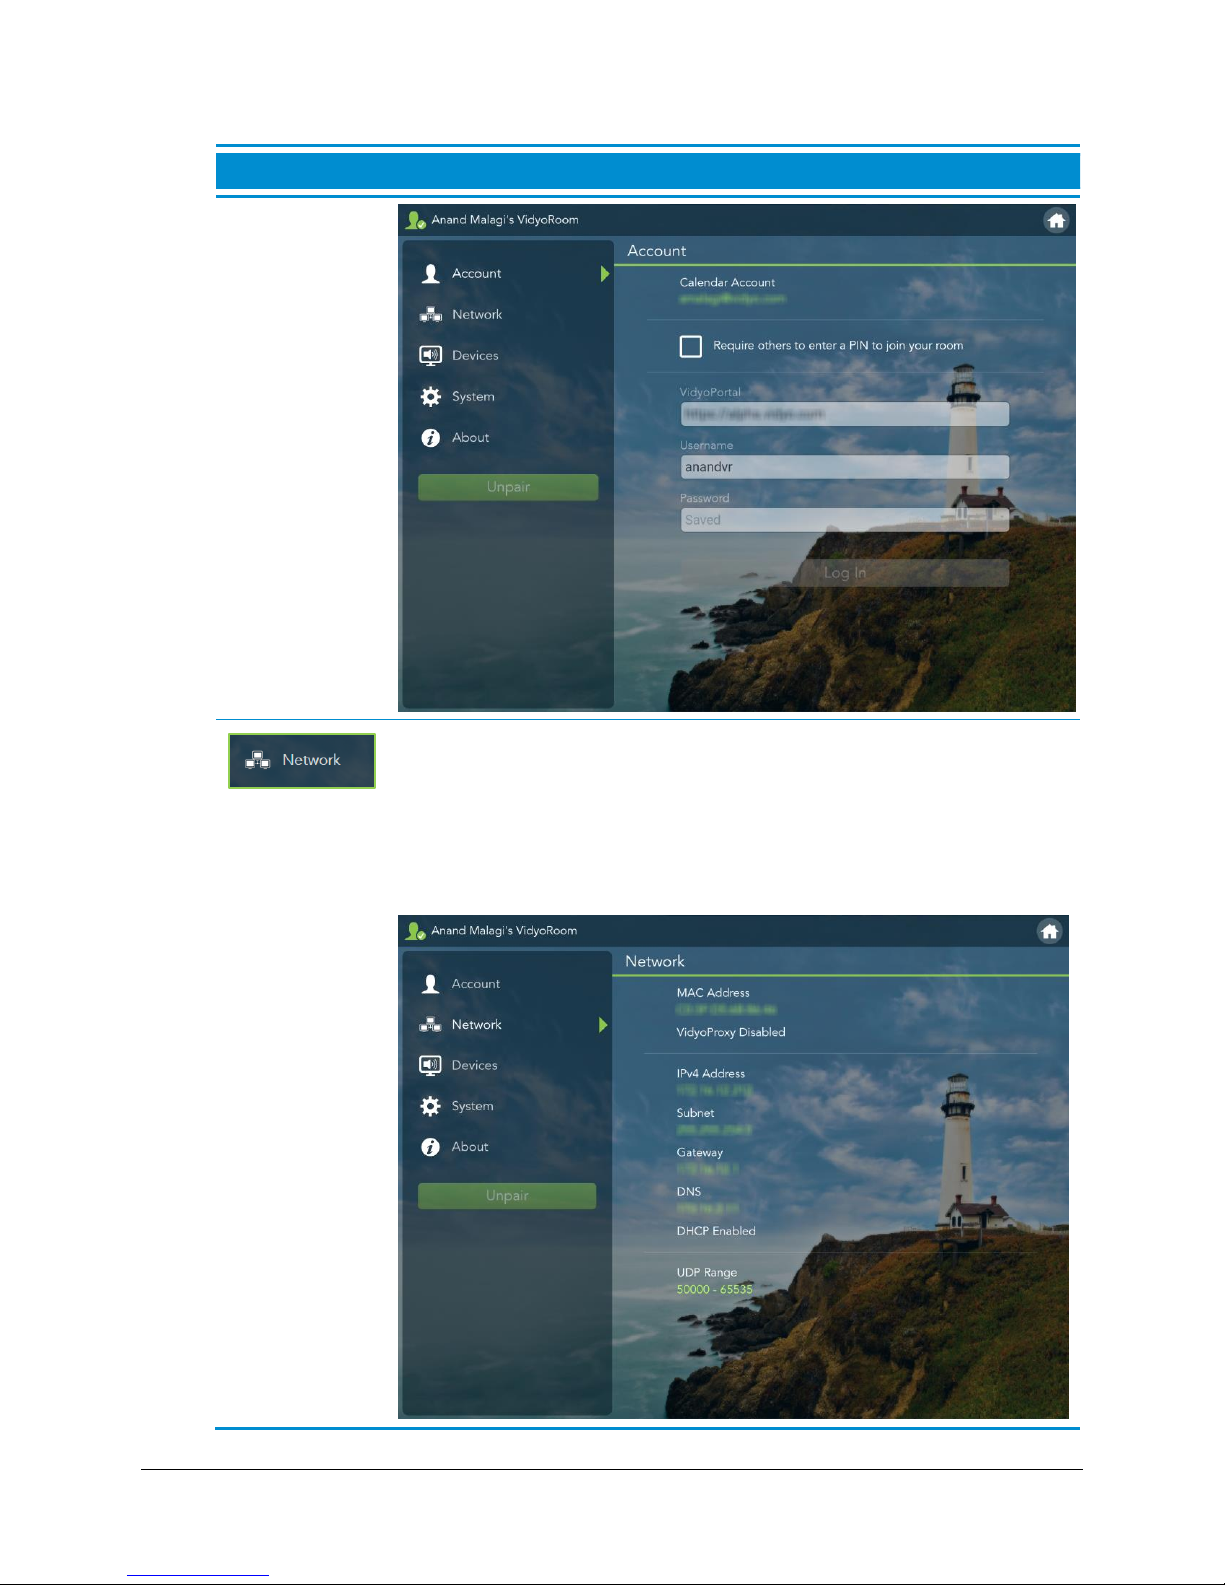
Network settings made by your system administrator display for
viewing only (read-only) on this screen and include your MAC address,
whether or not VidyoProxy is enabled, and specific UDP range values.
IPv4 and IPv6 (if configured) settings also display showing the IP
address, subnet, gateway, DNS, and whether or not your system is set
to use DHCP and automatically obtain its IP address.
52
Page 56
VidyoRoom™ and VidyoPanorama™ 600 Quick User Guide
Icon
Description
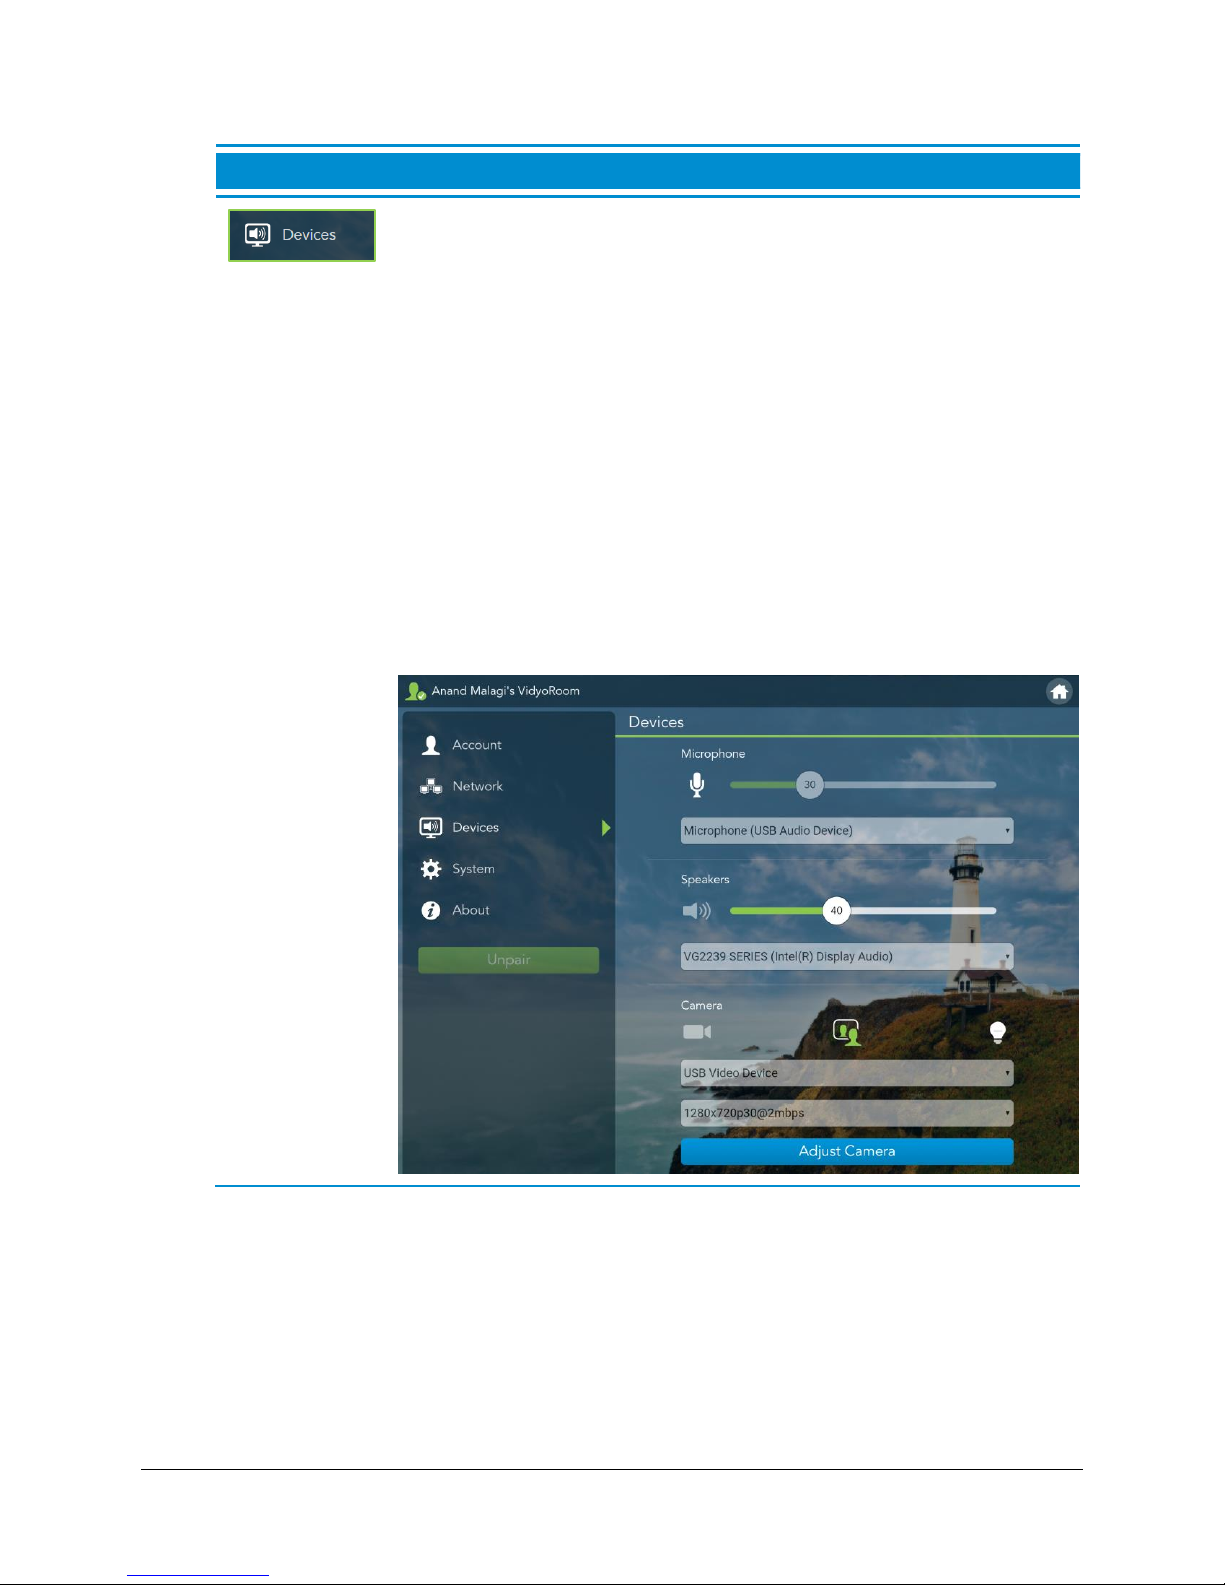
Select Microphone, Speaker, Camera, and Content Source settings:
For the Microphone settings, you can adjust the microphone level
and select from available microphones.
For the Speakers settings, you can adjust the speaker volume and
select from available speakers.
For the Camera settings, you can enable or disable the video feed,
turn self-view on or off, and turn the backlight setting on or off. You
can also select your camera input, the resolution, pan, tilt or zoom
adjust your camera, and select if participants are allowed to pan,
tilt, or zoom adjust your camera.
For the Content Source settings, you can select from available
content sources, select whether to automatically share content to
conferences when you join then, and/or preview your share locally
to review your automatic share before sending it to conferences.
53
Page 57
VidyoRoom™ and VidyoPanorama™ 600 Quick User Guide
Icon
Description
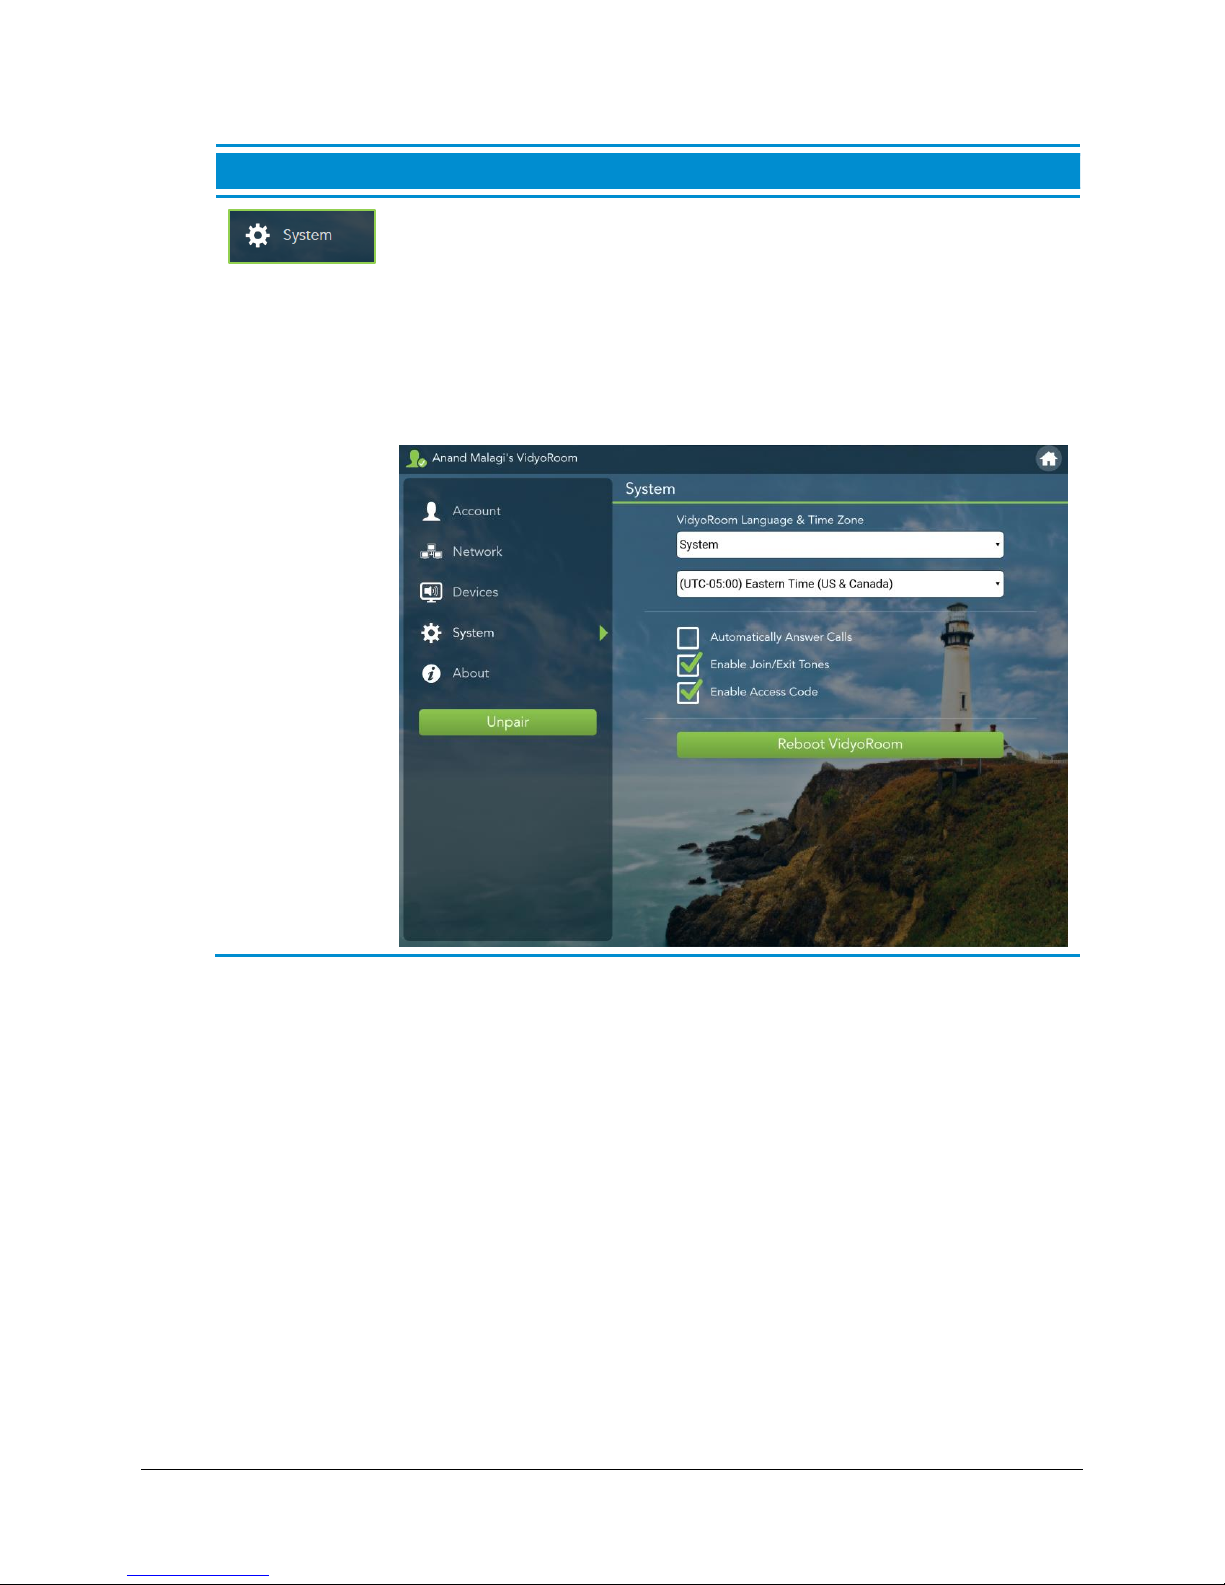
Select the language and time zone of the VidyoRoom, select whether
to automatically answer incoming calls, enable the system to play
tones when participants join or exit conferences, and enable an
access code. If you enable an access code, users will have to enter
the code in order to make changes to various screens or fields, such
as the
Account
and
Network
screens.
You can also tap Reboot VidyoRoom on this screen to reboot your
machine.
54
Page 58
VidyoRoom™ and VidyoPanorama™ 600 Quick User Guide
Icon
Description
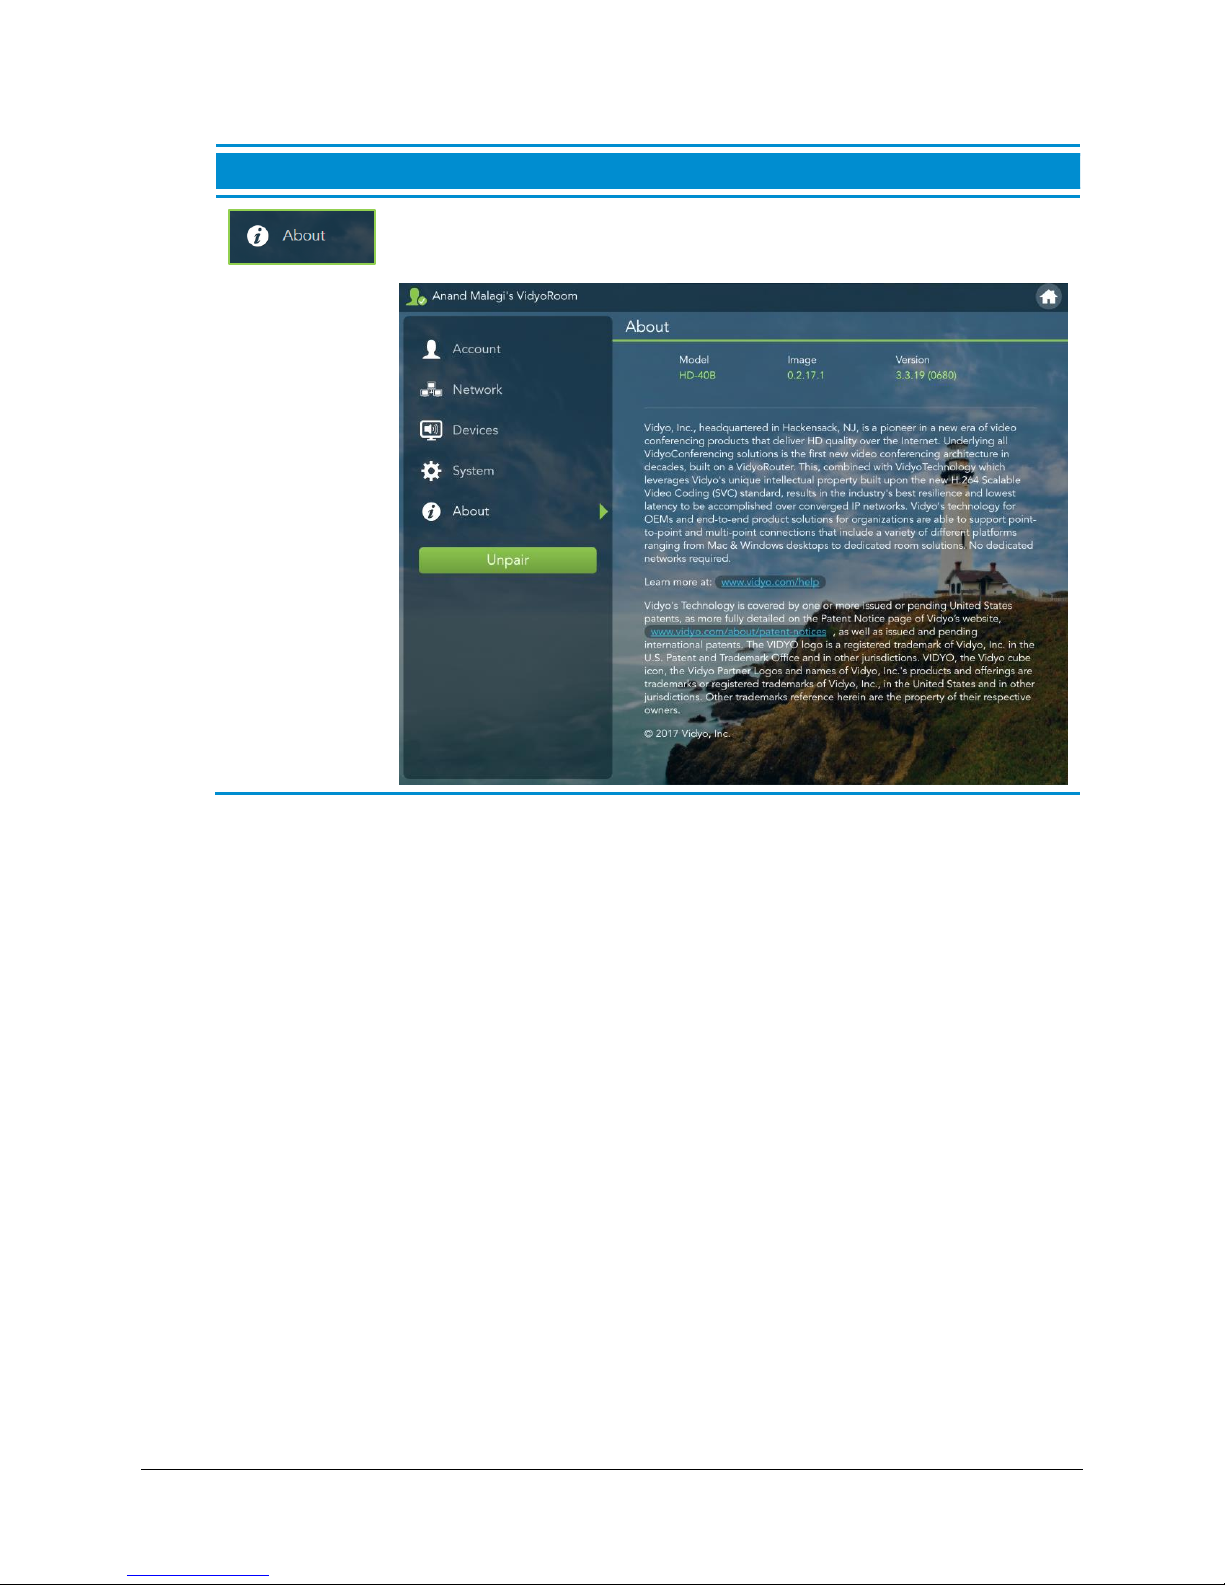
View the VidyoRoom or VidyoPanorama 600 model, image, version
being used, the Vidyo company description, INOGENI, and the
copyright statement.
55
Page 59
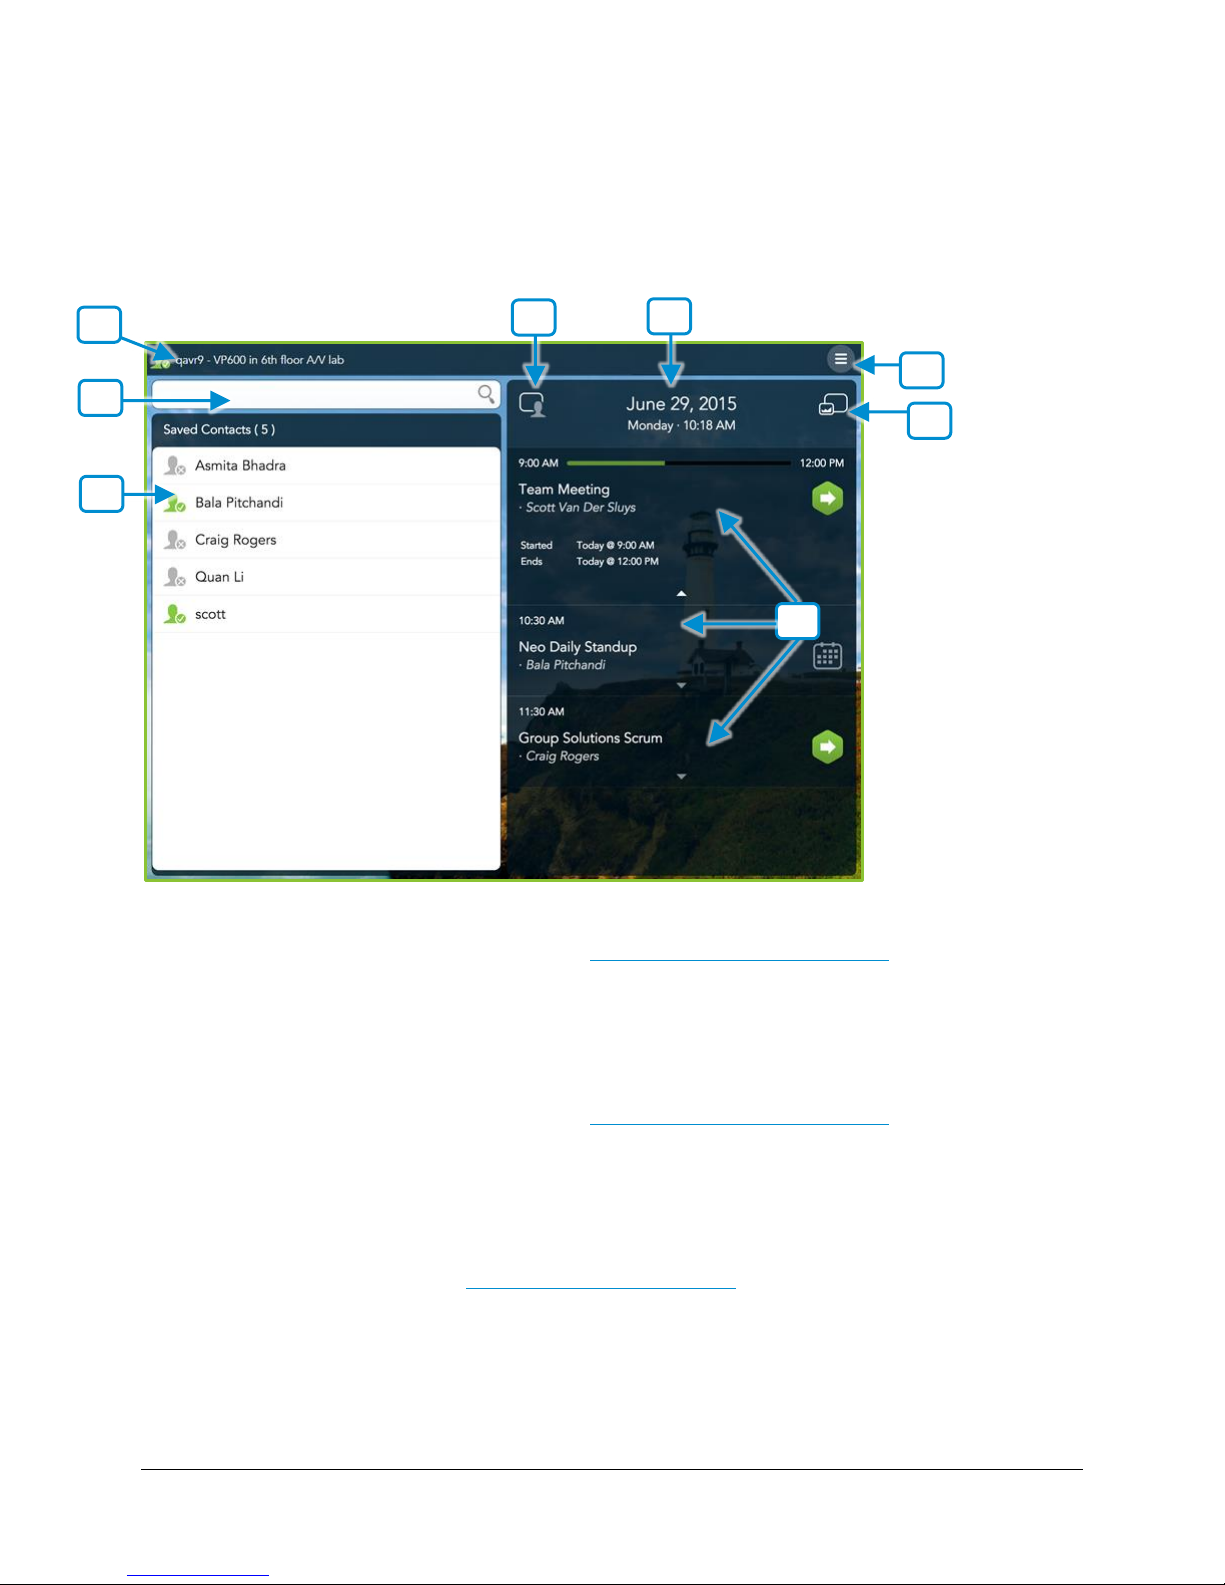
Pre-Call
2 3 7 6 1 8 4
5
Viewing the Pre-Call Menu
VidyoRoom™ and VidyoPanorama™ 600 Quick User Guide
1. The status and name of your VidyoRoom.
For more information about status, see Understanding the Status Icons.
2. The search box where you can enter a name to search for a contact or room.
As soon as you begin typing, search results display in the Directory.
3. The list of your contacts and their status.
For more information about status, see Understanding the Status Icons.
4. Icon that toggles self-view.
5. The VidyoRoom or VidyoPanorama 600 system date and time.
6. The System Settings button.
For more information, see Configuring System Settings.
7. Icon that toggles local share preview (Projection).
8. A list of upcoming appointments from your calendar (if your system administrator has
synchronized your VidyoRoom or VidyoPanorama 600 system with a Microsoft Exchange™
calendar, a Google Calendar™, or another supported calendar).
56
Page 60
VidyoRoom™ and VidyoPanorama™ 600 Quick User Guide
For more information, see Using the VidyoRoom Calendar.
Joining a Contact’s Room or Calling a Contact Directly
To join a contact’s room or call a contact directly:
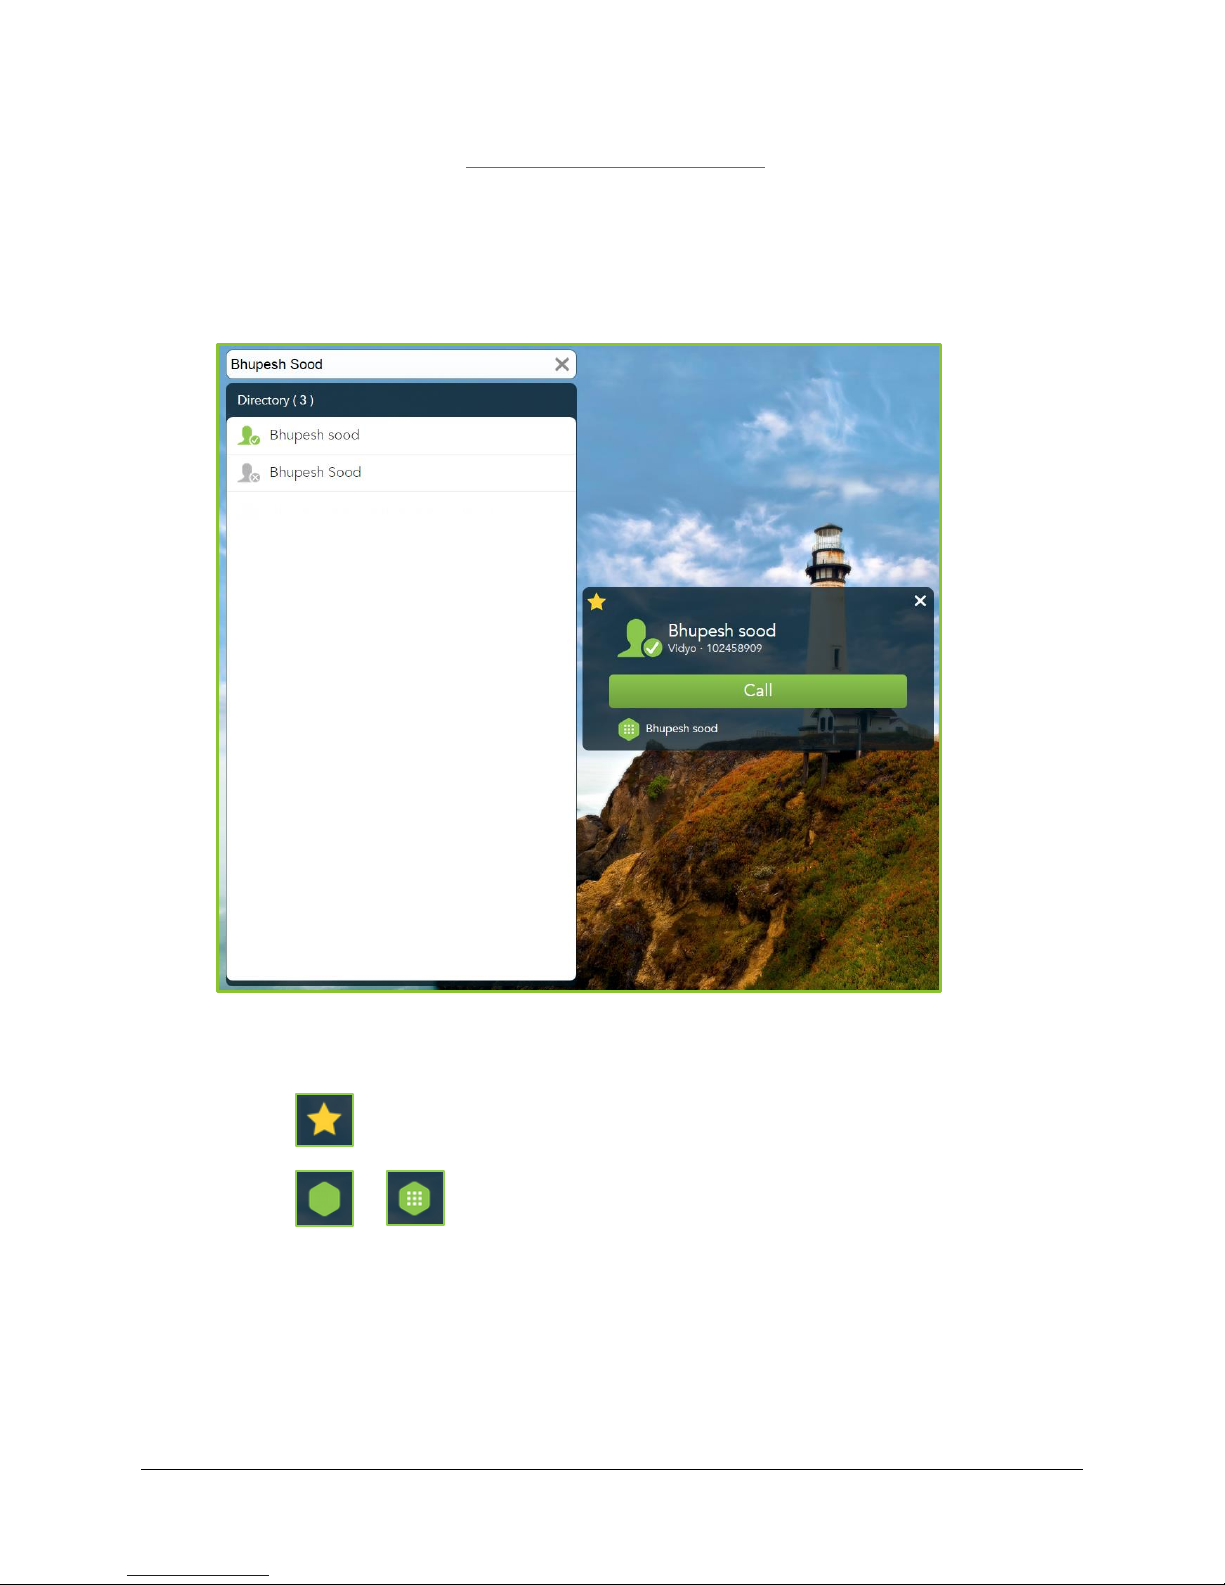
1. Tap the name of the desired contact in My Contacts or the Directory.
2. Tap any of the following options:
Tap Call to make a direct call.
Tap to add the selected contact to your list.
Tap or (if the room is PIN-protected) to join the contact’s room.
57
Page 61
VidyoRoom™ and VidyoPanorama™ 600 Quick User Guide
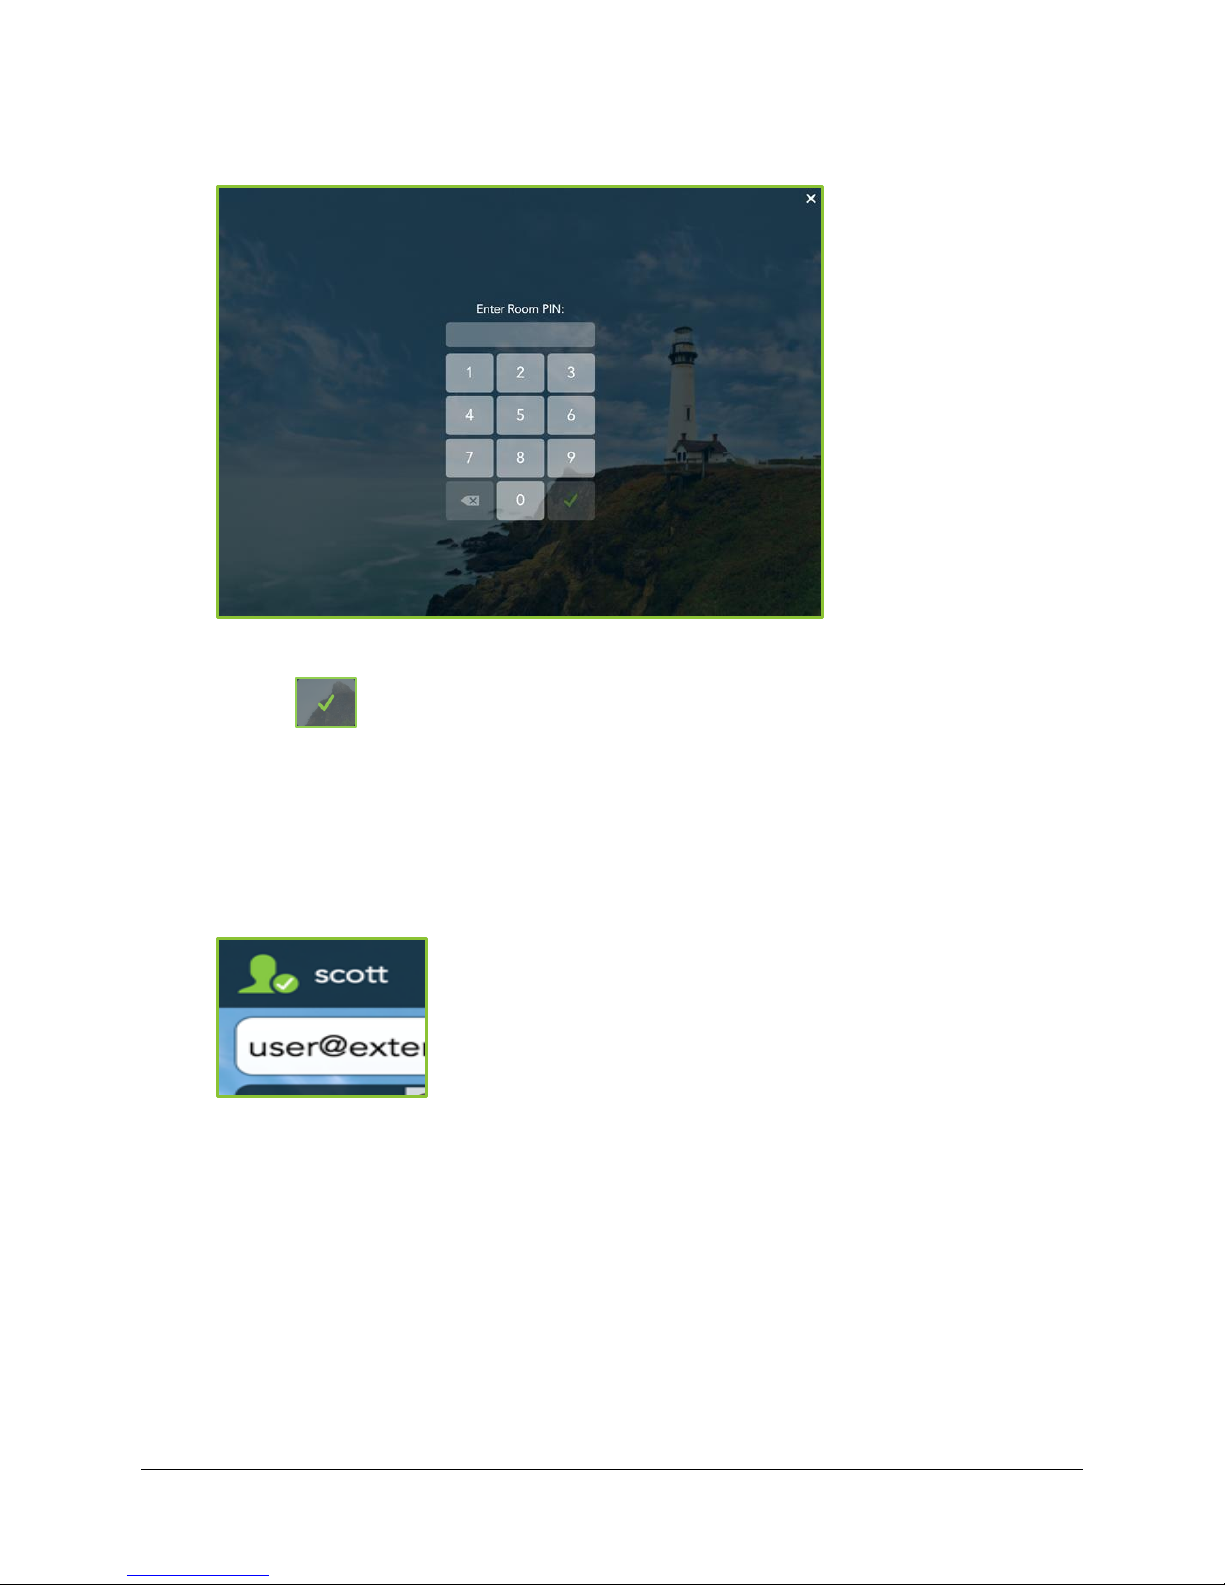
If the room is PIN-protected, do the following:
a. Enter your PIN number.
b. Tap .
Calling a User on a Different VidyoPortal or an H.323/SIP Endpoint
To call a user on a different VidyoPortal or an H.323/SIP endpoint:
1. Enter the address of the contact that is on a different VidyoPortal or on an H.323/SIP
endpoint.
2. Tap the contact that displays in the External Contact list.
3. Tap Connect.
Using the VidyoRoom Calendar
The calendar integration feature enables the VidyoRoom to display upcoming scheduled meetings
from a Google Calendar, a Microsoft Exchange calendar, or another supported calendar specified
by your system administrator. This feature enables the system to display meetings that are taking
place up to three hours in the future and up to one hour in the past, as well as display or hide
meeting details.
58
Page 62
Viewing Meeting Details
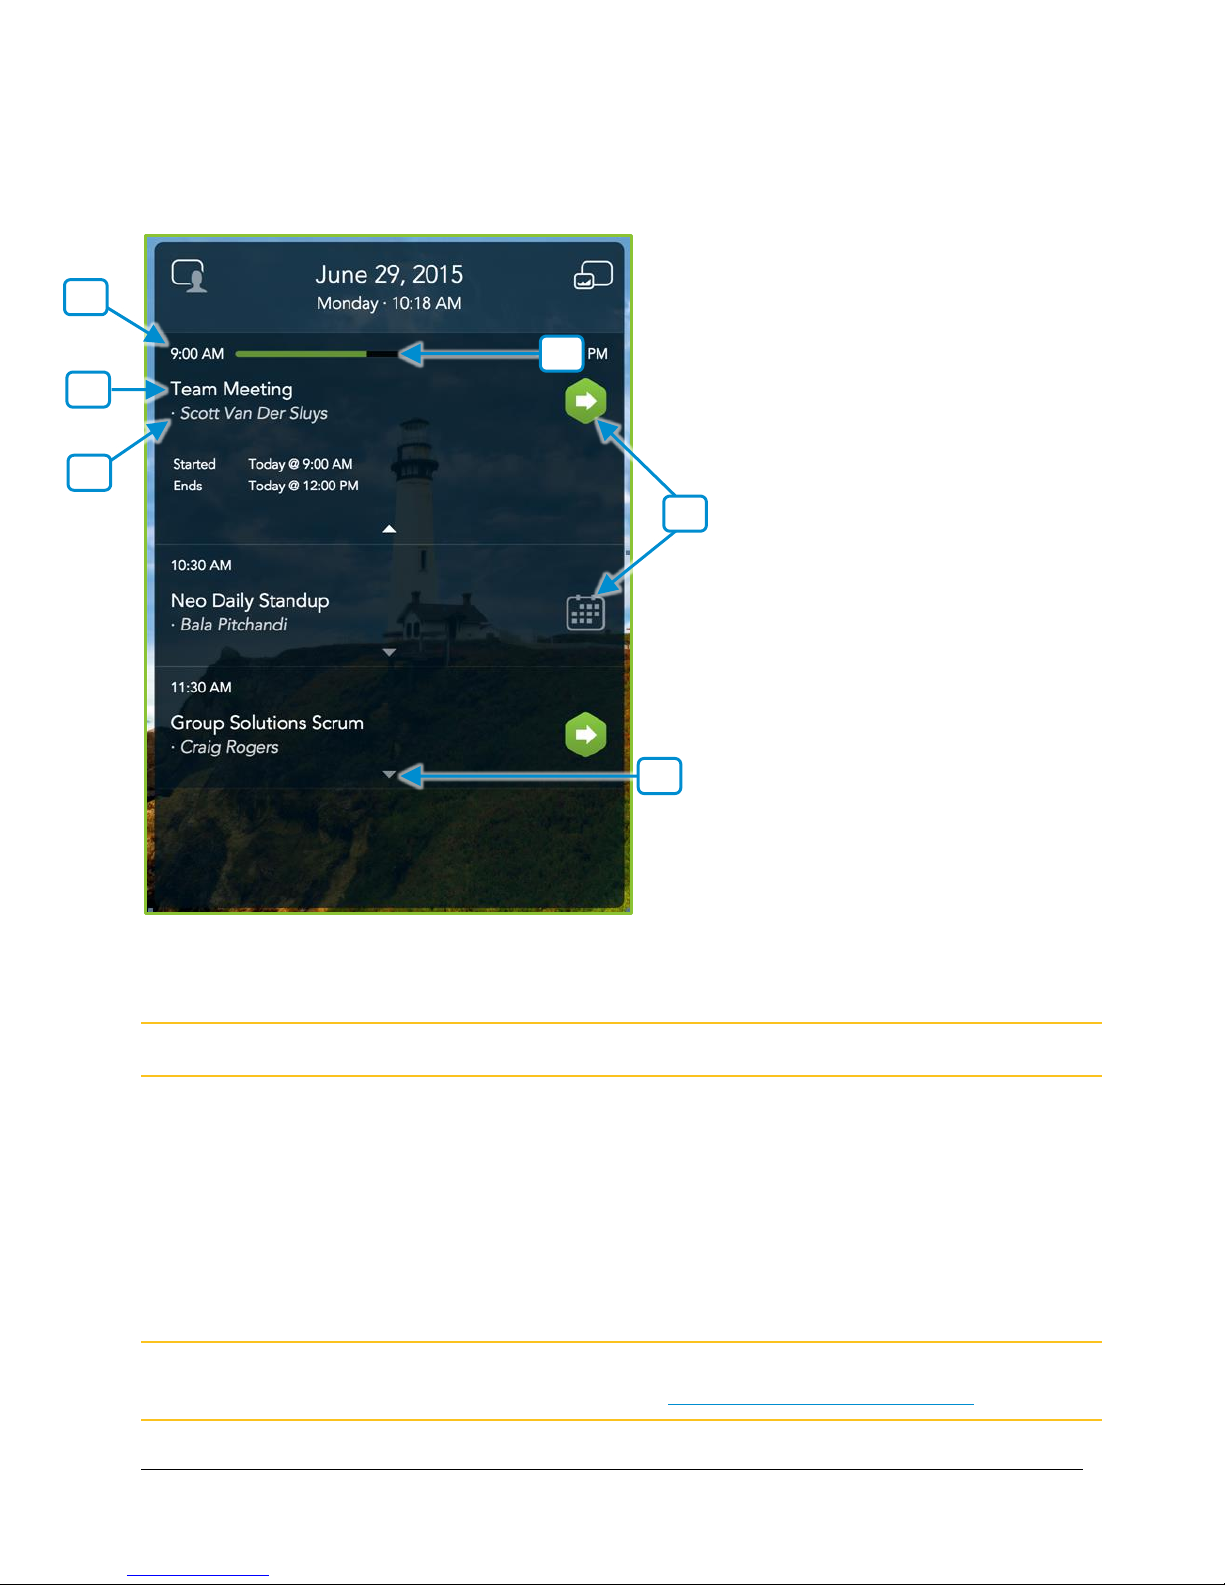
5
4 6 2 3 1
VidyoRoom™ and VidyoPanorama™ 600 Quick User Guide
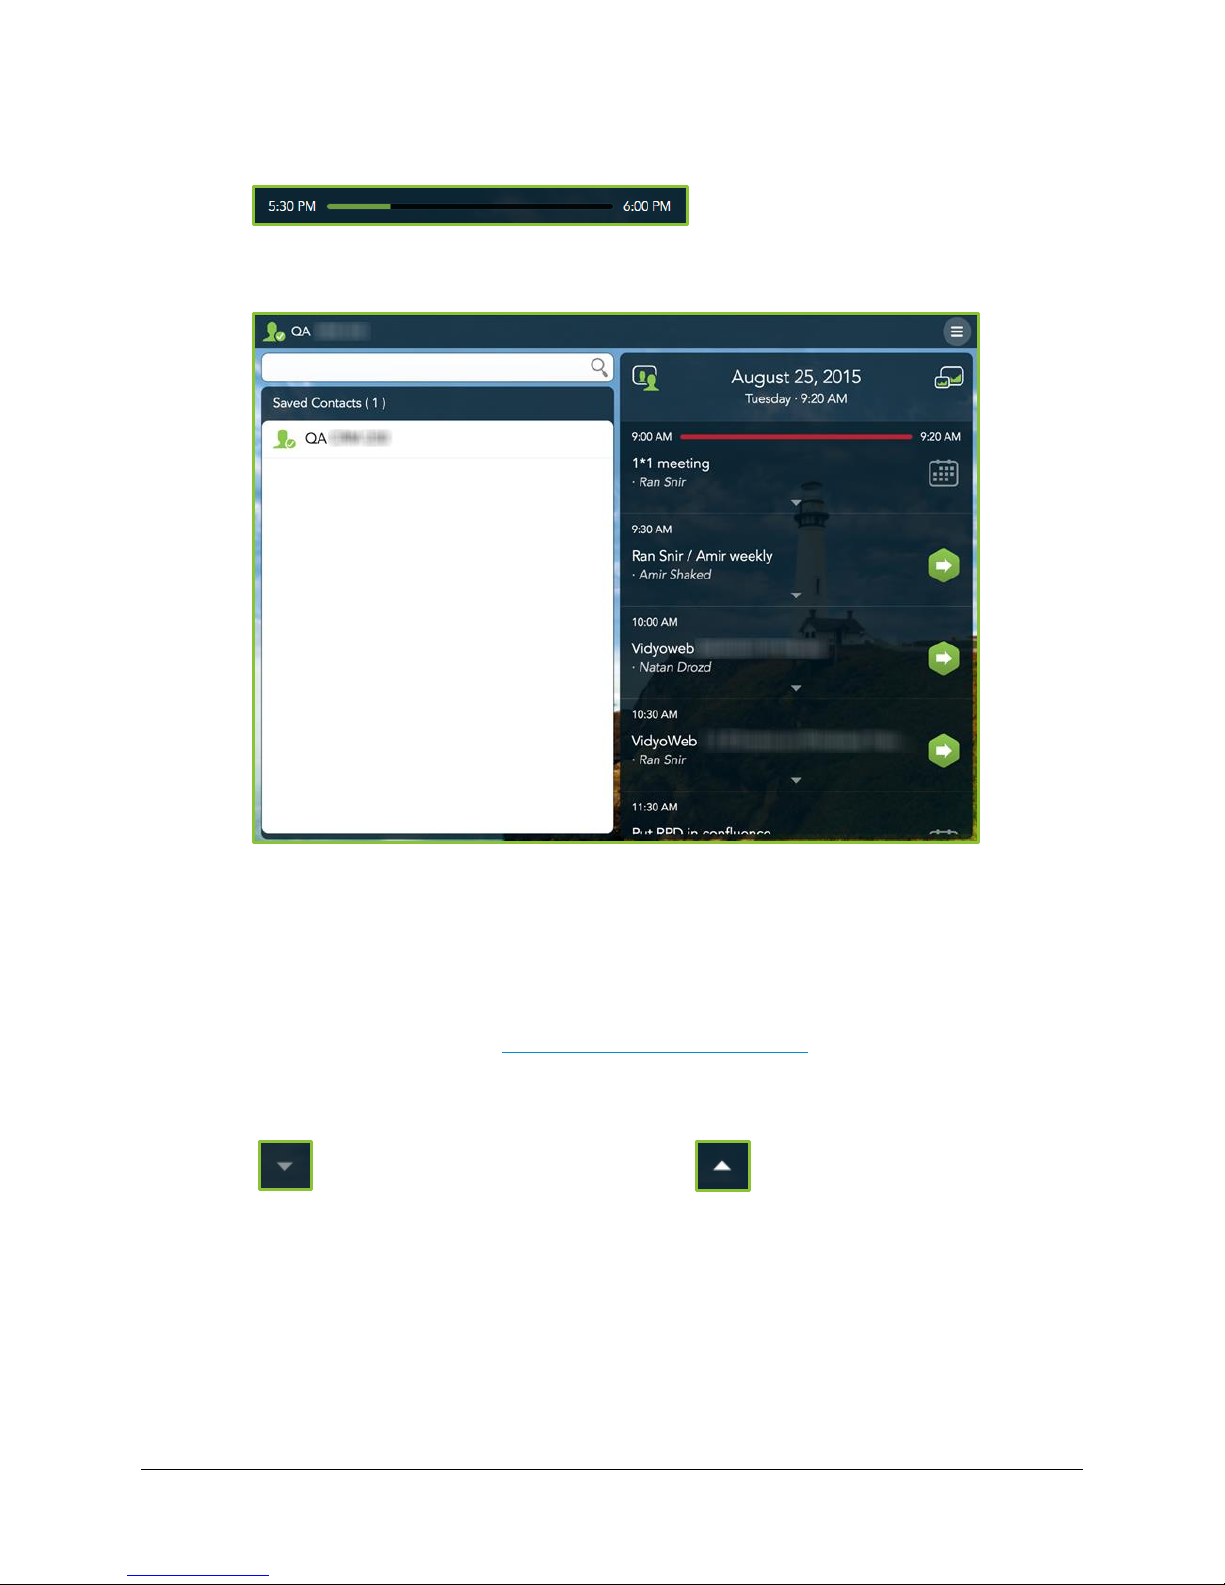
Meetings are displayed as tiles on the right side of the
Pre-Call
screen.
The following information is displayed about each meeting:
1. The time the meeting is scheduled to begin.
Note Only appointments scheduled up to three hours in the future display on the screen.
2. The subject of the meeting.
3. The name of the meeting organizer.
4. The following meeting status details display in the meeting status region five minutes
before, during, and one hour after your meeting:
If it’s five minutes before your meeting, a timer displays and counts down your meeting
time.
Note The system also asks you if you want to join or ignore the meeting both five minutes prior and
during your meeting. For more information, see Joining Vidyo-Enabled Meetings.
59
Page 63
VidyoRoom™ and VidyoPanorama™ 600 Quick User Guide
If your meeting is taking place, a green progress bar displays.
If your meeting is complete, a red progress bar displays for one hour after the ending
time of your meeting, and then the meeting tile disappears from your calendar.
5. Whether the meeting is Vidyo-enabled:
Vidyo-enabled meetings display with green hexagonal icons on the right of the tile.
When the meeting ends, the red progress par displays and the meeting remains on the
screen for one hour after the ending time of your meeting, and then the meeting tile
disappears from your calendar.
For more information, see Joining Vidyo-Enabled Meetings.
Non-Vidyo-enabled meetings display with gray calendar icons on the right of the tile;
they disappear from your calendar right after the scheduled start time.
6. Tap to expand your meeting details and tap to collapse them.
The details include the following:
The meeting start time.
The meeting end time.
The required meeting attendees.
The optional meeting attendees.
60
Page 64
VidyoRoom™ and VidyoPanorama™ 600 Quick User Guide
Joining Vidyo-Enabled Meetings
To join a Vidyo-enabled meeting:
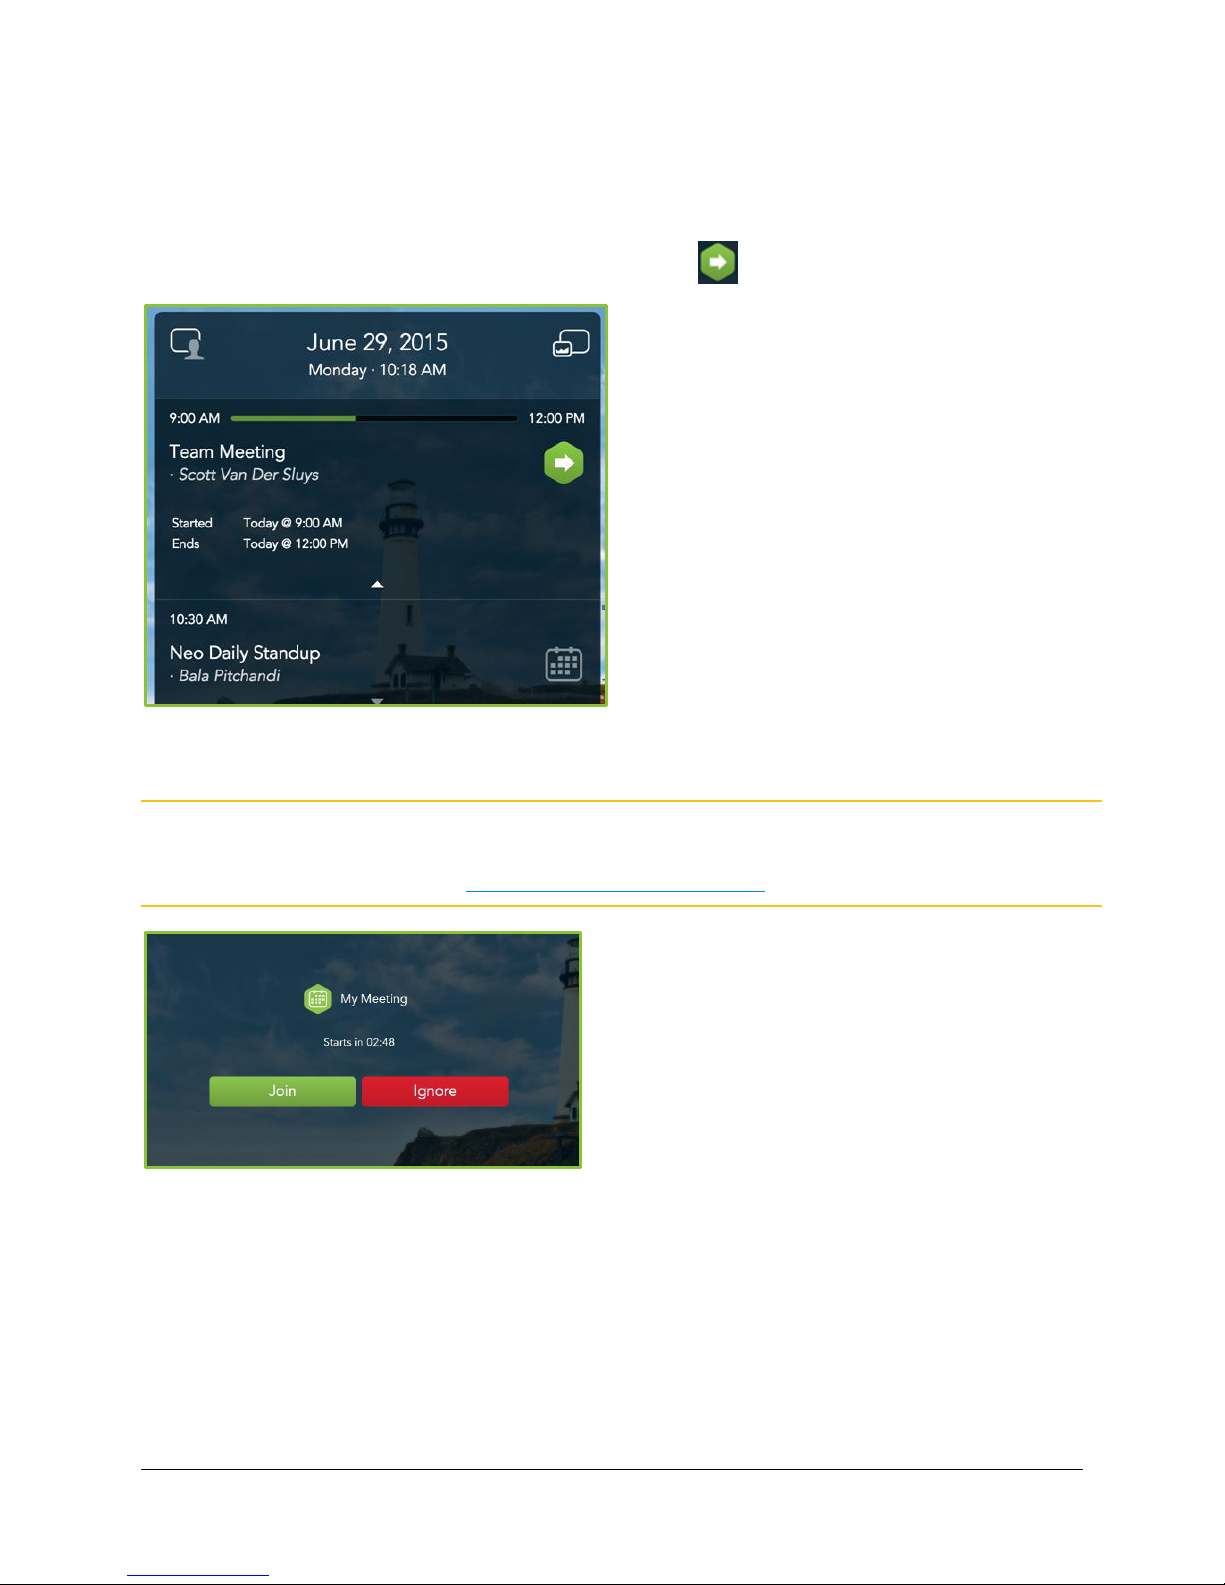
If you want to manually join an upcoming meeting, tap on the right of the meeting tile.
If a dialog box displays reminding you of an upcoming meeting, tap Join if you want to join the
meeting or tap Ignore if you do not want to join the meeting.
Note This dialog box displays if your system administrator has synced up a Google Calendar, a
Microsoft Exchange calendar, or another supported calendar with your VidyoRoom system.
For more information, see Using the VidyoRoom Calendar.
The dialog box remains on the screen indicating “Starts in XX:XX” or “Active for XX:XX” for one
hour after the ending time of your Vidyo-enabled meeting or until acknowledged.
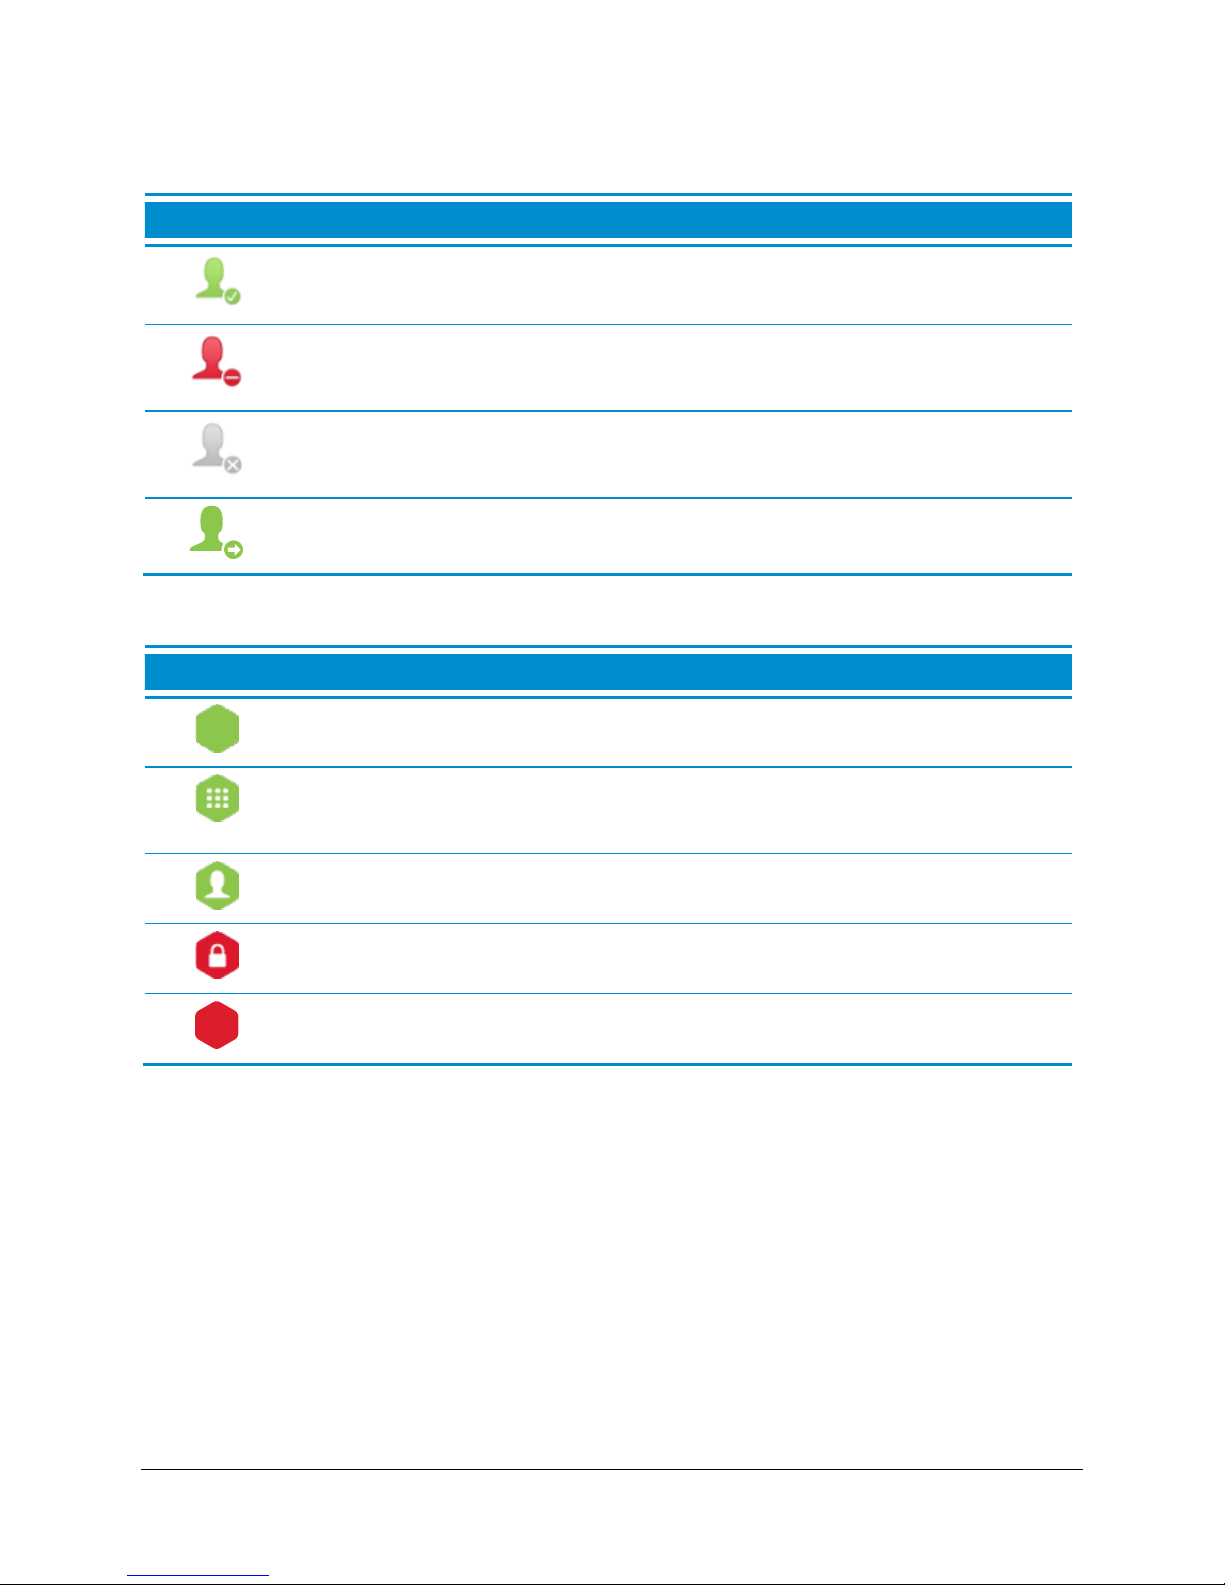
Understanding the Status Icons
The following tables provide status icons and explanations as they display in VidyoRemote 3 for
Android.
61
Page 65
Contact Status
Icon
Description
The contact is online and available to receive incoming calls.
The contact is online but is currently in a call. You cannot make a direct call to
this contact; however, you can join the contact’s room.
The contact is offline (not logged in to the VidyoPortal). You cannot make a
direct call to this contact; however, you can join the contact’s room.
The contact is connected to another VidyoPortal or is an H.323/SIP endpoint.
Icon
Description
The room is available and empty, so you can enter the room.
The room is available and PIN-protected. If you attempt to join the room, you will
be asked to enter a PIN.
The room is occupied but available to enter.
The room is locked, so you cannot enter it.
The room is full, so you cannot enter it.
Room Status
VidyoRoom™ and VidyoPanorama™ 600 Quick User Guide
62
Page 66
VidyoRoom™ and VidyoPanorama™ 600 Quick User Guide
Projecting Content in Your System
To project content on your local system when you are not in a call:
1. Connect a compatible content-sharing device to your laptop/pc or your VidyoRoom
system.
The content will be displayed on the screen of your VidyoRoom system if the Preview Local
Content checkbox is selected in the
Projection Mode as the content is locally displayed on your VidyoRoom system.
In addition, this will also depend upon the selected settings in the VidyoRemote 3
application.
For information about sharing to the entire conference while in-call, see Sharing Content to
a Conference.
Settings
tab of the Admin User Interface. This is called
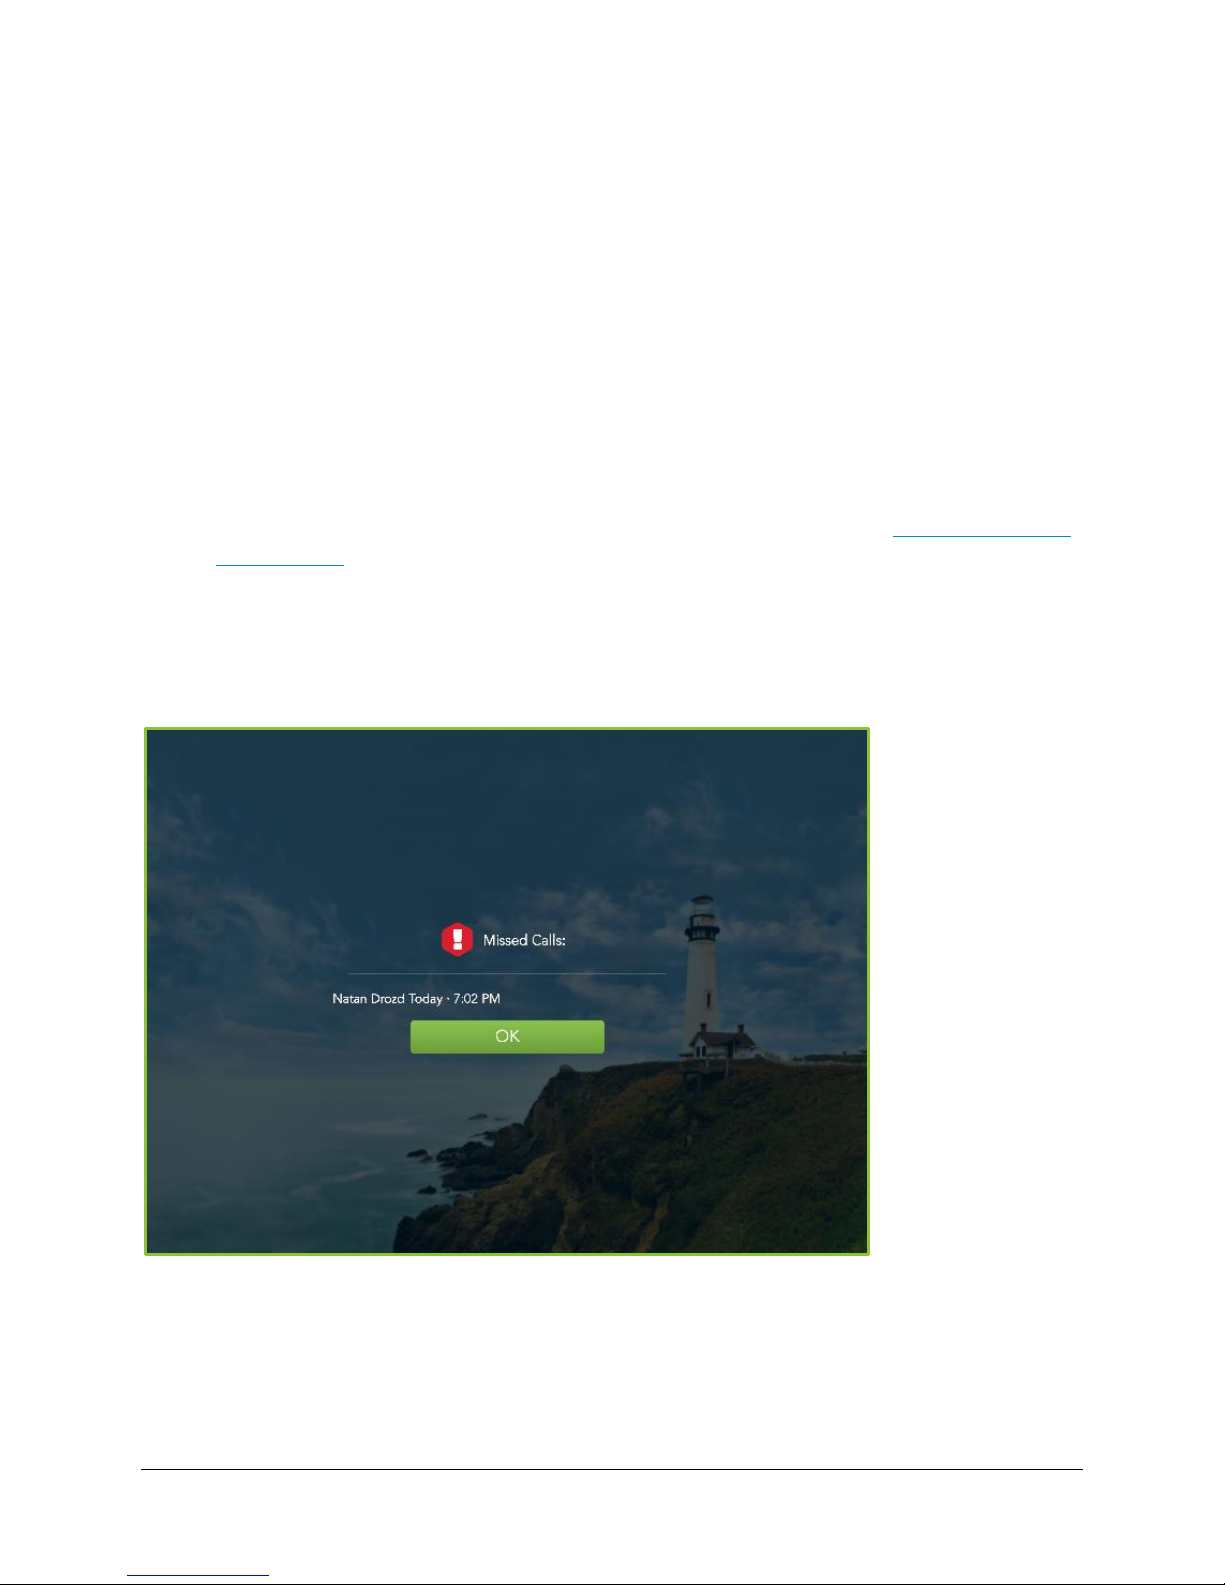
Managing Missed Call Notifications
If an incoming call is not answered, a list of current and previous missed calls displays. Click OK
and the list will disappear.
63
Page 67
In-Call
2 3 4
1
5
Viewing the In-Call Menu
VidyoRoom™ and VidyoPanorama™ 600 Quick User Guide
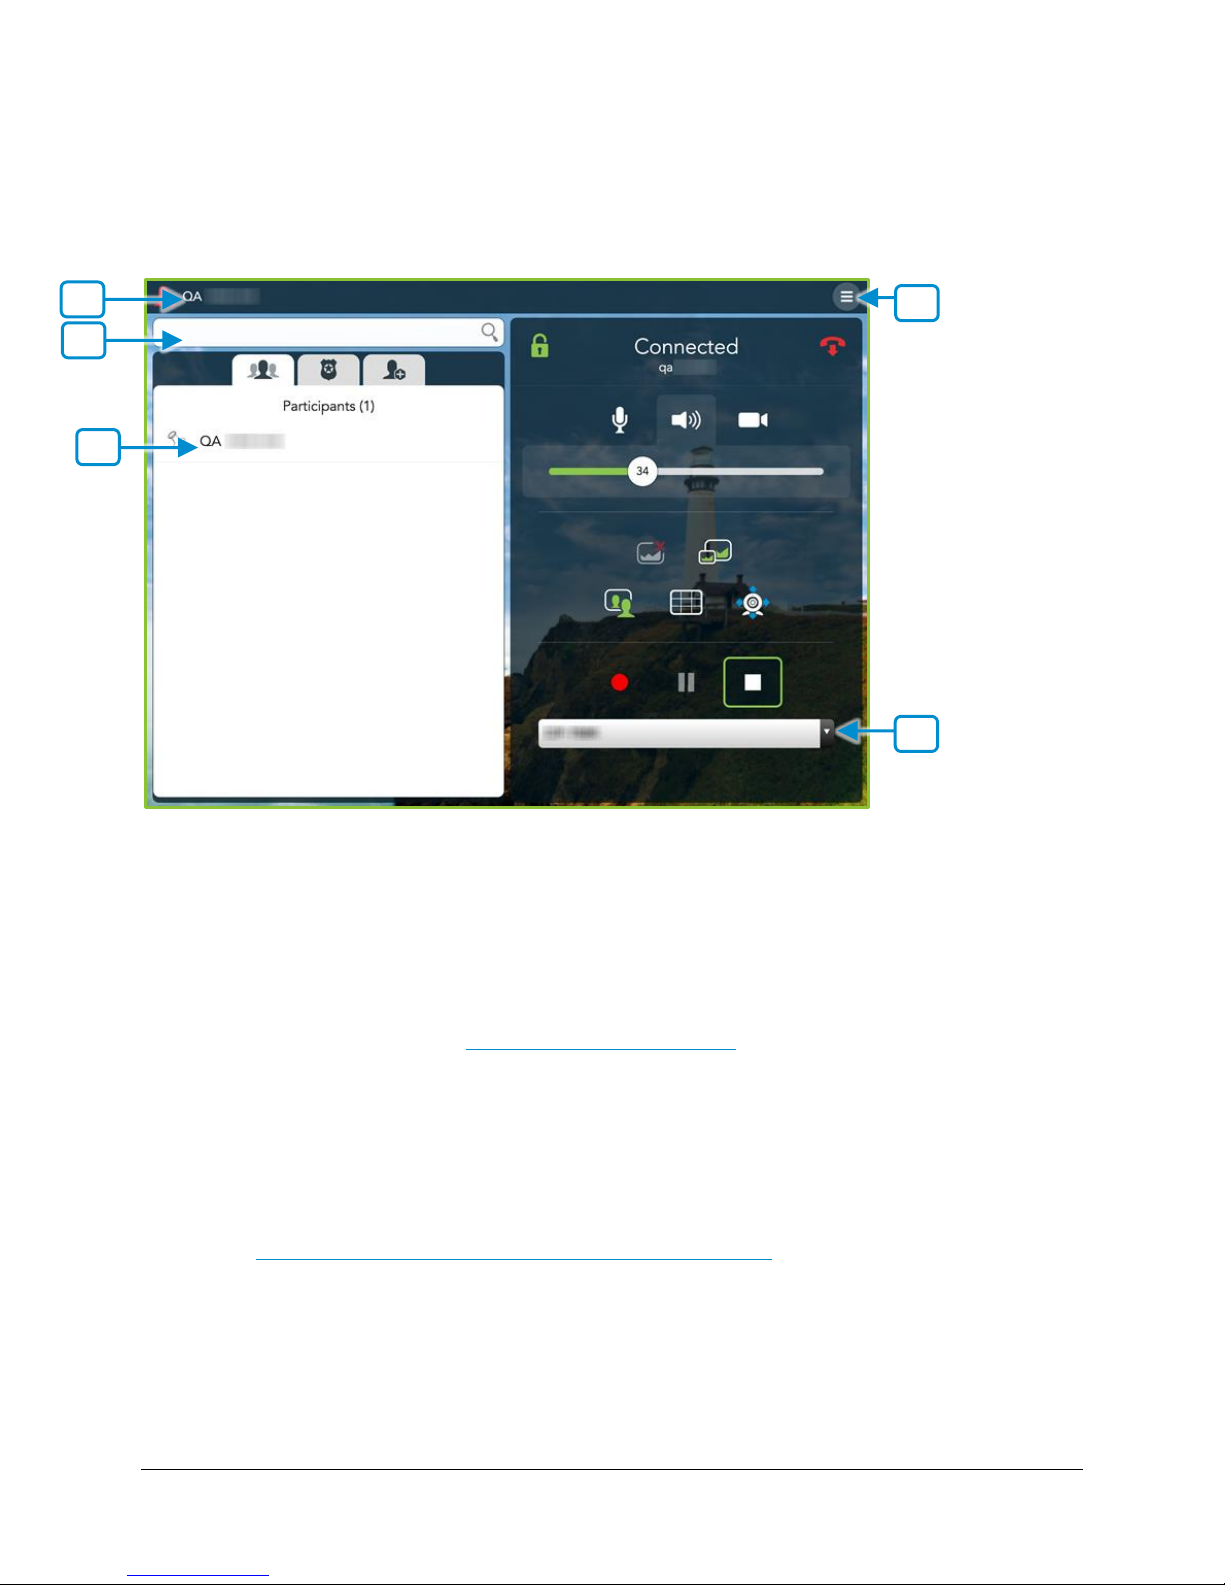
1. The name of your VidyoRoom.
2. The search box where you can filter through all active participants on the call.
As soon as you begin typing, search results display in the Directory.
3. The list of participants currently in the call.
4. The System Settings button.
For more information, see Configuring System Settings.
5. Drop-down that displays available profiles from the VidyoRecorder so that the call can be
recorded.
This drop-down is available only if you join your own room or if you are the room
moderator.
Once you are connected to a conference, the In Call Menu displays. For more information,
see Joining a Contact’s Room or Calling a Contact Directly.
64
Page 68
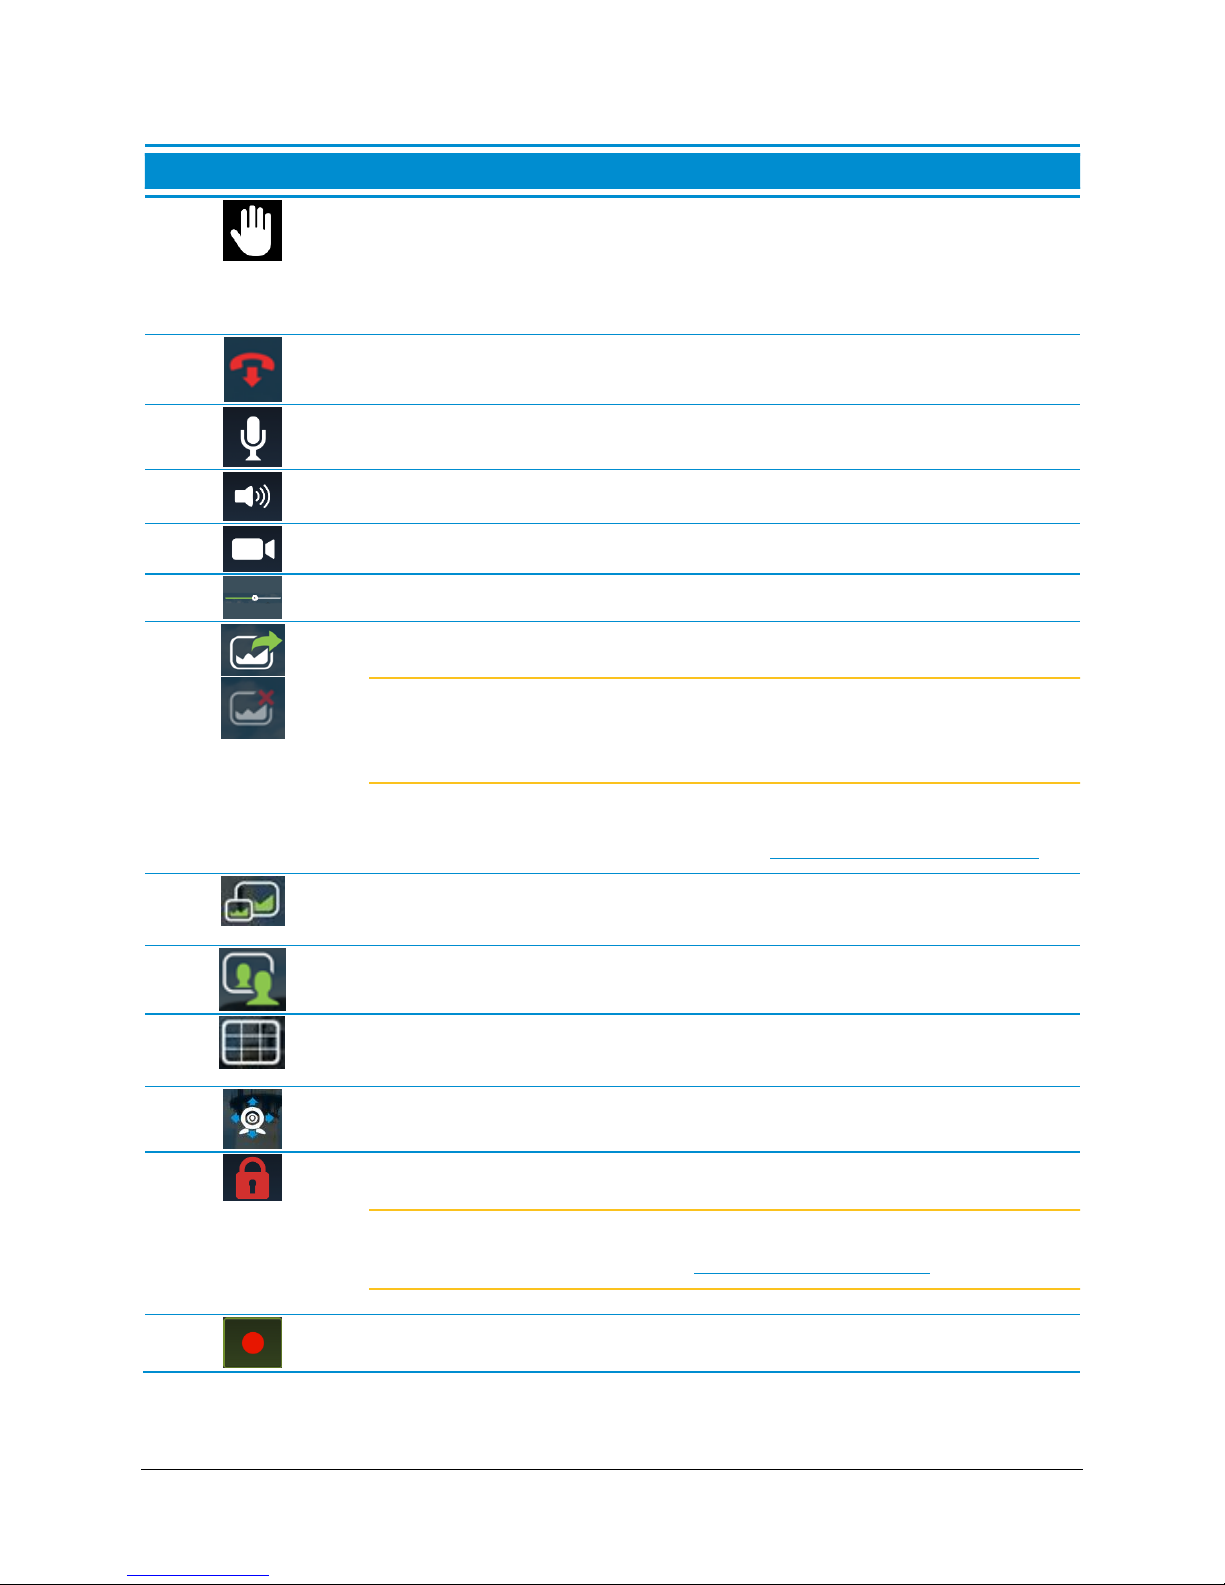
VidyoRoom™ and VidyoPanorama™ 600 Quick User Guide
Icon
Description
Click to signal the meeting moderator that you have raised your hand
when participating in conferences that are using the Presenter Mode
feature.
For more information, refer to the
VidyoDesktop Quick User Guide
.
Click to end the conference.
Click to mute, unmute, and control your microphone volume.
Click to mute and unmute your speakerphone volume.
Click to show or hide the video feed from your camera.
Control your speakerphone volume.
Click to toggle sharing to the conference.
Note This icon is transparent when no share device is connected to your
system, opaque when one is connected and not yet shared, and
green when the share device is sharing to a conference.
Configure your shares in the Content Source settings under the
Settings
> Devices
tab. For more information, see Configuring System Settings.
Click to display content on the VidyoRoom screen without sharing to
participants.
Click to toggle your self-view preference.
Click to select how to view the participants’ video windows during the
conference.
Click to pan, tilt, and zoom your camera.
Click to lock and unlock your meeting room.
Note This function only displays when you’re the moderator of the room.
For more information, see Becoming the Moderator.
The Vidyo conference is being recorded.
65
Page 69
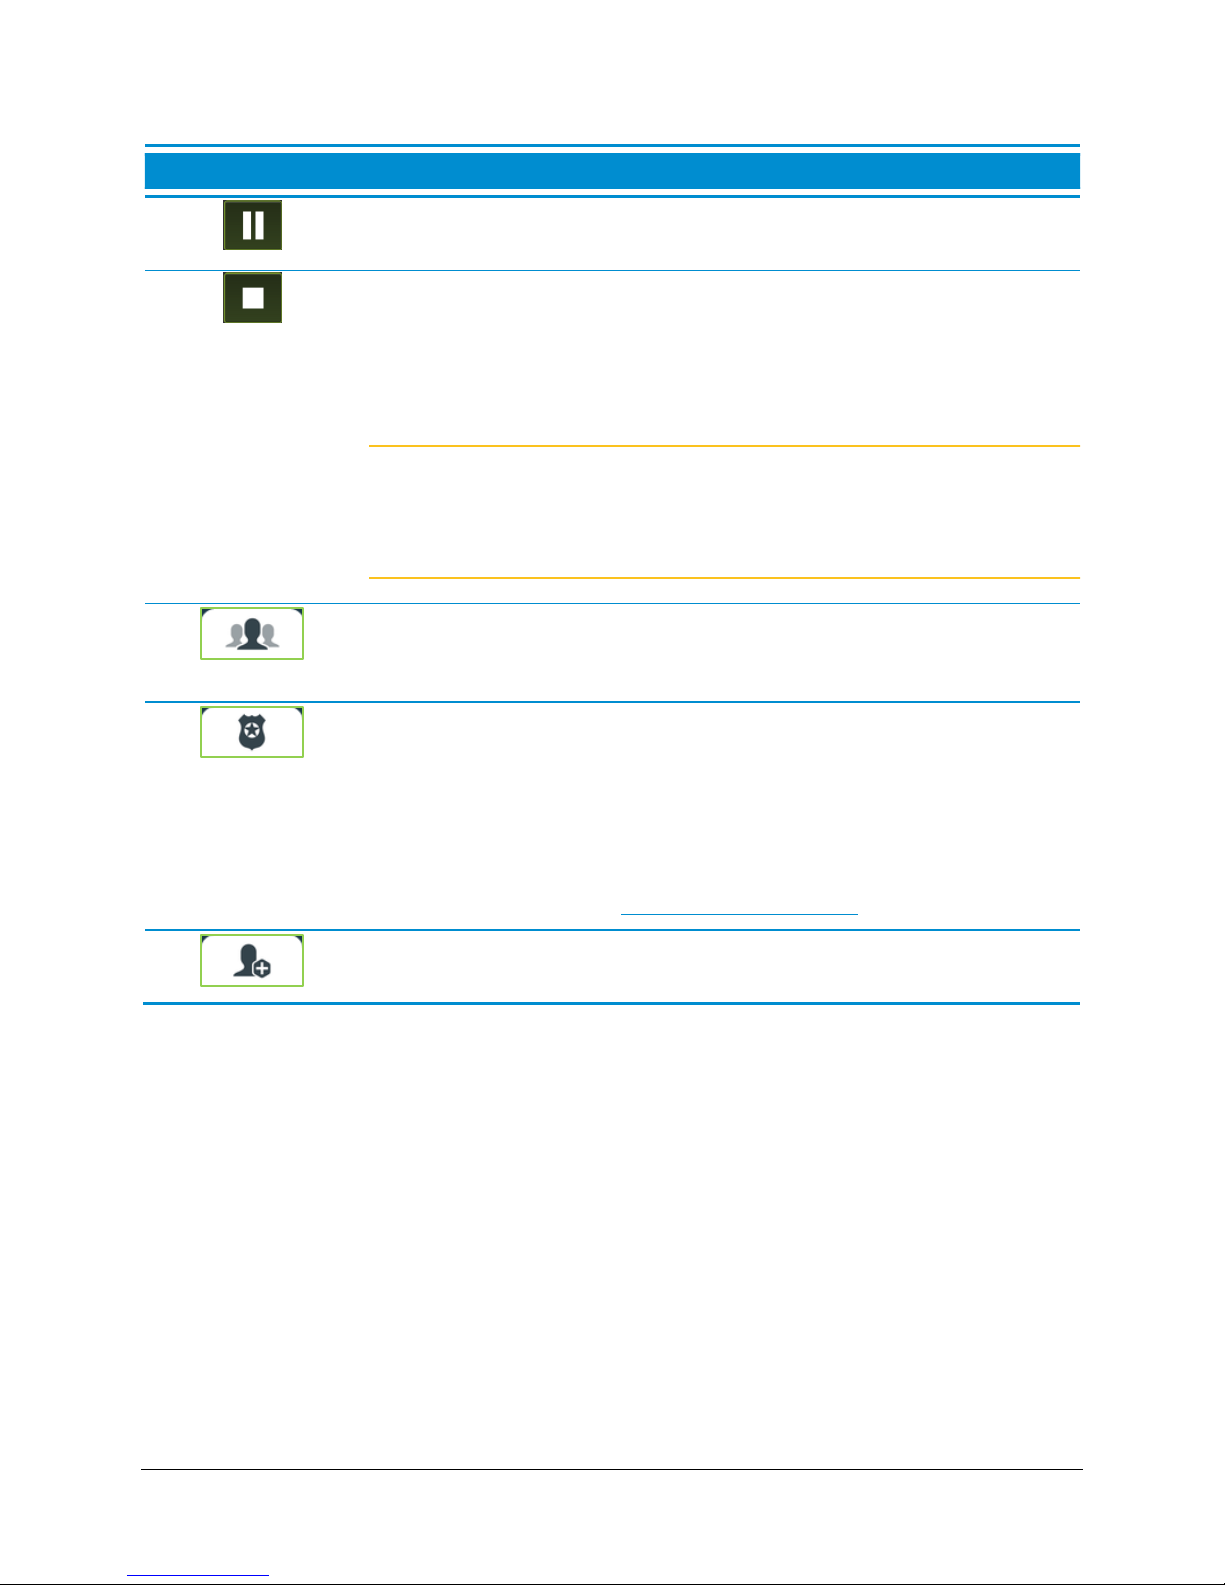
VidyoRoom™ and VidyoPanorama™ 600 Quick User Guide
Icon
Description
The recording is paused. Pausing while recording results in a single
recording file stored in the .flv format on your VidyoReplay.
The recording is stopped. Stopping while recording results in separate
recorded files stored in the .flv format on your VidyoReplay.
Select your desired Recording Profile for recording VidyoRoom or
VidyoPanorama 600 conferences. If no Recording Profiles are configured,
contact your system administrator.
Note The record, pause, stop, and select recording profile options are
only enabled if your organization has VidyoReplay and when you’re
the moderator of the room. For more information, contact your
Vidyo sales representative.
Tap the
Participants
tab to view conference participants and pin them to
specific system screens, view a participant’s Share, and pan, tilt, and
zoom their cameras.
Tap the
Moderator
tab and enter the Moderator PIN and become an
additional Moderator of the conference.
Moderators can also mute, unmute, hide video, show video, and remove
a selected participant or all participants from the conference. For more
information refer to the “Controlling a Meeting Room” section in the
VidyoConferencing Administrator Guide
.
For more information, see Becoming the Moderator.
By tapping this icon you will be able to invite participants to join the call if
you are the meeting room owner or can moderate the meeting.
Becoming the Moderator
Becoming a moderator allows you to use call control functions, such as muting and unmuting the
conference participants and recording the conference.
If you want to become the conference moderator, you must first enable a Moderator PIN for the
conference room. To do so, you must:
Ask your VidyoPortal Administrator to set up the Moderator PIN on a specific conference room
via the Admin portal.
Set the Moderator PIN via VidyoDesktop or via the VidyoPortal User portal. For more
information, refer to the
Guide.
VidyoDesktop Quick User Guide
66
or the
VidyoPortal Administrator
Page 70
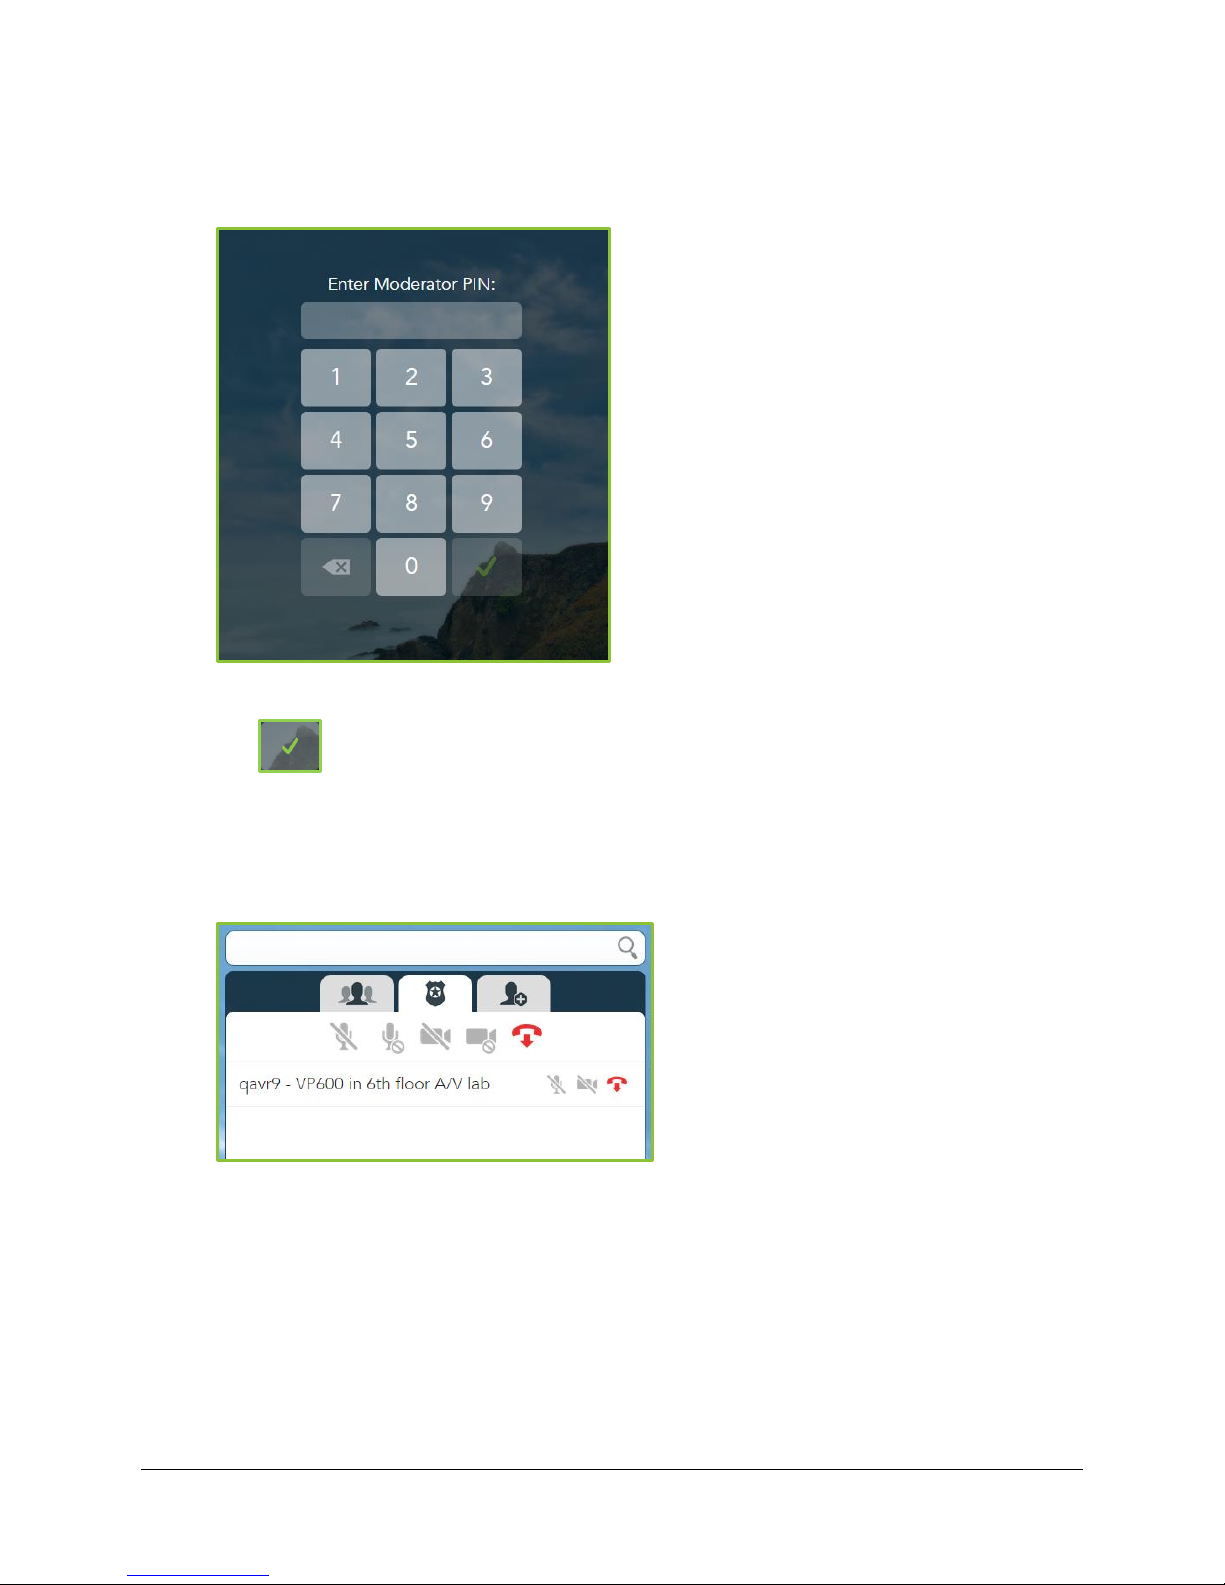
To become the moderator:
VidyoRoom™ and VidyoPanorama™ 600 Quick User Guide
1. Tap the
2. Enter the Moderator PIN.
3. Tap .
Moderator
tab.
You then become the conference moderator and the conference moderation functions,
such as Mute, Unmute, Hide Video, Show Video, and Remove, display on the
tab while you are in the call. For more information, refer to the “Controlling a Meeting
Room” section in the
VidyoConferencing Administrator Guide
.
Moderator
In-Call Viewing Modes
When in a conference, participants can easily modify the layout for a variety of VidyoRoom viewing
experiences. When using VidyoRemote 3 for Android, you can pin participants to specific viewing
screens as explained in the following section.
67
Page 71
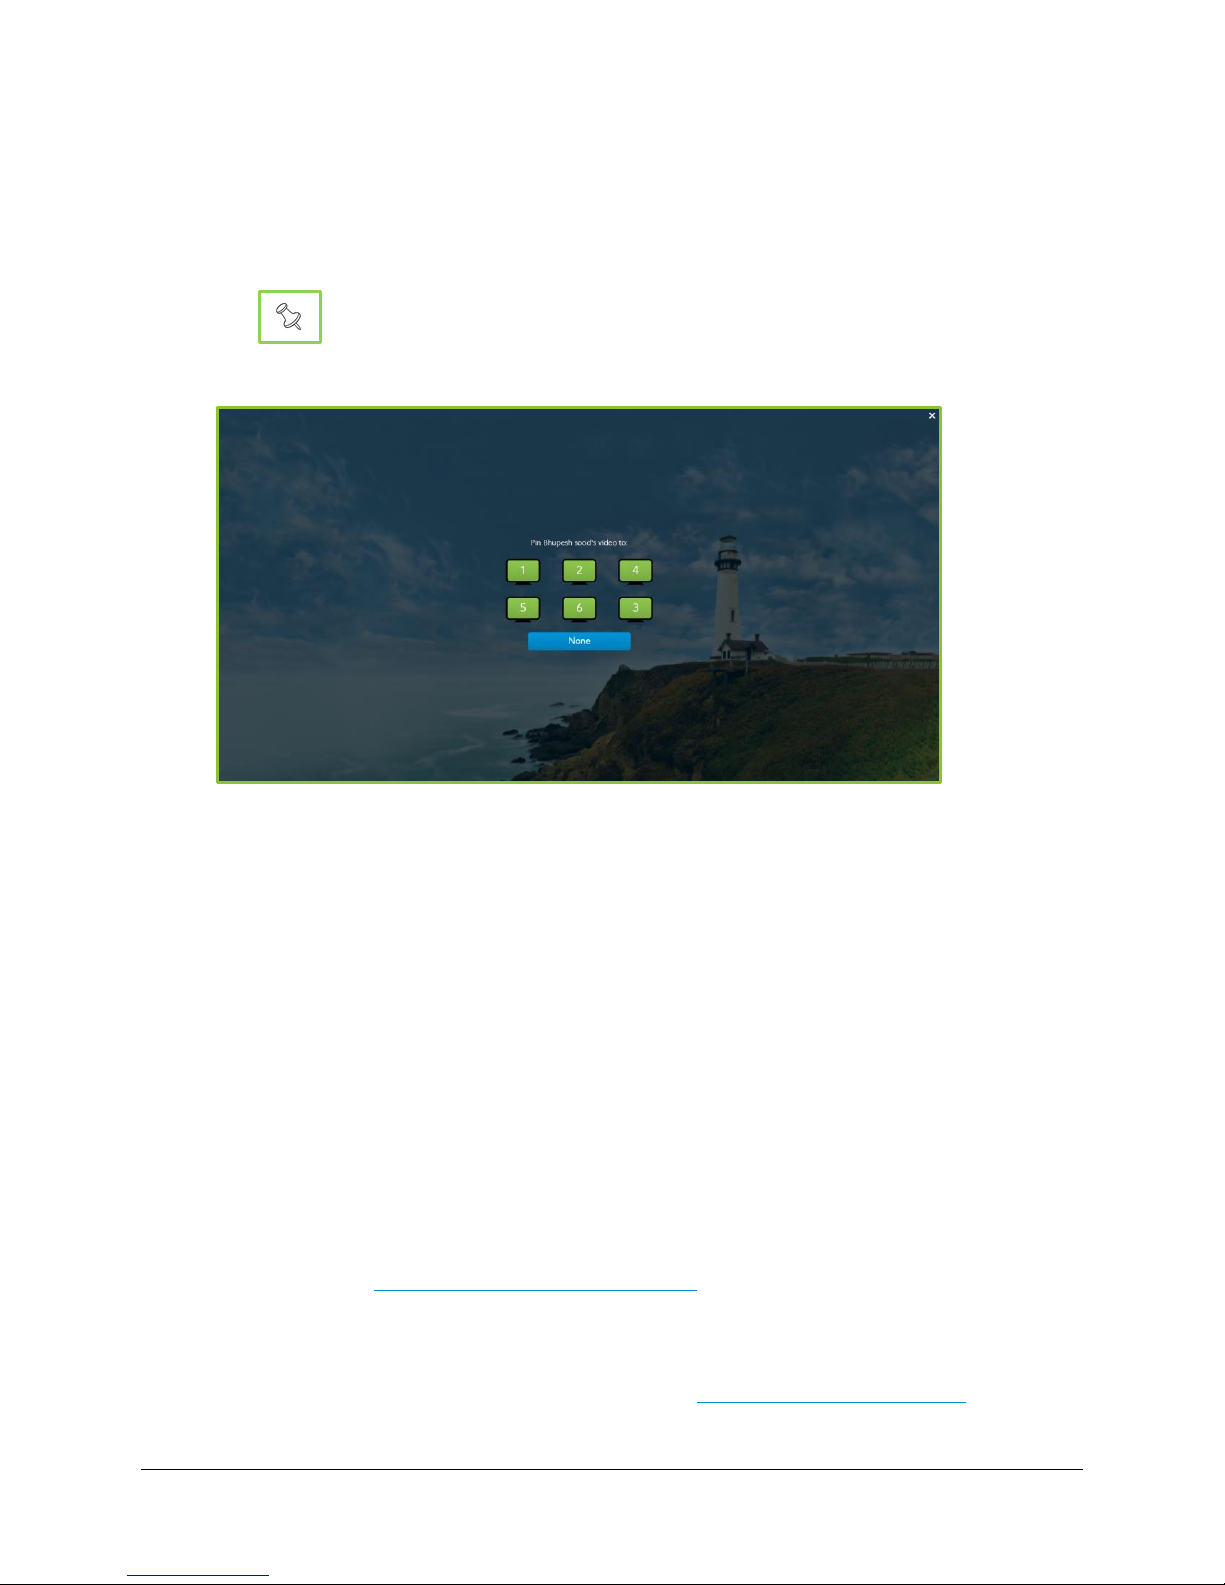
VidyoRoom™ and VidyoPanorama™ 600 Quick User Guide
Pinning Participants to Specific Screens
To pin participants to specific screens:
1. Tap the
2. Tap next to your desired contact.
The
3. Tap the numbered screen in your system to which you want the contact pinned.
Conference Participants
Pin Video to Monitor
tab.
screen displays.
The participant is now pinned to the selected screen and remains there regardless of the
loudest speaker settings.
To move a participant to a different screen, repeat steps 1 and 2 but select a different
screen.
To unpin the participant and revert back to the automatic layout, repeat steps 1 and 2, and
select None.
Sharing Content to a Conference
To share content to a conference while in a call:
1. Connect a compatible content-sharing device to your laptop and your VidyoRoom system.
While your content now displays on the video screen of your VidyoRoom system, it is not
shared to the participants in your conference. This is called Projection Mode. For more
information, see Projecting Content in Your System.
The Content Share Encode Status icon displays in gray on the upper-right of the screen.
2. Select from your available content sources in the Content Source settings under the
Settings > Devices
tab. For more information, see Configuring System Settings.
68
Page 72

VidyoRoom™ and VidyoPanorama™ 600 Quick User Guide
3. Tap .
Note This icon is transparent when no share device is connected to your system, opaque when
one is connected and not yet shared, and green when the share device is sharing to a
conference.
For more information, see Viewing the In-Call Menu and Configuring System Settings.
Adjusting Your Content Source to Avoid Cropping
Some VidyoRoom systems may crop content you share from your computer screen. Other
computers default to a mirrored or duplicated multiple display output setting when connected to a
VidyoRoom system as a shared device. This section describes how to adjust your computer as
needed.
Note The following information is not applicable when using an Epiphan device.
Adjusting a Computer that Crops Content
To adjust a computer that crops content:
On a PC:
1. Select
2. Select 720p from the Resolution drop-down.
Control Panel > Display > Screen Resolution
.
On a Mac:
1. Select
2. Select the Scaled option.
3. Select 720p.
Display > Preferences
.
On all other platforms:
1. Select
2. Select the Maintain Display Scaling option.
Display > Advanced Settings
.
Adjusting a Computer that Defaults to a Mirrored Display Output Setting
To adjust a computer that defaults to a mirrored or duplicated multiple display output setting:
On all platforms:
1. Select Extend display from the Multiple Display field.
2. Select 720p for the resolution of your second display.
69
Page 73
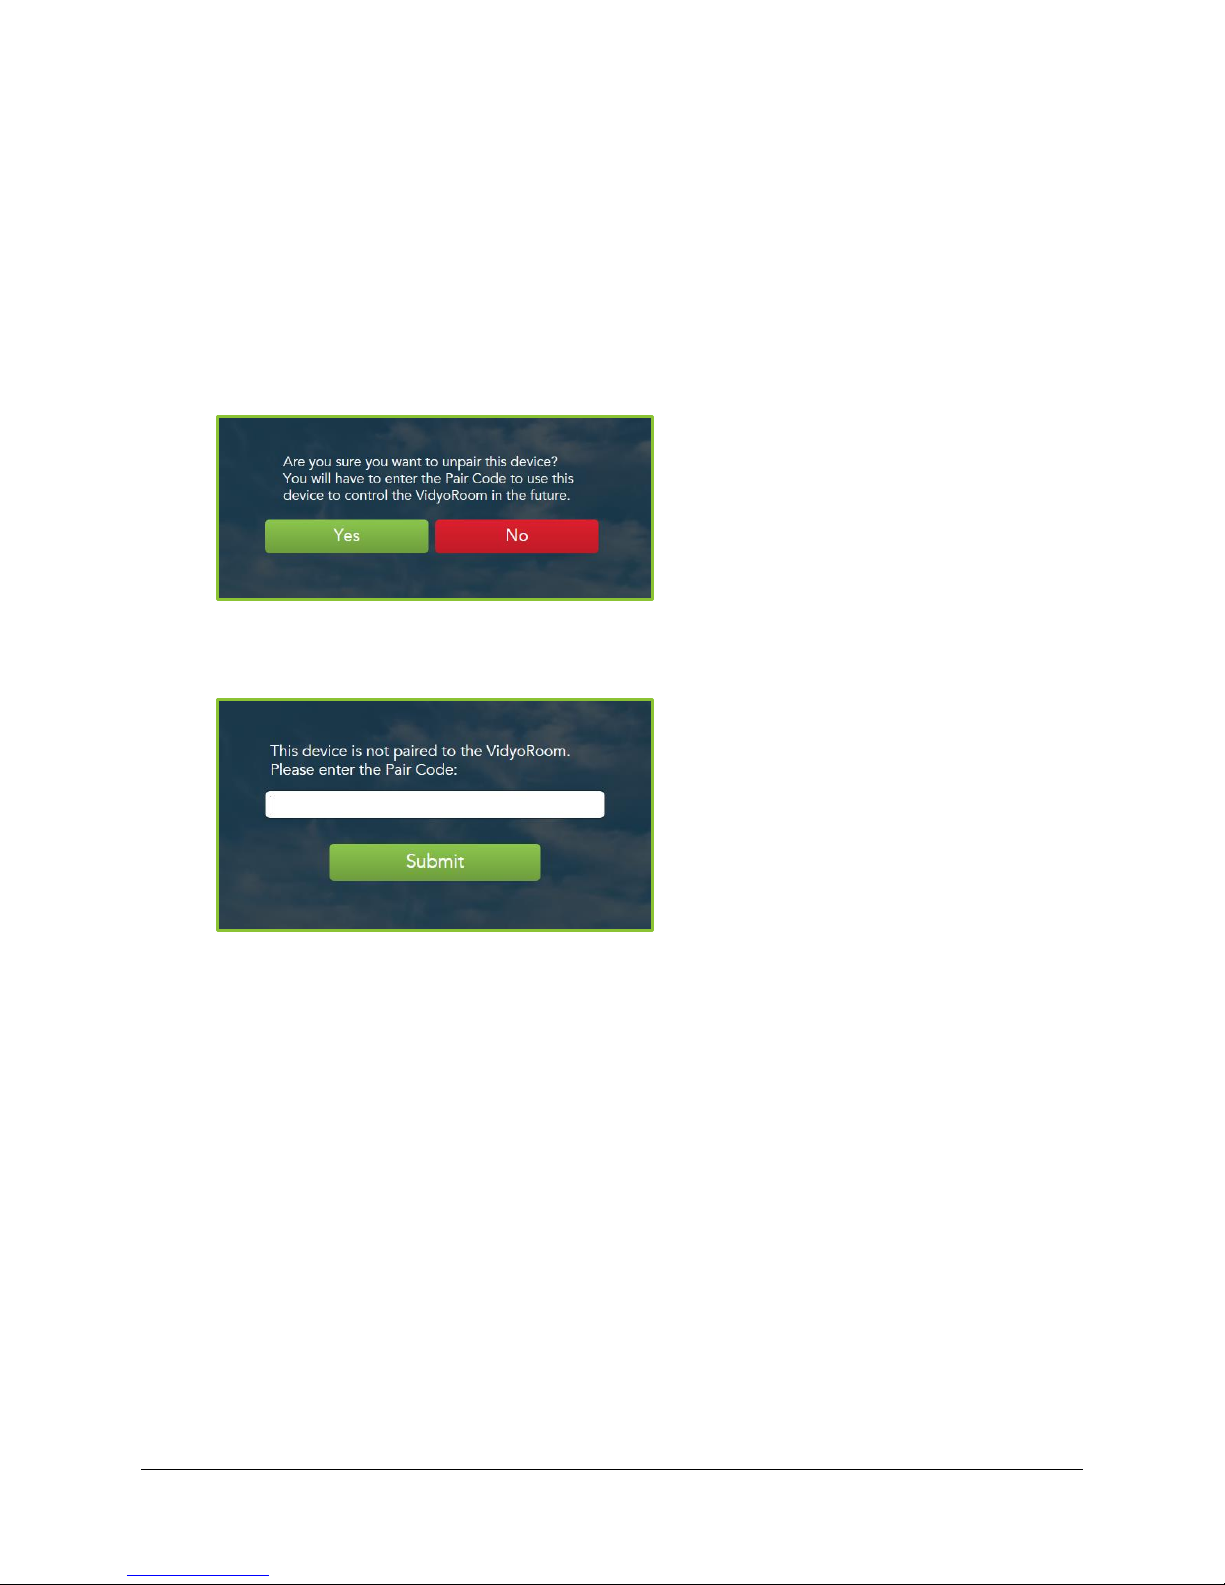
VidyoRoom™ and VidyoPanorama™ 600 Quick User Guide
Unpairing VidyoRemote 3 for Android from Your VidyoRoom
System
To unpair VidyoRemote 3 for Android from your VidyoRoom system:
1. Tap Unpair.
The system asks if you are sure you want to unpair your device and displays a warning that
you will have to enter the Pair Code to use the device to control the system in the future.
2. Tap Yes.
The system unpairs your device and the prompt for the Pair Code displays.
70
Page 74

VidyoRoom™ and VidyoPanorama™ 600 Quick User Guide
5. Licensing Attribution
Development tools and related technology provided under license from Logitech. ©2017 Logitech.
All rights reserved.
71
 Loading...