

Vidyo VidyoPanorama Installation And Configuration Manual
VidyoPanorama™
Installation and Configuration Guide
System Version 1.0
Document Version 1.0-B
TABLE OF CONTENTS
About This Guide ...........................................................................................................................5
If You’re Installing VidyoPanorama ................................................................................................5
If You Want More Information.......................................................................................................5
If You Need Customer Support.......................................................................................................5
1 Preparing for the Installation .....................................................................................................6
Selecting the Room ........................................................................................................................6
Participant Location ........................................................................................................................6
Display Size .....................................................................................................................................7
Determining the Room Layout .......................................................................................................8
Display Layout ................................................................................................................................8
Display Layout Worksheet ............................................................................................................10
Camera Position ...........................................................................................................................12
Table Location ..............................................................................................................................12
Equipment Rack Location .............................................................................................................14
Room Design Recommendations ................................................................................................. 15
Windows .......................................................................................................................................15
Flooring, Walls, and Ceilings .........................................................................................................15
Noise and Temperature ................................................................................................................15
Acoustics .......................................................................................................................................16
Room Color ...................................................................................................................................16
Lighting .........................................................................................................................................17
Collaborative Tools .......................................................................................................................18
Vibration .......................................................................................................................................18
Power ...........................................................................................................................................18
Network ........................................................................................................................................18
Checking the Equipment .............................................................................................................. 19
© 2012 Vidyo, Inc. All rights reserved. Vidyo, VidyoConferencing, VidyoDesktop, VidyoGateway, VidyoLine, VidyoMobile,
VidyoPanorama, VidyoPortal, VidyoProxy, VidyoRemote, VidyoReplay, VidyoRoom, VidyoRouter, and VidyoTechnology are trademarks
of Vidyo, Inc.
All other trademarks are the property of their respective owners. All specifications subject to change without notice, system specifics
may vary. All images are for representational purposes only; actual products may differ.
This product is covered by U.S. Pat. Nos. 7593032, 7643560, 7701851, and 7948886 as well as additional International patents and
pending U.S. or International patent applications owned by Vidyo, Inc.
TABLE OF CONTENTS
2 Installing VidyoPanorama ........................................................................................................ 21
Installing the Hardware ............................................................................................................... 21
Checking the Rack Mounting ........................................................................................................21
Installing the Equipment ..............................................................................................................22
Connecting the Cables ..................................................................................................................23
Accessing the Interface for Each Decoder Node ........................................................................... 29
Assigning the Cluster Name and Node Names .............................................................................29
Troubleshooting and Obtaining Information About the Decoder Nodes .....................................31
Enabling Access to the VidyoRemote ........................................................................................... 32
3 Configuring VidyoPanorama ..................................................................................................... 34
Accessing the Admin Pages .......................................................................................................... 34
Viewing System Information ........................................................................................................ 35
Configuring the Portal Credentials ............................................................................................... 37
Configuring the VidyoPanorama Settings and Options ................................................................. 38
Configuring the Cluster .................................................................................................................38
Configuring the Network ..............................................................................................................39
Setting the Video Encoding Resolution ........................................................................................39
Setting the Video Decoding ..........................................................................................................40
Selecting Options ..........................................................................................................................40
Showing Indications ......................................................................................................................41
Designing the Display Layout ....................................................................................................... 42
Stream Types ................................................................................................................................42
Layout Guidelines .........................................................................................................................42
Sorting Order ................................................................................................................................43
Display Layout Design ...................................................................................................................43
Indications ....................................................................................................................................48
Common Display Layouts .............................................................................................................48
Managing the Remote Nodes....................................................................................................... 49
3

TABLE OF CONTENTS
Configuring Audio and Video Devices .......................................................................................... 50
Obtaining Logging Information .................................................................................................... 51
Viewing the Statistics ................................................................................................................... 52
Performing Controller Node and Configuration File Administration ............................................ 53
Viewing the About Information ................................................................................................... 55
4

About This Guide
The
VidyoPanorama Installation and Configuration Guide
VidyoPanorama installation, such as how to select the correct room and determine how to lay out the
displays in that room. This guide also explains how to physically install the VidyoPanorama equipment in
the room, and it explains how to configure and manage VidyoPanorama using the Admin pages.
This guide is intended for you if you are a trained installer of Vidyo™ equipment or you are an IT
administrator who needs to manage the VidyoPanorama system.
IF YOU’RE INSTALLING VIDYOPANORAMA
If you are installing the system, keep in mind that this guide provides high-level guidelines for how to set up
the room. Ultimately, the quality of the audio and video in the room depends on numerous factors including
lighting, room size and acoustics, furniture choice, placement of the displays, seating arrangements,
camera position and angles, and many other factors. Therefore, to ensure the highest quality audio and
video for your VidyoPanorama system, Vidyo recommends working with an AV engineer or integrator.
provides information on how to prepare for the
IF YOU WANT MORE INFORMATION
For more information about how to use VidyoPanorama to make calls and join conferences, refer to the
VidyoPanorama User Guide
For more information about peripheral devices (such as KVMs, equipment racks, cable extenders, etc.)
recommended for use with your VidyoPanorama system, refer to the
VidyoPanorama
You can also find additional Vidyo documents at
technical note.
.
Choosing Peripheral Devices for
http://support.vidyo.com.
IF YOU NEED CUSTOMER SUPPORT
If you are a Vidyo reseller or end user with PLUS support, please feel free to contact the Vidyo Customer
Support team via email or phone:
Email: support@vidyo.com
Phone: 1-866-99-Vidyo (Int'l: +201-289-8597) - Option 3
If you are a Vidyo end user without PLUS support, please contact your Vidyo reseller for further assistance.
5

Chapter 1: Preparing for the Installation
1
Preparing for the Installation
Before you begin installing VidyoPanorama, you should prepare for the installation as described in this
chapter.
If your VidyoPanorama equipment is already installed and you simply need to configure the system, skip the
chapters that describe the installation process and continue with Chapter 3, “Configuring VidyoPanorama.”
SELECTING THE ROOM
The most important factor that you should consider when selecting the room is how you plan on using the
room. Ask yourself these questions: What size are the existing project teams? What size are the current
meetings and phone conferences? Can the room you’re considering comfortably accommodate the typical
group size? Your goal is to select a room and design it for the most common use case while keeping it open
for other uses as much as possible.
Some other basic principles to keep in mind during the room selection process include:
Capturing participants at life-size proportions
Ensuring good eye contact between sites
Hiding the technology (such as the camera and microphones)
Trying to get an across-the-table feel
Not all of these principles are applicable to all meeting configurations, of course. For example, a room with
nine displays will not provide a natural across-the-table feel between each participant. However, by
attempting to follow as many of the design and integration principles as you can, you can create your own
tailored room and provide your conference participants with the best possible VidyoPanorama experience.
Participant Location
Since you can use anywhere from three to nine displays with your VidyoPanorama system, it’s not possible
to recommend one particular room size for the system. There is, however, one constant that you must
consider when selecting your room: the on-camera participants should be between 7 ft. (2.13 m) and 12 ft.
(3.66 m) from the camera. This distance allows the camera to capture acceptable-sized images of all the
participants.
As long as you remain within that 7 ft. (2.13 m) to 12 ft. (3.66 m) range, you have some flexibility with other
room factors, such as room size and shape, table size and shape, and how many people you want to capture
on screen. Keep in mind, however, that the wall that the participants face must be able to accommodate the
6
Chapter 1: Preparing for the Installation
16:9 Display
Recommended Viewing Distance
50”
6.3 ft. – 12.5 ft. (1.92 m – 3.81 m)
55”
6.9 ft. – 12.8 ft. (2.10 m – 3.90 m)
60”
7.5 ft. – 15.0 ft. (2.28 m – 4.57 m)
65”
8.1 ft. – 16.3 ft. (2.46 m – 4.96 m)
VidyoPanorama displays and that the equipment rack should be within 15 ft. (4.57 m) of the displays (if you
want to avoid using cable extenders).
Display Size
So now that you have an idea of the room size you need, what size should you select for your displays?
Vidyo recommends that you select at least a 50” display, but if you often have more than four participants in
a conference, displays measuring 60” to 65” provide the best experience. Vidyo also recommends using
LCD displays. LCD displays are generally superior to plasma displays; they weigh less and use less energy.
The following table provides general guidelines for viewing distances for various display sizes:
Diagonal Screen Size
Note that in many cases the acceptable viewing distance is much farther than the recommended seating
distance. For example, a 65 in. display can be viewed up to 16.3 ft. (4.96 m) away, which is beyond our 7 ft.
(2.13 m) to 12 ft. (3.66 m) ideal seating range. However, the extra distance allows an additional row of
people to see the displays. These additional meeting participants may not appear full-size at the remote
locations, but they will be able to see and participate in the conference.
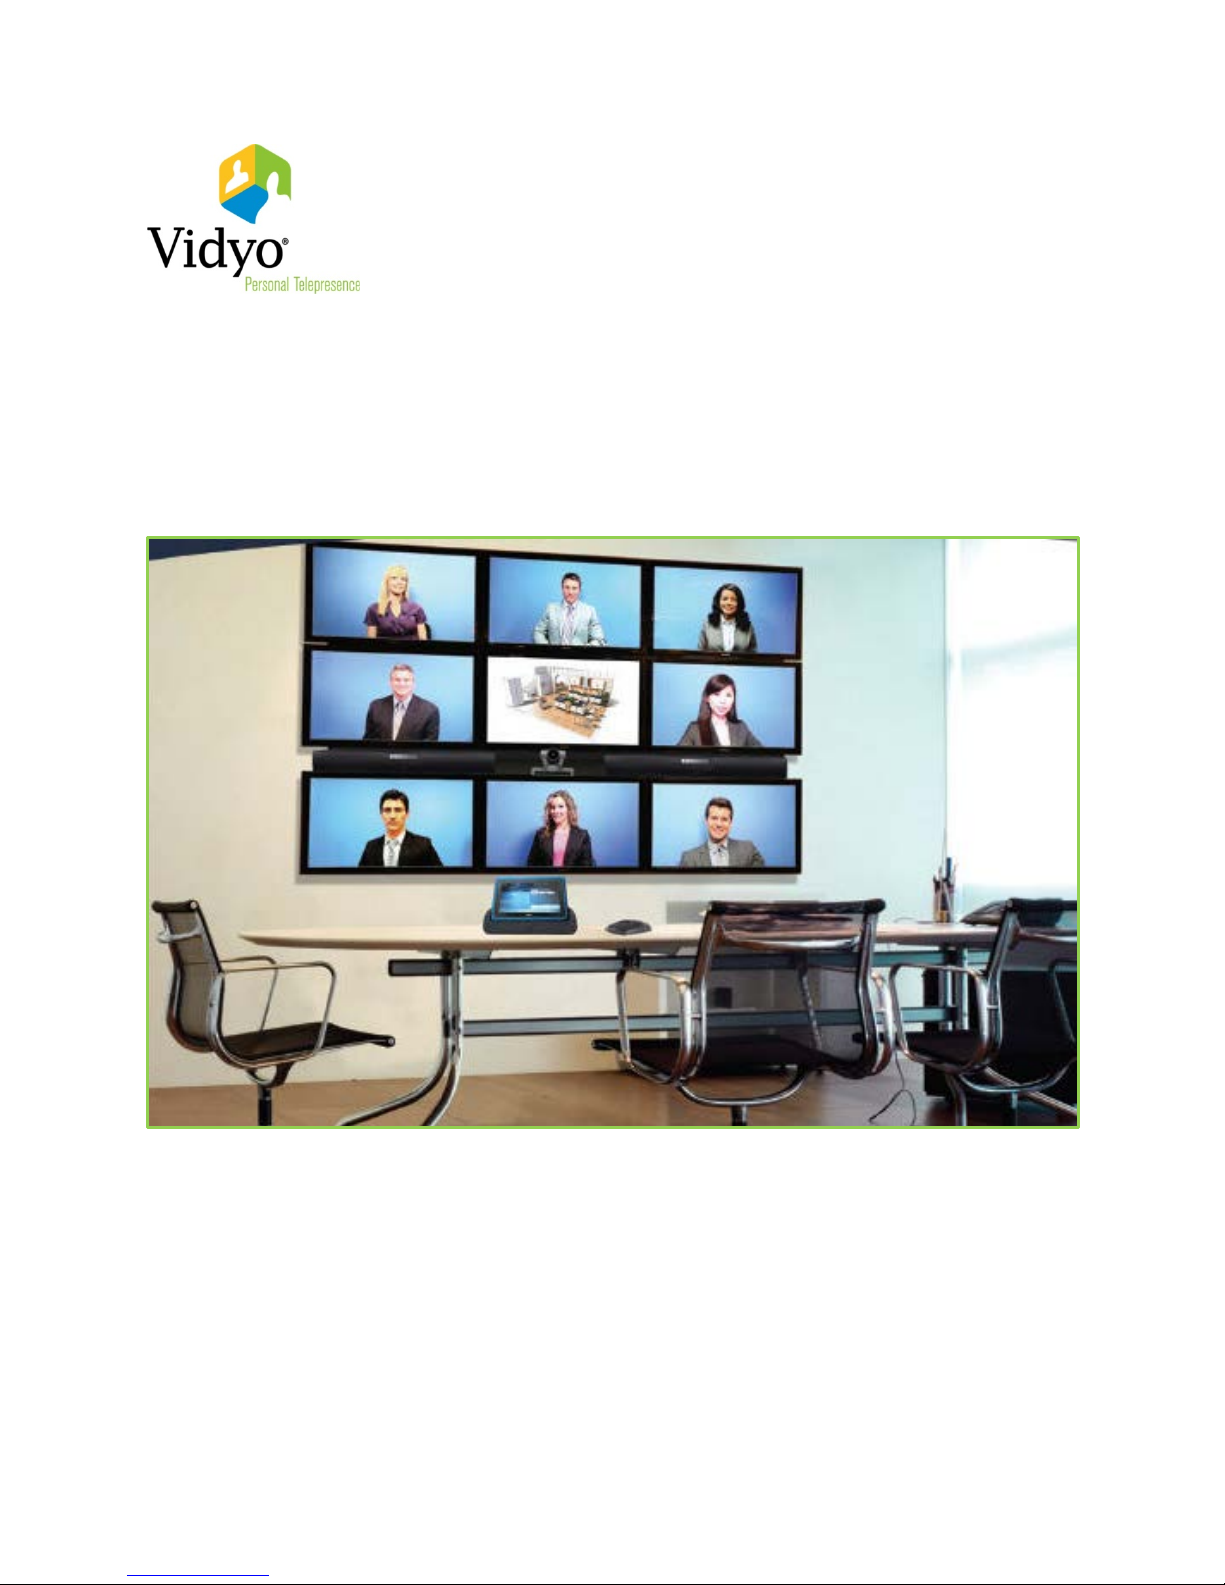
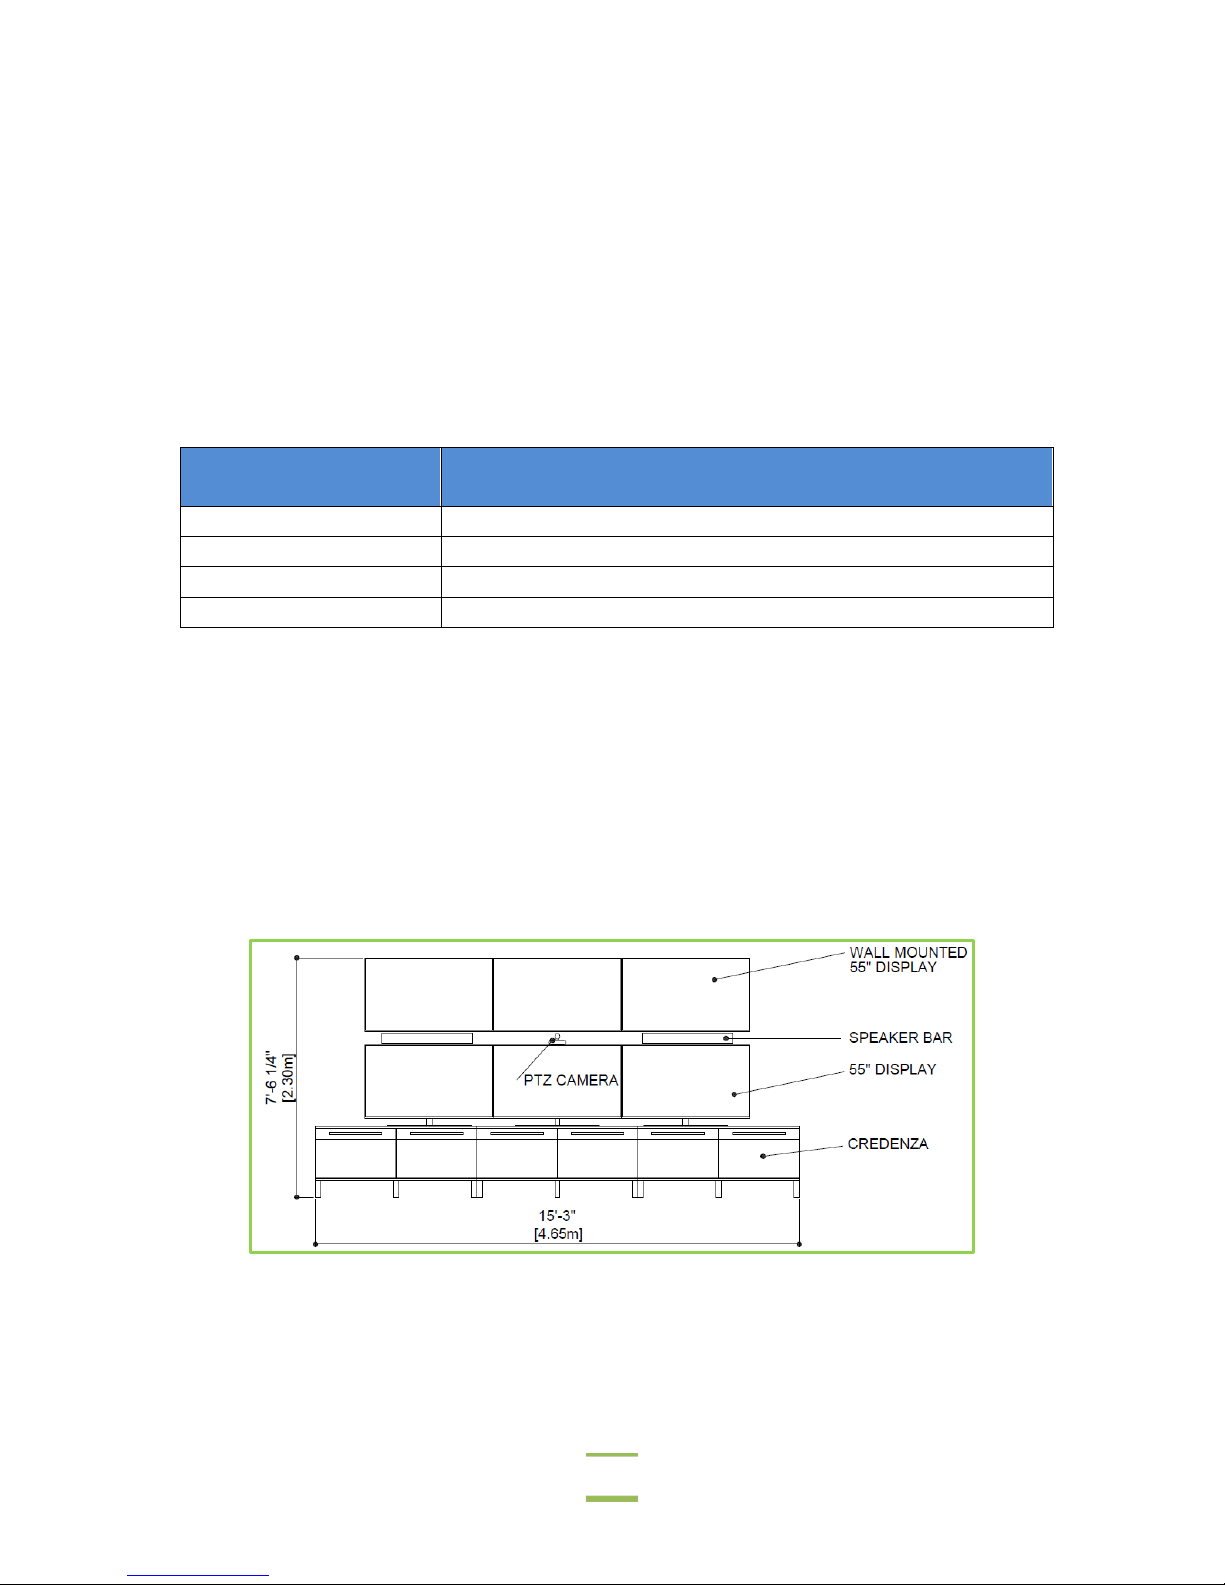
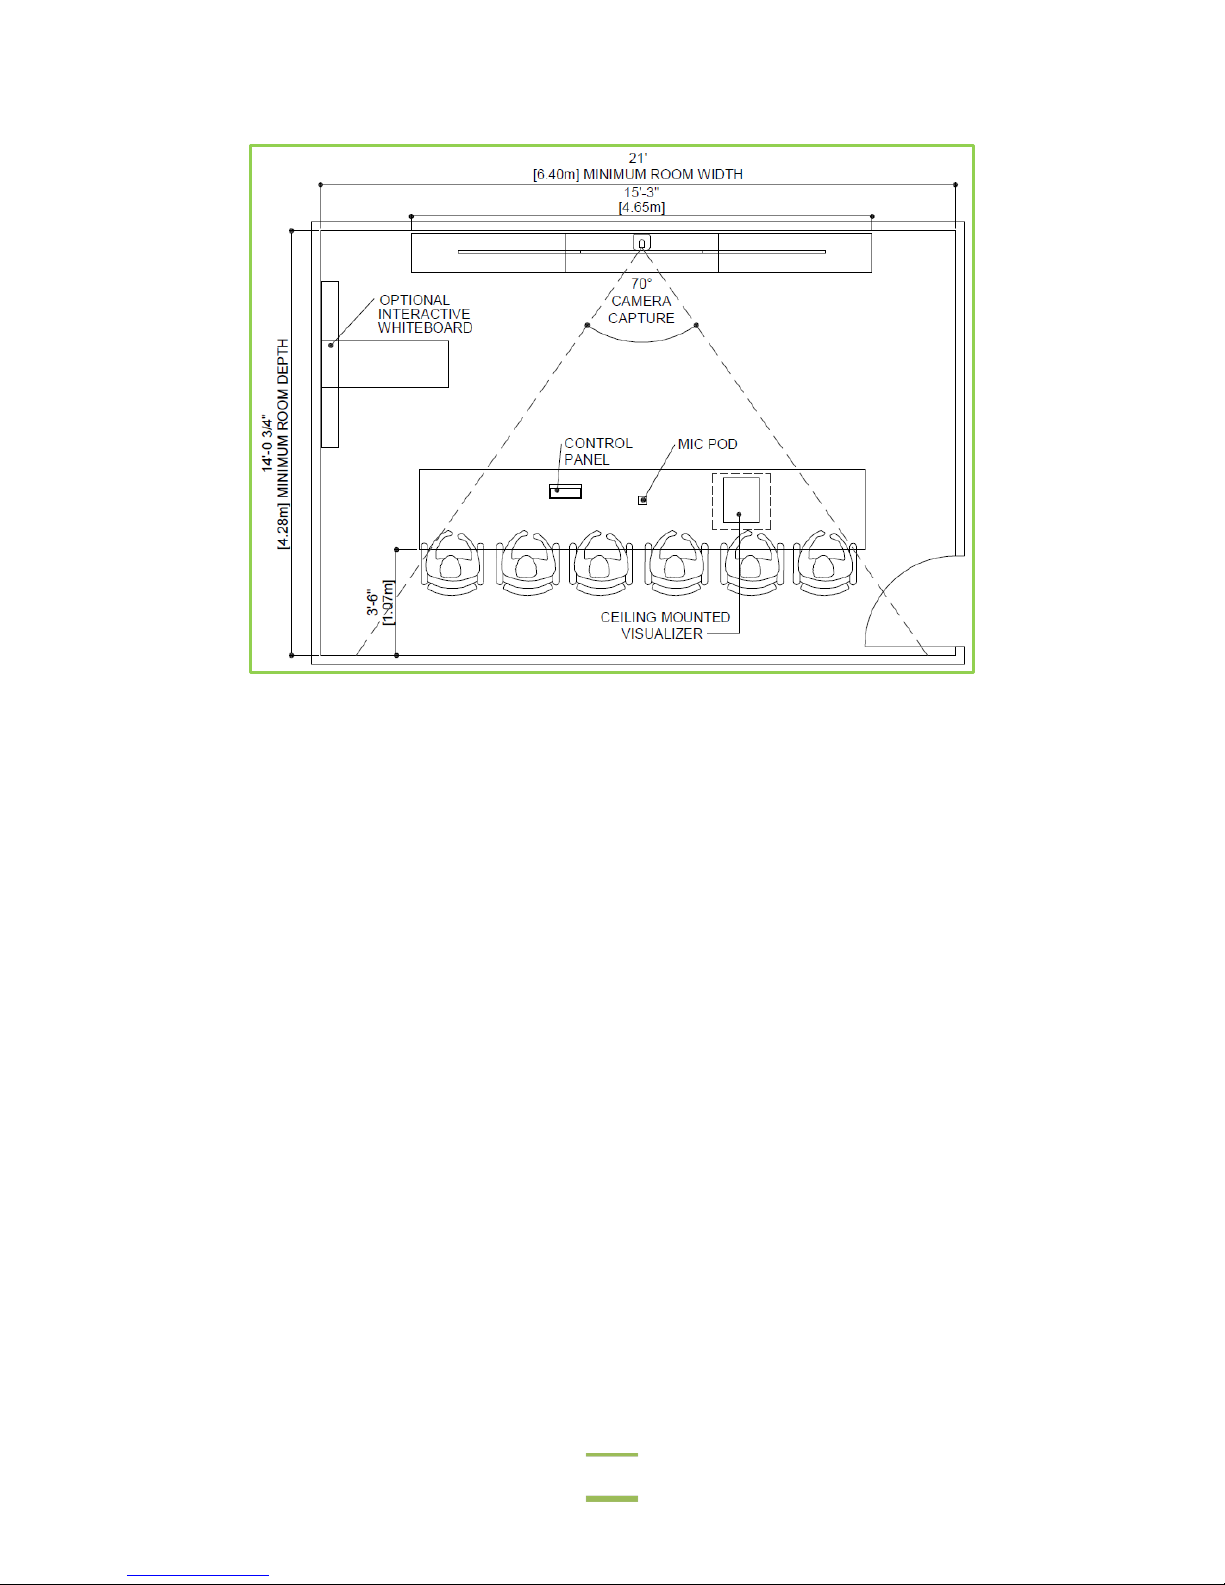
To make it easier for you to visualize a room, let’s use an example. Suppose you have six 55” displays and
you want to mount them on one wall with a credenza below them. You will need a wall that’s at least 15’-3”
(4.64 m) wide and 8’-10¾” (2.70 m) high to accommodate the credenza and displays (as well as the camera
and speakers):
In a typical conference room, you will have a table, chairs, and perhaps some collaboration tools, such as a
whiteboard and a ceiling-mounted visualizer. You should leave enough space behind the participants for
them to move their chairs out from the table as well as walk behind the table. You also need to leave room
for the door. Therefore, our room with the six 55” displays would require a minimum 14 ft. ¾” (4.28 m) room
depth and 21 ft. (6.40 m) room width as you can see here:
7
Chapter 1: Preparing for the Installation
DETERMINING THE ROOM LAYOUT
Before beginning the actual physical installation of the VidyoPanorama equipment, you should plan the
layout of the displays, camera, and table in the room. You should also determine where you will place the
equipment rack.
Display Layout
VidyoPanorama gives you the flexibility to place your displays in any layout that you choose and on more
than one wall. You can even choose displays of different sizes and mount them landscape, portrait, or a
combination of both.
Many customers choose to place all the displays near each other on the same wall to enable the conference
participants to more easily view all the screens at once.
When determining how to lay out your displays, consider the following:
How many displays do you have?
Do you want to line them up in one row? If not, how many rows do you want?
Are all the displays the same size? If not, which displays do you want to place in which positions?
No matter how you lay out your displays, you should avoid having any of the displays below the level of the
tabletop so that the table does not block the view of the display(s). In addition, if the displays are above
eye level, consider slightly tilting the displays down towards the participants.
8
Chapter 1: Preparing for the Installation
1 2 3 1 2 3 4 5 6 7 8
9
1
Here are three display layout examples:
Example 1—Three-screen VidyoPanorama: For this VidyoPanorama room, we have to lay out three
displays that are all the same size. We decide that we simply want to lay them out in one row sideby-side like this:
Example 2—Nine-screen VidyoPanorama: For this VidyoPanorama room, we have to lay out nine
displays that are all the same size. We could lay them out in one long row, in two rows with four
displays on the top row and five displays on the bottom row, or other combinations. However, we
decide to lay them out in three rows with three displays each like this:
Example 3 —Four-screen VidyoPanorama: For this VidyoPanorama room, we have to lay out four
displays. Three are the same size, but one is larger. We could lay them out in a number of ways. For
example:
In one row with the larger display at the left-center or right-center position.
In two rows with the three equal-sized displays in the top row and the larger display in the bot-
tom row.
In two rows with the larger display in the center of the top row and the three equal-sized dis-
plays in the bottom row. We decide this is what we want, so we lay out the displays like this:
When you have an unequal number of displays in the rows or you have displays of different sizes as in
Example 3, you should carefully consider the placement of the displays depending on what you want to
show in which position and on which size of display. If, for example, showing content is of utmost
importance to you, then you would want content to appear on the largest display. However, in what position
do you want to place that display? Some people might want to place it alone on the top row as shown in our
example above, but other people might want to place it alone on the bottom row so that it is at eye level. It’s
a matter of preference, but you must decide before you physically install the displays on the wall.
To help you decide on your display layout before the actual installation begins, we’ve created a Display
Layout Worksheet, which is on the next page. Follow the directions on this worksheet to create the display
layout for your particular VidyoPanorama room.
9
Chapter 1: Preparing for the Installation
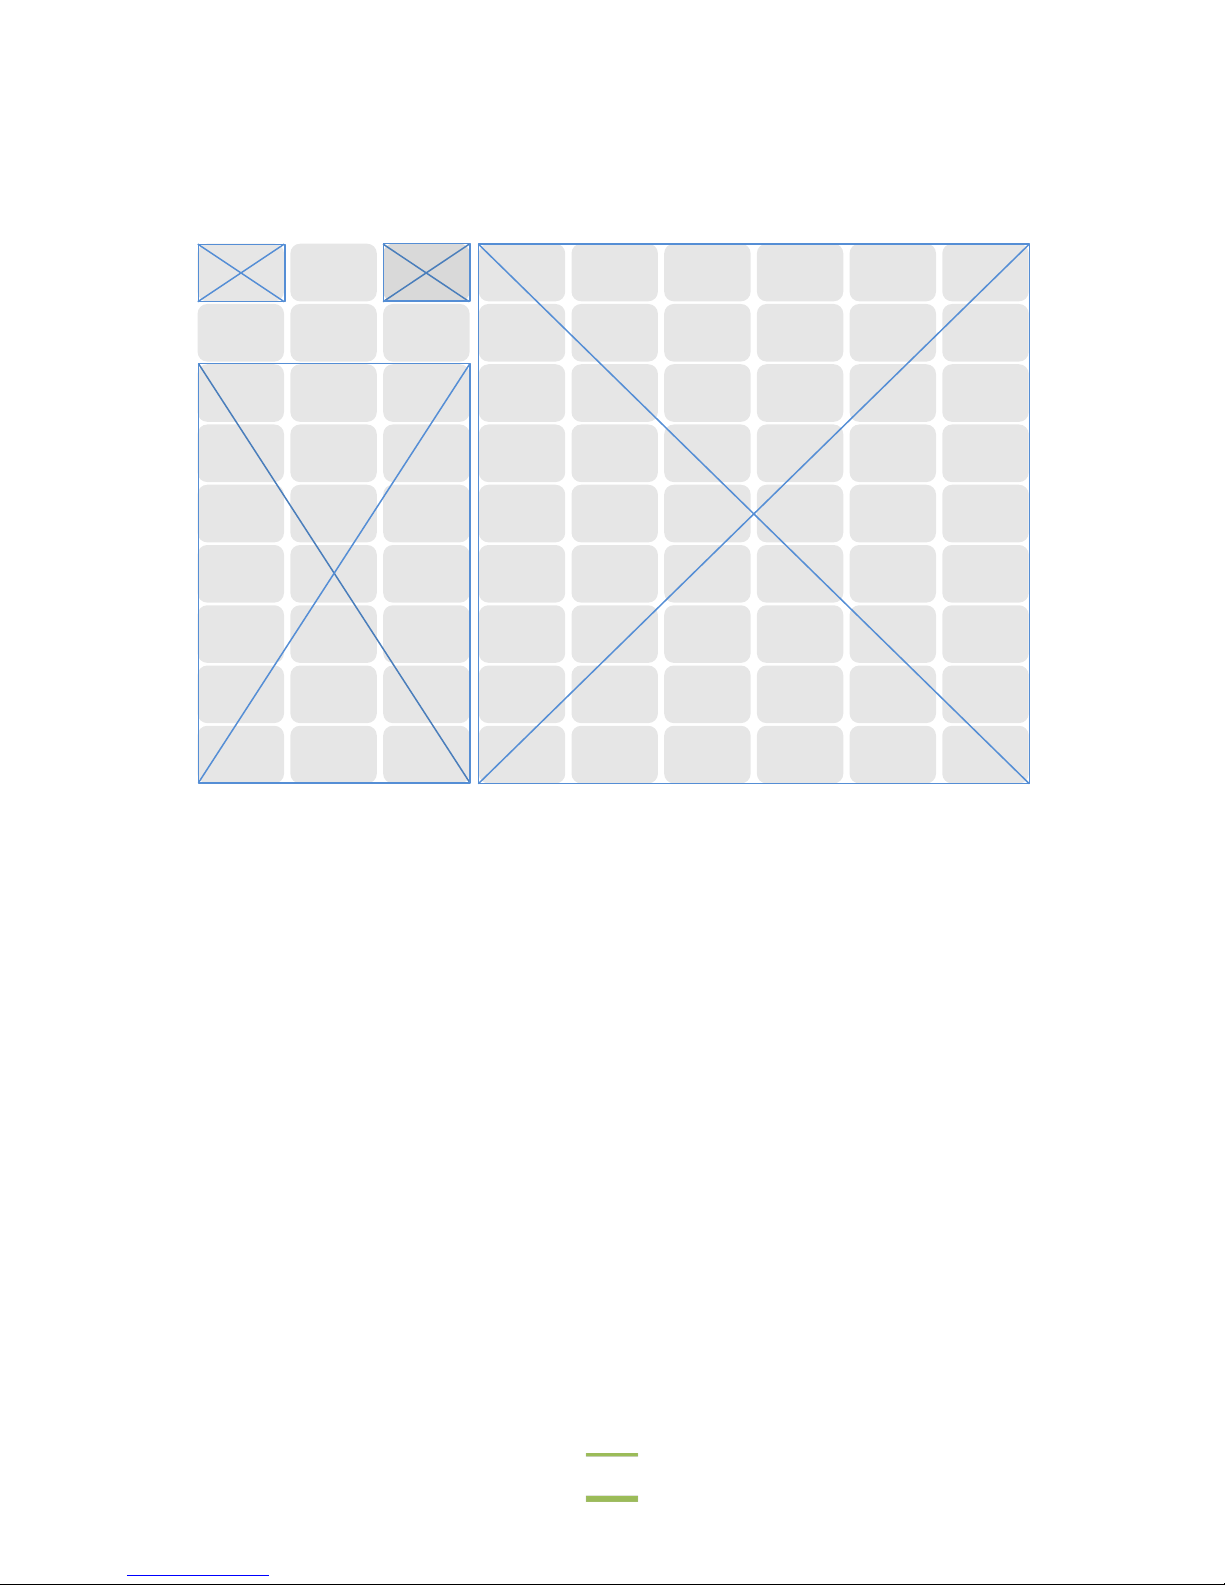
Display Layout Worksheet
To determine the layout of your displays:
1. Determine how many rows of displays you want.
2. Determine how many displays you want in each row.
If you have displays of different sizes, determine where you want to place the different-sized
displays. (For guidelines, see the previous page.)
3. In the table below, indicate how you want your displays laid out by crossing out the unused display
icons or by circling the group of display icons that represent your displays (choose whichever
method you prefer to indicate your display layout).
4. If you have any displays of different sizes, mark the size of the display on the icon.
5. Copy this page and give it to the person who is responsible for installing the displays in the Vidyo-
Panorama room.
10
Chapter 1: Preparing for the Installation
65”
52”
52”
52”
Here’s an example of how the Display Layout Worksheet would look if we wanted to lay out our displays as
shown in Example 3 on page 9:
11
Chapter 1: Preparing for the Installation
Camera Position
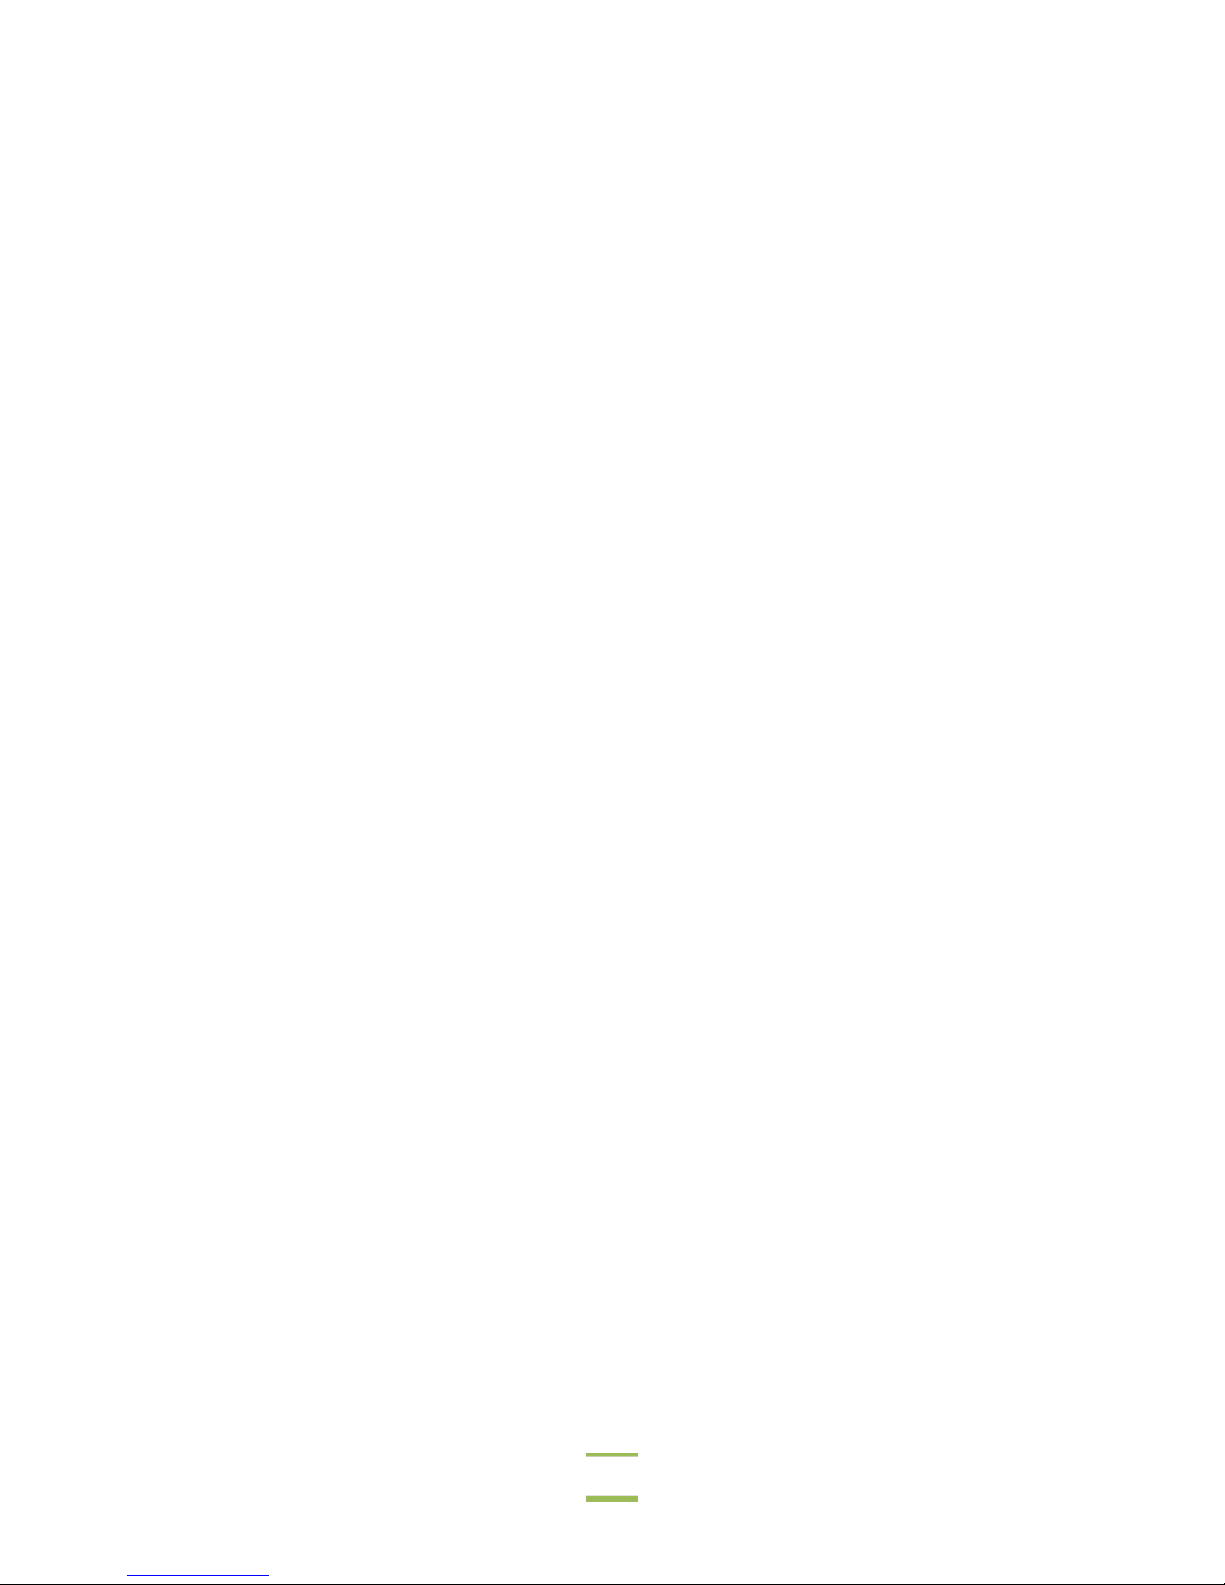
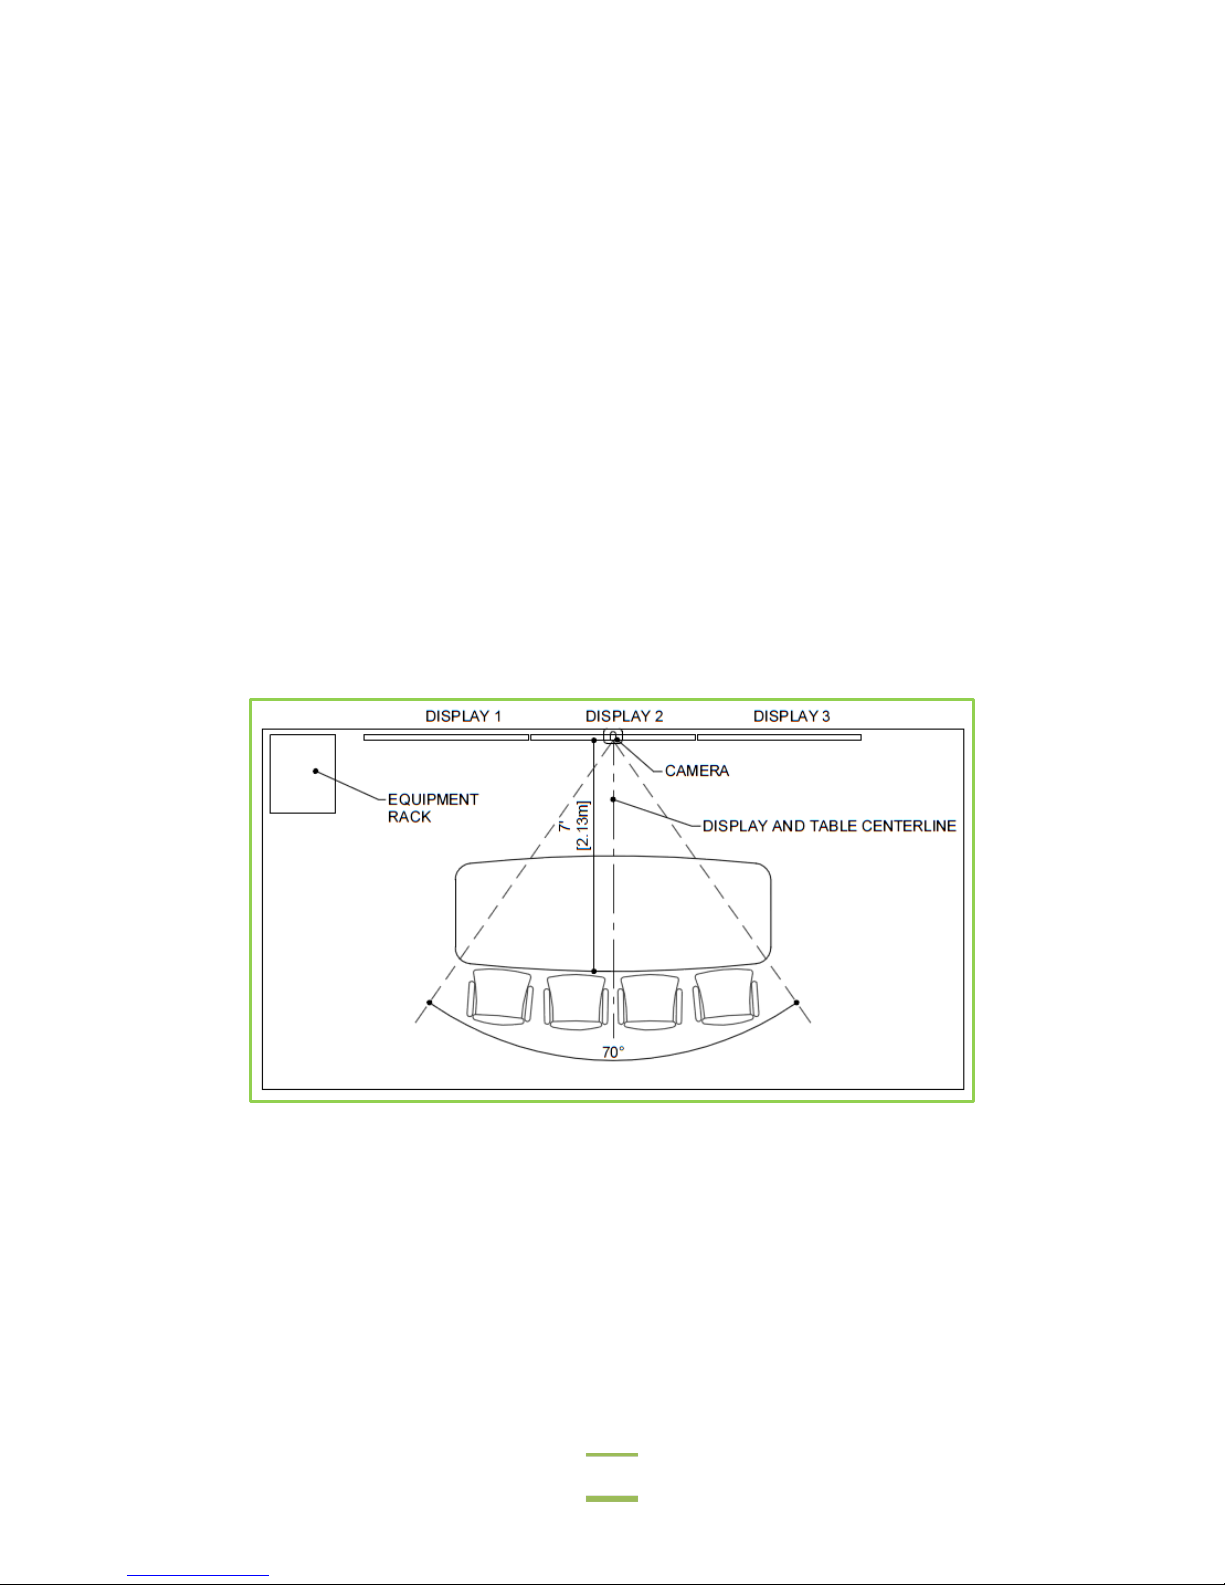
The camera that comes standard with VidyoPanorama has the following specifications:
70° horizontal view angle
Recommended 7 ft. (2.13 m) to 12 ft. (3.66 m) distance between camera and participants to capture
full-sized images of the participants
Requires a minimum distance of 10 ft. (3.05 m) to the back of the table to capture six participants
If you purchase your own camera, ensure that it meets these specifications.
In general, you should place your camera as close to eye-level as possible:
If your displays are laid out horizontally in one row like in Example 1 on page 9, Vidyo recommends
that you place the camera directly above the displays at the vertical centerline. In this case, you
would place the camera above display 2.
If your displays are laid out in more than one row like in Examples 2 and 3 on page 9, Vidyo
recommends placing the camera above the bottom row of displays at the vertical centerline. In
Example 2, you would place the camera above display 8. In Example 3, you would place the camera
above display 3.
You can attach the camera on a shelf on the wall above or between the displays or you can install the
camera on top of a display. Better still, if there is room available behind the wall on which the displays are
located, you can recess your camera in the wall. Doing so will make the camera less obtrusive as well as
provide you with easy access to the back of the camera.
No matter how you attach your camera, try to make it as unobtrusive in the room as possible since people
tend to behave differently when “on camera.” By recessing the camera in the wall or by using other
techniques to reduce to visibility of the camera, you can help conference participants be at ease and behave
more naturally.
Once the camera is placed, ensure that it points in-between the two seats that will serve as the primary
seats during a conference (your aim should be to capture and display the two primary participants at lifesize proportions). Use camera presets for capturing two participants, four participants, six participants, and
the entire room. If you have a whiteboard, use a preset for capturing the whiteboard.
Table Location
With VidyoPanorama, you’re free to select any table of your choosing; however, Vidyo recommends
following these guidelines:
Choose an oblong-shaped table if you can. Oblong tables enable more participants to remain at the
same distance from the camera lens, which avoids focus and sharpness issues.
Allow 26.50 in. (67.31 cm) of space per seated participant. Let’s say, for example, that you want to
fit six participants on one side of the table. In that case, you should select a table that is
13.25 ft. (4.04 m) long. Typically, however, you should choose a table that is slightly longer than the
minimum width to provide more room between participants.
at least
12
Chapter 1: Preparing for the Installation
You should typically place the table so that the long side is parallel to the wall on which the
displays are mounted. However, if you always have more than four participants at your conferences,
you may want to place the table perpendicular to the display wall.
Choose a table that does not have a reflective surface.
If possible, choose a table that has power and Ethernet jacks so participants can easily share
content from their laptops.
When selecting chairs for your table, be sure to choose chairs that are an appropriate width
(allowing 26.50 in. (.67 m) per participant), that have fairly low backs, and that are a muted or dark
color.
When deciding where to place the table in the room, consider the location of the camera and displays.
Remember that if you purchased the camera from Vidyo, it has a 70° horizontal view angle and requires a
minimum distance of 10 ft. (3.05 m) to capture a 13.83 ft. (4.22 m) table and its participants. You must also
ensure that you leave enough space behind the participants for them to move their chairs out from the table
as well as walk behind the table.
For the best camera viewing angle, you should align the centerline of the table with the centerline of the
displays, and place the chairs on the side of the table opposite the displays and camera as shown in the
following two illustrations:
13
Chapter 1: Preparing for the Installation
Equipment Rack Location
When determining where to place your equipment rack, keep in mind the distance between the rack and the
displays. These must be in somewhat close proximity due to the physical limitations of HDMI transmission.
If the distance is too great, you may need to purchase extender cables and an HDMI amplifier.
For more information about recommended extender cables as well as recommended equipment racks, refer
Choosing Peripheral Devices for VidyoPanorama
to the
One of the best places to place the equipment rack is in a server room behind the wall on which the displays
are located. If the room behind that wall is available and you place your equipment rack in that room, you
reap multiple benefits:
technical note.
The noise and heat associated with the equipment rack is removed from the VidyoPanorama room.
The distance between the displays and the equipment rack can be minimized (thereby reducing the
need to purchase extender cables).
You can recess the camera in the wall between or above the displays and have access to the back of
the camera from that server room.
If a separate server room is not available and you must place the equipment rack in the VidyoPanorama
room, you should purchase an equipment rack that has an office-quality appearance (such as the Kell
Systems equipment rack recommended by Vidyo). The illustrations on page 13 and page 14 show a preferred
location for the equipment rack in the VidyoPanorama room. By placing the rack near the displays as
shown, you minimize the length of the cables needed to connect to the displays and other equipment in the
room.
The Kell Systems equipment rack recommended by Vidyo for use in the conference room has the following
specifications when populated with three Decoder Nodes and one Controller Node:
40.5 dBA total noise generated by the rack when measured 39.37” (1.00 m) in front of the rack.
14

Chapter 1: Preparing for the Installation
The Decoder Nodes and Controller Node are not audible when in the rack.
The temperature when stress testing inside the rear of the rack (where most heat is generated) does
not exceed 102° F.
If you purchase your own equipment rack for use in the conference room, ensure that it meets these
specifications.
ROOM DESIGN RECOMMENDATIONS
When designing the room in which you are going to install VidyoPanorama, you should take a number of
factors into consideration such as the placement of the windows, the noise level in the room, the lighting,
and so on. This section describes these factors and provides recommendations to help you design an
effective conferencing room.
Windows
Because windows create audio reverberation, less than 20% of the room should have windows or other
vertical glass walls. Also, natural light coming from windows varies considerably, which can affect the
quality of the video. Therefore, if your room does have windows, you should install acoustical window
treatments or blackout curtains.
Flooring, Walls, and Ceilings
A room where the floor is carpeted, the walls are composed of drywall, and the ceiling is suspended
typically provides the best acoustics. Of course, you can select a room with different surfaces (such as tile
floors or concrete walls), but these are often more reverberant, and therefore, may affect the sound quality.
To simply and cost effectively improve the acoustics, add carpeting or rugs if your floor is not carpeted. You
may also want to consider adding acoustical sound panels to the walls.
Noise and Temperature
When selecting the room in which to install VidyoPanorama, keep these noise and temperature
considerations in mind:
The VidyoPanorama room and the server room (if you are using one) must be equipped with
Heating, Ventilation, and Air Conditioning (HVAC) equipment. Remember, however, that HVAC
equipment can raise the noise level in the room.
You should consider which rooms are nearby and try to select a room that is not adjacent to
frequently noisy areas, such as cafeterias or reception areas.
15
Chapter 1: Preparing for the Installation
Specification
Operating Conditions
Non-Operating Conditions
Temperature Ranges
50° to 95° F (10° to 35° C)
-40° to 149° F (-40° to 65° C)
Temperature Gradient
50° F (10° C)
68° F (20° C)
Humidity Percent Ranges
20% to 80%
5% to 95% (non-condensing)
Humidity Gradient
10%
10%
Low Limits: -50 ft. (-15.2 m)
Low Limits: -50 ft. (-15.2 m)
High Limits: 10,000 ft. (3048 m)
High Limits: 35,000 ft. (10,668 m)
Heat Dissipation for Power
1040 BTU/hr (maximum)
N/A
Typical Configuration at 23° C Ambient
Power
Standby
2.8
16
None
Idle
5.2
40
None
Active
5.2
41
None
Stressed
5.2
41
None
The following table lists the environmental specifications for the Controller and Decoder Nodes:
(maximum per 60 minutes)
(non-condensing)
(maximum per 60 minutes)
Altitude Ranges
Supply
The following table lists the noise specifications for the Controller and Decoder Nodes.
Processor Hard Drives
Intel® Xeon®
E3-1200
product family
(80W)
2 x 3.5”
SATA (7.2k)
500GB
(maximum wet bulb
temperature = 29° C)
Supply
1 x 250W
RAID
PERC
H200
Operating
Mode
hard
drives
processor
(maximum wet bulb temperature
= 38° C)
LwA-UL
(bels)
LpA
(dBA)
Prominent
Tones
Acoustics
The quality of the sound is just as important as the quality of the video. You want the dialogue between
participants to sound like everyone is in the same location, a trick that involves quality microphones placed
in the right spots. In the VidyoPanorama room, microphones can be hung from the ceiling, embedded in the
table, or placed on the table.
Microphones will pick up sound reverberating off hard and flat surfaces in the room. You can dampen
reverberations by installing noise-dampening ceiling tiles, fabric-wrapped acoustical panels on the walls, or
a combination of both.
Room Color
The color of the walls within the camera field of view can impact how the far-end participants perceive the
video quality. If you want the far-end participants to see higher quality video, ensure that the wall at which
the camera is pointing is non-textured, non-patterned, and not reflective.
16

Chapter 1: Preparing for the Installation
Painting the wall a muted color, such as beige or blue-gray, looks better on video than bright white or dark
colors. As a general rule of thumb, the brighter the room is, the darker the walls should be. For example, if
your room has no windows, dark carpeting, and the overhead lights are not extremely bright, you should
consider painting your walls a lighter shade, such as pale blue or light beige. If, on the other hand, your
room has some natural light, light-colored carpeting, and bright overhead lights, you should consider
painting your walls a slightly darker shade, such as tan or medium gray or blue.
If you want to test colors before painting the walls, try hanging fabric of various colors on the back wall to
see which color looks best on video.
Lighting
Your VidyoPanorama room should have evenly dispersed, ambient lighting. For the best lighting, use LED
lights. Although the upfront cost for these is higher, the long-term cost is lower. The direct fluorescent
lighting that is common in offices is not recommended because it causes harsh shadows on the faces of the
participants and because its brightness can vary considerably at different parts of the room. If you are stuck
with fluorescent fixtures, get full spectrum bulbs designed for video.
The ideal color temperature should be between 3,000° and 3,500° Kelvin, and about 70 foot candles of
intensity at the subject.
Lighting for video can involve as many as four lighting positions (which are explained below), with the Key
Light being the most important. For most multi-purpose conference rooms, a strong color-balanced Key
Light supported by additional full spectrum lighting in the room will work well. Just remember: you don't
want meeting participants feeling like they're in a television studio.
Here is some additional information about the lighting positions:
Key Light: Light shining on the participant from the front. These lights are generally placed high and
at the center, or to each side of the seating area if two are required. Aim them downward at a 45°
angle to light the participants’ faces without causing their eyebrows to cast a shadow over their
eye-sockets.
Fill Light: Lights shining on the participant from the front, but placed at a low angle to soften
shadows under the eyes and chin.
Hair Light: Lights at the rear of the room, above the participants and aimed downward to help
separate the participants from the background.
Backdrop lighting: Lights above and (if space allows) between the participants and the background.
Two lights are usually required, each aimed toward the opposite half of the background to evenly
light it.
In addition, always ensure that no lights are pointing in the camera lens, and avoid pointing any lights
directly at the displays. If possible, you may want to hire a lighting designer and have the lighting
professionally installed.
17
 Loading...