

Page 1
Part Number: DEV-ACC-DOC-GSG100-D9020-RB
© 2014 Vidyo, Inc. all rights reserved. Vidyo’s technology is covered by one or more issued or pending United States patents, as more fully detailed on the Patent Notice page of Vidyo's website
http://www.vidyo.com/about/patent-notices/, as well as issued and pending international patents. The VIDYO logotype is a registered trademark of Vidyo, Inc. in the United States and certain other countries,
and is a trademark of Vidyo, Inc. throughout the world. VIDYO and the Vidyo family of marks are trademarks of Vidyo, Inc. in the United States and throughout the world.
VidyoRoom™ HD-100 Revision D
Getting Started Guide
What’s Included
Your HD-100 Revision D ships with the HD-100 Revision D codec, an infrared remote control, and the following items:
Depending on your order, you may receive one of the following Pro Pack Accessory Kits or the DVI to USB adapter:
Separate diagrams in this guide show connections for both the Logitech CC3000e and Sony EVI-HD7V cameras with the Phoenix Quattro3 speakerphone. Additional peripherals sold separately. To view a list of
peripherals compatible with VidyoRoom, go to http://www.vidyo.com/support/peripherals.
VidyoRoom HD-100 Revision D
Power cables for the United States, Europe, and
Ireland/United Kingdom – 6 ft (1.82 m)
HDMI to HDMI Cable – 6 ft (1.82 m), Qty. 2
DisplayPort to HDMI adapter, Qty. 2
External infrared receiver with USB cable – 6 ft (1.82 m)
Ethernet cable, Cat5E – 7 ft (2.13 m)
AAA batteries, 2-Pack for VidyoRoom remote control
Pro Pack Accessory Kit
Part Number: PKG-ACC-RM-PRO
VISCA to serial cable, EVI control – 6 ft (1.82 m)
DVI to USB 3.0 adapter – includes 3 ft. (.91 m) USB 3.0
cable
USB hub
Sony EVI-HD7 and Phoenix Quattro 3
Pro Pack Accessory Kit (Lite)
Part Number: PKG-ACC-RM-LITE
For use with your HDMI or DVI connected cameras (sold separately)
VISCA to serial cable, EVI control – 6 ft (1.82 m)
DVI to USB 3.0 adapter – includes 3 ft. (.91 m) USB 3.0 cable
DVI to USB3 Adapter
Part Number: DEV-ACC-RM-DXT-D2U3
For high frame rate shares and projection capabilities
DVI to USB 3.0 adapter – includes 3 ft. (.91 m) USB 3.0
cable
Sony EVI-HD7
Camera
Power adapter and power cables for United States, Ireland and
United Kingdom, and Europe – 6 ft (1.82 m)
DVI to DVI Cable – 15 ft (4.57 m)
Remote control
Phoenix Quattro3
Quattro3 unit
USB A to USB Mini B cable
Ethernet Cable
Logitech CC3000e
Camera, Speakerphone, Remote Control, and Powered Hub
Wall or table camera mount
Speakerphone to hub cable – 16 in (40.6 cm), USB cable
and Remote control
Adhesive (for mounting hub) and Power adapter
Page 2

Page 2
Installing Your HD-100 Revision D with a USB-Connected Camera (Logitech CC3000e Pictured)
VidyoRoom HD-100 Rev D
(Back)
Logitech CC3000e
Infrared
Receiver
VGA SHARES:
Epiphan VGA2USB
Note: Purchase the
Epiphan adapter for USB
2.0 conference shares.
DVI OR HDMI SHARES WITH AUDIO:
DVI to USB3
VidyoRoom HD-100 Rev D
(Front)
DisplayPort
to HDMI
Adapter
DisplayPort
to HDMI
Adapter
Display 1
Display 2
Note: If the edges of your display
cut off the VidyoRoom user
interface, see page 5.
Note: Purchase a
Vidyo DVI to USB3
adapter for USB 3.0
conference shares.
Share
Device
Solutions
Page 3

Page 3
Installing Your HD-100 Revision D with a DVI or HDMI-Connected Camera (Sony EVI-HD7V Pictured)
VidyoRoom HD-100 Rev D
(Back)
Infrared
Receiver
VidyoRoom HD-100 Rev D
(Front)
Sony EVI-HD7V
System Select Camera Dial
Note: Set to #7 and use
the VISCA cable to allow
VidyoRoom controls to
move your camera.
Inogeni DVI to USB (3.0)
A DVI to DVI
(Sony EVI-HD7V)
or a DVI to HDMI
(Minrray VHD-A910)
cable is included with
camera purchase.
DisplayPort
to HDMI
Adapter
DisplayPort
to HDMI
Adapter
Note: Purchase a Pro
Pack accessory kit,
which includes the
Inogeni adapter, for Pro
Camera connections.
Phoenix Quattro3
Display 1
Display 2
Note: If the edges of your display
cut off the VidyoRoom user
interface, see page 5.
VGA SHARES:
Epiphan VGA2USB
Note: Purchase the
Epiphan adapter for USB
2.0 conference shares.
DVI OR HDMI SHARES WITH AUDIO:
DVI to USB3
Note: Purchase a
Vidyo DVI to USB3
adapter for USB 3.0
conference shares.
Share
Device
Solutions
Page 4
Page 4
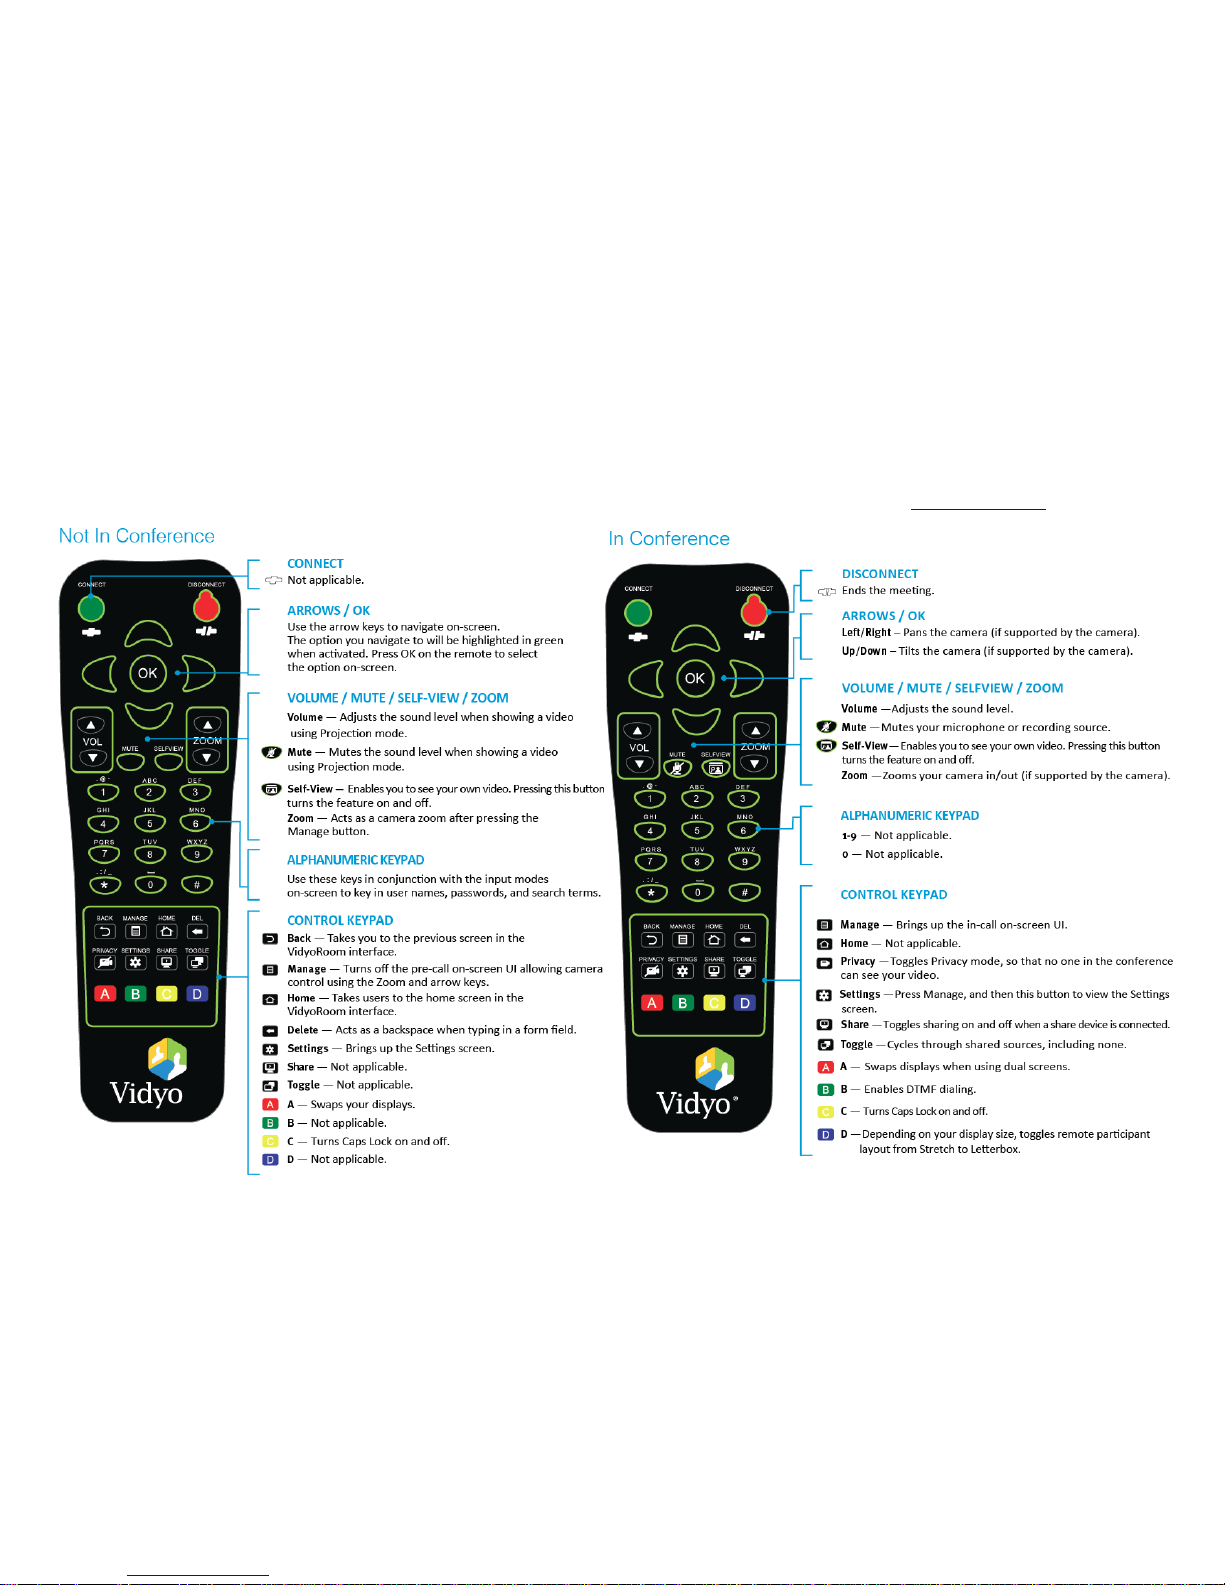
Using the Remote Control
The VidyoRoom comes with a remote control that provides you with quick shortcuts to the most frequent VidyoRoom activities. As shown below, the
functions of the buttons on the remote control vary depending on whether or not you’re in a conference.
Many remote functions also work with controls on the Logitech CC3000e base console and remote control. For more detailed information, refer to
Using
the Logitech CC3000e with VidyoRoom Systems Technical Note
and additional Logitech CC3000e documentation at www.logitech.com.
Page 5

Page 5
Configuring Your Television Picture Settings
If the edges of your display cut off your VidyoRoom UI, your screen may resemble the screenshot to the right of the table. The following table describes
how to configure your television picture settings in order to properly align the user interface:
LG
Samsung
Sharp
Sony
Vizio
1. Press Menu on
your TV remote.
2. Select Picture >
Picture Options.
3. Select Just Scan.
1. Press P. Size on
your TV remote.
2. Select Screen
Fit.
1. Press Menu on your
TV remote.
2. Select Picture >
Advanced Settings.
3. Turn Overscan Off.
1. Press Wide on
your TV
remote.
2. Select Wide
Mode > Full.
1. Press Display on
your TV remote.
2. Select Normal.
For more information, refer to the documentation provided with your television.
Using the Lucky Clover Remote Control Keypad
The Lucky Clover remote control keypad is an alphanumeric character input method for your VidyoRoom remote control. Enabled by default, the feature
can be disabled, if desired.
To disable the Lucky Clover remote control keypad:
1. Press the Settings button on the remote control.
The Settings screen appears with the Account tab selected by default.
2. Use the arrow buttons to navigate to the Advanced tab.
3. Press the down arrow key to the Lucky Clover Keypad field, then the right arrow key
to turn it OFF.
To use the Lucky Clover remote control keypad:
1. When in applicable text fields, press any button on the alphanumeric keypad.
The corresponding number is shown in the text field. Alphanumeric options
for the selected number are presented in a surrounding, clockwise clover format starting from the top.
2. Use the arrow keys to select the options presented from top, right, bottom, or left (where applicable).
Note: Characters are automatically selected when either an arrow key is pressed; an alphanumeric character is pressed again, or is pressed.
Tip: When available, remote control hints appear on the lower part of the screen.
Page 6

Page 6
Configuring the Account and Network Settings
To configure the VidyoPortal™ account settings:
1. When the VidyoRoom powers up, press the Settings button on the remote
control.
The Account screen displays the default IP address of your VidyoPortal as
well as the default user name and password that came with your
VidyoRoom. You must change these as described here.
2. Navigate to the Username text box and use the Lucky Clover Keypad to
enter the name of the VidyoPortal.
3. Navigate to the Password text box and use the Lucky Clover Keypad to
enter the password for the VidyoPortal.
4. Navigate to the VidyoPortal text box and use the Lucky Clover Keypad to
enter the IP address or URL of the VidyoPortal. (You don’t have to enter
“http://”.)
5. Navigate to the Save button and press to save your settings.
To configure the network settings:
1. Use the arrow buttons to navigate to the Network tab and press .
The Network screen appears:
Your VidyoRoom is set to Use DHCP by default. This enables it to
automatically obtain its IP address.
2. If you want to change your VidyoRoom network settings, press the down
arrow key to the DHCP field, then the right arrow key to turn DHCP OFF.
3. Navigate to each text box, enter the appropriate network setting.
4. Navigate to the Save button and press to save your settings.
For complete information about how to configure your settings and use the
VidyoRoom, refer to the
VidyoRoom Administrator and User Guide
.
For more information about VidyoRoom, refer to the following:
To obtain user documentation and access other helpful resources,
register at selfservice.vidyo.com/register.
To view a list of the various peripherals available with VidyoRoom, go
to http://www.vidyo.com/support/peripherals.
 Loading...