

Vido Media ZDVM9092471782 User Manual

ZuniDigital Travel Connect
Portable Wireless Router
with USB Charging Station
Model : ZTRP150
Model: ZTRS150
User’s Guide
Page | 1

Table of Contents
Introduction…..2
Retail Package Contents…..2
Safety Information…..2
Product Overview…..3
Key Features…..4
Other Features…..4
Setup Instructions
Router Mode…..5
WISP Mode…..10
Charging Station…..16
Frequently Asked Questions
General Questions…..18
Travel Router Specific…..18
USB Charging Station Specific…..18
Troubleshooting Information
Router Mode…..21
WISP Mode…..22
Charging Station…..22
Technical Specifications…..24
Warranty Information…..26
FCC Certification Information…..27
Introduction
Congratulations on your purchase of the ZuniDigital Travel Connect. Before installing and
using this innovative product, please read this user’s guide thoroughly, and retain it for future
use. This user’s guide will explain how to setup and use the travel router / USB charging station.
Retail Package Contents
ZuniConnect Travel Router PREMIUM™
Power Adapter
Travel Case
Ethernet Cable (optional)
Quick Start Guide
User’s Guide
Safety Information
For indoor use and in dry locations only. To decrease the risk of electrical shock, unplug the
travel router and allow it to cool before cleaning.
Page | 2

Product Overview
Designed for people on-the-go, this travel friendly device lets you create a secure wireless
network whenever a wired Broadband connection is available, and it also provides a
convenient charging station for portable electronic devices like: cell phones, smart phones,
tablet / pad computers, e-readers, MP3 players, digital cameras, and portable gaming
systems.
Convenient & Easy-to-Use High Speed Wireless Routing
This high-speed wireless router allows Internet ready devices a convenient way to connect to
and share a wired Broadband connection. This is especially convenient for smartphones,
tablet PC’s, and e-reader users since most of these products lack a traditional RJ-45 Ethernet
port needed to plug in a network cable. Utilizing patent pending Intelli+IP technology, this
device easily creates a reliable and secure wireless network from a wired Broadband
connection. Once established, users can connect multiple devices to a personal Wi-Fi Hotspot,
which is useful for tradeshows, hotel rooms, or anywhere multiple users need to share an
Internet connection.
Smart USB Charging Station
Our patent pending process, incorporating smart power charging technology, permits the
simultaneous charging of multiple devices such as a smart phone, tablet computer, or ereader from one convenient location. Travelers won’t have to use the plug in the bathroom to
charge their personal electronics, nor do they have to carry all the heavy / bulky wall charger
transformers with them.
Page | 3

Key Features
Intelli+IP Sensing Technology – Patent pending technology that detects the main network’s IP
address, and if there is a network conflict, the Intelli+IP sensing technology will automatically
change the travel router’s IP address to resolve the issue.
Smart USB Charging Station with QuickCharge – Two (1) Standard and (1) QuickCharge USB
charging ports utilizing patent pending smart power allocation technology allow for the
simultaneous charging of two portable electronic devices without interrupting power to the
wireless travel router. The QuickCharge ports provide additional power and will provide faster
charging of tablet / pad computers and e-readers.
Fast & Secure Network Connectivity – 802.11N wireless technology offers data transfer rates up
to 300 Mbps and WPA / WPA2 / WEP data encryptions with dual-active firewalls provide a
safe and secure network connection.
Travel Friendly Design – Small and lightweight, this trave l router packs neatly into lu ggage and
lets you keep bulky / heavy wall charger transformers at home.
Router AP Mode or Wireless ISP Function – User selectable standard routing AP or Wi-Fi IN / OUT
modes.
Other Features
- Compatible with IEEE 802.11N and 802.11B/G Wireless Standards
- Intelli+IP Sensing Technology
- (2) Smart USB Charging Ports (one QuickCharge)
- User Selectable Routing Modes
- Data Transfer Rate up to 150 Mbps
- Dual Antennas Use 2.4 GHz Frequency Band (2T2R)
- Supports 64-Bit and 128-Bit Wireless Data Encryption (WPA/WPA2/WEP)
- Supports Multiple SSID
- Supports Hidden SSID
- WDS Supported w ith W EP, TKIP, AES Encryp tion
- Supports NAT / IP sharing
- Supports DHCP, Static, PPPoE, and PPTP WAN Connections
- Supports MDI/MDI-X Auto Switching
- Provides DHCP Server
- Firmware Up gradeable vi a Web Interface
- System Log Function
- Lightweight, Travel Friendly Design
Page | 4
Setup Instructions
WIRELESS SETUP (ROUTER MODE)
ABOUT ROUTER MODE
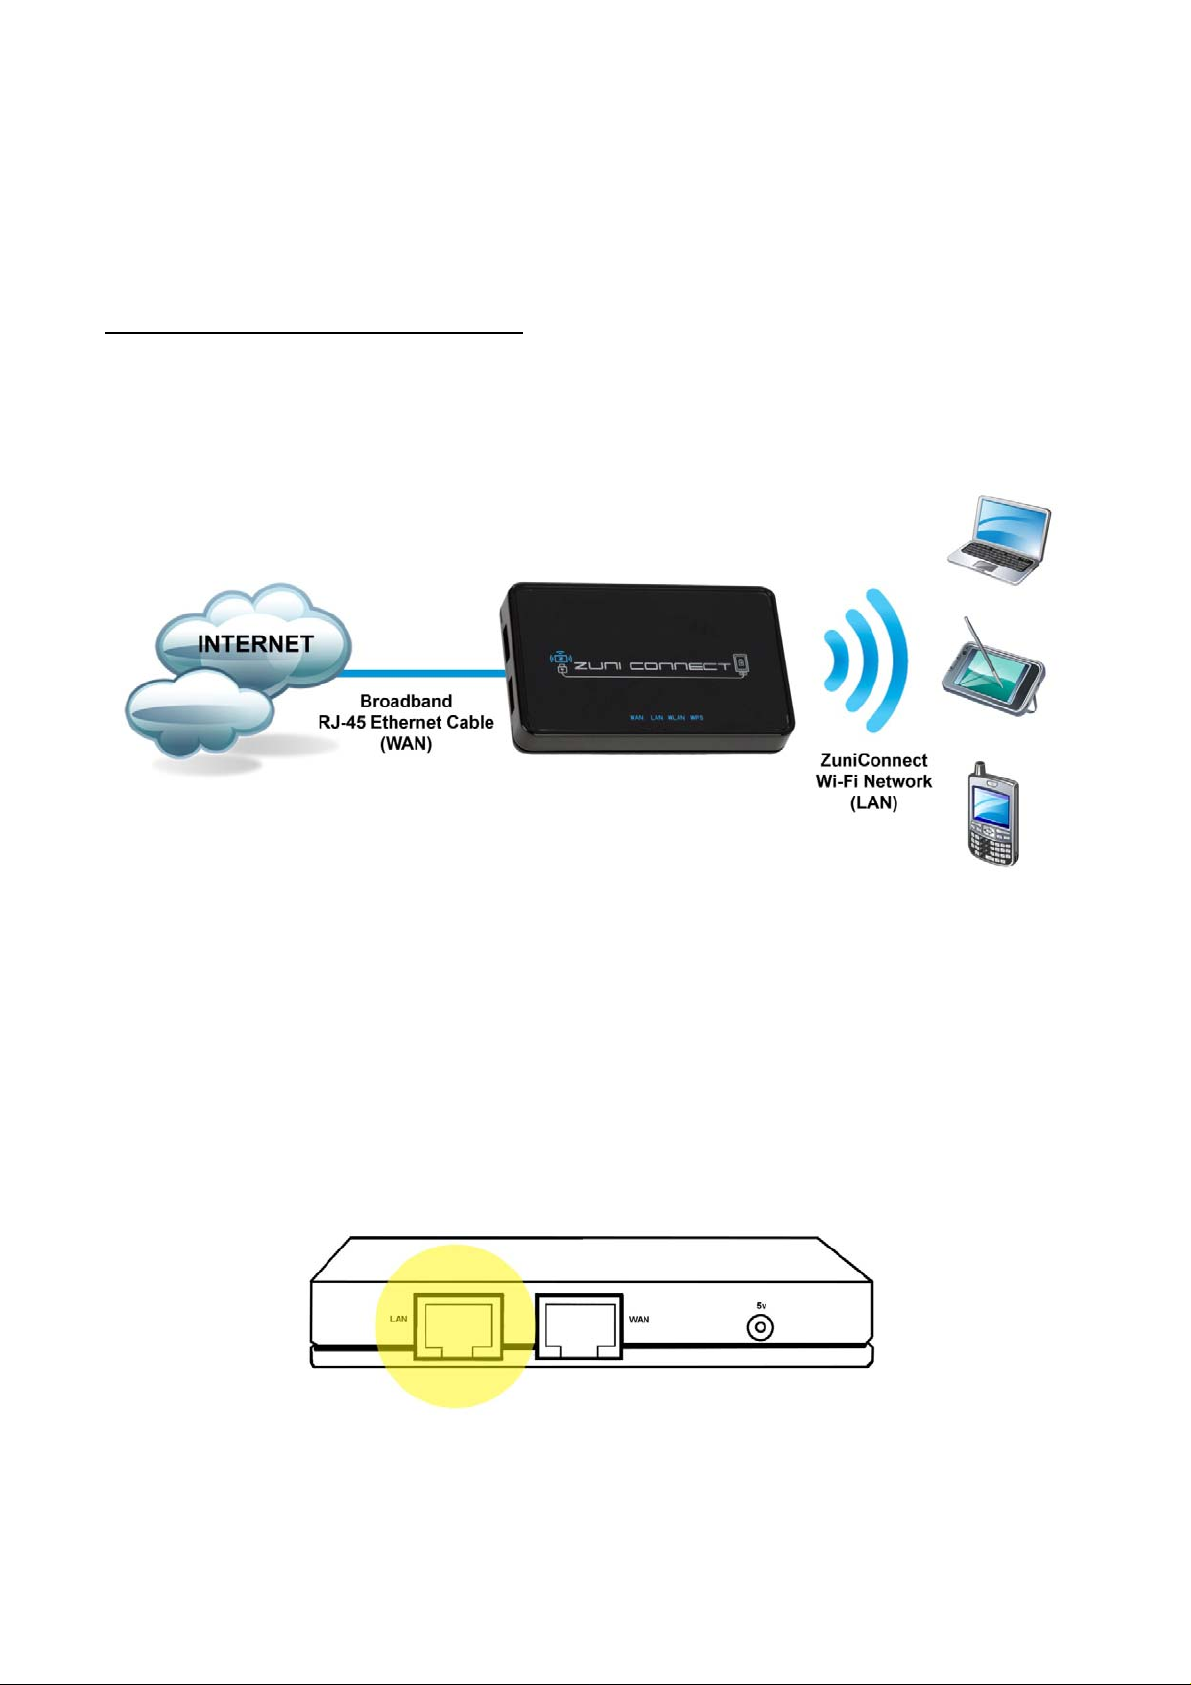
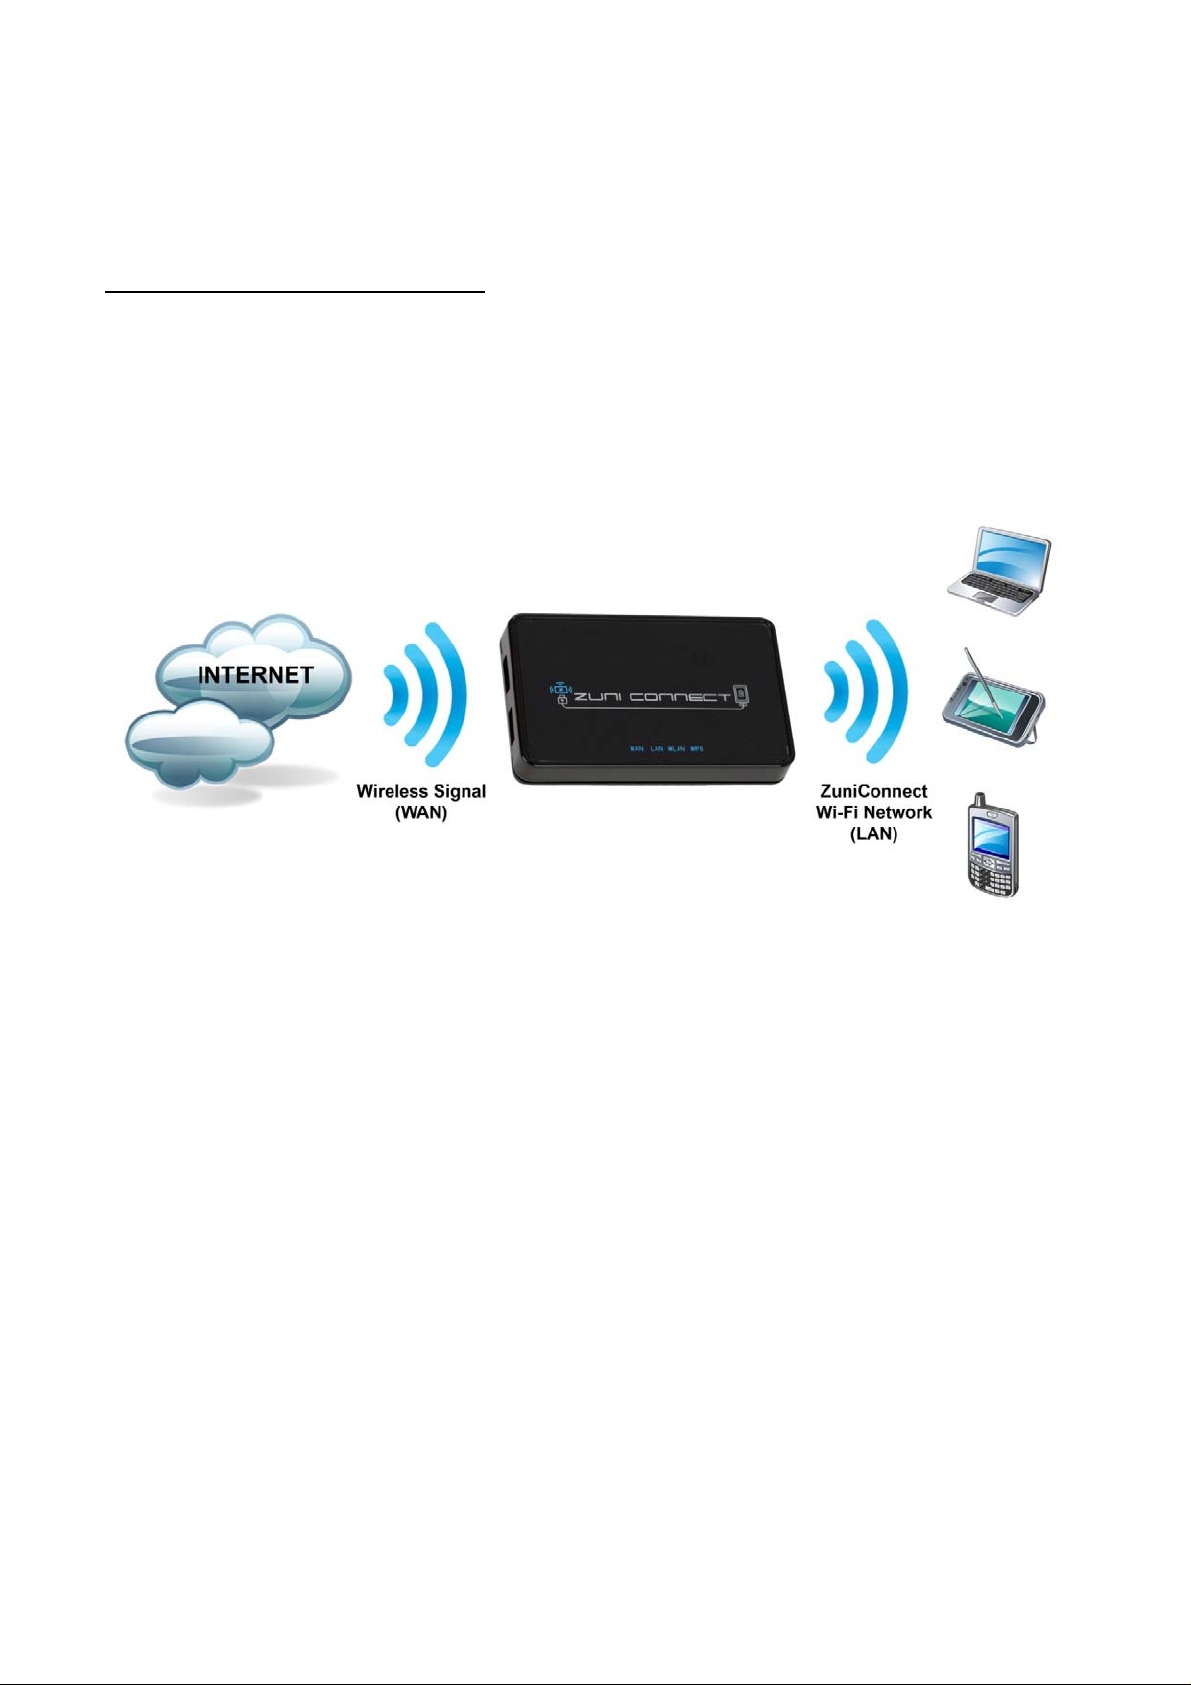
For this mode the ZuniDigital Travel Connect uses a wired Broadband connection as the WAN
(Internet) connection, to create a new sub-network that can then be shared via Wi-Fi and the
LAN port on the travel router.
Follow these instructions to setup the ZuniDigital Travel Connect for use in ROUTER Mode. For
the best results do not place the ZuniDigital Travel Connect near any large metal objects or
magnets (like those found in speakers). Also note that elevating the travel router from the floor
will increase wireless broadcast signal performance and range.
THE SWITCH ON THE TRAVEL ROUTER IS SET TO ROUTER
Step 1 - Attach LAN (Ethernet) CableAttach one side of an RJ-45 Ethernet cable into the LAN
(Ethernet) port of the Travel Router, and then connect the other end to the Ethernet port on
your computer.
Page | 5

Step 2 - Attach Power CablePlug the AC adapter into a wall socket and plug the po wer tip
into the Travel Router’s 5v power port. Please wait 30 seconds for the router to fully boot up
before continuing to the next step.
Step 3 - Access Web ConfigurationFrom your computer, open a W eb browser (Internet
Explorer, Firefox, Safari, etc.) then type 192.168.222.1 into the address bar and press the
“ENTER" key.
Step 4 - Setup L oginIn the login window key in the default User Name (admin) / Password
(admin) and click the OK button.
Page | 6
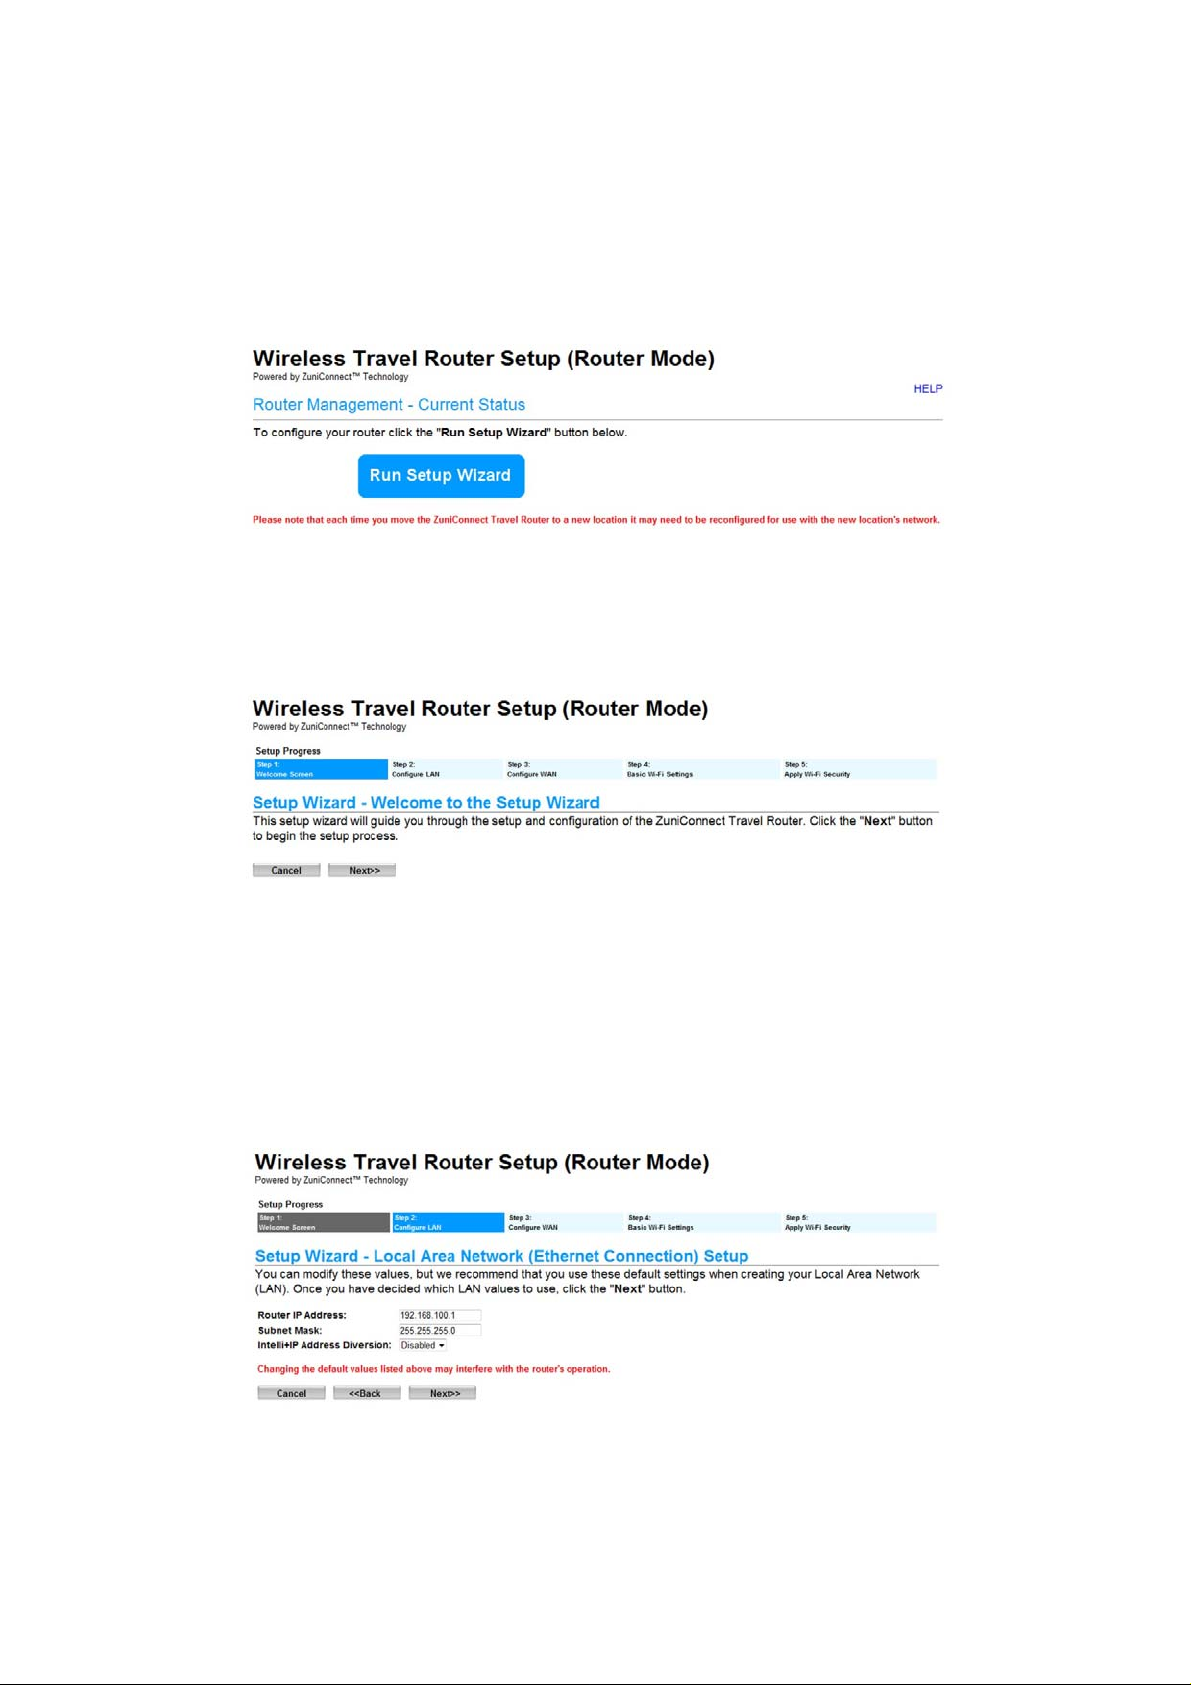
Step 5 – Enter the Setup WizardClick the “Run Setup Wizard” button on the travel router’s main
page, or from the navigation menu on the left side of the web interface.
Step 6 - Begin the Setup WizardTo begin the Setup Wizard click the “Next” button. If you wish
to exit the Setup Wizard click the “Cancel” button.
Step 7 - Configure LAN (Ethernet) Parameters
The pre-entered default values should work for most networks, but if they need to be modified
you can do so now. Unless you are an advanced user we recommend that you use these
default settings w hen creating your Local Area Network (LAN), because changing the default
values listed may interfere with the router's operation. Once the values are correctly entered,
press the “Next” button.
Page | 7
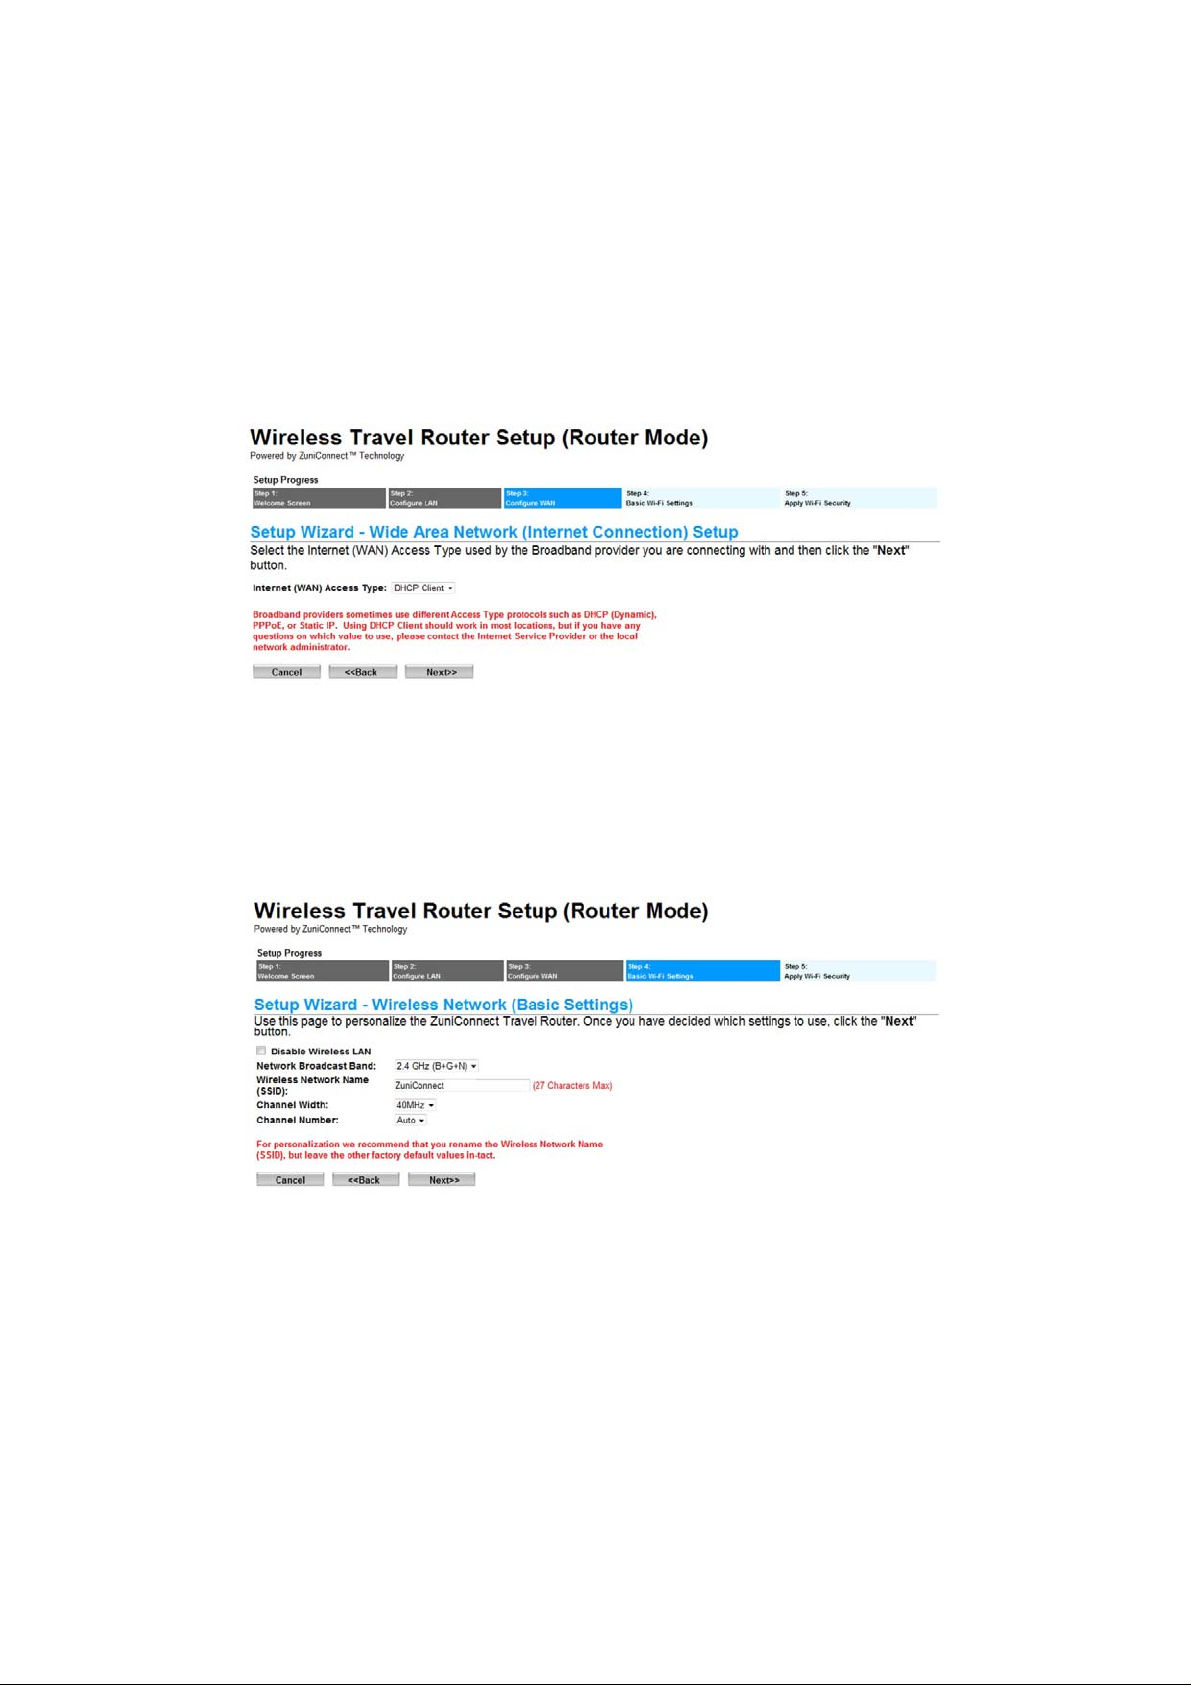
Step 8 - Configure WAN (Internet) ParametersThis step lets you configure the router to utilize the
broadband signal provided by the Internet provider. The majority of providers use DHCP
which is the default setting of the ZuniDigital Travel Connect. This setting should work in most
locations, but if you have any questions on which settings to use, please contact the Internet
Service Provider or the local network administrator.
Step 9 - Configure Basic Wi-Fi SettingsUse this page to personalize the name of the wireless
network (SSID) to be broadcast by the ZuniDigital Travel Connect. If desired, changes can be
made to these settings, but it is recommended that only experienced users do so. Otherwise it
is recommended that you do not make any changes to default values that are listed.
Page | 8
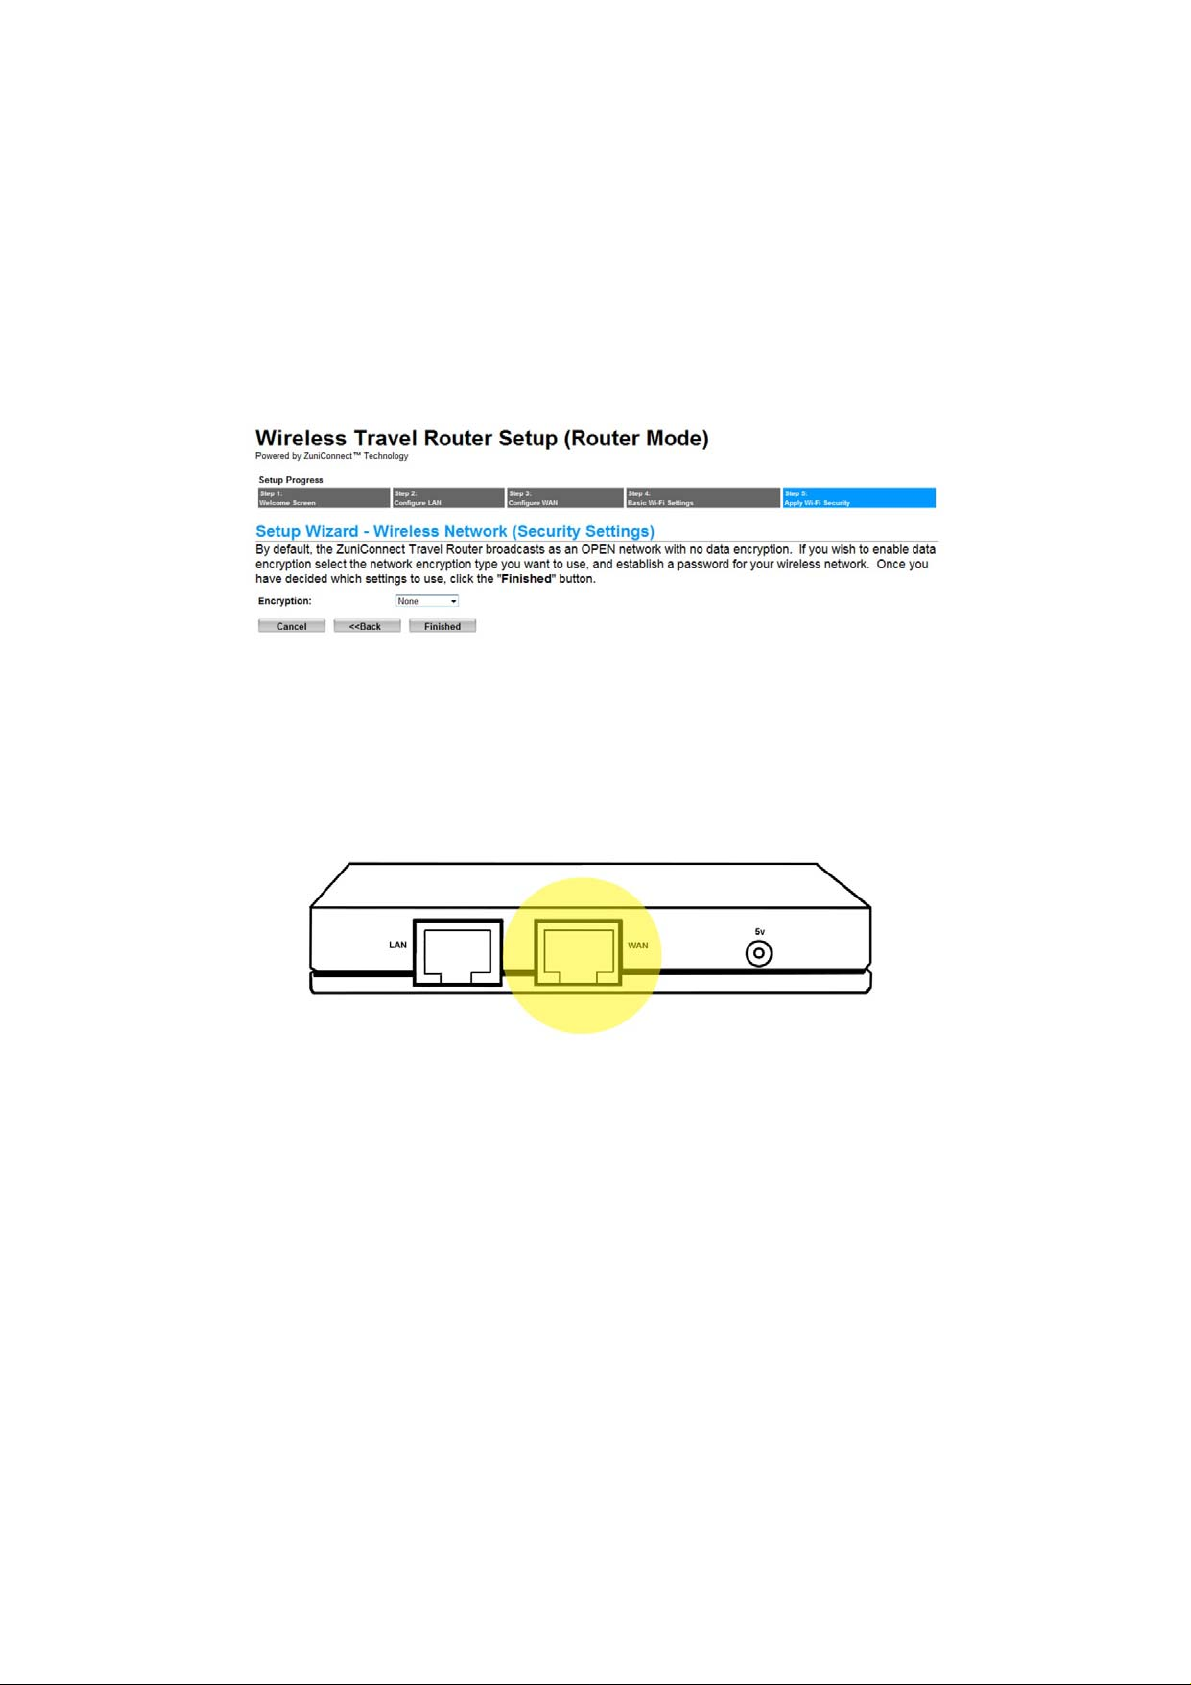
Step 10 - Apply Wi-Fi Network Security SettingsBy default, the ZuniDigital Travel Connect
broadcasts as an OPEN network with no data encryption. If you wish to enable network
encryption to help secure your network, please select the encryption type you want to use,
establish a password that you can remember, and then click the “Finished” button. This will
finalize the settings for your Travel Router and you may begin using it as a wireless access point.
Step 11 - Using the Travel RouterAttach the Ethernet cable that provides the Internet
connection into the WAN (Internet) port, then power the travel router ON and wait for it to fully
boot. The router will broadcast the SSID setup in step 9 which you can connect wireless
devices to.
RESTORE FACTORY DEFAULT SETTINGS
Should you at any time with to restore the factory default se ttings press and hold the “Reset”
button on the bottom of the Travel Router for 10 seconds, then release. The travel rou ter will
re-boot and all of the original factory settings will be restored.
Page | 9
WIRELESS SETUP (WISP MODE)
For model ZTRP150 only
ABOUT WISP MODEThis mode allows the ZuniDigital Travel Connect to use an existing wireless
network signal as the WAN (Internet) connection instead of relying on a wired Broadband
signal. This mode is used for providing access to users in locations where no wired Broadband
Internet connection is available, but where a wireless signal exists.
Follow these instructions to setup the ZuniDigital Travel Connect for use in Wireless ISP (WISP)
Mode. For the best results do not place the ZuniDigital Travel Connect near any large metal
objects or magnets (like those found in speakers). Also note that elevating the travel router
from the floor will increase wireless broadcast signal performance and range.
THE SWITCH ON THE TRAVEL ROUTER IS TO SET TO WISP
Step 1 - Attach LAN (Ethernet) CableAttach one side of an RJ-45 Ethernet cable into the LAN
(Ethernet) port of the Travel Router, and then connect the other end to the Ethernet port on
your computer.
Page | 10
 Loading...