

Page 1

USER MANUAL
Interactive Flat Panel Display
Vidi-Touch Lite Version
Rev.10/01/2017
Page 2

2
NOTICES
COPYRIGHT AND TRADEMARKS
Copyright © 2016 Vidistri Europe BV. All rights reserved.
All brand names and product names are trademarks, registered trademarks or trade names of their respective
holders.
General
Every effort has been made to ensure accuracy, however in some cases changes in the products or availability
could occur which may not be reflected in this document. We reserve the right to make changes to
specifications at any time without notice. Performance specifications are typical, but may vary depending on
conditions beyond our control such as maintenance of the product in proper working conditions. Performance
specifications are based on information available at the time of printing. We makes no warranty of any kind
with regard to this material, including, but not limited to, implied warranties of fitness for a particular purpose.
We will not be liable for errors contained herein or for incidental or consequential damages in connection with
the performance or use of this material. Our manufacturing facility is ISO 9001 and 14001 certified.
REGULATORY
The product has been tested and found to comply with the limits for a Class B digital device, pursuant to Part
of KC,CE, CB,FCC Rules. These limits are designed to provide reasonable protection against harmful
interference when the product is operated in a commercial environment. The product generates, uses, and
can radiate radio frequency energy and, if not installed and used in accordance with the instruction manual,
may cause harmful interference to radio communications. Operation of the product in a residential area is
likely to cause harmful interference in which case the user will be required to correct the interference at the
user’s own expense.
Environmental
The product is designed and manufactured with high‐quality materials and components that can be recycled
and reused. This symbol means that electrical and electronic equipment, at their end‐of‐life, should be
disposed of separately from regular waste. Please dispose of the product appropriately and according to local
regulations. In the European Union, there are separate collection systems for used electrical and electronic
products. Please help us to conserve the environment we live in!
Page 3

3
Table of Contents
1 BEFORE USING THE PRODUCT .............................................................. 4
1.1 Safety Precautions ................................................................................ 4
2 PREPARATIONS ................................................................................... 11
2.1 Parts List ............................................................................................. 11
2.2 Control product .................................................................................. 11
2.3 Input/output connection .................................................................... 12
2.4 Remote Controller Button Description ............................................... 13
3 INSTALLATION GUIDE ......................................................................... 15
3.1 Caution before installation ................................................................. 15
3.2 Unpacking Process .............................................................................. 15
3.3 Handling Guide ................................................................................... 16
3.4 Product Installation ............................................................................ 18
3.5 Wall mounting Installation ................................................................. 19
3.6 Remote Controller .............................................................................. 19
3.7 Setup .................................................................................................. 20
4 REMOTE CONTROL ............................................................................. 21
4.1 RS-232C connection ............................................................................ 21
5 CONNECT THE EXTERNAL DEVICE ....................................................... 23
5.1 HDMI Connection ............................................................................... 23
5.2 VGA Connection.................................................................................. 23
6 TOUCH REQUIREMENTS...................................................................... 25
6.1 Touch Requirements........................................................................... 25
7 MENU CONTROL ................................................................................. 26
7.1 Input selection .................................................................................... 26
7.2 User function ...................................................................................... 27
8 TROUBLE SHOOTING........................................................................... 28
9 PRODUCT SPECIFICATION ................................................................... 31
10 SUPPORTED RESOLUTIONS ................................................................. 35
11 REQUIRED INFORMATION .................................................................. 36
11.1 Prevent image sticking .................................................................... 364
Page 4
4
1 Before using the product
l Before installing or using the product, to avoid damaging the product, read and follow as the guidelines
of the user manual for your safety.
l The color, design and specification may change without notice to enhance the function.
1.1 Safety Precautions
Precautions are divided into two "Warning" and "Caution", and meaning of the each is as follows.
Warning: If you do not follow, it could result in serious injury or death.
Caution: If you do not follow, it could result in minor injury or product damage.
Please keep users to access USER MANUAL easily.
This illustration below is for reference only.
Warning
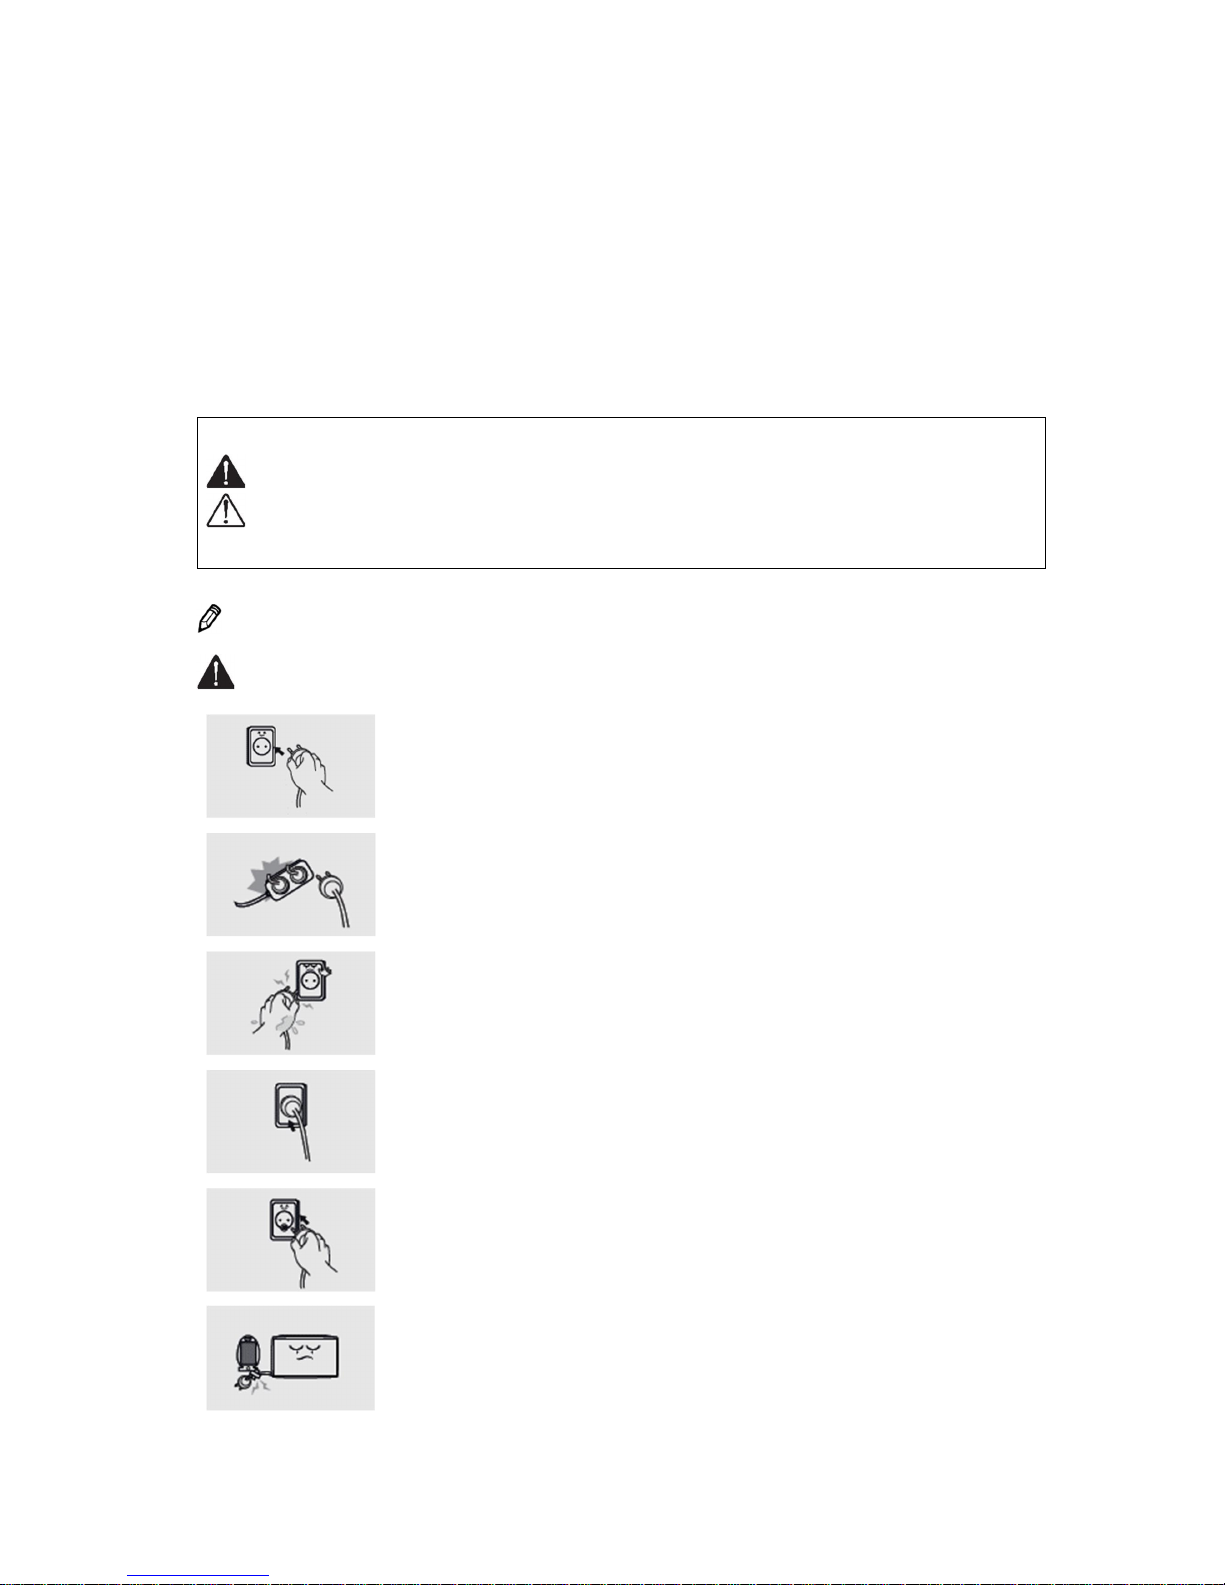
Do not use a damaged power cable or plug which does not meet the standard.
- This may cause a fire or an electric shock.
If you are using a power strip, do not use several devices at the same time.
- Due to the heat generated by the multi-outlet, it may cause fire.
Do not touch the power plug with wet hands.
- This may cause an electric shock.
Plug in the outlet end exactly.
- If the connection is not stable, it may cause fire.
Connect the power cable to a grounded outlet.
- This can cause electric shock when the ground is broken or shorted.
- When installing on a place that cannot be grounded, connect to the outlet by
using a circuit breaker to protect the product from electric shock.
Do not pull or bend the power cable forcibly.
Avoid placing heavy objects on the cables.
- If the cable is damaged, it may result in electric shock or a fire.
Page 5
5
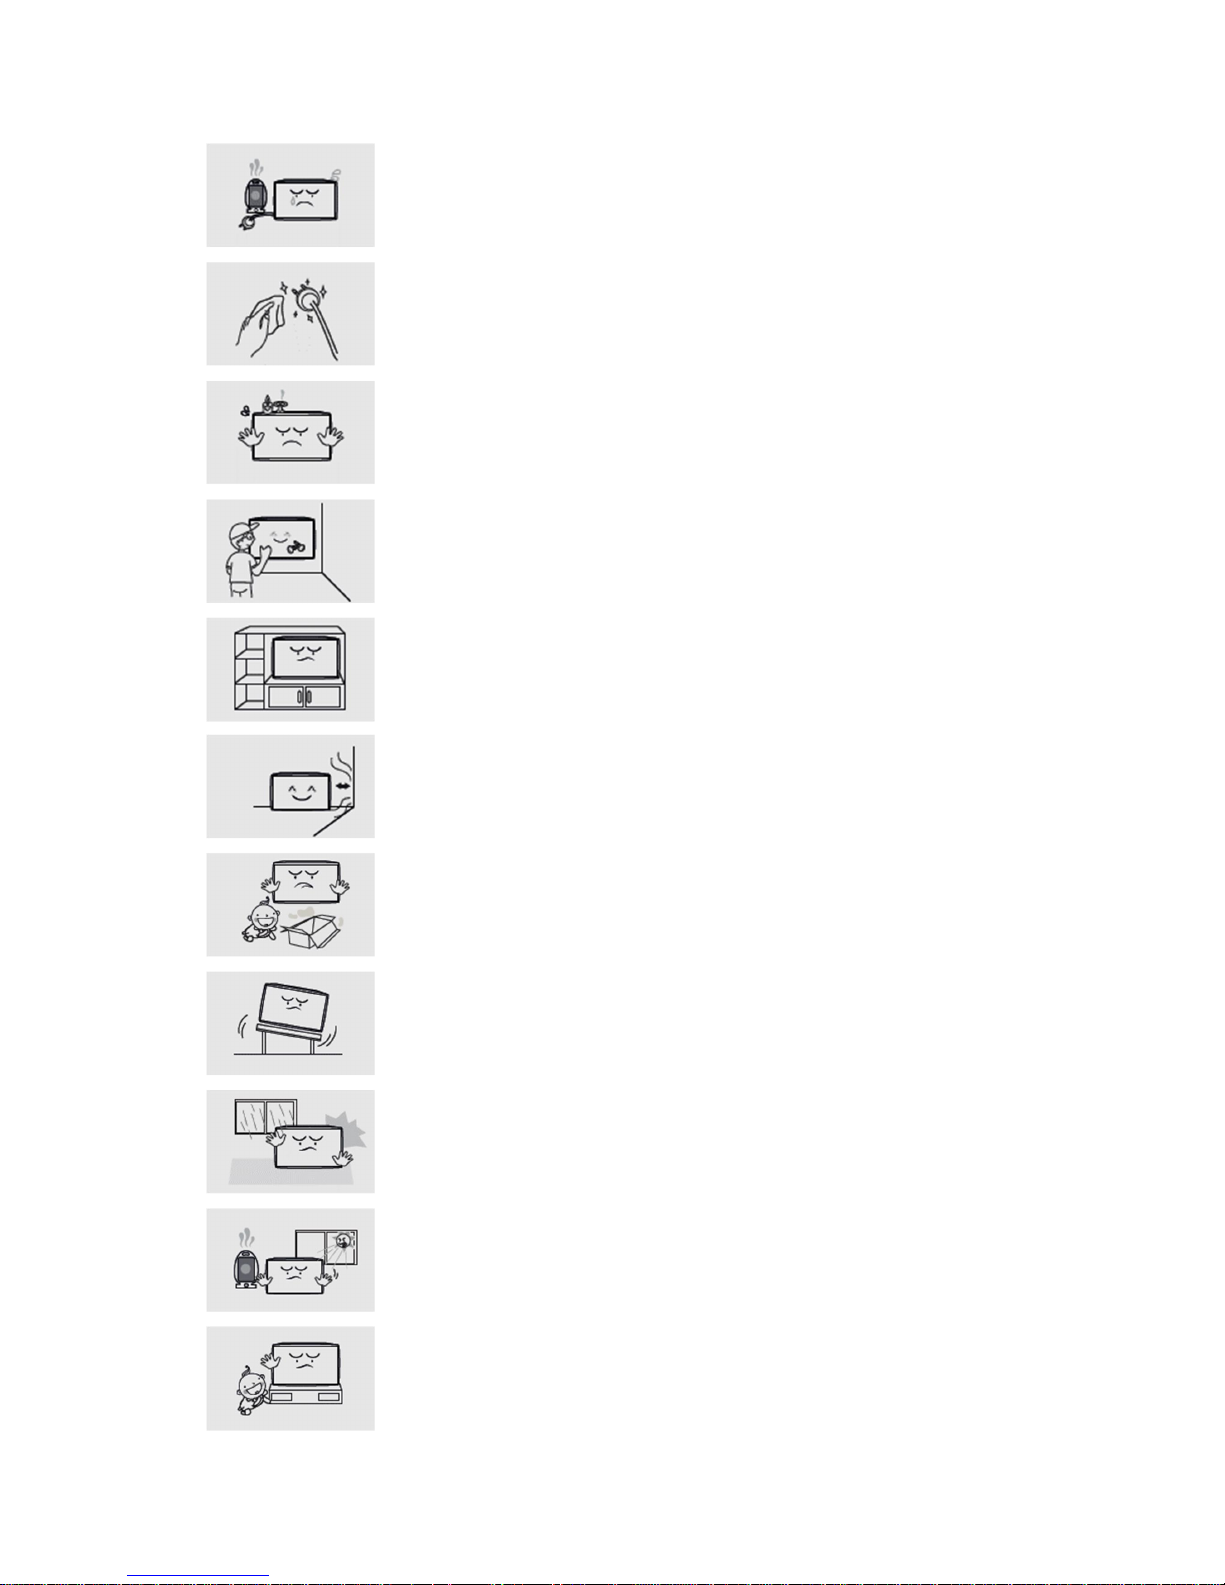
Do not use the power cable near heating appliances and products.
- This may cause a fire or electric shock.
In case of contamination around the power plug or outlet, wipe clean with a dry
cloth.
- This may cause a fire.
Do not place flammable objects near the product.
- This may cause a fire.
If you want to install by using the wall
mount, make the product be installed by a
trained technician. Refer to the User Guide Wall Mounting.
- This may cause injury.
Do not install the product in poorly ventilated places such as a bookshelf or
closet.
- Otherwise it may affect internal temperature to be increased and cause a fire.
Install the product at least 10 cm far from the wall.
- Otherwise it may affect internal temperature to be increased and cause a fire.
After unpacking the product, packaging vinyl should be kept away from the hands
of young children.
- If a child uses it incorrectly, it may cause a choking accident.
Do not install in locations where has vibration or in an unstable position.
- Product fall may occur and it might cause damage.
- This may cause a fire.
Do not install in places which dirt, moisture, smoke, much water or rain water can
reach.
Do not install under the air conditioner that could fall water drops.
- This may result in electric shock or fire.
Avoid exposure to direct sunlight and do not place near hot objects such as a fire
or heater heat.
- This may cause a fire or shortening the product life.
Do not install in the low place where a child can touch.
- A child may be injured while playing and touching the product.
Page 6
6
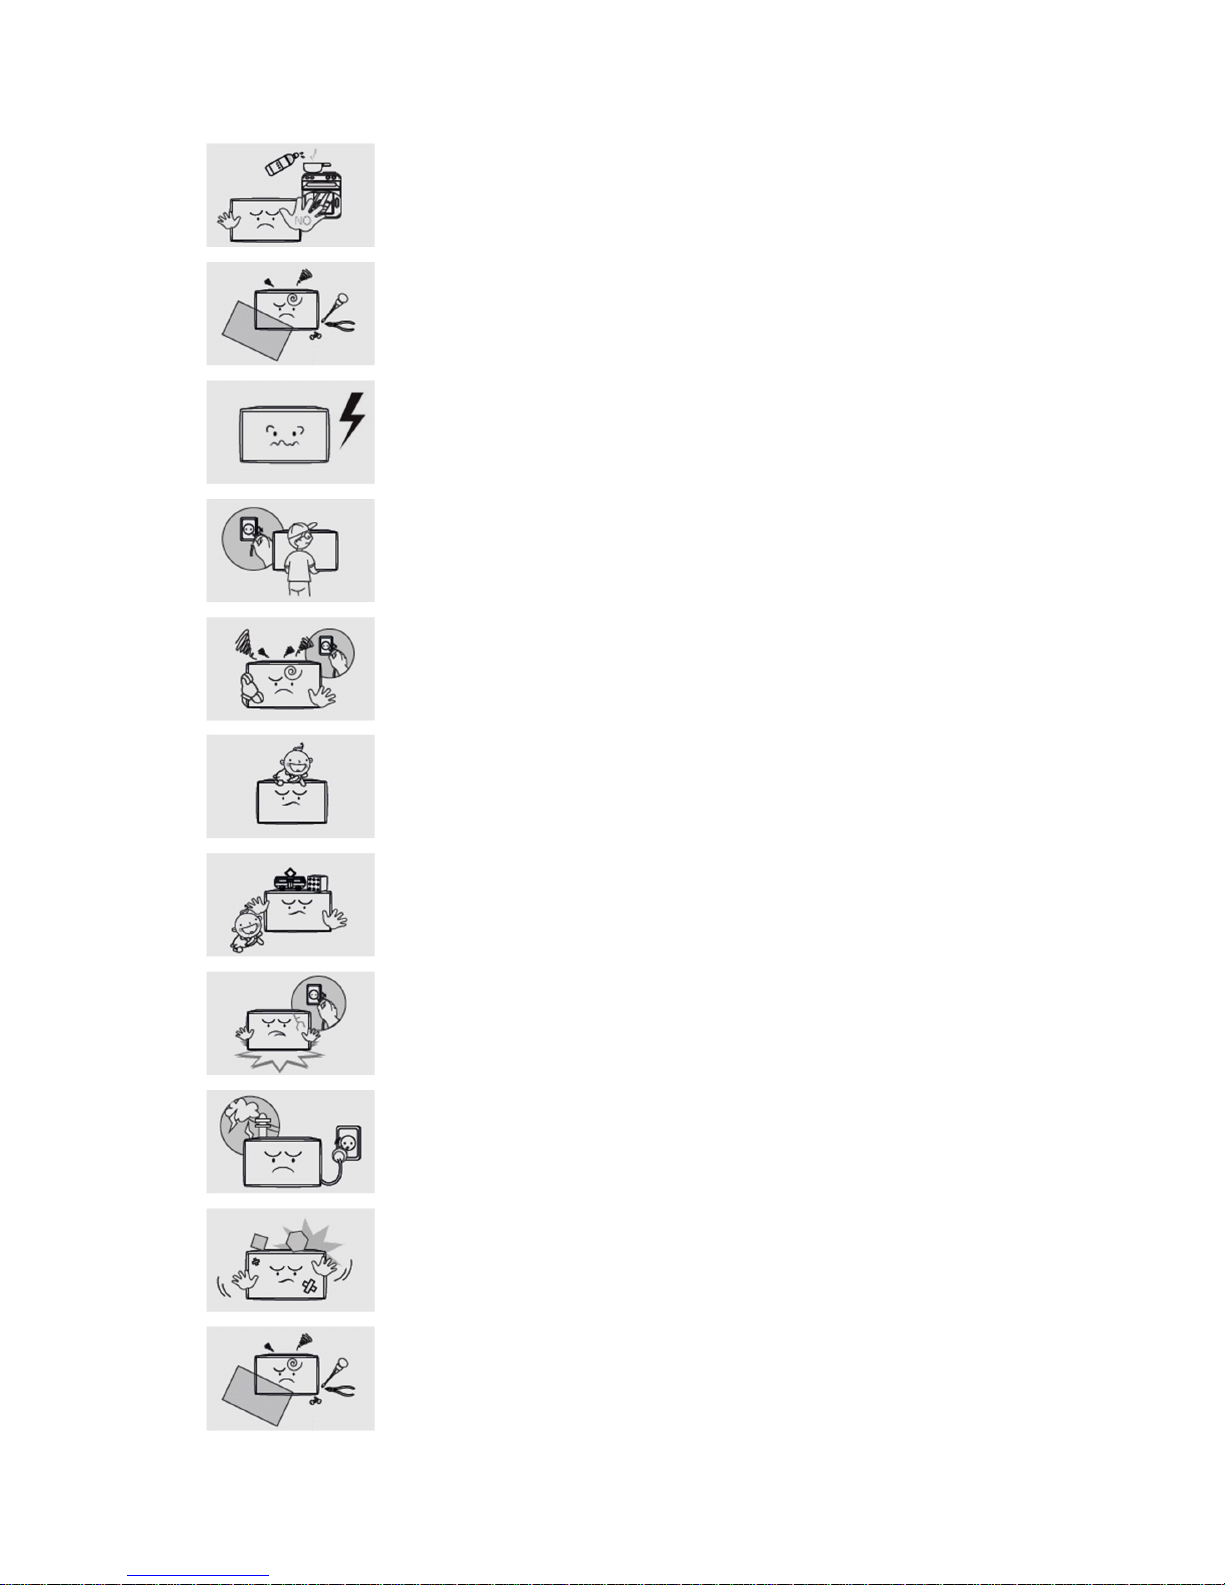
Do not install near any kitchen or kitchen counter because it may cause damage
or deformation of the product by the vapor or oil.
- This may cause a fire.
Do not try to repair or transform the product because the high voltage can flow
inside the product.
- This may cause a fire or electric shock.
- When problem is found in the product, contact a service center.
Do not use electrical equipment which uses high-voltage around the product.
- This may result in poor quality of display or cause amblyopia.
- This may cause a fire or electric shock.
When moving the product, turn off the power and remove all of the cables
including power cables connected to the product.
- If the cable is damaged, it may cause a fire or electric shock.
When smelling something burning or hearing strange sound from the product,
disconnect the power cable immediately and contact a service center.
- This may cause a fire or electric shock.
Do not allow a child to get on or hang on the product.
- If the product falls off, a child may result in injury or death.
Do not place heavy object, toy or sweets that a child can play with on the
product.
- If a child hangs the product and fall, it may cause personal injury or death.
When the product is damaged or falls off, disconnect the power cable
immediately and contact a service center.
- This may cause a fire or electric shock.
When lightning occurs, turn off the power switch and disconnect the power cable.
- This may cause a fire or electric shock.
Do not drop the product or throw something to the product.
- This may cause a fire or electric shock.
Do not give a shock or scratch to the screen with sharp objects.
- This may cause damage to the product.
Page 7
7
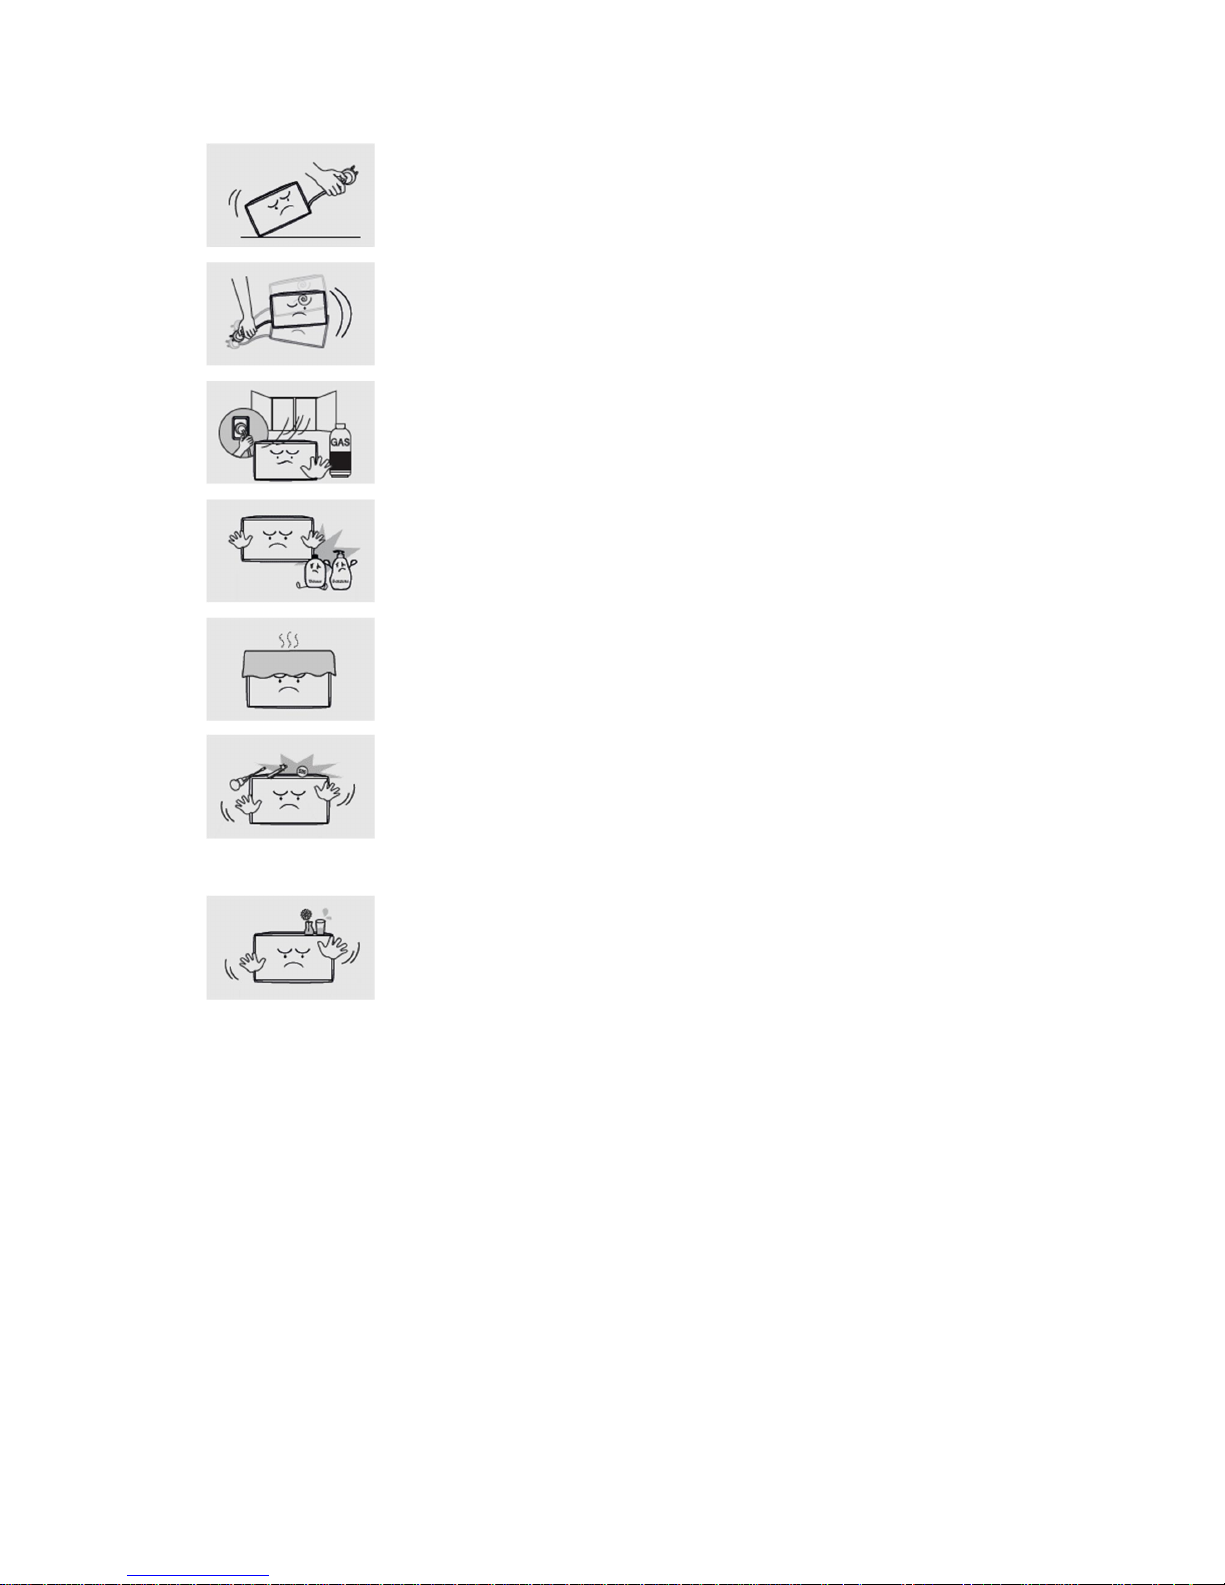
Do not pull the power cable or signal cables connected to the product when
moving the product.
- Cable damage may cause a malfunction or an electric shock or fire.
Do not shake or uplift a product by holding only the power cable and signal cable.
- Cable damage may cause a malfunction or an electric shock or fire.
If you smell a gas around the place of the product or there is a risk of a gas
leakage,
Do not plug in or turn on the product. Make sure to ventilate.
- A spark in the appliance power can cause an explosion or fire.
Do not store or use flammable material and flammable
sprays near the product.
- This may cause an explosion or fire.
Please do not block a vent with the curtain or cloth, etc.
- The rise of internal temperature may cause a fire.
Do not put a steel rod, coin, hair pin etc. in the vent and input/output terminals of
the product.
Also, do not put a flammable object such as papers.
- When a strange substance enters into the product, turn off the power of the
product. Please contact the Service Center after unplugging the power cable.
- This may cause a malfunction or an electric shock or fire.
Do not place anything containing liquid or metals on the product.
- When a strange substance enters into the product, turn off the power of the
product. Please contact the Service Center after unplugging the power cable.
- This may cause a malfunction or an electric shock or fire.
Page 8
8
Caution
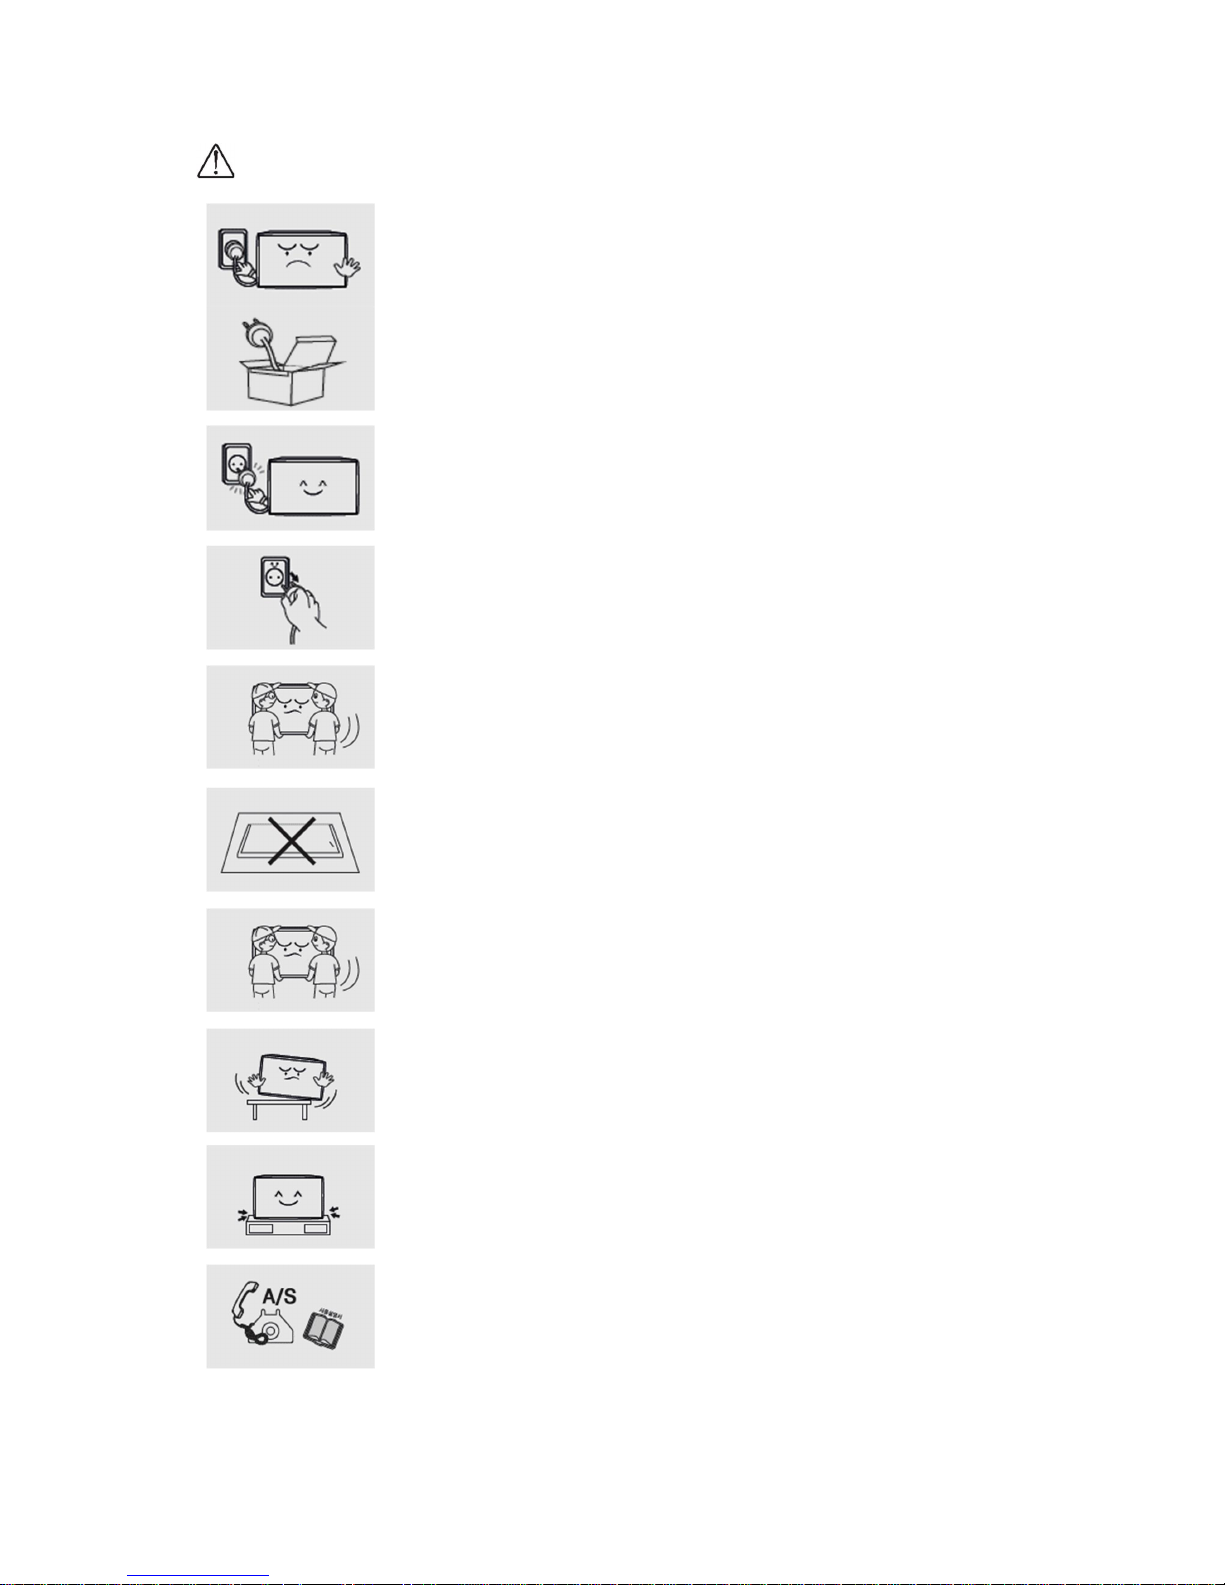
Do not unplug the power cable while using the product.
- This may cause a fire or electric shock.
Use only the power cable qualified for the
standard.
- This may cause a fire or electric shock.
Connect the power cable to the nearest outlet.
- If having a problem with the product, unplug the power cable completely.
When disconnecting the power cable from the outlet, do not pull the cable wire.
Please be sure to hold the plug and separate it.
- This may cause a fire or electric shock.
Please move the product carefully not to occur the twist and drop.
- This may cause a malfunction or injury.
Put the product’s screen faces upwards.
- The screen may be damaged.
Work together more than one person if the product is heavy.
- This may cause a malfunction or injury.
When installing the product on a cabinet or shelf, use the larger size of the tray
than the product to use and maintain the horizon.
- The product may fall and cause damage or injury.
Please do not shock when installing the product.
- This may cause a malfunction.
When installing the product in a special place, contact a dealer or a service center
because the peculiar environment can be effected to the event of a problem with
the
- This may cause a malfunction or fire.
Page 9
9
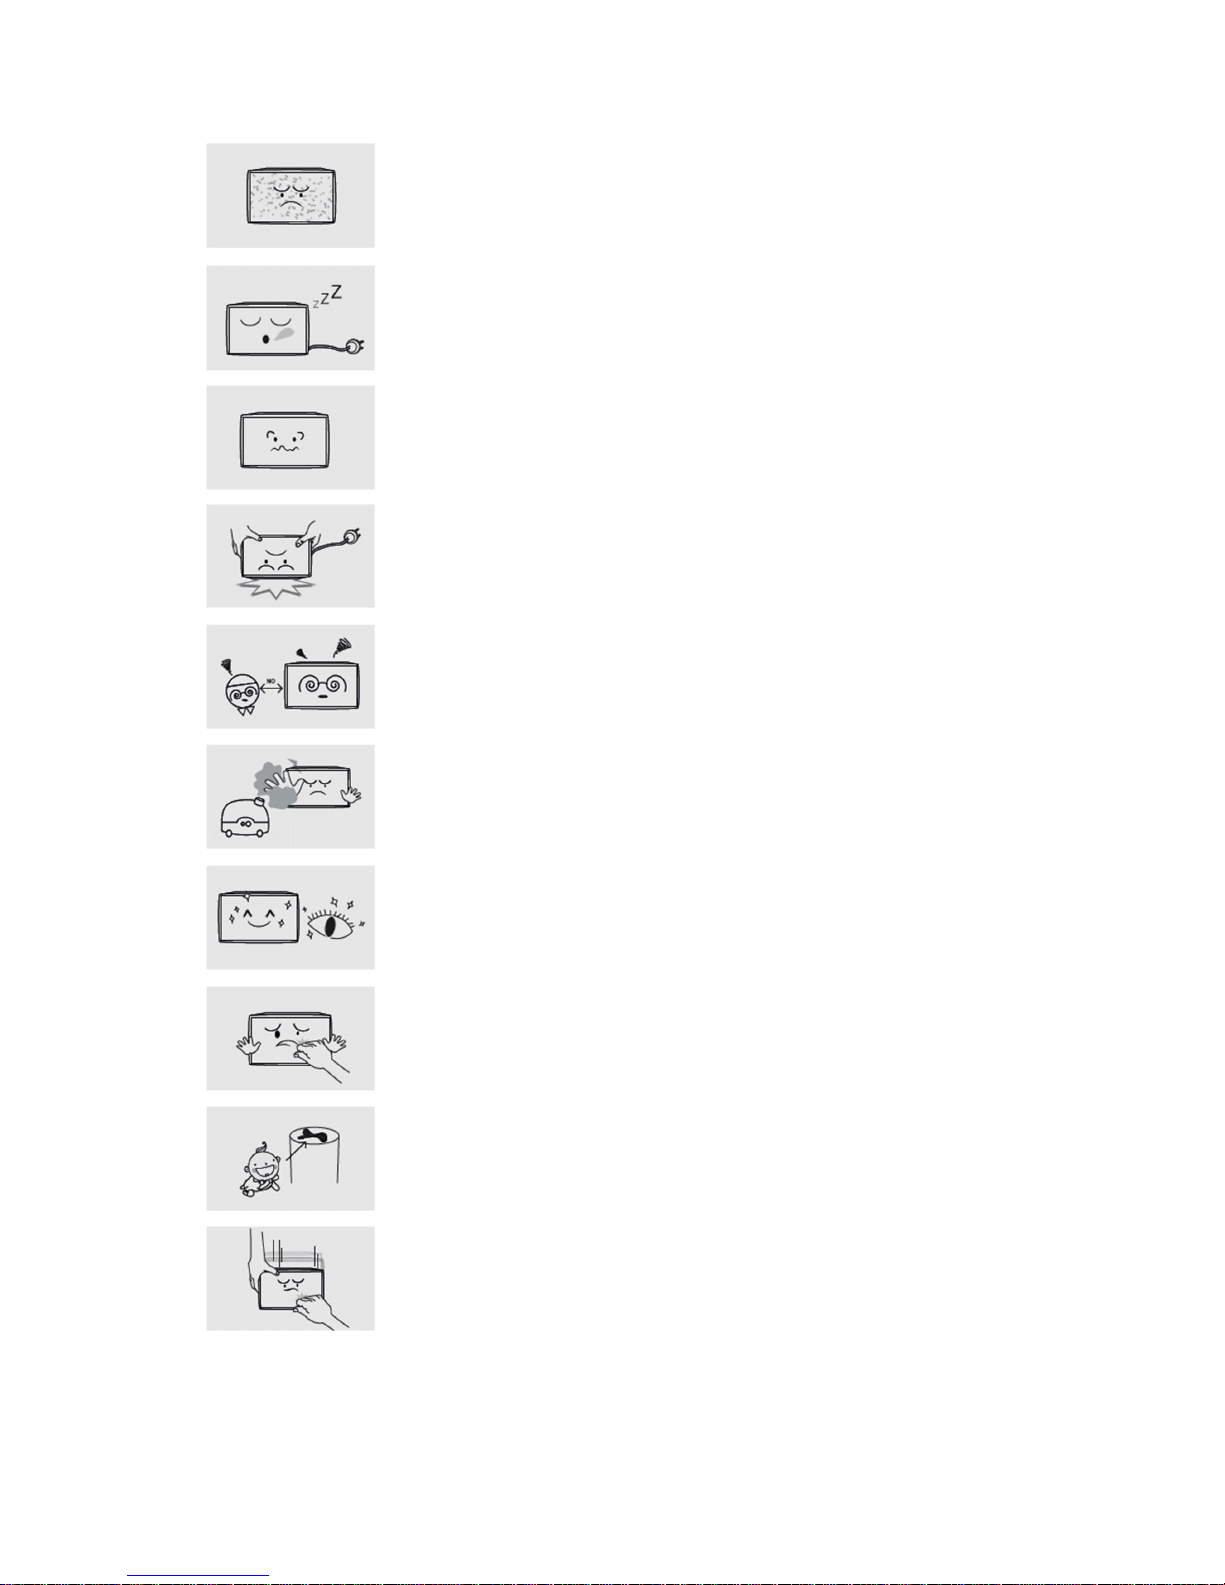
Turing on the product in the condition of the fixed screen or 4:3 screen for a long
time may also cause an afterimage or stain on the screen.
- When using the product for a long time, set a screen saver of the connected
computer or signaling equipment products or set it in sleep mode.
When you are not using the product for a long time, after unplugging the power
cable and take action to prevent the product from a dust.
- Dust accumulation, heat generation or sparks can occur and cause fire.
Set a resolution and frequency appropriately to the product.
- The state of the screen can result in poor or blurred vision.
For products with a stand, do not move the product by holding only the stand or
lift the product upside down.
- The stand might be split from the product and it may cause damage or injury.
Look at the screen from a distance of about longer 2.5 times than the screen
diagonal length.
- Looking at the screen for a long time can lead to vision loss.
Do not use anything that causes the water vapor near the product. (Moisturizers,
etc.).
- This may cause a malfunction or an electric shock or fire.
After 1 hours use, rest your eyes for more than 5 minutes.
If the product is turned on for a long time, do not touch the screen surface or
vent because it may be hot.
Keep the accessories of the products out of reach of children.
For products with a stand, be careful when adjusting the angle and height of the
stand of the product.
- Tilting severely the product may cause the product to fall off and injury.
- Stuck a finger or hand may cause an injury.
Page 10
10
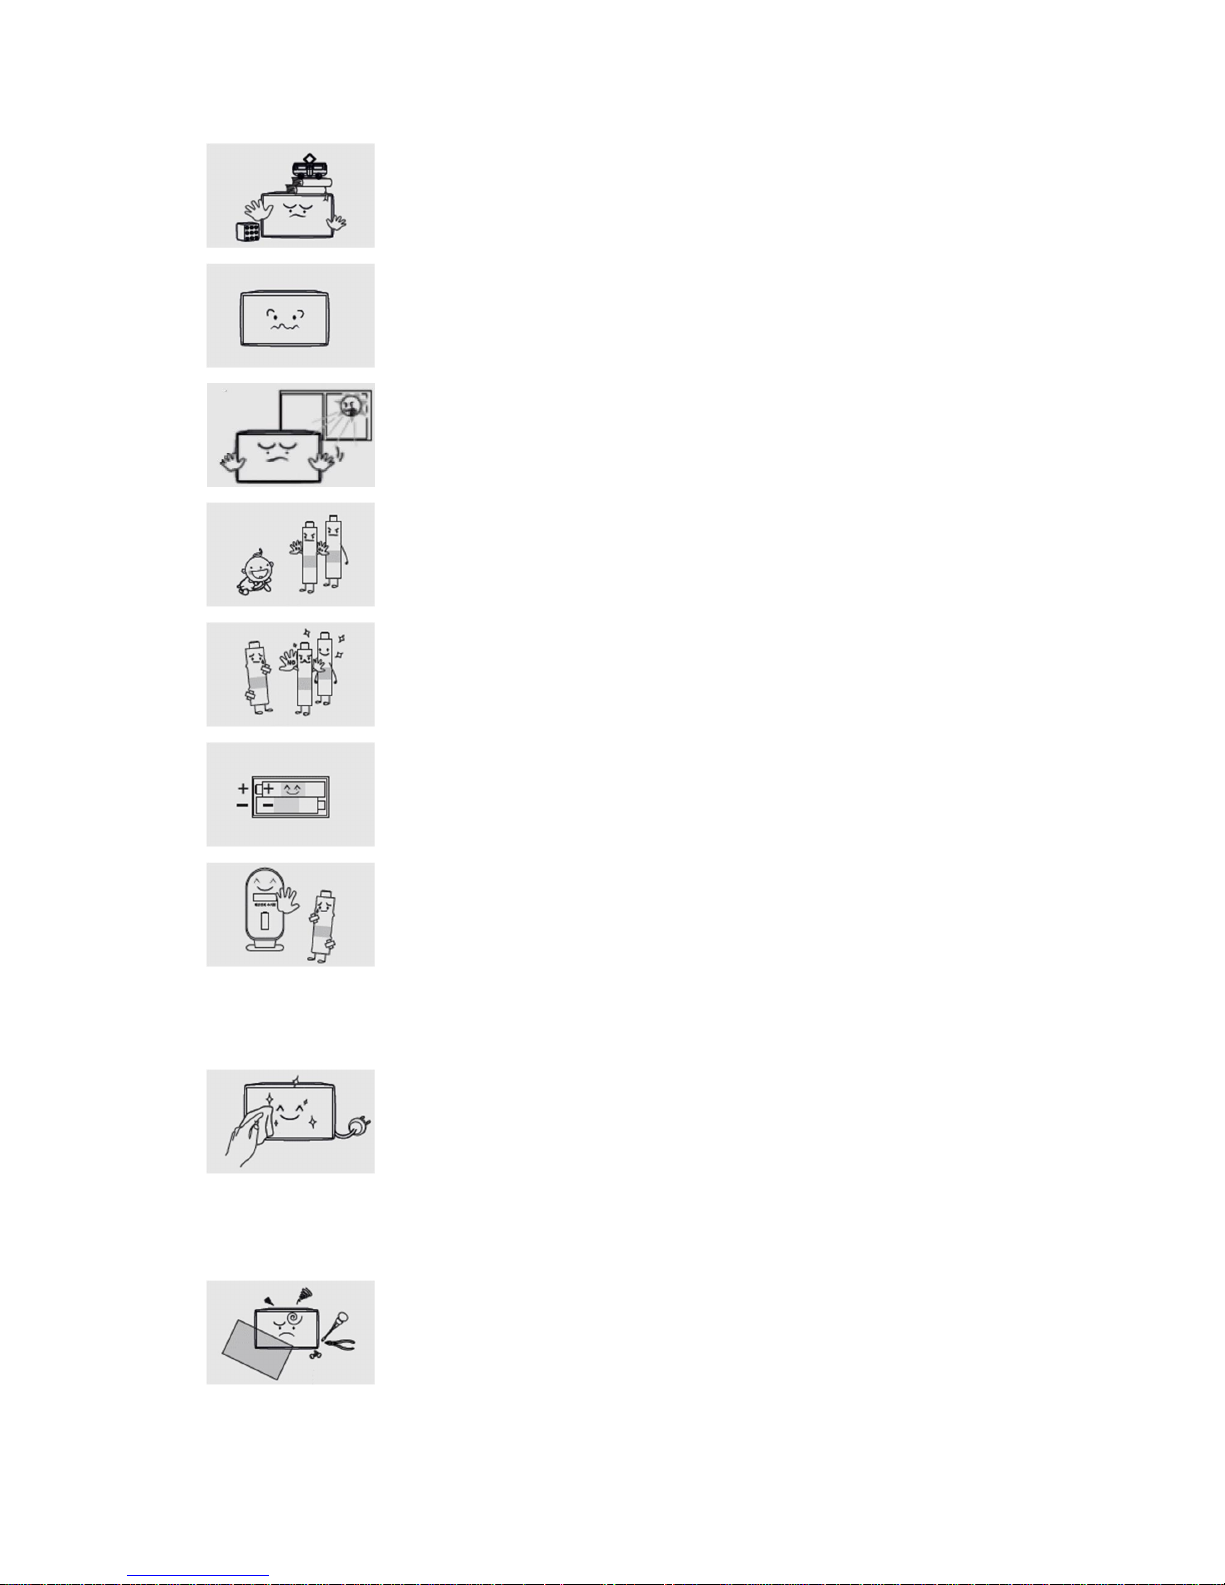
Do not place heavy objects on the product.
- This may result in a malfunction or an injury.
Please put obstacles away from the space between the remote controller and the
product.
- The product may not be operated by remote controller.
The remote control may not be good in this operation under the sun or strong
light.
Please change the location of the product in this case.
Make sure that a child does not eat the battery and keep it out of a child's reach.
- If a child eats the battery, please consult a doctor immediately.
When replacing the battery, insert it to the correct polarities (+,
-
).
- If it is different from the polarity of the battery, it may cause a fire or injury to
break or leak.
- This may also contaminate the surrounding.
Use a standard battery; do not mix old batteries with new one.
- If it is different from the polarity of the battery, it may cause a fire or injury to
break or leak.
- This may also contaminate the surrounding.
The depleted Battery and rechargeable batteries must be handled separately
from the general waste and it needs to be collected for recycling.
- If the end-of-life battery, please bring your nearest recycling center or battery
dealer
- This may cause an explosion or fire.
Cleaning
After disconnecting the power cable, wipe contaminated parts and each part of
the product screen lightly with a dry and soft cloth.
Do not clean the product directly with a wet cloth or wet spray water.
- There is a risk of fire or an electric shock.
When washing by various cleaning agents, brighteners, abrasives, waxes,
benzene, alcohol, solvent, surface active agent, the surface of the product may be
damaged.
If cleaning inside the product is required, please contact your dealer or service
center.
- This may result in fire or electric shock.
Page 11
11
2 Preparations
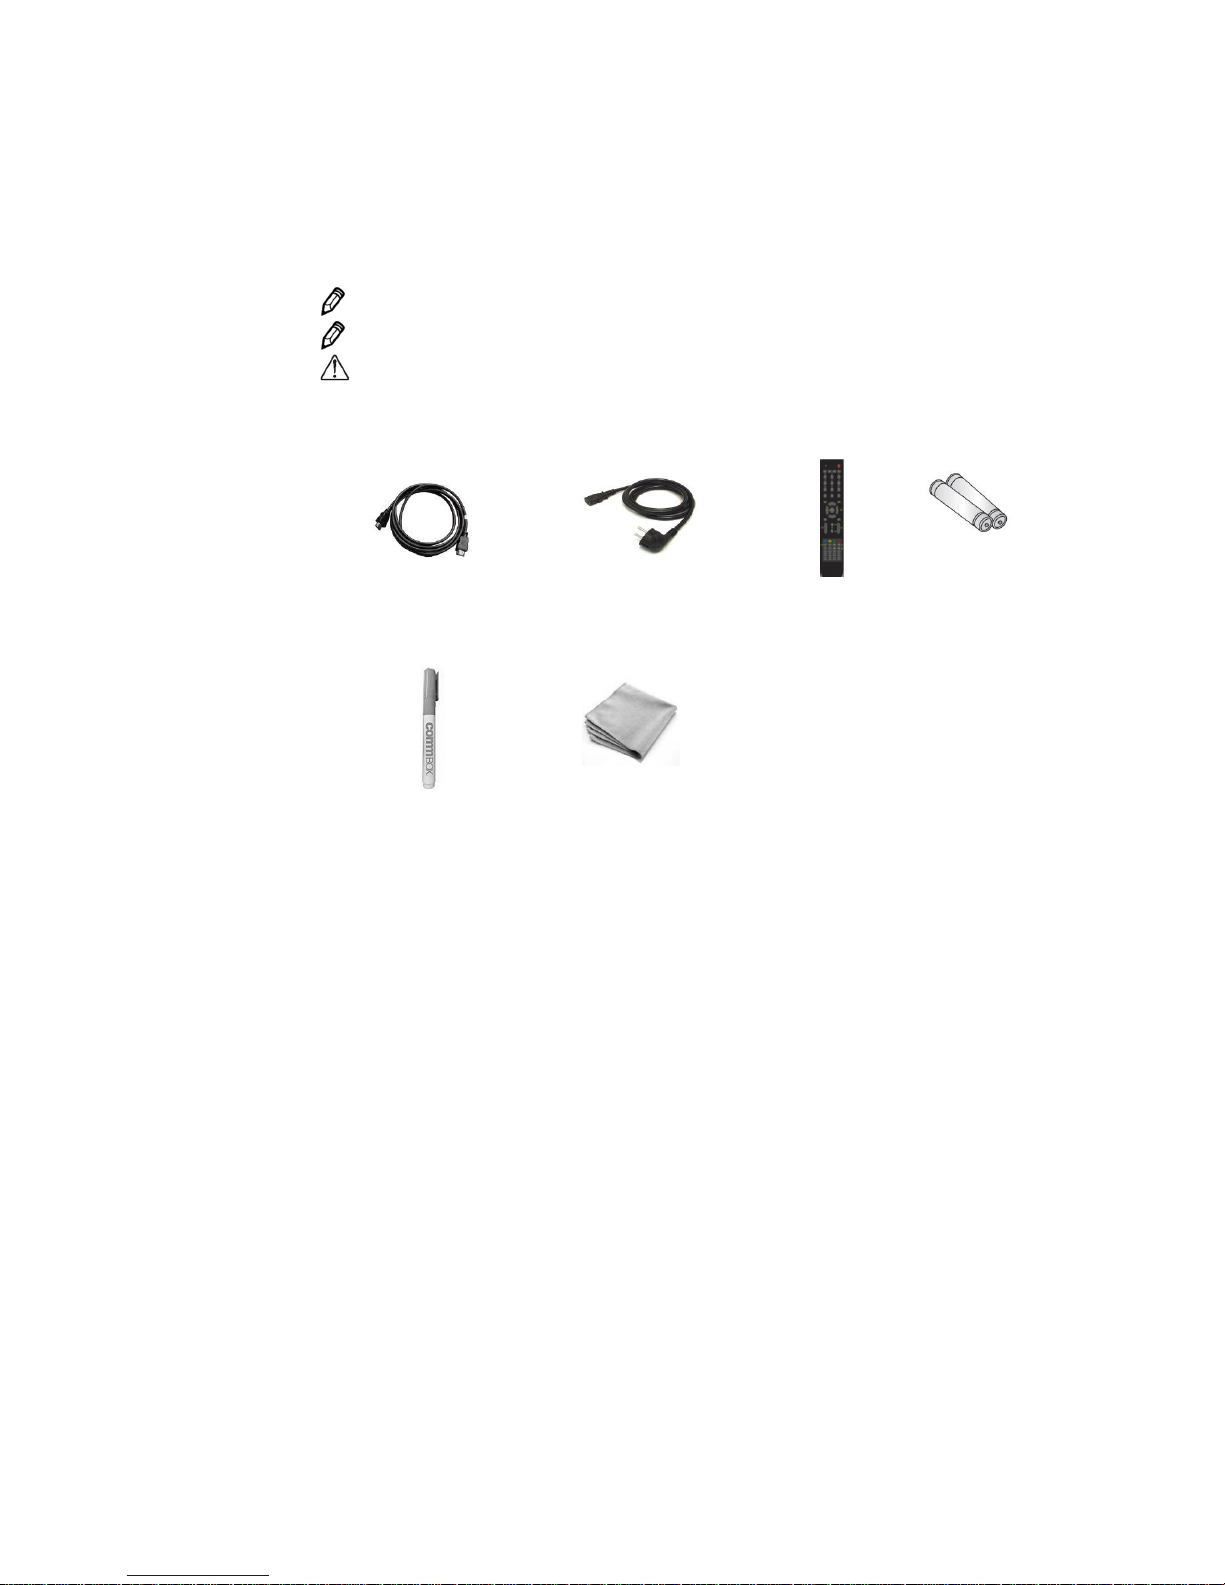
2.1 Parts List
If these items are missing, contact your dealer or service center.
The following images may differ from the image shown.
Other parts not packed in contents may cause performance degradation or
problem during use.
2.2 Control product
Power Cable
(Option)
HDMI Cable
Remote
Control
AAA 1.5V
Battery x 2
Cleaning cloth
IFPD touch pen
Page 12
12
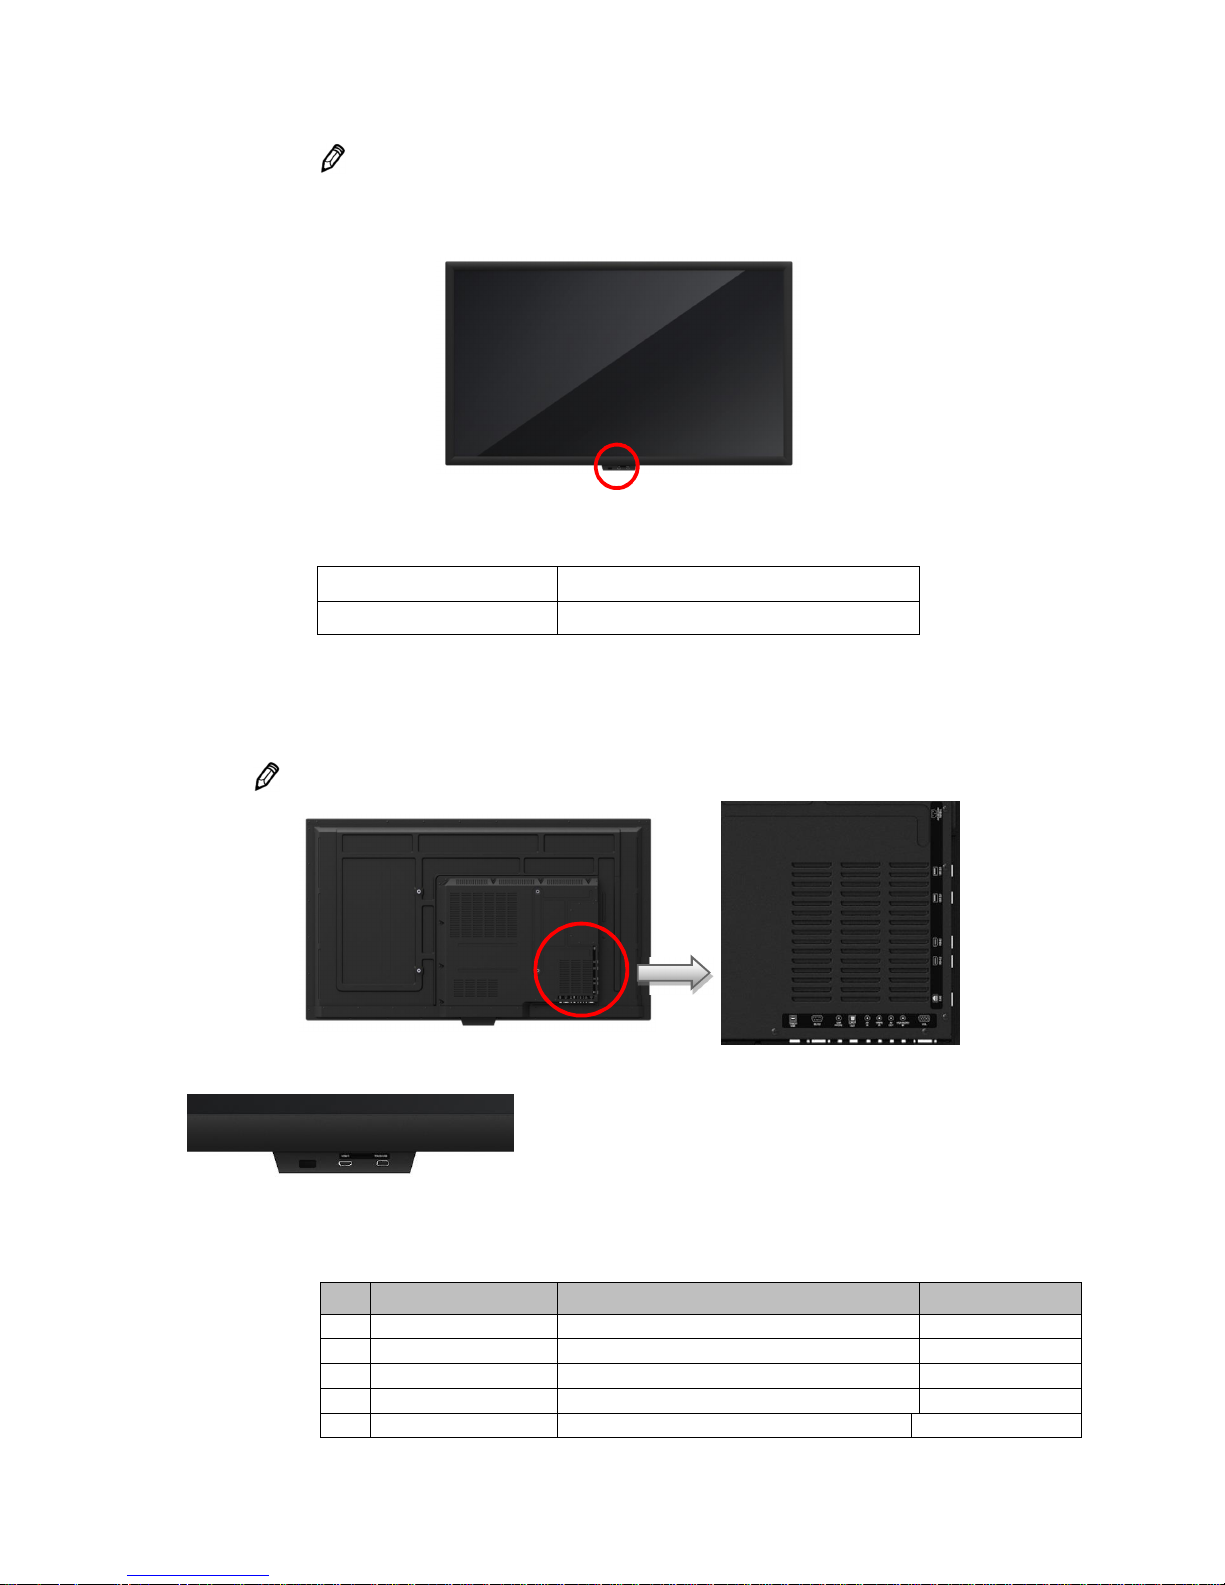
The following images may differ from the image shown.
•
You can control the product by using the control buttons on the rear side of the product.
Remote Sensor / Power indicator
2.3 Input/output connection
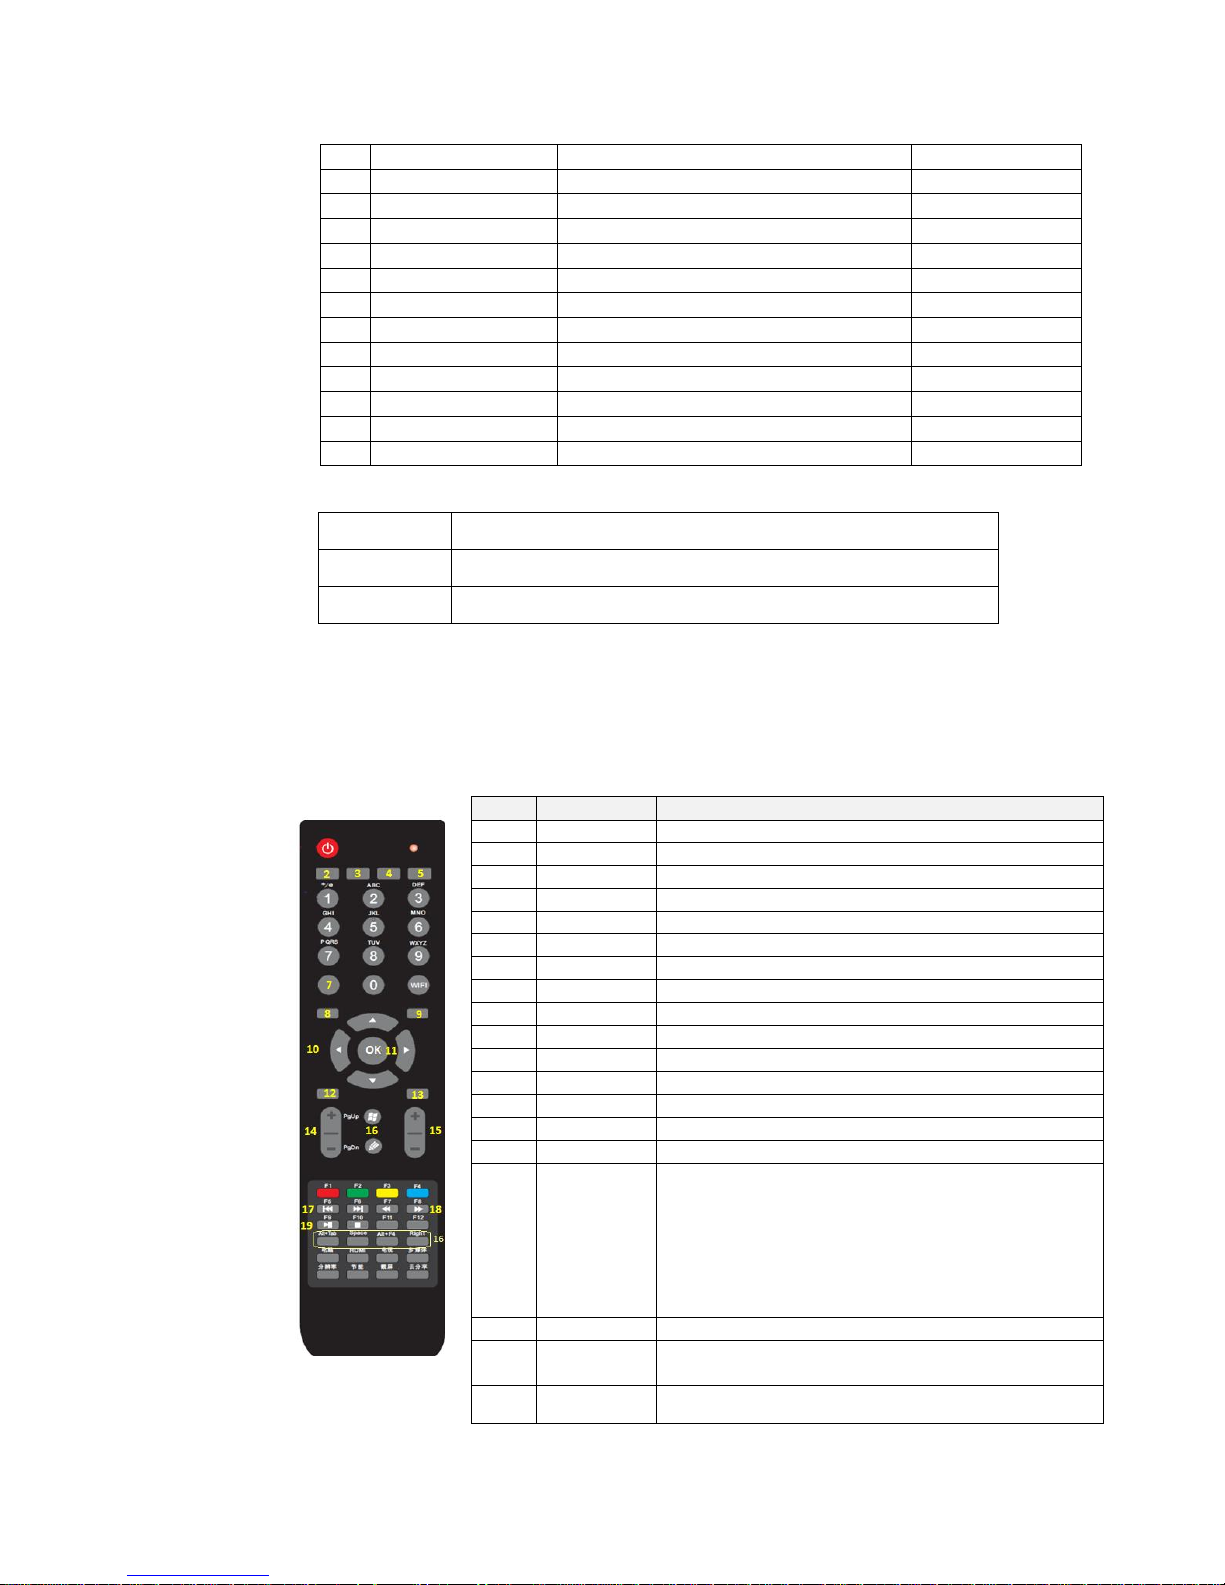
The items may differ from the image shown. (AD board:AD51UN).
16 17 18
(Front IO ports)
Connector name and description
No. Connector Description Input/output
①
AC 100-240V 50/60Hz
Power connector (AC 100-240V, 50/60Hz) Input
②
USB3.0 USB3.0 A Type Input/output
③ USB3.0 USB3.0 A Type Input/output
④
HDMI3 A type Input
⑤
HDMI2 A type Input
Power on Green
Stand-by Black
⑮⑭⑬⑫⑪⑩⑨⑧⑦
①
②
③
④
⑤
⑥
Page 13
13
⑥ RJ45 Standard Type Input/output
⑦ VGA DB15 Type Input
⑧ VGA AUDIO IN Standard Type Input
⑨ AV OUT Mini jack Output
⑩ YPBPR IN Mini jack Input
⑪ AV IN Mini jack Input
⑫ S/PDIF Optical fiber jack Output
⑬ EARPHONE Standard Type Output
⑭ RS232 UART DB9 Type Input/output
⑮ Touch USB(BACK) USB2.0B Type (Match with HDMI2,3) Input/output
⑯ IR receiver
Remote controller IR receiver
17 HDMI1(FRONT)
A type Input
18 Touch USB(FRONT) USB2.0B Type (Match with HDMI1) Input/output
- USB Multi media playback format
Type Notes
Video
MPEG-2/4, AVS,H.264, H.265,TS,Realmedia
Audio MPEG1/2layer I/II,AC-3,AAC-Lc,WMA
2.4 Remote Controller Button Description
Button Description
The following
images may differ from the actual items.
No. Menu Description
1 Power
power on or off
2 Picture
select the desired picture mode
3 Sound
select the desired sound mode
4 Image size
select different image size
5 Mute
mute or restore sound.
6 Numeric keys
entre pass word
7 OSD
display the setting on the screen
8 SOURCE
select input source
9 Android
enter the android mode
10
▲▼◀▶
adjust or select display menu, or select APP under Android system
11 OK
confirm your selection
12 EXIT
exit from the current menu
13 Menu
menu screen for various optional adjustable setting
14 PgUp/PgDn
Press this key to page down or up under android system
15 Volume
volume level up or down
16 Windows
Window/ F11/F12/Alt+Tab/Space/Alt+F4 /Right
(only available in OPS,HDMI and VGA SOURCE)
Window: Start menu
F11: Full-screen display under browser
F12: Developer tool
Alt+Tab: Switch windows under window system`
Space: Space , Alt+F4: Close current window
Right: Stimulate right button of mouse
17
▶▶l / l◀◀
Press this key to go to the next /previous chapter
18
◀◀ / ▶▶
/ ▶ll
Press this key to allow skipping ahead / back /pause
19 ▶■ / ■
Press this key to start to pause / stop the playback in media,
android
Page 14

14
Page 15

15
3 Installation Guide
3.1 Caution before installation
Caution: Installation must be performed by a qualified custom video installation specialist
under the conditional installation environment as below.
Ambient Lighting
•
When the sun or strong light shines on the front screen of the product, image contrast can be
seen as it is decreased conspicuously or the image is fading.
•
If direct sunlight or strong artificial light (halogen lamps, etc.) shines on the front screen of the
product (if the product has touch function, it may cause of malfunction of touch.), install the
product in the shady environments or in the opposite direction of the source of the sunshine or
the artificial light.
Ambient temperature
• Install the product in the well-ventilated place with maintaining the ambient temperature of
below 35° C (95° F).
3.2 Unpacking Process
Page 16
16
The following mages may differ from the actual items.
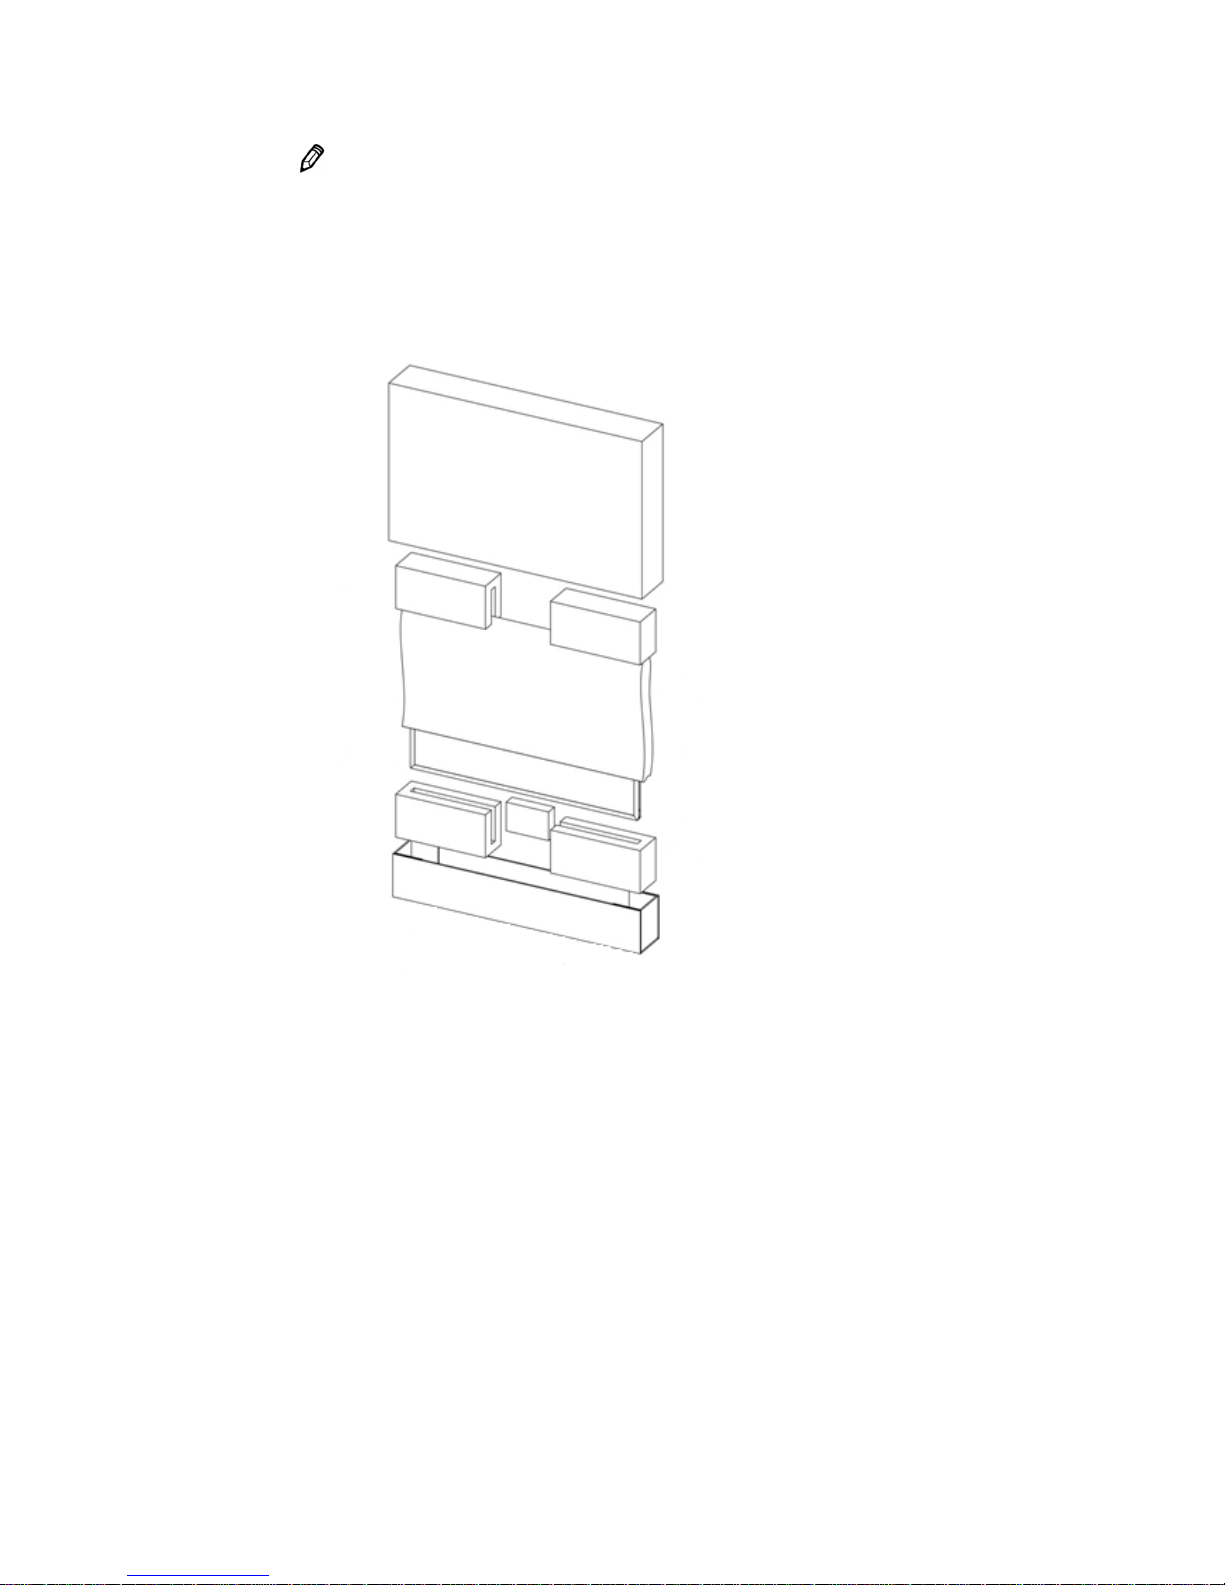
Before unpacking the box, refer to the diagram below.
1. Remove the outer packing box.
2. Remove the top foam.
3. Lower down or remove the wrapping.
4. Three or more people, remove the
packing from the product.
3.3 Handling Guide
Page 17
17
The following mages may differ from the actual items.
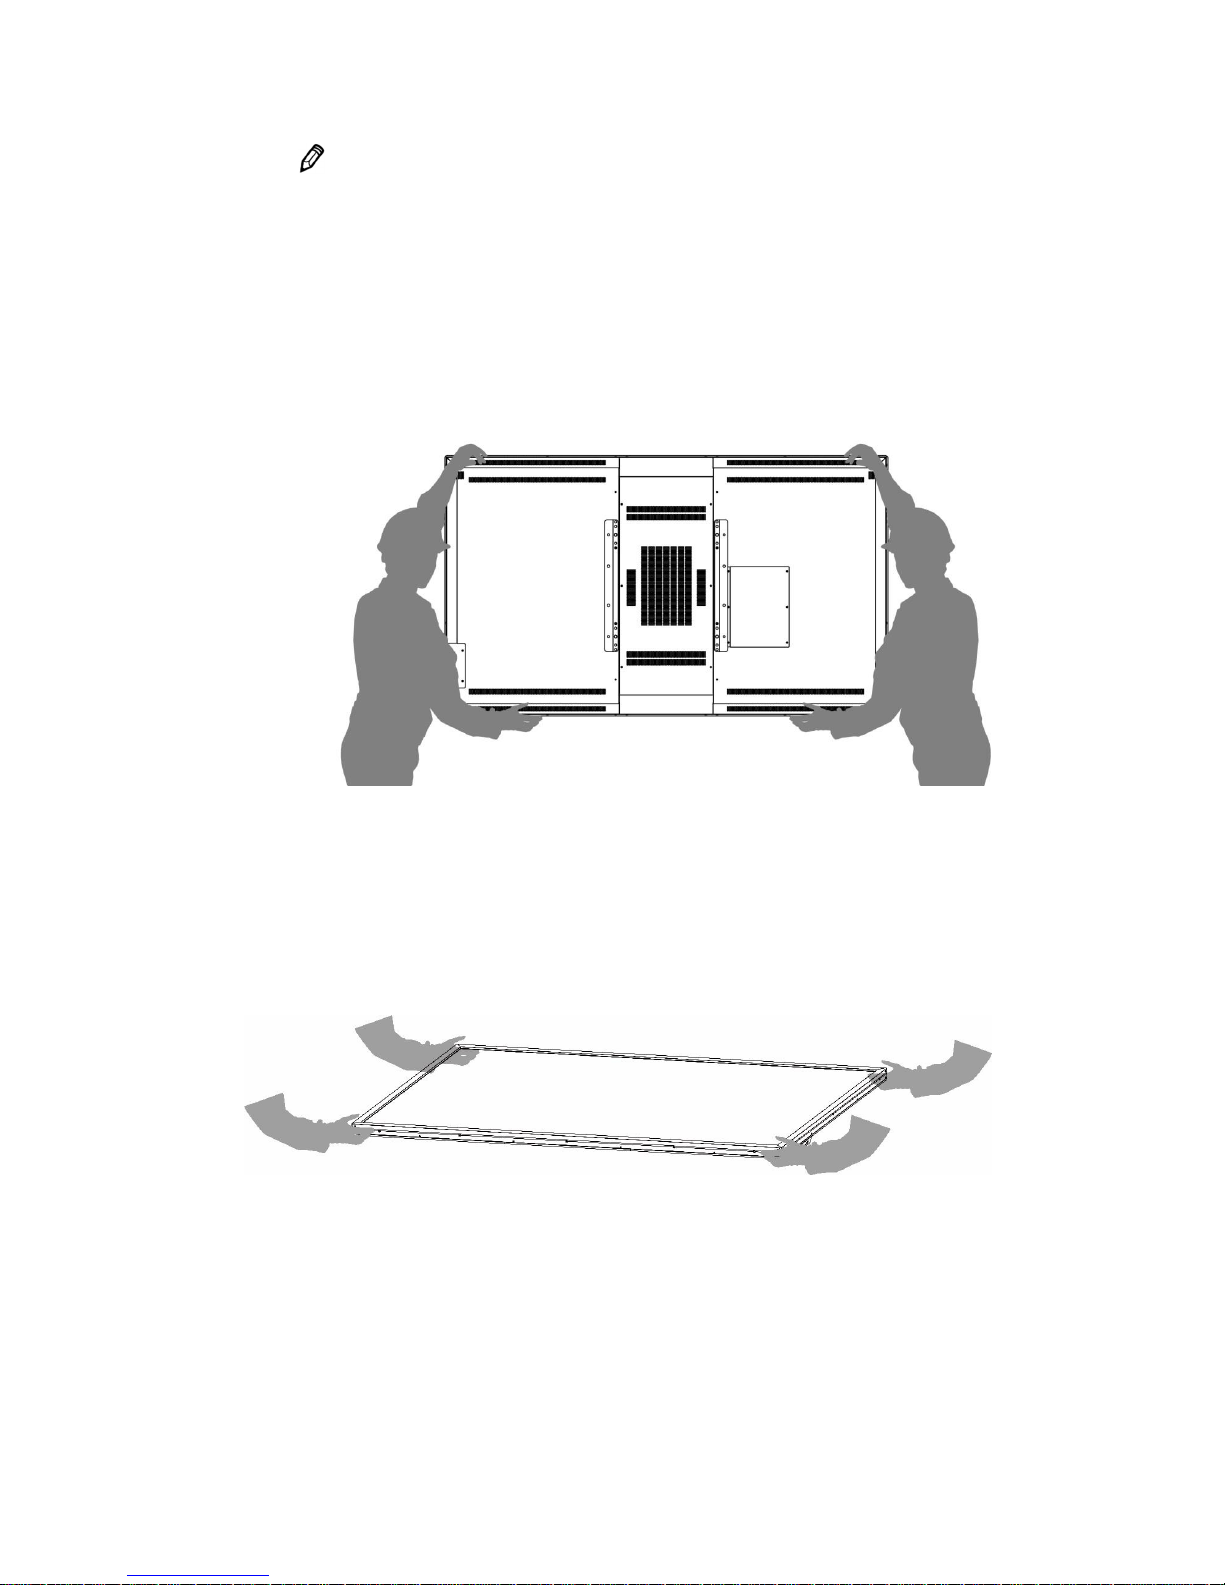
Holding a product
1. Right way
At least two persons are required to handle the product during transportation.
Two persons should hold the each left and right handle of the backside of the product with
one hand of the each person and with the other hand, grip the bottom portion of the rear side
of the product to move.
(The illustration below may differ from the actual items.)
2. Wrong way
Do not use or touch any part of the front screen of the product during transportation
.
Putting a product
1. Right Way
X
Page 18
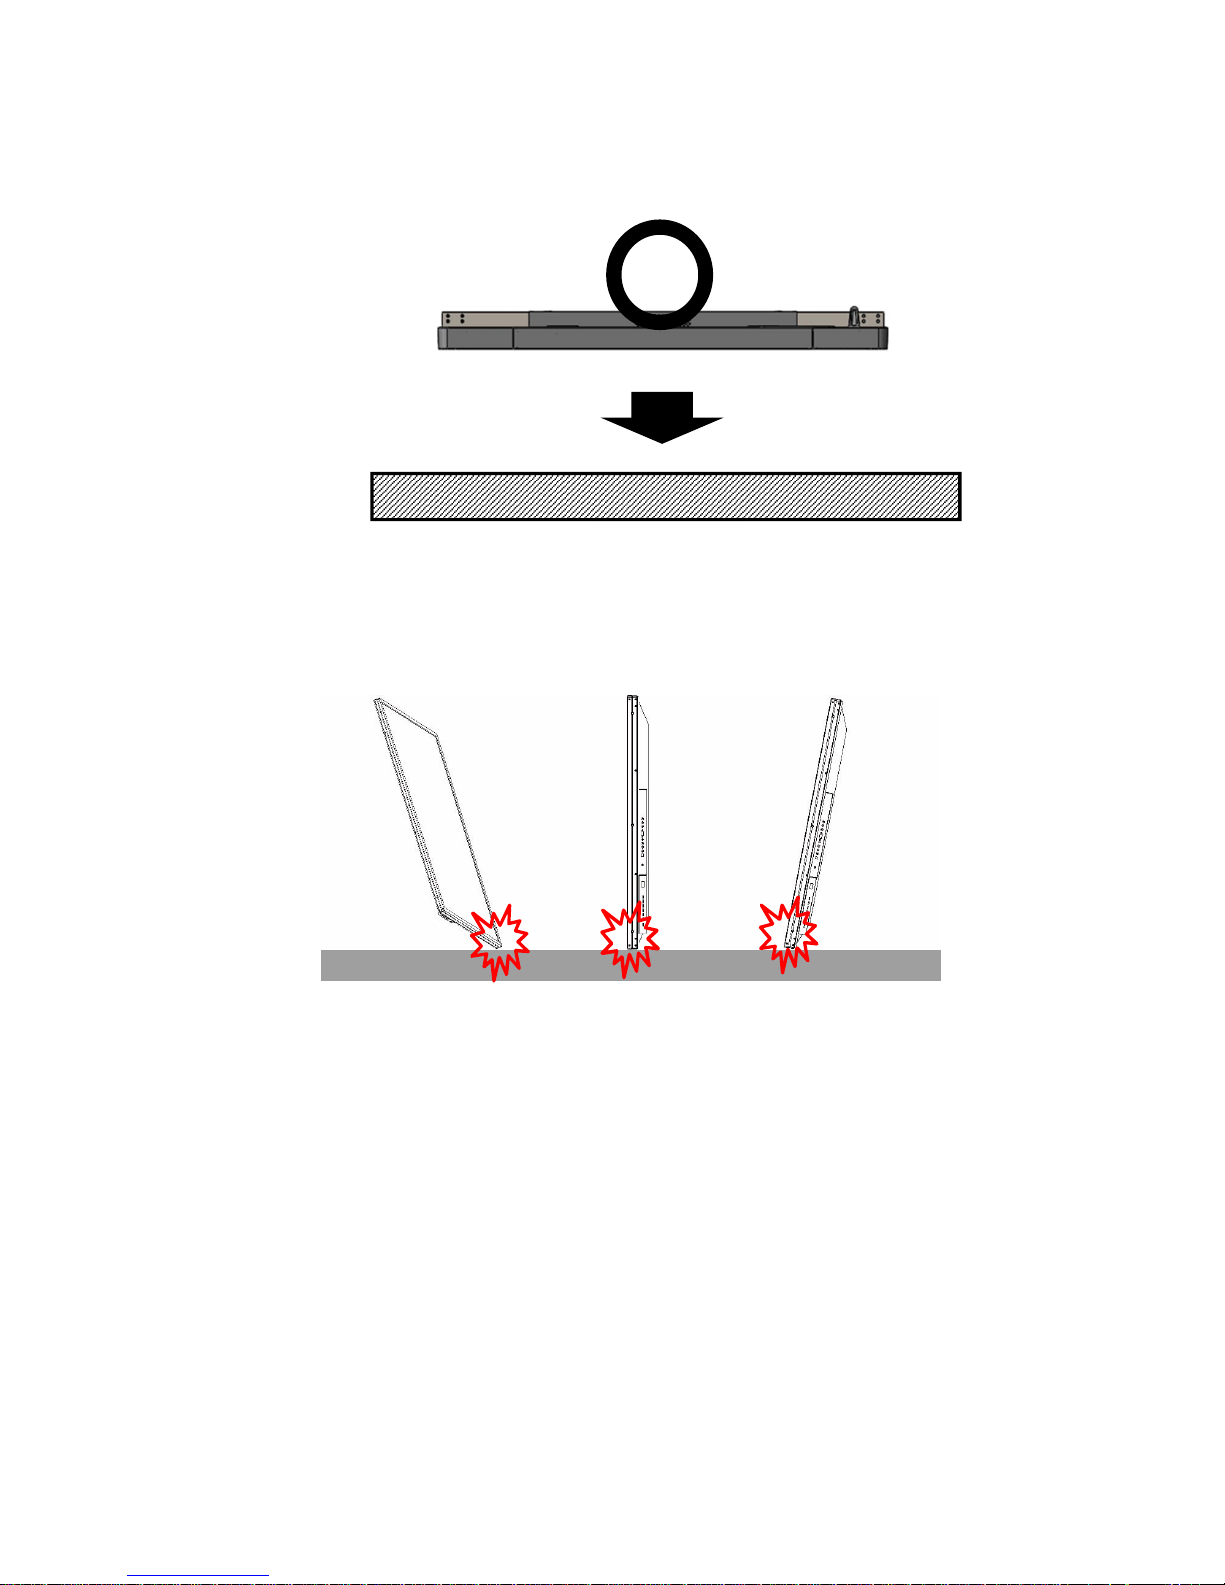
18
Before putting the product on the floor, prepare flat and soft cushions. Place the product
horizontally and slowly on the floor. If firstly laying the edge of the bezel of the product, the
screen panel of the product may be fragile or damaged.
2. Wrong way
Put down carefully not to damage the outside of the product. If the corner part of the product
is placed first, the bezel may be damaged easily.
3.4 Product Installation
When installing the product with wall mount, make the product installed by a well-trained
technician. Please refer to the User Guide of Wall Mounting.
Cushions
X
Page 19
19
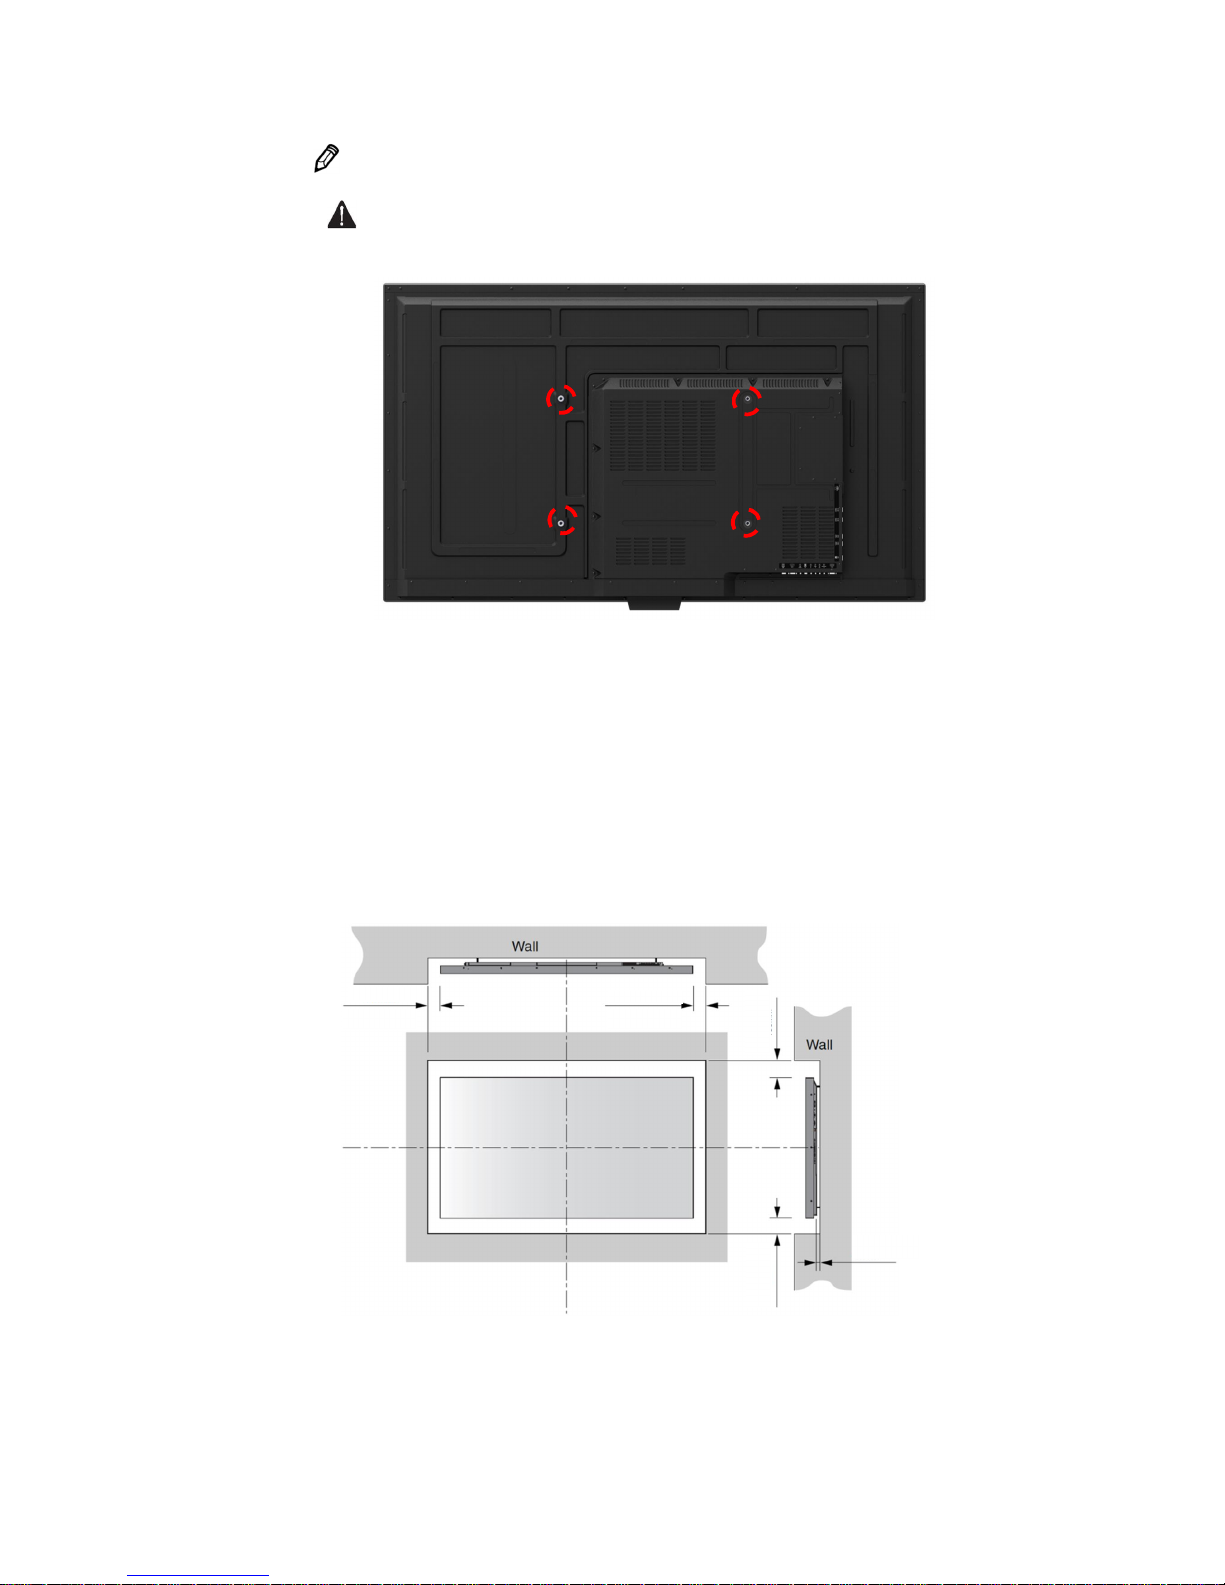
The product has VESA standard of 400X400 MM for wall mounting, and of M8
(Maximum length 35mm) of the screws by size.
Warning: We are not responsible for the product damage or personal injury caused by
user’s own installation.
3.5 Wall mounting Installation
Install the product only on the robust and vertical wall. When installing inside the wall or cabinet,
install the product with the space behind between the product and the wall as the illustration
below.
Ambient temperature is kept below 35 °C.
3.6 Remote Controller
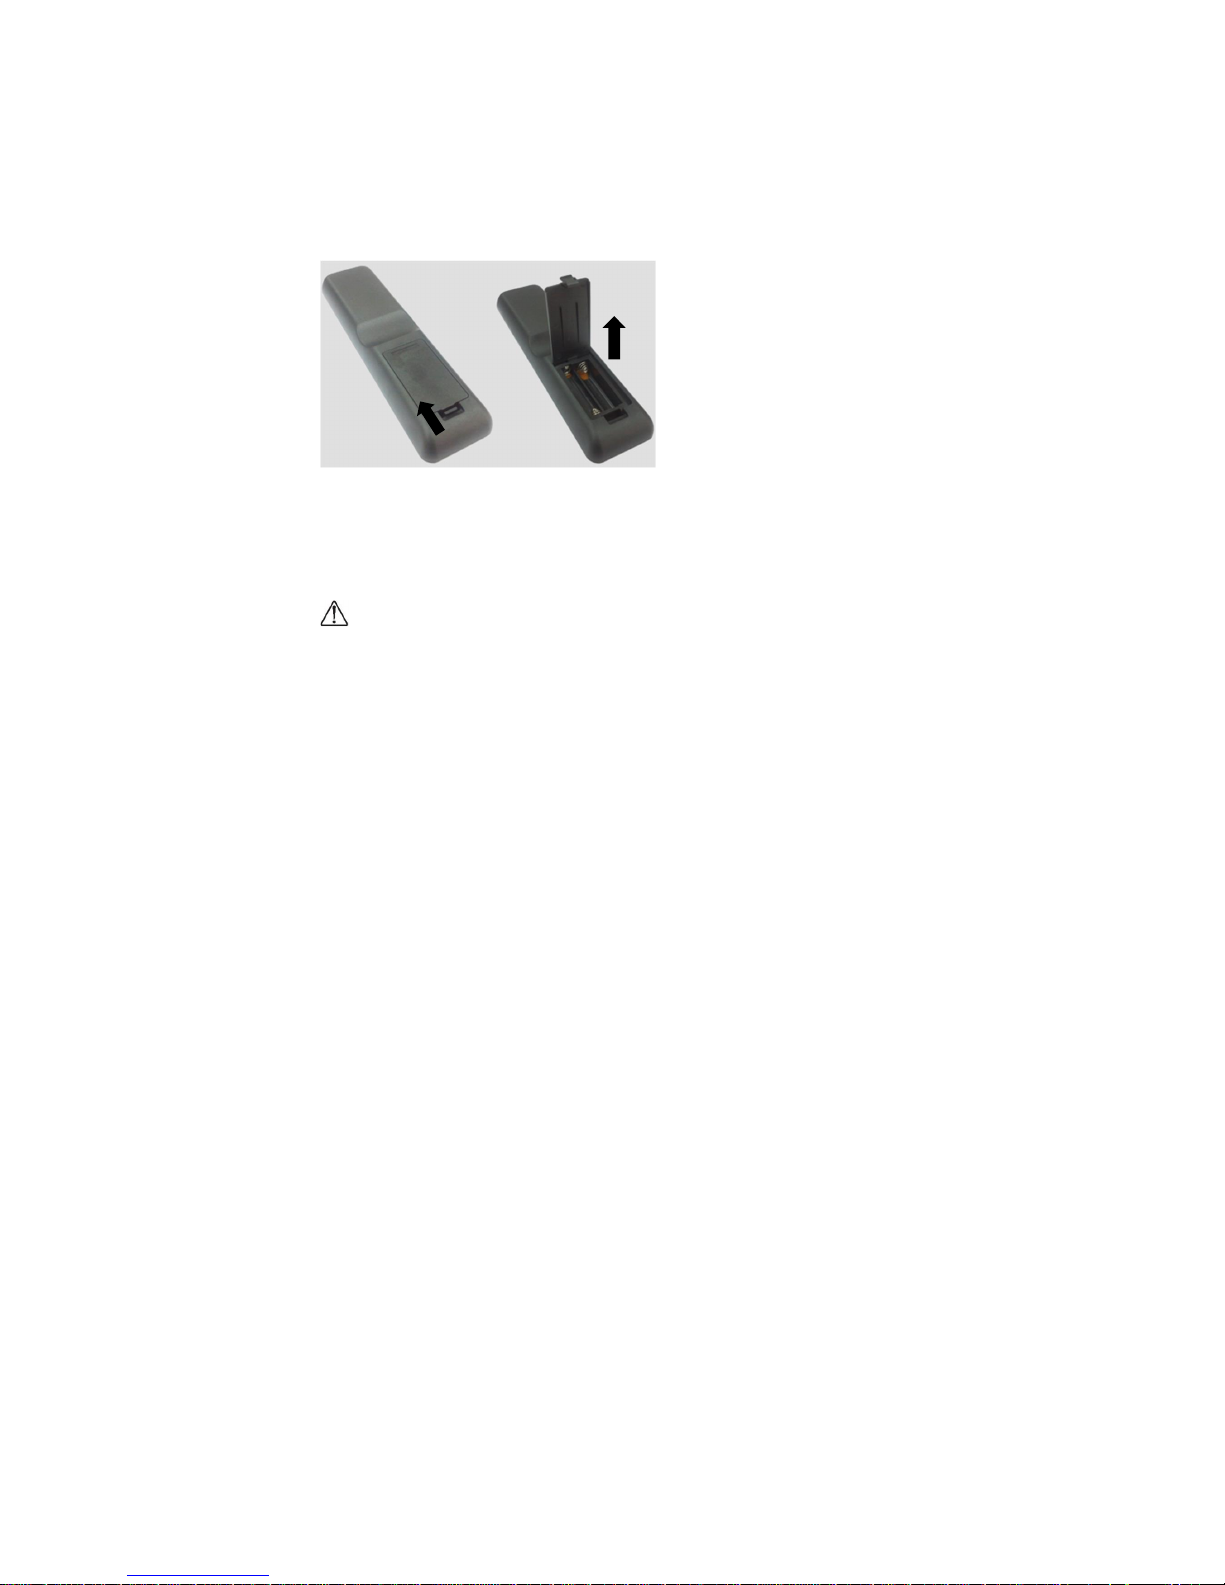
Inserting batteries in the remote controller
60mm
100mm
100mm
100mm
100mm
Page 20
20
•
Press the tab on the battery case and open it.
• Insert the battery (1.5V AAA) into the battery case.
• Insert the battery case until clack sounds.
Notice on battery
•
When loading the battery, check if the polarity of the batteries is correct.
• If not using the remote controller for long time, remove the batteries to prevent damage
caused by battery fluid leak.
• Don’t expose the battery to direct sunlight or excessive heat such as a fire.
Notes on the remote controller
•
If anything interrupts in front of IR receiver or between IR receiver and remote controller, the
remote controller may not work.
• If the receiving distance of the remote controller becomes narrow or does not work,
replace the battery with new one.
• In case of the product is exposed to direct sunlight or fluorescent light, it may not operate.
3.7 Setup
Turning on the power
1. Connect the power cable of the product into outlet with AC 100-240V 50 / 60Hz.
2. Turn on the main AC power switch.
3. If the power indicator is green, the screen turns on automatically.
4. If the power light is red not green, press the power key on the remote controller or operate
to turn on the power.
Changing language of the menu
•
The language of the menu is basically English as the default set.
• Users can select a language
•
To change the menu language,
1. Press the Menu button to go to the menu.
2. Select the OSD from the main menu.
3. Select the language of the OSD setup menu.
4. Select the language you want to select, and then exit the menu.
Page 21
21
4 Remote Control for FHD
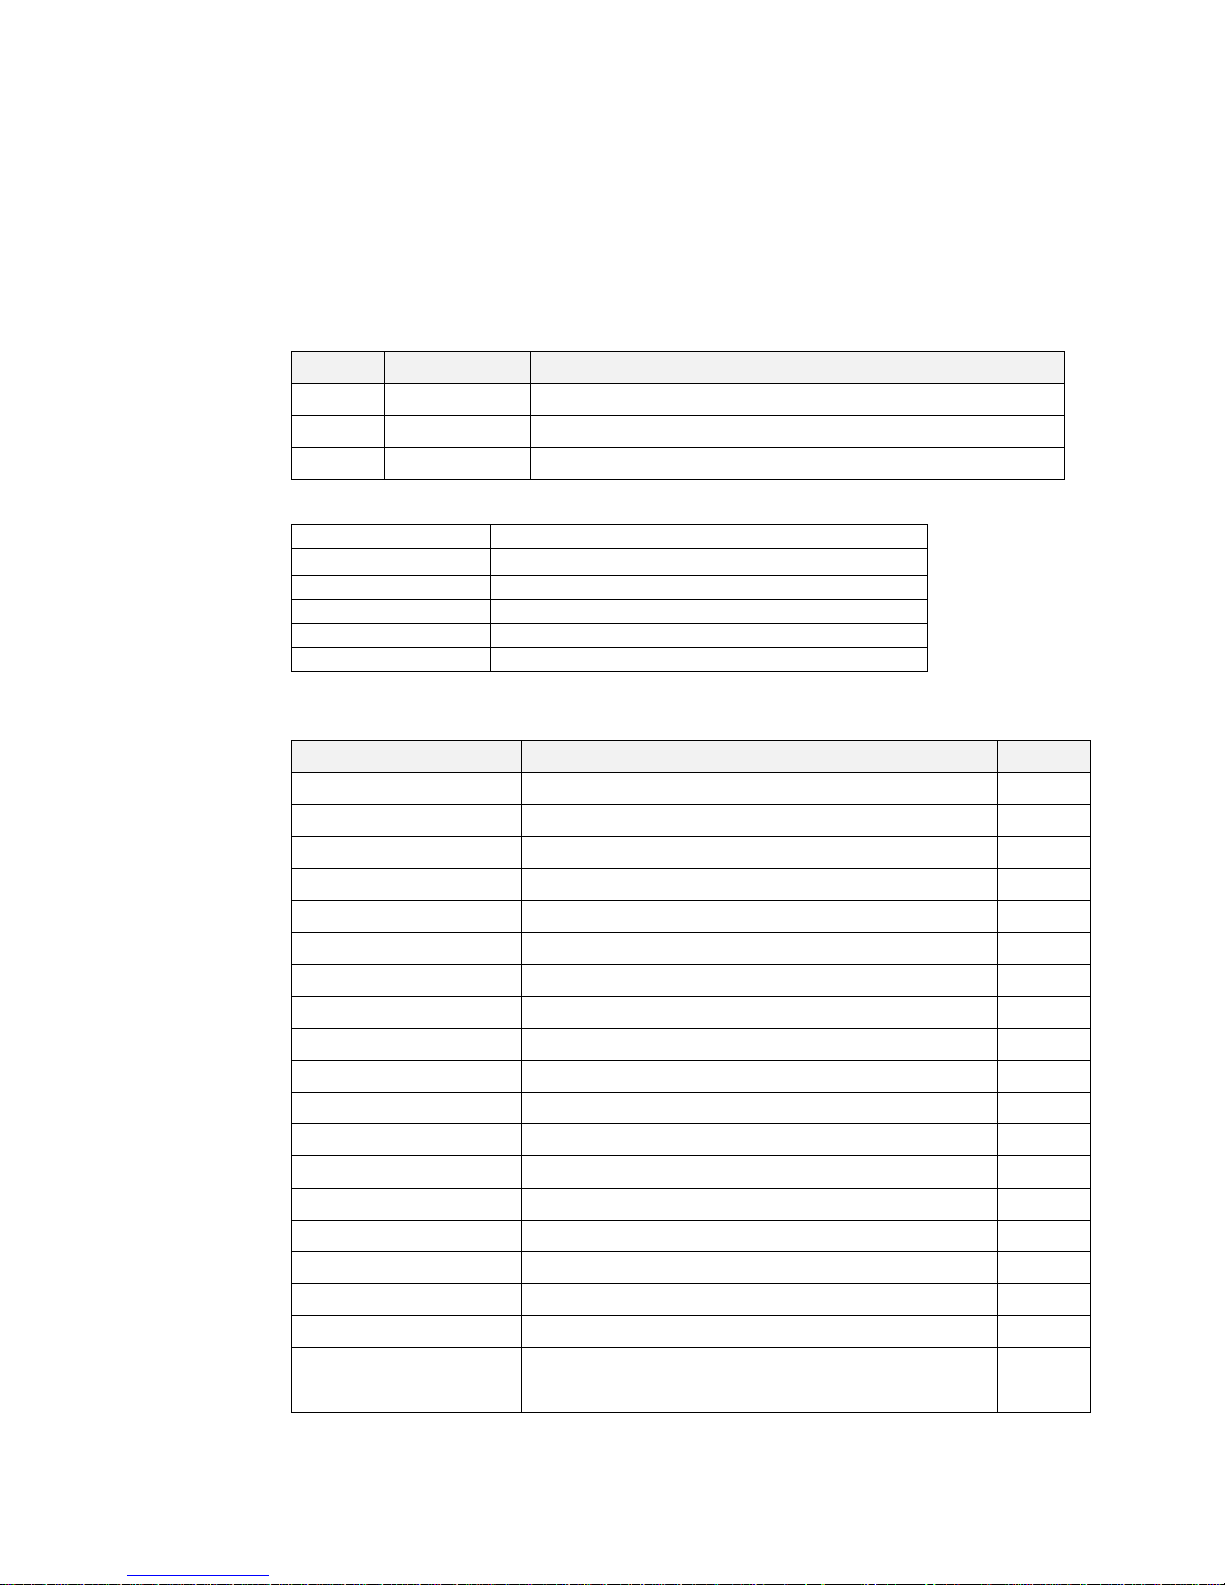
4.1 RS-232C connection
Connector on the display: DB9 Male, configured as DTE.
Pin Function Comments
2 RxD Data input to the display. Connects to TxD on the Controller
3 TxD Data output from the display. Connects to RxD on the Controller.
5 GND Ground. Connects to GND on the Controller
Communication Parameter
Baud Rate 38400
Data Length 8 bit
Parity Bit None
Stop Bit 1 bit
Communication code Hex code
Cable Use a crossed cable
Serial Command List
Function Required Commands(Hex) Reply
Power 55 00 8E 00 E3
SOURCE 55 00 80 00 D5
MENU 55 00 14 00 69
UP 55 00 00 01 56
DOWN 55 00 00 02 57
OK 55 00 00 00 55
LEFT 55 00 00 03 58
RIGHT 55 00 00 04 59
EXIT 55 00 16 00 6B
MUTE 55 00 1A 00 6F
Source change to HDMI1 55 00 80 08 DD
Source change to HDMI2 55 00 80 09 DE
Source change to HDMI3 55 00 80 11 E6
Source change to OPS 55 00 80 0B E0
Source change to VGA 55 00 80 05 DA
Source change to YPBPR 55 00 80 04 D9
Source change to USB 55 00 80 0F E4
Volume Up 55 00 0C 00 61
Volume Down 55 00 0E 00 63
Page 22
22
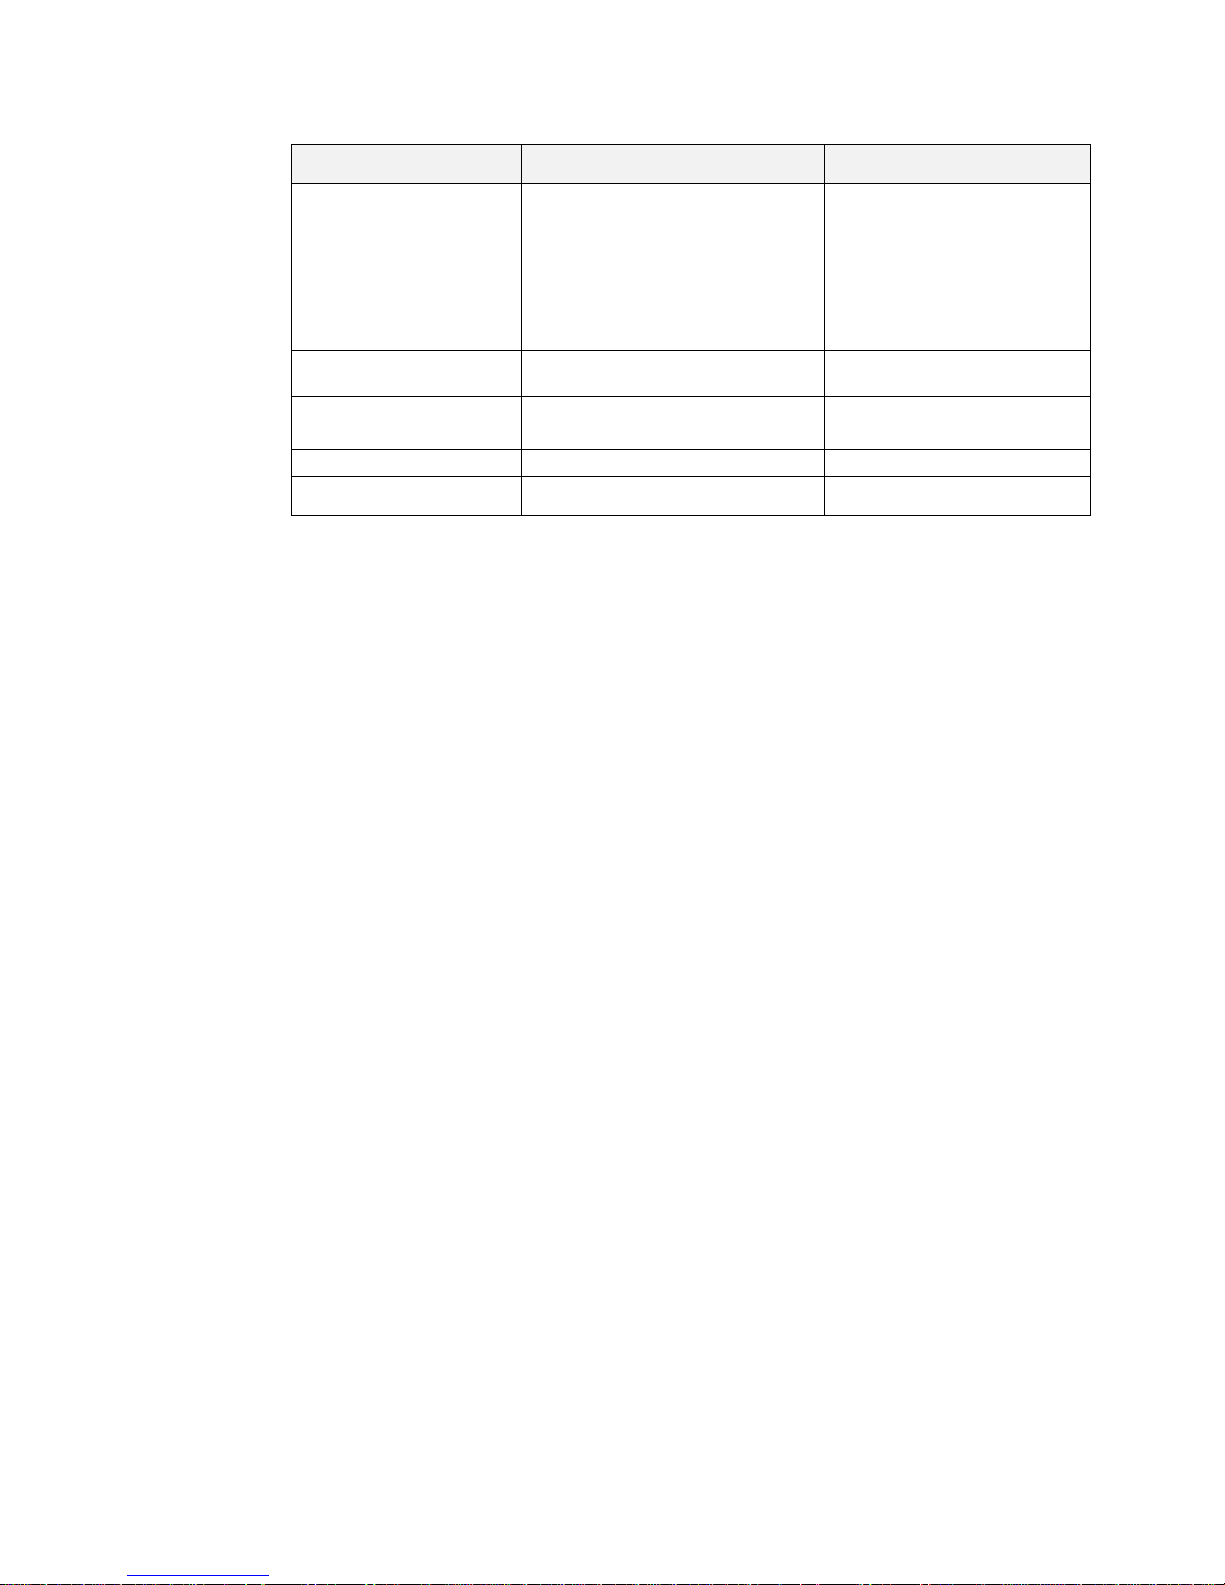
Function Required Commands(Hex) Feedback Date byte 4(Hex)
SOURCE 55 00 81 00 D6
01: DTV 02: ATV
03: SCART 04: YPBPR
05~07: VGA 1~3 08: HDMI 1
09: HDMI 2 0A: front HDMI
0B: OPS 0C: AV 1
0D: AV 2 0E: SV
0F: USB 10:YPBPR2
11~14: HDMI 3~6 15: DP
VOLUME 55 00 65 00 BA It’s the volume value (hex)
STATUS QUERY 55 00 45 00 9A
01: Power on
02: Standby
Picture mode 55 00 61 00 B6 It’s the Picture mode value (hex)
Aspect 55 00 63 00 B8 It’s Aspect value (hex)
Page 23
23
5 Connect the external device
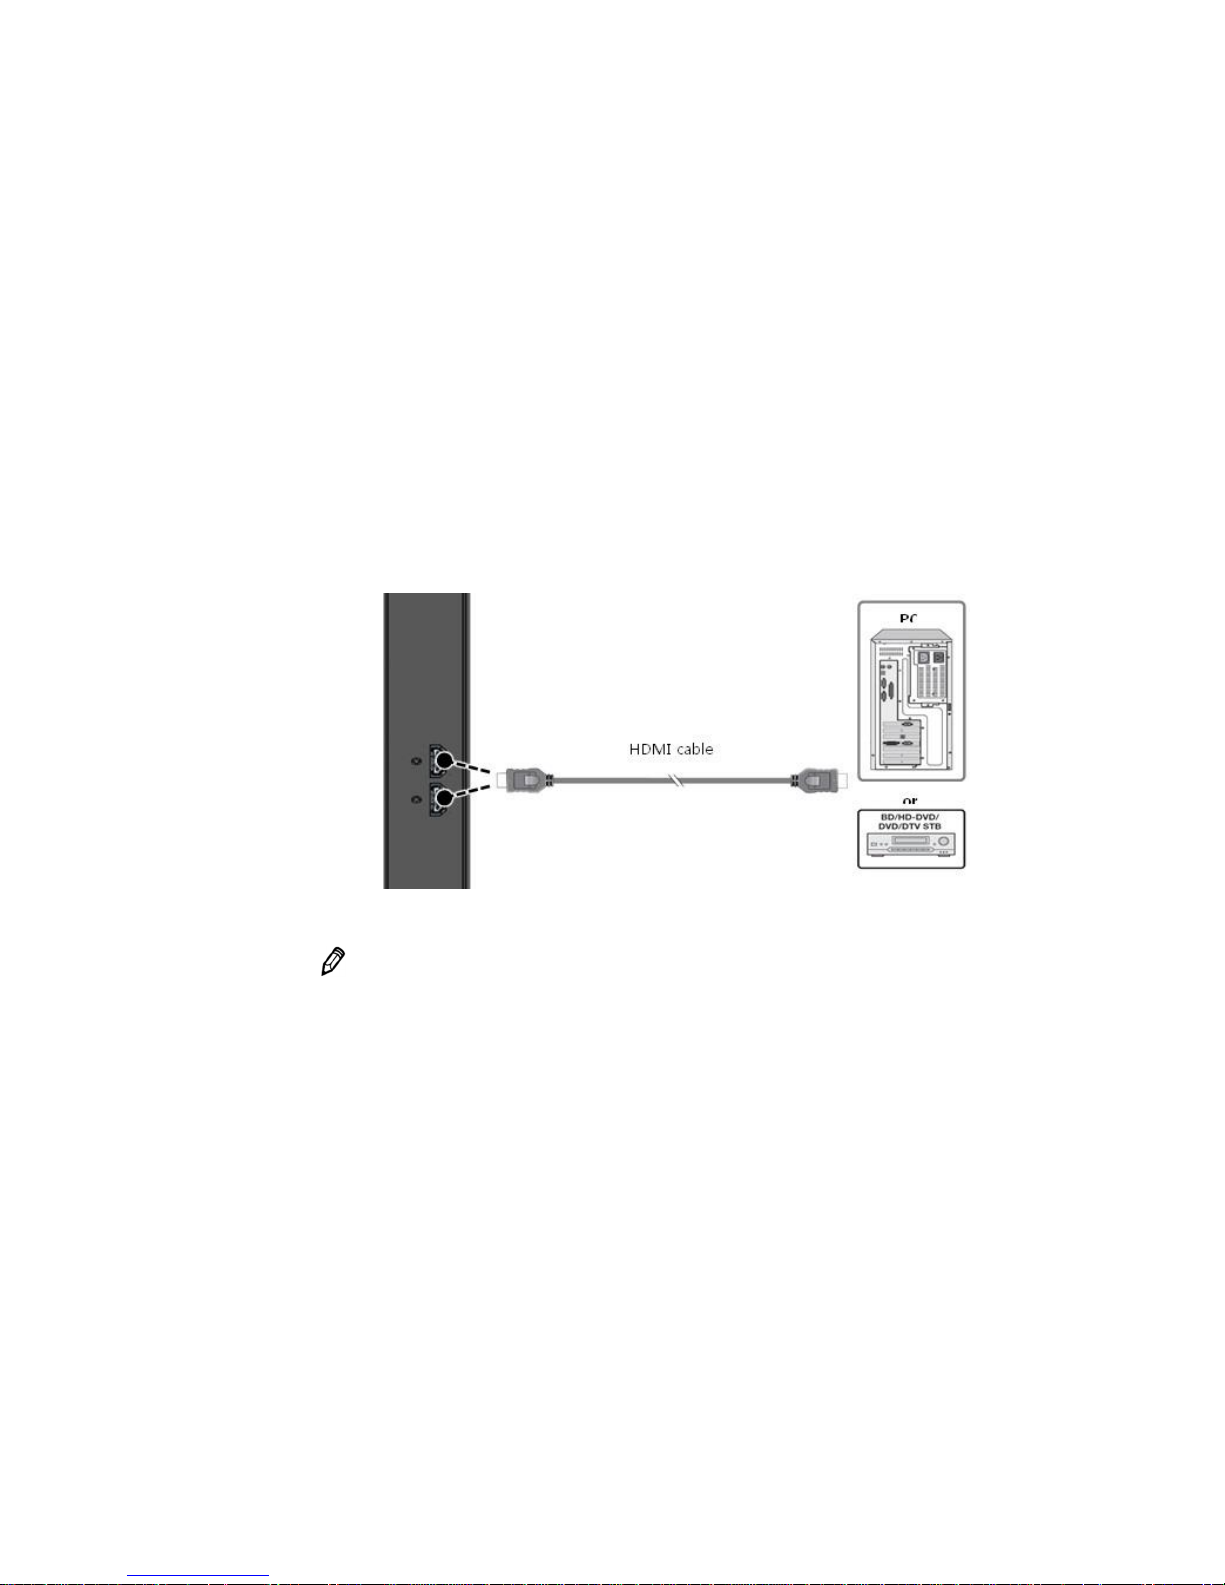
5.1 HDMI Connection
•
HDMI input is recommended because it receives a digital signal input from an external device
with HDMI output to ensure high quality of digital signal.
* Use the cable provided with the product. Otherwise
, no image may be shown on the screen or
normal display may not be shown.
•
If connecting the product to the PC, it supports the VESA Display Data Channel (DDC) standard.
This standard supports "plug and play" function which helps the PC recognize the product
automatically to output the optimal resolution.
In order to operate the 'plug and play' after connecting the product, connect the video cable of
the PC to the product before turning on your PC, and turn on the power of this product first and
then turn on the power of the PC.
• When the incompatible resolution of the input signal is input to the product no image is shown
on the screen or normal display is not shown. As for the supported resolutions, refer to page 31.
If you receive a 3840 x 2160 60Hz input HDMI cable, please use the 4K,2K certified products
.
The screen may look strange.
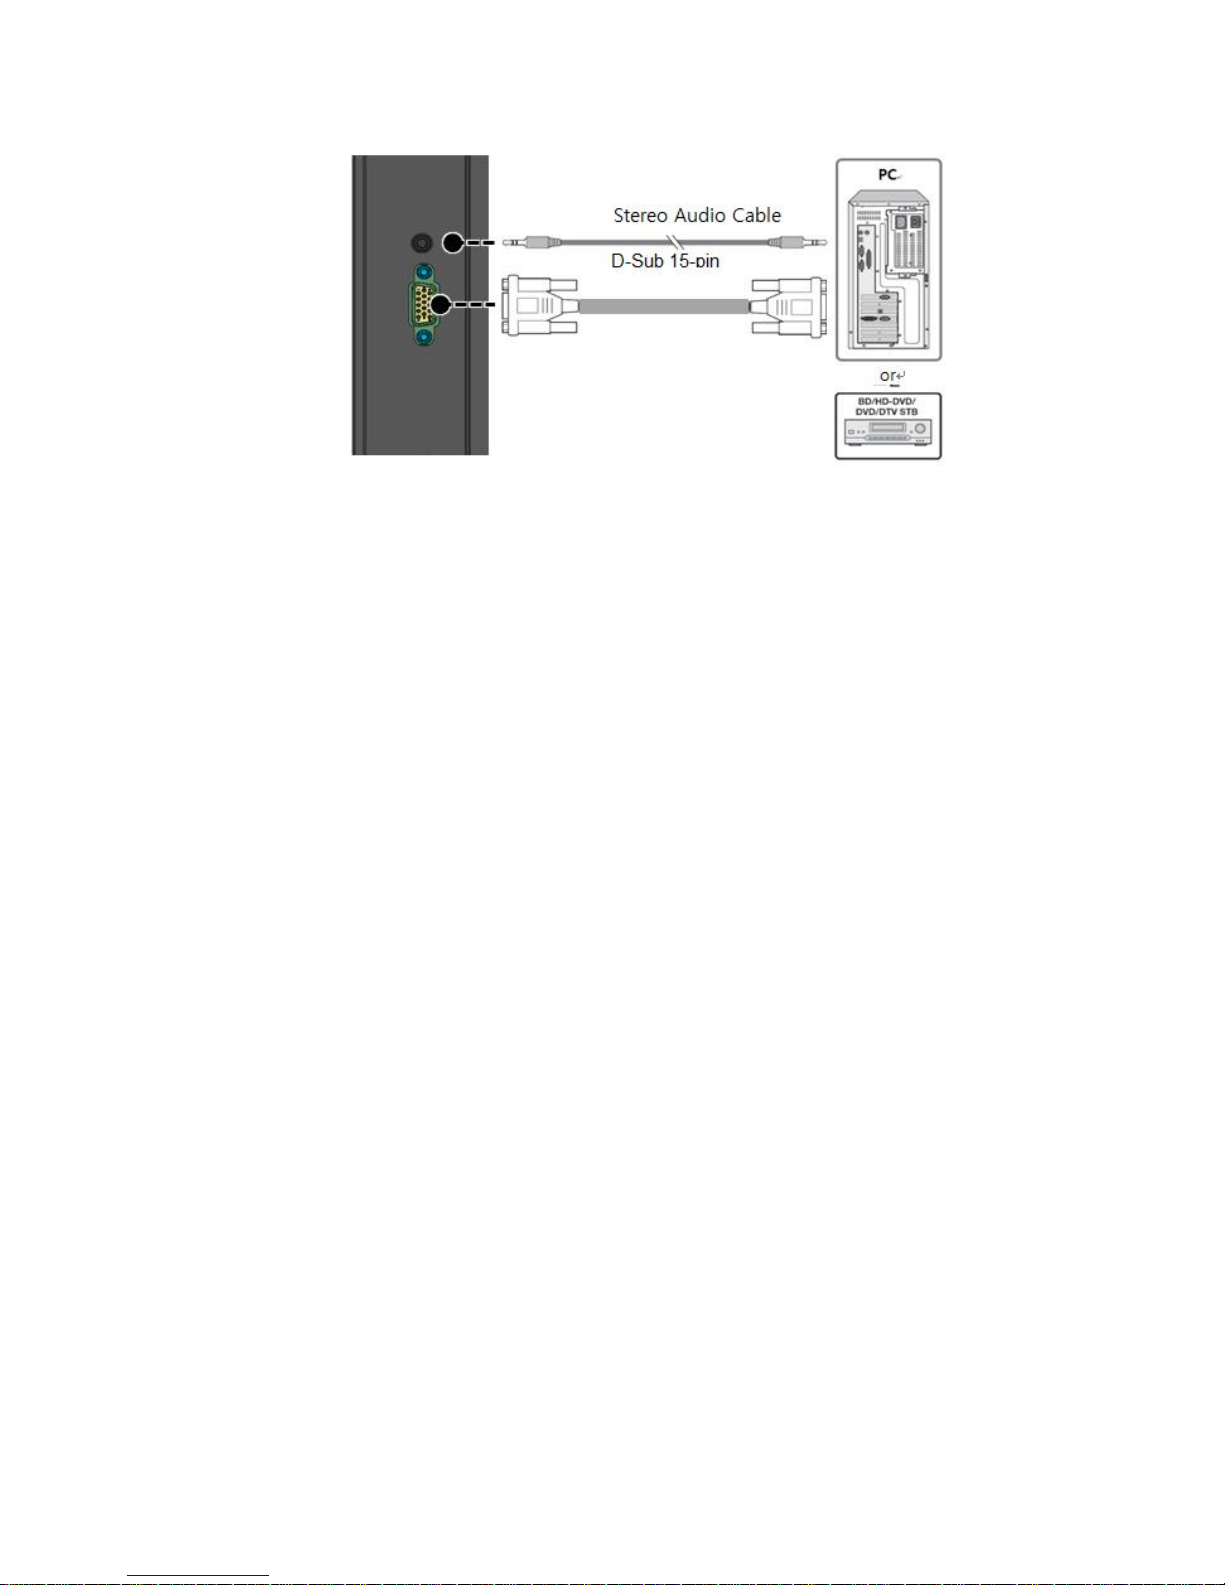
5.2 VGA Connection
•
To see the video, connect D-Sub 15P cable of the PC to the VGA In port of the product.
•
If connecting the product to the PC, it supports the VESA Display Data Channel (DDC) standard.
This standard supports "plug and play" function which helps the PC recognize the product
automatically to output the optimal resolution.
In order to operate the 'plug and play' after connecting the product, connect the video cable of
the PC to the product before turning on your PC, and turn on the power of this product first and
then turn on the power of the PC.
• When the incompatible resolution of the input signal is input to the product no image is
shown on the screen or normal display is not shown. As for the supported resolutions, refer to
page 31.
Page 24
24
Page 25
25
6 Touch Requirements
6.1 Touch Requirements
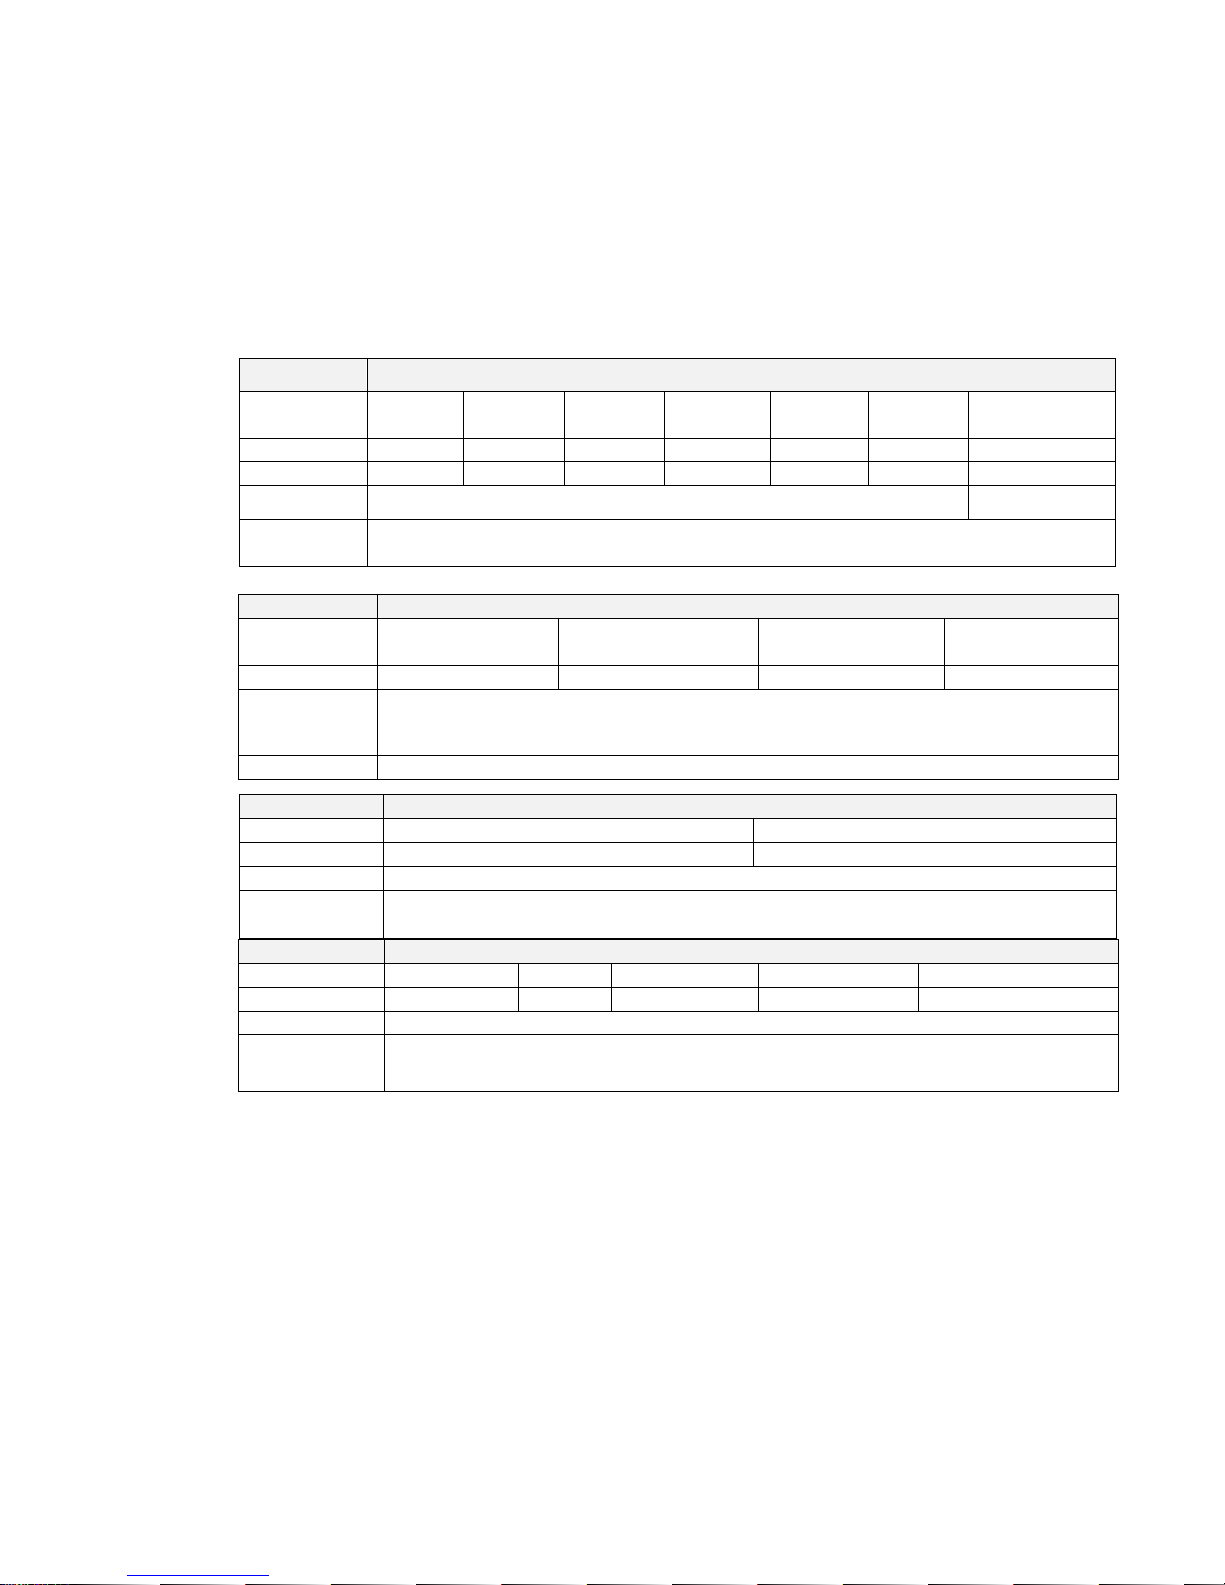
Computer Configuration (Recommended):
• 3.0 GHz quad-core processor
• 8 GB RAM
• 10 GB available hard disk space
• 1 GB NVidia GTX330 graphics card
OS Windows
Sub-OS
Windows
2000
Windows
XP
Windows
Vista
Windows7 Windows
8/8.1
Windows
10
Windows CE6.0
Support
√ √ √ √ √ √ √
Multi-touch single single single √ √ √ single
Driver
HID compliance, not need any drive
need driver
Notice:
.Performance will be impacted if mentioned systerms do not support multi
-
touch functions or
.have no copyrights. And Windows8 must be non OEM version
OS Linux
Sub-OS Fedora 10 or above Ubuntu 10.04 orabove RedFlag 6.2 or above
OpenSuse 11.4 or
above
Support √ √ √ √
Multi-touch
.kernal version3.0+,can support multi-touch by adding patch
.Kernal version3.5+,HD compliance support multi-touch
Driver HID complicance
OS Android
Sub-OS 2.1 2.2 2.3 3 4.0/4.1/4.2
Support N/A √ √ N/A √
Driver HID compliance
Multi-touch
.kernal version2.6.32+,we can procide patch
.version 3.5+,HID compliance support Multi-touch
*) Note, Chrom Os supports. The version is 39 or above
OS Mac OS X
Sub-OS 10.9 or lower 10.10 or lower
Support √ √
Multi-touch .Supported UPDD drive
Driver
.HID compliance support single touch
.Multi-touch supported by UPDD drive
Page 26
26
7 Menu Control
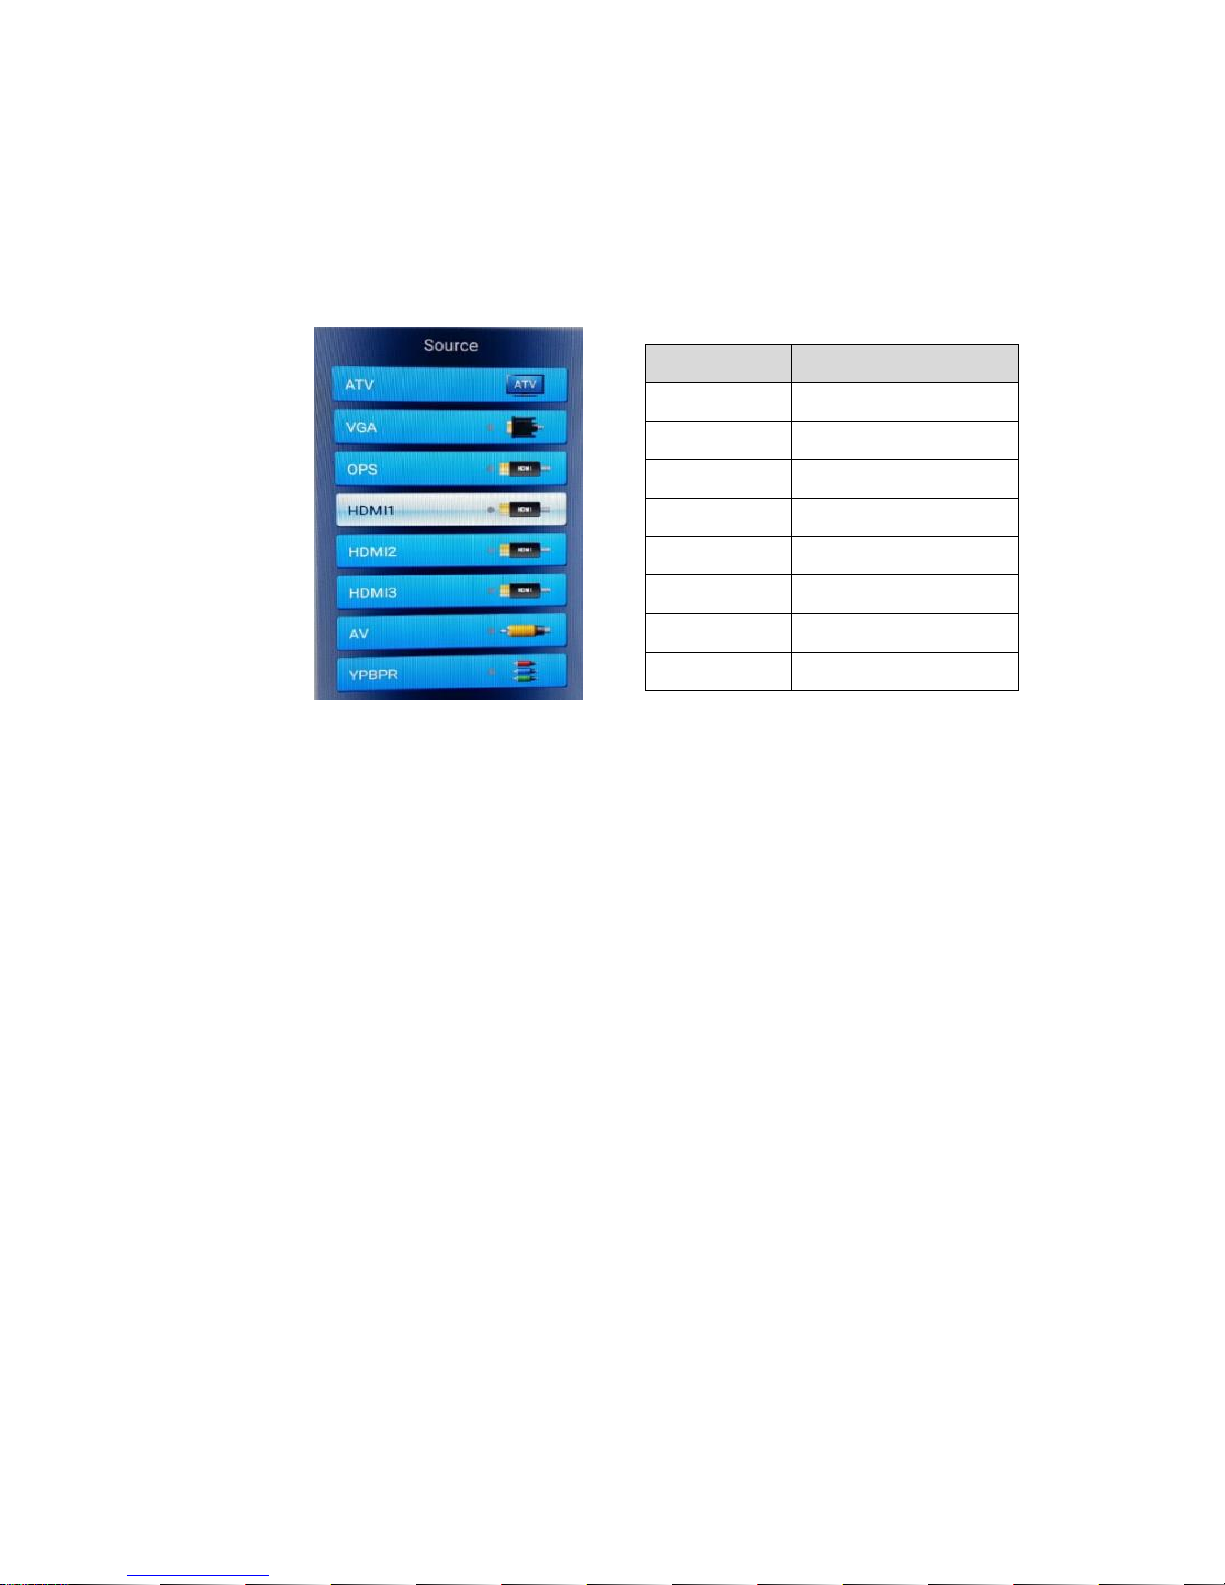
7.1 Input selection
Press the Input button and then select ▲ or ▼, or the input you want to select,
and then press the ▶ (+) button.
1) AVT will be removed.
2) OPS Input : current default is built-in Android. If you want to use Windows OPS, it supports the
connectivity.
Input Description
ATV ATV input 1)
VGA VGA input
OPS OPS input 2)
HDMI1 HDMI1 input
HDMI2 HDMI2 input
HDMI3 HDMI3 input
AV AV input
YPBPR YPBPR input
Page 27
27
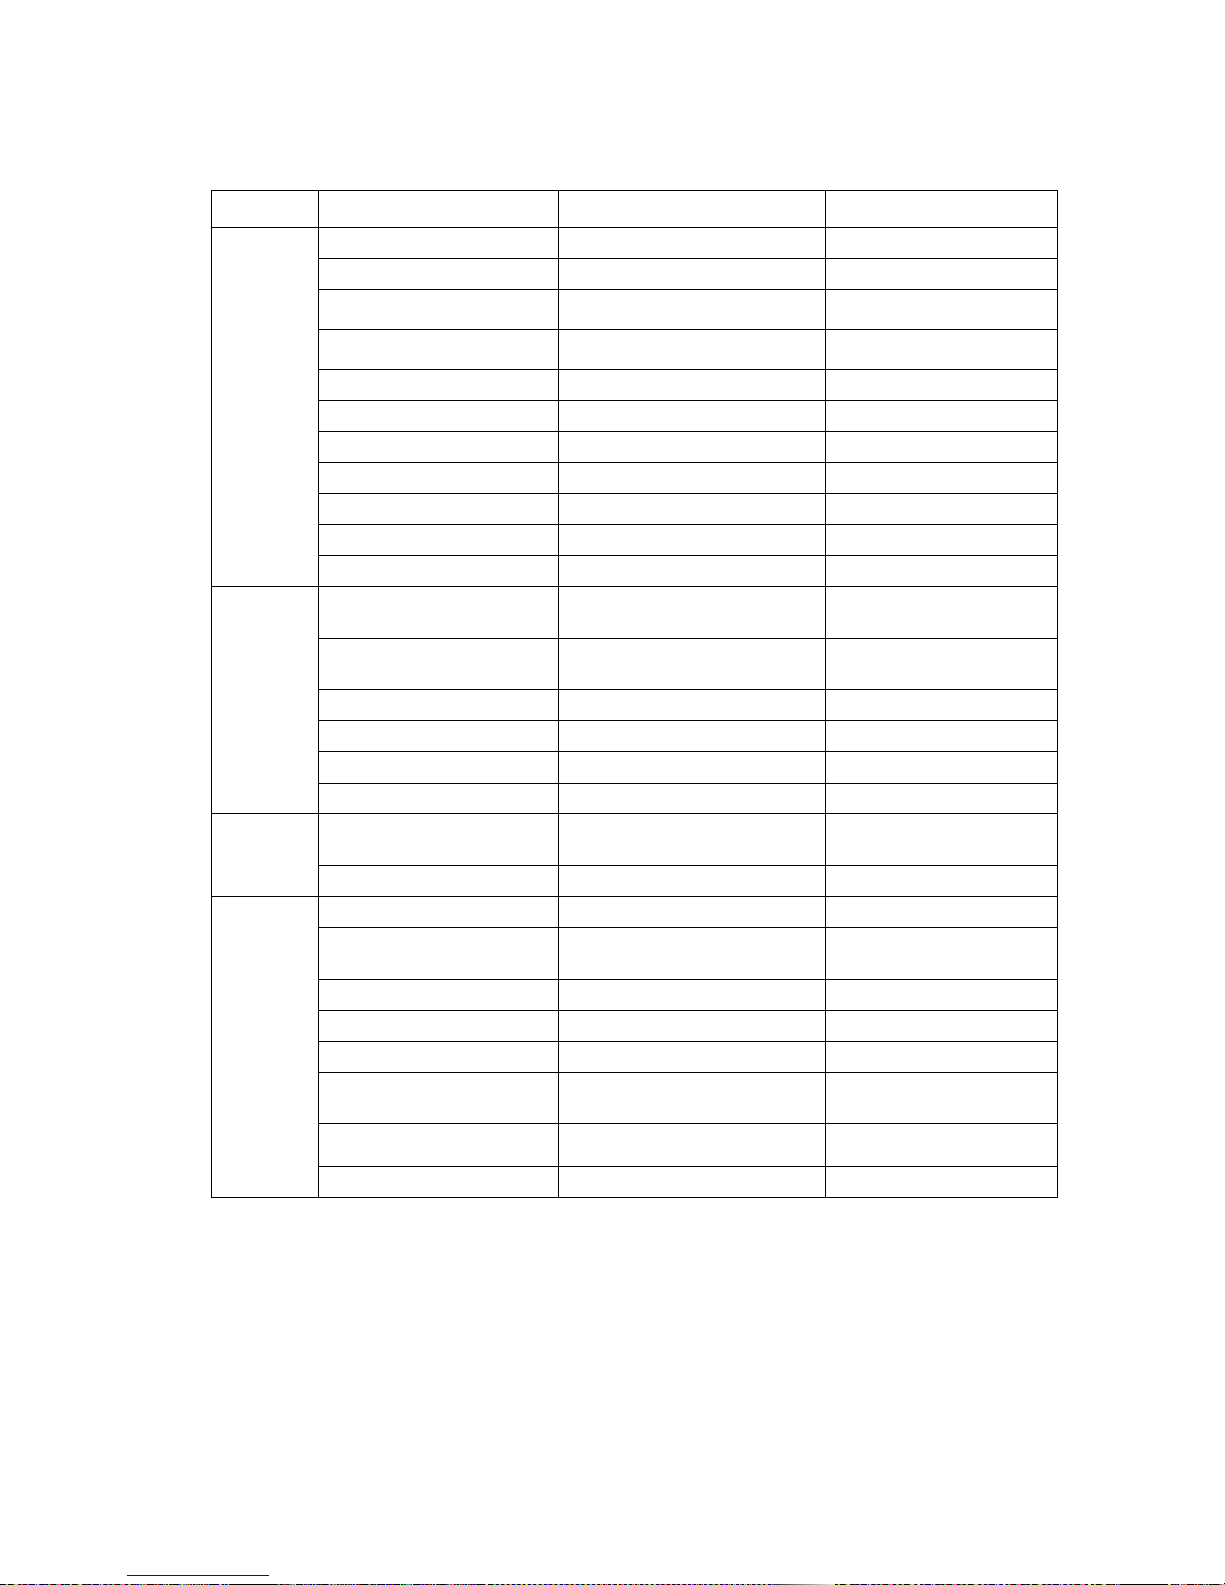
7.2 User function
Upper Lower Value Note
Picture
Picture mode Standard/Soft/User/Lightness (Default: USER)
Contrast 0-100 (Default: 50)
Brightness 0-100 (Default: 55)
Sharpness 0-100 (Default: 50)
Satauation 0-100 (Default: 50)
Computer model ON, OFF (Default: ON)
Image Demoise Middle, Strong, Auto, Off, Weak (Default: Middle)
MPEG Demoise Weak, Middle, Strong, Off (Default:Weak )
XvYCC Color ON, OFF (Default: )
Color Temp Nature /Warm/user/cold (Default: Normal)
Display Mode P2P/16:9/4:3/Auto/14:9 (Default: P2P)
Sound
Sound Mode
Standard /Music/Movie /
Sports/User
(Default: Standard)
Equilizer
120Hz / 500Hz / 1.5KHz / 5KHz /
10KHz
(Default: 50)
AVC ON, OFF (Default: 80)
Balance 0~100 (Default: 50)
Surround / SRS On, Off (Default: Off)
SPDIF OutPut Off, PCM, RAW (Default: PCM)
Sleep Timer
Off,5,10,15,30,45,60,90,120,180,24
0Min
(Default: Off)
No signal Auto power off On, Back Light, off Default: On)
SETTING
Menu TIME 5, 10, 15, 30, Always (Default: 10seconds)
HDMI Related Settings
Color Range/EDID Version/MHL
Switch/hdmi_cec
Signal Identify Manual jump/Automatic jump/off (Default: Manual jump )
Movie Mode On,Off (Defaul:on)
Child Lock On,Off (Defaul:on)
Boot Setting
Android/Last Channel/Fixed
Channel
(Default: Android)
Restore To Default Settings Yes, No
No Signal shutdown Yes, No
Page 28
28
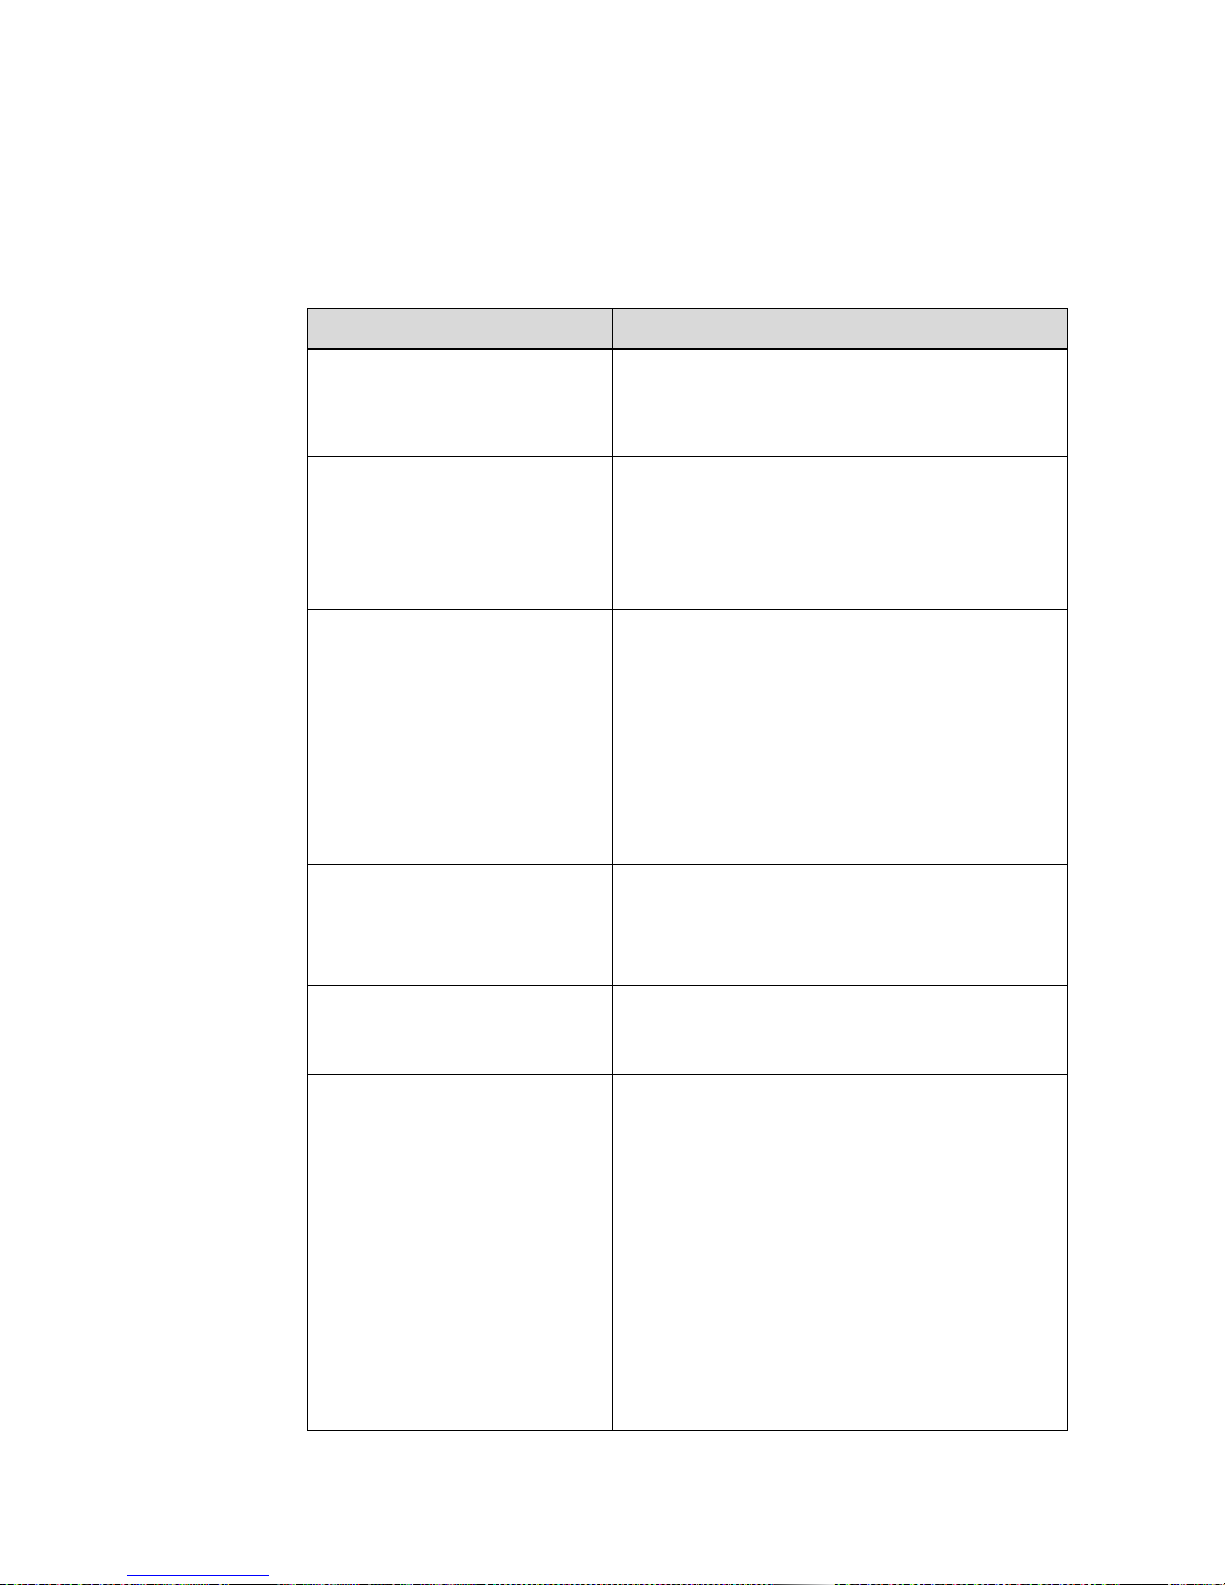
8 Trouble Shooting
The table below provides some general guidelines for trouble shooting problems you may
encounter with your product. If the suggested solutions fail to resolve the problem or if you
encounter an issue not described here, please contact your dealer or service centre.
Symptom Checklist & Solution
The power is not turned on.
(When the LED light indication is red
or orange.)
• Turn on power switch of the product or by using
remote controller, check if the product is in power
saving mode for no input of video signal.
The power is not turned on.
(LED indication that the light is off)
• Ensure that the product is plugged in and that the AC
outlet is active.
• Set the main power switch to the on position.
• Try to connect other electric equipment to AC outlet to
check if there is no problem in power source.
The remote controller does not
work.
• Replace the batteries in the remote controller.
• If the remote controller receiver of the product is
prevented by any object, delete the object and try to
operate again.
• If the remote controller receiver of the product is
exposed to direct sunlight or strong light, try to block
the light and operate again.
• Check the control buttons (OSD buttons) work
properly.
The power is on only but the screen
does not appear.
When the LED indicator of the product is green, video
displays on the screen. Turn on the power of the
product by using the power switch or remote controller.
•Turn off the AC power, and then turn it on again.
A message of ‘Input out of range’ is
displayed.
• Check if a signal with other resolution which the
product does not support is input to the product and
refer to the details in the page 31.
Images are not displayed correctly or
noise is shown on the screen.
• Ensure the cables are connected in and video signal is
active.
• Change the cable.
• Check if a signal with other resolution which the
product does not support is input to the product and
refer to the details in the page 31.
• Connect another product to check if there is no
problem, considering the possibility of problem in outer
video signal equipment.
• Ensure the input windows resolution and ratio(16:9)
• When mirroring or duplicate displays can only be as
high as the device screen will go. Hold Windows key and
press P to Display only
Page 29
29
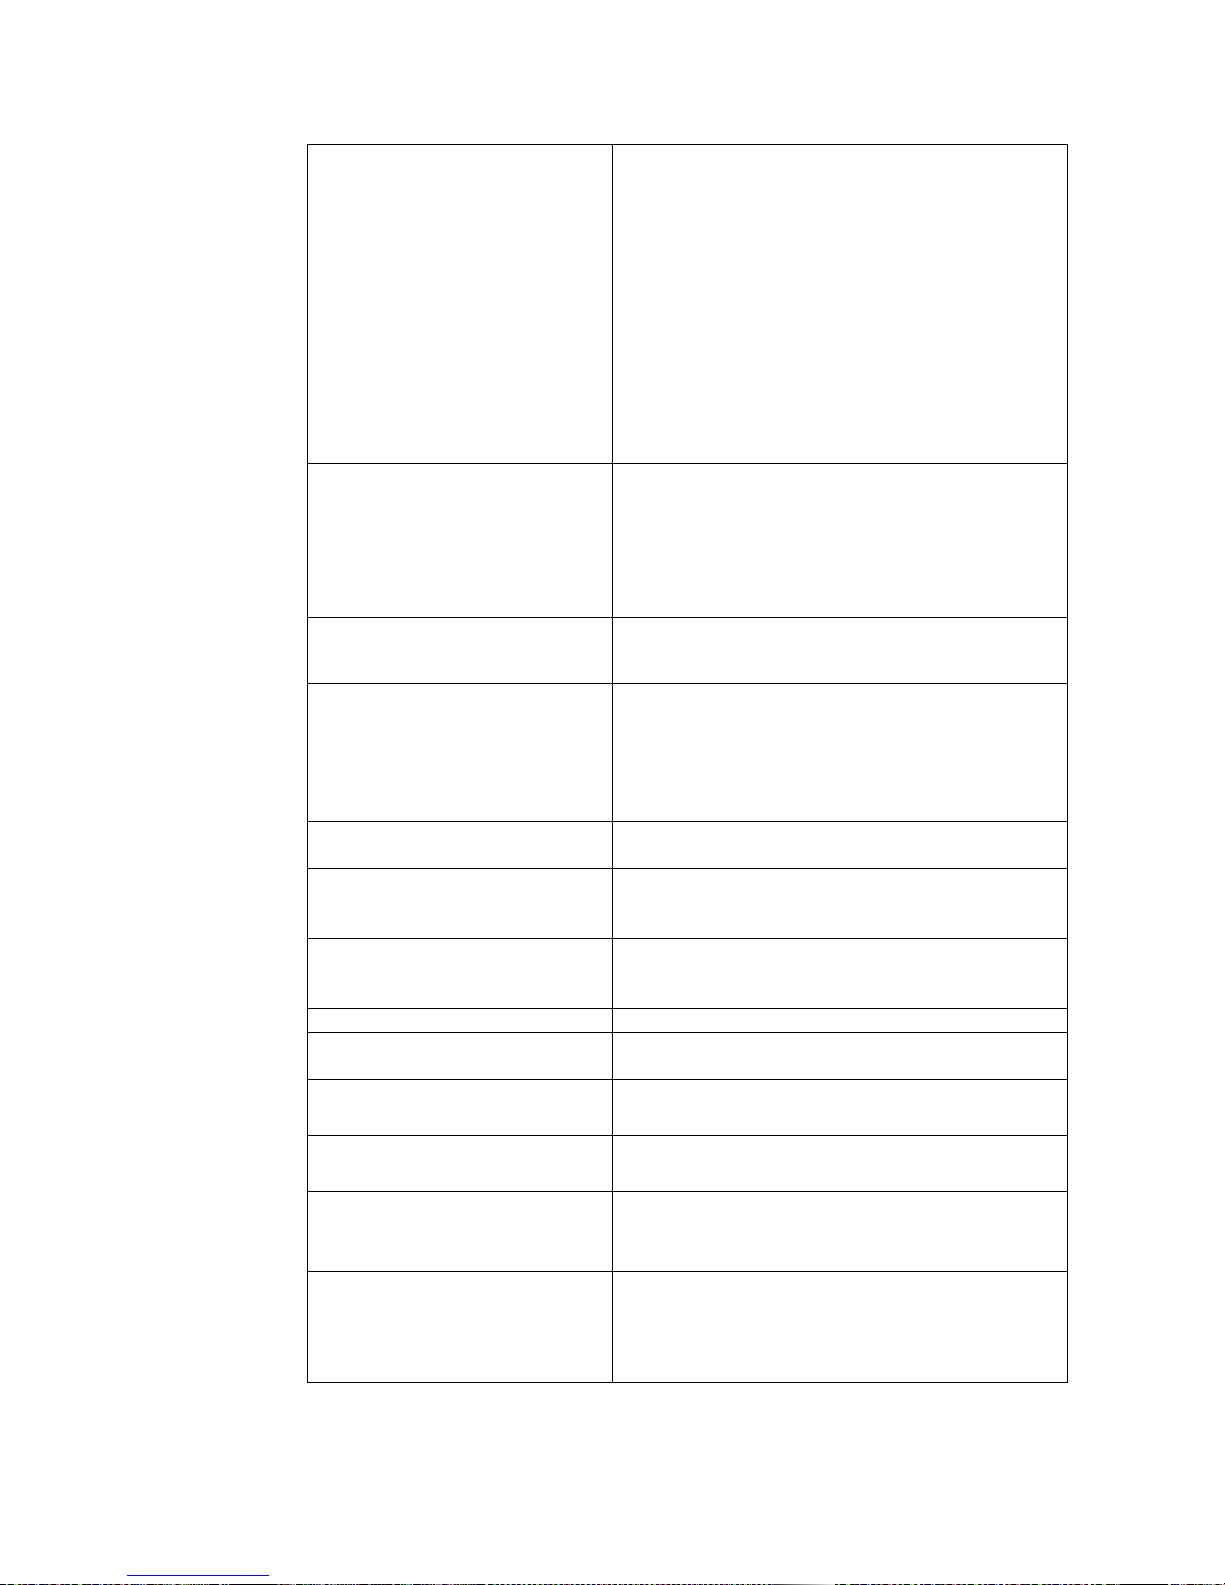
'No Signal' message is displayed. • Check to see if the external signal device is turned on.
• Check if computer is on power saving mode by
handling the mouse or pressing keyboard to wake.
• Check to see if the external signal devices and cables
are connected.
• Check to see if the cable connections are loose or
missing out.
• Try changing the cable.
• Check if the input selection of products is correctly set
to an external device by using the SOURCE button on the
remote controller.
HDMI screen is not displayed.
Or screen appears strange.
• Check to see if the cable connections are loose or
missing out.
• Try changing the cable.
• If you use an HDMI cable not certified, it may result in
a problem.
HDMI display is small or large visible. • Try adjusting video output size of the graphic card in
case of computer.
The color of VGA screen is strange. • Check to see if the cable connections are loose or
missing out.
• Try changing the cable.
• Connect another product to check if there is no
problem, considering the possibility of problem in outer
video signal equipment.
The position of VGA screen is
strange.
• Try adjusting the automatic position by using the
menu on the remote controller.
The screen is too bright and the
image is not separated.
• From the menu, try making the value of the black level
lower on the screen menu setting.
• Or try to initialize the screen menu settings.
The dark area of the screen is too
bright
• From the menu, try making the value of the contrast
lower on the screen menu settings.
• Or try to initialize the PICTURE settings.
Screen looks too dark. • Try to initialize the PICTURE settings.
Touch doesn’t work • See Connecting the Touch Screen Controller Host
Computer to the Display
Touch Alignment • Ensure the output resolution of the attached device is
set to a 16:9
No Sound on VGA • Install into the “Sound” socket or check the Audio
setting in the computer
No Sound on internal speaker • Increase the volume level on both the Vidistri Europe
BV interactive display, Media Player and Device e.g
laptop or PC
No Sound on External Speakers
• Ensure the external speakers are connected to the
correct jacks.
• Check for any shorts on the wires connecting to the
speakers.
Page 30
30
•Power down the touchscreen, remove any external
speaker connection, wait for 30seconds, reapply power
and test internal speakers only.
UD@60Hz is not displayed.
• Connect directly from HDMI 2.0 of PC to HDMI port of
the screen. Screen has to be set HDMI 2.0 in OSD setting
menu.
• Use the bellow’s gender of DP and HDMI port if your
computer has only DP port for UD@60Hz.
What kind of computer or
specification do I need for
4K@60Hz?
• Video output must be 4K@60Hz
• Memory and graphic card: 8GB above and
NVIDIA® GeForce® GTX 745 (included 4GB DDR3)
• HDD : 1TB(64MB cash)7200RPM SATA 6Gb/S
Same or above specification
(※ e.g Gamming desktop is normally suitable for this
specifications : Dell Alienware X51 series)
Page 31
31
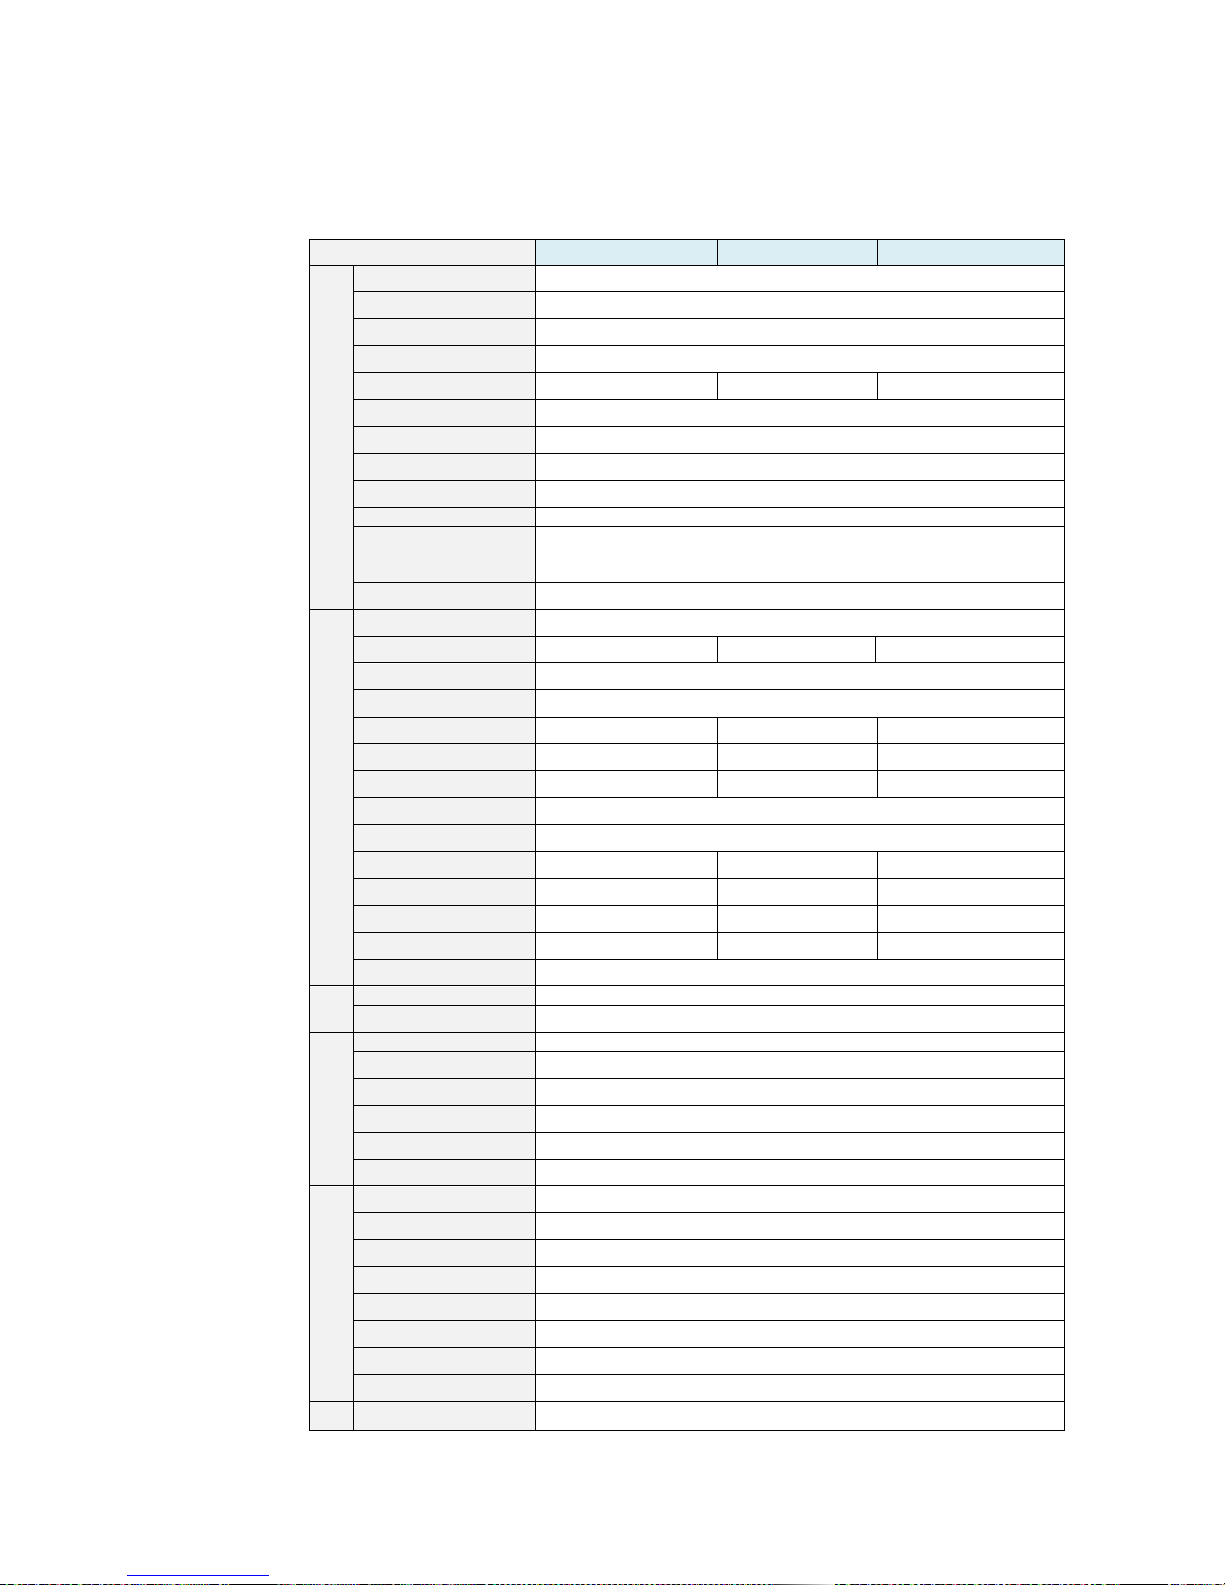
9 Product Specification
* Product specifications can be changed for quality improvement without prior notice.
With Android Lite65 Lite70 Lite75
Interactive touch
Glass Type Black coated AG glass
Glass thickness 4mm
Haze 2%~5%
Touch surface hardness >H7
Touch screen size 65 inch 70 inch 75 inch
Touch technology IR
Touch point 10 touch points
Touch tool Finger or the solid object (soft tip)
Response Time < 15ms
Interface USB 1.1, HID compliant, Plug & Play, USB 2.0
Supported OS
WinXP, Vista,7,8,10,Android,Linux-driverless
Mac.OSX-first installation is needed.
(Detail, please refer the user's manual)
Driverless Win OS
Display
Type LCD (LED Backlight) Panel
Panel diagonal size 65 inch 70 inch 75incch
Panel resolution 1920 x 1080p
Panel Refresh rate 1920 x 1080p
Brightness (nits) 350cd/m2 340cd/m2~400cd/m2 400cd/m2
Contrast ratio 5000:1 - 5000 : 1
Response time 6.5 (typ.) (G to G) 6.5 (typ.) (G to G) 8 (typ.) (G to G)
Aspect ratio 16:9
Display color 16.7M (16-bit)
Viewing angle 178' - -
Pixel pitch(mm) 0.248 x 0.744 0.807 x 0.807 0.8595 x 0.8595
Color gamut 70 70 72
W x H (mm) 1475.66 x 862.56 1566.44 x 891.2 1650 x 928.26
Life time (hrs) minimum 30000
Audio
Internal SPK 10W x 2
SPK out 10W x 2
Conectivity
Video Input 4xHDMI, 1xVGA, 1xYPBPR1, USB(android)-2xUSB 3.0, 1xUSB2.0,RS232
Audio Input 1x3.5 Stereo, 1xMini AV in
Audio Output 1x Mini AV out, 1xSPDIF
Ethernet & Wi-fi 1xRJ45, 1xWi-Fi(on board-option)
USB for touch USB
Control RS-232
OSD Convinient
Video PSM/Picture Mode Standard/Soft/User/Lightness
Display Mode P2P/16:9/4:3/Auto/14:9
Color Temp Nature /Warm/user/cold
HDMI Mode Color Range/EDID Version/MHL Switch/hdmi_cec
Sound SSM/Sound Mode Standard /Music/Movie / Sports/User
Sound AVC ON/OFF
Sound Output 10/15W 2CH RMS
OSD Language English/Chinese
Built
-
in
CPU 64 bit Quad-core Cortex-A53
Page 32
32
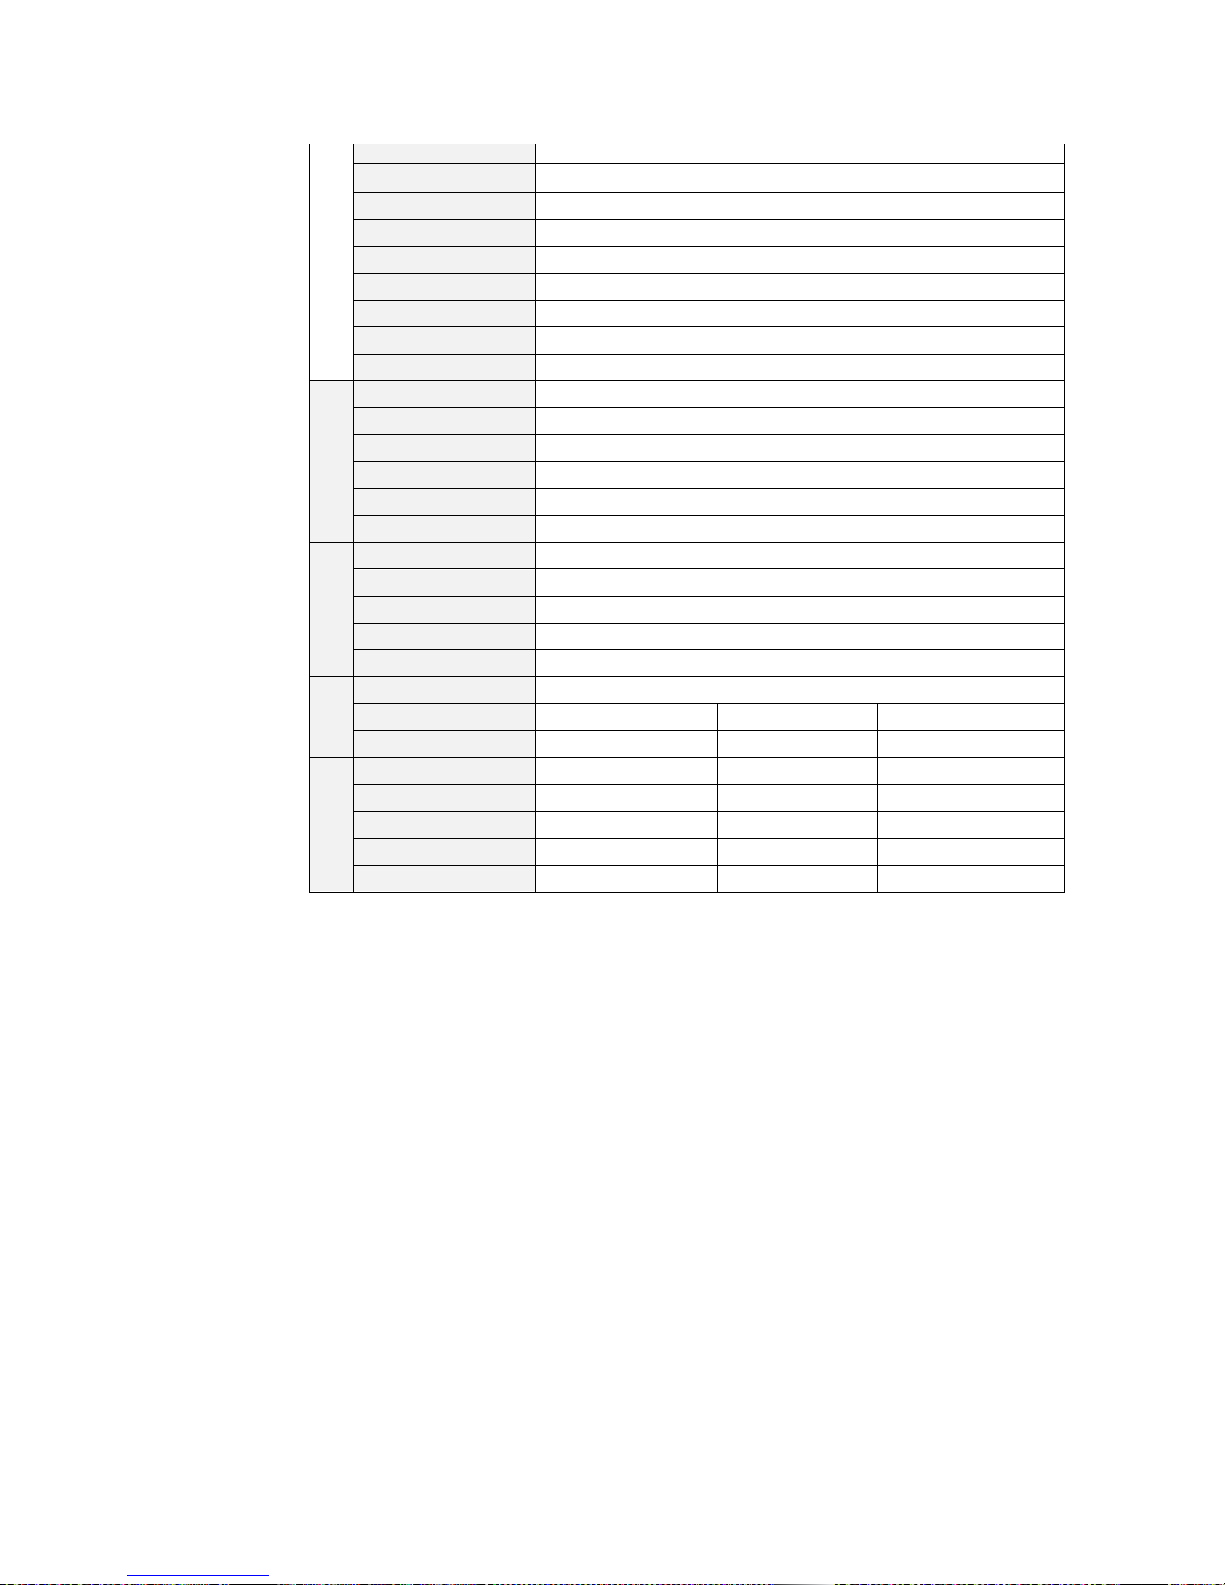
GPU Hexa-core ARM Mali-450 + dual Core VPU
Android 5.0 above
Memory Mali-450
Hard Drive 1.2Ghz
DDR3/RAM 2GB
eMMC/Flash 8GB
Operating System 5.0 above
Kernel Linux3.10.0
Type Embeded type
Accessories
HDMI cable Yes
USB cables Yes
Power Cable Optional
Stylus pen Yes
Remtoe controller Yes
User manual Yes
Storage & operating
Storage Temperature - 20 ~ 60℃
Operating Temperature 5 ~ 35℃
Storage Humidity 5–90% RH
Operating Humidity 20~80%
Noise Below 40dB ⓐ25C
Power
Power requirments 100 to 240V AC, 50/60Hz
Power consumption Max. 180W 210W 260W
Power consumption Typ. 160W 195W 230W
Dimension
Product dimension (mm) 1486 x 873 x 80 1576 x 901 x 80 1744 x 1023 x 104
Weight (Kg) 45 55 80
Packing dimension (mm) 1636 x 1023 x 250 1726 x 1050 x 300 1900 x 1174 x 320
Packing weight (Kg) 58 68 95
Bracket mount 600 x 600 456 x 400 600*400
Page 33
33
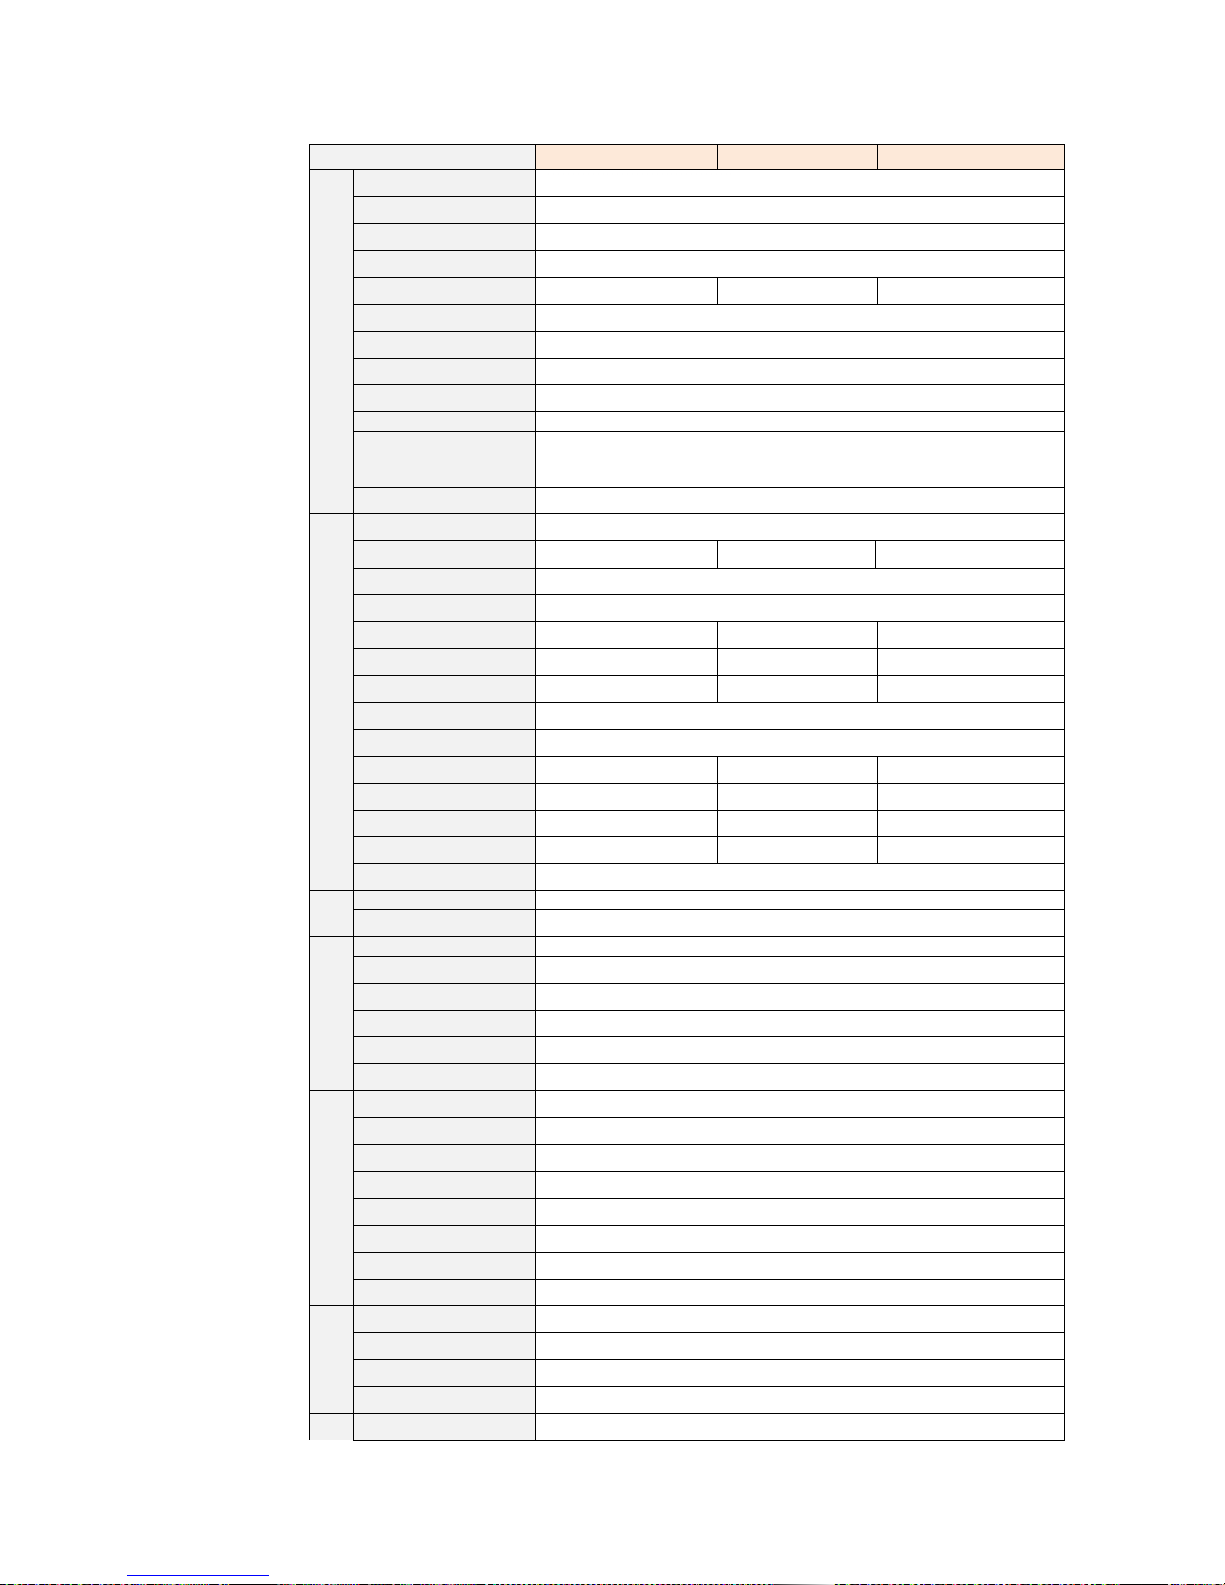
Without Android
Lite65WTOA Lite70WTOA Lite75WTOA
Interactive touch
Glass Type Black coated AG glass
Glass thickness 4mm
Haze 2%~5%
Touch surface hardness >H7
Touch screen size 65 inch 70 inch 75 inch
Touch technology IR
Touch point 10 touch points
Touch tool Finger or the solid object (soft tip)
Response Time < 15ms
Interface USB 1.1, HID compliant, Plug & Play, USB 2.0
Supported OS
WinXP, Vista,7,8,10,Android,Linux-driverless
Mac.OSX-first installation is needed.
(Detail, please refer the user's manual)
Driverless Win OS
Display
Type LCD (LED Backlight) Panel
Panel diagonal size 65 inch 70 inch 75incch
Panel resolution 1920 x 1080p
Panel Refresh rate 1920 x 1080p
Brightness (nits) 350cd/m2 340cd/m2~400cd/m2 400cd/m2
Contrast ratio 5000:1 - 5000 : 1
Response time 6.5 (typ.) (G to G) 6.5 (typ.) (G to G) 8 (typ.) (G to G)
Aspect ratio 16:9
Display color 16.7M (16-bit)
Viewing angle 178' - -
Pixel pitch(mm) 0.248 x 0.744 0.807 x 0.807 0.8595 x 0.8595
Color gamut 70 70 72
W x H (mm) 1475.66 x 862.56 1566.44 x 891.2 1650 x 928.26
Life time (hrs) minimum 30000
Audio
Internal SPK 10W x 2
SPK out 10W x 2
Conectivity
Video Input 4xHDMI, 1xVGA, 1xYPBPR1, USB(android)-2xUSB 3.0, 1xUSB2.0,RS232
Audio Input 1x3.5 Stereo, 1xMini AV in
Audio Output 1x Mini AV out, 1xSPDIF
Ethernet & Wi-fi 1xRJ45, 1xWi-Fi(on board-option)
USB for touch USB
Control RS-232
OSD Convinient
Video PSM/Picture Mode Standard/Soft/User/Lightness
Display Mode P2P/16:9/4:3/Auto/14:9
Color Temp Nature /Warm/user/cold
HDMI Mode Color Range/EDID Version/MHL Switch/hdmi_cec
Sound SSM/Sound Mode Standard /Music/Movie / Sports/User
Sound AVC ON/OFF
Sound Output 10/15W 2CH RMS
OSD Language English/Chinese
Accessories
HDMI cable Yes
USB cables Yes
Power Cable Optional
Stylus pen Yes
Remtoe controller Yes
Page 34
34
User manual Yes
Storage & operating
Storage Temperature - 20 ~ 60℃
Operating Temperature 5 ~ 35℃
Storage Humidity 5–90% RH
Operating Humidity 20~80%
Noise Below 40dB ⓐ25C
Power
Power requirments 100 to 240V AC, 50/60Hz
Power consumption Max. 180W 210W 260W
Power consumption Typ. 160W 195W 230W
Dimension
Product dimension (mm) 1486 x 873 x 80 1576 x 901 x 80 1744 x 1023 x 104
Weight (Kg) 45 55 80
Packing dimension (mm) 1636 x 1023 x 250 1726 x 1050 x 300 1900 x 1174 x 320
Packing weight (Kg) 58 68 95
Bracket mount 600 x 600 456 x 400 600*400
Page 35
35
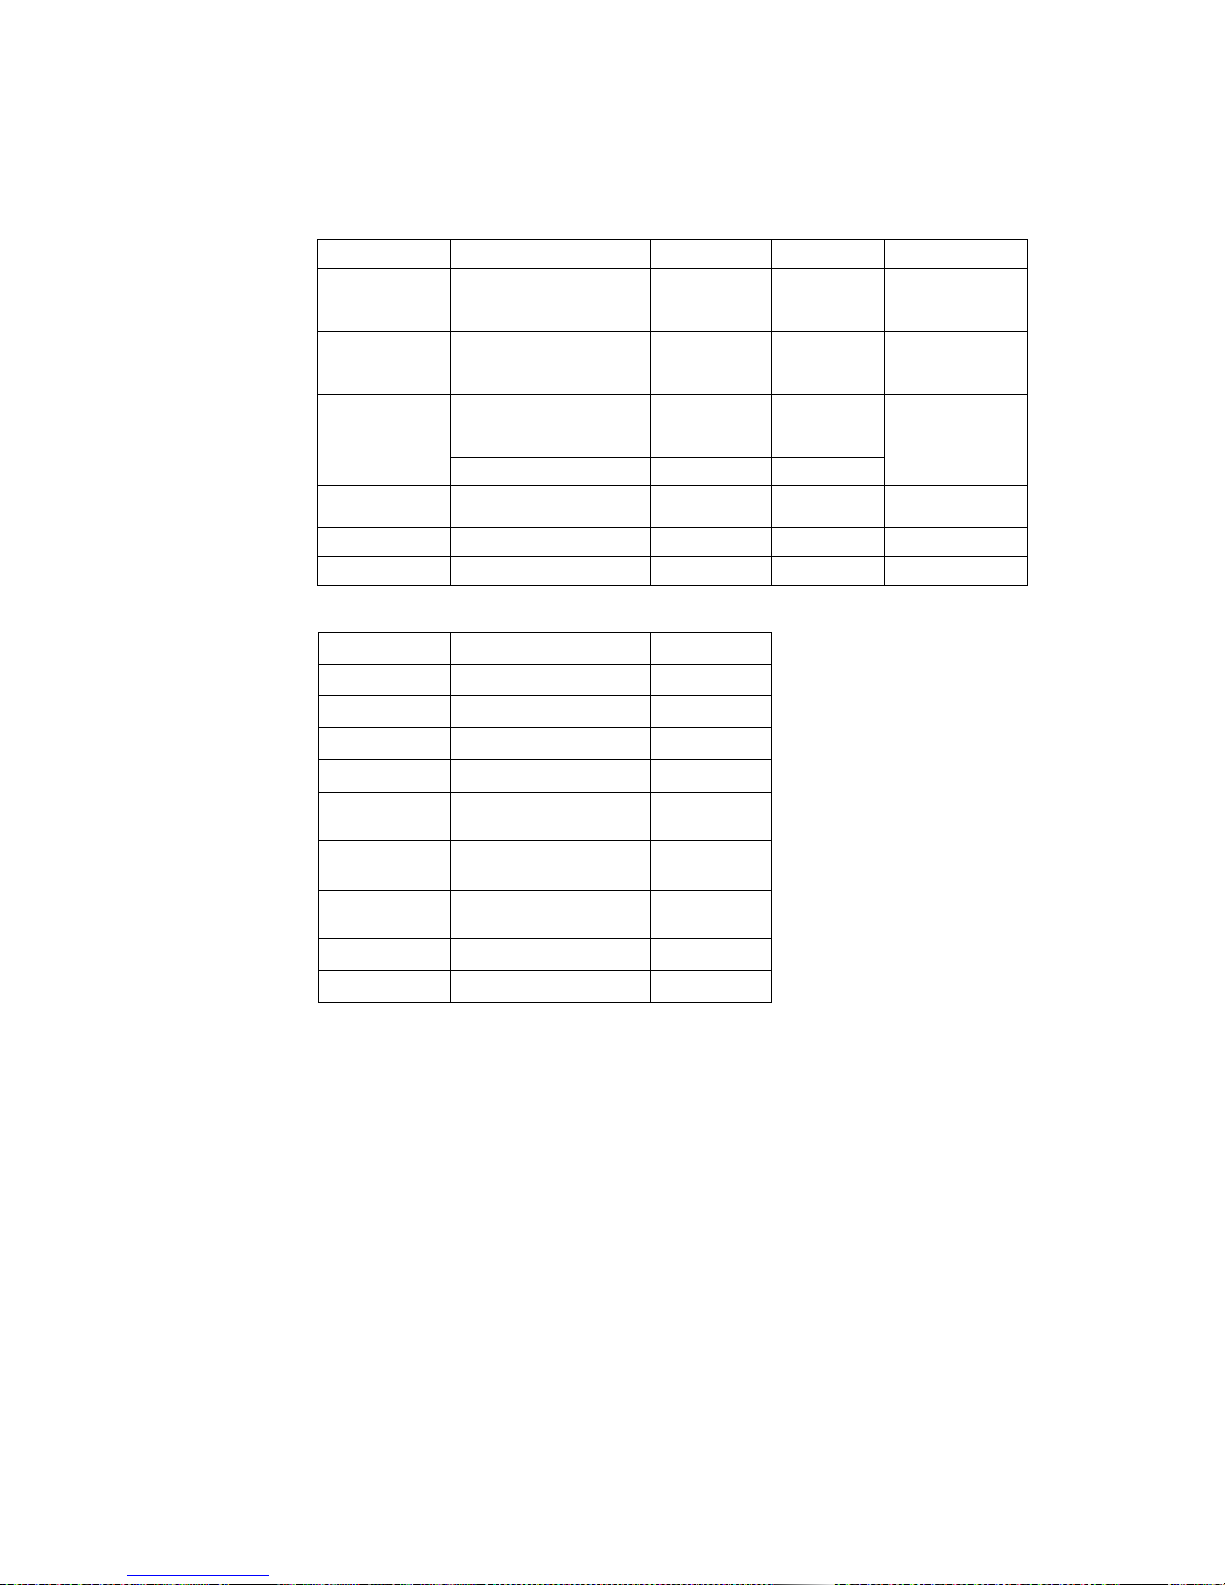
10 Supported Resolutions
VGA_Singal_Format
Format Resolution H.Freq(KHz) V.Freq(Hz) Standard
VGA 640x480
31.5
37.9
37.5
60
72
75
VESA
SVGA 800x600
37.9
48.1
46.9
60
72
72
VESA
XGA
1024x768
48.4
56.5
60
60
70
75
VESA
1280x960 60 60
SXGA 1280x1024
64
80
60
75
VESA
SXGA 1360x768 37.5 60
WUXGA 1920x1080 37.5 60
HDMI_Singal_Format
Format Resolution V.Freq(Hz)
480i 720x480 60
480p 720x480 60
576i 720x576 50
576p 720x576 50
720p 1280x720
50
60
1080i 1920x1080
50
60
1080p 1920x1080
50
60
4K2K 3840x2160 30
4K2K 3840x2160 60*)
*) HDMI1 supports 4K2K@60Hz (max to 6Gpbs), other HDMI ports only support 4K2K@60Hz
with YUV4:2:0 (max to 3.75Gpbs)
Page 36

36
11 Required information
11.1 Prevent image sticking
The fixed image (title, menu image, picture, motionless movie etc.) on the screen is maintained for a
long time, image sticking may occur. Image sticking may be subject to operating time of still picture.
Since the image sticking is not defect but a characteristic of the product, it is restricted from the product
warranty.
Thus, please refer to the following information for the prevention of image sticking.
• When external device (PC) is not used for a long time, please use screensavers.
(The screensaver should be monochrome or moving image.)
• If 4:3 aspect ratio is used for a long time, image sticking might occur.
So, it is recommended to use the full screen.
• In case of displaying still picture for long time, change pictures a certain time.
If image sticking is shown, turn off the unit for a while and turn it on again.
Turn off time may be require.
 Loading...