

Page 1
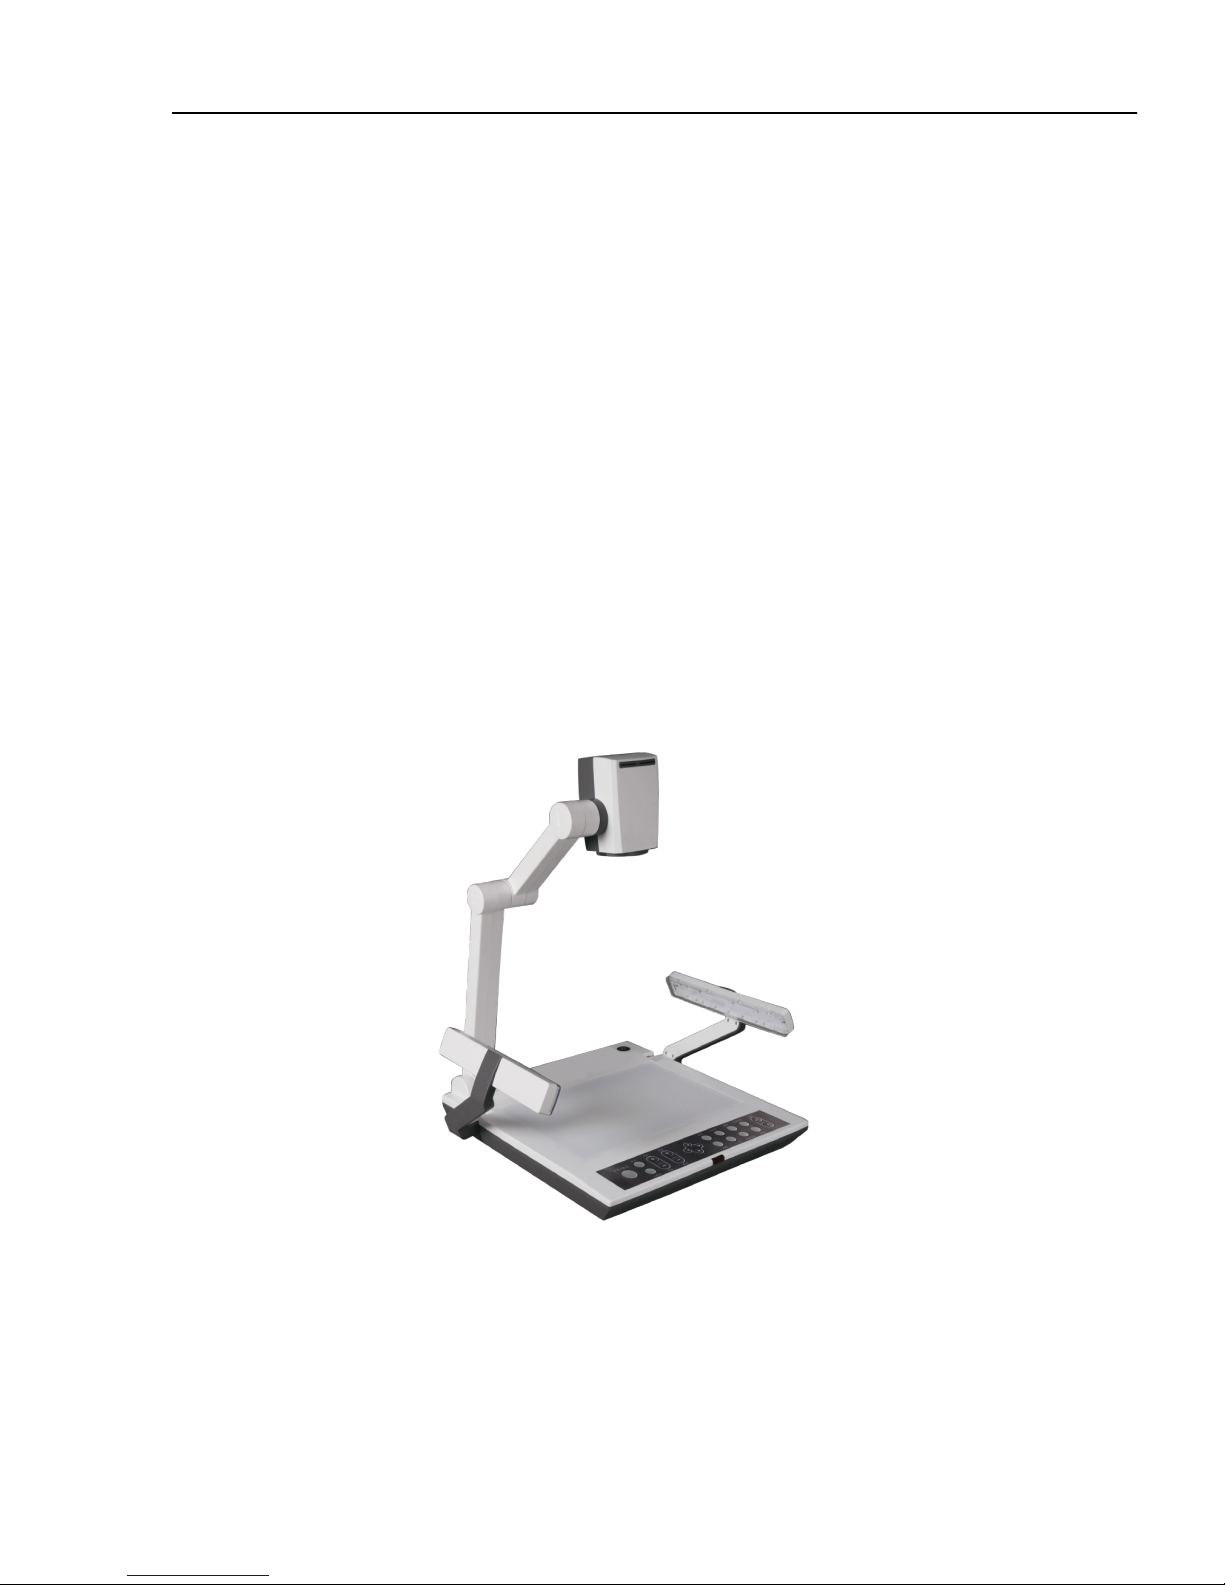
Vidifox® Document Camera
DV 485
USER GUIDE
Please read this manual carefully before operating the camera and keep it for your reference.
Page 2

1
PLEASE READ CAREFULLY BEFORE USE
! Please be aware of the required power supply environment is 100-240V, 50/60Hz, 2A
Max.
! Do not place the equipment under sunlight, near heaters, near water, or on any
unstable surface.
! Keep the equipment away from acid or alkali gas.
! The recommended operating environment is:
Temperature: 0ºC--45ºC(32ºF-113ºF)
Humidity: less than 75%
! Always unplug BEFORE cleaning the equipment. Do not use volatile solvent when
cleaning.
! Unplug the power cable if camera is not in use for a long period.
! Consult the dealer for professional assistance when there is any problem with the
equipment.
Page 3

2
CONTENTS
'
!"
#$%&'($)*(+,)-&./)
("""""""""""""""""""""""""""""""""""""""""""""""""""""""""""""""""""""""""(!(
0".)#,&'($)*(/,&#,&'(""""""""""""""""""""""""""""""""""""""""""""""""""""""""""""""""""""""""""(0(
1"(-234526(#7386(""""""""""""""""""""""""""""""""""""""""""""""""""""""""""""""""""""""""""""""""""""""""(
1(
9"$))/&$&./)
("""""""""""""""""""""""""""""""""""""""""""""""""""""""""""""""""""""""""""""""""""""""(9(
:";,<&.;=*.$('>'&=;("""""""""""""""""""""""""""""""""""""""""""""""""""""""""""""""""""""""""""(?(
?"'/+&@$%=(""""""""""""""""""""""""""""""""""""""""""""""""""""""""""""""""""""""""""""""""""""""""""(
!0(
A"'#=-.+.-$&./)'
(""""""""""""""""""""""""""""""""""""""""""""""""""""""""""""""""""""""""""""""""""(!?(
B"'=&&.)C(,#
("""""""""""""""""""""""""""""""""""""""""""""""""""""""""""""""""""""""""""""""""""""""""(!A(
D"/#=%$&./)(#%/-=*,%='
(""""""""""""""""""""""""""""""""""""""""""""""""""""""""""""""""""(!B(
!E"&%/,F<=G'H//&.)C
(""""""""""""""""""""""""""""""""""""""""""""""""""""""""""""""""""""""""(!D(
!!"(#$-I.)C(<.'&($)*($--=''/%.='
("""""""""""""""""""""""""""""""""""""""""""""""""""""(0E(
Page 4
1
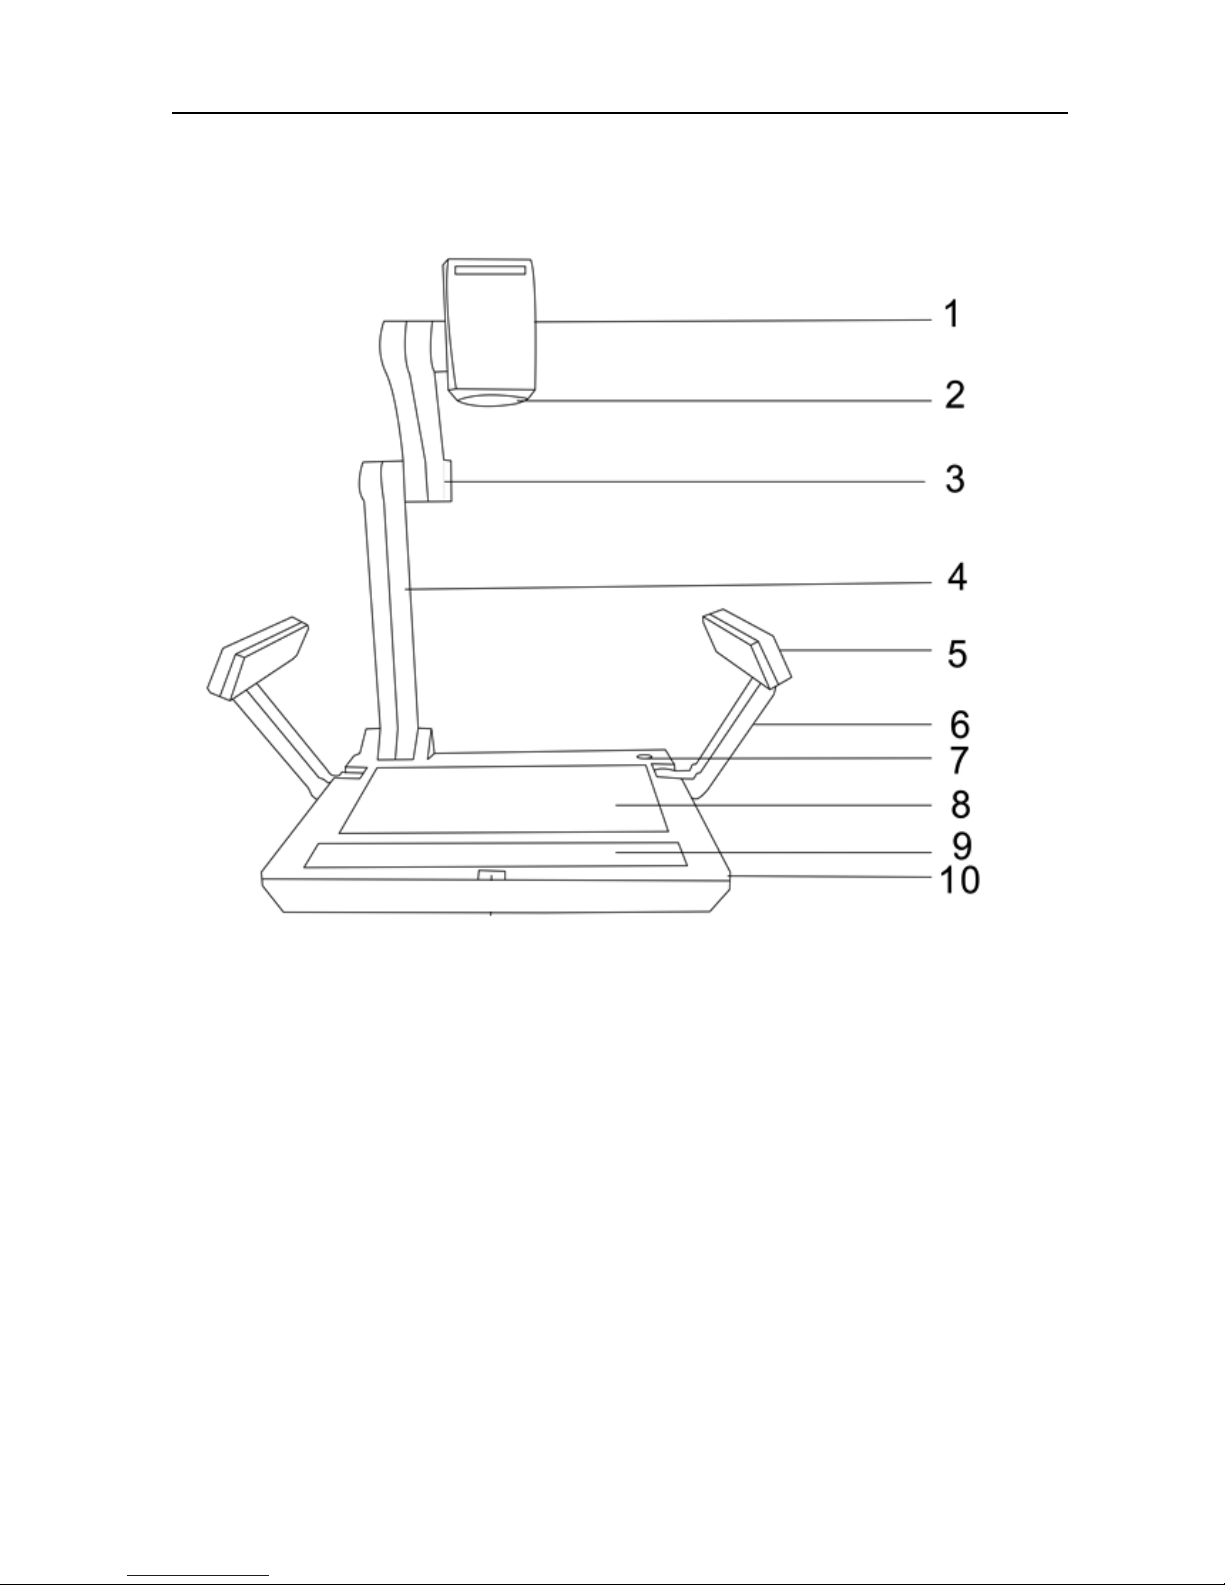
1. PARTS AND FUNCTIONS
(1) camera head
(2)camera lens
(3) upper mechanical arm
(4) main mechanical arm
(5) side lamp
(6) lighting arm
(7) power switch
(8)base light
(9) control panel
(10) base unit
Page 5
2
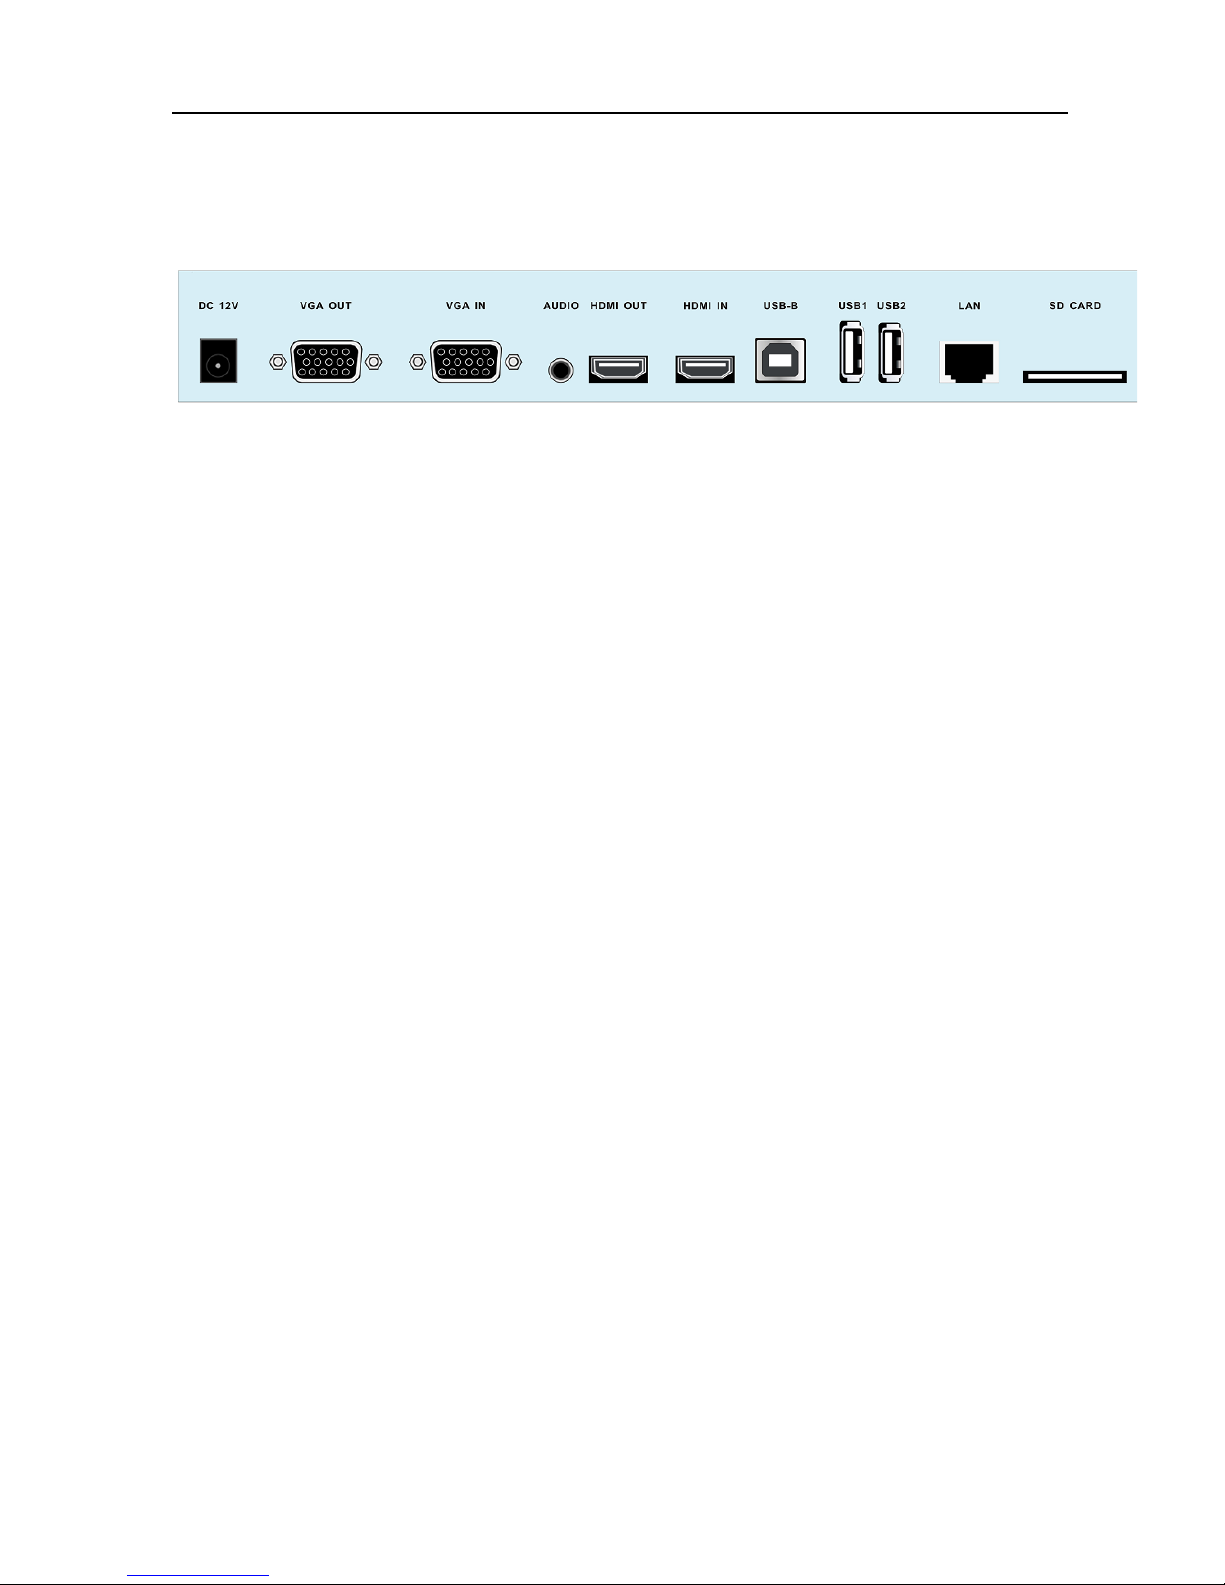
2.INPUTS AND OUTPUTS
1.DC 12V: Power input
2.VGA OUT:VGA Output
3.VGA IN: VGA Input
4.AUDIO: Audio Output
5.HDMI OUT: HDMI output
6.HDMI IN: HDMI input
7.USB-B: USB slave, for connecting with PC
Firmware upgrading.
8.USB1/USB2: USB host, for connecting with USB mouse or USB memory stick.
9.LAN: Network connection
10.SD CARD: SD card slot.
Note: VGA signal and HDMI signal can not be outputted at the same time, please switch needed
output signal type.
Note: Visualizer is based on HDMI 1.3,display device based on HDMI 1.3 and above is
recommended. There may cause compatibility problems when working with display device
below HDMI 1.3.
Page 6
3
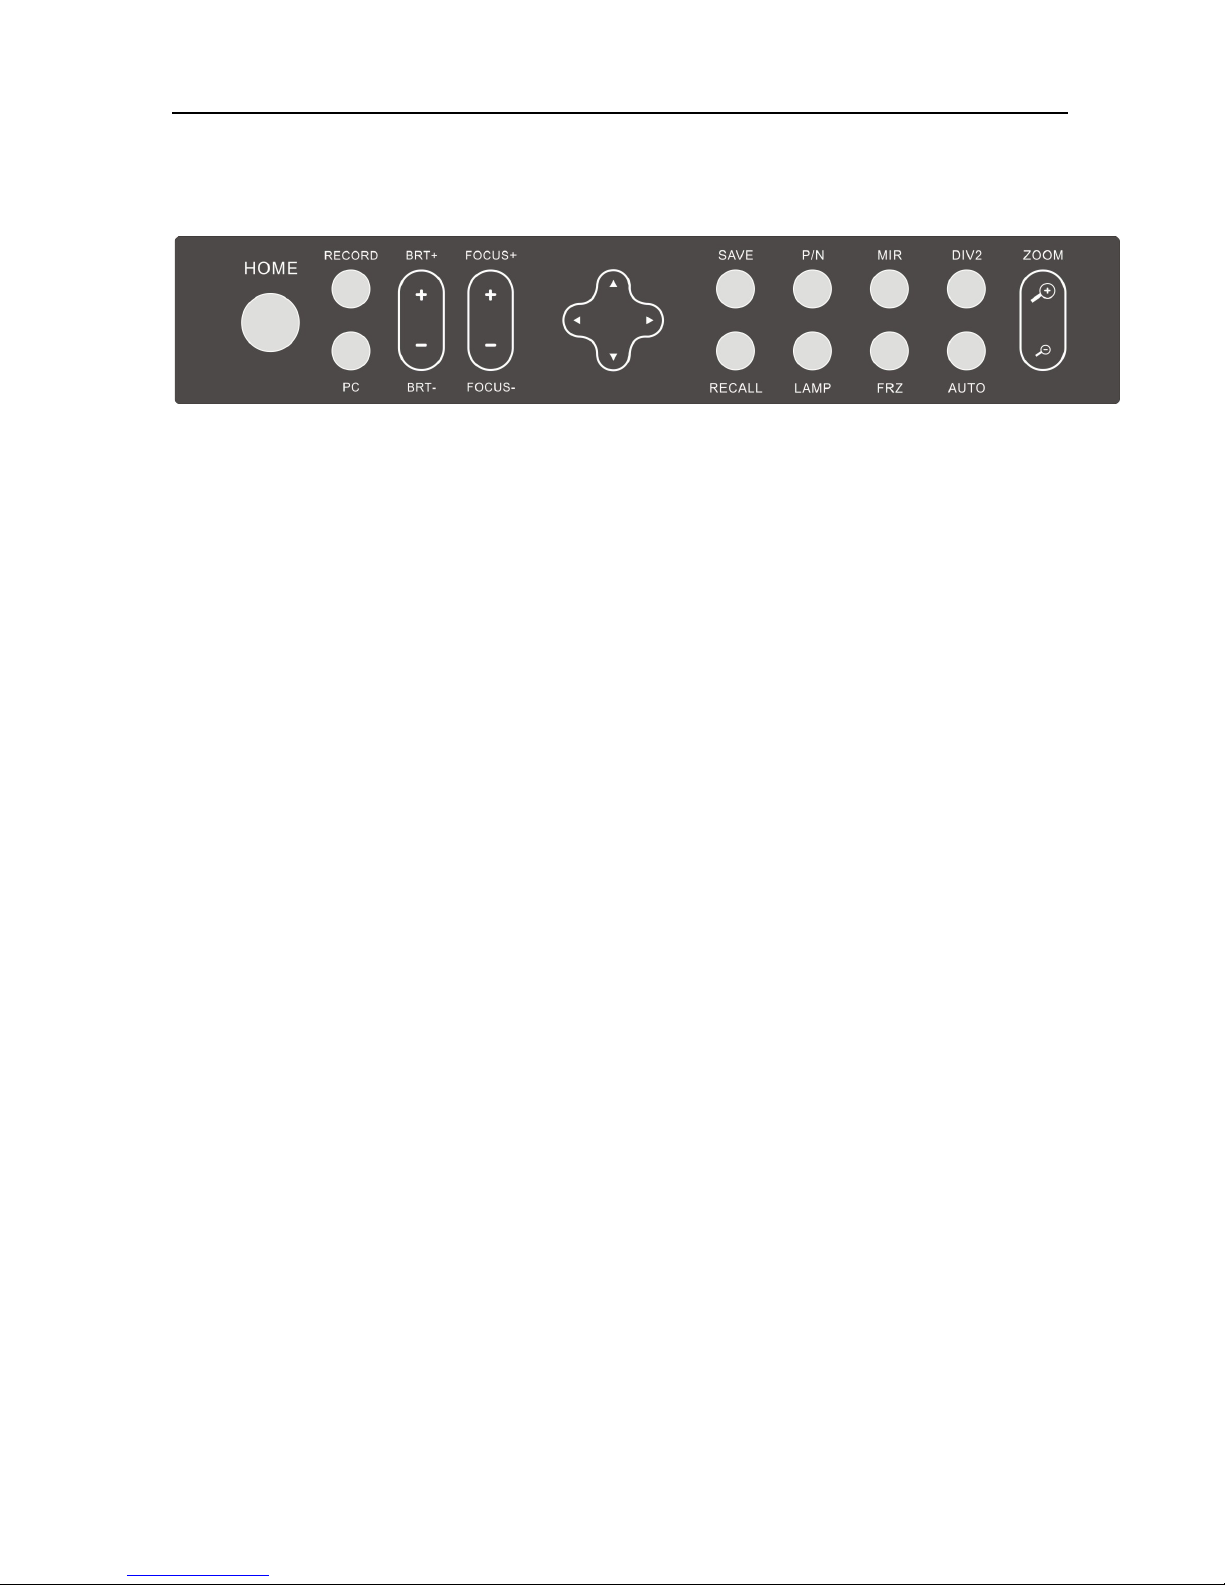
3.Control Panel
1.HOME: a. Switch back to the camera signal.
b. Display the selected image and video clips in image recall mode.
2.RECORD:Start/stop video recording, the video clip recorded will be automatically saved to a
USB memory stick, SD card, or built-in memory. DV 485 can detect an external storage
media and put the last detected storage as a priority storage site. If there is no external
storage detected, all video clips will be saved in the built-in memory.
3.PC: Switch to the PC signal.
4.BRT+, BRT-:Control the brightness of displaying image.
5.FOCUS+, FOCUS-:Adjust focus manually, focus far and focus near.
6.ARROWS: Select images and video clips in image recall mode.
7.SAVE: Capture and save the images to USB memory stick, SD card, or built-in memory. DV
485 can detect an external storage media and put the last detected storage as a priority
storage site. If there is no external storage detected, all video clips will be saved in the
built-in memory.
8.RECALL:Enable image recall mode, displaying the saved images and video clips.
9.P/N: Switch the image display between positive and negative.
10.LAMP: Toggle arm light, back light and no light.
11.MIR:Flip the current displaying image.
12.FRZ: Freeze the displaying image .
13.DIV2:Split the displaying image.
14.AUTO: Adjust white balance and focus automatically.
15.ZOOM+, ZOOM-: Zoom in and zoom out the current displaying image.
Page 7

4
4.ANNOTATION
The annotation function will be activated by connecting a USB mouse to the document camera.
We will see the following icons by clicking the left button on a mouse:
1. :Clicking this icon, the whiteboard function is activated. The image captured is now
subjected to annotation. To switch back to the real-time camera mode, click icon .
2. :Clicking this icon, the current image will be saved and annotation function activated.
In annotation mode, click the following icons to choose the color of annotating pen.
Yellow, Red, Blue.
3. :In annotation mode, click this icon to delete annotation, there are two types of deletion:
: area clear : all clear.
4. :In annotation mode, click this icon to choose the thickness of the pen, there are 3
options: Thin, Medium, Thick.
5. :Click to capture and save the image.
6. :Click to start recording, click again to stop recording and save the video clip.
7. :Click to recall the saved images or video clips, meanwhile the annotation function is
activated, click again back to camera image. Press and hold left key on mouse for at least
three seconds to delete this image.
8. :Click to rotate the image(90°,180°,270°)
9. :Click to go to control menu.
:Image zoom in and zoom out control
:Image brightness control
:Adjust focus manually
:Perform white balance and focus automatically
Page 8
5
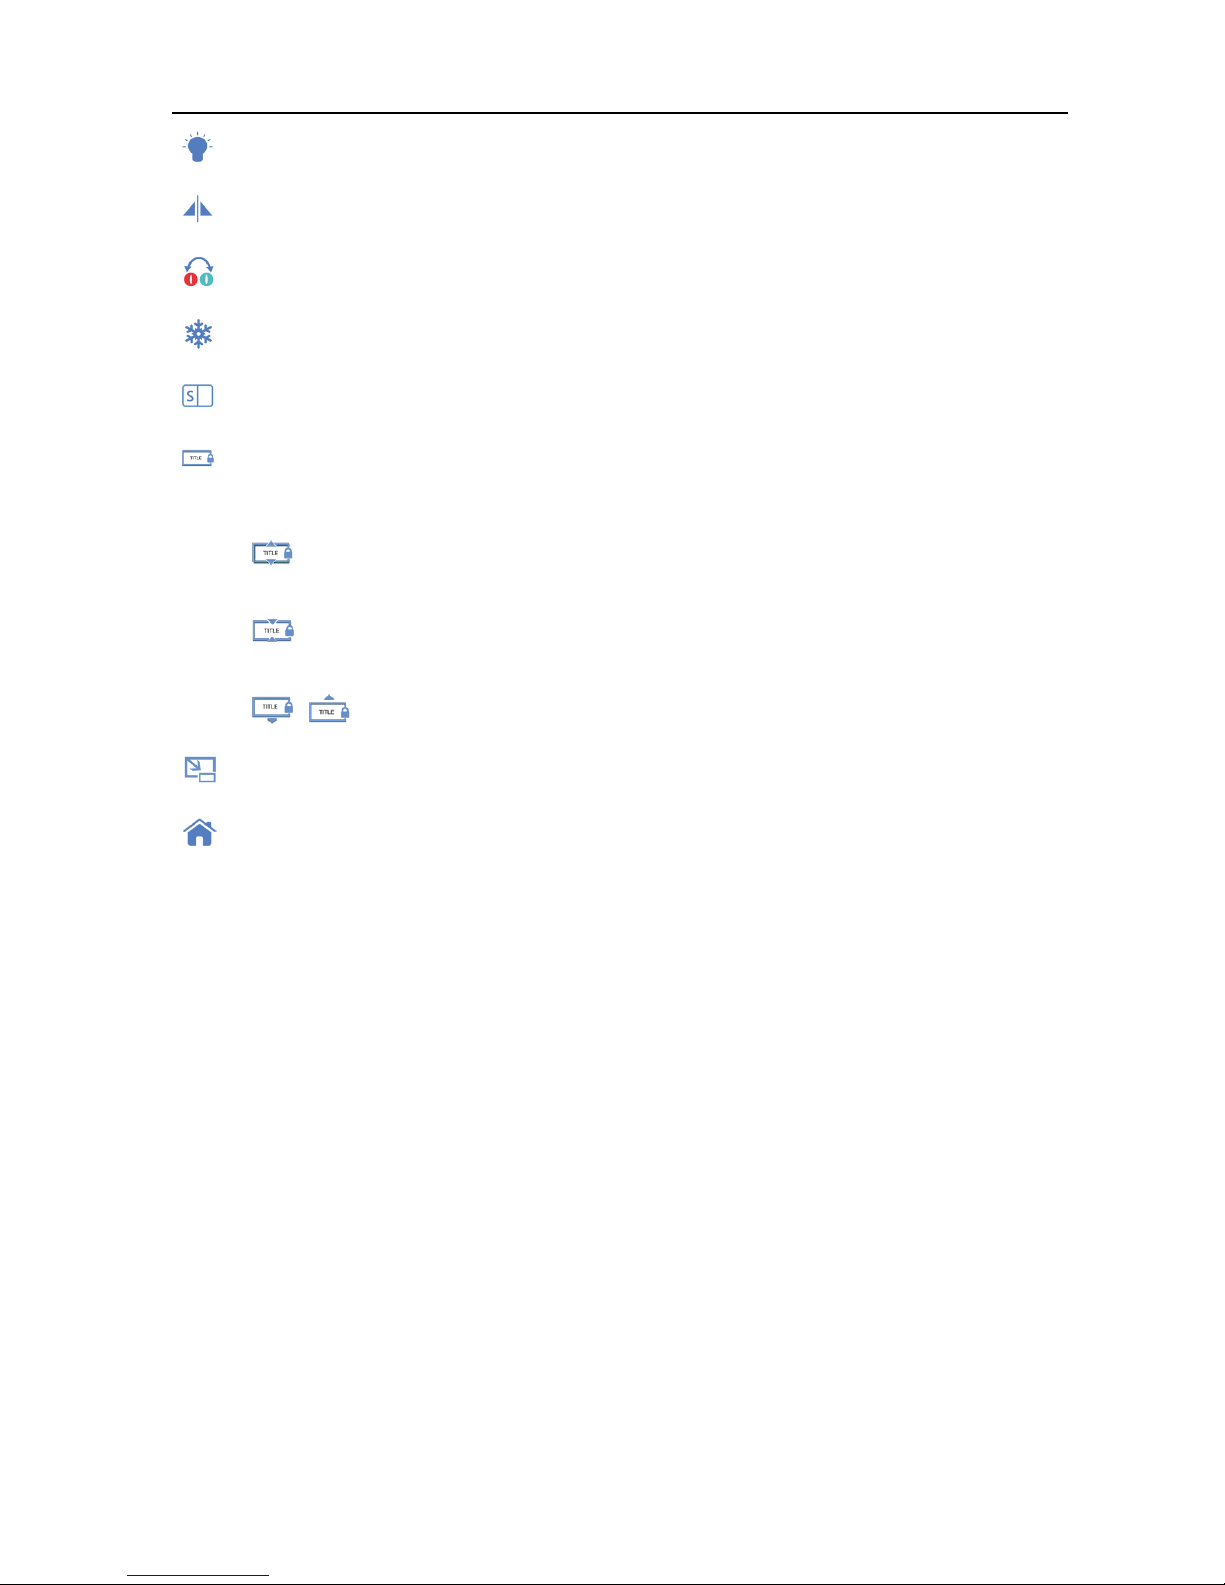
:Toggle arm light, back light and no light.
:Output the mirror image
:Switch the image mode between positive and negative.
:Image freeze
:Image split.
:Title freeze.
In Title freeze mode, there are 4 buttons used to adjust the title function:
: Enlarge the frozen title area
: Reduce the frozen title area
: Adjust the frozen title position.
:Picture in picture
:Click to go to start page of the embedded multimedia system.
Page 9
6
5.MULTIMEDIA SYSTEM
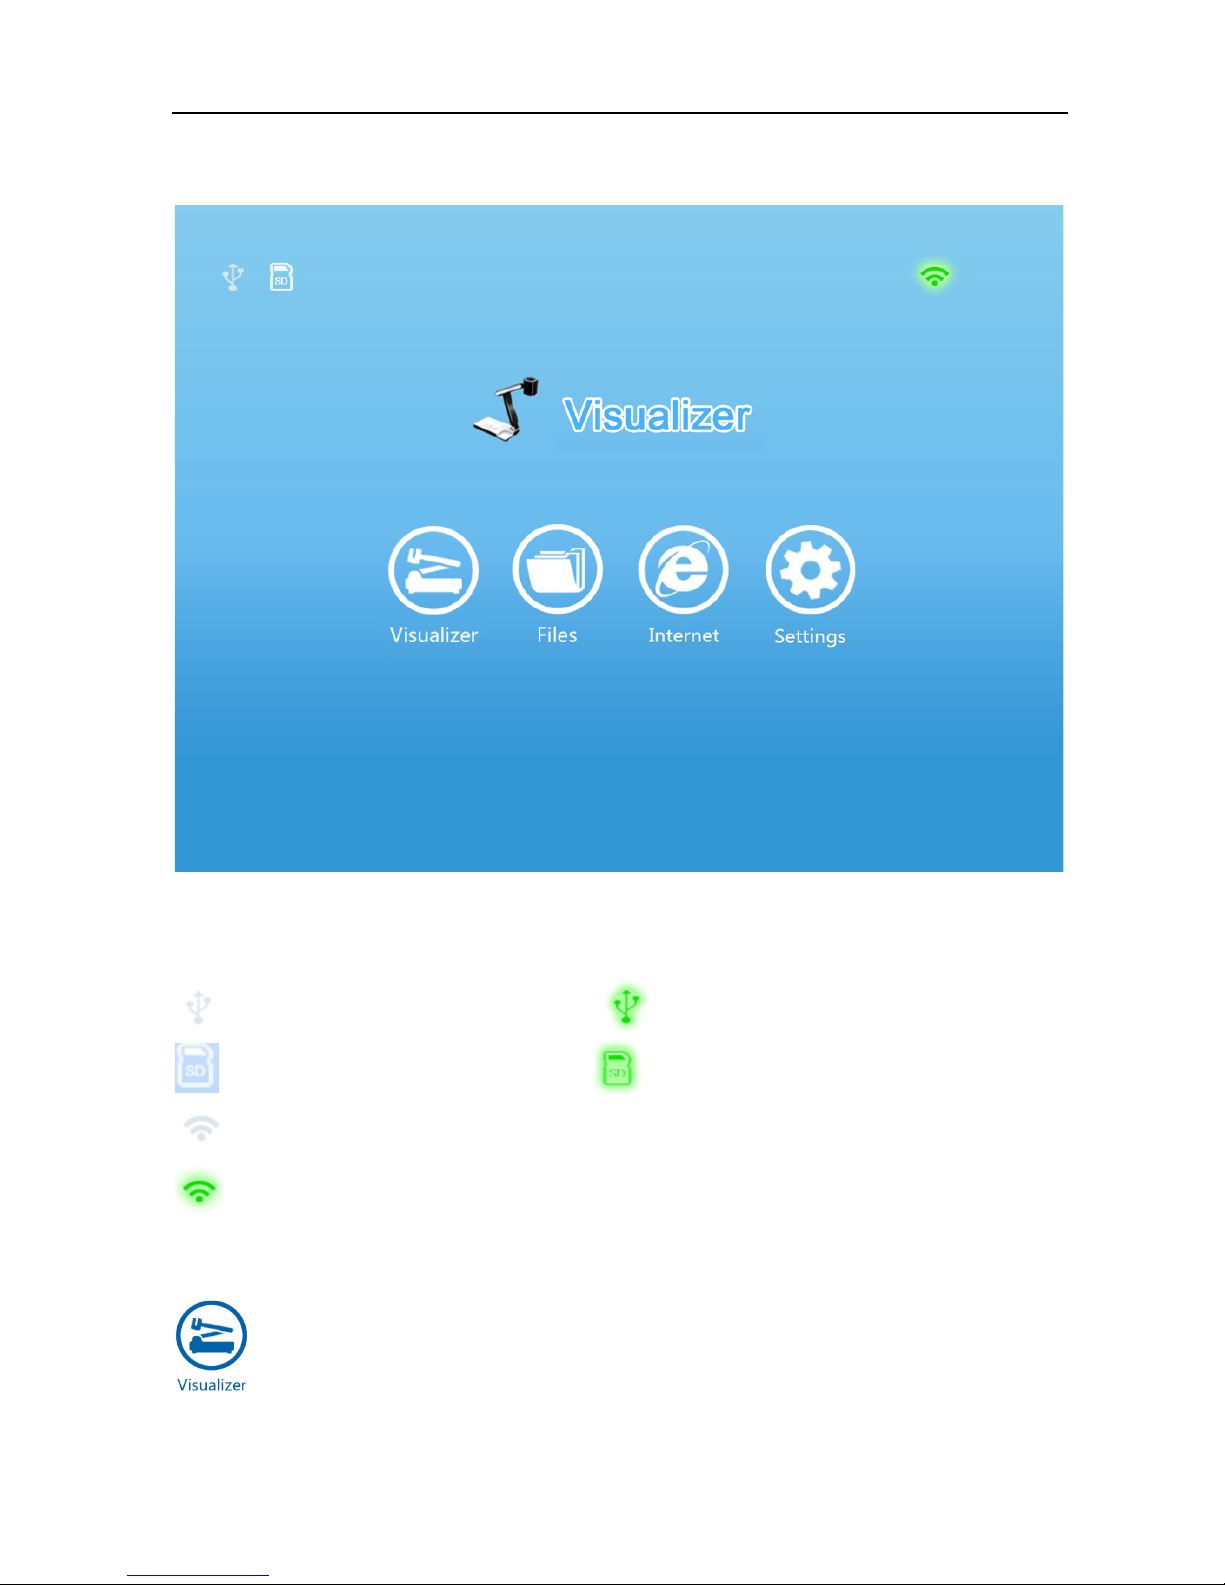
Under the main system interface user can find tips column and function column.
1. Tips column
indicates no USB flash drive plugs in indicates USB flash drive plugs in
indicates no SD card plugs in indicates SD card plugs in
indicates document camera’s wireless function has been disabled
indicates document camera’s wireless function has been enabled
2. Function column
:Go to real-time camera image.
Page 10
7
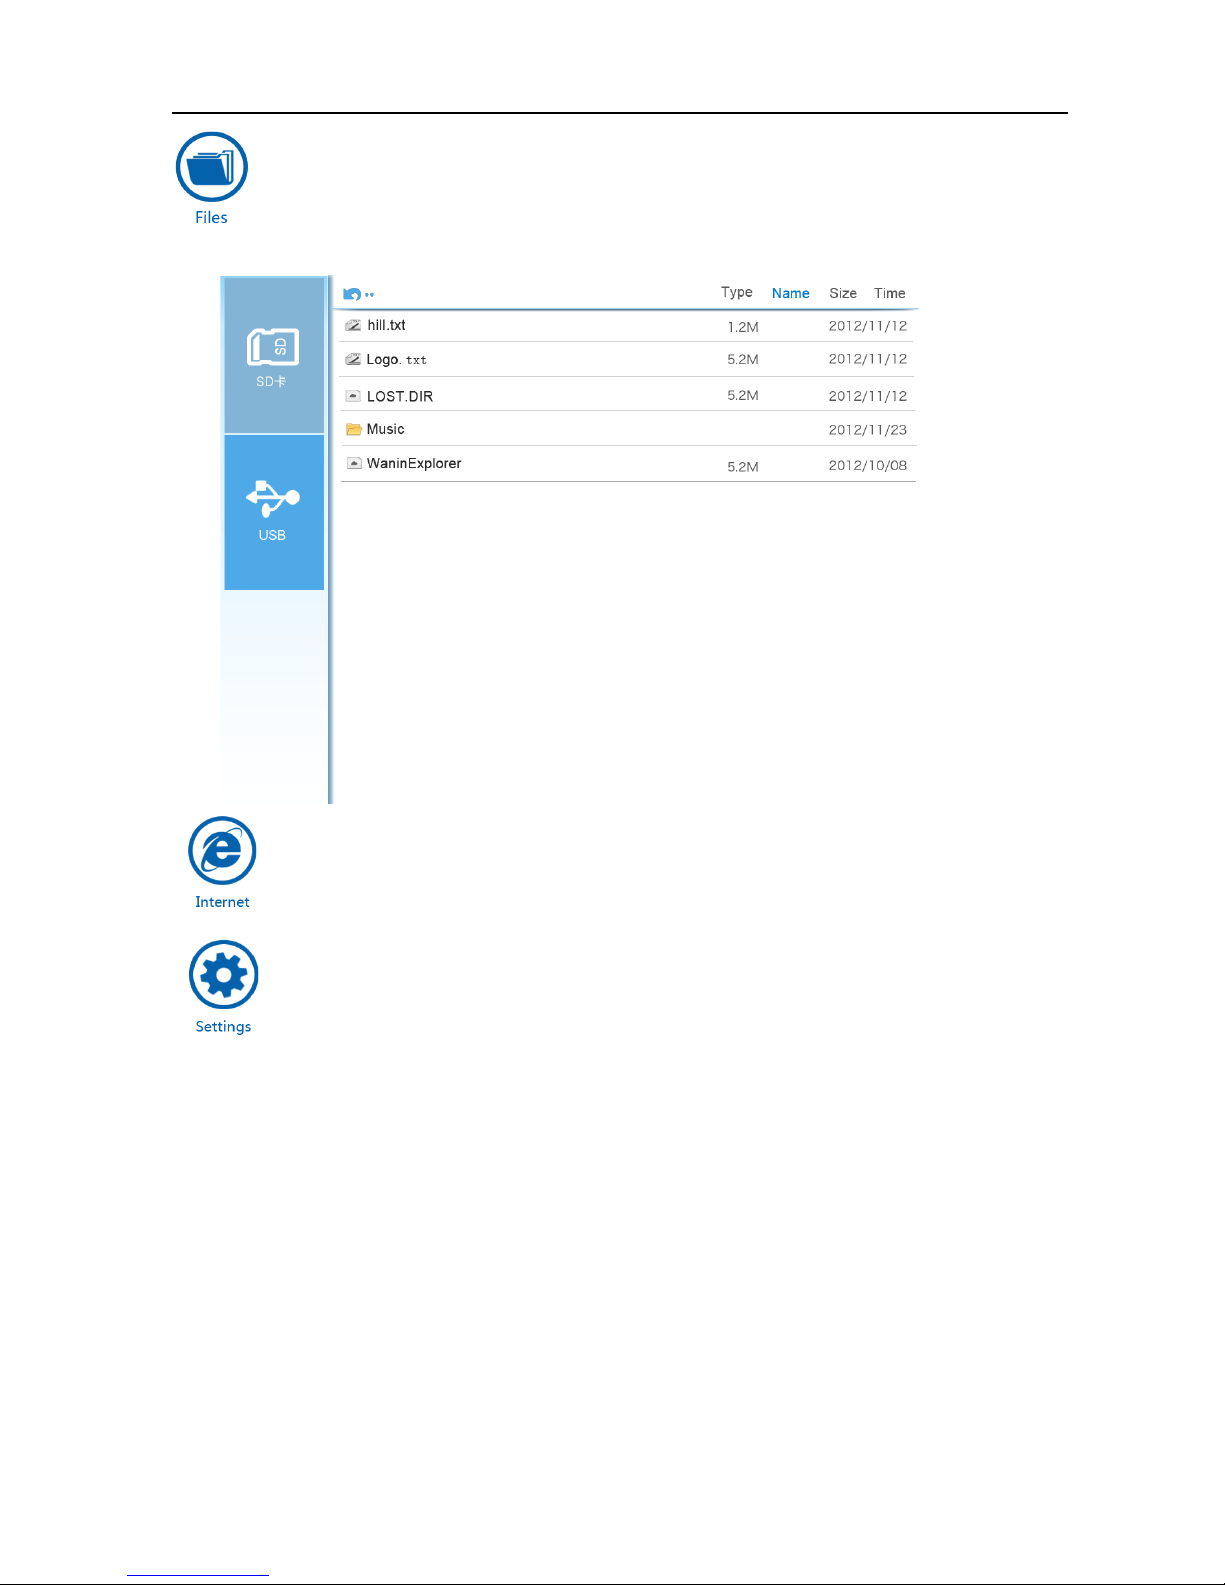
:Open the files saved in SD card or memory stick that connected to the document
camera(see the screen shot below)
:Browse the webpage
:System settings
Page 11
8
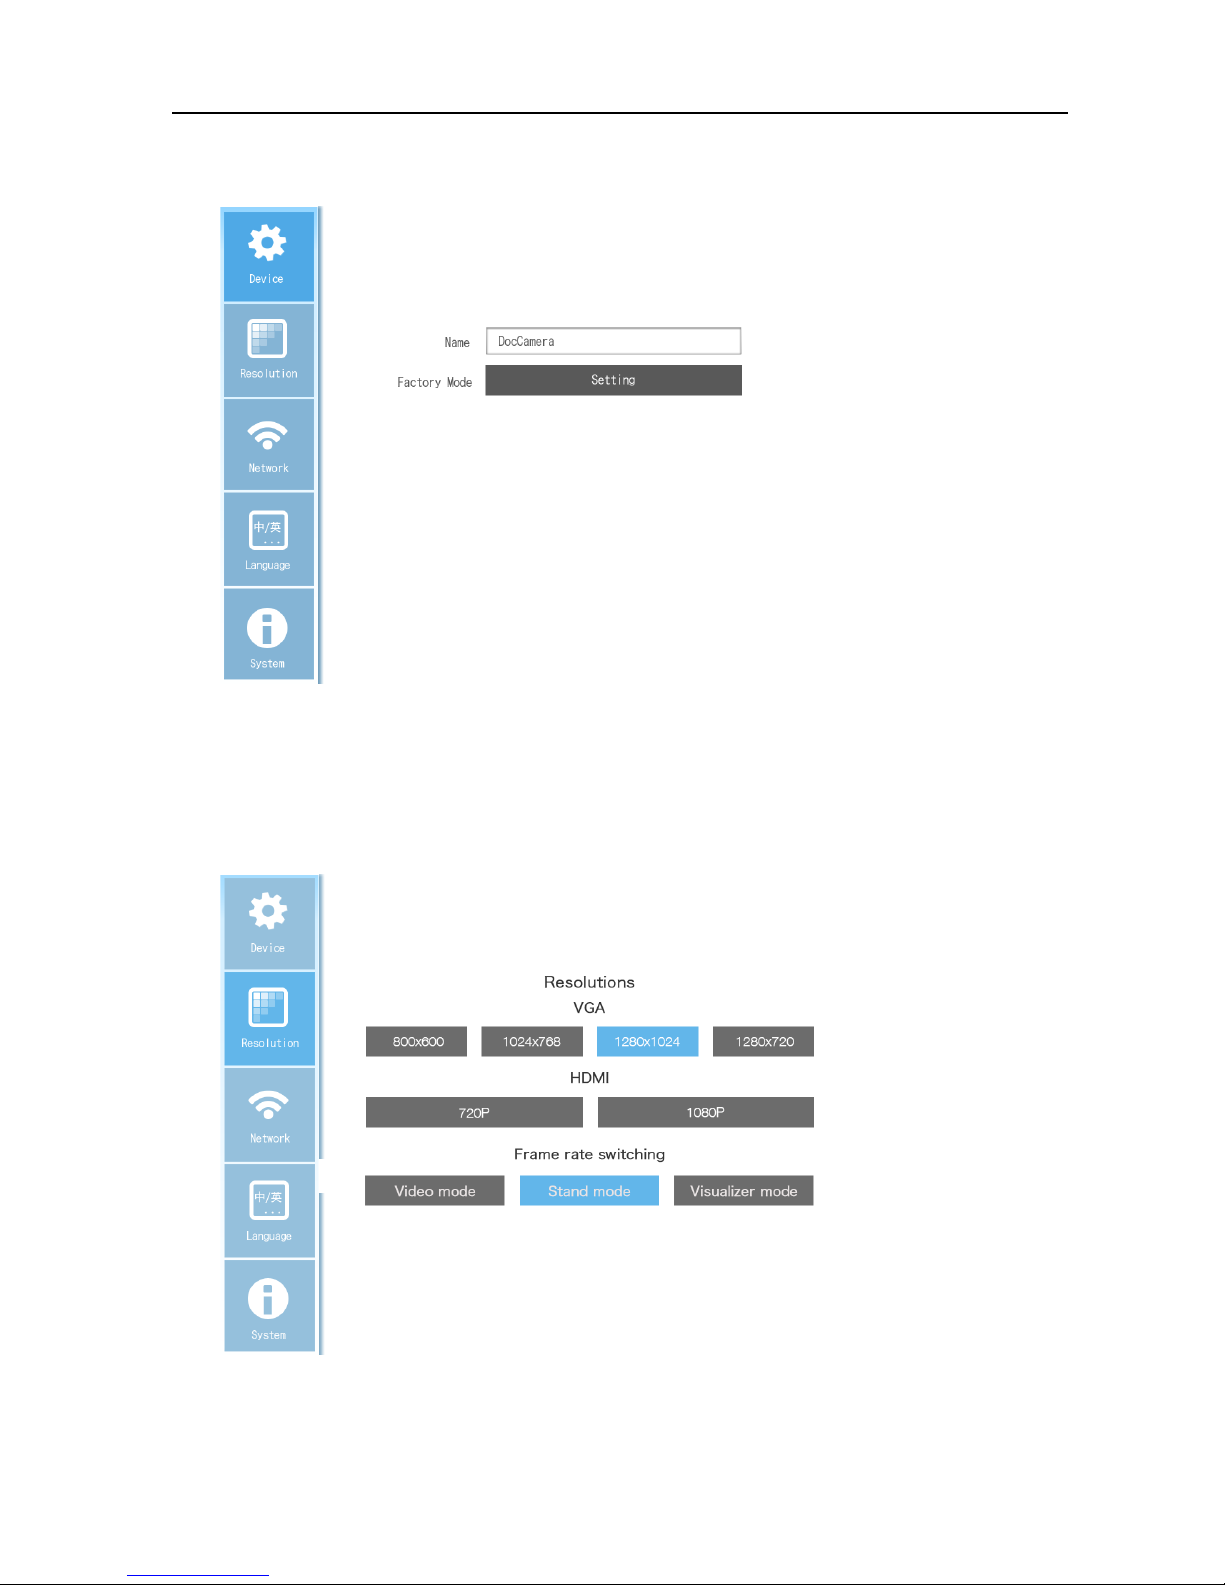
Settings(
1. Device
Name :Define the SSID of the document camera.
Factory Mode: Enter to adjust the parameters of document camera. Please contact the dealer
for professional assistance.
2. Resolution
Select the suitable output resolution of the document camera.
Note: Document camera will be restarted after switches resolution.
Page 12
9
Frame rate switching:
Video mode: Frame rate: 30fps
Stand mode: Frame rate: 22fps
Visualizer mode: Frame rate: 12fps
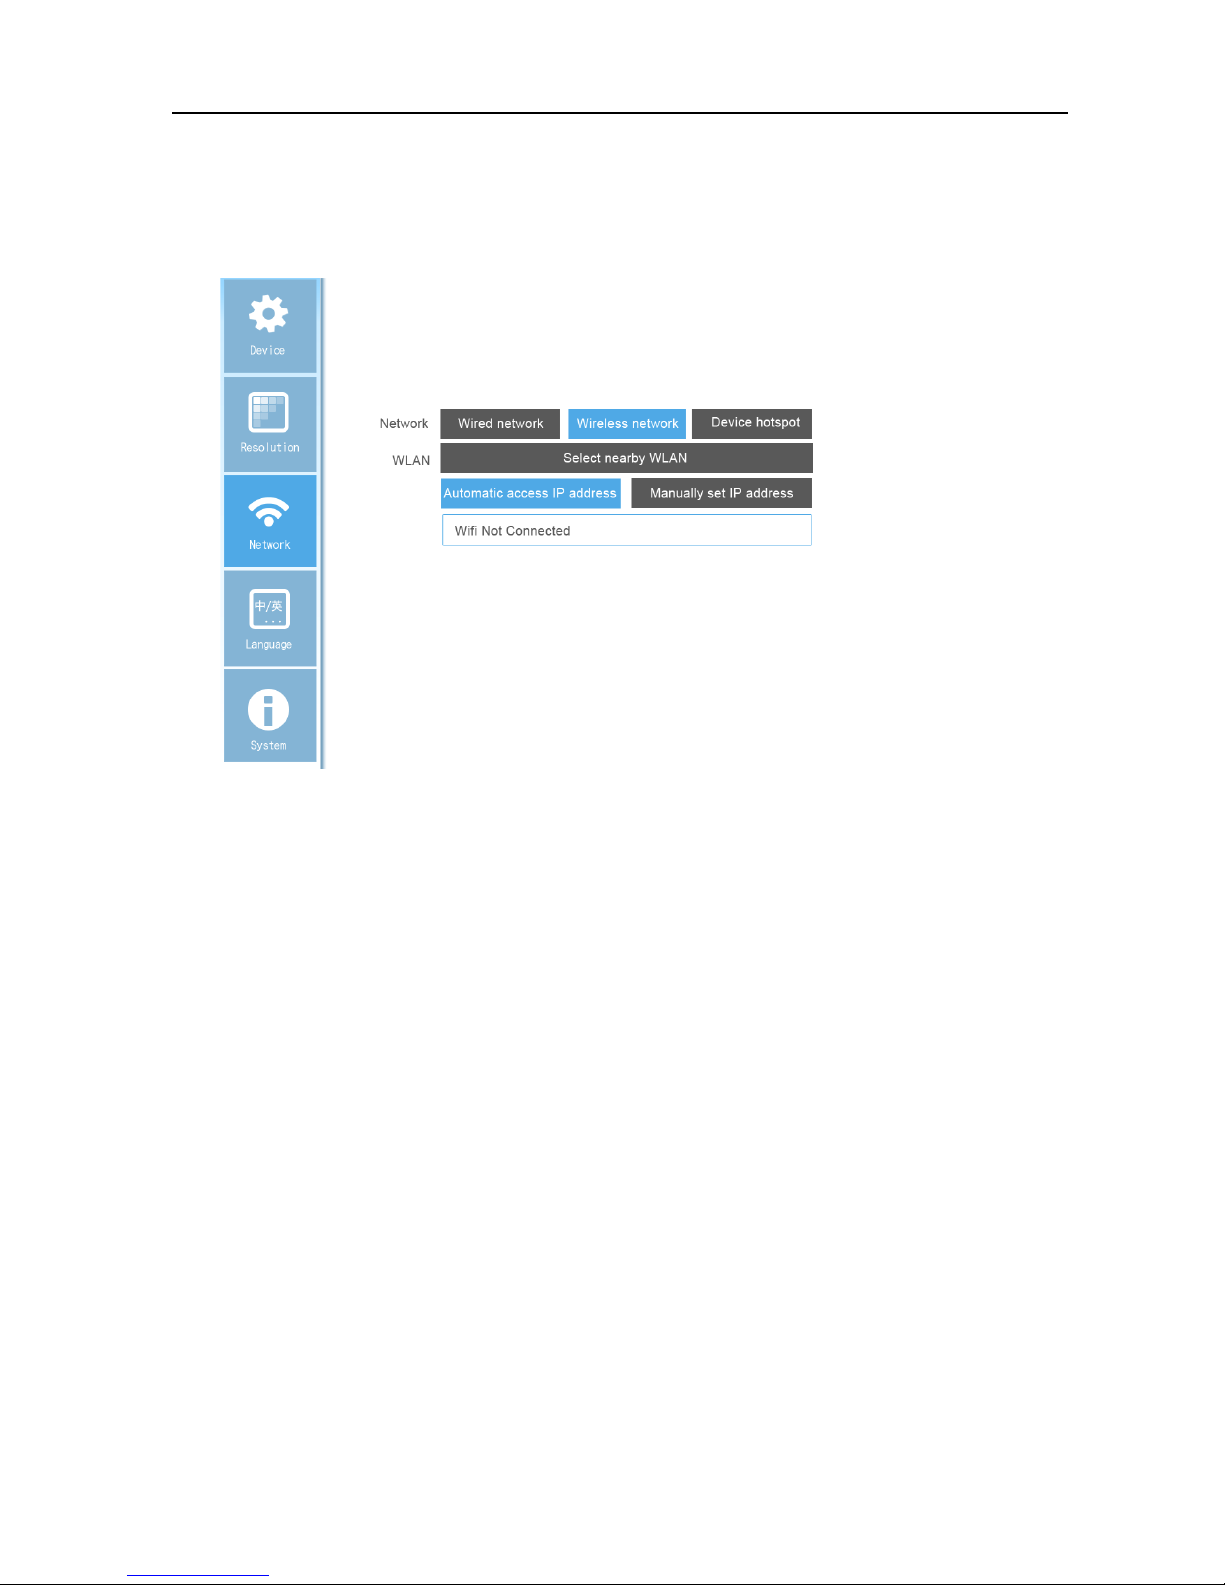
3. Network
Network:
Wired network: Select to connect to a router with cable via LAN.
Wireless network: Select to connect to an external Wi-Fi network.
Device hotspot: Select to connect to the embedded Wi-Fi network.
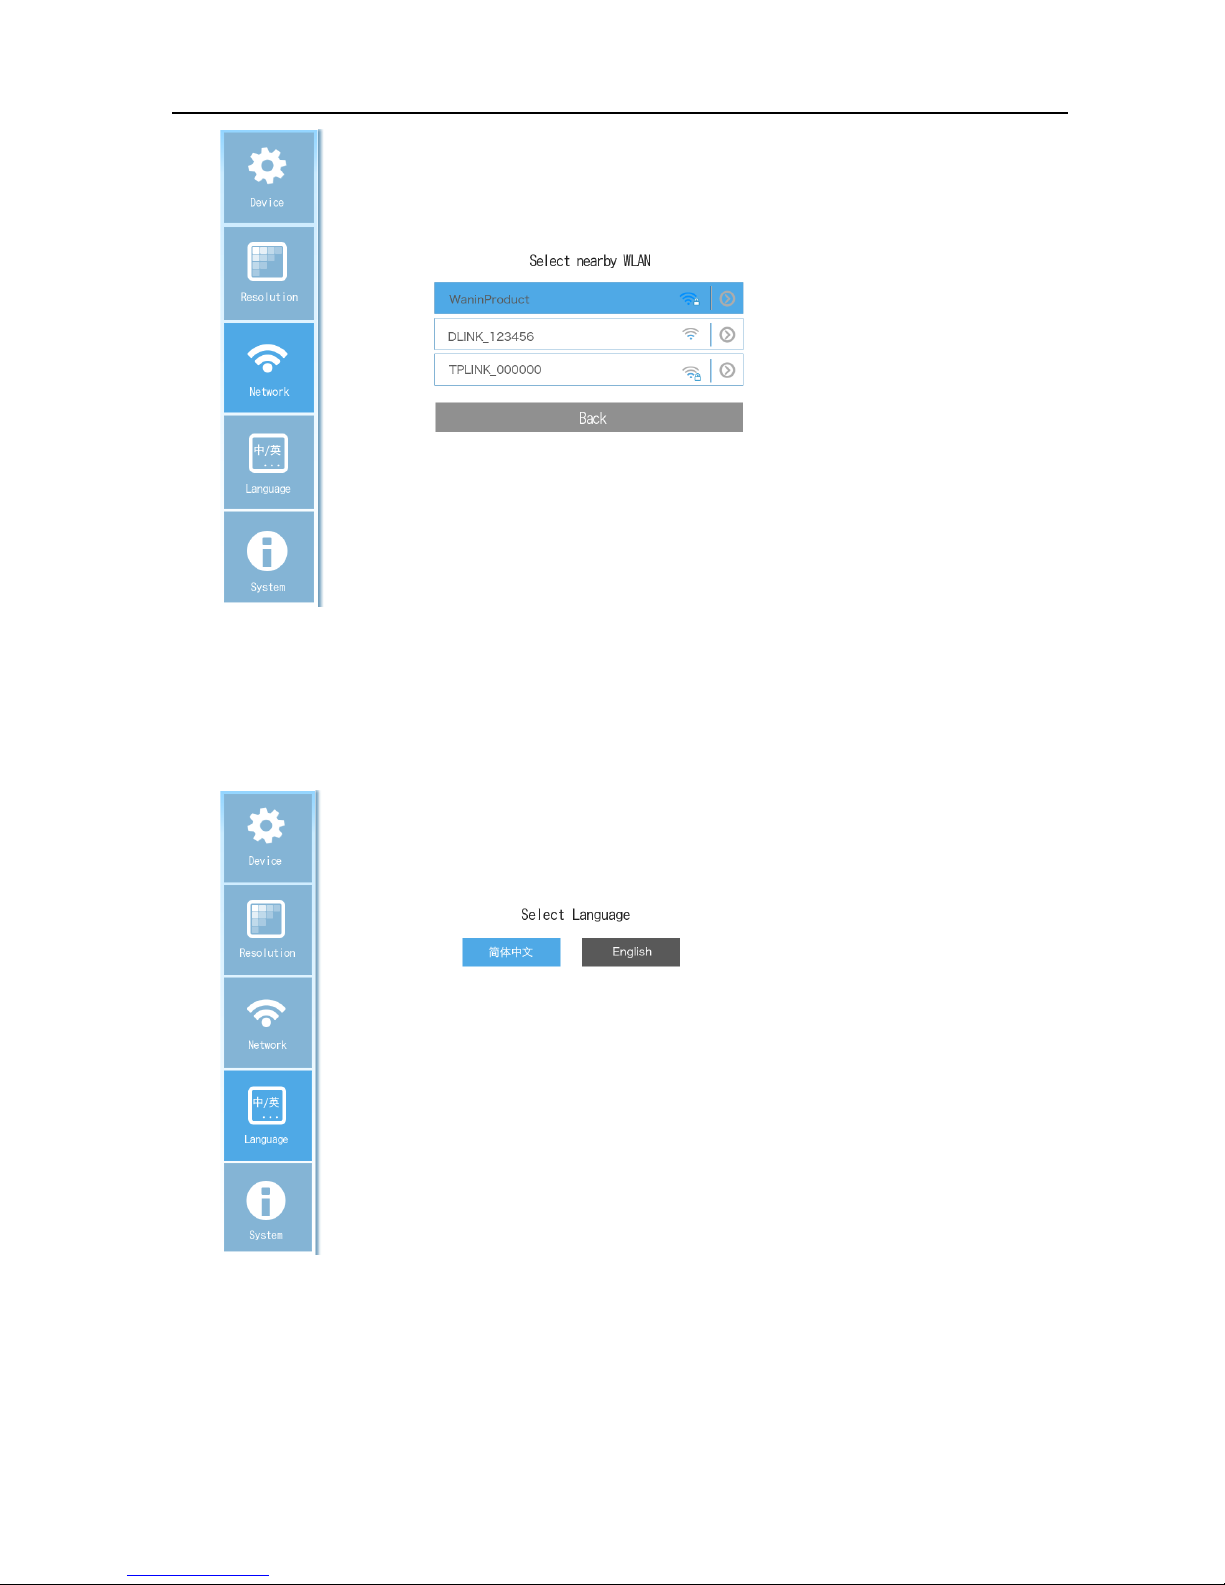
WLAN:Click to view and select the available external Wi-Fi networks.(see below)
Page 13
10
IP: Select to configure the IP address automatically or manually.
4. Language
Switch the system language between simplified Chinese and English.
5. System
Page 14
11
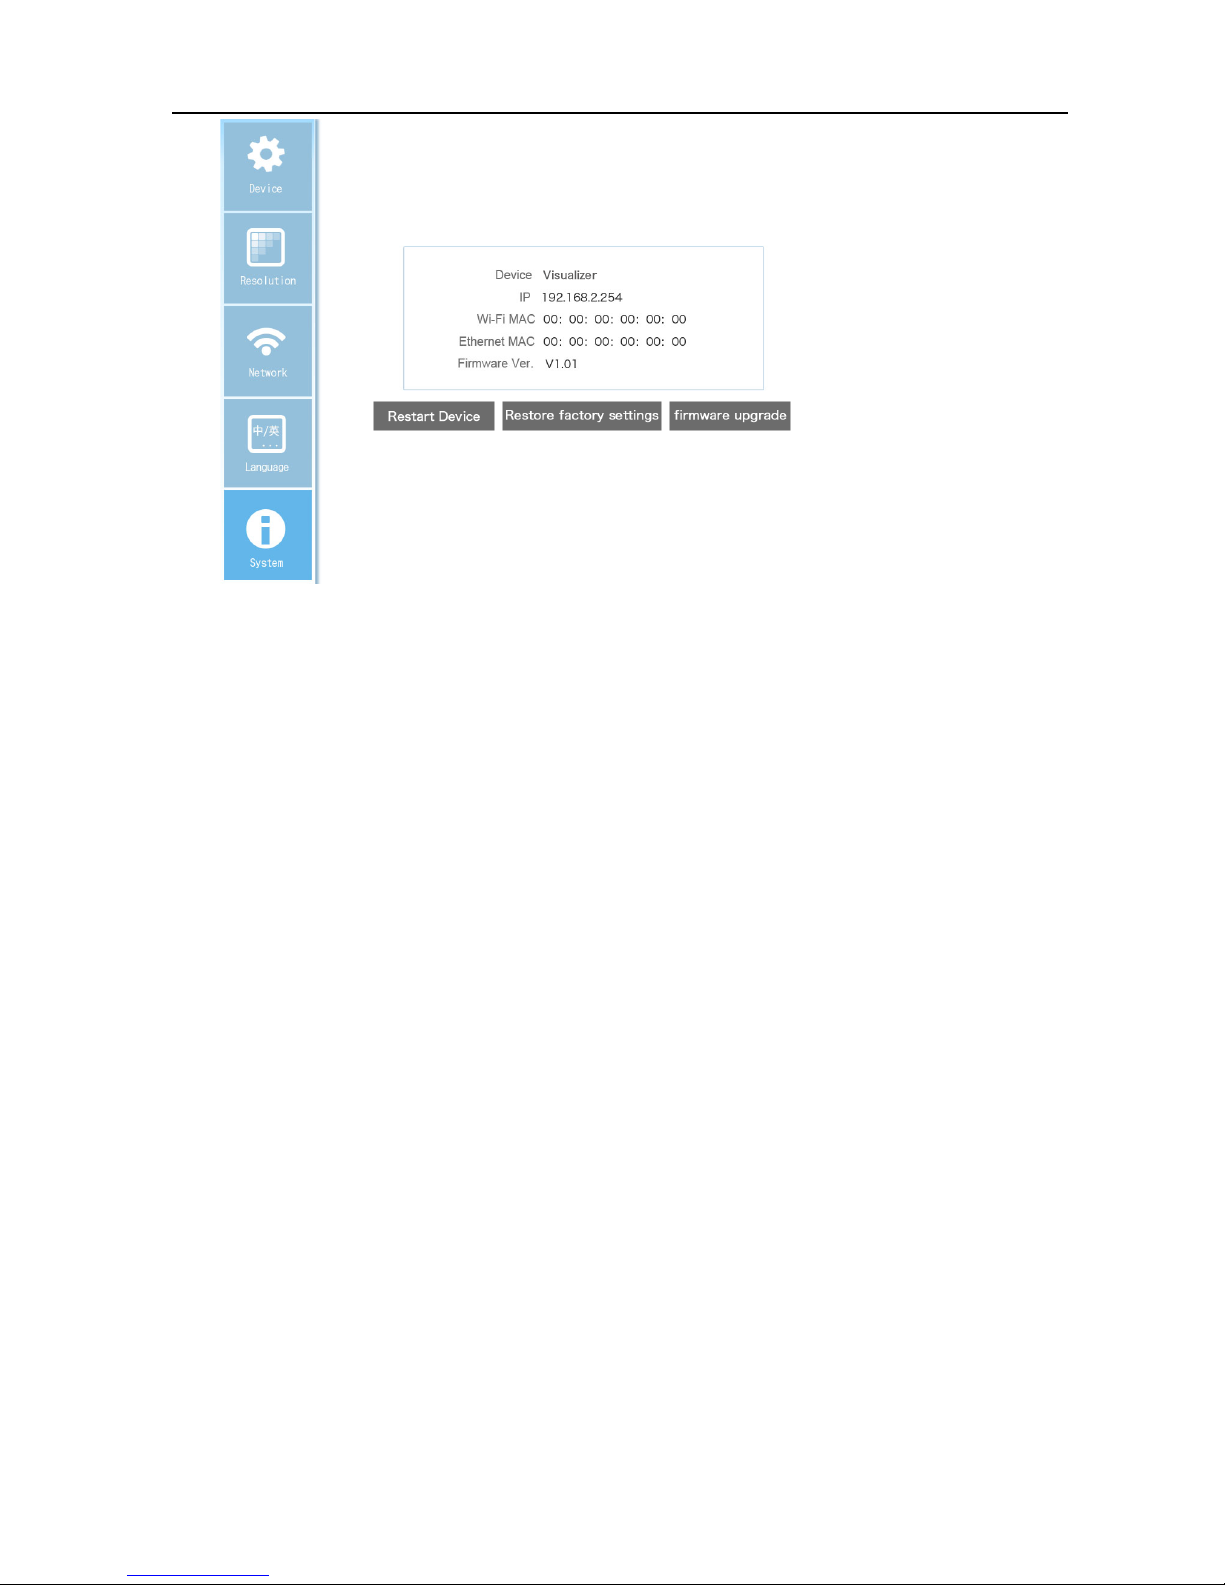
Please try restarting the device or restoring factory settings if there is a problem with the
system.
Click “firmware upgrade” to start upgrading system firmware.
Note: There is risk involved in upgrading the firmware ,please upgrade under the guidance of
professionals.
Page 15
12
6.SOFTWARE
(
Software(Installation(
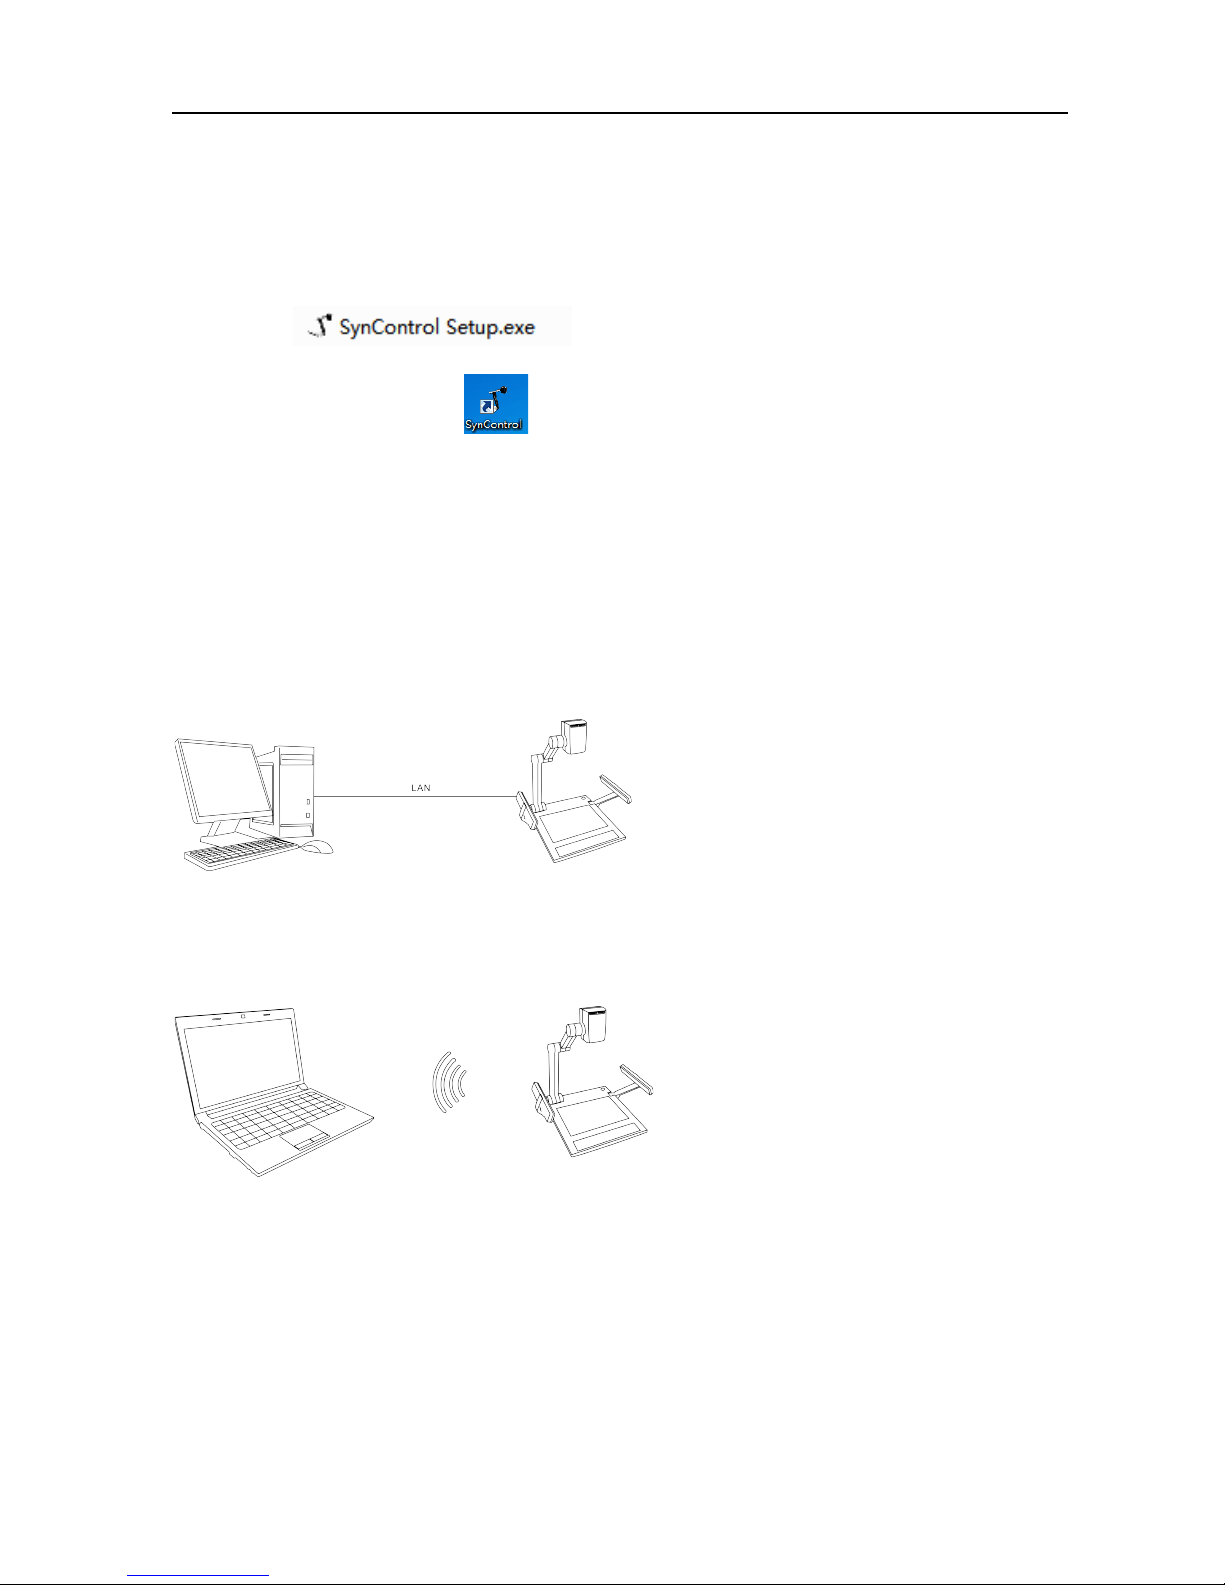
There are 3 types of software in CD for different operation systems, here we take the software of
Windows system for example.
Double click in CD to install the software to your PC, there will be
a generated icon on the desktop .
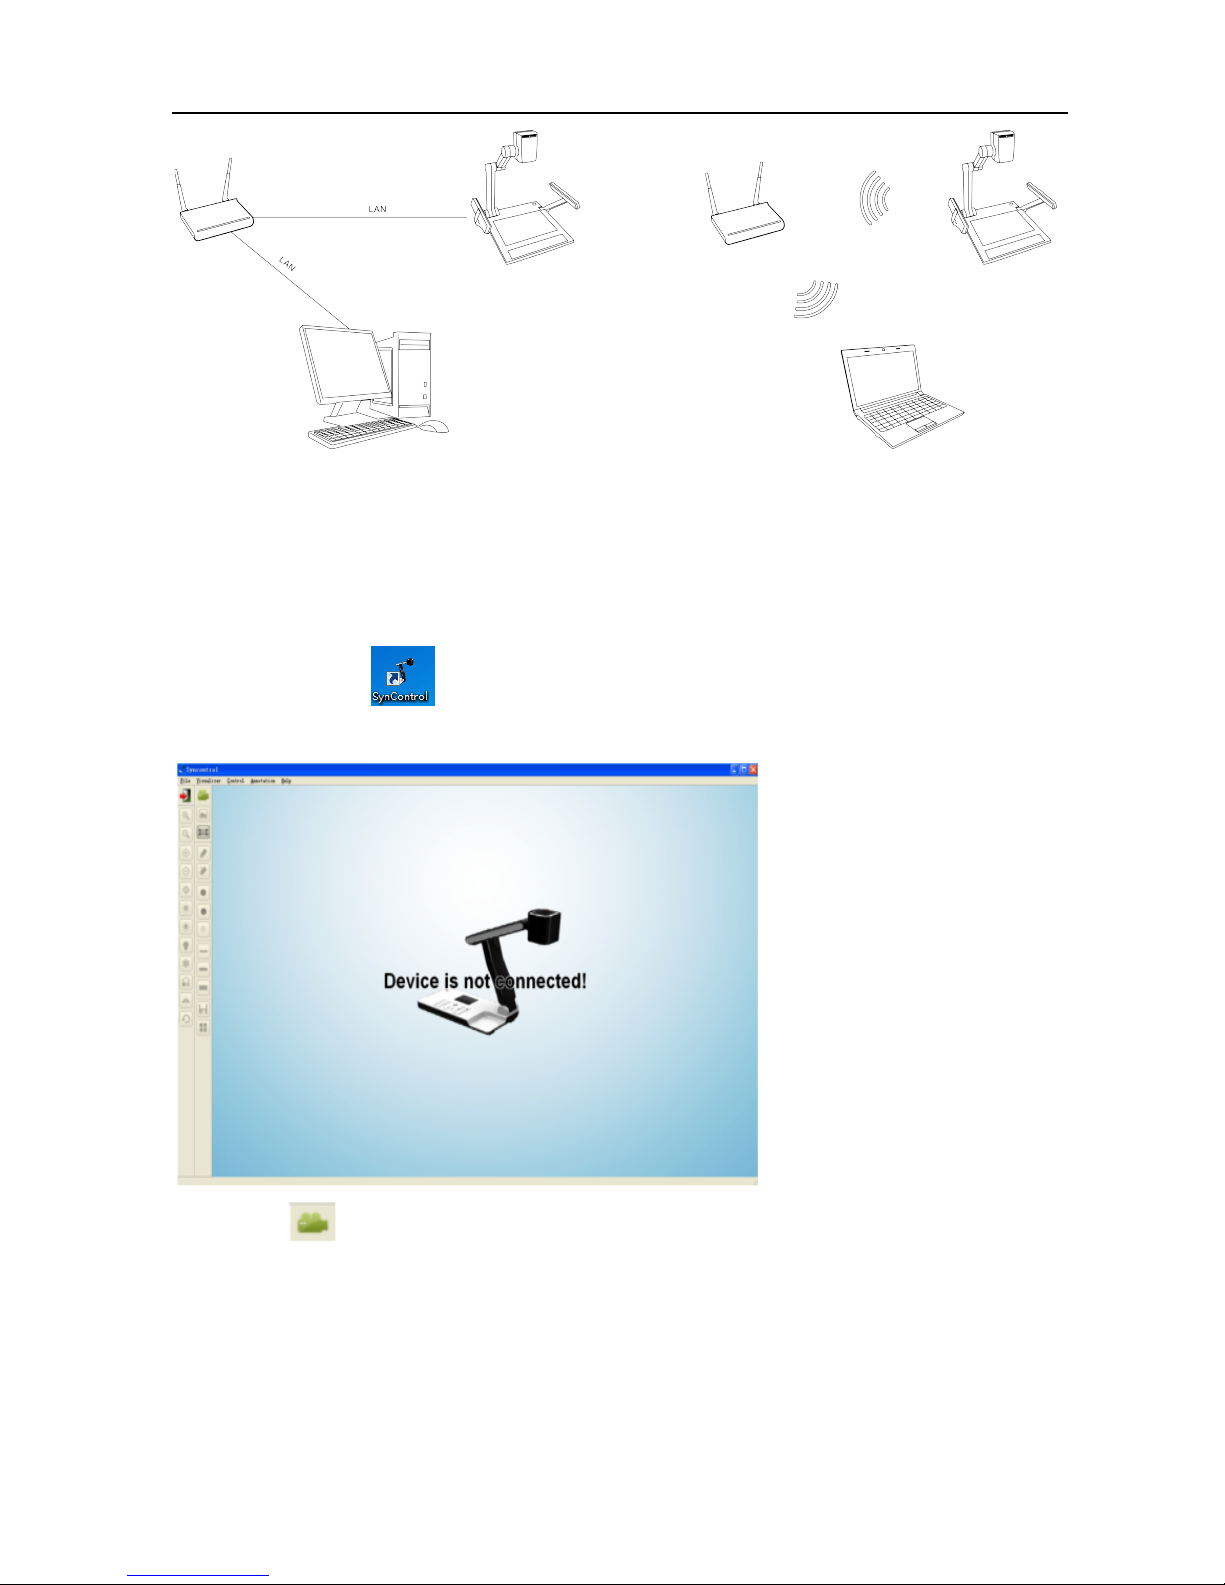
Connection(
Option 1
Select “Wired network” in network setting of the document camera.
Select “IP automated acquisition” in network setting of the PC.
Connect the document camera and PC with a network cable,
Option 2
Select “Device hotspot” in network setting of the document camera.
Connect the PC to the Wi-Fi signal of the document camera.
Option 3
Select “Wired network” or” Wireless network” in networking setting of the document camera.
Connect the document camera to a router with LAN or Wi-Fi.
Connect the PC to the same router with LAN or Wi-Fi.
Page 16
13
Wired network Wireless network
Software(Start(
Note: Please go back to Visualizer mode before start the software.
Double click the icon on the desktop.
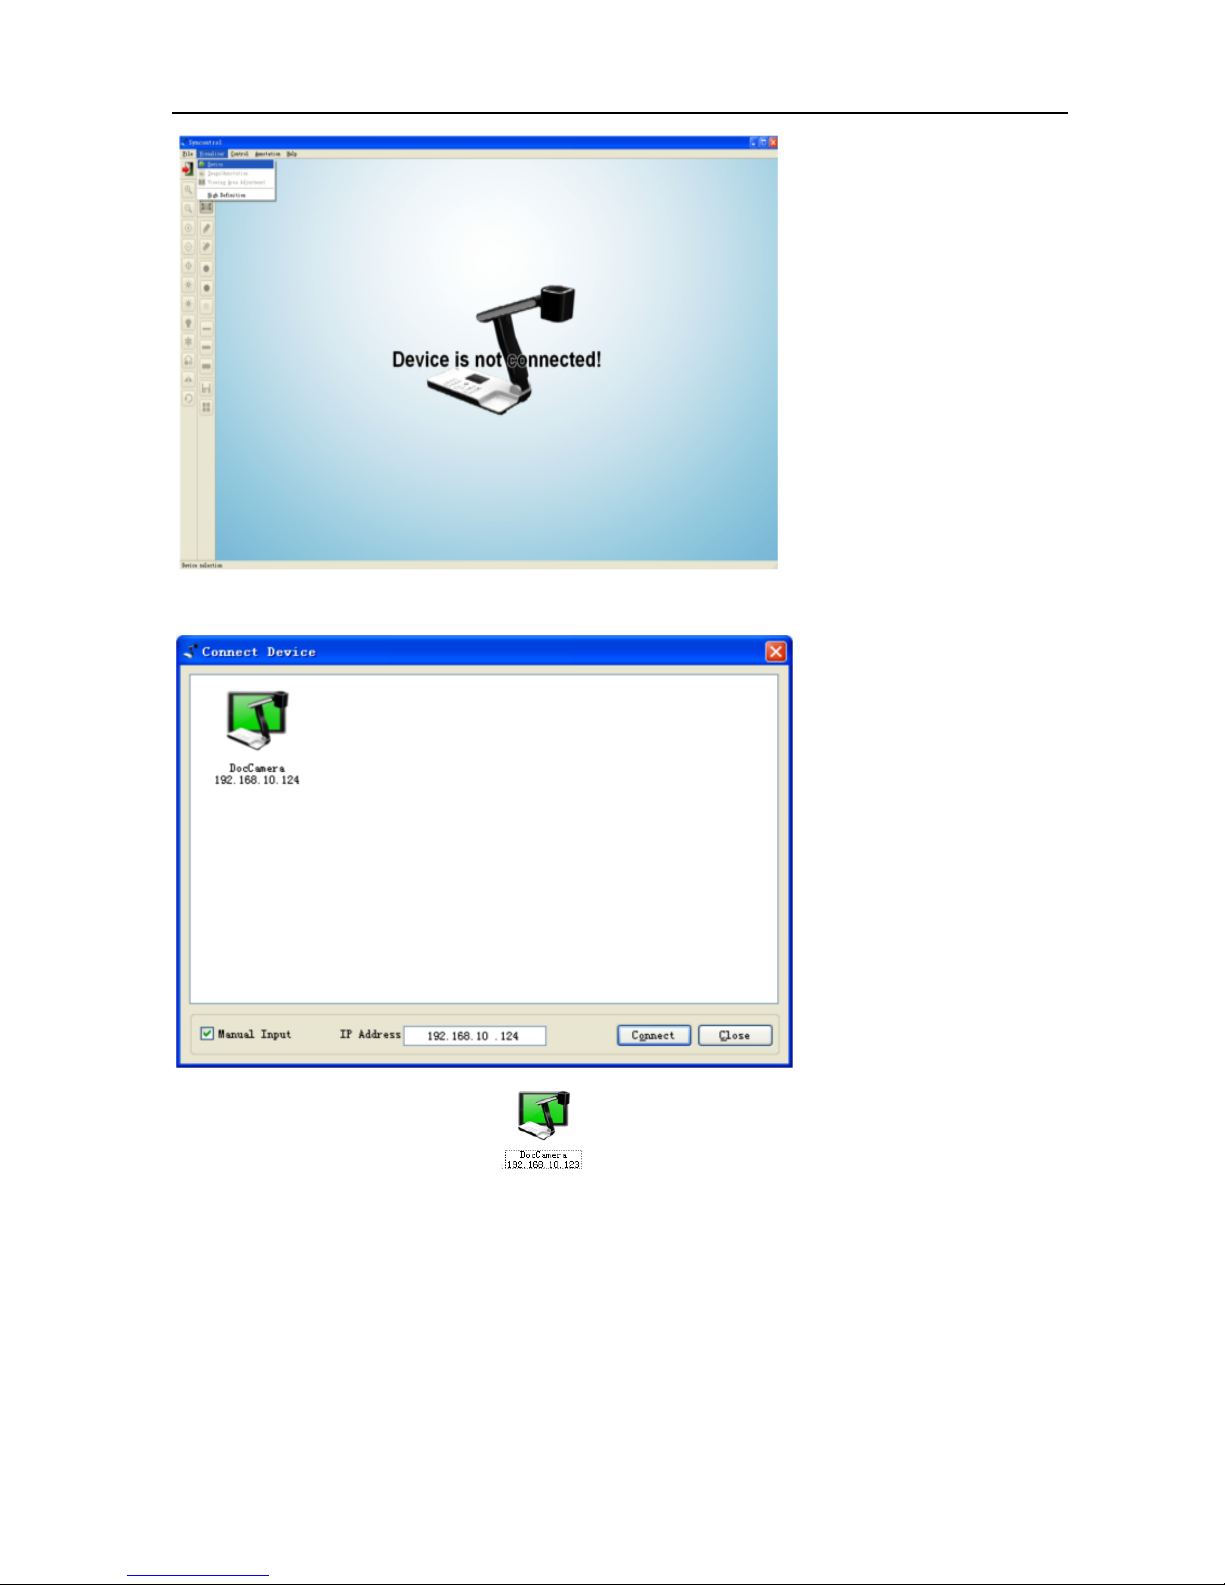
Left click on the left tool bar , or choose the “select” of “visualizer” in the menu bar.
Page 17
14
There will be a window lists all connected devices.
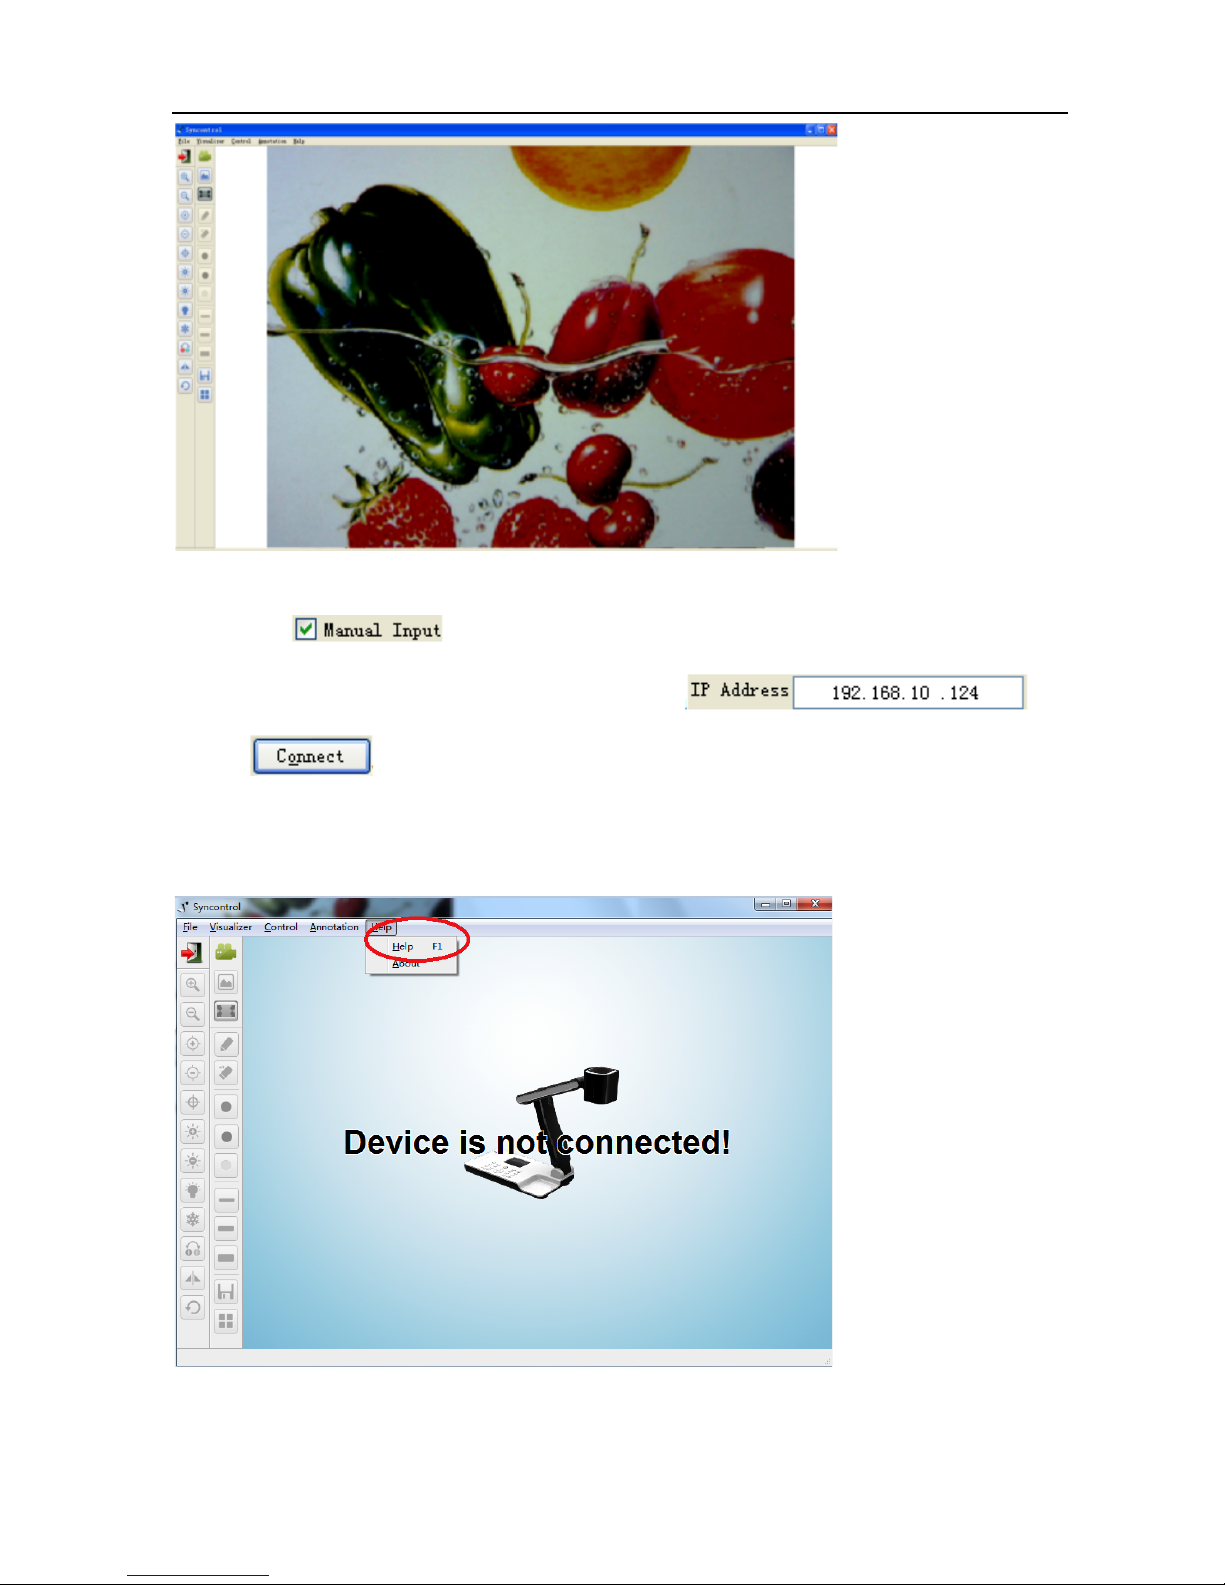
Double click the DocCamera icon to activate it, then the image from this camera will
be displayed.
Page 18
15
We also can choose to connect a device manually.
1) Tick the
2) Input the IP address of the device need to be selected .
3) Click to activate.
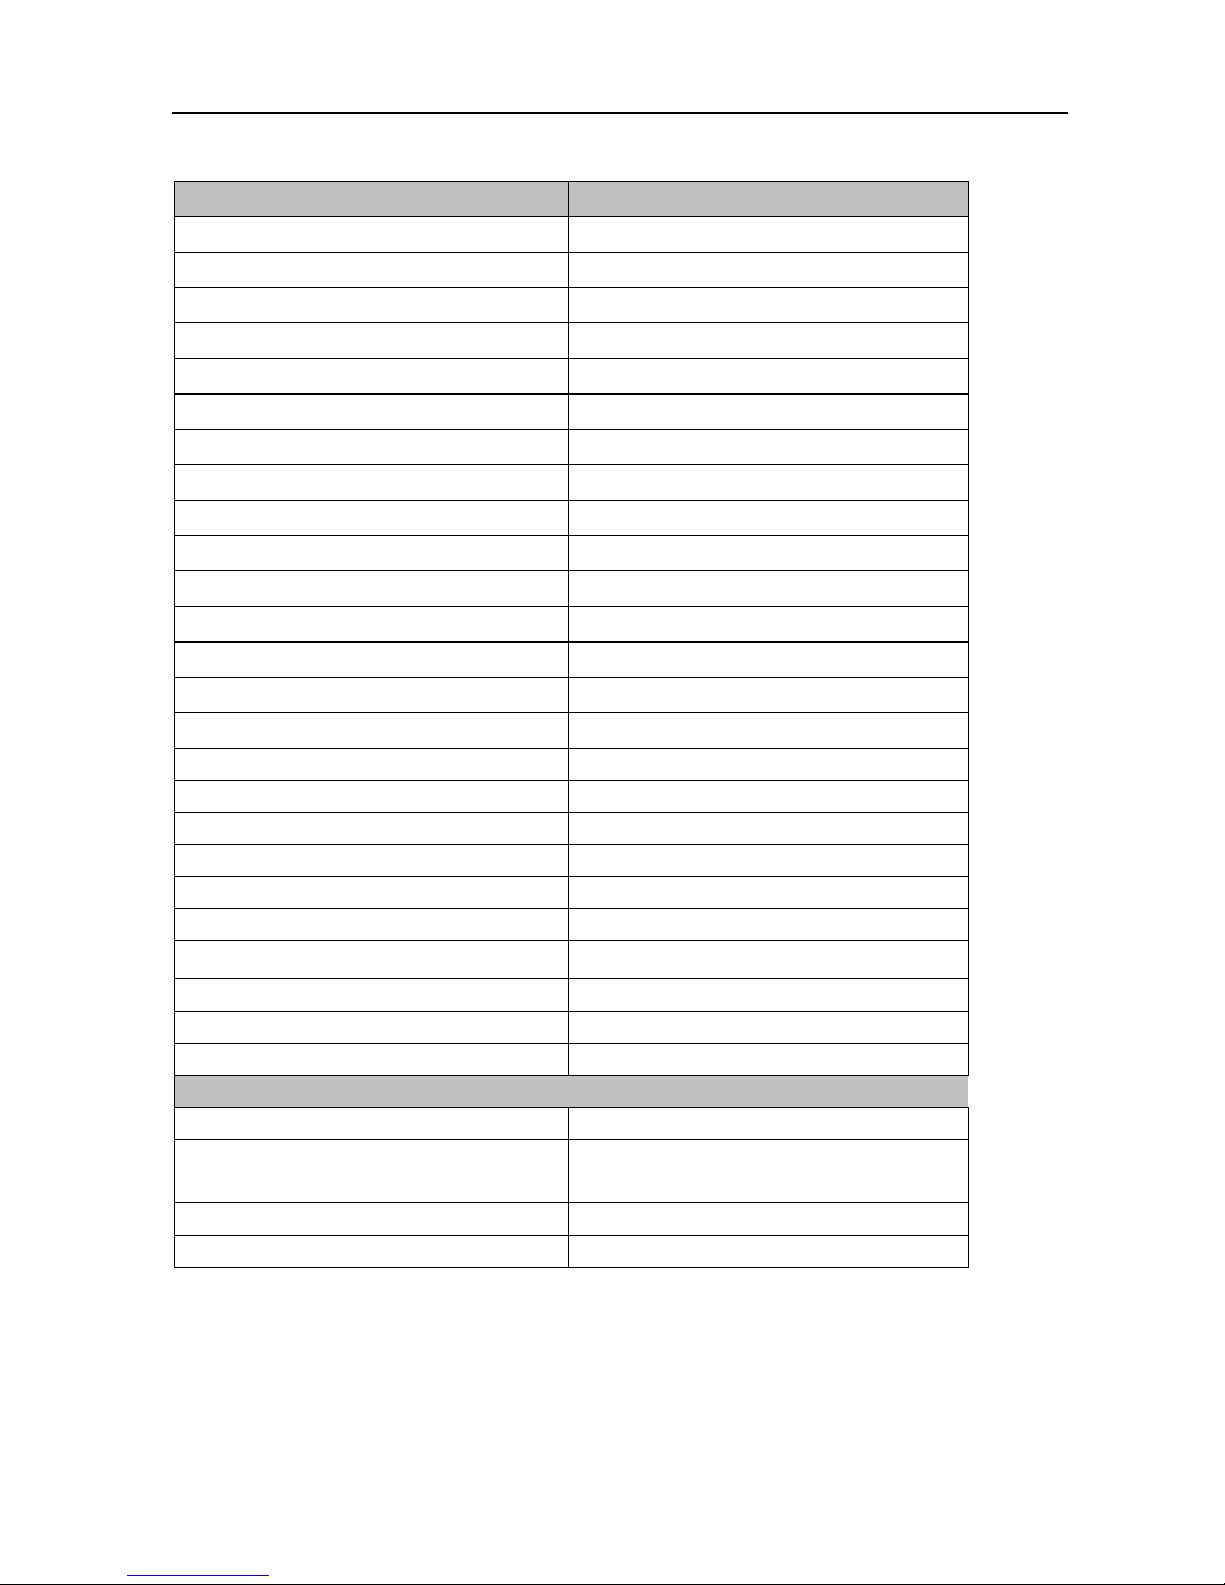
Please refer to the help for detailed information.
Page 19
16
7.SPECIFICATIONS
Model No.
DV 485
Sensor
1/3" CMOS
Zoom
9x optical, 20x digital
Frame rate
30
Shooting area
Max: 13.5"x10.6", Min: 0.1"x0.1"
Focus
Auto/manual
Native output signal
SXGA(1280x1024@60Hz)
Converted output signal
XGA,720P, 1080P
Resolution (Horizontal)
≥ 750 TV lines
White balance
Auto/manual
Brightness adjustment
Yes
image capture
Yes, on-board 400 images
Video recording
Yes
Image mirror
Yes
Image rotation
90/180/270
Image split
Yes
Picture in picture
Yes
Positive/negative conversion
Yes
Image freeze
Yes
OSD
Chinese/English
Inputs
VGA×1,HDMI×1
Outputs
HDMI×1,VGA×1,Audio×1
USB2.0
Host×2, Slave×1
Software
Windows XP /7 or above, Mac
LAN
x1
SD card slot
x1
Light source
Arm light×2, A4 size lightbox(LED)
Dimensions
Folded: 15.9"x16.7"x6.1"
Setup: 18.7"x16.7"x22.3"
Power supply
12V DC power adapter
Weight(net)
4.5Kg
Page 20

17
8.SETTING UP
1. Remove all the packing
materials. Unfold the light
arms to the end position.
2. Raise the camera arm completely.
3. Rotate the camera head until the
lens face the center of the base unit.
4. Connect the VGA OUTPUT of
the document camera to the
VGA(RGB) INPUT of the display
(monitor, television or projector) with
the provided VGA cable.
5. Connect the HDMI OUTPUT
of the document camera to the
HDMI INPUT of the display
(monitor, television or projector) with
the provided HDMI cable.
6. Get the document camera connected with
the power supply with the provided power
adaptor and cord.
Page 21

18
9.OPERATION PROCEDURES
1. General:
1). Turn on the power switch.
2). Place the target object on the base unit surface.
3). Adjust the image size according to the object size by pressing the ZOOM+,
ZOOM- buttons on the control panel.
4). Press the AF button for automatic focus and white balance.
5) Press Save/Record to capture and save the image/video clip to memory.
6). FRZ button can be used to lock the image while changing displaying materials.
7) DIV2 button can be used to compare the camera live image with a saved image in
memory side by side.
2. Display the PC signal:
Connect the VGA IN of the document camera to the PC OUTPUT with the provided VGA
cable, then press PC to display the PC signal.
3. Showing the 3D objects:
Use the FOCUS+, FOCUS- buttons on the front panel to adjust the focus on any part of
the 3D object.
4. Showing the transparent material such as an overhead transparent sheet:
Press the LAMP button to turn on the built-in base light, then press P/N, switch to
negative mode.
5. By-pass function
When turn off the power switch, the PC signal can pass through the document camera via
VGA in and VGA out.
Note: Please disconnect the power cable if document camera will not be used for a long
period.
Page 22
19
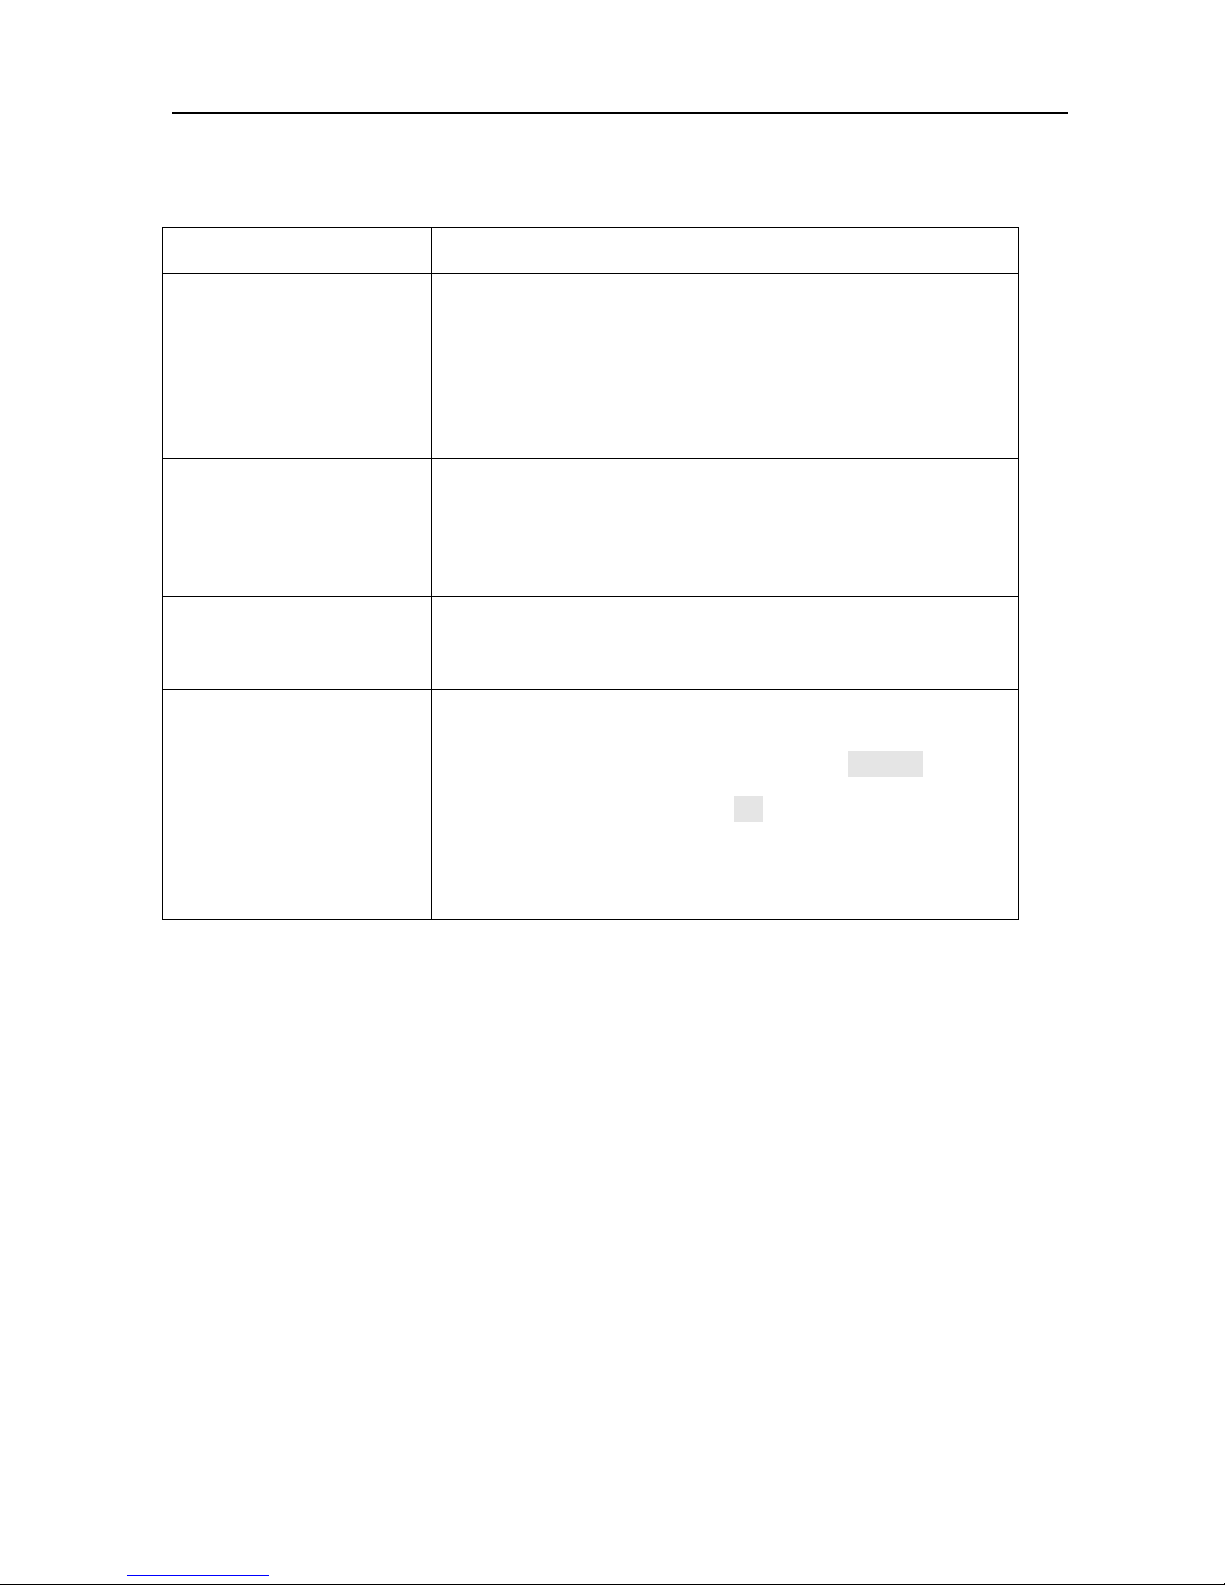
10.TROUBLE-SHOOTING
Symptoms
Possible causes/counter-measures
No image
1. Check the power cord and adaptor.
2. Check the VGA/HDMI cables that connect the document
camera and display device
3. Check the power switch.
Can not get PC signal
1. Check the VGA/HDMI cables that connect the document
camera and PC.
2. Press PC to switch to PC signal.
Image bending
1. Camera is not in right position, adjust the camera.
2. Press the “Auto adjust” of the LCD.
Out of focus or blurring
image
1. The object is too close to the lens.
2. Focus is on the top point of zoom press ZOOM-.
3. Auto-focus is not on: press AF again.
4. There is mist on the lens. It will disappear gradually
when the equipment warms up.
If the problem still remains after checking the above, consult your dealer or authorized service
for help.
Page 23
20
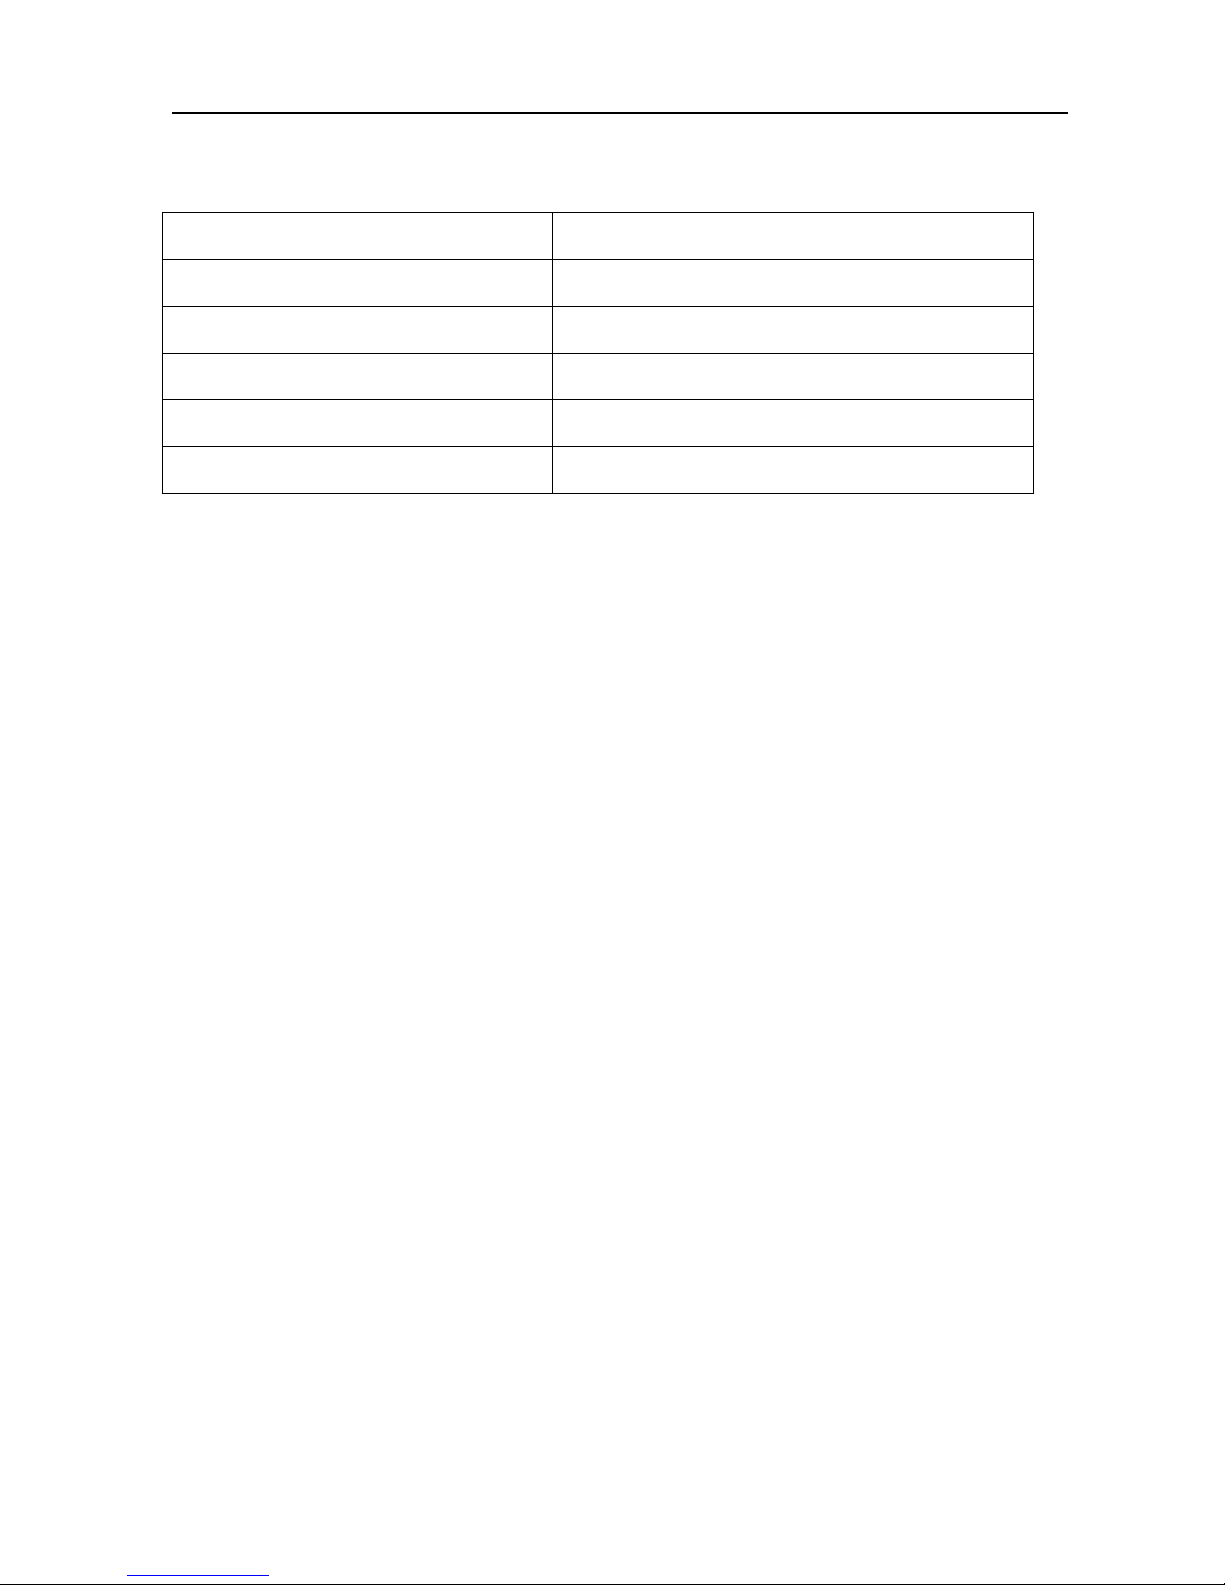
11.PACKING LIST AND ACCESSORIES
Items
Quantity
Power cord & adaptor
1
VGA Cable
1
HDMI Cable
1
USB Cable
1
CD(Software and user manual)
1
 Loading...