

Vidifox DV 480 User Manual
®
Vidifox
Document
Camera
DV 480
USER MANUAL
Please r
convenient place so you can use it quickly if you need to.
Please visit us at http://www.waninusa.com where you can
an
ead this User Manual thoroughly before you use the document camera. Keep the CD-ROM in
d answers to frequen
tly asked questions (
FAQs) and t
1
get product suppo
echnical ques
a
rt, the latest driver updates,
tions.

PRECAUTIONS
NOTICES: PLEASE READ CAREFULLY BEFORE USE
Use the document camera under the rated electric conditions.
Do not place the document camera on any unstable surface. It may fall and cause injuries or
damages.
Do not place this device directly under sunlight or near heaters.
Do not place this device near water.
Keep the camera away from acid or alkali gas.
Do not place this document camera in humid, dusty, windy or vibrant locations.
The recommended operating environment is:
Temperature: 32ºF-113ºF (0ºC--45ºC)
Humidity: less than 75%
Always unplug BEFORE cleaning the device. Use a damp soft-cloth for cleaning. Do not use
volatile solvent.
When this equipment functions abnormally, such as smoke, smell, noise, immediately unplug
and call for professional assistance.
Unplug the document camera or shut off the power w hen not in use.
Legal Notice
FCC Part 15
This device complies with Part 15 of the FCC Rules. Operation of this product is
subject to the following two conditions: (1) this device may not cause harmful interference, and (2)
this device must accept any interference received, including interference that may cause undesired
operation.
Compilation and Publication Notice
This manual has been compiled and published to cover the latest product’s descriptions and
specifications. The contents of this manual and the specifications of this product are subject to change
without notice.
Wanin USA reserves the right to make changes without notice in the specifications and materials
contained herein and shall not be responsible for any damages (including consequential) caused by
reliance on the materials presented, including but not limited to typographical and other errors relating
to the publication.
© 2010 Wanin USA Inc.
2

Table of Contents
Basic Setup ............................................................................................................. 4
Parts Identification ............................................................... ................................... 5
Control Panel........................................................................................................... 6
Button Inst ru ction .......................................................................................... ......... 7
Remote Control ....................................................................................................... 7
Input and Output Ports .................................................. ......................................... 8
Making Conne ctions ............................................................................................. 10
Access Basic Functions ....................................................................................... 12
Output Format ..................................................................................................... 13
Software Installation ........................................................................................... 13
Working on the Platform ............................................................. ............ ............ .. 15
Working ou tside the Platform........................................................................ ....... 15
Light ....................................................................................................................... 16
Zoom In and Zoom Out ......................................................................................... 16
Positive/Negative Conversion .............................................................................. 16
Focus Adjustment ................................................................................................. 16
Brightness Adjustment ......................................................................................... 16
White Balance Adjustment ................................................................................... 16
Text/Image Mode ................................................................................................... 16
Color A d jus tment ................................................................................... ............... 17
Image Freeze ......................................................................................................... 17
Image Mirror ................................ .......................................................................... 17
Split Screen ........................................................................................................... 17
Image Save ............................................................................................................ 17
Image Recall .......................................................................................................... 17
RBG Input Switch .................................................................................................. 17
Video Input Switch ................................................................................................ 17
USB 2.0 Port .......................................................................................................... 18
USB Image Capture and Video Recording........................................................... 18
RS232 Control ....................................................................................................... 31
Folding the Un it ............................................... ......... .......... ......... .......... ......... ....... 33
Specifica tions.......................................................... .............................................. 34
Technical Support ............................................................................................. 35
3

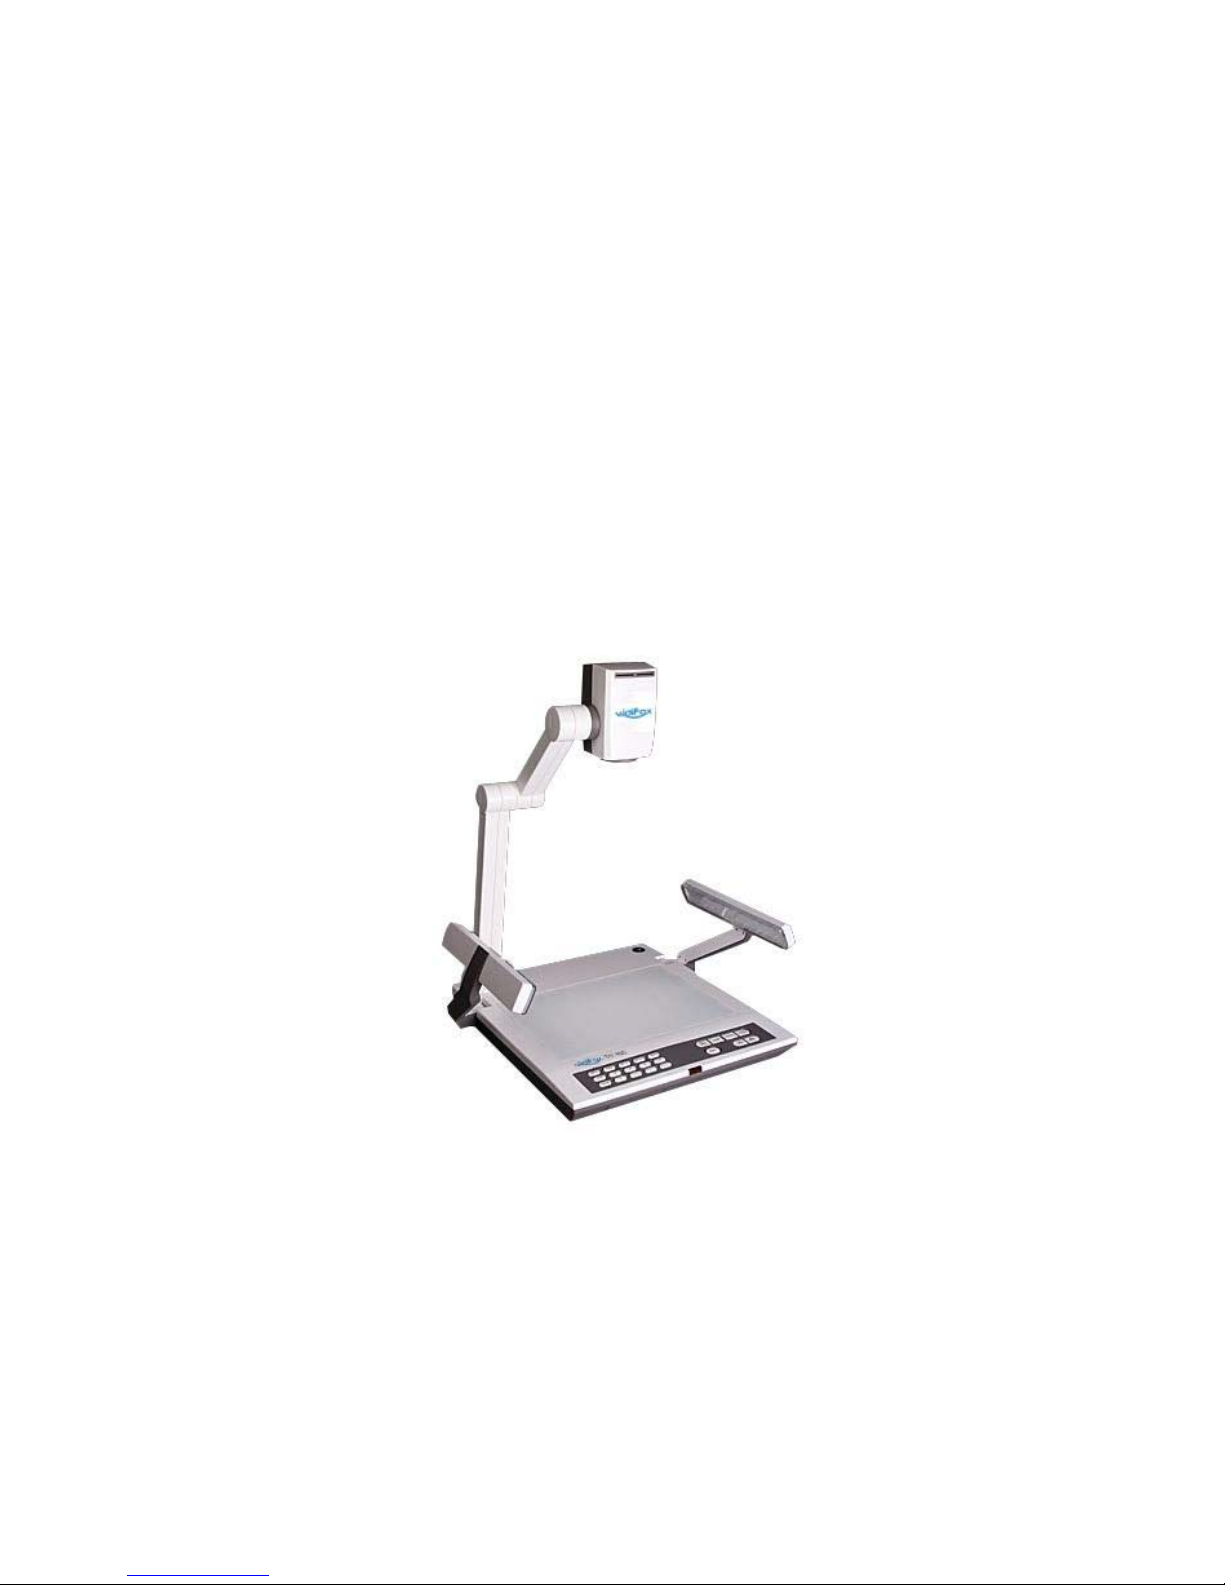
BASIC SETUP
1. Unpack, put aside all packing materials.
2. Unfold the light arms until reaching the end position.
3. Raise the camera arm completely. Rotate the camera head until the lens face the
center of the base unit.
4
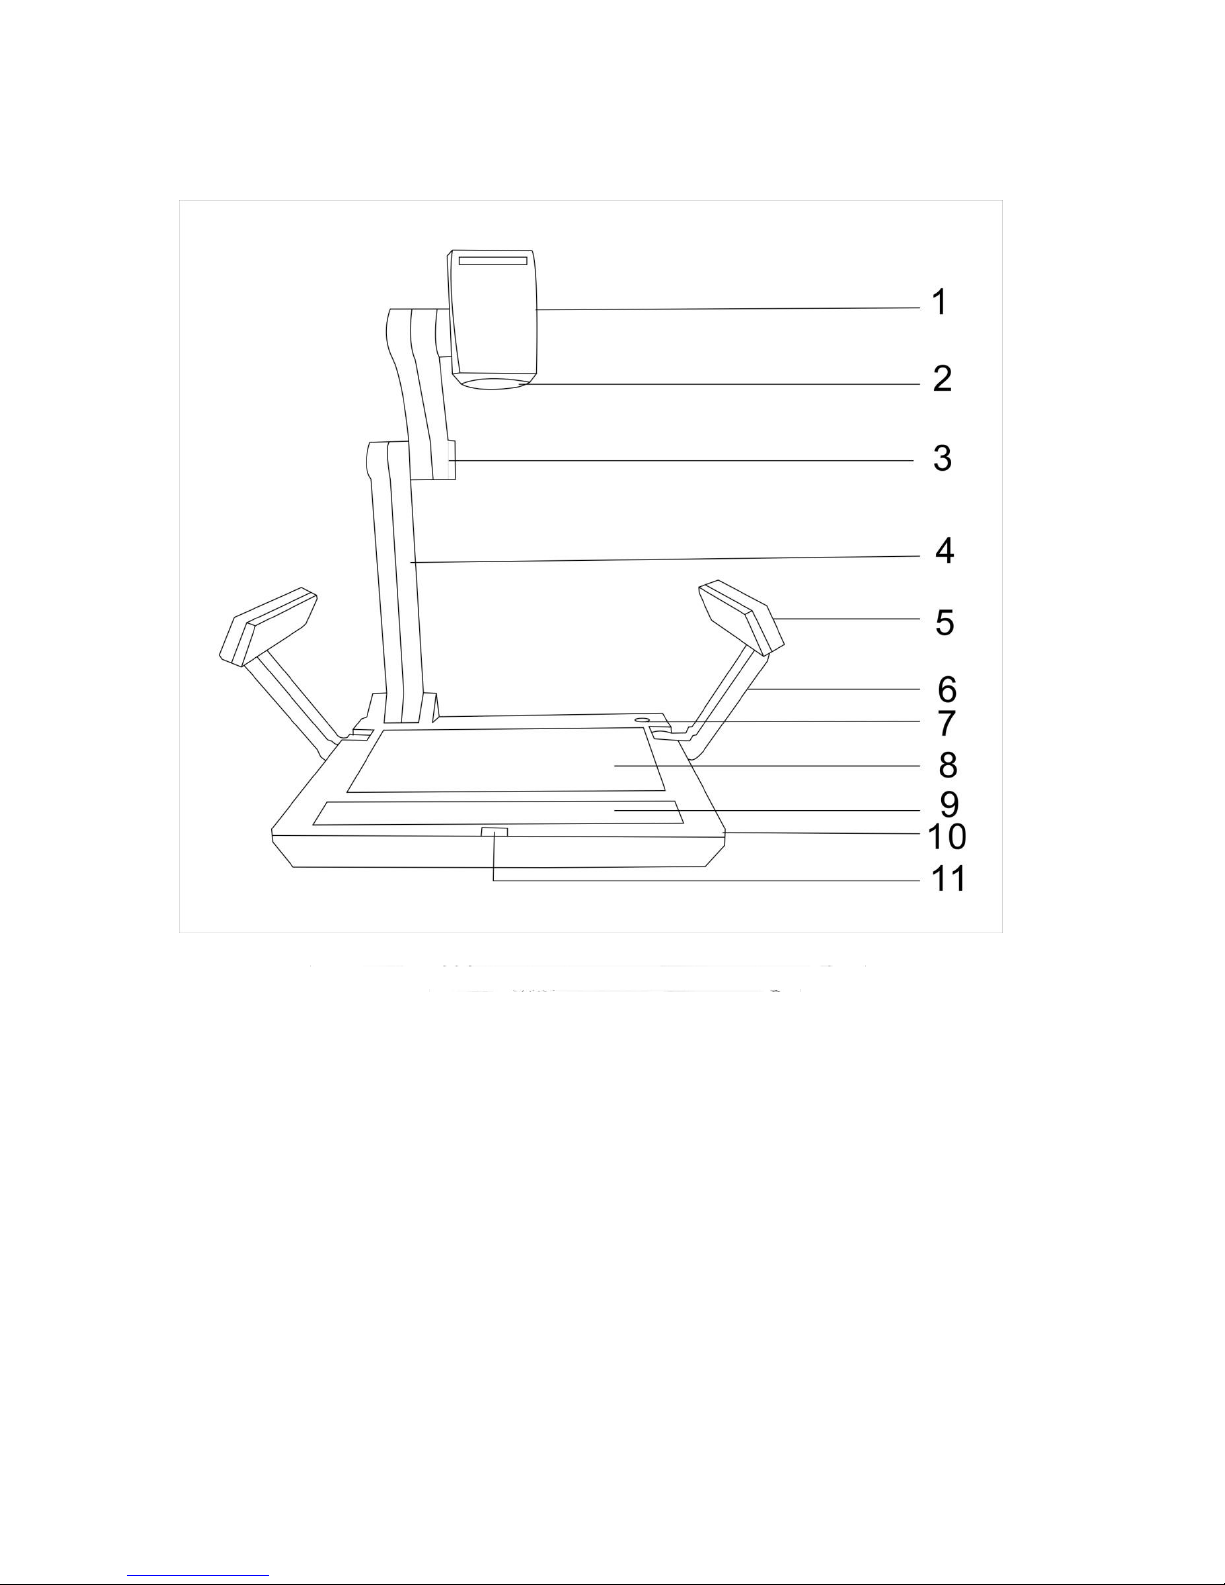
PARTS I DE N TIFICATI ON
1. camera cover 2. camera lens 3. upper mechanical arm
4. main mechanical arm 5. side lamp 6. lighting arm
7. power switch 8. base light 9. control panel
10. base unit
infrared receiver
11.
5

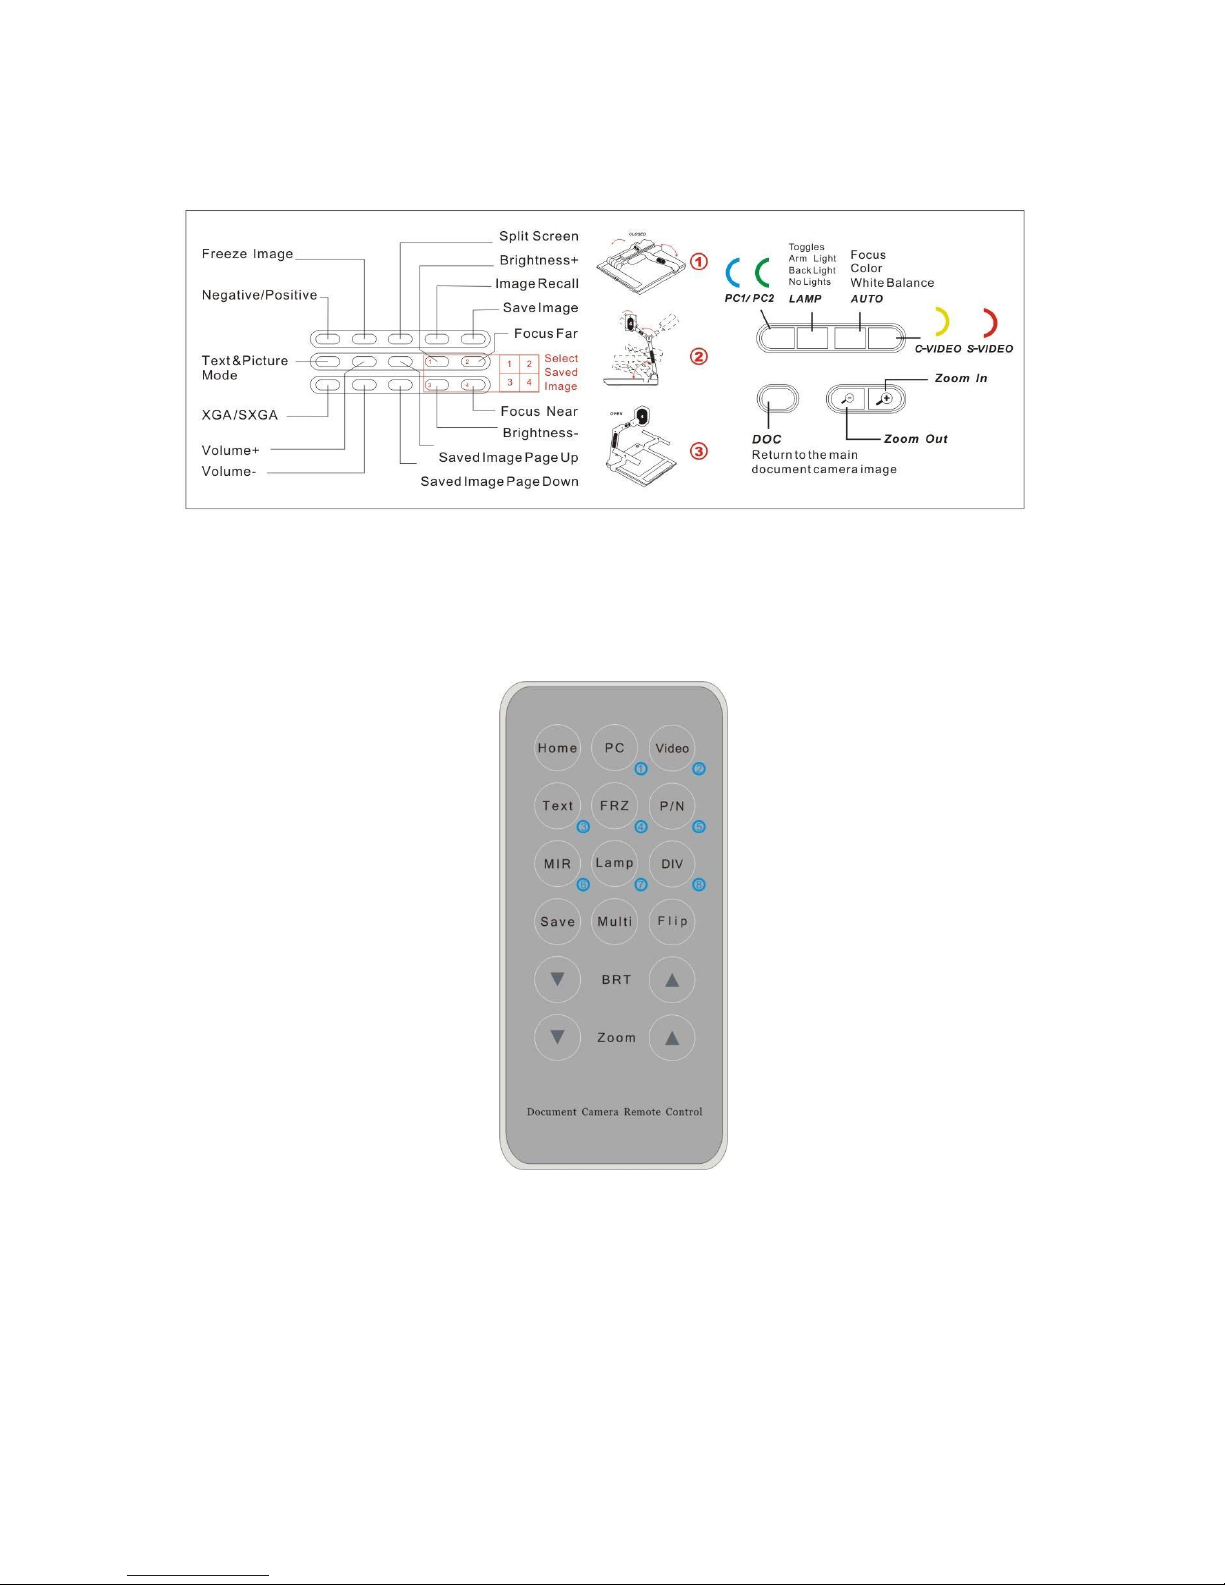
CONTROL PA NEL
DOC: Press this button for shorter than 3 seconds to display the image on the platform. If
pressing DOC for longer than 3 seconds, the camera will stop transmitting image
and go to standby; pressing for another 3 seconds, the camera will come back to work.
C-VIDEO S-VIDEO: Switch the input between Composite Video and S-Video.
PC1 PC2: Switch the input between PC1 and PC2.
LAMP: Switch between arm light, back light and no light.
AUTO: Carry out auto focus, color adjustment and white balance adjustment.
ZOOM+, ZOOM-: Image zoom in and zoom out control.
NEG: Switch the image mode between positive and negative.
FRZ: Freeze and unfreeze the image.
SPLIT: Split screen, enable comparison between the frozen image and live image.
RECAL: Display saved images.
SAVE: Save the current image.
T/P: Switch the output image between the text mode and picture mode
SXGA: Switch the output signal between XGA (1024 x 768) and SXGA (1280 x 1024)
VOLUME+, VOLUME-: Output volume control
PAGE+, PAGE-: Navigate between pages in Image Recall mode.
BRIGHT+, BRIGHT-: Image brightness adjustment
FOCUS+, FOCUS-: Adjust focus man ually, focus far and focus near.
In the Image Recall mode:
1 (BRIGHT+): Display the first image.
2 (FOCUS+): Display the second image.
3 (BRIGHT-): Display the third image.
4 (FOCUS-): Display the fourth image.
6
BUTTON INSTRUCTION
REMOTE CONTROL
1. Home: Press for shorter than 3 seconds to output the current
image of the camera. Press this button for longer than 3 seconds to
adjust color and white balance automatically.
2. PC: Switch the input VGA source between PC1 and PC2.
3. Video: Switch the input Video signal source between video1 and video2.
4. Text: Switch the image between the text mode and image mode.
Text mode
7
enhances the black and white contrast to increase the readability of the text.
5. FRZ: Freeze and unfreeze the image.
6. P/N: Switch the image between positive and negative mode.
7. MIR: Switch the output image between the right/left mirrored image,
up/down mirrored image and original image.
8. Lamp: Switch between arm light, back light and no light.
9. DIV: Activate the Split Screen function to allow side by side comparison of
the frozen image and live image.
10. Save: Save the image in display to memory.
11. Multi: Multi-image mode enabled. Press again, back to the normal mode. In the
multi-image mode:
PC/
Video/
Text/
1 : Display the first image.
○
2 : Display the second image.
○
3 : Display the third image. FRZ/
○
○
4 : Display the fourth image.
12. Flip: Turn page in multi-image mode.
13. BRT: Image brightness adjustment.
14. Zoom: Image zoom in and zoom out control.
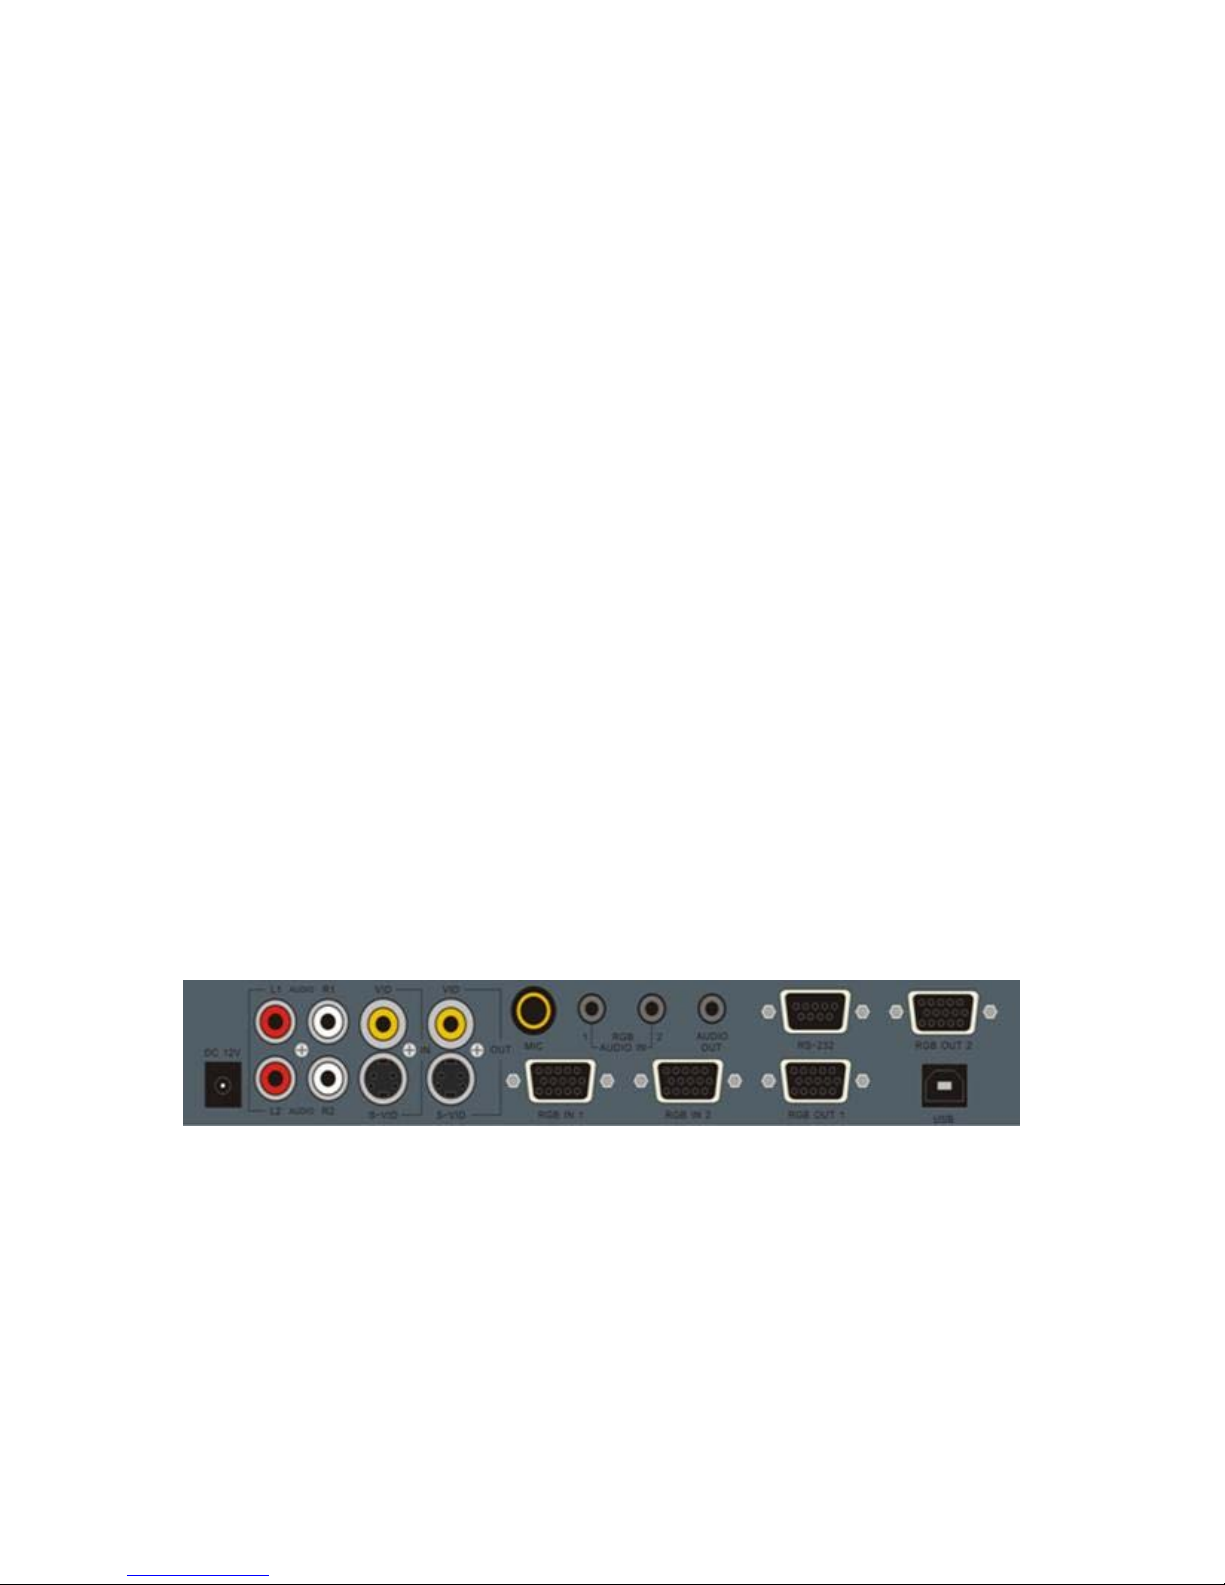
CONNECTION TERMIN ALS
L1, R1: Audio input of Composite Video input
L2, R2: Audio input of S-Video input
VID IN: Composite Video input
S-VID IN: S-Video input
VID OUT: Composite Video output
S-VID OUT: S-Video output
8

MIC:Microphone input
RGB AUDIO IN 1/2: Audio input for RGB input 1/2
AUDIO OUT: Audio output
RGB IN 1/2: RGB signal input 1/2 (15 pin D-SUB)
RGB OUT 1/2: RGB signal output 1/2 (15 pin D-SUB)
RS-232: Allow a computer or external control system to control the document camera via
this port.
USB: Capture images and video into a connected computer via provided software
9
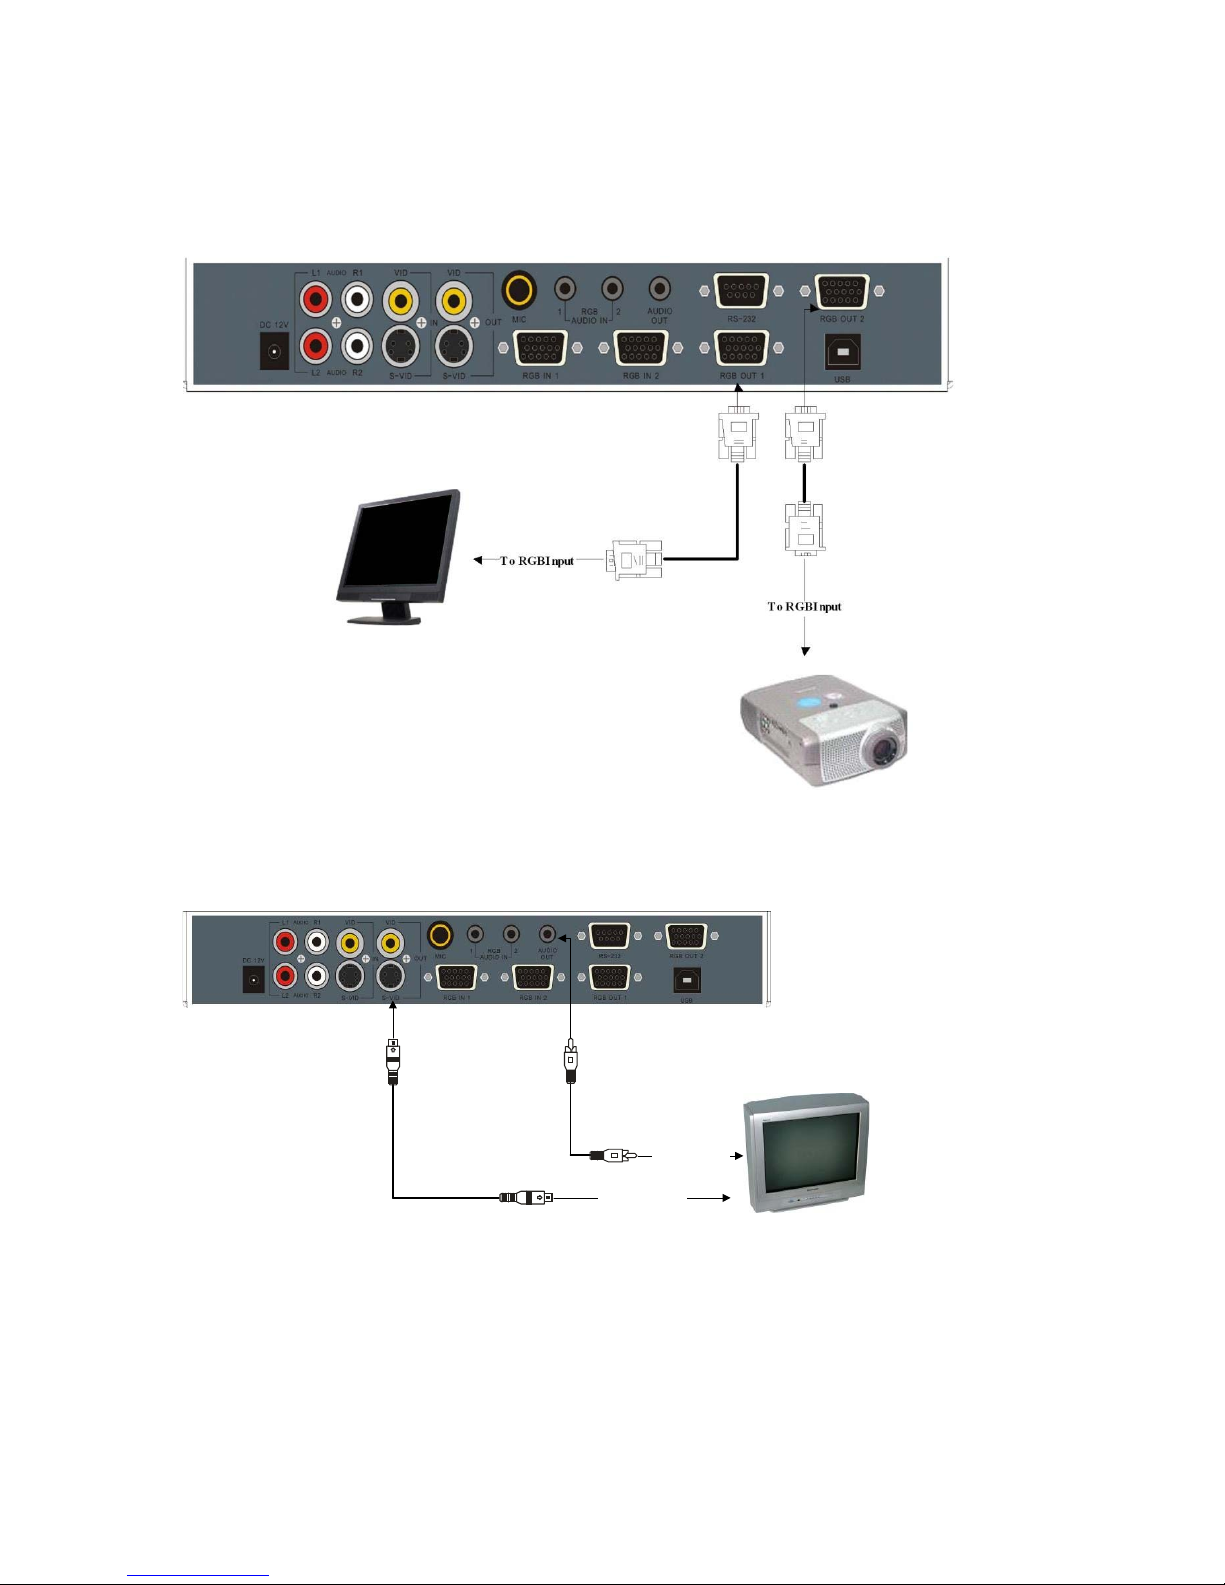
MAKING CONNECTIONS
1. VGA output connection
2. S-Video output connection
S-Video cable
To Audio input
To S-Video Input
10
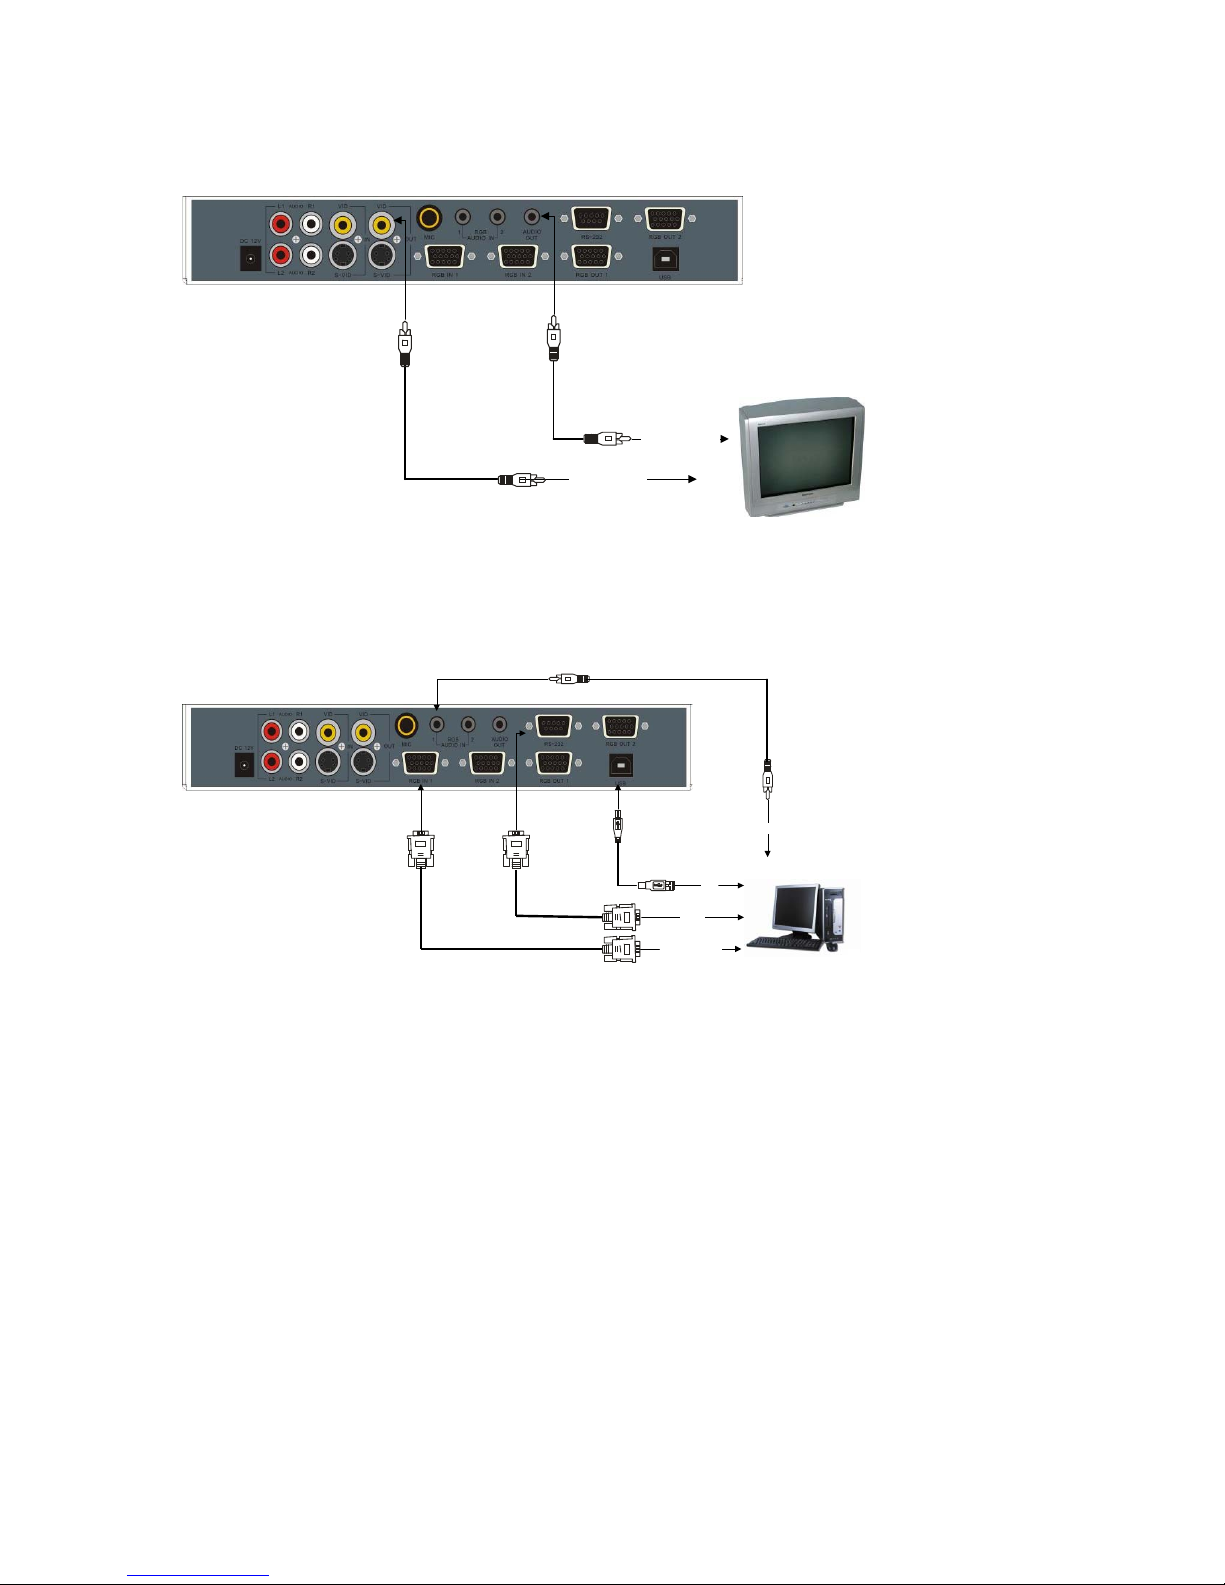
3. Composite Video output connection
Video Cable
4. Computer connection
To Video Input
11
To Audio Input
Audio Cable
USB
RS232
To RGB Output
To Audio Output
 Loading...