

Page 1

Quick Guide for the V-Tap Analog 2
V2.1 © 2018 Vidicode 1
The V-Tap Analog 2 is a device that can record the audio from an analog
telephone line or any telephone that works with a handset. Additionally, there
is a 3.5 mm stereo input jack that enables recording from other audio sources,
such as microphones or radio’s. The captured data is stored onto an SD card and
can optionally be sent to an external server (an Apresa recorder or the Call
Recorder VoIP software running on the PC).
NOTE: When no analog line is connected or when no SD card is inserted, the Red LED starts
flashing on first power on with default settings, to indicate an error situation.
NOTE: The SD card must be formatted with the FAT32 file system. Cards above 32 GB (up to 2 TB)
are not tested and must be formatted as FAT32 first, before inserting them into the V-Tap.
BOX CONTENT
• V-Tap Analog unit
• USB adapter
• USB cable
• Curled Telephone cable
• SD card
• CD with manual and Call Recorder VoIP software for the PC
• 1 year Support & Update license
• This Quick Guide
Page 2
Quick Guide for the V-Tap Analog 2
V2.1 © 2018 Vidicode 2
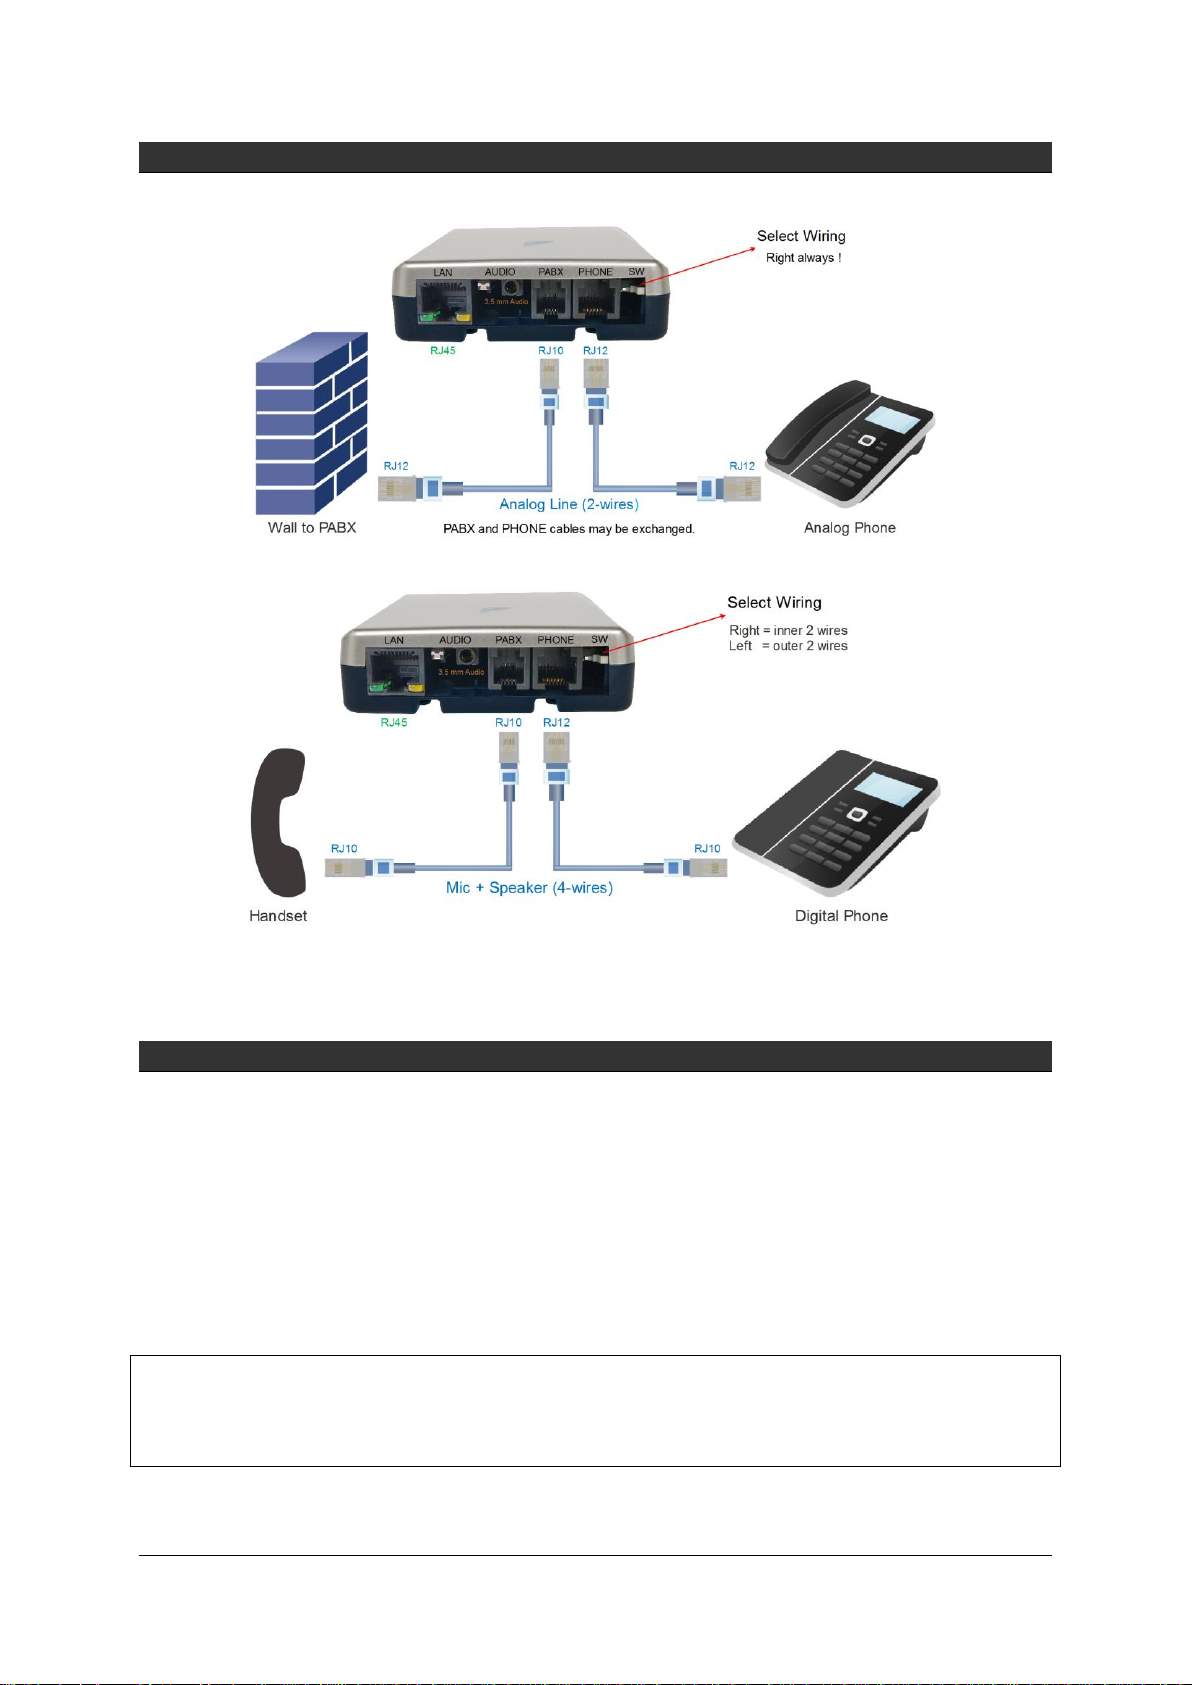
HARDWARE INSTALLATION – TWO WAYS TO CONNECT TO A PHONE SYSTEM
1. On an analog line, in between the wall and the phone:
2. In between the handset and the phone:
NOTE1: USB must be connected for power supply.
NOTE2: An SD card must be inserted to store the recordings on.
NOTE3: Optionally connect the network for web access and/or Tunnel function.
SETUP THROUGH THE WEB INTERFACE
• When Wi-Fi is available and enabled on the V-Tap, search on your mobile phone or laptop for
the name “V-Tap…”, connect to it using the 12 digits MAC address for the Wi-Fi password,
found on the bottom of the unit. Then open a browser and enter the IP address
192.168.55.66.
• When using a LAN cable, there are 3 ways to access the web interface:
1) Setup your PC to reach the IP address 192.168.55.66 and enter this in your browser.
2) Enter an IP address on the first line of the text file “IP.TXT”, put this file onto an SD card
and insert the card into the V-Tap.
3) Enable DHCP temporary by pressing the button for 1 second.
Default IP address: 192.168.55.66
Default User name: admin
Default Password: admin
Default Wi-Fi Password: 000349xxxxxx [12 digits MAC address]
After login, the settings page appears. For a detailed description of the above possibilities and of
all the settings, see the V-Tap Analog manual.
Page 3

Quick Guide for the V-Tap Analog 2
V2.1 © 2018 Vidicode 3
PC REQUIREMENTS FOR THE CALL RECORDER VOIP SOFTWARE
Windows Vista/7/8/10 , Intel Pentium >2GHz , 4GByte RAM , >100 MB free disk space.
CALL RECORDER VOIP SOFTWARE INSTALLATION
1. Connect the V-Tap Analog to a free USB port on your PC.
NOTE: The V-Tap unit must be connected to the same PC, otherwise the installer will not continue.
2. Software installation
• Place the CD-ROM in your computer and the software installation starts automatically. In case the
installation does not start automatically, locate the file ‘CRVoIPInstall.exe’ on the CD and start it
manually. The following window appears:
• Select your preferred language for the installation and press OK.
• The menu will ask for an installation key, please enter: V-TAP
• Now you can proceed with the next steps of the installation and you will be asked to confirm the
locations on your hard drive where to store the software and the data files.
NOTE: A separate installation of the WinPcap driver may be needed and is started automatically,
depending on the absence of this low-level network interface driver.
• To setup the CR-VoIP software to receive data from a V-Tap, go to Options, Setup, Recording tab:
NOTE1: The PC’s IP address must be entered as the “Tunnel Server Address” in the V-Tap unit.
NOTE2: The PC’s firewall must be open for TCP port 2016, the “Tunnel Destination Port” in the V-Tap unit.
NOTE3: The Encryption password must be the same as the “Encryption Password” in the V-Tap unit.
NOTE4: The CR-VoIP software itself does not need channel licenses to receive from the V-Tap unit.
 Loading...