

Page 1

Soft Call Recorder
Manual
International
Headquarters
USA
VIDICODE Datacommunicatie BV
Blauwroodlaan 140, 2718 SK Zoetermeer
The Netherlands
Tel. +31 79-3617181 Fax +31 79-3618092
vidicode@vidicode.nl www.vidicode.nl
VIDICODE Datacommunications
P.O. Box 3288
Wilmington, N.C. 28406
Tel. 910.452.5600 Fax 910.254.3525
sales@vidicode.com www.vidicode.com
Page 2

Soft Call Recorder Manual 2
Page 3

Contents
1 INTRODUCTION ............................................................... 7
2 MODELS ........................................................................... 9
3 SOFTWARE INSTALLATION .......................................... 11
3.1 Start............................................................................ 11
3.2 Set-up Wizard............................................................. 11
4 SOFT CALL RECORDER CLASSIC................................ 15
4.1 Connecting the SCR Classic....................................... 15
4.1.1 Connecting diagrams SCR Classic .......................................... 16
4.2 Adjusted connection SCR Classic............................... 17
4.2.1 Adjusted connection diagrams SCR Classic ............................ 18
4.3 Settings SCR Classic.................................................. 19
4.3.1 Settings "record from telephone line" ....................................... 19
4.3.2 Settings "record from handset"................................................. 20
5 SOFT CALL RECORDER GAME PORT.......................... 23
5.1 Connecting the SCR Game Port................................. 23
5.1.1 Connecting diagrams SCR Game port..................................... 24
5.2 Windows configuration SCR Game Port ..................... 25
5.3 Settings SCR Game Port............................................ 28
5.3.1 Settings "record from telephone line" ....................................... 28
5.3.2 Settings "record from handset"................................................. 29
Soft Call Recorder Manual
3
Page 4

6 SOFT CALL RECORDER USB........................................ 31
6.1 Connecting the SCR USB........................................... 31
6.1.1 Connecting diagrams SCR USB .............................................. 32
6.2 Settings SCR USB...................................................... 33
6.2.1 Settings "record from telephone line" ....................................... 33
6.2.2 Settings "record from handset"................................................. 34
7 RECORDER FUNCTIONS............................................... 37
7.1 Recording................................................................... 38
7.1.1 Introduction .............................................................................. 38
7.1.2 Manually starting a recording................................................... 38
7.1.3 Automatic recording ................................................................. 39
7.1.4 Stopping a recording................................................................ 39
7.1.5 Beep while recording................................................................ 39
7.2 Playing a recording..................................................... 39
8 DATABASE...................................................................... 41
8.1 Functions.................................................................... 41
8.2 CD Archives................................................................ 41
8.3 Names........................................................................ 42
8.3.1 List of names............................................................................ 42
8.3.2 Adding names from the list....................................................... 42
8.4 Notes.......................................................................... 42
8.5 Query/Search ............................................................. 42
8.6 Import ......................................................................... 42
8.6.1 Users........................................................................................ 43
8.6.2 Playing imported recordings..................................................... 43
Soft Call Recorder Manual 4
Page 5

8.7 Security ...................................................................... 43
8.7.1 Opening Lock........................................................................... 43
8.7.2 Configuring password .............................................................. 43
9 MENU.............................................................................. 45
9.1 File ............................................................................. 45
9.1.1 Current archive......................................................................... 45
9.1.2 CD Archive............................................................................... 45
9.1.3 Recycle bin............................................................................... 45
9.1.4 Exit ........................................................................................... 46
9.2 Action ......................................................................... 46
9.2.1 Delete selected ........................................................................46
9.2.2 Recover selected ..................................................................... 46
9.2.3 Export....................................................................................... 46
9.2.4 Import....................................................................................... 47
9.2.5 Build CD Archive...................................................................... 47
9.3 Query.......................................................................... 47
9.4 View ........................................................................... 47
9.4.1 System Tray............................................................................. 47
9.4.2 Recorder Only.......................................................................... 48
9.4.3 All ............................................................................................. 48
9.5 Options....................................................................... 49
9.5.1 Language ................................................................................. 49
9.5.2 Hardware.................................................................................. 49
9.5.2.1 Recorder Type .................................................................................49
9.5.2.2 Record Source: ................................................................................50
9.5.2.3 Automatic Recording........................................................................50
9.5.2.4 Silence Timeout ...............................................................................50
9.5.2.5 Detection Threshold.........................................................................50
9.5.2.6 Levels ..............................................................................................51
9.5.2.7 Game Port Access ...........................................................................51
9.5.3 Database.................................................................................. 51
9.5.4 Audio Mixer .............................................................................. 52
9.5.4.1 Mute while playing............................................................................52
9.5.4.2 Adjust Automatic Gain Control on SCR Classic................................52
Soft Call Recorder Manual
5
Page 6

9.5.5
Password .................................................................................53
9.5.6 General .................................................................................... 53
10 ACKNOWLEDGEMENTS........................................... 55
10.1 Privacy..................................................................... 55
10.2 Liability .................................................................... 55
Soft Call Recorder Manual 6
Page 7

1 Introduction
The Soft Call Recorder (SCR) is an application consisting of an interface
connecting your telephone to your PC and a computer program. The SCR
enables you to record and archive telephone conversations. Up to 240 Hrs of
conversation can be recorded for each Gigabyte free disk-space.
Recorded conversations are stored in a database. Using the recorder buttons
you can record and play conversations. The database is basically a list of
recorded conversations and is referred to as an "Archive". The archive can be
manipulated to your specific requirements, names and notes can be added to
recordings and recordings of other SCR users can be imported. It is also
possible to save archives on writable CD's.
This manual is organized as follows.
Chapters 1-5 will instruct you to connect your SCR and talk you through your
first recordings.
Chapters 6 and 7 describe all major functions of the SCR including the
database that stores all recordings.
Chapter 8 will give you a description of all SCR features on the basis of all the
menu options.
Chapter 9 contains a short explanation of rights and duties that come with the
use of the SCR.
Soft Call Recorder Manual
7
Page 8

Soft Call Recorder Manual 8 Soft Call Recorder Manual
Page 9
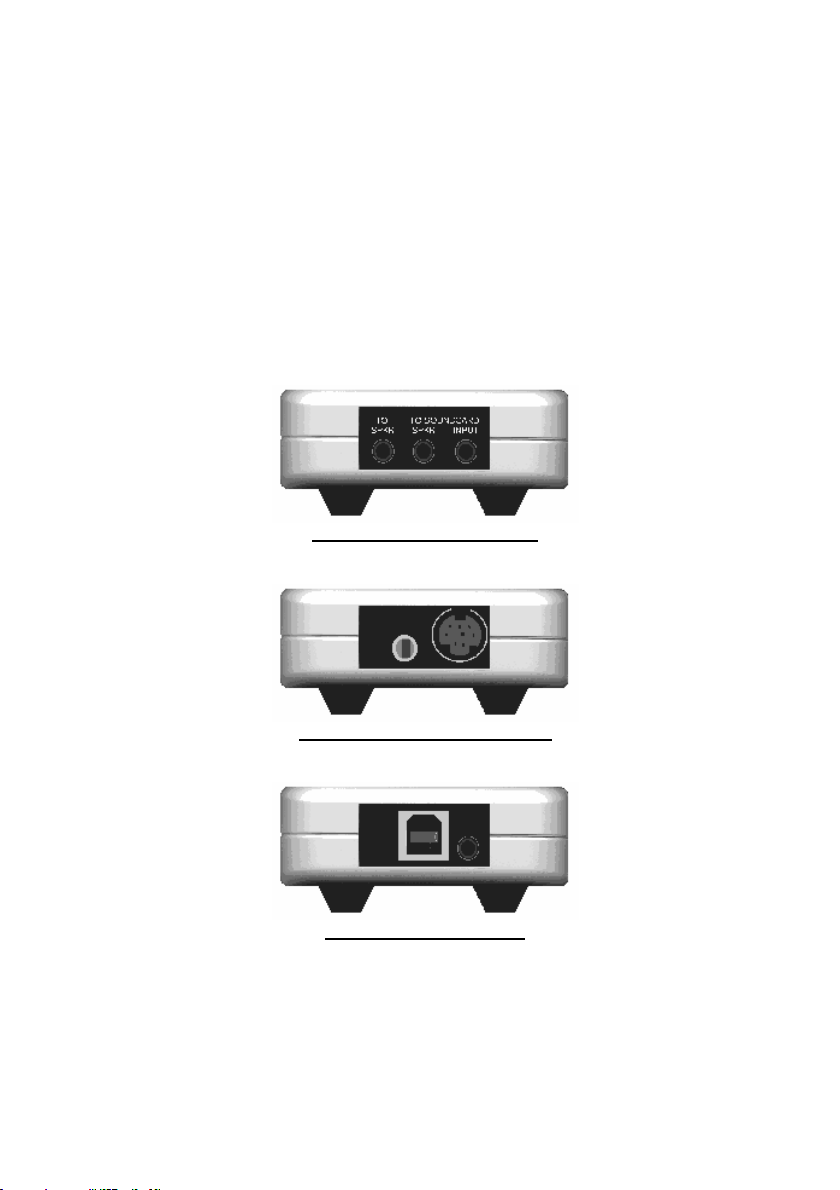
2 Models
There are three SCR models available. Make sure which model you possess.
Connections and settings vary for each model.
The model is named on the packaging. The rear view of the SCR-interface
also identifies each model:
Soft Call Recorder Classic
Soft Call Recorder Game Port
Soft Call Recorder USB
9
Page 10

Soft Call Recorder Manual 10 Soft Call Recorder Manual
Page 11

3 Software installation
In case you are using a SCR USB the interface needs to be installed and
connected before installing and running the software. See Chapter 6 about
installation details of the SCR USB interface.
Placing the CD-ROM in your computer starts software installation. If the
installation is not started automatically, locate the file setup.exe
start it by double-clicking. Follow the instructions on the screen.
3.1 Start
Click “Start“ in the lower left corner on your desktop. Go to Programs/Vidicode
and click on “Soft Call Recorder”. The SCR will start right away with a Set-up
Wizard.
3.2 Set-up Wizard
In this Set-up the separate devices for the recording and playback of the
telephone calls are selected. The choice of devices is determined by the
configuration of your PC. Read through the connecting instructions for your
kind of SCR first. The correct selection of recording- and playback-devices
depends on the way you have the SCR connected to your PC.
on the CD and
11
Page 12
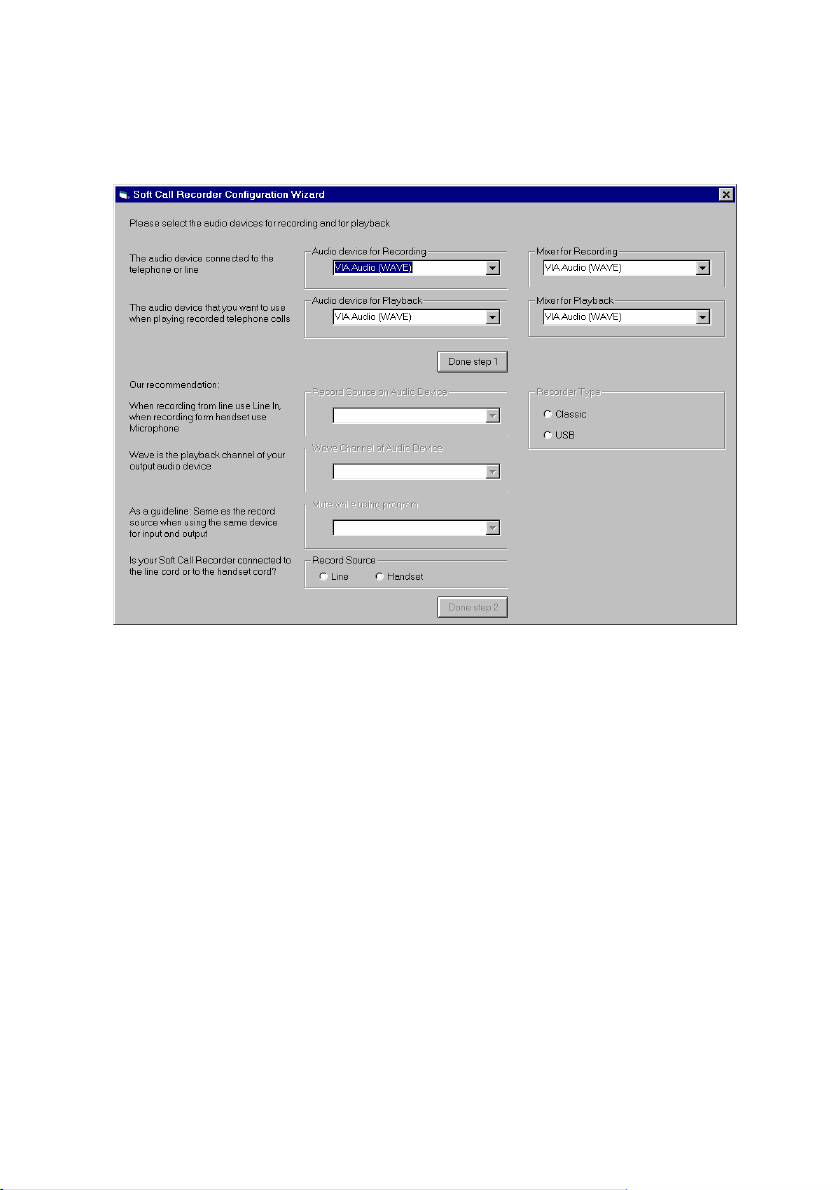
• First select the "Audio device for Recording". Select the device that
the SCR interface is connected to. Presumably this is your
soundcard. In case you have a USB SCR this device will be preselected for you as your input device.
• Next select the "Mixer for Recording". Select the Mixer of the device
you have selected as "Audio device for Recording". This mixer
probably carries the same name as the Recording device.
• Now select the "Audio device for Playback". This is the general
device you use for playback of sound or the device that have your
speakers connected to.
• Finally select the "Mixer for Playback". Select the Mixer of the device
you have selected as "Audio device for Playback". This mixer
probably carries the same name as the Playback device.
• Press the button "Done step 1".
Soft Call Recorder Manual 12
Page 13
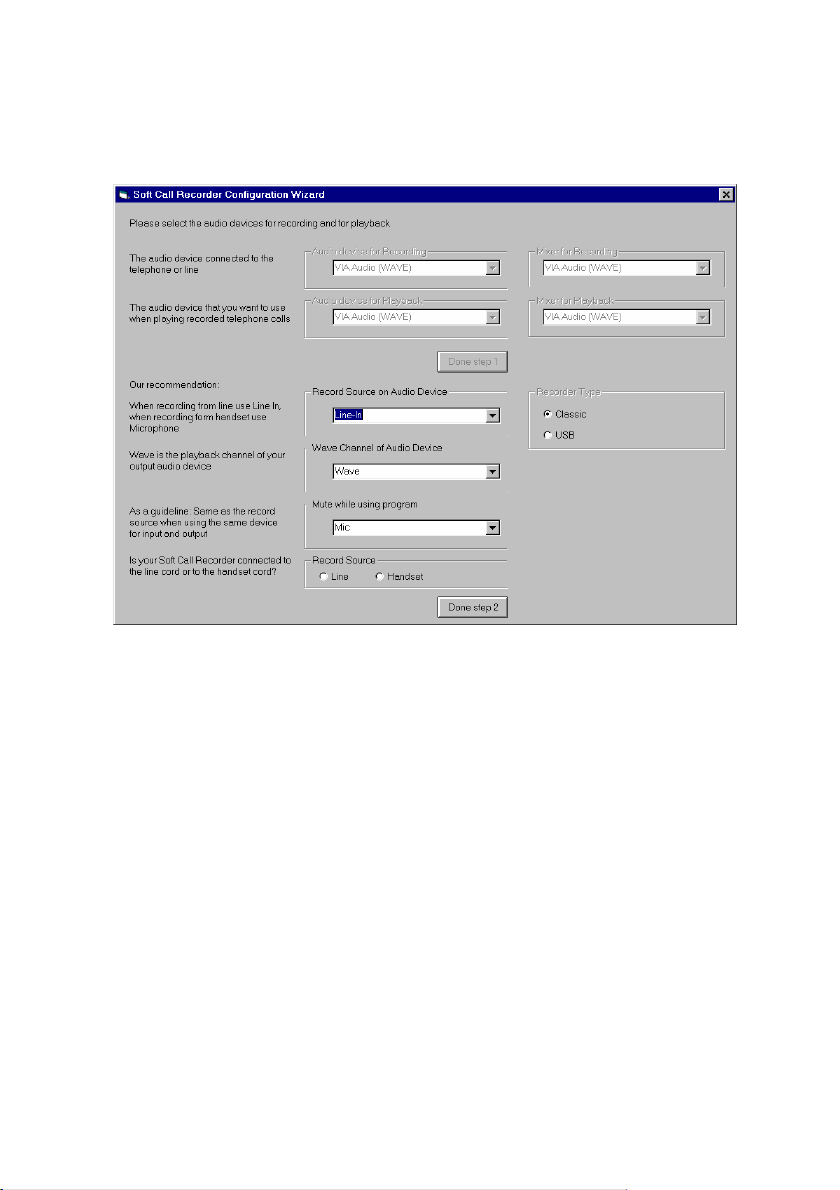
• Select "Record Source on Audio Device". All channels of the
selected Recording Mixer are displayed in this drop box. Select the
channel that you have the SCR interface connected to.
• Select "Wave Channel of Audio Device". All channels of the selected
Playback Mixer are displayed in this drop box. Select the general
channel that is used for sound. Probably this channel is called
'Wave'.
• Select "Mute while using program". All channels of the selected
Playback Mixer are displayed in this drop box. Select the channel
that you want muted when the Playback of a recording is started.
Soft Call Recorder Manual
13
Page 14
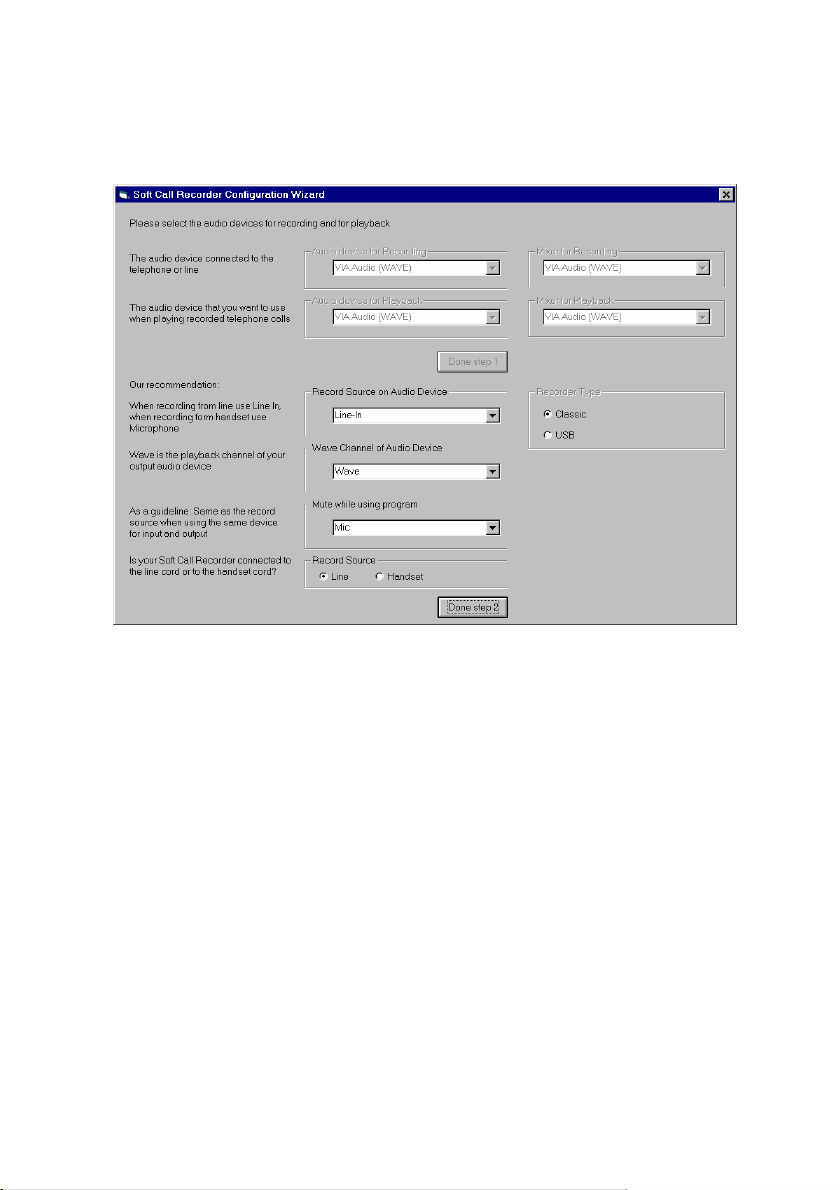
• Select "Record Source". Select "Line" if you have an analog
telephone line. Select "Handset" if you have a digital telephone line.
• Selection of "Recorder type" is made automatically. If you have a
SCR USB the USB recorder will be selected. Else the Classic
recorder has been selected.
• Press the button "Done Step 2".
The program will automatically start in Recorder View. Click the “All” selection
in the menu option “View” to enlarge. The SCR dialog is scaleable. Place your
mouse in the bottom right corner of the dialog and drag the corner to resize
the dialog to your convenience.
Although the software is the same for every SCR, settings must correspond to
your model. Connect your SCR-interface following the instructions
corresponding to your model. Then continue with the settings for the SCR
software.
Soft Call Recorder Manual 14
Page 15

4 Soft Call Recorder Classic
The Soft Call Recorder Classic requires a properly installed sound card in
your PC.
For normal use of the SCR follow the Connecting the SCR Classic (4.1)
instructions. When recording a conversation with the SCR it is possible to
notify your conversation partner of the recording through a regularly returning
beep or through a spoken message. It is only if you want to use one of the
notification methods that the adjusted connection SCR Classic (4.2)
instructions should be used.
4.1 Connecting the SCR Classic
Determine the kind of telephone you want to connect the SCR to. This will
either be a normal (analog) or digital (e.g. Key System, PBX, ISDN) device.
When using a normal (analog) telephone, connect the SCR-interface as in the
"record from telephone line" diagram of Method 1
telephone line" is used the SCR can detect "on/off hook" straight from the
telephone line. The switch at the bottom of the SCR-interface must be in
position A. When using a digital telephone, connect the SCR-interface as in
the "record from handset" diagram of Method 2
is used the SCR needs to detect "on/off hook" by “listening” to the handset.
The switch at the bottom of the SCR-interface must be in position A.
In case your PC does not come with a “line in” connection, it is possible to
connect the SCR-interface using the “Aux” or “Microphone”. If you have
chosen the “Aux” port, connect the SCR-interface as described above. If you
want to use the “Microphone” port it is mandatory to connect the SCRinterface as in the "record from handset" diagram of Method 2
Tip: In case the "record from handset" method is deployed it is possible to use
the provided longer curled cable to connect the handset to the SCR-interface
and use your original curled cable to connect the SCR-interface to the
telephone. This should prevent tearing the SCR-interface from its place when
picking up the phone. The left and right connector may be switched in this
particular case.
. When "record from
. When "record from handset"
.
Soft Call Recorder Manual
15
Page 16
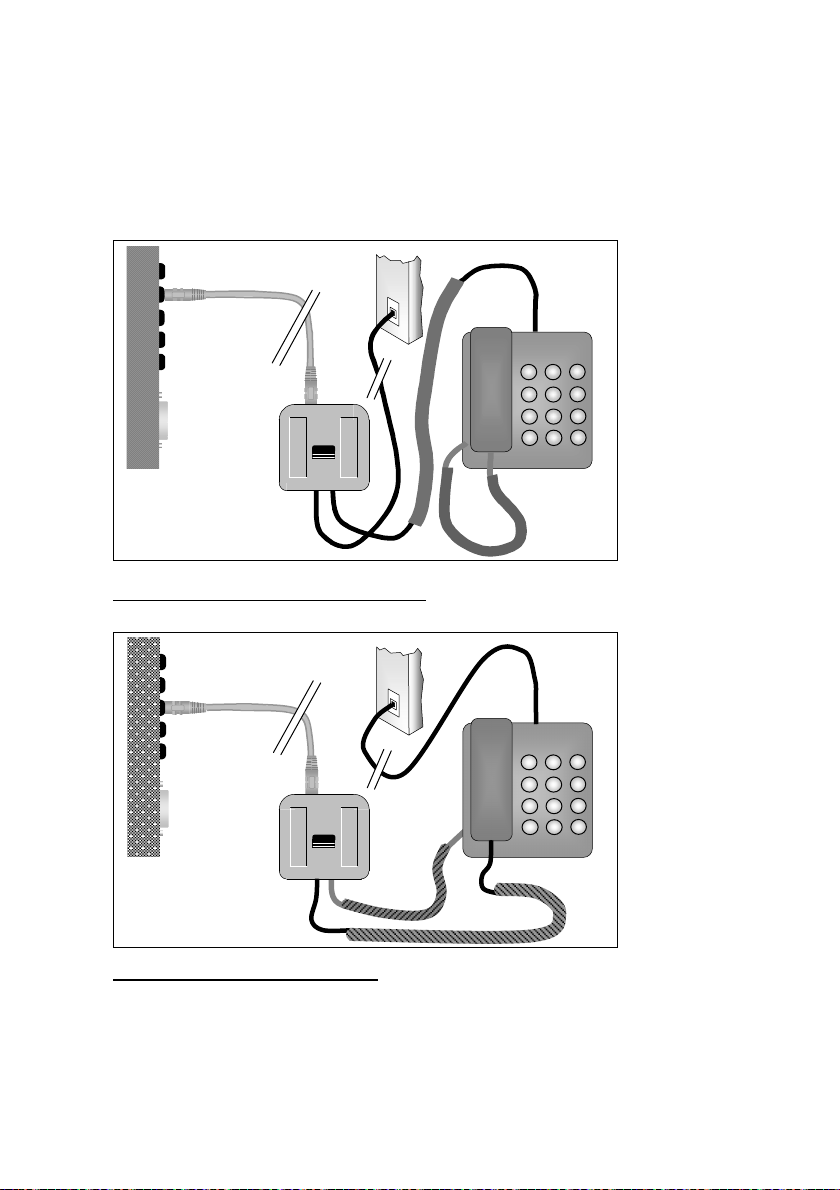
4.1.1 Connecting diagrams SCR Classic
LINE IN
1 2
4 5
7 8
*
PC
soundcard
CALL RECORDER
3
6
9
#
0
Method 1: "record from telephone line"
MICROPHONE
PC
soundcard
CALL RECORDER
Method 2: "record from handset"
Warning: Use supplied and original cables only. Connecting the SCRinterface in any other way than described can cause damage.
Soft Call Recorder Manual 16
1 2
4 5
7 8
*
3
6
9
#
0
Page 17

4.2 Adjusted connection SCR Classic
This adjusted connection should be used only if you want to use one of the
notification methods as described above.
Determine the kind of telephone you want to connect the SCR to. This will
either be a normal (analog) or digital (e.g. Key System, PBX, ISDN) device.
When using a normal (analog) telephone, connect the SCR-interface as in the
"record from telephone line" diagram of Method 3
telephone line" is used the SCR can detect "on/off hook" straight from the
telephone line. The switch at the bottom of the SCR-interface must be in
position A.
When using a digital telephone, connect the SCR-interface as the "record
from handset" diagram of Method 4
SCR needs to detect "on/off hook" by “listening” to the handset. The switch at
the bottom of the SCR-interface must be in position A.
Important: In case Method 3 or 4 is deployed to connect the SCR-interface it
is mandatory that "Sound return on SCR Classic"
“Options/Advanced” in the “General” tab.
In case your PC does not come with a “line in” connection, it is possible to
connect the SCR-interface using the “Aux” or “Microphone”. In case you have
chosen the “Aux” port, connect the SCR-interface as described above. In case
you want to use the “Microphone” port it is mandatory to connect the SCRinterface as in the "record from handset" diagram of Method 4
Tip: In case the "record from handset" method is deployed it is possible to use
the provided longer curled cable to connect the handset to the SCR-interface
and use your original curled cable to connect the SCR-interface to the
telephone. This should prevent tearing the SCR-interface from its place when
picking up the phone. The left and right connector may be switched in this
particular case.
. When "record from handset" is used the
. When "record from
is enabled in menu option
.
Soft Call Recorder Manual
17
Page 18
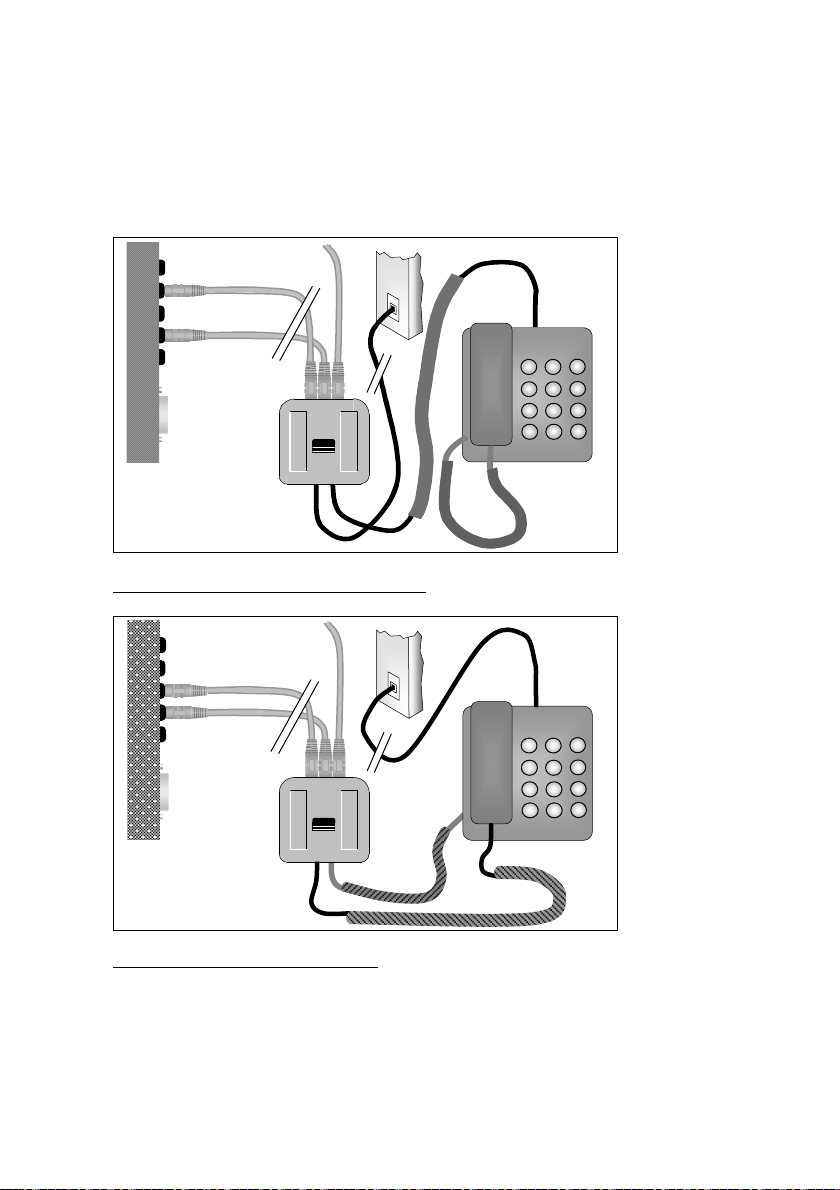
4.2.1 Adjusted connection diagrams SCR Classic
TO SPEAKERS
LINE IN
SPEAKER OUT
3
1 2
6
4 5
9
7 8
#
0
*
PC
soundcard
CALL RECORDER
Method 3: "record from telephone line"
TO SPEAKERS
MICROPHONE
SPEAKER OUT
PC
soundcard
Method 4: "record from handset"
Warning: Use supplied and original cables only. Connecting the SCRinterface in any other way than described can cause damage.
CALL RECORDER
1 2
4 5
7 8
*
3
6
9
#
0
Soft Call Recorder Manual 18
Page 19

4.3 Settings SCR Classic
The settings of the SCR depend on the way you have connected the SCRinterface. Follow instructions Settings "record from telephone line" (4.3.1)
in case you have connected the SCR-interface using Method 1 or 3
instructions Settings "record from handset" (4.3.2) in case you have
connected the SCR-interface using Method 2 or 4
.
4.3.1 Settings "record from telephone line"
Start the Soft Call Recorder software. See Software installation (3.1). Click the
menu option “View” and then “All” to enlarge the program dialog.
• Click “Options/Advanced” and click on “Hardware” tab to display.
• Select “Classic” as Recorder Type and “Line” as Record Source.
• Select “Autostart Enabled”, deselect “Ask to store”.
• Set "Silence Timeout" to “5”.
• Click “OK” to confirm.
Pick up the phone and “Telephone off hook” will be displayed. Hang up the
phone and “Telephone on hook” is displayed.
Pick up the phone, wait for the dial tone and wait another 10 seconds. The
sounding of the dial tone is crucial to obtain a good setting. It is possible a
new recording is starting every few seconds. Return to “Options/Advanced”
and click on “Hardware” tab to display. Lower the "Detection threshold"(to the
left) and click “OK” to confirm. Pick up the phone and again wait for 10
seconds. In case a new recording is still starting every few seconds than
further lower "Detection threshold". Repeat until a satisfactory setting is
established and a single recording continues for more than 10 seconds.
Go to “Options/Advanced”, click on “Hardware” tab to display. Increase
"Silence Timeout" to “60” seconds and confirm.
Pick up the phone and try to create a recording. Play the recording. To adjust
the sound level return to menu option “Options/Advanced” and click “Audio
Mixer” tab to display. In case the sound is too faint when playing increase
“Maximum Peak Level” (to the right) on the "Adjust Automatic Gain Control..."
. Follow
Soft Call Recorder Manual
19
Page 20

panel. In case the sound is too loud, lower the “Maximum Peak Level” (to the
left).
This should lead to a well sounding recording. If this is not the case repeat
previous steps to accomplish.
4.3.2 Settings "record from handset"
Start the Soft Call Recorder software. See Software installation (3.1). Click
“All” in menu option “View” to enlarge.
• Click “Options/Advanced” and click on “Hardware” tab to display.
• Select “Classic” as Recorder Type and “Handset” as Record Source.
• Select “Autostart Enabled”, deselect “Ask to store”.
• Set "Silence Timeout" to “5”.
• Click “OK” to confirm.
Pick up the phone and “Telephone off hook” will be displayed. If this is not the
case, return to “Options/Advanced” and click on “Hardware” tab to display.
Lower "Detection threshold"(to the left) and click “OK” to confirm. Repeat until
“Telephone off hook” is displayed when picking up the phone.
Pick up the phone, wait for the dial tone and wait another 10 seconds. The
sounding of the dial tone is crucial to obtain a good setting. It is possible that a
new recording may start every few seconds. Return to “Options/Advanced”
and click on “Hardware” tab to display. Lower "Detection threshold" (to the
left) a little bit and click “OK” to confirm. Repeat until a satisfactory adjustment
is obtained.
Go to “Options/Advanced”, click on “Hardware” tab to display. Increase
“Silence Timeout” to “30” seconds and confirm.
When "record from handset" is used the SCR needs to detect "on/off hook" by
“listening” to the handset. When hanging up the phone the SCR will keep
“listening” to the telephone line. If a “silence” exceeds the "Silence Timeout"
(in this case 30 seconds) the SCR will assume the phone has been hung up.
Soft Call Recorder Manual 20
Page 21

In case recordings are being stopped during conversation there are two
possible causes. Either the "Detection threshold" is set too high to detect your
speech, or the "Silence Timeout" is set too low.
Pick up the phone and try to create a recording. Play the recording. To adjust
the sound level, return to the menu option “Options/Advanced” and click
“Audio Mixer” tab to display. In case the sound is too faint when playing
increase “Maximum Peak Level” (to the right) on the "Adjust Automatic Gain
Control..." panel. In case the sound is too loud, lower the “Maximum Peak
Level” (to the left).
This should lead to a well sounding recording. If this is not the case repeat
previous steps to accomplish. In case it is not possible to create a well
sounding recording, set the switch at the bottom of the SCR-interface in
position B and repeat previous steps to accomplish.
Soft Call Recorder Manual
21
Page 22

Soft Call Recorder Manual 22 Soft Call Recorder Manual
Page 23

5 Soft Call Recorder Game Port
The Soft Call Recorder Game Port communicates through the Game Port of
your PC. You need a properly installed sound card on your PC.
Connect the SCR-interface following the instructions below.
5.1 Connecting the SCR Game Port
Determine the kind of telephone you want to connect the SCR-interface to.
This will either be a normal (analog) or digital (e.g. Key System, PBX, ISDN)
device.
When using a normal (analog) telephone, connect the SCR-interface as in the
"record from telephone line" diagram of Method 1
telephone line" is used the SCR can detect "on/off hook" straight from the
telephone line. The switch at the bottom of the SCR-interface must be in
position A.
When using a digital telephone, connect the SCR-interface as in the "record
from handset" diagram of Method 2
SCR needs to detect "on/off hook" by “listening” to the handset. The switch at
the bottom of the SCR-interface must be in position A.
In case your PC does not come with a “line in” connection, it is possible to
connect the SCR-interface using the “Aux” or “Microphone”.
. When "record from handset" is used the
Warning: Use supplied and original cables only. Connecting the SCRinterface in any other way than described can cause damage.
Tip: When "record from handset" layout is deployed it is possible to use the
provided longer curled cable to connect the handset to the SCR-interface and
use your original curled cable to connect the SCR-interface to the telephone.
This should prevent tearing the SCR-interface from its place when picking up
the phone. The left and right connector may be switched in this particular
case.
. When "record from
23
Page 24
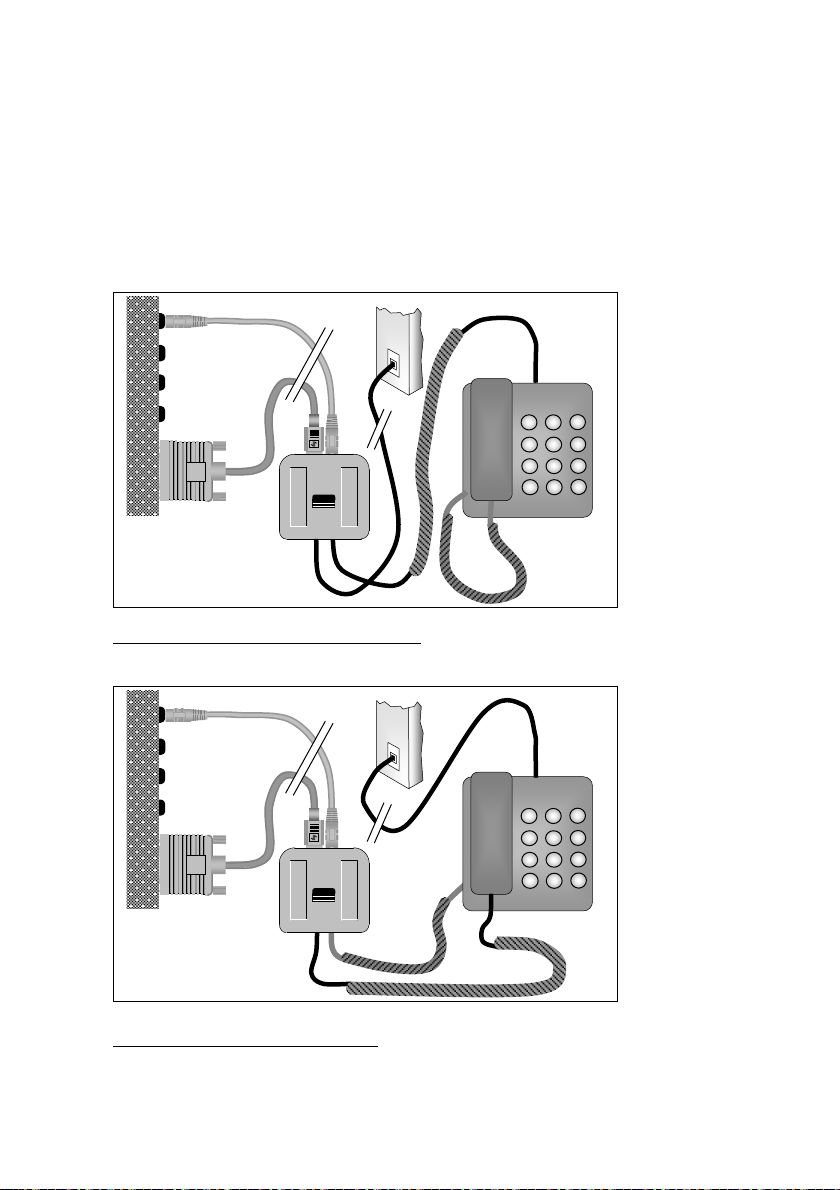
5.1.1 Connecting diagrams SCR Game port
LINE IN
JOYSTICK
PC
soundcard
CALL RECORDER
Method 1: "record from telephone line"
LINE IN
JOYSTICK
PC
soundcard
Method 2: "record from handset"
CALL RECORDER
1 2
4 5
7 8
*
1 2
4 5
7 8
*
0
0
3
6
9
#
3
6
9
#
Soft Call Recorder Manual 24
Page 25
5.2 Windows configuration SCR Game Port
The default SCR Game Port "Game Port Access" is in “DOS style”. See also
Game Port Access (9.5.2.7). Most of the time this works all right. However, in
some cases it is necessary to move to “Windows style”. In this case a joystick
driver that goes with your sound card needs to be installed. It is described
below how to install this driver.
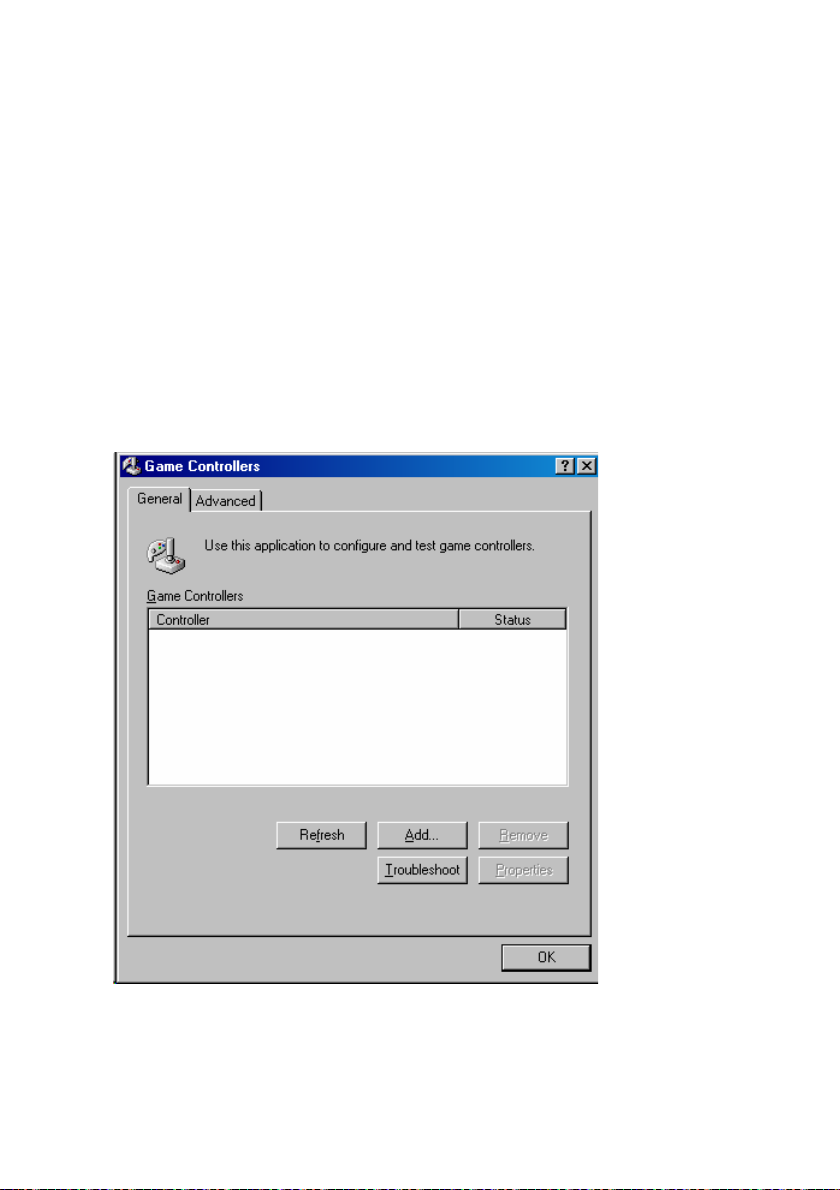
The Soft Call Recorder requires the drivers for a joystick with 2 axis and 4
buttons that will go with your sound card. To install this driver go to the Control
Panel and select “Game Controllers“ or “Gaming Options”. You will see the
following:
Soft Call Recorder Manual
25
Page 26

Select “Add”, select the 2-axis 4-button joystick that goes with your sound
card and click “OK”. The game port driver for the Soft Call Recorder will then
be displayed:
To determine if the game port driver can actually "talk" to the Soft Call
Recorder hardware, click “Properties” and then “Test”.
Soft Call Recorder Manual 26
Page 27

When the Soft Call Recorder Game Port is connected correctly to the game
port and the game port driver can "see" the hardware, the plus sign (or cross),
which represents the axis, will jump around in the screen. Also button 4 will
flash. When the Soft Call Recorder is connected to a telephone line with the
telephone “on hook” button 2 will light as well. Take the telephone “off hook”
and button 2 will darken.
This is an excellent test for the SCR Game Port. In case the driver shows a
different action find a driver that gives you the correct axis and button display.
There is a possibility Windows is unable to control the game port of your PC.
This is most likely to happen with PC”s that have a rather old sound system.
The configuration described above might fail. In this case the “Dos style”
Game Port Access will have to be selected.
Soft Call Recorder Manual
27
Page 28

5.3 Settings SCR Game Port
The settings of the SCR depend on the way you have connected the SCRinterface. Follow the instructions for Settings "record from telephone line"
(5.3.1) if you have connected the SCR-interface using Method 1
instructions for Settings "record from handset" (5.3.2) if you have
connected the SCR-interface using Method 2
seem to work in any way try setting the Game Port Access to Windows Style
See Windows configuration SCR Game Port (5.2).
. In case your SCR does not
5.3.1 Settings "record from telephone line"
Start the Soft Call Recorder software. See Software installation (3.1).
• Click the “All” selection in the “View” menu option to enlarge.
• Click “Options/Advanced” and click on the “Hardware” tab to display.
• Select “Game Port” as Recorder Type and “Line” as Record Source.
• Select “Autostart Enabled”, and deselect “Ask to store”.
• Set "Silence Timeout" to “30”.
• Click “OK” to confirm.
Pick up the phone and “Telephone off hook” will be displayed. Hang up the
phone and “Telephone on hook” will display.
Pick up the phone, wait for the dial tone and dial a number. Hang up the
phone and play the recording using the “play” button. Go to
“Options/Advanced”, click the “Hardware” tab. Adjust the Channel A slider
until dial tones have a clear undistorted sound.
Now create a recording of an actual conversation. If the sound is too faint go
to “Options/Advanced”, click the “Audio Mixer” tab. Increase (to the right) the
slide bar "Wave". If this doesn't suffice, increase (to the right) the slide bar
“Record source”.
This should lead to a well sounding recording. If this is not the case repeat the
previous steps to improve the recording.
. Follow the
Soft Call Recorder Manual 28
Page 29

5.3.2 Settings "record from handset"
Start the Soft Call Recorder software. See Software installation (3.1).
• Click the “All” selection in the “View” menu option to enlarge.
• Click “Options/Advanced” and select the “Hardware” tab.
• Select “Game Port” for Recorder Type and “Handset” as the Record
Source.
• Select “Autostart enabled”, deselect “Ask to store”.
• Set "Silence Timeout" to “5”.
• Click “OK” to confirm.
Pick up the phone and “Telephone off hook” should be displayed. If this does
not happen return to “Options/Advanced” and click on the “Hardware” tab.
Lower the "Detection threshold" (to the left) and click “OK” to confirm. Repeat
until “Telephone off hook” is displayed when picking up the phone.
Pick up the phone, wait for the dial tone and wait another 10 seconds. The
sounding of the dial tone is crucial to obtain a good setting. If a new recording
is starting every few seconds, return to “Options/Advanced” and click on the
“Hardware” tab. Lower the "Detection threshold" (to the right) a little bit and
click “OK” to confirm. Repeat this until a satisfactory adjustment is obtained.
Go to the “Options/Advanced” menu selection; click on the “Hardware” tab.
Increase "Silence Timeout" to “30” seconds and confirm.
When "record from handset" is used the SCR needs to detect "on/off hook" by
“listening” to the handset. When hanging up the phone the SCR will keep
“listening” to the telephone line. If a “silence” exceeds the "Silence Timeout"
(in this case 30 seconds) the SCR will assume the phone has been hung up.
If recordings are stopping during conversation, there are two possible causes.
Either the "Detection threshold" is set too high to detect your speech, or the
"Silence Timeout" is set too short.
Pick up the phone, wait for the dial tone and dial a number. Hang up the
phone and play the recording using the “play” button. Go to
“Options/Advanced”, click the “Hardware” tab. Increase the level of Channel
Soft Call Recorder Manual
29
Page 30

A and B and create a similar recording. Adjust Channel A and B until dial
tones have a clear undistorted sound.
Now create a recording of an actual conversation. It is possible the volume of
your voice is very different from the remote voice. This can be corrected by
adjusting Channel A and B. Due to many differences in handset cables there
is no way in telling whether Channel A or B must be increased or lowered.
A bit of experimenting will help you find out quickly. Try and make a few
recordings to figure out the effects.
If the general sound remains too faint, go to “Options/Advanced”, click the
“Audio Mixer” tab. Increase (to the right) the slide bar "Wave". If this doesn't
suffice, increase (to the right) the slide bar “Line in”.
This should lead to a well sounding recording. In case it is not possible to
accomplish a reasonably good recording you can try setting the switch on the
bottom of the SCR-interface in position B and repeat the previous steps to
accomplish.
Soft Call Recorder Manual 30
Page 31

6 Soft Call Recorder USB
The Soft Call Recorder USB is connected to a free USB port. Connect the
interface following the instructions.
6.1 Connecting the SCR USB
Determine the kind of telephone you want to connect the SCR-interface to.
This will either be a normal (analog) or digital (e.g. Key System, PBX, ISDN)
device.
When using a normal (analog) telephone, connect the SCR-interface as in the
"record from telephone line" diagram of Method 1
telephone line" is used the SCR can detect "on/off hook" straight from the
telephone line. The switch at the bottom of the SCR-interface must be in
position A.
When using a digital telephone, connect the SCR-interface as in the "record
from handset" diagram of Method 2
SCR needs to detect "on/off hook" by “listening” to the handset. The switch at
the bottom of the SCR-interface must be in position A.
In case your PC does not come with a “line in” connection, it is possible to
connect the SCR-interface using the “Aux” or “Microphone”.
. When "record from handset" is used the
Warning: Use supplied and original cables only. Connecting the SCRinterface in any other way than described can cause damage.
Tip: When "record from handset" layout is deployed it is possible to use the
provided longer curled cable to connect the handset to the SCR-interface and
use your original curled cable to connect the SCR-interface to the telephone.
This should prevent tearing the SCR-interface from its place when picking up
the phone. The left and right connector may be switched in this particular
case.
. When "record from
Soft Call Recorder Manual
31
Page 32

6.1.1 Connecting diagrams SCR USB
Optional to speakers
PC USB connector
PC
CALL RECORDER
Method 1: "Recording from the Line"
Optional to speakers
PC USB connector
PC
Method 2: "Recording from the Handset"
Warning: Use supplied and original cables only. Connecting the SCRinterface in any other way than described can cause damage.
CALL RECORDER
1 2
4 5
7 8
*
1 2
4 5
7 8
*
3
6
9
#
0
3
6
9
#
0
Soft Call Recorder Manual 32
Page 33

6.2 Settings SCR USB
Once you have connected the SCR USB to your computer’s USB port or USB
hub, restart your computer. The next time your operating system loads, it
should recognize the new hardware and display the Hardware Wizard to
install drivers for your new hardware. Follow the instructions on the screen.
You may be asked for your original Windows CD to install the necessary
drivers. Once the drivers are installed you will again need to restart your
computer.
The installation of the SCR USB interface will make this device the preferred
sound device of your computer because it is the last device that has been
added to your configuration. If you have a soundcard in your system and you
are using it for other applications it is advised to set your original sound device
back as preferred device. This is done in the following way. Click "Start" and
select the Control Panel. Select "Multimedia" or "Sound and Multimedia" and
select the Audio tab-page. Now select your preferred device for playing and
recording. If you do not restore your soundcard as preferred audio device
there is a chance the sound of games and other applications will no
longer work.
The settings of the SCR depend on the way you have connected the SCRinterface. Follow instructions Settings "record from telephone line" (4.3.1)
in case you have connected the SCR-interface using Method 1 or 3
instructions Settings "record from handset" (4.3.2) in case you have
connected the SCR-interface using Method 2 or 4
.
6.2.1 Settings "record from telephone line"
Start the Soft Call Recorder software. See Software installation (3.1). Click the
menu option “View” and then “All” to enlarge the program dialog.
• Click “Options/Advanced” and click on “Hardware” tab to display.
• Select “USB” as Recorder Type and “Line” as Record Source.
• Select “Autostart Enabled”, deselect “Ask to store”.
• Set "Silence Timeout" to “5”.
• Click “OK” to confirm.
. Follow
Soft Call Recorder Manual
33
Page 34

Pick up the phone and “Telephone off hook” will be displayed. Hang up the
phone and “Telephone on hook” is displayed.
Pick up the phone, wait for the dial tone and wait another 10 seconds. The
sounding of the dial tone is crucial to obtain a good setting. It is possible a
new recording is starting every few seconds.
Return to “Options/Advanced” and click on “Hardware” tab to display. Lower
the "Detection threshold"(to the left) and click “OK” to confirm. Pick up the
phone and again wait for 10 seconds. In case a new recording is still starting
every few seconds than further lower "Detection threshold". Repeat until a
satisfactory setting is established and a single recording continues for more
than 10 seconds.
Go to “Options/Advanced”, click on “Hardware” tab to display. Increase
"Silence Timeout" to “60” seconds and confirm.
Pick up the phone and try to create a recording. After hanging up, a new
record should be created. Now play the recording by highlighting the record
and pressing the Play button on the main program screen.
To adjust the sound level return to menu option “Options/Advanced” and click
“Audio Mixer” tab to display. In case the sound is too faint when playing
increase “Maximum Peak Level” (to the right) on the "Adjust Automatic Gain
Control..." panel. In case the sound is too loud, lower the “Maximum Peak
Level” (to the left).
Using these basic configuration settings should result in a good sounding
recording. If this is not the case repeat the previous steps to tweak the
settings as needed.
6.2.2 Settings "record from handset"
Start the Soft Call Recorder software. See Software installation (3.1). Click
“All” in menu option “View” to enlarge.
• Click “Options/Advanced” and click on “Hardware” tab to display.
• Select “USB” as Recorder Type and “Handset” as Record Source.
• Select “Autostart Enabled”, deselect “Ask to store”.
• Set "Silence Timeout" to “5”.
Soft Call Recorder Manual 34
Page 35

• Click “OK” to confirm.
Pick up the phone and “Telephone off hook” will be displayed. If this is not the
case, return to “Options/Advanced” and click on “Hardware” tab to display.
Lower "Detection threshold"(to the left) and click “OK” to confirm. Repeat until
“Telephone off hook” is displayed when picking up the phone.
Pick up the phone, wait for the dial tone and wait another 10 seconds. The
sounding of the dial tone is crucial to obtain a good setting. It is possible that a
new recording may start every few seconds. Return to “Options/Advanced”
and click on “Hardware” tab to display. Lower "Detection threshold" (to the
left) a little bit and click “OK” to confirm. Repeat until a satisfactory adjustment
is obtained.
Go to “Options/Advanced”, click on “Hardware” tab to display. Increase
“Silence Timeout” to “30” seconds and confirm.
When "record from handset" is used the SCR needs to detect "on/off hook" by
“listening” to the handset. When hanging up the phone the SCR will keep
“listening” to the telephone line. If a “silence” exceeds the "Silence Timeout"
(in this case 30 seconds) the SCR will assume the phone has been hung up.
In case recordings are being stopped during conversation there are two
possible causes. Either the "Detection threshold" is set too high to detect your
speech, or the "Silence Timeout" is set too low.
Pick up the phone and try to create a recording. After hanging up, a new
record should be created. Now play the recording by highlighting the record
and pressing the Play button on the main program screen.
To adjust the sound level, return to the menu option “Options/Advanced” and
click “Audio Mixer” tab to display. In case the sound is too faint when playing
increase “Maximum Peak Level” (to the right) on the "Adjust Automatic Gain
Control..." panel. In case the sound is too loud, lower the “Maximum Peak
Level” (to the left).
This should lead to a well sounding recording. If this is not the case repeat
previous steps to accomplish. In case it is not possible to create a well
sounding recording, set the switch at the bottom of the SCR-interface in
position B and repeat previous steps to accomplish.
Soft Call Recorder Manual
35
Page 36

Soft Call Recorder Manual 36
Page 37
7 Recorder functions
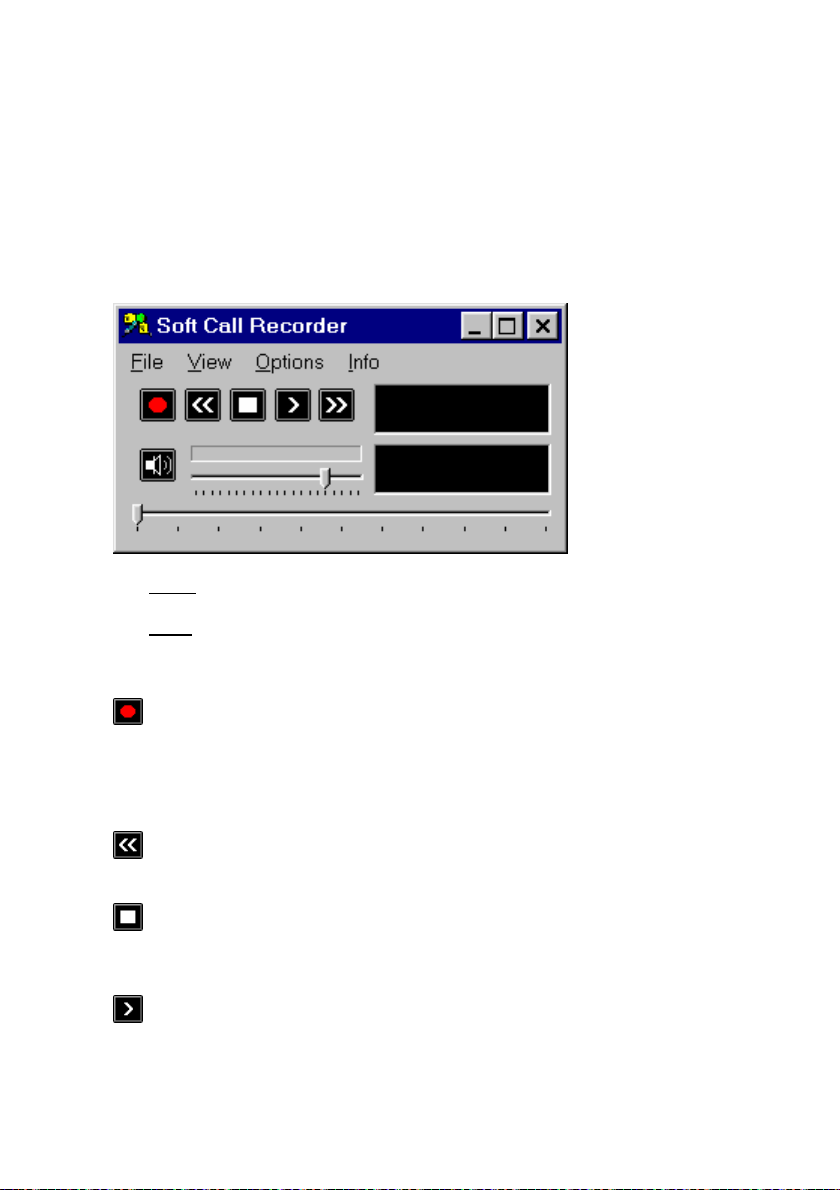
The operation of the SCR very much resembles your VCR. All Soft Call
Recorder buttons and options will be discussed below.
The upper
The lower
along the slide bar moves the playing position of the recording to the
corresponding position in the recording.
can be started only when the telephone is “off hook”. Automatic recording
starts a new recording every time the telephone is “off hook“. With automatic
recording selected it is not possible to stop a recording manually, only the “on
hook” signal will stop the recording.
backwards.
recording. With automatic recording selected (enabled) it is not possible to
stop a recording manually.
slide bar adjusts the volume.
slide bar represents the length of the recording. Moving the slider
The Record button is used to manually start a recording. A recording
The Backward button will move the playing position 60 seconds
The Stop button will stop playing and will stop a manually started
The Play button is used to play or pause a recording.
Soft Call Recorder Manual
37
Page 38

The Forward button will move the playing position 60 seconds forwards.
The Mute button toggles the speaker on and off.
In the entire View of the SCR the database tab (at the top-right of the program
window) display's the following keys.
The Locked and Unlocked buttons replace each other when
pressed. All program actions and operations are disabled when the Unlocked
button is pressed and the Locked icon is displayed. However, even when
locked, automatic recording remains operational. See Security (8.7).
The Upward button and the Downward button move the current
selected recording one recording forward or backward in the database.
The Recycle Bin button places a selected recording or selection of
recordings in the Recycle Bin. Under the menu option ''File/Recycle Bin'', the
Recycle Bin recordings can be viewed or permanently removed from the
computer's hard drive. Recordings you don't want to delete after all can be
restored to the current archive with the menu option "Action/Restore
selection". See also (9.1.3) and (9.2.2).
7.1 Recording
7.1.1 Introduction
The recording of telephone conversations is the most important feature of the
Soft Call Recorder. Settings are crucial to quality and operation of the Soft
Call Recorder. Text in this chapter frequently refers to the settings. Most of the
settings can be found on the dialog presented by selecting the menu option
“Options/Advanced” on the tabs “Hardware” and “Audio Mixer” (9.5).
7.1.2 Manually starting a recording
A recording can be started manually using the record button. A recording
can only be started if the telephone is “off hook”.
Soft Call Recorder Manual 38
Page 39

7.1.3 Automatic recording
Recording can also be started automatically every time the telephone is
picked up (e.g. taken “off hook”). Automatic recording can be selected in the
menu selection "Options/Advanced" on the “Hardware” tab. If “Ask to store” is
selected, a dialog box will be displayed after every recording asking whether
you want to store the recording.
7.1.4 Stopping a recording
A manually started recording can also be stopped manually. An automatically
started recording can only be stopped when the telephone conversation is
stopped and the "on hook" has been generated. When "recording from
handset" this may take a while, because the “Silence Timeout” must pass for
the Soft Call Recorder to assume the telephone is "on hook".
7.1.5 Beep while recording
It is possible, and in some countries mandatory, to sound a beep regularly to
indicate you are recording the conversation. This Beep can be selected and
its interval set by selecting the menu “Options/Advanced” in the “General” tab.
If you are using the SCR Classic, the SCR-interface must be connected in a
different way. See Connecting SCR Classic (4.1).
7.2 Playing a recording
The playing of a recording is done simply by selecting a recording in the
archive and pressing the
The upper slide bar adjusts the volume.
The
While playing the display shows the elapsed time of the recording. The lower
slide bar represents the length of the recording. Moving the slider along the
slide bar moves the playing position of the recording to the corresponding
position in the recording.
mute button toggles the speaker on and off.
Soft Call Recorder Manual
play-button.
39
Page 40

Soft Call Recorder Manual 40
Page 41

8 Database
8.1 Functions
All recordings are automatically stored in a database. The database of the
Soft Call Recorder is referred to as "Archive". The archive is merely a list of
recordings and their properties. Archive properties can be set in the menu
item “Options/Advanced” on the Database tab. You can split your calls
between different archives for instance for different employees, and build CD
Archives for back up or storage. Transfer CD Archives to CD-ROM when they
approach the size of a writable CD . See the menu option “File” (9.1) to learn
about creating new archives.
The recorder functions Play and Delete always refer to the currently selected
recording(s).
There are different ways to manipulate the recordings in the archive.
Note: Standard Windows keyboard mapping is generally effective.
The Upward button and the Downward button move the current
selected recording one recording forward or backward in the database.
Multiple selections of recordings can be made by dragging your mouse cursor
over more then one record, or by holding the Control (Ctrl) key down and
successively clicking on a desired record to add to the selection. Perform any
action on your selection using the options available in menu option “Action”.
Recordings in the archive are sorted by date and time by default. Clicking the
header field (the top row field for a particular column), the records will be
sorted by the property of the corresponding column. Click the header field
again to reverse the sort.
8.2 CD Archives
CD Archives are archives that are intended to be transferred to CD for back
up or storage. To organize your back up or storage you can open more than
one CD Archive. For instance you can have a CD Archive for the sales
department and a CD Archive for the support department. CD Archives are
play and view archives only. When viewing a CD Archive, new recordings are
still stored in the current archive. See also CD Archive (9.1.2) and Build CD
Soft Call Recorder Manual
41
Page 42

Archives (9.2.5) to build CD Archives. When a CD Archive approaches the
actual size of a writable CD, then transfer the CD Archive to the CD.
8.3 Names
Recordings in the archive can be given a “name”. Select a recording, doubleclick the name-field and enter the name.
8.3.1 List of names
Regularly returning names can be kept in a list and selected when needed.
Select the names tab in the upper right corner on the main dialog. Click “New”
and enter a name. Click "OK" to confirm.
8.3.2 Adding names from the list
Select the recording to which you want to add the name. Select the names
tab. Then select the starting letter of the name in the little scroll-box (to the left
of the “new” button). Select the name in the list of names and click “OK” to
confirm.
8.4 Notes
Like names you can also add Notes to your recordings. Select a recording in
the archive. Double click the notes field and enter your notes. You can also
select the “Notes” tab in the upper right corner of the Soft Call Recorder main
dialog to enter the notes in the specialized notes field. Double click the notes
field and the notes are tagged as belonging to the selected recording.
8.5 Query/Search
A selection of recordings can be made with the help of a query. A selection
can be made on date, duration, name, incoming or outgoing. See menu option
Query (9.3) for a more detailed explanation.
8.6 Import
Archives made by other SCR users can be imported into your own archive.
These other existing archives must be accessible through your computer
network. A ''user'' must first be created to import their archive. See below.
Soft Call Recorder Manual 42
Page 43

8.6.1 Users
Users are associated with SCR archives accessible through the computer
network. To import another archive into your own archive a user must first be
created. See (9.5.3). Once several users have been created, their archives
can be imported using the “Import from other users” under the “Action” menu
(9.2.4).
8.6.2 Playing imported recordings
Imported recordings can be played like any other recording.
8.7 Security
The Locked and Unlocked buttons replace each other when
pressed. All program actions are disabled when the Unlocked button is
pressed and the Locked icon is displayed. However, automatic recording
remains operational while locked. Opening the lock enables all program
actions and operations.
8.7.1 Opening Lock
A password can be set to protect the Lock. Important: Once a password has
been configured the opening of the lock is possible only by entering the
password.
8.7.2 Configuring password
Click the menu item "Options/Advanced" and select the “Password“ tab.
Enter and then re-enter your password it to confirm.
Soft Call Recorder Manual
43
Page 44

Soft Call Recorder Manual 44 Soft Call Recorder Manual
Page 45

9 Menu
Every feature of the SCR software can be found and operated through menuoptions. All menu options are described below.
9.1 File
9.1.1 Current archive
The current archive is the displayed archive. Different archives can be
created. Select “Current Archive” and a standard Windows Open dialog box
allows you to select an archive or select a folder to create a new archive in.
If the selected folder already contains an archive (there exists a file named
“softarchive.mdb”) the existing archive in the selected folder will be opened
and displayed. If there is not an archive in the selected folder, then a new
archive will be created. The new archive will of course be empty upon
creation. All new recordings made will be stored in the selected current
archive.
9.1.2 CD Archive
CD Archives are archives created with the intention of transferring to CD for
back up or storage. CD Archives may be viewed and the recordings played.
New recordings will always be written to the Current Archive. See also CD
Archives (8.2).
CD Archives will need to be transferred to CD when their size approaches the
maximum storage space on your CD. Selected recordings of an existing
archive or entire archives can be added to the CD archive. See menu option
"Action" (9.2.5).
The “Set Path for new CD Archives” menu item enables you to specify the
location of a new CD archive.
Once a CD Archive has been transferred to CD, the CD Archive on your PC
can be deleted using the "Erase" option.
9.1.3 Recycle bin
The SCR Recycle Bin can best be compared to the Windows Recycle Bin.
Deleted recordings are placed in the Recycle Bin. Deleted recordings can be
45
Page 46

recovered and returned to the current archive. See below in menu option
"Action".
The “Show Contents” menu item will display the Recycle Bin.
The “Empty Recycle Bin” menu item deletes all recordings in the Recycle Bin.
Recordings that have been deleted from the Recycle Bin can no longer be
retrieved.
9.1.4 Exit
Shuts down the Soft Call Recorder program.
9.2 Action
9.2.1 Delete selected
This item can be used to delete the currently selected recording or a multiple
selection of recordings. Deleted recordings are placed in the Recycle Bin.
9.2.2 Recover selected
The “Recover Selected” menu item applies only in the Recycle Bin. It is used
to recover a selected recording or a multiple selection of recordings from the
Recycle Bin. Recovered recordings are placed back in the current archive.
9.2.3 Export
The Export function is used to save a recording in another file format. By
default, recordings in the SCR are saved in a .CRF format. The only currently
available alternative format is WAVE format. Recordings exported as .WAV
have ADPCM coding. This format is a very familiar compression method and
can be played on almost any PC. However WAVE files can require 5 times the
disk space as CRF files.
If you need to share recordings on a regular basis, consider the SCR Player
program. This program allows you to select and play recordings by selecting
the .CRF files. You can also mail .CRF files and have them played using the
SCR Player.
The SCR Player can be found on the Soft Call Recorder CD-ROM in the
directory "SCRPlayer". Locate the file “SCRPlayer” and start it by double
clicking.
Soft Call Recorder Manual 46
Page 47

9.2.4 Import
Archives of other SCR-users can be imported into your own current archive
using this option. These archives must be accessible through the computer
network. A corresponding Soft Call Recorder "User" must be created first. See
Database tab (9.5.3) and Database explanation (8.6).
9.2.5 Build CD Archive
Build CD Archive gives you a choice of two options. Either add a selection of
recordings or add an entire archive to the CD archive. See also CD Archive
(8.2).
9.3 Query
Click the menu item "Query/Start" to begin a query in the archive. The upper
row of the archive changes to display a small downward pointing arrow in
each column. For a query on date or duration click an arrow of the column
corresponding to the field which you desire to apply the query to. A dialog box
will open allowing you to enter boundaries for the query. Click “OK” and the
query will be executed and the results displayed. For other queries click the
field to the left of the arrow and enter the term you want to select on. This can
be done using wildcards. E.g. *rik will result in all records being displayed that
have the letters "rik" in their name, considering you have clicked the field
above the "name" column. (There is always an imaginary wildcard at the end
of a search term). The menu option “Return to Complete Archive” will revert
back to the entire current archive.
9.4 View
The three options in the View menu enable you to have the SCR displayed on
your computer desktop in three different ways. The options are:
9.4.1 System Tray
Select the System tray menu item to display the (green microphone) icon
in the System Tray at the bottom right of your screen. If automatic recording is
not enabled a red cross will be displayed over the icon. With automatic
recording enabled the
is being made. When not recording the (green microphone) icon
reappears. Click the SCR system tray icon once to open the main Soft Call
Recorder dialog.
Soft Call Recorder Manual
(red microphone) icon will appear when a recording
47
Page 48

9.4.2 Recorder Only
Click “Recorder only” to display the minimal Soft Call Recorder screen like the
example below.
In the menu item “Options/Advanced”, on the “General” tab, you can also
indicate that the Soft Call Recorder is to be displayed “Always on Top”. This
means that if other programs have focus, the Soft Call Recorder dialog will still
be on top of the focused program.
9.4.3 All
Click the “All“ menu item to display the entire Soft Call Recorder including the
"Names, Notes and Database" tabs and the current archive database.
Soft Call Recorder Manual 48
Page 49
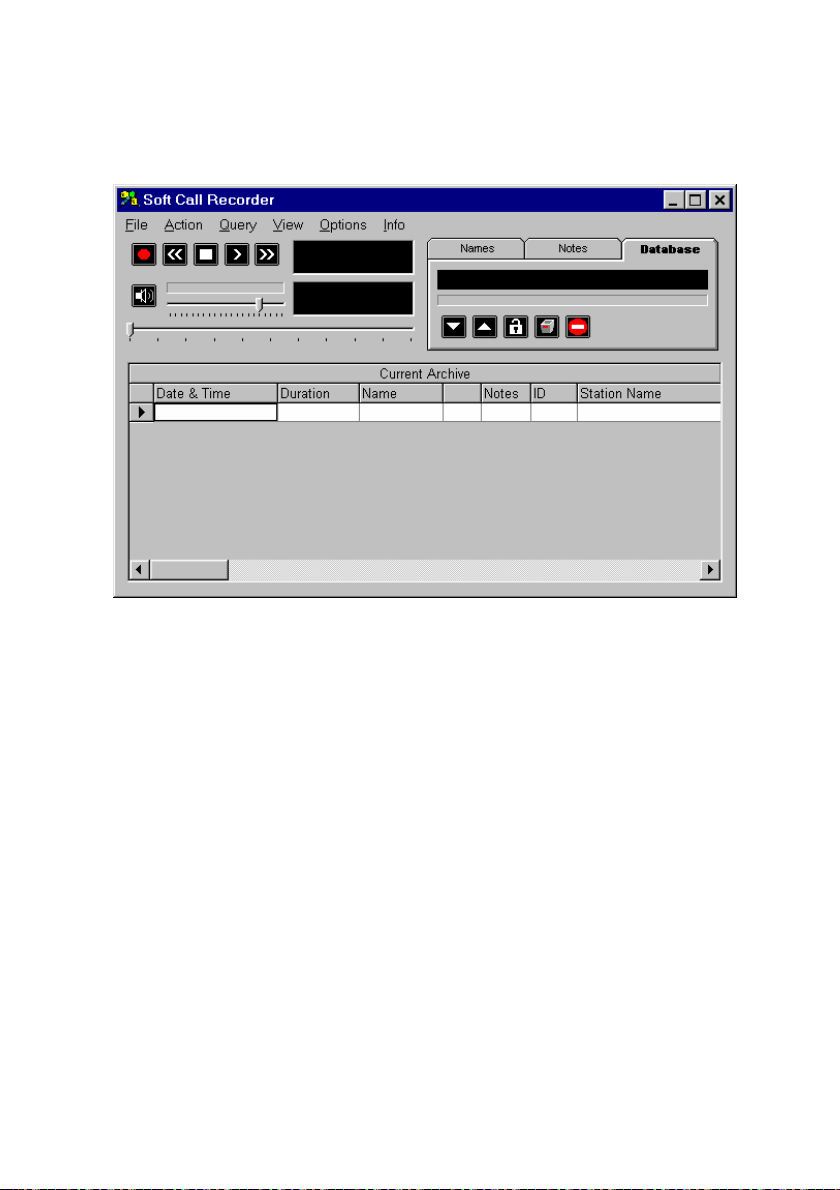
This view of the SCR dialog can be scaled to your preferred size. Place your
mouse on the bottom right corner and drag to the preferred size.
9.5 Options
By selecting “Options/Advanced” a dialog box with six tabs appears. A brief
description of available choices on the tabs is below.
9.5.1 Language
Set the language of your choice by selecting the corresponding flag.
9.5.2 Hardware
9.5.2.1 Recorder Type
Set to the model of Soft Call Recorder you are using. See also Models (2) to
check for your model.
Soft Call Recorder Manual
49
Page 50

9.5.2.2 Record Source:
Connecting the SCR-interface, you have chosen a record source. Select
“Line” if the SCR-interface was connected using the "record from telephone
line" method. Select “Handset” if the SCR-interface was connected using the
"record from Handset" method.
9.5.2.3 Automatic Recording
Select Autostart Enabled to allow Automatic Recording. Enabling Ask to Store
opens a dialog box after each recording prompting whether you want the
recording to be stored. Enabling Priority over Playing applies only to the
Game Port model and will automatically start recording if a new call is initiated
while playing a recording.
Minimum duration sets the required minimum duration of a recording.
Recordings shorter than the minimum duration will not be stored.
9.5.2.4 Silence Timeout
If the SCR-interface has been connected using the "record from Handset"
method, the SCR needs to “listen” to the handset to know whether a call is
underway. If the SCR detects silence for a period exceeding the specified
“Silence Timeout”, the SCR will assume the telephone call has ended and will
stop the recording. See also Detection threshold below.
If the SCR-interface has been connected using the "record from Line" method
the “Silence Timeout” can be set at 60 seconds or higher, since the SCR can
detect "on/off hook" straight from the telephone line.
9.5.2.5 Detection Threshold
If the SCR-interface has been connected using the “record from Handset"
method, the SCR needs to “listen” to the handset to know whether a call is
underway. The Detection Threshold must be exceeded by the dial tone or
speech for the SCR to “detect” a call is being made. Lowering the Detection
Threshold will make the SCR require less volume of noise to detect the dial
tone or speech. The point is to set the Detection Threshold as high as
possible while maintaining detection of the dial tone and speech.
If the SCR-interface has been connected using a "record from Line" method,
there are two possibilities. Setting the Detection Threshold too low can result
in the SCR detecting the telephone is “off hook” too soon. Setting the
Detection Threshold too high can result in the SCR assuming the telephone is
Soft Call Recorder Manual 50
Page 51

“on hook” too soon thereby stopping recordings prematurely. Increasing the
“Silence Timeout” can also help you solve this problem.
9.5.2.6 Levels
Setting of the Levels of Channels A and B apply to the SCR Game Port only.
Channel A is the input channel when recording from “Line” mode. Channel B
is the second input channel and is used in combination with Channel A when
recording from the “Handset”.
Usually the default settings for both channels will be fine. Follow instructions
in the chapter corresponding to the SCR Game Port to adjust the channels. It
is possible the volume of your voice is very different from the remote voice.
Inequitable volumes can be corrected by adjusting the Channel A and B
sliders, compensating for differences in remote and local volumes. Due to
many differences in handset cables there is no way in telling whether Channel
A or B must be increased or lowered. A bit of experimenting with extreme
settings will help you quickly find out channel assignments for your phone
system. Try and make a few recordings to figure out the effects.
9.5.2.7 Game Port Access
Game Port Access applies to the SCR Game Port model only and pertains to
the Game Port communication of the SCR. The default is DOS Style. In some
cases however the Windows style is preferred. In this case a 2 axis, 4 button
joystick driver belonging to your sound card must to be installed. See
Windows Configuration Game Port (5.2).
9.5.3 Database
On the “Database” tab the properties of recordings can be selected for display
in the archive. Additionally, at the bottom of the tab the display font can be
selected.
The order of columns can also be changed to suite individual needs.
Remember to disable column rearranging when done. Changing the column
order is performed by selecting the column header and dragging it to the
preferred location.
In the “Import List“ group box, "Users" can be added and removed. Click “Add”
and enter the user-name. Click “OK” to confirm and locate the SCR archive
belonging to that user. Important: the user must point to an existing
archive. User archives added here can be imported to your own archive using
Soft Call Recorder Manual
SCR
51
Page 52

the menu option "Action/Import...". See Import (9.2.4) and Database (8.6).
Select "Station name" in the database and the user-names of all imported
recordings will be displayed.
9.5.4 Audio Mixer
This tab allows adjustment of audio settings. Most settings are made at
startup of the program by the setup wizard. Standard levels are probably all
right. However, if you must adjust, experiment a little with the settings to
obtain a good result. Follow the instructions of your model SCR. Have you
changed model of SCR or do you want to change Soundcards press the "Start
config". Choose your audio device for input(recording). If you are using a SCR
USB you need to select that particular device here. In case you are using
either a SCR Classic or Game Port, select your soundcard that the SCR
interface is connected to. In the second field you select the device that your
speakers are connected to for playback of the recordings. Press "Done step
1" to finish this part of the setup. Automatically part two of the setup is started.
Select the record source in the third field. If you are using a SCR USB you
need to select that particular device here. In case you are using either a SCR
Classic or Game Port, select the port of your soundcard that the SCR
interface is connected to. With the slider to the right "Recording Volume
Control" you can set the recording level. As Wave channel you select the
channel of your selected output device that you have your speakers
connected to. With the slider to the right "Wave Channel Volume Control" you
can set the playback level.
9.5.4.1 Mute while playing
This item must be the same as the channel selected in Record Source above.
Thus, if you selected “Line In” for Record Source, also select “Line In” for
"Mute while playing”. If you are using a SCR USB you can select the CDplayer.
9.5.4.2 Adjust Automatic Gain Control on SCR Classic
Automatic Gain Control (ACG) is a software amplification and applies to the
SCR Classic only. This option amplifies every sound to the same level. This
particular level can be adjusted with the upper slide bar “Maximum Peak
Level”. The lower slide bar adjusts the “minimum level” to be amplified. Sound
below this level will not be amplified. This feature will automatically level
differences in the voices of the local and remote caller. See also the settings
the SCR Classic (4.3). "ACG enabled" must be enabled to be operational.
Soft Call Recorder Manual 52
Page 53

9.5.5 Password
On the “Password” tab, a password can be configured to protect and secure
your recordings. See also Security (8.7).
9.5.6 General
The “General” tab lets you enable the “Beep while Recording”. Also, a spoken
message can be configured to announce to the caller that the call is being
recorded, however this is only possible while "recording from the handset". In
some countries this announcement is compulsory. Users of the SCR Classic
need to connect the SCR-interface differently to be able to enable this feature.
See appropriate connecting instructions (4.1) for more details. The “Sound
return on SCR Classic” field needs to be enabled for this feature to work
correctly.
When building CD Archives the “Maximum Bytes on CD” can be set at the
bottom of the tab.
Be very careful when using the “Erase All CD Archives form Hard Disk”
button. Be sure to have transferred all CD Archives images to CD before
erasing.
“Always on top” forces the SCR dialog to be always displayed on top of all
other applications running on your PC.
Soft Call Recorder Manual
53
Page 54

Soft Call Recorder Manual 54 Soft Call Recorder Manual
Page 55

10 Acknowledgements
10.1 Privacy
When recording telephone conversations the privacy of your conversation
partner must be considered.
In some countries there is an obligation to notify your conversation partner of
the recording. Check your national legal obligations on this and other issues
concerning the use of the Soft Call Recorder.
In the United States, the Federal government requires that only one person
involved in a conversation must know the call is being recorded. However,
each state has legislation. The vast majority of states have laws complying
with the Federal “one party” requirement. A few states, such as Florida and
others, do require both parties are informed the call is being recorded.
The Soft Call Recorder can comply with either one party or two party
requirements. One party simply means the person with the Soft Call Recorder
knows the call is being recorded. Compliance is made with two party
requirements by either playing the beep while recording, or by playing an
announcement at the beginning of the call.
Vidicode is not a source of official interpretation of laws of any country or
state, and shall not be construed as a source for making decisions whether to
provide notification or not. Vidicode assumes no liability regarding incorrect
notification of call recording.
10.2 Liability
Correct functioning of the SCR cannot be guaranteed under all conditions and
thus we do not accept any liability for loss of information or other damages
due to the use of the Soft Call Recorder.
55
Page 56

Soft Call Recorder Manual 56
Page 57

INDEX
A
Acknowledgements, 55
Action, 46
Adjusted connection SCR Classic,
17
All, 48
Always on top, 53
Analog, 15; 17
Announce, 53
Archive, 41
Audio device for Playback, 12
Audio device for Recording, 12
Audio Mixer, 52
Automatic recording, 39
Current archive, 45
D
Delete, 46
Desktop, 47
Detection, 50
Detection Threshold, 50
DOS Style, 51
Duration, 50
E
Empty, 46
Exit, 46
Export, 46
B
Beep, 53
Beep while recording, 39
Build, 47
F
Fast Backward-button, 37
Fast Forward -button, 38
File, 45
Font, 51
C
CD archives, 41; 45
CD-ROM, 41
Channel B, 51
Channels A, 51
Classic, 15
Column, 47
Connecting diagrams SCR
Classic, 16
Connecting diagrams SCR Game
port, 24
Connecting diagrams SCR USB,
32
Connecting the SCR Classic, 15
Connecting the SCR Game Port,
23
Connecting the SCR USB, 31
CRF format, 46
Soft Call Recorder Manual
G
Game controls, 25
Game Port, 23
H
Handset, 50
Hardware, 49
Hook, 37
I
Icon, 47
Import, 42
Import List, 51
Installation, 11
Installation Guide, 7
Interface, 7
57
Page 58

ISDN, 15; 17
J
Joystick, 25
L
Language, 49
Levels, 51
Liability, 55
List (names), 42
Lock, 43
M
Menu, 45
Mixer for Playback, 12
Mixer for Recording, 12
models, 9
Mute while using program, 13
Mute-button, 38
N
Names, 42
Network, 42
Notes, 42
O
Off hook, 37
On hook, 37
Options, 49
Order, 51
P
Password, 43
Play, 39
Play-button, 38
Priority, 50
Privacy, 55
Q
Query, 42
R
Record Source, 14; 50
Record Source on Audio Device,
13
Record-button, 37
Recorder, 37
Recorder buttons, 37
Recorder type, 14
Recording, 37; 38; 39
Recover, 46
Recycle bin, 45
Recycle-bin-button, 38
S
SCR, 7
Search, 42
Security, 43
Settings, 49
Settings SCR Classic, 19
Settings SCR Game Port, 28
Settings SCR USB, 33
Set-up Wizard, 11
Silence time-out, 50
Soft Call Recorder Classic, 15
Soft Call Recorder Game Port, 23
Soft Call Recorder USB, 31
software installation, 11
Spoken message, 53
Start, 11
Stop-button, 37
Store, 41
System tray, 47
T
Threshold, 50
Time, 41
Transfer, 45
Soft Call Recorder Manual 58
Page 59

Type, 49
U
USB, 31
User, 43
V
View, 47
Volume, 37
W
Wave Channel of Audio Device,
13
Windows configuration SCR
Game Port, 25
Wizard, 11
Soft Call Recorder Manual
59
 Loading...