

Page 1

PTAM
manual
Page 2

Handleiding PTAM ©-1998 Vidicode Datacommunicatie BV
2
Page 3

Contents
1 Introduction 7
1.1 Connecting to the telephone network 8
1.2 Hard disk capacity 9
1.3 Some terminology 9
1.4 Switching the hard disk on and off 11
1.5 Accessories 11
1.6 Guarantee conditions 12
1.7 Additional information about your PTAM 13
1.8 Millennium compatibility 13
2 Installation 15
2.1 Unpacking 15
2.2 Connecting 15
2.3 Powering on 16
2.4 Configuring your PTAM for use 17
3 Using the PTAM 19
3.1 Use as a telephone answering machine 19
3.2 Using the PTAM as a normal recorder 21
3.3 Use as a telephone 22
3.4 Recording from a telephone 26
3.5 General information about playing back 26
3.6 How the disk is organized and how to erase a recording 27
Handleiding PTAM ©-1998 Vidicode Datacommunicatie BV
3
Page 4

4 The timetable and voice response 29
4.1 The timetable 29
4.2 System messages and options, voice response. 31
4.3 Connecting through calls 34
4.4 Working with the information obtained via Voice Response 34
5 Configuration 37
5.1 Introduction 37
5.2 Use of the password 38
5.3 The clock 39
5.4 Number of rings before answering 39
5.5 “Always answer” mode 39
5.6 Ringing settings 40
5.7 Use of speaker when answering machine is on 40
5.8 Minimum and maximum length of message 40
5.9 Duration of the hook-flash 41
5.10 Connecting through 41
5.11 Number Identification 41
5.12 K-break detection 41
5.13 Sound characteristics and quality 42
5.14 Recording Amplification 42
5.15 Playback Volume 42
5.16 Microphone type selection 42
5.17 How to start microphone recording 42
5.18 The start switch for automatic recording 43
5.19 Starting and stopping by sound 43
5.20 Use of footpedal 43
Handleiding PTAM ©-1998 Vidicode Datacommunicatie BV
4
Page 5

5.21 Language 43
5.22 Reset all values 43
5.23 The VU meter 44
6 Remote access 47
6.1 Typing in the password 47
6.2 Listening to new messages remotely 47
6.3 Selecting a welcome message 48
6.4 Changing the password remotely 48
6.5 Changing the welcome message remotely 48
6.6 Switching on the answer machine remotely 49
6.7 Changing system messages 49
7 Index 53
Handleiding PTAM ©-1998 Vidicode Datacommunicatie BV
5
Page 6

Handleiding PTAM ©-1998 Vidicode Datacommunicatie BV
6
Page 7

1 Introduction
Congratulations on the purchase of your Professional Telephone Answering
Machine (PTAM). The PTAM is a quality product of Vidicode Datacommunicatie
BV.
The PTAM user interface is easy to understand, so you will rarely have to use
this manual.
The PTAM can be used in the following ways:
• Answering Machine
◊ Choice of several welcome messages, which can easily be changed.
◊ Automatic programming with the help of a daily, weekly, and yearly
timetable
◊ Message Search function
◊ Automatic recording level adjustment
◊ Remote listening to messages, secured by password
◊ Date and time reported when calling in from outside
◊ Remote changing of welcome message possible
◊ Listening and recording secured by password code, if required.
◊ Fast manual operation with on/off switch
• Voice response system
◊ Provides information based on the keys pressed by the user
◊ Has space for practically unlimited number of messages
◊ Change of language possible
◊ Recorded messages sorted in accordance with user’s choice of keys
• Universal high capacity recorder
◊ Records from microphone input
◊ High sensitivity due to advanced automatic gain control system
◊ Easy to use
Handleiding PTAM ©-1998 Vidicode Datacommunicatie BV
7
Page 8
◊ Unlimited recording time
◊ Recordings Search function
◊ Choice of recording quality
◊ ‘Room monitor function: Starts recording automatically when people
speak
◊ Recordings secured by
password code
• Call Recorder
◊ Calls made with PTAM or
telephone connected to
PTAM can be recorded
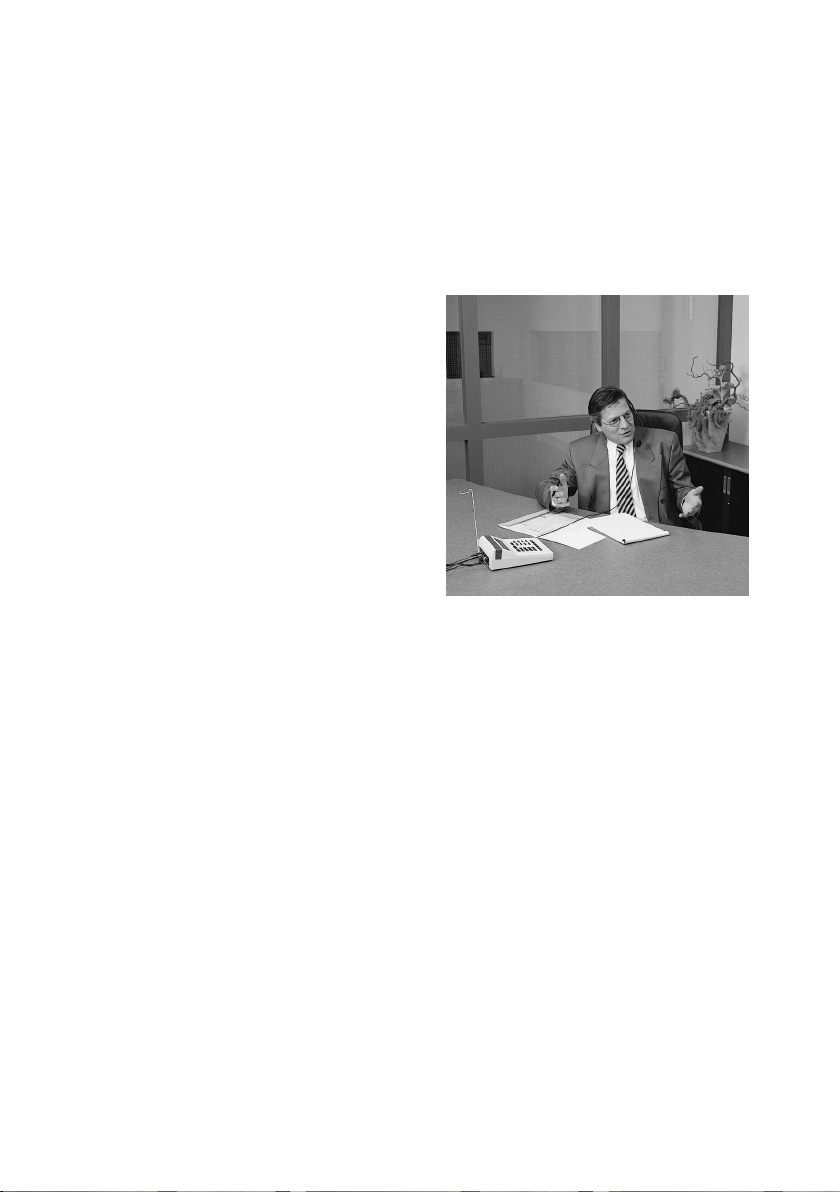
• Headset telephone
◊ Hands free use with
headset
◊ Last number repeat
◊ 200 number register,
accessible by name
◊ Overhear function via
internal speaker
◊ Transfer function
• Remote maintenance
◊ PTAM software and settings adjustable by supplier via data
connection
used as headset telephone
1.1 Connecting to the telephone network
There are two ways to connect your PTAM to the telephone network:
1. As a stand-alone telephone. The PTAM functions as a telephone
with a built-in answerphone.
Handleiding PTAM ©-1998 Vidicode Datacommunicatie BV
8
Page 9

2. In series with a normal telephone. The PTAM is connected to the
telephone line and the telephone to the PTAM.
1.2 Hard disk capacity
The total duration of the recordings the hard disk can store is determined by
the recording quality set by the user. This is approximately:
Standard High 1 High 2
900 hours 185 hours 140 hours
The maximum number of recordings on all PTAM models is 65.000.
The capacity has been calculated for the three audiocompression techniques
available. The standard quality mode is meant for the storage of messages
spoken into the telephone and is comparable in quality to, for instance, a GSM
telephone. It is more than adequate for a telephone answering machine. A lower
compression factor can be set when the recording quality is of specific
importance. It will result in a significant improvement of the quality at the cost
of a much lower capacity. The quality improvement will not be noticeable in
recorded telephone messages, however, because in that application the
telephone line is the determining factor. The high quality modes may come in
useful if a meeting is being recorded.
High and low compression modes can be used together; a few high quality
recordings will not significantly reduce the total capacity.
When the disk capacity is about to be exceeded, space is automatically created
by erasing the oldest recordings.
1.3 Some terminology
For clarity the following terms will always be used for the controls:
Handleiding PTAM ©-1998 Vidicode Datacommunicatie BV
9
Page 10
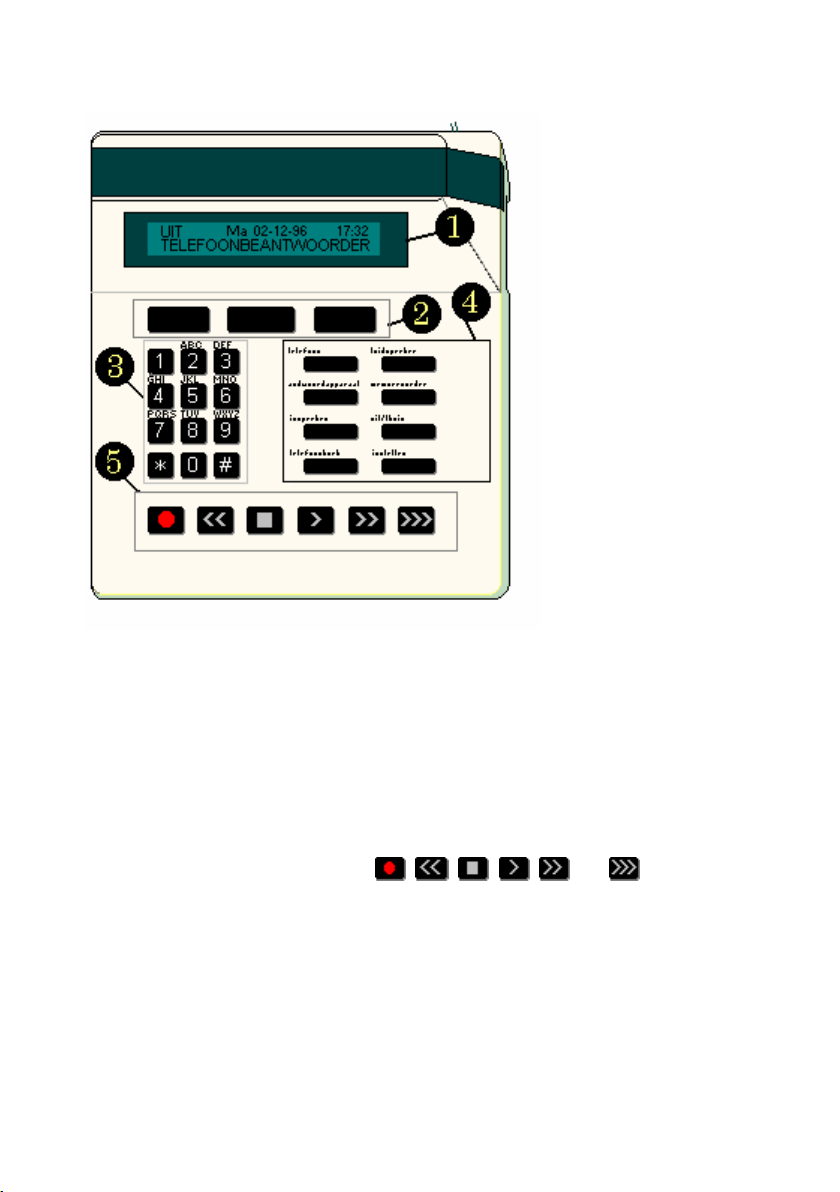
1: LCD or display
2: Softkeys
3: Telephone keys
4: Function keys
The information display
The keys under the display that perform the function
indicated on the display
The keys 0 and 1 to 9, * en #
The keys with the function printed above them , e.g.
‘telephone’, ‘call recorder’ or ‘menu’
5: Recorder keys
The keys
, , , , and , similar to
those found on a cassette or video recorder
The recording keys use either the symbols, or the usual English terms:
Handleiding PTAM ©-1998 Vidicode Datacommunicatie BV
10
Page 11

Record
Rewind
Stop
Play
Fast forward
special PTAM key for selecting the next recording
1.4 Switching the hard disk on and off
The PTAM contains a hard disk, just like a Personal Computer. When using your
PTAM you will notice that the hard disk switches itself on and off. This is
mentioned because you may not be used to your PC switching itself on and off.
Contrary to a PC, however, the PTAM has to be on permanent standby, and should
never be switched off, but left to switch itself on and off as necessary.
The maximum temperature the PTAM can work at is 50 degrees Celsius. If
positioned in front of a window in the full summer sun, the PTAM will display a
warning and the hard disk will temporarily not work.
1.5 Accessories
The following accessories are available for your PTAM:
Foot pedal, article number 1195
The foot pedal is useful when typing out recordings, in particular when one is
making minutes of a meeting. It offers foot operation of the ‘play’, ‘stop’, ‘fast
forward‘, and ‘rewind’ functions. The connection for the foot pedal is on the back
of the recorder.
Archive Software for Windows (versions ‘95/’98 and NT 4.0), article
number 1186
This software will read the contents of your PTAM into your PC, forming them
into a database. This database is then used to search for important recordings
that need to be saved permanently (they can be played by the PC straight away).
Handleiding PTAM ©-1998 Vidicode Datacommunicatie BV
11
Page 12

After the recordings have been marked, they can be stored in your PC, and
played at any time, using the PTAM as your output device.
Table top microphone for recording meetings, article 1196
When the PTAM is regularly used for recording meetings, a table microphone
may be preferred to the headset microphone. Various models can be used; the
article number above refers to a model that has been found to be highly
satisfactory.
Multi-media loudspeakers, article number 1197
If the internal loudspeaker of the PTAM does not provide a sufficiently high
quality of sound reproduction, multi-media loudspeakers with a built-in amplifier
can be connected to the headset.
PC connector cable
Dialling via your computer and using archive software both require a cable to
connect the serial port of your PC to your PTAM. The article numbers are:
For connection to a 25 pin PC serial port: article number 4085
For connection to a 9 pin PC serial port: article number 4086
1.6 Guarantee conditions
This section contains a general overview of the guarantee conditions. On request
we will send you a copy of the complete text.
Your PTAM has a 12-month factory guarantee. The guarantee is effective for
normal use only. The guarantee is not valid under exceptional environmental
conditions such as extreme temperatures or humidity levels, nor in the unlikely
event of a lightning strike. The guarantee is also invalid if the machine has not
been handled properly, e.g. in the case of dropping it, or knocking it against
something else. Hard disks are fragile, and not built for such treatment.
To claim under guarantee, you need to contact your supplier, submitting your
receipt. If your supplier proves to be unable to help, the manufacturer can be
contacted. The manufacturer reserves the right to determine the expiry date of
the guarantee based on the production date. Transport costs from and to the
supplier and/or manufacturer are for the customer’s account.
Handleiding PTAM ©-1998 Vidicode Datacommunicatie BV
12
Page 13

The guarantee is for parts only. We would like to emphasize that neither the
manufacturer nor the supplier can be held responsible for any costs resulting
from the breakdown of the PTAM.
1.7 Additional information about your PTAM
The PTAM has various features not described in this manual. Additional
information can be ordered, or downloaded from the Vidicode websites (Europe
WWW.VIDICODE.NL – USA WWW.VIDICODE.COM). The following section
gives an overview. A considerable number of configuration options have not been
described here because they are not of interest to the average user, and very
technical to explain.
Some of the configuration options have been provided in response to special
requirements from our customers. If you have any special wishes you should
first ask advice from your supplier. Your dealer or other experienced
programmers can assist you in further developing your PTAM’s options. For this
purpose the PTAM comes equipped with its own programming language, Argus
Basic. The Argus Basic manual can be ordered or downloaded from the Vidicode
Internet websites.
With additional software the PTAM can also be used as a ‘Call Recorder’, which
has been specifically designed to record telephone conversations. Technically
the two systems are identical, but the software and keyboard differ. The PTAM
can be changed into a ‘Call Recorder’ for a fee, if so required.
Your supplier can assist you with the installation of your PTAM via a
dataconnection. You will be asked to press the keys of the recorder in a special
way, enabling him to make a connection with the built-in modem of your PTAM via
the telephone. Needless to say it is only possible to make this connection with
your co-operation.
1.8 Millennium compatibility
The year 2000 will not affect the PTAM. At the start of the year 2000 the
display will jump to 00. Recordings made in the year 2000 will be recognized as
being more recent than those of previous years.
If you decide to apply data from the PTAM in other installations, the millennium
compatibility of these applications will be held to be your responsibility.
Handleiding PTAM ©-1998 Vidicode Datacommunicatie BV
13
Page 14

Guarantee claims as result of a millennium problem will be treated as normal
guarantee cases and treated under our registered delivery conditions. A copy of
these can be sent to you on request.
Handleiding PTAM ©-1998 Vidicode Datacommunicatie BV
14
Page 15

2 Installation
2.1 Unpacking
The PTAM comes supplied with the following:
Headset
Mains supply adapter
Telephone cable with 2 jack plugs with 6 contacts (RJ12)
Adapter plug for local telephone network
A mounting hook for the headset and a small plastic bag containing the
necessary screws and rings
Manual
The hook for the headset can be fixed to the recorder with the screws supplied.
2.2 Connecting
The way the PTAM is connected depends on the intended use.
The mains supply power adapter should always be used to connect the mains wall
outlet to the PTAM input labelled ‘POWER’.
The headset should be used as well, unless another microphone or external
loudspeakers are present. The headset connection is marked ‘HEADSET’.
Use as a telephone
The PTAM is used as your only telephone.
Use the telephone cable supplied, which has RJ12 jacks, to connect the PTAM as
a telephone. This is an American type of cable enjoying a growing popularity all
over the world. The supplied adapter plug may need to be used to connect the
end of this cable to the telephone extension outlet. If your firm uses the socalled RJ 45 telephone outlets, the wiring will differ, and we would recommend
you to contact your supplier for advice.
Handleiding PTAM ©-1998 Vidicode Datacommunicatie BV
15
Page 16
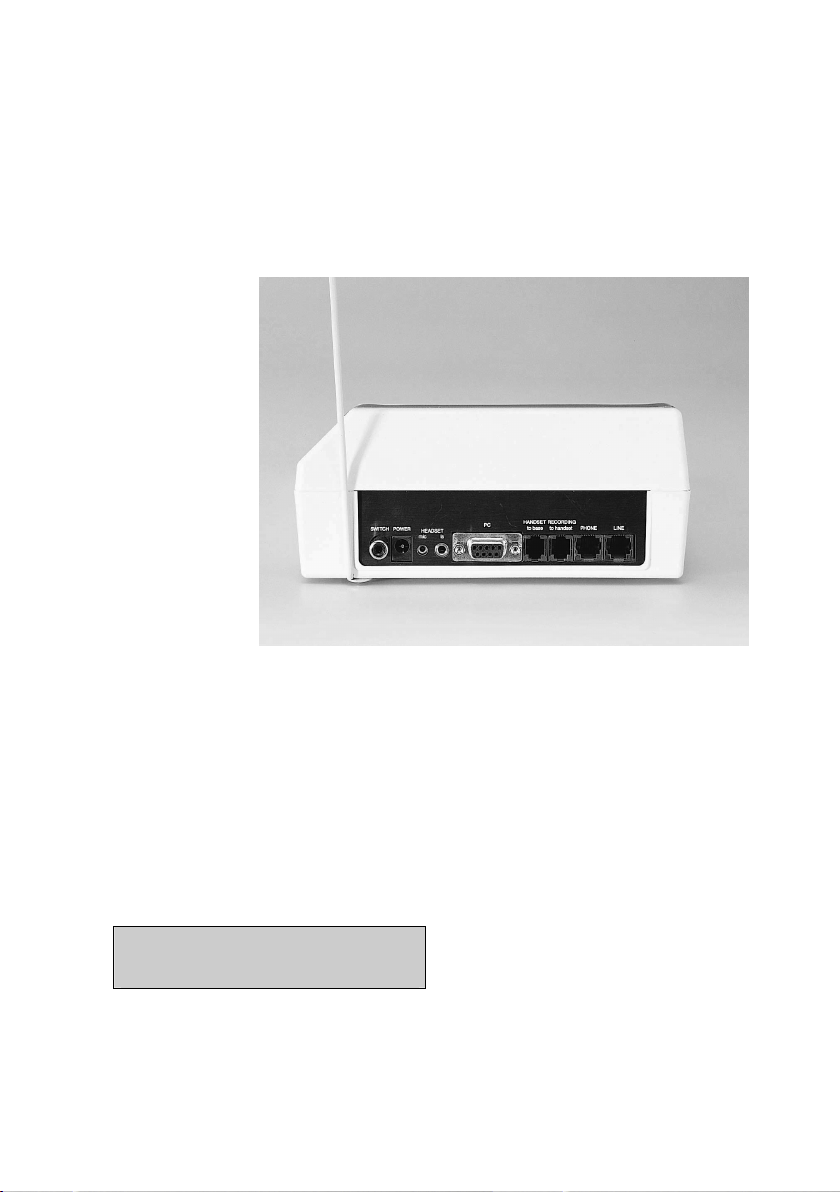
Use together with a telephone
The PTAM and your telephone stand next to one another. Either can be used for
telephoning. The phone is connected to the port ‘PHONE’ at the back of the
recorder, which
is connected to
the line via the
port ‘LINE’
If your
telephone has a
different type
of plug, it should
be inserted into
the adapter plug
supplied. This
doesn’t affect
the telephone.
Use as normal
audio recorder
When the PTAM
the connetions on the back panel
is used in this
way, only the normal microphone port is used.
2.3 Powering on
Connect your mains supply adapter to the ‘Power’ connector at the back of your
PTAM.
Put the plug in the socket. The text:
RESET
Handleiding PTAM ©-1998 Vidicode Datacommunicatie BV
16
Page 17

followed by:
INIT
with finally, for example:
AWAY MO 19-08-98 10:53
Answering Machine
will appear on the display. Instead of AWAY it could also say HOME. There is a
chance the screen will display:
AWAY SU 01-01-96 00:00
*** Clock is wrong ***
with a wrong date and time, i.e. 01-01-96. In that case the clock has not been set
yet, and should be set with the correct date and time first. See 5.3 for this.
2.4 Configuring your PTAM for use
Your PTAM is now ready for the following applications
Use as an answering machine
Use as a telephone
Use as an audio recorder
The PTAM may not yet be set quite the way you want it. The answer message will
have to be changed, and the timetable set. The audio recorder is ready for
manual use, but if it is to record automatically it will need to be configured.
Handleiding PTAM ©-1998 Vidicode Datacommunicatie BV
17
Page 18

Handleiding PTAM ©-1998 Vidicode Datacommunicatie BV
18
Page 19

3 Using the PTAM
This chapter contains the instructions for the various purposes to which the
PTAM can be put.
Three different types of recording are discussed: normal recording via the
microphone connection; recording of phonecalls, and recording via the answering
machine.
3.1 Use as a telephone answering machine
When the PTAM has been connected to the telephone network, it can be used
straightaway. If it has not been configured any further, it works like any other
telephone answering machine, with only a welcome text after which the message
can be spoken in.
Switching on and off
The answering machine can be switched on and off with the ‘home/away’ key.
When the switch is on ‘HOME’, the display will also say ‘audiorecorder’, to remind
you of the possibility of recording via the microphone
Recording and listening to welcome messages.
First press the ‘announcements’ key; then press the ‘WELCOME’ softkey. You will
see:
Welcomemessage
SYSTEM DELETE STOP
The current message can now be played, or a new one recorded using the
recording keys.
Press the ‘Record’ key (or the ‘Record’ and ‘Play’ keys) to record your message.
To finish recording press the ‘Stop’ key. The message can then be listened to by
pressing ‘Play’, or recorded all over again. When you are happy with it, press the
softkey ‘STORE’ . Press ‘CANCEL’ if the message is not to your liking.
Handleiding PTAM ©-1998 Vidicode Datacommunicatie BV
19
Page 20

A maximum of 30 different welcome messages can be recorded, which can then
be selected for recording, playing, or used as your current message, by pressing
the following keys:
0 - 9 select welcome message 0 to 9
*0 - *9 select welcome message 10 to 19
#0 - #9 select welcome message 20 to 29
If any message other than 0 is chosen this will be indicated on the display:
Welcomemessage 14
SYSTEM DELETE STOP
As soon as a welcome message has been chosen, the PTAM will record with that
message.
How to use the Timetable and Voice Response will be discussed in the next
chapter.
Listening to the messages
If messages have come in during your absence the display will show, for example:
AWAY Mon 19-08-98 17:09
32 new messages
The messages can be listened to straightaway by pressing the ‘answering
machine’ function key.
After the messages have been played, you have the choice of either storing or
deleting them.
Playing back old messages
Press the function key ‘Call Recorder’. The display will show
Playback Messages
Handleiding PTAM ©-1998 Vidicode Datacommunicatie BV
20
Page 21

SEARCH LAST STOP
If the most recent message has not been erased, it can be listened to by
pressing the softkey ‘LAST’. If you wish to listen to earlier messages, press the
soft key ‘SEARCH’. The messages can then be searched for by date, or date and
search code.
A * sign can be added at the beginning of the date, e.g. 28-09-98 becomes *–0998, or *-*-98. The search code does not need to be used. An explanation of the
use of the search code in sorting messages will follow later.
3.2 Using the PTAM as a normal recorder
Recording
Using the PTAM as a normal recorder is even simpler than using a cassette
recorder. There is no need to worry about space for the recording, or about
playing over a previous recording, etc. Just press ‘Record’ and ‘Play’, and start to
record.
Pressing the ‘Play’ key will pause the recording. While recording , you can break
off the old recording and start a new one by pressing the
Pressing ‘Stop’ will end the recording. The display will show:
key.
Searchcode = _______
STORE 60 DELETE
The recorder will wait 60 seconds to give you time to decide whether the
recording is to be saved or erased. If you do not react, the recording will
automatically be kept. A search code can be added to facilitate retrieving it
later. The recorder will pause counting while the code is being entered.
Playing back
Just as with an answering machine, playing back recordings starts with a search.
Press ‘memorecorder’ and the display will say:
Handleiding PTAM ©-1998 Vidicode Datacommunicatie BV
21
Page 22

Playback Mic.Records
SEARCH LAST STOP
You can again search by date and code. When searching by date, you do not need
to fill in the code, but when searching by code you do have to fill in the date. All
recordings with the code can be found by replacing the date with *-*-*.
Searching recordings by code on the PTAM is similar to searching for files in a
PC. An * is typed in as a “wildcard” that can represent everything. All recordings
starting with an A, for instance, can be found by typing the search code A*, etc.
Settings and special details
When recording, the PTAM automatically adjusts itself to the weakest sound
signals. This is why, although the microphone of the headset is meant to be held
directly in front of the mouth, every speaker in a room will be easy to
understand when recording through the headset microphone. Nevertheless, the
sound quality of recorded meetings can be improved by
- Changing the recording quality mode
- Buying a table microphone
When recording via the microphone it is worth changing the quality mode to high.
The signal from the microphone is definitely better than that from the
telephone line, and the difference in quality is noticeable.
3.3 Use as a telephone
With the headset, the PTAM can be used as a telephone.
It is operated as follows:
Dialling a number
• To make a phonecall, press the function key ‘telephone’. The display will show:
Handleiding PTAM ©-1998 Vidicode Datacommunicatie BV
22
Page 23

Number:
FLASH REPEAT VOLUME
• Press the softkey under ‘REPEAT’ to redial the last number, or select a new
number with the help of the telephone keys.
• The display will show something like this:
Number: 0793617181
FLASH MUTE 00:00:30
• Another, better, way of making phonecalls is to use the PTAM in the same
way as, for instance, a GSM. First key in the number, correcting any mistakes
with the
• At the end of the call the line is disconnected by pressing the ‘telephone’ key.
There are the following options during the call:
and Record call
Your call will be recorded and saved in the memorecorder.
Pause the recording
Recording can be paused by pressing the ‘play’ key once. Pressing the key again
will re-start the recording.
key. Then press ‘telephone’ to dial the number.
Handleiding PTAM ©-1998 Vidicode Datacommunicatie BV
23
Page 24

Stop the recording
Recording can be stopped by pressing the ‘stop’ key. Now select whether you
want to save or delete the call. A new recording of the remainder of the
conversation can be started by pressing the ‘record’ key, or the ‘record’ and ‘play’
key simultaneously. (The keys needed to start the recording can be adjusted
with the menu)
Save call and start new recording
Press the >>> key to stop the present recording, save the call, and start a new
recording. N.B. This key does not allow the addition of a search code.
Playing recordings
When the PTAM is used as a telephone, it is, within limits, possible to play
recordings.
You will hear the recording relatively softly, and will be able to hear your
conversation partner, but to him the recording will sound normal, and he will be
unable to hear you.
Adjusting the sound level
The sound level of a call can be adjusted with the right softkey, even when the
word ‘VOLUME’ doesn’t appear on the screen.
Redialling the last number
The functionkey ‘redial’ lets the PTAM redial the last number, after the
‘telephone’ key has been pressed.
Handleiding PTAM ©-1998 Vidicode Datacommunicatie BV
24
Page 25

Saving numbers in the memory
The PTAM has a 200 number memory, in which telephone numbers can be preprogrammed. To operate it follow these steps:
• Type in a number
• Press the ‘STORE’ softkey
• Type in the name by repeatedly pressing the letter keys
• Press the ‘STORE’ softkey
• Check the name and number on the display
• Press the ‘STORE’ softkey
When a telephone number is being saved, special effects can be added to it:
Adds a ‘hookflash’ (connect key)
Waits for a dialling tone
Pauses a short while during dialling
The character typed in last can be erased with
broken off with
.
and the action can be
Dialling a number from the Memory
Press the ‘telephone directory’ function key. Next type the first letter of the
name you are looking for: e.g. twice 6 to search for an M. The list with numbers
can then be scrolled up and down with the
and keys.
Connecting a call through
The softkey ‘FLASH’ on the left functions as the connect key when the phone is
being used. This will be indicated on the display.
Computeroperation CTI
PTAM can have the selection of numbers controlled by a computer. Selecting
telephone numbers is a fixed feature of contact database programs and
telephone CD’s.
Handleiding PTAM ©-1998 Vidicode Datacommunicatie BV
25
Page 26

3.4 Recording from a telephone
The PTAM can record calls made on another telephone (i.e. not on the PTAM
itself), provided this telephone is connected to the telephone port of the PTAM.
Start recording at the beginning of the conversation, in the same way you would
start recording from a microphone. The PTAM will sense that this is a telephone
conversation and will record from the line rather than from the microphone.
The recordings will be saved in the same way as normal recordings are on the
memorecorder, and can be searched for by date, time and search code.
3.5 General information about playing back
Playing back messages and playing back recordings from the microphone are done
in the same way, which is why we conclude with a general overview of playback
operation.
The recorder keys serve the following functions when playing back:
Before play back Starts to play selected recording
During play Pauses play
During pause Resumes play
Before playback Selects next recording from the
During playback Fast forward, This will be done with
Before playback Starts the sequential playback of all
During playback Starts playing the next call in the
selection
increasing speed, so that the selected
place is found quickly even in long
recordings
calls
selection
Handleiding PTAM ©-1998 Vidicode Datacommunicatie BV
26
Page 27

Before playback Selects the preceding record
During playback Fast rewind. This is done with
increasing speed, so that the selected
place is found quickly even in long
recordings.
During playback Stops recording
3.6 How the disk is organized and how to erase a recording
The PTAM stores all recordings sequentially. When the disk is full, it will start
all over again, always erasing the oldest recordings first. The advantage of this
approach is that the disk does not require any further management, unlike a
computer. Only when the order ‘ERASE’ has been given straight after a
recording, will the space be used for another recording
Because of this, it is not possible to free space by erasing particular recordings.
Every item remains stored, until it is its turn to be written over again.
There may be occasions when you decide only later that a certain recording is so
confidential that it should not be stored under any circumstance. Rest assured:
it can be erased completely. Erasing a recording from the PTAM differs from
erasing recordings from a computer in one important aspect: the PTAM will
really erase the recording, so that it cannot be recovered. A PC’s erased file can
easily be recovered, and is only gone for good when the space happens to have
been used for another purpose. The disadvantage of erasing a message like this
on the PTAM is that it takes time to clear the disk; the advantage is that you can
be certain that the information has disappeared.
To erase a recording, do the following:
• Locate the conversation in the usual way
• Press the ‘ CODE’ softkey
Handleiding PTAM ©-1998 Vidicode Datacommunicatie BV
27
Page 28

• You will see:
Searchcode = 7936171
ERASE BACK ERASE
• Press on both ‘ERASE’ keys simultaneously.
• The display will show:
16-04-98 12:50 7936171
BACK ERASE BACK
• Press ‘ERASE’ again to confirm
• You will see:
16-04-98 12:50 7936171
One moment please!
• As has been said before, it takes time for the PTAM to erase the recording
Handleiding PTAM ©-1998 Vidicode Datacommunicatie BV
28
Page 29

4 The timetable and voice response
The timetable is an important feature of the PTAM, offering the user a choice
of several options.
The timetable makes sure that the PTAM works correctly at any moment of the
day. It only works when the PTAM has been switched to ‘AWAY’.
Voice response enables callers to ask for information or switch to a different
language. The choices they make are stored in searchcodes, enabling you to sort
the recorded messages according to the preferences of the callers.
The connection between the timetable and the voice response options is that the
timetable determines with which welcome message the PTAM answers the phone.
The caller can then choose which referral options mentioned in the welcome
message are applicable to him. In this way the timetable and the associated
scenario ensure that your callers are always answered in the way you want.
4.1 The timetable
The timetable consists of two parts: a week timetable, and a date timetable.
The PTAM works according to the week timetable, unless the special date
timetable is applicable. Please be aware of this when using the date timetable:
make sure all the desired variations have been entered
This is how the timetable is adjusted:
Choosing the week or date timetable
Press ‘configuration’. Next press the ‘TABLE’ softkey. Next select ‘WEEK’ or
‘DATE’. Use the ‘DAY’ softkey to move to the right day of the week. Fill in the
date with the date timetable. When you have got this far the display will say:
25-12 00:00=?
DATE EMPTY BACK
Handleiding PTAM ©-1998 Vidicode Datacommunicatie BV
29
Page 30

or:
Monday 00:00=?
DAY EMPTY BACK
Filling in the timetable
Always indicate the starting time in the timetable, and with it the number of the
message that should be spoken from that time onwards.
The message is either a welcome message (from 351 to 379), or a personal
system message (from 400 upwards).
If you do not want the PTAM to answer, fill in *. The display will show XXX and
the PTAM will not answer until the next starting time.
The entire day is described in the timetable, which is why it always starts with
the compulsory filling in of 00:00. When that has been done, you are free to
complete the other starting times, e.g.
25-12 12:30=353
DATE EMPTY BACK
When completing the timetable the
between the starting times already filled in and the empty ones.
When completing the date timetable, the ‘DATE’ softkey is used to scroll
between the various dates filled in and the empty ones, allowing you to make
changes in each of them.
When completing the week timetable, the ‘DAY’ softkey is used to scroll through
the weekdays.
When ‘BACK’ is chosen, the PTAM wants to know if the changes are to be saved.
Handleiding PTAM ©-1998 Vidicode Datacommunicatie BV
and keys are used to scroll
30
Page 31

Switching the timetable on and off
The PTAM only works according to the timetable when it has been switched to
‘AWAY’. This means the timetable can be switched off by switching the PTAM
to ‘HOME’. It will not switch itself on automatically again.
It is possible to program the PTAM not to answer when switched to ‘AWAY’. This
can be done by filling in XXX in the timetable (with *).
If a day or a date has not been filled in on the timetable, the PTAM will function
as a normal answering machine that day.
4.2 System messages and options, voice response.
All spoken messages are called ‘system messages’, and can be numbered from 001
to 999. All numbers above 400 and the numbers of the welcome messages 300,
351 to 379 are free to be used. After a system message has been spoken in, one
can indicate which key the caller should press during or after the conversation
to achieve a certain result. This is an example of a system message:
This is the telephone answering machine of Vidicode; to continue in English press
1, to continue in German press 2.
If the number of this system message were 401, the next message in English
could be in system message 500, and the message in German in 600.
The welcome messages are system messages, too, with the numbers 300
(welcome message 0) and 351 to 379 reserved for them.
How to record a system message
Select ‘announcements’, next the softkeys ‘WELCOME’ followed by ‘SYSTEM’.
Then press the number you have selected. The display might look like this
System message 600
Handleiding PTAM ©-1998 Vidicode Datacommunicatie BV
31
Page 32

SELECT DELETE STOP
The message can now be recorded, or, if there is an existing message, it can be
listened to and re-recorded if necessary.
How to fill in the options
Press ‘SELECT’ if you are satisfied with the message. Now the corresponding
messages can be filled in under 0 to 9,*, #, ?, and ! The question mark and
exclamation mark offer particular options.
An optional exclamation mark will result in the caller not having to press a key,
the PTAM continuing straightaway with its next assignment.
The optional question mark implies that the PTAM will continue with its next
assignment, unless a key has been pressed. The most common assignment in a
daytime scenario would be for the caller to be connected through to the
telephonist, and in a nighttime scenario for the caller to be asked to leave a
message.
When there is no reaction to a message, or the caller presses 0, the message will
be repeated, giving the caller the chance to make the correct choice the second
time.
Special options
When you enter 0 to 9 instead of the number of the systems message the key
press of the caller will have the following special effects:
1 Causes nothing to happen after selection (dangerous)
2 Records a message
3 Gives the opportunity to key in a number (sequence of digits). The
number will be stored.
4 Speaks the last number filled in
5 Connects with ‘telephone number 1’, see also 5.10
6 Connects with ‘telephone number 2’, see also 5.10
7 Lets the telephone bell ring for somebody to answer
8 Asks for a password for external management and listening in
Handleiding PTAM ©-1998 Vidicode Datacommunicatie BV
32
Page 33

9 Breaks off the connection
0 Clears the selection, so pressing the key will have no effect
Special actions such as connecting through (to the telephonist) are often
attached to a message without an option (add the referral at the ‘!’). When, for
instance, a spoken menu contains the statement: “to be connected to the
telephonist, type 3”, the caller referred to 3 may hear a message such as” You
are being connected” . From this last message you fill in by the referral to ! for
example 5 for connection through to the telephonist.
Voice Response scenarios
With the help of referrals attached to the system messages, a relatively
complex process can be programmed. The PTAM has been especially designed to
provide concise information or to receive requests for information outside office
hours. Callers dislike complex and longwinded menus. A few words of advice
follow:
• Draw the welcome message and all submenus on paper first, and write out
the messages. Check if everything tallies, and make sure there are no
options which have no outcome for the caller.
• Avoid choices that are too complex. It too many options are read out, the
callers will forget the first ones.
• Avoid complex outcomes. Successful voice response scenarios are small and
simple.
• We advise you to let the caller make no more than 3, and preferably 2
choices.
• First mention the option, and then the key to press, e.g.:
For information about fax machines, choose 1
For information about telephone exchanges, choose 2
• Offer help to the caller who still has on old-fashioned dial telephone, and
connect callers who don’t make a choice through to the telephonist, or let
them leave a message.
Handleiding PTAM ©-1998 Vidicode Datacommunicatie BV
33
Page 34

4.3 Connecting through calls
The PTAM can transfer callers to two telephone numbers, either internal or
external. This is done by the PTAM via the following procedure:
• Press the ‘Connect’ key (hook flash or earth flash)
• Choose the number
• Wait a moment
• Disconnect
This transfer possibility is meant for callers who cannot handle voice response.
The PTAM does not stack calls. This is done on purpose: if the PTAM were to
stack calls, the PTAM would need adjusting to characteristics of the
switchboard in various ways, which would make the PTAM too complicated. If you
would like calls to be stacked, with or without voice response, you are advised to
review some other products of Vidicode, the ARGUS Call Attendant and the
ARGUS Telecommunication Centre respectively, which have been specially
designed for this purpose.
We have the following advice for internal transfer of calls:
- Have a telephonist receive the call. She will usually be quick to answer, and
as it is an internal call, the caller will hear the telephone ring while waiting.
- Use the timetable to ensure that callers are only transferred if there is
somebody present to answer the telephone. Give them the opportunity to
leave a message outside office hours.
4.4 Working with the information obtained via Voice Response
Voice response offers you the possibility of sorting messages on the basis of the
options chosen by the user. This could be especially useful for a company,
allowing callers to ask information about a range of products. We also know of a
GP using it to split his messages in demands for repeat prescriptions, and
requests to be called back.
Sorting messages
The choices made by the user are saved in a searchcode. If one is interested in
finding the users who first pressed a two and then a three, press the
searchcode 23* when listening to the requests for information and the PTAM
will reproduce all the messages from people interested in this product.
Handleiding PTAM ©-1998 Vidicode Datacommunicatie BV
34
Page 35

Numbers pressed
As was mentioned earlier in this chapter, the PTAM can also record numbers,
which will be shown on the display, but stored as messages. If you offer callers
the option of typing in numbers after pressing key 3 and key 4, it is enough to
select code 34*, for all the numbers typed in to appear. An application of this
that we see frequently is to list phonenumbers of people who want to be rung
back.
Handleiding PTAM ©-1998 Vidicode Datacommunicatie BV
35
Page 36

Handleiding PTAM ©-1998 Vidicode Datacommunicatie BV
36
Page 37

5 Configuration
5.1 Introduction
The functionkey ‘configuration’ starts a program with which the configuration of
the Call Recorder can be changed. There are two groups of settings: one for the
system, and one for the timetable. The timetable has been discussed before.
When the key is pressed for the first time, the display will show:
Configure
NEXT TABLE STOP
Press the ‘NEXT’ softkey to enter a program with which a number of setup
preferences can be changed.
The function of the softkeys when changing the settings
The softkeys always have the same three functions:
NEXT Choose the next setting
CHANGE Select this menu function and change the setting
STOP Exit, the changes have been made
The use of the recorder keys in the menu
The menu is operated by the softkeys under the display, their functions being
shown at all times. During their use some of the recorder keys have another
meaning, allowing experienced users to operate even faster.
Choose previous menu function
Exit the menu, the changes have been made (STOP)
Select this menu function and change the setting (CHANGE)
Choose the next menu function (NEXT)
Handleiding PTAM ©-1998 Vidicode Datacommunicatie BV
37
Page 38

Starting the VU meter
The VU meter is started by pressing the ‘memorecorder’ function key. It gives a
graphic representation of the recording level, to facilitate choosing threshold
values for turning on and turning off. It will only operate when recording
automatically, and is based on the level of sound detected.
The VU meter will be discussed at the end of the chapter.
5.2 Use of the password
The next two menu functions are for programming the password, which can be
switched on or off for internal use, but is essential for remote use.
One reason to use your password internally would be to prevent unauthorized
people from walking into your office, listening to your recordings, and changing
your settings. When the password is activated, the PTAM will ask you for your
password when you want to listen to recordings.
Switching the password on and off
With ‘CHANGE’ the ‘Password Active’ can be changed from ‘No’ to ‘Yes’, or the
other way round.
Entering the Password
Press ‘CHANGE’ and the password can be changed.
You can choose your own (numerical) password, with a length from 1 to 7
numbers.
Confirm your choice with ‘STORE’ or cancel it with ‘CANCEL’.
Be aware – very important:
When the password has been activated, it is not possible to de-activate it
without entering the same password again. Activate the password only when you
have noted it down, or are sure you have remembered it. At delivery the
password is: 0000
Handleiding PTAM ©-1998 Vidicode Datacommunicatie BV
38
Page 39

If the password is entered incorrectly three times, the system will block entry
for 15 minutes. If you have forgotten your password you will have to contact
your supplier.
When access is closed the display will show:
Access denied
For 15 minutes STOP
5.3 The clock
The next menu function is for setting the clock.
The day of the weeks can be set with the numeric keyboard:
1=Sunday, 2=Monday, 3=Tuesday, 4=Wednesday, 5=Thursday, 6=Friday and 7 is
Saturday.
If an incorrect date and/or time is entered the system will not accept it.
The ‘>>’ and ’<<’ keys select the next and previous characters respectively.
Once the information has been entered, confirm the changes with ‘STORE’ or
cancel them with ‘CANCEL’.
5.4 Number of rings before answering
This function configures the number of rings before the PTAM answers. It is
especially useful in determining the possible time you have to answer the call
yourself.
5.5 “Always answer” mode
With this function the PTAM can be programmed to answer after a certain
number of rings, even when the top left corner of the display shows the word
‘HOME’.
After the PTAM has answered a call in this way, for instance because the
telephone rang 15 times, it will switch automatically to ‘AWAY’. It can only be
changed back to ‘HOME’ manually.
Handleiding PTAM ©-1998 Vidicode Datacommunicatie BV
39
Page 40

At delivery this function is switched off.
5.6 Ringing settings
When the PTAM is going to be used as a telephone, the ringing sound can be
programmed.
Ringing variation
Ringing variation programmes the number of bleeps the PTAM gives for one ring,
and how long they will last.
Ringing frequency
Each ring consists of a series of double tones. With this parameter the
frequencies of these tones can be set.
Ringing volume
The sound level of the ringing is adjusted with this function. The correct way to
switch off ringing is to switch the volume to 0.
5.7 Use of speaker when answering machine is on
It is possible to listen in when somebody is using the answering machine. The
speaker options are ‘on’ and ‘off’. When this function is switched ‘on’, the
speaker will automatically be turned on when a message is being spoken into the
answering machine, giving you the chance to take the call after all.
5.8 Minimum and maximum length of message
Both a minimum and a maximum length of message can be set on the answering
machine.
The minimum time can be set between 1 and 255 seconds; its function is to stop
the machine from recording a message if the caller puts the phone down when he
hears the beep.
The maximum time can be set between 30 and 7650 seconds, or even be
switched off, so that there is no time limit to the message. Setting a long time
does not pose the PTAM any problem, as it automatically stops recording when
the caller stops speaking or disconnects.
Handleiding PTAM ©-1998 Vidicode Datacommunicatie BV
40
Page 41

5.9 Duration of the hook-flash
The softkey FLASH is used to activate the internal telephone system. It is
normally used to transfer a call, but has other functions too. Unfortunately not
all internal telephone systems are the same, so it must be possible to alter the
duration of the hook-flash. Unless there is a good reason to change the set-up, it
is best to leave the manufacturer’s set-up unchanged (100 ms). On rare
occasions the telephone system requires an earth connection instead of a hook
flash. In this case please consult your dealer who will be happy to configure this
for you.
5.10 Connecting through
The PTAM can connect callers to two telephone numbers selected by you. Any
internal or external telephone number can be reached by the PTAM via the
following procedure:
• Send a hook flash
• Choose the number
• Wait a moment
• Disconnect
Please remember that the PTAM doesn’t stack calls. The caller is connected
through even if the number is engaged.
These numbers are utilised with voice response, and can be coupled to a message.
For more information see: 4.2 and 4.3.
5.11 Number Identification
When Number Identification is switched on, and the PTAM is connected to a
port where Number Identification is active, the display will show the telephone
number when the message is being played.
5.12 K-break detection
K-break detection is used to find out whether the caller has disconnected. This
is important for switching off a message quickly. This facility is only offered on
normal telephone lines in the UK, and not on lines connected to internal telephone
networks or ISDN AB adapters. It is advisable to switch on K-break detection
Handleiding PTAM ©-1998 Vidicode Datacommunicatie BV
41
Page 42

only if the telephone is connected to an outside line, and to leave it switched off
in all other cases. K-break detection cannot be enabled when another language
then English is selected, because it only applies to the telephone network of the
United Kingdom.
5.13 Sound characteristics and quality
There are two options here: sound type and recording quality.
Sound type can be set for speech, or all types of sound (audio). The factory
setting is for speech.
The recording quality has three settings: Normal, High 1 and High 2. Normal is
sufficient when recording from the telephone line. The capacity of the PTAM is
reduced by a factor of 6 and 7 respectively with the settings High 1 and High 2.
High 1 is the optimum setting for recording speech, High 2 for recording music.
5.14 Recording Amplification
It is possible to adjust the amplification factor. This level is independent of the
signal level, but determines the level of output after automatically adjusting it
during input. Once your preference has been set, everything recorded will sound
equally loud, despite the fact that a voice may sometimes speak directly into the
telephone, and at other times may be quite far away. This recording amplification
can be switched off if desired.
5.15 Playback Volume
This determines the basic setting of the playback volume. The softkeys can be
used to adjust the volume while you are listening.
5.16 Microphone type selection
This setting is determined by the type of microphone to be connected. Some
types need DC current, and some need extra sensitivity. Naturally, the PTAM
default setting is correct for the headset delivered with it.
5.17 How to start microphone recording
There are two possibilities: Record + Play (factory setting) and only Record.
Handleiding PTAM ©-1998 Vidicode Datacommunicatie BV
42
Page 43

5.18 The start switch for automatic recording
A start switch is an external signaller for starting and stopping recording of the
chosen source. The start switch should be connected to the footpedal port. With
the start switch you can determine whether contact should be made or broken
to start recording; alternatively you can leave the start switch switched off.
5.19 Starting and stopping by sound
Automatic recordings can start and stop on the basis of the sound level
detected. PTAM has four options for this:
Recording starts when the signal exceeds the ‘start threshold’ level during the
(short) ‘start period’. When the signal drops below the level of the ‘silence
threshold’ during a (longer) ‘silence period’ recording is stopped.
With these four options the values can be set, although in practice start
threshold and silence threshold will probably be adjusted using the VU meter,
which is discussed at the end of this chapter. Normally only the start period and
the silence period would be programmed in this way.
5.20 Use of footpedal
The footpedal option can be switched ‘on’ or ‘off’. You should not set the
footpedal option if you do not possess one, because a loose connection might
influence the working of the recorder.
5.21 Language
With this parameter the language of the messages on the display can be set. The
languages you can choose from are English, German, Dutch and American. English
and American differ in the way date and time are indicated and also influence
the way the PTAM uses calling line identification and K-break detection.
5.22 Reset all values
When you change this parameter into ‘yes’ all the parameters will go back to the
original settings they had when you bought the PTAM.
Handleiding PTAM ©-1998 Vidicode Datacommunicatie BV
43
Page 44

5.23 The VU meter
As has been discussed before, it is possible to record automatically. Recording
can be started by an external switch, or be controlled by the volume of sound. In
the latter case, the recorder will wait for speech to start, and when it does,
begin to record. When there is little or no sound for some time the PTAM will
stop recording.
It is best to set the signal level which stops and starts recording with the VU
meter. A graphic image of the signal will be shown on the display when you are
not recording. The threshold, or switch-on, value is represented by a dash, while
the switch-off value is indicated by a colon. At delivery the switch-on and
switch-off value are the same, so that you only see a dash.
Starting the VU meter
To start the VU meter, press ‘configure’, the softkey ‘NEXT’ and finally
‘memorecorder’. The display will show:
Mi••••|•••••••••••••••••
16/16 STOP
The first line indicates the signal level, and the second shows the numeric values
of the start and stop sensitivities in the bottom left-hand corner.
Setting start threshold and silence threshold
To make the VU meter work a sound is made. This will be shown on the display:
Mi❚
❚•|•••••••••••••••
❚❚❚❚❚❚❚❚❚❚❚❚❚❚❚❚❚❚❚❚❚❚
8/8 STOP
In the display shown above, the PTAM will not switch itself on, because the level
of the sound is below the switch-on point.
The switch-on and switch-off point can be changed in the following way:
Handleiding PTAM ©-1998 Vidicode Datacommunicatie BV
44
Page 45

>> = Start threshold + 1
<< = Start threshold – 1
>>> = Silence threshold + 1
Record = Silence threshold – 1
Do not forget to take the ‘starting period’ and the ‘silence period’ into account.
The recorder starts when a sound above the level of start threshold has been
perceived during the start period, and stops when no sound above the silence
threshold has been heard during the silence period.
Handleiding PTAM ©-1998 Vidicode Datacommunicatie BV
45
Page 46

Handleiding PTAM ©-1998 Vidicode Datacommunicatie BV
46
Page 47

6 Remote access
The messages in the PTAM can be listened to remotely. The remote access
capability is explained in more detail in this chapter.
6.1 Typing in the password
In order to get remote access, the PTAM’s answer function should have been
activated. When it has not, access is impossible.
If the manufacturer’s settings are active, you should press a 1 during the
welcome message to get to the access message. As has been discussed in
Chapter 4, you may determine yourself with which message, and via which option,
the access message is called up. The access message asks for your password,
which is the same code used to limit access via your keyboard. This password
should be typed in, followed by a ‘wicket‘’ (#).
Next the menu will ask you to choose between the following options:
1 Listen to new messages
3 Select a welcome message
5 Change the password
6 Change the welcome message
9 Disconnect
6.2 Listening to new messages remotely
When the ‘1’ is pressed, new messages can be listened to.
If the system messages 0 to 9, 188 to 200, and 210 to 259 are present in the
system, as they are at delivery, the date and time of each message will be
mentioned.
While listening to the messages, you have control options. With the help of the
following telephone keys the messages can be played back and forth
Handleiding PTAM ©-1998 Vidicode Datacommunicatie BV
47
Page 48

1
10 seconds
back
4
60 seconds
back
2
next
message
5
pause
3
10 seconds
forwards
6
60 seconds
forward
7
300 seconds
back
8
stop
9
300 seconds
forward
*0 #
Messages listened to remotely, will remain saved as new messages, to ensure you
do not miss any messages when you come home. When you call again before you
came home you will hear the same messages. This can be forestalled by pressing
‘0’ five times after listening to the messages, which will mark them as having
been listened to.
6.3 Selecting a welcome message
It is possible to select a different welcome message remotely from the
maximum of 30 messages that can be stored. After you have opted to do so in
the first menu, the recorder will ask you to type in the number of the welcome
message.
6.4 Changing the password remotely
Option 5 in the menu gives you the chance to change your password remotely.
After you have typed in the new pass word , it will be read to you as a check.
Just follow the instructions read out to you.
6.5 Changing the welcome message remotely
The menu also offers you the option of recording a new welcome message or
selecting another one of a number of pre-recorded messages. Again, just follow
the spoken instructions.
Handleiding PTAM ©-1998 Vidicode Datacommunicatie BV
48
Page 49

6.6 Switching on the answer machine remotely
The PTAM can be programmed to answer the telephonehen ‘HOME’ is switched
on, if the telephone has been ringing for a long time. Afterwards the PTAM will
automatically switch to ‘AWAY’, and will immediately answer the phone when
there is another call. This option has been described in 5.5.
6.7 Changing system messages
When controlling the answering machine remotely, a number of system messages
will be used. They have a permanent function, but can be altered any way you
want if you wish to do so (this is done via ‘announcements’).
The following system messages are used. The number of each message has been
indicated.
Date and time record
0-9 ‘ zero’ to ‘nine’
188 t/m 199 ‘January to ‘December’
200 ‘hour’
210-259 ‘ten’ to ‘fifty nine’
Responses
300 Welcome message 0, at delivery it is: ’This is an answering
machine. Unfortunately we cannot help you personally at
the moment. Please leave a message including your name and
telephone number after the beep.’
351-379 Reserved for your own welcome messages nrs. 1 to 29.
303 ‘Your message has been saved‘.
Handleiding PTAM ©-1998 Vidicode Datacommunicatie BV
49
Page 50

Remote operation
The following system messages will help the user when operated remotely:
303 ‘Your message has been saved. Goodbye’
304 ‘No new messages received’
310 ‘To listen to new messages, press 1
To select a different welcome message, press 3
To change your password, press 5
To record a new welcome message, press 6
To disconnect, press 9’
311 ‘Enter your password’
312 ‘Your password is:
313 ‘To save, press 1
To record again, press 2
To cancel, press 3’
314 ‘The new password has been saved’
315 ‘To record a new welcome message, press 1,
To play the current welcome message, press 2
To cancel, press 3’
316 ‘To record a new welcome message, press 1,
To listen to the newly recorded message, press 2,
To cancel, press 3,
to enable the new welcome message, press 4’
317 ‘The new welcome message is in use’
318 ‘Make your choice now’ (Optional, will be played if the user
has not made a choice after a certain period of time)
320 ‘Enter the number of the welcome message’
321 ‘This welcome message does not exist’
322 ‘The selected welcome message is: ’
Handleiding PTAM ©-1998 Vidicode Datacommunicatie BV
50
Page 51

323 ‘To confirm your selection, press 1,
To play the message for verification, press 2,
To cancel, press 3’
324 ‘The change has been processed
330 ‘These were all the new messages’
335 'To listen again, press 1,
To go back to the menu, press 3,
To disconnect, press 9'
339 ‘You will now be disconnected. Goodbye!’ (optional)
Handleiding PTAM ©-1998 Vidicode Datacommunicatie BV
51
Page 52

Handleiding PTAM ©-1998 Vidicode Datacommunicatie BV
52
Page 53

7 Index
Accessories 11
Adjusting the sound level 24
Always answer 39
Argus Basic manual 13
audio recorder 16; 21
Bel
Variation 40
Call Attendant 34
clock 39
configuration 37
Connecting 8; 15
As telephone 9
In series 9
connecting callers 41
Connecting through calls 34
connection to PCPC 12
control by a computer 25
CTI 25
current message 20
dialling a number 22
Dialling from the Memory 25
Duration of the hook-flash 41
erase recording 27
footpedal 43
guarantee conditions 12
K-break detection 41
Language 43
Listening remotely 47
Listening to messages 20
maximum length of message 40
Microphone type selection 42
Millennium compatibility 13
normal recorder 21
Number Identification 41
password 38
activate 38
entering 38
Pause the recording 23
Playback Volume 42
playing back 26
Playing back old messages 20
Playing recordings over telephone 24
record a system message 31
Recording Amplification 42
Recording from a telephone 26
recording quality 42
Redialling the last number 24
remote access 47
changing password 48
changing welcome message 49
Handleiding PTAM ©-1998 Vidicode Datacommunicatie BV
53
Page 54

selecting a welcome message 48
switching on 49
system messages 49
Remote access
password 47
Reset all values 43
Ringing frequency 40
Ringing settings 40
Ringing volume 40
rings before answering 39
Saving numbers in the memory 25
Softkeys 10
Sorting messages 34
Sound characteristics 42
speaker when answering 40
Special options for voice response
32
start switch for automatic
recording 43
Starting by sound 43
Stop recording 24
stopping by sound 43
system messages 31
date and time 49
remote operation 50
responses 49
Telecommunication Centre 34
timetable 29
Unpacking 15
use as a telephone 15
voice response 31
Voice Response scenarios 33
VU meter 38; 44
welcome message 20
start microphone recording 42
Handleiding PTAM ©-1998 Vidicode Datacommunicatie BV
54
 Loading...