

Page 1

FeaturePhone 175 SD
Manual
Version 4.000. © Vidicode 2011
Page 2
FeaturePhone 175 SD
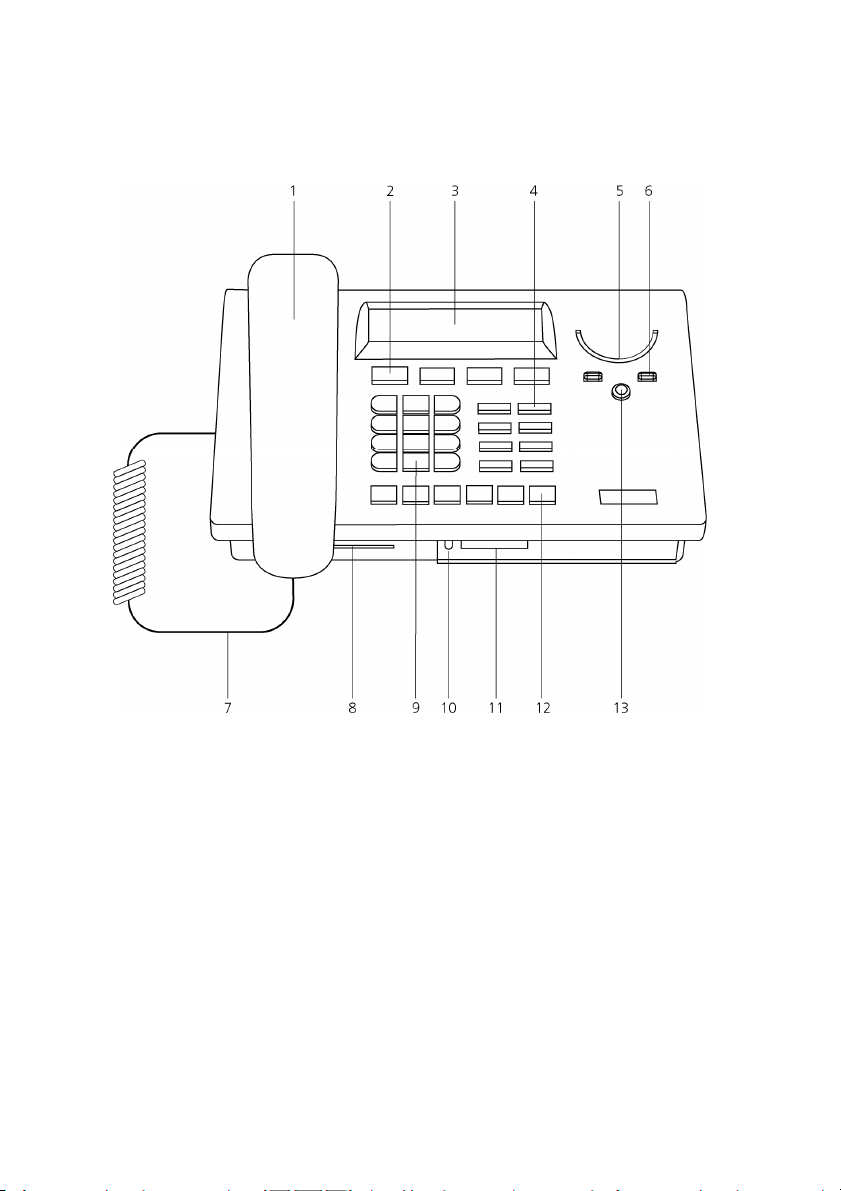
1. Handset
2. Menu-keys
3. Backlight display
4. Function-keys
5. Speaker
6. Volume-adjustment
7. Handset cord
8. CryptoCard reader
9. Numerical keys
10. LED SD inserted
11. SD card slot
12. Recorder-keys
13. Speakerphone key
2
Manual FeaturePhone 175 SD © Vidicode 2011
Page 3
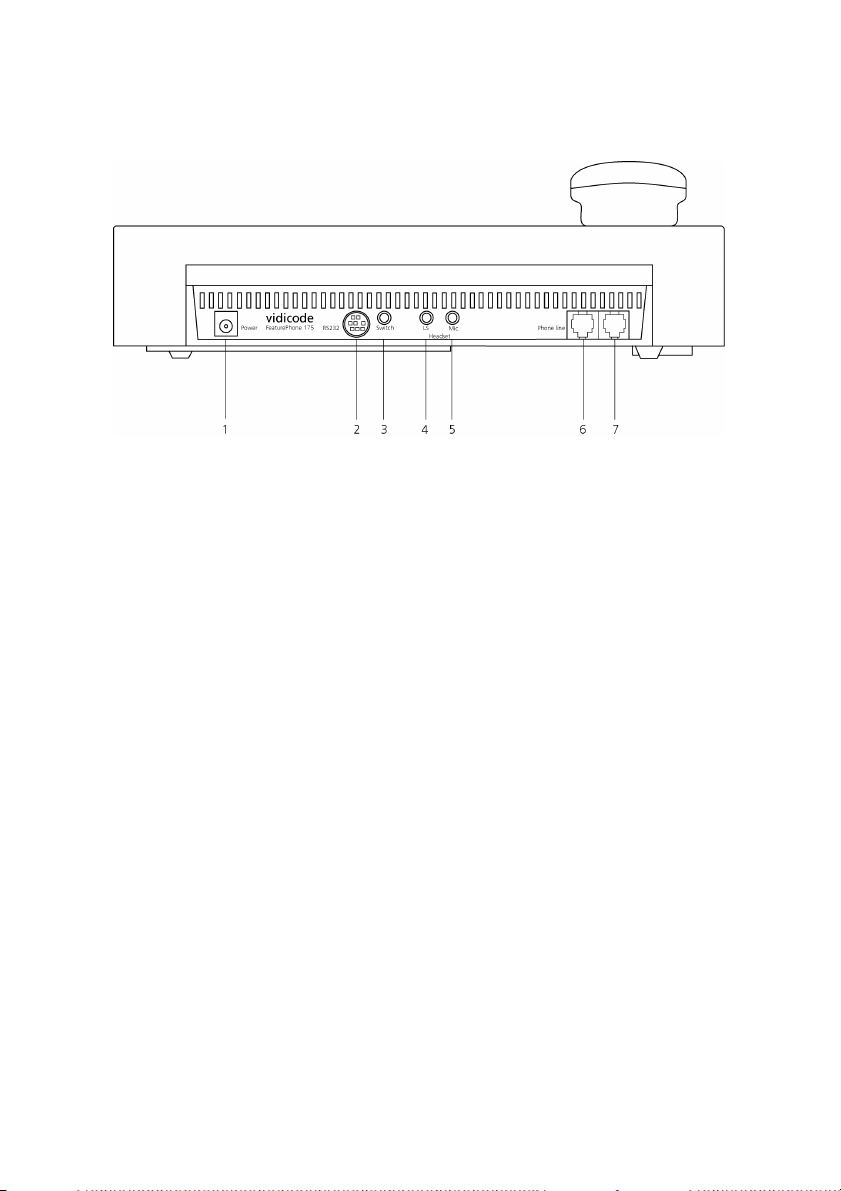
Connections
1. Power supply
2. RS 232 serial port
3. Start/Stop switch
4. Loudspeaker
5. Microphone
6. Phone line Out
7. Phone line In
Manual FeaturePhone 175 SD © Vidicode 2011
3
Page 4
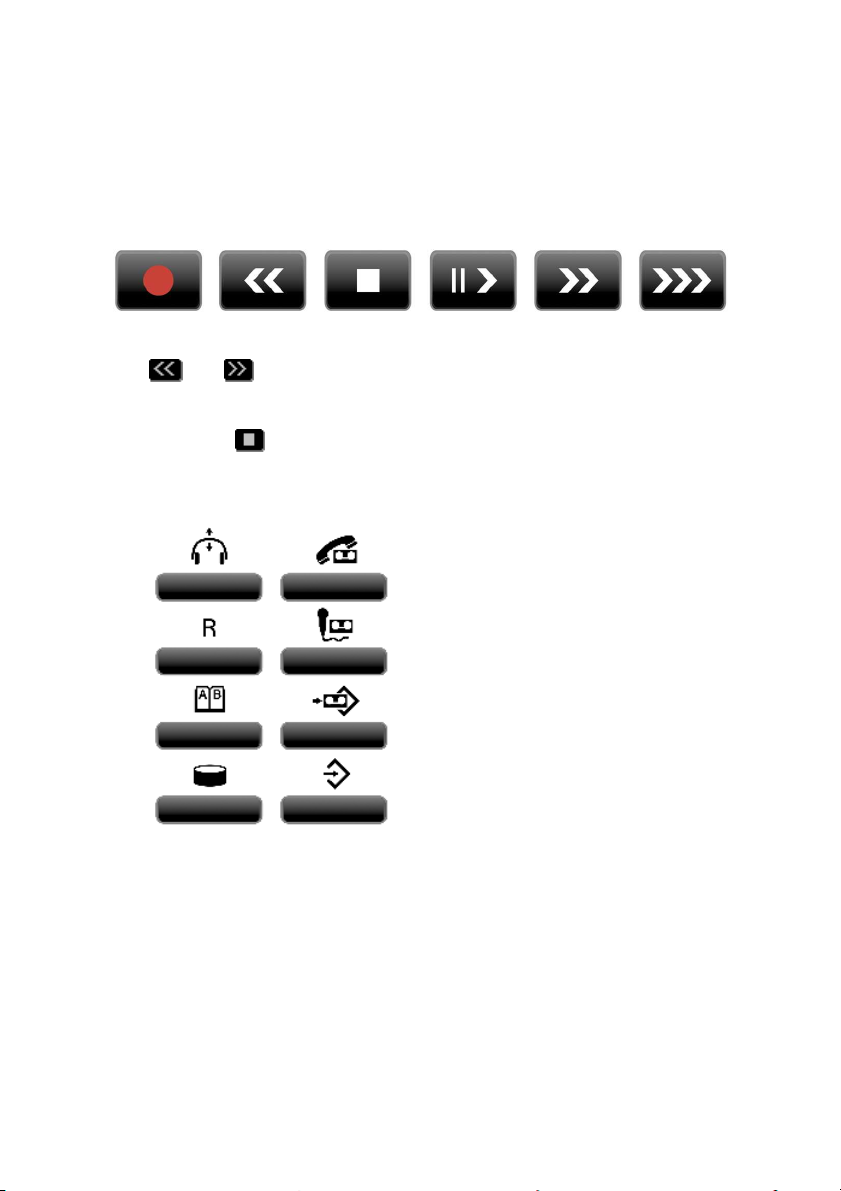
Recorder-keys
The recorder keys have specific functions in different situations although
the operation is always very similar. During recording and playback the
keys have the standard recorder key functions as explained below.
Record Backward Stop Pause/Play Forward Skip
The and keys can be used to scroll through numbers in the
telephone book or through a settings menu. If no recording or playback
is taking place these keys always have an Up/Down or Left/Right
function. The key will always exit the current operation.
Function-keys
from left to right:
1. Hook control
2. Playback calls
3. Flash/History
4. Playback Microphone recordings
5. Telephone book
6. Playback Messages
7. Disk menu
8. Configuration
4
Manual FeaturePhone 175 SD © Vidicode 2011
Page 5

Alfa-numerical functions
Manual FeaturePhone 175 SD © Vidicode 2011
5
Page 6
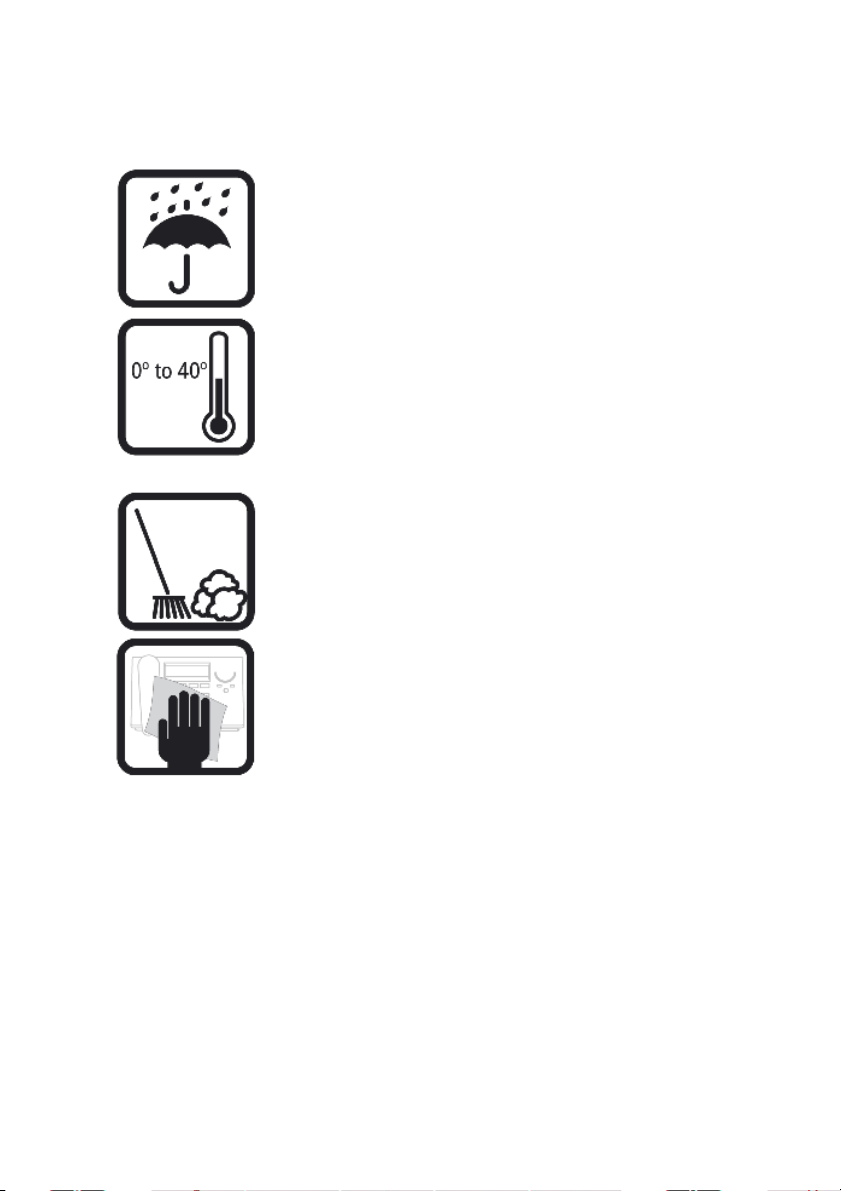
Care and Maintenance
Keep the FeaturePhone 175 SD
dry. If it gets wet, wipe it dry
immediately Liquids might contain
minerals that can corrode the
electronic circuits.
Use and store the FeaturePhone
175 SD only in normal
temperature environments.
Temperature extremes can
shorten the life of electronic
devices and distort or melt plastic
parts.
Keep the FeaturePhone 175 SD
away from excessive dust and dirt
that can cause premature wear of
parts.
6
Manual FeaturePhone 175 SD © Vidicode 2011
Do not use harsh chemicals,
cleaning solvents or strong
detergents to clean the
FeaturePhone 175 SD.
Page 7

Table of contents
1 Operation and Important information .................11
1.1 Frequently used key indicators ......................................... 12
1.2 Save Changes .....................................................................12
1.3 Adjusting the Volume........................................................13
2 Getting started .......................................................14
2.1 Out of the box....................................................................14
2.2 Connecting the Handset .................................................... 15
2.3 Connecting the power supply........................................... 16
2.4 Connecting to the telephone line .....................................16
2.5 Setting the FeaturePhone 175 SD up for use .................17
2.5.1 Set the clock ......................................................................17
2.5.2 Select the language ........................................................... 18
3 Using the FeaturePhone 175 SD............................20
3.1 Compression ....................................................................... 20
3.2 Search and playback ..........................................................20
3.3 Security ...............................................................................20
3.4 Automatic Gain Control.....................................................21
3.5 Microphone mode..............................................................21
3.6 Handset / Headset / Speakerphone..................................21
3.7 Start a call ...........................................................................21
3.8 Accept a call........................................................................22
3.9 End a call.............................................................................23
4 Recording calls........................................................24
4.1 Automatic recording .......................................................... 24
4.2 Copy recordings to SD .......................................................24
4.3 Notification.........................................................................25
5 Search and play recordings....................................26
5.1 Search recordings...............................................................26
5.2 Search according to date ................................................... 27
5.3 Search according to code ..................................................27
6 Copy recordings to SD card ...................................29
Manual FeaturePhone 175 SD © Vidicode 2011
7
Page 8

6.1 Copy the last recording to SD card ................................... 29
6.2 Copy a selection of recordings..........................................29
6.3 Copy a recording during playback.................................... 30
7 Answering machine ...............................................31
7.1 Turn the answering machine On ......................................31
7.2 Record welcome message .................................................32
7.3 New Messages....................................................................33
7.4 Playback messages.............................................................34
7.5 Remove messages .............................................................. 35
8 The Telephone book ..............................................36
8.1 Add a contact .....................................................................36
8.2 Search a contact .................................................................37
8.3 Making a call from the telephone book ..........................37
8.4 Edit a contact......................................................................37
8.5 Remove a contact...............................................................38
8.6 Call History .........................................................................38
9 Using the CryptoCard.............................................39
9.1 Insert the CryptoCard into the FeaturePhone 175 SD..... 39
9.2 The CryptoCard and its PIN and PUC code .......................39
9.3 Making an encrypted recording .......................................40
9.4 Playing an encrypted recording ........................................ 40
10 Settings ...................................................................42
10.1 General Settings..............................................................42
10.1.1 Password protection.......................................................43
10.1.2 CryptoCard ..................................................................... 44
10.1.3 Clock...............................................................................45
10.1.4 Language .......................................................................46
10.1.5 Reset all values............................................................... 46
10.2 Telephone Settings ......................................................... 46
10.2.1 Enter the Telephone Settings......................................... 47
10.2.2 Caller ID.......................................................................... 47
10.2.3 Flash time....................................................................... 47
10.2.4 Wait after dial................................................................ 48
10.2.5 Rings to answer on......................................................... 48
10.2.6 Rings always answer....................................................... 48
10.2.7 Ring Volume...................................................................49
8
Manual FeaturePhone 175 SD © Vidicode 2011
Page 9

10.2.8 Ring frequency ............................................................... 49
10.2.9 Ring variation................................................................. 49
10.3 Recorder Settings............................................................50
10.3.1 Enter the Recording Settings..........................................50
10.3.2 Automatic recording...................................................... 50
10.3.3 Automatic SD Copy ........................................................ 50
10.3.4 Notification .................................................................... 51
10.3.5 Ask Store/Delete............................................................. 51
10.3.6 Beep after store..............................................................51
10.3.7 Minimum call time .........................................................52
10.3.8 Compression................................................................... 52
10.3.9 Microphone mode.......................................................... 52
10.3.10 Microphone amplification.............................................. 53
10.3.11 Automatic gain control ..................................................53
10.3.12 Footswitch......................................................................53
10.4 Answering machine Settings .........................................54
10.4.1 Enter the Answering machine Settings .......................... 54
10.4.2 Turn Answering machine on.......................................... 54
10.4.3 Welcome message..........................................................55
10.4.4 Rings to answer on......................................................... 55
10.4.5 Rings always answer....................................................... 55
10.4.6 Speaker after answer .....................................................56
10.4.7 K-break detection...........................................................56
10.4.8 Maximum message time.................................................56
10.4.9 Silence period................................................................. 57
10.5 Software update ............................................................. 57
11 The SD Access system ............................................59
11.1 Using the SD Access Software .......................................59
11.2 Install the software ........................................................59
11.3 Start .................................................................................60
11.4 Playback and recording ..................................................60
11.5 The toolbar ...................................................................... 61
11.6 The tabs List, Search .......................................................61
11.6.1 Search in the database ................................................... 62
11.6.2 Standard queries ............................................................62
11.6.3 Custom queries............................................................... 62
11.6.4 View all ..........................................................................64
11.7 Menu................................................................................64
11.7.1 File..................................................................................64
11.7.2 View ............................................................................... 64
11.7.3 List.................................................................................. 64
Manual FeaturePhone 175 SD © Vidicode 2011
9
Page 10

11.7.4 Actions ...........................................................................64
11.7.5 Admin.............................................................................65
11.7.6 Options...........................................................................65
11.7.7 Help................................................................................ 65
11.8 The database ................................................................... 65
11.8.1 Properties of recordings................................................. 65
11.8.2 Edit Names .....................................................................66
11.9 Notes................................................................................66
11.10
Export recordings ........................................................67
11.11
Technical database information .................................67
11.12
Option window ...........................................................68
11.13
Playback settings .........................................................68
11.14
Display settings ...........................................................69
11.15
Security settings ..........................................................70
11.15.1 Acknowledgements........................................................70
12 Acknowledgements ...............................................71
12.1 Warranty..........................................................................71
12.2 Liability ............................................................................71
13 Index .......................................................................72
.
10
Manual FeaturePhone 175 SD © Vidicode 2011
Page 11

1 Operation and Important information
The FeaturePhone 175 SD is a special telephone aimed at the automatic
recording of telephone conversations. For this purpose the
FeaturePhone 175 SD is equipped with a SD card. The FeaturePhone 175
SD can be connected to any regular analogue telephone line and is used
as a regular telephone. It has the ability to automatically record
telephone calls as they are being made. Telephone calls are recorded on
a flash disk during the call. After the calls have ended the recordings can
be either manually or automatically, copied to SD.
The FeaturePhone 175 SD can also be used as headset telephone. It has
a standard headset interface to which the optional headset can be
connected. If desired the handset can be disabled when using the
headset. The FeaturePhone 175 SD also features a speakerphone
function.
Other features of the FeaturePhone 175 SD include the phonebook and
microphone recording ability. Recordings can be encrypted using the
CryptoCard option. Encrypted recordings can only be played using the
same or a matching card to the card the recording was made with. The
telephone can even be disabled without a CryptoCard present.
The FeaturePhone 175 SD has a common menu driven user interface.
Most functions and operations are initiated by pressing a function key
followed by a sequence of display determined menu keys. The use of
function keys and menu keys is indicated as follows:
Function keys
The most frequently used functions of the FeaturePhone 175 SD have
been grouped in the function keys. Pressing one of the function keys
will always result in a display where the various options are assigned to
the four menu keys.
Menu keys
After pressing a function key the available options are assigned to the
four menu keys. The operation of the menu keys is determined by the
text in the display right above the corresponding key. If there is an
underlying menu the MENU key will open this menu.
Example with the keys:
Manual FeaturePhone 175 SD © Vidicode 2011
11
Page 12

General Settings
NEXT MENU STOP
In this example you can open the General settings menu by pressing the
corresponding MENU key.
1.1 Frequently used key indicators
The following menu key functions are consistently used throughout the
manual.
MENU in the display indicates the presence of an underlying menu
• Press MENU to open the underlying menu
NEXT in the display indicates the presence of more menu items
• Press NEXT to jump to the next menu item
BACK in the display indicates the presence of an embracing menu
• Press BACK to return to the embracing menu
STOP in the display indicates the absence of an embracing menu
• Press STOP to return to operating mode
CHANGE will toggle the item in the display between "On" and "Off"
1.2 Save Changes
After altering the settings the alterations have to be confirmed. After
pressing STOP the display as shown below will appear.
Save Changes?
YES NO CANCEL
• YES returns the FeaturePhone 175 SD to normal use with
changed settings
• NO returns the FeaturePhone 175 SD to normal use without
changed settings
12
Manual FeaturePhone 175 SD © Vidicode 2011
Page 13

• CANCEL returns to the settings
1.3 Adjusting the Volume
The speaker volume of the FeaturePhone 175 SD can be adjusted easily.
Use the + and - keys below the speaker to adjust the volume. The
volume can be set separately for speakerphone and handset use.
Manual FeaturePhone 175 SD © Vidicode 2011
13
Page 14

2 Getting started
In this Chapter the connections of the FeaturePhone 175 SD are
described.
2.1 Out of the box
In the box of the FeaturePhone 175 SD you will find:
• FeaturePhone 175 SD
• Handset
• Curled handset cable with two RJ 10 connectors
• 10 Volt DC power adapter
• Flat telephone cable with two RJ 11 connectors
• CD containing manual
• Quick guide FeaturePhone 175 SD
• SD- card
• License: SD Access system
• Warranty / Registration form
14
Manual FeaturePhone 175 SD © Vidicode 2011
Page 15
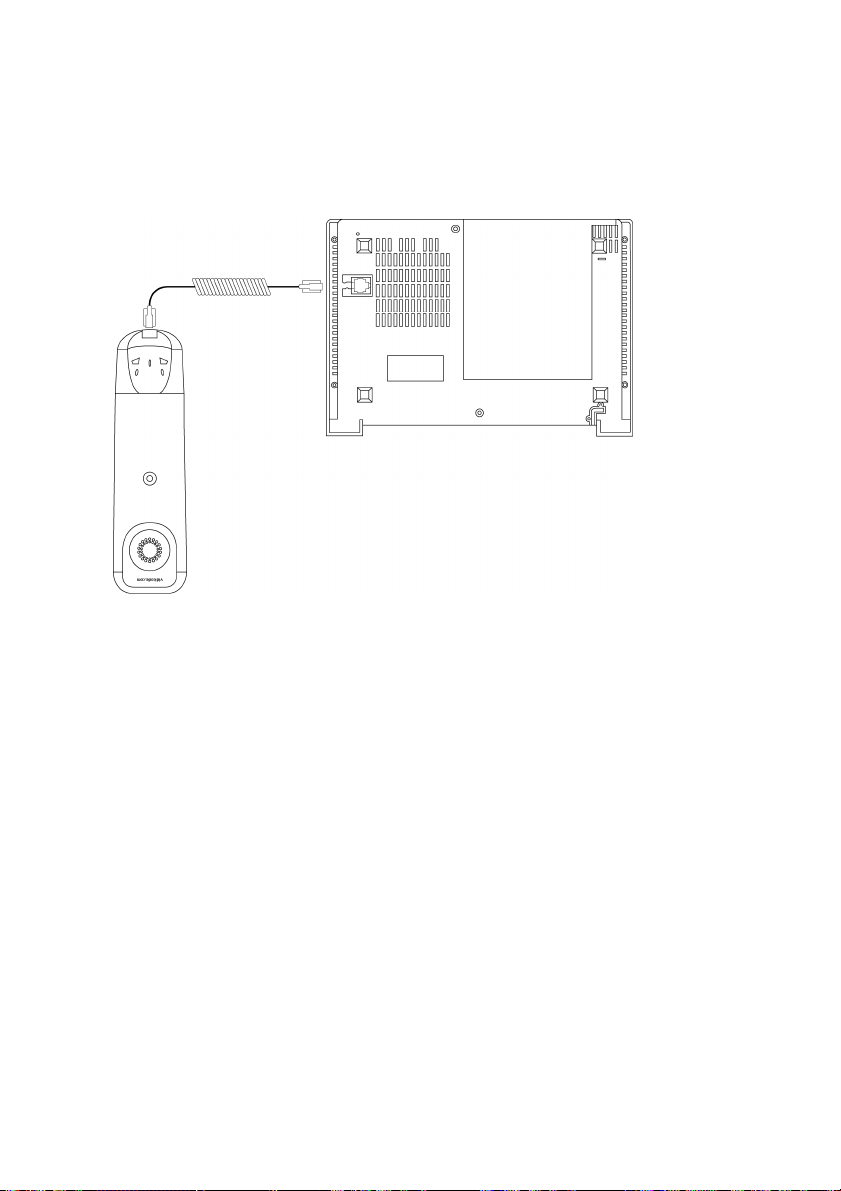
2.2 Connecting the Handset
The handset is connected to the FeaturePhone 175 SD with the supplied
curled cable with two RJ 10 connectors.
• Connect one side of the curled cable to the connector at the
bottom of the handset.
• Connect the other side of the curled cable to the handset
connector at the bottom of the FeaturePhone 175 SD. Lead the
cable through the dedicated groove to protect the cable.
Manual FeaturePhone 175 SD © Vidicode 2011
15
Page 16
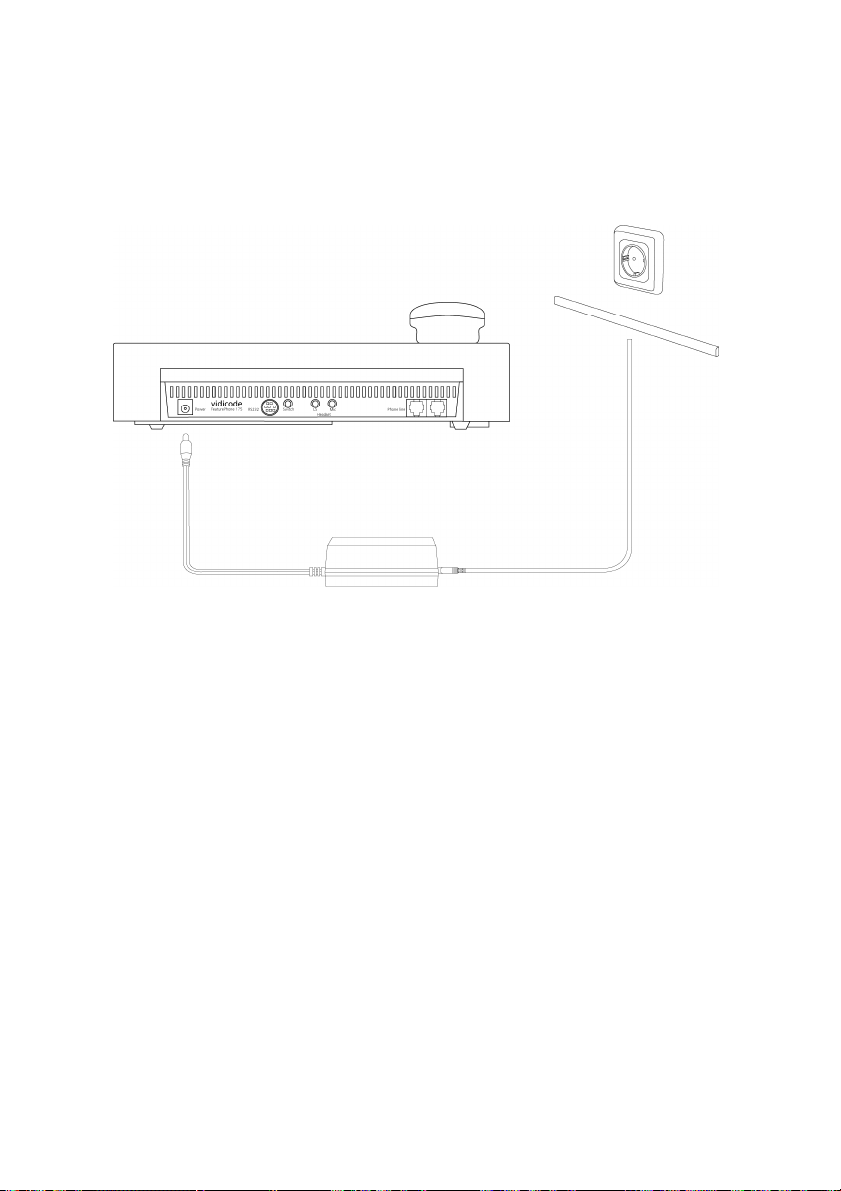
2.3 Connecting the power supply
The FeaturePhone 175 SD is powered through a wall socket power
adapter.
• First connect the AC power adapter to the wall socket.
• Then connect the mini jack of the adapter to the Power connector
on the back side of the FeaturePhone 175 SD.
2.4 Connecting to the telephone line
Connect the FeaturePhone 175 SD to the telephone line with the
supplied flat cable with two RJ11 connectors.
16
Manual FeaturePhone 175 SD © Vidicode 2011
Page 17
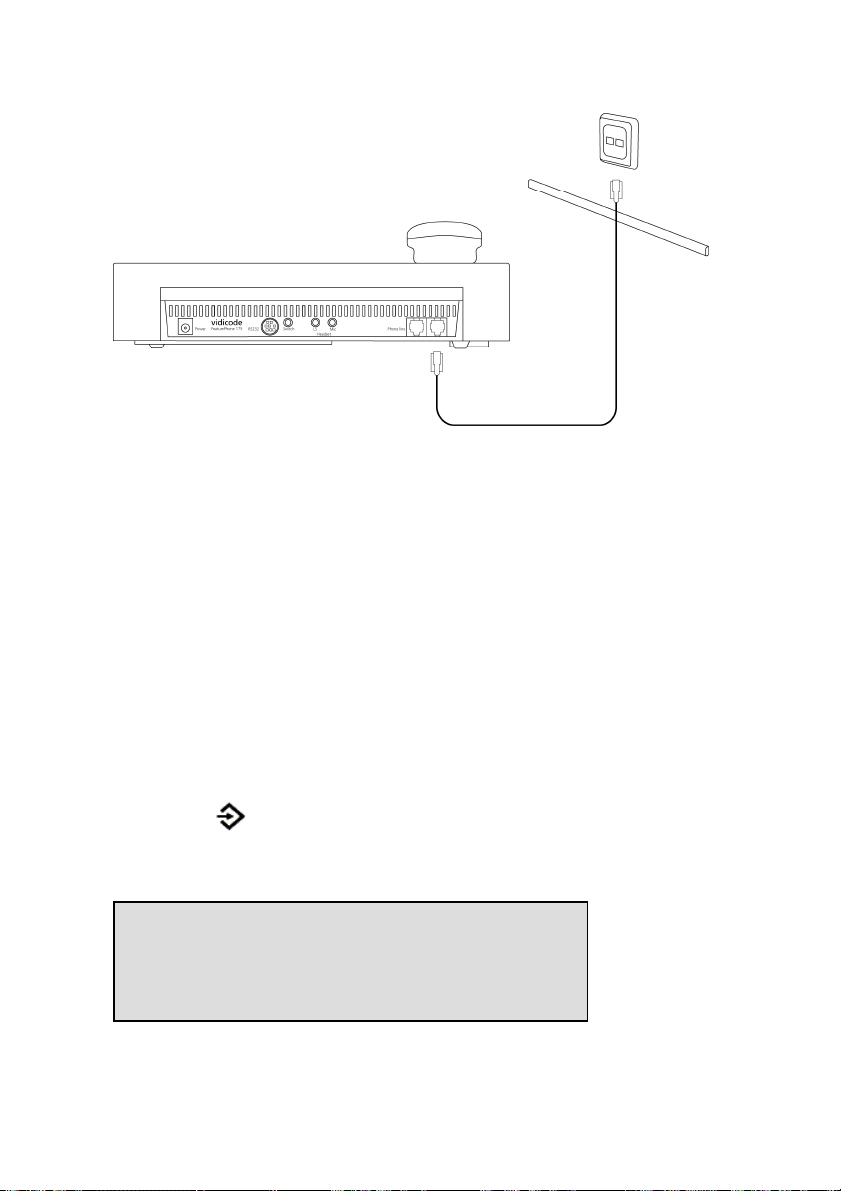
• Connect one end of the telephone cable to the telephone line
wall socket. (For UK only use the supplied BT telephone line
adapter)
• Connect the other side of the telephone cable to the Line
connector at the back of the FeaturePhone 175 SD.
2.5 Setting the FeaturePhone 175 SD up for
use
To configure the FeaturePhone 175 SD for use the Clock needs to be set
and the Language needs to be selected. These settings are part of the
General Settings menu. Setting the Clock and selecting the Language is
described in the next two paragraphs.
2.5.1 Set the clock
Set the clock as follows:
• Press Configuration.
• Press MENU to enter the General Settings menu.
• Press NEXT twice
Clock: Fri 05-08-11 14:31
NEXT CHANGE STOP
• Press CHANGE to set the clock
Manual FeaturePhone 175 SD © Vidicode 2011
17
Page 18
Clock: Fri 05-08-11 14:31
STORE << >> CANCEL
• Press keys 1 - 7 to set the day:
1 = Sunday
2 = Monday
3 = Tuesday
4 = Wednesday
5 = Thursday
6 = Friday
7 = Saturday
Clock: Tue 05-08-11 14:31
STORE << >> CANCEL
• Enter the date (format depends on selected language)
Clock: Tue 02-08-11 14:31
STORE << >> CANCEL
• Enter the time
• Press STORE to save the time.
Other options:
• CANCEL to return to previous set time.
• << and >> to move the cursor.
• Press NEXT twice to continue with language selection.
• Enter the time
2.5.2 Select the language
Select the language as follows:
18
Manual FeaturePhone 175 SD © Vidicode 2011
Page 19

Enter the General Settings menu and scroll through the menu or
continue from the previous paragraph by pressing NEXT until the
following display appears:
Language: English
NEXT CHANGE STOP
• Press CHANGE to scroll through the available languages.
• Press STOP to return to the main display.
Together with the Language the date format can change:
Standard date format is: DD-MM-YY
When set to "American" the format is changed to : MM-DD-YY
Setting the FeaturePhone 175 SD up for use is described in the next
chapter.
Manual FeaturePhone 175 SD © Vidicode 2011
19
Page 20

3 Using the FeaturePhone 175 SD
The FeaturePhone 175 SD is a special telephone aimed at the automatic
recording of telephone conversations. For this purpose the
FeaturePhone 175 SD is equipped with a SD card. The FeaturePhone 175
SD can be connected to any regular analogy telephone line and is used
as a regular telephone. It has the ability to automatically record
telephone calls as they are being made. Telephone calls are recorded on
the flash disk during the call. After the calls have ended the recordings
can be either automatically or manually, copied to SD.
3.1 Compression
The digital format of the recordings is determined by the use of speech
compression. The Call Recorder compresses recordings default according
to the GSM format. This type of compression has a good balance
between audio quality and recording size and is compatible for most
Windows versions. Compressed recordings take up 1/5th of the size of
uncompressed recordings. A high compression rate generally has a
poorer quality.
The FeaturePhone 175 SD supports 2 different formats. The table below
shows the relation between recording quality and storage capacity.
Recording
quality
G.711 A-law 2 hrs 69 hrs 8000
GSM 10hrs 340 hrs 1625
By default the FeaturePhone 175 SD is set to record in GSM compression
format.
Flash disk SD 2GB Bytes/Sec.
3.2 Search and playback
The FeaturePhone 175 SD has its own menu driven search function to
find and play specific recordings. Recordings can be searched for
according to Date and Code, by default the Called number or Caller ID
will be stored as Code. The FeaturePhone 175 SD has an internal
speaker for playback of recordings.
3.3 Security
All recordings can be encrypted. The FeaturePhone 175 SD uses the
CryptoCard option for this feature. Playback of encrypted recordings is
impossible without the CryptoCard. Playback of encrypted recordings on
20
Manual FeaturePhone 175 SD © Vidicode 2011
Page 21

a PC is possible only with the optional CryptoCard reader in conjunction
with the original or a matching CryptoCard.
3.4 Automatic Gain Control
Automatic Gain Control adjusts the recording level of the local and
remote voice to attain similar audio levels during playback of the
recording. The Automatic Gain Control is enabled by default to ensure
the recording quality for the local and remote voice.
3.5 Microphone mode
When using an External Microphone it should be connected to the
microphone connection that is associated with the option to connect a
headset.
3.6 Handset / Headset / Speakerphone
The FeaturePhone 175 SD features a handset and speakerphone. Both
the handset and the speakerphone key control Hook contact. The
Handset controls Hook contact by a magnetic proximity detector
mounted inside the device-case below the cradle for the microphone
side of the handset. Inside the handset a small magnet is mounted that
allows the FeaturePhone 175 SD to detect whether the handset is lifted
from the phone or put down again.
The handset control takes precedence over the speakerphone. If the
handset is “off hook”, press the Speakerphone key to transfer the call to
the speakerphone. The display will show “Speakerphone ON”. Press
speakerphone key again to transfer the call back to the handset. The
display will show “Speakerphone OFF”. If the call is on “speakerphone”
and the handset is “off hook” then putting down the handset will end
the call.
An optional headset can be connected to the FeaturePhone 175 SD. The
headset and handset can be used interchangeably. If a headset is used
the Hook control function key can be used for “On” and “Off”
hook.
3.7 Start a call
There are three ways to start a call.
- Pick up the handset,
- Press the Hook control function key,
- Open the phone book and select a telephone number, and then
push the hook-control or lift the handset.
Manual FeaturePhone 175 SD © Vidicode 2011
21
Page 22
• Push the hook-control function key
tone.
and wait for the dial
Number:
REPEAT
• Enter the number and wait for the remote phone to ring.
It is also possible to use the FeaturePhone 175 SD entering the number
first, before the handset is picked up or the Hook-control pushed. :
• First enter the number.
Number: 0791234567
STORE CLEAR STOP
• Then push the hook-control function key
(If you were to press STORE, the phonebook will open and the number
can be stored together with the Name.)
Dial: 0791234567
The number is dialled
Instead of pushing the hook-control function key .
It is also possible to start a call from the Telephone book.
3.8 Accept a call
When the phone is ringing
Monday 1-8-11 11:24
Telephone ringing 1x
The FeaturePhone 175 SD will keep track of the number of rings that
have passed and shows it in the display.
22
Manual FeaturePhone 175 SD © Vidicode 2011
Page 23

• Push the hook-control function key
pick up the handset.
The speakerphone key can also be used to accept the call.
to accept the call, or
3.9 End a call
A call is ended by putting the handset back on the FeaturePhone 175 SD,
pushing the hook-control function key or by pressing the
speakerphone key when the speakerphone was used.
Manual FeaturePhone 175 SD © Vidicode 2011
23
Page 24

4 Recording calls
By default all telephone calls are recorded. Recordings are primarily
stored on the Flash disk. If a call is ended the recording can be
automatically copied to SD. The recording also remains ‘on disk’.
Automatic copying of recordings to SD can be disabled in the Recording
Settings menu, see § 10.3. When Automatic copying is disabled
recordings can be copied to SD manually as described in § 6.
4.1 Automatic recording
By default all calls are recorded automatically.
Automatic recording can be disabled in the Recording Settings menu,
see § 10.3.2. When Automatic recording is disabled recording can be
started manually using the recorder keys.
There is one exception to Automatic recording: When the use of the
announcement message has been enabled recording of outgoing calls
need to be started manually.
For incoming calls the recording announcement message is played when
the phone is picked up.
For outgoing calls it is not possible to determine what the correct
moment to play the message is. It has therefore been made that the
recording can only be started manually and the message is played
directly after the recording is started.
The display will show START when the announcement message has been
selected in the menu.
4.2 Copy recordings to SD
During a call the recording is stored on the flash disk of the
FeaturePhone 175 SD. Once the call has ended the recording is copied to
SD. The automatic copying of recordings from Flah disk to SD can be
turned ON and OFF in the Recording Settings menu.
When Automatic copy to SD has been disabled the unwanted recordings
can be removed from the flash disk. When all undesired recordings have
been removed the remaining recordings can be copied to SD.
24
Manual FeaturePhone 175 SD © Vidicode 2011
Page 25

4.3 Notification
In certain countries or regions the recording of the telephone call has to
be announced to the remote caller. There are two ways to let the
remote caller know the call is being recorded
Notification tone. The notification tone is a regularly returning beep.
The beep can be heard both by the local and the remote caller. In the
FeaturePhone 175 SD the beep is reproduced only when a silence occurs
in the call. This way you can always be sure the remote caller will hear
the beep.
Notification message: The notification message is a spoken message that
can notify the caller the call is being recorded. The message has to be
recorded first.
The playback of the notification message is different for incoming and
outgoing calls.
For incoming calls the message is reproduced when the phone is picked
up. For outgoing calls the moment of playing the message is determined
manually. The reason being that the FeaturePhone 175 SD cannot
determine when the remote side picks up the phone.
NOTE! Even when Automatic recording is enabled the recording
of outgoing calls has to be started manually when the notification
message is enabled. The recording is started by pressing the menu
key START. The notification message is played when the recording
is started.
The notification tone and message can be enabled separately and
together. See § 10.3.4 for details.
Manual FeaturePhone 175 SD © Vidicode 2011
25
Page 26

5 Search and play recordings
The FeaturePhone 175 SD has three different kinds of recordings:
• Call recordings,
• Microphone recordings,
• Answering machine messages.
Search and playback of these recordings is initiated with the
corresponding function keys. Each recording type has its own Search and
playback function key.
The search and playback menus and operation thereof for the different
recordings are virtually the same.
Recordings can be searched for according to Date and Code.
For all recordings the date of the recording is stored with the recording.
The Code of a recording can be addressed when storing the recording.
By default the dialled number or the caller ID is used as Code of a
recording.
When a search is started one has to choose between searching the SD
card or the Disk. Searching the SD or the Disk is done in exactly the same
way.
During the search the character can be used as a wildcard. The
wildcard is default used for the Code search string. This way the search is
performed on Date and time only. In the next paragraphs the searching
for the various recordings is described.
5.1 Search recordings
Press one of the Playback function keys.
• Press one of the Playback function keys (Calls),
(Microphone),
Then choose from the following options:
- Press DISK to search the Flash disk for the desired recordings
(Messages).
26
Manual FeaturePhone 175 SD © Vidicode 2011
Page 27

- Press SD to search the SD-card for the desired recordings
- Press LAST to play the last recorded call. (If available)
When SD or DISK is chosen the search continues as below.
5.2 Search according to date
Following from the previous paragraph
Calls from: 31-07-11
SEARCH CODE STOP
• Enter the date of the call you want to search for.
• Press SEARCH to execute the entered query.
31-07-11 09:48 1/23
SEARCH CODE STOP
In this example 23 recordings were found. Now the recorder keys can be
used to select and play the recordings.
Other options are:
SEARCH to start a new search
CODE to expand the search to the code of the recording. The code
search is described below.
STOP to quit searching.
5.3 Search according to code
In the previous paragraph the search according to date has been
described. The search can be expanded to incorporate the code of the
recording. Throughout the search the code can be incorporated as
follows:
• Press CODE when you are in the search menu.
Manual FeaturePhone 175 SD © Vidicode 2011
27
Page 28

Code = .________________
SEARCH DATE STOP
• Enter the desired code you want to search for.
• Press SEARCH to search for the entered code.
31-07-11 09:48 1/11
SEARCH CODE STOP
Now the recorder keys can be used to select and play the found
recordings.
Example: The date search string "-03-11 will return all the calls from
March 2011. The date search string "--11 will return all the calls
from the year 2011.
The code search string 234 will return all the calls that contain the
number 234.
28
Manual FeaturePhone 175 SD © Vidicode 2011
Page 29

6 Copy recordings to SD card
It is possible to copy recordings from the Flash disk to SD card. There are
different ways to copy recordings to SD card. A copying action is always
preceded by a Search action. It is possible to copy a recording while
playing it back, or a selection of recordings can be made first, either per
day, per month or per week.
6.1 Copy the last recording to SD card
• Press one of the Playback function keys
(Calls), (Microphone), (Messages).
Playback Calls
DISK SD-CARD LAST STOP
• Press LAST to start the playback
• Press copy function key:
Copy Recording to SD-Card
START CANCEL
• Press START to start copying the last recording.
• Press CANCEL to cancel the copy.
6.2 Copy a selection of recordings
• Press one of the Playback function keys
(Calls), (Microphone), (Messages).
Playback Calls
DISK SD-CARD LAST STOP
• Select DISK
• Use the numerical keys to enter a date.
Manual FeaturePhone 175 SD © Vidicode 2011
29
Page 30

Entering the date or code to search for you can use the key as
wildcard. For example enter :11:09 to search for all recordings from
November 2009. The
left or right.
and keys can be used to move the cursor
31-07-11 09:48 1/11
SEARCH CODE DELETE STOP
• Press the function key to open the Copy mode and copy all
11 Recordings to SD.
• Press SEARCH to start copying the recordings.
• Press CANCEL to cancel the copy.
6.3 Copy a recording during playback
First select the recording you want to copy as described in chapter §
Fout! Verwijzingsbron niet gevonden.
Press to start the playback then press the function key.
Copy Recording to SD-card
START CANCEL
Press START to start copying the recording.
30
Manual FeaturePhone 175 SD © Vidicode 2011
Page 31

7 Answering machine
The FeaturePhone 175 SD has a simple answering machine with a single
welcome message. Settings include:
• Number of rings to answer on. This is the amount of rings to pass
before the FeaturePhone 175 SD answers the phone
• Number of rings to always answer. This is the amount of rings to
pass before the FeaturePhone 175 SD answers the phone when
the Answering Machine was turned Off. Hereafter the answering
machine stays turned on.
• Enable speaker after answer. This function turns the speaker on
when the FeaturePhone 175 SD answers an incoming call. The
playing of the welcome message and the caller leaving a message
sounds through the speaker.
• Maximum message time. This function restricts the duration of
the messages.
• Silence period. This function restricts the duration of a silence
period in a message. Recording will continue during this period,
even if the caller is not talking.
When new messages have been left on the machine the display will
indicate so. When messages have been listened to the FeaturePhone 175
SD will prompt you whether or not to save the messages.
For playback of the stored messages see § 7.4.
Depending on whether recordings are automatically copied to SD the
messages will either be stored on the flash disk only, or when Automatic
copy to SD mode is active the messages will be copied to SD as well.
Messages can be selected and erased individually.
7.1 Turn the answering machine On
When the FeaturePhone 175 SD is idle the answering machine can be
turned on without entering the settings menu.
Manual FeaturePhone 175 SD © Vidicode 2011
31
Page 32

Wednesday 03-07-11 16:15
Call Recorder
• Press the far right menu key.
Answering machine
ON OFF STOP
• Press ON to turn the answering machine On.
To disable the answering machine follow the instructions as above and
press OFF to turn the answering machine Off.
7.2 Record welcome message
The welcome message is the message the FeaturePhone 175 SD answers
an incoming call with when the answering machine is turned on.
The welcome message is recorded through the handset or the internal
microphone.
• Press Configuration key
General Settings
NEXT MENU STOP
• Press NEXT three times
Answ.Machine Settings
MENU STOP
32
Manual FeaturePhone 175 SD © Vidicode 2011
Page 33

• Press MENU
•
/>
Answ.Machine Settings
Answering Machine: On
NEXT CHANGE BACK
• Press NEXT
Answ.Machine Settings
Welcome Message
NEXT
DELETE BACK
• Press
• Press to stop the recording.
• Press to listen to the recording before saving. It is possible
to record the message again as described above.
To save a recorded welcome message press BACK followed by STOP.
to start the recording of the welcome message.
7.3 New Messages.
When there are new messages on the FeaturePhone 175 SD the display
will say:
Wednesday 03-07-11 16:15
3 new messages
• Press the Playback messages function key to start
listening to the new messages. Playback of the new messages will
start immediately.
All the new messages have to be listened to before they can be saved.
During playback messages can be skipped with the skip key. When
all the new messages have been played or scrolled through you will be
prompted whether to save or delete the messages.
Manual FeaturePhone 175 SD © Vidicode 2011
33
Page 34

7.4 Playback messages
• Press Playback messages function key to start searching
for messages.
Playback Message
DISK SD-CARD LAST STOP
• Press DISK or SD-CARD depending on where the messages you are
looking for are located.
Messages from: 31-07-11
SEARCH CODE STOP
Enter the date of the messages or use * as a wildcard to leave date
month or year open.
• Press SEARCH to execute the entered query.
or
• Press CODE to search according to code.
Code = 3________________
SEARCH DATE STOP
• Press SEARCH to execute the entered query.
01-07-11 11:54 1/23
SEARCH CODE STOP
Now the recorder keys can be used to select and play the messages.
34
Manual FeaturePhone 175 SD © Vidicode 2011
Page 35

7.5 Remove messages
Perform a search for messages on Disk as described in § 5.1.
01-07-11 11:54 1/23
SEARCH CODE ERASE STOP
Then use the recorder keys to select the message that has to be
removed.
01-07-11 11:54 9/23
SEARCH CODE ERASE STOP
• Press ERASE to remove the message.
When all messages that do not need to be saved are removed the rest of
the messages can be saved and / or copied to SD. See § 6 for a detailed
description.
Manual FeaturePhone 175 SD © Vidicode 2011
35
Page 36

8 The Telephone book
The FeaturePhone 175 SD has an extensive History and Telephone book
function. If Caller ID is configured on your telephone line the
FeaturePhone 175 SD will automatically display the incoming number
when the telephone is ringing.
Both the numbers of incoming and outgoing calls are stored on Disk. By
default the FeaturePhone 175 SD also stores the numbers as the Code of
the recordings.
8.1 Add a contact
• Type in the number that you want to add to the telephone book
0598765432
STORE << CLEAR STOP
• Press STORE to add the number to the telephone book.
Name:
STOP
• Enter the Name belonging to the number. Using the alpha
numerical keys. Press once for A, twice for B etc.
Name: John Brown
STORE << CLEAR STOP
• Press STORE to store the number
John Brown
0598765432
YES Store? NO
36
Manual FeaturePhone 175 SD © Vidicode 2011
Page 37

• Press YES to store the entry in the Telephone book.
8.2 Search a contact
• Press the Telephone book function key
Telephone Book
SEARCH STOP
• Press the numerical key closest to the name you want to search
for.
(press A-Z)
John Brown
NEXT EDIT DELETE STOP
• Press NEXT or use the and keys to scroll through the list
to locate the name you are searching for.
8.3 Making a call from the telephone book
• Press the Telephone book function key.
0598765432
Telephone Book
SEARCH STOP
Search the contact in the list as described above. To dial the number,
pick up the handset or press the Hook-function key and the number will
be dialled automatically when the dial tone has been detected.
(press A-Z)
8.4 Edit a contact
Go through the steps above to locate the entry in the telephone book
you want to edit.
John Brown
NEXT EDIT DELETE STOP
0598765432
Manual FeaturePhone 175 SD © Vidicode 2011
37
Page 38

• Press EDIT to edit the entry.
An identical display is shown as when adding a number to the telephone
book.
8.5 Remove a contact
Go through the steps above to locate the entry in the telephone book
you want to remove.
John Brown
NEXT EDIT DELETE STOP
• Press DELETE to remove the entry from the telephone book.
8.6 Call History
Numbers can also be added to the telephone book through the Call
history function. When the telephone is On hook the Flash key (R) has a
call history function. Call history keeps track of remote numbers of all
your calls. The numbers for outgoing calls are always known. The
numbers for incoming calls can only be detected if Caller ID is enabled.
• Press function key to enter the call history.
0598765432
History #1 -> 11-07 09:18
0612345678
STORE CLEAR STOP
The first call in the history table is the last call made.
The arrow indicates an outgoing call.
Date and time was 11-07 at 09:18 hours.
The and keys can be used to scroll through the call history.
• Press STORE to move the number to the Telephone book.
38
Manual FeaturePhone 175 SD © Vidicode 2011
Page 39

9 Using the CryptoCard
Encrypting recordings is done to prevent unauthorized playback of and
listening to recordings. The FeaturePhone 175 SD uses a CryptoCard to
encrypt recordings. The CryptoCard is a chip card that holds the key to
the encryption and decryption. Encrypted recordings can only be played
back together with the original or a matching CryptoCard.
The FeaturePhone 175 SD is equipped with a card reader specifically for
this purpose, it is located on the left front side of the device.
CryptoCards can be obtained from your FeaturePhone 175 SD supplier.
The use of the CryptoCard encryption function is default enabled by
inserting a CryptoCard.
9.1 Insert the CryptoCard into the
FeaturePhone 175 SD
Insert the CryptoCard into the FeaturePhone 175 SD as shown in the
figure.
9.2 The CryptoCard and its PIN and PUC code
The CryptoCard is supplied with a PIN code and a PUC code. The PIN
code is a four-digit code and is requested by the FeaturePhone 175 SD
to enable playback of recordings. The PUC code is a twelve-digit code
and is used only when the card has been disabled. The PIN code can be
changed with the FeaturePhone 175 SD. See § 10.1.2.
Manual FeaturePhone 175 SD © Vidicode 2011
39
Page 40

A CryptoCard allows for two invalid PIN code entries. After the third
invalid Pin code entry the CryptoCard is disabled. The next time the
FeaturePhone 175 SD will ask for the PUC code to enable the card
again. The CryptoCard allows for four invalid PUC code entries. After the
fifth invalid PUC code entry the FeaturePhone 175 SD will disable the
card definitively. It is advised to keep the PUC code in a safe place.
9.3 Making an encrypted recording
To make encrypted recordings only it is essential that the Use
CryptoCard function is enabled in the Recorder Settings menu. Enable
the Use CryptoCard function as described in § 10.1.2. With Use
CryptoCard enabled it is no longer possible to make normal,
unencrypted recordings without disabling the Use CryptoCard function
again.
Insert the CryptoCard in the card reader of the FeaturePhone 175 SD.
Friday 01-07-11 11:54
Card inserted
When a valid CryptoCard has been inserted all recordings made
thereafter will be encrypted as long as the card remains inserted.
Removing the card disables recording automatically.
NOTE: Removing the card disables recording automatically.
Encrypted recordings are stored as such and can be played only
with a matching CryptoCard inserted. Encrypted recordings can
also be played with a PC with the FeaturePhone 175 SD software;
however, they cannot be played on the PC without a CryptoCard
matching the card used when the recording was made. See the
following section for a detailed explanation.
9.4 Playing an encrypted recording
Encrypted recordings can only be played back with the original or a
matching CryptoCard. For playback of an encrypted recording on the
FeaturePhone 175 SD this works quite simple. Search and select the
desired recording as described in Chapter 5. If playback of the encrypted
recording is started the FeaturePhone 175 SD will automatically ask for
the Card code.
40
Manual FeaturePhone 175 SD © Vidicode 2011
Page 41

Card Code : 4
CANCEL
After entering your PIN code the menu key function CONTINUE is added
in the display.
• Press CONTINUE to start playback of the selected recording.
It is not necessary to enter your card code every time.
Your supplier of the FeaturePhone 175 SD can supply you with a Card
reader for your PC .
Manual FeaturePhone 175 SD © Vidicode 2011
41
Page 42

10 Settings
All the settings start with the Configuration function key followed
by the menu keys of which the function is determined by the text in the
display as described in Chapter Fout! Verwijzingsbron niet gevonden..
The settings appear in various formats, the display may show:
- a question that can be answered with YES or NO.
- a function that can be turned ON or OFF.
- a setting of numerical values.
- a setting of predefined options.
The kind of setting unfolds in the description in the menu and from the
display text.
The settings appear in a sequence of questions. The settings are
described in exactly that same sequence:
- General Settings (underlying menu)
- Telephone settings (underlying menu)
- Recorder Settings (underlying menu)
- Answering Machine settings (underlying menu)
If you require to change one specific setting you can scroll through the
settings pressing NEXT consecutively or by using the and keys to
scroll forwards and backwards through the menu.
• Press the Configuration function key to enter the settings.
10.1 General Settings
The General Settings of the FeaturePhone 175 SD deal with the basic
setup of the device.
The General Settings cover:
• Password protection
• CryptoCard
• Clock, see
• Language, see
• Reset all Values
42
Manual FeaturePhone 175 SD © Vidicode 2011
Page 43

General Settings
NEXT MENU STOP
• Press MENU to enter the Telephone settings menu.
Password: Off
NEXT CHANGE BACK
10.1.1 Password protection
Password protection is provided as a minimum level of prevention
against unauthorized setting changes. When Password protection is
enabled all Settings and Playback functions are disabled.
Password: Off
NEXT CHANGE BACK
• Press CHANGE to enable Password protection.
New Password: a
Enter a numerical password.
• Press STORE
Repeat Password: a
STORE CANCEL
Repeat the password.
• Press STORE again to store the password.
Manual FeaturePhone 175 SD © Vidicode 2011
43
Page 44

Password: On
NEXT CHANGE BACK
For every time the Password protection is enabled a new password has
to be entered. This is to prevent the password protection to be enabled
without the password being known.
Press NEXT to move on to the next menu item..
10.1.2 CryptoCard
The CryptoCard function is used to encrypt recordings. Encryption is
described in Chapter 9.
The CryptoCard is the first item in the Recorder Settings.
Crypto Card: Off
NEXT CHANGE BACK
• Press CHANGE to enable or disable the CryptoCard function.
Only in case a CryptoCard is inserted the personal code of the card can
be set or changed.
Insert your CryptoCard and press NEXT to set the personal code of your
card.
Change Card Code
NEXT CHANGE BACK
• Press CHANGE to change Card code.
Card Code: a
STORE CANCEL
• First enter the original code of the card and press CONTINUE.
44
Manual FeaturePhone 175 SD © Vidicode 2011
Page 45

New Card Code: a
STORE CANCEL
• Enter a numerical code and press STORE.
Repeat Card Code: a
STORE CANCEL
• Repeat the code and press STORE again to store the code.
Crypto Card: On
NEXT CHANGE BACK
• Press NEXT to move on to the next menu item.
10.1.3 Clock
Set the clock as follows:
Clock: Mon 01-08-11 1:54
CHANGE BACK
• Press CHANGE to set the clock
Clock: Mon 01-08-11 11:54
STORE << >> CANCEL
• Press keys 1 - 7 to change the day beginning with 1 for Sunday
• Enter the date (format depending on selected language) using
the numerical keys
• Enter the time
• Press STORE to save the time.
Manual FeaturePhone 175 SD © Vidicode 2011
45
Page 46

Other options:
CANCEL to return to previous set time.
<< and >> to move the cursor.
• Press NEXT to move on to the next menu item.
10.1.4 Language
Language: English
NEXT CHANGE STOP
• Press CHANGE to scroll through the available options.
Together with the Language the date format can change also:
Standard date format is: DD-MM-YY
When set to "American" the format is changed to : MM-DD-YY
When set to American the format is changed to: MM-DD-YY
10.1.5 Reset all values
The Reset all values prompt is used to revert the FeaturePhone 175 SD
to factory settings.
Warning: Reverting to factory settings may cause personal settings to be
lost.
Reset all values: No
CHANGE STOP
• Press CHANGE to enable Reset all values operation.
Reset all Values is the last item in the settings.
• Press BACK to exit
• Press STOP to exit the Network settings menu.
You will be prompted to SAVE or CANCEL changes made
10.2 Telephone Settings
The Telephone Settings of the FeaturePhone 175 SD deal with the basic
setup of the telephone of the device.
Telephone Settings cover:
46
Manual FeaturePhone 175 SD © Vidicode 2011
Page 47

• Caller ID
pola
• Hook-flash-time
• Wait after dial
• Ring volume
• Ring frequency
• Ring variation
10.2.1 Enter the Telephone Settings
• Press the Configuration function key to enter the settings.
• Press NEXT to move to the Telephone Settings menu.
• Press MENU to enter the Telephone Settings menu.
10.2.2 Caller ID
• To change this setting you should be aware of the caller ID that is
used in your country or region. Please contact your reseller for this
information.
Caller ID: DTMF-
NEXT CHANGE BACK
• Press CHANGE to set the type of Caller ID.
The choices are:
- DTMF-pola,
- DTMF-ring,
- FSK-pola.
- FSK-ring
- DTMF Hi imp
You can also turn the Caller ID Off.
• Press NEXT to move on to the next menu item.
10.2.3 Flash time
Hook-Flash time: 110mS
NEXT - CHANGE + BACK
• Press CHANGE to alter the Hook-Flash time.
Manual FeaturePhone 175 SD © Vidicode 2011
47
Page 48

Flash time refers to the switch time of the Hook flash. Standard setting
1
for the Hook-Flash is 110 mSeconds. Check with your PBX or service
provider for information.
• Press NEXT to move on to the next menu item.
10.2.4 Wait after dial
The Wait after dial is the time the FeaturePhone 175 SD waits to start
recording after the first number is dialled. Default the Wait after dial is
set to 4.0 seconds. A shorter time may cause the FeaturePhone 175 SD
to record the dialling of the number. A longer wait after dial may cause
the FeaturePhone 175 SD not to record the beginning of the
conversation.
Wait after dial: 4.0s
NEXT - CHANGE + BACK
• Press + or – to increase or decrease the value.
• Press NEXT to move on to the next menu item.
10.2.5 Rings to answer on
Sets the amount of rings before the FeaturePhone 175 SD answers the
phone.
• This option is only used when you want the call recorder to act as
an answering machine.
Rings to answer on:
NEXT - CHANGE + BACK
• Press – or + to change the Ring volume property.
• Press NEXT to move on to the next menu item.
10.2.6 Rings always answer
Set the amount of rings before the FeaturePhone 175 SD answers the
phone when the answering machine is off. After picking up the phone
the answering machine is automatically turned on. If you don't want the
FeaturePhone 175 SD to answer the phone when the answering
machine is off select Off.
48
Manual FeaturePhone 175 SD © Vidicode 2011
Page 49

Rings Always Answer: Off
NEXT - CHANGE + BACK
• Press – or + to alter the number of rings to always answer on.
• Press NEXT to move on to the next menu item.
10.2.7 Ring Volume
The Ring volume determines the volume of the ringer
Select a value between 0 and 12.
Ring volume: 3
NEXT - CHANGE + BACK
• Press – or + to change the Ring volume property.
• Press NEXT to move on to the next menu item.
10.2.8 Ring frequency
Ring frequency determines the pitch of the ring, the higher the
numbers, the higher the sound.
Select a value between 400+50 and 3400+350.
Ring frequency: 1200+250
NEXT - CHANGE + BACK
• Press – or + to change the Ring frequency property.
• Press NEXT to move on to the next menu item.
10.2.9 Ring variation
Ring variation determines the variation in the sound of the ring, the
user will have to try different variations to find out which suits him best.
Select a value between 1x3 and 3x12.
Ring variation: 2x5
NEXT - CHANGE + BACK
•
Manual FeaturePhone 175 SD © Vidicode 2011
49
Page 50

• Press CHANGE to change the Ring variation property.
• Press NEXT to move on to the next menu item.
10.3 Recorder Settings
The Recorder Settings deal with the settings related to the recording
properties of the FeaturePhone 175 SD. These are:
• Automatic Recording
• Automatic copy to SD card
• Notification
• Ask Store/Delete
• Beep after store
• Minimum call time
• Compression
• Microphone mode
• Mic. amplification
• Automatic gain control
• Footswitch
10.3.1 Enter the Recording Settings
• Press the Configuration function key to enter the settings.
• Press NEXT twice to move to the Recording Settings menu.
• Press MENU to enter the Recording Settings menu.
10.3.2 Automatic recording
Automatic recording can be turned On or Off.
Automatic recording: On
NEXT CHANGE BACK
• Press CHANGE to disable Automatic recording.
10.3.3 Automatic SD Copy
The Automatic SD copy is described in §6
50
Manual FeaturePhone 175 SD © Vidicode 2011
Page 51

Auto copy to SD Card: Off
NEXT CHANGE BACK
• Press CHANGE to enable or disable Automatic SD copy.
• Press NEXT to move on to the next menu item.
10.3.4 Notification
The Notification is described in § 4.3.
The Notification options are:
- Off
- Tone
- Message
- Tone + Message
Notification: Off
NEXT CHANGE BACK
• Press CHANGE to select the required Notification method.
• To record the notification message follow instructions in § 4.3.
10.3.5 Ask Store/Delete
Every call is recorded when Automatic recording is on, but not every
recording has to be stored. If the Ask Store/Delete function is enabled
the user can decide, after the recording has ended whether to keep the
recording or not. The FeaturePhone 175 SD will prompt the user after
every recording. The decision period is 60 seconds. After that the
recording will automatically be stored.
Ask Store/Delete: Off
NEXT CHANGE BACK
• Press CHANGE to enable Ask Store/Delete .
• Press NEXT to move on to the next menu item.
10.3.6 Beep after store
The Beep after store function sounds a beep after a recording is stored.
Manual FeaturePhone 175 SD © Vidicode 2011
51
Page 52

Beep after store: Off
NEXT CHANGE BACK
• Press CHANGE to enable Beep after store .
• Press NEXT to move on to the next menu item.
10.3.7 Minimum call time
The Minimum call time is the minimum duration of a recording to be
stored. Default the Minimum call time is set to 5 seconds. Recordings
shorter then 5 seconds will not be stored.
Minimum call time: 4s
NEXT - CHANGE + BACK
• Press + or – to increase or decrease the value.
Press NEXT to move on to the next menu item.
10.3.8 Compression
The effect Compression has on the amount of disk space used per
recording is described in § 3.1
Compression: Off
NEXT CHANGE BACK
• Press CHANGE to select On or Off.
• Press NEXT to move on to the next menu item.
10.3.9 Microphone mode
The Microphone mode options are:
- Internal
- External
Microphone mode: Internal
NEXT CHANGE BACK
52
Manual FeaturePhone 175 SD © Vidicode 2011
Page 53

• Press CHANGE to select the desired Microphone mode.
• Press NEXT to move on to the next menu item.
10.3.10 Microphone amplification
The Microphone amplification determines the amplification of the
microphone signal, where 1 is the lowest and 4 is the highest:
Mic. amplification: 4
NEXT CHANGE BACK
• Press CHANGE to adjust the Microphone amplification.
• Press NEXT to move on to the next menu item.
10.3.11 Automatic gain control
The Automatic Gain control function is described in § 3.4.
Auto. Gain control: On
NEXT CHANGE BACK
• Press CHANGE to enable Automatic Gain control.
• Press NEXT to move on to the next menu item.
10.3.12 Footswitch
The Footswitch function allows you to use a footswitch for playback of
recordings.
Foot switch: On
CHANGE BACK
• Press CHANGE to enable Footswitch use.
Footswitch is the last menu item in the Recorder Settings.
• Press BACK to exit
• Press STOP to exit the Recorder settings menu.
You will be prompted to SAVE or CANCEL changes made.
Manual FeaturePhone 175 SD © Vidicode 2011
53
Page 54

• Press BACK to leave the Recorder Settings menu.
10.4 Answering machine Settings
The Answering Machine Settings contain all the settings related to the
functioning of the Answering machine of the FeaturePhone 175 SD.
Settings include:
• Answering machine On / Off
• Welcome message
• Rings to answer on
• Rings always answer
• Speaker after answer
• K-break detection
• Maximum message time
• Silence period
10.4.1 Enter the Answering machine Settings
• Press the Configuration function key to enter the settings.
• Press NEXT three times to move to the Answering machine
Settings menu.
• Press MENU to enter the Answering machine Settings menu.
10.4.2 Turn Answering machine on
The answering machine is turned on as follows: (It can also be done
without entering the Settings menu:
In idle mode, press the far right of the menu keys and change the
setting to On.)
Answ. Machine Settings
Answering machine: Off
NEXT CHANGE BACK
• Press CHANGE to enable the Answering machine
NEXT to continue with the Welcome message
54
Manual FeaturePhone 175 SD © Vidicode 2011
Page 55

10.4.3 Welcome message
1
•
/>
The Welcome message is the message that is reproduced when the
Answering machine answers the phone. There is no default Welcome
message.
Answ.Machine Settings
Welcome Message
NEXT
DELETE BACK
• Press
Record a welcome message as follows:
• Press to start the recording of the welcome message.
• Press to stop the recording.
• Press to listen to the recording before saving. It is possible
To save a recorded welcome message press BACK followed by STOP.
Sets the amount of rings before the FeaturePhone 175 SD answers the
phone.
• This option is only used when you want the call recorder to act as
•/>
to playback the welcome message
to record the message again as described above.
10.4.4 Rings to answer on
an answering machine.
Rings to answer on:
NEXT - CHANGE + BACK
• Press – or + to change the Ring volume property.
• Press NEXT to move on to the next menu item.
10.4.5 Rings always answer
Set the amount of rings before the FeaturePhone 175 SD answers the
phone when the answering machine is off. After picking up the phone
the answering machine is automatically turned on. If you don't want the
Manual FeaturePhone 175 SD © Vidicode 2011
55
Page 56

FeaturePhone 175 SD to answer the phone when the answering
No
machine is off select Off.
Rings Always Answer: Off
NEXT - CHANGE + BACK
• Press – or + to alter the number of rings to always answer on.
• Press NEXT to move on to the next menu item.
10.4.6 Speaker after answer
This function puts the conversation on speaker automatically after a call
is answered.
Speaker after Answer: Off
NEXT CHANGE BACK
• Press CHANGE enable or disable Speaker after answer.
• Press BACK to move on to the next menu.
10.4.7 K-break detection
This menu item will only appear when the FeaturePhone 175 SD
language is set to English. K-break detection is specific for the UK.
K-break detection:
NEXT CHANGE BACK
• Press CHANGE to enable or disable K-break detection.
This service needs to be supported by your PABX or your telephone
service provider.
• Press NEXT to move on to the next menu item
10.4.8 Maximum message time
The Maximum message time determines the maximum duration of a
message. Default the Max. message time is set to 120 seconds.
56
Manual FeaturePhone 175 SD © Vidicode 2011
Page 57

Max. message time: 1200s
NEXT - CHANGE + BACK
• Press - or + to set the Maximum message time in steps of 30s .
• Maximum message time is the last menu item in the Telephone
Settings.
• Press BACK to exit the Telephone settings menu.
• Press NEXT to move on to the Recorder settings.
10.4.9 Silence period
The Silence period is described in § 7.
Silence period: 10s
NEXT - CHANGE + BACK
• Press + or – to increase or decrease the value.
• Press NEXT to move on to the next menu item.
• Press BACK to leave the Answering machine Settings menu.
10.5 Software update
The FeaturePhone 175 SD has the ability to update its software from SD.
• Press the Disk key to enter the menu and press NEXT four
times.
Software update
START STOP
• Press START
Software update
YES Start? NO
Manual FeaturePhone 175 SD © Vidicode 2011
57
Page 58

• Press YES to start the software update.
The various software parts will be updated automatically when newer
versions have been found. During the updating the display will show the
message “One moment please!”
WARNING! Do not interrupt the FeaturePhone 175 SD in any way
at this point! Interrupting the software update may cause unrestorable failure in the FeaturePhone 175 SD!
When the FeaturePhone 175 SD is finished
Update finished
STOP
• Press STOP to finish.
The recordings on the flash disk and your settings will remain intact
after the software update.
58
Manual FeaturePhone 175 SD © Vidicode 2011
Page 59

11 The SD Access system
When you insert an SD card in a suitable SD Card Reader that is
connected to your Windows PC, you can browse the contents of the
archive like any disk drive, using Windows Explorer. The recordings are
stored on the SD card as regular files that you can playback using an
audio player, such as Windows Media Player (provided the files are not
encrypted with a CryptoCard).
The SD Access system is intended to view the recordings on the SD card
in a comprehensive list, as an archive so to speak.
The recordings in the list can be played back, attached to an e-mail,
copied to the computer’s hard disk etc.
11.1 Using the SD Access Software
As an alternative to manual access, you can use the SD Access system to
access recordings on a SD card. This has the advantage that it has
functions to search for recordings on properties, such as date and time
and telephone number, to copy recordings to hard disk, and to decrypt
recordings using a CryptoCard. When you open an archive on a SD card,
the software will scan the SD card and build a versatile database of the
available recordings. Recordings on the SD card can be played back from
within the software.
It is also possible to create an archive on your hard disk. Recordings in
the archive on your hard disk can also be given a name. All recordings
with the same remote number will acquire the same name
automatically.
An extensive query screen allows for the definition of a query to be
executed in the current archive. Queries can be made according to date
and time, remote number, name, incoming and outgoing calls,
answering machine messages and microphone recordings.
11.2 Install the software
Placing the product CD-ROM in your computer starts software
installation. If the installation is not started automatically, locate the file
setup.exe on the CD and start it by double-clicking. Follow the
instructions on the screen.
Manual FeaturePhone 175 SD © Vidicode 2011
59
Page 60

11.3 Start
• Click “Start“ in the lower left corner on your desktop.
• Go to Programs/Vidicode and click on “SD Access Software”. The
application will start right away.
The main dialog looks like this:
The main screen is divided in four parts:
1. The playback and recording department (at the top)
2. The toolbar
3. The two tabs: List and Search (left side)
4. The list of recordings (the large remaining area)
11.4 Playback and recording
• Double-click on a recording to play it,
• or right click on it and select Play.
60
Manual FeaturePhone 175 SD © Vidicode 2011
Page 61

A. Moves the playback position backward. Keep the key pressed for
repeated and increased speed.
B. Start or pause the playback of the currently selected recording.
C. Stop the playback or recording.
D. Moves the playback position forward. Keep the key pressed for
repeated and increased speed.
E. Information about the current playback or recording is displayed
here. Click on the progress bar to move to a specific position in
the playback.
F. Controls the playback volume.
11.5 The toolbar
A description of the toolbar buttons is displayed when hovering over the
buttons with the mouse. The toolbar contains the following buttons
(from left to right):
A. Archive on SD card: Switches the view to the archive on SD card
B. Archive on hard disk: Switches the view to the archive on hard
disk
C. Copy selected recordings to hard disk: Copies the selected
recording from the SD archive to the hard disk archive. This
option is only available when the SD archive is selected.
D. Copy all recordings to hard disk: Copies all recordings in the SD
archive to the hard disk archive. This option is only available
when the SD archive is selected.
E. Setup: Opens the Set up screen
11.6 The tabs List, Search
The tabs List and Search are situated at the left of the window.
Manual FeaturePhone 175 SD © Vidicode 2011
61
Page 62

In the List tab, you can view All recordings, or recordings within a
predefined timeframe (Today, This week, This month, This year) or
recordings in the Recycle Bin, from earlier saved Search Queries or
recordings by a specific device.
In the Search tab, you can define a Search Query based on a recording's
Date, Week, Time of day, Device, Duration, Telephone number, Name,
and Notes.
11.6.1 Search in the database
The SD Access system has a comprehensive database and query function.
See § 11.8 for a detailed description of the database.
All queries are executed for the current archive.
To switch between the SD card and hard disk archive, use the View
menu, or the first two Toolbar buttons.
To open an archive that is located in another directory, use the File
menu.
11.6.2 Standard queries
The List tab at the left of the screen contains several shortcuts to
standard database queries. These include Today, This week, This month,
This year or the Recycle Bin, earlier saved Search Queries or a specific
device.
These queries will display the recordings of the chosen period.
11.6.3 Custom queries
The SD Access system allows for the composition of custom queries in
the Search tab.
• Click on the Search tab an the bottom left of the main screen.
The Search tab displays a list of properties on which you can search.
• Click on a property to expand it, and fill in the required value or
range of values.
• Finally, click on the Search button, to execute the query.
• The result will be displayed in the main screen.
Date and Time
Four properties are related to time: Date, Week, Time of day, and
Duration. A value will taken into account only when the checkbox is
enabled (checked).
62
Manual FeaturePhone 175 SD © Vidicode 2011
Page 63

Device, Telephone number, and Name
When selecting a Device,
• either use the drop-down box to select any of the devices which
have made recordings
• or type a part of a device’s name, to search for recordings by any
device that includes the typed text in its name.
The same is possible for telephone numbers and names.
To search for a telephone number that starts with a number,
• type ^ followed by the number.
For example: ^0031 searches for telephone numbers that start with
0031. This is useful when searching for certain international calls.
Notes
You can fill in text to search for recordings that include the requested
text in their notes.
Save the query
It is possible to save a custom query for regular execution. The query will
be executed before it is saved. The query will not be saved if it is empty.
• Click the Add Query button to save the query.
• Enter a relevant name for the query
• Click OK.
The query will now be saved with the entered name and a shortcut to
the saved query will be added to the List tab. To run that query again,
select the button in the List tab. New recordings will be included when
the query is executed again.
Manual FeaturePhone 175 SD © Vidicode 2011
63
Page 64

11.6.4 View all
The list of recordings changes according to the Search, or view a of
predefined List. To view a list of the complete database, click the Allbutton in the List tab.
11.7 Menu
The menu has six options, File, View List Actions, Options and Help. The
menu options will be described in this chapter.
11.7.1 File
The File menu has 6 options:
Open archive on SD card: Opens a dialog screen where you select the
drive and directory of the SD card archive that must be opened.
Reopen archive on SD card: Opens a sub menu, where you can select a
previously opened SD archive
New archive on hard disk: Opens a dialog screen, where you can choose
a directory to create a new archive on hard disk.
Open archive on hard disk: Opens a dialog screen, where you can select
the drive and directory of the archive on hard disk that must be opened.
Reopen archive on hard disk: Opens a sub menu, where you can select a
previously opened hard disk archive
Exit: Closes the software
11.7.2 View
List: Moves to the List tab
Search: Moves to the Search tab
Archive on SD card: Selects the SD card archive.
Archive on hard disk: Selects the hard disk archive.
Telephone book: Opens the telephone book of the selected archive that
contains a list of telephone numbers and associated names.
Move to system tray: Moves the program to the system tray
11.7.3 List
All: Displays all recordings in the archive.
Today, This week, This month, This year: Displays the recordings in the
selected time frame.
View Recycle Bin: Displays the content of the recycle bin of the archive.
Recordings that are deleted are moved first to the recycle bin. To delete
recordings permanently, use Shift+Del, instead of Del.
11.7.4 Actions
Copy selection to hard disk: Copies the selected recording from the SD
archive to the hard disk archive. This option is only available when the
SD archive is selected.
64
Manual FeaturePhone 175 SD © Vidicode 2011
Page 65

Copy all to hard disk: Copies all recordings in the SD archive to the hard
disk archive. This option is only available when the SD archive is selected.
Export: Displays the Export dialog screen. See § 11.10. for an explanation
or Exporting recordings.
Email: Composes a new email with the default email software, with the
selected recording added as an attachment.
Recycle Bin: Each archive has a "recycle bin" where deleted recording
are listed until they are permanently deleted. It is similar, but not equal,
to the Windows Recycle Bin.
Restore: Moves the selected recordings from the recycle bin back to the
archive.
Empty recycle bin: Permanently removes all recordings in the recycle bin
of the selected archive.
11.7.5 Admin
Compact & Repair database: Compacts the database, and attempts to
repair errors in the database.
11.7.6 Options
Language: Opens a sub menu, where the interface language can be
selected.
Setup: Opens the Options window See § 11.12 for more detailed
information on the Options. .
11.7.7 Help
Contents: Open this help file.
Check for update: Checks online for updates of the software, and
provides an option to download and install an available update.
About: Displays the version number of the software.
11.8 The database
The SD Access system has a comprehensive database that contains call
information about the archive. There is only one archive selected at the
same time. You can quickly switch between the SD card archive and the
Hard disk archive using the Toolbar.
11.8.1 Properties of recordings
The following properties of recordings can be stored in the database:
- Date and time
- Duration
- Remote, local, and connected number (*)
- Call Recorder ID
- CryptoCard number (**)
Manual FeaturePhone 175 SD © Vidicode 2011
65
Page 66

In addition, the following properties can be filled in by the user:
- Notes regarding a recording
- Name, that is associated with a telephone number
- Call recorder name, that is associated with a call recorder ID
These properties are displayed in the corresponding columns in the
database. It is possible to sort the recordings according to the recording
properties by clicking the headers of the according columns, except on
the Note column.
(*) The availability of the remote, local and connected numbers depend
on the type of telephone line (analogue or ISDN), and the availability of
a detectable caller ID.
(**) when the recording is encrypted
11.8.2 Edit Names
You can edit the names that are associated with a telephone number
directly in the main recordings view. Alternatively, you can view and edit
telephone names by choosing menu View, Telephone Book.
11.9 Notes
The Note field of a recording can be edited directly when in the main
screen. To edit the Note field in large window, double click on the Note
filed. The following dialog will appear:
• Click OK to save the changes to the notes.
66
Manual FeaturePhone 175 SD © Vidicode 2011
Page 67

11.10 Export recordings
Individual recordings and groups of recordings can be exported from the
selected archive to a user-specified destination directory. To open ' the
Export dialog, select the Actions menu, and choose Export. The
following dialog opens:
Select if you want to export the current selection or the whole query.
The Export directory is the location where the files will be stored. This
location can be changed to your convenience.
The following recording properties can be preserved in the filename of
the recordings:
• %ORI is the original name of the recording as used on the call
recorder. Use %ORI.wav to get a playable audio file.
• %FN is the current file name
• %I is the number of the recording
• %D is the date of the recording
• %T is the time of the recording
• %X is the duration of the recording
• %P is the remote telephone number of the recording
• %N is the remote name associated with the recording
• Press OK to execute the export.
Note: Encrypted recordings are exported decrypted and can be played
back by anyone without using a CryptoCard.
11.11 Technical database information
Manual FeaturePhone 175 SD © Vidicode 2011
67
Page 68

The database is stored in a file named recinfo.mdb in Microsoft Access
compatible format. It can be accessed with an SQL interface using
DAO/ADO and the MS Jet driver. The individual files are stored as
regular .wav audio files. The encoding of the audio files is the encoding
that is used by the Call Recorder.
11.12 Option window
The Options are divided into two sections.
• Playback: In this section playback settings can be made.
• Display: In this section the visible columns of the database can be
configured.
• Security: In this section you can set password and CryptoCard
options
11.13 Playback settings
Select the audio device for play-back. In most cases the sound card of
the computer is used for playback. For the channel selection of the
sound card the Wave or PC Speakers channel must be selected.
68
Manual FeaturePhone 175 SD © Vidicode 2011
Page 69

11.14 Display settings
Choose here which columns must be visible in the main screen.
The options are
- Date
- Time
- Duration
- Name of Remote number
- Remote Number
- Direction
- Notes
- Device
- Serial Number
- CryptoCard
- Name Local telephone
- Local Number
- Name Connected MSN
- Connected MSN
Manual FeaturePhone 175 SD © Vidicode 2011
69
Page 70

11.15 Security settings
- Password to delete: A password must to entered before
recordings can be deleted.
- Password for options: A password must to entered before settings
can be changed.
- Password: Enter here the password that must be entered.
When the password has been entered during a session, the application
will not ask again for the password for some time. If you want to
reactivate the password after entering the password, restart the
application.
- Use CryptoCard reader: Enable this option if you want to play
encrypted recordings by using a CryptoCard.
- PIN timeout: The number of minutes that the PIN-code is
remembered by the software.
11.15.1 Acknowledgements
The software may use one or more components from the JEDI Library.
The JEDI Library is available in source code form under the terms and
conditions of the Mozilla Public License version 1.1.
PNG Library by Gustavo Daud.
70
Manual FeaturePhone 175 SD © Vidicode 2011
Page 71

12 Acknowledgements
12.1 Warranty
Your FeaturePhone 175 SD has a 12-month factory warranty . The
warranty is effective for normal use only. We would like to emphasize
that the warranty is not valid under exceptional environmental
conditions, such as extreme temperatures or humidity levels, nor in the
unlikely event of a lightning strike. The warranty is not valid if the
machine has not been handled properly, for example when it has been
dropped, or bumped into. In order to qualify for warranty , you should
contact your supplier, and show the receipt. If your supplier cannot help
you, you should contact the manufacturer. The manufacturer reserves
the right to determine the final date of the warranty period on the
basis of the date of production. Costs of transport to and from the
supplier or the manufacturer are for the buyer’s account. Warranty is
for parts only and does not cover any costs resulting from the
breakdown of the FeaturePhone 175 SD.
The FeaturePhone 175 SD has various extra features that have not been
described in this manual. Additional information about this is given in a
technical information bulletin. Subjects discussed in this technical
documentation are further configuration options and remote
configuring. The further configuration options concern all aspects of
operation. In our experience most people are interested in
configurations related to user’s access.
12.2 Liability
Correct functioning of the FeaturePhone 175 SD cannot be guaranteed
under all conditions and thus we do not accept any liability for loss of
information or other damages due to the use of the FeaturePhone 175
SD.
Vidicode is not a source of official interpretation of laws of any country
or state and shall not be construed as a source for making decisions.
Warning: In case of power failure the FeaturePhone 175 SD does not
proceed to call an alarm number
Manual FeaturePhone 175 SD © Vidicode 2011
71
Page 72

13 Index
A
Accept a call, 22
Acknowledgements, 71
Add a contact, 36
Answering machine, 31
Answering machine Settings, 54
Ask Store/Delete, 51
Automatic Gain Control, 21
Automatic recording, 24
B
Beep after store, 51
C
Caller ID, 47
Clock, 17, 45
connections, 14
Copy recordings, 29
Copy recordings to CD, 24
Credits, 70
CryptoCard, 39
E
Edit a contact, 37
Encrypted recording, 40
End a call, 23
Export, 67
F
Flash time, 47
Footswitch, 53
Function keys, 11
G
General Recording and
Playback settings, 68
General Settings, 42
Guarantee, 71
H
Handset, 14
Hang-up detection, 56
Headset, 21
I
Install, 59
L
Language, 18, 46
Liability, 71
M
Maximum message time, 56
Menu keys, 11
Menu-key indicators, 12
Messages, 33
Microphone mode, 21
Minimum call time, 52
N
Names and Notes, 66
Notification, 25
O
Option windows, 68
72
Manual FeaturePhone 175 SD © Vidicode 2011
Page 73

P
Password, 43
PIN and PUC code, 39
Playback, 34
Playback of the recordings, 60
Power adapter, 16
Q
Query the database, 62
R
Recorder Settings, 50
Recording calls, 24
Remove a contact, 38
Reset all values, 46
Silence period, 57
software installation, 59
Software update, 57
Speakerphone, 21
Start, 60
Start a call, 21
T
Telephone book, 36
Telephone line, 16
Telephone Settings, 46
U
User interface, 11
V
S
Search, 26
according to code, 27
according to date, 27
Search a contact, 37
Settings, 42
Set-up Wizard, 60
Volume, 13
W
Wait after dial, 48
Welcome message, 32
Wildcard, 30
Wizard, 60
Manual FeaturePhone 175 SD © Vidicode 2011
73
 Loading...