

Page 1
Art.VR5478/VR5178 Handsfree video monitor / intercom Vandal Resistant line
Art.VR5478/VR5178 Monitor / citofono vivavoce linea Anti Vandalo
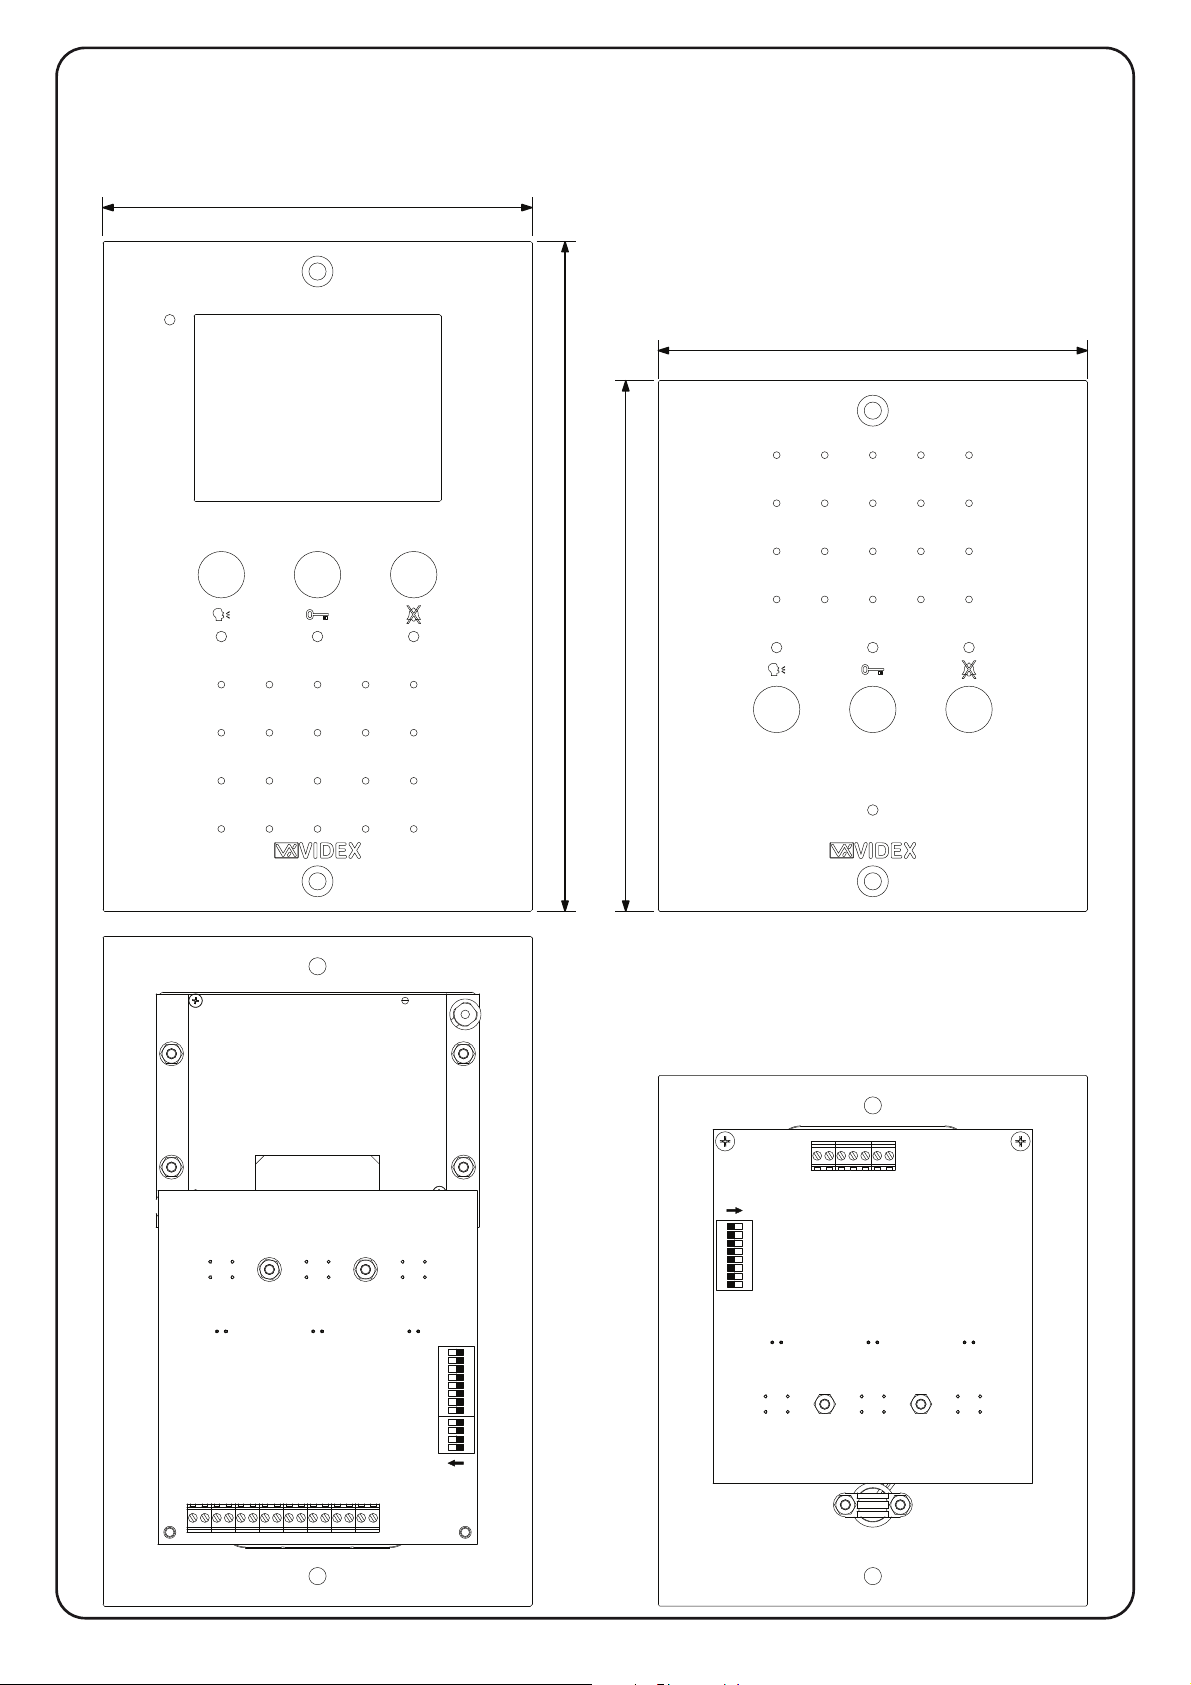
125 mm
125 mm
195 mm
154 mm
1
2
3
4
5
678
DL
L1
LB
AL5
+Vi
−
SB
ON
ON
678
5
4
3
2
1
ON
4
3
2
1
ON
ON
V1
V2
4
+VD
+20
−
2
+Vo
T
AL5
−
+Vi
SB
L1
LB
DL
75
Page 2
VIDEX ELECTRONICS S.p.A. VX2200 “2 WIRE” Bus Digital System
ART.VR5478/VR5178 VIDEOCITOFONO / CITOFONO
VIVAVOCE LINEA ANTI-VANDALO PER SISTEMI
VX2200
Descrizione
Videocitofono/Citofono viva voce “half duplex” con pulsante di risposta/fine
conversazione, pulsante “apri-porta” , pulsante “Privacy” (durata programmabile) e 3 LED* per indicare lo stato di conversazione in corso, lo stato
d’apertura/ chiusura della porta e lo stato di abilitazione/ disabilitazione del
servizio privacy. Regolazione del volume della nota di chiamata e
dell’altoparlante.
Pulsanti
Programmazioni e Regolazioni – VR5178
Le operazioni di programmazione e regolazione permettono di impostare il
numero di squilli, il tipo di suoneria ed il relativo volume, la durata della
privacy e il volume della fonia.
Ciascuna operazione è facilitata da segnali acustici e visivi.
Trascorsi 3 secondi di inattività una volta entrati in una delle funzioni di programmazione/regolazione, l’unità torna al normale funzionamento memorizzando il relativo parametro.
Impostazione numero di squilli – VR5178
Con il sistema in stand-by, premere e tenere premuto (circa 10 secondi) il
pulsante “
messo un bip.
Premere tante volte il pulsante “
che si vogliono programmare.
Raggiunto il numero di squilli desiderato (es. 5 pressioni per 5 squilli) at-
tendere (circa 3 secondi) senza premere nulla che il LED si spenga.
Il nuovo numero di squilli è memorizzato.
Pulsante risposta / conversazione ad una via / autoaccensione / spegnimento
Premere questo pulsante alla ricezione della chiamata per
avviare la conversazione con il posto esterno in full duplex
(il relativo LED si accende).
Premere e tenere premuto per più di un secondo alla rice-
zione della chiamata o durante una conversazione per iniziare la conversazione ad una via verso il posto esterno (il relativo LED lampeggia rapidamente): per ascoltare il visitatore
rilasciare il pulsante (il LED lampeggia lentamente) e premerlo nuovamente ogni qual volta si deve prendere la parola.
Premere brevemente durante la conversazione per spegnere
l’impianto. In ogni caso lo spegnimento è automatico allo
scadere del tempo di conversazione (il LED si spegne).
Ad impianto spento, premere il pulsante per effettuare
l’auto-accensione ed aprire la comunicazione verso il posto
esterno (il relativo LED si accende). Il numero di pressioni
del pulsante dipende dall’identificativo del posto esterno
che si vuole accendere
Pulsante Apri-porta
Premere durante la conversazione per aprire la porta
dell’ingresso dal quale proviene la chiamata. L’apertura della porta viene confermata da un segnale acustico. Se il morsetto “DL” è opportunamente collegato, il relativo LED resta acceso fino a quando resta aperta la porta.
Premere ad impianto spento per chiamare il centralino di
portineria VX2210 se presente nel sistema.
Pulsante Privacy on/off
Con il sistema in stand-by, premere per attivare il servizio
privacy per il tempo programmato: il relativo LED si accende a segnalare lo stato di attivazione del servizio.
All’arrivo della chiamata, con il servizio attivo, l’unità non
emette alcun segnale acustico. Il servizio si disattiva allo
scadere del tempo programmato o premendo nuovamente il
pulsante.
Durante la conversazione, se premuto per più di 3 secondi,
attiva l’uscita ausiliaria (il morsetto “open collector” “SB”
chiude verso massa).
” fino a che il relativo LED inizia a lampeggiare e viene e-
” quant’è il numero si squilli (max 9)
ART.VR5478/VR5178 HANDS FREE VIDEOMONITOR
/ INTERCOM VANDAL RESISTANT LINE FOR
VX2200 SYSTEMS
Description
Half duplex hands free videomonitor / intercom with buttons to control “answer/end conversation”, “door open” and “privacy on/off” (programmable
duration). In addition there are 3 LEDs to indicate the status of “answer/end
conversation”, “door open/closed” and “privacy on/off” status. Call tone
and loudspeaker volume controls are also incorporated on this model.
Push buttons
Programming and Adjustments – VR5178
Programming and adjustment action allows the setting of the number of
rings, the melody and the related volume, the privacy duration and the
speech volume.
Acoustic and visual signals are used to help the user during each programming stage.
After 3 seconds of idle time once entered in one of programming/adjustment
function, the unit returns to normal operation storing the parameter related
to the function that was last selected.
VR5178 – How to setup the number of rings
When the system is in stand-by, press and hold the button “
related LED starts flashing and the intercoms emit a beep.
Press the “
the number of rings (max 9) required.
Once the number of rings is reached (i.e. press 5 times for 5 rings), wait
(approx 3 seconds) until the LED switches off.
The new number of rings is stored.
Answer / simplex communicaiton / Camera Recall / End Call
push button
Press this button during an incoming call to open the
speech in duplex mode allowing free speech with the caller
in both directions (The related LED will illuminate)
Press and hold this button (more than 1 second), during an
incoming call or a conversation in progress, to allow the
user to answer a call from a visitor at the door station in
SIMPLEX speech mode (The related LED will flash rapidly): releasing the button will allow the user to listen to the
visitor (The LED will flash slowly). Press and hold the button when you talk to the visitor and release the button when
you listen to the visitor.
During a conversation, momentary operation of this button
will end the call. The LED next to the button will switch off.
The system will automatically switch off when the conversation time expires.
When the system is in standby, (No calls on the system) op-
eration of this button will open the speech to the door station. The related LED will illuminate. Press as many time as
the ID value of the door panel to connect to.
Door Open Push Button
During a conversation, operation of this button will release
the door from where the call originated. This will be confirmed by an acoustic tone. If terminal “DL” is connected,
the “door open” LED next to the button will also be illuminated.
When the system is in stand-by, a button press will book a
call to the concierge (If available)
Privacy on/off Push Button
When the system is in stand-by, press this button to enable
the service for the programmed time: the related LED will
illuminate to signal the service enabled. During an incoming call, with the service enabled, the device does not emit
any acoustic signal. The service is disabled when the programmed time expires or pressing again the button.
During a conversation, if pressed for more than 3 seconds,
operates the auxiliary output (open collector terminal “SB”
linked to ground).
” button as many times (each time is confirmed by a beep) as
” until the
76
Page 3
VIDEX ELECTRONICS S.p.A. VX2200 “2 WIRE” Bus Digital System
Impostazione suoneria e regolazione volume suoneria – VR5178
Con il sistema in stand-by, premere e tenere premuto (circa 10 secondi) il
pulsante “
si accendono i LED “parla” e “privacy”. Terminata la riproduzione della
suoneria correntemente attiva, il citofono emette un bip ed i LED “parla” e
“privacy iniziano a lampeggiare.
Per regolare il volume della suoneria, premere ripetutamente o tenere pre-
muto il pulsante “
volume dei bip emessi varia in base al pulsante che si sta premendo).
Ad ogni pressione del pulsante “
ria (max 9 disponibili): i LED “parla” e “privacy” smettono di lampeggiare, viene riprodotta la nuova suoneria, al termine viene emesso un bip ed i
LED tornano a lampeggiare.
Ripetere il passo precedente per selezionare una nuova suoneria altrimenti
attendere circa 3 secondi (i LED si spengono) senza premere alcun pulsante
per selezionare la suoneria appena ascoltata e fissare il livello di volume.
Impostazione durata privacy – VR5178
Con il sistema in stand-by, premere e tenere premuto (circa 10 secondi) il
pulsante “
so un bip.
Ad ogni pressione del pulsante “
tato di 30 minuti a partire da 0. Per impostare il modo privacy “infinito” (il
servizio viene disattivato solo premendo nuovamente il pulsante) passare
al passo successivo senza premere nulla.
Raggiunta la durata desiderata (es. per impostare 3 ore premere 6 volte)
attendere senza premere nulla che il LED si spenga.
La nuova durata della privacy è memorizzata.
Regolazione volume della fonia
A conversazione in corso (LED “parla” acceso), premere il pulsane “
il LED “parla” si spegne ed inizia a lampeggiare il LED “privacy”.
Premere ripetutamente o tenere premuto il pulsante “
volume della fonia o il pulsante “
Raggiunto il livello di volume desiderato , attendere circa 3 secondi senza
premere nulla o premere nuovamente il pulsante “
Il LED “privacy” smette di lampeggiare spegnendosi ed il LED parla si
riaccende.
Programmazioni e Regolazioni – VR5478
Il videocitofono ha due differenti menù per operazioni di programmazione e
regolazione:
1. Un menù viene attivato dalla condizione di stand-by e consente di im-
postare:
La durata della “privacy”;
Il volume della suoneria;
Il tipo di suoneria;
Il numero di squilli;
2. Il secondo menù è accessibile quando il videocitono è in funzione (du-
rante una conversazione o auto-accensione) e consente di impostare:
Il volume della fonia;
La luminosità;
Il Contrasto;
La saturazione;
Menù 1
Con il sistema a riposo (monitor spento) premere e tenere premuto (circa 9
secondi) il pulsante “
Il monitor si accende mostrando il menù OSD: la parte superiore dello
schermo riporta la scritta “menù” seguita dall’icona della funzione selezio-
nata mentre la parte inferiore indica a sinistra il valore della funzione sele-
zionata, al centro l’icona della funzione selezionata e a destra l’icona della
successiva funzione disponibile.
La prima funzione disponibile è la durata della privacy (massimo 20 ore):
premere ripetutamente o tenere premuto il pulsante “
re o il pulsante “
(segnalato da un bip).
Premere il pulsante “
programmazione successiva.
La seconda funzione è il volume della suoneria: premere ripetutamente o
tenere premuto il pulsante “
decrementare il volume della suoneria ad ogni step (segnalato da un bip).
Premere il pulsante “
programmazione successiva.
La terza funzione è il tipo di suoneria: premere il pulsante “
scoltare e selezionare la suoneria precedente o il pulsante “
re e selezionare la suoneria successiva.
” fino a che il citofono non riproduce la suoneria corrente e
” per diminuire o il pulsante “ ” per incrementare (il
” viene selezionata una nuova suone-
” fino a che il relativo LED inizia a lampeggiare e viene emes-
” il tempo (max 20 ore) viene incremen-
” per diminuire il
” per incrementare.
”.
” per entrare nel menù di programmazione;
” per incrementa-
” per decrementare la durata di mezzora ad ogni step
” per memorizzare il nuovo valore e accedere alla
” per incrementare o il pulsante “ ” per
” per memorizzare il nuovo valore e accedere alla
” per a-
” per ascolta-
VR5178 – How to setup a melody and volume
When the system is in stand-by, press and hold pressed (approx 10 sec-
onds) the button “
the “talk” and “privacy” LEDs illuminate. At the end of current melody
play the intercom emit a beep and the LEDs “talk” and “privacy” start to
flash.
To adjust the volume of the melody, press several times or hold pressed the
button “
emitted beeps vary according to the button pressed).
Each time the button “
selected: the LEDs “talk” and “privacy” stop flashing, the new melody is
played, at the end a beep is emitted and the two LEDs restart to flash.
Repeat the step above to select a new melody otherwise wait approx 3 seconds of idle time (the LEDs turn OFF) without pressing any button to select
the melody played and set the volume adjusted.
VR5178 - Privacy duration programming
Press and hold the “
a beep and the related LED starts flashing.
Each time the“
by 30 minutes (starting from 0 up to a maximum of 20 hours i.e. pressing
the button 6 times = 3 hours up to a maximum of 40 presses for 20 hours).
To set the privacy with no time out do not press the button.
Once the required privacy duration has been reached, wait 3 seconds for
the exit beep.
The new value is now stored.
VR5178 – Speech line volume adjustment
When a conversation is in progress (“speak” LED illuminated), press the
” :
“
OFF.
Press more times or hold pressed the “
volume or the “
Once the required volume level is reached, wait approx 3 seconds of idle
time or press again the “
The “privacy” LED stops flashing and turns OFF while the “talk” LED
turns back ON.
Programming and Adjustments – VR5478
The videomonitor has two different menus for programming and adjustment
functions:
1. One menu operates when the system is in stand-by and allows to set:
2. The second menu operates when the system is turned ON (during a con-
Menu 1
When the system is in stand-by (monitor turned OFF) press and hold
pressed (approx 9 seconds) the “
menu;
The OSD menu appears on the display: the top of the screen shows
“menu” followed by the available function icons, the bottom of the screen
shows the currently selected function value on the left, the currently se-
lected function icon in the middle and the next function icon on the right
side.
The first function available is the privacy duration (max 20 hours): press
as many times or hold pressed the “
button to decrease the duration of a half an hour each step (signalled by a
beep).
Press the “
programming function.
The second function is the melody volume: press as many times or hold
pressed the “
melody volume level (signalled by a beep).
Press the “
programming function.
The third function is the melody type: press the “
select the previous melody or the “
lowing melody.
” to decrease or the button “ ” to increase (the volume of
” button: the “privacy” LED starts flashing and the “talk” LED turns
The privacy duration;
The melody volume;
The melody type;
The number of rings;
versation or a camera recall) and allows to set;
Speech volume;
Brightness;
Contrast;
Hue;
” button to store the new value and to enter the following
” button to store the new value and to enter the following
” until the intercom plays the current melody and
” is pressed, a new melody (9 are available) is
” button (for approx 10 seconds) until the unit emits
” button is pressed, it will increase the privacy duration
” button to decrease the speech
” button to decrease.
” button.
” button to enter the programming
” button to increase or the “ ”
” button to increase or the “ ” button to decrease the
” button to hear and
” button to hear and select the fol-
77
Page 4

VIDEX ELECTRONICS S.p.A. VX2200 “2 WIRE” Bus Digital System
Premere il pulsante “ ” per memorizzare il nuovo valore e accedere alla
programmazione successiva.
La quarta ed ultima funzione di programmazione è il numero di squilli
(max 9): premere ripetutamente o tenere premuto il pulsante “
crementare o il pulsante “
Premere il pulsante “
programmazione, il videocitofono si spegne.
Menù 2
Quando il sistema è acceso (conversazione o auto-accensione) premere il
pulsante “
Il menù OSD si attiva: la parte superiore dello schermo riporta la scritta
“menù” seguita dall’icona della funzione selezionata mentre la parte inferiore indica a sinistra il valore della funzione selezionata, al centro l’icona
della funzione selezionata e a destra l’icona della successiva funzione disponibile.
La prima funzione è il volume della fonia: premere ripetutamente o tenere
premuto il pulsante “
mentare il volume della fonia ad ogni step (segnalato da un bip).
Premere il pulsante “
programmazione successiva.
La seconda funzione è la luminosità: premere ripetutamente o tenere pre-
muto il pulsante “
tare il livello della luminosità ad ogni step (segnalato da un bip).
Premere il pulsante “
programmazione successiva.
La terza funzione è il contrasto: premere ripetutamente o tenere premuto il
pulsante “
contrasto ad ogni step (segnalato da un bip).
La quarta ed ultima funzione è la saturazione: premere ripetutamente o
tenere premuto il pulsante “
decrementare il livello di saturazione ad ogni step (segnalato da un bip).
Premere il pulsante “
programmazione, il monitor torna a mostrare i messaggi standard della
conversazione.
Impostazione indirizzo video/citofono, modo e terminazione video Videomonitor/intercom address, video mode and termination setup
L’indirizzo del citofono/videocitofono è codificato in binario tramite il dipswitch ad 8 vie situato sul retro dell’unità. Ogni switch corrisponde ad un bit
che può essere a 0 (OFF) o 1 (ON), a ciascun bit corrisponde un peso decimale in base alla posizione: Switch 1=decimale 1, 2=2, 3=4, 4=8, 5=16, 6=32,
7=64, 8=128 per impostare l’indirizzo desiderato, mettere ad ON (1) gli
switch la cui somma dei pesi corrisponde al valore dell’indirizzo. Ad esempio, per impostare l’indirizzo 37, mettere ad ON gli switch 1, 3 e 6
(1+4+32=37).
8 7 6 5 4 3 2 1 128 64 32 16 8 4 2 1
” per accedere al menù di programmazione.
” per incrementare o il pulsante “ ” per decrementare il
” per decrementare il numero di squilli.
” per memorizzare il nuovo valore e uscire dalla
” per incrementare o il pulsante “ ” per decre-
” per memorizzare il nuovo valore e accedere alla
” per incrementare o il pulsante “ ” per decremen-
” per memorizzare il nuovo valore e accedere alla
” per incrementare o il pulsante “ ” per
” per memorizzare il nuovo valore ed uscire dalla
Switches - Switch Decimal Weight - Peso Decimale
” per in-
Press the “
programming function.
The fourth and last programming function is the number of rings (max 9):
press as many times or hold pressed the “
” button to decrease the number of rings.
“
Press the “
menu, the monitor turns OFF.
Menu 2
When the monitor is on during a call is turned ON (conversation or cam-
era recall) press the “
The OSD menu appears on the display: the top of the screen shows
“menu” followed by the allowed function icons, the bottom of the screen
shows the currently selected function value on the left, the currently se-
lected function icon in the middle and the next function icon on the right
side.
The first function is the speech volume: press as many times or hold
pressed the “
speech volume level (signalled by a beep).
Press the “
programming function.
The second function is the brightness: press as many times or hold pressed
the “
ness level (signalled by a beep).
Press the “
programming function.
The third function is the contrast: press as many times or hold pressed the
“
level (signalled by a beep).
Press the “
programming function.
The fourth and last function is the hue: press as many times or hold
pressed the “
hue level (signalled by a beep).
Press the “
menu the monitor goes back to shown standard messages for conversation.
Each intercom is addressed in binary (PHONE ID) using the 8 way dipswitches located on the rear of the unit. Each switch corresponds to one bit
which can have a value 0 (OFF) or 1 (ON). Each bit corresponds to a decimal weight depending on the position: Switch 1 = decimal 1, 2=2, 3=4, 4=8,
5=16, 6=32, 7=64, 8=128. I.E. to set the address 37, put switches 1, 3 and 6
on (1+4+32=37).
” button to store the new value and to enter the following
” button to increase or the
” button to store the new value and exit the programming
” button to enter the programming menu.
” button to increase or the “ ” button to decrease the
” button to store the new value and to enter the following
” button to increase or the “ ” button to decrease the bright-
” button to store the new value and to enter the following
” button to increase or the “ ” button to decrease the contrast
” button to store the new value and to enter the following
” button to increase or the “ ” button to decrease the
” button to store the new value and exit the programming
Addr.
Indir.
OFF OFF OFF OFF OFF OFF OFF ON 0 0 0 0 0 0 0 1
OFF OFF OFF OFF OFF OFF ON OFF 0 0 0 0 0 0 1 0
OFF OFF OFF OFF OFF OFF ON ON 0 0 0 0 0 0 1 1
OFF OFF OFF OFF OFF ON OFF OFF 0 0 0 0 0 1 0 0
1
2
3
4
OFF OFF ON OFF OFF ON OFF ON 0 0 1 0 0 1 0 1
37
ON OFF ON ON OFF ON OFF OFF 1 0 1 1 0 1 0 0
Nota: in impianti dove il segnale video viene rilanciato da un videocitofono
al successivo (max 50m in totale) senza utilizzare il distributore video, la
terminazione deve essere disabilitata per tutti i videocitofoni ad eccezione
dell’ultimo seguendo l’ordine di collegamento.
78
Modo Video
Switch 1,2 Modo
Coassiale
Bilanciato
Terminazione video 75 Ohm
Switch 3,4 Terminazione
Abilitata
Disabilitata
Video Mode
Switches 1,2 Mode
Note: on installations where the video cable is in a parallel connection (max
50 metres) between two or more videophones without using the video distributor, the video termination must be disabled on each videophone except
the last linked.
Coax
Balanced
75 Ohm Video Termination
Switches 3,4 Termination
180
Enabled
Disabled
Page 5

VIDEX ELECTRONICS S.p.A. VX2200 “2 WIRE” Bus Digital System
Art.VR5478/VR5178 Segnali morsettiera
Non usato
Uscita +12Vdc per alimentare il distributore video Art.894
Ingresso di alimentazione 15÷20V
Segnale video bilanciato 1
Segnale video bilanciato 2 o segnale video coassiale V (in base ai settaggi per il tipo di segnale video)
Massa segnale video/alimentazione
Uscita stabilizzata +12Vdc – 100mA
Non usato
Non usato
Ingresso +12Vdc
Linea Bus massa
Linea Bus dati
Ingresso attivo basso per funzione “Local Bell” (campanello di piano)
Ingresso attivo basso per segnale di allarme
Uscita open collector per servizio ausiliare
Ingresso +12Vdc per LED porta aperta
Art.VR5178-VR5478 Istruzioni di fissaggio a parete Art.VR5178-VR5478 Wall mounting instructions
Segnale
Signal
T
+VD
+20
V1
V2/V
-
Vo
2
4
+Vi
-
L1
LB
AL5
SB
DL
Art.VR5478/VR5178 Signals on connection board
Not used
+12Vdc output to supply the Art.894 video distributor
+15÷20V power supply input
Balanced video signal 1
Balanced video signal 2 or standard video signal V (according to video
signal settings)
Video signal / power supply Ground
Stabilized +12Vdc - 100mA output
Not used
Not used
+12Vdc power supply input
Bus Ground
Bus data line
Local bell input (active low)
Alarm input (active low)
Auxiliary Service Output (open collector active low)
DL = Door monitor LED input (+12V = ON)
135cm
Fig.1 Fig.2 Fig.3
Proteggere opportunamente i fori di fissaggio della scatola da incasso
quindi murarla lasciando circa 135cm tra la parte inferiore della scatola ed
il pavimento come mostrato in figura 1. Fare attenzione al verso della
scatola (vedi le indicazioni sul fondo della stessa) e a che venga murata
a filo muro finito.
Effettuare le connessioni necessarie come da schema fornito a corredo
serrando i conduttori nella morsettiera con l’ausilio di un giravite a taglio
da 2,5mm. N.B. non lasciare mai che il peso dell’unità (citofo-
no/videocifotono) sia sostenuto dai conduttori ad essa collegati.
Dopo il test dell’impianto, con l’ausilio di una chiave esagonale da 2,5mm,
procedere al fissaggio dell’unità (videocitofono/citofono) alla relativa scatola da incasso come mostrato nelle figure 2 e 3 rispettivamente per la versione video e per quella audio.
Protect the fixing holes of the flush back box from dust then embed the
flush back box into the wall about 135cm between the bottom of the box
and the floor level as shown on the figure 1. Observe the direction of the
box (see instruction on the bottom of the box) and take care that the box
profile is in line with the finished wall profile.
Carry out the required connections as per installation diagram provided.
Fix the wires into the terminals using a 2,5mm flat screw driver. N.B. do
not leave the unit (intercom or videomonitor) hanged so that its weight is
supported only by the wires linked to it.
After testing the system, using a 2,5mm hexagonal spanner, proceed to fix
the unit (videomonitor/intercom) to the relative back box as shown in fig-
ures 2 and 3 respectively for video and audio version.
79
Page 6

92
Page 7

93
 Loading...