

Page 1

66251435-EN - V1.1 - 15/10/16
1
VX2200 Digital System “6 Wire” BUS Video - “2 Wire” BUS Audio
Art.CST2220 - Operating Instructions
Art.CST2220 VX2200 IP Concierge Station GUI instruction sheet
Fig. 1 CST2220 - VX2200 IP Concierge Station
DESCRIPTION
The Art.CST2220 is an IP Concierge station for VX2200 digital systems and is used in conjunction with the Art.2220 IP block interface.
The unit consists of a Voip Android Phone having a 7” Capacitive Touch Display on which is installed the VIDEX concierge application. The CST2220 allows the connection to multiple Art.2220 devices, so one station can manage multiple system installations: the
unit receives all the incoming calls from all the systems to which it is connected, each system can then be independently controlled
by the concierge. For those familiar with the Art.2210 concierge the CST2220 includes all the functionality of this device with many
additional features due to the advanced IP technology used in the Art.2220 interface. In a standard installation the CST2220 would
connect to the same LAN as the Art2220 interface whoever it is also possible to congure communication via WAN to enable a remote concierge installation. The Art.CST220 includes the SERVER to elimination the requirement for an external server on small to
medium installations.
The application can be sub divided into four distinct sections g.2 : the status section
(cyan), the system management section (white), the action section (yellow) and the
buttons section (magenta).
The status section provide information concerning the system operation, the system
management allows the management of calls (incoming or outgoing depend on the
selection made through the call management buttons), the action section shows the
possible actions on the active call and the buttons section allows the system settings,
the call control (incoming call, outgoing call to apartments or doors) and, once an action is established, this area shows the necessary buttons to proceed with the conversation.
Fig. 2 App information areas
ENG
Page 2
66251435-EN - V1.1 - 15/10/16
2
VX2200 Digital System “6 Wire” BUS Video - “2 Wire” BUS Audio
Art.CST2220 - Operating Instructions
Art.CST2220 VX2200 IP Concierge Station GUI instruction sheet
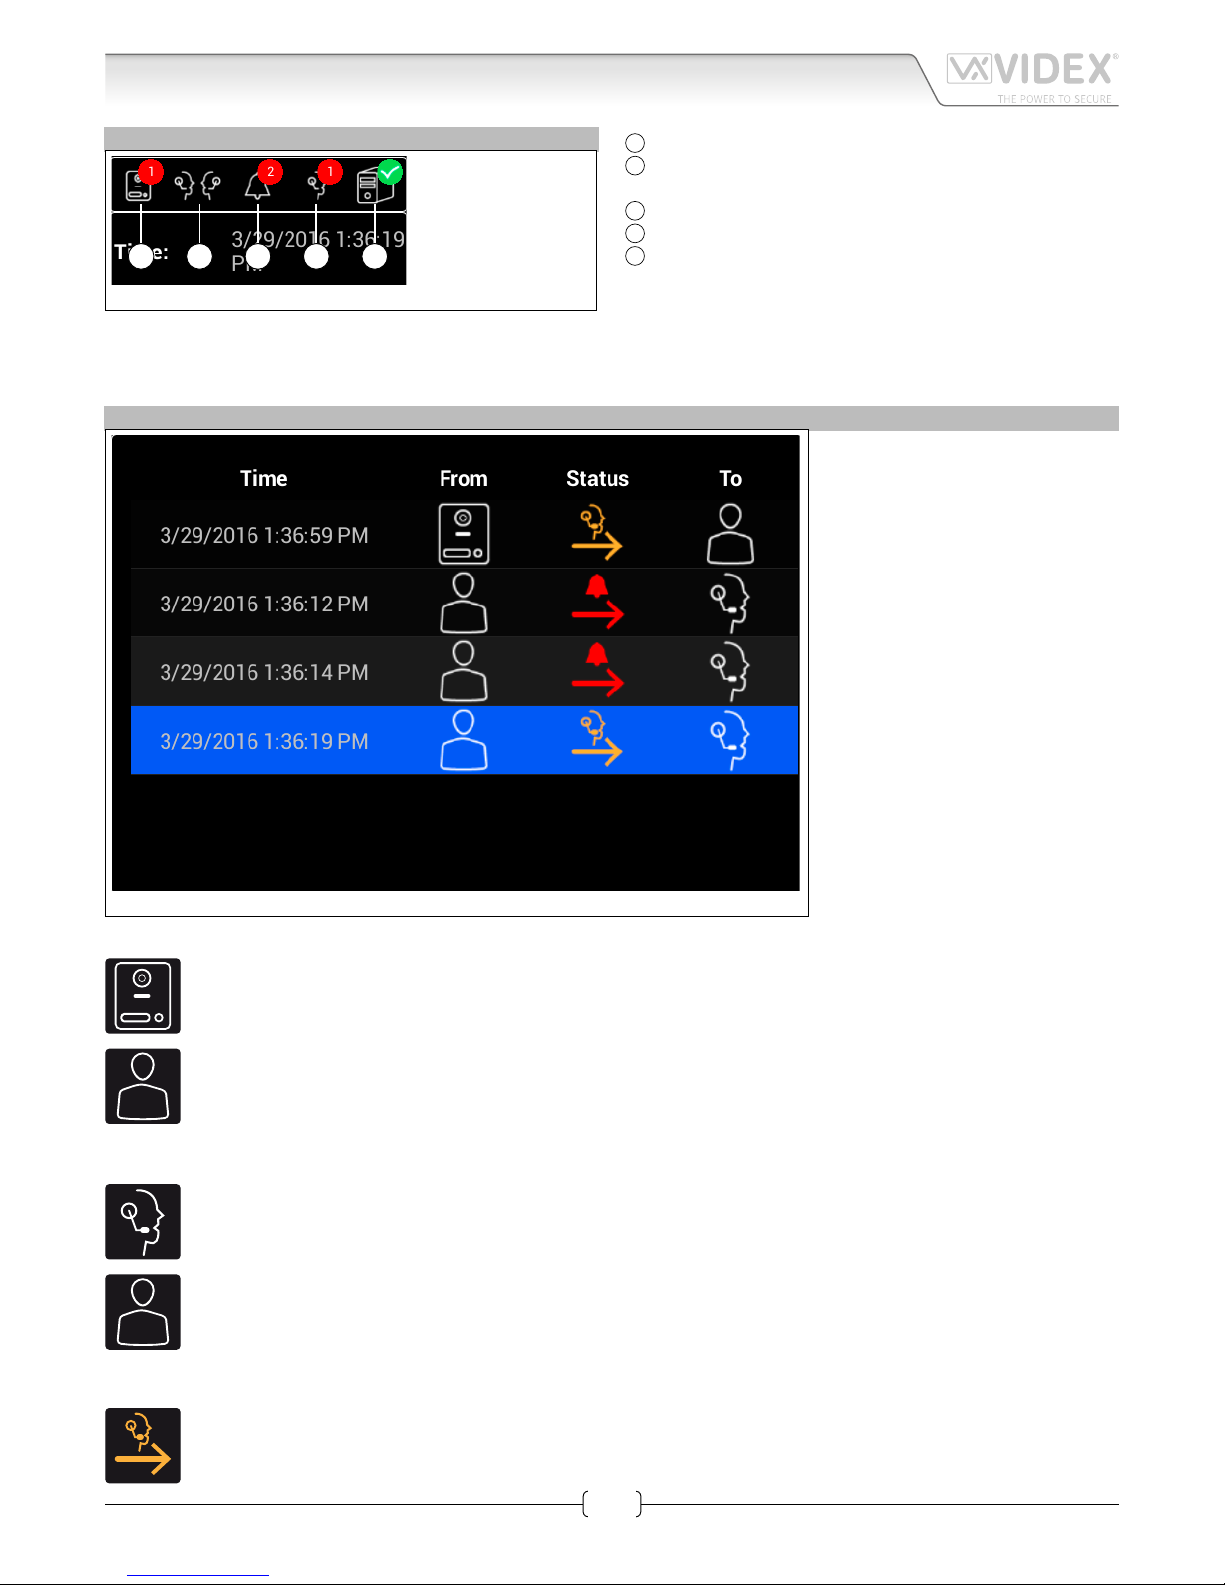
THE STATUS AREA
The status area is the only area that is not interactive and provides information on current call activity and outstanding tasks.
When the unit is in conversation, this area is reduced to show
only essential icons.
A
Indicates call from door panels to be processed.
B
Indicates communication between two concierge units.(not
implemented yet);
C
An indication of alarm signals from apartments.;
D
An indication of calls from apartments;
E
A status indicator of the communication with the serv-
er: white cross on red background in case of fault or white
check sign on green background for good communication.
A B C D E
Fig. 3 The STATUS AREA
THE SYSTEM MANAGEMENT AREA
The content of this area depends on
the selection made through the call
management buttons.
This gure shows the content when the
“Call List” button is pressed: it shows all
incoming calls to the system, showing
the date & time of the call, the source
of the call, the type of the call and the
destination.
When selecting the function “Call Door”
or “Call Apartment”, this area will show
the “Doors” or the “Apartments” relevant to the currently selected Art.2220.
When the system is in conversation,
this area shows the video (Art.2220 video version).
When the “Call List” button is selected
(standard operation), this area shows
all the call active for the complete installation. (all the VX2200 digital systems connected to the concierge).
The column “From” can show the following symbol:
when the source of the call is the door panel;
when the source of the call is the apartment;
The column “To” can show the following symbol:
when the call destination is the concierge unit;
when the call destination is the apartment.
The status column can show the following symbols:
When a call is passed to the concierge and awaiting processing;
Fig. 4 The SYSTEM MANAGEMENT AREA - Call List selected
Page 3

66251435-EN - V1.1 - 15/10/16
3
VX2200 Digital System “6 Wire” BUS Video - “2 Wire” BUS Audio
Art.CST2220 - Operating Instructions
Art.CST2220 VX2200 IP Concierge Station GUI instruction sheet
when an alarm is triggered inside an apartment;
when the call is in the ringing stage. For example when the apartment call is set for “Bypass” or “Divert to Apt” mode or
when the concierge operator forwards the call to the apartment;
when the conversation is in progress. For example when the apartment call is set for “Bypass” or “Divert to Apt” mode; or
when the concierge operator forwards the call to the apartment or during an intercommunication.
THE ACTION AREA
This area shows the possible action according to what is selected in the system management area.
In the case of gure 5 is shown the possible actions when the operator is managing an call from an apartment.
Once the action is selected, the screen changes and the possible actions are
carried out through the buttons in the button area.
When the conversation starts, this area will provide information concerning
the conversation and the operational buttons will be available in the buttons
area.
THE BUTTONS AREA
When the unit is in stand-by, the buttons area shows the buttons of gure 6.
• The “Call List” button manages all the incoming calls from apartments or door panels;
• The “Call Door” button provides a list of door panels to call which are connected to the currently selected Art.2220;
• The “Call Apartments” button provides a list of apartments to call which are connected to the currently selected Art.2220;
• The “Software List” provides a means to check the concierges (software CSW2220 or stations CST2220) that are active in the
system;
• The fth button allows to select the Art.2220 with which the opeator would like to interact. The name shown on the button depends on the descriptive name associated to each Art.2220 during the server conguration. Once the Art.2220 is selected, the
‘Call Door’ & ‘Call Apartment’ buttons will list the available doors and apartments associated with that block.
• The “GEAR” button allows:
» to carry out audio adjustments toward door panels and apartments connected to the currently selected Art.2220 VX2200 IP
INTERFACE;
» to setup the operating mode for the apartments connected to the currently selected Art.2220 VX2200 IP INTERFACE;
» to read information about the devices connected to the system
» to change the parameters about the Follow Me function
This area changes during a conversation to show the button necessary to manage the functions for the active process.
Fig. 5 The ACTION AREA incoming call from apartment
Fig. 6 The BUTTONS AREA in stand-by mode
Page 4

66251435-EN - V1.1 - 15/10/16
4
VX2200 Digital System “6 Wire” BUS Video - “2 Wire” BUS Audio
Art.CST2220 - Operating Instructions
OPERATION
This section describes how the operator can manage all the functions of the concierge.
LAUCH THE APPLICATION & SERVER SETUP
Fig. 7 Launch CST2220 application
Tap on the CST2220 application icon to launch the application (Fig. 7)
Fig. 8 Login Screen SERVER OFF
On the "Login" screen (Fig. 8), if "Run as server" is unchecked, you must enter the SERVER IP Address (Fig. 9) while if the "Run as server"
is checked (Fig. 10), the SERVER IP address input is disabled because the server will run locally on the CST2220.
Art.CST2220 VX2200 IP Concierge Station GUI instruction sheet
Page 5

66251435-EN - V1.1 - 15/10/16
5
VX2200 Digital System “6 Wire” BUS Video - “2 Wire” BUS Audio
Art.CST2220 - Operating Instructions
Fig. 9 Login Screen SERVER OFF server IP address entering
Enter the Server IP address (Fig. 9) then press the login button. The “Please select IP address:” normally should be left as is but in case
of VPN connection you can tap on this eld to select the Ip address of the VPN connection.
Fig. 10 Login Screen SERVER ON
Art.CST2220 VX2200 IP Concierge Station GUI instruction sheet
Page 6

66251435-EN - V1.1 - 15/10/16
6
VX2200 Digital System “6 Wire” BUS Video - “2 Wire” BUS Audio
Art.CST2220 - Operating Instructions
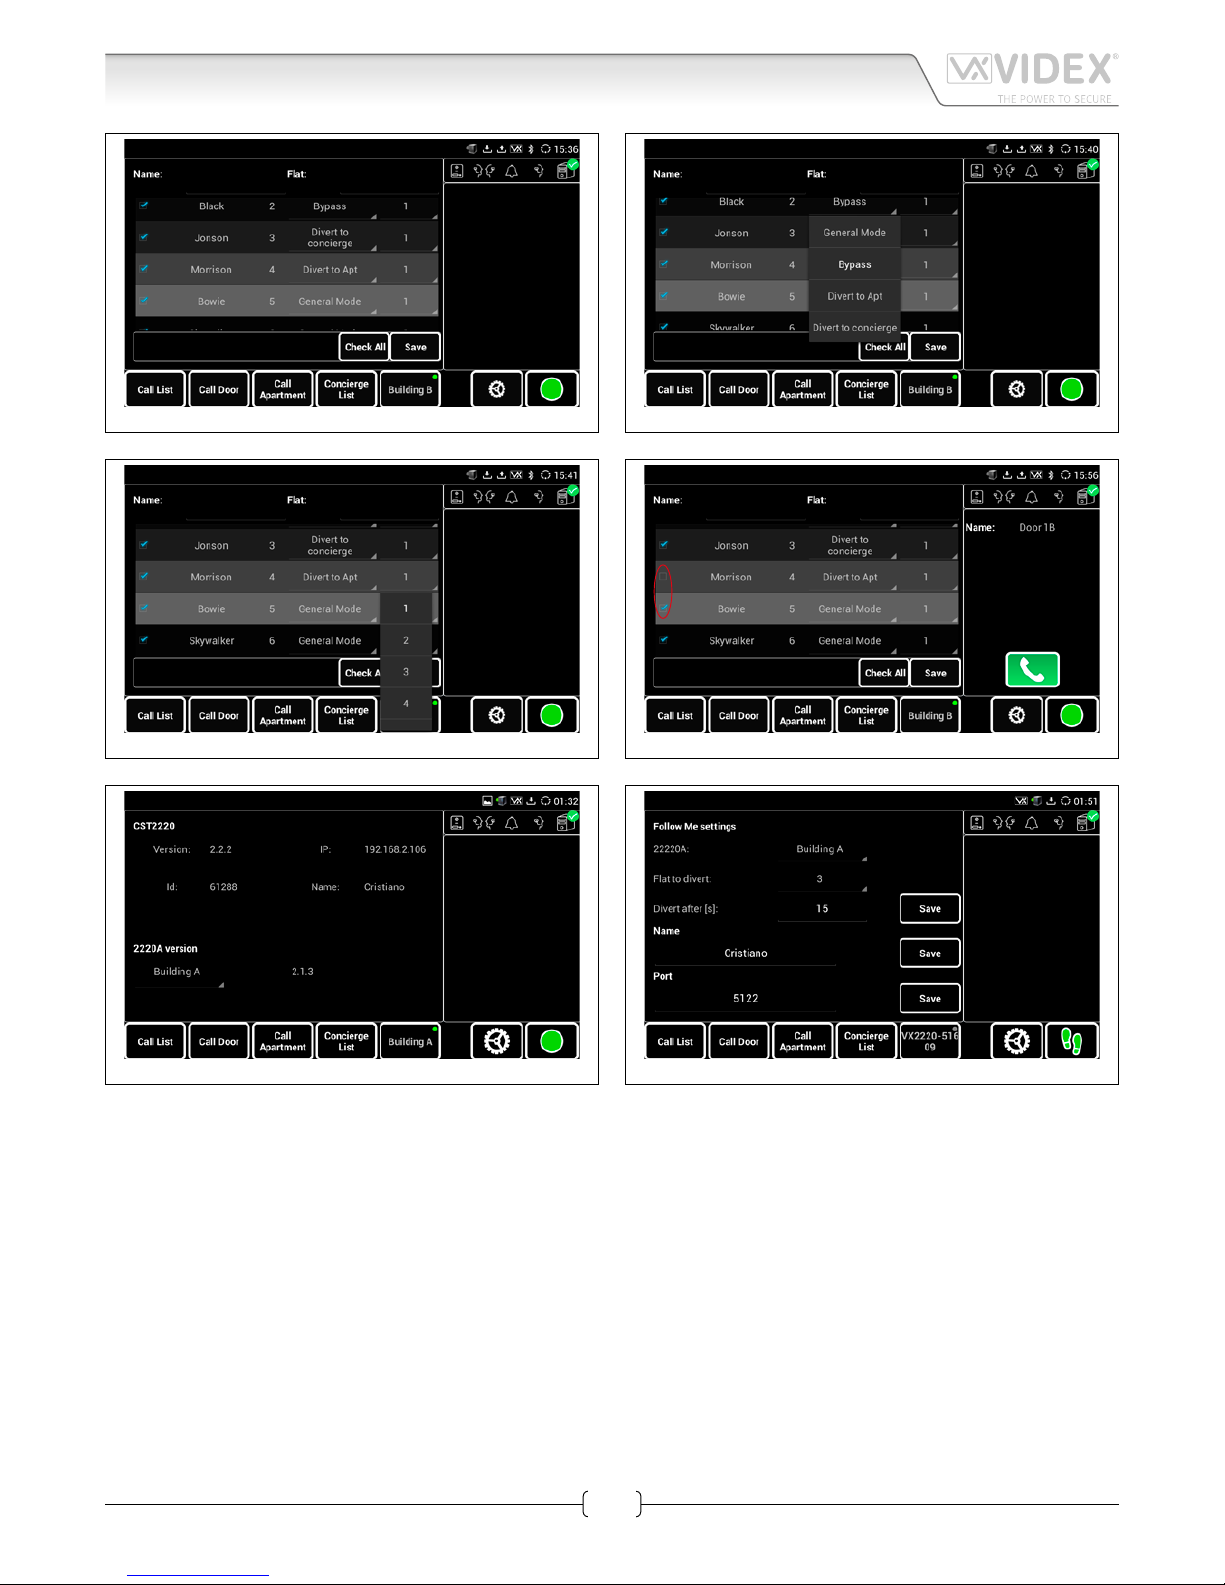
CONCIERGE OPERATING MODE SETUP APARTMENTS SETTINGS AND 2220 SETTINGS
The concierge has 4 operating modes (Fig. 11):
A
In “O Mode”, the concierge can monitor the system (only “call list” button enabled). If all
the concierges on the system are in “O Mode” all the Art.2220 connected to the system
will operate in bypass mode forwarding calls directly to the called apartment;
B
In “Day Mode”, (the standard operating mode) the concierge station can receive and
manage any call (from door panel, from apartment or alarm call) except for those apartments programmed not to call the concierge (“Bypass” or “Divert to Apt”).
C
In “Night Mode”, the concierge station continues to receive any internal call (from apart-
ment because of call or alarm) while for calls from the door panel the concierge can
receive only calls that are specically addressed to it or calls addressed to apartments for
which the “divert to concierge station” is set.
D
In “Follow Me Mode”, any call is diverted to the apartment set in the server (see server
setup manual) for the “follow me” function. Under the setting for the “follow me” function
it is possible to set the divert time. When the concierge station receives a call, it will ring
for the programmed divert time then the call is diverted to the programmed apartment.
All calls are forwarded with the exception of alarm calls which will remain active until
they are managed by one of the active concierges.
The gear button accesses the Art.2220 audio settings and apartment settings:
E
This is a password protected setup. After entered the password (Fig. 13) you have access
to a screen (Fig. 14) that can be used to make a test call to a door panel or an apartment
(connected to the currently selected Art.2220). Make the test call (Fig. 15), adjust the
volume and the echo settings accordingly to obtain the best audio performance then
close the call by the "close call" button (Fig. 16). This setting should be carried out for
each Art.2220 connected to the system.
F
Apartment setup (Fig. 17) allows for each apartment of the currently selected Art.2220
(Fig. 6 fth button) to set the call mode, the divert address and to enable or disable the
booking call. Four call modes are available (Fig. 18):
› General mode - this is the standard call mode and any call to this apartment is in-
tercepted and managed by the concierge.
› Bypass - in this mode the call goes directly to the apartment. The operator of the
concierge unit can view and manage the call if required.
› Divert to Apt - in this mode the call is diverted directly to the divert address set for
the called apartment. To set the divert address press the relevant column of the
corresponding apartment (Fig. 19). The operator of the concierge unit can view see
and manage the call if required.
› Divert to Concierge - in this mode the call is always diverted to the concierge unit
even if the concierge unit is in night mode.
To enable or disable the booking call, check or uncheck the relevant checkbox (Fig. 20).
The “check all” button allows a block selection or de-selection of all the apartment in the
list. If the booking call is disabled, it will be not possible to call the concierge unit from
the apartment. These settings will aect the complete system so are valid for any concierge connected to the system. Press the "Save" button to save the new settings and
exit.
The apartment settings can also be accessed through a web page to the server.
A
B
C
D
Fig. 11 Concierge operating mode setup
E
F
G
H
Fig. 12 Settings
Art.CST2220 VX2200 IP Concierge Station GUI instruction sheetArt.CST2220 VX2200 IP Concierge Station GUI instruction sheetArt.CST2220 VX2200 IP Concierge Station GUI instruction sheet
Page 7

66251435-EN - V1.1 - 15/10/16
7
VX2200 Digital System “6 Wire” BUS Video - “2 Wire” BUS Audio
Art.CST2220 - Operating Instructions
G
This page is composed of 3 sections.
In the rst section the user can set the intercom to forward calls to using the Follow me facility. Settings include:
› 2220A: drop down box to select the ID of the 2220 device
› Flat to Divert: drop down box to select the apartment number to forward the calls to
› Divert After[s]: text box to enter the number of seconds to wait before diverting the call
The settings will be sent and stored on the server when the user clicks the “Save” button.
Notes: Leaving the 2220 ID or Flat To Divert elds empty will disable the divert. Setting the Divert After[S] to zero will allow the
divert to happen immediately.
In the second section its possible to rename the concierge. Click “Save” after editing.
In the last section it’s possible to change the communication port used for communication between the controller and concierge. It may be necessary to change this if the port is used by other devices on the network.
H
This page provides the user with information about the devices on the system. It has two sections, the rst provides information
about the concierge phone where the application is installed.
› Version -> CST2220 software version
› Id -> unique ID of the device
› IP -> ip address
› Name -> name
The seconds section allows the user to retrieve the version of the 2220 rmware: Selecting a device from the menu will display
the rmware version for that device.
Fig. 13 2220 Settings password request
Fig. 14 Test call for volume adjustment
Fig. 15 Test call for volume and echo adjustment
Fig. 16 Test call closed
Art.CST2220 VX2200 IP Concierge Station GUI instruction sheet
Page 8
66251435-EN - V1.1 - 15/10/16
8
VX2200 Digital System “6 Wire” BUS Video - “2 Wire” BUS Audio
Art.CST2220 - Operating Instructions
Fig. 17 Apartment Settings
Fig. 18 Apartment Settings Call Mode
Fig. 19 Apartment Settings Divert Apt
Fig. 20 Apartment Settings Booking Call
Fig. 21 Info
Fig. 22 Phone settings
Art.CST2220 VX2200 IP Concierge Station GUI instruction sheet
Page 9

66251435-EN - V1.1 - 15/10/16
9
VX2200 Digital System “6 Wire” BUS Video - “2 Wire” BUS Audio
Art.CST2220 - Operating Instructions
Art.CST2220 VX2200 IP Concierge Station GUI instruction sheet
CALL LIST CALL MANAGEMENT
Fig. 23 Call List - call management
The call list allows calls that are in progress to be managed. The operator can select the call to manage by tapping it. A call from a
door panel always has priority so in case of concurrent calls the operator is not able to manage internal calls until all external calls have been cleared.
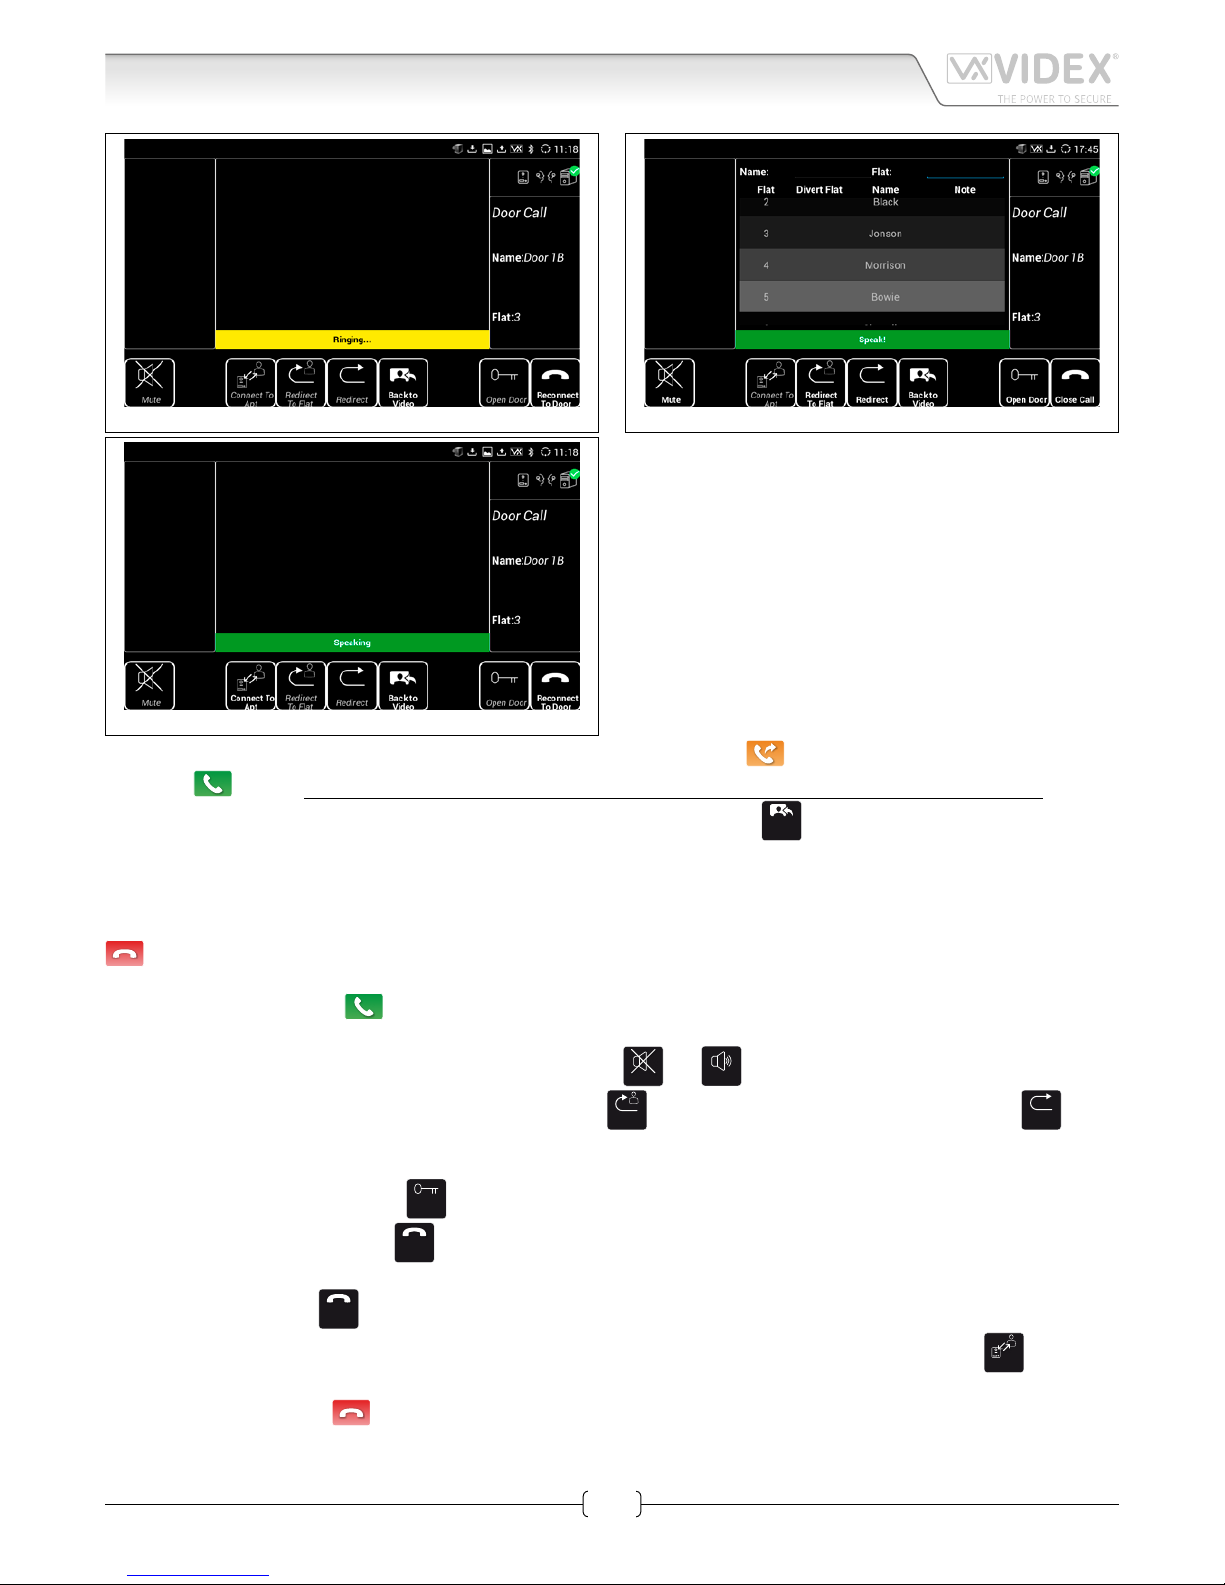
TO MANAGE A CALL FROM A DOOR PANEL
Fig. 24 Call from door panel to concierge
Fig. 25 FORWARDING A CALL to an apartment - ring status
Fig. 26 FORWARDING A CALL to an apartment - conversation status
Fig. 27 ANSWERING A CALL - conversation with door panel
Page 10
66251435-EN - V1.1 - 15/10/16
10
VX2200 Digital System “6 Wire” BUS Video - “2 Wire” BUS Audio
Art.CST2220 - Operating Instructions
Fig. 28 ANSWERING A CALL - apartment ringing after a redirect
Fig. 29 ANSWERING A CALL - Redirect
Fig. 30 ANSWERING A CALL - Connected To Apt
The operator can forward the call directly to the apartment by pressing the button or answer and manage the call by pressing
the button
(Fig. 24). This call management is the same also if the operator intercepts a “bypass” or “divert to apt” call.
During the conversation, the buttons that cannot be used are grayed out. The button
Back to
Video
returns the video to the screen if pressed
after the button like "Redirect" that shows the list of apartments.
FORWARDING A CALL
The call is forwarded to the apartment, rst it will ring (Fig. 25) then when answered, switches to conversation status (Fig. 26).
While the conversation is in progress (Fig. 26), the operator, at any time, can tap on the conversation and cancel it by pressing the
button.
ANSWERING A CALL
Once the operator presses the
button (Fig. 24), the concierge unit is connected with the door panel (Fig. 27).
When the conversation with the door panel is in progress (Fig. 27), the operator can:
Mute or unmute the audio toward the door panel by pressing the
Unmute
and
Mute
buttons;
Redirect the call (Fig. 28) to the called apartment by pressing the
Redirect To
Flat
button or to another apartment by pressing the
Redirect
button
(after pressing the "Redirect" button Fig. 29, select the apartment by browsing the list or searching it by at or name then tap on
the selected line) ;
Open the door by pressing the button
Open Door
;
Close the call by pressing the button
Close Call
.
When the call is redirected to a at and the apartment is ringing (Fig. 28) the operator can take back the communication with the
door panel by pressing the
Reconnect
To Door
button.
Once the apartment answers (Fig. 30) the operator can connect the apartment to the door panel by pressing the
Connect to
Apt
button.
Doing so the concierge unit returns to the same status shown in (Fig. 26) and the operator, at any time, can tap on the conversation
and cancel it by pressing the
button.
Art.CST2220 VX2200 IP Concierge Station GUI instruction sheet
Page 11

66251435-EN - V1.1 - 15/10/16
11
VX2200 Digital System “6 Wire” BUS Video - “2 Wire” BUS Audio
Art.CST2220 - Operating Instructions
Art.CST2220 VX2200 IP Concierge Station GUI instruction sheet
TO MANAGE AN ALARM CALL OR A BOOKING CALL
Fig. 31 Call from apartment - Alarm or Booking call
Fig. 32 Apartment call management
Fig. 33 Alarm call apartment ringing
Fig. 34 Alarm call apartment answer
Fig. 35 Alarm call redirect
Fig. 36 Alarm call redirected
To manage a call from an apartment (Fig. 31) because of an alarm or a booking call, the operator must tap on the call (Fig. 32) then
press the
button to manage it or the button to cancel it. If the cancelled call is a “booking call”, the indoor station, de-
pending on the model, cannot book another call immediately due to a timeout controlled by the apartment intercom.
If the operator press the
button the call is canceled while if the operator press the button, the concierge calls the apart-
ment: the display rst shows “...calling...” while ringing (Fig. 33) then shows “Speak!” (Fig. 34) once the apartment answers.
Duing the call (Fig. 33) or the conversation (Fig. 34), the operator, at any time, can close the call by pressing the
Close Call
button.
Once the apartment answers, the operator can forward the call to another apartment by pressing the
Intercom
button (Fig. 34).
Pressing the
Intercom
button (Fig. 35) presents a list of apartments to direct the call to, either elect from the list by tapping the line or
search by apartment number or name.
Once the call is redirected and the destination apartment is ringing or in conversation, the operator (Fig. 36) can close the conver-
sation by tapping on it and pressing the
button.
Page 12
66251435-EN - V1.1 - 15/10/16
12
VX2200 Digital System “6 Wire” BUS Video - “2 Wire” BUS Audio
Art.CST2220 - Operating Instructions
Art.CST2220 VX2200 IP Concierge Station GUI instruction sheet
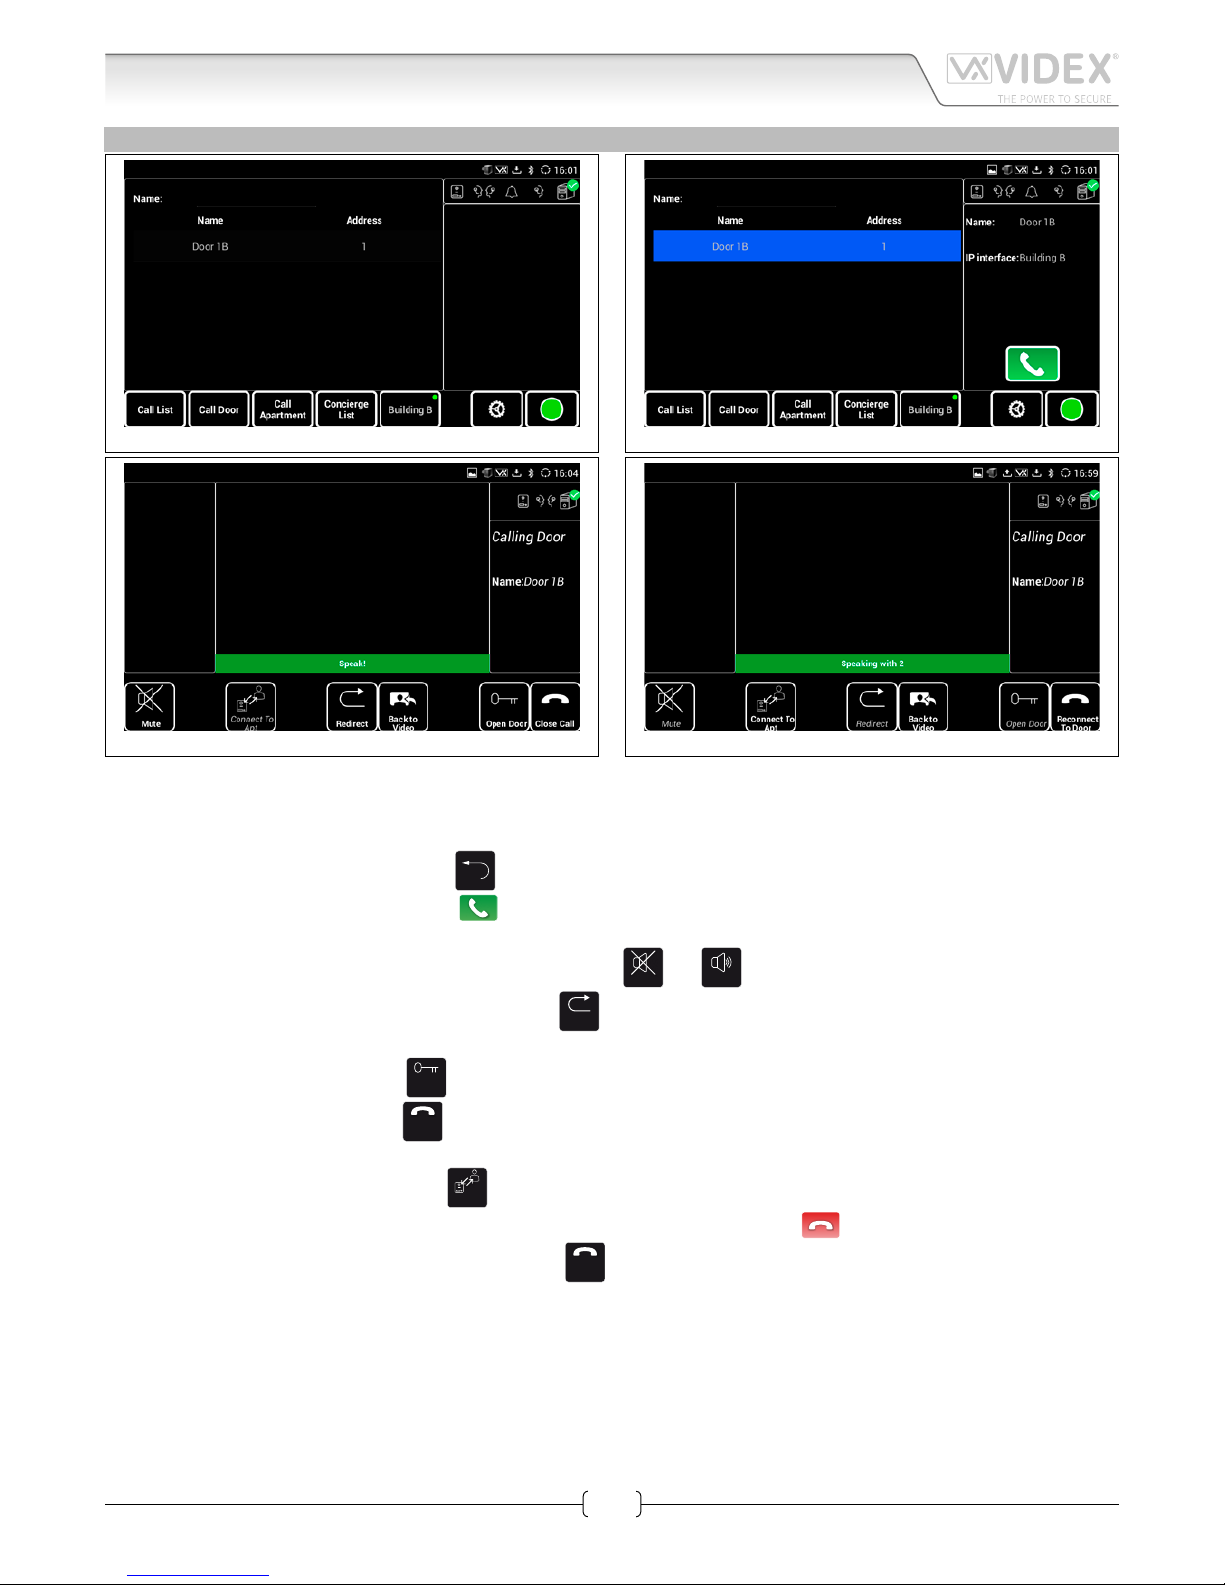
CALL DOOR
Fig. 37 Call Door - Door List
Fig. 38 Call Door - Call selected door
Fig. 39 Call Door - Door Connected
Fig. 40 Call Door - Apt answer after redirect
To call a door, the operator must press the "Call Door" button (Fig. 6 on page 3 second button from left). The screen will show
the list of door panels (Fig. 37) that are connected to the Art.2220 currently selected (Fig. 6 on page 3 fth button from left).
The operator can select the door from the list or search using the name eld (Fig. 37). A keypad will appear when the name eld is
selected. To close the keypad use the button
.
Tap the selected door (Fig. 38) then press the
button.
Once the door is connected (Fig. 39), the operator can:
Mute or unmute the audio toward the door panel by pressing the
Unmute
and
Mute
buttons;
Redirect the connection to an apartment by pressing the
Redirect
button, once pressed Fig. 29 on page 10, select the apartment by
browsing or search it by at or name then tap on the selected line);
Open the door by pressing the button
Open Door
;
Close the connection by pressing the
Close Call
button.
Once the connection is redirected to an apartment and the apartment answers (Fig. 40), the operator can:
Connect the Apt to the door by pressing the
Connect to
Apt
button (the door panel is connected to the apartment as shown in Fig. 26 on page
9 and the operator, at any time, can tap on the conversation and cancel it by pressing the
button ).
Reconnect the concierge to the door panel by pressing the
Reconnect
To Door
button and the concierge goes back to the status shown in Fig. 39
on page 12.
Page 13
66251435-EN - V1.1 - 15/10/16
13
VX2200 Digital System “6 Wire” BUS Video - “2 Wire” BUS Audio
Art.CST2220 - Operating Instructions
Art.CST2220 VX2200 IP Concierge Station GUI instruction sheet
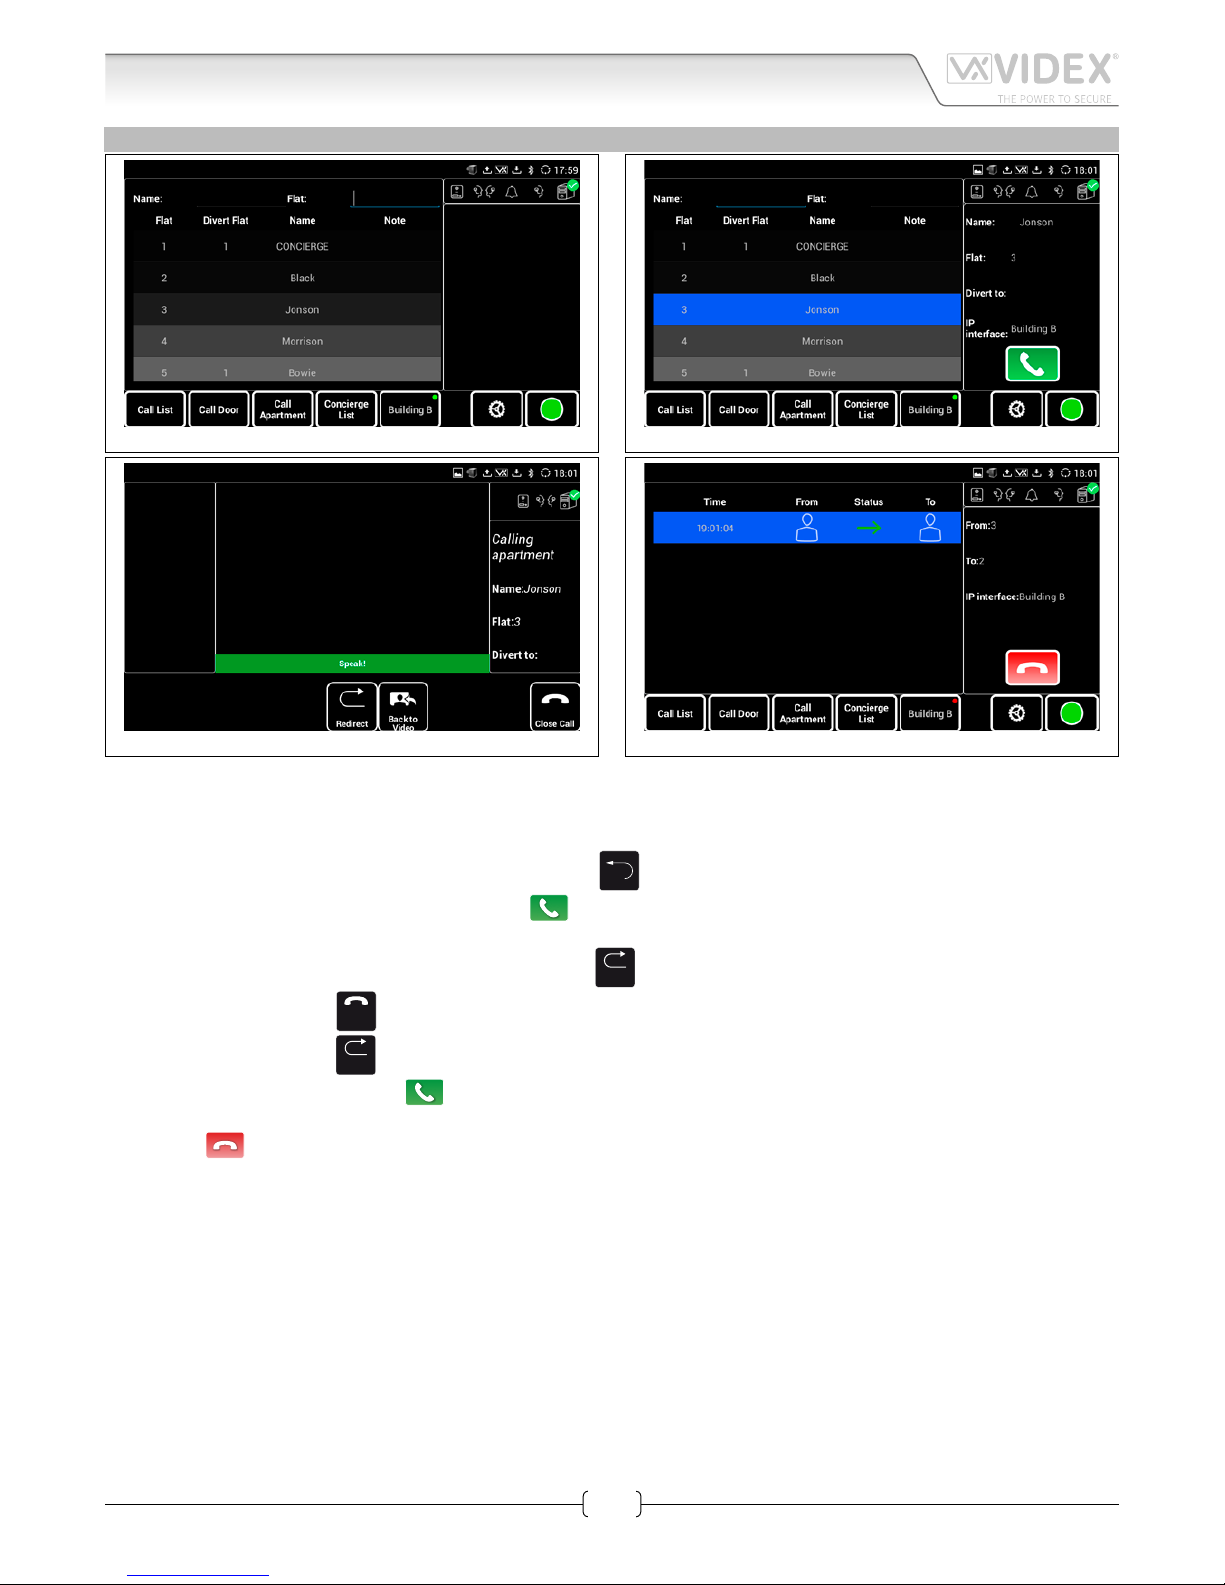
CALL APARTMENT
Fig. 41 Call Apartment - Apartment List
Fig. 42 Call Apartment - Call selected apartment
Fig. 43 Call Apartment - Apartment connected
Fig. 44 Call Apartment - Apartment Intercommunications
To call an apartment, the operator must press the "Call Apartment" button (Fig. 6 on page 3 third button from left). The screen
will show the list of apartments (Fig. 41) that are connected to the Art.2220 currently selected (Fig. 6 on page 3 fth button from
left).
Select the apartment from the list (Fig. 41) or search using the name or at elds at the top of the screen. When searching by name
or at a keypad will appear. To close the keypad use the button
).
Tap on the selected apartment (Fig. 42) then press the
button.
Once the apartment is connected (Fig. 43), the operator can:
Redirect the connection to another apartment by pressing the
Redirect
button to allow intercommunication.
Close the call by pressing the
Close Call
.
When the operator press the
Redirect
button, it will be possible to search for a destination apartment as described above: select the
destination apartment then press the
button to make the call.
Once the intercommunication is in progress (Fig. 44) the operator, at any time, can close the communication by tapping on it then
pressing the
button.
Page 14

66251435-EN - V1.1 - 15/10/16
14
VX2200 Digital System “6 Wire” BUS Video - “2 Wire” BUS Audio
Art.CST2220 - Operating Instructions
ANDROID PHONE OPERATION
To avoid risks of system crash or hang up of the concierge application, it is strongly recommended not to install other applications on the device.
WARNING ! Do not unistall these applications “Bit Web Server” and “CST2220”.
HOW TO SETUP IP ADDRESS
Setting up the IP address:
Fig. 45 press the options button then tap on “System settings”
Fig. 46 tap on “Wireless & network”
Fig. 47 tap on “Ethernet settings”
Fig. 48 tap on “IPv4 settings”
To avoid problems due to the lease time of the DHCP server, it is
strongly recommended to use a static IP address or we suggest to
operate the proper settings on the network router to have DHCP
static lease. Please contact your system administrator for help with
the setup of the IP settings.
Take note of the IP address as this will be needed later when setting up the server at address “http://IP-address:9998/videx”
Fig. 49 edit the IP settings then tap on “OK”
Art.CST2220 VX2200 IP Concierge Station GUI instruction sheet
Page 15

66251435-EN - V1.1 - 15/10/16
15
VX2200 Digital System “6 Wire” BUS Video - “2 Wire” BUS Audio
Art.CST2220 - Operating Instructions
HOW TO RECOVER A CRASH OR HANG UP STATUS
In case of system crash or application hang up, proceed as follows:
Fig. 50 keep pressed the home button untill the screen shows the
open applications.
Fig. 51 tap on the application button
Fig. 52 swipe the nger to the right to select the “DOWNLOADED” tab
Fig. 53 tap on the app shown in gure.
Fig. 54 rst tap on “Force stop” then conrm tapping on “OK”
Fig. 55 press the home icon to go to home screen and restart the
application
Art.CST2220 VX2200 IP Concierge Station GUI instruction sheet
Page 16

66251435-EN - V1.1 - 15/10/16
16
VX2200 Digital System “6 Wire” BUS Video - “2 Wire” BUS Audio
Art.CST2220 - Operating Instructions
WRONG LOGIN PARAMETERS
If after the login you receive the message “Wrong login parameters! Please check Server IP settings” proceed as follows depending
on if ‘Run As Server’ is selected or not:
• if it is unchecked, check the IP address settings following the procedure described on page 14;
• if it is checked, please rst proceed as described on page 15 then follow the procedure below
Fig. 56 press the home button
Fig. 57 tap on the Bit Web Server icon to launch it
Fig. 58 Web and Database servers must be switched on by tapping
on it then tap on settings to verify the “Auto Start” options
Fig. 59 tap on “General conguration”
Fig. 60 Be sure that the “Auto Start” is enabled (orange) for both
servers then press the home button again.
Fig. 61 After starting the bitweb server, tap on the concierge application and restart it
Art.CST2220 VX2200 IP Concierge Station GUI instruction sheet
Page 17

66251435-EN - V1.1 - 15/10/16
17
VX2200 Digital System “6 Wire” BUS Video - “2 Wire” BUS Audio
Art.CST2220 - Operating Instructions
SETTING UP A VPN CONNECTION
We have tested the VPN connection using a Fritz!BOX modem router 7390. The Art.2220 must be connected to the same LAN of
the 7390 and must have an IP address of the same network class. It is expected that the installer knows how to setup a router like
the 7390.
Fig. 62 Access the router, go to the page FRITZ!Box Users then add
a user
Fig. 63 Edit all user parameters then enable vpn connection then
click on “Show VPN Settings”.
Fig. 64 Print the VPN settings that will be used to set a VPN prole
on the concierge station CST2220
Fig. 65 press the options button then tap on “System settings”
Art.CST2220 VX2200 IP Concierge Station GUI instruction sheet
Page 18

66251435-EN - V1.1 - 15/10/16
18
VX2200 Digital System “6 Wire” BUS Video - “2 Wire” BUS Audio
Art.CST2220 - Operating Instructions
Fig. 66 tap on “Wireless & network”
Fig. 67 tap on “VPN”
Fig. 68 tap on “Add VPN prole”
Fig. 69 edit the “VPN prole” with the proper VPN settings Fig. 64 on
page 17 then save
Art.CST2220 VX2200 IP Concierge Station GUI instruction sheet
Page 19

66251435-EN - V1.1 - 15/10/16
19
VX2200 Digital System “6 Wire” BUS Video - “2 Wire” BUS Audio
Art.CST2220 - Operating Instructions
Art.CST2220 VX2200 IP Concierge Station GUI instruction sheet
START A VPN CONNECTION
To start a VPN connection, rst follow the steps as shown in gures Fig. 65 on page 17 to Fig. 67 on page 18. Then proceed as
shown below:
Fig. 70 tap on the VPN connection to start
Fig. 71 tap on “Connect” to start the connection
Fig. 72 the VPN connection is established
Fig. 73 select the IP address of the “VPN” connection
A “VPN” icon on the top right side of the screen shows that the connection is established (Fig. 72).
After the “VPN” connection is established you can RUN the CST2220 application.
When the application starts, select the correct IP address that must be the address assigned by the VPN connection (Fig. 73).
Then set the “server IP address” or check the ag “Run as server” before tapping on the “Login” button.
Note: while the connection to another server requires only to set up the proper IP server address, the “Run as server” option requires that the local server is properly congured and that all the other
devices of the system (interfaces 2220 and any other concierge CST2220 or CSW2220) are congured to point to the server on the VPN connection.
Page 20

MANUFACTURER
VIDEX ELECTRONICS S.P.A.
Via del Lavoro, 1 - 63846 Monte Giberto (FM) Italy
Tel (+39) 0734 631669 - Fax (+39) 0734 632475
www.videx.it - info@videx.it
CUSTOMER SUPPORT
All Countries:
VIDEX ELECTRONICS S.P.A.
www.videx.it - technical@videx.it
Tel: +39 0734-631669 - Fax: +39 0734-632475
UK Customers:
VIDEX SECURITY LTD
www.videx-security.com
Tech Line: 0191 224 3174 - Fax: 0191 224 1559
The product is CE marked demonstrating its conformity and is for distribution
within all member states of the EU with no restrictions. This produc t follows
the provisions of the European Directives 2014/30/EU (EMC); 2014/35/EU
(LVD); 2011/65/EU (RoHS): CE marking 93/68/EEC.
Main UK oce:
VIDEX SECURITY LTD
1 Osprey Trinity Park
Trinity Way
LONDON E4 8TD
Phone: (+44) 0870 300 1240
Fax: (+44) 020 8523 5825
www.videx-security.com
marketing@videx-security.com
Northern UK oce:
VIDEX SECURITY LTD
Unit 4-7
Chillingham Industrial Estate
Chapman Street
NEWCASTLE UPON TYNE - NE6 2XX
Tech Line: (+44) 0191 224 3174
Phone: (+44) 0870 300 1240
Fax: (+44) 0191 224 1559
Greece oce:
VIDEX HELLAS Electronics
48 Filolaou Str.
11633 ATHENS
Phone: (+30) 210 7521028
(+30) 210 7521998
Fax: (+30) 210 7560712
www.videx.gr
videx@videx.gr
Danish oce:
VIDEX DANMARK
Hammershusgade 15
DK-2100 COPENHAGEN
Phone: (+45) 39 29 80 00
Fax: (+45) 39 27 77 75
www.videx.dk
videx@videx.dk
Benelux oce:
NESTOR COMPANY NV
E3 laan, 93
B-9800 Deinze
Phone: (+32) 9 380 40 20
Fax: (+32) 9 380 40 25
www.videx.be
info@videx.be
Dutch oce:
NESTOR COMPANY BV
Business Center Twente (BCT)
Grotestraat, 64
NL-7622 GM Borne
www.videxintercom.nl
info@videxintercom.nl
 Loading...