

Page 1
6200 - 6300 - 6400 - 6700 Series
6200 and 6300 Series Memory Board User Manual
A
B
C
D
E
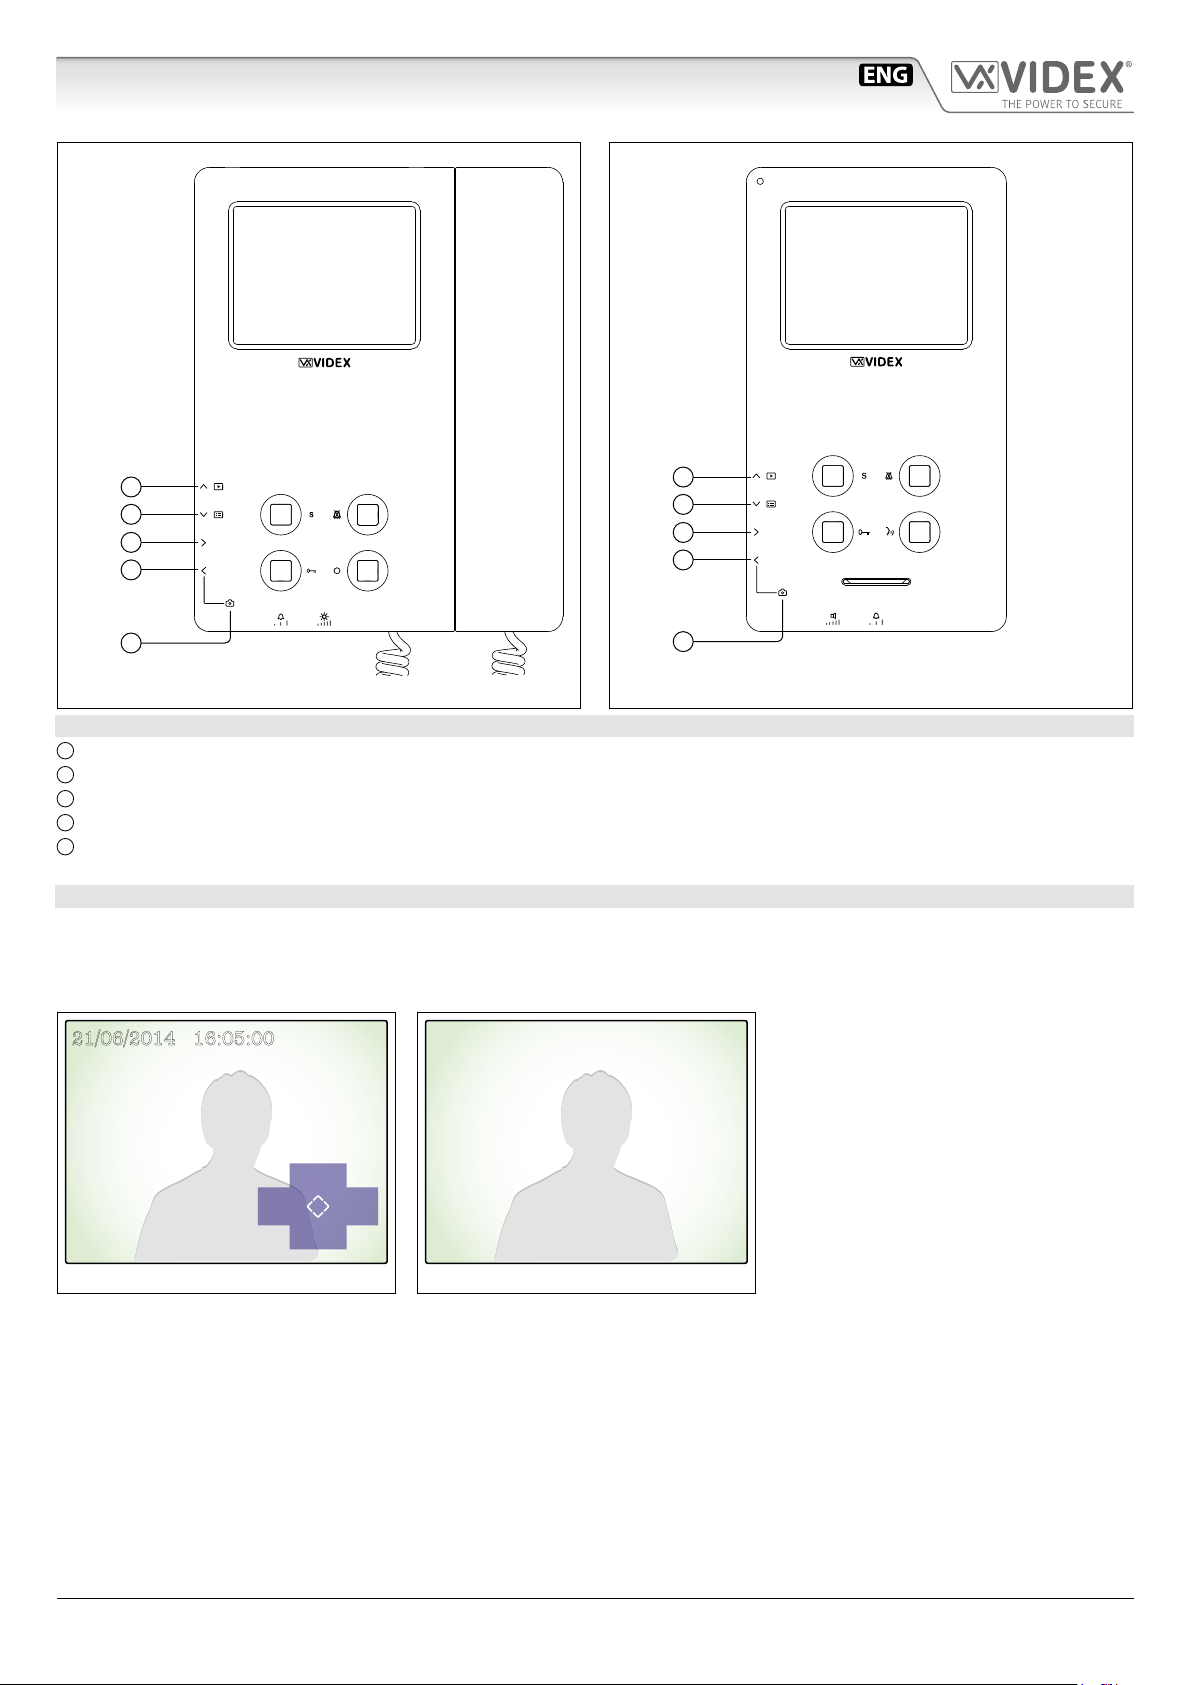
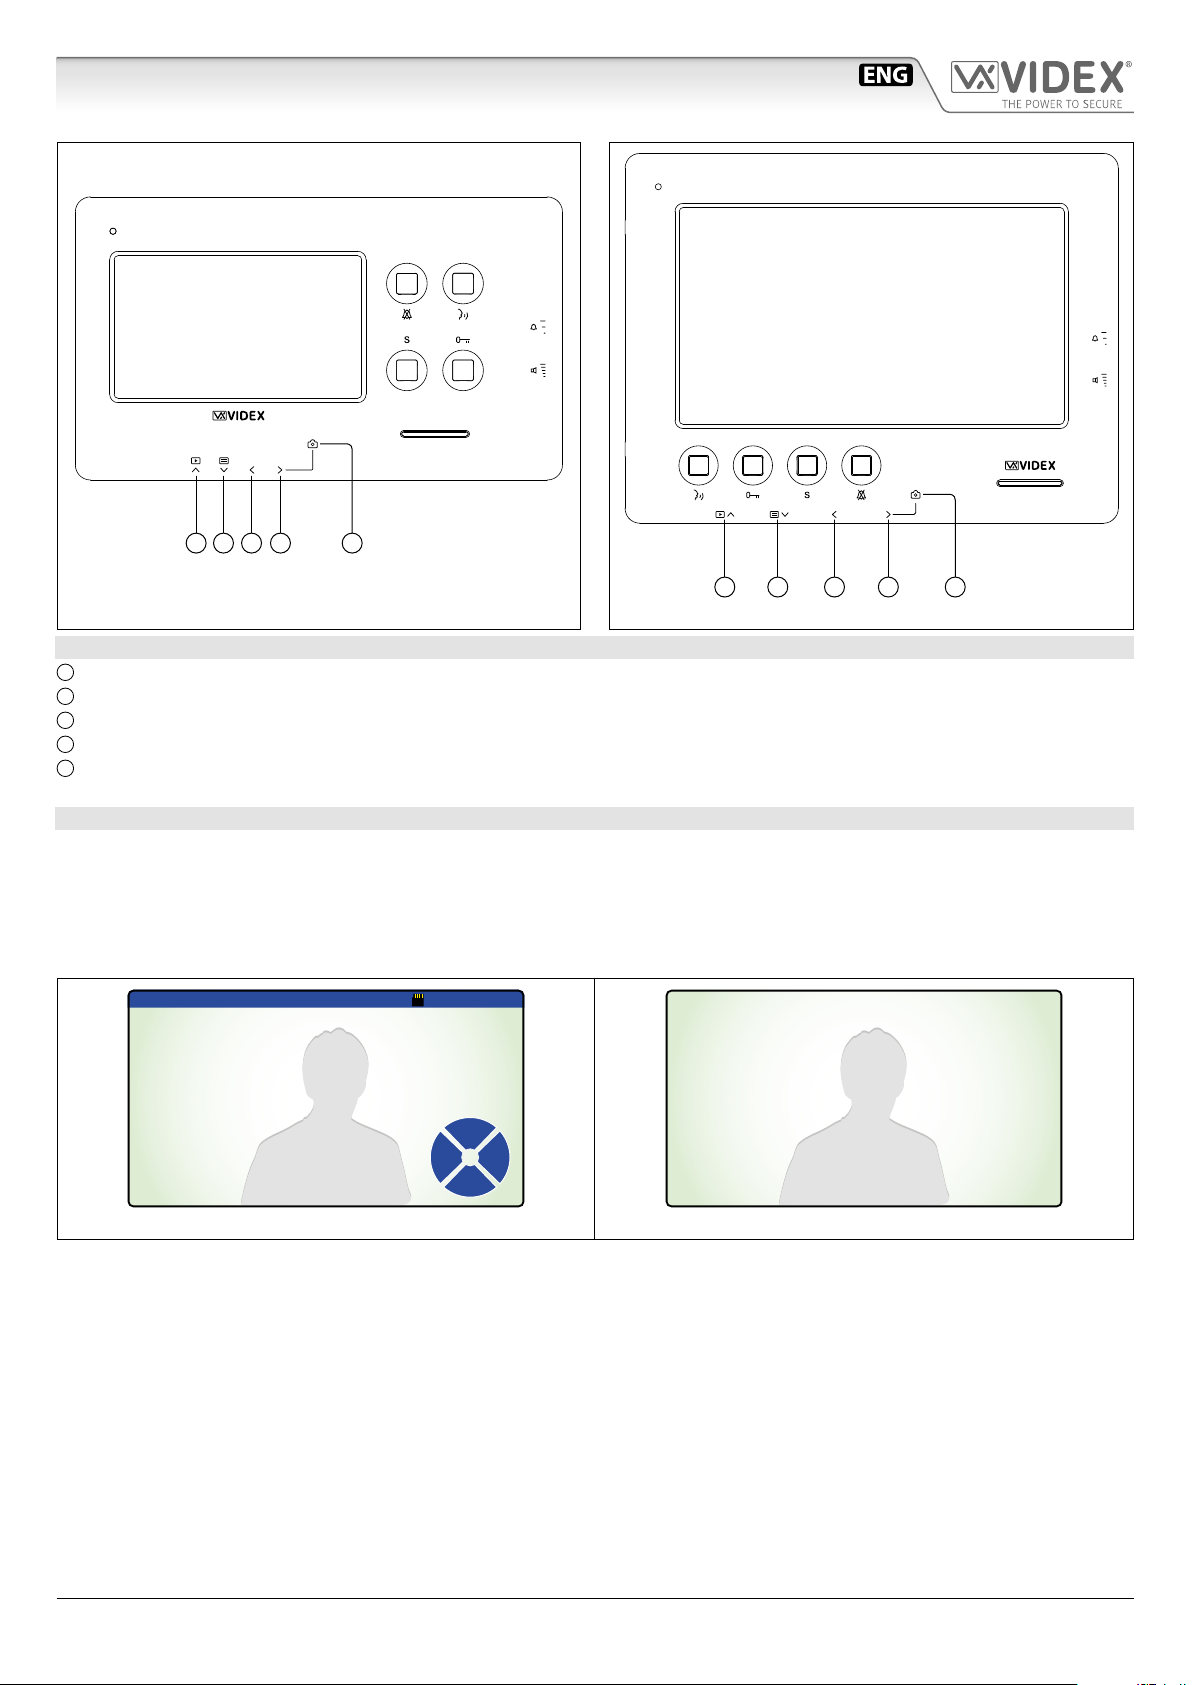
Fig. 1 6200 Series videophones
Fig. 2 6300 Series videophones
A
B
C
D
E
LEGEND
A
Recorded pictures browse button;
B
Screen adjustments and date & time button;
C
Take a picture button;
D
Automatic capture function button (enable/disable);
E
Automatic capture function status LED.
OPERATION
The memory board has 4 management buttons plus one status LED.
When the videophone switches on (answering a call or camera recall), you will see the image as shown in Fig. 3: The live video
image in the background plus the date & time and the function buttons as an overlay, if no buttons are pressed, the overlay will
disappear after a few seconds as shown in Fig. 4. To show the overlay again, press any of the video memory buttons (Fig. 3).
21/06/2014 16:05:00
Memory
Auto Photo
Menu
Fig. 3
Fig. 4
6200 - 6300 - 6400 - 6700 Series - Memory board User manual
- 1 -
66250782 - V2.5 - 30/06/18
Page 2
6200 - 6300 - 6400 - 6700 Series
6200 and 6300 Series Memory Board User Manual
STANDARD FUNCTIONS
Recorded pictures browse button.
Press to browse the recorded pictures. This function is also available when the videophone is in stand-by.
Menu button.
Press it to open a menu with options to adjust picture brightness, contrast, colour, time and date. This function is also
available when the videophone is in standby.
Take a picture button.
During a conversation or when its ringing, press this button to capture a picture.
Automatic capture function button.
Press it to enable the function (the relevant LED turns ON) or press it again (the relevant LED turns OFF) to disable the
function. When the function is enabled, the videophone records a picture each time it is called or recalled. This function
is also available when the videophone is in stand-by.
Automatic capture function status LED.
If the LED is ON the function is enabled. When the LED ashes, it indicates that there is a new picture stored in the videophone memory.
The function of the buttons is contextual to the active menu, the LED shows the status of the automatic capture function (illuminated = ON, not illuminated = OFF) and indicates new photos recorded when it ashes. The ashing for the new photos stops when
you browse the recorded photos and the LED reverts to showing the status of the automatic capture function.
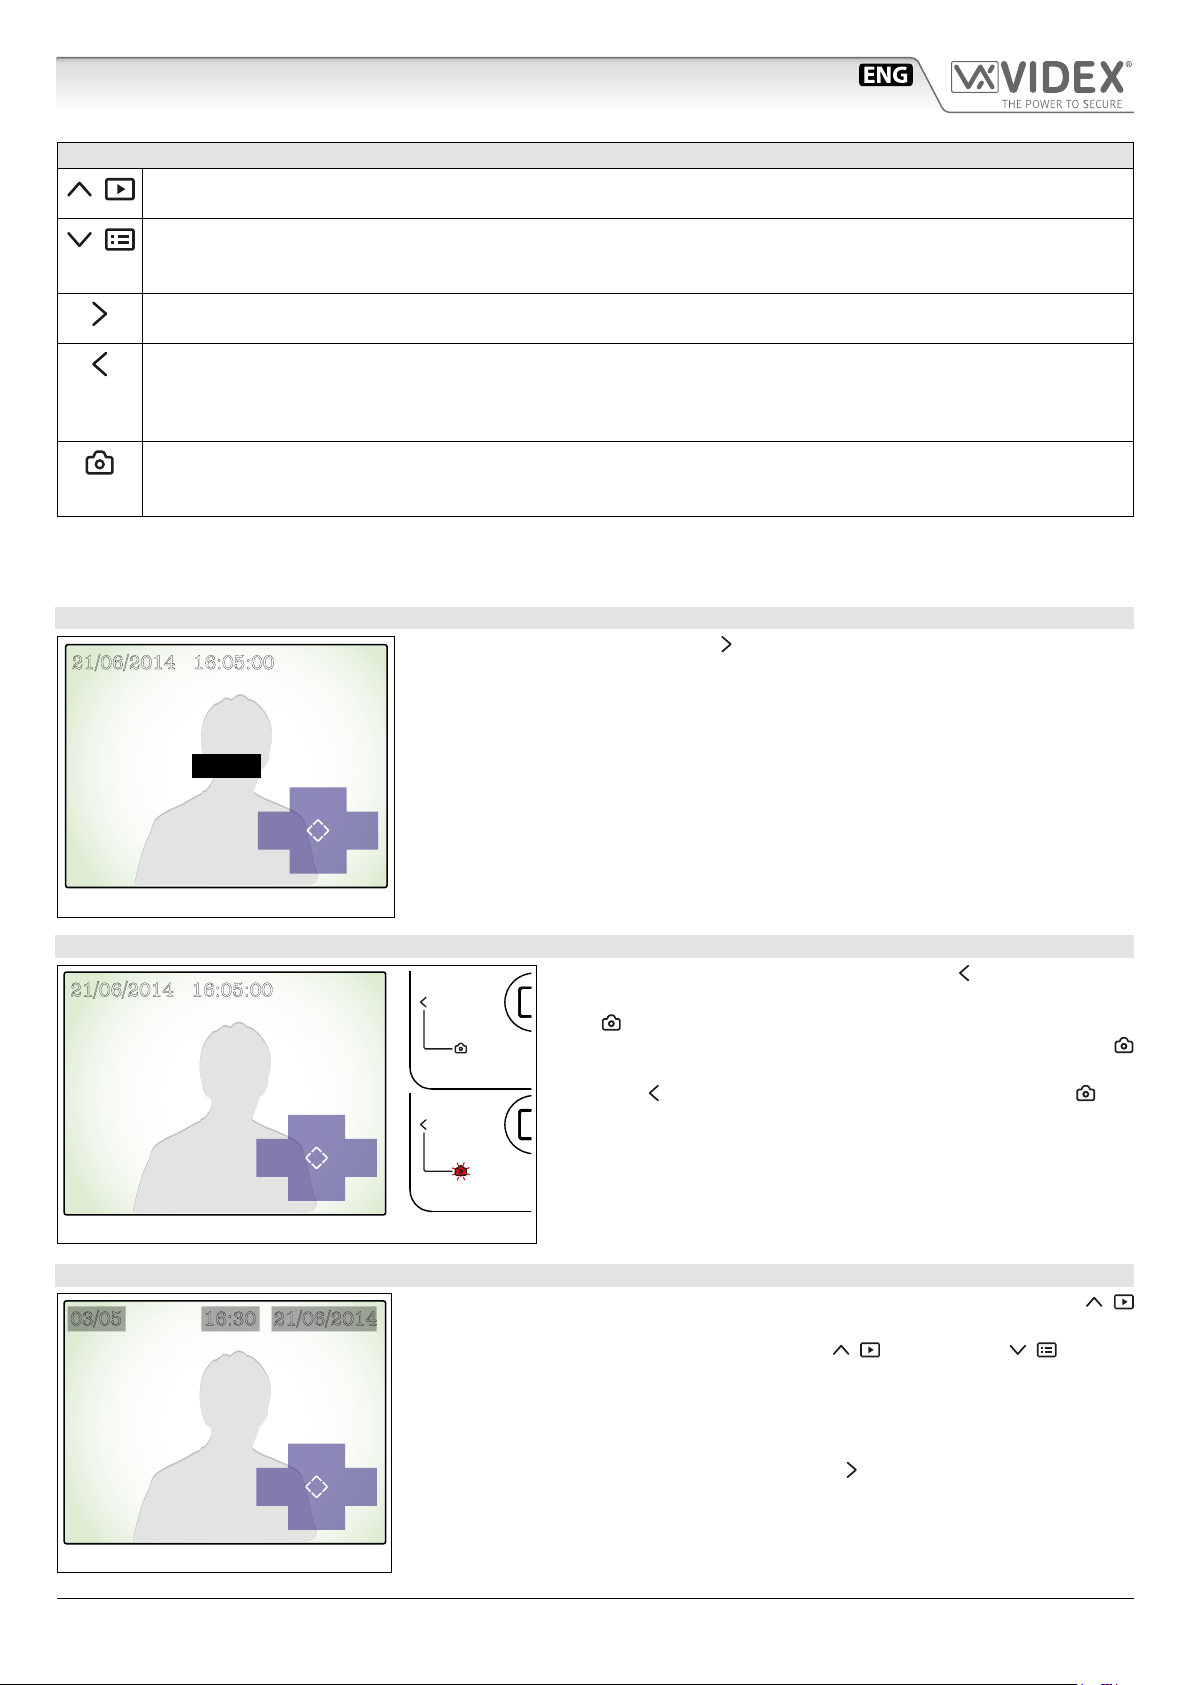
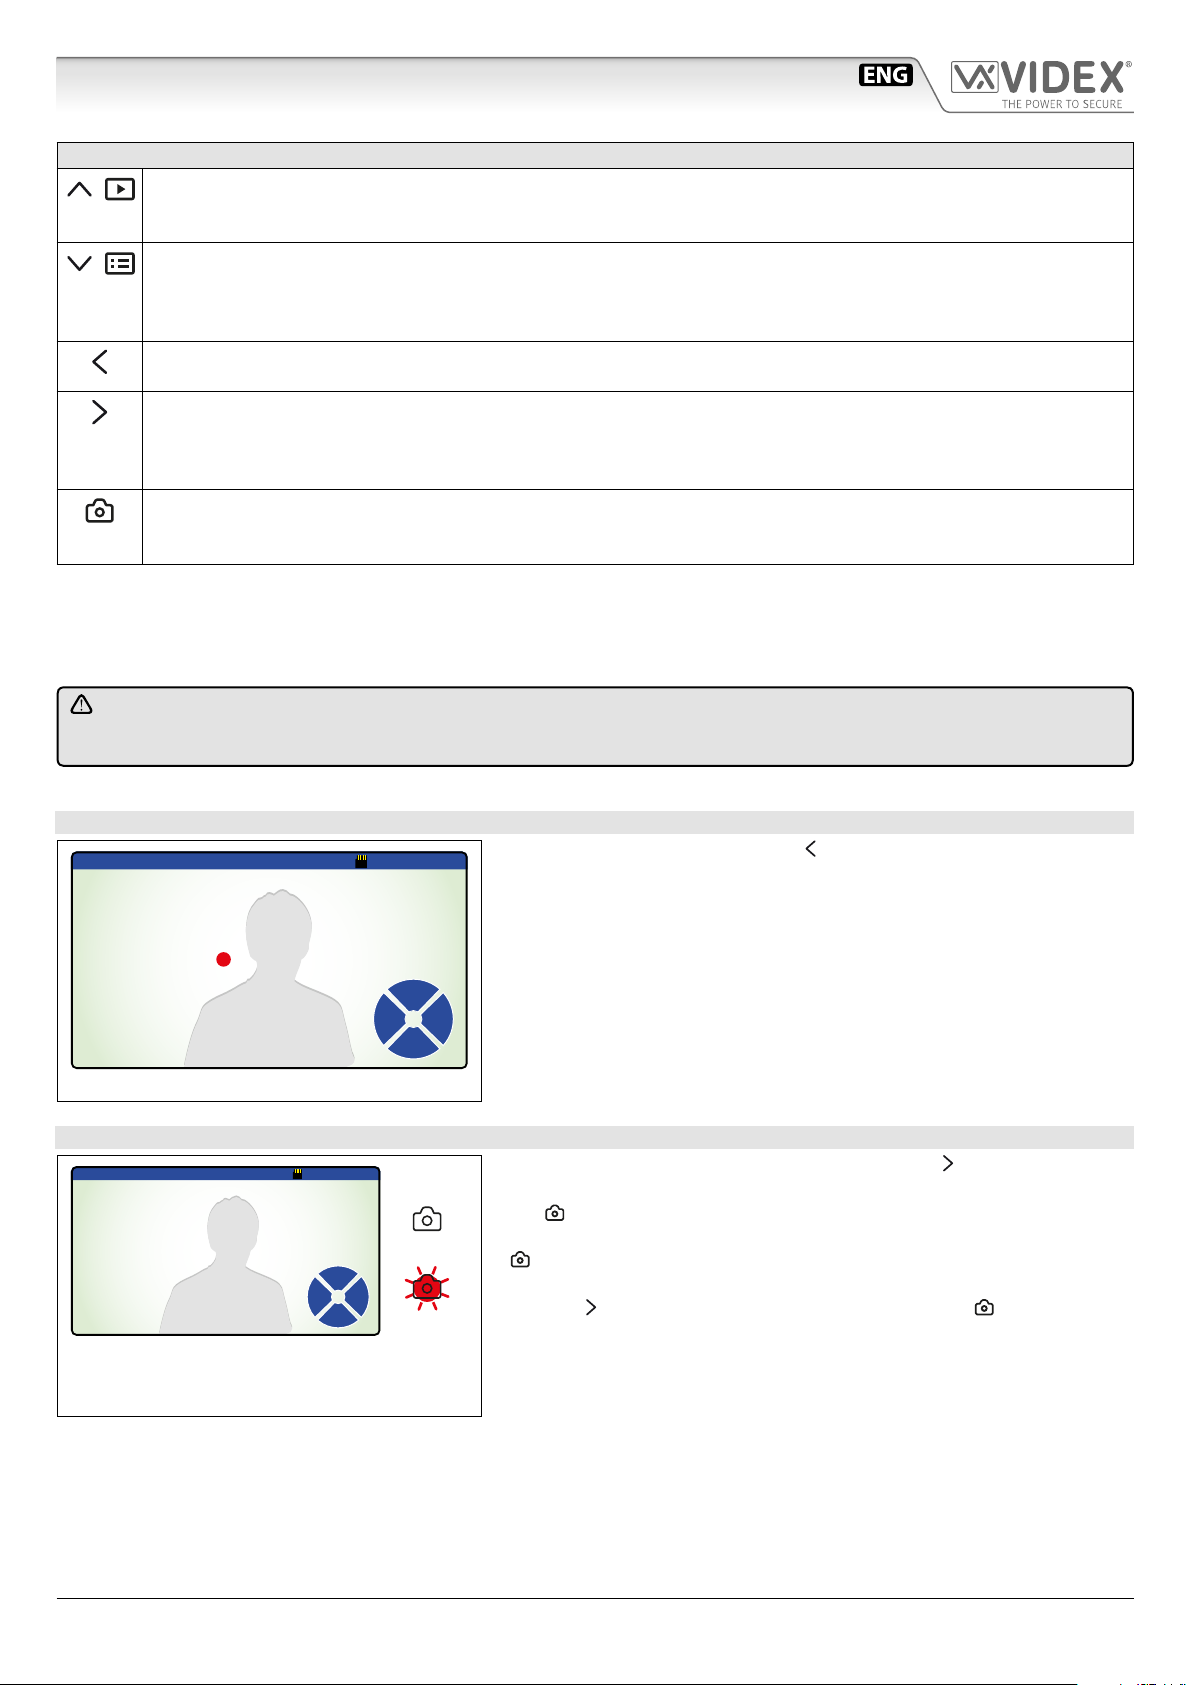
HOW TO RECORD A PICTURE MANUALLY
21/06/2014 16:05:00
During normal operation press the
During the recording, the display shows the message “REC” in the middle of the screen
(Fig. 5).
(Photo) button to instantly take a picture.
•
REC
Memory
Auto Photo
Menu
Fig. 5
HOW TO ENABLE AUTOMATIC PHOTO RECORDING
21/06/2014 16:05:00
Memory
Auto Photo
Menu
Fig. 6
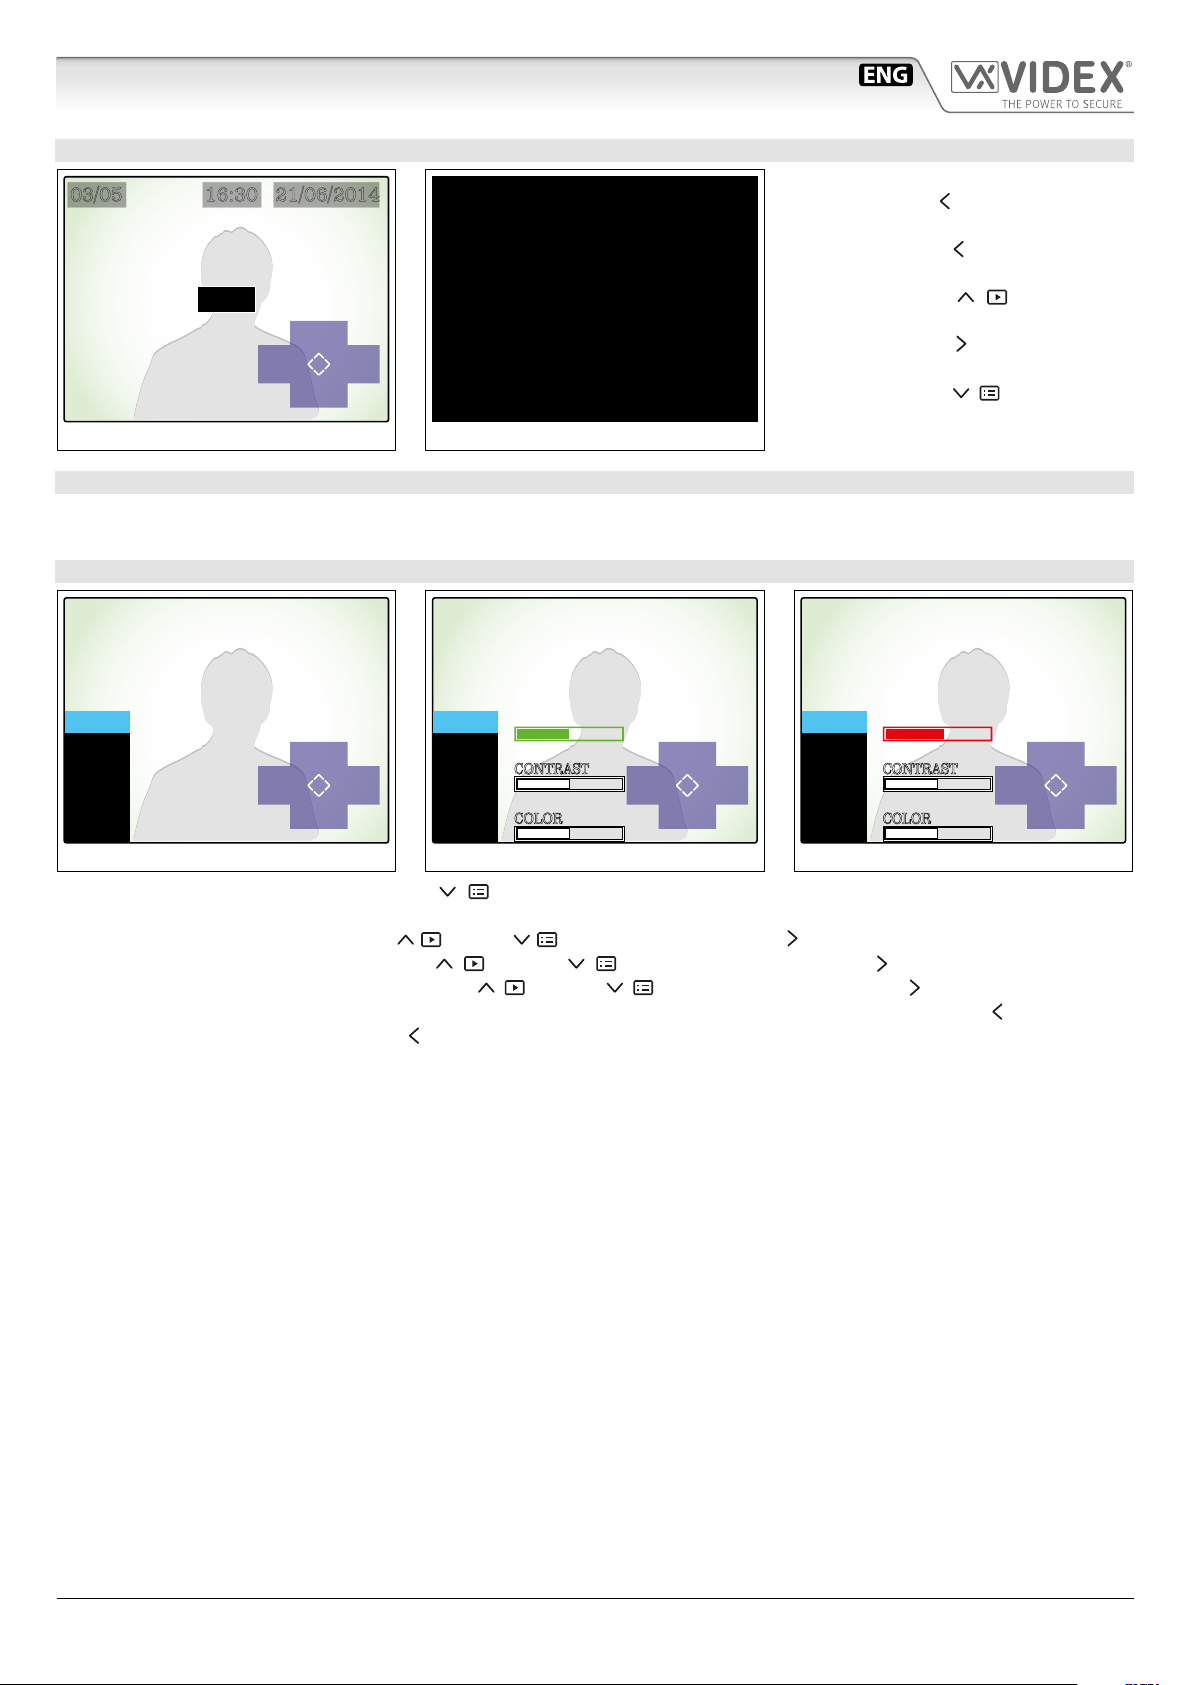
HOW TO BROWSE STORED PICTURES
03/05 16:30 21/06/2014
Previous
Next
Stop
Quit
Del
During normal operation or with the videophone in stand-by, press the button
(Memory) to enter the browsing mode (Fig. 7).
Once you are in browsing mode, use the buttons (Previous) and (Next) to
browse forward or backward through the stored pictures. At the top of the screen an
index number of the picture is shown with the time and date of recording. The index
shows both the number of the current picture and the total number of pictures stored
(max 100).
To go back and exit from browsing mode press the button (Stop Quit).
From the status shown in Fig. 6, press the button
(Auto) to enable the
automatic capture. A picture will be taken for each call or camera recall.
The LED will turn ON to indicate that the function is enabled. If a
new picture is stored by the automatic capture function, the LED
will ash until the image is viewed.
Press the (Auto) button again to disable the function, The LED
will turn OFF.
This function is also available when in standby.
Fig. 7
6200 - 6300 - 6400 - 6700 Series - Memory board User manual
- 2 -
66250782 - V2.5 - 30/06/18
Page 3
6200 - 6300 - 6400 - 6700 Series
6200 and 6300 Series Memory Board User Manual
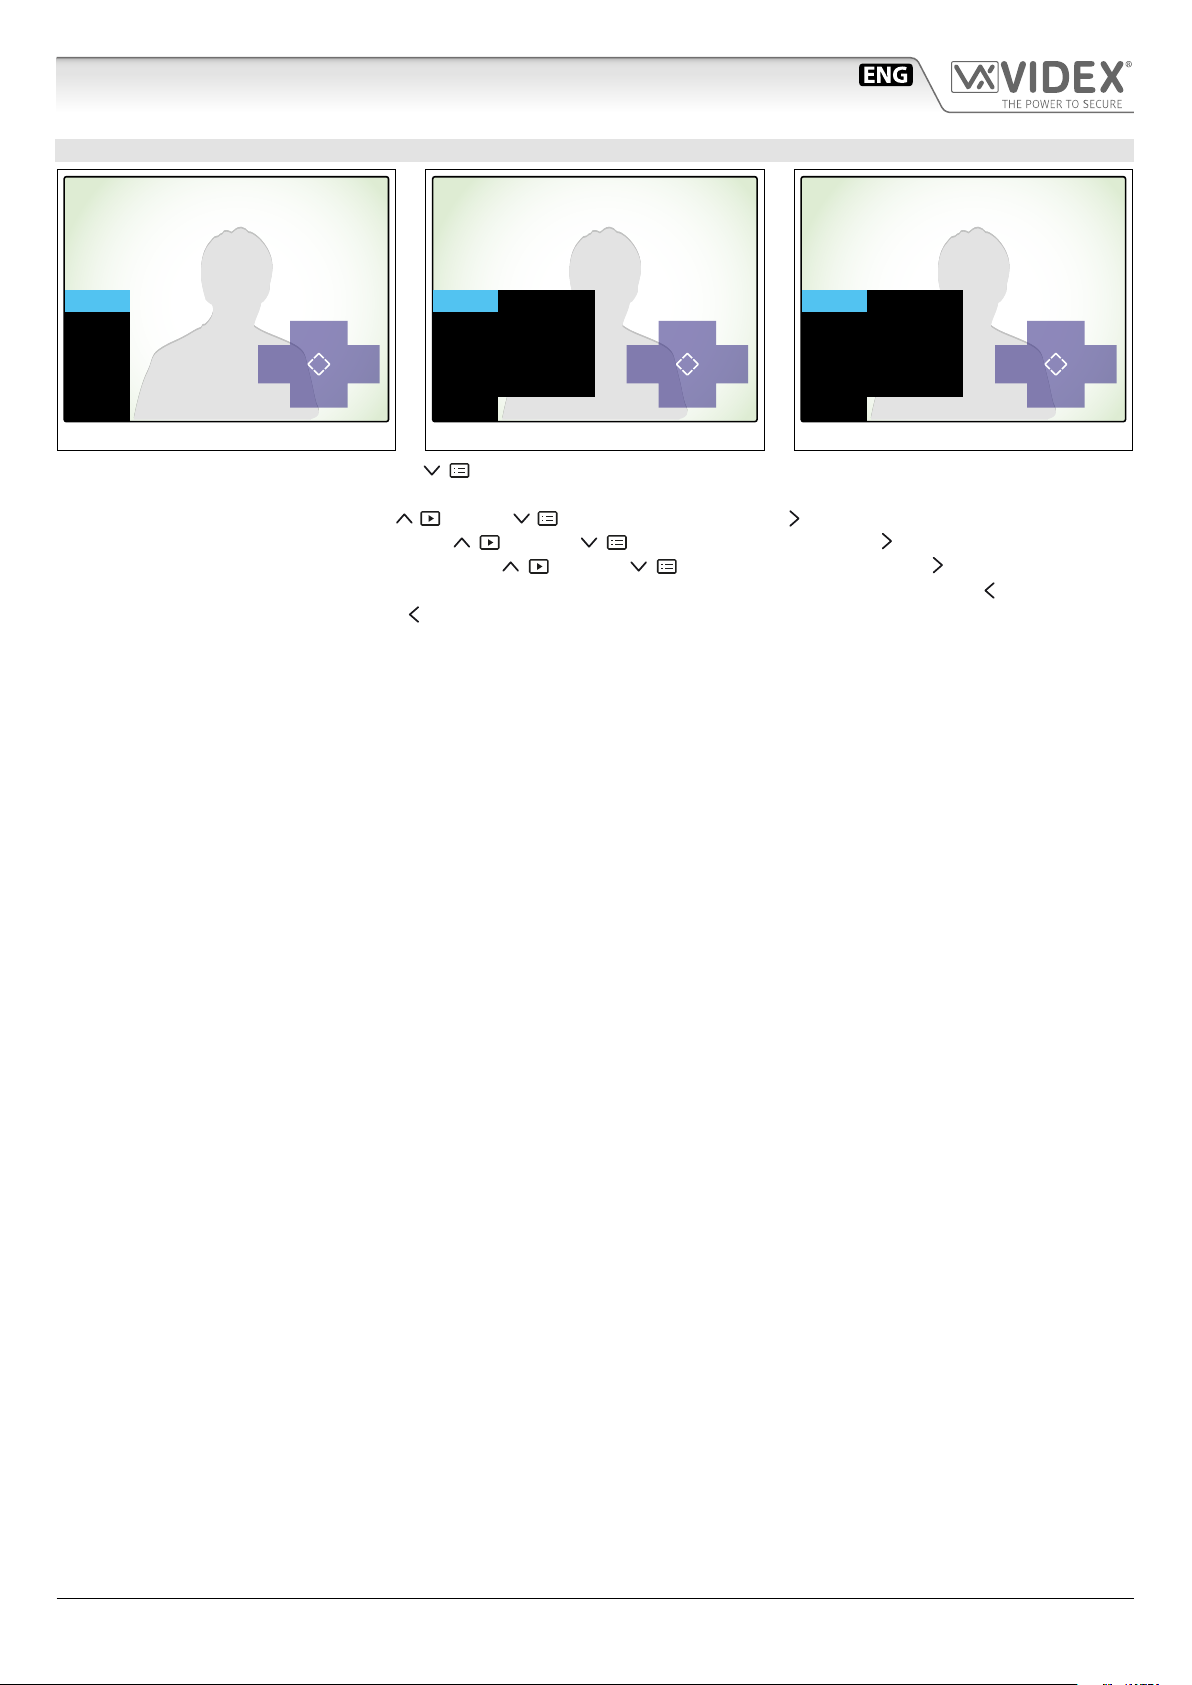
HOW TO DELETE ONE OR MORE STORED PICTURES
03/05 16:30 21/06/2014
DEL?
Del
Quit
Del
All?
Fig. 9
No
Fig. 8
BUILTIN MEMORY MANAGEMENT
When the memory is full, the next picture will delete the oldest (First-In-First-Out).
Picture memory capacity: 100 pictures.
HOW TO ADJUST THE DISPLAY
DELETING
When you are in browsing mode (Fig. 7)
press the button (Del) to enter the delete mode (Fig. 8).
• Press the button (No) to go back and
cancel the deletion;
• Press the button (Del) to delete
the currently selected picture;
• Press the button (Del All ?) to delete
all the pictures (Fig. 9);
• Press the button (Quit) to quit.
NOTE: THE DELETE OPERATION IS
IRREVERSIBLE!
MENU
DISPLAY
TIME
EXIT
Fig. 10
Up
Quit Enter
Down
MENU
DISPLAY
TIME
EXIT
Fig. 11
BRIGHTNESS
CONTRAST
COLOR
Up
Quit Enter
Down
MENU
DISPLAY
TIME
EXIT
Fig. 12
BRIGHTNESS
CONTRAST
COLOR
Up
Quit Enter
Down
• From the status of Fig. 4, press the button (Menu) to open the menu (Fig. 10) that allows the display adjustments and
allows to set the date & time.
• Select the “DISPLAY” option by the buttons (Up) and (Down) then press the button (Enter) to open the 2nd menu level (Fig. 11);
• Select the parameter to set by the buttons (Up) and (Down) then press the button (Enter) to edit the parameter
selected (Fig. 12), alter the value by the buttons (Up) and (Down) then press the button (Enter) again (Fig. 11);
• To alter other parameters restart the point above otherwise exit from the display menu by pressing the button (Quit);
• To exit from the menu, press the button (Quit).
6200 - 6300 - 6400 - 6700 Series - Memory board User manual
- 3 -
66250782 - V2.5 - 30/06/18
Page 4
6200 - 6300 - 6400 - 6700 Series
6200 and 6300 Series Memory Board User Manual
HOW TO SET DATE & TIME
MENU
DISPLAY
TIME
EXIT
Fig. 13
Up
Quit Enter
Down
MENU
DISPLAY
TIME
EXIT
Fig. 14
DAY
MONTH
YEAR
HOUR
MINUTE
21
06
14
16
05
Up
Quit Enter
Down
MENU
DISPLAY
TIME
EXIT
Fig. 15
DAY
MONTH
YEAR
HOUR
MINUTE
21
06
14
16
05
Up
Quit Enter
Down
• From the status of Fig. 4, press the button (Menu) to open the menu (Fig. 13) that shows the display adjustments and time
and date settings.
• Select the “TIME” option using the buttons (Up) and (Down) then press the button (Enter) to open new menu (Fig. 14);
• Select the parameter to set using the buttons (Up) and (Down) then press the button (Enter) to edit the parameter
selected (Fig. 15), alter the value using the buttons (Up) and (Down) then press the button (Enter) again (Fig. 14);
• To alter other parameters repeat the steps above otherwise exit from the “TIME” menu by pressing the button (Quit);
• To exit from the menu, press the button (Quit).
6200 - 6300 - 6400 - 6700 Series - Memory board User manual
- 4 -
66250782 - V2.5 - 30/06/18
Page 5
6200 - 6300 - 6400 - 6700 Series
6400 and 6700 Series Memory Board User Manual
A B C D E
A B C D E
Fig. 1 6400 Series videophones
LEGEND
A
Browse function button;
B
Menu button;
C
Instantly recording function button;
D
Automatic capture function button (enable/disable);
E
Automatic capture status LED.
Fig. 2 6700 Series videophones
OPERATION
The memory board has 4 management buttons plus one status LED.
When the device switches on (answering a call or camera recall), the image in Fig. 3 will appear: the live video in the back ground
with an overlay showing the time & date, MicroSD card icon and the function buttons.
The overlay information will disappear after a few seconds if no buttons are pressed as shown in Fig. 4.
To show the overlay again, press any of the video memory buttons (Fig. 3).
2016-07-28 09:46:10
Memory
AutoPhoto
Menu
Fig. 3 Fig. 4
6200 - 6300 - 6400 - 6700 Series - Memory board User manual
- 5 -
66250782 - V2.5 - 30/06/18
Page 6
6200 - 6300 - 6400 - 6700 Series
6400 and 6700 Series Memory Board User Manual
STANDARD FUNCTIONS
Browse function button.
Press to browse the recorded pictures or videoclips.
This function is also available when the device is in stand-by.
Menu button.
Press to enter in a menu with the option of either still pictures or videoclips, copy les from built-in memory to MicroSD
card and formatting it (if present), adjust the monitor brightness, contrast and colour, set the current date and time.
This function is also available when the unit is in stand-by.
Instantly record function button.
Press it to record a picture or videoclip of the currently shown video during a conversation or while the videophone is ringing.
Automatic recording function button.
Press it to enable the function (the relevant LED turns ON) or press it again (the relevant LED turns OFF) to disable the function.
When the function is enabled, the device records a picture or videoclip (depending on settings) for every call or camera
recall. This function is also available when the device is in stand-by.
Automatic recording function status LED.
If the LED is ON the function is enabled. When the LED ashes, it indicates that there is a new picture or videoclip recorded in the device memory.
The function of the buttons is contextual to the active menu, the LED shows the status of the automatic capture function (illuminated = ON, not illuminated = OFF) and indicates new photos recorded when it ashes. The ashing for the new photos stops when
you browse the recorded photos and the LED reverts to showing the status of the automatic capture function.
NOTE: VIDEOCLIP RECORD FUNCTION IS AVAILABLE FOR 6700 SERIES VIDEOMONITORS ONLY AND ONLY IF YOU
INSERT A MICROSD CARD INTO THE DEVICE AND ENABLE THE FUNCTION. SEE “USING WITH A MICROSD CARD”
ON PAG. 8.
HOW TO RECORD A PICTURE OR VIDEOCLIP MANUALLY
2016-07-28 09:46:10
07
During normal operation press the
ture or videoclip.
(Photo) button to instantly take a pic-
During the recording, the display shows the message “RECORD” in the mid-
dle of the screen (Fig. 5).
RECORD
Memory
AutoPhoto
Menu
Fig. 5
In case of videoclip recording the device show the duration of the recording
in the top right of the screen.
HOW TO ENABLE AUTOMATIC RECORDING
2016-07-28 09:46:10
New File
From the status shown in Fig. 6, press the button
(Auto) to enable the
automatic photo recording during call and camera recall.
The LED will turn ON to indicate that the function is enabled. If a new picture or videoclip is recorded by the automatic recording function, the LED
Memory
AutoPhoto
Menu
will ash and the message “New le” appears in the status bar.
The LED will ash until the videoclip or image is viewed.
Press the (Auto) button again to disable the function, the LED will turn OFF.
This button also works when the monitor is in stand-by.
Fig. 6
6200 - 6300 - 6400 - 6700 Series - Memory board User manual
- 6 -
66250782 - V2.5 - 30/06/18
Page 7
6200 - 6300 - 6400 - 6700 Series
6400 and 6700 Series Memory Board User Manual
HOW TO BROWSE STORED PICTURES OR VIDEOCLIPS
2016-07-280001-0100 09:46:10
Previous
Stop
Delete
Quit
Next
Fig. 7
HOW TO DELETE ONE OR MORE RECORDED PICTURES OR VIDEOCLIPS
During normal operation or with the device in stand-by, press the but-
(Memory) to enter into browsing mode (Fig. 7).
ton
Once you are in browsing mode, use the buttons (Previous) and
(Next) to browse forward or backward through the stored pictures or videoclips. In the top left of the screen the index number of the picture will be
shown (or videoclip) with the time and date of recording.
The index shows both the number of the current picture or videoclip and
the total number of pictures or videoclips stored.
To play a video, when selected, press (Play) button.
The device shows the length of the videoclip in the right top of the screen.
To stop it press the button (Stop Quit).
To go back and exit the browsing mode press the button (Stop Quit).
Fig. 8
2016-07-280001-0100 09:46:10
DELETE?
Delete
Delete
No
All
Next
Fig. 9
2016-07-280001-0100 09:46:10
ARE YOU SURE?
NoYes
2016-07-280001-0100 09:46:10
Deleting... 040%
NoYes
Fig. 10
When in the browsing mode (Fig. 7) press the button (Delete) to enter the delete mode (Fig. 8).
• Press the button (No) to go back and cancel the deletion;
• Press the button (Delete) to delete the currently selected picture or videoclip;
• Press the button (Next) to browse the next picture or videoclip stored;
• Press the button (Delete All) to delete all pictures or videoclips stored: the message “ARE YOU SURE?” will appear in the middle
of the display (Fig. 9);
• Choose between “YES” or “NO” using the buttons and . If you choose “YES” a progress bar will appear in the middle of the
display and all the pictures or videoclips stored will be deleted (Fig. 10);
NOTE: THE DELETE OPERATION IS IRREVERSIBLE!
BUILTIN MEMORY MANAGEMENT
When the memory is full, the next picture will delete the oldest (First-In-First-Out).
Picture memory capacity: 100 pictures.
HOW TO ADJUST THE DISPLAY
MENU
DISPLAY
MEMORY
TIME
EXIT
Fig. 11
09:46:102016-07-28 ver1.05
Down
Up
EnterQuit
MENU
DISPLAY
MEMORY
Fig. 12
TIME
EXIT
09:46:102016-07-28 ver1.05
BRIGHTNESS
CONTRAST
COLOR
09:46:102016-07-28 ver1.05
Up
Enter
Quit
Down
MENU
DISPLAY
MEMORY
TIME
EXIT
BRIGHTNESS
CONTRAST
COLOR
Up
EnterQuit
Down
Fig. 13
• From the status of Fig. 4, press the button (Menu) to open the menu (Fig. 11);
• Select the “DISPLAY” option using the buttons (Up) and (Down) then press the button (Enter) open a new menu (Fig. 12);
• Select the parameter to set using the buttons (Up) and (Down) then press the button (Enter) to edit the parameter
selected, alter the value using the buttons (Up) and (Down) then press the button (Enter) again (Fig. 13);
• To alter other parameter repeat the steps above otherwise exit from the display menu by pressing the button (Quit);
• To exit from the menu, press the button (Quit).
6200 - 6300 - 6400 - 6700 Series - Memory board User manual
- 7 -
66250782 - V2.5 - 30/06/18
Page 8
6200 - 6300 - 6400 - 6700 Series
2
2
ERR
6400 and 6700 Series Memory Board User Manual
HOW TO SET DATE & TIME
MENU
DISPLAY
MEMORY
TIME
EXIT
Fig. 14
09:46:102016-07-28 ver1.05
Down
Up
EnterQuit
MENU
DISPLAY
MEMORY
Fig. 15
TIME
EXIT
09:46:102016-07-28 ver1.05
DAY 28
MONTH 07
YEAR 2016
HOUR 09
MINUTE 46
Up
Down
09:46:102016-07-28 ver1.05
DAY 28
MENU
MONTH 07
DISPLAY
YEAR 2016
MEMORY
EnterQuit
TIME
EXIT
HOUR 09
MINUTE 46
Up
EnterQuit
Down
Fig. 16
• From the status of Fig. 4, press the button (Menu) to open the menu;
• Select the “ TIME” option using the buttons (Up) and (Down) then press the button (Enter) open a new menu (Fig. 15);
• Select the parameter to set using the buttons (Up) and (Down) then press the button (Enter) to edit the parameter
selected, alter the value using the buttons (Up) and (Down) then press the button (Enter) again (Fig. 16);
• To alter other parameters repeat the steps above otherwise exit from the “TIME” menu by pressing the button (Quit);
• To exit from the menu, press the button (Quit).
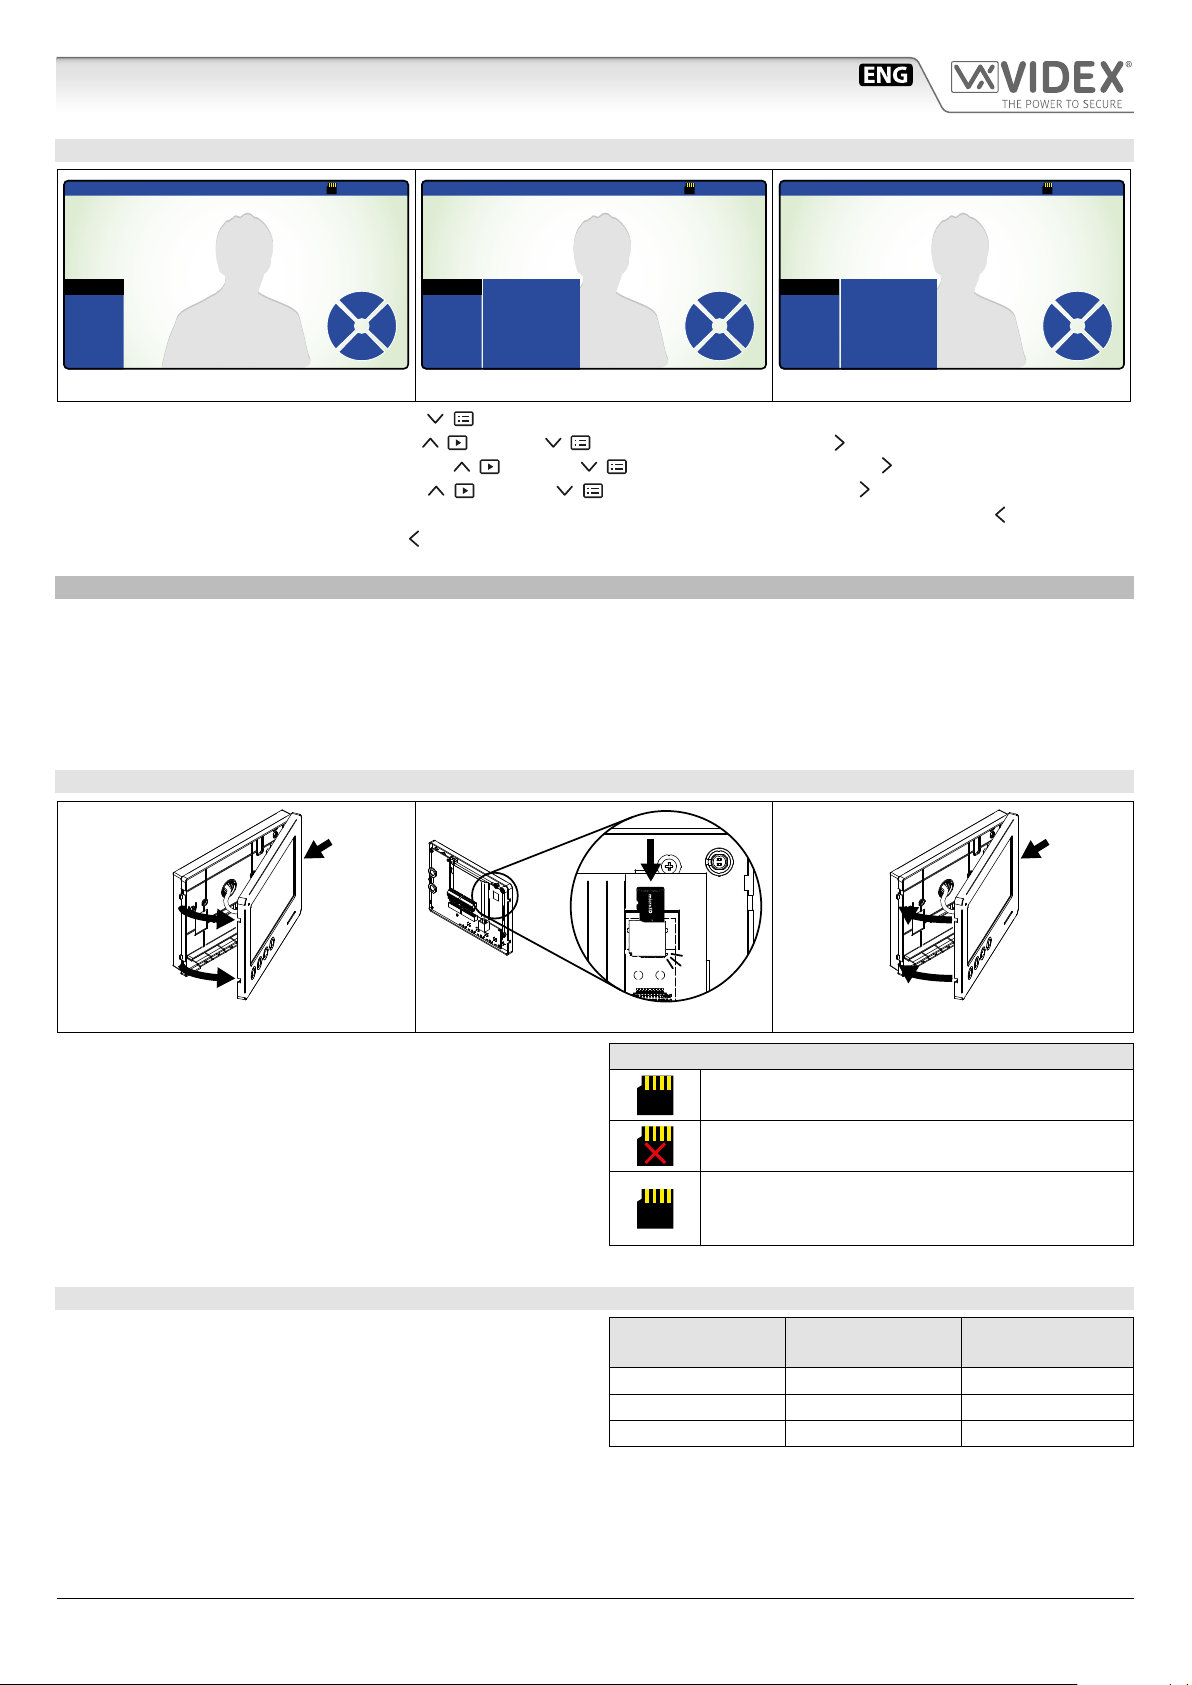
USING WITH A MICROSD CARD ONLY 6700 SERIES VIDEOMONITORS
When you insert a MicroSD card into a 6700 Series videomonitor, in addition to the other functions described previously, additionally you can:
• Record more than 100 pictures (depending on the size of the MicroSD card);
• Choose between still pictures or 15 second videoclips recordings;
• Copy pictures recorded in the built-in device memory into the MicroSD card;
• Move pictures or videoclips in others devices (PC’s, smartphones ect.).
HOW TO INSTALL A MICROSD CARD
1
Fig. 17
Fig. 18
• Switch o the power;
• Remove the cover, which contains all the electronics, from the
base: press lightly on the right part of the device and simultaneously pulling outwards the left part;
• Insert the MicroSD card in the slot and push it until you hear
a “click”;
• To remove the MicroSD card, push it again until you hear a
“click” and remove it;
• Close the unit and restore the power.
MICROSD MEMORY MANAGEMENT
When the MicroSD card is full, the next picture or videoclip will
delete the oldest (First-In-First-Out).
Maximum MicroSD card size: 16GB.
1
CLICK!
Fig. 19
MICROSD ICON IN THE STATUS BAR
Correctly installed.
The card is ready to work.
Not correctly installed or not in the device.
Please check the card in the device.
Formatting error.
The card needs to be formatted: see "How to
format a MicroSD card" on pag. 9
MicroSD size JPG pictures MJPEG 15 sec.
videoclips
4GB 1024 128
8GB 2048 256
16GB 4096 512
6200 - 6300 - 6400 - 6700 Series - Memory board User manual
- 8 -
66250782 - V2.5 - 30/06/18
Page 9

6200 - 6300 - 6400 - 6700 Series
2016-07-28
6400 and 6700 Series Memory Board User Manual
HOW TO FORMAT A MICROSD CARD
MENU
DISPLAY
MEMORY
TIME
EXIT
Fig. 20
09:46:102016-07-28 ver1.05
MEMORY MODE
VIDEO STILL
COPY TO SD CARD
YES NO
FORMAT SD CARD
YES NO
Up
Enter
Quit
Down
MENU
DISPLAY
MEMORY
Fig. 21
TIME
EXIT
09:46:102016-07-28 ver1.05
ARE YOU SURE?
MEMORY MODE
VIDEO STILL
COPY TO SD CARD
YES NO
FORMAT SD CARD
YES NO
09:46:102016-07-28 ver1.05
Formatting...
TIME
EXIT
MEMORY MODE
VIDEO STILL
COPY TO SD CARD
YES NO
FORMAT SD CARD
YES NO
Up
Enter
Quit
Down
Up
Enter
Quit
Down
MENU
DISPLAY
MEMORY
Fig. 22
• From the status of Fig. 4, press the button (Menu) to open the menu;
• Press (Down) to select “MEMORY”, then press (Enter) to open a new menu (Fig. 20);
• Press (Down) to select “FORMAT SD CARD”, press the button (Enter) to edit it (Fig. 20);
• Choose between “YES” or “NO” using the buttons (Up) and (Down) then press the button (Enter) (Fig. 21);
• If you choose “YES” the message “ARE YOU SURE?” will appear in the middle of the display. Press the button (Enter) to conrm (Fig. 21);
• The device will format the MicroSD card. The message “Formatting...” will appear in the middle of the display (Fig. 22).
NOTE: ALL THE FILES STORED IN MICROSD CARD WILL BE LOST!
• To exit from the menu, press the button
(Quit).
HOW TO SET THE STILL PICTURES OR VIDEOCLIPS RECORDING TYPE
09:46:102016-07-28 ver1.05
09:46:102016-07-28 ver1.05
MENU
DISPLAY
MEMORY
TIME
EXIT
Fig. 23
MEMORY MODE
VIDEO STILL
COPY TO SD CARD
YES NO
FORMAT SD CARD
YES NO
Down
Up
EnterQuit
MENU
DISPLAY
MEMORY
Fig. 24
TIME
EXIT
MEMORY MODE
VIDEO STILL
COPY TO SD CARD
YES NO
FORMAT SD CARD
YES NO
Up
EnterQuit
Down
From the status of Fig. 4, press the button (Menu) to open the menu;
• Press (Down) to select “MEMORY”, then press (Enter) to open a new menu (Fig. 23);
• “MEMORY MODE” is already selected, press the button (Enter) to edit (Fig. 24);
• Choose between “STILL” or “VIDEO” using the buttons (Up) and (Down) then press the button (Enter) to set the value (Fig. 24);
• To exit from the menu, press the button (Quit).
HOW TO COPY PICTURES RECORDED IN THE BUILTIN DEVICE MEMORY
MENU
DISPLAY
MEMORY
TIME
EXIT
Fig. 25
09:46:102016-07-28 ver1.05
MEMORY MODE
VIDEO STILL
COPY TO SD CARD
YES NO
FORMAT SD CARD
YES NO
09:46:102016-07-28 ver1.05
09:46:10
ARE YOU SURE?
TIME
EXIT
MEMORY MODE
VIDEO STILL
COPY TO SD CARD
YES NO
FORMAT SD CARD
YES NO
TIME
EXIT
MEMORY MODE
VIDEO STILL
COPY TO SD CARD
YES NO
FORMAT SD CARD
YES NO
Enter
MENU
DISPLAY
MEMORY
Up
Quit
Down
Fig. 27
Up
Enter
Quit
Down
MENU
DISPLAY
MEMORY
Fig. 26
ver1.05
Copying ... 040%
• From the status of Fig. 4, press the button (Menu) to open the menu;
• Press (Down) to select “MEMORY”, then press (Enter) to open a new menu (Fig. 25);
• Press (Down) to select “COPY TO SD CARD”, press the button (Enter) to select (Fig. 25);
• Choose between “YES” or “NO” using the buttons (Up) and (Down) then press the button (Enter) (Fig. 26);
• If you choose “YES” the message “ARE YOU SURE?” will appear in the middle of the display. Press the button (Enter) to conrm
(Fig. 26);
• The device will copy the data onto MicroSD card. A progress bar will appear in the middle of the display. The pictures recorded in
the built-in memory will not be deleted (Fig. 27);
• To exit from the menu, press the button (Quit).
Up
Enter
Quit
Down
6200 - 6300 - 6400 - 6700 Series - Memory board User manual
- 9 -
66250782 - V2.5 - 30/06/18
Page 10

Serie 6200 - 6300 - 6400 - 6700
Memoria video Serie 6200 e 6300 Manuale utente
A
B
C
D
E
Fig. 1 Videocitofoni Serie 6200
Fig. 2 Videocitofoni Serie 6300
A
B
C
D
E
LEGENDA
A
Pulsante di consultazione immagini registrate;
B
Pulsante regolazioni schermo e impostazione data e ora;
C
Pulsante cattura una immagine;
D
Pulsante foto automatica (attiva/disattiva);
E
LED di stato funzione foto automatica.
FUNZIONAMENTO
La scheda di memoria ha 4 pulsanti di gestione più un LED di segnalazione.
Quando il videocitofono si accende (risposta o auto-accensione), lo schermo mostra l’immagine di Fig. 3: il video sullo sfondo, data
e ora e il menù OSD che viene mostrato per qualche secondo. Dallo stato mostrato in Fig. 4 (monitor acceso OSD o), per attivare
qualsiasi funzione premere prima uno dei pulsanti di gestione poi premere il pulsante relativo alla funzione richiesta come specicato dal menù OSD (Fig. 3).
21/06/2014 16:05:00
Memory
Auto Photo
Menu
Fig. 3
Serie 6200 - 6300 - 6400 - 6700 - Memoria Video Manuale Utente
Fig. 4
- 10 -
66250782 - V2.5 - 30/06/18
Page 11

Serie 6200 - 6300 - 6400 - 6700
Memoria video Serie 6200 e 6300 Manuale utente
FUNZIONI STANDARD
Pulsante mostra immagini registrate.
Premere il pulsante per visualizzare le immagini registrate. La funzione è disponibile anche con il monitor in stand-by.
Pulsante menu.
Premere il pulsante per accedere ad un menù secondario che consente di regolare la luminosità, il contrasto, la saturazione del monitor e data e ora.
Pulsante cattura un’immagine.
Durante la conversazione o durante lo squillo, premere il pulsante per catturare un’immagine.
Pulsante funzione foto automatica.
Premere il pulsante per abilitare la funzione (il relativo LED va ON) o premere nuovamente per disattivarla (il relativo LED
va OFF). Con la funzione attiva, il videocitofono cattura un’immagine ogni volta che si accende a causa di una chiamata
o autoaccensione. La funzione può essere attivata o disattivata anche durante lo stand-by.
LED di stato della funzione foto autoamtica.
Il LED è acceso a funzione attiva mentre è spento con la funzione disattiva. Quando il LED lampeggia segnala che è stata
memorizzata una nuova immagine.
La funzione dei pulsanti è contestuale al menù attivo, il LED mostra lo stato della funzione “Foto Automatica” (illuminato = ON, non
illuminato = OFF) ed segnala nuove foto registrate lampeggiando. La segnalazione delle nuove foto memorizzate si disattiva quando le foto vengono consultate e il LED torna a mostrate lo stato della funzione “Foto Automatica”.
REGISTRAZIONE MANUALE DI UN’IMMAGINE
21/06/2014 16:05:00
Durante il normale utilizzo del videocitofono premere il pulsante
rare istantaneamente un fotogramma del video mostrato sullo schermo.
Durante la memorizzazione (Fig. 5), il display mostra il messaggio “REC” nel centro dello schermo.
(Photo) per cattu-
•
REC
Memory
Auto Photo
Menu
Fig. 5
ABILITARE LA FUNZIONE FOTO AUTOMATICA
21/06/2014 16:05:00
Memory
Auto Photo
Menu
Fig. 6
CONSULTARE LE IMMAGINI MEMORIZZATE
03/05 16:30 21/06/2014
Previous
Next
Stop
Quit
Del
Durante il normale funzionamento o con il videocitofono in stand-by, premere il pulsante
Una volta entrati, utilizzare i pulsanti (Previous) e (Next) per scorrere in
avanti o indietro le foto memorizzate. Nella parte alta dello schermo viene mostrato il
numero progressivo dell’immagine con data e ora di registrazione. Insieme al numero
progressivo è indicato anche il numero totale delle immagini memorizzate (max 100).
Per uscire dalla modalità di consultazione premere il pulsante (Stop Quit).
Dalla condizione mostrata in Fig. 6, premere il pulsante
abilitare la registrazione automatica della foto ogni volta che il videocitofono viene acceso.
Il LED si accende a segnalare l’attivazione della funzione. Se una
nuova foto viene memorizzata, il LED lampeggerà no a quando
le foto non vengono consultate.
Premere il pulsante (Auto) nuovamente se si desidera disabilitare la
funzione: il LED si spegne
Questo pulsante è operativo anche quando il monitor è in stand-by.
(Memory) per entrare in consultazione delle foto (Fig. 7).
(Auto) per
Fig. 7
Serie 6200 - 6300 - 6400 - 6700 - Memoria Video Manuale Utente
- 11 -
66250782 - V2.5 - 30/06/18
Page 12

Serie 6200 - 6300 - 6400 - 6700
Memoria video Serie 6200 e 6300 Manuale utente
CANCELLARE LE FOTO MEMORIZZATE
03/05 16:30 21/06/2014
DEL?
Del
Quit
Del
All?
Fig. 9
No
Fig. 8
GESTIONE DELLA MEMORIA
Quando la memoria interna è piena, la nuova immagine registrata cancellerà la più vecchia in memoria (First-In-First-Out).
Capacità memoria: 100 immagini.
REGOLAZIONE LUMINOSITÀ, CONTRASTO E SATURAZIONE
DELETING
Durante la consultazione (Fig. 7) premere il pulsante (Del) per entrare nel
modo cancellazione (Fig. 8).
• Premere il pulsante (No) per tornare indietro e annullare la cancellazione;
• Premere il pulsante (Del) per cancellare l’immagine mostrata;
• Premere il pulsante (Del All ?) per cancellare tutte le foto (Fig. 9);
• Premere il pulsante (Quit) per uscire.
NOTA: LA CANCELLAZIONE È IRRE
VERSIBILE!
MENU
DISPLAY
TIME
EXIT
Fig. 10
Up
Quit Enter
Down
MENU
DISPLAY
TIME
EXIT
Fig. 11
BRIGHTNESS
CONTRAST
COLOR
Up
Quit Enter
Down
MENU
DISPLAY
TIME
EXIT
Fig. 12
BRIGHTNESS
CONTRAST
COLOR
Up
Quit Enter
Down
• Dallo stato di Fig. 4, premere il pulsante (Menu) per aprire il menù (Fig. 10) che consente di fare le regolazioni del display.
• Selezionare “DISPLAY” tramite i pulsanti (Up) e (Down) quindi premere il pulsante (Enter) per attivare il menù di
secondo livello (Fig. 11);
• Selezionare il parametro da impostare tramite i pulsanti (Up) e (Down) quindi premere il pulsante (Enter) per
modicare il parametro selezionato (Fig. 12), modicare il valore tramite i pulsanti (Up) e (Down) quindi premere il
pulsante (Enter) per confermare e tornare alla selezione (Fig. 11);
• Per modicare altri parametri procedere nuovamente come descritto al precedente punto altrimenti premere il pulsante (Quit)
per uscire dal menù “DISPLAY”;
• Per uscire dal menù, premere il pulsante (Quit).
Serie 6200 - 6300 - 6400 - 6700 - Memoria Video Manuale Utente
- 12 -
66250782 - V2.5 - 30/06/18
Page 13

Serie 6200 - 6300 - 6400 - 6700
Memoria video Serie 6200 e 6300 Manuale utente
IMPOSTAZIONE DATA E ORA
MENU
DISPLAY
TIME
EXIT
Fig. 13
Up
Quit Enter
Down
MENU
DISPLAY
TIME
EXIT
Fig. 14
DAY
MONTH
YEAR
HOUR
MINUTE
21
06
14
16
05
Up
Quit Enter
Down
MENU
DISPLAY
TIME
EXIT
Fig. 15
DAY
MONTH
YEAR
HOUR
MINUTE
21
06
14
16
05
Up
Quit Enter
Down
• Dallo stato di Fig. 4, premere il pulsante (Menu) per aprire il menù (Fig. 13) che consente di fare le regolazioni data e ora.
• Selezionare (colore verde) “TIME” tramite i pulsanti (Up) e (Down) quindi premere il pulsante (Enter) per attivare
il menù di secondo livello (Fig. 14);
• Selezionare il parametro da impostare tramite i pulsanti (Up) e (Down) quindi premere il pulsante (Enter) per
modicare il parametro selezionato (Fig. 15), modicare il valore tramite i pulsanti (Up) e (Down) quindi premere il
pulsante (Enter) per confermare e tornare alla selezione (Fig. 14);
• Per modicare altri parametri procedere nuovamente come descritto al precedente punto altrimenti premere il pulsante (Quit)
per uscire dal menù “TIME”;
• Per uscire dal menù, premere il pulsante
(Quit).
Serie 6200 - 6300 - 6400 - 6700 - Memoria Video Manuale Utente
- 13 -
66250782 - V2.5 - 30/06/18
Page 14

Serie 6200 - 6300 - 6400 - 6700
Memoria video 6400 e 6700 Manuale utente
A B C D E
Fig. 1 Videocitofoni Serie 6400
LEGENDA
A
Pulsante di consultazione immagini/videoclip registrate;
B
Pulsante menù;
C
Pulsante funzione registrazione istantanea;
D
Pulsante funzione registrazione automatica (attiva/disattiva);
E
LED di stato funzione registrazione automatica.
Fig. 2 Videocitofoni Serie 6700
A B C D E
FUNZIONAMENTO
La scheda di memoria ha 4 pulsanti di gestione più un LED di segnalazione.
Quando il videocitofono si accende (risposta o auto-accensione), lo schermo mostra l’immagine di Fig. 3: il video sullo sfondo, data
e ora, l'icona della MicroSD ed i pulsanti delle funzioni in sovrimpressione.
Le informazioni in sovrimpressione, se non viene premuto alcun pulsante, scompariranno dopo pochi secondi (Fig. 4).
Per visualizzare le nuovamente, premere un qualsiasi pulsante di gestione della memoria video.
2016-07-28 09:46:10
Memory
AutoPhoto
Menu
Fig. 3 Fig. 4
Serie 6200 - 6300 - 6400 - 6700 - Memoria Video Manuale Utente
- 14 -
66250782 - V2.5 - 30/06/18
Page 15

Serie 6200 - 6300 - 6400 - 6700
Memoria video 6400 e 6700 Manuale utente
FUNZIONI STANDARD
Pulsante mostra immagini/videoclip registrate.
Premere il pulsante per visualizzare le immagini/videoclip registrate (in base ).
La funzione è disponibile anche con il monitor in stand-by.
Pulsante menu.
Premere il pulsante per accedere al menù che consente di scegliere tra immagini sse o videoclip, copiare dati dalla
memoria interna alla MicroSD e formattare quest'ultima (se presente), regolare la luminosità, il contrasto, la saturazione
del monitor e data e ora.
La funzione è disponibile anche con il monitor in stand-by.
Pulsante funzione registrazione instantanea.
Durante la conversazione o durante lo squillo, premere il pulsante per catturare un’immagine/videoclip.
Pulsante funzione registrazione automatica.
Premere il pulsante per abilitare la funzione (il relativo LED va ON) o premere nuovamente per disattivarla (il relativo LED
va OFF). Con la funzione attiva, il videocitofono cattura un’immagine/videoclip ogni volta che si accende a causa di una
chiamata o autoaccensione. La funzione può essere attivata o disattivata anche durante lo stand-by.
LED di stato funzione registrazione automatica.
Il LED è acceso a funzione attiva mentre è spento con la funzione disattiva. Quando il LED lampeggia segnala che è stata
memorizzata una nuova immagine/videoclip.
La funzione dei pulsanti è contestuale al menù attivo, il LED mostra lo stato della funzione “Registrazione Automatica” (illuminato = ON,
non illuminato = OFF) ed segnala nuove immagini/videoclip registrate lampeggiando. La segnalazione delle nuove immagini/videoclip
memorizzate si disattiva quando le foto vengono consultate e il LED torna a mostrate lo stato della funzione “Registrazione Automatica”.
NOTA: LA FUNZIONE DI REGISTRAZIONE VIDEOCLIP È DISPONIBILE SOLO PER I VIDEOCITOFONI DELLA SERIE
6700 E SOLAMENTE SE DOTATI DI SCHEDA MEMORIA MICROSD E CON LA FUNZIONE ATTIVATA. VEDI "UTILIZZO
CON SCHEDA MEMORIA MICROSD SOLO VIDEOCITOFONI 6700" A PAG. 17.
REGISTRAZIONE MANUALE DI UN'IMMAGINE/VIDEOCLIP
2016-07-28 09:46:10
07
Durante il normale utilizzo del videocitofono premere il pulsante
per catturare istantaneamente un fotogramma o un videoclip del video mostrato sullo schermo.
Durante la memorizzazione, il display mostra il messaggio “RECORD” nel
RECORD
Memory
AutoPhoto
Menu
Fig. 5
centro dello schermo (Fig. 5).
In caso di registrazione di un videoclip il dispositivo mostra la durata della
registrazione nell'angolo in alto a destra del display.
ABILITARE LA REGISTRAZIONE AUTOMATICA
2016-07-28 09:46:10
New File
Dalla condizione mostrata in Fig. 6, premere il pulsante
(Auto) per abilitare la registrazione automatica delle immagini/videoclip ogni volta che il
videocitofono viene acceso.
Il LED si accende a segnalare l’attivazione della funzione. Se una nuova
Memory
AutoPhoto
Menu
immagine/videoclip viene memorizzata, il LED lampeggerà e il messaggio “New le” comparirà nella barra di stato.
Il LED lampeggerà no a quando le immagini/videoclip non vengono consultati.
Premere il pulsante (Auto) nuovamente se si desidera disabilitare la funzione: il LED si spegne.
Fig. 6
Questo pulsante è operativo anche quando il monitor è in stand-by.
(Photo)
Serie 6200 - 6300 - 6400 - 6700 - Memoria Video Manuale Utente
- 15 -
66250782 - V2.5 - 30/06/18
Page 16

Serie 6200 - 6300 - 6400 - 6700
Memoria video 6400 e 6700 Manuale utente
CONSULTARE LE IMMAGINI/VIDEOCLIP MEMORIZZATI
2016-07-280001-0100 09:46:10
Previous
Stop
Delete
Quit
Next
Fig. 7
Per tornare indietro e uscire dal modo visualizzazione, premere il pulsate (Stop Quit).
CANCELLARE LE IMMAGINI/VIDEOCLIP MEMORIZZATI
Durante il normale funzionamento o con il videocitofono in stand-by, premere il
pulsante
(Memory) per entrare in modo visualizzazione (Fig. 7).
Una volta entrati, utilizzare i pulsanti (Previous) e (Next) per
scorrere in avanti o indietro le immagini/videoclip memorizzati.
Nella parte alta dello schermo viene mostrato il numero progressivo dell’immagine (o del videoclip) con data e ora di registrazione
Insieme al numero progressivo è indicato anche il numero totale delle immagini/videoclip memorizzati.
Per riprodurre un video, una volta selezionato, premere il pulsante (Play).
Il dispositivo mostra la lunghezza del videoclip nella parte alto a destra del
display.
Per fermare il video premere il pulsante (Stop Quit).
Fig. 8
2016-07-280001-0100 09:46:10
DELETE?
Delete
Delete
No
All
Next
Fig. 9
2016-07-280001-0100 09:46:10
ARE YOU SURE?
NoYes
2016-07-280001-0100 09:46:10
Deleting... 040%
NoYes
Fig. 10
Durante la consultazione (Fig. 7) premere il pulsante (Delete) per entrare nel modo cancellazione (Fig. 8).
• Premere il pulsante (No) per tornare indietro e annullare la cancellazione;
• Premere il pulsante (Delete) per cancellare l'immagine/videoclip mostrato;
• Premere il pulsante (Next) per visualizzare la prossima/videoclip memorizzato;
• Premere il pulsante (Delete All) per cancellare tutte le immagini/videoclip memorizzate : il messaggio “ARE YOU SURE?” appa-
rirà al centro del display (Fig. 9);
• Scegliere tra “YES” or “NO” utilizzando i pulsanti e . Se si sceglie “YES” una barra di progresso comparirà al centro del display
e tutte le immagini/videoclip memorizzati verranno cancellati (Fig. 10);
NOTA: LA CANCELLAZIONE È IRREVERSIBILE!
GESTIONE DELLA MEMORIA
Quando la memoria interna è piena, la nuova immagine registrata cancellerà la più vecchia in memoria (First-In-First-Out).
Capacità memoria: 100 immagini.
REGOLAZIONE LUMINOSITÀ, CONTRASTO E SATURAZIONE
MENU
DISPLAY
MEMORY
TIME
EXIT
Fig. 11
09:46:102016-07-28 ver1.05
Down
Up
EnterQuit
MENU
DISPLAY
MEMORY
Fig. 12
TIME
EXIT
09:46:102016-07-28 ver1.05
BRIGHTNESS
CONTRAST
COLOR
09:46:102016-07-28 ver1.05
Up
Enter
Quit
Down
MENU
DISPLAY
MEMORY
TIME
EXIT
BRIGHTNESS
CONTRAST
COLOR
Up
EnterQuit
Down
Fig. 13
• Dallo stato di Fig. 4, premere il pulsante (Menu) per aprire il menù (Fig. 11);
• Selezionare “DISPLAY” tramite i pulsanti (Up) e (Down) quindi premere il pulsante (Enter) per aprire il sottomenù (Fig. 12);
• Selezionare il parametro da impostare tramite i pulsanti (Up) e (Down) quindi premere il pulsante (Enter) per modicare il parametro selezionato, modicare il valore tramite i pulsanti (Up) e (Down) quindi premere il pulsante
(Enter) per confermare e tornare alla selezione (Fig. 13);
• Per modicare altri parametri procedere nuovamente come descritto al precedente punto altrimenti premere il pulsante (Quit)
per uscire dal menù "DISPLAY";
• Per uscire dal menù, premere il pulsante (Quit).
Serie 6200 - 6300 - 6400 - 6700 - Memoria Video Manuale Utente
- 16 -
66250782 - V2.5 - 30/06/18
Page 17

Serie 6200 - 6300 - 6400 - 6700
2
2
ERR
Memoria video 6400 e 6700 Manuale utente
IMPOSTAZIONE DATA E ORA
MENU
DISPLAY
MEMORY
TIME
EXIT
Fig. 14
09:46:102016-07-28 ver1.05
Down
Up
EnterQuit
MENU
DISPLAY
MEMORY
Fig. 15
TIME
EXIT
09:46:102016-07-28 ver1.05
DAY 28
MONTH 07
YEAR 2016
HOUR 09
MINUTE 46
Up
Down
09:46:102016-07-28 ver1.05
DAY 28
MENU
MONTH 07
DISPLAY
YEAR 2016
MEMORY
EnterQuit
TIME
EXIT
HOUR 09
MINUTE 46
Up
EnterQuit
Down
Fig. 16
• Dallo stato di Fig. 4, premere il pulsante (Menu) per aprire il menù;
• Selezionare “TIME” tramite i pulsanti (Up) e (Down) quindi premere il pulsante (Enter) per aprire il sottomenù (Fig. 15);
• Selezionare il parametro da impostare tramite i pulsanti (Up) e (Down) quindi premere il pulsante (Enter) per modicare il parametro selezionato, modicare il valore tramite i pulsanti (Up) e (Down) quindi premere il pulsante
(Enter) per confermare e tornare alla selezione (Fig. 16);
• Per modicare altri parametri procedere nuovamente come descritto al precedente punto altrimenti premere il pulsante (Quit)
per uscire dal menù “TIME”;
• Per uscire dal menù, premere il pulsante (Quit).
UTILIZZO CON SCHEDA MEMORIA MICROSD SOLO VIDEOCITOFONI 6700
Quando si installa una scheda di memoria MicroSD in un videocitofono Serie 6700, in aggiunta alle altre funzioni descritte in precedenza, è possibile:
• Memorizzare più di 100 immagini (in base alla capacità della scheda MicroSD);
• Scegliere se registrare immagini sse o videoclip di 15 secondi;
• Copiare le immagini registrate nella memoria interna in quella della scheda MicroSD;
• Spostare le immagini o i videoclip registrati in altri dispositivi (PC, smartphone ecc.)
INSTALLARE UNA SCHEDA MEMORIA MICROSD CARD
1
Fig. 17
Fig. 18
• Scollegare l'alimentazione;
• Rimuovere il coperchio che ospita tutta l’elettronica dalla
base: premere leggermente la parte destra sganciando contemporaneamente la parte sinistra tirandola verso l’esterno;
• Inserire la scheda MicroSD nella sede e premerla no a sentire
un "click";
• Per rimuovere la scheda, premerla nuovamente no a sentire
un "click" e slarla dalla sede;
• Chiudere il coperchio e ripristinare l'alimentazione.
GESTIONE DELLA MEMORIA DELLA SCHEDA MICROSD
Quando la memoria della scheda MicroSD è piena, la nuova immagine/videoclip registrata cancellerà la più vecchia in memoria (First-In-First-Out).
Capacità massima MicroSD consentita: 16GB.
1
CLICK!
Fig. 19
ICONA MICROSD NELLA BARRA DI STATO
Scheda installata correttamente.
La scheda è pronta per l'utilizzo.
Scheda non installata correttamente o non
presente nel dispositivo.
Controllare la scheda all'interno del dispositivo.
Errore formattazione.
La scheda deve essere formattata: vedi "Formattare
una scheda memoria MicroSD card" a pag. 18
Capacità MicroSD Immagini JPG Videoclips MJPEG
15 sec.
4GB 1024 128
8GB 2048 256
16GB 4096 512
Serie 6200 - 6300 - 6400 - 6700 - Memoria Video Manuale Utente
- 17 -
66250782 - V2.5 - 30/06/18
Page 18

Serie 6200 - 6300 - 6400 - 6700
2016-07-28
Memoria video 6400 e 6700 Manuale utente
FORMATTARE UNA SCHEDA MEMORIA MICROSD CARD
MENU
DISPLAY
MEMORY
TIME
EXIT
Fig. 20
09:46:102016-07-28 ver1.05
MEMORY MODE
VIDEO STILL
COPY TO SD CARD
YES NO
FORMAT SD CARD
YES NO
Up
Enter
Quit
Down
MENU
DISPLAY
MEMORY
Fig. 21
TIME
EXIT
09:46:102016-07-28 ver1.05
ARE YOU SURE?
MEMORY MODE
VIDEO STILL
COPY TO SD CARD
YES NO
FORMAT SD CARD
YES NO
09:46:102016-07-28 ver1.05
Formatting...
TIME
EXIT
MEMORY MODE
VIDEO STILL
COPY TO SD CARD
YES NO
FORMAT SD CARD
YES NO
Up
Enter
Quit
Down
Up
Enter
Quit
Down
MENU
DISPLAY
MEMORY
Fig. 22
• Dallo stato di Fig. 4, premere il pulsante (Menu) per aprire il menù;
• Premere (Down) per selezionare “MEMORY”, quindi premere il pulsante (Enter) per aprire il sottomenù (Fig. 20);
• Premere (Down) per selezionare “FORMAT SD CARD”, premere il pulsante (Enter) per editare il parametro (Fig. 20);
• Scegliere tra “YES” o “NO” utilizzando i pulsanti (Up) e (Down) quindi premere il pulsante (Enter) (Fig. 21);
• Se si sceglie “YES” il messaggio “ARE YOU SURE?” apparirà al centro del display. Premere il pulsante (Enter) per confermare (Fig. 21);
• Il dispositivo formatterà la scheda MicroSD. Il messaggio “Formatting...” apparirà al centro del display (Fig. 22).
NOTA: TUTTI I FILE MEMORIZZATI NELLA SCHEDA MICROSD ANDRANNO PERSI!
• Per uscire dal menù, premere il pulsante
(Quit).
SCEGLIERE TRA IMMAGINI FISSE O VIDEOCLIP
09:46:102016-07-28 ver1.05
09:46:102016-07-28 ver1.05
MENU
DISPLAY
MEMORY
TIME
EXIT
Fig. 23
MEMORY MODE
VIDEO STILL
COPY TO SD CARD
YES NO
FORMAT SD CARD
YES NO
Down
Up
EnterQuit
MENU
DISPLAY
MEMORY
Fig. 24
TIME
EXIT
MEMORY MODE
VIDEO STILL
COPY TO SD CARD
YES NO
FORMAT SD CARD
YES NO
Up
EnterQuit
Down
• Dallo stato di Fig. 4, premere il pulsante (Menu) per aprire il menù;
• Premere (Down) per selezionare “MEMORY”, quindi premere il pulsante (Enter) per aprire il sottomenù (Fig. 23);
• “MEMORY MODE” è già selezionato, premere il pulsante (Enter) per editare il parametro (Fig. 24);
• Scegliere tra “STILL” o “VIDEO” utilizzando i pulsanti (Up) e (Down) quindi premere il pulsante (Enter) per confermare (Fig. 24);
• Per uscire dal menù, premere il pulsante (Quit).
COPIARE LE IMMAGINI DALLA MEMORIA INTERNA
MENU
DISPLAY
MEMORY
TIME
EXIT
Fig. 25
09:46:102016-07-28 ver1.05
MEMORY MODE
VIDEO STILL
COPY TO SD CARD
YES NO
FORMAT SD CARD
YES NO
09:46:102016-07-28 ver1.05
09:46:10
ARE YOU SURE?
TIME
EXIT
MEMORY MODE
VIDEO STILL
COPY TO SD CARD
YES NO
FORMAT SD CARD
YES NO
TIME
EXIT
MEMORY MODE
VIDEO STILL
COPY TO SD CARD
YES NO
FORMAT SD CARD
YES NO
Enter
MENU
DISPLAY
MEMORY
Up
Quit
Down
Fig. 27
Up
Enter
Quit
Down
MENU
DISPLAY
MEMORY
Fig. 26
ver1.05
Copying ... 040%
• Dallo stato di Fig. 4, premere il pulsante (Menu) per aprire il menù;
• Premere (Down) per selezionare “MEMORY”, quindi premere il pulsante (Enter) per aprire il sottomenù (Fig. 25);
• Premere (Down) per selezionare “COPY TO SD CARD”, premere il pulsante (Enter) per editare il parametro (Fig. 25);
• Scegliere tra “YES” o “NO” utilizzando i pulsanti (Up) e (Down) quindi premere il pulsante (Enter) per confermare (Fig. 26);
• Se si sceglie “YES” il messaggio “ARE YOU SURE?” apparirà al centro del display. Premere il pulsante (Enter) per confermare (Fig. 26);
• Il dispositivo copierà i dati sulla scheda MicroSD. Una barra di progresso comparirà al centro del display. Le immagini memorizzate
nella memoria interna non saranno cancellate (Fig. 27);
• Per uscire dal menù, premere il pulsante (Quit).
Up
Enter
Quit
Down
Serie 6200 - 6300 - 6400 - 6700 - Memoria Video Manuale Utente
- 18 -
66250782 - V2.5 - 30/06/18
Page 19

6200 - 6300 - 6400 - 6700 Series
Gebruikershandleiding geheugenfunctie 6200 en 6300 Series
A
B
C
D
E
Fig. 1 6200 Series videophones
Fig. 2 6300 Series videophones
A
B
C
D
E
LEGENDE
A
Toets om te bladeren tussen opgenomen beelden;
B
Toets scherminstellingen en instellen datum en tijd;
C
Toets om een foto te maken;
D
In- of uitschakelen van de automatische opname;
E
LED status automatische opname.
BEDIENING
De geheugenfunctie wordt bediend met 4 toetsen en heeft 1 status LED.
Wanneer het beeldscherm wordt ingeschakeld (via een oproep of beeldoproep), zie je het scherm zoals afgebeeld in Fig. 3: Het live
videobeeld in de achtergrond met de datum, tijd en functietoetsen in overlay. Wanneer geen toetsen worden ingedrukt zal deze
overlay verdwijnen na enkele seconden zoals afgebeeld in Fig. 4. Om de overlay terug te activeren, druk op eender welke van de
knoppen van de geheugenfunctie (Fig. 3).
21/06/2014 16:05:00
Memory
Auto Photo
Menu
Fig. 3
Gebruikershandleiding geheugenfunctie 6200 - 6300 - 6400 en 6700 Series
Fig. 4
- 19 -
66250782 - V2.5 - 30/06/18
Page 20

6200 - 6300 - 6400 - 6700 Series
Gebruikershandleiding geheugenfunctie 6200 en 6300 Series
STANDAARD FUNCTIES
Play toets.
Druk op deze toets om te bladeren tussen de foto’s. Deze functie is ook beschikbaar wanneer de monitor in standby mode is.
Menu toets.
Druk op deze toets om een menu te openen waarin datum, tijd, helderheid, contrast en kleurinstellingen kunnen worden aangepast. Deze functie is ook beschikbaar wanneer de monitor in standby mode is.
Foto maken toets.
Tijdens een oproep of gesprek, druk op deze toets om een foto te maken.
Automatische opname toets.
Druk op deze toets om de automatische opname van foto’s in te schakelen (de bijhorende LED zal oplichten) of druk
opnieuw om deze functie uit te schakelen (de bijhorende LED zal doven). Wanneer deze functie is ingeschakeld zal de
monitor een foto opslaan telkens iemand aanbelt of het beeld van binnenuit wordt opgeroepen. Deze functie is ook
beschikbaar wanneer de monitor in standby mode is.
LED status automatische opname.
Wanneer de LED oplicht is de automatische opname ingeschakeld. Wanneer deze LED knippert zijn er nieuwe foto
opnames in het geheugen aanwezig.
De functie van de toetsen is afhankelijk van het actieve menu, de LED geeft de status van de automatische opname weer (LED licht op:
functie actief, LED niet opgelicht: functie gedesactiveerd). en geeft aan dat er nieuwe foto’s werden genomen wanneer de LED knippert.
Het knipperen stopt wanneer de nieuwe foto’s werden bekeken en de LED geeft terug de status van de automatische opname weer.
MANUELE OPNAME VAN EEN FOTO
21/06/2014 16:05:00
Tijdens normale werking, druk op de
te bewaren. Tijdens het opslaan komt de vermelding “REC” in het midden van het
scherm (Fig. 5).
(photo) toets om direct een foto te nemen en
•
REC
Memory
Auto Photo
Menu
Fig. 5
AUTOMATISCHE BEELDOPSLAG INSCHAKELEN
21/06/2014 16:05:00
Memory
Auto Photo
Menu
Fig. 6
FOTO’S IN HET BEELDGEHEUGEN BEKIJKEN
03/05 16:30 21/06/2014
Previous
Next
Stop
Quit
Del
Tijdens normale werking, of met het systeem in stand by, druk op de toets
mory) om de mode beelden bekijken op te starten (Fig. 7).
Eenmaal in de mode beelden bekijken kan door middel van de toetsen (Previous) en (Next) vooruit en achteruit worden gescrold door te bewaarde foto’s.
Bovenaan het scherm wordt een volgnummer van de foto met vermelding van tijd en
datum van de opname weergegeven. Dit volgnummer toont het nummer van de huidige foto en het totaal aantal bewaarde foto’s (max. 100).
Om terug te keren en de mode beelden bekijken te verlaten, druk op de toets (Stop Quit).
Vanaf de status getoond in Fig. 6, druk op de toets
(Auto) om de automatische beeldopname in te schakelen. Een foto zal worden bewaard
telkens er wordt aangebeld of wanneer beeld wordt opgeroepen. De
LED zal oplichten om aan te geven dat deze functie werd ingeschakeld. Wanneer tijdens de automatische opname een nieuwe foto
werd opgeslagen, zal de LED knipperen tot de foto werd bekeken.
Druk opnieuw op de toets (Auto) om de functie te desactiveren, de
LED zal doven.
Deze functie is ook beschikbaar in de standby mode.
(Me-
Fig. 7
Gebruikershandleiding geheugenfunctie 6200 - 6300 - 6400 en 6700 Series
- 20 -
66250782 - V2.5 - 30/06/18
Page 21

6200 - 6300 - 6400 - 6700 Series
Gebruikershandleiding geheugenfunctie 6200 en 6300 Series
EEN OF MEERDERE FOTO’S UIT HET BEELDGEHEUGEN VERWIJDEREN
03/05 16:30 21/06/2014
DEL?
Del
Quit
Del
All?
Fig. 9
No
Fig. 8
BEHEER INGEBOUWD GEHEUGEN
Wanneer het geheugen vol is zal bij een nieuwe foto, de oudste foto worden gewist (First-In-First-Out).
Geheugencapaciteit: 100 foto’s.
DELETING
Wanneer je in de mode bent om beelden te bekijken (Fig. 7) druk op de toets
(Del) om beelden te wissen (Fig. 8).
• Druk op de toets (No) om terug te
keren en het wissen van beelden te annuleren;
• Druk op de toets (Del) om de huidig geselecteerde foto te verwijderen;
• Druk op de toets (Del All ?) om alle
foto’s uit het geheugen te verwijderen
(Fig. 9);
• Druk op de toets (Quit) om de
mode beelden wissen te verlaten.
NOTA: DE BEWERKING FOTO
VERWIJDEREN IS ONOMKEERBAAR!
INSTELLINGEN VAN HET BEELDSCHERM
MENU
DISPLAY
TIME
EXIT
Fig. 10
Up
Quit Enter
Down
MENU
DISPLAY
TIME
EXIT
Fig. 11
BRIGHTNESS
CONTRAST
COLOR
Up
Quit Enter
Down
MENU
DISPLAY
TIME
EXIT
Fig. 12
BRIGHTNESS
CONTRAST
COLOR
Up
Quit Enter
Down
• Vanuit de status getoond in Fig. 4, druk op de knop (Menu) om het menu getoond in (Fig. 10) te openen. In dit menu kun-
nen de instellingen van het beeldscherm alsook de datum en de tijd worden aangepast.
• Selecteer de optie “DISPLAY” door middel van de knoppen (Up) en (Down) bevestig met de knop (Enter) om het
submenu (Fig. 11) te openen;
• Selecteer de aan te passen parameter door middel van de knoppen (Up) en (Down) druk daarna op de knop (Enter)
om de geselecteerde parameter aan te passen (Fig. 12). Wijzig de instelling met behulp van de knoppen (Up) en
(Down) druk daarna opnieuw op de knop (Enter) om te bevestigen (Fig. 11);
• Om andere parameters aan te passen, herneem vanaf bovenstaand punt. Anders verlaat het display menu door op de knop
(Quit) te drukken;
• Om het menu te verlaten, druk op de knop (Quit).
Gebruikershandleiding geheugenfunctie 6200 - 6300 - 6400 en 6700 Series
- 21 -
66250782 - V2.5 - 30/06/18
Page 22

6200 - 6300 - 6400 - 6700 Series
Gebruikershandleiding geheugenfunctie 6200 en 6300 Series
INSTELLEN VAN DE DATUM EN DE TIJD
MENU
DISPLAY
TIME
EXIT
Fig. 13
Up
Quit Enter
Down
MENU
DISPLAY
TIME
EXIT
Fig. 14
DAY
MONTH
YEAR
HOUR
MINUTE
21
06
14
16
05
Up
Quit Enter
Down
MENU
DISPLAY
TIME
EXIT
Fig. 15
DAY
MONTH
YEAR
HOUR
MINUTE
21
06
14
16
05
Up
Quit Enter
Down
• Vanuit de status getoond in Fig. 4, druk op de knop (Menu) om het menu voor het aanpassen van de datum en tijd (Fig. 13)
te openen.
• Selecteer de optie “TIME” door middel van de knoppen (Up) en (Down) en druk daarna op de knop (Enter) om het onderlig-
gende menu te openen. (Fig. 14);
• Selecteer de aan te passen parameter door middel van de knoppen (Up) en (Down) Druk daarna op de knop (Enter)
om de geselecteerde parameter aan te passen (Fig. 15). Wijzig de instelling met behulp van de knoppen (Up) en
(Down) druk daarna opnieuw op de knop (Enter) om te bevestigen (Fig. 14);
• Om andere parameters aan te passen, herneem vanaf bovenstaand punt. Anders verlaat het “TIME” menu door op de knop
(Quit) te drukken;
• m het menu te verlaten, druk op de knop (Quit).
Gebruikershandleiding geheugenfunctie 6200 - 6300 - 6400 en 6700 Series
- 22 -
66250782 - V2.5 - 30/06/18
Page 23

6200 - 6300 - 6400 - 6700 Series
Gebruikershandleiding geheugenfunctie 6400 en 6700 Series
A B C D E
A B C D E
Fig. 1 6400 Series videophones
LEGENDE
A
Toets om te bladeren tussen opgenomen beelden;
B
Menu toets;
C
Toets om direct een opname te maken;
D
In- of uitschakelen van de automatische opname;
E
LED status automatische opname.
Fig. 2 6700 Series videophones
BEDIENING
De geheugenfunctie wordt bediend met 4 toetsen en heeft 1 status LED.
Wanneer het beeldscherm wordt ingeschakeld (via een oproep of beeldoproep), zie je het scherm zoals afgebeeld in Fig. 3: Het live
videobeeld in de achtergrond met de datum, tijd, Micro SD kaart icoon en functietoetsen in overlay. Wanneer geen toetsen worden
ingedrukt zal deze overlay verdwijnen na enkele seconden zoals afgebeeld in Fig. 4.
Om de overlay terug te activeren, druk op eender welke van de knoppen van de geheugenfunctie (Fig. 3).
2016-07-28 09:46:10
Memory
AutoPhoto
Menu
Fig. 3 Fig. 4
Gebruikershandleiding geheugenfunctie 6200 - 6300 - 6400 en 6700 Series
- 23 -
66250782 - V2.5 - 30/06/18
Page 24

6200 - 6300 - 6400 - 6700 Series
Gebruikershandleiding geheugenfunctie 6200 en 6300 Series
STANDAARD FUNCTIES
Play toets.
Druk op deze toets om te bladeren tussen de opgenomen foto’s en videoclips. Deze functie is ook beschikbaar wanneer
de monitor in standby mode is.
Menu toets.
Druk op deze toets om een menu te openen waarin datum, tijd, helderheid, contrast en kleureninstelling kunnen worden
aangepast, te kiezen voor opname van foto of videoclip, bestanden te kopiëren van het intern geheugen naar de SD kaart of
de SD kaart te formatteren (indien geplaatst). Deze functie is ook beschikbaar wanneer de monitor in standby mode is.
Toets opname maken.
Tijdens een oproep of gesprek, druk op deze toets om een foto of videoclip te maken.
Automatische opname toets.
Druk op deze toets om de automatische opname van foto’s of videoclips in te schakelen (de bijhorende LED zal oplichten) of druk opnieuw om deze functie uit te schakelen (de bijhorende LED zal doven). Wanneer deze functie is ingeschakeld zal de monitor een foto of videoclip opslaan (afhankelijk van de instellingen) telkens iemand aanbelt of het
beeld van binnenuit wordt opgeroepen. Deze functie is ook beschikbaar wanneer de monitor in standby mode is.
LED status automatische opname.
Wanneer de LED oplicht is de automatische opname ingeschakeld. Wanneer deze LED knippert zijn er nieuwe foto of
videoclip opnames in het geheugen aanwezig.
De functie van de toetsen is afhankelijk van het actieve menu, de LED geeft de status van de automatische opname weer (LED licht
op: functie actief, LED niet opgelicht: functie gedesactiveerd). en geeft aan dat er nieuwe foto's of videoclips werden genomen
wanneer de LED knippert. Het knipperen stopt wanneer de nieuwe foto's of videoclips werden bekeken en de LED geeft terug de
status van de automatische opname weer..
OPMERKING: DE FUNCTIE OPNAME VAN VIDEOCLIPS IS BESCHIKBAAR VOOR DE 6700 SERIE MONITOREN ENKEL
EN ALLEEN WANNEER EEN SD KAART IN HET TOESTEL WERD GEPLAATST EN DE RESPECTIEVELIJKE FUNCTIE WERD
GEACTIVEERD. ZIE "GEBRUIK MET EEN MICROSD KAART" OP PAG. 26.
MANUELE OPNAME VAN EEN FOTO OF VIDEOCLIP
2016-07-28 09:46:10
07
Tijdens normale werking, druk op de
foto of videoclip te mekan en te bewaren. Tijdens het opslaan komt de ver-
(Photo) (photo) toets om direct een
melding “RECORD” in het midden van het scherm (Fig. 5).
In het geval een videoclip wordt opgeslagen zal het toestel de duur van de
RECORD
Memory
AutoPhoto
Menu
Fig. 5
videoclip weergeven bovenaan rechts op het scherm.
AUTOMATISCHE BEELDOPSLAG INSCHAKELEN
2016-07-28 09:46:10
New File
Vanaf de status getoond in Fig. 6, druk op de toets
(Auto) om de automatische beeldopname in te schakelen. Een foto of videoclip zal worden bewaard telkens er wordt aangebeld of wanneer beeld wordt opgeroepen.
De LED zal oplichten om aan te geven dat deze functie werd ingeschakeld.
Memory
AutoPhoto
Menu
Wanneer tijdens de automatische opname een nieuwe foto of videoclip
werd opgeslagen, zal de LED knipperen en de vermelding "Nex File"
wordt weergegeven in de statusbalk tot de foto of videoclip werd bekeken.
Druk opnieuw op de toets (Auto) om de functie te desactiveren, de LED
zal doven.
Deze functie is ook beschikbaar in de standby mode.
Fig. 6
Gebruikershandleiding geheugenfunctie 6200 - 6300 - 6400 en 6700 Series
- 24 -
66250782 - V2.5 - 30/06/18
Page 25

6200 - 6300 - 6400 - 6700 Series
Gebruikershandleiding geheugenfunctie 6200 en 6300 Series
FOTO'S OF VIDEOCLIPS IN HET BEELDGEHEUGEN BEKIJKEN
2016-07-280001-0100 09:46:10
Previous
Stop
Delete
Quit
Next
Fig. 7
Om terug te keren en de mode beelden bekijken te verlaten, druk op de toets (Stop Quit).
EEN OF MEERDERE FOTO'S OF VIDEOCLIPS UIT HET BEELDGEHEUGEN VERWIJDEREN
Tijdens normale werking, of met het systeem in stand by, druk op de toets
(Memory) om de mode beelden bekijken op te starten (Fig. 7).
Eenmaal in de mode beelden bekijken kan door middel van de toetsen
(Previous) en (Next) vooruit en achteruit worden gescrold door
te bewaarde foto's en videoclips. Bovenaan het scherm wordt een volgnummer van de foto (of videoclip) met vermelding van tijd en datum van de
opname weergegeven.
Dit volgnummer toont het nummer van de huidige foto of videoclip en het
totaal aantal bewaarde foto's of videoclips.
Om een videoclip af te spelen (wanneer geselecteerd), druk op de toets (Play).
Het toestel geeft de duur van de videoclip weer in de rechter bovenkant van het scherm.
Om het afspelen van de videoclip te stoppen, druk op de toets (Stop Quit).
Fig. 8
2016-07-280001-0100 09:46:10
DELETE?
Delete
Delete
No
All
Next
Fig. 9
2016-07-280001-0100 09:46:10
ARE YOU SURE?
NoYes
2016-07-280001-0100 09:46:10
Deleting... 040%
NoYes
Fig. 10
Wanneer je in de mode bent om beelden te bekijken (Fig. 7) druk op de toets (Delete) om beelden te wissen (Fig. 8).
• Druk op de toets (No) om terug te gaan en het wissen te annuleren;
• Druk op de toets (Delete) om de huidig geselecteerde foto of videoclip te verwijderen;
• Druk op de toets (Next) om naar de volgende foto of videoclip te gaan.;
• Druk op de toets (Delete All) om alle bewaarde foto's en videoclips te verwijderen. De boodschap "ARE YOU SURE" verschijnt
in het midden van het scherm (Fig. 9);
• Kies tussen de opties “YES” of “NO” door middel van de toetsen en . Wanneer je de optie “YES” kiest zal de voortgang van het verwijderen van de gegevens worden weergegeven in het midden van het scherm (Fig. 10) en alle foto's en videoclips zullen worden verwijderd;
NOTA: HET VERWIJDEREN VAN FOTO'S EN VIDEOCLIPS KAN NIET ONGEDAAN GEMAAKT WORDEN!
BEHEER INGEBOUWD GEHEUGEN
Wanneer het geheugen vol is zal bij een nieuwe foto, de oudste foto worden gewist (First-In-First-Out)..
Geheugencapaciteit: 100 foto's.
INSTELLINGEN VAN HET BEELDSCHERM
MENU
DISPLAY
MEMORY
TIME
EXIT
Fig. 11
09:46:102016-07-28 ver1.05
Down
Up
EnterQuit
MENU
DISPLAY
MEMORY
Fig. 12
TIME
EXIT
09:46:102016-07-28 ver1.05
BRIGHTNESS
CONTRAST
COLOR
09:46:102016-07-28 ver1.05
Up
Enter
Quit
Down
MENU
DISPLAY
MEMORY
TIME
EXIT
BRIGHTNESS
CONTRAST
COLOR
Up
EnterQuit
Down
Fig. 13
• Vanuit de status getoond in Fig. 4, druk op de knop (Menu) om het menu getoond in (Fig. 11) te openen. In dit menu kunnen de instellingen van het beeldscherm alsook de datum en de tijd worden aangepast.
• Selecteer de optie "DISPLAY" door middel van de knoppen (Up) en (Down) bevestig met de knop (Enter) om het submenu (Fig. 12) te openen;
• Selecteer de aan te passen parameter door middel van de knoppen (Up) en (Down) druk daarna op de knop (Enter)
om de geselecteerde parameter aan te passen. Wijzig de instelling met behulp van de knoppen (Up) en (Down) Druk
daarna opnieuw op de knop (Enter) om te bevestigen (Fig. 13);
• Om andere parameters aan te passen, herneem vanaf bovenstaand punt. Anders verlaat het display menu door op de knop
(Quit) te drukken;
• Om het menu te verlaten, druk op de knop (Quit).
Gebruikershandleiding geheugenfunctie 6200 - 6300 - 6400 en 6700 Series
- 25 -
66250782 - V2.5 - 30/06/18
Page 26

6200 - 6300 - 6400 - 6700 Series
2
2
ERR
Gebruikershandleiding geheugenfunctie 6200 en 6300 Series
INSTELLEN VAN DE DATUM EN DE TIJD
MENU
DISPLAY
MEMORY
TIME
EXIT
Fig. 14
09:46:102016-07-28 ver1.05
Down
Up
EnterQuit
MENU
DISPLAY
MEMORY
Fig. 15
TIME
EXIT
09:46:102016-07-28 ver1.05
DAY 28
MONTH 07
YEAR 2016
HOUR 09
MINUTE 46
Up
Down
09:46:102016-07-28 ver1.05
DAY 28
MENU
MONTH 07
DISPLAY
YEAR 2016
MEMORY
EnterQuit
TIME
EXIT
HOUR 09
MINUTE 46
Up
EnterQuit
Down
Fig. 16
• Vanuit de status getoond in Fig. 4, druk op de knop (Menu) om het menu voor het aanpassen van de datum en tijd (Fig.
14) te openen;
• Selecteer de optie “TIME” door middel van de knoppen (Up) en (Down) en druk daarna op de knop (Enter) om het onderliggende menu te openen (Fig. 15);
• Selecteer de aan te passen parameter door middel van de knoppen (Up) en (Down) druk daarna op de knop (Enter)
om de geselecteerde parameter aan te passen. Wijzig de instelling met behulp van de knoppen (Up) en (Down) druk
daarna opnieuw op de knop (Enter) om te bevestigen (Fig. 16);
• Om andere parameters aan te passen, herneem vanaf bovenstaand punt. Anders verlaat het “TIME” menu door op de knop
(Quit) te drukken;
• Om het menu te verlaten, druk op de knop (Quit).
GEBRUIK MET EEN MICROSD KAART ENKEL 6700 SERIE MONITOREN
Wanneer een MicroSD kaart wordt geplaatst in een monitor van de 6700 serie dan zijn, bovenop de eerder beschreven, volgende
functies beschikbaar:
• Opslag van meer dan 100 foto's (afhankelijk van de opslagcapaciteit van de MicroSD kaart);
• Mogelijkheid te kiezen tussen de opname van een foto of een videoclip van 15 seconden;
• Foto's uit het interne geheugen kopiëren naar de MicroSD kaart.;
• Foto's of videoclips via de MicroSD kaart verplaatsen naar andere toestellen (PC, smartphone, enz.).
PLAATSEN VAN EEN MICROSD KAART
1
Fig. 17
Fig. 18
• Schakel de voeding uit;
• Verwijder de voorzijde van de monitor van de basisplaat: druk
lichtjes aan de rechterzijde van het toestel en trekt voorzichtig
de linkerkant naar voren;
• Plaats de MicroSD kaart in de daarvoor voorziene slede en
druk tot je een "click" hoort;
• Om de MicroSD kaart te verwijderen druk opnieuw op de MicroSD kaart tot je een "click" hoort en verwijder de kaart;
• Maak het toestel terug dicht en herstel de spanningstoevoer.
BEHEER GEHEUGEN MICROSD KAART
Wanneer de MicroSD kaart vol is zal een nieuwe foto of videoclip de oudste overschrijven (First-In-First-Out).
Maximum grootte MicroSD kaart: 16GB.
1
CLICK!
Fig. 19
ICOON MICROSD IN DE STATUSBALK
Correct geïnstalleerd.
De kaart is klaar voor gebruik.
Niet correct geïnstalleerd of afwezig.
Kijk de plaatsing van de MicroSD kaart na.
Fout bij het formatteren.
De kaart moet opnieuw worden geformatteerd:
"Microsd Kaart Formatteren" op pag. 27
Capaciteit MicroSD JPG foto's Videoclips 15sec.
MJPEG
4GB 1024 128
8GB 2048 256
16GB 4096 512
Gebruikershandleiding geheugenfunctie 6200 - 6300 - 6400 en 6700 Series
- 26 -
66250782 - V2.5 - 30/06/18
Page 27

6200 - 6300 - 6400 - 6700 Series
2016-07-28
Gebruikershandleiding geheugenfunctie 6200 en 6300 Series
MICROSD KAART FORMATTEREN
MENU
DISPLAY
MEMORY
TIME
EXIT
Fig. 20
09:46:102016-07-28 ver1.05
MEMORY MODE
VIDEO STILL
COPY TO SD CARD
YES NO
FORMAT SD CARD
YES NO
Up
Enter
Quit
Down
MENU
DISPLAY
MEMORY
Fig. 21
TIME
EXIT
09:46:102016-07-28 ver1.05
ARE YOU SURE?
MEMORY MODE
VIDEO STILL
COPY TO SD CARD
YES NO
FORMAT SD CARD
YES NO
09:46:102016-07-28 ver1.05
Formatting...
TIME
EXIT
MEMORY MODE
VIDEO STILL
COPY TO SD CARD
YES NO
FORMAT SD CARD
YES NO
Up
Enter
Quit
Down
Up
Enter
Quit
Down
MENU
DISPLAY
MEMORY
Fig. 22
• Vanuit de status getoond in Fig. 4, druk op de toets (Menu) om het menu te openen;
• Druk op de toets (Down) om “MEMORY”, te selecteren, druk daarna op (Enter) om het submenu te openen (Fig. 20);
• Druk op de toets (Down) om “FORMAT SD CARD”, te selecteren, druk daarna op de toets (Enter) om te bevestigen (Fig. 20);
• Kies tussen “YES” en “NO” door middel van de toetsen (Up) en (Down) en bevestig met de toets (Enter) (Fig. 21);
• Na het kiezen voor de optie “YES” verschijnt de boodschap “ARE YOU SURE?” in het midden van het scherm. Druk op de toets
(Enter) om te bevestigen (Fig. 21);
• Het toestel zal de MicroSD kaart formatteren. De boodschap “Formatting...” verschijnt op het midden van het scherm (Fig. 22).
NOTA: ALLE BESTANDE AANWEZIG OP DE MICROSD KAART GAAN HIERBIJ VERLOREN!
• Om het menu te verlaten, druk op de toets
(Quit).
KEUZE MAKEN VOOR OPNAME VAN FOTO OF VIDEOCLIP
09:46:102016-07-28 ver1.05
09:46:102016-07-28 ver1.05
MENU
DISPLAY
MEMORY
TIME
EXIT
Fig. 23
MEMORY MODE
VIDEO STILL
COPY TO SD CARD
YES NO
FORMAT SD CARD
YES NO
Down
Up
EnterQuit
MENU
DISPLAY
MEMORY
Fig. 24
TIME
EXIT
MEMORY MODE
VIDEO STILL
COPY TO SD CARD
YES NO
FORMAT SD CARD
YES NO
Up
EnterQuit
Down
Vanaf de status getoond in Fig. 4, druk op de toets (Menu) om het menu te openen;
• Druk op de toets (Down) om “MEMORY”, te selecteren, druk daarna op de toets (Enter) om het submenu te openen (Fig. 23);
• “MEMORY MODE” is reeds geselecteerd, druk op de toets (Enter) om de instelling aan te passen (Fig. 24);
• Kiest tussen “STILL” of “VIDEO” door middel van de toetsen (Up) en (Down) druk daarna op de toets (Enter) om
te bevestigen (Fig. 24);
• Druk op de toets (Quit) om het menu te verlaten.
BEELDEN KOPIEREN VANUIT HET INTERNE GEHEUGEN
MENU
DISPLAY
MEMORY
TIME
EXIT
Fig. 25
09:46:102016-07-28 ver1.05
MEMORY MODE
VIDEO STILL
COPY TO SD CARD
YES NO
FORMAT SD CARD
YES NO
09:46:102016-07-28 ver1.05
09:46:10
ARE YOU SURE?
TIME
EXIT
MEMORY MODE
VIDEO STILL
COPY TO SD CARD
YES NO
FORMAT SD CARD
YES NO
TIME
EXIT
MEMORY MODE
VIDEO STILL
COPY TO SD CARD
YES NO
FORMAT SD CARD
YES NO
Enter
MENU
DISPLAY
MEMORY
Up
Quit
Down
Fig. 27
Up
Enter
Quit
Down
MENU
DISPLAY
MEMORY
Fig. 26
ver1.05
Copying ... 040%
• Vanuit de status getoond in Fig. 4, druk op de toets (Menu) om het menu te openen;
• Druk op de toets (Down) om “MEMORY”, te selecteren. Druk daarna op de toets (Enter) om het submenu te openen (Fig. 25);
• Druk op de toets (Down) om “COPY TO SD CARD”, te selecteren. Druk daarna op de toets (Enter) om te bevestigen (Fig. 25);
• Kies tussen “YES” of “NO” door middel van de toetsen (Up) en (Down) Druk daarna op de toets (Enter) (Fig. 26);
• Wanneer je kiest voor de optie “YES” verschijnt de boodschap “ARE YOU SURE?” in het midden van het scherm. Druk op de toets
(Enter) om te bevestigen (Fig. 26);
• Het toetsel zal de data uit het interne geheugen kopiëren naar de MicroSD kaart. Een indicatie van de voortgang zal verschijnen in het
midden van het scherm. De foto's uit het interne geheugen worden gekopieerd, maar niet verwijderd uit het interne geheugen (Fig. 27);
• Druk op de toets (Quit) om het menu te verlaten.
Up
Enter
Quit
Down
Gebruikershandleiding geheugenfunctie 6200 - 6300 - 6400 en 6700 Series
- 27 -
66250782 - V2.5 - 30/06/18
Page 28

MANUFACTURER
El producto lleva la marca CE que demuestra su conformidad y puede ser
Het product heeft de CE-markering om de conformiteit ervan aan te tonen en
gen. Dit product volgt de bepalingen van de Europese Richtlijnen 2014/30/EU
Le produit est marqué CE à preuve de sa conformité et peut être distribué
The product is CE marked demonstrating its conformity and is for distribution
Il prodotto è marchiato CE a dimostrazione della sua conformità e può essere
FABBRICANTE
FABRICANT
FABRICANTE
FABRIKANT
VIDEX ELECTRONICS S.P.A.
Via del Lavoro, 1
63846 Monte Giberto (FM) Italy
Tel (+39) 0734 631669
Fax (+39) 0734 632475
www.videx.it - info@videx.it
CUSTOMER SUPPORT
SUPPORTO CLIENTI
SUPPORTS CLIENTS
ATENCIÓN AL CLIENTE
KLANTENDIENST
VIDEX ELECTRONICS S.P.A.
www.videx.it - technical@videx.it
Tel: +39 0734-631669
Fax: +39 0734-632475
Main UK oce:
VIDEX SECURITY LTD
1 Osprey Trinity Park
Trinity Way
LONDON E4 8TD
Phone: (+44) 0870 300 1240
Fax: (+44) 020 8523 5825
www.videxuk.com
marketing@videxuk.com
Greece oce:
VIDEX HELLAS Electronics
48 Filolaou Str.
11633 ATHENS
Phone: (+30) 210 7521028
(+30) 210 7521998
Fax: (+30) 210 7560712
www.videx.gr
videx@videx.gr
UK Customers only:
VIDEX SECURITY LTD
www.videxuk.com
Tech Line: 0191 224 3174
Fax: 0191 224 1559
Northern UK oce:
VIDEX SECURITY LTD
Unit 4-7
Chillingham Industrial Estate
Chapman Street
NEWCASTLE UPON TYNE - NE6 2XX
Tech Line: (+44) 0191 224 3174
Phone: (+44) 0870 300 1240
Fax: (+44) 0191 224 1559
Danish oce:
VIDEX DANMARK
Hammershusgade 15
DK-2100 COPENHAGEN
Phone: (+45) 39 29 80 00
Fax: (+45) 39 27 77 75
www.videx.dk
videx@videx.dk
Benelux oce:
NESTOR COMPANY NV
E3 laan, 93
B-9800 Deinze
Phone: (+32) 9 380 40 20
Fax: (+32) 9 380 40 25
www.videx.be
info@videx.be
within all member states of the EU with no restrictions. This product follows
the provisions of the European Directives 2014/30/EU (EMC); 2014/35/EU
(LVD); 2011/65/EU (RoHS): CE marking 93/68/EEC.
librement à l’intérieur des pays membres de l’union européenne EU.
Ce produit est conforme aux directives européennes 2014/30/EU (EMC) ;
2014/35/EU (LVD) ; 2011/65/EU (RoHS): marquage CE 93/68/EEC.
is bestemd voor distributie binnen de lidstaten van de EU zonder beperkin-
(EMC); 2014/35/EU (LVD); 2011/65/EU (RoHS): CE-markering 93/68/EEG.
Dutch oce:
NESTOR COMPANY BV
Business Center Twente (BCT)
Grotestraat, 64
NL-7622 GM Borne
www.videxintercom.nl
info@videxintercom.nl
distribuito liberamente all’interno dei paesi membri dell’Unione Europea UE.
Questo prodotto è conforme alle direttive Europee: 2014/30/UE (EMC);
2014/35/UE (LVD); 2011/65/UE (RoHS): marcatura CE 93/68/EEC.
distribuido en todos los estados miembros de la unión europea UE.
Este producto cumple con las Directivas Europeas 2014/30/EU (EMC);
2014/35/EU (LVD); 2011/65/EU (RoHS): marca CE 93/68/EEC.
 Loading...