

Page 1
66250730 1.0 23/06/08 23/06/08 -Pag.1/4
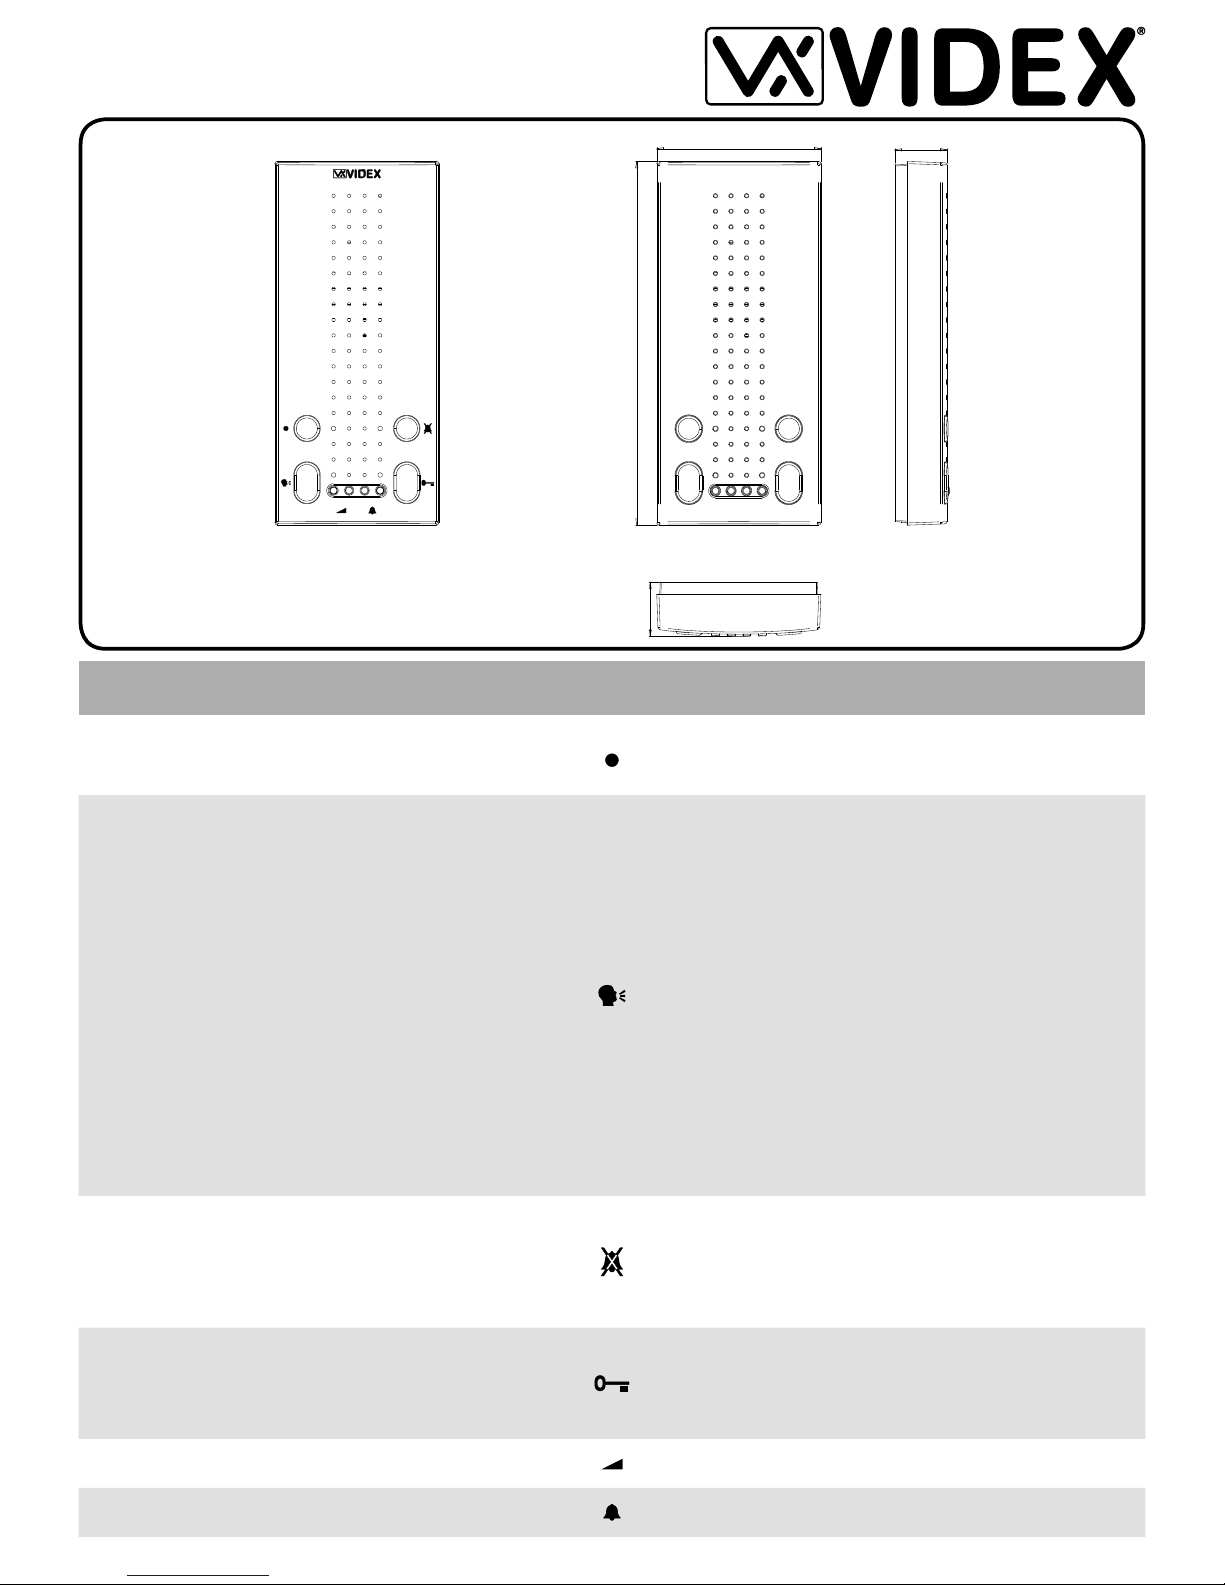
164,00
74,00
23,50
24,50
Pulsante di Servizio
Quando premuto collega internamente i morsetti 1 (“Sb”) ed 8
(“Sa”).
Service Push Button
When pressed, shorts internally terminal 1 (“Sb”) and 8 (“Sa”).
Pulsante risposta / conversazione ad una via / autoaccensione / spegnimento
Premendo questo pulsante alla ricezione della chiamata si avvia •
la conversazione con il posto esterno in full duplex (il relativo
LED si accende.
Premere e tenere premuto alla ricezione della chiamata per ini-•
ziare la conversazione ad una via verso il posto esterno (il LED in
corrispondenza del pulsante lampeggia rapidamente): per ascoltare il visitatore rilasciare il pulsante (il LED lampeggia lentamente) e tornare a tenerlo premuto ogni qual volta si deve prendere
la parola.
Ad impianto spento, premere il pulsante per effettuare l’auto-•
accensione ed aprire la comunicazione verso il posto esterno(il
LED in corrispondenza del pulsante si accende).
Ad impianto acceso, consente lo spegnimento manuale (rapida •
pressione del tasto). In ogni caso lo spegnimento è automatico
allo scadere del tempo di conversazione (il LED si spegne).
Answer / simplex communicaiton / Camera Recall / End Call
push button
Pressing this button during an incoming call will open the speech •
in duplex mode allowing free speech with the caller in both directions (The LED next to this button will illuminate)
Pressing and holding this button will allow the user to answer a •
call from a visitor at the door station in SIMPLEX speech mode
(The LED next to the button will flash rapidly): releasing the button will allow the user to listen to the visitor (The LED next to the
button will flash slowly). Press and hold the button when you
talk to the visitor and release the button when you listen to the
visitor.
When the system is in standby, (No calls on the system) opera-•
tion of this button will open the speech to the door station. The
LED next to the button will illuminate.
During a conversation, momentary operation of this button will •
end the call. The LED next to the button will switch off. The system will automatically switch off when the conversation time expires.
Pulsante Privacy on/off
Abilita / disabilita il servizio privacy. Quando il servizio è attivo, il
LED in corrispondenza del pulsante si accende e le chiamate entranti vengono ignorate. La durata del servizio privacy, salvo nuova pressione del tasto, dipende dalla relativa programmazione.
Privacy on/off Push Button
This button Enables / Disables the privacy function. When privacy
is enabled calls will not be received and the LED next to the button
will be illuminated. The duration of the privacy time is set when in
the programming mode, privacy can be disabled at any time by
operation of this Push Button.
Pulsante Apri-porta
Premere a sistema acceso per aprire la porta d’ingresso. L’apertura della porta viene confermata da un segnale acustico. Se il morsetto 10 (LD1) è collegato opportunamente, il LED in prossimità
del pulsante resta acceso fino a quando resta aperta la porta.
Door Open Push Button
During a call, operation of this button will release the door from
where the call originated. This will be confirmed by an acoustic
tone. If terminal 10 (LD1) is connected, the “door open” LED next
to the button will also be illuminated.
Regolazione del volume del tono di chiamata. Premere il pulsante
di destra per incrementare o quello di sinistra per diminuire.
Call tone volume control (3 levels). Press the right button to increase or the left button to decrease.
Impostazione suoneria (9 disponibili). Vedi la sezione di programmazione per l’utilizzo di questi pulsanti.
Melody control (9 melodies are available). See programming section for the operation of these buttons
Art.5178
Installation Instructions
Istruzioni di installazione
PULSANTI E REGOLAZIONI PUSH BUTTONS & CONTROLS
Page 2
66250730 1.0 23/06/08 23/06/08 -Pag.2/4
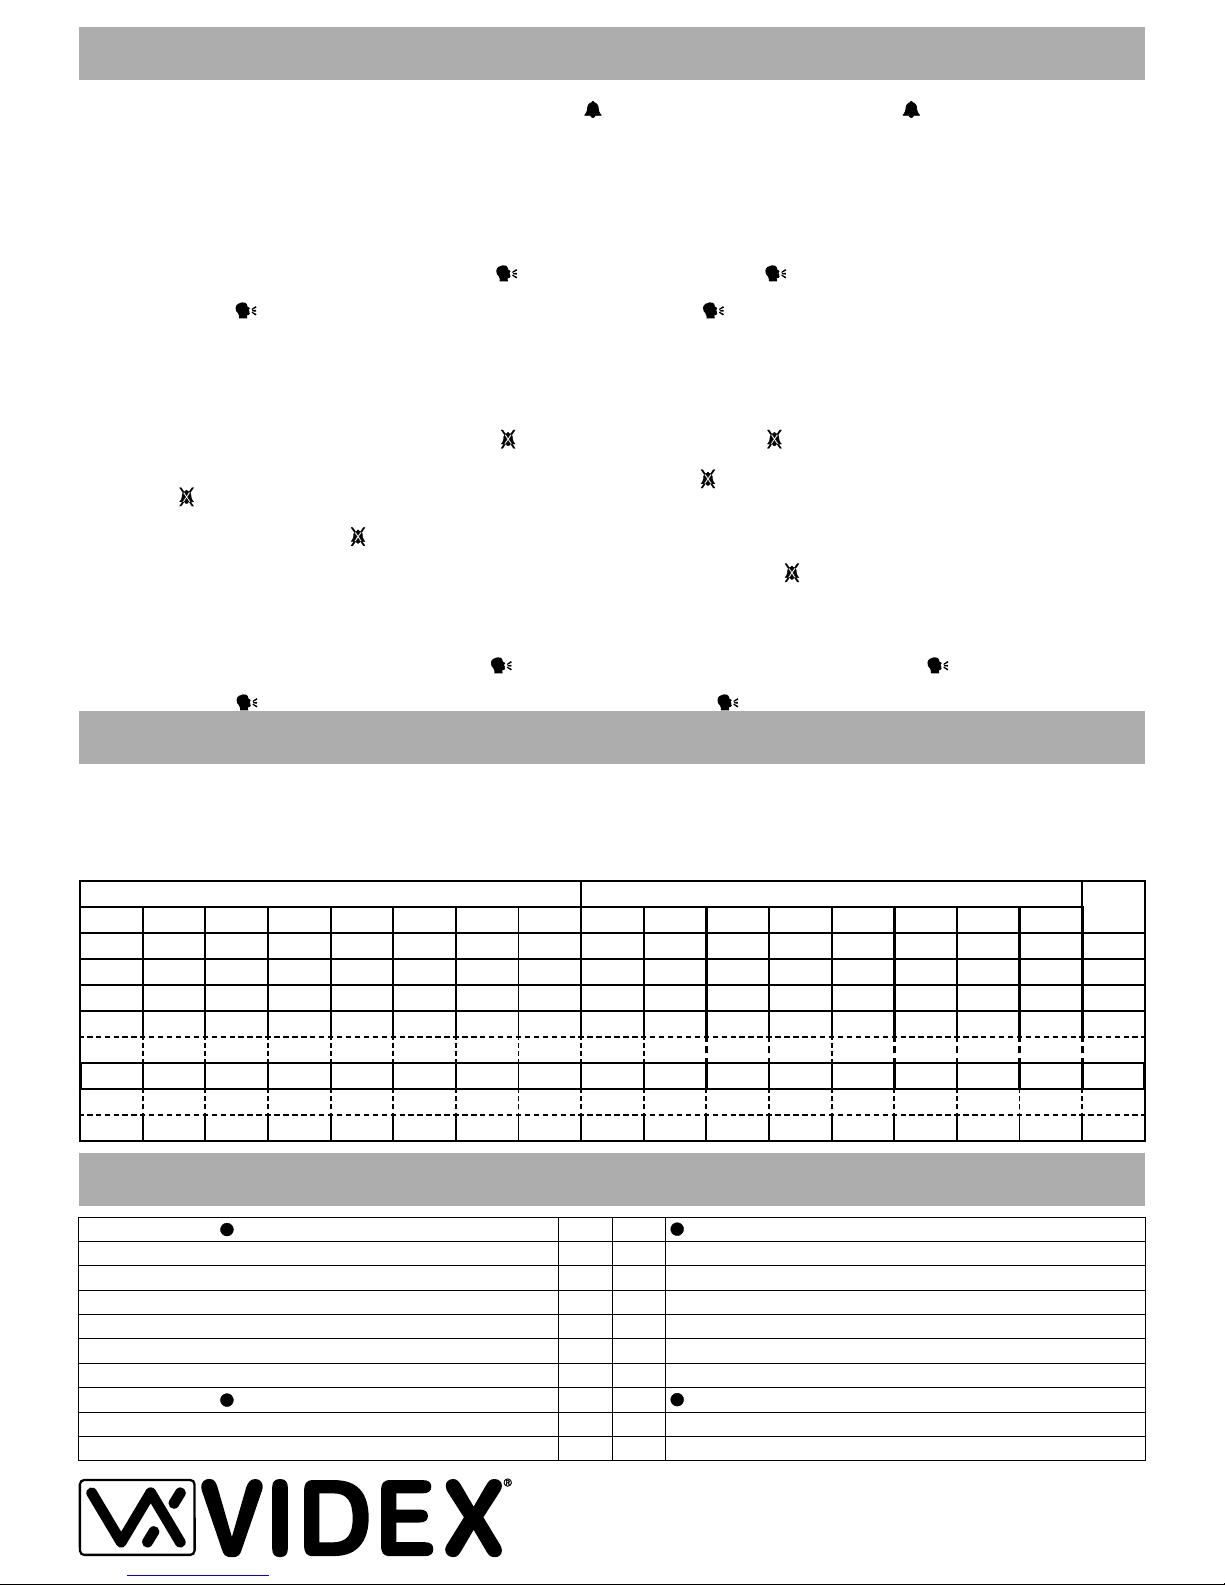
Programmazione suoneria (di fabbrica = suoneria 1)
Premere e tenere premuti per circa 10 secondi i due pulsanti di suoneria “•
”
fino a che il videocitofono non riproduce la suoneria attiva ed emette un bip;
Utilizzare i pulsanti di suoneria (destro o sinistro) per riprodurre le suonerie •
disponibili (max 9)
Per selezionare una suoneria attendere 3 secondi dopo la riproduzione senza •
premere pulsanti fino all’emissione di un bip;
La nuova suoneria è memorizzata.•
Programmazione numero di squilli (di fabbrica = 6 squilli)
Premere e tenere premuto per circa 10 secondi il pulsante “•
” fino a che il
videocitofono non riproduce la suoneria attiva ed emette un bip;
Premere il pulsante “• ” tante volte quant’è il numero di squilli desiderato
(Es.6 volte per impostare 6 squilli);
Raggiunto il valore desiderato, attendere 3 secondi fino all’emissione di un •
bip;
Il nuovo numero di squilli è memorizzato.•
Programmazione durara privacy (di fabbrica = infinito)
Premere e tenere premuto per circa 10 secondi il pulsante “•
” fino a che il
videocitofono non emette un bip;
Premere lo stesso tasto per impostare la durata della privacy: ogni pressione •
del pulsante “
”incrementa la durata di 15 minuti (es. 8 volte = 2 ore - Max 80
volte = 20 ore) a partire da 0. Per impostare un tempo pari ad infinito (disattivazione privacy solo tramite pulsante “
”), attendere la normale uscita dalla
programmazione senza premere il pulsante;
Raggiunto il valore desiderato, attendere 3 secondi fino all’emissione di un •
bip;
La nuova durata privacy è memorizzata.•
Ripristino dei valori di fabbrica
Dare alimentazione al citofono tenendo premuto il pulsante “• ”;
L’emissione di un beep conferma l’avvenuta operazione;•
Rilasciare il pulsante “• ”,
L’indirizzo del citofono è codificato in binario tramite il dip-switch ad 8 vie situato
al suo interno. Ogni switch corrisponde ad un bit che può essere a 0 (OFF) o
1 (ON), a ciascun bit corrisponde un peso decimale in base alla posizione: per
impostare l’indirizzo desiderato, mettere ad ON (1) gli switch la cui somma dei
pesi corrisponde al valore dell’indirizzo. Ad esempio, per impostare l’indirizzo
37, mettere ad ON gli switch 1, 3 e 6 (1+4+32=37).
Melodies Programming (factory preset melody 1)
Press and hold the two melody buttons “•
”(for approx 10 seconds) until the
unit plays the current stored melody and emits a beep.
Press the melody button again (left or right) to listen to the available melodies •
(maximum 9).
When the chosen melody has been reached, do not press any buttons wait 3 •
seconds for the exit beep.
The new melody is now stored.•
Number of Rings Programming (factory preset = 6 rings)
Press and hold the “•
” button (for approx 10 seconds) until the unit emits a
beep.
Press the “• ” button as many times as the number of rings required (i.e. 6
presses = 6 rings with a maximum of 9 rings)
Once the number of rings required has been reached, wait 3 seconds for the •
exit beep.
The new value is now stored.•
Privacy duration programming (factory preset = without time out)
Press and hold the “•
” button (for approx 10 seconds) until the unit emits a
beep.
Press the “•
” button again to set the privacy duration. Each time the button is
pressed, it will increase the privacy duration by 15 minutes (starting from 0 up
to a maximum of 20 hours i.e. pressing the button 8 times = 2 hours up to a
maximum of 80 presses for 20 hours). Once the required privacy duration has
been reached, wait 3 seconds for the exit beep.To set the privacy with no time
out Press and hold the “
” button (for approx 10 seconds) until the unit emits a
beep do not press any other button wait 3 seconds for the exit beep.
The new value is now stored.•
Restore to factory preset
Power on the intercom keeping pressed the “• ”;
The intercom will emit a beep to confirm the operation;•
Release the “• ” button.
Each intercom address is binary (PHONE ID) using the 8 way dipswitches located on the rear of the unit. Each switch correspond to one bit which can have
a value 0 (OFF) or 1 (ON). Each bit corresponds to a decimal weight depending
on the position: Switch 1 = decimal 1, 2=2, 3=4, 4=8, 5=16, 6=32, 7=64, 8=128.
I.E. to set the address 37, put switches 1, 3 and 6 on (1+4+32=37).
Factory - Office (All Countries Support)
VIDEX ELECTRONICS S.p.A. Via del lavoro,1 63020 MONTEGIBERTO (AP) - ITALY
Phone: (+39) 0734 - 631669 Fax: (+39) 0734 - 632475 www.videx.it e-mail: info@videx.it
Northern UK Office (Only UK Support)
VIDEX LTD Unit 5-7 Chillingam Industrial Estate Chapman Street NEWCASTLE UPON TYNE Ne6 2XX
Phone: 0191 2243174 Fax: 0191 - 2241559 www.videx-security.com
Morsetto 1 pulsante
Sb
1
button terminal 1
Massa LED “Aux” e “Door Open”
-LD
2
“Aux” and “Door Open” LEDs ground
Ingresso di alimentazione 12Vdc
+12V
3
+12Vdc power supply input
“Bus” massa
GND
4
“Bus” line ground
“Bus” linea dati
L
5
“Bus” line data
Ingresso Local Bell
LB
6
Local bell input
Ingresso Allarme attivo basso
AL
7
Active low alarm input
Morsetto 2 pulsante
Sa
8
button terminal 2
Ingresso di alimentazione LED Ausiliario
AUL
9
“Aux” LED power supply input
Ingresso di alimentazione LED Porta Aperta
DOL
10
“Door Open” LED power supply input
Switches - Switch Decimal Weight - Peso Decimale
Addr.
Indir.
876543211286432168421
OFFOFFOFFOFFOFFOFFOFFON000000011
OFFOFFOFFOFFOFFOFFONOFF000000102
OFFOFFOFFOFFOFFOFFONON000000113
OFFOFFOFFOFFOFFONOFFOFF000001004
OFFOFFONOFFOFFONOFFON0010010137
ONOFFONONOFFONOFFOFF10110100180
PROGRAMMAZIONE CITOFONO INTERCOM PROGRAMMING
SEGNALI CITOFONO INTERCOM SIGNALS
IMPOSTAZIONE INDIRIZZO CITOFONO INTERCOM ADDRESS SETUP
Page 3

66250730 1.0 23/06/08 23/06/08 -Pag.3/4
As show in Fig 1, looking at the rear of the intercom, insert the tip of •
a flat blade screwdriver into one of the two openings (Fig 1A) then
slightly move the screwdriver in an upward direction to release the
front from the back plate and opening the intercom unit (Fig 1B).Take
care! The back plate of the intercom houses the pcb connection
board which is normally connected to the pcb in the front of the
intercom by the ribbon cable, the ribbon cable should not be
connected when first opened.
Place the back plate of the intercom against the wall at approximately •
135cm (Fig 2) above finished floor level, then mark the fixing holes
taking into account that the cable group “a” must feed into the opening
“b” (Fig 3).
As shown in figure 3, fix the back plate of the intercom to the wall •
feeding the cable group “a” through opening “b”.
Using a flat blade screwdriver connect the wires to the pcb connection •
board “c” as shown in Figure 4, according to the installation diagram
provided.
Connect ribbon cable plug “• d” from the front plate into plug “e” on the
pcb connection board as shown in Figure 5.
Close the intercom by hooking the front plate “• g” to the back plate “h”
as described below:
Hook the top of the front plate “ - g” to the top of the back plate as
shown by pointer “A” in Figure 6.
Move the lower side of the front plate “ - g” towards the back plate “h”
and press until the unit locks into the back plate of the intercom.
To open the intercom once installed, firmly grasp the bottom sides of
the front plate cover, pull forward in an upward direction to separate the
front cover from the back plate as in Figure 6.
NB. Please take care when opening to avoid damage, remember
that the ribbon cable connects the front plate to the back plate
connector pcb.
Come mostrato in figura 1, capovolgere il citofono guardando la par-•
te posteriore, inserire la lama di un giravite piatto in una delle due
aperture indicate dalle frecce (Fig.1A) ed aprire il citofono muovendo
delicatamente il giravite verso l’alto e tirando con le mani il coperchio.
Fate attenzione ! la base del citofono ospita la scheda di connessione
che è normalmente collegata al coperchio tramite un cavo flat: la prima volta che il citofono viene aperto il cavo flat non dovrebbe essere
collegato.
Appoggiare la base del citofono alla parete tenendo una distanza di •
circa 135cm tra la parte bassa della base ed il pavimento (Fig.2) quindi prendere i riferimenti per i fori nella parete considerando che il gruppo di fili “a” deve passare attraverso l’apertura “b” (Fig.3).
Come mostrato in Figura 3, fissare la base del citofono alla parete •
facendo passare il gruppo di fili “a” attraverso l’apertura “b”.
Come mostrato in Figura 4, utilizzando un giravite a punta piatta, col-•
legare i fili alla morsettiera della scheda di connessione “c” come da
schema di installazione fornito a corredo.
Collegare il connettore maschio “• d” al connettore fermmina “e” come
mostrato in Figura 5.
Chiudere il citofono agganciando il coperchio “• g” alla base “h” come
descritto di seguito:
appoggiare la parte superiore del coperchio “ - g” alla parte superiore
della base “h” come suggerito dalla freccia “A” di Figura 6;
come suggerito dalla freccia “ - B” di Figura 6, muovere la parte inferiore del coperchio “g” verso il muro e premere fino a bloccare il
coperchio nella base.
Per aprire nuovamente il citofono una volta installato, stringere saldamente i lati del citofono nella parte inferiore e tirare delicatamente verso
l’esterno compiendo movimenti inversi a quelli mostrati in Figura 6.
N.B. ricordarsi, per evitare danneggiamenti, di non tirare eccessivamente il coperchio in quanto è presente il cavo flat collegato
alla base !!
Fig.1 Fig.2 Fig.3
Fig.4 Fig.5 Fig.6
INSTALLAZIONE A PARETE WALL MOUNT
A
B
135cm
a
b
c
d
e
g
h
A
B
Page 4

66250730 1.0 23/06/08 23/06/08 -Pag.4/4
Videx Electronics S.p.A.
Via del Lavoro 1, 63020 Monte Giberto (AP)
Phone: +39 0734 631669 - Fax +39 0734 631669
www.videx.it - info@videx.it
Autore:
Data modifica:
Data creazione:
Title:
Notes:
Titolo:
Note:
Cod.File:
Foglio
/11
Marco Rongoni
224kau001a.dwg
27/03/2008
27/03/2008
.
Impianto citofonico ad 1 ingresso con pannello di chiamata tradizionale
1 Entrance Audio Door Entry System with functional panel
.
SE
12Vac
-
L
ON/OFF
system
+
13V
Battery
(optional)
ART.521B
115
230V
0
+-
12V
swsw
+B
Local Bell
87
4
653
2
1
ON
1
2
3
4
5
678
A
B
C
D
E
F
G
H
NCCNO
SL
BSY
L
_
+12
GND
A
Art.4203-0
5C
4
1
3C4C3
2
2C
-
1C
+
5
2C
3C
4C
5C
1C
Art.4845
5C
4
1
3C4C3
2
2C
-
1C
+
5
2C
3C
4C
5C
1C
Art.4845
5C
4
1
3C4C3
2
2C
-
1C
+
5
2C
3C
4C
5C
1C
Art.4845
+12V
12345678
ON
Address N.
Art.5178
1
2
3
4
5
6
7
8
9
10
1
Local Bell
12345678
ON
Address N.
Art.5178
1
2
3
4
5
6
7
8
9
10
2
Local Bell
12345678
ON
Address N.
Art.5178
1
2
3
4
5
6
7
8
9
10
3
Local Bell
12345678
ON
Address N.
Art.5178
1
2
3
4
5
6
7
8
9
10
4
Si raccomanda
di far installare il presente dispositivo
esclusivamente da personale qualificato
We recommend
This equipment is installed by a Competent Electrician, Security or Communications Engineer
 Loading...