

Page 1
66250200 - V2.1 - 15/08/18
- 1 -
4000 Series
Art.4202 - Installation instructions
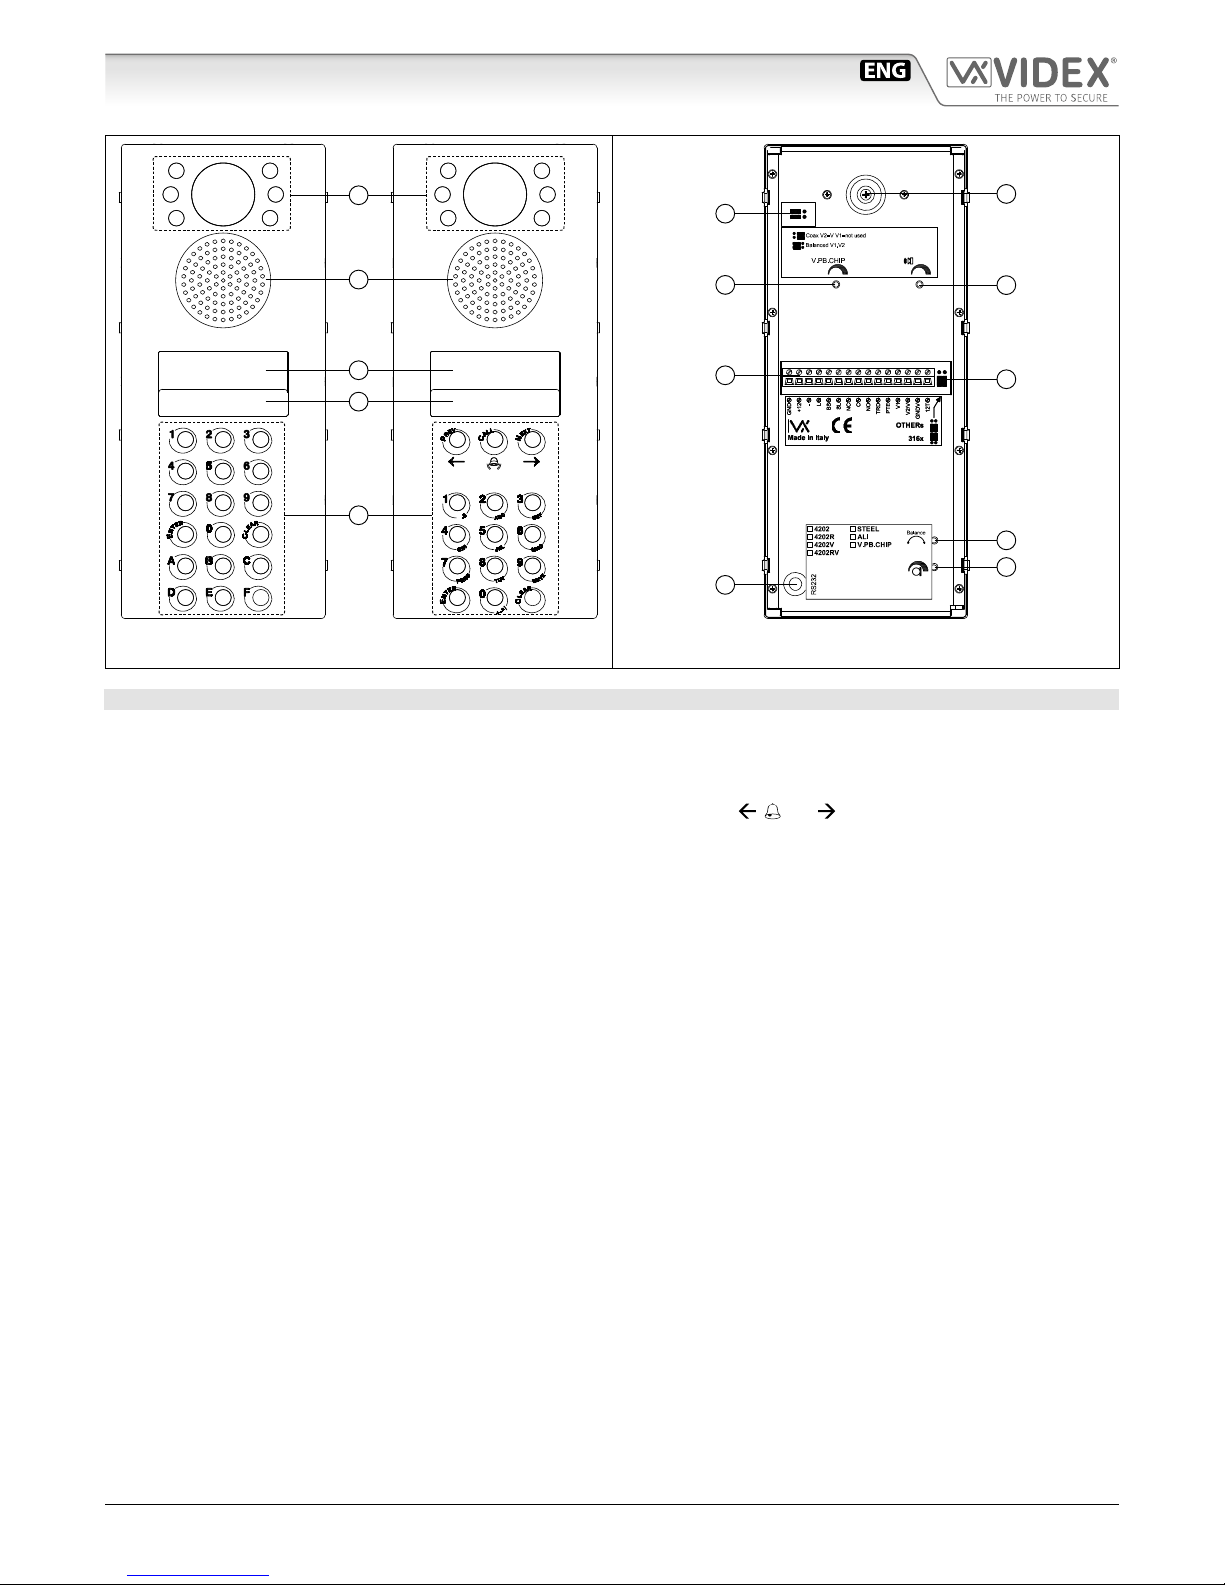
Art.4202 Audio/video digital front panel
A
B
C
D
E
Art.4202V Art.4202RV
Fig. 1
G
I
O
M
P
F
L
H
N
Fig. 2
DESCRIPTION
Digital front panel based on the “2 Wire” BUS system (video versions Art.4202V and Art.4202R use a 6 Wire bus for non coax or a 4
+ coax for coax video systems).
These modules house the speaker and camera units which t into a two module 4000Series back box.
All versions have 10 numeric buttons (0…9) plus ENTER and CLEAR buttons: in addition to these, 6 alphabetic buttons (A...F) can
be incorporated on the standard version while the (“R”) versions have 3 buttons (
, and
) to manage the repertory names.
All versions have a 2 x 16 character LCD display with back lighting and keypad illumination panel, which are protected by a transparent
polycarbonate shield. The Art.4202 has acoustic and visual signalling as standard (displayed as messages on the LCD display and audio
annunciation) indicating the modes of operation.
Art.4202 allows for the connection of up to10 entrances on the same level and is compatible with the Art.2210 concierge.
The keypads allow the programming of up to 255 users (combinations of apartment number and access codes). The maximum
number of addressable devices with 3000Series is 180, with 900Series 150 and with Art.316X phones 254. More than one memory
location can link to a single apartment having dierent access codes and user names.
In addition to the standard features above, the 4000Series door panels have the following features:
• Serial RS232 for PC programming of the system (additional Art.2207 kit which includes software and pc connection cable)
• Trade Code (for use by trades persons)
• “Standard” or “Main” mode (for use with Art.2206N)
• Trades “Time Clock” (Art.701T) for use with Trades Code allowing access during specied times
• “Push to Exit” button input
• Door panel identication on concierge (concierge can identify from which door a call has originated)
• LCD display will display in six languages
• Audio annunciation of messages (for people with impaired sight)
• Programmable / editable stand-by message / Logo
• Phone address self test included in “Programming menu”
• Compatible with audio door entry systems using intercoms Art.316X (up to 254 ats)
• Options for balanced video signal or coaxial
All door panels are programmed as default to work with 3000Series intercoms and videointercoms, panels can be programmed to
work with 900Series units.
Page 2
66250200 - V2.1 - 15/08/18
- 2 -
4000 Series
Art.4202 - Installation instructions
Art.4202 Audio/video digital front panel
LEGEND
A
Camera and illumination LEDs
B
Loudspeaker
C
Display
D
Illumination LEDs for keypad
E
Keypad
F
Video signal setup jumpers (only Art.4202V and Art.4202RV)
G
Camera orientation adjustment
H
Volume play back speech adjustment (only on version with
play back chip)
I
Loudspeaker volume
L
Connection terminals
M
Phones, videophones type setup jumpers
N
Serial RS-232 connector (for PC connection)
O
Balance
P
Microphone volume
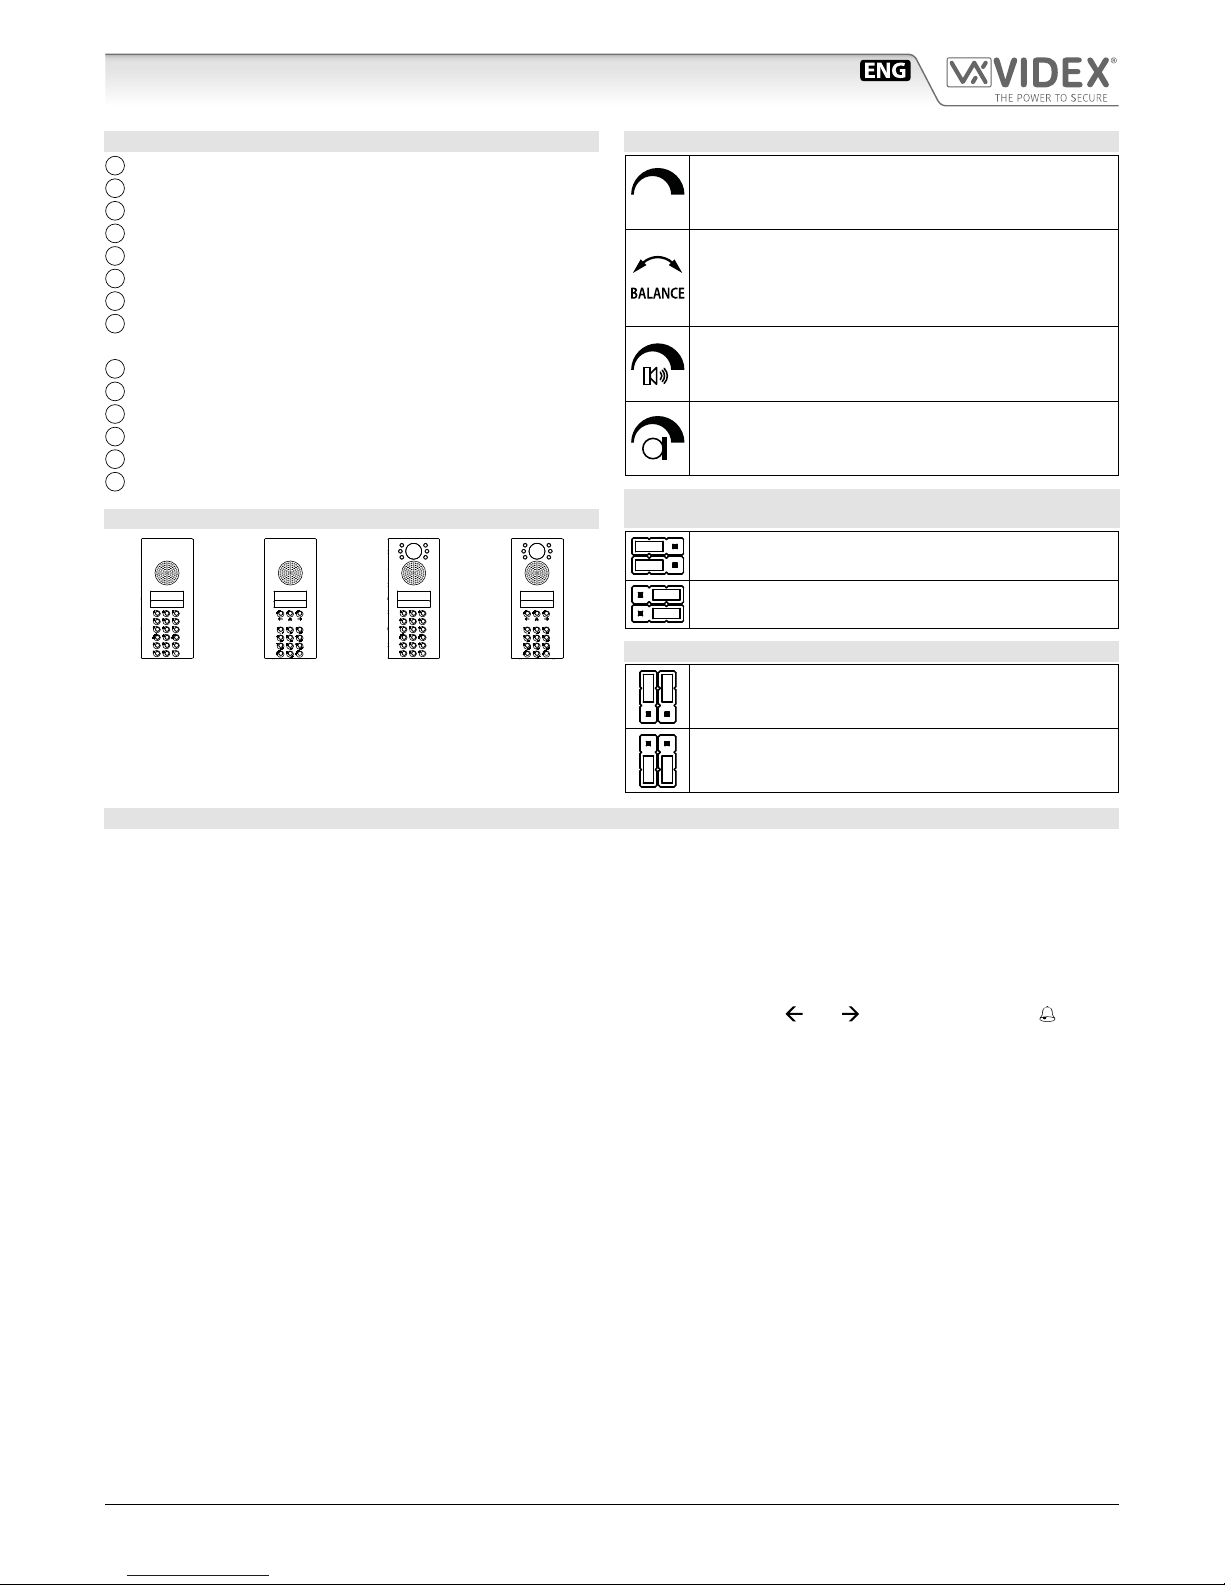
AVAILABLE VERSIONS
Art.4202
Audio only
Art.4202R
Audio only
with repertory
name
Art.4202V
Audio/video
Art.4202RV
Audio/video
with repertory
name
CONTROLS
SPB
Play back speech volume
Adjust the play back speech volume.
Rotate clockwise to increase or anti-clockwise to decrease.
Balance
Prevent Larsen eect on bidirectional audio conversation. Refers to the Speech adjustment of “VX2200
- General directions for installation” techincal manual
Loudspeaker volume
Adjust the loudspeaker volume.
Rotate clockwise to increase or anti-clockwise to decrease.
Microphone volume
Adjust the microphone volume.
Rotate clockwise to increase or anti-clockwise to decrease.
VIDEO SIGNAL SETUP JUMPERS ONLY ART.4202V AND
ART.4202RV
Both left = balanced video
Both right = coax video
PHONES, VIDEOPHONES TYPE SETUP JUMPERS
Both top = Art.316X phones
Both bottom = all other phone and videophones
models
OPERATION
IN STANDBY MODE
The display alternates between “ENTER FLAT NUMBER” (or “SEARCH” on Art.4202R and Art.4202RV versions) and the stand-by mes-
sage or logo and is ready to accept: a at / apartment number or the search for user name using the “Repertory Name” facility (Art.4202R
and Art.4202RV only) to make a call, enter an access code to open the door, operate the trade code or enter the programming code.
If a time clock is tted (Art.701T) and connected to the door station, the trade code is enabled or disabled by the time clock input signal.
TO CALL A TENANT
Enter the at number (alphanumeric code up to 6 digits for Art.4202 and Art.4202V or a numeric code up to 6 digits for Art.4202R
and Art.4202RV) and press ENTER or scroll the user names on the display by operating
and buttons and press the button:
the at / apartment number is displayed on the LCD display and the call is acoustically signalled.
“CALL IN PROGRESS” will appear until the call is answered. If a mistake is made or there is no answer to the call press CLEAR to
cancel and end the call.
“SPEAK” indicates that the at / apartment has answered and a conversation can take place. “DOOR OPEN” and an acoustic signal
indicate that the door has been opened.
At the end of the conversation, “END” will indicate the system has reset and awaits another call.
TO OPEN THE DOOR USING THE CODED ACCESS FACILITY
• press the 0 or code button, the display will show “CODE:”, enter the access code (up to 6 digits), a “
*
” will appear for each digit,
then press ENTER; if the code is correct, the LCD display will show “DOOR OPEN” on the second line and an acoustic signal will
announce the opening of the door for the time programmed.
• using trade code, press CLEAR push button; the LCD display will show “TRADE:”; enter the trade code (for each digit a “*” will
appear) and then press ENTER; if the code is correct, the LCD display will show “DOOR OPEN” on the second line and an acoustic
signal will announce the opening of the door for the time programmed otherwise a wrong code is signalled by “ERROR !” mes-
sage and acoustic signal.
Page 3

66250200 - V2.1 - 15/08/18
- 3 -
4000 Series
Art.4202 - Installation instructions
Art.4202 Audio/video digital front panel
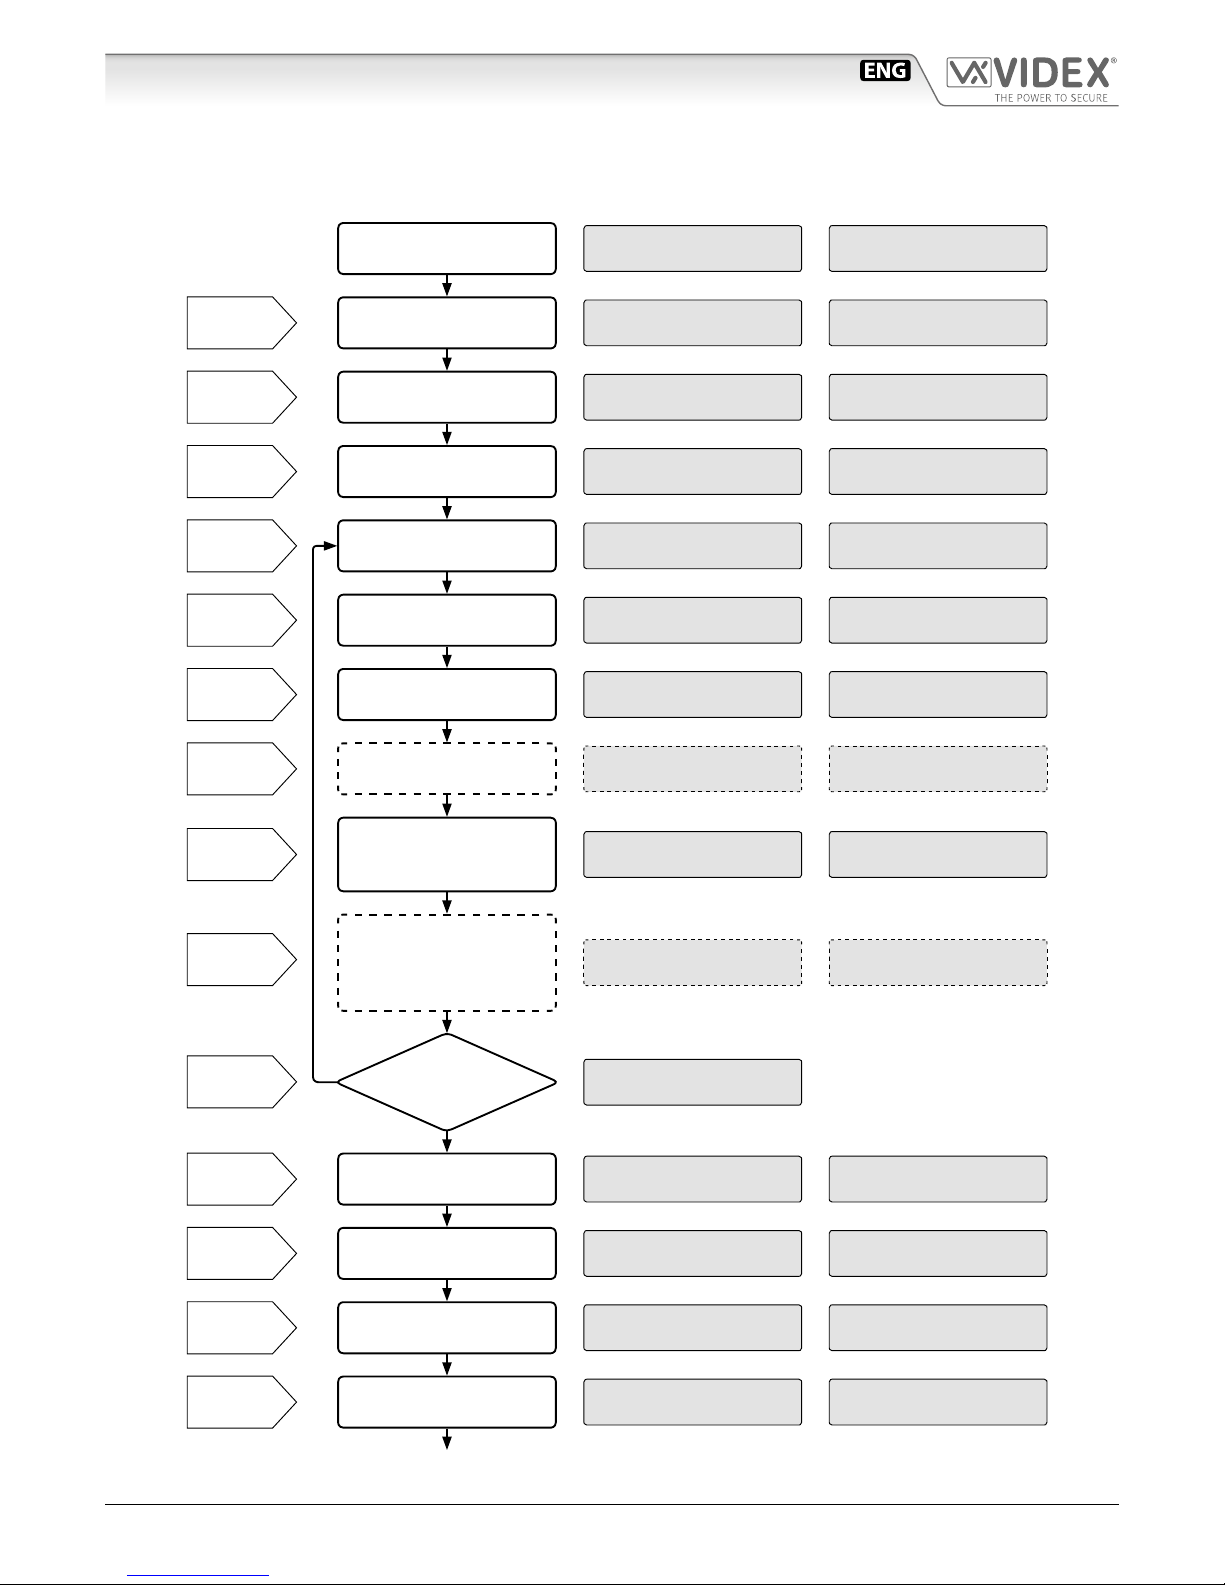
PROGRAMMING
The Digital Panel programming owchart on pag. 6 shows the procedure for programming the door panel. The programming is
carried out using the keypad. The programming is protected by a master code and enables:
• set to work with 3000Series or with 900Series;
• the master code to be changed;
• trade code to be changed;
• program the at number to the relevant dip switch setting on the telephone (Max. 6 char alphanumeric code for Art.4202 and
Art.4202V or numeric code for Art.4202R and Art.4202RV);
• program the access code for the user;
• program the speech time;
• program the door opening time;
• program the device number;
• enable speech play back system;
• program the “Master/Slave” setting ( Master for the main station and Slave for all others);
• execute phone address self test.
HOW TO PROGRAM
To use the digital front panel combined with 3000Series intercoms and videointercoms, press the ENTER button while giving power to the unit and wait until the display shows the message “S3000”, to release the button.
To use the digital front panel combined with 900Series intercoms and videointercoms, press the CLEAR button while giving power
to the unit and wait until the display shows the message “S900”, to release the button.
The programming allows for both the inserting of new data and the modifying of existing data, therefore, the data in memory, even
if empty, will be shown on the display to be either modied or conrmed.
1. From stand-by mode (display shows “ENTER FLAT NUMBER”), press 0 then type in the master code (111111 if factory default),
followed by the ENTER button. A continuous acoustic signal and the message “ERROR !” on LCD display means a wrong code;
try again with the right code.
2. The display will show “NEW:”: press the ENTER button twice to conrm the code or type the new master code (from 1 to 6 char-
acters: numbers from 0 to 9 and characters from A to H) and press the ENTER button.
3. The display shows “TRADE C.:”: press the ENTER button twice to conrm the code or type the new trade code (from 1 to 6
digits) and press the ENTER button.
4. The display shows “MODE : STANDARD” (rst line) - “1=MAIN” (second line): press ENTER button to keep the “STANDARD”
mode if the panel is installed after a Art.2206N block exchanger or if there aren’t any Art.2206N; while press button 1 to set
“MAIN” mode if the panel is installed before one or more Art.2206N block exchangers.
5. The display shows “MEM LOCATION:”, press ENTER button twice to jump to the next programming mode (step 5) or type the
number of the “Mem Location” (0 for logo 1, from 1 to 254 for ats or 255 for logo2) and press ENTER. After selection of memory location it is possible to insert user informations: the at code, the code that typed on front panel keypad make a call to relevant user;
the Phone Id, the ID programmed on phone dip-switch relevant to user; the door code, the code that typed on front panel keypad
open the door and the user name (only Art.2202-1R), a 16 characters description shown to visitors during repertory name scrolling.
» The display shows “FLAT:”, type the at number (up to 6 alphanumeric characters for Art.4202 and Art.4202V and up to 6
numerical charactes for Art.4202R and Art.4202RV) and press ENTER or press ENTER twice to conrm the same value (the
at code is the code that when typed from the outdoor station will call the relevant user-at);
» The display shows “ID. PHONE:” type phone ID. (This should have been already congured on the phone dip-switches be-
fore power up, from 1 to 150 for 900Series, from 1 to 180 for 3000Series or from 1 to 254 on audio systems with Art.316x
phones) then press ENTER or press ENTER twice to conrm the same value;
» Only if the “Main mode” is enabled, the display shows “2206N N.:” type block number. (This is a value from 1 to 15 that
should have been already congured on the block exchanger Art.2206N dip-switches to which the phone/videophone is
connected) then press ENTER or press ” twice to conrm the same value;
» The display shows “DOOR CODE:”, it is possible to enter a door opening code (numeric user code to open the door from 1
to 6 digits) and press ENTER or press ENTER twice to conrm the same value;
» (Only Art.4202R - Art.4202RV). The display shows “USER NAME”, it is possible to enter a user namer (description of max
16 character) then press ENTER or press ENTER twice to conrm the same value. To insert text data from outdoor station
keypad, please make reference to table on pag. 4.
The programming starts again from step 4. To edit the logo, select memory location “0”; the LCD display will show “LOGO:”
followed by the current logo if entered previously: press ENTER twice to conrm current logo or type the new logo. Proceed in
the same way to edit alternative logo but select memory location “255”. To insert text data from outdoor station keypad, please
make reference to table on pag. 4.
6. The display shows “SPEECH TIME:”, followed by the value of the speech time previously set up. Press ENTER twice to conrm
the time programmed or type a new value from 1 to 255 (secs) then press ENTER.
7. The display shows “DOOR TIME:” followed by the value of the time previously programmed. Press ENTER twice to conrm the
Page 4
66250200 - V2.1 - 15/08/18
- 4 -
4000 Series
Art.4202 - Installation instructions
Art.4202 Audio/video digital front panel
time programmed, or type a new value from 1 to 255 (secs) then press ENTER.
8. The display shows “DEVICE N.:” followed by the device number previously programmed. Press ENTER twice to conrm the
current value, or type a new value from 1 to 15 then press ENTER.
9. The display shows the languages available (the language selected at this stage of the programming refers exclusively to the
user messages, while the programming messages are always in English) with a ashing cursor corresponding to the active language: “0 = ENG (English), 1 = IT (ITALIAN), 2 = SP (Spanish), 3 = POR (Portuguese), 4 = FR (French), 5 = GER (German)”;
press ENTER twice to conrm the active language or type the number corresponding with the new one; the system will jump
automatically to the next programming step;
10. The display shows speech board available settings “0=NO 1=M. 2=F.” with a ashing cursor corresponding to the active setting:
press ENTER twice to conrm current setting or type “0” to disable speech board, “1” to enable speech board with male voice,
“2” to enable speech board with female voice. The speech board option must be installed on outdoor station;
11. If the display shows “MASTER: YES”, press 0 button to set the unit as SLAVE, otherwise, if it is already SLAVE (the display shows
“MASTER: NO”), press the 1 button to set as MASTER or press ENTER to leave the programming unchanged.
12. The display shows “1=TEST FLAT” on the rst row “ENTER=END” on the second row. Press ENTER to exit from the program-
ming menu otherwise press 1 to start phone address self test. The test makes calls to each phone installed on the system and
will stop if a connection error is found (“ERR” message on LCD display). Press 1 button to continue the test with the next phones
otherwise press ENTER button to exit from programming menu.
The system is ready to use.
VIDEO SYSTEM SETUP ONLY ART.4202V, ART.4202RV
Please, refer to point
F
of Fig. 2. Put both jumpers left for balanced video signal or both right for coax video signal.
CONNECTED DEVICES KIND SETUP
Please, refer to point
M
of Fig. 2. Put both jumpers at the top position for audio systems using Art.316X phones or put both bottom
for audio or audio/video systems using phones and/or videophones 900 or 3000 Series.
PROGRAMMING NOTES
a. During the programming of the master door panel, all slave door panels will be o line.
b. If the programming of the MASTER device is wrong (Eg. programmed as a SLAVE when it should be a MASTER), an error condition
takes place signalled by the message “ERROR!” on the display. To recover from this situation keep the 0 button pressed until the
unit goes back to the display showing “CODE”. Perform the programming again correcting the error. Alternatively programming
a SLAVE as a MASTER can cause feedback (Larsen eect) during the conversation.
c. The entering of values not admitted is signalled by an error message, the unit waits for a valid entry before going on with the
programming.
d. Pressing the CLEAR button, at any stage will clear the current data previously entered.
e. To allow the call to the concierge unit Art.VX2210-1/V (if present), combine the “at number” to the “ID PHONE” address n.1.
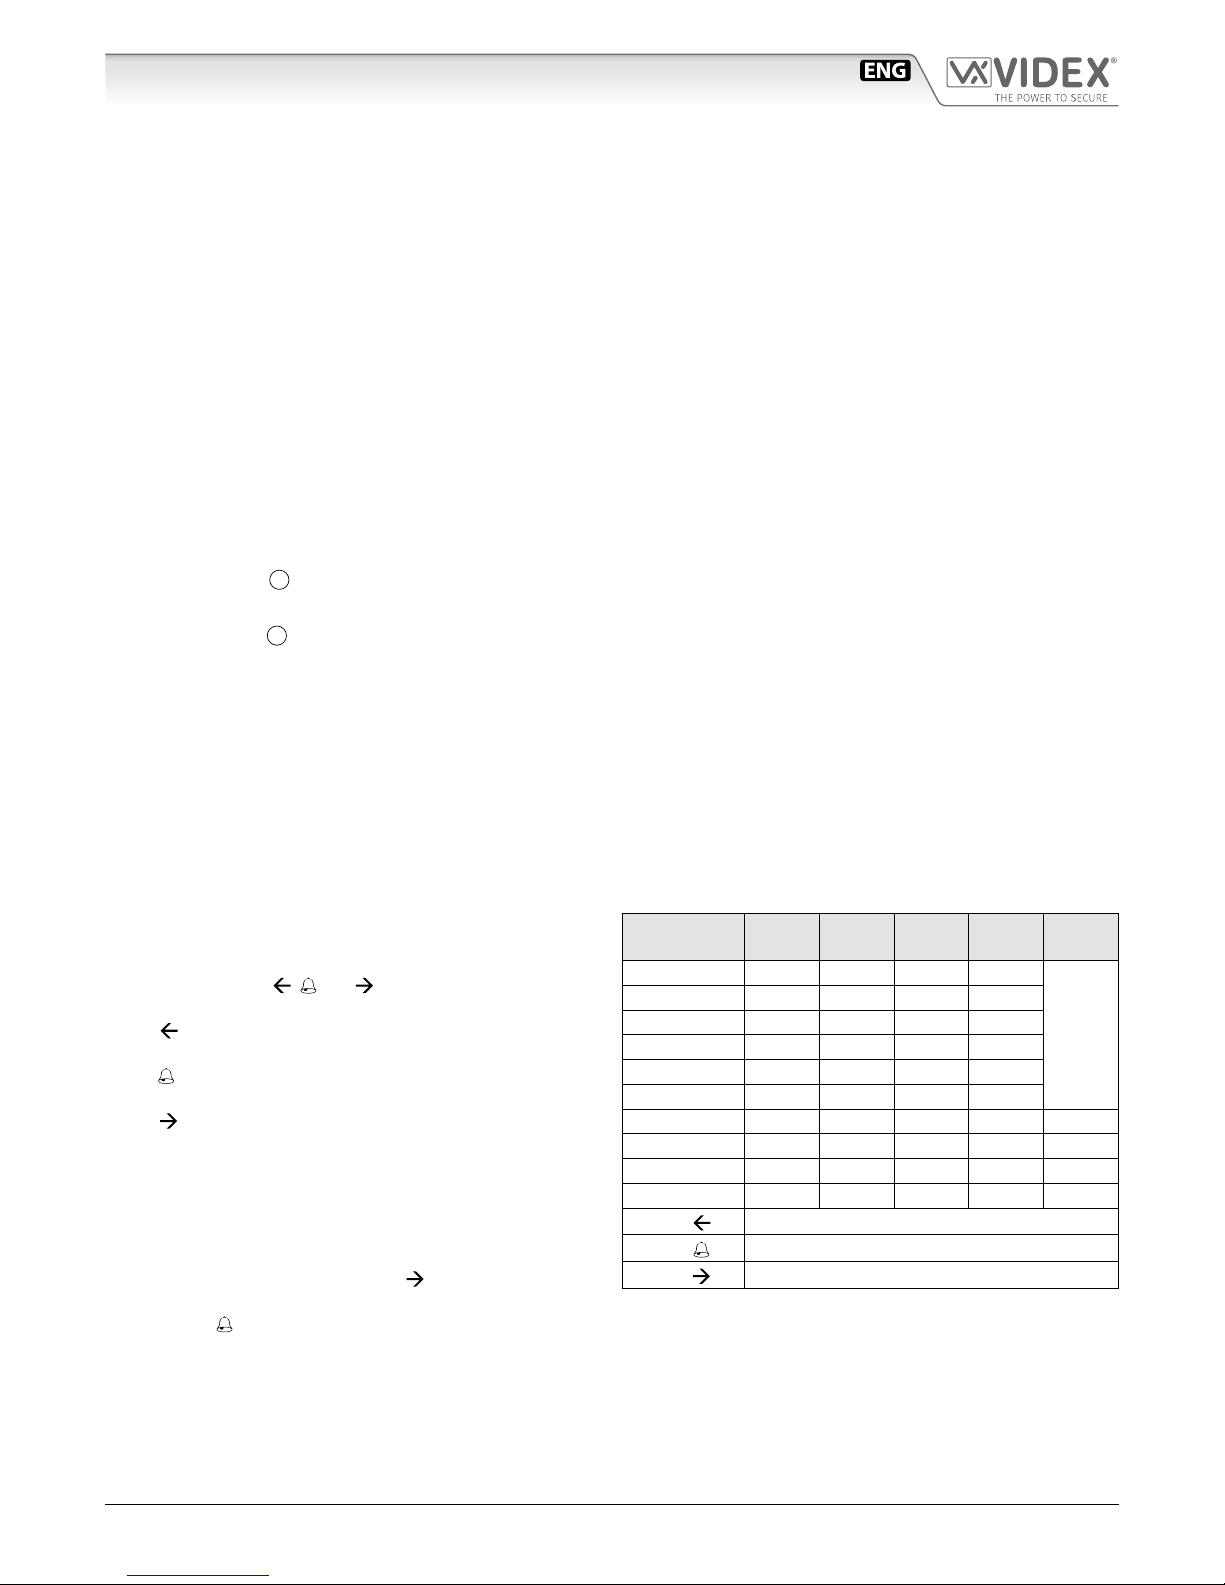
Text typing with Art.4202 is similar to mobile phone text typing.
This table shows the characters and symbols that can be typed by
pressing one or more times the keypad numeric push buttons. The
buttons A, B and C or , and (depending of panel version)
are used for special functions:
• A or button erases the last character like PC keyboard back-
space;
• B or push button conrm the inserted text and the end of typ-
ing;
• C or push button conrms the character inserted (Also the
character conrmed by pressing a dierent numeric push button).
For instance, to type the name “BRASS” it is necessary to press:
“B”: 2 times 2 button
“R”: 3 times 7 button
“A”: 1 times 2 button
“S”: 4 times 7 button followed by C or button
“S”: 4 times 7 button
Press the B or button to conrm the inserted data.
Keys/Pressing
times
Once Twice 3 times 4 times 5 times
1 “Space” “.” “&” “1”
NOT USED
2 “A” “B” “C” “2”
3 “D” “E” “F” “3”
4 “G” “H” “I” “4”
5 “J” “K” “L” “5”
6 “M” “N” “O” “6”
7 “P” “Q” “R” “S” “7”
8 “T” “U” “V” “8” NOT USED
9 “W” “X” “Y” “Z” “9”
0 “+” “–” “*” “/” “0”
A or
Delete last inserted char
B or
End text insertion
C or
Conrm last inserted char
Page 5
66250200 - V2.1 - 15/08/18
- 5 -
4000 Series
Art.4202 - Installation instructions
Art.4202 Audio/video digital front panel
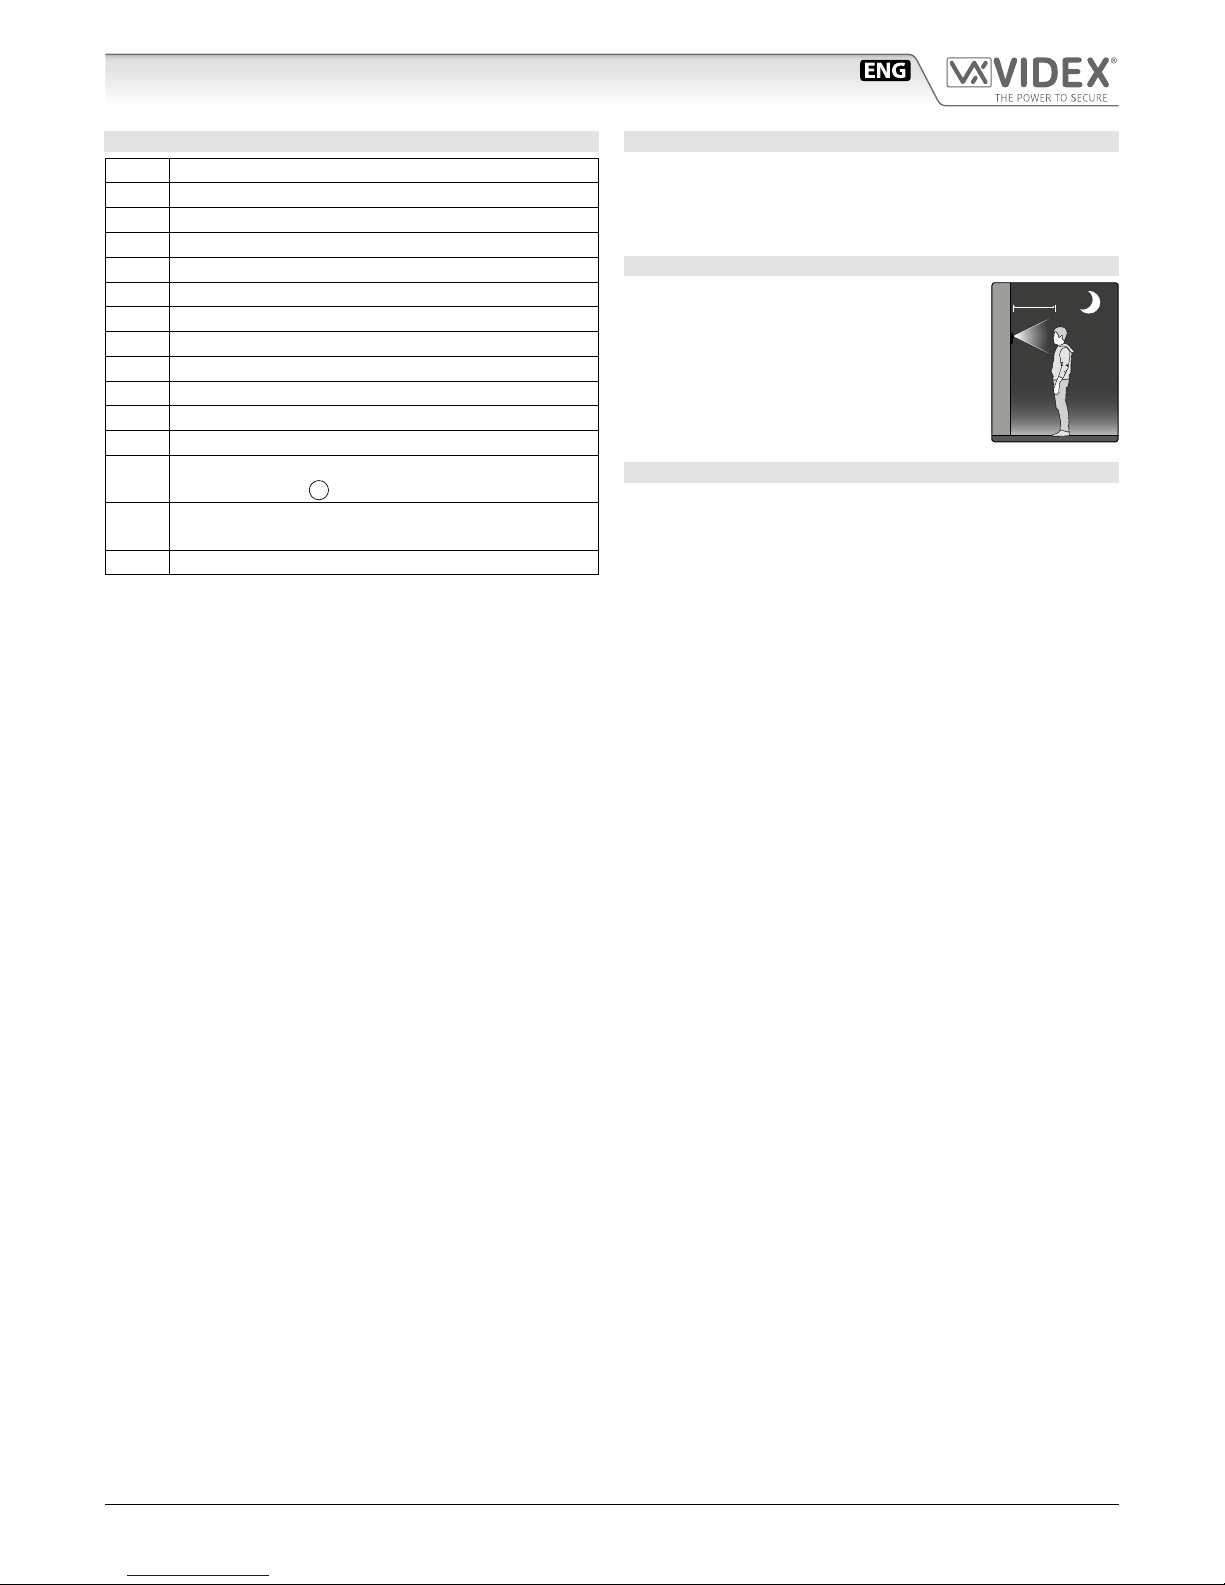
CONNECTION TERMINALS SIGNALS
GND Power supply - ground
+12 Power supply - positive
– BUS connection - negative
L BUS connection - positive
BS “Busy system” signal
SL Accessory control signal
NC Relay out - normally close contact
C Relay out - common contact
NO Relay out - normally open contact
TRD Trade signal (from Art.701T)
PTE Push to exit button
V1 Balanced video signal sync+
V2/V Balanced video signal sync– (V2) or coax video signal
(V) refer to point
F
GNDV Camera power supply ground & video ground on coax
video system
12T +12Vdc camera power supply input
TECHNICAL SPECIFICATIONS
Memory capacity: 998 users
Working voltage: 13 Vdc +/- 10%
Max. absorption: about 350 mA
Working temperature: -10 +50° C
MAXIMUM ILLUMINATION DISTANCE FROM CAMERA AT NIGHT
The illumination LED’s within the camera will
illuminate the visitor when they are within
50cm of the camera.
Note: The camera supplied may be either
a CCD (With IR illumination) or CMOS (With
white LED illumination) sensor. This dierence
does not aect the performance.
MAX 50 cm
CLEANING OF THE PLATE
Use a clean and soft cloth. Use moderate warm water or non-aggressive cleansers.
Do not use:
• abrasive liquids;
• chlorine-based liquids;
• metal cleaning products.
Page 6
66250200 - V2.1 - 15/08/18
- 6 -
4000 Series
Art.4202 - Installation instructions
code:*******
ENTER PRESET FACTORY
CODE: 0+6X1 (0111111)
code:*******
New:*******
ENTER MASTER CODE
(1 to 6 digits)
trade c.:xxxxxx
New:xxxx
ENTER “TRADE“ CODE
(1 to 6 digits)
Mode:standard
1=main
Set STANDARD or MAIN
MODE
mem.location:
ENTER MEMORY LOCATION
(1 to 998)
Flat:
New:xxxxxx
ENTER FLAT NUMBER
(1 to 6 digits)
ID Phone:
New:xxx
ENTER ID PHONE ADDRESS
(1 to 180)
Door code:
New:xxxxxx
ENTER “USER” CODE TO
OPEN THE DOOR
(1 to 6 digits)
User name:
xxxxxxx xxxxxxx
ENTER “USER NAME”
(R version only)
BY USING LETTERS ON
KEYPAD
MEM. LOCATION:
SPEECH TIME:XXX
NEW:XXX
ENTER “SPEECH TIME”
(1 to 255 sec)
DOOR TIME:XXX
NEW:XXX
ENTER “DOOR TIME”
(1 to 255 sec)
DEVICE NR:XXX
NEW:XXX
ENTER “DEVICE NUMBER”
(1 to 15)
SET LANGUAGE
(0 to 5)
[0]=ENG,1=IT,2=ESP,
3=POR, 4=FR, 5=GER
[0]=ENG,1=IT,2=ESP,
3=POR, 4=FR, 5=GER
SPEECH TIME:255
NEW:120
DOOR TIME:255
NEW:3
DEVICE NR:1
NEW:9
2206N N.
NEW: XXX
ENTER BLOCK NUMBER
2206N Addr. (1 to 15)
code:*******
code:*******
New:*******
trade c.:0
New:1234
Mode:standard
1=main
mem.location: 15
Flat:
New: 15
ID Phone:
New:15
Door code:
New:123456
User name:
HOGART STEVE
2206N N.
NEW: 2
On LCD display
PRESS ENTER
BUTTON
Example
OTHER
USER TO
PROGRAM?
YES
NO
NOTE 1
NOTE 1
NOTE 2
NOTE 3
NOTE 1,4
NOTE 1,4
NOTE 1,4
NOTE 6,4
NOTE 1
NOTE 1
NOTE 1
NOTE 1
NOTE 7
NOTES
1,4,5
CONTINUED ON NEXT PAGE
Art.2202, Art.4202, Art.8202
Digital Panel programming owchart (Fw. rev 5.6 or later)
Page 7

66250200 - V2.1 - 15/08/18
- 7 -
4000 Series
Art.4202 - Installation instructions
[0]=NO 1=ST 2=CMB
SPEECH BOARD
SET SPEECH PLAYBACK
MODE (0,1,2)
MASTER: NOT
1=YES
MASTER/SLAVE SETTING
(0=SLAVE, 1=MASTER)
1=TEST FLAT
"ENTER"=END
AUTOMATIC FLAT TEST
(1 or ENTER)
ENTER FLAT NR. OR
<- SEARCH ->
SYSTEM READY TO USE
[0]=NO 1=ST 2=CMB
SPEECH BOARD
MASTER: YES
0=NO
TEST FLAT 101
ID PH:101 OK
ENTER FLAT NR. OR
<- SEARCH ->
NOTE 8
NOTE 9
NOTE 10
CONTINUED FROM PREVIOUS PAGE
On LCD display Example
NOTA 1: To jump to the next programming press twice ENTER button and the existing information will be kept, while to insert
new data type the new information and press ENTER button just once. If you make any mistake while typing, press
CLEAR button to erase and insert back the information.
NOTA 2: To move to the next programming press 0 button for STANDARD mode, 1 button for MAIN mode or ENTER button to
keep the programming unchanged. Set MAIN mode when the panel is connected before one or more Art.2206N or set
STANDARD mode when Art.2206N are not installed in the system or the panel is connected after one of them.
NOTA 3: To move to the next programming, press twice ENTER button or type the location number you want to change and press
ENTER button to start inserting the location information.
From 5.0 Firmware revision and following, memory locations n. 0 and n. 999 are for display logo during stand-by mode.
NOTA 4: ATTENTION! If you press CLEAR button you will erase all memory location contents.
NOTA 5: This programming is available when the panel is set in main mode only.
NOTA 6:
This programming is only available in panels with name repertory where user name is required type the user name using
the push button and following the table below: once you have nished typing the name conrm by pressing button.
o A= Back
o B= Accept
o C= Forward
1= . & 2= ABC 3= DEF
4= GHI 5= JKL 6= MNO
7= PQRS 8= TUV 9= WXYZ
0= + – * /
To change the stand-by logo (special locations n.0 and n.999) use the same table above:
, and buttons are respec-
tively replaced by A, B and C buttons.
NOTA 7: To jump to the next programming , press twice ENTER button to keep existing information unchanged or press one of
the keys requested.
NOTA 8: To jump to the next programming, press twice ENTER button to keep existing information unchanged or press one of
the keys requested. In “ST” mode the speech boaro will speak numbers digit by digit while in “CMB” mode it will speak the
complete number.
NOTA 9: Among all the analogical or digital panels installed on the same level, one must be a “MASTER” unit. To move to the next
programming press once ENTER button otherwise press one of the button required ( 0 or 1).
NOTA 10: Press ENTER button to end the programming or 1 button to start the test. if you press 1 button the panel starts the con-
nection test with all the programmed devices and shows the test result in case an error occur the test stops: press ENTER
button to end or carry on by pressing 1 button.
Art.2202, Art.4202, Art.8202
Digital Panel programming owchart (Fw. rev 5.6 or later)
Page 8

66250200 - V2.1 - 15/08/18
- 8 -
Serie 4000
Art.4202 - Istruzioni di installazione
Art.4202 Pannello digitale audio/video
A
B
C
D
E
Art.4202V Art.4202RV
Fig. 1
G
I
O
M
P
F
L
H
N
Fig. 2
DESCRIZIONE
L’Art.4202 (Art.4202R, Art.4202V, Art.4202RV ) è una tastiera digitale di chiamata per il sistema citofonico “BUS 2 li” (le versioni
video Art.4202V e Art.4202RV utilizzano un bus a 6 li o 4+coassiale in base al tipo di sistema video). Pur ospitando anche il portiere
elettrico, sia nella versione audio che audio/video, l’unità occupa lo spazio di 2 moduli della serie 4000. La tastiera ospita di base 10
tasti numerici (0..9) più i tasti ENTER e CLEAR: in aggiunta possono essere presenti 3 tasti (
, e
) per la gestione del repertorio
nomi (nelle versioni “R”) o 6 tasti alfabetici (A..F) nelle versioni standard.
Tutte le versioni montano un display LCD retroilluminato ad alto contrasto da 2 righe per 16 caratteri e dispongono dei LED d’illu-
minazione tastiera, il tutto è protetto da uno schermo in policarbonato trasparente.
La programmazione e l’utilizzo sono agevolati da messaggi visivi ed acustici. L’Art.4202 permette la connessione di più ingressi sullo stesso
livello no ad un massimo di 10 unità ed è compatibile con il centralino di portineria Art.2210. La pulsantiera gestisce no a 180 (150 con la
Serie900 e 254 in impianti audio con citofoni Art.316X) appartamenti, ma permette di programmare no a 255 chiamate utente (abbinamento tra l’indirizzo sico del citofono/videocitofono ed il codice appartamento) per ciascuna delle quali è possibile memorizzare il codice
appartamento, il codice individuale d’accesso (funzione apri-porta con codice) ed il nome utente (16 caratteri solo nelle versioni Art.4202R
e Art.4202RV): questo da la possibilità di poter associare più codici appartamento e codici apri-porta ad uno stesso appartamento.
In aggiunta alle funzioni di base sopra descritte, le tastiere digitali Serie4000 hanno le seguenti funzionalità:
• possibilità di programmazione da personal computer tramite connessione seriale RS232 (è necessario il kit Art.2207 che comprende software e cavo di collegamento);
• gestione del “Trade Code” (codice “apri-porta” riservato ai visitatori periodici come il postino, fattorino ecc.);
• Modo “Standard” o “Main” (per l’utilizzo insieme agli scambiatori di blocco Art.2206N);
• possibilità di interfacciamento con l’Art.701T “Time Clock” (per l’abilitazione temporizzata del “Trade Code”);
• gestione dell’identicativo del posto esterno (da centralino è possibile conoscere da quale posto esterno proviene la chiamata);
• possibilità di selezionare sei dierenti lingue per i messaggi informativi relativi al funzionamento;
• gestione del pulsante interno “apri-porta” (dall’interno dello stabile permette di attivare la serratura elettrica ed aprire la porta);
• gestione della sintesi vocale (questa funzionalità permette di agevolare i visitatori non vedenti);
• possibilità di personalizzare il logo di stand-by ed un secondo logo che viene mostrato alternativamente a quello standard;
• test automatico delle connessioni e degli indirizzamenti;
• possibilità di utilizzo in sistemi audio con citofoni Art.316X (no 254 appartamenti);
• funzionamento in sistemi video con cavo coassiale o con segnale video bilanciato (solo per le versioni “V”)
Tutte le versioni di tastiera sono programmate di fabbrica per l’impiego in abbinamento ai citofoni e videocitofoni della Serie3000,
ma possono essere programmate per l’impiego con i prodotti della Serie900.
Page 9

66250200 - V2.1 - 15/08/18
- 9 -
Serie 4000
Art.4202 - Istruzioni di installazione
Art.4202 Pannello digitale audio/video
LEGENDA
A
Telecamera e LED di illuminazione
B
Altopralante
C
Display
D
LED di illuminazione tastiera
E
Tastiera
F
Jumper di impostazione segnale video (solo Art. 4202V e
Art.4202RV)
G
Regolazione orientamento telecamera
H
Regolazione volume sintesi vocale (solo per versioni con
chip per la sintesi vocale)
I
Volume altopralante
L
Morsetteria di connessione
M
Jumper d’impostazione tipo citofoni/videocitofoni
N
Connettore seriale RS-232 (per collegamento al PC)
O
Bilanciamento
P
Microphone volume
VERSIONI DISPONIBILI
Art.4202
Solo audio
Art.4202R
Solo audio
con repertorio
nomi
Art.4202V
Audio/video
Art.4202RV
Audio/video
con repertorio
nomi
REGOLAZIONI
SPB
Volume sintesi vocale
Regolazione del volume sintesi vocale.
Ruotare in senso orario per aumentare o antiorario per diminuire
Bilanciamento
Previene l’eetto Larsen su conversazione audio bidirezionale.
Rif. Regolazione della fonia sul manuale tecnico
“VX2200 - Norme generali di installazione”
Volume altoparlante
Regolazione del volume dell’altopalralte.
Ruotare in senso orario per aumentare o antiorario per diminuire
Volume microfono
Regolazione del volume del microfono.
Ruotare in senso orario per aumentare o antiorario per diminuire
JUMPER DI IMPOSTAZIONE SEGNALE VIDEO SOLO
ART.4202V E ART.4202RV
Entrambi a sinistra = segnale video bilanciato
Entrambi a destra = cavo coassiale
JUMPER D’IMPOSTAZIONE TIPO CITOFONI/VIDEOCITOFONI
Entrambi in alto = citofoni Art.316X
Entrambi in basso = tutti gli altri modelli di citofoni/
videocitofoni
FUNZIONAMENTO
IN POSIZIONE DI RIPOSO CONDIZIONE DI STANDBY
Il display mostra alternativamente il logo standard “ENTER FLAT NUMBER” (“CERCA” negli Art.4202R e Art. 4202RV ) e quello
personalizzato con un intervallo di circa 3 secondi; l’unità è pronta ad accettare: il codice appartamento (codice relativo all’appartamento dell’utente cercato) o la ricerca tramite repertorio nomi (solo Art.4202R e Art.4202RV), il codice “apriporta”, il “codice visitatore periodico” (“Trade Code”) o il codice di programmazione. Il “codice visitatore periodico” può essere sempre attivo o abilitato ad
intervalli di tempo se al posto esterno è collegato l’Art.701T (“Time Clock”).
PER CHIAMARE UN UTENTE
Digitare il codice di chiamata (codice alfanumerico no a 6 caratteri per 4202-4202V e numerico no a 6 cifre per l’Art. 4202R e
Art.4202RV) e premere il pulsante “ENTER” oppure (solo Art.4202R e Art.4202RV) cercare l’utente desiderato scorrendo l’elenco
nominativo con i tasti
e e chiamare premendo il tasto ; il display mostra il codice inserito e la scritta “CALL IN PROGRESS”
no alla risposta dell’utente o allo scadere del timeout di 60 secondi.
In caso di errore o mancata risposta, premere il pulsante “CLEAR” per annullare la chiamata. Il messaggio “SPEAK” a display, indica che
la connessione è stata eettuata e si può instaurare la conversazione con l’utente. Il messaggio “DOOR OPEN” ed un segnale acustico
intermittente, indicano che l’utente ha aperto la porta. A ne conversazione il display mostra la scritta “END” per qualche secondo.
PER APRIRE LA PORTA
• Premere il pulsante 0, il display mostra la scritta “CODE:”; digitare il codice (“apri-porta”) segreto numerico no a 6 cifre (per ciascuna
cifra digitata apparirà sul display un carattere “
*
”), quindi premere il pulsante ENTER. Il display LCD mostrerà la scritta “DOOR OPEN”
sulla seconda riga e l’apertura della porta, per il tempo programmato, sarà accompagnata da un segnale acustico intermittente. La digitazione di un codice errato viene segnalata dal messaggio “ERROR !” sul display e da un segnale acustico intermittente.
• utilizzando il “codice visitatore periodico”, premere il tasto CLEAR, il display mostra la scritta “TRADE:”; digitare il codice segreto numerico
no a 6 cifre (per ciascuna cifra digitata apparirà sul display un carattere “*”), quindi premere il pulsante ENTER. Il display LCD mostrerà la
scritta “DOOR OPEN” sulla seconda riga e, l’apertura della porta per il tempo programmato, sarà accompagnata da un segnale acustico intermittente. La digitazione di un codice errato viene segnalata dal messaggio “ERROR!” sul display e da un segnale acustico intermittente.
PROGRAMMAZIONE
Il ow chart di programmazione a pag. 13 indica come programmare l’unità. La programmazione viene eettuata attraverso la
tastiera, solo dopo l’inserimento del codice segreto e permette di:
• impostare il funzionamento con la Serie3000 o la Serie900.
Page 10

66250200 - V2.1 - 15/08/18
- 10 -
Serie 4000
Art.4202 - Istruzioni di installazione
Art.4202 Pannello digitale audio/video
• modicare il codice segreto di programmazione;
• programmare il “codice visitatore periodico” (“trade code”);
• programmare i citofoni, videocitofoni e gli eventuali accessori addizionali (deve essere noto l’indirizzo programmato sul Dipswitch all’interno delle periferiche) con il numero di chiamata richiesto (codice alfanumerico no a 6 caratteri per il Art.4202 e
Art.4202V e codice numerico per Art.4202R e Art.4202RV);
• programmare il codice individuale di accesso;
• programmare la durata della chiamata;
• programmare il tempo di apertura porta;
• programmare il numero identicativo dell’unità;
• programmare le impostazioni per la sintesi vocale (sull’unità deve essere inserito l’apposito integrato);
• programmare la congurazione “Master/Slave” (Portiere principale sempre Master ed i secondari sempre Slave);
• eseguire il test delle connessioni e degli indirizzi per i citofoni/videocitofoni programmati nell’unità.
COME PROCEDERE ALLA PROGRAMMAZIONE
Per utilizzare la pulsantiera con i citofoni ed i videocitofoni Serie3000, dare alimentazione tenendo premuto il pulsante ENTER e
rilasciarlo alla comparsa del messaggio “S3000” a display.
Per utilizzare la pulsantiera con i citofoni ed i videocitofoni Serie900, dare alimentazione tenendo premuto il pulsante CLEAR e
rilasciarlo alla comparsa del messaggio “S900” a display.
La programmazione permette sia di inserire nuovi dati che di modicare i vecchi; durante le sue fasi verranno proposti i dati già
presenti in memoria, anche se nulli, per essere modicati o confermati. I messaggi di programmazione sono in lingua inglese.
1. Dalla modalità di riposo (messaggio sul display “ENTER FLAT NUMBER”) premere il tasto 0, quindi digitare il codice di pro-
grammazione (impostazione di fabbrica 111111 “sei volte uno”) seguito dal tasto ENTER; Un segnale acustico continuo ed il
messaggio “ERRORE !” sul display, indicano la digitazione di un codice errato; provare nuovamente digitando il codice corretto.
2. Alla richiesta “NEW:” premere 2 volte il tasto ENTER per confermare il vecchio codice, altrimenti digitare il nuovo codice di pro-
grammazione (codice numerico da 1 a 6 cifre) e premere il tasto ENTER;
3. Il display mostra “TRADE C.:”; premere 2 volte il tasto ENTER per confermare il vecchio “codice visitatore periodico”, altrimenti
digitare il nuovo codice (codice numerico da 1 a 6 cifre) e premere il tasto ENTER;
4. Il display mostra “MODE: STANDARD” (prima riga) – “1=MAIN” (seconda riga): premere ENTER per lasciare impostato il modo
“STANDARD” se il pannello è installato a valle di uno scambiatore di blocco Art.2206N o se nell’impianto non sono installati
scambiatori di blocco Art.2206N oppure premere il pulsante 1 per impostare il modo “MAIN” se il posto esterno è installato a
monte di uno o più scambiatoridi blocco Art.2206N.
5. Il display mostra la scritta “MEM. LOCATION:”; digitare il numero della locazione di memoria (da 1 a 254 per gli appartamenti,
0 per il “logo1” e 255 per il “logo2”) nella quale memorizzare i dati utente, altrimenti premere 2 volte il tasto ENTER per passare
alla fase successiva di programmazione. Una volta inserito il numero della locazione di memoria, verrà richiesto di digitare le
informazioni related all’utente: il codice appartamento “FLAT”, un codice alfanumerico di massimo 6 caratteri (il codice che si
utilizza dall’esterno per chiamare l’utente); l’identicativo citofono “ID PHONE:”, un codice numerico compreso tra 1 e 180 (150
per la Serie900 o 254 in sistemi audio con citofoni Art.316X), tale codice deve corrispondere a quello programmato in binario
sul dip-switch presente all’interno del citofono, videocitofono o accessorio installato nell’appartamento dell’utente; il codice
apri-porta “DOOR CODE:”, un codice numerico di massimo 6 cifre (il codice che, digitato sul posto esterno permette di aprire
la porta d’ingresso); il nome utente “USER NAME:” (solo Art.4202R e Art.4202RV), una descrizione di 16 caratteri al massimo (il
nome che viene mostrato consultando il repertorio nomi).
» Il display mostra la scritta “FLAT” seguita da un codice appartamento se la locazione era stata programmata in precedenza:
› per inserire un nuovo codice o modicare quello esistente, digitare il codice e confermare premendo il tasto ENTER;
› per passare alla voce successiva senza inserimenti o modiche, premere 2 volte il tasto ENTER.
» Il display mostra la scritta “ID PHONE:” seguita da un identicativo citofono se la locazione era stata programmata in precedenza:
› per inserire un nuovo identicativo citofono o modicare quello esistente, digitare l’identicativo e confermare premendo
il tasto ENTER;
› per passare alla voce successiva senza inserimenti o modiche, premere 2 volte il tasto ENTER;
» Se è abilitato il “Main mode”, il display mostra la scritta “2206N N.:” seguito da un valore di indirizzo di blocco (l’indirizzo di
blocco è quello da 1 a 15 impostato sullo scambiatore di blocco al quale il citofono/videocitofono che si sta registrando è
collegato) se la locazione era stata programmata in precedenza:
› per inserire un nuovo numero di blocco o modicare quello esistente, digitare il numero e confermare premendo il tasto ENTER;
› per passare alla voce successiva senza inserimenti o modiche, premere 2 volte il tasto ENTER;
» Il display mostra la scritta “DOOR CODE:” seguita da un codice apri-porta se la locazione era stata programmata in precedenza:
› per inserire un nuovo codice apri-porta o modicare quello esistente, digitare il nuovo codice e confermare con il tasto ENTER;
› b. per passare alla voce successiva senza inserimenti o modiche, premere 2 volte il tasto ENTER;
» (solo Art.4202R, Art.4202RV) Il display mostra la scritta “USER NAME:” seguita da un nome utente se la locazione era stata
programmata in precedenza:
› per inserire un nuovo nome utente o modicare quello esistente, digitare il testo facendo riferimento alle indicazioni ed
alla tabella di pag. 12;
Page 11

66250200 - V2.1 - 15/08/18
- 11 -
Serie 4000
Art.4202 - Istruzioni di installazione
Art.4202 Pannello digitale audio/video
› per proseguire senza modiche o inserimenti premere 2 volte il tasto ENTER.
La programmazione torna all’inizio del punto 4. Per la personalizzazione del logo, digitare, alla richiesta “MEM LOCATION:”, il
numero “0” e alla comparsa della scritta “LOGO:”, digitare il logo desiderato e confermare con la pressione del tasto ENTER
altrimenti premere 2 volte il tasto ENTER per lasciare invariata l’impostazione. Procedere in maniera analoga per la personalizzazione del logo alternativo inserendo, alla richiesta “MEM LOCATION:” il numero “255”. Per la modalità di digitazione del testo
relativo ai logo, consultare la tabella a pag. 12.
6. Il display mostra la scritta “SPEECH TIME:” seguita dal valore del tempo di conversazione precedentemente impostato. Premere
2 volte ENTER per confermare il tempo impostato, altrimenti digitare un valore compreso tra 1 e 255 (sec), quindi premere
ENTER per confermare;
7. Il display mostra la scritta “DOOR TIME:” seguita dal valore del tempo di apertura porta precedentemente impostato. Premere 2
volte ENTER per confermare il tempo impostato, altrimenti digitare un valore compreso tra 1 e 255 (sec), quindi premere ENTER
per confermare;
8. Il display mostra “DEVICE N.:XX” (dove XX è il numero dell’unità); premere due volte ENTER per confermare il valore impostato
o digitare il valore desiderato (1-15) e premere ENTER per confermare. Il numero dell’unità permette, dal centralino di portineria,
di individuare il posto esterno dal quale proviene la chiamata.
9. Il display mostra le lingue disponibili (la lingua selezionata in questa fase della programmazione è relativa esclusivamente ai messaggi
utente, mentre i messaggi di programmazione sono sempre in inglese) con un cursore lampeggiante in corrispondenza della lingua
attiva: “0 = ENG (Inglese), 1= IT (Italiano) , 2 =ESP (Spagnolo), 3 = POR (Portoghese), 4 = FR (Francese) 5 = GER (Tedesco)”
premere 2 volte ENTER per confermare la lingua correntemente attiva, altrimenti digitare il numero corrispondente alla nuova;
10. Il display visualizza le scritte: “0=NO 1=M. 2=F.” sulla prima riga e “SPEECH BOARD” sulla seconda. Un cursore lampeggiante
indica l’impostazione correntemente attiva; premere 2 volte il tasto ENTER per confermarla, altrimenti digitare 0, 1 o 2 rispettivamente per: disattivare la funzione, attivare la funzione con voce maschile o voce femminile. Questa funzione permette di attivare
la sintesi vocale per facilitare utenti non vedenti nelle operazioni di chiamata. La sintesi vocale è disponibile solo su richiesta e
attualmente solo in lingua inglese;
11. Se il display mostra “MASTER: SI”, premere il tasto 0 per impostare a SLAVE l’unità, altrimenti se è gia SLAVE (messaggio sul
display “MASTER: NO”), premere il tasto 1 per impostarla a MASTER oppure premere direttamente ENTER per lasciare invariata
la programmazione esistente.
12. Il display visualizza le scritte: “1=TEST FLAT” sulla prima riga e “ENTER=END” sulla seconda. Premere ENTER per terminare
la programmazione, altrimenti premere il tasto 1 per iniziare il test di connessione. Il test di connessione simula la chiamata in
sequenza a tutti i citofoni/videocitofoni programmati nel posto esterno e per ognuno di questi fornisce indicazioni circa l’esito
della chiamata: “OK” per il collegamento andato a buon ne o “ERR” per un collegamento in errore. In caso di errore, il test si
arresta e l’unità torna nelle condizioni descritte all’inizio di questo punto 12 con la possibilità di proseguire il test premendo il
pulsante 1 o di uscire dal test premendo ENTERper rimuovere la causa della condizione di errore.
Il sistema è di nuovo pronto per il normale utilizzo.
IMPOSTAZIONE DEL SISTEMA VIDEO SOLO ART.4202V, ART.4202RV
Fare riferimento al punto
F
di Fig. 2. Posizionare entrambi i jumper a sinistra per il segnale video bilanciato oppure entrambi a
destra per il segnale video coassiale.
IMPOSTAZIONE DEL TIPO DI PERIFERICHE COLLEGATE AL SISTEMA
Fare riferimento al punto
M
di Fig. 2. Spostare entrambi i jumper verso l’alto per impianti audio con citofoni Art.316X oppure por-
tarli in basso per impianti audio o audio/video facenti uso di citofoni e/o videocitofoni Serie900 o Serie3000.
Page 12

66250200 - V2.1 - 15/08/18
- 12 -
Serie 4000
Art.4202 - Istruzioni di installazione
Art.4202 Pannello digitale audio/video
NOTE DI PROGRAMMAZIONE
a. Durante la programmazione del dispositivo MASTER, gli eventuali SLAVE dello stesso livello sono disattivati;
b. Se si programma come SLAVE un dispositivo che deve essere MASTER, si innesca una condizione d’errore segnalata dal messaggio
“ERROR!”. In tal caso, tenere premuto alcuni secondi il tasto 0 no a che l’unità non torna in attesa del codice di programmazione
(“CODE:” sul display) e correggere l’impostazione. Se invece si programma come MASTER un dispositivo che deve essere SLAVE, si
avranno dei disturbi (schi - eetto Larsen) durante la conversazione che verranno eliminati non appena corretta la programmazione.
c. L’inserimento di valori non ammessi è segnalato da messaggi d’errore e l’unità non avanza nella programmazione, ma rimane in
attesa del parametro corretto.
d. Il tasto CLEAR, in ogni fase di inserimento dati, permette di cancellare i dati appena inseriti o precedentemente programmati.
e. Per consentire la chiamata al centralino Art.VX2210-1/V (se presente), utilizzare il codice appartamento abbinato all’ “ID PHONE” n.1.
L’inserimento del testo tramite tastiera è simile a quello previsto
per i telefoni cellulari. La tabella mostra i caratteri ed i simboli
che è possibile inserire premendo i tasti della pulsantiera (Es.
premere 2 volte il tasto 2 per inserire il carattere “B”).
I pulsanti A, B e C oppure , e (in base alla versione del
pannello in uso) svolgono funzioni particolari:
• Il tasto A o cancella l’ultimo carattere inserito;
• Il tasto B o conferma la ne della digitazione del testo;
• Il tasto C o conferma il carattere inserito ed è possibile in-
serire il successivo (l’ultimo carattere inserito viene comunque
confermato dalla pressione di un pulsante numerico diverso
da quello premuto precedentemente).
Ad esempio, per digitare il nome “ROSSI”, sarà necessario premere:
“R”: 3 volte il tasto 7
“O”: 3 volte il tasto 6
“S”: 4 volte il tasto 7 seguito dal tasto C o
“S”: 4 volte il tasto 7
“I”: 3 volte il tasto 4
1 volta il tasto B o per confermare i dati inseriti.
MORSETTERIA DI CONNESSIONE
GND Massa alimentazione
+12 Positivo alimentazione
– Connessione negativa linea BUS
L Connessione positiva linea BUS
BS Segnale “sistema occupato”
SL Segnale di controllo accessori
NC Relè di uscita - contatto normalente chiuso
C Relè di uscita - contatto comune
NO Relè di uscita - contatto normalmente aperto
TRD Segnale abilitazione Trade (da Art.701T)
PTE Comando “apri-porta” da pulsante interno
V1 Segnale video bilanciato Sync +
V2/V Segnalie video bilanciato Sync – o segnale video
coassiale (V) vedi punto
F
GNDV Massa alimentazione telecamera e massa video siste-
ma coassiale
12T Ingresso alimentazione telecamera +12Vdc
SPECIFICHE TECNICHE
Capacità di memoria: 998 utenti
Tensione di lavoro: 13 Vdc +/- 10%
Assorbimento massimo: 350 mA circa
Temperatura di funzionamento: -10 +50° C
DISTANZA DI ILLUMINAZIONE MASSIMA DALLA CAMERA DI NOTTE
I LED di illuminazione all’interno della camera
illuminano correttamente il visitatore quando
si trova a una distanza massima di 50cm.
Nota: la telecamera potrebbe essere dotata di
sensore CCD (illuminazione IR) oppure CMOS
(illuminazione LED a luce bianca). Tale dierenza non inuisce sulle sue prestazioni.
MAX 50 cm
PULIZIA DELLA PLACCA
Usare un panno morbido e pulito. Usare acqua tiepida o un detergente non aggressivo.
Non usare:
• prodotti abrasivi;
• prodotti contenenti cloro;
• prodotti per la pulizia dei metalli.
Tasti/
Nr. pressioni
Prima
Seconda
Terza Quarta Quinta
1 “Spazio” “.” “&” “1”
NON USATO
2 “A” “B” “C” “2”
3 “D” “E” “F” “3”
4 “G” “H” “I” “4”
5 “J” “K” “L” “5”
6 “M” “N” “O” “6”
7 “P” “Q” “R” “S” “7”
8 “T” “U” “V” “8” NON USATO
9 “W” “X” “Y” “Z” “9”
0 “+” “–” “*” “/” “0”
A o
Cancella ultimo carattere
B o
Fine inserimento testo
C o
Conferma ultimo carattere
Page 13

66250200 - V2.1 - 15/08/18
- 13 -
Serie 4000
Art.4202 - Istruzioni di installazione
code:*******
INSERIRE PRESET FACTORY
CODE: 0+6X1 (0111111)
code:*******
New:*******
DIGITARE IL CODICE MASTER
(da1 a 6 cifre)
trade c.:xxxxxx
New:xxxx
DIGITARE IL CODICE “TRADE“
(da1 a 6 cifre)
Mode:standard
1=main
IMPOSTARE IL MODO
STANDARD o MAIN
mem.location:
DIGITARE LA LOCAZIONE DI
MEMORIA (da 1 a 998)
Flat:
New:xxxxxx
DIGITARE ILCODICE APPAR-
TAMENTO (da 1 a 6 cifre)
ID Phone:
New:xxx
DIGITARE INDIRIZZO VIDEOCI-
TOFONO (da 1 a 180)
Door code:
New:xxxxxx
DIGITARE CODICE APRI
PORTA UTENTE
(da 1 a 6 cifre)
User name:
xxxxxxx xxxxxxx
DIGITARE IL NOME UTENTE
(solo versioni R)
UTILIZZANDO I PULSANTI
CON LE LETTERE
MEM. LOCATION:
SPEECH TIME:XXX
NEW:XXX
DIGITARE TEMPO DI CONVER-
SAZIONE (da 1 a 255 sec)
DOOR TIME:XXX
NEW:XXX
DIGITARE TEMPO APRI PORTA
(da 1 a 255 sec)
DEVICE NR:XXX
NEW:XXX
DIGITARE INDIRIZZO DISPO-
SITIVO (da 1 a 15)
IMPOSTA LINGUA
(da 0 a 5)
[0]=ENG,1=IT,2=ESP,
3=POR, 4=FR, 5=GER
[0]=ENG,1=IT,2=ESP,
3=POR, 4=FR, 5=GER
SPEECH TIME:255
NEW:120
DOOR TIME:255
NEW:3
DEVICE NR:1
NEW:9
2206N N.
NEW: XXX
DIGITARE INDIRIZZO BLOC-
CO 2206N (da 1 a 15)
code:*******
code:*******
New:*******
trade c.:0
New:1234
Mode:standard
1=main
mem.location: 15
Flat:
New: 15
ID Phone:
New:15
Door code:
New:123456
User name:
HOGART STEVE
2206N N.
NEW: 2
Sul display LCD
PREMRERE IL
PULSANTE
ENTER
Esempio
ALTRI UTEN-
TI DA PROGRAMMA-
RE?
SI
NO
NOTA 1
NOTA 1
NOTA 2
NOTA 3
NOTA 1,4
NOTA 1,4
NOTE 1,4
NOTE 6,4
NOTA 1
NOTA 1
NOTA 1
NOTA 1
NOTA 7
NOTE 1,4,5
SEGUITA A PAGINA SUCCESSIVA
Art.2202, Art.4202, Art.8202
Flowchart programmazione pannello digitale (Fw. rev 5.6 o successivi)
Page 14

66250200 - V2.1 - 15/08/18
- 14 -
Serie 4000
Art.4202 - Istruzioni di installazione
[0]=NO 1=ST 2=CMB
SPEECH BOARD
MODO SINTESI VOCALE
(0,1,2)
MASTER: NOT
1=YES
IMPOST. MASTER/SLAVE
(0=SLAVE, 1=MASTER)
1=TEST FLAT
"ENTER"=END
TEST AUTOMANTICO
APPARTAMENTI
(1 oppure ENTER)
ENTER FLAT NR. OR
<- SEARCH ->
SISTEMA PRONTO
ALL’USO
[0]=NO 1=ST 2=CMB
SPEECH BOARD
MASTER: YES
0=NO
TEST FLAT 101
ID PH:101 OK
ENTER FLAT NR. OR
<- SEARCH ->
NOTA 8
NOTA 9
NOTA 10
CONTINUA DALLA PAGINA PRECENDENTE
Sul display LCD Esempio
NOTA 1: Per saltare alla prossima programmazione, premere due volte il tasto ENTER per lasciare inalterati i dati esistenti oppure
inserire i nuovi dati quindi premere una volta il tasto ENTER. In caso di errore durante la digitazione, premere il tasto
CLEAR e digitare nuovamente il valore desiderato.
NOTA 2:
Per passare alla prossima programmazione, premere 0 per il modo STANDARD, 1 per il modo MAIN o il tasto ENTER per
lasciare invariata la programmazione.
Impostare il modo MAIN quando il pannello è collegato prima di uno o più Art.2206N oppure il modo STANDARD quando
non ci sono Art.2206N nel sistema o il pannello è collegato dopo uno di essi.
NOTA 3: Per saltare alla prossima programmazione, premere due volte il pulsante ENTER oppure digitare il numero di locazione
da modicare e premere ENTER per iniziare ad inserire i dati della locazione.
Dalla revisione rmware 5.0 e successive le locazioni di memoria 0 e 999 sono riservate per logo del display durante lo stand-by.
NOTA 4: ATTENZIONE! Premendo il pulsante CLEAR viene cancellato l’intero contenuto della locazione di memoria.
NOTA 5: Questa programmazione è presente solo quando il pannello è impostato in modo MAIN.
NOTA 6:
Questa programmazione è presente solo nelle verisoni dei pannelli con repertorio nomi dove è richiesto l’inserimento del
nome utente. Digitare il nome utente tramite la pulsantiera seguendo la tabella sottostante. Una volta digitato il nome
confermare con il pulsante .
o A= Indietro
o B= Accetta
o C= Avanti
1= . & 2= ABC 3= DEF
4= GHI 5= JKL 6= MNO
7= PQRS 8= TUV 9= WXYZ
0= + – * /
Per modicare il logo di stand-by (locazioni speciali 0 e 999) considerare lo stesso layout di tastiera anche per i pannelli
senza il repertorio nomi: i tasti
, e sono rimpiazzati rispettivamente dai tasti A, B e C.
NOTA 7: Per saltare alla prossima programmazione, premere due volte il tasto ENTER per lasciare inalterati dati esistenti oppure
premere uno dei tasti richiesti.
NOTA 8: Per saltare alla prossima programmazione, premere due volte il tasto ENTER per lasciare inalterati i dati esistenti oppure
premre uno dei tsti richiesti. Nel modo “ST” la sintesi volcale pronuncerà i numeri per cifra mentre nel modo “CMB” sarà
pronunciato il numero intero.
NOTA 9: Tra tutti i pannelli digitali o analogici installati sullo stesso livello, uno solo deve essere MASTER. Per passare alla program-
mazione successiva, premere una volta il tasto ENTER altrimenti premere uno dei pulsanti richiesti (0 o 1).
NOTA 10: Premere il pulsante ENTER per terminare la programmazione oppure 1 per avviare il test. Se si preme 1, il pannello inizia
a fare il test di connessione con tutti i dispositivi programmati indicando l’esito del test. In caso di errore il test si blocca:
premere il pulsante ENTER per terminare oppure proseguire premendo 1.
Art.2202, Art.4202, Art.8202
Flowchart programmazione pannello digitale (Fw. rev 5.6 o successivi)
Page 15

66250200 - V2.1 - 15/08/18
- 15 -
ON/OFF
+
13V
ART.521B
115
0
swsw
+B
+12
_
L
BSSLNCCNO
TRD
PTE
V1
V2 / V
GNDV
12T
B.V.
coax
others
316x
GND
Art.4202RV
A
SE
12Vac
ART.893N1
0
Address N.3
Art.6378
Address N.4
Art.6378
Address N.1
Art.6378
Address N.2
Art.6378/MV
Videx Electronics S.p.A.
Via del Lavoro 1, 63846 Monte Giberto (FM)
Phone: +39 0734 631669 - Fax +39 0734 631669
www.videx.it - info@videx.it
Autore:
Data modifica:
Data creazione:Title:
Notes:
Titolo:
Note:
Cod.File:
Foglio
/
10/11/2015
06/09/2016
224kvd119.dw
g
Marco Rongoni
11
12Vdc
230V
+
-
ART.
323/12
Page 16

66250200 - V2.1 - 15/08/18
- 16 -
Videx Electronics S.p.A.
Via del Lavoro 1, 63020 Monte Giberto (AP)
Phone: +39 0734 631669 - Fax +39 0734 631669
www.videx.it - info@videx.it
Autore:
Data modifica:
Data creazione:Title:
Notes:
Titolo:
Note:
Cod.File:
Foglio
/11
Marco Rongoni
224kau002b.dw
g
20/05/2009
06/07/2009
L
SE
12Vdc
ON/OFF
system
+
13V
ART.521B
115
0
swsw
+B
+12
_
L
BSSLNCCNO
TRD
PTE
others
316x
GND
Art.4202R
A
Phone nr.4
VR1
B
JP1
A
RELAY
JP2
+
AL
SW
SW
LB
L
4
S1
5 7861
2
3
ON
+
JP1
B
A
RELAY
JP2
VR1
SW
AL
LB
SW
L
S1
Phone nr.3
678
12
35
4
ON
Local Bell
VIDEX VIDEX
Art.3171 or 3172 Art.3171 or 3172
Suoneria Addizionale
Extension Sounder
ART.512D
ON
PHONE Nr.3
1
B
JP2
A
JP1
H
L
Connection
5
32 4 76 8
LLB L
Additional Bell
or Light
ON
PHONE Nr.4
1
A
JP2
B
NONC
JP1
C
Connection
7432 658
LB LL
H
L
POWER SUPPLY
Extension Relay
Relè Addizionale
ART.512DR
Posizione ponticelli mobili S1 S2
Jumpers S1 S2 position
S1
S2
PABX INTERFACE
230V
MADE IN ITALY
VIDEX
ART.2280
1234 8765
ON
S1
ART.2280
VIDEX
56784321
ON
S1
CO.Line
Art.380
TELEPHONE INTERFACE
INTERFACCIA TELEFONICA
50/60 Hz
230 V
230V 0
Page 17

66250200 - V2.1 - 15/08/18
- 17 -
Page 18

66250200 - V2.1 - 15/08/18
- 18 -
Page 19

66250200 - V2.1 - 15/08/18
- 19 -
Page 20

MANUFACTURER
FABBRICANTE
FABRICANT
FABRICANTE
FABRIKANT
VIDEX ELECTRONICS S.P.A.
Via del Lavoro, 1
63846 Monte Giberto (FM) Italy
Tel (+39) 0734 631669
Fax (+39) 0734 632475
www.videx.it - info@videx.it
CUSTOMER SUPPORT
SUPPORTO CLIENTI
SUPPORTS CLIENTS
ATENCIÓN AL CLIENTE
KLANTENDIENST
VIDEX ELECTRONICS S.P.A.
www.videx.it - technical@videx.it
Tel: +39 0734-631669
Fax: +39 0734-632475
UK Customers only:
VIDEX SECURITY LTD
www.videxuk.com
Tech Line: 0191 224 3174
Fax: 0191 224 1559
Main UK oce:
VIDEX SECURITY LTD
1 Osprey Trinity Park
Trinity Way
LONDON E4 8TD
Phone: (+44) 0870 300 1240
Fax: (+44) 020 8523 5825
www.videxuk.com
marketing@videxuk.com
Northern UK oce:
VIDEX SECURITY LTD
Unit 4-7
Chillingham Industrial Estate
Chapman Street
NEWCASTLE UPON TYNE - NE6 2XX
Tech Line: (+44) 0191 224 3174
Phone: (+44) 0870 300 1240
Fax: (+44) 0191 224 1559
Greece oce:
VIDEX HELLAS Electronics
48 Filolaou Str.
11633 ATHENS
Phone: (+30) 210 7521028
(+30) 210 7521998
Fax: (+30) 210 7560712
www.videx.gr
videx@videx.gr
Danish oce:
VIDEX DANMARK
Hammershusgade 15
DK-2100 COPENHAGEN
Phone: (+45) 39 29 80 00
Fax: (+45) 39 27 77 75
www.videx.dk
videx@videx.dk
Benelux oce:
NESTOR COMPANY NV
E3 laan, 93
B-9800 Deinze
Phone: (+32) 9 380 40 20
Fax: (+32) 9 380 40 25
www.videx.be
info@videx.be
Dutch oce:
NESTOR COMPANY BV
Business Center Twente (BCT)
Grotestraat, 64
NL-7622 GM Borne
www.videxintercom.nl
info@videxintercom.nl
El producto lleva la marca CE que demuestra su conformidad y puede ser
distribuido en todos los estados miembros de la unión europea UE.
Este producto cumple con las Directivas Europeas 2014/30/EU (EMC);
2014/35/EU (LVD); 2011/65/EU (RoHS): marca CE 93/68/EEC.
Het product heeft de CE-markering om de conformiteit ervan aan te tonen en
is bestemd voor distributie binnen de lidstaten van de EU zonder beperkin-
gen. Dit product volgt de bepalingen van de Europese Richtlijnen 2014/30/EU
(EMC); 2014/35/EU (LVD); 2011/65/EU (RoHS): CE-markering 93/68/EEG.
Le produit est marqué CE à preuve de sa conformité et peut être distribué
librement à l’intérieur des pays membres de l’union européenne EU.
Ce produit est conforme aux directives européennes 2014/30/EU (EMC) ;
2014/35/EU (LVD) ; 2011/65/EU (RoHS): marquage CE 93/68/EEC.
The product is CE marked demonstrating its conformity and is for distribution
within all member states of the EU with no restrictions. This product follows
the provisions of the European Directives 2014/30/EU (EMC); 2014/35/EU
(LVD); 2011/65/EU (RoHS): CE marking 93/68/EEC.
Il prodotto è marchiato CE a dimostrazione della sua conformità e può essere
distribuito liberamente all’interno dei paesi membri dell’Unione Europea UE.
Questo prodotto è conforme alle direttive Europee: 2014/30/UE (EMC);
2014/35/UE (LVD); 2011/65/UE (RoHS): marcatura CE 93/68/EEC.
 Loading...