

Page 1
61
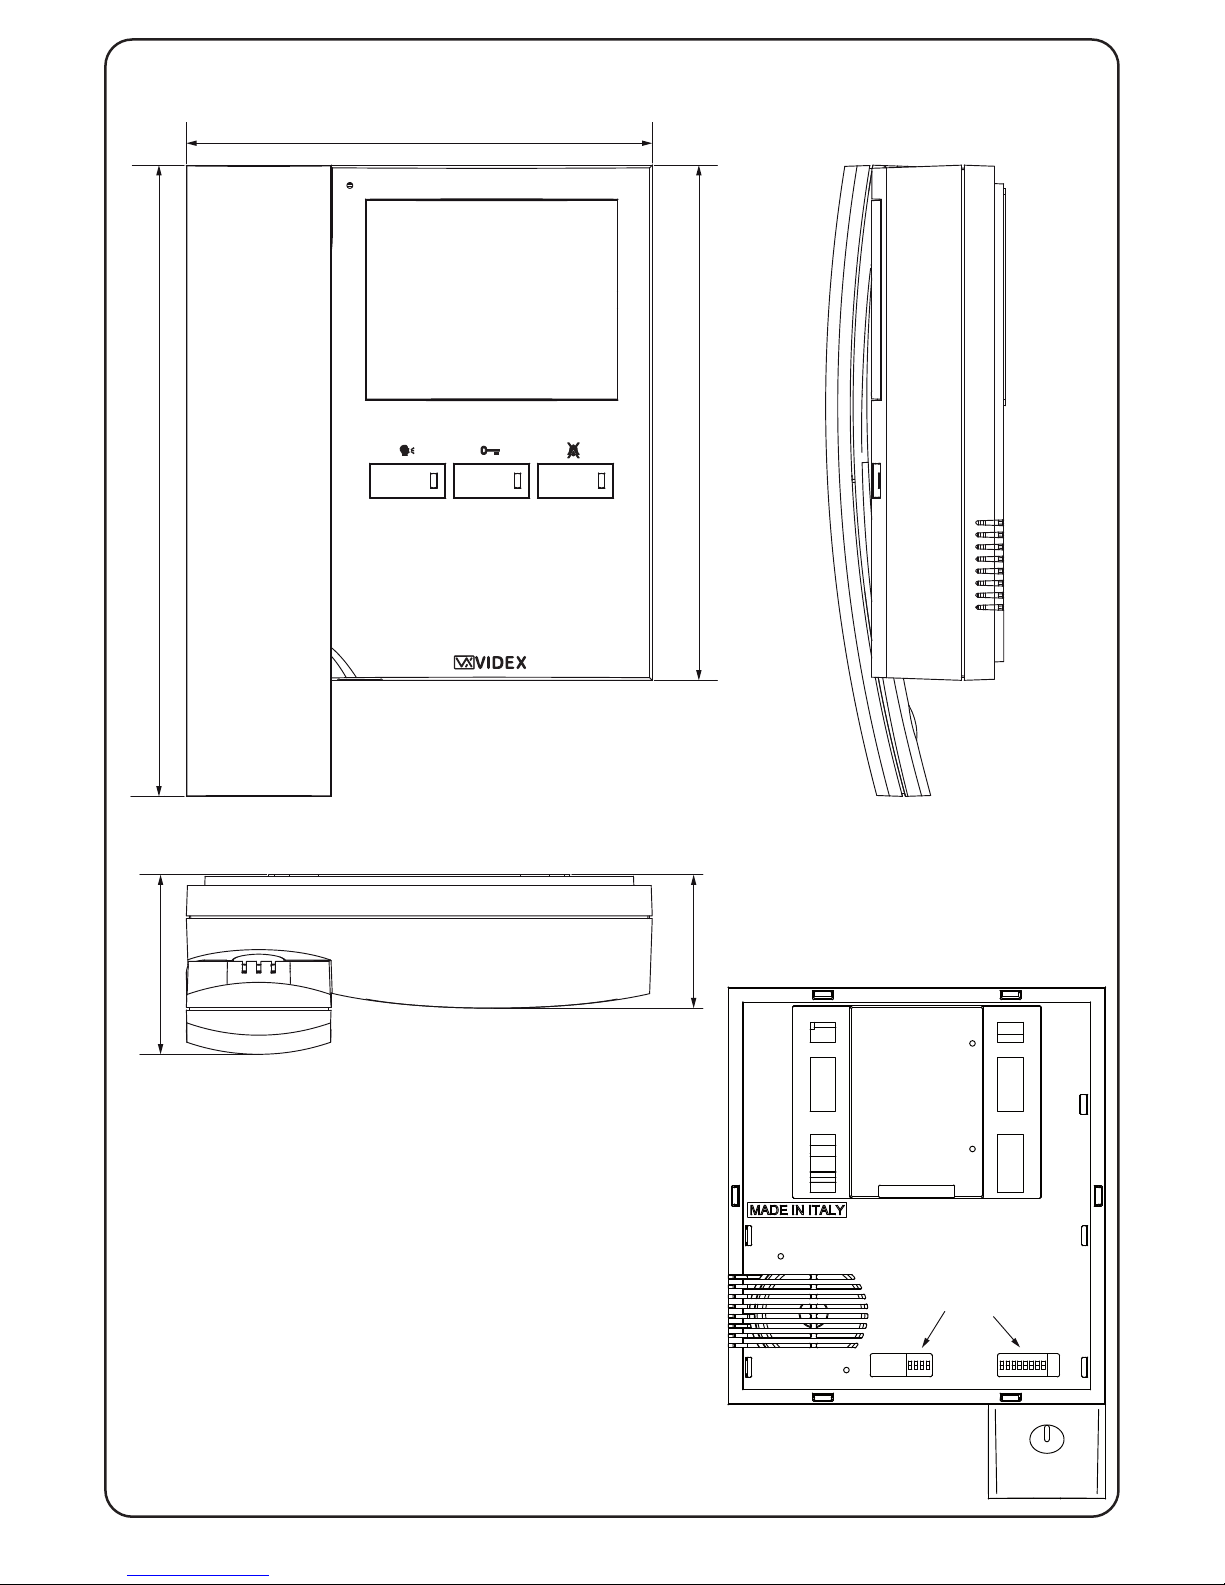
Art.3678 Videophone - Art.3678 Videocitofono
161
178
218
46
62
A
B
Page 2
VIDEX ELECTRONICS S.p.A. VX2200 “2 WIRE” Bus Digital System
62
ART.3678 VIDEOCITOFONO CON FUNZIONE VIVAVOCE
Descrizione
Videocitofono specifico per il sistema VX2200 con monitor a colori LCD
TFT da 3,5”, pulsanti “apri-porta”, “risposta/auto-accensione”, “privacy/servizio”, più 3 LED relativi al funzionamento dei pulsanti.
Il videocitofono può funzionare come unità vivavoce senza sollevare la cornetta o come unità tradizionale utilizzando la cornetta.
Programmazioni: modo video (coassiale o bilanciato), tipo di suoneria, numero di squilli e durata della privacy.
Regolazioni: volume suoneria, volume fonia, luminosità, contrasto e saturazione.
Fatta eccezione per il pulsante di servizio, gli altri segnali sono compatibili
con la numerazione dei segnali per il videocitofono Art.5478
Pulsanti
Pulsante risposta / conversazione ad una via / autoaccensione / spegnimento
Premere questo pulsante alla ricezione della chiamata per
avviare la conversazione con il posto esterno in full duplex
(il relativo LED si accende).
Premere e tenere premuto per più di un secondo alla rice-
zione della chiamata o durante una conversazione per iniziare la conversazione ad una via verso il posto esterno (il relativo LED lampeggia rapidamente): per ascoltare il visitatore
rilasciare il pulsante (il LED lampeggia lentamente) e premerlo nuovamente ogni qual volta si deve prendere la parola.
Premere brevemente durante la conversazione per spegnere
l’impianto. In ogni caso lo spegnimento è automatico allo
scadere del tempo di conversazione (il LED si spegne).
Ad impianto spento, premere il pulsante per effettuare
l’auto-accensione ed aprire la comunicazione verso il posto
esterno (il relativo LED si accende). Il numero di pressioni
del pulsante dipende dall’identificativo del posto esterno
che si vuole accendere
Pulsante Apri-porta
Premere durante la conversazione per aprire la porta
dell’ingresso dal quale proviene la chiamata. L’apertura della porta viene confermata da un segnale acustico. Se il morsetto “DL” è opportunamente collegato, il relativo LED resta acceso fino a quando resta aperta la porta.
Premere ad impianto spento per chiamare il centralino di
portineria se presente nel sistema.
Pulsante Privacy on/off – Servizio – Rifiuto chiamata
Con il sistema in stand-by, premere per attivare il servizio
privacy per il tempo programmato: il relativo LED si accende a segnalare lo stato di attivazione del servizio.
All’arrivo della chiamata, con il servizio attivo, l’unità non
emette alcun segnale acustico. Il servizio si disattiva allo
scadere del tempo programmato o premendo nuovamente il
pulsante.
Durante la conversazione, premere e tenere premuto questo
pulsante fino a che il videocitofono non emette un segnale
acustico: l’uscita ausiliaria viene attivata e il morsetto “12/
SB” chiude verso massa per circa 2 secondi.
Premere questo pulsante alla ricezione della chiamata: il
monitor si spegne e la chiamata viene ignorata senza dare
alcuna segnalazione all’esterno.
ART.3678 VIDEOPHONE WITH HANDS FREE FACILITY
Description
Intelligent videophone for the VX2200 digital system incorporating a 3,5”
full colour active matrix LCD monitor, with “door open” , “answer/camera
recall”, “privacy/service” buttons plus 3 LEDs related to the operation of
the buttons. The videophone can work as hands free unit or as standard videophone using the handset.
Programmable settings: video mode (coax or balanced), melody, number of
rings and privacy duration.
Adjustments: call tone volume, loudspeaker volume, brightness, contrast and
hue.
Exception made for the service push button, the other signals are numbered
like the signals for the Art.5478.
Push buttons
Answer / simplex communication / Camera Recall / End Call
push button
Press this button during an incoming call to open the
speech in duplex mode allowing free speech with the caller
in both directions (The related LED will illuminate)
Press and hold this button (more than 1 second), during an
incoming call or a conversation in progress, to allow the
user to answer a call from a visitor at the door station in
SIMPLEX speech mode (The related LED will flash rapidly): releasing the button will allow the user to listen to the
visitor (The LED will flash slowly). Press and hold the button when you talk to the visitor and release the button when
you listen to the visitor.
During a conversation, momentary operation of this button
will end the call. The LED next to the button will switch off.
The system will automatically switch off when the conversation time expires.
When the system is in standby, (No calls on the system) op-
eration of this button will open the speech to the door station. The related LED will illuminate. Press as many time as
the ID value of the door panel to connect to.
Door Open Push Button
During a conversation, operation of this button will release
the door from where the call originated. This will be confirmed by an acoustic tone. If terminal “DL” is connected,
the “door open” LED next to the button will also be illuminated.
When the system is in stand-by, a button press will book a
call to the concierge (If available)
Privacy on/off - Service Push Button – Call reject
When the system is in stand-by, press this button to enable
the service for the programmed time: the related LED will
illuminate to signal the service enabled. During an incoming call, with the service enabled, the device does not emit
any acoustic signal. The service is disabled when the programmed time expires or pressing again the button.
During a conversation, press and keep pressed this button
until the videophone emits a beep: the auxiliary output is
operated and the terminal “12/SB” is linked to ground for
2 seconds.
Press this button during an incoming call while the video-
phone is ringing to reject the call. The visitor doesn’t receive any warning of the call rejected.
Page 3

VIDEX ELECTRONICS S.p.A. VX2200 “2 WIRE” Bus Digital System
63
Programmazioni e Regolazioni
Il videocitofono ha due differenti menù per operazioni di programmazione e
regolazione:
1. Un menù viene attivato dalla condizione di stand-by e consente di impostare:
La durata della “privacy”;
Il volume della suoneria;
Il tipo di suoneria;
Il numero di squilli;
2. Il secondo menù è accessibile quando il videocitono è in funzione (durante una conversazione o auto-accensione) e consente di impostare:
Il volume della fonia;
La luminosità;
Il Contrasto;
La saturazione;
Menù 1
Con il sistema a riposo (monitor spento) premere e tenere premuto (circa 9
secondi) il pulsante “
” per entrare nel menù di programmazione;
Il monitor si accende mostrando il menù OSD: la parte superiore dello
schermo riporta la scritta “menù” seguita dall’icona della funzione selezionata mentre la parte inferiore indica a sinistra il valore della funzione selezionata, al centro l’icona della funzione selezionata e a destra l’icona della
successiva funzione disponibile.
La prima funzione disponibile è la durata della privacy (massimo 20 ore):
premere ripetutamente o tenere premuto il pulsante “
” per incrementa-
re o il pulsante “
” per decrementare la durata di mezzora ad ogni step
(segnalato da un bip).
Premere il pulsante “
” per memorizzare il nuovo valore e accedere alla
programmazione successiva.
La seconda funzione è il volume della suoneria: premere ripetutamente o
tenere premuto il pulsante “
” per incrementare o il pulsante “ ” per
decrementare il volume della suoneria ad ogni step (segnalato da un bip).
Premere il pulsante “
” per memorizzare il nuovo valore e accedere alla
programmazione successiva.
La terza funzione è il tipo di suoneria: premere il pulsante “
” per
ascoltare e selezionare la suoneria precedente o il pulsante “
” per ascol-
tare e selezionare la suoneria successiva.
Premere il pulsante “
” per memorizzare il nuovo valore e accedere alla
programmazione successiva.
La quarta ed ultima funzione di programmazione è il numero di squilli
(max 9): premere ripetutamente o tenere premuto il pulsante “
” per in-
crementare o il pulsante “
” per decrementare il numero di squilli.
Premere il pulsante “
” per memorizzare il nuovo valore e uscire dalla
programmazione, il videocitofono si spegne.
Menù 2
Quando il sistema è acceso (conversazione o auto-accensione) premere il
pulsante “
” per accedere al menù di programmazione.
Il menù OSD si attiva: la parte superiore dello schermo riporta la scritta
“menù” seguita dall’icona della funzione selezionata mentre la parte inferiore indica a sinistra il valore della funzione selezionata, al centro l’icona
della funzione selezionata e a destra l’icona della successiva funzione disponibile.
La prima funzione è il volume della fonia: premere ripetutamente o tenere
premuto il pulsante “
” per incrementare o il pulsante “ ” per decre-
mentare il volume della fonia ad ogni step (segnalato da un bip).
Premere il pulsante “
” per memorizzare il nuovo valore e accedere alla
programmazione successiva.
La seconda funzione è la luminosità: premere ripetutamente o tenere pre-
muto il pulsante “
” per incrementare o il pulsante “ ” per decremen-
tare il livello della luminosità ad ogni step (segnalato da un bip).
Premere il pulsante “
” per memorizzare il nuovo valore e accedere alla
programmazione successiva.
La terza funzione è il contrasto: premere ripetutamente o tenere premuto il
pulsante “
” per incrementare o il pulsante “ ” per decrementare il
contrasto ad ogni step (segnalato da un bip).
La quarta ed ultima funzione è la saturazione: premere ripetutamente o
tenere premuto il pulsante “
” per incrementare o il pulsante “ ” per
decrementare il livello di saturazione ad ogni step (segnalato da un bip).
Premere il pulsante “
” per memorizzare il nuovo valore ed uscire dalla
programmazione, il monitor torna a mostrare i messaggi standard della
conversazione.
Programming and Adjustments
The videomonitor has two different menus for programming and adjustment
functions:
1. One menu operates when the system is in stand-by and allows to set:
The privacy duration;
The melody volume;
The melody type;
The number of rings;
2. The second menu operates when the system is turned ON (during a con-
versation or a camera recall) and allows to set;
Speech volume;
Brightness;
Contrast;
Hue;
Menu 1
When the system is in stand-by (monitor turned OFF) press and hold
pressed (approx 9 seconds) the “
” button to enter the programming
menu;
The OSD menu appears on the display: the top of the screen shows
“menu” followed by the available function icons, the bottom of the screen
shows the currently selected function value on the left, the currently selected function icon in the middle and the next function icon on the right side.
The first function available is the privacy duration (max 20 hours): press
as many times or hold pressed the “
” button to increase or the “ ”
button to decrease the duration of a half an hour each step (signalled by a
beep).
Press the “
” button to store the new value and to enter the following
programming function.
The second function is the melody volume: press as many times or hold
pressed the “
” button to increase or the “ ” button to decrease the
melody volume level (signalled by a beep).
Press the “
” button to store the new value and to enter the following
programming function.
The third function is the melody type: press the “
” button to hear and
select the previous melody or the “
” button to hear and select the fol-
lowing melody.
Press the “
” button to store the new value and to enter the following
programming function.
The fourth and last programming function is the number of rings (max 9):
press as many times or hold pressed the “
” button to increase or the
“
” button to decrease the number of rings.
Press the “
” button to store the new value and exit the programming
menu, the monitor turns OFF.
Menu 2
When the monitor is on during a call is turned ON (conversation or cam-
era recall) press the “
” button to enter the programming menu.
The OSD menu appears on the display: the top of the screen shows
“menu” followed by the allowed function icons, the bottom of the screen
shows the currently selected function value on the left, the currently selected function icon in the middle and the next function icon on the right side.
The first function is the speech volume: press as many times or hold
pressed the “
” button to increase or the “ ” button to decrease the
speech volume level (signalled by a beep).
Press the “
” button to store the new value and to enter the following
programming function.
The second function is the brightness: press as many times or hold pressed
the “
” button to increase or the “ ” button to decrease the bright-
ness level (signalled by a beep).
Press the “
” button to store the new value and to enter the following
programming function.
The third function is the contrast: press as many times or hold pressed the
“
” button to increase or the “ ” button to decrease the contrast lev-
el (signalled by a beep).
Press the “
” button to store the new value and to enter the following
programming function.
The fourth and last function is the hue: press as many times or hold
pressed the “
” button to increase or the “ ” button to decrease the
hue level (signalled by a beep).
Press the “
” button to store the new value and exit the programming
menu the monitor goes back to shown standard messages for conversation
Page 4

VIDEX ELECTRONICS S.p.A. VX2200 “2 WIRE” Bus Digital System
64
Impostazione indirizzo video/citofono, modo e terminazione video Videomonitor/intercom address, video mode and termination setup
L’indirizzo del citofono/videocitofono è codificato in binario tramite il dipswitch ad 8 vie situato sul retro dell’unità. Ogni switch corrisponde ad un bit
che può essere a 0 (OFF) o 1 (ON), a ciascun bit corrisponde un peso decimale in base alla posizione: Switch 1=decimale 1, 2=2, 3=4, 4=8, 5=16, 6=32,
7=64, 8=128 per impostare l’indirizzo desiderato, mettere ad ON (1) gli
switch la cui somma dei pesi corrisponde al valore dell’indirizzo. Ad esempio, per impostare l’indirizzo 37, mettere ad ON gli switch 1, 3 e 6
(1+4+32=37).
Each intercom is addressed in binary (PHONE ID) using the 8 way
dipswitches located on the rear of the unit. Each switch corresponds to one
bit which can have a value 0 (OFF) or 1 (ON). Each bit corresponds to a
decimal weight depending on the position: Switch 1 = decimal 1, 2=2, 3=4,
4=8, 5=16, 6=32, 7=64, 8=128. I.E. to set the address 37, put switches 1, 3
and 6 on (1+4+32=37).
Switches – Switch Decimal Weight – Peso Decimale
Addr.
Indir.
8 7 6 5 4 3 2 1 128 64 32 16 8 4 2 1
OFF OFF OFF OFF OFF OFF OFF ON 0 0 0 0 0 0 0 1 1
OFF OFF OFF OFF OFF OFF ON OFF 0 0 0 0 0 0 1 0 2
OFF OFF OFF OFF OFF OFF ON ON 0 0 0 0 0 0 1 1 3
OFF OFF OFF OFF OFF ON OFF OFF 0 0 0 0 0 1 0 0 4
OFF OFF ON OFF OFF ON OFF ON 0 0 1 0 0 1 0 1 37
ON OFF ON ON OFF ON OFF OFF 1 0 1 1 0 1 0 0 180
Modo Video
Switch 1,2 Modo
Coassiale
Bilanciato
Terminazione video 75 Ohm
Switch 3,4 Terminazione
Abilitata
Disabilitata
Video Mode
Switches 1,2 Mode
Coax
Balanced
75 Ohm Video Termination
Switches 3,4 Termination
Enabled
Disabled
Art.3678 - SEGNALI SCHEDA DI CONNESSIONE Art.3678 - PCB CONNECTION BOARD SIGNALS
Descrizione
Morsetto
Terminal
Description
Ingresso alimentazione video 17÷20Vdc
+20V 1
Video power supply 17÷20Vdc
Ingresso alimentazione video 17÷20Vdc
+20V 2
Video power supply 17÷20Vdc
Alimentazione video riferimento di massa
GND 3
Video power supply ground reference
Alimentazione video riferimento di massa
GND 4
Video power supply ground reference
Sincronia V2 segnale video bilanciato (modo seg. video bil.)
Segnale video composito (modo segnale video coassiale)
V2/V 5
Balanced video signal V2 sync.(balanced video signal mode)
Composite video signal (coax video signal mode)
Sincronia V1 segnale video bilanciato (modo seg. video bil.)
V1 6
Balanced video signal V1 sync.(balanced video signal mode)
Linea BUS
L 7
BUS line
Linea BUS riferimento di massa
GND 8
BUS line ground reference
Ingresso chiamata locale (attivo basso)
LB 9
Local bell input (active low)
Ingresso segnale d’allarme (attivo basso)
AL 10
Alarm input (active low)
11
Pulsante di servizio open collector
SB 12
S1 Push button (close to ground when pressed)
13
14
Uscita +12Vdc per alimentazione distr. video Art.894/894N
+VD 15
+12Vdc output to supply the video distributor Art.894/894N
Massa
GND 16
Ground
Uscita stabilizzata +12Vdc
12VO 17
Stabilized +12Vdc output
Ingresso alimentazione +12Vdc
12VI 18
+12Vdc Power supply input
Ingresso di alimentazione per accensione LED ausiliario “1”
LDA 19
Auxiliary LED “1” power supply input
Massa
GND 20
Ground
Specifiche tecniche
Tensioni d’alimentazione : 17÷20Vdc
12÷14Vdc
Assorbimenti : 12mA in stand-by (on 12Vdc)
: 70mA Max (on 12Vdc)
: 250mA Max (on 20Vdc)
Temperatura di Lavoro : -10ºC +50ºC
Technical specification
Working Voltage : 17÷20Vdc
12÷14Vdc
Power Consumption : 12mA in stand-by (on 12Vdc)
70mA Max (on 12Vdc)
250mA Max (on 20Vdc)
Working Temperature: -10ºC +50ºC
Page 5

VIDEX ELECTRONICS S.p.A. VX2200 “2 WIRE” Bus Digital System
65
Art.3678 Istruzioni di fissaggio a parete Art.3678 Wall mounting instructions
135cm
Fig.1
a
a
a
b
c
c
f
f
f
f
g
e
d
b
b
b
a
Fig.2
A
B
h
i
l
m
m
m
m
c
Fig.3
n
Fig.4
Dovendo passare attraverso la fessura “e” (fig.2A) della placca di fissaggio
a parete, consigliamo di canalizzare i conduttori in maniera tale da lasciare
135cm circa tra la parte inferiore della scheda di fissaggio ed il pavimento
finito come mostrato in figura 1;
Appoggiare la piastra di fissaggio “c” alla parete facendo passare il gruppo
di fili “d” attraverso l’apertura “e” della stessa e prendere i riferimenti per i
fori di fissaggio “a” (fig.2A);
Eseguire i fori “a”, inserire al loro interno i tasselli ad espansione “b” e
dopo aver fatto passare il gruppo di fili “d” attraverso l’apertura “e” fissare
la piastra “c” alla parete tramite le viti “f” fornite a corredo (Fig.2A);
Agganciare la scheda di connessione “g” alla placca di fissaggio “c” come
mostrato in figura 2B e procedere alla connessione dei fili alla morsettiera
(in accordo con lo schema fornito) tramite il giravite (lama lato a taglio)
fornito a corredo;
Collegati i fili, agganciare il videocitofono “h” alla piastra “c” come mo-
strato in figura 3:
inserire il connettore “i” del cavo flat che fuoriesce dal retro del vi-
deocitofono nel connettore “l” della scheda di connessione (Fig.3),
avvicinare il videocitofono alla placca di fissaggio facendo corri-
spondere le aperture “n” (Fig.4) ai ganci “m” (Fig.3) quindi spingere
il videocitofono verso il basso fino all’aggancio come suggerito dalle
frecce in figura 3.
Per rimuovere il videocitofono, tenendolo saldamente spingerlo verso
l’alto fino allo sblocco.
Cables must be fed through the opening “e” (Fig. 2A) of the mounting
plate “c”, which should be fitted approximately 135cm from finished floor
level as shown in Fig 1;
Place the mounting plate “c” against the wall feeding the wire group “d”
through opening “e” of the mounting plate and mark the fixing holes “a”
(Fig. 2A)
Drill the fixing holes “a”, insert the wall plugs “b” then with the cables
threaded through opening “e” fix the mounting plate “c” to the wall with
the 4 screws provided “f” (Fig. 2A).
Hook the pcb connection board “g” to the mounting plate “c”as shown in
Fig2B and connect the wires (using the screwdriver provided) to the terminals as shown in the diagram provided;
Once the wires are connected, hook the videophone “h” to the Mounting
plate “c” as shown in Fig. 3.
Connect the Plug “I” on the ribbon cable from the videophone to the
plug “l” on the PCB connection board “g”;
Place the videophone “h” against the 4 hooks “m” on the mounting
plate “c” (in line with the 4 openings “n” on the rear side of the videophone Fig. 4) and push down as suggested by the pointers in Fig.
3, the videophone will lock into place;
To remove the videophone, hold it firmly and push the unit in an upward
direction until the videophone “h” unlocks from the mounting plate “c”
 Loading...