

Page 1

Video
Wave
Installation Manual
OneTrack
Version 2.9.0, July 2014
© 2014 Video
Wave
Networks inc., all rights reserved
Page 2

OneTrack - © 2014 Video
Wave
2
Video
Wave
: (514) 789-0874 : [email protected]
Networks inc. © 2014, all rights reserved
Page 3

OneTrack - © 2014 Video
Wave
3
Table of Contents
Table of Contents 3
Introduction 5
Check list 6
Requirements 7
Installation 8
3.1 Hardware 9
3.1.1 OneTrack controller 9
3.1.2 Local PTZ Camera 12
3.1.3 Network Camera 17
3.1.4 RS-485 and RS-422 Converters 18
3.1.5 Video 20
3.2 Software 22
3.2.1 Software configuration 22
Cables and Accessories 25
4.1 Cable Choice 25
4.1.1 Coaxial cables 25
4.1.2 PTZ Control Cables 26
4.1.3 Power Cables 26
4.2 Power surge protector 27
4.3 Ground Loop 28
4.4 RS485/RS422 Converter 29
Analysis of Needs 30
Page 4

OneTrack - © 2014 Video
Wave
4
5.1 Camera Positioning Strategy 31
5.2 Choosing the cameras 33
5.3 Choosing the bracket 34
5.4 Size of detected objects 35
Troubleshooting guide 36
Troubleshooting guide 36
Appendix 38
Page 5

OneTrack - © 2014 Video
Wave
C h a p t e r 1
Introduction
With the OneTrack camera system, a moving object or a person can be tracked
automatically, without any manual operation or any operator intervention.
Upon detection of motion or objects in the image, the PTZ camera is positioned on the
detected subject and tracks it automatically, occasionally zooming in to catch close-up
shots.
The OneTrack can also perform object detection and recognition, making it possible to
react differently when a person or a vehicle appears in the scene.
With the OneTrack system, you can make use of full capabilities of PTZ cameras
without the need of an operator. The PTZ camera can operate independently by
tracking any moving subject, or can be installed as a slave of a fixed camera. When
installed with 1 or multiple fixed cameras, the object detection is performed on the
fixed cameras, while the PTZ will zoom and follow those objects.
5
The OneTrack controller is also a recording system. Video sequences recorded in
tracking mode have much less risk of « missing » the events, than static camera or
PTZ in tour mode.
This manual explains the process of installing the OneTrack controller.
Page 6

OneTrack - © 2014 Video
Check list
For those of you familiar with the installation of a OneTrack controller, we provide
you with a check list of important steps to look out for.
Installation of data and video cables.
Installation of the cameras.
Check or set communication settings if necessary.
Check or set the address.
Check or set common settings.
Wave
6
Installation of the OneTrack controller.
Plug all cameras in the OneTrack. PTZ cameras in the first inputs, fixed cameras
in the last inputs.
Execute the Setup Wizard.
Make sure you don’t have any Communication Errors. If so, check your
configuration and data cables.
Finish the configuration of the OneTrack. (refer to user guide)
Page 7

OneTrack - © 2014 Video
Wave
7
C h a p t e r 2
Requirements
The OneTrack system requires:
The OneTrack controller
A fixed camera and/or a Supported PTZ Camera (refer to compatibility list)
A RS-232 to RS-485 or RS-232 to RS-422 converter (One converter per analog
PTZ camera)
Page 8

OneTrack - © 2014 Video
Wave
C h a p t e r 3
Installation
This section describes in details the installation of the hardware components, followed
by the basic software configuration procedure.
8
Page 9
OneTrack - © 2014 Video
Wave
3.1 Hardware
This section describes how to install and connect all the hardware components
correctly.
3.1.1 OneTrack controller
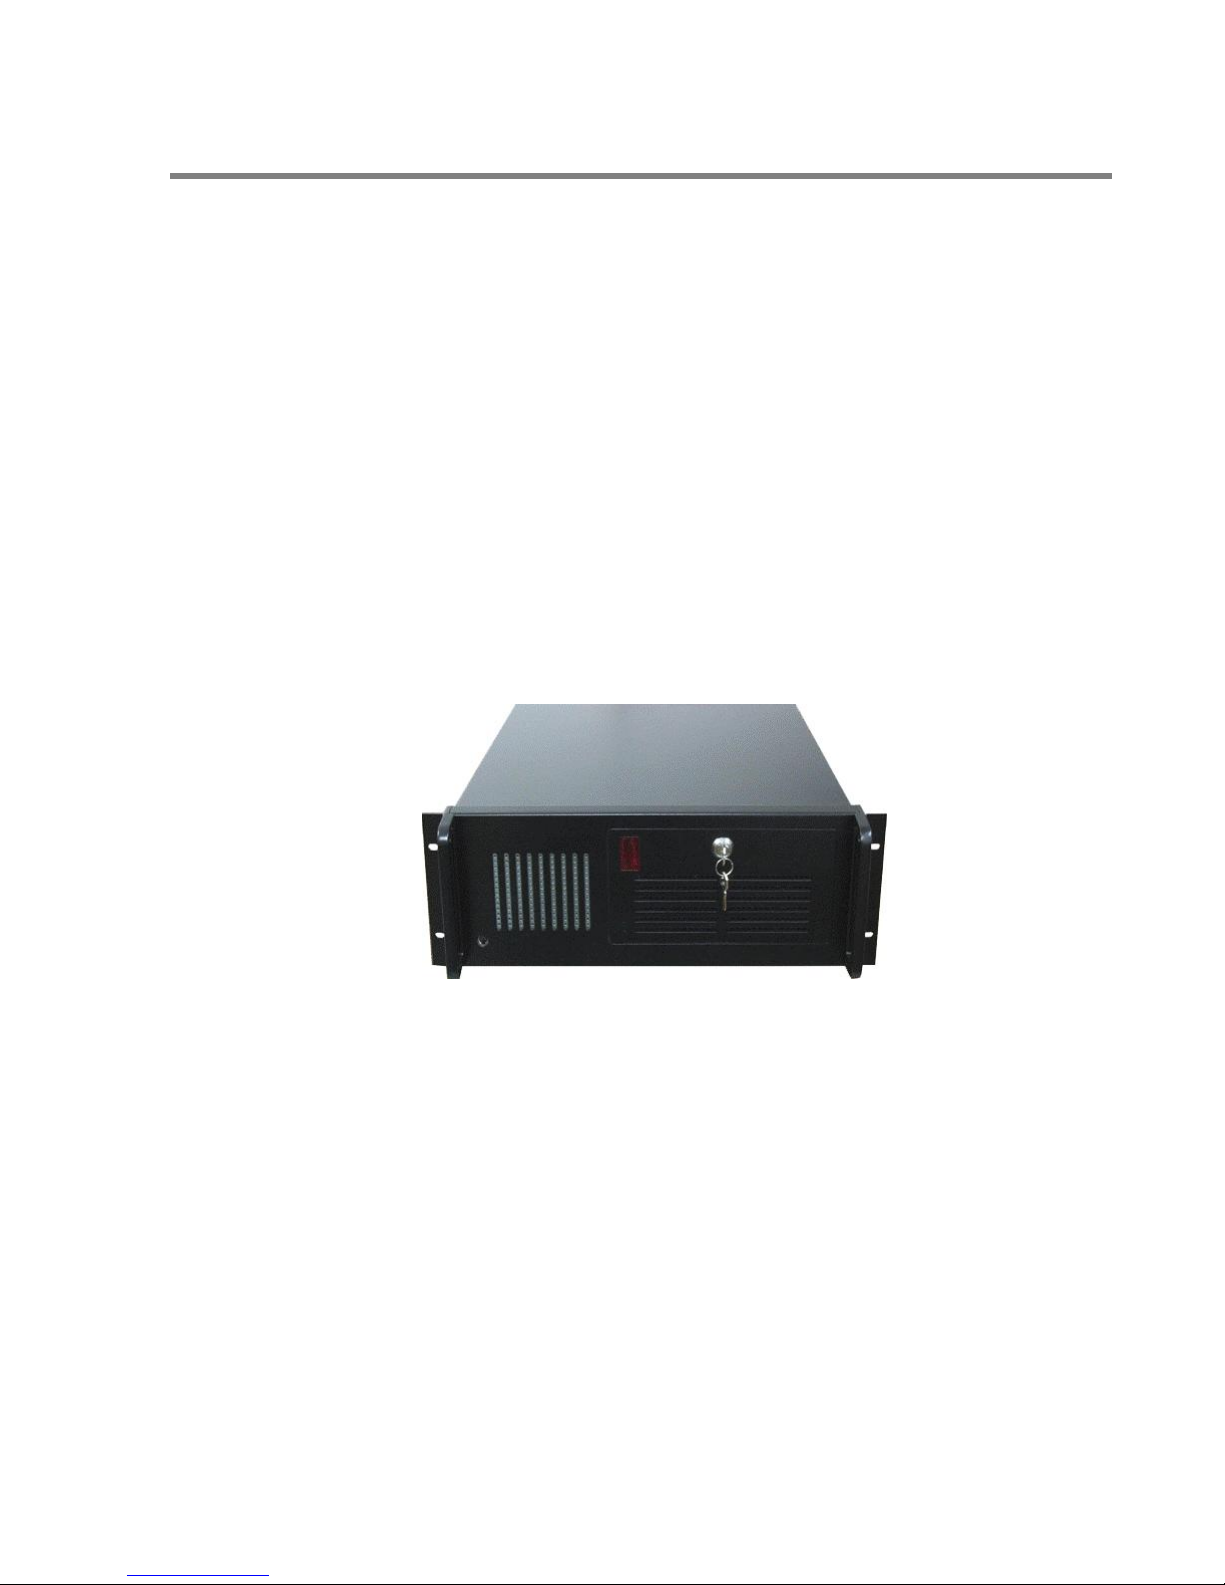
The pictures in this section show the different views of the OneTrack system.
This is the front of a OneTrack system with a rack mount casing.
9
Page 10
OneTrack - © 2014 Video
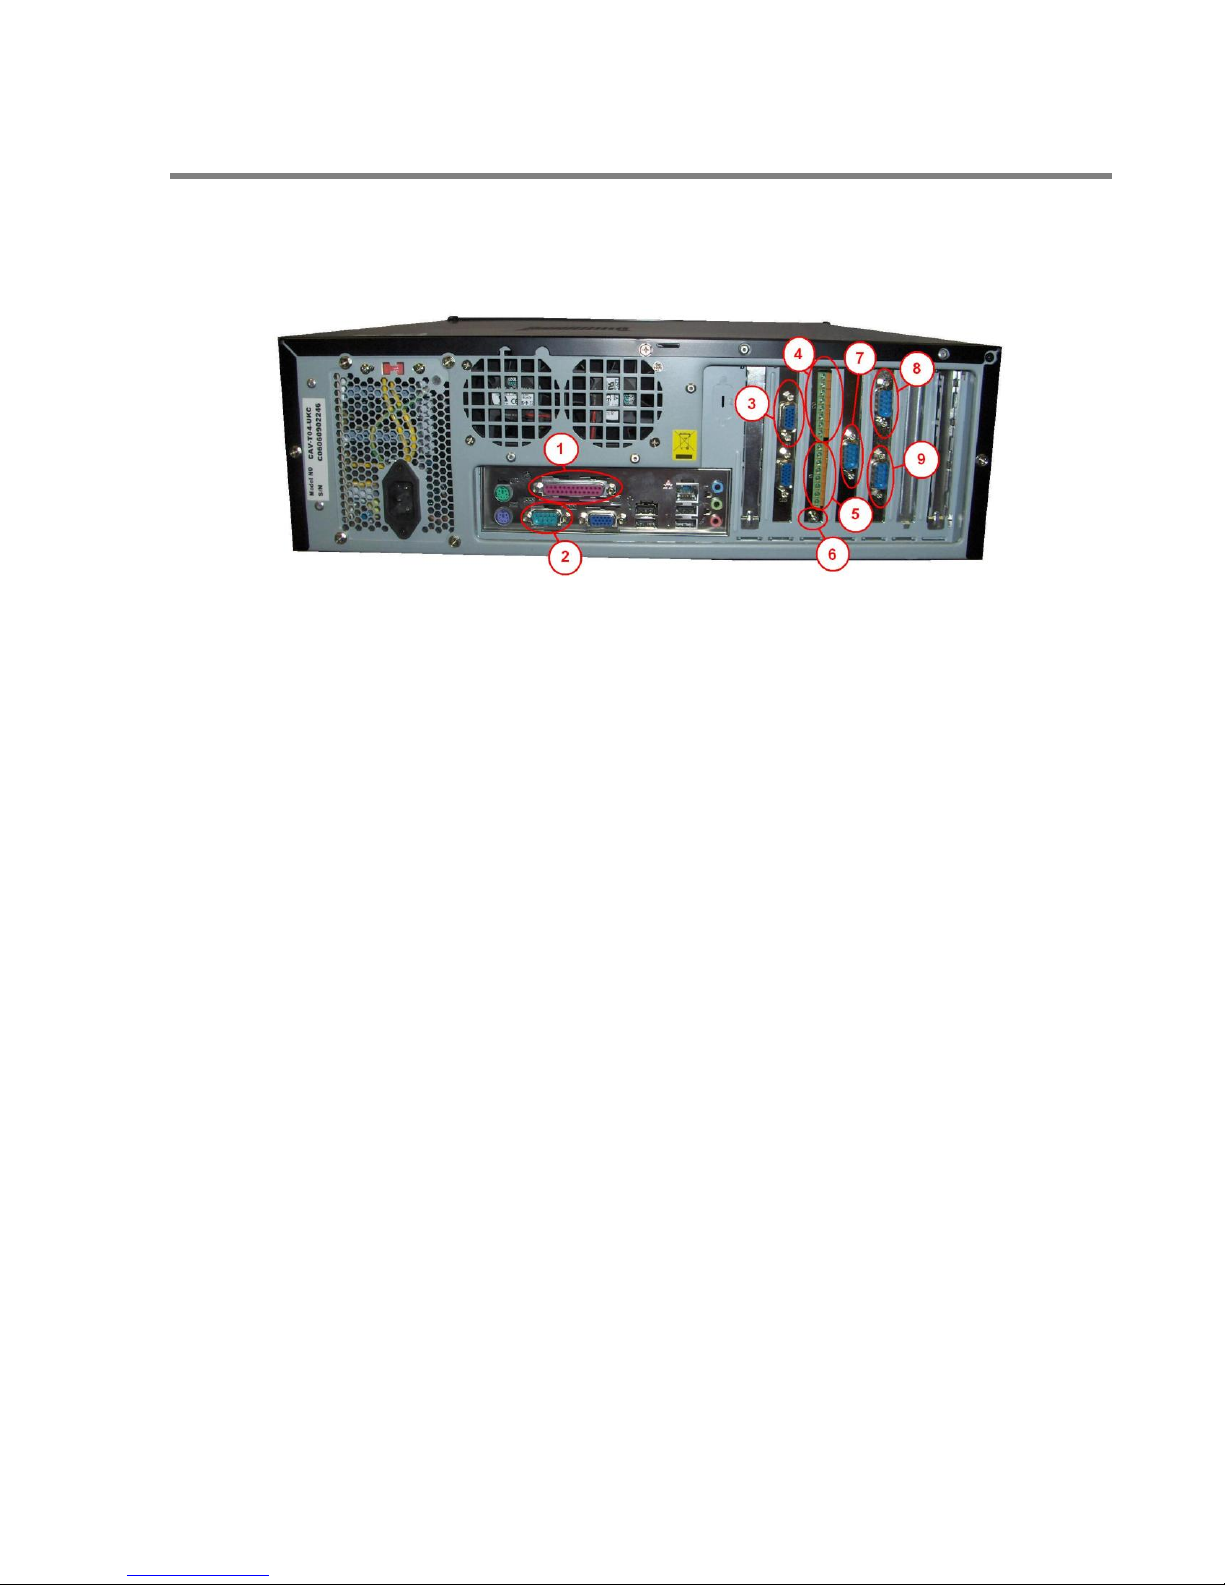
Back of a OneTrack system with the use of four PTZ cameras.
1. Parallel port which can be use for the alarms of the OneTrack system if an alarm
card is not present.
2. Serial port COM 1.
Wave
10
3. This is where you connect the OneTrack octopus cable for camera 1 to 4.
4. OneTrack Alarm output DO.
5. OneTrack Alarm input DI.
6. This screw is the ground for the OneTrack alarm card.
7. Serial port COM 2.
8. Serial port COM 4.
9. Serial port COM 3.
Page 11
OneTrack - © 2014 Video
3.1.1.1 Alarms
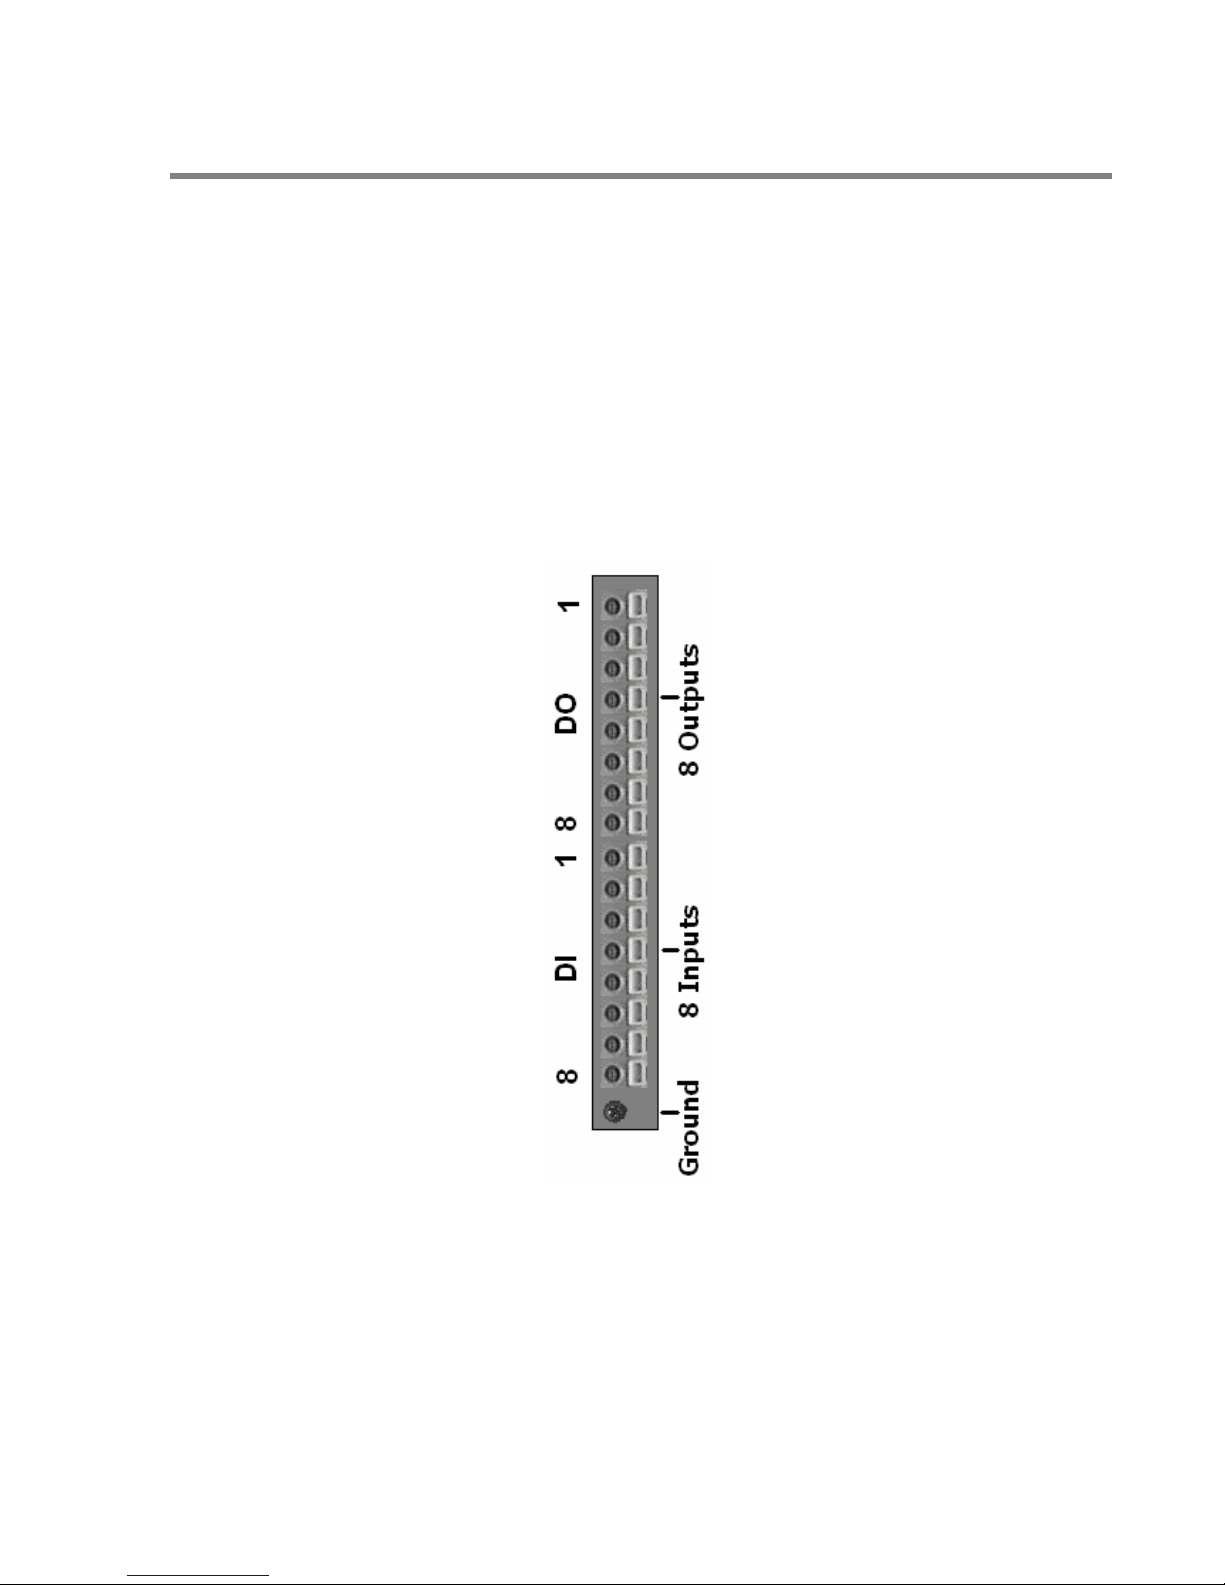
Input/output alarm card:
With the OneTrack system, it’s possible to send and receive alarm events. For
example, the OneTrack can generate an output alarm event when tracking occurs; it
can also execute an action when an alarm input event happens. Another example
would be that a preset can be called when a door opens.
If the OneTrack controller has an alarm I/O card, you can use both alarm inputs and
outputs. The card has 8 inputs and 8 outputs.
Wave
11
Page 12

OneTrack - © 2014 Video
3.1.2 Local PTZ Camera
The OneTrack system currently supports many camera models. The supported models
are listed in the grid below.
Please consult your installation manual for the complete details of your PTZ camera
operations. The following instructions should be used only with the installation of your
OneTrack system. These instructions do not replace your camera’s original manual.
Communication settings:
With your camera, you’ll have to make all these adjustments so that the OneTrack will
be able to communicate effectively with your PTZ.
Wave
12
Refer to the communication settings table (see the appendix).
Page 13

OneTrack - © 2014 Video
Common settings:
These settings are common to any camera you use.
Communication settings:
Your camera must have these settings and make sure that, in the General menu of
the OneTrack, you have the same values as the ones found here.
Data Bits: 8
Stop Bits: 1
Parity: none
Flow Control: none
Set the camera to address 1:
Make sure that the camera is set to address 01. This address number corresponds
to the CAM ID in the OneTrack.
Set the camera termination:
Make sure that the camera termination is set to ON, unless you are using a daisychain installation. In daisy-chain, only the last camera of the line should have the
termination to ON.
Wave
13
PTZ menu settings:
OSD:
In the On Screen Display (OSD) of your camera make sure that everything is at an
OFF position. When you look at your video feed from this camera, you must see
only the video without any position, numbers or zooming factor.
Digital zoom:
You have to make sure that the digital zoom of your camera is turned to OFF.
Connect the data cables:
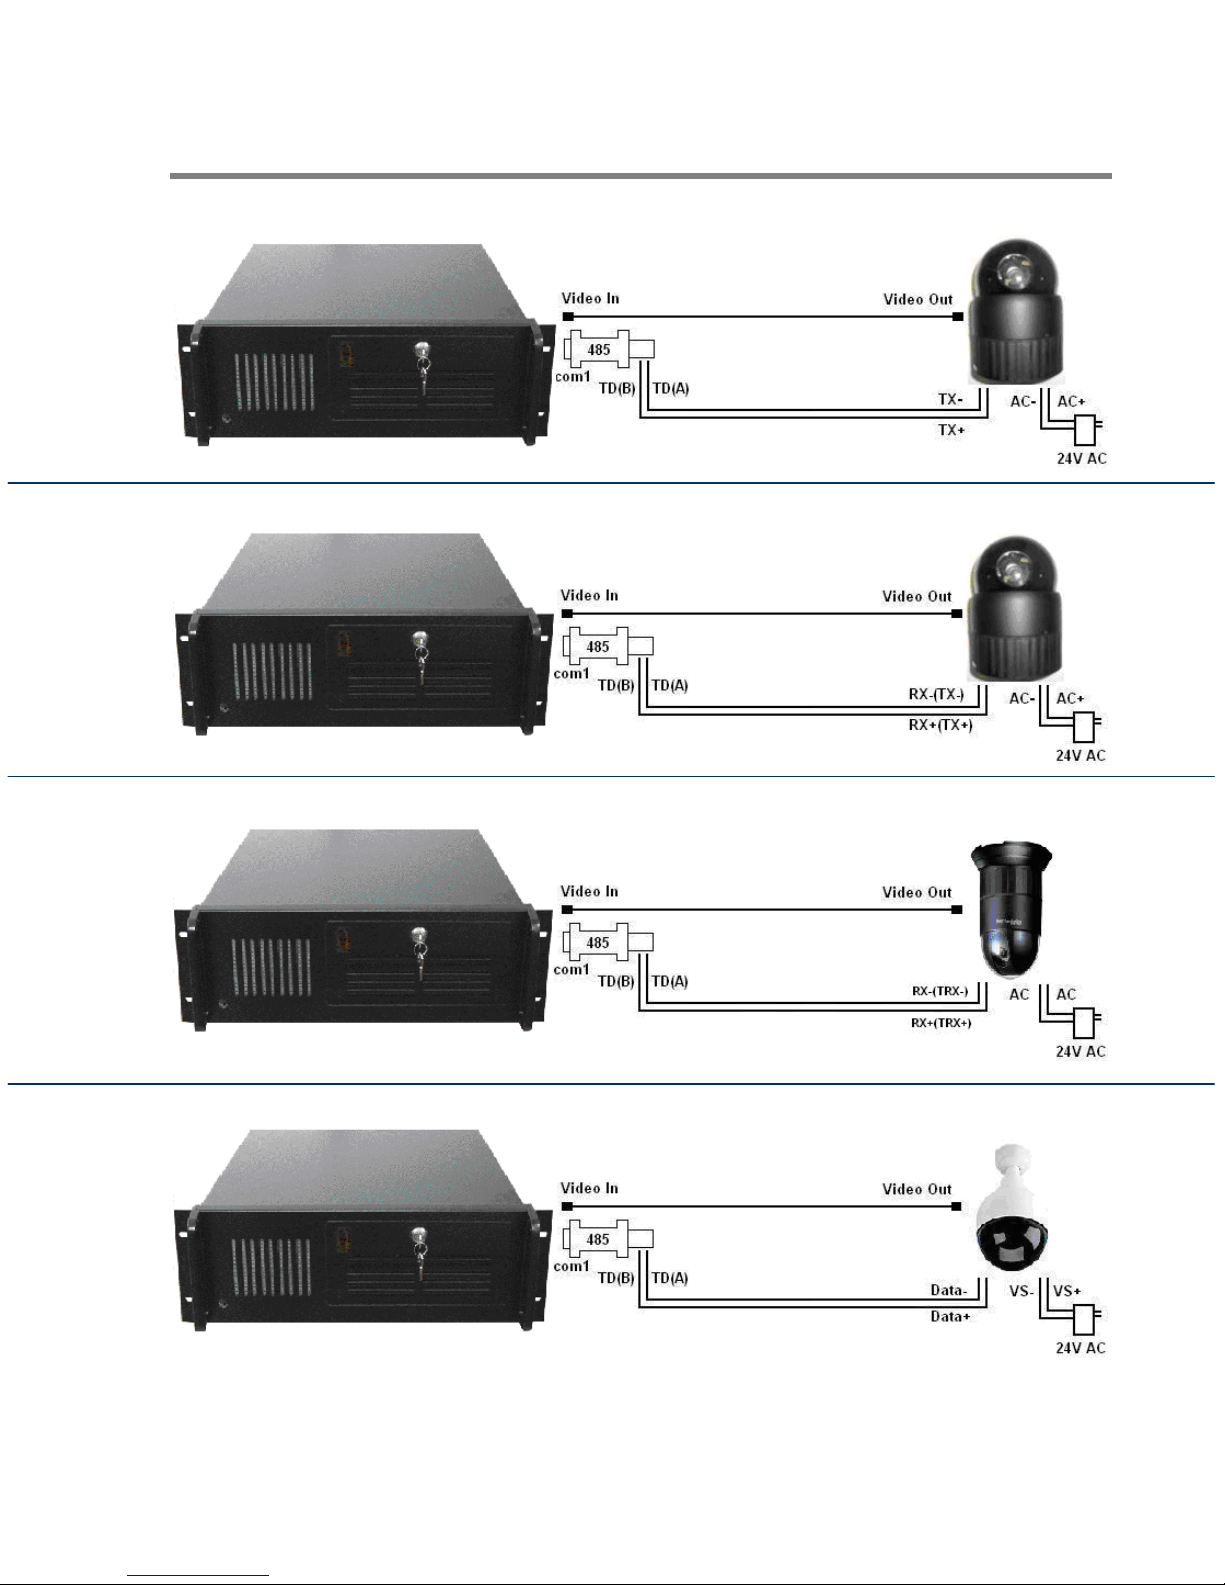
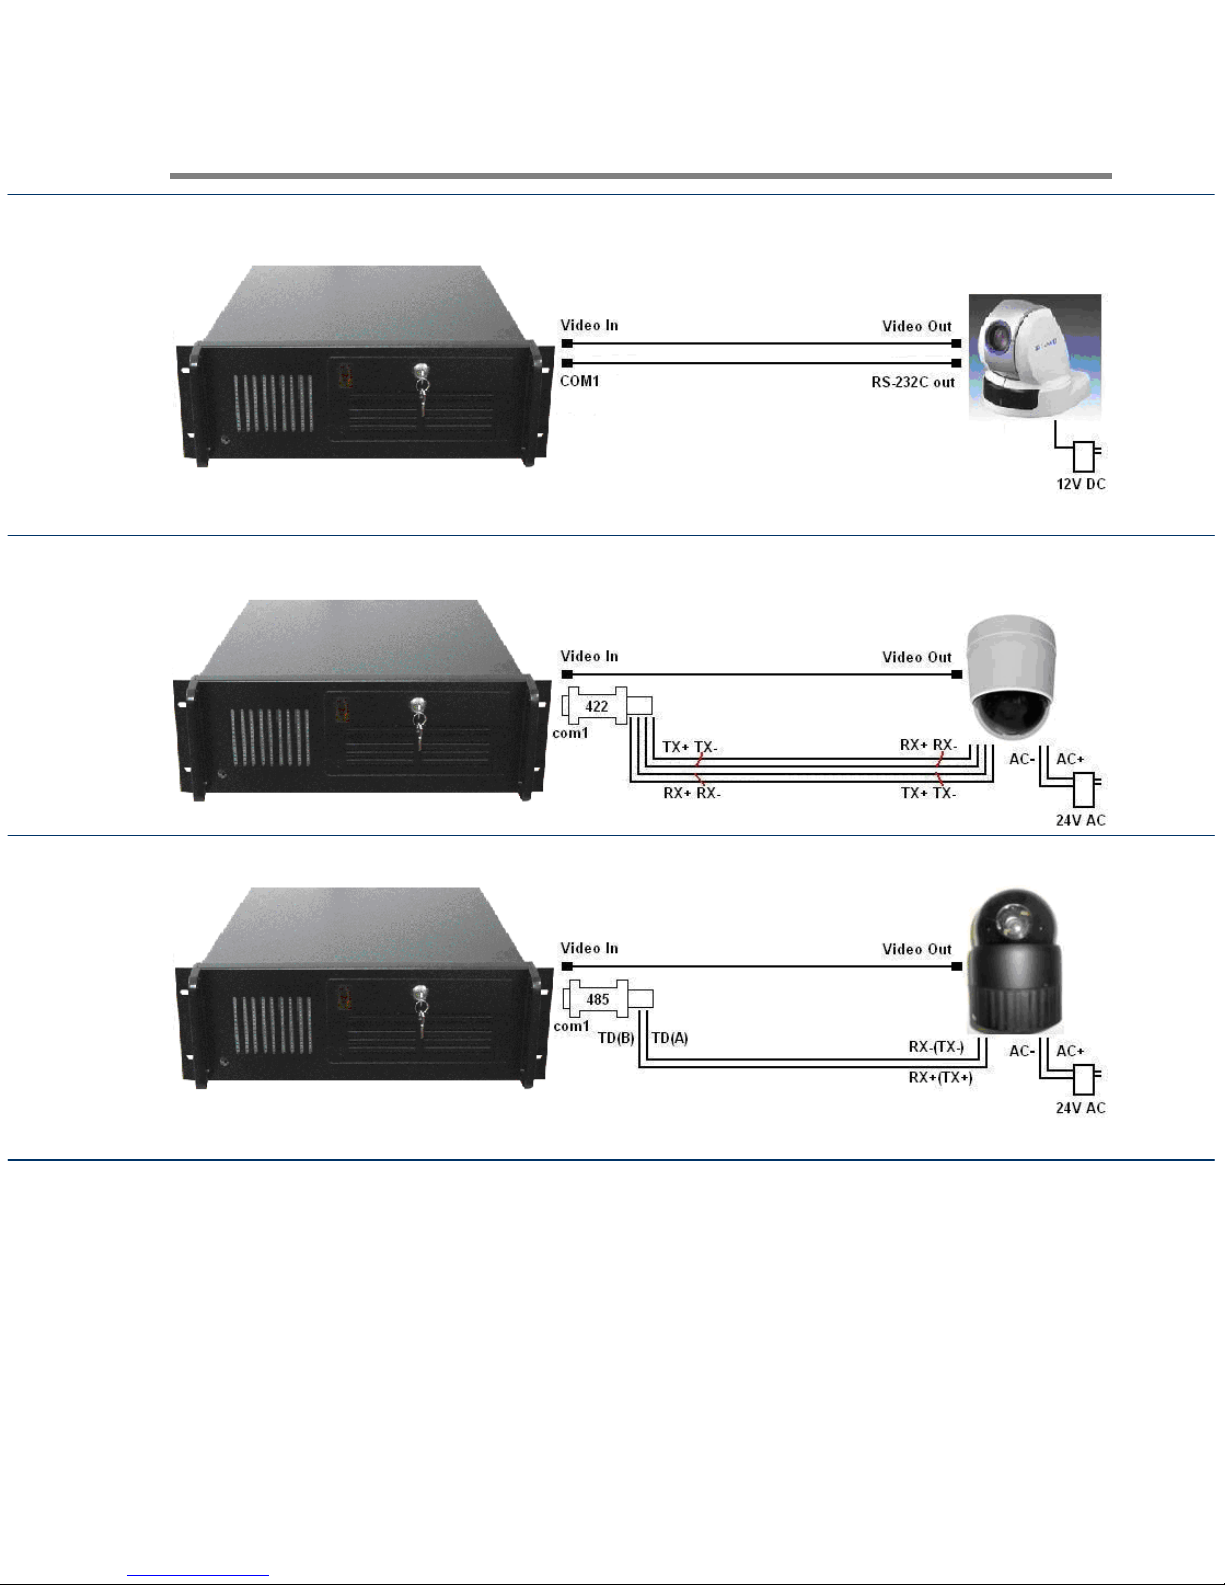
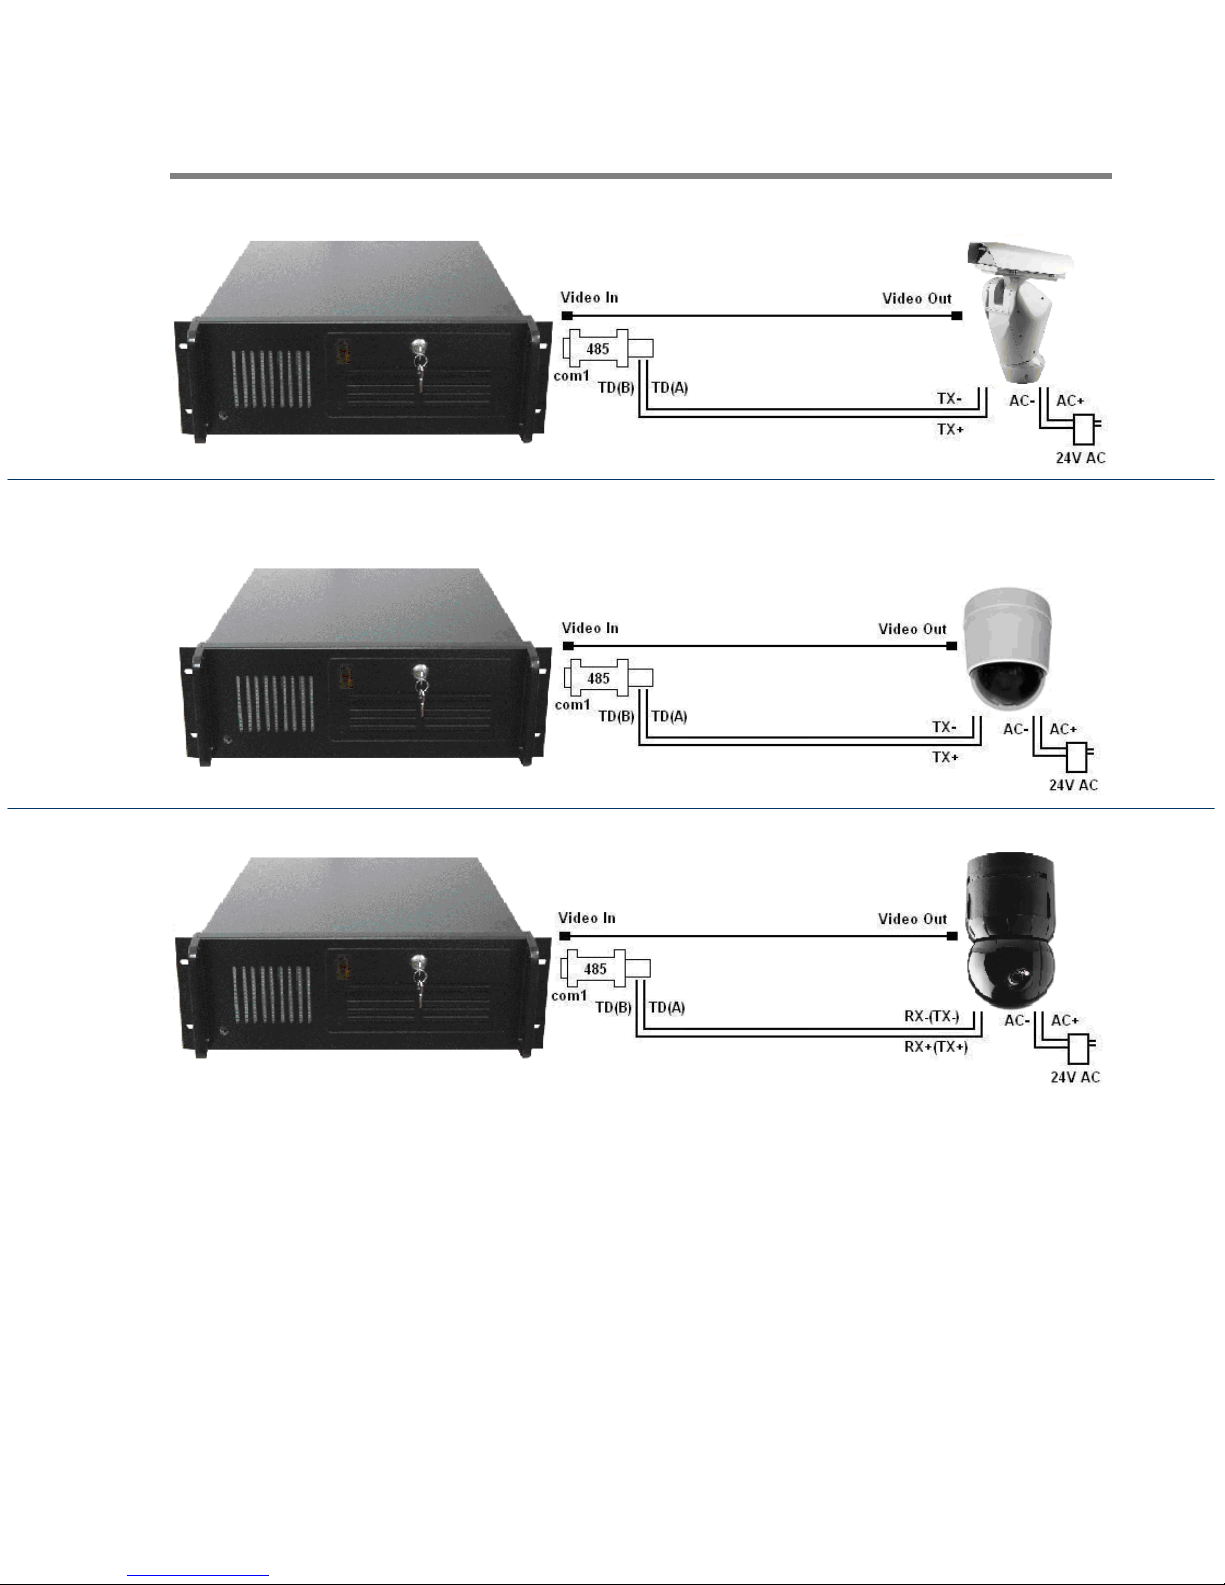
Please refer to the following diagrams to see which type of connection you need to
use. For some pictures and notes of converters that we use, please refer to the section:
“RS-485 and RS-422 converters”.
Page 14
OneTrack - © 2014 Video
Wave
14
Connection with the Honeywell HSDN-251
Connection with the ATV SD518SN and ATV SD523SN
Connection with the GSP Cyberscan II
Connection with the Ademco RapidDome
Note: Data- and Data+ are also called D- and D+ respectively.
Page 15
OneTrack - © 2014 Video
Wave
15
Connection with the ELMO PTC-100S
Connection with the Pelco Spectra III
Connection with the EzDome Cameras
Page 16
OneTrack - © 2014 Video
Wave
16
Connection with the Videotec Ulisse Cameras
Connection with the Uriel Hi-Speed Dome
Connection with the American Dynamics Speed Dome
Connect the power cable:
Connect the power to your camera. You can refer to the previous diagrams to help you
connect your AC adapter.
Important Note: Please refer to the appendix for the compatibility list of the
OneTrack for the protocol configuration.
Page 17

OneTrack - © 2014 Video
3.1.3 Network Camera
The OneTrack supports many network cameras. The list of supported cameras is
available in the appendix.
Please consult your installation manual for the complete details of your PTZ camera
operations. The following instructions should be used only with the installation of your
OneTrack system. These instructions do not replace your camera’s original manual.
Communication Parameters:
To communication with a network camera, you need the following information:
IP Address of the camera;
Communication Port (80 by default);
Username;
Password.
Camera Connection:
Wave
17
Connecting a network camera is really simple. You only need to connect the power
and then connect the RJ45 network cable.
AXIS Camera:
For the Axis cameras, it is necessary to set the resolution via a web browser. This can
be done by entering the IP address of the camera directly in your web browser
(example: http://192.168.1.25). In the Resolution section, it is important to specify a
resolution of at least 640x240. A lower resolution will result in poor detections by the
tracking system.
ONVIF Cameras:
Many onvif cameras are supported by the system. The supported video formats are
Jpeg and H.264. The video profiles can usually be modified via a web browser by
connecting to the IP address of the camera (example: http://192.168.1.25).
RTSP Cameras:
Many cameras offer a network video stream via the RTSP protocol. If the video stream
is in Jpeg or H.264, it is possible to use the camera with the system. For the rtsp
address of the camera, please refer to the camera manufacturer.
Page 18
OneTrack - © 2014 Video
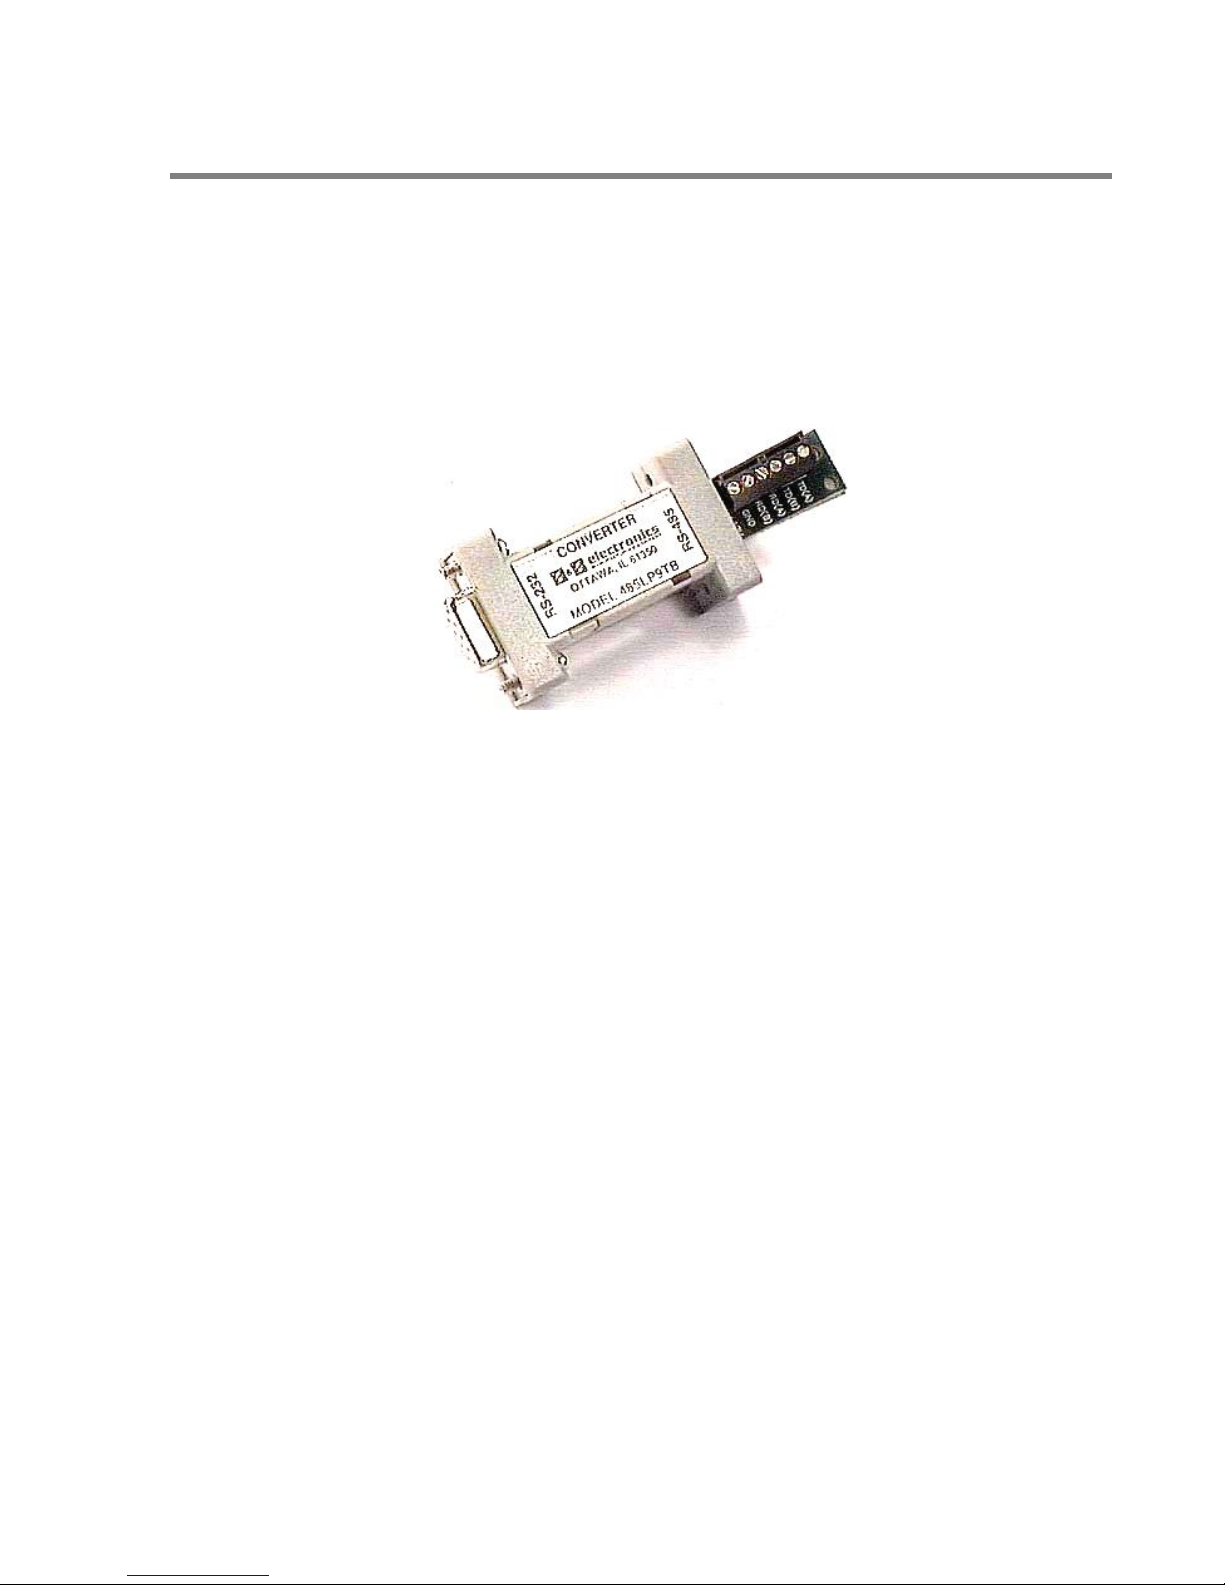
3.1.4 RS-485 and RS-422 Converters
These are some of the RS-485 and RS-422 converters that we use. You can refer to the
previous section: “Connect the data cables” to successfully connect your camera to the
OneTrack system.
Wave
18
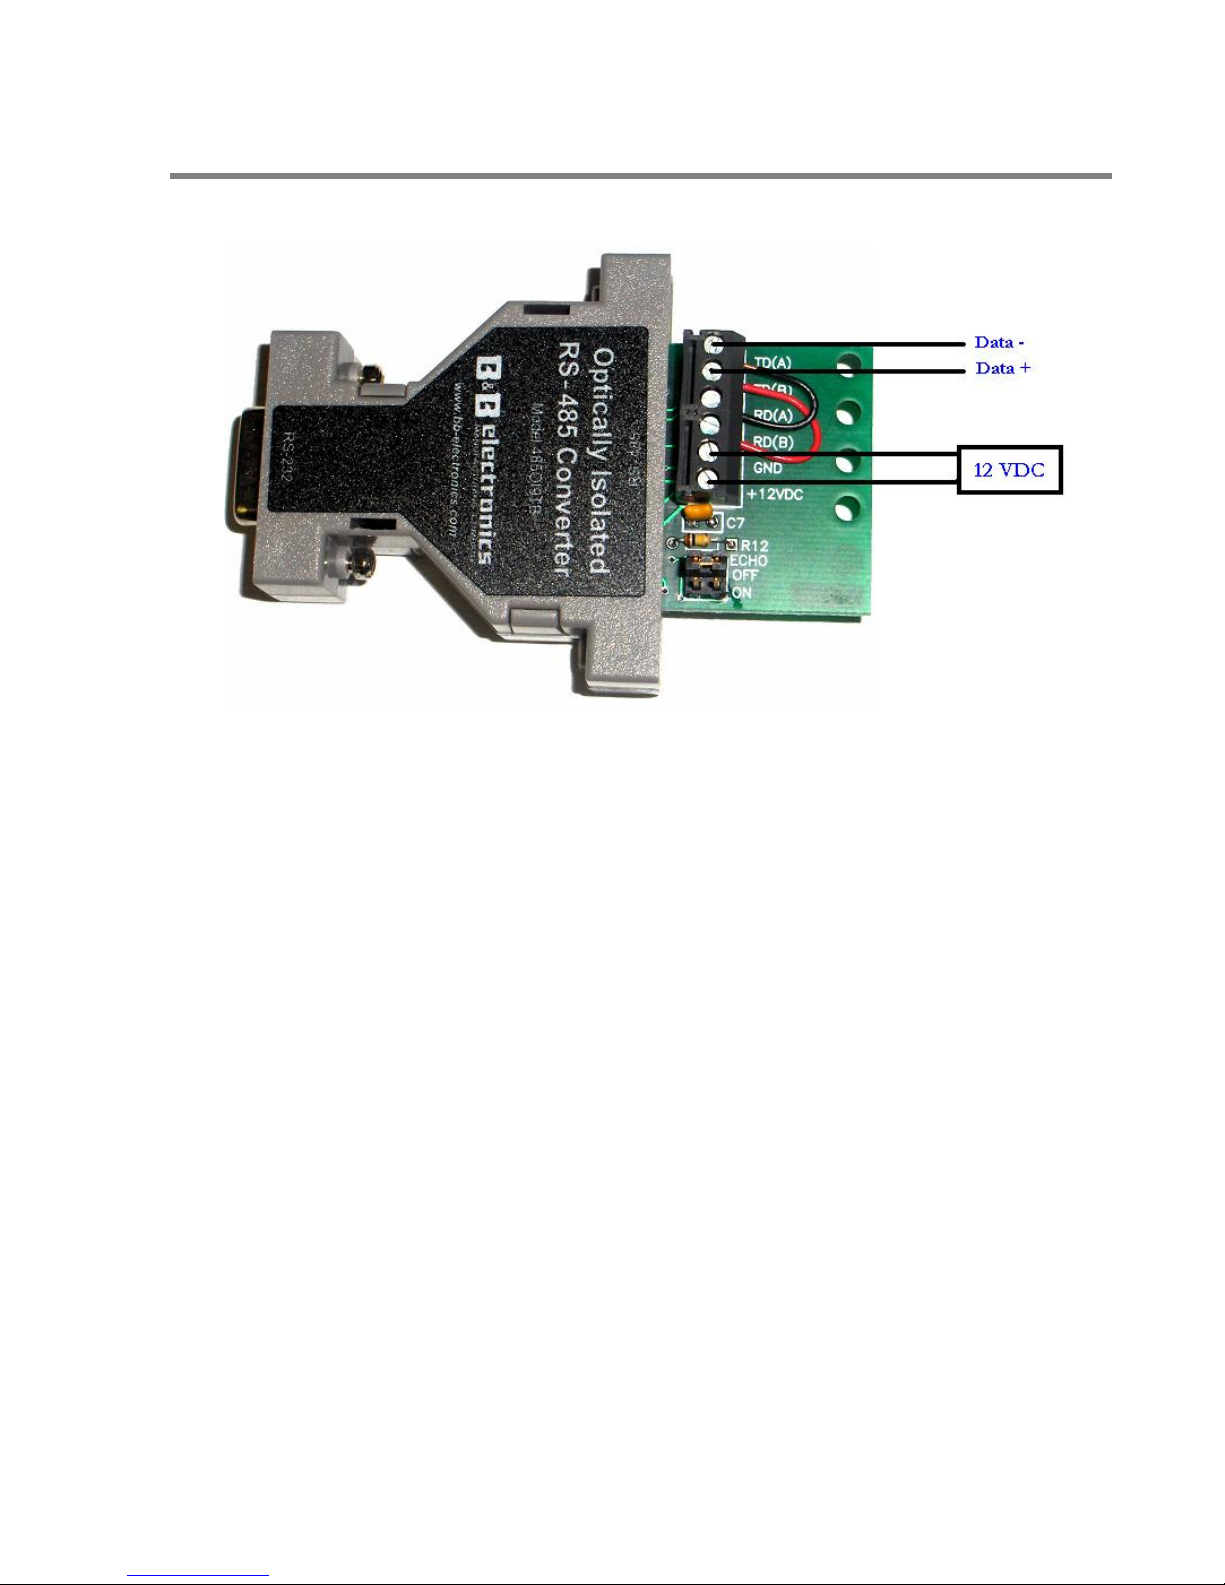
RS485-RS232 Configuration mode
To correctly configure the converter in RS485 mode, please follow these steps:
Set the jumper to ECHO OFF.
Install a small jumper (little wire) between the RD(B) and TD(B) pins.
Install a small jumper (little wire) between the RD(A) and TD(A) pins.
Power the converter with a regulated 12VDC power supply.
Connect the Data+ and Data- of your PTZ camera to the TD(B) and TD(A) pins
respectively. TD(B) represents the (+) and TD(A) represents the (-) pins.
Connect the converter to the PC COM port by using the supplied black extension
cable.
Page 19
OneTrack - © 2014 Video
Wave
19
RS422-RS232 Configuration Mode
To correctly configure the converter un RS422 mode, please follow these steps :
Set the jumper to ECHO ON.
Power the converter with a regulated 12VDC power supply.
Connect the 4 Data + and Data – pins of your PTZ camera to the TD(B), TD(A),
RD(B), and RD(A) pins. TD(B) and RD(B) represents the (+) pins and TD(A) and
RD(A) represents the (-) pins.
Connect the converter to the PC COM port by using the supplied black extension
cable.
Note: When the data cables are screwed to the converted, connect it to the serial
COM1 port of the OneTrack controller. Each additional camera must be
connected to a different serial port.
Page 20
OneTrack - © 2014 Video
3.1.5 Video
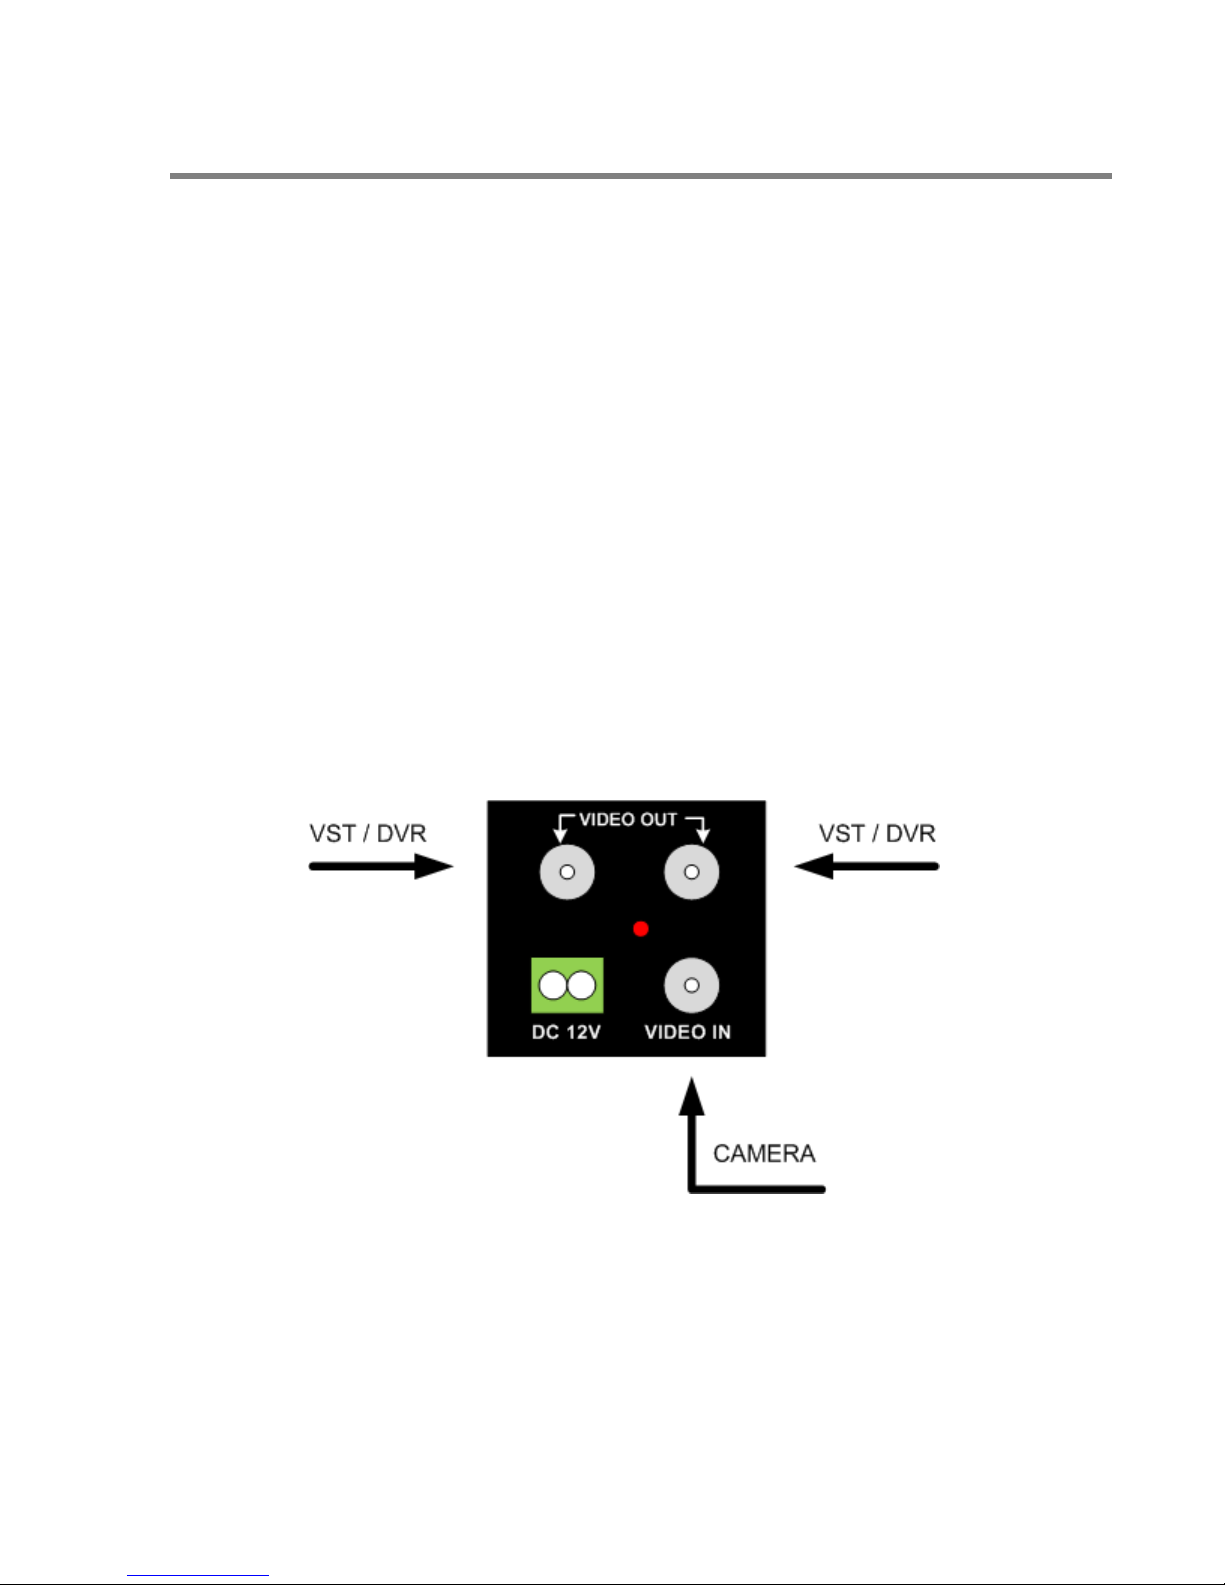
Connect video cables between the cameras and the OneTrack controller. Connect the
cable on the video output cable of the camera. Connect the other end of the cable into
the video composite input of the OneTrack controller. If the OneTrack controller
supports more than 1 camera, connect additional cameras to the other video inputs. It
is recommended to connect the PTZ cameras in the first inputs, and the fixed cameras
in the last inputs.
OneTrack with a DVR
If you have a DVR unit with your OneTrack system, here are some simple procedures
for you to plug the video of your PTZ camera to both systems at the same time.
1. If you have a video amplifier, you can plug the video output of your camera to the
input of the amplifier. You can then plug the outputs of your amplifier to both the
OneTrack and your DVR without having a reduction in video quality.
Wave
20
Page 21
OneTrack - © 2014 Video
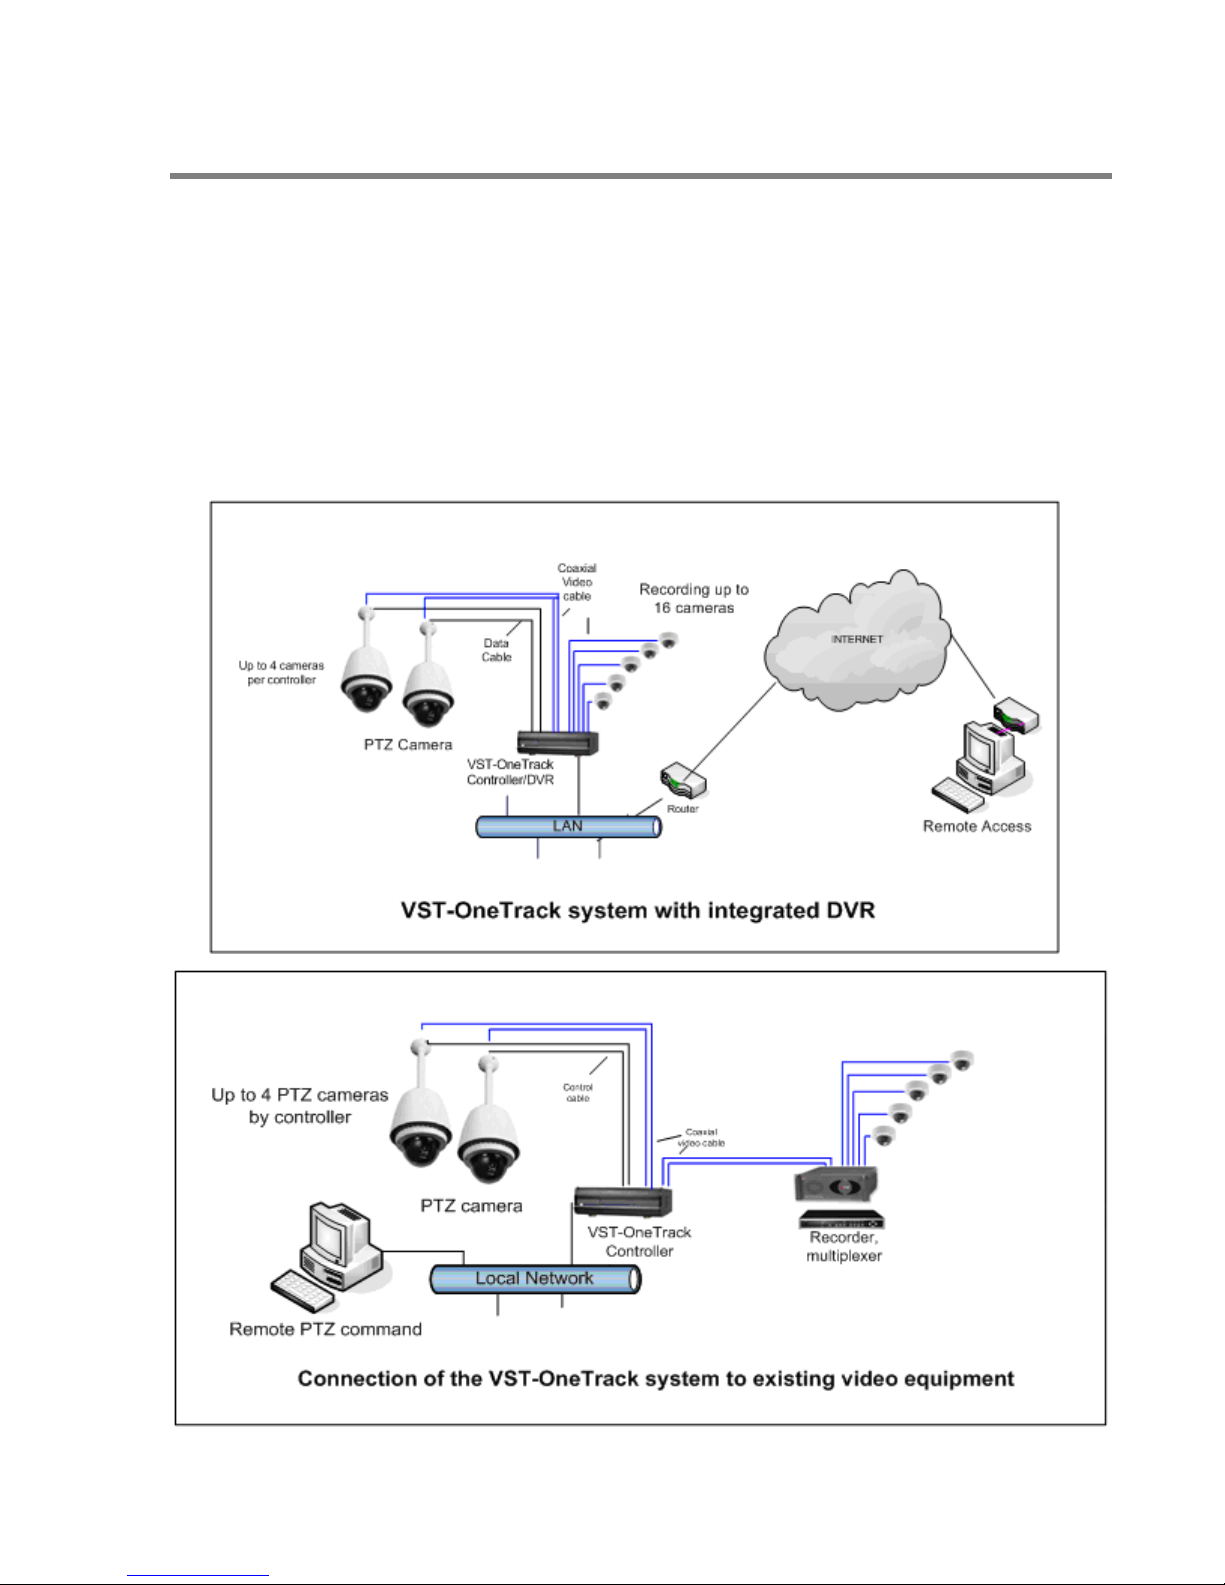
2. Lastly, if you use an external DVR and it has a loop thru output, you can plug the
camera directly in your DVR input and use its loop thru output and plug it into the
OneTrack system.
Here are two diagrams that can explain different types of connections that you can
have with a OneTrack controller:
Wave
21
Page 22
OneTrack - © 2014 Video
3.2 Software
This section describes the software configuration procedure.
3.2.1 Software configuration
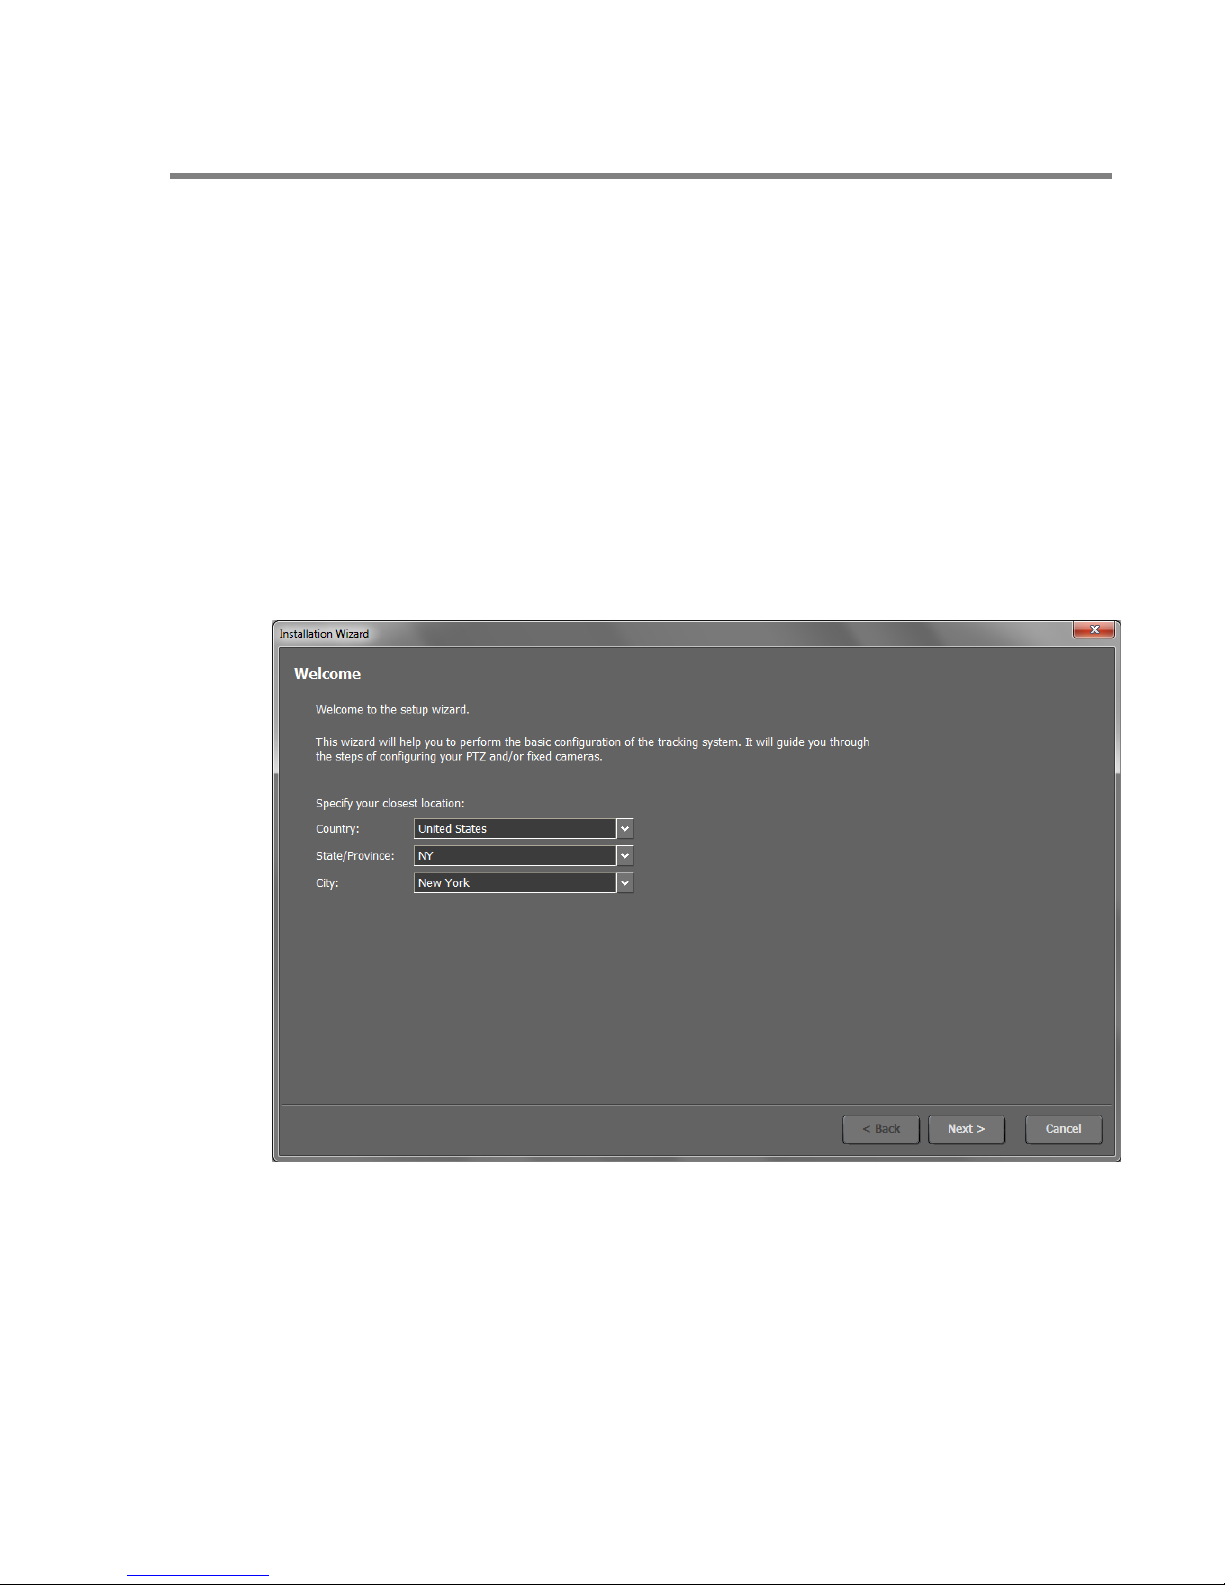
On the first launch, the Setup Wizard should be displayed. If it doesn’t, you can launch
it via the System menu.
Wave
22
It is recommended to follow each step properly. Make sure that you see the video of
all your cameras during the wizard. If you don’t see live video but only a blue image,
check that the video signal cable is connected correctly. Also make sure that you can
control all your PTZ cameras during the appropriate steps.
For a detailed explanation of the Setup Wizard, please refer to the User Guide.
Page 23

OneTrack - © 2014 Video
PTZ communication:
Make sure that the PTZ functions are working correctly. You should be able to control
the PTZ camera by using the manual PTZ buttons or by clicking directly in the video
window.
By default on the OneTrack, the communication parameters for all camera models are
the following:
Port: COM 1
Baud Rate: 9600
Data Bits: 8
Parity: None
Stop Bits: 1
Flow Control: None
Make sure that you put all the same settings that you configured on your camera. It’s
also important to choose the exact camera protocol and the exact camera model. The
model version can be seen in the video screen when you start up the camera. You only
have to unplug and plug the power of the camera, and to look for the camera version
that is displayed in the image at the camera start up.
Wave
23
Page 24
OneTrack - © 2014 Video
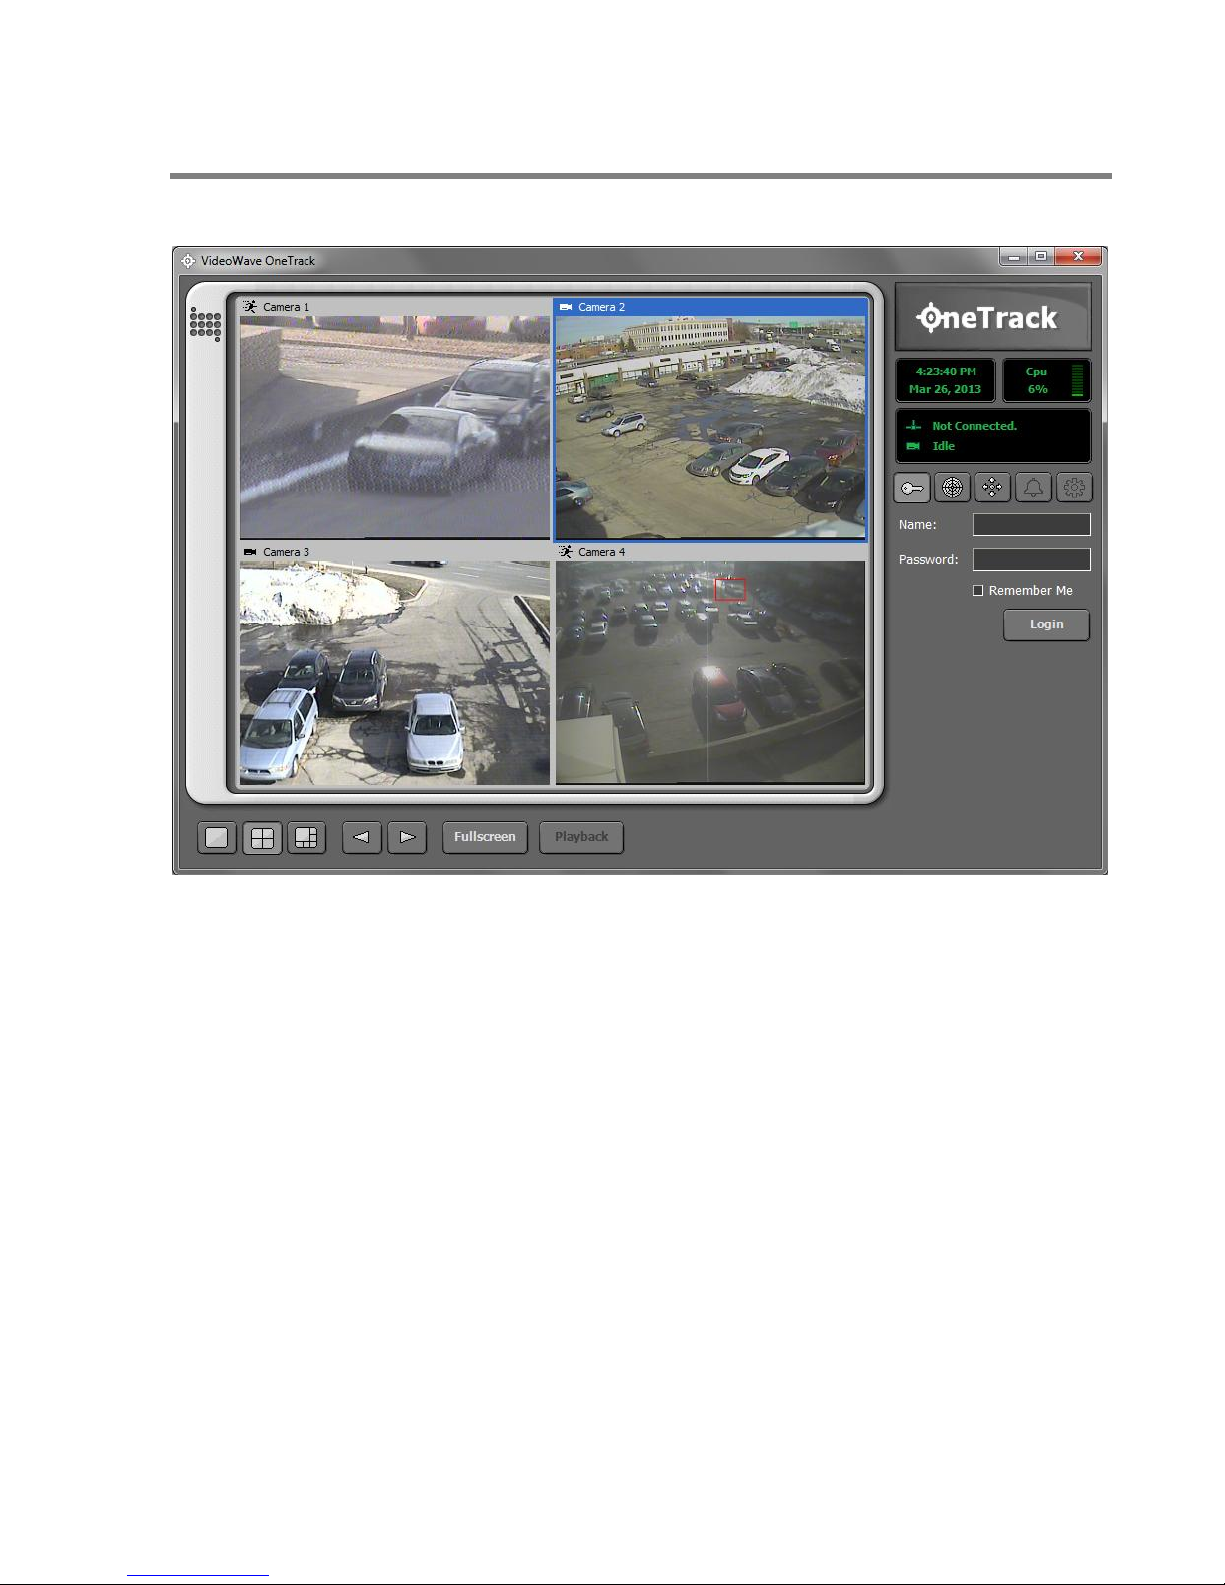
Once the wizard is completed, the system is started. The main window should show up
and display live video
Wave
24
Identification:
To be able to access the configuration menus, you must connect to the system with a
valid username and password. By default, only the administrator account exists. For
the initial usage, you can use the following user account:
Username: administrator
Password: 1111
Warning: For security reasons, it’s important to modify the administrator password. To
do this, you must modify the user account via the System configuration.
For more information about the configuration of the OneTrack controller, please refer
to the OneTrack user guide.
Page 25

OneTrack - © 2014 Video
Coaxial cable
category
Type
Cable Size
Maximal distance
(feets)
Temperature
(oC)
RG-59/U
95% braided
shield
18 AWG
600
-40 oC à +105 oC
RG-6/U
95% braided
shield
20 AWG
2000
-40 oC à +105 oC
Wave
25
C h a p t e r 4
Cables and Accessories
4.1 Cable Choice
This section will help you choose the right cable categories before you begin the
installation of the cameras. This may be useful to prevent problems like poor video
quality, PTZ communication errors, unstable power, etc.
4.1.1 Coaxial cables
Recommended
The coaxial video cables RG-59/U and RG-6/U are recommended to distribute video
signals of CCTV cameras. The specification of each cable type is available in the
following table:
Note: We recommend using a cable that is 95% braided.
Not Recommended
We don’t recommend coaxial video cables that are not 95% braided shield and that do
not respect the above specifications.
Page 26

OneTrack - © 2014 Video
Wire size
(AWG)
#24
(0.22 mm2)
#22
(0.33 mm2)
#20
(0.52 mm2)
#18
(0.83 mm2)
Cable
length
(approx.)
(m)
20
30
45
75
(ft)
65
100
160
260
4.1.2 PTZ Control Cables
Recommended
We recommend the UTP Cat5-E twisted pairs cables that include the <Enhanced
Outdoor> characteristic for external use. Also, we recommend a 24 AWG cable size.
The above recommendations will ensure an error free communication between the
PTZ and the OneTrack controller. Also, it is recommended to use a twisted pair cable
to reduce the interferences and the noise in the control signal.
With this category of cable, (UTP Cat5-E), we can reach a maximal distance of about
~ 4000 feet for RS485 or RS422 communication.
Not recommended
Wave
26
The PTZ control cables that do not have the above types (UTP Cat5-E et twisted pairs)
are not recommended.
4.1.3 Power Cables
Recommended
The recommended power cables for external use of 24V DC are shown in the
following table, for different distances:
Not recommended
The power cables that are not built for external use and the ones that do not meet the
above requirements are not recommended.
Page 27
OneTrack - © 2014 Video
Wave
27
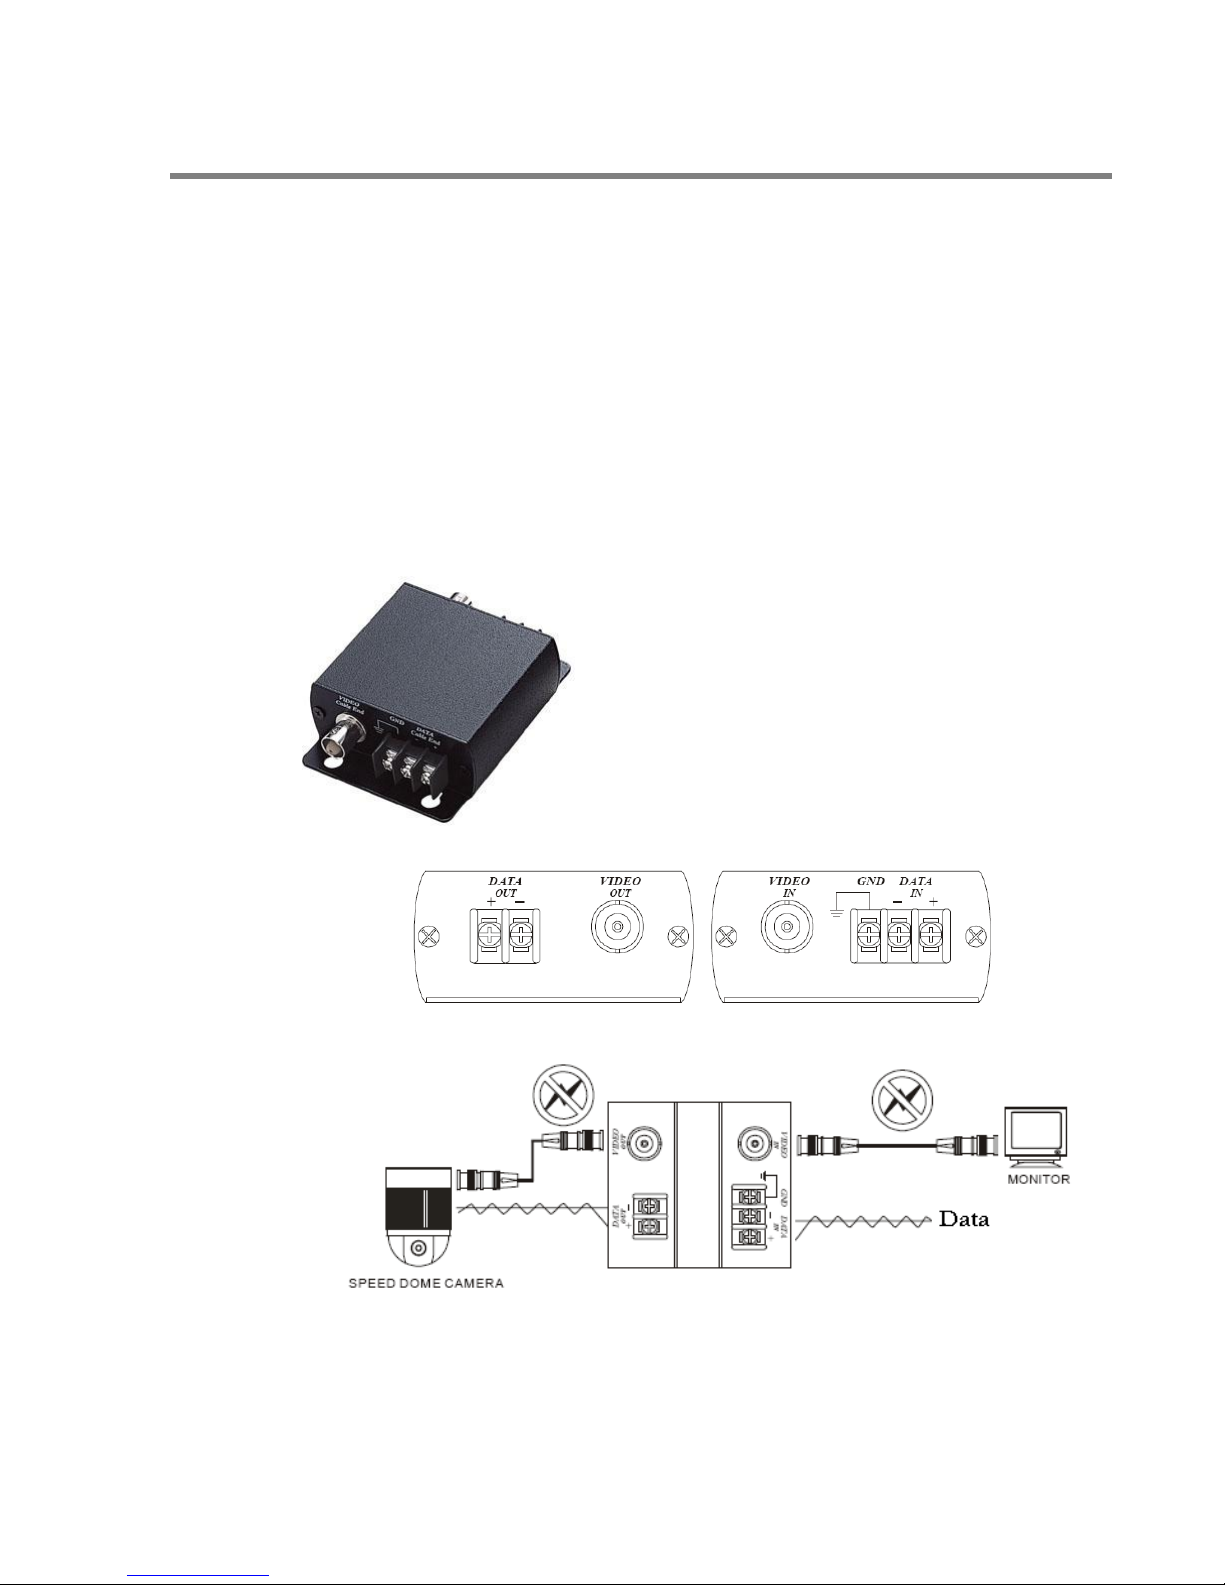
4.2 Power surge protector
When we can meet an electric problem like a tension overload, lightning, etc, it is
recommended to protect the CCTV devices.
We recommend using a surge protector for the camera video signal and the PTZ data
control line.
Here is an example of the 15-SP05 model that we recommend:
Note: This surge protector will protect the signals up to 5000A or 4 kV.
Page 28
OneTrack - © 2014 Video
Wave
28
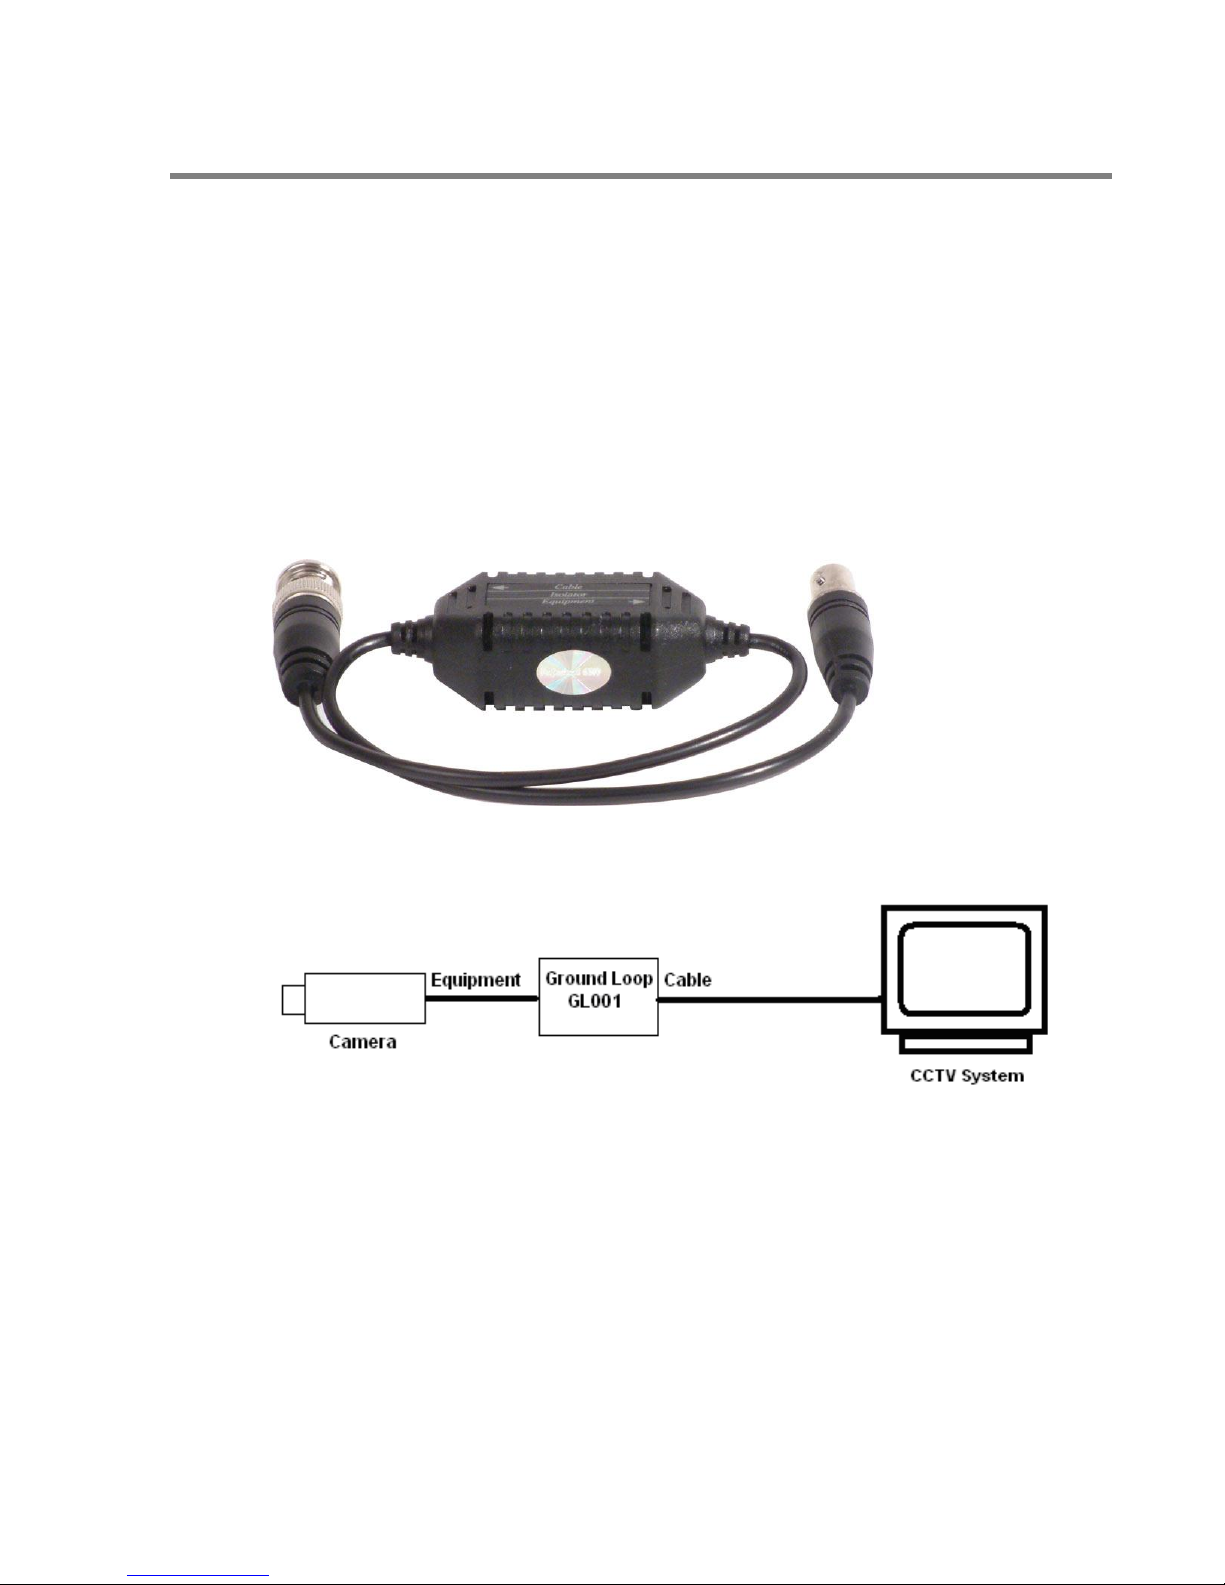
4.3 Ground Loop
A Ground Loop helps to remove the video signal interference caused by different
potentials of ground. Those differences can cause a deformation in the video image.
We recommend connecting a ground loop to the problematic video signal
Here is the GL001 ground loop model that we recommend:
Page 29
OneTrack - © 2014 Video
Wave
29
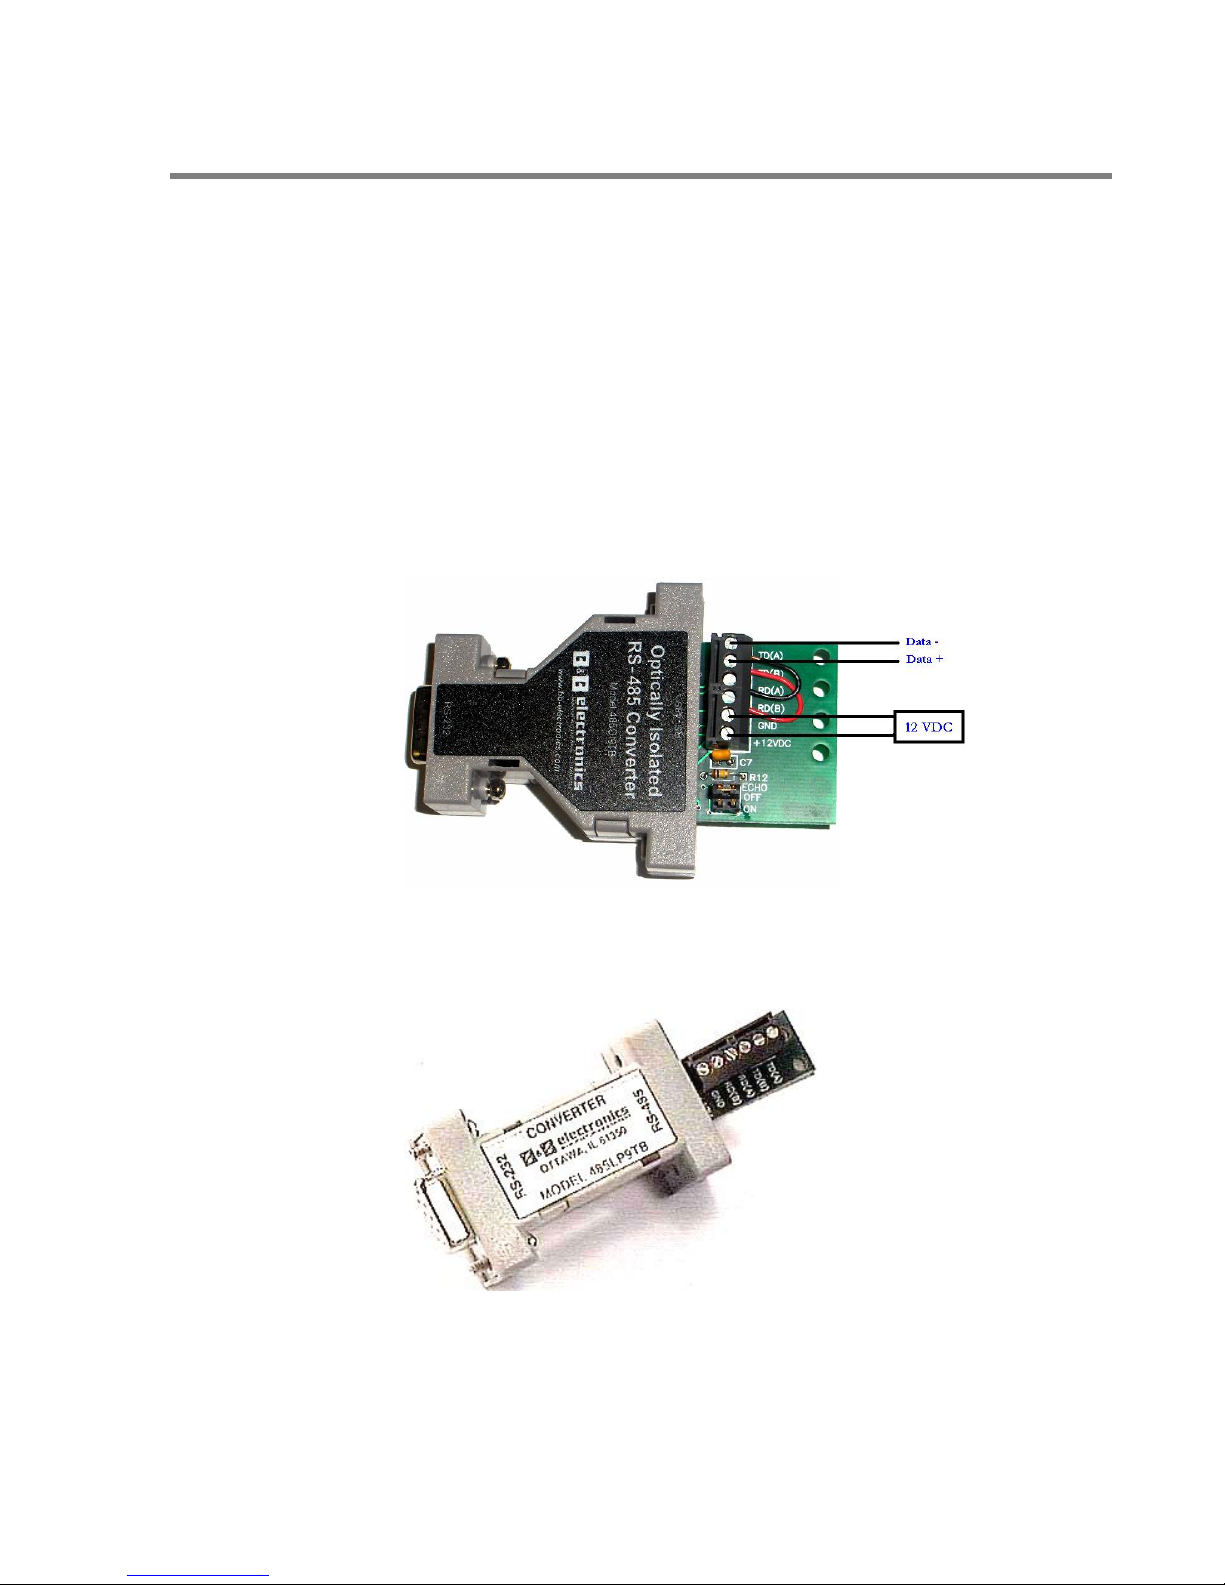
4.4 RS485/RS422 Converter
Regarding the converters to control the PTZ camera we recommend a RS422/RS485 –
RS232 optically isolated as shown in the figure below. This model can prevent any
interference that could have been transported by the control line. It can prevent
problems created by difference potential of the ground.
Note: The configuration and the connection of this converter is explained in section
3.1.3.
You can also use the following model of converter. However, you won’t have all the
protection of the above converter.
Page 30

OneTrack - © 2014 Video
Wave
30
C h a p t e r 5
Analysis of Needs
This section helps you to determine which sections of a site are important to monitor
and the sections that are secondary.
Page 31
OneTrack - © 2014 Video
Wave
31
5.1 Camera Positioning Strategy
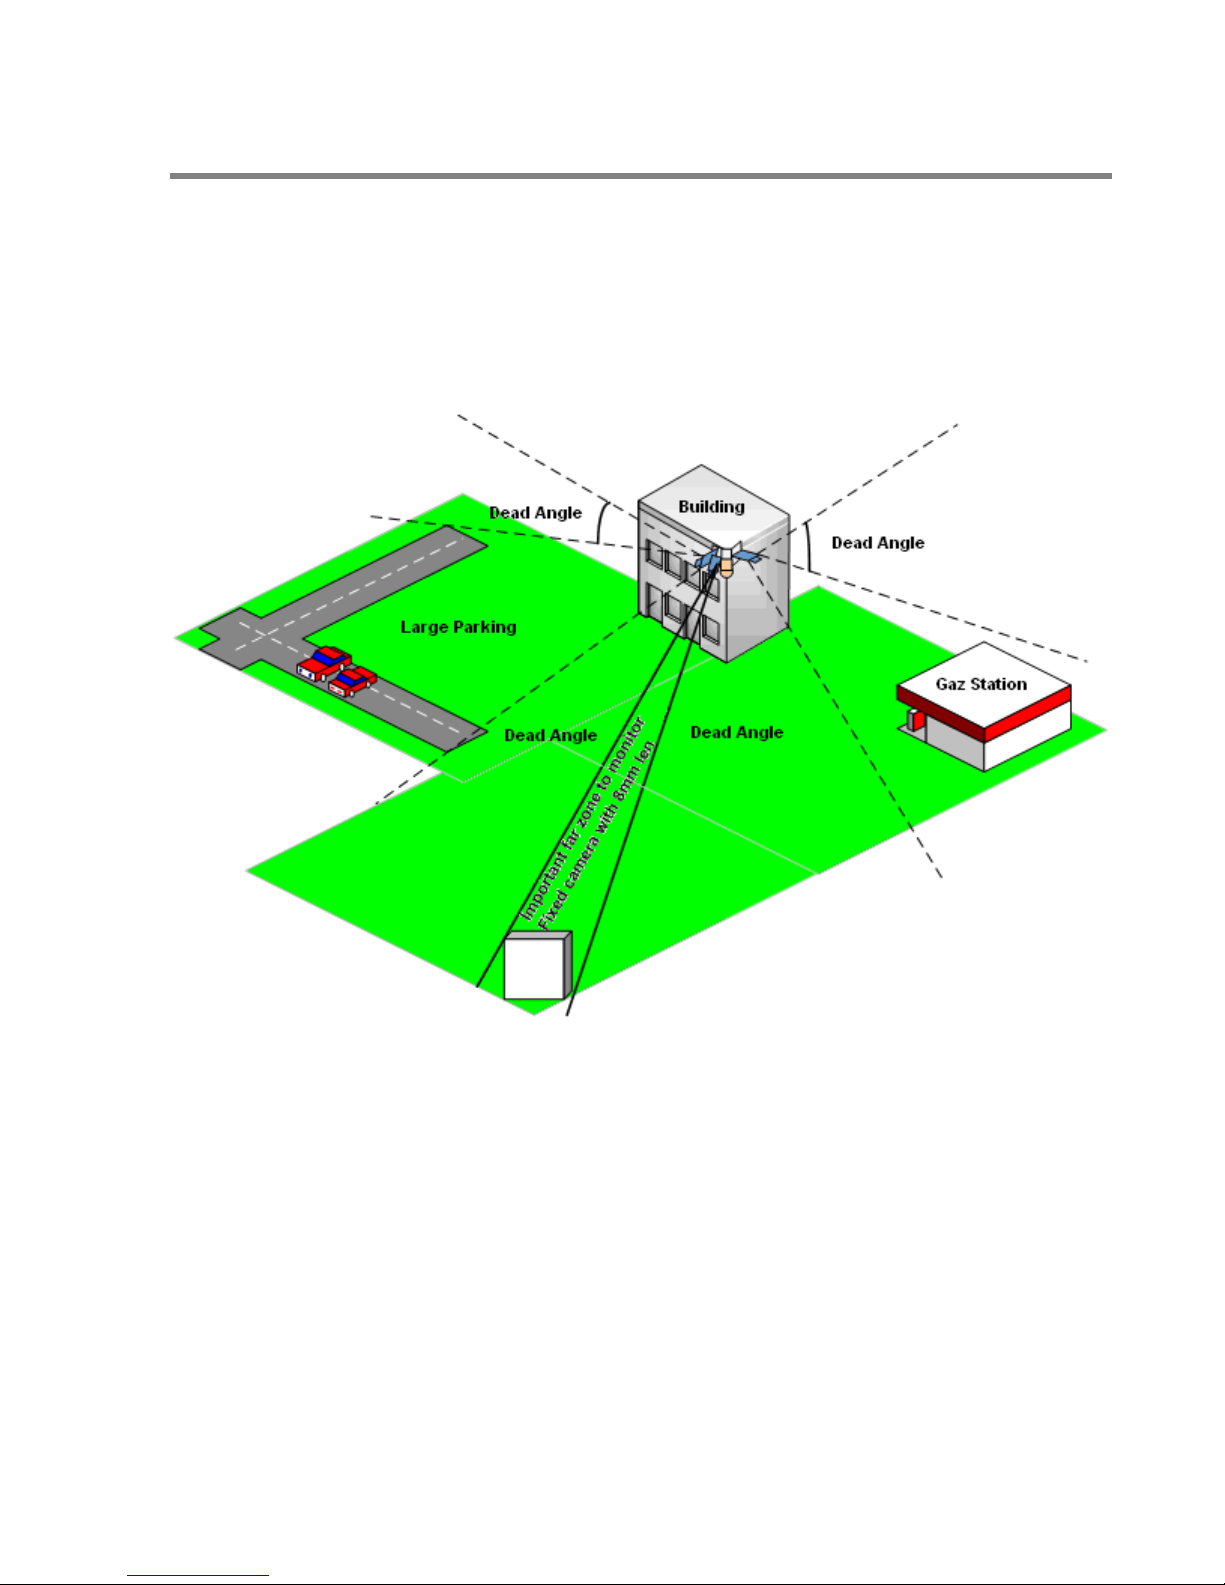
This section uses fixed cameras to cover the most important zones. In the figure
below, we are using the MultiTrack mode of the OneTrack with one PTZ camera and
three fixed cameras.
As seen in the above image, we have one fixed camera to monitor the large parking
zone and one fixed camera to monitor the gas station zone. In MultiTrack mode, the
object detection such as person, vehicles and other detection is done by the fixed
cameras. For example, when a person is detected in the large parking area, the PTZ
camera is sent on that object and then starts to follow that object. If, at the same time,
another object is detected in the gas station area, the PTZ will be switched to that
object. The PTZ will then alternate between the different objects, according to the
priorities that we assigned in the OneTrack configuration.
Page 32

OneTrack - © 2014 Video
For the system to perform well in MultiTrack mode, each fixed camera must
absolutely be installed close to the associated PTZ camera, as shown in the above
example. To get a good object tracking, a fixed camera and a PTZ camera must cover
the same area and be oriented in the same direction.
Concerning the dead angles that are not covered by the fixes cameras, the AutoTrack
mode will be used to cover them. That way, the PTZ camera will follow any moving
objects in that area, without the help of a fixed camera.
If we need to monitor an area that is far from the PTZ, we can install another fixed
camera with a bigger len (like 8mm). That way, the small area will be monitored. You
can check the camera lens table for fixed camera in section 5.4 for more details.
Wave
32
Page 33

OneTrack - © 2014 Video
Wave
33
5.2 Choosing the cameras
Once the positioning strategy has been decided, it is important to correctly choose the
camera models to use. As a guideline, we will enumerate some types of PTZ and fixed
cameras that are available.
For PTZ cameras, you can select an optical zoom of 18X, 26X or 35X with a len going
up to 100mm, so you can get a better close-up of the moving objects. Please refer to
the compatibility list in the appendix for the different PTZ models that are supported
bye the OneTrack.
For fixed cameras in MultiTrack mode, it is recommended to choose a camera built for
external use and with a good resolution. Depending of the field of vision that we need
to cover, you need to choose the right focal length. For more information, refer to
section 5.4 of this manual.
Page 34
OneTrack - © 2014 Video
Wave
34
5.3 Choosing the bracket
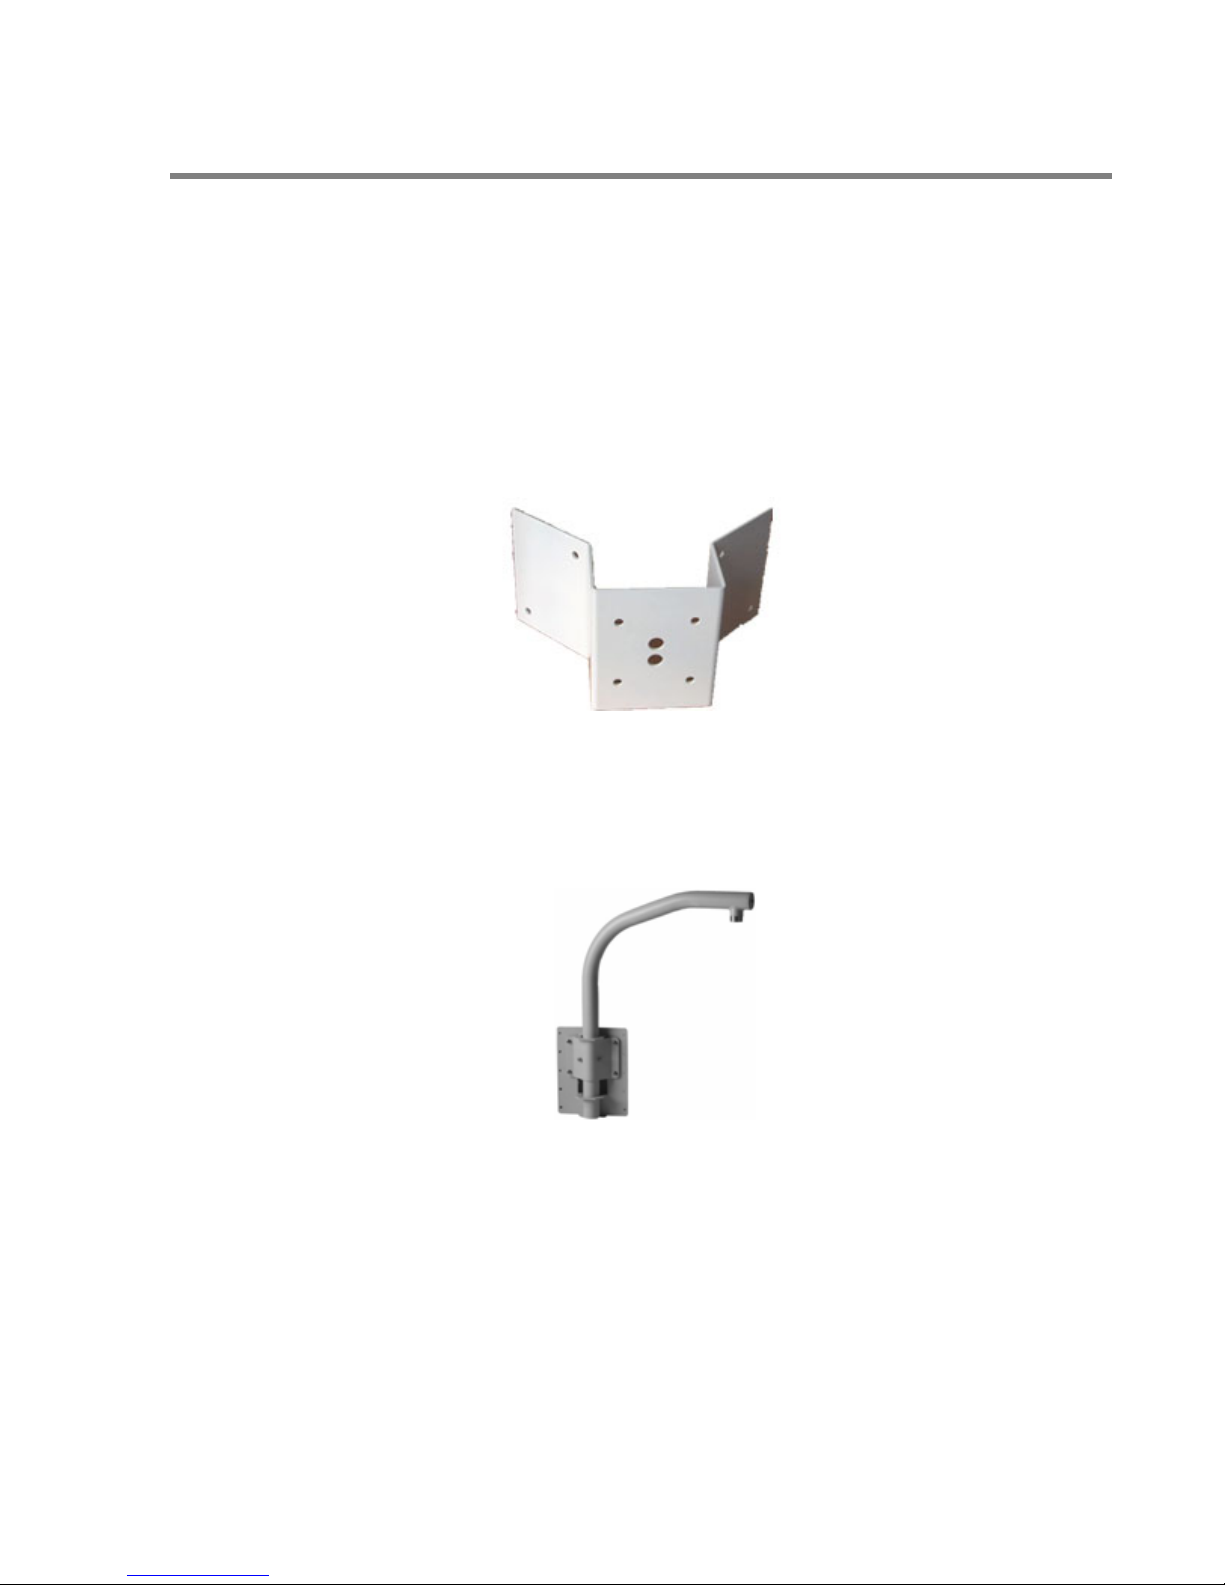
Regarding the brackets of PTZ cameras, it is recommended to choose a corner bracket
as seen in the image below. For example, if we need to install the PTZ on the corner of
a building, we will choose a bracket that will reduce the vibration as much as possible.
It is important to keep good image stability, even with bad weather like a strong wind.
However, parapet brackets, as shown below, are not recommended, because they are
sensible to the wind and vibrations which will generate an unstable image.
Page 35
OneTrack - © 2014 Video
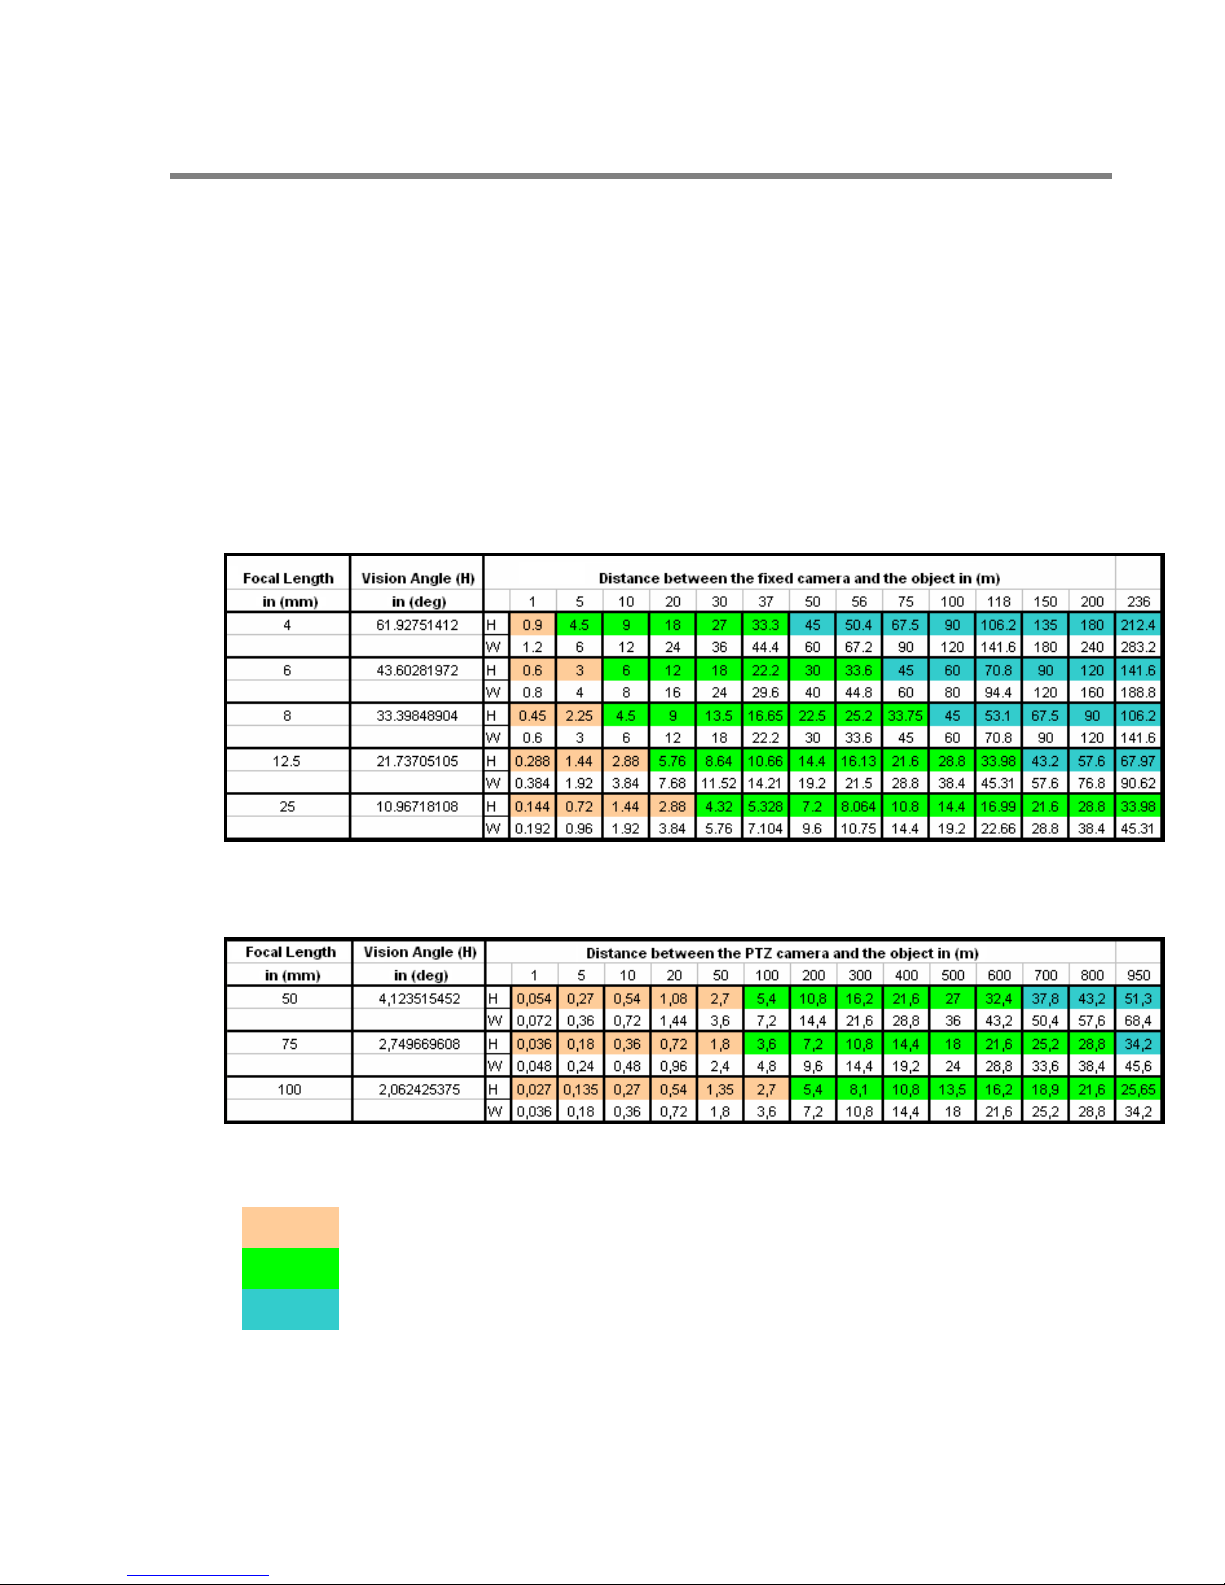
Person detectable and big enough for recognition (~ 50% of the height).
Person big enough for a OneTrack detection.
Person too small for a reliable detection.
Wave
35
5.4 Size of detected objects
In this section, we are representing the height and width of the image of each camera,
along with the vision angle, the focal length of the chosen len, and the desired distance
between the fixed camera and the object. The following table displays the results from
our different calculations.
The following results are valid for 1/3’’ inch CCD lens.
The following results are valid for ¼’’ inch CCD lens (for PTZ cameras)
Page 36

OneTrack - © 2014 Video
Wave
36
Troubleshooting guide
1. Error with communication PTZ
Check that the selected protocol and camera model are correct.
Check the camera address, i.e. that the ID of the camera and the ID in the <General>
screen are the same.
Check that the PTZ uses the same baud rate as the one in the <General> screen.
Check that the RS485/RS422 – RS232 converter is connected correctly.
Check that the PTZ camera is connected correctly to the Rx+, RX-, Tx+, Tx- pins.
Check the termination dip-switch on the PTZ camera.
Check that the data cable between the camera conduct from end to end and that there
is no cut somewhere in the middle.
Add a 12VDC power adapter on your RS485-RS232 converter.
2. No video signal in the OneTrack
Check the video signal of the camera.
Check the Octopus video cable.
Check if the camera and the video source are enabled in the general section of the
OneTrack software.
3. Status of the OneTrack on querying
Check if the OneTrack Server is running.
Check if the Auto Logon account is deleted.
Page 37

OneTrack - © 2014 Video
Wave
37
4. The PTZ camera doesn’t track
Check if the type of tracking is selected in the <General> screen.
Check the serial converter connection.
Check the Rx and Tx connection.
Check that the selected protocol and camera model are correct.
Check the profile and schedule to see if everything in configured correctly.
5. The PTZ camera moves by small steps
Check in the Tour section if the “Use intermediate steps between presets” is checked.
6. The PTZ camera operate improperly
Check if the appropriate protocol is selected.
Check if the right communication mode has been selected (BIR, BIA, UNI).
In MultiTrack mode, check if your bridges works correctly.
7. Video signal shakes or have wavy lines
Check the BNC video cable.
Check your video amplifier (if one is installed).
Using a ground loop might be necessary.
8. No video signal in the OneTrack (black image)
Check that the camera is activated in the <General> screen.
Check that the video signal is not too weak.
Page 38

OneTrack - © 2014 Video
Wave
38
Appendix
Page 39

OneTrack Compatibility Guide
Network Cameras and Video Servers
Model Category Protocol User / Password Format Comment RTSP URL
A-Soni
SVR610 1 channel video server ONVIF admin / admin H.264
Avigilon
ENC-4P-H264 4 channels video server ONVIF admin / admin H.264 rtsp://ipaddress/defaultPrimary0?streamType=u
Axis
233D Cam PTZ 4CIF VAPIX root / root MJPEG
240Q Video server VAPIX root / root MJPEG
241Q Video server VAPIX root / root MJPEG
211W Fixed camera VAPIX root / root MJPEG
225FD Fixed camera VAPIX root / root MJPEG
Q1602 Fixed camera VAPIX root / root MJPEG
M7001 1 channel video server ONVIF root / root MJPEG/H.264 rtsp://ipaddress/onvif-media/media.amp?profile=quality_jpeg&sessiontimeout=60
P7214 4 channels video server ONVIF root / root MJPEG/H.264 rtsp://ipaddress/onvif-media/media.amp?profile=quality_h264&sessiontimeout=60
P5522 Cam PTZ 18x, 4CIF ONVIF root / root MJPEG/H.264
P5534-E Cam PTZ 18x, 1Mpix ONVIF root / root MJPEG/H.264
P1344-E Fixed camera, 1Mpix ONVIF root / root MJPEG/H.264
P1346-E Fixed camera, 3Mpix ONVIF root / root MJPEG/H.264
Q6034-E PTZ ONVIF root / root MJPEG/H.264
Bosch
VEZ-221-EWCS PTZ 10x ONVIF admin / admin H.264
Dahua
IPC-HDBW3300 Fixed camera, 2Mpix ONVIF admin / admin MJPEG/H.264 rtsp://ipaddress:554/cam/realmonitor?channel=1&subtype=0&unicast=true&proto=Onvif
SD6582AN-HN PTZ 20x ONVIF admin / admin MJPEG/H.264
Digimerge
DNV14TL2 Fixed camera 2Mpix ONVIF admin / admin MJPEG/H.264 rtsp://ipaddress:554/snl/live/1/1
EYEONET
CAM-IP5022 Fixed camera, 2Mpix ONVIF admin / admin MJPEG/H.264 rtsp://ipaddress:554/snl/live/1/1
CAM-IP9741 Fixed camera, 2Mpix ONVIF admin / admin MJPEG/H.264
CAM-IP9612PTZ Cam PTZ, 20X, 2Mpix ONVIF admin / admin MJPEG/H.264
IPS-401 1 channel video server RTSP admin / admin MJPEG/H.264 rtsp://ipaddress/cam/realmonitor?channel=1&subtype=0
Geovision
GV-BX320D Fixed camera RTSP admin / admin MJPEG/H.264 rtsp://ipaddress:8554/CH001.sdp
GV-BX110-D Fixed camera 1.3 Mpix RTSP admin / admin MJPEG/H.264 rtsp://ipaddress:8554/CH001.sdp
GV-SD200 Cam PTZ, 18X, 1Mpix ONVIF admin / admin MJPEG/H.264
IQEye
IQ041S Fixed camera 1.3 Mpix ONVIF admin / admin MJPEG rtsp://ipaddress/rtsp/now.jpg
HikVision
DS-6604HFI 4 channels video server ONVIF admin / 123 45 H.264 rtsp://ipaddress/mjpeg/ch1/sub/av_stream
The following cameras and video servers has been tested with the specified protocols dans formats.
Page 40

DS-2DF157-A Cam PTZ, 18X, 2Mpix ONVIF admin / 12345 H.264 rtsp://ipaddress/h264/ch1/ sub/av_stream
DS-2DF157-2 Cam PTZ, 18X, 2Mpix ONVIF admin / 12345 H.264 slow, not recommended rtsp://ipaddress/h264/ch1/main/av_stream
DS-2CD2332-I Fixed camera, 3Mpix ONVIF admin / 12 345 H.264
DS-2CD7253F-EZH Fixed camera, 2Mpix ONVIF admin / 12 345 MJPEG/H.264
DS-2CD7153-E Fixed camera, 2Mpix ONVIF admin / 12345 MJPEG/H.264
Panasonic
NS202-A PTZ camera Pan iPro MJPEG
WV-SC384 Cam PTZ, 18X, 1.3M pix ONVIF MJPEG/H.264
Provideo
SD-715-2 2 channels video server ONVIF admin / admin MJPEG rtsp://ipaddress/g711 ; rtsp://ipaddress/g711v2
Samsung
SNP-3120VHN P TZ camera ONVIF admin / 4321 MJPEG/H.264
Video only, no PTZ control
rtsp://ipaddress/onvif/profile1/media.smp
SNP-5200H PTZ camera ONVIF admin / 4321 MJPEG/H.264
SNP-6200 PTZ camera ONVIF admin / 4321 MJPEG/H.264
Sony
SNC-RX570 PTZ camera Ipela MJPEG
SNC-RZ25 PTZ camera Ipela MJPEG
SNC-DF80N Fixed camera Ipela MJPEG
SNC-RS86N PTZ camera 3 6X ONVIF admin / admin MJPEG/H.264 rtsp://ipaddress/media/video1
Speco
OINT03D1G Fixed camera RTSP admin / admin H.264 rtsp://ipaddress/
TrendNet
TV-IP612P PTZ camera 10X, D1 RTSP admin / admin MJPEG/H.264 Tested in video mode only rtsp://ipaddress/play1.sdp
TV-IP512P Fixed camera, D1 RTSP admin / admin MJPEG
Vivotek
FD8136-F2 Fixed camera, 1Mpix ONVIF root /root MJPEG/H.264 rtsp://ipaddress:port/live.sdp
IP8151 Fixed cam era, 1.3Mpix ONVIF root /roo t MJPEG/H.264 rtsp://ipaddress:port/live2.sdp
Network cameras and Ip servers are addded to this list on a regular basis. To support a specific model, please contact Video
Wave
.
Page 41

OneTrack Compatibility Guide
Analog PTZ Cameras
UNA BIA BIR
Ademco
RapidDome
VCL TP RS-485 9600 yes √ AutoTrack/MultiTrack
American Dynamics
Ultra VII D&N
Ultra VII
SpeedDome RS-422 4800 yes √ √ √ AutoTrack/MultiTrack
Ameta
CA-7651, CA-8661
CA-8407 10X
Pelco D RS-485 4800 yes √ √ √ AutoTrack/MultiTrack
ATV
Fastrax IV 36X
SD518SN, SD523SN,
SD535DW
Fastrax II RS-485 9600 yes √ √ √ AutoTrack/MultiTrack
AVS
SP-200
Hi-Speed Dome RS-485 2400 yes √ √ √ AutoTrack/MultiTrack
Capture
FTD360, FTD366, FTD450,
FTD452, FTD454, FTD456,
FTD458
Fastrax II RS-485 9600 yes √ √ √ AutoTrack/MultiTrack
Domenor
EPP-S370Z 26X
Pelco D RS-422 2400 yes √ √ √ AutoTrack/MultiTrack
Elmo
D86
Elmo PTC-100S RS-232 9600 yes √ √ √ AutoTrack/MultiTrack
E-ronix
EPP-S370Z
Pelco D RS-485 2400 yes √ AutoTrack/MultiTrack
EZDome
EZ504MS, EZ504SS,
EZ504US
EZ Dome RS-485 9600 yes √ √ √ AutoTrack/MultiTrack
General Solutions
CTP480Z26
Pelco D RS-485 9600 yes √ AutoTrack/MultiTrack
Honeywell CCTV
HSDN-251
ScanDome II RS-485 9600 yes √ √ √ AutoTrack/MultiTrack
iSmart
IS-HS3600
Pelco D RS-422 9600 yes √ √ √ AutoTrack/MultiTrack
OpenEye
CM-410, 10X
Pelco D RS-485 2400 yes √ MultiTrack
CM-512, 36X
Pelco D RS-485 2400 yes √ AutoTrack/MultiTrack
Panasonic
WV-CW864A
WV-CS954
WV-CS964
Panasonic RS-422 9600 no √ AutoTrack
Control Modes²
Model
Protocol
Hardware
Protocol
Baud
Rate
MUX¹
The following cameras have been tested with the specified protocols, adapters and
configuration
OneTrack Mode
Page 42

Pelco
Spectra IV se 35X
Spectra III
Pelco D RS-422 2400 yes √ √ √ AutoTrack/MultiTrack
Samsung
SCC-C6325 v1.00
Samsung-E
√ AutoTrack
SCC-C6325 v1.03
Samsung-E
√ √ AutoTrack/MultiTrack
SCC-C6403
Samsung-E
RS-485 9600 yes √ √ √ AutoTrack/MultiTrack
SCC-C6413
Samsung-E
√ √ AutoTrack/MultiTrack
SCC-C6455
Samsung-E
√ √ AutoTrack/MultiTrack
SCC-C7478
Samsung-E √ AutoTrack/MultiTrack
SCP-2270HN
Samsung-T √ √ v AutoTrack/MultiTrack
Videotec
Ulisse Compact 36X Ulisse Macro1 &
Pelco D
RS-485 38400 no √ √ √ AutoTrack/MultiTrack
Additional IP cameras and servers are added to the list on a regular basis. If support for a specific model is needed, please contact Video
Wave
.
Other cameras with Pelco D protocol
Many PTZ cameras support the Pelco D protocol. However, many of them do not implement the complete set of commands present in version 2.1 of the Pelco D
protocol.
Specifically, OneTrack uses in the Pelco D protocol the “Advanced Feature Set” and specifically the following commands:
Set Pan Position
Set Tilt Position
Set Zoom Position
Query Pan Position
Query Tilt Position
Query Zoom Position
Others protocols
The OneTrack software is structured to enable easy implementation of multiple protocols. Any PTZ protocol that includes basic commands plus absolute coordinate
position and position query commands can be used. Please contact VideoWave for any specific need of this type.
¹ The MUX column indicates if control of several cameras can be multiplexed over a single port.
² To accommodate various protocols and camera models, VST OneTrack uses several control modes:
• UNA: Unidirectional communication. Used with models that do not have return communication channel or with unidirectional protocol.
• BIA: Bidirectional, absolute mode positioning. Used for models with bidirectional protocol, absolute positioning preferred.
• BIR: Bidirectional, Relative mode positioning. Used for models with bidirectional protocol, relative positioning preferred.
The check signs indicate which control modes can be used
 Loading...