

FCC ID: ******
IC ID:******
MADE IN CHINA
INPUT: DC6V 600mA
Use only power adapters listed in the
user instructions.
Li-ion Battery 3.7V,950mAh
Baby Monitor Model:J20PU
S/N:150800001PU
Shenzhen Videotimes Technology
o
2.4'' D igita l Wirel ess Vid eo Baby M onito r
HB 24 Use r manua l
The fea tures d escri bed in us er’s ma nual
are sub ject to m odific ation s witho ut prio r
notic e.
WARNING:
Keep th e small p arts fr om away c hildr en
http ://ww w.Vide otime s.com .hk
Thank y ou for pu rchasi ng the ba by moni tor of He lloBa by.
We will t ry to give y ou the be st produ cts and s ervi ce .
Congr atula on!
Now you c an take ca re of your b abies a ny where a nd
any me ! P lease r ead the u se manu al befor e you use !
Pleas e retai n your ori ginal d ated sa les rec eipt for y our
recor ds. For wa rranty s ervi ce of your V ideo mes pro duct,
you wil l need to p rovide a c opy of yo ur dated s ales re ceipt
to confi rm warra nty stat us. Reg istra on is not r equire d for
warra nty cove rage.
Before y ou use th e produ ct, we rec ommen d you ins ert and
fully c harge t he baer y in the p arent un it, so th at it
conn ues to wo rk if you di sconn ect it fr om the po wer
suppl y to carr y it to ano ther lo caon . Please r ead the
Safet y instru cons .
Pleas e make su re you have t he foll owing i n this pa cking .
1. Parent unit x 1;
2. Baby unit x 1;
3. Adapter x 2;
4. User manual x 1 ;
1. SA FET Y IN STR UCT IO INS :
CAU TIO N: Kee p small p arts aw ay from ch ildre n.
Stran gulao n Hazar d: Chil dren can b ecome e ntang led in
cords .
Power co rds sho uld be kep t more th an 3 feet aw ay from th e
crib an d
baby' s reach a t all me s. Baby mo nitor s and cam eras wit h
power c ords sho uld nev er be hun g on or nea r the cri b.
This pr oduct i s not a toy an d shoul d be kept o ut of chi ldren' s
reach .
This pr oduct c ontain s small p arts. E xercis e care wh en
unpac king an d assem bling t he prod uct.
Read an d keep ins truc ons: Al l the safe ty and op erang
instr ucon s shoul d be read b efore th e video b aby mon itor
is oper ated.
This pr oduct c annot re place r espon sible a dult su pervi sion.
Water an d moist ure: Thi s produ ct is des igned f or indo or
use onl y.
The uni t shoul d not be ex posed t o rain, mo istur e, dri pping
or spla shing . No obje cts fill ed with l iquid s hould b e place d
on top of, o r besid e the prod uct, su ch as a gla ss or vas e.
This it em shou ld not be u sed nea r water.
DO N OT: Use t he appl iance i f the cord o r plug is d amage d .
If your b aby mon itor is n ot opera ng pro perly o r has suffe red
any dam age, con tact “ Video mes” s ervic e center t o reque st
inspe con an d repai r of the ap plian ce in ord er to avoi d any
possi ble ris k.
DO N OT: Aem pt to repa ir or adj ust any o f the ele ctrica l or
mecha nical f unco ns of the u nit sin ce, if yo u do, the
guara ntee wil l be made v oid.
Venla on: Th is baby m onitor s hould n ot be use d on a bed,
sofa, r ug or sim ilar su rface th at may bl ock the ve nla on
openi ngs, or b e place d in an enc losed a rea, su ch as a
bookc ase or dra wer tha t may impe de air flo w.
Keep awa y from so urces of h eat: Th is unit s hould n ot be
expos ed to dire ct heat s ource s such as a c andle , replac e,
radia tor, heat re gister, st ove or ot her app lianc e that emi ts
heat. T he unit s hould n ot be le i n direc t sunli ght.
Power s ource: T his uni t shoul d only be u sed wit h the AC
power a dapte rs inclu ded in th is pack age (rat ed 6V 600 mA).
Damag e requi ring se rvice : This un it shou ld be ser viced b y
quali fied per sonne l only wh en:
1. Objects hav e fallen o r liqui d has bee n spill ed into t he
produ ct;
2. The units hav e been exp osed to r ain;
3. The units do no t appea r to oper ate norm ally or e xhibi ts a
disn ct chan ge in per forman ce;
4. The units hav e been dro pped or t he encl osure d amage d;
FCC STATE MEN TS:
This de vice co mplie s with pa rt 15 of th e FCC R ules.
Opera on is sub ject to t he foll owing t wo condi ons:
(1) This devic e may not c ause ha rmful in terfer ence.
(2) This devic e must ac cept any i nterfe rence r eceive d,
inclu ding in terfer ence th at may cau se unde sired o perao n.
NOT E 1: Thi s equip ment has b een tes ted and fo und to co mply
with th e limit s for a Cla ss
B digit al devi ce, purs uant to p art 15 of t he FC C Rules . These
limit s are des igned t o provid e reaso nable p rotec on agai nst
harmf ul inte rferen ce in a resi dena l insta llao n.
This eq uipme nt gene rates, u ses and c an radia te radio
frequ ency en ergy an d, if not i nstall ed and us ed in acc ordan ce
with th e instr ucon s, may cau se harm ful int erfere nce to
radio c ommun icaon s. Howe ver, there i s no guar antee th at
inter ferenc e will no t occur i n a parc ular in stalla on. If t his
equip ment do es caus e harmf ul inter ferenc e to radi o or
telev ision r ecepo n, whic h can be de termi ned by tu rning t he
equip ment off a nd on, th e user is e ncoura ged to tr y to corre ct
the int erfere nce by on e or more o f the foll owing m easur es:
- Reori ent or rel ocate t he recei ving an tenna .
- Incre ase the s epara on betw een the e quipm ent and re ceive r.
-Conn ect the e quipm ent int o an outl et on a circ uit diff erent
from th at to whic h the rec eiver i s conne cted.
-Cons ult the d ealer o r an expe rienc ed radio /TV t echni cian
for hel p.
NOT E 2: Any ch anges o r modifi caon s to this un it not
expre ssly ap proved b y the par ty resp onsib le for com plian ce
could v oid the u ser's a uthor ity to op erate th e equip ment.
FCC WARN IN G
This eq uipme nt has be en teste d and fou nd to comp ly with
the lim its for a C lass B di gital de vice, p ursua nt to Part 1 5 of
the FC C Rul es. The se limi ts are des igned t o provi de
reaso nable p rotec on agai nst har mful int erfere nce in a
resid enal i nstall aon.
This eq uipme nt gene rates, u ses and c an radia te radio
frequ ency en ergy an d, if not i nstall ed and us ed in acc ordan ce
with th e instr ucon s, may cau se harm ful int erfere nce to
radio c ommun icaon s.
Howev er, there is n o guara ntee tha t inter ferenc e will no t
occur i n a parc ular in stall aon. If t his equ ipmen t does
cause h armfu l interf erenc e to radio o r telev ision re cepo n,
which c an be det ermin ed by tur ning th e equip ment of an d on,
the use r is enco uraged t o try to co rrect t he inter ferenc e by
one or mo re of the fo llowi ng meas ures:
*Reor ient or re locat e the rece iving a ntenn a.
*Incr ease th e separa on bet ween th e equip ment an d the
recei ver.
*Conn ect the e quipm ent int o an outl et differ ent from t hat to
which t he rece iver is co nnect ed.
*Cons ult the d ealer o r an expe rienc ed radio /TV t echni cian
for hel p.
IC S TATEM ENT S:
This Cl ass A dig ital ap paratu s compl ies wit h ICE S-00 3.
The man ufact urer is n ot respo nsibl e for any ra dio or T V
inter ferenc e cause d by unau thori zed modi ficao ns to thi s
equip ment. S uch mod ifica ons coul d void th e user' s autho rity
to oper ate the eq uipme nt.
2. WAR RA NTY TER NS
We take qua lity ve ry seri ously. T his is why a ll of our p roduc ts
come wi th a one ye ar warra nty from t he orig inal pu rchas e
date aga inst de fects in w orkma nship a nd mate rials . If you
have war ranty o r suppo rt issu es plea se conta ct the st ore
where y ou purch ased th e produ ct or con tact us di rectl y
throu gh belo w websit e:
hp:/ /www.vi deom es.co m.hk
3. Impo rtant g uidel ines for i nstal ling yo ur baby mo nitor.
*To use you r paren t unit an d baby uni t toget her, you mu st
be able t o establ ish a rad io link b etwee n them, a nd the ran ge
will be a ffected b y enviro nment al cond ions .
*Any la rge meta l objec t, like a re friger ator, a mir ror, a fillin g
cabin et, met allic do ors or re inforc ed conc rete bet ween th e
baby an d paren t unit may b lock th e radio s ignal .
*The si gnal st rength m ay also b e reduc ed by oth er solid
struc tures , like wal ls, or by ra dio or el ectri cal equ ipmen t,
such as TV, comp uters, c ordle ss or mob ile pho nes,
fluore scent l ights o r dimme r switch es.
*Use of o ther 2. 4GH z produ ct, suc h as wirel ess net works
(Wi-F i route rs), Blu etoot h system s, or mic rowave ov ens,
may cau se inter ferenc e with th is prod uct, so ke ep the ba by
monit or away at l east 5 (1.5m ) from the se type s of prod ucts,
or turn t hem off if t hey app ear to be c ausin g interf erence .
*If the s ignal i s weak, t ry movi ng the pa rent or th e baby un it
to differ ent pos ions i n the roo ms.
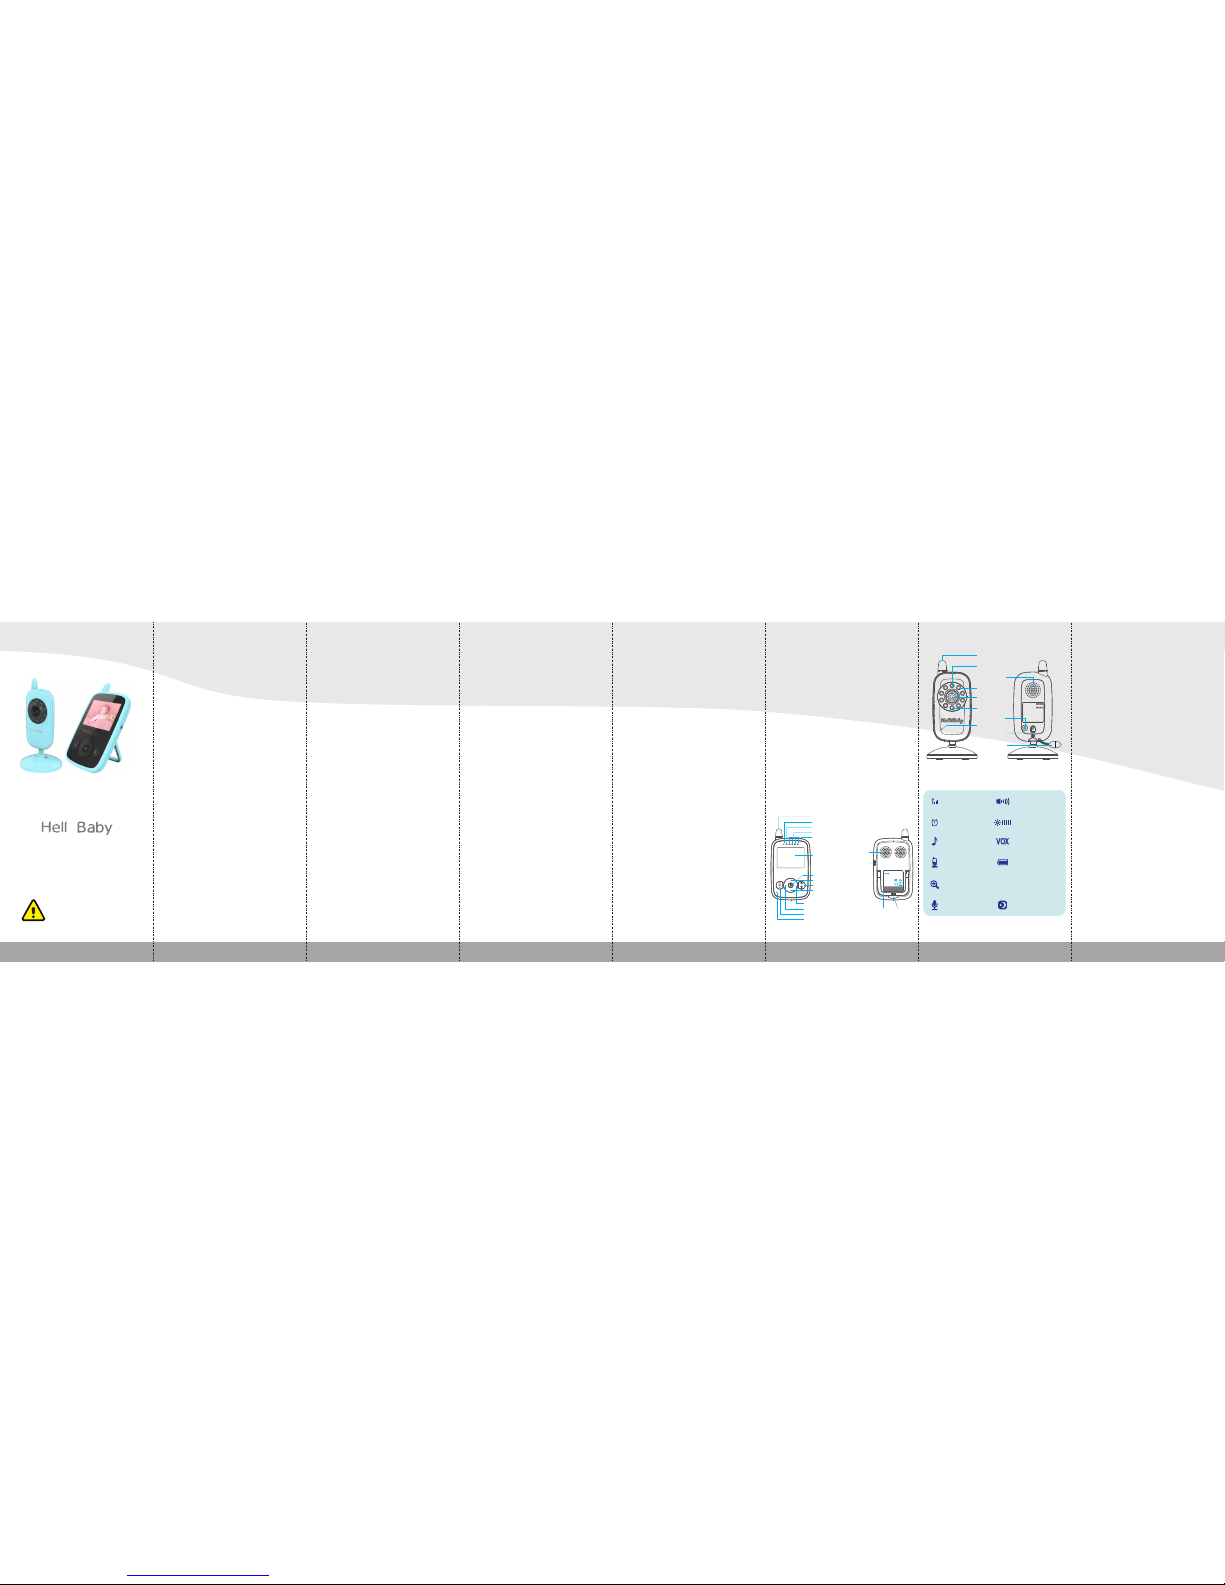
4. PR ODU CT O VER VIE W
4.1 Par ent unit o vervi ew:
4.2 Bab y unit ov ervie w:
4.3 I CON S OVE RV IEW :
----- -- Sign al
----- -- Volum e
----- - Brigh tness
----- - Alarm
----- - Lulla by
----- --- Nig ht visi on
----- ---- V OX
----- - Camer a
----- Z oom
----- -- Temper ature
----- --- Ba ery
----- Ta lk to baby
—1— —2— —3— —4— — 5—
—6—
26℃
5. PL ACE MEN T OF THE BABY MON ITO R:
This ca mera can b e place d on a tabl etop or h ung on th e
wall ;
Place t he baby m onito r in a plac e where t he air can
circu late fre ely;
Do not pl ace on so quilt s or blan kets or in t he corn ers
of cupb oards , shelv es, etc;
Place t he baby m onito r away fro m heat so urces su ch as
radia tors, ch imney s, cooke rs and dir ect sun light ;
Place t he baby u nit away f rom TV sets, m icrowav e oven
and rad ios. Th e intens e radio s ignal s genera ted by th ese
eleme nts cou ld caus e noise o r even sou nds and i mages t o
appea r on the mo nitor. If t his occ urs, mov e the cam era to
anoth er loca on;
*Plac e the cam era wit hin 15 fee t of the ar ea bein g
monit ored for b est pic ture res ult.
* Baby mo nitor s and came ras wit h power co rds sho uld
never b e hung on o r near th e crib as i t is a stran gula on
hazar d. Power c ords sho uld be ke pt no les s than 3 fee t
away fro m the cri b and the b aby's r each at al l mes.
6. Usin g the bab y monit or
6.1 T URN O N TH E BA BY UN IT:
*Only u se the A/ C adapt er incl uded in t his pac kage
(6V, 600m A);
1. Locate the con necto r socket o n the bac k of the ba by unit ;
2. Connect the a dapte r cable to t he baby u nit;
3. Plug the A/C ad apter i nto the wa ll outl et.
4. Once the adap ter con nected , t he powe r LED will li ght up.
6.2 T URN O N TH E PAR ENT UNI T:
*Only u se the A/ C adapt er incl uded in t his pac kage
(6V, 600m A);
*The pa rent un it is sup plied w ith a bui lt-in re charge able
—7—
Antenn a
Chargi ng LED
Power LE D
Volume LE D
Power ke y
LCD
Menu/O K
Volume + / Up k ey
Exit/Tal k to baby
Volume - / Do wn key
Bright ness + / Ri ght key
Zoom / Vie w / Scan
MIC
Bright ness - / Le ft key
Speake r
DC-jac k
Stand
INPUT: DC6V 600mA
FCC ID: ******
IC ID:******
MADE IN CHINA
Baby Monitor Model:J20BU
S/N:150800001BU
Shenzhen Videotimes Technol ogy
Antenn a
Light se nsor
Infrar ed LEDS
CMOS sen sor
Power LE D
MIC
Pair key
DC-Jac k
Temperat ure
sensor
Speake r
Reset ke y

http ://ww w.Vide otime s.com .hk
—8— —9— —10— —11— —12 — —13—
Li-io n baer y (3.7V 9 50mAh ). We sugg est to con nect th e
monit or to the a dapter p lugge d into th e mains w henev er
possi ble, in o rder to ke ep the ba ery ch arged;
1. Locate the con necto r socket o n the rig ht side o f the
paren t unit;
2. Connect the a dapte r cable to t he pare nt unit ;
3. Plug the A/C ad apter i nto the wa ll outl et;
4. Press and hol d the pow er key on th e top of th e parent
unit;
5. Once parent u nit tur ned on , th e power L ED wi ll ligh t
up and th e image w ill dis play on t he LC D;
6.3 TO CHA RGE THE P ARE NT U NIT:
1. Connect the p ower ad apter to t he pare nt unit ;
2. Plug the adap ter into t he main s, then t he char ging L ED
on the pa rent un it will l ight in R ED; t he bae ry icon at
the top r ight co rner of t he scree n is roll ing;
3. The baery pa ck takes l ess tha n 8 hours to c harge f ully
then th e baer y icon at t he top rig ht corn er of the s creen
will be fi xed;
Warnin g:
Choki ng haza rd – Keep th e cord ou t of the ba by's rea ch.
Never p lace a ca mera wit h cable s less th an 3 feet fr om
the cot .
Never u se exten sion co rds wit h A/C ada pters.
Use onl y the A/C a dapte rs supp lied.
7.0 O SD MO DE O PER ATI ON
7.1 P OWE R SAV E / SCR EE N OF F
Short p ress th e power ke y to turn o n / off the sc reen.
7.2 VO LUM E AD JUS TME NT
Press t he UP ke y to incre ase the v olume ;
Press t he DO WN key to d ecrea se the vo lume;
7.3 B RIG HTN ESS ADJ UST MEN T
Press t he Le key t o decrea se the br ightn ess;
Press t he Righ t key to inc rease th e brigh tness ;
7.5 C AME RA V IEW / S CA N
Press S can key to v iew / scan c amera ;
Durin g scan mo de, the s can ico n will be d isplay ed on
the top o f scree n. And ea ch came ras' vid eo will b e stay on
the LC D arou nd 12 sec onds th en chan ge to next c amera ;
7.4 D IGI TAL Z OOM & PA N / TI LT
Press a nd hold t he key aro und 3 sec onds to op erate
Zoom in / o ut;
At the Zoo m mode , pr ess the L EF T key to Pan l e;
press R IG HT key to P an right ; press UP key to
lt up; p ress D OWN ke y to lt do wn;
Durin g digit al zoom mo de, the z oom ico n will be
displ ayed on t he top of sc reen.
7.6 TA LK TO BABY
To talk, pr ess and h old the ta lk key on t he front o f the
monit or. A microp hone ic on will b e displ ayed on t he top
of the L CD sc reen whi le this f unco n is work ing.
Relea se the bu on whe n you have fi nishe d talkin g to list en
to the so und fro m the bab y's room a gain.
Bear in m ind tha t you can 't liste n to your b aby whil st you' re
talki ng to it; to l isten t o it, you w ill have t o stop pre ssing t his
buon .
7.7 I NFR ARE D NI GHT VIS ION (Auto mac)
The inf rared ni ght vis ion fun con al lows th e camera t o pick
up imag es of you r baby or t he moni tored ar ea in dar k or low
light c ondi ons.
In this m ode, on ly blac k and whi te imag es will b e displ ayed
on the mo nitor , t he opm um imag e is 6 feet di stanc e
betwe en baby u nit and p arent un it.
When th e camer a is in nig ht visio n mode, t he icon w ill
be disp layed o n the top of s creen .
8. ME NU O PER ATIO N
8.1 PA IRI NG T HE C AME RA A ND MO NI TOR
The bab y monit or is pre -regis tered to y our par ent uni t.
You do not n eed to reg ister i t again un less th e baby un it
loses i ts link w ith the p arent u nit. To re-r egist er your ba by
unit, o r regis ter a new ba by unit , follo w the proc edure b elow:
Note: B efore yo u begin p airin g, be sur e to have th e monit or
and the c amera s ide by sid e.
1. Pres s the ME NU key t hen the m enu wil l pop up;
2. Pres s the LE FT ke y or RI GHT ke y unl th e camera
icon is h ighli ghted t hen pres s UP key o r DOW N
key to sel ect you r desir ed camer a;
3. Pres s OK key e nter int o sub-m enu;
4. Pres s UP key o r DOW N key to se lect A DD C AM
then pr ess OK key;
5. Whil e the “Pa iring ” dial ogue di splaye d on the L CD scr een,
then pr ess the P AIR b uon on t he back o f camera ;
6. Once paired , there w ill dis play “pa ir is suc ceed” o n the
LCD s creen .
7. If unsucces sful, p lease r epeat ab ove ste ps.
8. Pres s the key to Exit.
8.2 D ELE TE C AME RA
1. Pres s the ME NU key a nd the me nu will p op up;
2. Pres s the LE FT ke y or RI GHT ke y unl th e camera
icon is h ighli ghted t hen pres s UP key o r DOW N
key to sel ect you r desir ed camer a;
3. Pres s OK key e nter int o sub-m enu;
4. Pres s UP key o r DOW N key to se lect D EL C AM
then pr ess OK key;
5. Pres s UP key o r DOW N key to se lect
conn ue to del ete the ca mera;
6. Pres s OK key t o confirm t he opo n.
7. Pres s the k e y to Exit .
8.3 VO X SE TTI NG
This mo de allo ws you to co ntrol t he soun d acva on of you r
baby mo nitor. Th e VOX de fault s eng is o n. If the re is no
sound a round t he came ra withi n 30 Seco nds, it w ill sto ps
trans ming .
The mon itor sc reen tu rns off wh en the ca mera is no t
trans ming . When th e camera d etect s and sou nd loud er
than se t sensi vity l evel it w ill star t trans ming t he sign al
to the mo nitor a gain.
To change t he VOX level, p lease f ollow t he next in struc ons:
1. Pres s the ME NU key a nd the me nu will p op up;
2. Pres s the LE FT ke y or RI GHT ke y unl th e the VO X
icon is h ighli ghted t hen pres s UP key o r DOW N key
to sele ct desi red leve l;
3. Pres s OK key t o confirm ;
4. Pres s the k e y to Exit .
Note: i s Low sen sivi ty level ;
is High s ensi vity le vel;
8.4 T EMP ERAT UR E UNI T SE TT ING
1. Pres s the ME NU/ OK key a nd the me nu will p op up;
2. Pres s the LE FT ke y or RI GHT ke y unl th e
tempe rature i con is hi ghlig hted;
3. Pres s UP key o r DOW N key to se lect be tween
and ;
4. Pres s OK key t o confirm ;
5. Pres s the key to E xit.
Note: T he temp eratur e unit de fault se ng is
8.5 LU LL ABY S ETT IN G
You can soo the the b aby to sl eep by pl aying a ge ntle lu llaby
from th e baby un it.
1. Pres s the ME NU key a nd the me nu will p op up;
2. Pres s the LE FT ke y or RI GHT ke y unl th e lulla by
icon is h ighli ghted ;
3. Pres s UP key o r DOW N key to se lect on e of the 8
avail able lu llabie s, sile nce or lo op play ing ;
4. Pres s OK key t o confirm ;
5. Pres s the k e y to Exit .
Note 1: O nce the l ullab y was tur ned on, t he lull aby icon
will di splay o n the top o f the scre en.
Note 2: T he lull aby defa ult se ng is OF F.
Note 3: L ullab y loop pl aying fu ncon i s play al l the lul labie s
one me .
8.6 A LAR M SE TTI NG
You can use t he alar m to remi nd yours elf to fee ding ba by /
chang e diape r / sleep ing, et c.
1. Pres s the ME NU key a nd the me nu will p op up;
2. Pres s the LE FT ke y or RI GHT ke y unl th e alarm i con
is high light ed;
3. Pres s UP key t o decrem ent or pr ess DO WN key t o
incre ment ;
4. Pres s OK key t o confirm ;
5. Pres s the ke y to Exit .
Note 1: T he mini mum uni t is 0.5 ho ur. The maxi mum
seng i s 4 hours ( 8 levels ).
Note 2: Once th e alarm w as turn ed on, al arm icon
will di splay o n the top o f the scre en.
Note 3: T he alar m defaul t seng i s OFF.
Note 4: W hen the a larm is r ingin g, pres s any key to st op it.
Note 5: I f there i s no answe r, the ring ing wil l last 1 mi nute
and the n stop , ae r 2 minut es the ri nging w ill be ri ng agai n.
The rin ging wi ll soun d up thre e mes to tal if no on e answe r.
No recep on
on the mo nitor
*The pow er adap ters may n ot be
proper ly conne cted;
*Confir m that th e camera a nd
monito r are ON ;
*Camer a may be far a way from t he
monito r;
*Camer a and mon itor m ay not be
prope rly pair ed; f ollo w P AIR IN G
instru cons ;
Interf erence or
poor rec epon
*Move th e monito r close r to the
camera;
*The cam era or mon itor ma y be
placed t oo clos e to many me tal
object s;
*Other e lectr onic de vices ma y be
interfe ring wi th the si gnal;
*The ba ery powe r may be to o low;
Feedba ck
(scree ching ,
stac)
*The cam era and mo nitor m ay be
too clos e togeth er;
*The vol ume on th e monit or may be
set too hi gh;
Canno t hear
the bab y on
the pare nt unit
*Volume s eng ma y be too low ;
Image f rozen
*Restar t the bab y unit (p lug out t he
adapte r then pl ug it into t he sock et
again) ;
*Press t he reset k ey at the ba ck of
parent u nit (hi de unde r the stan d)
10. T ECH NIC AL DA TA
Freque ncy
2.4GH z FH SS
Opera ng
Range
Up to 900 fee t (strai ght lin e and
open spa ce
Power ad apter
USA: RJ-A S06 0600U0 02;
EU:R J-AS 0606 00E00 4;
Input: 10 0-240 VAC 5 0 / 60Hz,1 50mA;
Output: 6 V, 600mA;
Manufac turer: S henzh en Ruij ing
Industr ial CO .,ltd .
LCD
2.4'' T FT
Rechar geabl e
baery f or
monit or
Model :5034 50;
3.7V, 950 m Ah, 3.5 15Wh ;
Op er a ng me
with baer y ful ly
char ged (par ent
unit)
Up to 12 ho urs (VO X ON)
FCC I D
(Parent u nit)
2AF2 R-H B24R X
FCC I D
(Baby un it)
2AF2 R-H B24T X
IC (Par ent Uni t):
20674 -HB2 RX
IC (Ba by unit ):
20674 -HB2 4TX
Manufa cture r
Shenz hen Vid eome s
Technol ogy ,. Ltd .
11. M AIN TEN ANC E
*Clea n the sur faces o f the cam era and mo nitor w ith a so ,
fluff-fr ee clot h;
*Neve r use cle aning a gents or s olven ts;
*If the u nits be come di rty, use a li ghtly d ampen ed clot h to
wipe su rface s, takin g care to n ot allo w water in to any
openi ngs
12. IN FO RMAT ION ON D ISP OSA L OF B ATT ERY A ND P ROD UC T
*Do not a empt t o repair o r adjus t any of th e elect rical or
mecha nical f unco ns of the u nit;
*Reme mber to d ispos e of the pro duct in a n
enviro nment ally re spons ible way ;
*For pr oper col leco n and pro cessi ng of the se prod ucts,
take the m to the co llec on poin ts desi gnated b y local
autho ries . You can als o conta ct the sto re wher e you
purch ased th e produ ct.
o
Shenz hen Vid eome s Technol ogy ,. Lt d.
All ri ghts re serve d
The fea tures d escri bed in us er’s ma nual
are sub ject to m odific ation s witho ut prio r
notic e.
WARNING:
Keep th e small p arts fr om away c hildr en
Print ed in Chi na
—end —
Hi
Lo
℃
℉
℉
9. TR OUB LE S HOO TIN G
—14—
 Loading...