

Videotel VP71 XD Operation Manual
VP71 XD Operation manual
digital
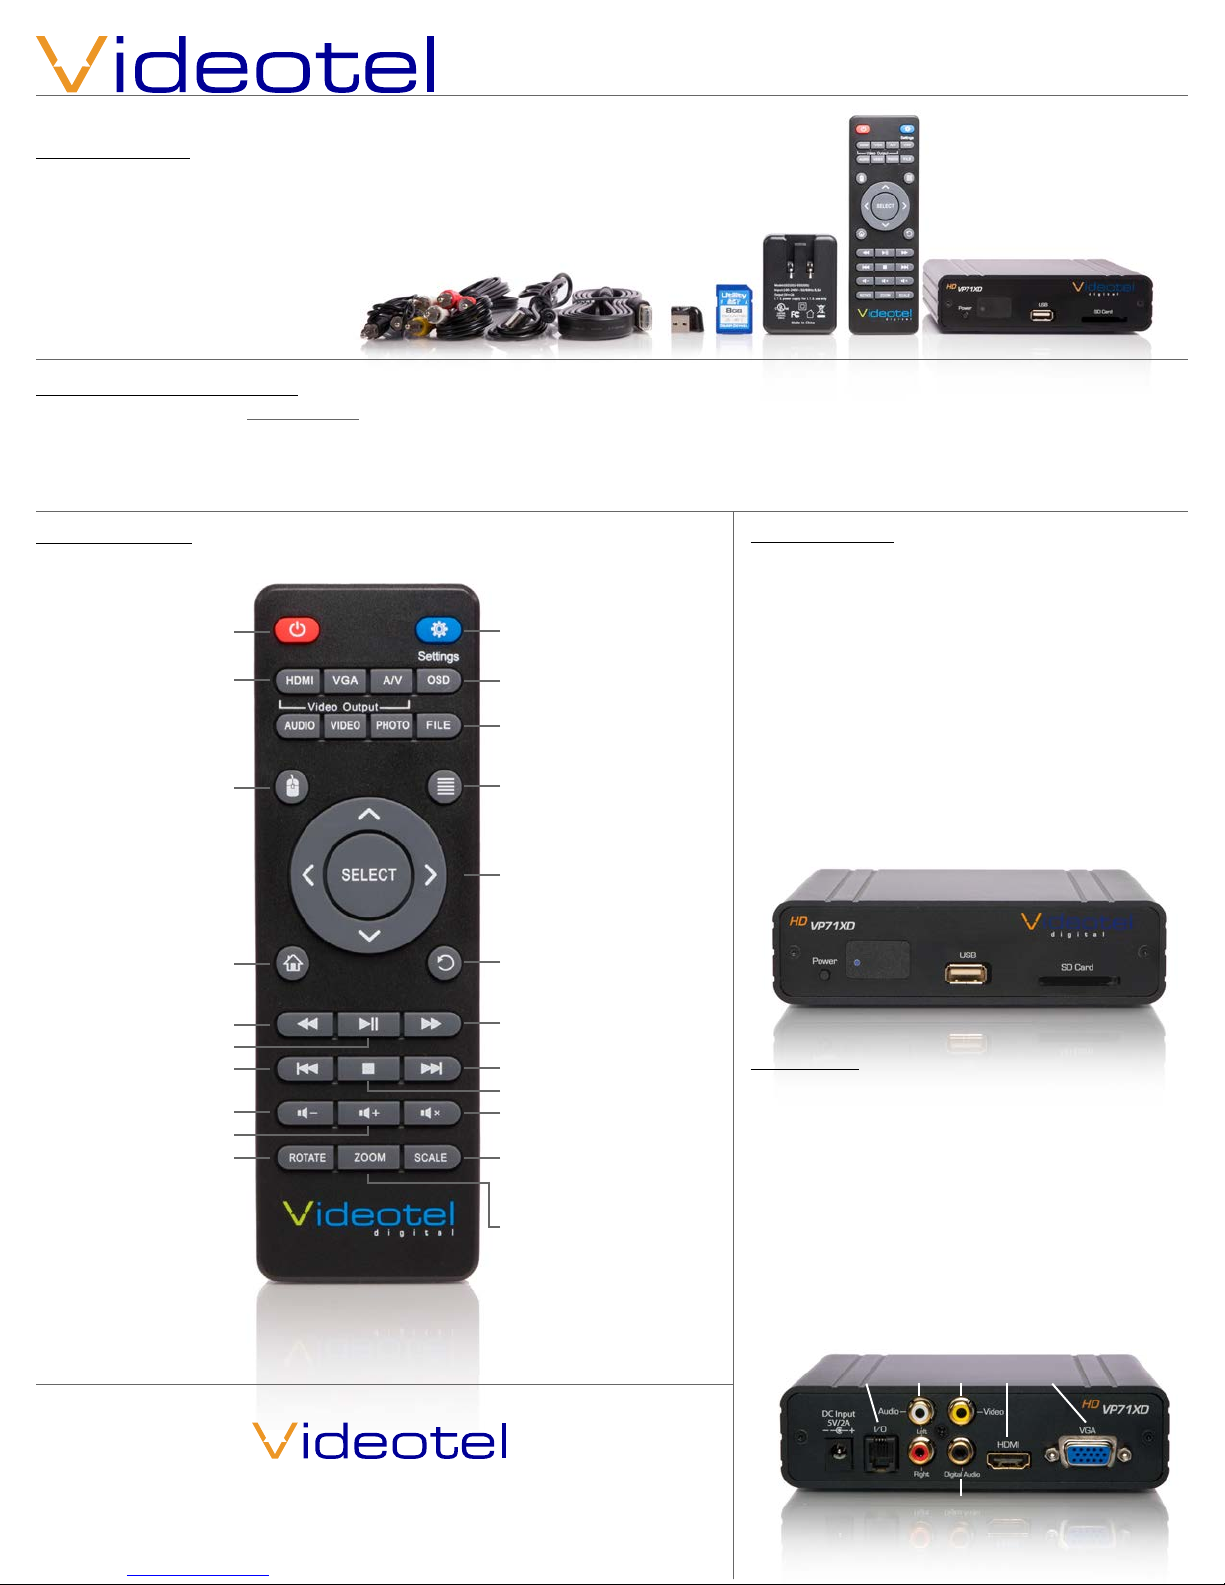
What is in the box
1 - VP71 XD Video Player
1 - 8 Gig USB Drive
1 - 8 Gig SD Card
1 - 5’ HDMI Cable
1 - Remote Control
1 - USB Power Supply W/5’ Cable
1 - 5’ RCA Audio/Video Cable
1 - 5’ RCA Digital Audio Cable
Basic operation of the VP71XD
The VP71XD is pre-set to Repeat Mode, which will auto power on and auto loop any video, audio and/or photos loaded on the SD or USB
drive. Once you connect the player to a TV or monitor, simply load your video (SD card is loaded in player with sample les), audio and/or
photo les on the enclosed SD Card or USB drive and insert it into the player. The order in which the les are sorted on the card is the order
in which they play. Your player will start play and continue to auto loop until power is turned o.
Remote Functions
Power On and O
Change Video Output
- HDMI , VGA and A/V
(Composite Video)
Mouse Mode - Press to
enter and exit “mouse
mode”, then use arrow
keys to navigate
setting options
Home - Return to main
Video/Audio/Photo/
Settings Screen
Rewind
Play / Pause
Previous Video
Volume Down
Volume Up
Rotate - Rotates video
counter clockwise /
clockwise / normal
Settings
OSD - Not Active
File type selection - Lists
corresponding le types
loaded on SD/USB
Not Active
Arrow and SELECT - Navi-
gate all options on home
screen and setting menu
Return/Last - Returns to
previous menu option
Fast Forward
Next Video
Stop Video
Mute Audio
Scale - Rotate through
video output options
4:3/16:9/full screen/origin
Zoom - Trim screen size
with 11 pre set options
SD / USB / Power
The VP71 is pre programmed to automatically power on and begin playing video from either the USB
port (1) or SD card slot (2). The VP71XD can only play
content from 1 RAM device at a time. It is not recommend to insert both a USB and SD at the same time.
Changing SD cards and USB drives is as simple as removing either RAM and inserting a new SD or USB.
The VP71XD will auto detect the new RAM and begin
playing the loaded content (no need to use the remote or cycle power on the player when changing
RAM). When the VP71XD is on, the power LED (3) will
be illuminated Blue and illuminated Red, when o.
(3)
Connections
The VP71XD is capable out outputting video from either Composite Video (4), HDMI (5) or VGA (6). Only 1
output can be used at a time and it is not recommend
to have other outputs connected when not in use.
The VP71XD is capable of outputting audio through
HDMI (5), R/L audio jacks (7) and digital audio (8)
while HDMI is being used (see audio settings). The I/O
port (9) is used for RS232 communication and connecting to our line of interactive solutions including
push buttons, motion, weight and wave sensors.
(1)
(2)
681 Anita Street Suite 104 - Chula Vista, CA 91911
(800) 878-4056 - (619) 670-4412
www.videoteldigital.com - sales@videoteldigital.com
(9)
(7)
(4) (5) (6)
(8)
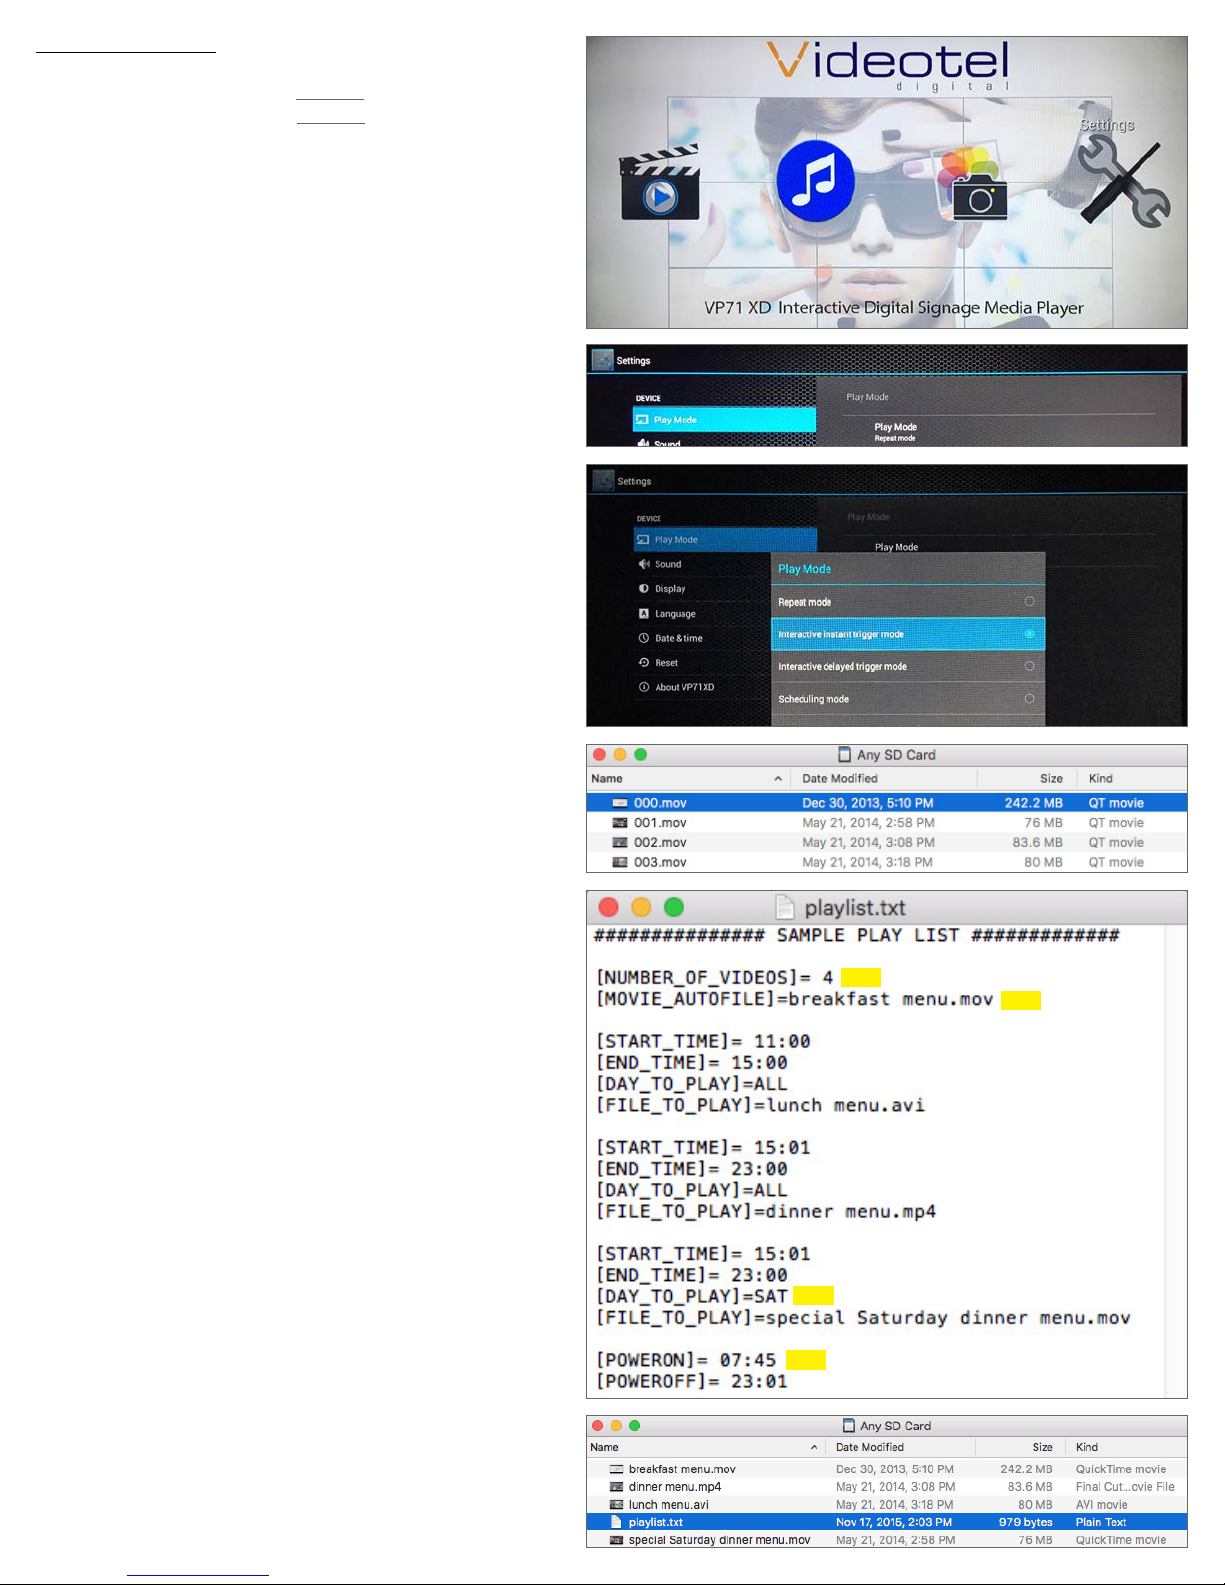
Settings - Play Mode (10)
The VP71XD has 4 play back modes which can be accessed
and changed by selecting the Settings option from the home
screen (11) or by pressing the Settings button on the remote.
Each mode has unique functionality and can be easily changed
for your specic application.
• Repeat Mode (12) - This mode will loop all content on either
the SD or USB card in alphabetical order. If your RAM includes videos & photos, the VP71XD will play all video les
rst and then play photo les. Your le list will automatically
play from the beginning when your SD or USB is inserted
and when the player powers up.
• Interactive trigger mode (instant & delayed) - These modes
would be used if you have an application that requires
interactive video triggering using a motion sensor, push
buttons, a wave sensor or weight platform. For example:
Lets say your application requires a looping video and 3
mechanical buttons that each play a specic video when
pressed. First you would load 4 video les on your SD or
USB card (13). These les would need to be labeled 000.
mov (14), 001.mov, 002.mov and 003.mov (or what ever
extension your video has.... mp4, avi, etc..). The video le
000.mov represents the video that will loop endlessly until
either button 1 (001.mov will play), 2 (002.mov will play) or
3 (003.mov will play) is pressed.
- Instant mode (15) will trigger a dierent video even if
the rst video has not nished playing. For example:
If 3 buttons are available and button 2 is pressed, video 002.mov will begin playing. If button 3 is pressed,
then video 002.mov will stop and video 003.mov will
instantly play.
- Delayed mode (16) will ignore any additional button or
sensor triggers until the 1st video is nished playing.
For example: If 3 buttons are available and button 2 is
pressed, video 002.mov will begin playing, play once
and then begin looping the 000.mov video. If button
3 is pressed during video 002.mov, the VP71XD will ignore all requests for a new video until the 1st selected
video is done playing.
• Scheduling mode (17) - This mode would be used if you
wish to play specic videos at dierent times of the day
and/or week. For example if you wanted to play a breakfast
menu from 8am to 11am, a lunch menu from 11am to 3pm
and a dinner menu from 3pm to 11pm you would use this
menu option. Once scheduling mode is selected you simply need to create a text le (18) with start and stop times
and load it on the same SD or USB as your video les (19).
A sample play list can be downloaded from our web site
or can be manually typed from the example on the right
(18). Notes: 1) The text le must be called playlist.txt 2)
None of the command text is case sensitive, only the video
le names are 3) Make sure the date and time are set correctly on the Date & Time settings section. In this example
the [NUMBER_OF_VIDEOS] (20) must equal the total number of videos loaded on your SD or USB. [MOVIE_AUTOFILE]
(21) will be your looping attract screen or default video. The
“breakfast menu.mov” will loop whenever no other start/
stop time is active. You can input an unlimited number of
stop and start times and the scheduler works o of a 7 day
calendar. Trigger playback on specic days by inputting the
[DAY_TO_PLAY]= as MON TUE WED THU FRI SAT (22)
SUN, otherwise enter ALL (every day). You can also set your
VP71XD to power on and o at specic times by using the
{POWERON] (23) and [POWEROFF]= commands.
(11)
(10)
(12)
(15)
(16)
(17)
(13)
(14)
(18)
(20)
(21)
(22)
(23)
(19)
 Loading...