

Page 1
What is in the box
digital
1 - HD2700D DVD Player
1 - 5’ HDMI Cable
1 - Remote Control
2 - AAA Batteries
1 - 5V Power Supply W/4’ Cable
1 - 5’ RCA Audio/Video Cable
1 - 5’ Component Video Cable
1 - 5’ RCA Digital Audio Cable
HD2700D Operation manual
HD2700D Quick Start Guide
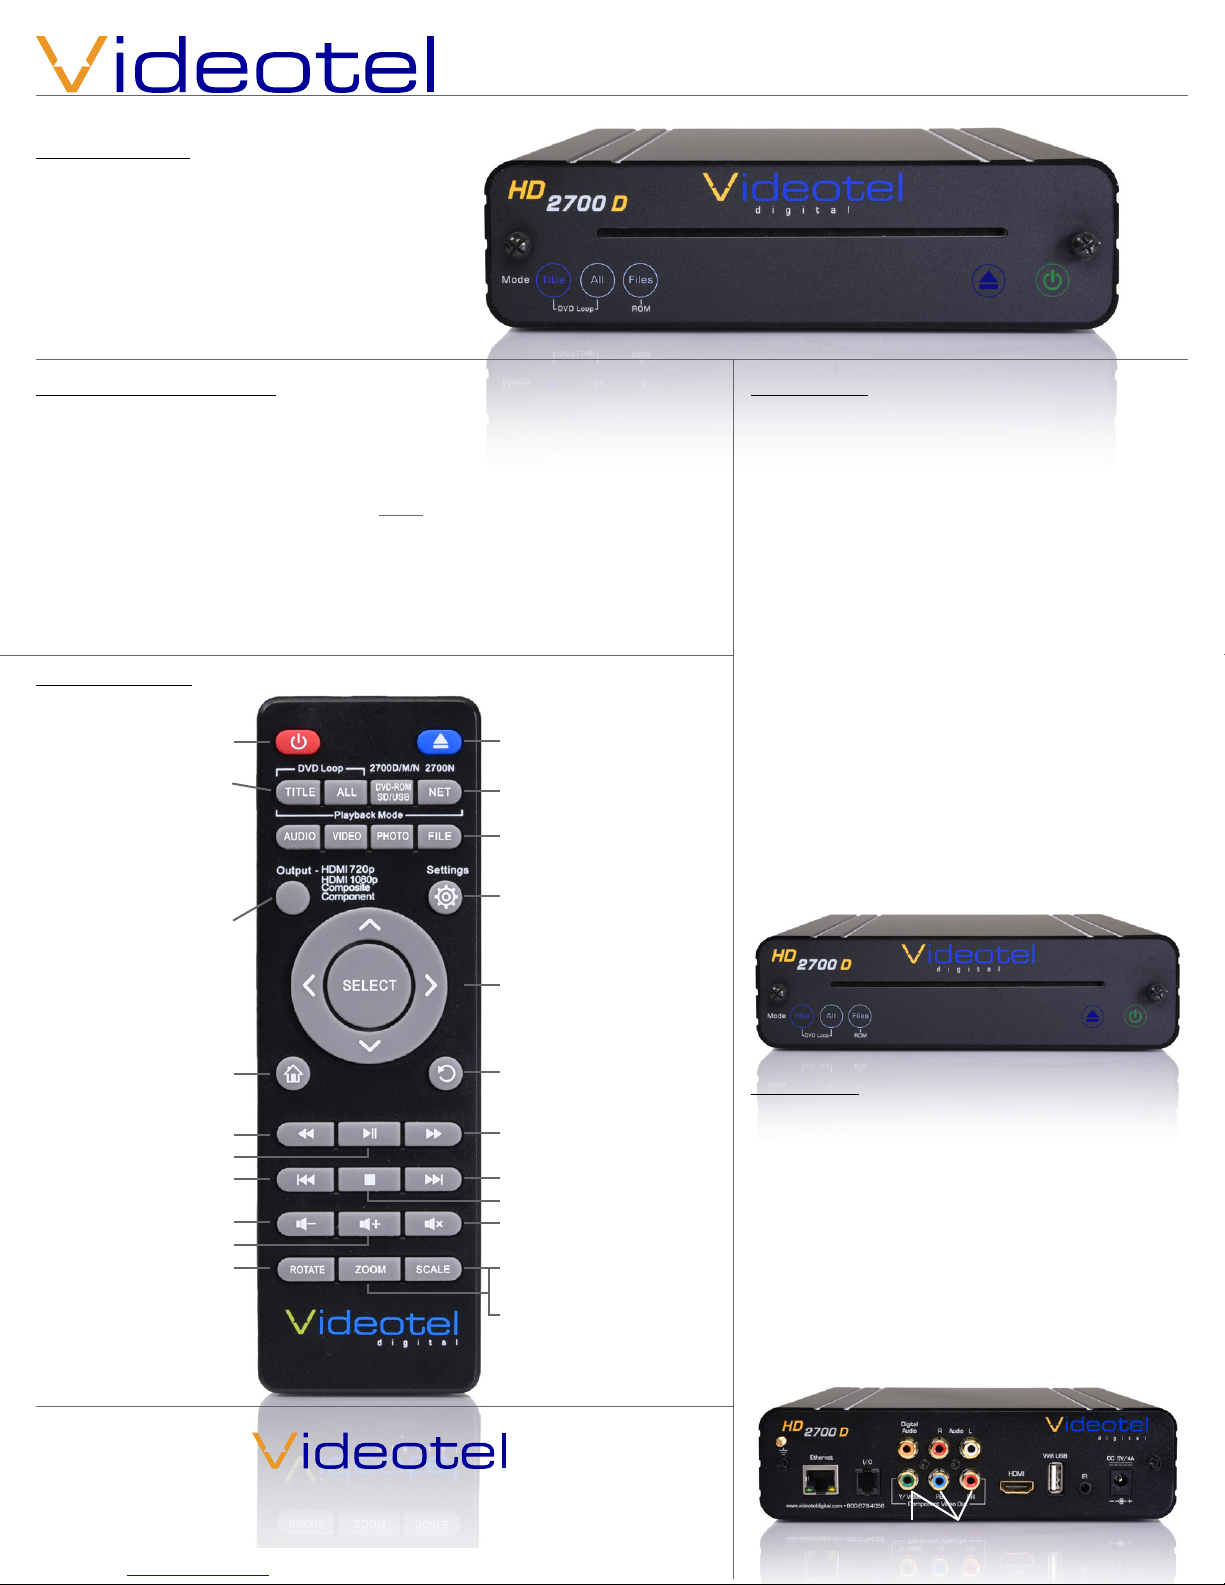
Connect the HD2700D to your TV using either HDMI (7), Composite Video (6) or
Component Video (8) and then connect power (14). The HD2700D is “pre-set” to
HDMI 720p, if you wish to switch to 1080p, press the output button 2 times. To
switch to Composite Video press the “Output” button 3 times and 4 times for Component video.. The HD2700D is pre-set to TITLE, which will auto power on and auto
loop the largest title of the DVD. If you wish to play all of the Titles and Chapters
of the DVD then select the ALL option on the remote or on the front of the DVD
player. Lastly simply insert your DVD and the HD2700D will begin buering the
content. Within 1-4 minutes your video will begin to play. Within 5-20 minutes your
DVD will be fully buered and the DVD disc will stop spinning.
Remote Functions
Eject
Power On and O
Change Play Mode
- Loop largest TITLE/
Loop ALL Videos/ROM
- Play various video
les (.mov .mp4 .avi
.MPEG, etc.)
Video Output - Press
to scroll through HDMI
720p, HDMI 1080p,
Composite Video and
Component Video
Home - Return to main
Video/Audio/Photo/
Settings Screen
Rewind
Previous Video/VOB
Rotate - Rotates video
2x/4x/8x/16x
Play / Pause
Volume Down
Volume Up
counter clockwise /
clockwise / normal
NET - Not Active
File type selection - Lists
corresponding le types
buered from DVD
Settings
Arrow and SELECT - Navi-
gate all options on home
screen and setting menu
Return/Last - Returns to
previous menu option
Fast Forward
Next Video/VOB
Stop Video
Mute Audio
Scale - Rotate through
video output options
4:3/16:9/full screen/origin
Zoom - Trim screen size
with 11 pre set options
2x/4x/8x/16x
Control Panel
The HD2700D has 3 modes for DVD and DVD ROM
playback. The rst 2 modes are for traditional DVD
formats. Meaning the DVD has authored with a
menu, chapters and titles. The “TITLE” (1) mode will
auto play and loop all the video les and chapters
associated with the largest title on the DVD. Most
main stream DVDs are authored so the main feature
is in a single title and other content such as behind
the screens footage is in separate titles. The “ALL” (2)
mode option will simply play all of the DVD content
in order according to how the disc was authored. The
“ROM” (3) mode is to be used when video les such
as .mov, .mp4, .MPEG2, jpg, etc are simply copied
onto a DVD Disc (DVD ROM). Once in ROM mode the
settings menu oers multiple “Play Mode” options including repeat, interactive and scheduler (see page 3
for more details). The Eject button (4) only illuminates
30 seconds after a DVD has been inserted. The player
can be powered on and o with either the power
button (5) (RED=O/GREEN=On) or the remote.
(1) (2) (3)
Connections
The HD2700D is capable out outputting video from
either Composite Video (6), HDMI (7) or Component
Video (8). The HD2700D is capable of outputting
audio through HDMI, R/L audio jacks (9) and digital
audio (10) while HDMI is being used (see audio settings). The I/O port (11) is used for RS232 communication and connecting to our line of interactive solutions including PUSH, ELEVATE, MOVE, SENSE and
WAVE. The Ethernet jack (12) and Wi USB (13) can
be used for time sync only. For remote access please
refer to the HD2700N.
(4) (5)
681 Anita Street Suite 104 - Chula Vista, CA 91911
(800) 878-4056 - (619) 670-4412
www.videoteldigital.com - [email protected]
(10)
(9)
(11)(12)
(8)(6)
(7)
(13)
(14)
Page 2
Settings - Play Mode
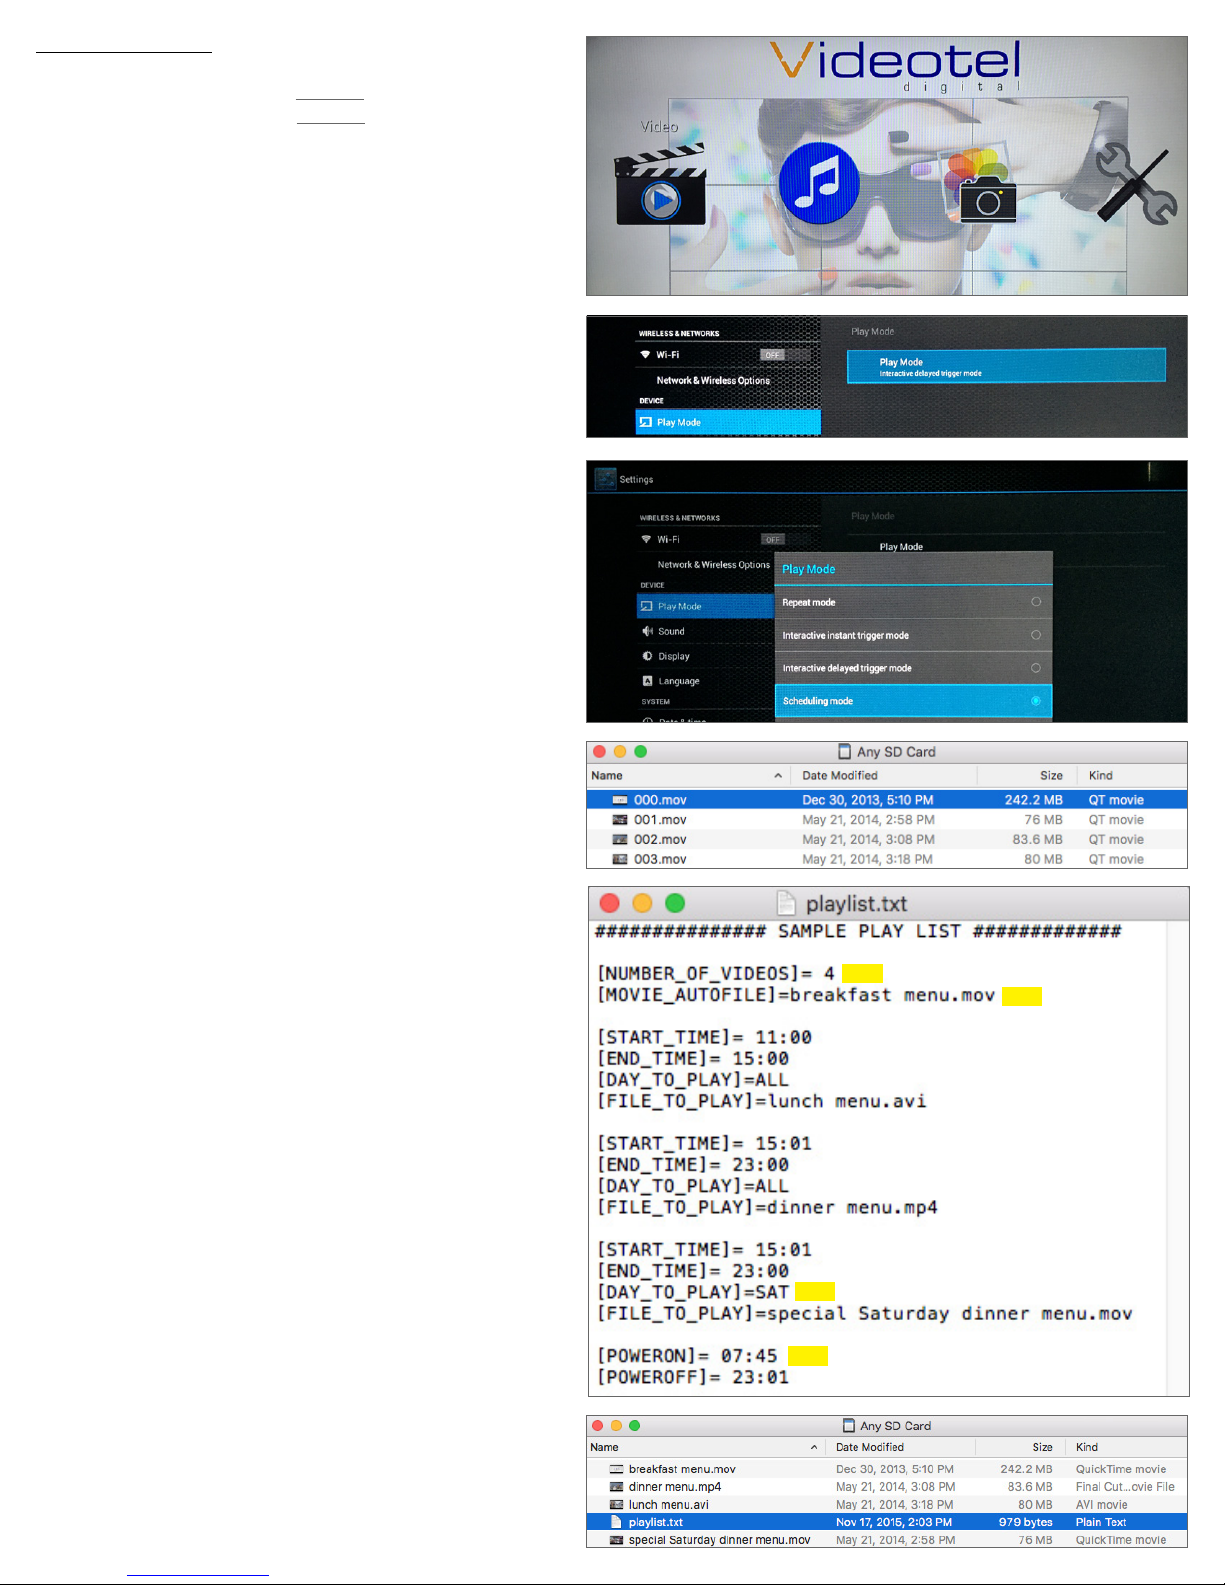
The HD2700D has 4 play back modes which can be accessed
and changed by selecting the Settings option from the home
screen (15) or by pressing the Settings button on the remote.
Each mode has unique functionality and can be easily changed
for your specic application.
• Repeat Mode (16) - This mode will loop all content burned
onto DVD ROM in alphabetical order. If your DVD ROM includes videos & photos, the HD2700D will play all video les
rst and then play photo les. Your le list will automatically
play from the beginning when your DVD ROM is inserted
and when the player powers up.
• Interactive trigger mode (instant (19) & delayed (20)) - These
modes would be used if you have an application that requires interactive video triggering using a motion sensor,
push buttons, a wave sensor or weight platform. For example: Lets say your application requires a looping video
and 3 mechanical buttons that each play a specic video
when pressed. First you would load 4 video les on your
DVD ROM (17). These les would need to be labeled 000.
mov (18), 001.mov, 002.mov and 003.mov (or what ever ex-
tension your video has.... mp4, avi, etc..). The video le 000.
mov represents the video that will loop endlessly until either button 1 (001.mov will play), 2 (002.mov will play) or 3
(003.mov will play) is pressed.
- Instant mode (19) will trigger a dierent video even if
the rst video has not nished playing. For example:
If 3 buttons are available and button 2 is pressed, video 002.mov will begin playing. If button 3 is pressed,
then video 002.mov will stop and video 003.mov will
instantly play.
- Delayed mode (20) will ignore any additional button or
sensor triggers until the 1st video is nished playing.
For example: If 3 buttons are available and button 2 is
pressed, video 002.mov will begin playing, play once
and then begin looping the 000.mov video. If button
3 is pressed during video 002.mov, the HD2700D will
ignore all requests for a new video until the 1st selected video is done playing.
• Scheduling mode (21) - This mode would be used if you
wish to play specic videos at dierent times of the day
and/or week. For example if you wanted to play a breakfast
menu from 8am to 11am, a lunch menu from 11am to 3pm
and a dinner menu from 3pm to 11pm you would use this
menu option. Once scheduling mode is selected you simply need to create a text le (22) with start and stop times
and load it on the same DVD ROM as your video les (23).
A sample play list can be downloaded from our web site
or can be manually typed from the example on the right
(24). Notes: 1) The text le must be called playlist.txt 2)
None of the command text is case sensitive, only the video
le names are 3) Make sure the date and time are set correctly on the Date & Time settings section. In this example
the [NUMBER_OF_VIDEOS] (25) must equal the total number of videos loaded on your SD or USB. [MOVIE_AUTOFILE]
(26) will be your looping attract screen or default video. The
“breakfast menu.mov” will loop whenever no other start/
stop time is active. You can input an unlimited number of
stop and start times and the scheduler works o of a 7 day
calendar. Trigger playback on specic days by inputting the
[DAY_TO_PLAY]= as MON TUE WED THU FRI SAT (27)
SUN, otherwise enter ALL (every day). You can also set your
HD2700D to power on and o at specic times by using the
{POWERON] (28) and [POWEROFF]= commands.
(15)
(15)
(16)
(19)
(20)
(21)
(17)
(18)
(24)
(25)
(26)
(27)
(28)
(23)
Page 3
Settings - Sound / Audio Output
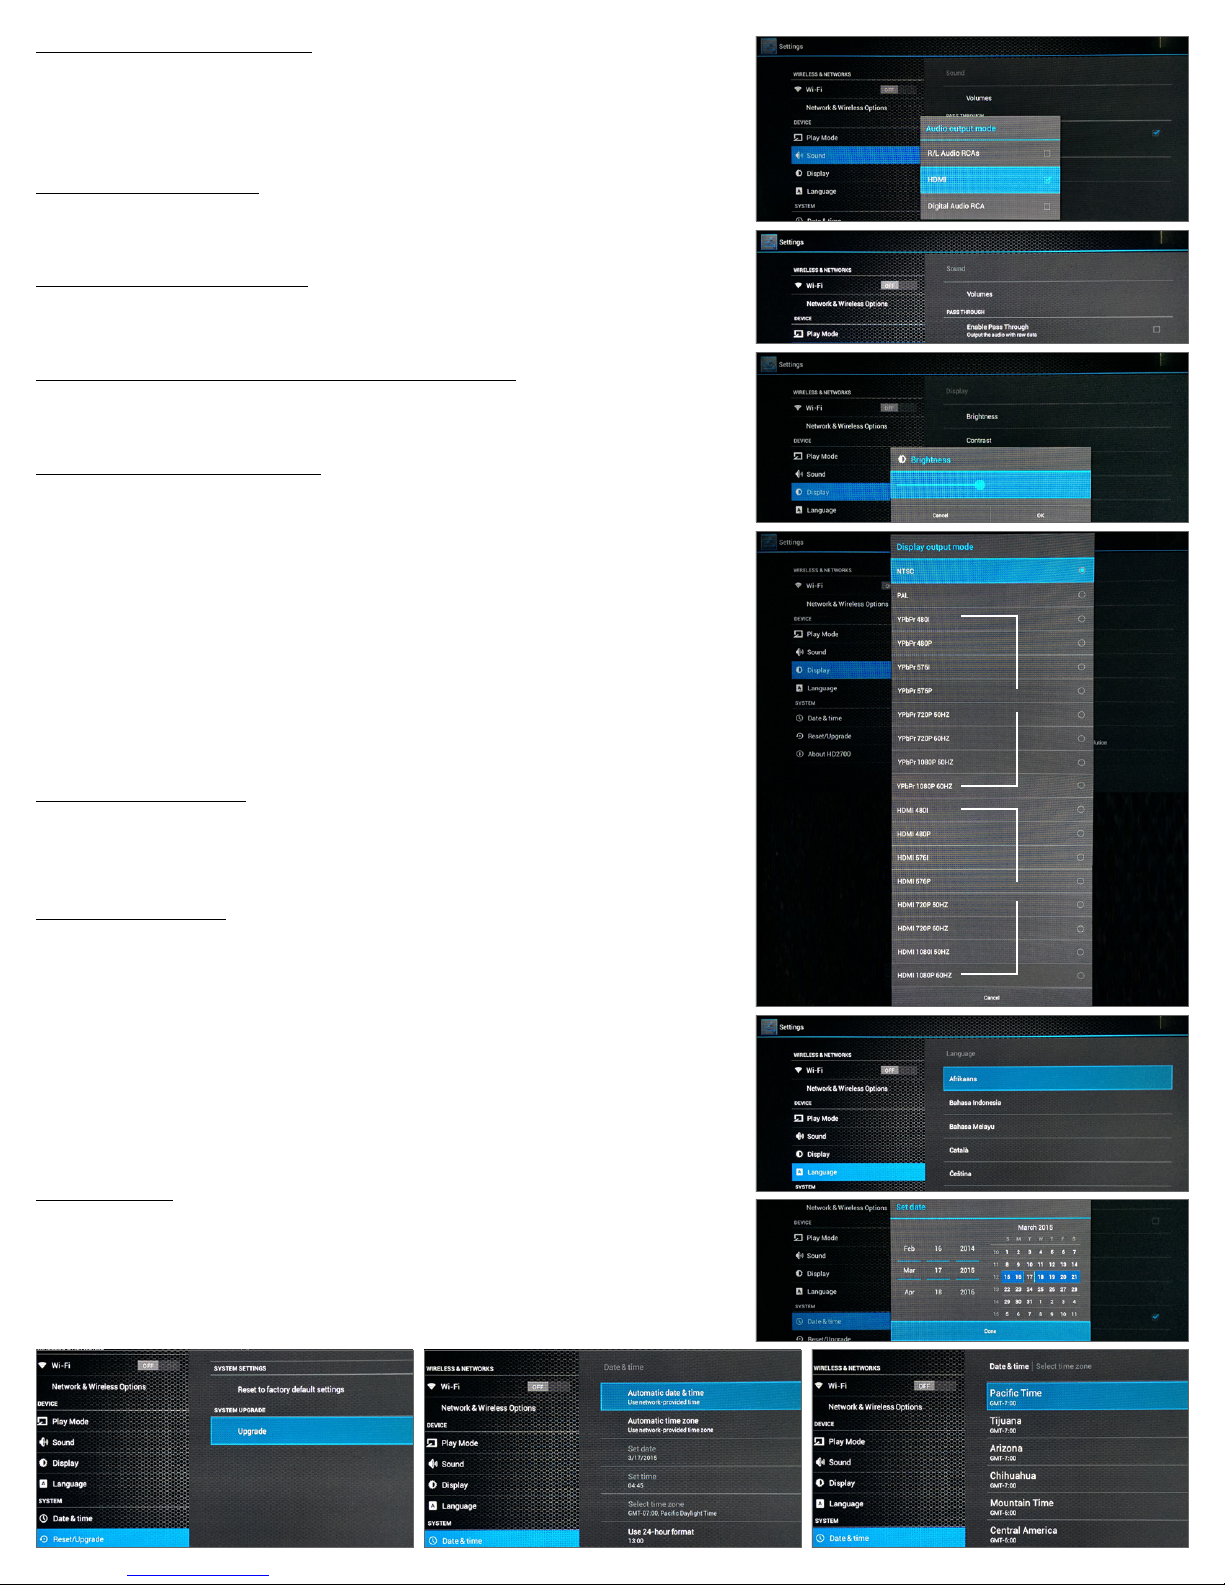
The HD2700D is capable of outputting audio through the HDMI (7) cable, the red/
white RCA jacks (9) and the black Digital Audio RCA jack (10) (individually or all at the
same time). To change audio outputs, simply chose an option from the Sound menu
(29) and choose R/L Audio RCAs (30), HDMI (31) or Digital Audio RCA (32).
Settings - Sound / Volume
On the Sound menu you can adjust the output volume (33) of the HD2700D just as
you can with the volume and mute buttons on the remote control.
(29)
(30)
(31)
(32)
Settings - Sound / Pass Through
If you would like your audio signal from the HD2700D to travel through an intermediary component without alteration then turn on the Enable Pass Through option (34).
Settings - Display / Brightness, Contrast and Saturation
Brightness (35), contrast and saturation are all adjustable under the Display menu
option using the remote and the navigation buttons.
Settings - Display / Video Output
The HD2700D is capable of outputting Composite video (NTSC (United States Composite Video Standard) (36) or PAL (European Composite Video Standard) (37), Component Video (38) (YpbPr 480i, 480p, 576i, 576p, 720p 50HZ, 720p 60HZ, 1080p 50HZ,
1080p 60HZ) and HMDI (39) (480i, 480p, 576i, 576p, 720i, 720p, 1080i or 1080p).
The HD2700D will only output one video signal at a time and is typically shipped set
to HDMI 720p. You can switch the video output using the “Output” button on the top
of the remote. The “Output” buttons switches to the default setting of each output.
The button should be pressed twice to change 1 mode. For example pressing the
button once will bring up the current output mode, pressing it again will advance it 1
mode. If you wish to change the output from 720p to 1080p simply press and release
the “Output” button twice. For additional options, use the settings / display option.
Settings - Language (39)
Use the language settings option if you wish to change the settings menu language.
Available options are Chinese, English, Japanese, Korean, German, Spanish, French,
Italian, Portuguese, Dutch, Russian, Polish, Turkish and Czech.
Settings - Date & Time
Date and time settings are only required if you using Scheduling Mode (21). Date
(40), time and time zone (41) can be edited using the remote under the Date & Time
option. For automatic time sync (42), simply connect the Ethernet jack to any internet connection, activate the sync setting and the time and date will automatically be
updated.
When adjusting date and time make sure you set your time zone rst. Adjusting the
time zone after setting the date and time will change the set time and possibly the
date. Using the remote you can use the arrow keys and the SELECT button or you can
switch to “Mouse Mode”.
(33)
(34)
(35)
(36)
(37)
(38)
(39)
(39)
Settings - Reset
The Reset option (44) on the settings menu will simply reset the HD2700D to its default settings. If you have received a rmware update, insert the supplied SD or USB
and then select the upgrade option (45).
(44)
(45)
(42)
(40)
(41)
Page 4
Settings - About
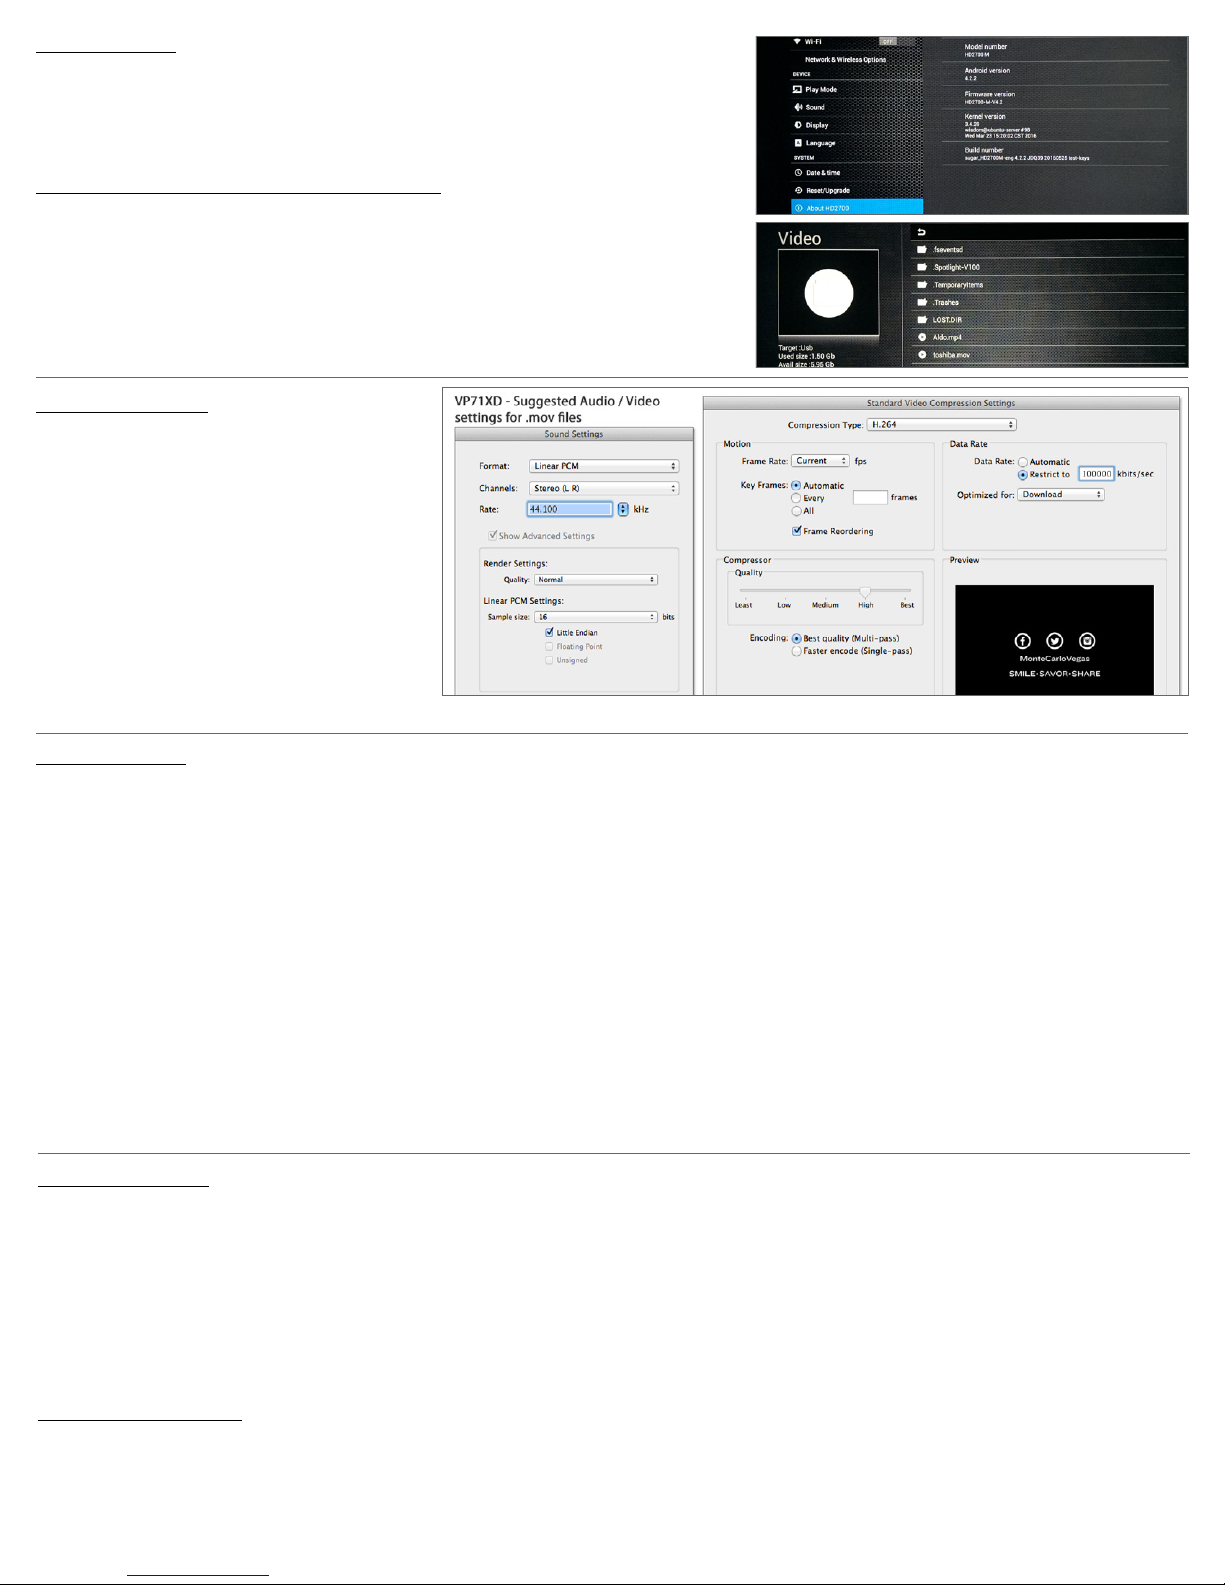
The About option (45) will list the model #, Android version, Firmware Version, Kernal
version and Batch Number. The most important item is the Firmware Version (46) you
can nd the most up to date rmware version on our web site. If you are running an
older version we can send you a USB/SD rmware update.
Home and Video, Photo, Audio and File options
The HD2700D is capable of separating and listing video (47), photo and audio les.
You can access a list of les on the loaded DVD by either pressing the buttons on the
top of the remote or by accessing them on the Home screen (15). Video will display
all video les, audio will display all audio le and photo will display all photo les. If
you wish to view all les loaded, then use the File button on the top of the remote.
Video encoding tips
The HD2700D will play a majority of video and
audio codecs. The only limitation is the bit rate
of the le. The HD2700D is capable of playing
up to 100mbps. As a comparison a standard
DVD plays at 8mbps and a Blu-Ray DVD plays at
roughly 20mbps. Most customers are using video les well under 100mbps but if the HD2700D
is not playing properly, load the video on any
computer and play it. Every video program
should have an option for “Video Properties”.
You can view the bit rate and determine if it is
within range. If the video is out of range, it will
need to be re-encoded. The example above shows how to limit the maximum bit rate
(46)
(45)
(47)
Trouble Shooting
• No image on TV - Start by determining if you are having a video le issue or an issue with the output by removing the DVD, SD and USB. If
you still do not have a picture, unplug the power to the HD2700D and make sure you only have 1 video output connected (either HDMI,
Composite or Component). Follow this output cable to your TV and verify which input its connected to (some TVs have multiple inputs...
Example: HDMI1, HDMI 2 and HDMI 3). Make sure your TV is set on the correct input. Next plug the HD2700D back in. If you still do not
have an image after 30 seconds then press then press and release the “Output” button (on the remote) 2 TIMES.. wait 10 seconds. If you
still do not see a picture, press and release the “Output” button 2 TIMES again. You may have to follow this sequence up to 4 times.
• Interactive option not working - Make sure the HD2700D is set to “Interactive” mode (either instant or delayed). Make sure your video
les are labeled as shown on page 2 (18). If the video le does not have an extension ( .mov .mp4 .avi ...etc) and/or does not have 000
001 002 before the extension the interactive portion will not trigger.
• Video is pausing or pixilated - Make sure the bit rate is under 100mbps. Make sure the audio codec is 16bits or less. Check to make sure
the frame rate is not 23.97. If any of these conditions apply the video may not play back properly and will need to be converted.
• Video scheduler is not playing videos at the set times - Make sure the play list is a text le and is called playlist.txt also make sure the
play list is on the same SD, USB or DVD ROM that contains the videos you wish to play. Review the text le (24) (page 2) and make sure
the video le names match what is entered exactly (the video le names ARE case sensitive). Make sure the date and time are set correctly. If you need additional help, please take screen shots/photos of the play list and DVD ROM les names and email them to sales@
videoteldigital.com and we will be happy to assist.
Common Questions
Question: When the player powers on will it instantly begin playing video or do I need to do something with the remote?
Answer: Once power is applied the DVD will be “re-buered” and will begin playing within 4 minutes.
Question: Can I use the HD2700D as an audio player?
Answer: Yes, the auto on, auto loop feature works the same for video, audio and photo les.
Question: Can the scheduler be used with the interactive functions?
Answer: No, only 1 mode can be used at a time.
Question: How long of a video can I play?
Answer: There is no time limit aside from how much content your SD/USB/DVD is capable of holding.
Limited 2 Year Warranty
Videotel, Inc. warrants the HD2700D against defects in materials and workmanship under normal use for a period of two (2) years from the
date of purchase. If Videotel, Inc. determines that the Videotel, Inc. Product is defective, Videotel, Inc. will, at its option, either repair the unit
or replace the unit with a new or rebuilt Videotel, Inc. product or an equivalent model of the Videotel, Inc. product, at no charge to the customer. The foregoing sets forth Videotel, Inc.’s sole obligation and your exclusive remedy in the event of any breach of this limited warranty.
 Loading...