

Videotec ONXNAB User Manual [en, de, fr, it]
MNVKNXAB1025_0539
Bedienungsanweisung
Manuel d’instructions
Operating instructions
Manuale istruzioni
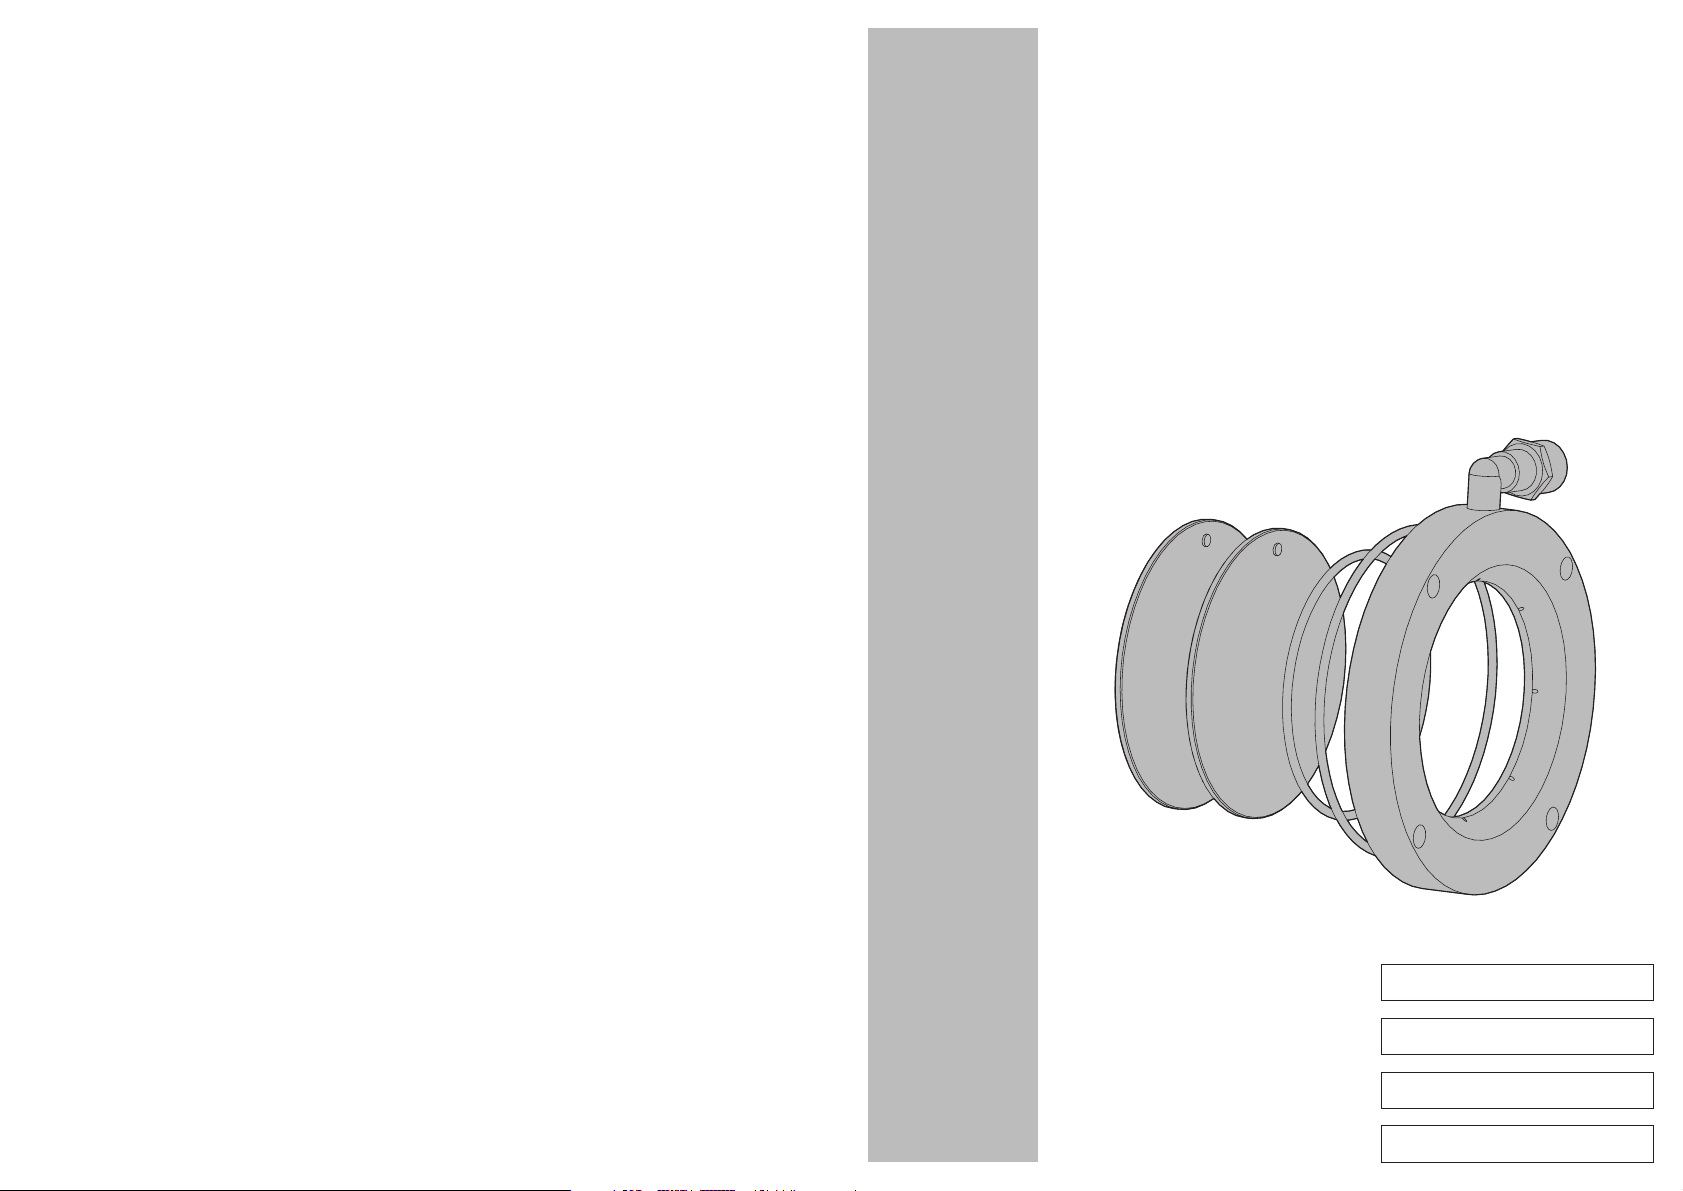
Kit barriera d’aria
con 2 vetri IR
Air barrier kit
with 2 IR filter glasses
Kit barrière d'air
avec 2 verres IR
Kit Luftbarriere
mit 2 IR-Filterscheiben
INSTALLAZIONE:
Prima di eseguire qualsiasi operazione ricordarsi di togliere tensione al
prodotto.
Attenzione al corretto orientamento dei vetri filtro IR. Tali vetri sono
dotati di un riferimento che identifica il lato che deve essere rivolto
verso l’esterno della custodia cioè verso la direzione di provenienza
della radiazione IR. Prima di effettuare la chiusura della flangia
rimuovere il riferimento vetri IR (Fig. 2).
La temperatura massima d’impiego di tali vetri filtro IR è T
max = 300°C.
La percentuale di radiazione IR filtrata da tali vetri filtro IR è 80%.
Sono da evitare alcool etilico, solventi, idrocarburi idrogenati, acidi forti
e alcali. L’utilizzo di detti prodotti danneggia in modo irreparabile la
superficie trattata.
Il kit è costituito da una coppia di vetri filtro IR e da una speciale flangia anteriore con
barriera d’aria diversa da quella standard che deve essere sostituita.
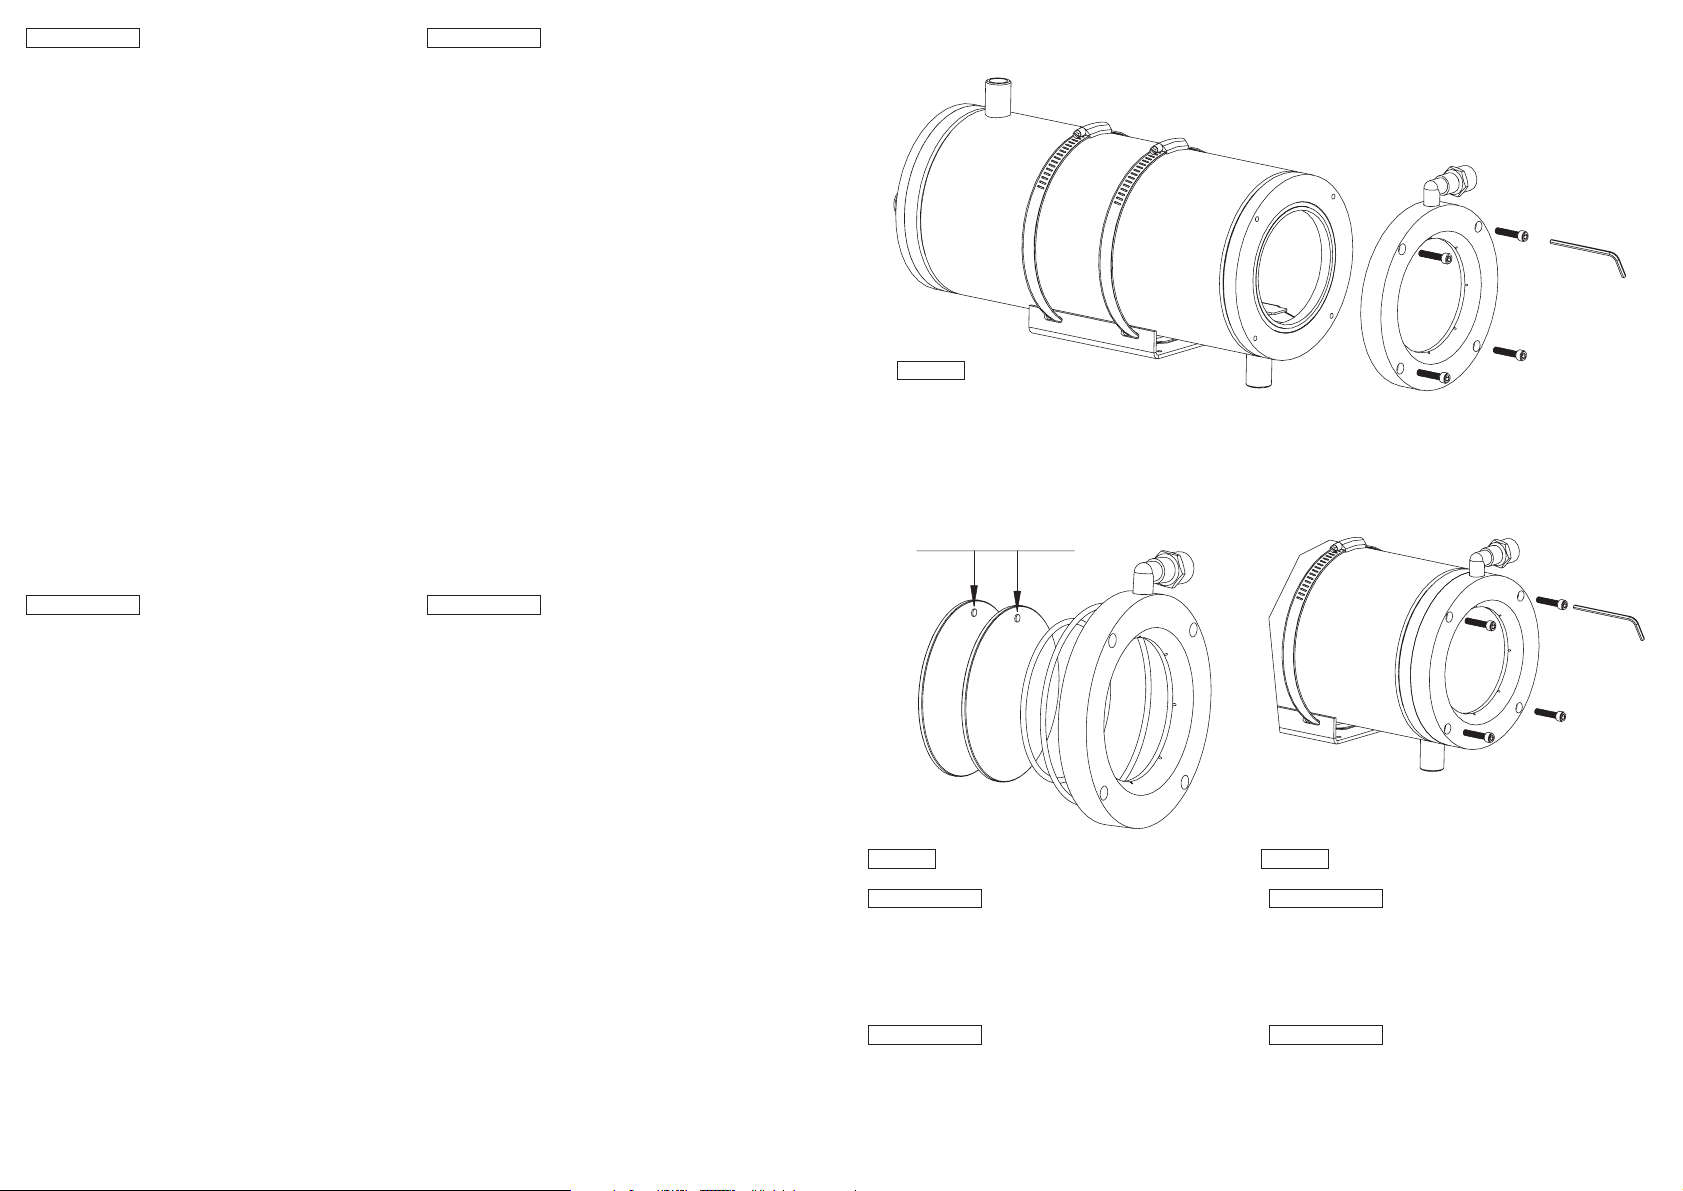
• Smontare la flangia anteriore della custodia svitando le 4 viti con l’utilizzo della
chiave esagonale in dotazione (Fig. 1).
• Posizionare la coppia di vetri nell’apposita sede della nuova flangia fornita in
dotazione al kit dopo aver inserito correttamente le guarnizioni O-Ring (Fig. 2).
• Posizionare la flangia frontale dotata così di vetri filtro IR sul corpo della custodia
prestando attenzione che le guarnizioni di tenuta siano correttamente inserite nelle
proprie sedi in modo da non danneggiarle. Serrare le 4 viti utilizzando la chiave
esagonale in dotazione (Fig. 3).
• Per la pulizia del vetro si consigliano saponi neutri diluiti con acqua o prodotti
specifici per la pulizia delle lenti degli occhiali con l’utilizzo di un panno morbido.
ITALIANO
ENGLISH
FRANCAIS DEUTSCH
INSTALLATION:
Before carrying out any operation remember to disconnect the power
supply from the product.
Make sure the IR filter glasses face the right direction. The glasses
have a reference mark showing the side that should face towards the
outside of the housing i.e. towards the direction from which the IR
radiation will arrive. Before closing the air barrier remove the IR
glasses reference (Fig. 2).
The maximum working temperature of these IR filter glasses is T
max =
300°C.
The percentage of IR radiation filtered by these filter glasses is 80%.
Avoid ethyl alcohol, solvents, hydrogenated hydrocarbide, strong acid
and alkali. Such products may irreparably damage the surface.
The kit consists of a pair of IR filter glasses and a special front flange with air barrier that
is different from the standard one, which should be replaced.
• Dismantle the front flange of the housing by unscrewing the 4 screws using the
Allen wrench supplied (Fig. 1).
• Position the glass pair in the appropriate seating on the new flange supplied with
the kit, after correctly inserting the O-ring seals (Fig. 2).
• Position the front flange now fitted with the IR filter glasses on the housing body,
making sure the sealing rings are correctly inserted in their seating so as not to
damage them. Tighten the 4 screws using the Allen wrench supplied (Fig. 3).
• For the window cleaning the surface dirt should be rinsed away with water and then
cleaned with a neutral soap diluted with water, or specific products for spectacle lens
cleaning. These should be applied with a soft cloth.
INSTALLATION:
Ne pas oublier de placer le produit hors tension avant de procéder à
toute opération.
Attention à orienter correctement les verres filtre IR. Ces verres sont
équipés d'un repère identifiant le côté devant être tourné vers l'extérieur
du caisson, c'est-à-dire vers la direction de provenance des radiations IR.
Avant de fermer la barrière d’air enlever la référence verres IR (Fig. 2).
La température maximale d'utilisation des verres filtre IR est Tmax = 300°C.
Le taux de radiations IR filtrées par les verres IR est de 80%.
On doit éviter: alcool éthylique, solvants, hydrocarbures hydrogénés,
acides forts et alcali. L’emploi de ce type de produits abîme d’une façon
irréparable la surface traitée.
Le kit comprend deux verres filtre IR et une bride intérieure spécifique barrière d'air,
différente du modèle standard devant être remplacé.
• Démonter la bride avant du caisson en dévissant les 4 vis au moyen de la clé
hexagonale fournie (Fig. 1).
• Positionner les deux verres dans le logement prévu de la nouvelle bride fournie
avec le kit après avoir mis en place les anneaux toriques d'étanchéité (Fig. 2).
• Positionner la bride frontale équipée des verres filtre IR sur le corps du caisson
en ayant soin d'insérer correctement les joints d'étanchéité dans leur logement
pour éviter tout endommagement. Serrer les 4 vis au moyen de la clé
hexagonale fournie (Fig. 3).
• Pour l’ntretiens de la vitre nous conseillons l’emploi, avec un chiffon souple, de
savons neutres dilués avec de l’eau ou bien de produits spécifiques pour le
nettoyage des verres de lunettes.
INSTALLATION:
Vor Beginn jedweder Tätigkeit ist die Stromversorgung des Produktes
zu unterbrechen.
Achten Sie darauf, daß die IR-Filterscheiben richtig herum eingesetzt
werden. Diese Scheiben sind mit einer Markierung versehen, um die
Seite zu kennzeichnen, die außerhalb des Gehäuses zeigt, also in die
Richtung, aus der die IR-Strahlung kommt. Bevor Sie die Luftbarriere
schliessen, nehmen Sie die Markierung IR-Scheiben ab (Fig. 2).
Diese IR-Filterscheiben halten Temperaturen bis zu Tmax = 300°C aus.
Sie filtern 80% der IR-Strahlung.
Zu vermeiden sind Äthylalkohol, Lösungsmittel, hydrierte
Kohlenwasserstoffe, starke Säuren und Alkali. Diese Produkte können
die behandelte Oberfläche beschädigen.
Der Bausatz besteht aus einem Paar Infrarot-Filterscheiben und dem vorderen
Luftschranken-Flansch, der den Standardflansch ersetzt.
• Den vorderen Flansch des Gehäuses abmontieren. Dazu werden die 4 Schrauben mit
dem beiliegenden Sechskantschlüssel entfernt (Fig. 1).
• Setzen Sie die O-Ring-Dichtungen korrekt ein (Fig. 2). Positionieren Sie dann die beiden
Scheiben im zugehörigen Sitz des neuen, im Bausatz enthaltenen Flansches ein.
• Positionieren Sie den solchermaßen mit IR-Filterscheiben versehenen Vorderflansch
auf dem Korpus des Gehäuses. Achtung, die Abdichtungen müssen korrekt in ihre
Sitze eingefügt sein, damit sie nicht beschädigt werden. Ziehen Sie die 4 Schrauben
mit dem beiliegenden Sechskantschlüssel an (Fig. 3).
• Zur Glasreinigung werden verwässerte neutrale Seifen oder spezifische Produkte
zusammen mit einem weichen Tuch empfohlen.
Fig. 1
RIFERIMENTO VETRI IR
GLASSES IR REFERENCE
RÉFÉRENCE VERRES IR
MARKIERUNG IR-SCHEIBEN
Fig. 2 Fig. 3
Il produttore declina ogni responsabilità per eventuali danni derivanti da un uso improprio delle
apparecchiature menzionate in questo manuale. Si riserva inoltre il diritto di modificarne il contenuto senza
preavviso. Ogni cura é stata posta nella raccolta e nella verifica della documentazione contenuta in questo
manuale, tuttavia il produttore non può assumersi alcuna responsabilità derivante dall’utilizzo della stessa.
Lo stesso dicasi per ogni persona o società coinvolta nella creazione e nella produzione di questo manuale.
The manufacturer declines all responsibility for any damage caused by an improper use of the
appliances mentioned in this manual. Furthermore, the manufacturer reserves the right to modify its
contents without any prior notice. The documentation contained in this manual has been collected with
great care, the manufacturer, however, cannot take any liability for its use. The same thing can be
said for any person or company involved in the creation and production of this manual.
Le producteur décline toute responsabilité pour les dommages éventuels dus à une utilisation non appropriée
des appareils mentionnés dans ce manuel. On réserve en outre le droit d’en modifier le contenu sans préavis.
La documentation contenue dans ce manuel a été rassemblée et vérifiée avec le plus grand soin, cependant,le
producteur ne peut pas s’assumer aucune responsabilité dérivante de l’emploi de celle-là. La même chose
vaut pour chaque personne ou société impliquées dans la création et la production de ce manuel.
Der Hersteller lehnt jede Haftung für eventuelle Schäden ab, die aufgrund unsachgemäßer Anwendung der in
diesem Handbuch erwähnten Geräte entstanden ist. Ferner behält er sich das Recht vor, den Inhalt ohne
Vorkündigung abzuändern. Die Dokumentation in diesem Handbuch wurde sorgfältig ausgeführt und
überprüft, dennoch kann der Hersteller keine Haftung für die Verwendung übernehmen. Dasselbe gilt für jede
Person oder Gesellschaft, die bei der Schaffung oder Produktion von diesem Handbuch miteinbezogen ist.
ITALIANO ENGLISH
FRANCAIS DEUTSCH
 Loading...