

Page 1
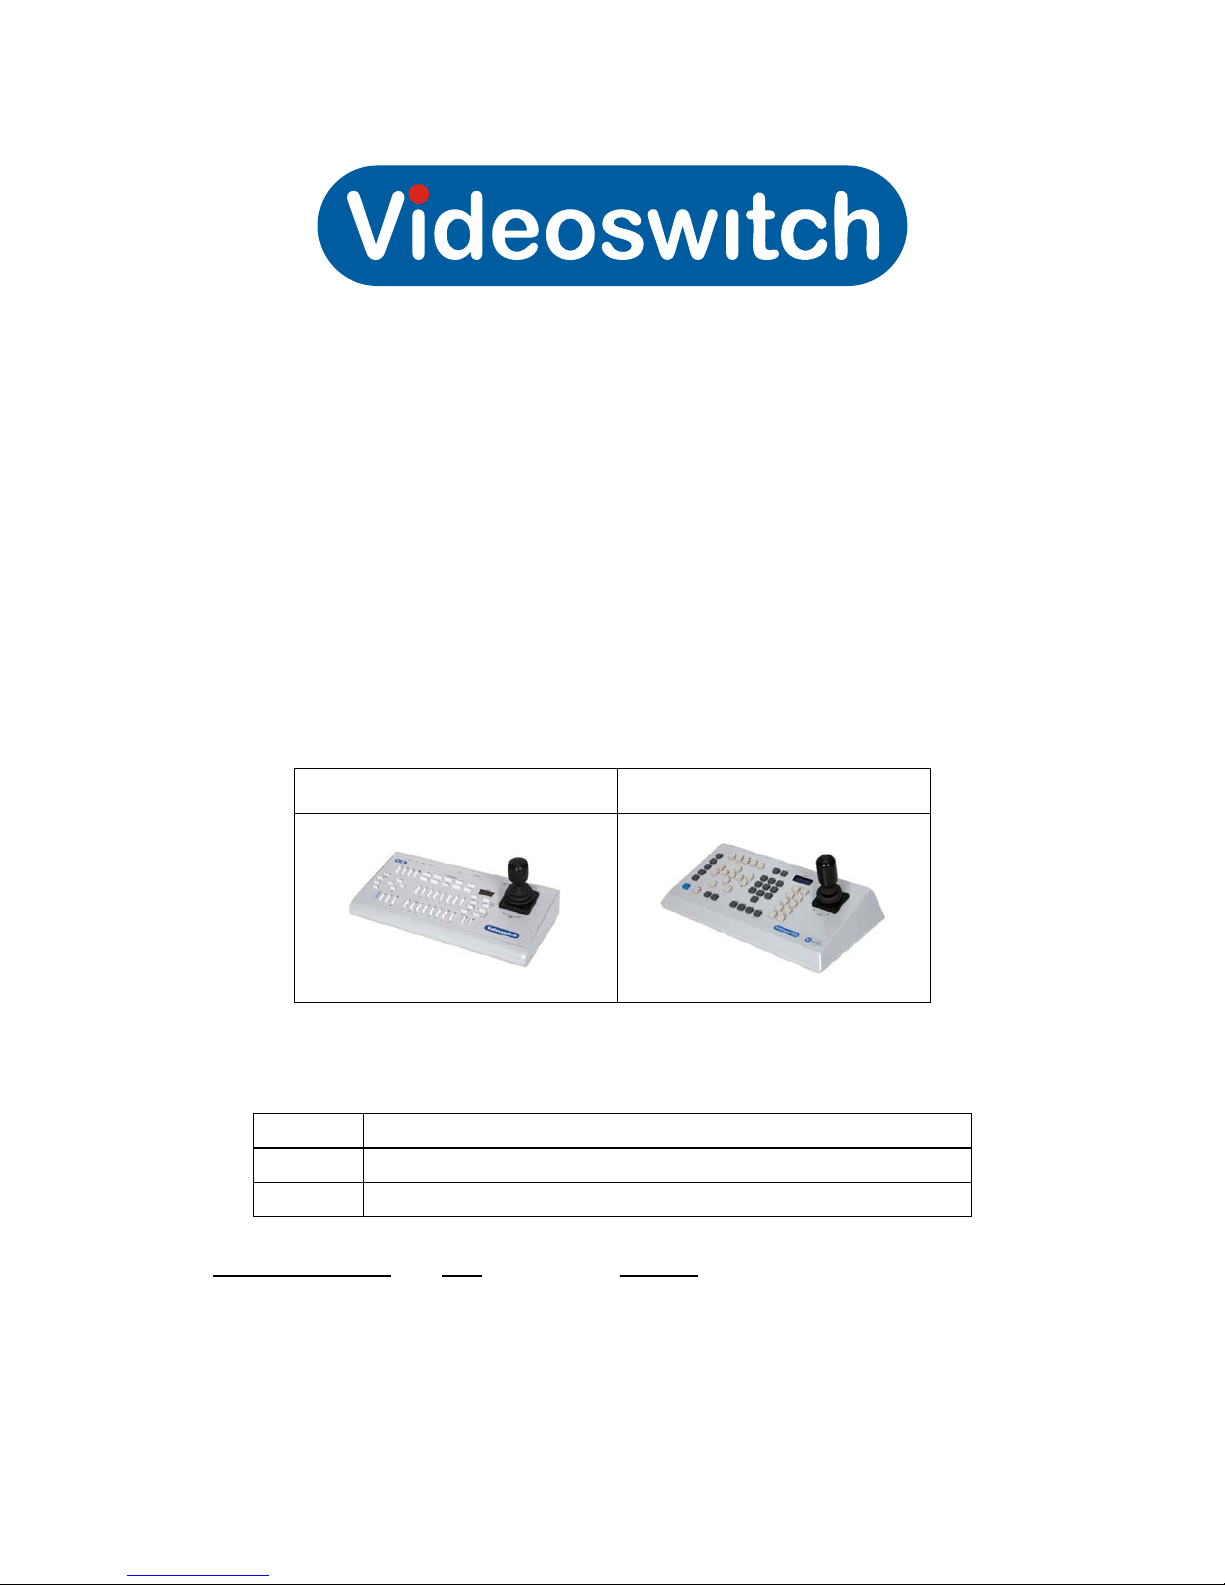
Vi-K2/Vi-K3
Joystick Keyboard
User Manual
Vi-K2 Vi-K3
Products covered by this manual:
Product Description
Vi-K2 Compact Joystick Keyboard
Vi-K3 Enhanced Joystick Keyboard
Document Reference
Date Firmware
Vk604r.doc 21/04/2009 From VK002L1
Videoswitch
Telephone 01252-851510
Ocean House, Redfields Industrial Park Fax 01252-851296
Redfields Lane, Church Crookham Email [email protected]
Hants GU52 0RD Web www.videoswitch.co.uk
Page 2

Page 3

Vi-K2/Vi-K3 Universal
Keyboard
Vi-K2 Universal Keyboard User Manual
1
Contents
1 Start Here..................................................................................................................................6
1.1 Connecting Up..............................................................................................................................................................................6
1.2 Connection Example....................................................................................................................................................................8
1.3 Termination ..................................................................................................................................................................................9
1.4 Star Expander ............................................................................................................................................................................10
2 Vi-K2 Configuration..............................................................................................................11
2.1 Quick Configuration....................................................................................................................................................................11
2.2 Full Configuration.......................................................................................................................................................................11
3 Vi-K3 Configuration..............................................................................................................15
3.1 Quick Configuration....................................................................................................................................................................15
3.2 Full Configuration.......................................................................................................................................................................15
4 Using the Vi-K2/Vi-K3 ..........................................................................................................16
4.1 Home..........................................................................................................................................................................................16
4.2 Camera Selection.......................................................................................................................................................................16
4.3 Monitor Selection........................................................................................................................................................................17
4.4 Controlling Digital Recorders .....................................................................................................................................................17
5 Current Protocol Support...................................................................................................19
6 Protocol 1 - Slave..................................................................................................................21
6.1 Supported functions ...................................................................................................................................................................21
7 Protocol 2 - JVC ....................................................................................................................22
7.1 Connections ...............................................................................................................................................................................22
7.2 Settings ......................................................................................................................................................................................22
7.3 Supported functions ...................................................................................................................................................................23
7.4 Joystick Operation......................................................................................................................................................................23
7.5 Lens Control...............................................................................................................................................................................23
7.6 Auxiliary Functions.....................................................................................................................................................................23
7.7 Presets.......................................................................................................................................................................................24
7.8 Tours..........................................................................................................................................................................................25
7.9 Menus.........................................................................................................................................................................................25
8 Protocol 3 - Molynx ..............................................................................................................26
8.1 Connections ...............................................................................................................................................................................26
8.2 Settings ......................................................................................................................................................................................26
8.3 Supported functions ...................................................................................................................................................................27
8.4 Joystick Operation......................................................................................................................................................................27
8.5 Lens Control...............................................................................................................................................................................27
8.6 Auxiliary Functions.....................................................................................................................................................................27
8.7 Presets.......................................................................................................................................................................................28
8.8 Tours..........................................................................................................................................................................................28
8.9 Other Commands.......................................................................................................................................................................30
9 Protocol 4 - Dennard............................................................................................................31
9.1 Connections ...............................................................................................................................................................................31
9.2 Settings ......................................................................................................................................................................................31
9.3 Supported functions ...................................................................................................................................................................32
9.4 Joystick Operation......................................................................................................................................................................32
9.5 Lens Control...............................................................................................................................................................................32
9.6 Auxiliary Functions.....................................................................................................................................................................32
9.7 Presets.......................................................................................................................................................................................33
Page 4

Vi-K2/Vi-K3 Universal
Keyboard
Vi-K2 Universal Keyboard User Manual
2
9.8 Tours..........................................................................................................................................................................................33
9.9 Menus.........................................................................................................................................................................................34
10 Protocol 5 - VCL....................................................................................................................35
10.1 Supported functions ...................................................................................................................................................................35
10.2 Joystick Operation......................................................................................................................................................................35
10.3 Lens Control...............................................................................................................................................................................35
10.4 Auxiliary Functions.....................................................................................................................................................................36
10.5 Presets.......................................................................................................................................................................................37
10.6 Tours..........................................................................................................................................................................................37
10.7 Other Commands.......................................................................................................................................................................38
11 Protocol 6 - Sanyo................................................................................................................39
11.1 Connections ...............................................................................................................................................................................39
11.2 Supported functions ...................................................................................................................................................................39
11.3 Joystick Operation......................................................................................................................................................................39
11.4 Lens Control...............................................................................................................................................................................40
11.5 Presets.......................................................................................................................................................................................40
11.6 Tours..........................................................................................................................................................................................40
11.7 Other Commands.......................................................................................................................................................................41
12 Protocol 7 - BBV (RS232)....................................................................................................42
12.1 Connections ...............................................................................................................................................................................42
12.2 Settings ......................................................................................................................................................................................42
12.3 Supported functions ...................................................................................................................................................................43
12.4 Joystick Operation......................................................................................................................................................................43
12.5 Lens Control...............................................................................................................................................................................43
12.6 Auxiliary Functions.....................................................................................................................................................................43
12.7 Presets.......................................................................................................................................................................................45
12.8 Tours..........................................................................................................................................................................................45
12.9 Menus.........................................................................................................................................................................................45
13 Protocol 8 - BBV (20mA).....................................................................................................47
13.1 Connections ...............................................................................................................................................................................47
13.2 Settings ......................................................................................................................................................................................47
13.3 Supported functions ...................................................................................................................................................................48
13.4 Joystick Operation......................................................................................................................................................................48
13.5 Lens Control...............................................................................................................................................................................48
13.6 Auxiliary Functions.....................................................................................................................................................................48
13.7 Presets.......................................................................................................................................................................................49
13.8 Tours..........................................................................................................................................................................................50
13.9 Menus.........................................................................................................................................................................................50
14 Protocol 9 - Forward Vision (VCL)....................................................................................52
14.1 Connections ...............................................................................................................................................................................52
14.2 Settings ......................................................................................................................................................................................52
14.3 Supported functions ...................................................................................................................................................................53
14.4 Joystick Operation......................................................................................................................................................................53
14.5 Lens Control...............................................................................................................................................................................53
14.6 Auxiliary Functions.....................................................................................................................................................................54
14.7 Presets.......................................................................................................................................................................................55
14.8 Tours..........................................................................................................................................................................................55
14.9 Privacy commands.....................................................................................................................................................................56
14.10 Other Commands.......................................................................................................................................................................56
15 Protocol 10 - Mercer.............................................................................................................58
Page 5

Vi-K2/Vi-K3 Universal
Keyboard
Vi-K2 Universal Keyboard User Manual
3
15.1 Connections ...............................................................................................................................................................................58
15.2 Settings ......................................................................................................................................................................................58
15.3 Supported functions ...................................................................................................................................................................59
15.4 Joystick Operation......................................................................................................................................................................59
15.5 Lens Control...............................................................................................................................................................................59
15.6 Auxiliary Functions.....................................................................................................................................................................59
15.7 Presets.......................................................................................................................................................................................60
15.8 Tours..........................................................................................................................................................................................61
15.9 Privacy........................................................................................................................................................................................61
15.10 Other Commands.......................................................................................................................................................................62
16 Protocol 11 - Merit Lilin (MLP1).........................................................................................63
16.1 Connections ...............................................................................................................................................................................63
16.2 Settings ......................................................................................................................................................................................63
16.3 Supported functions ...................................................................................................................................................................64
16.4 Joystick Operation......................................................................................................................................................................64
16.5 Lens Control...............................................................................................................................................................................64
16.6 Auxiliary Functions.....................................................................................................................................................................64
16.7 Presets.......................................................................................................................................................................................66
16.8 Tours..........................................................................................................................................................................................66
16.9 Menus (PIH-7625 series only)....................................................................................................................................................67
16.10 Other Commands.......................................................................................................................................................................67
17 Protocol 12 - Borsatec.........................................................................................................68
17.1 Connections ...............................................................................................................................................................................68
17.2 Supported functions ...................................................................................................................................................................68
17.3 Joystick Operation......................................................................................................................................................................68
17.4 Lens Control...............................................................................................................................................................................69
17.5 Auxiliary Functions.....................................................................................................................................................................69
17.6 Presets.......................................................................................................................................................................................70
17.7 Tours..........................................................................................................................................................................................70
17.8 Menus.........................................................................................................................................................................................70
17.9 Programming a Tour ..................................................................................................................................................................71
17.10 Other Commands.......................................................................................................................................................................71
18 Protocol 13 - Samsung........................................................................................................72
18.1 Connections ...............................................................................................................................................................................72
18.2 Settings ......................................................................................................................................................................................72
18.3 Supported functions ...................................................................................................................................................................73
18.4 Joystick Operation......................................................................................................................................................................73
18.5 Auxiliary Functions.....................................................................................................................................................................73
18.6 Presets.......................................................................................................................................................................................74
18.7 Tours..........................................................................................................................................................................................74
18.8 Menus.........................................................................................................................................................................................74
18.9 Other Commands.......................................................................................................................................................................75
19 Protocol 14 - Pelco-D...........................................................................................................76
19.1 Connections ...............................................................................................................................................................................76
19.2 Settings ......................................................................................................................................................................................76
19.3 Supported functions ...................................................................................................................................................................77
19.4 Joystick Operation......................................................................................................................................................................77
19.5 Lens Control...............................................................................................................................................................................77
19.6 Presets.......................................................................................................................................................................................78
19.7 Tours..........................................................................................................................................................................................78
19.8 Menus.........................................................................................................................................................................................79
Page 6

Vi-K2/Vi-K3 Universal
Keyboard
Vi-K2 Universal Keyboard User Manual
4
19.9 Other Commands.......................................................................................................................................................................79
19.10 Forward vision Pelco-D..............................................................................................................................................................79
20 Protocol 15 – Videoswitch (VXP4)....................................................................................80
20.1 Supported functions ...................................................................................................................................................................80
20.2 Joystick Operation......................................................................................................................................................................80
20.3 Lens Control...............................................................................................................................................................................80
20.4 Auxiliary Functions.....................................................................................................................................................................81
20.5 Presets.......................................................................................................................................................................................81
20.6 Tours..........................................................................................................................................................................................81
20.7 Menus.........................................................................................................................................................................................81
20.8 Other Commands.......................................................................................................................................................................82
21 Protocol 16 - SpeedDome...................................................................................................83
21.1 Connections ...............................................................................................................................................................................83
21.2 Settings ......................................................................................................................................................................................83
21.3 Supported functions ...................................................................................................................................................................83
21.4 Joystick Operation......................................................................................................................................................................83
21.5 Presets.......................................................................................................................................................................................84
21.6 Tours..........................................................................................................................................................................................84
21.7 Menus.........................................................................................................................................................................................86
22 Protocol 17 - Forward Vision (FV)....................................................................................87
22.1 Connections ...............................................................................................................................................................................87
22.2 Settings ......................................................................................................................................................................................87
22.3 Supported functions ...................................................................................................................................................................88
22.4 Joystick Operation......................................................................................................................................................................88
22.5 Lens Control...............................................................................................................................................................................88
22.6 Auxiliary Functions.....................................................................................................................................................................88
22.7 Presets.......................................................................................................................................................................................89
22.8 Tours..........................................................................................................................................................................................89
22.9 Privacy commands.....................................................................................................................................................................90
23 Protocol 18 – BBV RS485 ...................................................................................................91
24 Protocol 19 – Vista (PelcoD)..............................................................................................92
24.1 Connections ...............................................................................................................................................................................92
24.2 Settings ......................................................................................................................................................................................92
24.3 Supported functions ...................................................................................................................................................................93
24.4 Joystick Operation......................................................................................................................................................................93
24.5 Lens Control...............................................................................................................................................................................93
24.6 Presets.......................................................................................................................................................................................94
24.7 Tours..........................................................................................................................................................................................94
24.8 Menus.........................................................................................................................................................................................95
24.9 Other Commands.......................................................................................................................................................................95
25 Protocol 20 – LiLin (MLP2).................................................................................................96
25.1 Connections ...............................................................................................................................................................................96
25.2 Settings ......................................................................................................................................................................................96
25.3 Supported functions ...................................................................................................................................................................97
25.4 Joystick Operation......................................................................................................................................................................97
25.5 Lens Control...............................................................................................................................................................................97
25.6 Auxiliary Functions.....................................................................................................................................................................97
25.7 Presets.......................................................................................................................................................................................99
25.8 Tours..........................................................................................................................................................................................99
25.9 Menus.......................................................................................................................................................................................100
Page 7

Vi-K2/Vi-K3 Universal
Keyboard
Vi-K2 Universal Keyboard User Manual
5
25.10 Other Commands.....................................................................................................................................................................100
26 Pin-Out Reference ..............................................................................................................101
26.1 Connector Arrangement...........................................................................................................................................................101
26.2 12V DC Power Input (2.1mm Inlet) ..........................................................................................................................................101
26.3 Monitor Output (BNC)...............................................................................................................................................................101
26.4 RS232 (9-way female D-type, DCE) ........................................................................................................................................101
26.5 DOMES-2 Output (RJ45) .........................................................................................................................................................102
26.6 DOMES-1 Output (RJ45) .........................................................................................................................................................102
26.7 Slave Vi-K2/Vi-K3 Input (RJ45)................................................................................................................................................102
26.8 Vi-series Input/Output (RJ45)...................................................................................................................................................103
27 Specifications......................................................................................................................104
27.1 Power Requirements................................................................................................................................................................104
27.2 Dimensions & Weight...............................................................................................................................................................104
27.3 Operating Distances.................................................................................................................................................................104
Page 8
Vi-K2/Vi-K3 Universal
Keyboard
Vi-K2 Universal Keyboard User Manual
6
1 Start Here
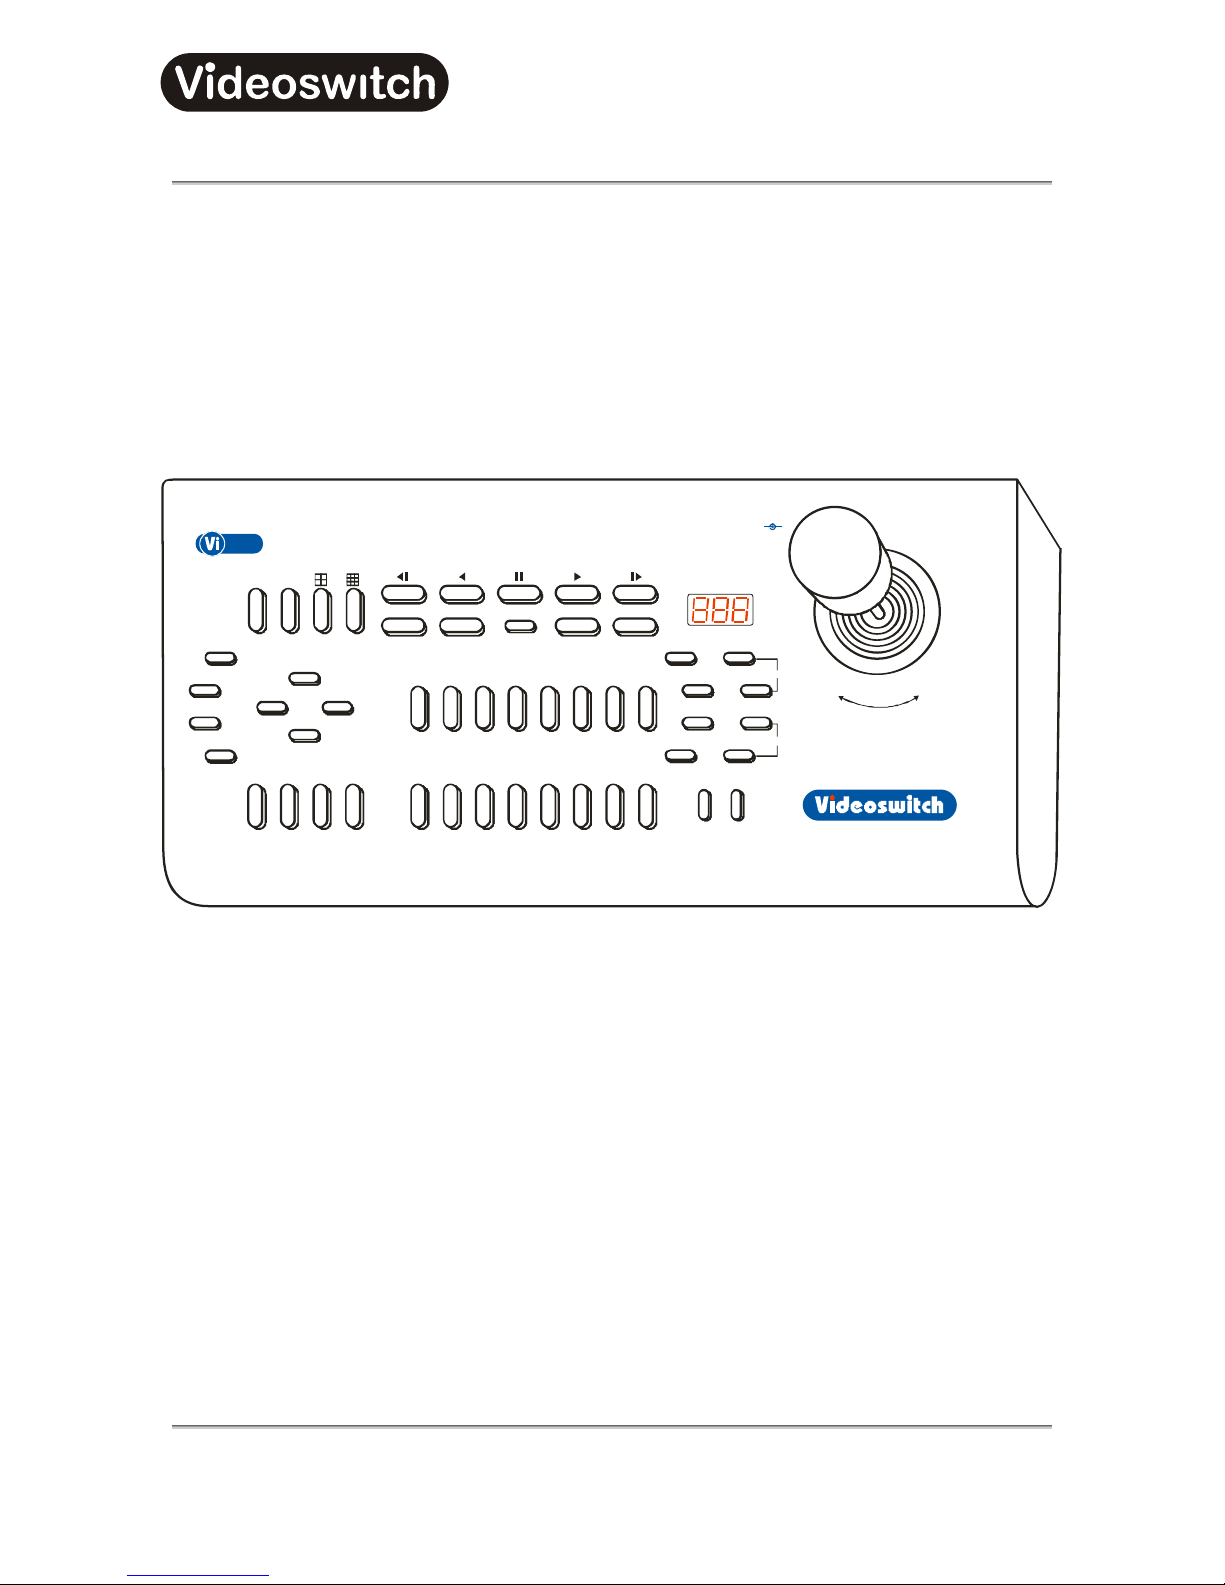
The Vi-K2/Vi-K3 is designed to provide integrated control of Videoswitch Digital Recorders and third party
domes and/or pan and tilt heads.
The Vi-K2/Vi-K3 controls all Videoswitch Vi-series digital recorders. For controlling VDM and VDC series
products, the VK-2 should be used.
PLAYBACK CONTROL
TOUR
FOCUS
ZOOM
IRIS
PRESET
AUTO-PAN
LAMP
WASH
STATUS
WIPE
CAMERA
LIVE
BACK OK DEF
DISPLAY
UNIT
DOME
FN PSW
INFO MENU BURN FIND
12345678
Í
Í
Í
Í
9 0 / 10 11 12 13 14 15 16
ALT
RS232 MO NI T O R 12V DCOUT IN DOMES-1
DOME S-2
AUTOPROG
CONFIG
STORE
AUTO
CAMERA
RELAY
F1
F9HOME
F2
F10F3F11F4F12F5F13F6F14F7F15F8F16
K2
+
-
1.1 Connecting Up
1.1.1 Control of Digital Recorder (or other Videoswitch unit)
The connector marked “Out” is connected to the keyboard input of a Videoswitch Digital recorder, using a
CAT5 cable.
1.1.2 Connect to a monitor
Connect a monitor to the BNC connector marked “MONITOR” on the Vi-K2/Vi-K3. Note that the Digital
Recorder must be equipped with the necessary interface. Early Videoswitch Digital Recorders may lack this
interface, in which case a Videoswitch T25A adaptor PCB and balun are required.
1.1.3 Multiple Vi-K2/Vi-K3 Keyboards
If a second Vi-K2/Vi-K3 keyboard is to be used, connect the “Out” output RJ45 connector of the second
(slave) keyboard to the “In” input RJ45 connector of the first (master) keyboard. Further keyboards may be
daisy-chained in the same way. All domes and Digital Recorders are connected to the master keyboard.
Page 9

Vi-K2/Vi-K3 Universal
Keyboard
Vi-K2 Universal Keyboard User Manual
7
1.1.4 Dome Control from Vi-K2/Vi-K3
Up to 16 domes may be directly connected to the Vi-K2/Vi-K3. The appropriate protocol(s) must be set in the
Vi-K2/Vi-K3. Dome control may be via RS485, RS232 or 20mA loop.
• The Vi-K2/Vi-K3 has two dome outputs “DOMES1” and “DOMES-2”.
• A particular Vi-K2/Vi-K3 can be connected to a maximum of two different types of dome; all of one
type must be connected to the “DOMES-1” output, and all of the other type of dome must be
connected to the “DOMES-2” output.
• Each camera (up to 256) must be assigned to use one or other of these outputs (the factory default
assigns all cameras assigned to “DOMES-1” output).
• Each of the two dome outputs is assigned a dome protocol.
• The domes may be either daisy-chained. In this case, turn the termination off on all domes except
the last in the daisy chain, which should have its termination set on.
• The dome may be connected in “star” mode by means of a RS485 “star expander” (our product
code “VX Hub”). In this case, all domes should have their termination on.
• Each dome must be set up with an address that corresponds with the camera input to which it is
connected (i.e. addresses 1, 2, 3 etc for domes on camera inputs 1, 2, 3 etc)
1.1.5 Dome Control from DVR
If the DVR, or multiple DVRs, have dome control built in, the domes may be connected to the DVR(s) and
the Vi-K2/Vi-K3 used as slave to control everything. The Vi-K2/Vi-K3 protocol must be set to SLAVE (i.e.
number 1). Up to 16 Vi-series DVRs may be linked to provide control of up to 256 dome cameras. Dome
control may be via RS485, RS232, 20mA loop or “up-the-coax” as supported by the DVR(s).
Page 10

Vi-K2/Vi-K3 Universal
Keyboard
Vi-K2 Universal Keyboard User Manual
8
1.2 Connection Example
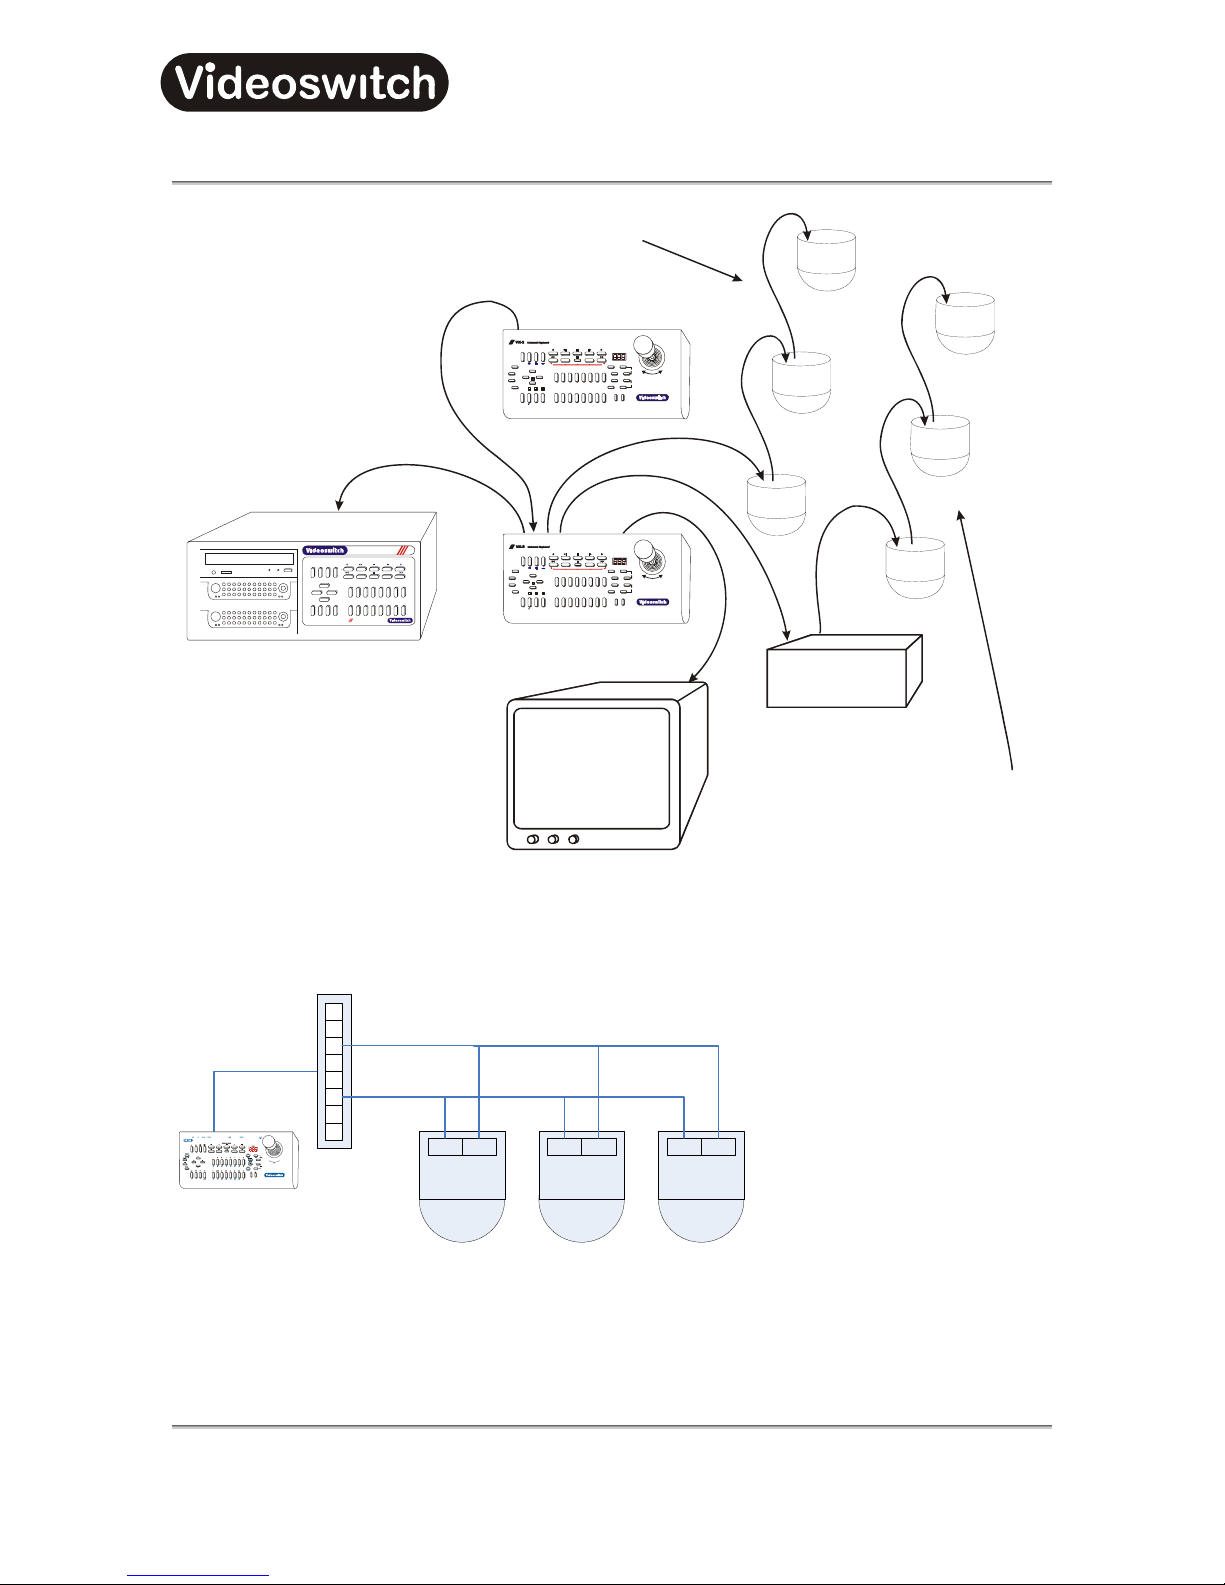
The diagram below illustrates how the Vi-K2/Vi-K3 is typically interconnected with other equipment.
Note:
• All dome control by the Vi-K2/Vi-K3 is via RS485 twisted pair.
• Supported domes, which have RS485 twisted pair control, may be connected directly as shown.
• Domes, which only have coax control, require a protocol converter, also shown.
• The “DOMES-1” and “DOMES-2” outputs from the Vi-K2/Vi-K3 may be used to control different
makes of domes. They may also be used to control the same make of dome.
• If master/slave operation is required, all domes must be connected to the master Vi-K2/Vi-K3.
• Multiple Vi-series Digital Recorders may be daisy chained. Each must be allocated a different unit
address (1, 2, 3 etc). Clock synchronisation keep dates and times of all units in step with the master
(Unit 1).
Page 11
Vi-K2/Vi-K3 Universal
Keyboard
Vi-K2 Universal Keyboard User Manual
9
VDM
Digital Multiplexer
Vi-K2 (MASTER)
Vi-K2 (SLAVE)
DIGITAL RECORDER
MONITO
R
DOMES WHICH DO NOT
REQUIRE PROTOCOL CONVERTOR
DOMES WHICH DO REQUIRE
PROTOCOL CONVERTOR
PROTOCOL CONVERTOR
1.3 Termination
Dome 3Dome 2Dome 1
Domes-1
or
Domes-2
VX10
5
4
2
1
7
8
3
6
Rs485+
Rs485-
Vi-K2 Keyboard
The last dome in a series must be terminated (In the above example, this would be “Dome 3”). The method
is dome specific but will usually be a dipswitch setting.
Page 12

Vi-K2/Vi-K3 Universal
Keyboard
Vi-K2 Universal Keyboard User Manual
10
1.4 Star Expander
Videoswitch manufacture a Star Expander (Part number Vi-X9) which allow 8 domes to be driven in star
configuration from one dome output port. Use two star expanders if up to 16 domes are to be driven in this
manner, one connected to each dome output.
Page 13

Vi-K2/Vi-K3 Universal
Keyboard
Vi-K2 Universal Keyboard User Manual
11
2 Vi-K2 Configuration
2.1 Quick Configuration
This section describes how to set-up the Vi-K2 for use with any one type of dome. For more complex
configurations, see section
2.2.
• Holding the ALT key on, press the CONFIG key.
• The LED display will show “PSd”, indicating that a password must be entered.
• Press the number keys 1, 2, 3, 4, 5, 6 (to enter default password).
• Press the OK key (the characters “C1.1” should be flashing on the display).
• Press the DOME key (the display shows “1.01” indicating “DOMES-1” output has been assigned
protocol number 1)
• Enter the protocol you require by pressing two number keys (refer to section Error! Reference
source not found.). E.g. 1 followed by 2 would select Borsatec (protocol 12).
• Holding the ALT key on, press the CONFIG key. The word “Sto” indicates that the configuration is
being stored.
The Vi-K2/Vi-K3 is now ready to control all domes connected to the “DOMES-1” output and a Digital
Recorder connected to the “Out” output.
Note
• If the Vi-K2/Vi-K3 is being used as a slave keyboard, no further configuration is required after factory
reset.
• Each dome must be set-up with a camera address (usually DIP switches on the dome).
• The Digital Recorder must have its default unit address (i.e. “001”).
2.2 Full Configuration
2.2.1 Restore Factory Configuration
If you wish to return all settings to the factory defaults, follow this procedure:
• Power on the Vi-K2 while pressing the ALT key. Keep pressing the ALT key (for about 10 seconds)
until the word “Fac” is displayed on the LED display.
• The Vi-K2 now has all factory settings restored.
2.2.2 Entering Configuration Mode
The Vi-K2/Vi-K3 has a Configuration Mode that is allows you to specify the dome protocols and change
the user password. To enter this mode, follow these steps:
• Holding the ALT key on, press the CONFIG key.
• The LED display will show “PSd”, indicating that a password must be entered.
Page 14

Vi-K2/Vi-K3 Universal
Keyboard
Vi-K2 Universal Keyboard User Manual
12
• Enter the password using the number keys 1, 2, 3, 4, 5, 6, 7, 8, 9 and ZERO (the factory default
password is 123456). Note that only the last 3 digits are displayed.
• Press the OK key.
• If the password is rejected, the word “Rej” will be displayed;
• If the password is accepted, the display will flashing ”C1.1”. The Vi-K2/Vi-K3 is now in
Configuration Mode. While is configuration mode, the display will always be flashing.
2.2.3 Selecting Dome Protocol for the “DOMES-1” output
• Make sure that you are in Configuration Mode as detailed in section
2.2.2.
• Press the DOME key.
• Press the BACK key to select “DOMES-1” output.
• Enter the protocol you require by pressing two number keys (refer to section Error! Reference
source not found.). E.g. 1 followed by 2 would select Borsatec (protocol 12).
2.2.4 Selecting Dome Protocol for the “DOMES-2” output
• Make sure that you are in Configuration Mode as detailed in section
2.2.2.
• Press the DOME key.
• Press the OK key to select “DOMES-2” output.
• Enter the protocol you require by pressing two number keys (refer to section Error! Reference
source not found.). E.g. 1 followed by 2 would select Borsatec (protocol 12).
2.2.5 Assigning cameras to the “DOMES-1” or “DOMES-2” outputs.
Following a factory reset, all cameras are allocated to the “DOMES-1” output. If only one type of dome is
being used, this section can be skipped.
If two types of dome are to be controlled, all domes of one type should be connected to the “DOMES-1”
output and all domes of the other type should be connected to the “DOMES-2” output. Program the ViK2/Vi-K3 to tell it which domes are connected to which outputs as follows:
• Make sure that you are in Configuration Mode as detailed in section
2.2.2.
• Press the UNIT key and select the unit address (usually 1 if only one Vi-series being controlled)
• Press the CAMERA key, and select a camera that is to be assigned. The LED display indicates the
camera number 1 to 16 and the currently assign dome output 1 or 2. For example, the display
“C7.2” would indicate that camera 7 is controlled via the “DOMES-2” output.
• Press the BACK key to select the “DOMES-1” output or press the OK key to select the “DOMES-
2” output.
• Repeat for all units and cameras as required.
2.2.6 Enabling Display Monitors
Each Vi-K2/Vi-K3 keyboard can be set to have control of a limited choice of displays. For example, you may
want one Vi-K2/Vi-K3 to be able to select cameras for the spot monitor (i.e. display 2) whilst another ViK2/Vi-K3 can select cameras for the main monitor (i.e. display 1).
• Make sure that you are in Configuration Mode as detailed in section
2.2.2.
• Press the DISPLAY key and select a display that you wish to enable or disable by using the
number keys.
Page 15

Vi-K2/Vi-K3 Universal
Keyboard
Vi-K2 Universal Keyboard User Manual
13
• Press the OK key if you want this Vi-K2/Vi-K3 to be able to select cameras on this display. Press
the BACK key if you do not want this Vi-K2/Vi-K3 to be able to select cameras on this display.
Note the LED display indicates the selected display and whether it is enabled for camera selection, for
example: “D1.y” means that the main display monitor can be controlled, whereas “D2.n” would mean that
the spot monitor cannot be controlled.
2.2.7 Changing the Password
A new password may be set as follows:
• Make sure that you are in Configuration Mode as detailed in section
2.2.2.
• Holding the ALT key, press the 11 key.
• The LED display will show “PSd”.
• Enter the password using the number keys 1, 2, 3, 4, 5, 6, 7, 8, 9 and ZERO. Up to 8 digits may
be entered (only the last 3 are displayed)
• Press the OK key to save the new password (make sure you remember the password as it will be
required next time to wish to enter Configuration Mode).
2.2.8 Enabling remote dome control from a Vi400, Vi405, Vi600 or Vi605 Digital Recorder
Domes connected to the Vi-K2/Vi-K3 can be controlled remotely via Ethernet, PSTN or ISDN via a Vi400 or
Vi600 Videoswitch Digital Recorder (DVR). Use Vi-Connect as the remote access software. This provides a
virtual joystick.
• Single Vi-K2/Vi-K3 When configuring the Vi-K2/Vi-K3, press ALT and 10 to enable the remote
control feature (the display will show ”--|”).
• Multiple Vi-K2/Vi-K3 When configuring each of the keyboards except for the furthest in the daisy
chain from the DVR, press ALT and 9 (the display will show ”---”). When
configuring the furthest in the daisy chain from the DVR, press ALT and 10
(the display will show ”--|”).
The Vi-K2/Vi-K3 that is connected to the DVR should be connected with a CAT5 cable (or equivalent) that
has all pairs connected.
2.2.9 Enabling remote dome control from a Vi200 Digital Recorder
Domes connected to the Vi-K2/Vi-K3 can be controlled remotely via Ethernet, PSTN or ISDN via a Vi200
Videoswitch Digital Recorder (DVR). Use Vi-Connect as the remote access software. This provides a virtual
joystick.
When configuring the keyboard or keyboards, press ALT and 9 (the display will show ”---”).
Connect the Vi-K2/Vi-K3 to the DVR as for normal control. Add an additional control cable between RJ45
connector that is above the keyboard connector on the Vi200 and the keyboard loop “IN” connector on the
Vi-K2/Vi-K3. Note that the cable should be wired as follows::
Vi200 Vi-K2/Vi-K3
Pin1----------------------Pin1
Pin2----------------------Pin2
Pin5----------------------Pin5
2.2.10 Camera/Unit Mode
To address multiple DVRs by entering unit 1-16 and camera 1-16 select this mode as follows:
Page 16

Vi-K2/Vi-K3 Universal
Keyboard
Vi-K2 Universal Keyboard User Manual
14
• Press ALT and 12
• The LED display will show “16”.
2.2.11 Camera Select Mode 1-99
To address multiple DVRs by entering just the camera number (up to 99) select this mode as follows:
• Press ALT and 13
• The LED display will show “99”.
2.2.12 Camera Select Mode 1-999
To address multiple DVRs by entering just the camera number (up to 999) select this mode as follows:
• Press ALT and 14
• The LED display will show “999”
2.2.13 Vi-Map Control
2.2.14 Storing Configuration
To exit Configuration Mode, Holding the ALT key on, press the CONFIG key. The word “Sto” will be
displayed, indicating that the configuration is being stored.
Page 17

Vi-K2/Vi-K3 Universal
Keyboard
Vi-K2 Universal Keyboard User Manual
15
3 Vi-K3 Configuration
3.1 Quick Configuration
This section describes how to set-up the Vi-K3 for use with any one type of dome. For more complex
configurations, see section
3.2.
• Holding the ALT key on, press the CONFIG key.
• The LCD display will show “Password”, indicating that a password must be entered.
• Press the number keys 1, 2, 3, 4, 5, 6 (to enter default password).
• Press the OK key
• Use the LEFT and RIGHT keys to select the required protocol
• Holding the ALT key on, press the CONFIG key to save the configuration
The Vi-K3 is now ready to control all domes connected to the “DOMES-1” output and a Digital Recorder
connected to the “Out” output.
3.2 Full Configuration
3.2.1 Restore Factory Configuration
If you wish to return all settings to the factory defaults, follow this procedure:
• Power on the Vi-K3 while pressing the ALT key. Keep pressing the ALT key (for about 10 seconds)
until the word “Store” is displayed on the LCD display.
• The Vi-K3 now has all factory settings restored.
3.2.2 Entering Menu
• Holding the ALT key on, press the CONFIG key.
• The LCD display will show “Password”, indicating that a password must be entered.
• Press the number keys 1, 2, 3, 4, 5, 6 (to enter default password).
• Press the OK key
3.2.3 Configuration
The V-K3 can now be configured using the following keys:
• UP and DOWN keys - select configuration item to be set
• INC and DEC keys - select auxillary parameter to be set
• LEFT and RIGHT keys - change setting
3.2.4 Exiting Menu
• To exit the menu, holdthe ALT key on, then press the CONFIG key.
Page 18

Vi-K2/Vi-K3 Universal
Keyboard
Vi-K2 Universal Keyboard User Manual
16
4 Using the Vi-K2/Vi-K3
4.1 Home
To set the Vi-K2/Vi-K3 to its “home” state (Camera 1, Monitor 1 and Unit 1), and to call up the Preset 1 of all
connected domes, press these keys:
• While pressing the ALT key, press the DEF key. Release both.
4.2 Camera Selection
4.2.1 Camera Select Mode
Note that the Camera Select mode must first be set up in the configuration before use (see section
2.2.11 and 2.2.12).
To display a particular camera in full screen mode:
• Press the CAMERA key
Using the number keys 1, 2, 3, 4, 5, 6, 7, 8, 9 and 0, enter the number of the camera you wish to view.
You may enter one, two or three digits as required. In multi-unit systems, the appropriate DVR will
automatically be selected.
4.2.2 Camera/Unit Mode
Note that the Camera/Unit mode must first be set up in the configuration (see section
2.2.10).
The required DVR must be first be selected for controlling as follows:
• Press the UNIT key
• The LED display will show the letter ”U” followed by the currently selected unit number (1…16).
• Press one of the number keys 1, 2, 3…16 to select another unit. Each unit must be given a
different address : 1 (Master), 2, 3 etc. so that the correct one is selected.
To display a particular camera in full screen mode:
• Press the CAMERA key
• The LED display will show the letter “C” followed by the currently selected unit number (1…16).
• Press one of the number keys 1, 2, 3…16 to select another camera.
Page 19

Vi-K2/Vi-K3 Universal
Keyboard
Vi-K2 Universal Keyboard User Manual
17
4.3 Monitor Selection
4.3.1 Using the main monitor text
The display that you wish to control may be selected by pressing the “BACK” key. The bottom right of the
DVR’s main monitor will indicate whether the spot monitor is selected. If no monitor is specified, it means
that the main monitor will be controlled .
Note that for this display selection method to work, that the Direct Addressing mode described below must
not have selected any other display other than 1.
4.3.2 Direct addressing
Alternatively, the display to be controlled may be selected as follows:
• Press the DISPLAY key
• The LED display will show the letter “D” followed by the currently selected unit number (1…16).
• Press one of the number keys 1, 2, 3…16 to select another display.
• Subsequent camera selection will now apply to this display. Note that on a Vi-series Digital
Recorder, multi-screen, menus and replay are always displayed on the main monitor, irrespective of
the selected display.
4.4 Controlling Digital Recorders
All the keys necessary to control a Vi-series Digital Recorder (DVR) are provided on the Vi-K2/Vi-K3. Once
the correct unit number for the DVR has been selected as above (see section
4.1), it can be controlled in the
normal way using the Vi-K2/Vi-K3. Refer to the Vi-series Manual for details.
Page 20

Vi-K2/Vi-K3 Universal
Keyboard
Vi-K2 Universal Keyboard User Manual
18
Page 21
Vi-K2/Vi-K3 Universal
Keyboard
Vi-K2 Universal Keyboard User Manual
19
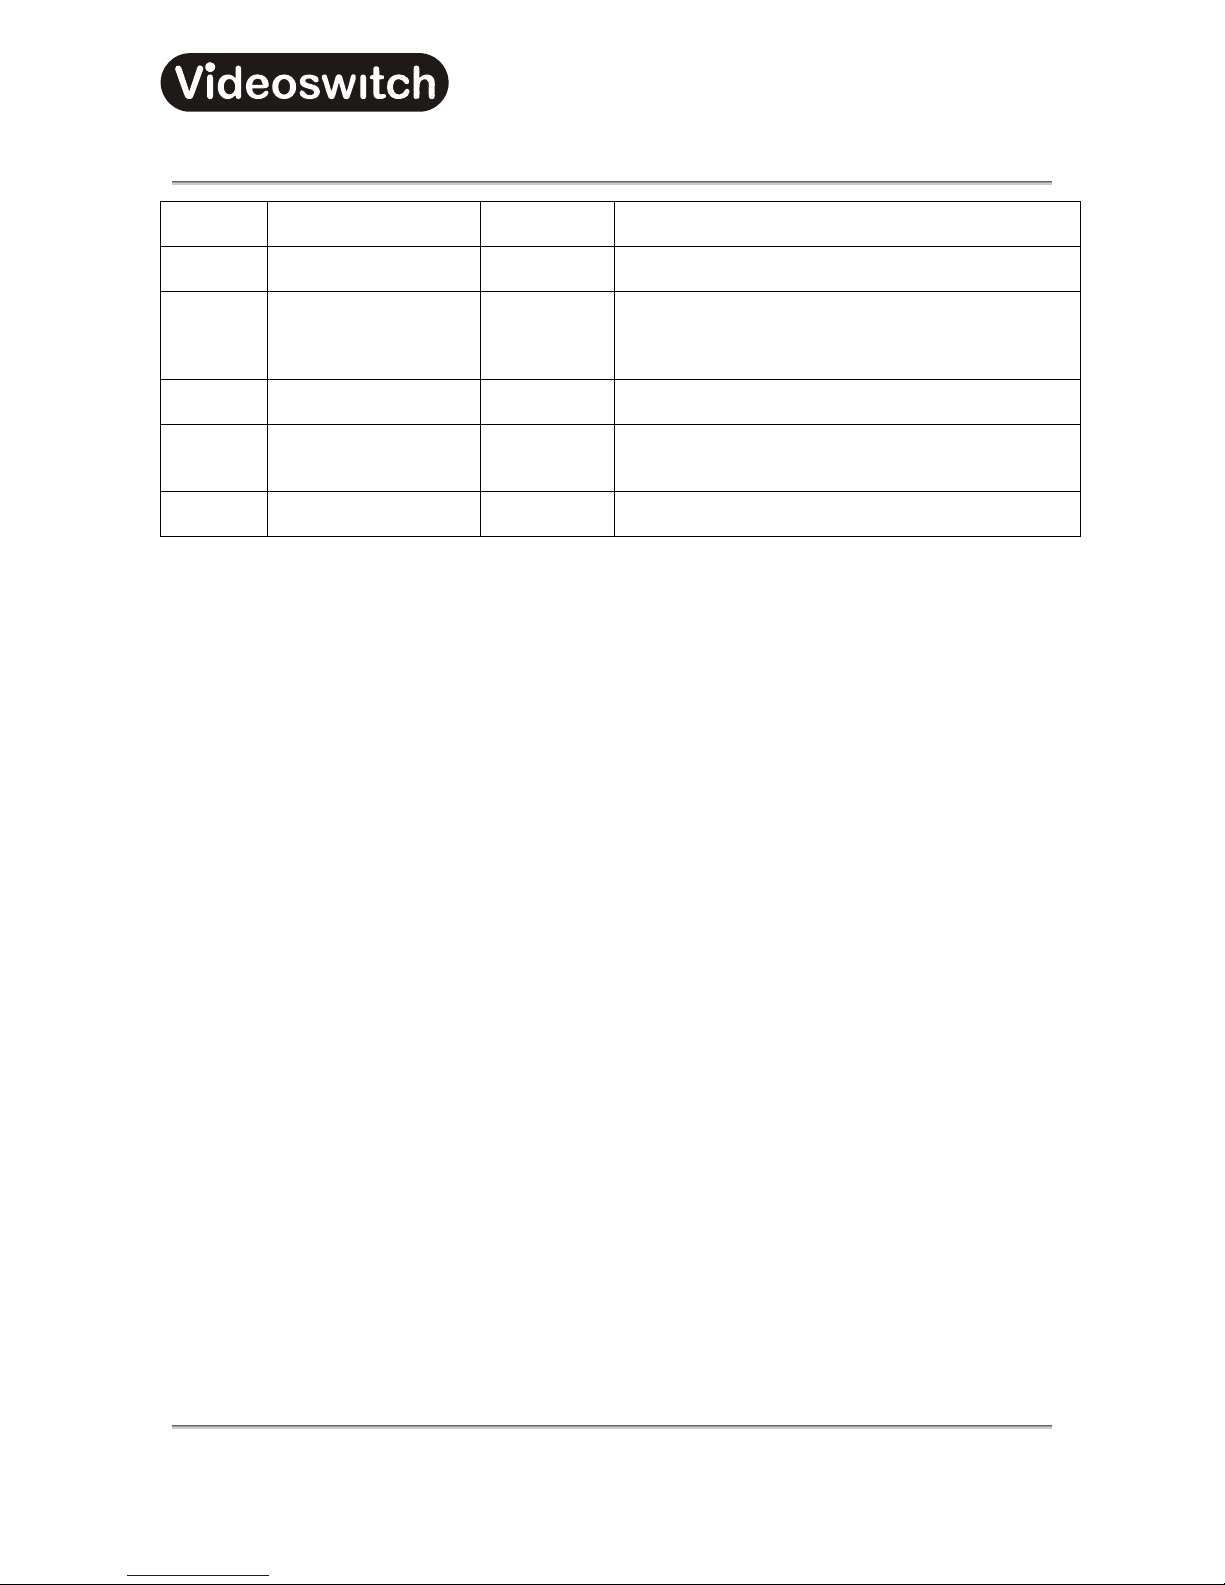
5 Current Protocol Support
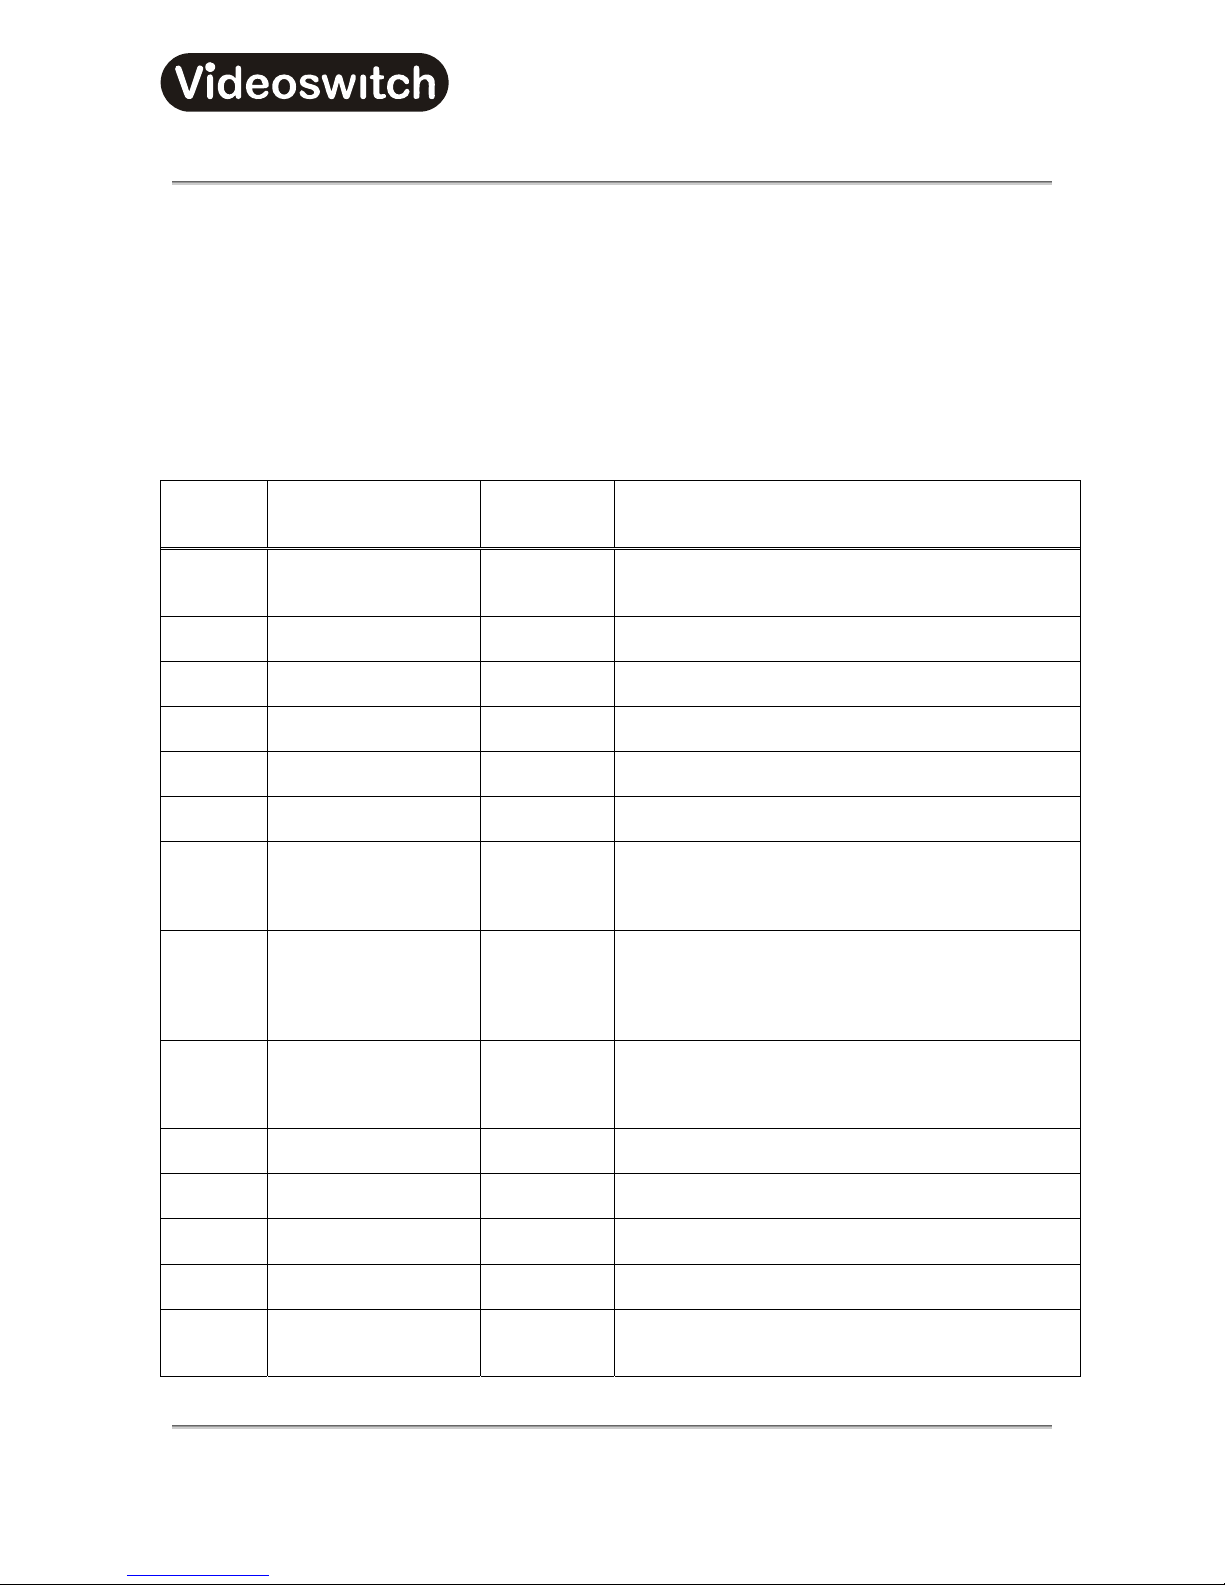
A Vi-K2/Vi-K3 is capable of controlling a mixture of two different types of dome. All domes of one type must
be connected to the “DOMES-1” output, and all domes of the other type must be connected to the
“DOMES-2” output. These outputs must each be allocated one of the following protocol numbers (See
sections
2.2.3 and 2.2.4):
Note that some domes support protocols from other manufacturers, or may be controlled via a protocol
converter. It is important to select the correct protocol from the list below, not necessarily the manufacturer
of the dome.
Protocol
Number
Protocol Name Output Used Comments
1
Slave RS485 Select this protocol in all slave Vi-K2/Vi-K3’s and if
domes are connected to dome-enabled DVRs.
2
JVC RS485 Direct connection via twisted pair.
3
Molynx RS485 Connect directly to Molynx receivers via twisted pair.
4
Dennard RS485 Direct connection via twisted pair.
5
VCL RS485 Direct connection via twisted pair.
6
Sanyo RS485 Direct connection via twisted pair.
7
BBV RS232 Connect to a BBV transmitter such as the TX1000/8,
which provides control of BBV compatible domes &
receivers via coax.
8
BBV 20mA Connection to BBV compatible receivers via twisted
pair. The RX100 receivers provide coax or RS485
control of a range of dome domes as supported by
BBV.
9
Forward Vision (VCL) RS485 Direct connection via twisted pair. Note that the dome
must be purchased with the VCL-based protocol
option.
10
Mercer RS485 Direct connection via twisted pair.
11
Merit Lilin (MLP1) RS485 Direct connection via twisted pair.
12
Borsatec RS485 Direct connection via twisted pair.
13
Samsung RS485 Direct connection via twisted pair.
14
Pelco-D RS485 Direct connection via twisted pair. A number of
domes use this protocol.
Page 22
Vi-K2/Vi-K3 Universal
Keyboard
Vi-K2 Universal Keyboard User Manual
20
15
VXP4 RS485 Direct connection via twisted pair.
16
SpeedDome (VCL) RS485 Direct connection via twisted pair.
17
ForwardVision (FV) RS485 Direct connection via twisted pair. Note that the dome
must be purchased with the Forward Vision protocol
option.
18
BBV RS485 RS485
19
Vista Powerdome
(PelcoD)
RS485 Similar to standard PelcoD, except for Tour
commands.
20
LiLin (MLP2) RS485 Direct connection via twisted pair.
Page 23

Vi-K2/Vi-K3 Universal
Keyboard
Vi-K2 Universal Keyboard User Manual
21
6 Protocol 1 - Slave
6.1 Supported functions
This protocol is only for use on slave keyboards and the supported functions are dependant on the protocol
used by the selected dome.
Note: Programming of presets & tours and “Do” menu keys is only available on the master keyboard.
Page 24
Vi-K2/Vi-K3 Universal
Keyboard
Vi-K2 Universal Keyboard User Manual
22
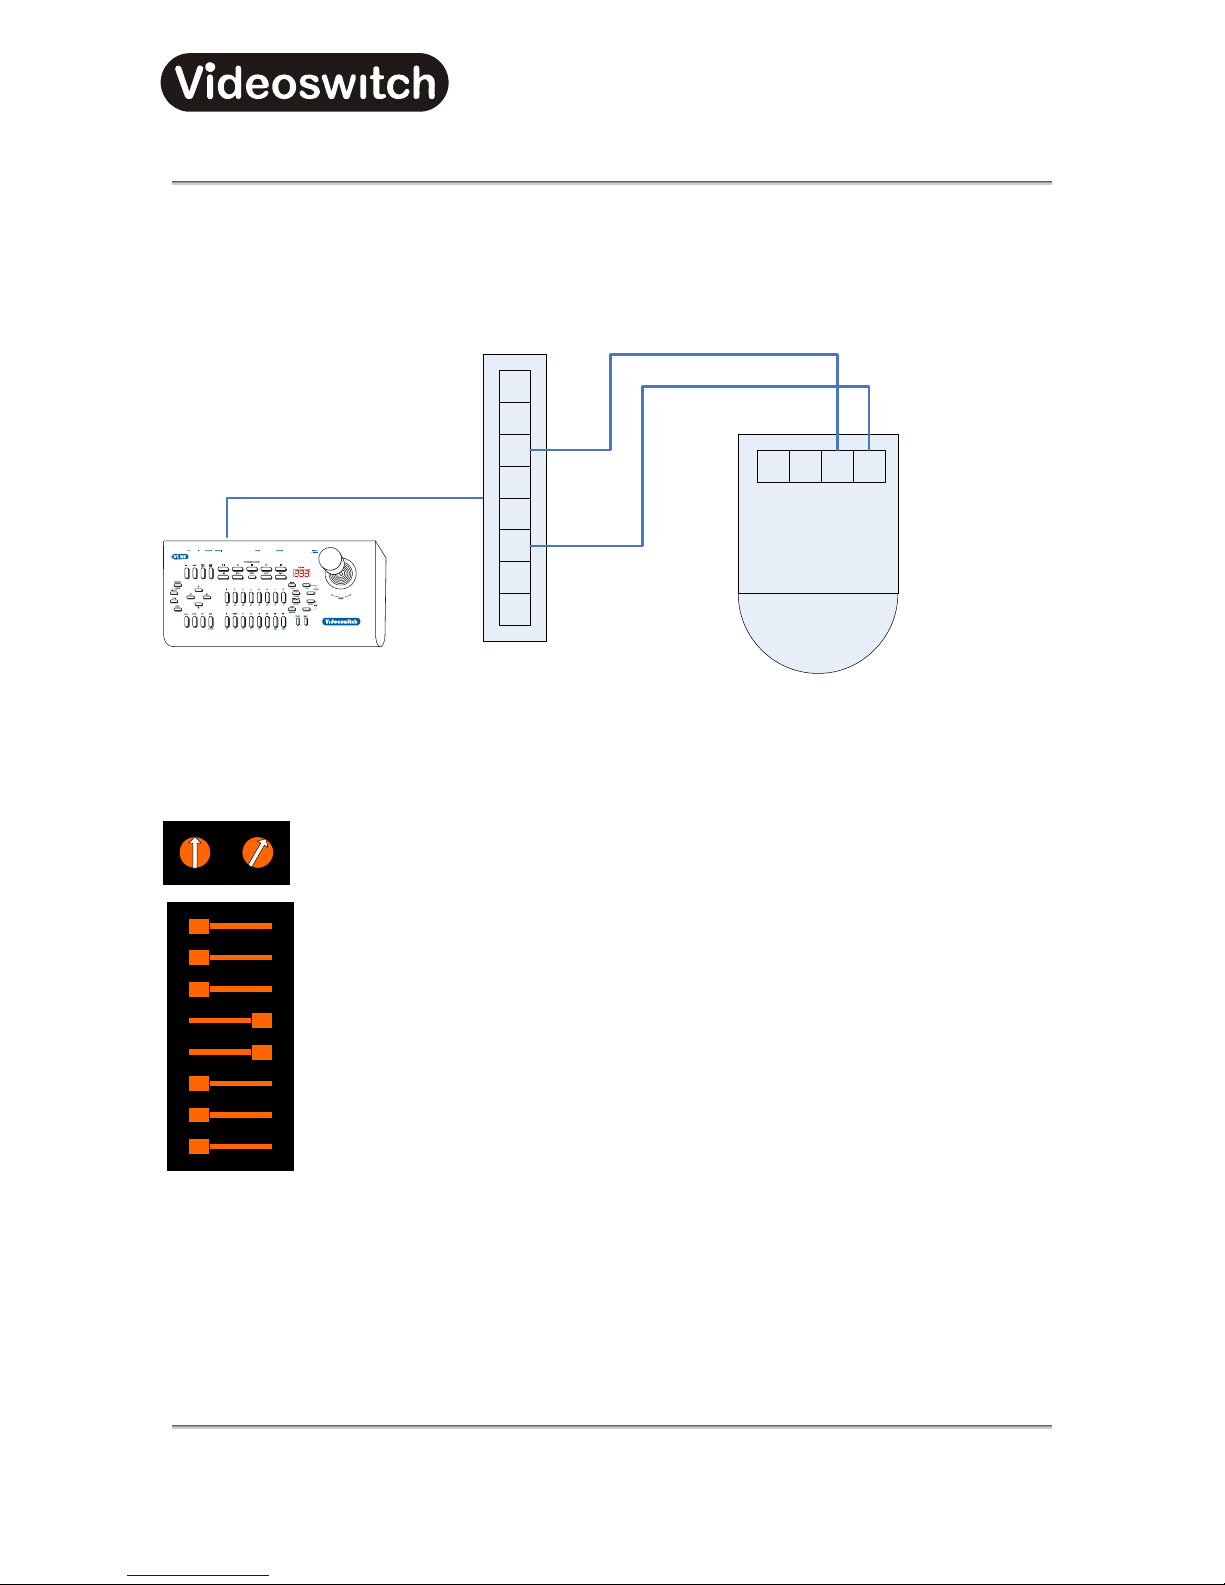
7 Protocol 2 - JVC
7.1 Connections
Domes-1 or Domes-2
Control
DC
VX10
5
4
2
1
7
8
3
6
BA
Vi-K2 Keyboard
7.2 Settings
7.2.1 Switch Settings
0
1
2
3
456
7
8
9
0
1
2
3
456
7
8
9
Off
1
2
3
4
5
6
7
8
7.2.2 Notes
• Dome Camera numbers are equivalent to Vi-K2/Vi-K3 Keyboard camera numbers.
Switch 4: On (Multi-drop)
Switch 5: On (Simplex)
Address 01 (e.g. 01 = Camera 1)
Page 25

Vi-K2/Vi-K3 Universal
Keyboard
Vi-K2 Universal Keyboard User Manual
23
7.3 Supported functions
• Pan / tilt / zoom / focus / iris
• Variable speed pan / tilt / zoom / focus / iris
• Relay
• Auto-focus
• Auto-iris
• Auto-pan
• Presets (16)
• Tours (1 sequence)
• Menus
7.4 Joystick Operation
7.4.1 Pan & Tilt
Move the joystick left, right, up and down to move the dome in the corresponding direction. If the dome has
variable speed, then the further the joystick is moved from its central position, the faster the camera will pan
or tilt.
7.4.2 Zoom
Zoom is achieved by twisting the handle of the joystick clockwise (zoom in), or anti-clockwise (zoom out). If
the camera has variable zoom speed, the more the handle is twisted, the faster the zoom movement will be.
7.5 Lens Control
7.5.1 Focus
• The two FOCUS keys can be used to adjust the focus.
• Press the ALT key and the upper FOCUS key to select auto-focu s.
7.5.2 Iris
• The two IRIS keys can be used to adjust the iris.
• Press the ALT key and the upper IRIS key to select auto-iris.
7.6 Auxiliary Functions
7.6.1 Wash
Press the WASH key to operate the wash function.
7.6.2 Wipe
Press the WIPE key to turn on the wiper. Press again to turn off.
Page 26

Vi-K2/Vi-K3 Universal
Keyboard
Vi-K2 Universal Keyboard User Manual
24
7.6.3 Auto-Pan
Press the AUTO-PAN key to turn on the auto-pan function. Press again to turn off.
7.6.4 Relay
Holding the ALT key on, press the RELAY key to turn on the auxiliary relay. Press these keys again to turn
relay off again.
7.7 Presets
7.7.1 Recalling a Preset
• Press the PRESET key.
• The display will show the letter “P—”.
• Press one of the number keys 1, 2, 3…16 to select a preset that has previously been stored.
• The dome will move to that preset position.
• If the joystick is moved, the preset display will be cancelled.
7.7.2 Setting a Preset
• Move the dome to the position at which you wish to set a preset.
• Press and hold the ALT key and then press the STORE key.
• The display will show the letter “P—”, flashing.
• Press one of the number keys 1, 2, 3…16 to select a preset.
• Press and hold the ALT key and then press the STORE key to store the preset.
7.7.3 Clearing a Preset
• Press and hold the ALT key and then press the STORE key.
• The display will show the letter “P—”, flashing.
• Press one of the number keys 1, 2, 3…16 to select a preset.
• Press and hold the ALT key and then press the WIPE key to clear the preset.
Page 27

Vi-K2/Vi-K3 Universal
Keyboard
Vi-K2 Universal Keyboard User Manual
25
7.8 Tours
The JVC dome supports 1 tour. It is a sequence of all preset positions.
7.8.1 Running a Tour
• Press the TOUR key.
• The display will show the letter “t—”.
• Press a number key 1 to run the tour.
• The dome will run the tour until the TOUR key is pressed again.
7.9 Menus
The Vi-K2/Vi-K3 has a special mode to make access to dome menus very easy:
• Press the DOME key on the Vi-K2/Vi-K3.
• The letters “Do” will appear on the display.
While the “Do” is being displayed, some of the keys on the Vi-K2/Vi-K3 have special functions as follows:
• Press the MENU key to enter the dome user menu.
• Use the Up, Down, Left, Right arrow keys to navigate within the dome menu.
• Press the OK key to enter a sub-menu or to accept a menu setting.
Page 28
Vi-K2/Vi-K3 Universal
Keyboard
Vi-K2 Universal Keyboard User Manual
26
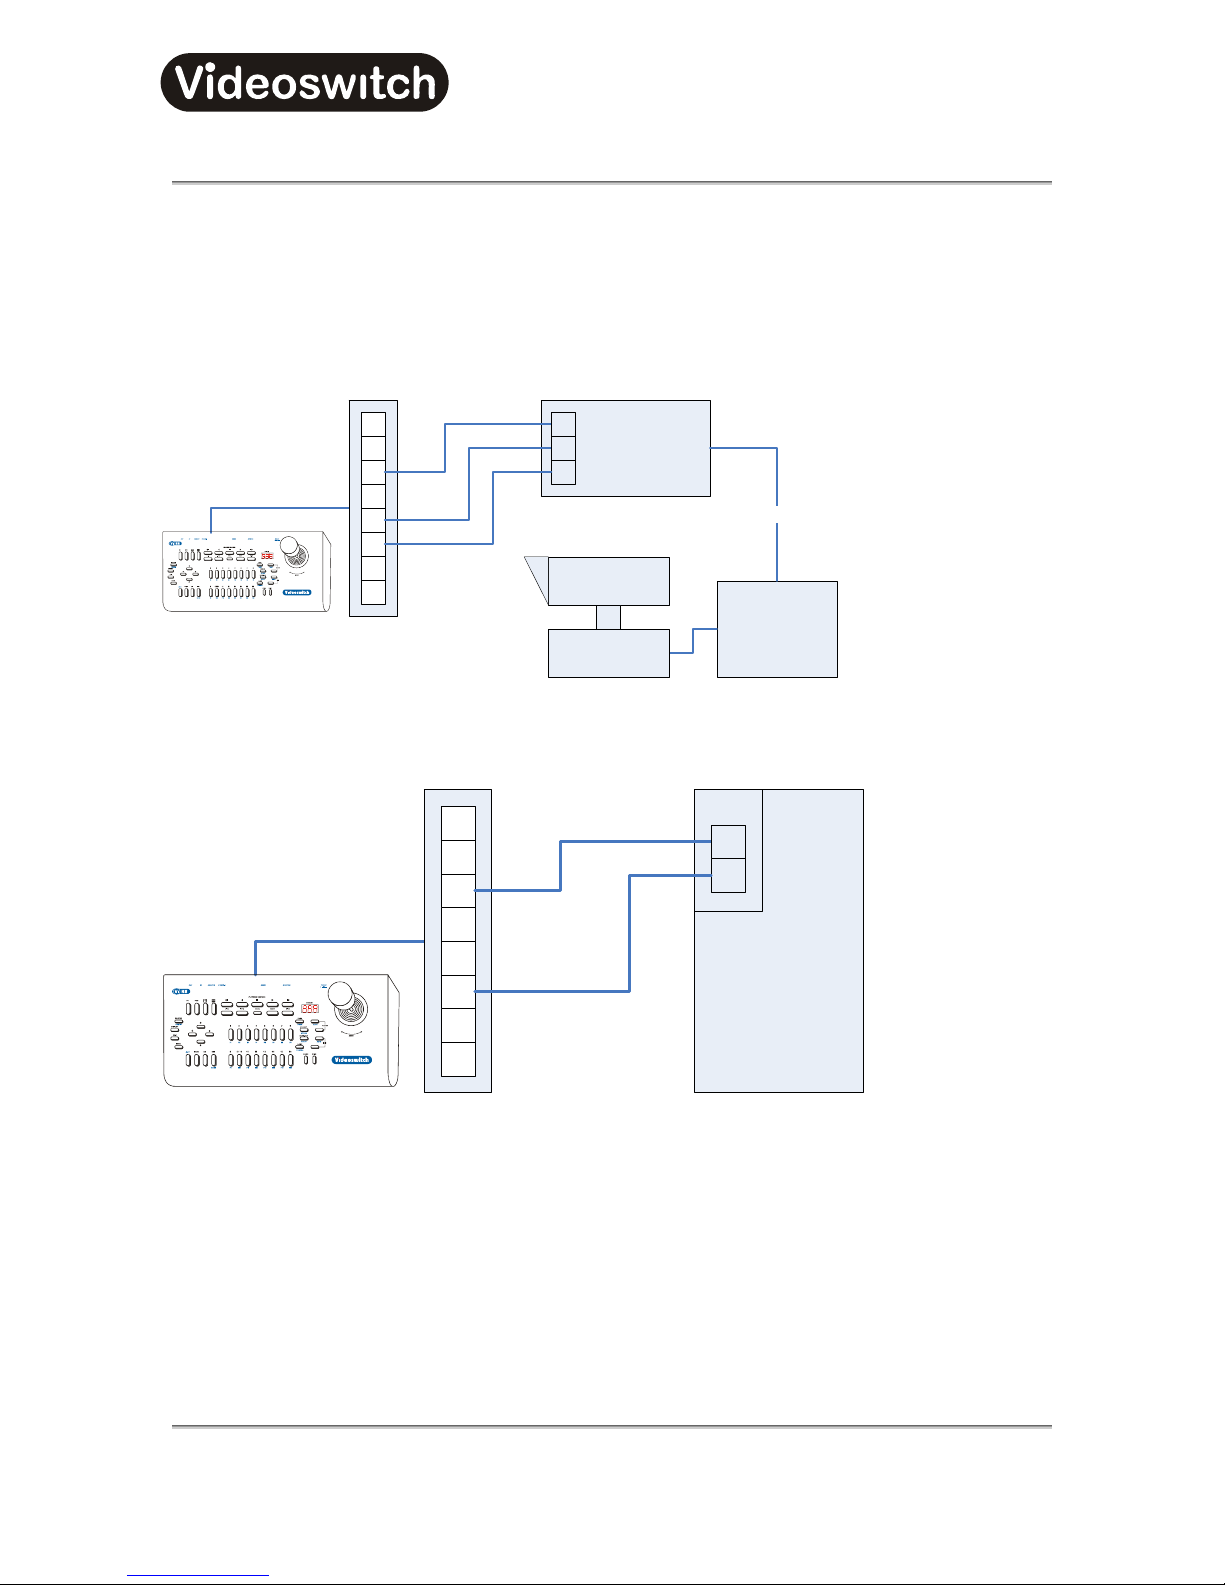
8 Protocol 3 - Molynx
8.1 Connections
Example 1
6000
Series
Controller
6
Domes-1 or Domes-2
VX10
5
4
2
1
7
8
3
6
Molynx Receiver
TRX 229
TRX 228
5
9
coax
Pan/Tilt Head
Vi-K2 Keyboard
Example 2
RX217D
(TRX260)
RS485
6
Domes-1 or Domes-2
VX10
5
4
2
1
7
8
3
6
9
Vi-K2 Keyboard
8.2 Settings
Example 2:
Address 00 = Camera 1, Address 01 = Camera 2, Address 02 = Camera 3
Make sure the receiver is reset the first time it is used (with pan/tilt head connected) to initialise presets (see
section
8.9.1 Receiver Reset).
Page 29

Vi-K2/Vi-K3 Universal
Keyboard
Vi-K2 Universal Keyboard User Manual
27
8.3 Supported functions
• Pan / tilt / zoom / focus
• Variable speed pan / tilt
• Wash
• Wipe
• Relay
• Lamp
• Camera power
• Presets (16)
• Tours (1 sequence & 1 tour)
• Auto-focus
• Auto-iris
• Lens speed
• Receiver Reset
8.4 Joystick Operation
8.4.1 Pan & Tilt
Move the joystick left, right, up and down to move the dome in the corresponding direction. If the dome has
variable speed, then the further the joystick is moved from its central position, the faster the camera will pan
or tilt.
8.4.2 Zoom
Zoom is achieved by twisting the handle of the joystick clockwise (zoom in), or anti-clockwise (zoom out). If
the camera has variable zoom speed, the more the handle is twisted, the faster the zoom movement will be.
8.5 Lens Control
8.5.1 Focus
• The two FOCUS keys can be used to adjust the focus.
• Press the ALT key and the upper FOCUS key to select auto-focu s.
8.5.2 Iris
• Press the ALT key and the upper IRIS key to select auto-iris.
8.6 Auxiliary Functions
8.6.1 Wash
Press the WASH key to operate the wash function.
Page 30

Vi-K2/Vi-K3 Universal
Keyboard
Vi-K2 Universal Keyboard User Manual
28
8.6.2 Wipe
Press the WIPE key to turn on the wiper. Press again to turn off.
8.6.3 Auto-Pan
Press the AUTO-PAN key to turn on the auto-pan function. Press again to turn off.
8.6.4 Lamp
Press the LAMP key to turn on the lamp. Press again to turn off.
8.6.5 Relay
Holding the ALT key on, press the RELAY key to turn on the auxiliary relay. Press these keys again to turn
relay off again.
8.6.6 Camera
Press and hold the ALT key and press the CAMERA key to turn on the camera relay. Press these keys
again to turn it off again.
8.7 Presets
8.7.1 Recalling a Preset
• Press the PRESET key.
• The display will show the letter “P—”.
• Press one of the number keys 1, 2, 3…16 to select a preset that has previously been stored.
• The dome will move to that preset position.
• If the joystick is moved, the preset display will be cancelled.
8.7.2 Setting a Preset
• Move the dome to the position at which you wish to set a preset.
• Press and hold the ALT key and then press the STORE key.
• The display will show the letter “P—”, flashing.
• Press one of the number keys 1, 2, 3…16 to select a preset.
• Press and hold the ALT key and then press the STORE key to store the preset.
8.8 Tours
This dome only supports programmable 1 tour/sequence. Tour 1 is a tour through all programmed presets
with a default dwell & speed, tour 2 uses individual dwell and speed for each preset.
Page 31

Vi-K2/Vi-K3 Universal
Keyboard
Vi-K2 Universal Keyboard User Manual
29
8.8.1 Running a Tour
• Press the TOUR key.
• The display will show the letter “t—”.
• Press one of the number keys 1 (sequence, default dwell and speed) or 2 (tour, individual dwell and
speed per preset).
• The dome will run the tour until the TOUR key is pressed again.
8.8.2 Programming Tour 1
To start the tour programming:
• Holding the ALT key on, press the PROG key.
• The display will show the letter “t—”, flashing.
• Press one of the number key 1 to select a tour number.
• Holding the ALT key on, press the PROG key.
Repeat these steps for each position in the tour:
• The display will show the letters “PoS”, flashing (asking for a preset position).
• Enter the next preset position number 1, 2, 3…16.
• Holding the ALT key on, press the PROG key, and repeat for all positions.
To finish programming a tour:
• Holding the ALT key on, press the PROG key (i.e. without entering another position) to finish
the tour programming.
• The word “Fin” will be displayed, indicating that the tour programming has finished.
• Finally, Holding the ALT key on, press the PROG key to return the display to its normal mode.
8.8.3 Programming Tour 2
To start the tour programming:
• Holding the ALT key on, press the PROG key.
• The display will show the letter “t—”, flashing.
• Press one of the number key 2 to select a tour number.
• Holding the
ALT key on, press the PROG key.
Page 32

Vi-K2/Vi-K3 Universal
Keyboard
Vi-K2 Universal Keyboard User Manual
30
Repeat these steps for each position in the tour:
• The display will show the letters “PoS”, flashing (asking for a preset position).
• Enter the next preset position number 1, 2, 3…16.
• Holding the ALT key on, press the PROG key.
• The display will show the letters “dLL”, flashing (asking for a dwell time).
• Optionally enter a new dwell time (0, 1, 2…99 where each increment represents about 2
seconds).
• Holding the ALT key on, press the PROG key.
• The display will show the letters “Spd”, flashing (asking for a speed).
• Optionally enter a speed value to determine the speed of movement between one position and
the next (0, 1, 2…99).
• Holding the ALT key on, press the PROG key, and repeat for all positions.
To finish programming a tour:
• The tour can be finished when the letters “PoS” are displayed, as follows:
• Holding the ALT key on, press the PROG key (i.e. without entering another position) to finish
the tour programming.
• The word “Fin” will be displayed, indicating that the tour programming has finished.
• Finally, Holding the ALT key on, press the PROG key to return the display to its normal mode.
8.9 Other Commands
8.9.1 Lens Slow
Press and hold the ALT key and press the F9 key to toggle the lens speed between normal and slow.
8.9.2 Receiver Reset
Press and hold the ALT key and press the F4 key to reset the receiver. This should be done when the
system is installed, with pan/tilt head connected, to initialise the presets.
Page 33
Vi-K2/Vi-K3 Universal
Keyboard
Vi-K2 Universal Keyboard User Manual
31
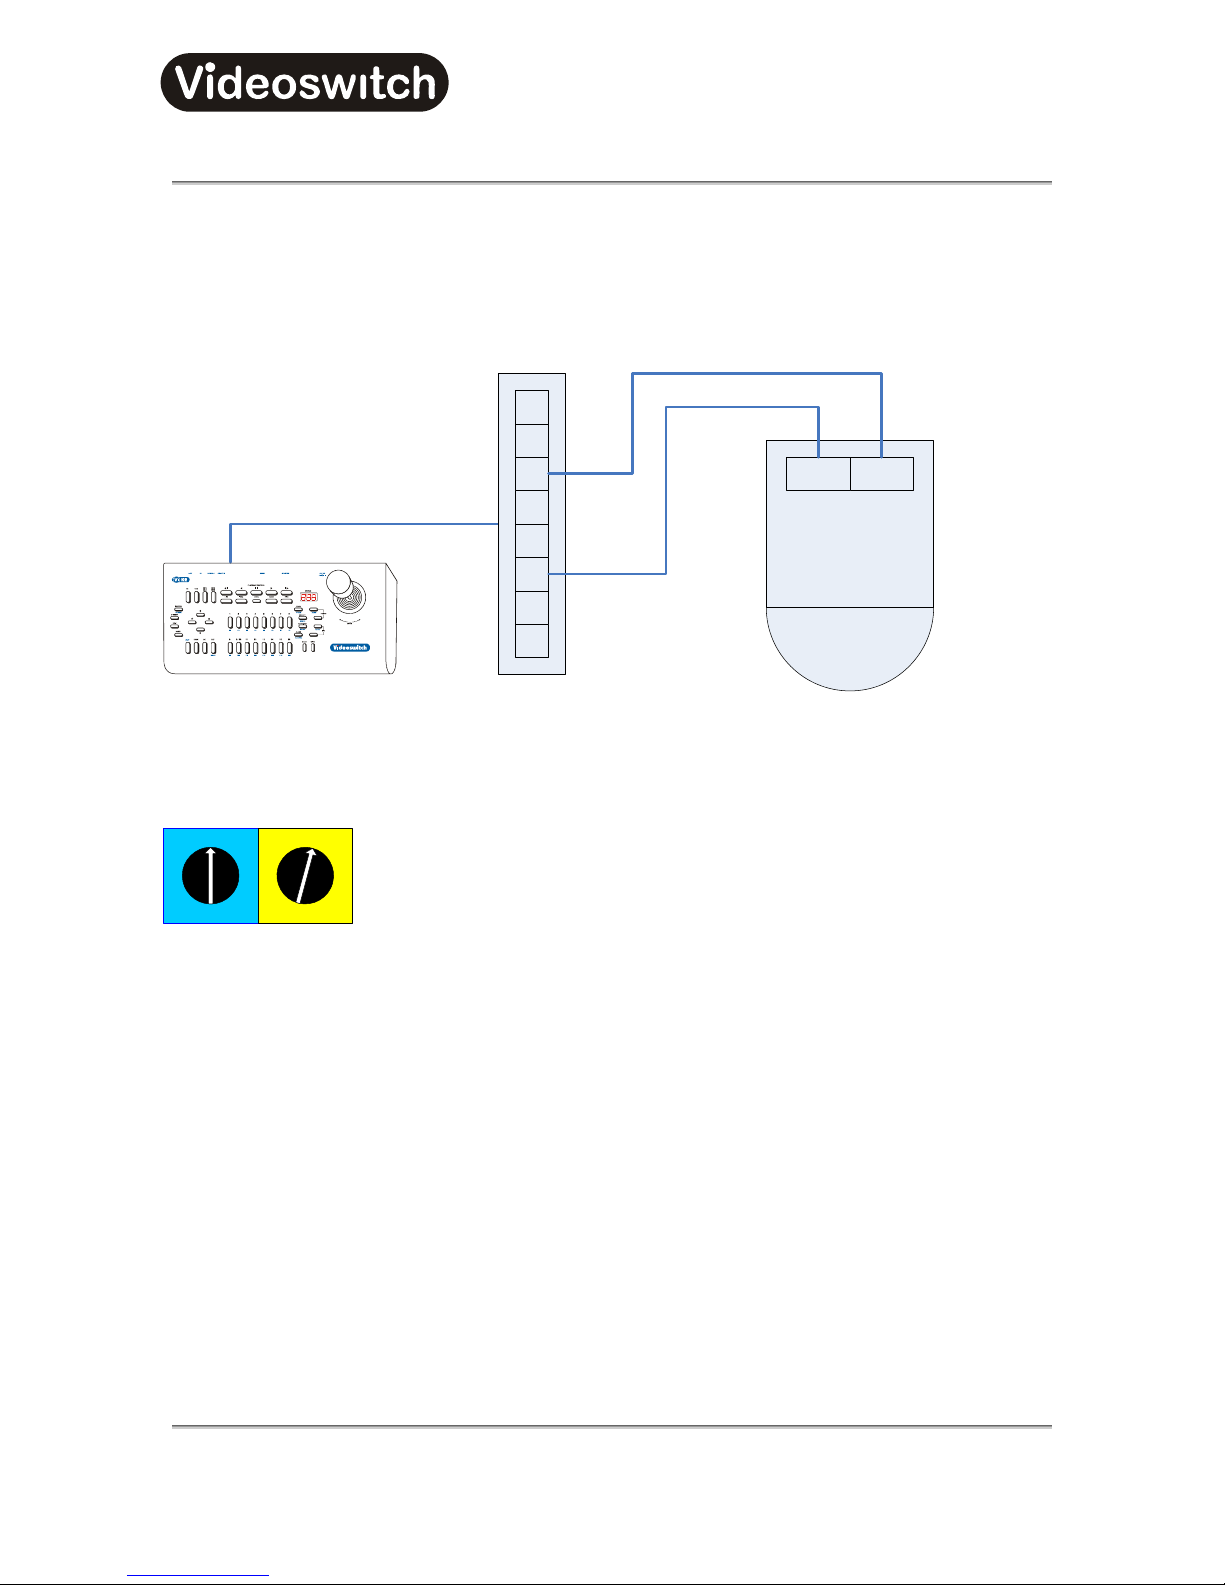
9 Protocol 4 - Dennard
9.1 Connections
Domes-1 or Domes-2
green yellow
VX10
5
4
2
1
7
8
3
6
Vi-K2 Keyboard
9.2 Settings
0
1
2
3
4
5
6
7
8
9
A
B
C
D
E
F
0
1
2
3
4
5
6
7
8
9
A
B
C
D
E
F
BLUE YELLOW
9.2.1 Notes
•
Default supervisor password for Dennard dome internal menus is “1111”
• Default engineer password Dennard dome internal menus is “9999”
Camera number (e.g. 01 = Camera 1)
Page 34

Vi-K2/Vi-K3 Universal
Keyboard
Vi-K2 Universal Keyboard User Manual
32
9.3 Supported functions
• Pan / tilt / zoom / focus (Focus is dependent on dome model)
• Variable speed pan / tilt / zoom / focus (Focus is dependent on dome model)
• Wash
• Wipe
• Relay
• Lamp
• Presets (16)
• Tours (16)
• Menus
• Menu hot-keys
9.4 Joystick Operation
9.4.1 Pan & Tilt
Move the joystick left, right, up and down to move the dome in the corresponding direction. If the dome has
variable speed, then the further the joystick is moved from its central position, the faster the camera will pan
or tilt.
9.4.2 Zoom
Zoom is achieved by twisting the handle of the joystick clockwise (zoom in), or anti-clockwise (zoom out). If
the camera has variable zoom speed, the more the handle is twisted, the faster the zoom movement will be.
9.5 Lens Control
9.5.1 Focus (Dome model dependent)
•
The two FOCUS keys can be used to adjust the focus.
9.6 Auxiliary Functions
9.6.1 Wash
Press the WASH key to operate the wash function.
9.6.2 Wipe
Press the WIPE key to turn on the wiper. Press again to turn off.
9.6.3 Lamp
Press the LAMP key to turn on the lamp. Press again to turn off.
Page 35

Vi-K2/Vi-K3 Universal
Keyboard
Vi-K2 Universal Keyboard User Manual
33
9.6.4 Relay
Holding the ALT key on, press the RELAY key to turn on the auxiliary relay. Press these keys again to turn
relay off again.
9.7 Presets
9.7.1 Recalling a Preset
•
Press the PRESET key.
• The display will show the letter “P—”.
• Press one of the number keys 1, 2, 3…16 to select a preset that has previously been stored.
• The dome will move to that preset position.
• If the joystick is moved, the preset display will be cancelled.
9.7.2 Setting a Preset
•
Move the dome to the position at which you wish to set a preset.
• Press and hold the ALT key and then press the STORE key.
• The display will show the letter “P—”, flashing.
• Press one of the number keys 1, 2, 3…16 to select a preset.
• Press and hold the ALT key and then press the STORE key to store the preset.
• The dome menus may automatically appear so that a text string can be entered.
9.8 Tours
9.8.1 Running a Tour
•
Press the TOUR key.
• The display will show the letter “t—”.
• Press one of the number keys 1, 2, 3…16 to run a tour (sequence) that has previously been
stored.
• The dome will run the tour until the TOUR key is pressed again.
9.8.2 Programming a Tour
To start the tour programming:
Page 36

Vi-K2/Vi-K3 Universal
Keyboard
Vi-K2 Universal Keyboard User Manual
34
• Holding the ALT key on, press the PROG key.
• The display will show the letter “t—”, flashing.
• Press one of the number keys 1, 2, 3…16 to select a tour number.
• Holding the ALT key on, press the PROG key.
Repeat these steps for each position in the tour:
• The display will show the letters “PoS”, flashing (asking for a preset position).
• Enter the next preset position number 1, 2, 3…16.
• Holding the ALT key on, press the PROG key.
• The display will show the letters “dLL”, flashing (asking for a dwell time).
• Optionally enter a new dwell time (0, 1, 2…9 where each increment represents 2 seconds).
• Holding the ALT key on, press the PROG key.
• The display will show the letters “Spd”, flashing (asking for a speed).
• Optionally enter a new speed value to determine how long the dome takes to get from one position
to the next (
0, 1, 2…9 where each increment represents 2 seconds).
• Holding the ALT key on, press the PROG key, and repeat for all positions.
To finish programming a tour:
• The tour can be finished when the letters “PoS” are displayed, as follows:
• Holding the ALT key on, press the PROG key (i.e. without entering another position) to finish the
tour programming.
• The word “Fin” will be displayed, indicating that the tour programming has finished.
• Finally, Holding the ALT key on, press the PROG key to return the display to its normal mode.
9.9 Menus
See 7.9 for basic details. Also, while the “Do” is being displayed, some of the keys on the Vi-K2/Vi-K3 have
special functions as follows:
• Press the BURN key to enter the dome supervisor menu.
• Press the FIND key to enter the dome technician menu.
If operating a Dennard dome using BBV protocol via coax, the BBV menu functions are accessed as follows:
• Holding the ALT key on, press one of the camera keys 1, 2, 3...15 to select one of the BBV menu
options (menu not visible). E.g.
ALT and 4 to choose to erase a preset.
• Press one of the camera keys 1, 2, 3...15 to set a value (e.g. 3 to erase preset number 3).
• Use the Up, Down, Left, Right arrow and OK keys to enter the title in the pop-up menu.
Page 37

Vi-K2/Vi-K3 Universal
Keyboard
Vi-K2 Universal Keyboard User Manual
35
10 Protocol 5 - VCL
10.1 Supported functions
• Pan / tilt / zoom / focus / iris
• Variable speed pan / tilt / zoom / focus / iris
• Wash
• Wipe
• Relay
• Auto-pan
• Presets (16)
• Tours (16)
• 180° turn
• Auto-focus
• Auto-iris
• Colour / mono switch
10.2 Joystick Operation
10.2.1 Pan & Tilt
Move the joystick left, right, up and down to move the dome in the corresponding direction. If the dome has
variable speed, then the further the joystick is moved from its central position, the faster the camera will pan
or tilt.
10.2.2 Zoom
Zoom is achieved by twisting the handle of the joystick clockwise (zoom in), or anti-clockwise (zoom out). If
the camera has variable zoom speed, the more the handle is twisted, the faster the zoom movement will be.
10.3 Lens Control
10.3.1 Focus
•
The two FOCUS keys can be used to adjust the focus.
• Press the ALT key and the upper FOCUS key to select auto-focus.
10.3.2 Iris
•
The two IRIS keys can be used to adjust the iris.
• Press the ALT key and the upper IRIS key to select auto-iris.
Page 38

Vi-K2/Vi-K3 Universal
Keyboard
Vi-K2 Universal Keyboard User Manual
36
10.4 Auxiliary Functions
10.4.1 Wash
Press the WASH key to operate the wash function.
10.4.2 Wipe
Press the WIPE key to turn on the wiper. Press again to turn off.
10.4.3 Auto-Pan
Press the AUTO-PAN key to turn on the auto-pan function. Press again to turn off.
10.4.4 Relay
Holding the ALT key on, press the RELAY key to turn on the auxiliary relay. Press these keys again to turn
relay off again.
Page 39

Vi-K2/Vi-K3 Universal
Keyboard
Vi-K2 Universal Keyboard User Manual
37
10.5 Presets
10.5.1 Recalling a Preset
•
Press the PRESET key.
• The display will show the letter “P—”.
• Press one of the number keys 1, 2, 3…16 to select a preset that has previously been stored.
• The dome will move to that preset position.
• If the joystick is moved, the preset display will be cancelled.
10.5.2 Setting a Preset
•
Move the dome to the position at which you wish to set a preset.
• Press and hold the ALT key and then press the STORE key.
• The display will show the letter “P—”, flashing.
• Press one of the number keys 1, 2, 3…16 to select a preset.
• Press and hold the ALT key and then press the STORE key to store the preset.
10.6 Tours
10.6.1 Running a Tour
•
Press the TOUR key.
• The display will show the letter “t—”.
• Press one of the number keys 1, 2, 3…16 to run a tour (sequence) that has previously been
stored.
• The dome will run the tour until the TOUR key is pressed again.
10.6.2 Programming a Tour
To start the tour programming:
• Holding the ALT key on, press the PROG key.
• The display will show the letter “t—”, flashing.
• Press one of the number keys 1, 2, 3…16 to select a tour number.
• Holding the ALT key on, press the PROG key.
Repeat these steps for each position in the tour:
Page 40

Vi-K2/Vi-K3 Universal
Keyboard
Vi-K2 Universal Keyboard User Manual
38
• The display will show the letters “PoS”, flashing (asking for a preset position).
• Enter the next preset position number 1, 2, 3…16.
• Holding the ALT key on, press the PROG key.
• The display will show the letters “dLL”, flashing (asking for a dwell time)
• Optionally enter a new dwell time (0, 1, 2…9 where each increment represents 2 seconds).
• Holding the ALT key on, press the PROG key.
• The display will show the letters “Spd”, flashing (asking for a speed).
• Optionally enter a new speed value to determine how long the dome takes to get from one position
to the next (
0, 1, 2…9 where each increment represents 2 seconds).
• Holding the ALT key on, press the PROG key, and repeat for all positions.
To finish programming a tour:
• The tour can be finished when the letters “PoS” are displayed, as follows:
• Holding the ALT key on, press the PROG key (i.e. without entering another position) to finish the
tour programming.
• The word “Fin” will be displayed, indicating that the tour programming has finished.
• Finally, Holding the ALT key on, press the PROG key to return the display to its normal mode.
10.7 Other Commands
180° turn:
• Press and hold the ALT key and then press the F1 key.
Colour/mono toggle:
• Press and hold the ALT key and then press the F2 key.
Page 41

Vi-K2/Vi-K3 Universal
Keyboard
Vi-K2 Universal Keyboard User Manual
39
11 Protocol 6 - Sanyo
11.1 Connections
Domes-1 or Domes-2
1 3
VX10
5
4
2
1
7
8
3
6
2
Vi-K2 Keyboard
11.2 Supported functions
• Pan / tilt / zoom / focus / iris
• Variable speed pan / tilt / zoom / focus / iris
• Presets (16)
• Tours (16)
• Auto-focus
• Camera Reset
11.3 Joystick Operation
11.3.1 Pan & Tilt
Move the joystick left, right, up and down to move the dome in the corresponding direction. If the dome has
variable speed, then the further the joystick is moved from its central position, the faster the camera will pan
or tilt.
11.3.2 Zoom
Zoom is achieved by twisting the handle of the joystick clockwise (zoom in), or anti-clockwise (zoom out). If
the camera has variable zoom speed, the more the handle is twisted, the faster the zoom movement will be.
Page 42

Vi-K2/Vi-K3 Universal
Keyboard
Vi-K2 Universal Keyboard User Manual
40
11.4 Lens Control
11.4.1 Focus
•
The two FOCUS keys can be used to adjust the focus.
• Press the ALT key and the upper FOCUS key to select auto-focus.
11.4.2 Iris
•
The two IRIS keys can be used to adjust the iris.
11.5 Presets
11.5.1 Recalling a Preset
•
Press the PRESET key.
• The display will show the letter “P—”.
• Press one of the number keys 1, 2, 3…16 to select a preset that has previously been stored.
• The dome will move to that preset position.
• If the joystick is moved, the preset display will be cancelled.
11.5.2 Setting a Preset
•
Move the dome to the position at which you wish to set a preset.
• Press and hold the ALT key and then press the STORE key.
• The display will show the letter “P—”, flashing.
• Press one of the number keys 1, 2, 3…16 to select a preset.
• Press and hold the ALT key and then press the STORE key to store the preset.
• In the case of Dennard domes, the dome menus may automatically appear so that a text string can
be entered.
11.6 Tours
11.6.1 Running a Tour
•
Press the TOUR key.
• The display will show the letter “t—”.
• Press one of the number keys 1, 2, 3…16 to run a tour (sequence) that has previously been
stored.
• The dome will run the tour until the TOUR key is pressed again.
Page 43

Vi-K2/Vi-K3 Universal
Keyboard
Vi-K2 Universal Keyboard User Manual
41
11.6.2 Programming a Tour
To start the tour programming:
• Holding the ALT key on, press the PROG key.
• The display will show the letter “t—”, flashing.
• Press one of the number keys 1, 2, 3…16 to select a tour number.
• Holding the ALT key on, press the PROG key.
Repeat these steps for each position in the tour:
• The display will show the letters “PoS”, flashing (asking for a preset position).
• Enter the next preset position number 1, 2, 3…16.
• Holding the ALT key on, press the PROG key.
• The display will show the letters “dLL”, flashing (asking for a dwell time)
• Optionally enter a new dwell time (0, 1, 2…9 where each increment represents 2 seconds).
• Holding the ALT key on, press the PROG key.
• The display will show the letters “Spd”, flashing (asking for a speed).
• Optionally enter a new speed value to determine how long the dome takes to get from one position
to the next (
0, 1, 2…9 where each increment represents 2 seconds).
• Holding the ALT key on, press the PROG key, and repeat for all positions.
To finish programming a tour:
• The tour can be finished when the letters “PoS” are displayed, as follows:
• Holding the ALT key on, press the PROG key (i.e. without entering another position) to finish the
tour programming.
• The word “Fin” will be displayed, indicating that the tour programming has finished.
• Finally, Holding the ALT key on, press the PROG key to return the display to its normal mode.
11.7 Other Commands
Camera reset:
• Press and hold the ALT key and then press the LAMP/CAMERA key.
Page 44
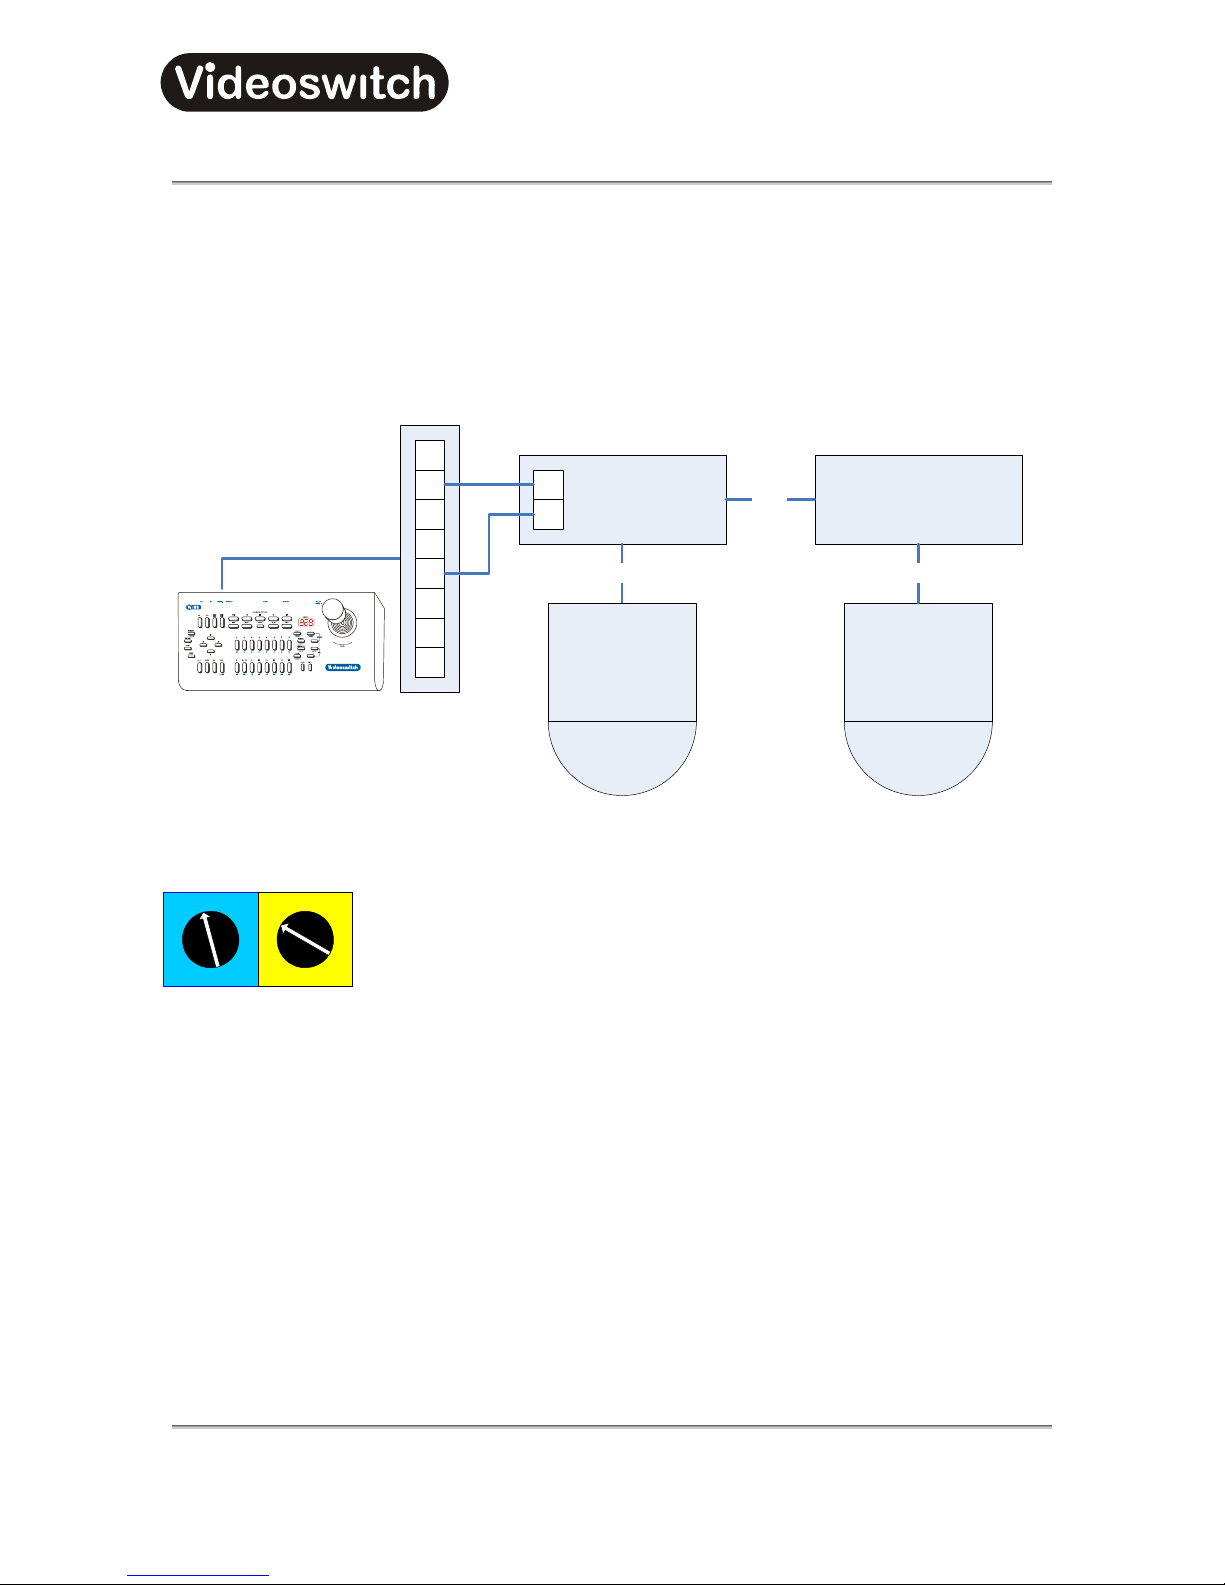
Vi-K2/Vi-K3 Universal
Keyboard
Vi-K2 Universal Keyboard User Manual
42
12 Protocol 7 - BBV (RS232)
12.1 Connections
This example shows a Vi-K2/Vi-K3 keyboard controlling a Dennard 2055 and another dome via a BBV
RX100.
Domes-1
VX10
5
4
2
1
7
8
3
6
BBV RX100TX 1008
2
5
coax
Dennard 2055
T/P
coax
Vi-K2 Keyboard
12.2 Settings
0
1
2
3
4
5
6
7
8
9
A
B
C
D
E
F
0
1
2
3
4
5
6
7
8
9
A
B
C
D
E
F
BLUE YELLOW
If a TX1008 or similar multiple camera transmitter is being used, make sure that camera inputs 1, 2, 3 etc of
the transmitter are looped through to the corresponding camera inputs 1, 2, 3 etc of the Videoswitch DVR (if
present)
Dennard 2055 must be set to Camera FD
Page 45

Vi-K2/Vi-K3 Universal
Keyboard
Vi-K2 Universal Keyboard User Manual
43
12.3 Supported functions
• Pan / tilt / zoom / focus / iris
• Variable speed pan / tilt
• Wash
• Wipe
• Relay
• Lamp
• Presets (16)
• Tours (2 tours & 1 sequence)
• Auto-pan
• Menus
12.4 Joystick Operation
12.4.1 Pan & Tilt
Move the joystick left, right, up and down to move the dome in the corresponding direction. If the dome has
variable speed, then the further the joystick is moved from its central position, the faster the camera will pan
or tilt.
12.4.2 Zoom
Zoom is achieved by twisting the handle of the joystick clockwise (zoom in), or anti-clockwise (zoom out). If
the camera has variable zoom speed, the more the handle is twisted, the faster the zoom movement will be.
12.5 Lens Control
12.5.1 Focus
•
The two FOCUS keys can be used to adjust the focus.
• Press the ALT key and the upper FOCUS key to select auto-focus.
12.5.2 Iris
•
The two IRIS keys can be used to adjust the iris.
• Press the ALT key and the upper IRIS key to select auto-iris.
12.6 Auxiliary Functions
12.6.1 Wash
Press the WASH key to operate the wash function.
Page 46

Vi-K2/Vi-K3 Universal
Keyboard
Vi-K2 Universal Keyboard User Manual
44
12.6.2 Wipe
Press the WIPE key to turn on the wiper. Press again to turn off.
12.6.3 Auto-Pan
Press the AUTO-PAN key to turn on the auto-pan function. Press again to turn off.
12.6.4 Lamp
Press the LAMP key to turn on the lamp. Press again to turn off.
12.6.5 Relay
Holding the ALT key on, press the RELAY key to turn on the auxiliary relay. Press these keys again to turn
relay off again.
Page 47

Vi-K2/Vi-K3 Universal
Keyboard
Vi-K2 Universal Keyboard User Manual
45
12.7 Presets
12.7.1 Recalling a Preset
•
Press the PRESET key.
• The display will show the letter “P—”.
• Press one of the number keys 1, 2, 3…16 to select a preset that has previously been stored.
• The dome will move to that preset position.
• If the joystick is moved, the preset display will be cancelled.
12.7.2 Setting a Preset
•
Move the dome to the position at which you wish to set a preset.
• Press and hold the ALT key and then press the STORE key.
• The display will show the letter “P—”, flashing.
• Press one of the number keys 1, 2, 3…16 to select a preset.
• Press and hold the ALT key and then press the STORE key to store the preset.
• In the case of Dennard domes, the dome menus may automatically appear so that a text string can
be entered.
12.8 Tours
12.8.1 Running a Tour
•
Press the TOUR key.
• The display will show the letter “t—”.
• Press one of the number keys 1 or 2 to run a tour (sequence) that has previously been stored.
• The dome will run the tour until the TOUR key is pressed again.
Note if attempting to set a tour on a Dennard 2055 dome using BBV, tours must be set in the dome
menus.
12.9 Menus
The Vi-K2/Vi-K3 has a special mode to make access to dome menus very easy:
• Press the DOME key on the Vi-K2/Vi-K3.
• The letters “Do” will appear on the display.
While the “
Do” is being displayed, some of the keys on the Vi-K2/Vi-K3 have special functions as follows:
Page 48

Vi-K2/Vi-K3 Universal
Keyboard
Vi-K2 Universal Keyboard User Manual
46
• Press the MENU key to enter the dome user menu.
• Use the Up, Down, Left, Right arrow keys to navigate within the dome menu.
• Use the BACK and DEF keys to move the cursor left and right within a text string.
• Press the SEARCH key to enter a sub-menu or to accept a menu setting.
If operating a Dennard dome using BBV protocol via coax, the BBV menu functions are accessed as follows:
• Holding the ALT key on, press one of the camera keys 1, 2, 3...15 to select one of the BBV menu
options (menu not visible). E.g.
ALT and 4 to choose to erase a preset.
• Press one of the camera keys 1, 2, 3...15 to set a value (e.g. 3 to erase preset number 3).
• Use the Up, Down, Left, Right arrow and OK keys to enter the title in the pop-up menu.
Page 49
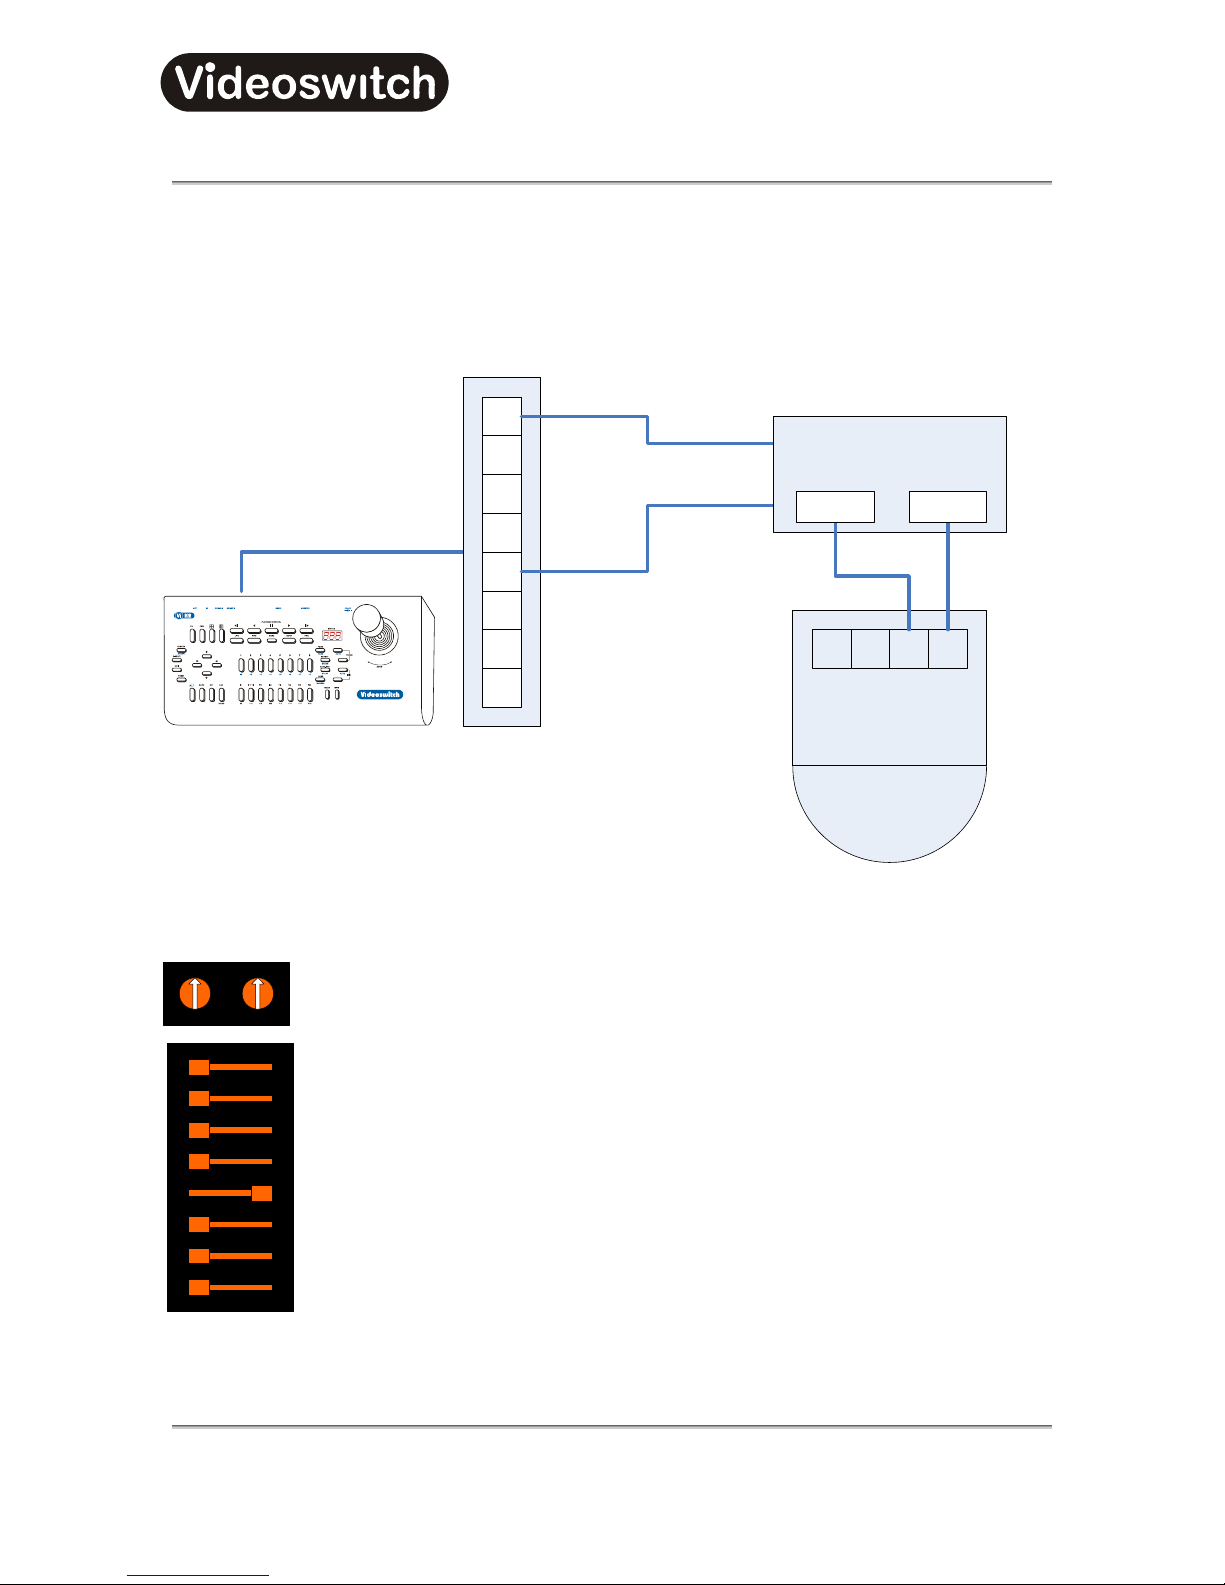
Vi-K2/Vi-K3 Universal
Keyboard
Vi-K2 Universal Keyboard User Manual
47
13 Protocol 8 - BBV (20mA)
13.1 Connections
Domes-1 or Domes-2
VX10
5
4
2
1
7
8
3
6
JVC676
A B C D
BBV RX100
C1C2
Vi-K2 Keyboard
13.2 Settings
0
1
2
3
456
7
8
9
0
1
2
3
456
7
8
9
Off
1
2
3
4
5
6
7
8
Switch 4: On (Point to point)
Switch 5: On (Simplex)
Address 00
Page 50

Vi-K2/Vi-K3 Universal
Keyboard
Vi-K2 Universal Keyboard User Manual
48
13.3 Supported functions
• Pan / tilt / zoom / focus / iris / zoom / focus
• Variable speed pan / tilt / zoom / focus
• Wash
• Wipe
• Lamp
• Presets (16)
• Tours (2)
• Auto-pan
13.4 Joystick Operation
13.4.1 Pan & Tilt
Move the joystick left, right, up and down to move the dome in the corresponding direction. If the dome has
variable speed, then the further the joystick is moved from its central position, the faster the camera will pan
or tilt.
13.4.2 Zoom
Zoom is achieved by twisting the handle of the joystick clockwise (zoom in), or anti-clockwise (zoom out). If
the camera has variable zoom speed, the more the handle is twisted, the faster the zoom movement will be.
13.5 Lens Control
13.5.1 Focus
•
The two FOCUS keys can be used to adjust the focus.
• Press the ALT key and the upper FOCUS key to select auto-focus.
13.5.2 Iris
•
The two IRIS keys can be used to adjust the iris.
• Press the ALT key and the upper IRIS key to select auto-iris.
13.6 Auxiliary Functions
13.6.1 Wash
Press the WASH key to operate the wash function.
13.6.2 Wipe
Press the WIPE key to turn on the wiper. Press again to turn off.
Page 51

Vi-K2/Vi-K3 Universal
Keyboard
Vi-K2 Universal Keyboard User Manual
49
13.6.3 Auto-Pan
Press the AUTO-PAN key to turn on the auto-pan function. Press again to turn off.
13.6.4 Lamp
Press the LAMP key to turn on the lamp. Press again to turn off.
13.6.5 Relay
Holding the ALT key on, press the RELAY key to turn on the auxiliary relay. Press these keys again to turn
relay off again.
13.6.6 Camera
Press and hold the ALT key and press the CAMERA key to turn on the camera relay. Press these keys
again to turn it off again.
13.7 Presets
13.7.1 Recalling a Preset
•
Press the PRESET key.
• The display will show the letter “P—”.
• Press one of the number keys 1, 2, 3…16 to select a preset that has previously been stored.
• The dome will move to that preset position.
• If the joystick is moved, the preset display will be cancelled.
13.7.2 Setting a Preset
•
Move the dome to the position at which you wish to set a preset.
• Press and hold the ALT key and then press the STORE key.
• The display will show the letter “P—”, flashing.
• Press one of the number keys 1, 2, 3…16 to select a preset.
• Press and hold the ALT key and then press the STORE key to store the preset.
• In the case of Dennard domes, the dome menus may automatically appear so that a text string can
be entered.
13.7.3 Clearing a Preset
•
Press and hold the ALT key and then press the STORE key.
• The display will show the letter “P—”, flashing.
• Press one of the number keys 1, 2, 3…16 to select a preset.
• Press and hold the ALT key and then press the WIPE key to clear the preset.
Page 52

Vi-K2/Vi-K3 Universal
Keyboard
Vi-K2 Universal Keyboard User Manual
50
13.8 Tours
13.8.1 Running a Tour
•
Press the TOUR key.
• The display will show the letter “t—”.
• Press one of the number keys 1 or 2 to run a tour (sequence) that has previously been stored.
• The dome will run the tour until the TOUR key is pressed again.
13.8.2 Programming a Tour
To start the tour programming:
• Holding the ALT key on, press the PROG key.
• The display will show the letter “t—”, flashing.
• Press one of the number keys 1 or 2 to select a tour number.
• Holding the ALT key on, press the PROG key.
Repeat these steps for each position in the tour:
• The display will show the letters “PoS”, flashing (asking for a preset position).
• Enter the next preset position number 1, 2, 3…16.
• Holding the ALT key on, press the PROG key.
• The display will show the letters “dLL”, flashing (asking for a dwell time).
• Optionally enter a new dwell time (0, 1, 2…9 where each increment represents 2 seconds).
• Holding the ALT key on, press the PROG key, and repeat for all positions.
To finish programming a tour:
• The tour can be finished when the letters “PoS” are displayed, as follows:
• Holding the ALT key on, press the PROG key (i.e. without entering another position) to finish the
tour programming.
• The word “Fin” will be displayed, indicating that the tour programming has finished.
• Finally, Holding the ALT key on, press the PROG key to return the display to its normal mode.
13.9 Menus
The Vi-K2/Vi-K3 has a special mode to make access to dome menus very easy:
• Press the DOME key on the Vi-K2/Vi-K3.
• The letters “Do” will appear on the display.
While the “
Do” is being displayed, some of the keys on the Vi-K2/Vi-K3 have special functions as follows:
Page 53

Vi-K2/Vi-K3 Universal
Keyboard
Vi-K2 Universal Keyboard User Manual
51
• Press the MENU key to enter the dome user menu.
• Use the Up, Down, Left, Right arrow keys to navigate within the dome menu.
• Use the BACK and DEF keys to move the cursor left and right within a text string.
• Press the SEARCH key to enter a sub-menu or to accept a menu setting.
Page 54

Vi-K2/Vi-K3 Universal
Keyboard
Vi-K2 Universal Keyboard User Manual
52
14 Protocol 9 - Forward Vision (VCL)
14.1 Connections
Domes-1 or Domes-2
VX10
5
4
2
1
7
8
3
6
RxA
RxB
Vi-K2 Keyboard
14.2 Settings
This protocol option requires a Forward Vision dome with VCL compatible protocol installed. The address of
the dome must also be set – refer to Forward Vision manual.
Page 55

Vi-K2/Vi-K3 Universal
Keyboard
Vi-K2 Universal Keyboard User Manual
53
14.3 Supported functions
• Pan / tilt / zoom / focus / iris
• Variable speed pan / tilt / zoom / focus / iris
• Wash
• Wipe
• Relay
• Auto-pan
• Presets (16)
• Tours (16)
• 180° turn
• Auto-focus
• Auto-iris
• Colour / mono switch
• Pan / tilt reverse
14.4 Joystick Operation
14.4.1 Pan & Tilt
Move the joystick left, right, up and down to move the dome in the corresponding direction. If the dome has
variable speed, then the further the joystick is moved from its central position, the faster the camera will pan
or tilt.
14.4.2 Zoom
Zoom is achieved by twisting the handle of the joystick clockwise (zoom in), or anti-clockwise (zoom out). If
the camera has variable zoom speed, the more the handle is twisted, the faster the zoom movement will be.
14.5 Lens Control
14.5.1 Focus
•
The two FOCUS keys can be used to adjust the focus.
• Press the ALT key and the upper FOCUS key to select auto-focus.
14.5.2 Iris
•
The two IRIS keys can be used to adjust the iris.
• Press the ALT key and the upper IRIS key to select auto-iris.
Page 56

Vi-K2/Vi-K3 Universal
Keyboard
Vi-K2 Universal Keyboard User Manual
54
14.6 Auxiliary Functions
14.6.1 Wash
Press the WASH key to operate the wash function.
14.6.2 Wipe
Press the WIPE key to turn on the wiper. Press again to turn off.
14.6.3 Auto-Pan
Press the AUTO-PAN key to turn on the auto-pan function. Press again to turn off.
14.6.4 Relay
Holding the ALT key on, press the RELAY key to turn on the auxiliary relay. Press these keys again to turn
relay off again.
Page 57

Vi-K2/Vi-K3 Universal
Keyboard
Vi-K2 Universal Keyboard User Manual
55
14.7 Presets
14.7.1 Recalling a Preset
•
Press the PRESET key.
• The display will show the letter “P—”.
• Press one of the number keys 1, 2, 3…16 to select a preset that has previously been stored.
• The dome will move to that preset position.
• If the joystick is moved, the preset display will be cancelled.
14.7.2 Setting a Preset
•
Move the dome to the position at which you wish to set a preset.
• Press and hold the ALT key and then press the STORE key.
• The display will show the letter “P—”, flashing.
• Press one of the number keys 1, 2, 3…16 to select a preset.
• Press and hold the ALT key and then press the STORE key to store the preset.
14.8 Tours
14.8.1 Running a Tour
•
Press the TOUR key.
• The display will show the letter “t—”.
• Press one of the number keys 1, 2, 3…16 to run a tour (sequence) that has previously been
stored.
• The dome will run the tour until the TOUR key is pressed again.
14.8.2 Programming a Tour
To start the tour programming:
• Holding the ALT key on, press the PROG key.
• The display will show the letter “t—”, flashing.
• Press one of the number keys 1, 2, 3…16 to select a tour number.
• Holding the ALT key on, press the PROG key.
Repeat these steps for each position in the tour:
Page 58

Vi-K2/Vi-K3 Universal
Keyboard
Vi-K2 Universal Keyboard User Manual
56
• The display will show the letters “PoS”, flashing (asking for a preset position)
• Enter the next preset position number 1, 2, 3…16.
• Holding the ALT key on, press the PROG key.
• The display will show the letters “dLL”, flashing (asking for a dwell time)
• Optionally enter a new dwell time (0, 1, 2…9 where each increment represents 2 seconds).
• Holding the ALT key on, press the PROG key.
• The display will show the letters “Spd”, flashing (asking for a speed).
• Optionally enter a new speed value to determine how long the dome takes to get from one position
to the next (
0, 1, 2…9 where each increment represents 2 seconds).
• Holding the ALT key on, press the PROG key, and repeat for all positions.
To finish programming a tour:
• The tour can be finished when the letters “PoS” are displayed, as follows:
• Holding the ALT key on, press the PROG key (i.e. without entering another position) to finish the
tour programming.
• The word “Fin” will be displayed, indicating that the tour programming has finished.
• Finally, Holding the ALT key on, press the PROG key to return the display to its normal mode.
14.9 Privacy commands
Set whole
• Press and hold ALT then press the F9 key.
Clear whole
• Press and hold ALT then press the F10 key.
Uncover all
• Press and hold ALT then press the F11 key.
Replace all
• Press and hold ALT then press the F12 key.
14.10 Other Commands
180° turn:
• Press and hold the ALT key and then press the F1 key.
Colour/mono toggle:
• Press and hold the ALT key and then press the F2 key.
Pan / tilt speed scaling on:
• Press and hold the ALT key and then press the F13 key.
Pan / tilt speed scaling off:
Page 59

Vi-K2/Vi-K3 Universal
Keyboard
Vi-K2 Universal Keyboard User Manual
57
• Press and hold the ALT key and then press the F14 key.
Pan / tilt reverse:
• Press and hold the ALT key and then press the F15 key.
Page 60
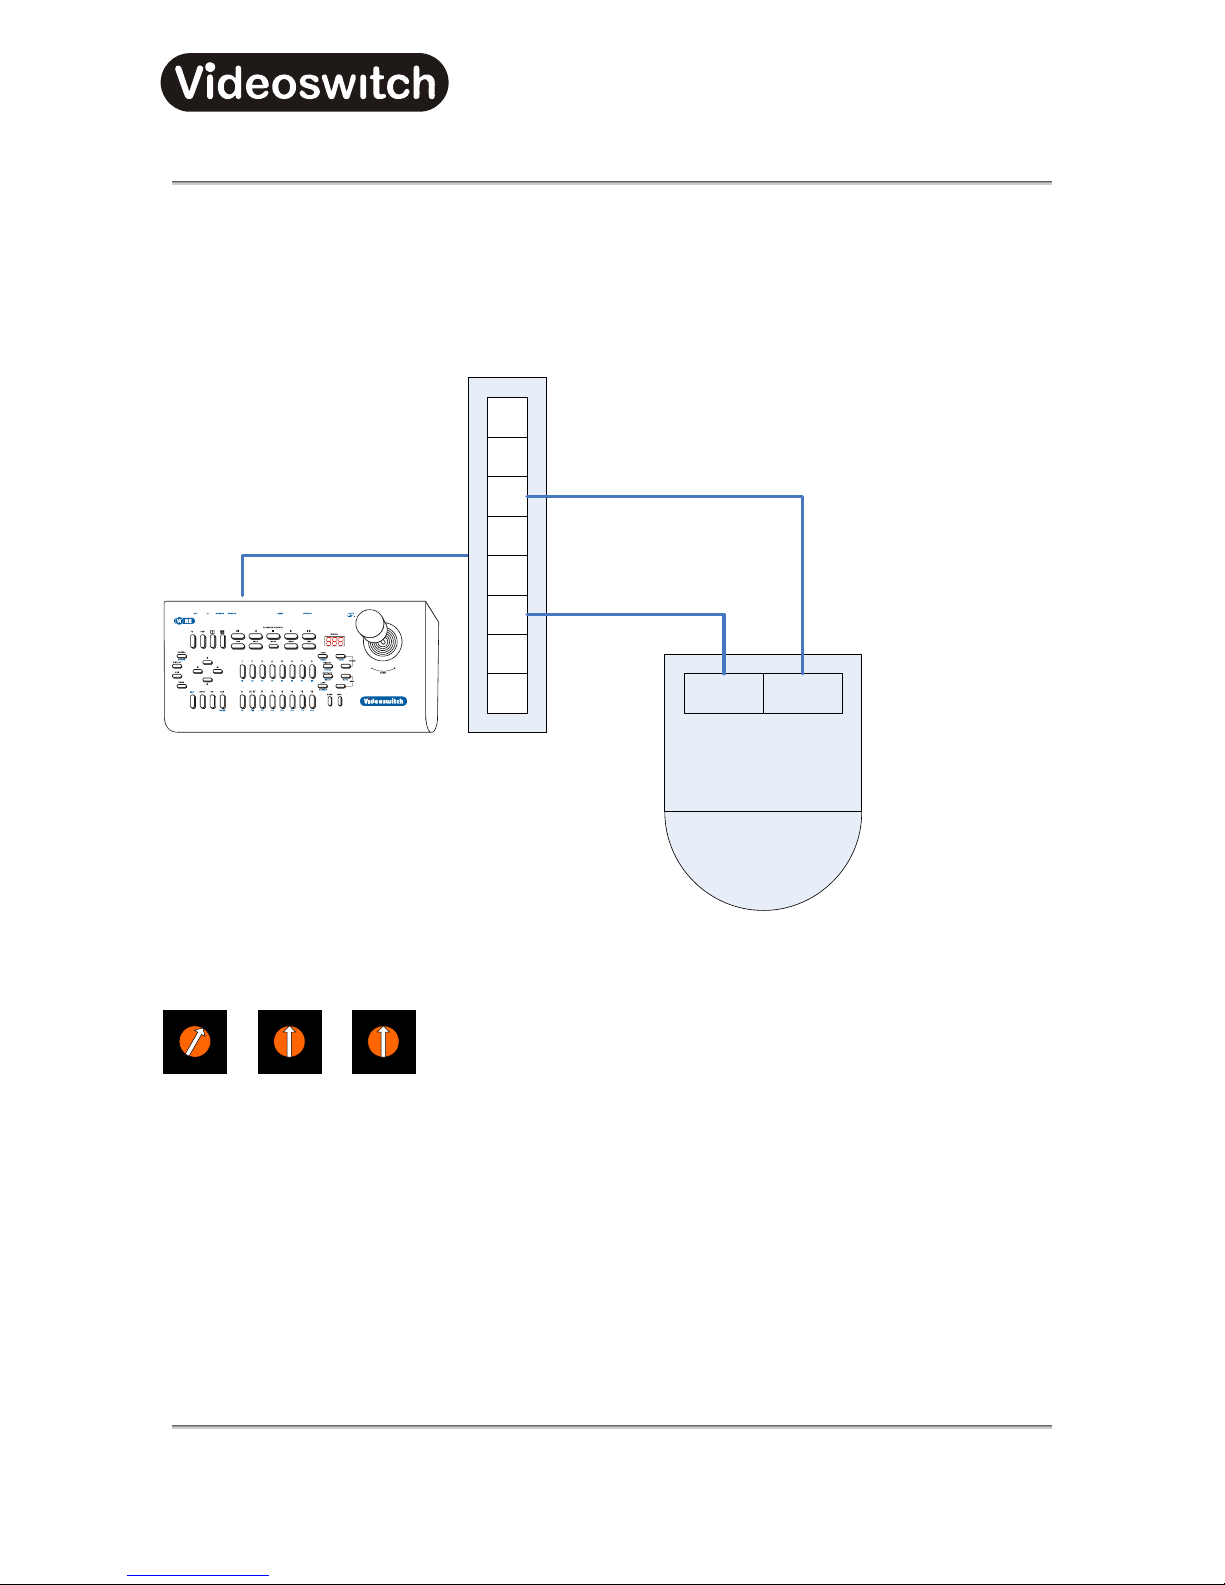
Vi-K2/Vi-K3 Universal
Keyboard
Vi-K2 Universal Keyboard User Manual
58
15 Protocol 10 - Mercer
15.1 Connections
Domes-1 or Domes -2
VX10
5
4
2
1
7
8
3
6
RxARxB
Vi-K2 Keyboard
15.2 Settings
0
1
2
3
456
7
8
9
0
1
2
3
456
7
8
9
0
1
2
3
456
7
8
9
7
8
Ones Tens Hundreds
Address 001 = Camera 1
Page 61

Vi-K2/Vi-K3 Universal
Keyboard
Vi-K2 Universal Keyboard User Manual
59
15.3 Supported functions
• Pan / tilt / zoom / focus / iris / zoom / focus
• Variable speed pan / tilt / zoom / focus
• Lamp
• Presets (16)
• Tours (4 + 2 “Walk Patrols” + all points)
• 180° turn
• Privacy zones
• Zero lux
• Colour mode
15.4 Joystick Operation
15.4.1 Pan & Tilt
Move the joystick left, right, up and down to move the dome in the corresponding direction. If the dome has
variable speed, then the further the joystick is moved from its central position, the faster the camera will pan
or tilt.
15.4.2 Zoom
Zoom is achieved by twisting the handle of the joystick clockwise (zoom in), or anti-clockwise (zoom out). If
the camera has variable zoom speed, the more the handle is twisted, the faster the zoom movement will be.
15.5 Lens Control
15.5.1 Focus
•
The two FOCUS keys can be used to adjust the focus.
15.5.2 Iris
•
The two IRIS keys can be used to adjust the iris.
15.6 Auxiliary Functions
15.6.1 Lamp
Press the LAMP key to turn on the lamp. Press again to turn off.
Page 62
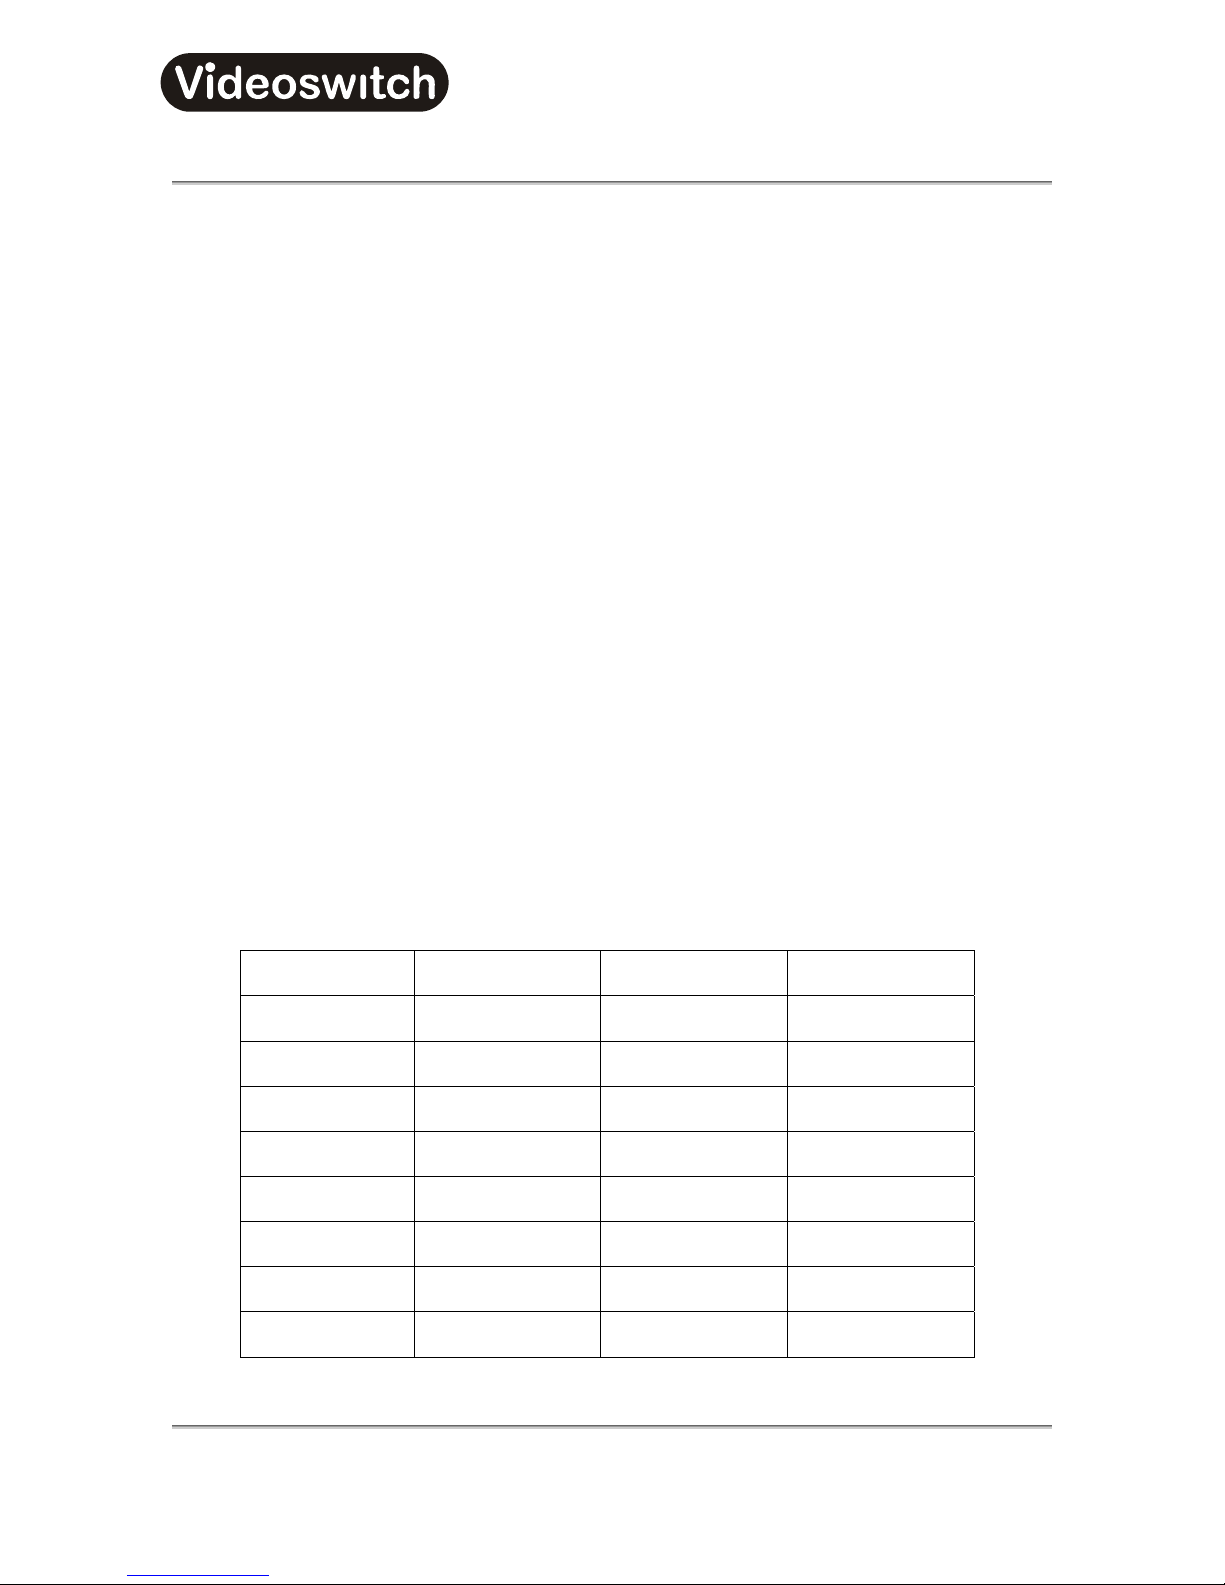
Vi-K2/Vi-K3 Universal
Keyboard
Vi-K2 Universal Keyboard User Manual
60
15.7 Presets
15.7.1 Recalling a Preset
•
Press the PRESET key.
• The display will show the letter “P—”.
• Press one of the number keys 1, 2, 3…16 to select a preset that has previously been stored.
• The dome will move to that preset position.
• If the joystick is moved, the preset display will be cancelled.
15.7.2 Setting a Preset
•
Move the dome to the position at which you wish to set a preset.
• Press and hold the ALT key and then press the STORE key.
• The display will show the letter “P—”, flashing.
• Press one of the number keys 1, 2, 3…16 to select a preset.
• Press and hold the ALT key and then press the STORE.
• The display will show the letter “Dll”, flashing.
• Enter the dwell time for this preset.
• Press and hold the ALT key and then press the STORE.
• The display will show the letter “SPd”, flashing.
• Enter the speed for this preset.
• Press and hold the ALT key and then press the STORE.
• The display will show the letter “Tr”, flashing.
• Enter the tour(s) you wish this preset to be in (see table below).
Enter number… Preset will be in… Enter number… Preset will be in…
1 Tour 1 only 9 Tours 2 + 4
2 Tour 2 only 10 Tours 2 + 5
3 Tour 4 only 11 Tours 4 + 5
4 Tour 5 only 12 Tours 1 + 2 + 4
5 Tours 1 + 2 + 4 + 5 13 Tours 1 + 2 + 4 + 5
6 Tours 1 + 2 14 Tours 1 + 2 + 5
7 Tours 1 + 4 15 Tours 1 + 4 + 5
8 Tours 1 + 5 16 Tours 2 + 4 + 5
• Press and hold the ALT key and then press the STORE.
Page 63

Vi-K2/Vi-K3 Universal
Keyboard
Vi-K2 Universal Keyboard User Manual
61
15.7.3 Clearing a Preset
•
Press and hold the ALT key and then press the STORE key.
• The display will show the letter “P—”, flashing.
• Press one of the number keys 1, 2, 3…16 to select a preset.
• Press and hold the ALT key and then press the WIPE key to clear the preset.
15.8 Tours
15.8.1 Running a Tour
•
Press the TOUR key.
• The display will show the letter “t—”.
• Press one of the number keys 1, 2, 3, 4, 5, 9, or 10 to run a tour (sequence) that has previously
been stored.
• 1, 2, 4, 5 are tours using selected presets (see Programming a preset).
• Tour 3 is a tour of randomly selected presets.
• Tour 9 & Tour 10 are pre-recorded “Walk Patrols” (see Programming a Tour).
• The dome will run the tour until the TOUR key is pressed again.
15.8.2 Programming a Tour (Walk Patrol)
To start the tour programming:
• Holding the ALT key on, press the PROG key.
• The display will show the letter “t—”, flashing.
• Press one of the number keys 9 or 10 to select a tour number.
• Holding the ALT key on, press the PROG key.
• The display shows flashing “rEC”.
• All joystick movements will be recorded until the programming is finished.
• While the display shows flashing “rEC”, pressing one of the number keys 1, 2, 3…16 will move to
a preset (See “Presets” above).
To finish programming a tour:
• Holding the ALT key on, press the PROG key to finish the tour programming.
15.9 Privacy
Zones on
• Press and hold ALT then press the F12 key.
Zones off
• Press and hold ALT then press the F13 key.
Cursor toggle
Page 64

Vi-K2/Vi-K3 Universal
Keyboard
Vi-K2 Universal Keyboard User Manual
62
• Press and hold ALT then press the F14 key.
Set/clear toggle
• Press and hold ALT then press the F15 key.
15.10 Other Commands
180° turn
• Press and hold ALT then press the F1 key.
Colour Mode
• Press and hold ALT then press the F2 key.
Zero Lux
• Press and hold ALT then press the F3 key.
Start Auto Setup routine
• Press and hold ALT then press the F4 key.
Digital Zoom Control toggle
• Press and hold ALT then press the F9 key.
On-Screen Display
• Press and hold ALT then press the F10 key.
Software Version On/Off
• Press and hold ALT then press the F11 key.
Page 65
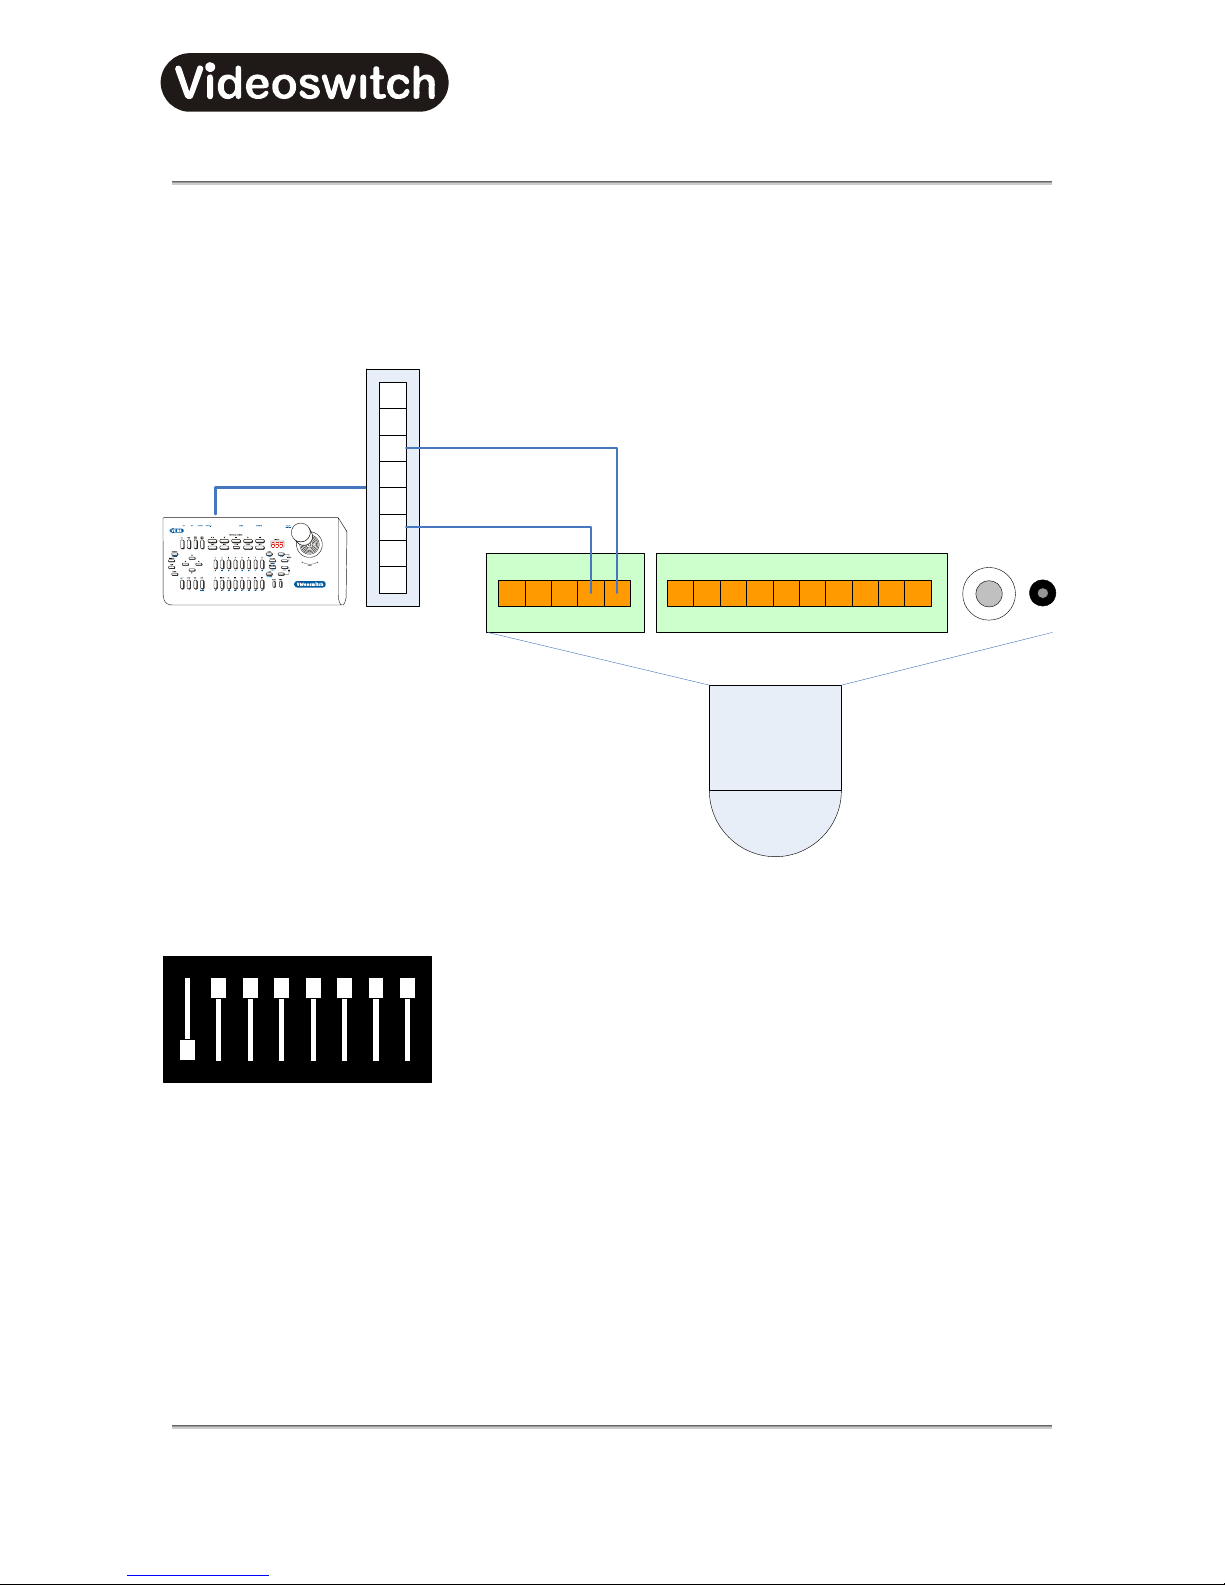
Vi-K2/Vi-K3 Universal
Keyboard
Vi-K2 Universal Keyboard User Manual
63
16 Protocol 11 - Merit Lilin (MLP1)
16.1 Connections
Domes-1 or Domes-2
VX10
5
4
2
1
7
8
3
6
Vi-K2 Keyboard
16.2 Settings
ON
12345678
Address 1 = Camera 1
Page 66

Vi-K2/Vi-K3 Universal
Keyboard
Vi-K2 Universal Keyboard User Manual
64
16.3 Supported functions
• Pan / tilt / zoom / focus / iris
• Variable speed pan / tilt
• Wash
• Wipe
• Relay
• Lamp
• Auto-focus
• Auto-iris
• Auto-pan
• Presets (16)
• Tours (16, see below)
• 180° turn
16.4 Joystick Operation
16.4.1 Pan & Tilt
Move the joystick left, right, up and down to move the dome in the corresponding direction. If the dome has
variable speed, then the further the joystick is moved from its central position, the faster the camera will pan
or tilt.
16.4.2 Zoom
Zoom is achieved by twisting the handle of the joystick clockwise (zoom in), or anti-clockwise (zoom out). If
the camera has variable zoom speed, the more the handle is twisted, the faster the zoom movement will be.
16.5 Lens Control
16.5.1 Focus
•
The two FOCUS keys can be used to adjust the focus.
• Press the ALT key and the upper FOCUS key to select auto-focus.
16.5.2 Iris
•
The two IRIS keys can be used to adjust the iris.
• Press the ALT key and the upper IRIS key to select auto-iris.
16.6 Auxiliary Functions
16.6.1 Wash
Press the WASH key to operate the wash function.
Page 67

Vi-K2/Vi-K3 Universal
Keyboard
Vi-K2 Universal Keyboard User Manual
65
16.6.2 Wipe
Press the WIPE key to turn on the wiper. Press again to turn off.
16.6.3 Auto-Pan
Press the AUTO-PAN key to turn on the auto-pan function. Press again to turn off.
16.6.4 Lamp
Press the LAMP key to turn on the lamp. Press again to turn off.
16.6.5 Relay
Holding the ALT key on, press the RELAY key to turn on the auxiliary relay. Press these keys again to turn
relay off again.
Page 68

Vi-K2/Vi-K3 Universal
Keyboard
Vi-K2 Universal Keyboard User Manual
66
16.7 Presets
16.7.1 Recalling a Preset
•
Press the PRESET key.
• The display will show the letter “P—”.
• Press one of the number keys 1, 2, 3…16 to select a preset that has previously been stored.
• The dome will move to that preset position.
• If the joystick is moved, the preset display will be cancelled.
16.7.2 Setting a Preset
•
Select preset number to be set from Vi-K2/Vi-K3
• Move the dome to the position at which you wish to set a preset.
• Press and hold the ALT key and then press the STORE key.
• The display will show the letter “dLL”, flashing.
• Using camera keys select dwell time for preset.
• Press and hold the ALT key and then press the STORE key to store dwell time “spd” will flash on
screen.
• Using camera keys select the speed for preset.
• Press and hold the ALT key and then press the STORE key to store the preset.
16.7.3 Clearing all Presets
•
Press the PRESET key on the Vi-K2/Vi-K3.
• The display will show the letter “P—”.
• Press and hold the ALT key and then press the WIPE key.
16.8 Tours
16.8.1 Running a Tour
16.8.2 Press the TOUR key.
•
The display will show the letter “t—”.
• Press one of the number keys 1, 2, 3…16 to run a tour (see table below).
• Group 1 contains presets 1, 2, 3 & 4.
• Group 2 contains presets 5, 6, 7 & 8.
• Group 3 contains presets 9, 10, 11 & 12.
• Group 4 contains presets 13, 14, 15 & 16.
•
Page 69
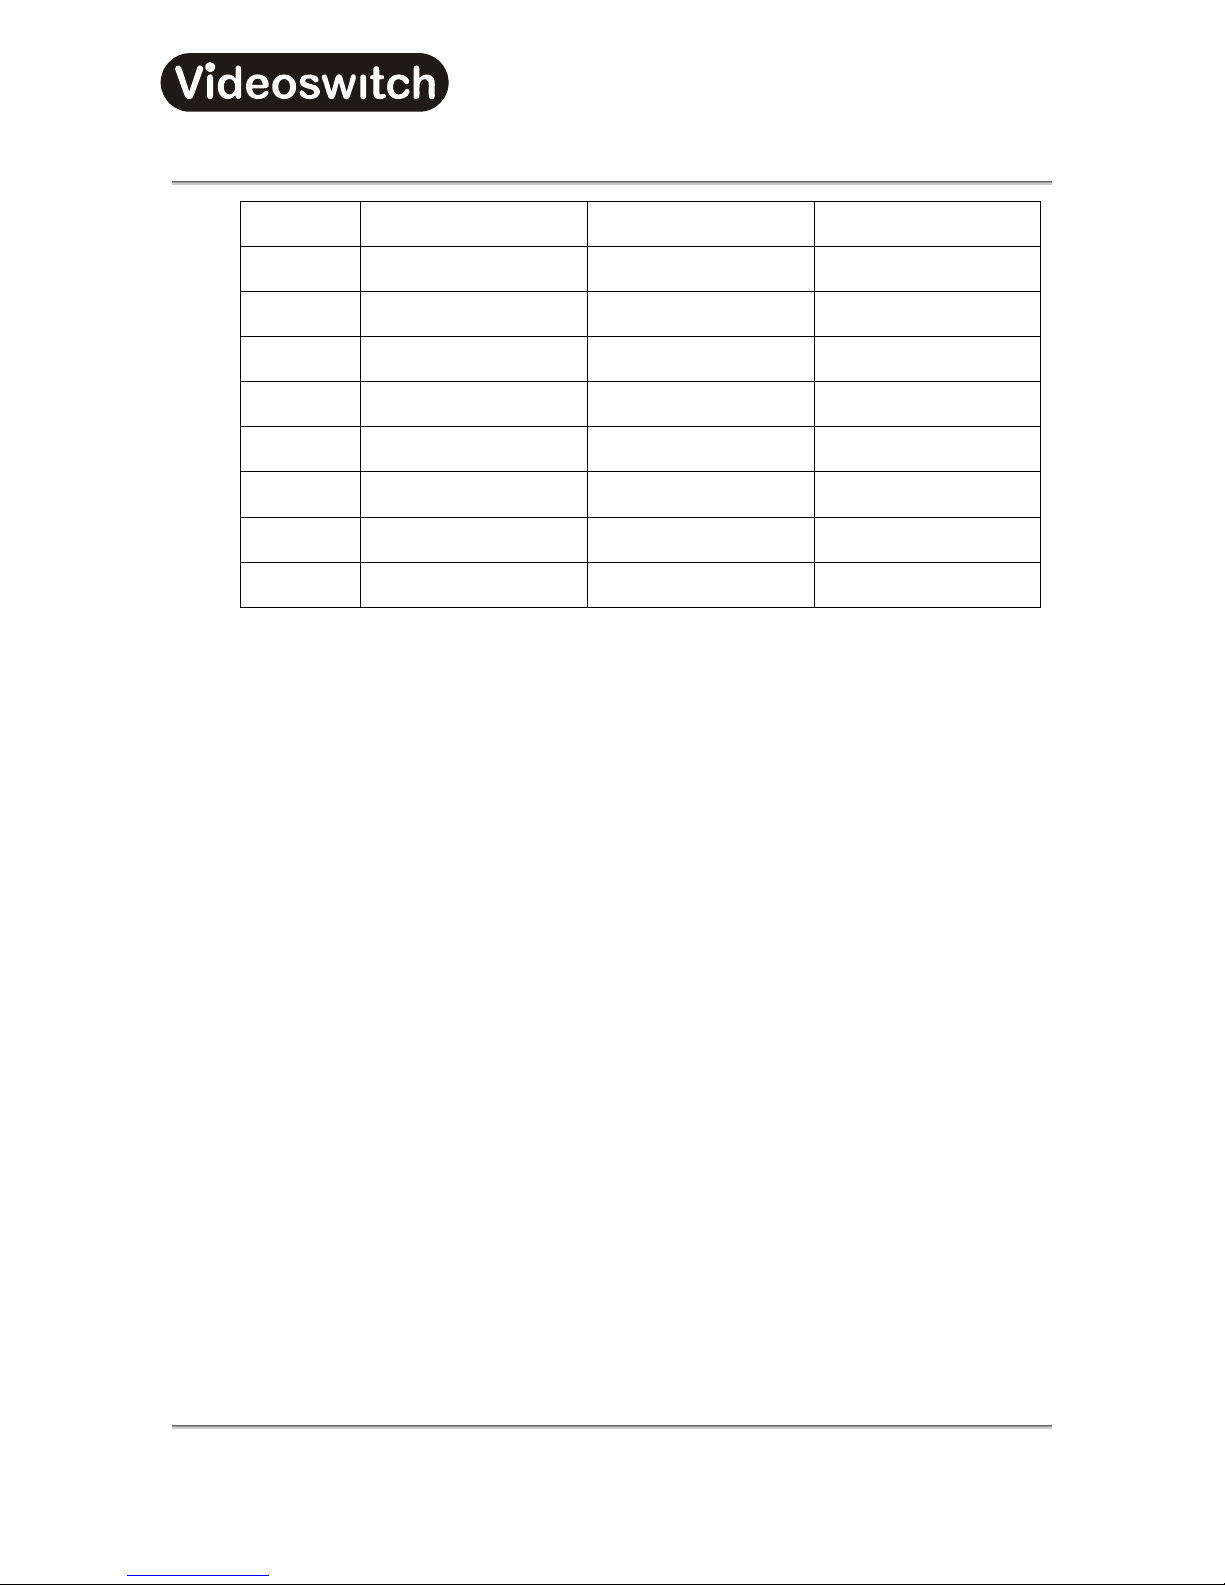
Vi-K2/Vi-K3 Universal
Keyboard
Vi-K2 Universal Keyboard User Manual
67
Key press Tour Groups Key press Tour Groups
1 Group 1 only 9 Groups 2 + 3
2 Group 2 only 10 Groups 2 + 4
3 Group 3 only 11 Groups 3 + 4
4 Group 4 only 12 Groups 1 + 2 + 3
5 Groups 1 + 2 + 3 + 4 13 Groups 1 + 2 + 3 + 4
6 Groups 1 + 2 14 Groups 1 + 2 + 4
7 Groups 1 + 3 15 Groups 1 + 3 + 4
8 Groups 1 + 4 16 Groups 2 + 3 + 4
• The dome will run the tour until the TOUR key is pressed again.
16.9 Menus (PIH-7625 series only)
The Vi-K2/Vi-K3 has a special mode to make access to dome menus very easy:
• Press the DOME key on the Vi-K2/Vi-K3.
• The letters “Do” will appear on the display.
While the “
Do” is being displayed, some of the keys on the Vi-K2/Vi-K3 have special functions as follows:
• Press the MENU key to enter the dome user menu.
• Use the Up, Down, Left, Right arrow keys to navigate within the dome menu.
• Press the OK key to enter a sub-menu or to accept a menu setting.
16.10 Other Commands
180° turn
• Press and hold ALT then press the F1 key
Page 70
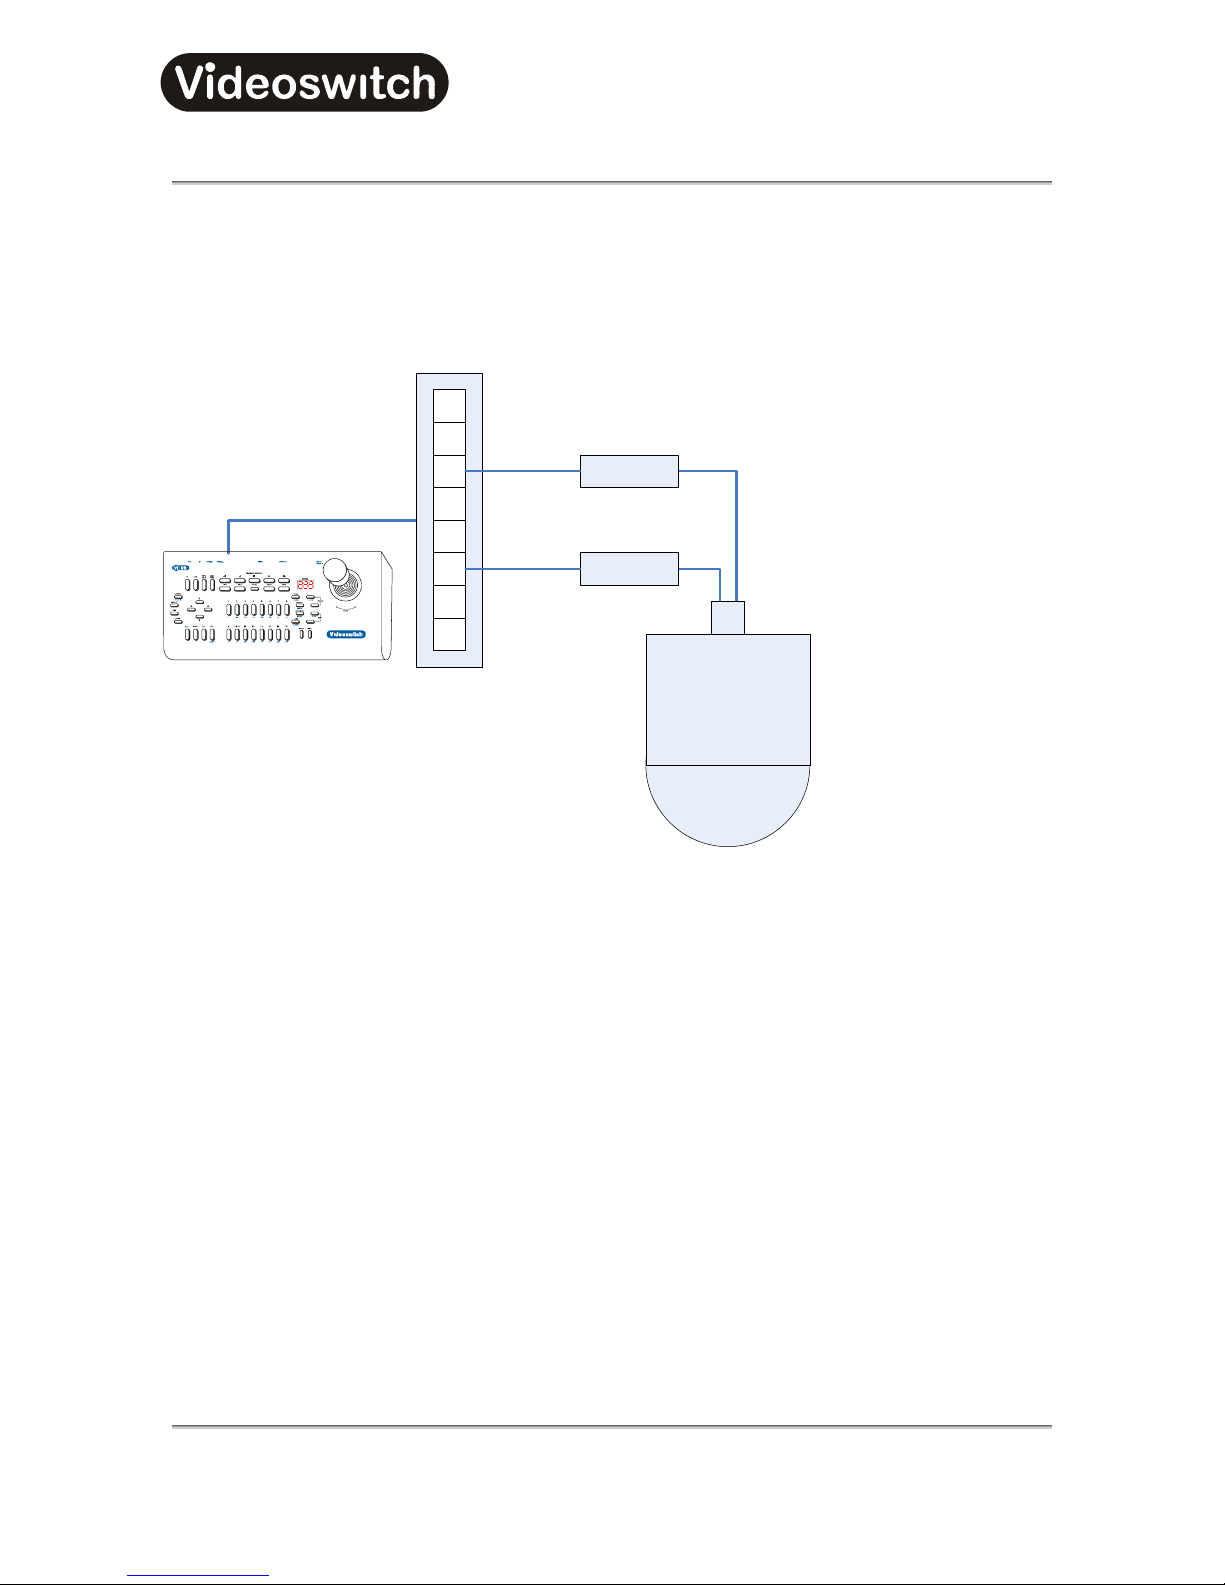
Vi-K2/Vi-K3 Universal
Keyboard
Vi-K2 Universal Keyboard User Manual
68
17 Protocol 12 - Borsatec
17.1 Connections
Domes-1 or Domes-2
VX10
5
4
2
1
7
8
3
6 RS485-
RS485+
Vi-K2 Keyboard
17.2 Supported functions
• Pan / tilt / zoom / focus
• Variable speed pan / tilt / zoom / focus
• Relay
• Auto-focus
• Auto-pan
• Presets (16)
• Tours (1)
• Camera Power
17.3 Joystick Operation
17.3.1 Pan & Tilt
Move the joystick left, right, up and down to move the dome in the corresponding direction. If the dome has
variable speed, then the further the joystick is moved from its central position, the faster the camera will pan
or tilt.
Page 71

Vi-K2/Vi-K3 Universal
Keyboard
Vi-K2 Universal Keyboard User Manual
69
17.3.2 Zoom
Zoom is achieved by twisting the handle of the joystick clockwise (zoom in), or anti-clockwise (zoom out). If
the camera has variable zoom speed, the more the handle is twisted, the faster the zoom movement will be.
17.4 Lens Control
17.4.1 Focus
•
The two FOCUS keys can be used to adjust the focus.
• Press the ALT key and the upper FOCUS key to select auto-focus.
17.4.2 Iris
•
The two IRIS keys can be used to adjust the iris.
• Press the ALT key and the upper IRIS key to select auto-iris.
17.5 Auxiliary Functions
17.5.1 Wash
Press the WASH key to operate the wash function.
17.5.2 Wipe
Press the WIPE key to turn on the wiper. Press again to turn off.
17.5.3 Auto-Pan
Press the AUTO-PAN key to turn on the auto-pan function. Press again to turn off.
17.5.4 Lamp
Press the LAMP key to turn on the lamp. Press again to turn off.
17.5.5 Relay
Holding the ALT key on, press the RELAY key to turn on the auxiliary relay. Press these keys again to turn
relay off again.
Page 72

Vi-K2/Vi-K3 Universal
Keyboard
Vi-K2 Universal Keyboard User Manual
70
17.6 Presets
17.6.1 Recalling a Preset
•
Press the PRESET key.
• The display will show the letter “P—”.
• Press one of the number keys 1, 2, 3…16 to select a preset that has previously been stored.
• The dome will move to that preset position.
• If the joystick is moved, the preset display will be cancelled.
17.6.2 Setting a Preset
•
Move the dome to the position at which you wish to set a preset.
• Press and hold the ALT key and then press the STORE key.
• The display will show the letter “P—”, flashing.
• Press one of the number keys 1, 2, 3…16 to select a preset.
• Press and hold the ALT key and then press the STORE key to store the preset.
• In the case of Dennard domes, the dome menus may automatically appear so that a text string can
be entered.
17.6.3 Clearing a Preset
•
Press and hold the ALT key and then press the STORE key.
• The display will show the letter “P—”, flashing.
• Press one of the number keys 1, 2, 3…16 to select a preset.
• Press and hold the ALT key and then press the WIPE key to clear the preset.
17.7 Tours
17.7.1 Running a Tour
•
Press the TOUR key.
• The display will show the letter “t—”.
• Press the number key 1 to run the tour (visit all presets).
• The dome will run the tour until the TOUR key is pressed again.
17.8 Menus
The Vi-K2/Vi-K3 has a special mode to make access to dome menus very easy:
• Press the DOME key on the Vi-K2/Vi-K3.
• The letters “Do” will appear on the display.
While the “
Do” is being displayed, some of the keys on the Vi-K2/Vi-K3 have special functions as follows:
Page 73

Vi-K2/Vi-K3 Universal
Keyboard
Vi-K2 Universal Keyboard User Manual
71
• Press the MENU key to enter the dome user menu.
• Use the Up, Down, Left, Right arrow keys to navigate within the dome menu.
• Press the OK key to enter a sub-menu or to accept a menu setting.
17.9 Programming a Tour
There is no specific key sequence for entering tour positions as all presets are used. To enter the dwell time,
use the following key sequence.
• Press the PROG key.
• The display will show flashing “dLL”.
• Enter the dwell time in seconds.
• Press the PROG key twice.
17.10 Other Commands
Auto-Pan
• The dome can auto-pan between two positions by pressing the F9 key and the F10 key. The pan
speed is currently fixed. The auto-pan is cancelled by pressing the
AUTO-PAN key.
Page 74
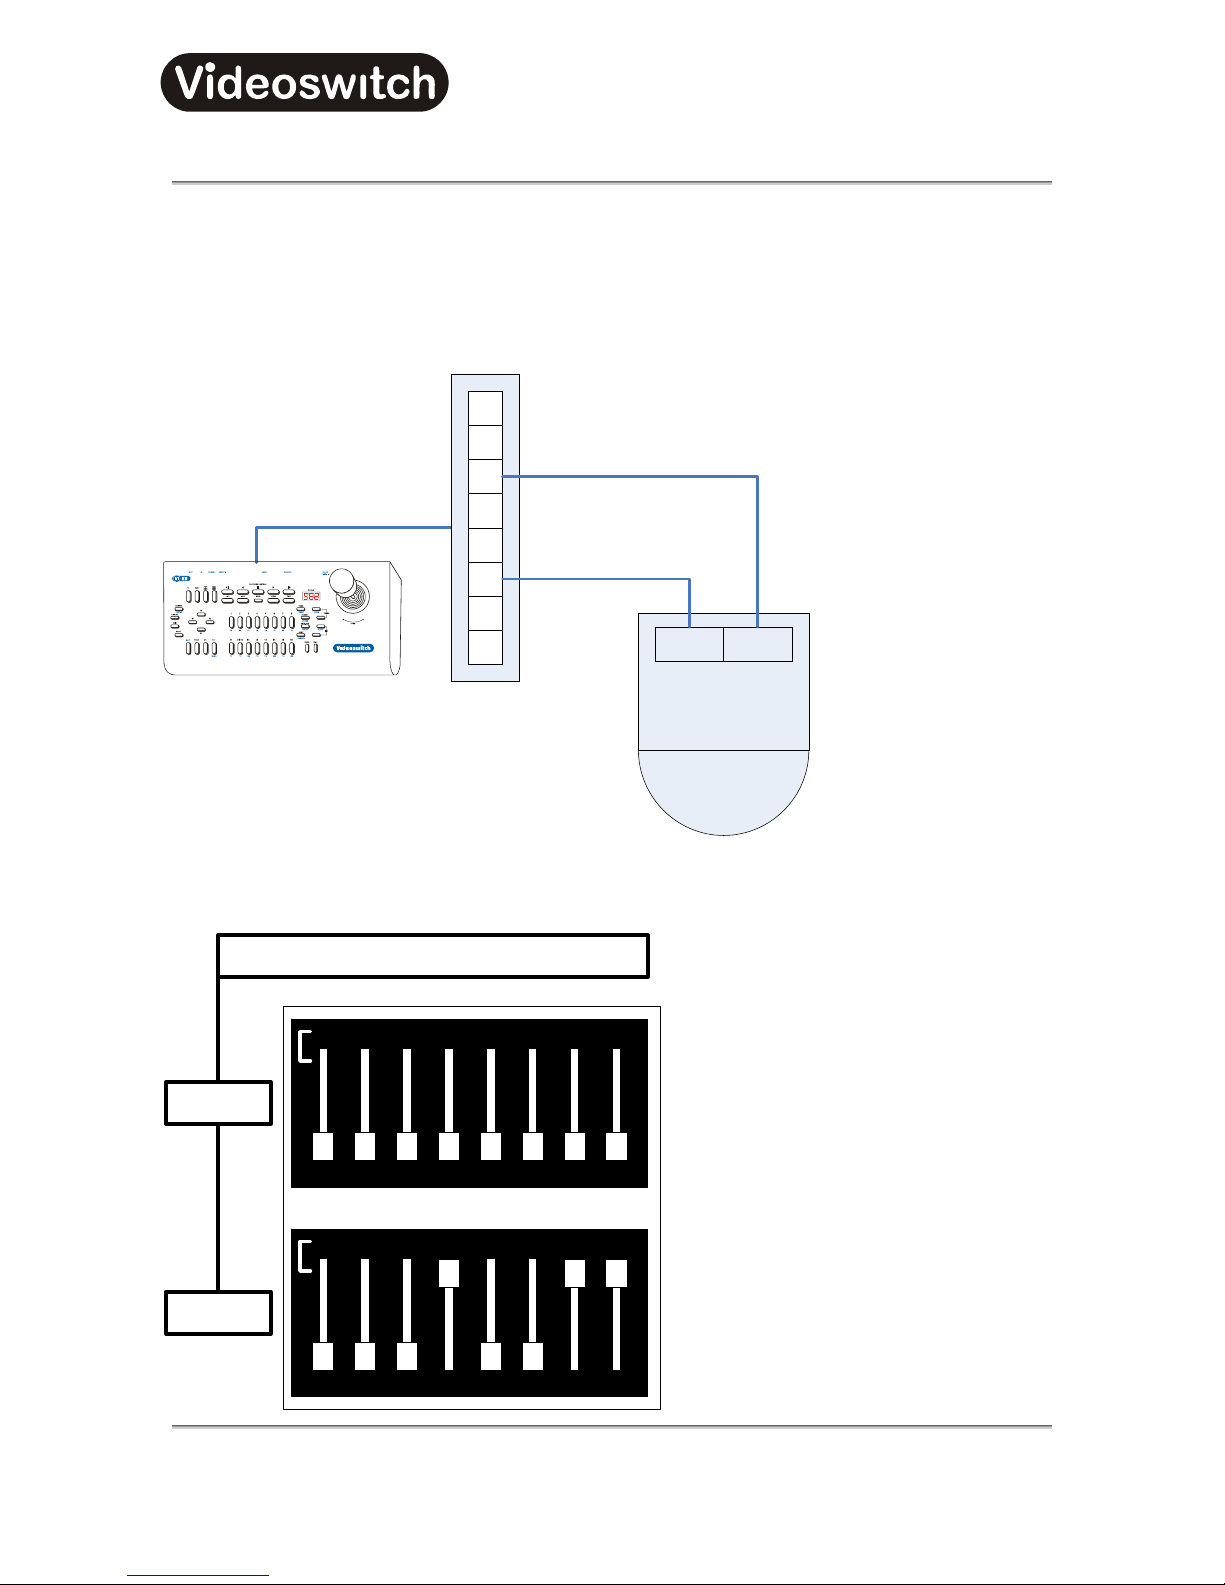
Vi-K2/Vi-K3 Universal
Keyboard
Vi-K2 Universal Keyboard User Manual
72
18 Protocol 13 - Samsung
18.1 Connections
Txd- Txd+
Samsung
SCC-643P
Domes-1 or Domes-2
VK10
5
4
2
1
7
8
3
6
Vi-K2 Keyboard
18.2 Settings
ON
12345678
ALPS
ON
12345678
ALPS
SW500
SW501
SEE INSTRUCTION MANUAL
Address 0 = Camera 1
1 & 2: Termination (e.g. off)
3 & 4: Baud rate (9600)
5, 6, 7 & 8: Protocol (M)
Page 75

Vi-K2/Vi-K3 Universal
Keyboard
Vi-K2 Universal Keyboard User Manual
73
18.3 Supported functions
• Pan / tilt / zoom
• Variable speed pan / tilt / zoom
• Presets (16)
• Tours (4)
• Menus
• Auto-pan
18.4 Joystick Operation
18.4.1 Pan & Tilt
Move the joystick left, right, up and down to move the dome in the corresponding direction. If the dome has
variable speed, then the further the joystick is moved from its central position, the faster the camera will pan
or tilt.
18.4.2 Zoom
Zoom is achieved by twisting the handle of the joystick clockwise (zoom in), or anti-clockwise (zoom out). If
the camera has variable zoom speed, the more the handle is twisted, the faster the zoom movement will be.
18.5 Auxiliary Functions
18.5.1 Auto-Pan
Press the AUTO-PAN key to turn on the auto-pan function. Press again to turn off.
Page 76

Vi-K2/Vi-K3 Universal
Keyboard
Vi-K2 Universal Keyboard User Manual
74
18.6 Presets
18.6.1 Recalling a Preset
•
Press the PRESET key.
• The display will show the letter “P—”.
• Press one of the number keys 1, 2, 3…16 to select a preset that has previously been stored.
• The dome will move to that preset position.
• If the joystick is moved, the preset display will be cancelled.
18.6.2 Setting a Preset
•
Move the dome to the position at which you wish to set a preset.
• Press and hold the ALT key and then press the STORE key.
• The display will show the letter “P—”, flashing.
• Press one of the number keys 1, 2, 3…16 to select a preset.
• Press and hold the ALT key and then press the STORE key to store the preset.
Presets can also be programmed via the in-built dome menu (Press
DOME then MENU to access the
menu).
18.7 Tours
18.7.1 Running a Tour
•
Press the TOUR key.
• The display will show the letter “t—”.
• Press one of the number keys 1, 2 or 3 (or 4 for a tour of all presets) to run a tour that has
previously been stored.
• The dome will run the tour until the TOUR key is pressed again.
18.7.2 Programming a Tour
Samsung domes use “patterns” that are programmed using the dome’s built -in menu (see below).
18.8 Menus
The Vi-K2/Vi-K3 has a special mode to make access to dome menus very easy:
• Press the DOME key on the Vi-K2/Vi-K3.
• The letters “Do” will appear on the display.
While the “
Do” is being displayed, some of the keys on the Vi-K2/Vi-K3 have special functions as follows:
Page 77

Vi-K2/Vi-K3 Universal
Keyboard
Vi-K2 Universal Keyboard User Manual
75
• Press the MENU key to enter the dome user menu.
• Use the Up, Down, Left, Right arrow keys to navigate within the dome menu.
• Press the OK key to enter a sub-menu or to accept a menu setting.
18.9 Other Commands
Auto-Pan
• Press AUTO-PAN key.
Page 78
Vi-K2/Vi-K3 Universal
Keyboard
Vi-K2 Universal Keyboard User Manual
76
19 Protocol 14 - Pelco-D
19.1 Connections
Rx- Rx+
Domes-1 or Domes-2
VX10
5
4
2
1
7
8
3
6
Vi-K2 Keyboard
19.2 Settings
19.2.1 Switch Settings
12345678 12345678
1
ON
SW1 SW2 SW3
on on
1
Notes
•
Dome Camera numbers are equivalent to Vi-K2/Vi-K3 Keyboard camera numbers.
• This protocol uses a data rate of 2400 baud
SW1 = Camera number
E.g.
10000000 = Camera 1
11010000 = Camera 11
Page 79

Vi-K2/Vi-K3 Universal
Keyboard
Vi-K2 Universal Keyboard User Manual
77
Please note for JUNO domes dipswitches 2, 3 and 4 must be set on switch 2.
For Vista Power dome users please set keyboard protocol to 19 all features below will still be
supported.
19.3 Supported functions
• Pan / tilt / zoom / focus / iris
• Variable speed pan / tilt / zoom / focus / iris
• Auto-focus
• Auto-iris
• Presets (16)
• Tours (4)
• Menus
• 180° turn
• Set/clear auxiliary (01 – 08)
• Alarm acknowledge (01 – 08)
19.4 Joystick Operation
19.4.1 Pan & Tilt
Move the joystick left, right, up and down to move the dome in the corresponding direction. If the dome has
variable speed, then the further the joystick is moved from its central position, the faster the camera will pan
or tilt.
19.4.2 Zoom
Zoom is achieved by twisting the handle of the joystick clockwise (zoom in), or anti-clockwise (zoom out). If
the camera has variable zoom speed, the more the handle is twisted, the faster the zoom movement will be.
19.5 Lens Control
19.5.1 Focus
•
The two FOCUS keys can be used to adjust the focus.
• Press the ALT key and the upper FOCUS key to toggle auto-focus on & off.
19.5.2 Iris
•
The two IRIS keys can be used to adjust the iris.
• Press the ALT key and the upper IRIS key to toggle auto-iris on & off.
Page 80

Vi-K2/Vi-K3 Universal
Keyboard
Vi-K2 Universal Keyboard User Manual
78
19.6 Presets
19.6.1 Recalling a Preset
•
Press the PRESET key.
• The display will show the letter “P—”.
• Press one of the number keys 1, 2, 3…16 to select a preset that has previously been stored.
• The dome will move to that preset position.
• If the joystick is moved, the preset display will be cancelled.
19.6.2 Setting a Preset
•
Move the dome to the position at which you wish to set a preset.
• Press and hold the ALT key and then press the STORE key.
• The display will show the letter “P—”, flashing.
• Press one of the number keys 1, 2, 3…16 to select a preset.
• Press and hold the ALT key and then press the STORE key to store the preset.
19.6.3 Clearing a Preset
•
Press and hold the ALT key and then press the STORE key.
• The display will show the letter “P—”, flashing.
• Press one of the number keys 1, 2, 3…16 to select a preset.
• Press and hold the ALT key and then press the WIPE key to clear the preset.
19.7 Tours
19.7.1 Running a Tour
•
Press the TOUR key.
• The display will show the letter “t—”.
• Press one of the number keys 1, 2, 3 or 4 to select a tour number.
• The dome will run the tour until the TOUR key is pressed again.
19.7.2 Programming a Tour (Pattern)
To start the tour programming:
• Holding the ALT key on, press the PROG key.
• The display will show the letter “t—”, flashing.
• Press one of the number keys 1, 2, 3 or 4 to select a tour number.
• Holding the ALT key on, press the PROG key.
Page 81

Vi-K2/Vi-K3 Universal
Keyboard
Vi-K2 Universal Keyboard User Manual
79
• The display shows flashing “rEC”.
• All joystick movements will be recorded until the programming is finished.
• While the display shows flashing “rEC”, pressing one of the number keys 1, 2, 3…16 will move to
a preset (See “Presets” above).
To finish programming a tour:
• Holding the ALT key on, press the PROG key to finish the tour programming.
19.8 Menus
The Vi-K2/Vi-K3 has a special mode to make access to dome menus very easy:
• Press the DOME key on the Vi-K2/Vi-K3.
• The letters “Do” will appear on the display.
While the “
Do” is being displayed, some of the keys on the Vi-K2/Vi-K3 have special functions as follows:
• Press the MENU key to enter the dome user menu.
• Use the Up, Down, Left, Right arrow keys to navigate within the dome menu.
• Press the OK key to enter a sub-menu or to accept a menu setting.
Please Note for JUNO domes to select menu options please use focus in on joystick rather then ok key.
19.9 Other Commands
180° turn
• Press and hold ALT then the F1 key
Alarm acknowledge (Alarms 01 – 08)
• Press and hold ALT while pressing F9 – F16
Auxiliary (01 – 08)
• Aux 1: Press and hold ALT then press the RELAY key to toggle.
• Aux 2: Press the LAMP key to toggle.
• Aux 3: Press the WASH key and hold to set, release to clear.
• Aux 4: Press the WIPE key to toggle.
• Aux 5-8: Press and hold ALT then press the one of the F5 - F8 keys.
19.10 Forward vision Pelco-D
When using A Forward vision PTZ dome camera the default AUX commands are mapped differently to the
default Videoswitch AUX commands. To rectify this you must download and use Forward Visions
PelcoDTungpo7 camset program to map the AUX commands so that our Vi-K2/Vi-K3 keyboard will function
correctly with the Dome Camera.
Page 82

Vi-K2/Vi-K3 Universal
Keyboard
Vi-K2 Universal Keyboard User Manual
80
20 Protocol 15 – Videoswitch (VXP4)
20.1 Supported functions
• Pan / tilt / zoom / focus / iris
• Variable speed pan / tilt / zoom
• Wash
• Wipe
• Relay
• Lamp
• Auto-focus
• Auto-iris
• Auto-pan
• Presets (16)
• Tours (16, see below)
• IR Lamp
20.2 Joystick Operation
20.2.1 Pan & Tilt
Move the joystick left, right, up and down to move the dome in the corresponding direction. If the dome has
variable speed, then the further the joystick is moved from its central position, the faster the camera will pan
or tilt.
20.2.2 Zoom
Zoom is achieved by twisting the handle of the joystick clockwise (zoom in), or anti-clockwise (zoom out). If
the camera has variable zoom speed, the more the handle is twisted, the faster the zoom movement will be.
20.3 Lens Control
20.3.1 Focus
•
The two FOCUS keys can be used to adjust the focus.
• Press the ALT key and the upper FOCUS key to select auto-focus.
20.3.2 Iris
•
The two IRIS keys can be used to adjust the iris.
• Press the ALT key and the upper IRIS key to select auto-iris.
Page 83

Vi-K2/Vi-K3 Universal
Keyboard
Vi-K2 Universal Keyboard User Manual
81
20.4 Auxiliary Functions
20.4.1 Lamp
Press the LAMP key to turn on the lamp. Press again to turn off.
20.5 Presets
20.5.1 Recalling a Preset
•
Press the PRESET key.
• The display will show the letter “P—”.
• Press one of the number keys 1, 2, 3…16 to select a preset that has previously been stored.
• The dome will move to that preset position.
• If the joystick is moved, the preset display will be cancelled.
20.5.2 Setting a Preset
•
Select preset number to be set from Vi-K2/Vi-K3
• Move the dome to the position at which you wish to set a preset.
• Press and hold the ALT key and then press the PRESET key.
• Select the required preset number
• Press and hold the ALT key and then press the PRESET key to store the preset.
20.6 Tours
20.6.1 Running a Tour
20.6.2 Press the TOUR key.
•
The display will show the letter “t—”.
• Press one of the number keys 1, 2, 3…16 to run a tour (see table below).
• The dome will run the tour until pan/tilt/preset
20.7 Menus
The Vi-K2/Vi-K3 has a special mode to make access to dome menus very easy:
• Press the DOME key on the Vi-K2/Vi-K3.
• The letters “Do” will appear on the display.
While the “
Do” is being displayed, some of the keys on the Vi-K2/Vi-K3 have special functions as follows:
Page 84

Vi-K2/Vi-K3 Universal
Keyboard
Vi-K2 Universal Keyboard User Manual
82
• Press the MENU key to enter the dome user menu.
• Use the Up, Down, Left, Right arrow keys to navigate within the dome menu.
• Press the OK key to enter a sub-menu or to accept a menu setting.
20.8 Other Commands
180° turn
• Press and hold ALT then press the F1 key
Page 85

Vi-K2/Vi-K3 Universal
Keyboard
Vi-K2 Universal Keyboard User Manual
83
21 Protocol 16 - SpeedDome
21.1 Connections
21.2 Settings
21.3 Supported functions
• Pan / tilt / zoom
• Variable speed pan / tilt / zoom
• Presets (16)
• Tours (4)
• Menus
21.4 Joystick Operation
21.4.1 Pan & Tilt
Move the joystick left, right, up and down to move the dome in the corresponding direction. If the dome has
variable speed, then the further the joystick is moved from its central position, the faster the camera will pan
or tilt.
21.4.2 Zoom
Zoom is achieved by twisting the handle of the joystick clockwise (zoom in), or anti-clockwise (zoom out). If
the camera has variable zoom speed, the more the handle is twisted, the faster the zoom movement will be.
Page 86

Vi-K2/Vi-K3 Universal
Keyboard
Vi-K2 Universal Keyboard User Manual
84
21.5 Presets
21.5.1 Recalling a Preset
•
Press the PRESET key.
• The display will show the letter “P—”.
• Press one of the number keys 1, 2, 3…16 to select a preset that has previously been stored.
• The dome will move to that preset position.
• If the joystick is moved, the preset display will be cancelled.
21.5.2 Setting a Preset
•
Move the dome to the position at which you wish to set a preset.
• Press and hold the ALT key and then press the STORE key.
• The display will show the letter “P—”, flashing.
• Press one of the number keys 1, 2, 3…16 to select a preset.
• Press and hold the ALT key and then press the STORE key to store the preset.
Presets can also be programmed via the in-built dome menu (Press
DOME then MENU to access the
menu).
21.6 Tours
21.6.1 Running a Tour
•
Press the TOUR key.
• The display will show the letter “t—”.
• Press one of the number keys 1, 2 or 3 (or 4 for a tour of all presets) to run a tour that has
previously been stored.
• The dome will run the tour until the TOUR key is pressed again.
21.6.2 Programming a Tour
To start the tour programming:
• Holding the ALT key on, press the PROG key.
• The display will show the letter “t—”, flashing.
• Press one of the number keys 1, 2 or 3 to select a tour number.
• Holding the ALT key on, press the PROG key.
Repeat these steps for each position in the tour:
Page 87

Vi-K2/Vi-K3 Universal
Keyboard
Vi-K2 Universal Keyboard User Manual
85
• The display will show the letters “PoS”, flashing (asking for a preset position).
• Enter the next preset position number 1, 2, 3…16.
• Holding the ALT key on, press the PROG key.
• The display will show the letters “dLL”, flashing (asking for a dwell time).
• Optionally enter a new dwell time (0, 1, 2…9 where each increment represents 2 seconds).
• Holding the ALT key on, press the PROG key.
• The display will show the letters “Spd”, flashing (asking for a speed)
• Optionally enter a new speed value to determine how long the dome takes to get from one position
to the next (
0, 1, 2…9 where each increment represents 2 seconds).
• Holding the ALT key on, press the PROG key, and repeat for all positions.
Page 88

Vi-K2/Vi-K3 Universal
Keyboard
Vi-K2 Universal Keyboard User Manual
86
To finish programming a tour:
• The tour can be finished when the letters “PoS” are displayed, as follows:
• Holding the ALT key on, press the PROG key (i.e. without entering another position) to finish the
tour programming.
• The word “Fin” will be displayed, indicating that the tour programming has finished.
• Finally, Holding the ALT key on, press the PROG key to return the display to its normal mode.
Tours can also be programmed via the in-built dome menu (Press
DOME then MENU to access the
menu).
21.7 Menus
The Vi-K2/Vi-K3 has a special mode to make access to dome menus very easy:
• Press the DOME key on the Vi-K2/Vi-K3.
• The letters “Do” will appear on the display.
While the “
Do” is being displayed, some of the keys on the Vi-K2/Vi-K3 have special functions as follows:
• Press the MENU key to enter the dome user menu.
• Use the Up, Down, Left, Right arrow keys to navigate within the dome menu.
• Press the OK key to enter a sub-menu or to accept a menu setting.
Page 89
Vi-K2/Vi-K3 Universal
Keyboard
Vi-K2 Universal Keyboard User Manual
87
22 Protocol 17 - Forward Vision (FV)
22.1 Connections
Domes-1 or Domes-2
VX10
5
4
2
1
7
8
3
6
RxA
RxB
Vi-K2 Keyboard
22.2 Settings
This protocol option requires a Forward Vision dome with Forward Vision protocol installed. The address of
the dome must also be set – refer to Forward Vision manual.
Page 90

Vi-K2/Vi-K3 Universal
Keyboard
Vi-K2 Universal Keyboard User Manual
88
22.3 Supported functions
• Pan / tilt / zoom / focus / iris
• Variable speed pan / tilt / zoom
• Wash
• Wipe
• Auto-pan
• Presets (16)
• Tours (1)
• Auto-focus
• Auto-iris
• Privacy (Where the dome supports this)
22.4 Joystick Operation
22.4.1 Pan & Tilt
Move the joystick left, right, up and down to move the dome in the corresponding direction. If the dome has
variable speed, then the further the joystick is moved from its central position, the faster the camera will pan
or tilt.
22.4.2 Zoom
Zoom is achieved by twisting the handle of the joystick clockwise (zoom in), or anti-clockwise (zoom out). If
the camera has variable zoom speed, the more the handle is twisted, the faster the zoom movement will be.
22.5 Lens Control
22.5.1 Focus
•
The two FOCUS keys can be used to adjust the focus.
• Press the ALT key and the upper FOCUS key to select auto-focus.
22.5.2 Iris
•
The two IRIS keys can be used to adjust the iris.
• Press the ALT key and the upper IRIS key to select auto-iris.
22.6 Auxiliary Functions
22.6.1 Wash
Press the WASH key to operate the wash function.
Page 91

Vi-K2/Vi-K3 Universal
Keyboard
Vi-K2 Universal Keyboard User Manual
89
22.6.2 Wipe
Press the WIPE key to turn on the wiper. Press again to turn off.
22.6.3 Auto-Pan
Press the AUTO-PAN key to turn on the auto-pan function. Press again to turn off.
22.7 Presets
22.7.1 Recalling a Preset
•
Press the PRESET key.
• The display will show the letter “P—”.
• Press one of the number keys 1, 2, 3…16 to select a preset that has previously been stored.
• The dome will move to that preset position.
• If the joystick is moved, the preset display will be cancelled.
22.7.2 Setting a Preset
•
Move the dome to the position at which you wish to set a preset.
• Press and hold the ALT key and then press the STORE key.
• The display will show the letter “P—”, flashing.
• Press one of the number keys 1, 2, 3…16 to select a preset.
• Press and hold the ALT key and then press the STORE key to store the preset.
22.8 Tours
22.8.1 Running the Tour
•
Press the TOUR key.
• The display will show the letter “t—”.
• Press the number key 1 to run the tour that has previously been stored.
• The dome will run the tour until the TOUR key is pressed again.
22.8.2 Programming the Tour
To start the tour programming:
• Holding the ALT key on, press the PROG key.
• The display will show the letter “t—”, flashing.
• Press one of the number keys 1, 2, 3 or 4 to select a tour block. Each tour has 4 blocks and each
block has 8 preset positions that can be programmed. When running, the tour will process each
block sequentially.
• Holding the ALT key on, press the PROG key.
Page 92

Vi-K2/Vi-K3 Universal
Keyboard
Vi-K2 Universal Keyboard User Manual
90
Repeat these steps for each position in the tour:
• The display will show the letters “PoS”, flashing (asking for a preset position)
• Enter the next preset position number 1, 2, 3…16.
• Holding the ALT key on, press the PROG key, and repeat for all positions.
To finish programming the tour:
• The tour can be finished when the letters “PoS” are displayed, as follows:
• Holding the ALT key on, press the PROG key (i.e. without entering another position) to finish the
tour programming.
• The word “Fin” will be displayed, indicating that the tour programming has finished.
• Finally, Holding the ALT key on, press the PROG key to return the display to its normal mode.
22.9 Privacy commands
Set whole
• Press and hold ALT then press the F9 key.
Clear whole
• Press and hold ALT then press the F10 key.
Uncover all
• Press and hold ALT then press the F11 key.
Replace all
• Press and hold ALT then press the F12 key.
Page 93

Vi-K2/Vi-K3 Universal
Keyboard
Vi-K2 Universal Keyboard User Manual
91
23 Protocol 18 – BBV RS485
Page 94
Vi-K2/Vi-K3 Universal
Keyboard
Vi-K2 Universal Keyboard User Manual
92
24 Protocol 19 – Vista (PelcoD)
24.1 Connections
Rx- Rx+
Domes-1 or Domes-2
VX10
5
4
2
1
7
8
3
6
Vi-K2 Keyboard
24.2 Settings
24.2.1 Switch Settings
12345678 12345678
1
ON
SW1 SW2 SW3
on on
1
Notes
•
Dome Camera numbers are equivalent to Vi-K2/Vi-K3 Keyboard camera numbers.
• This protocol uses a data rate of 2400 baud
SW1 = Camera number
E.g.
10000000 = Camera 1
11010000 = Camera 11
Page 95

Vi-K2/Vi-K3 Universal
Keyboard
Vi-K2 Universal Keyboard User Manual
93
24.3 Supported functions
• Pan / tilt / zoom / focus / iris
• Variable speed pan / tilt / zoom / focus / iris
• Auto-focus
• Auto-iris
• Presets (16)
• Tours (4)
• Menus
• 180° turn
• Set/clear auxiliary (01 – 08)
• Alarm acknowledge (01 – 08)
24.4 Joystick Operation
24.4.1 Pan & Tilt
Move the joystick left, right, up and down to move the dome in the corresponding direction. If the dome has
variable speed, then the further the joystick is moved from its central position, the faster the camera will pan
or tilt.
24.4.2 Zoom
Zoom is achieved by twisting the handle of the joystick clockwise (zoom in), or anti-clockwise (zoom out). If
the camera has variable zoom speed, the more the handle is twisted, the faster the zoom movement will be.
24.5 Lens Control
24.5.1 Focus
•
The two FOCUS keys can be used to adjust the focus.
• Press the ALT key and the upper FOCUS key to toggle auto-focus on & off.
24.5.2 Iris
•
The two IRIS keys can be used to adjust the iris.
• Press the ALT key and the upper IRIS key to toggle auto-iris on & off.
Page 96

Vi-K2/Vi-K3 Universal
Keyboard
Vi-K2 Universal Keyboard User Manual
94
24.6 Presets
24.6.1 Recalling a Preset
•
Press the PRESET key.
• The display will show the letter “P—”.
• Press one of the number keys 1, 2, 3…16 to select a preset that has previously been stored.
• The dome will move to that preset position.
• If the joystick is moved, the preset display will be cancelled.
24.6.2 Setting a Preset
•
Move the dome to the position at which you wish to set a preset.
• Press and hold the ALT key and then press the STORE key.
• The display will show the letter “P—”, flashing.
• Press one of the number keys 1, 2, 3…16 to select a preset.
• Press and hold the ALT key and then press the STORE key to store the preset.
24.6.3 Clearing a Preset
•
Press and hold the ALT key and then press the STORE key.
• The display will show the letter “P—”, flashing.
• Press one of the number keys 1, 2, 3…16 to select a preset.
• Press and hold the ALT key and then press the WIPE key to clear the preset.
24.7 Tours
24.7.1 Running a Tour
•
Press the TOUR key.
• The display will show the letter “t—”.
• Press one of the number keys 1, 2, 3 or 4 to select a tour number.
• The dome will run the tour until the TOUR key is pressed again.
24.7.2 Programming a Tour (Pattern)
To start the tour programming:
• Holding the ALT key on, press the PROG key.
• The display will show the letter “t—”, flashing.
• Press one of the number keys 1, 2, 3 or 4 to select a tour number.
• Holding the ALT key on, press the PROG key.
• The display shows flashing “rEC”.
• All joystick movements will be recorded until the programming is finished.
Page 97

Vi-K2/Vi-K3 Universal
Keyboard
Vi-K2 Universal Keyboard User Manual
95
• While the display shows flashing “rEC”, pressing one of the number keys 1, 2, 3…16 will move to
a preset (See “Presets” above).
To finish programming a tour:
• Holding the ALT key on, press the PROG key to finish the tour programming.
24.8 Menus
The Vi-K2/Vi-K3 has a special mode to make access to dome menus very easy:
• Press the DOME key on the Vi-K2/Vi-K3.
• The letters “Do” will appear on the display.
While the “
Do” is being displayed, some of the keys on the Vi-K2/Vi-K3 have special functions as follows:
• Press the MENU key to enter the dome user menu.
• Use the Up, Down, Left, Right arrow keys to navigate within the dome menu.
• Press the OK key to enter a sub-menu or to accept a menu setting.
Please Note for JUNO domes to select menu options please use focus in on joystick rather then ok key.
24.9 Other Commands
180° turn
• Press and hold ALT then the F1 key
Alarm acknowledge (Alarms 01 – 08)
• Press and hold ALT while pressing F9 – F16
Auxiliary (01 – 08)
• Aux 1: Press and hold ALT then press the RELAY key to toggle.
• Aux 2: Press the LAMP key to toggle.
• Aux 3: Press the WASH key and hold to set, release to clear.
• Aux 4: Press the WIPE key to toggle.
• Aux 5-8: Press and hold ALT then press the one of the F5 - F8 keys.
Page 98

Vi-K2/Vi-K3 Universal
Keyboard
Vi-K2 Universal Keyboard User Manual
96
25 Protocol 20 – LiLin (MLP2)
25.1 Connections
Domes-1 or Domes-2
VX10
5
4
2
1
7
8
3
6
Vi-K2 Keyboard
25.2 Settings
ON
12345678
Address 0 = Camera1
Address 1 = Camera 2
etc…
Page 99

Vi-K2/Vi-K3 Universal
Keyboard
Vi-K2 Universal Keyboard User Manual
97
25.3 Supported functions
• Pan / tilt / zoom / focus / iris
• Variable speed pan / tilt
• Wash
• Wipe
• Relay
• Lamp
• Auto-focus
• Auto-iris
• Auto-pan
• Presets (16)
• Tours (see below)
• 180° turn
25.4 Joystick Operation
25.4.1 Pan & Tilt
Move the joystick left, right, up and down to move the dome in the corresponding direction. If the dome has
variable speed, then the further the joystick is moved from its central position, the faster the camera will pan
or tilt.
25.4.2 Zoom
Zoom is achieved by twisting the handle of the joystick clockwise (zoom in), or anti-clockwise (zoom out). If
the camera has variable zoom speed, the more the handle is twisted, the faster the zoom movement will be.
25.5 Lens Control
25.5.1 Focus
•
The two FOCUS keys can be used to adjust the focus.
• Press the ALT key and the upper FOCUS key to select auto-focus.
25.5.2 Iris
•
The two IRIS keys can be used to adjust the iris.
• Press the ALT key and the upper IRIS key to select auto-iris.
25.6 Auxiliary Functions
25.6.1 Wash
Press the WASH key to operate the wash function.
Page 100

Vi-K2/Vi-K3 Universal
Keyboard
Vi-K2 Universal Keyboard User Manual
98
25.6.2 Wipe
Press the WIPE key to turn on the wiper. Press again to turn off.
25.6.3 Auto-Pan
Press the AUTO-PAN key to turn on the auto-pan function. Press again to turn off.
25.6.4 Lamp
Press the LAMP key to turn on the lamp. Press again to turn off.
25.6.5 Relay
Holding the ALT key on, press the RELAY key to turn on the auxiliary relay. Press these keys again to turn
relay off again.
 Loading...