

Videoswitch VDC User Manual

VDC Digital Recorder
User Manual
Products covered by this manual
Cameras / Hard Drive
Capacity
80 Gbytes
160 Gbytes
250 Gbytes
400 Gbytes
Document Reference
Vk604j 14/11/2005 From VDC001C0
Date Firmware
Videoswitch
Ocean House, Redfields Industrial Park Fax 01252-851296
Redfields Lane, Church Crookham Email sales@videoswitch.co.uk
Hants GU52 0RD Web www.videoswitch.co.uk
4 9
VDC-4G80 VDC-9G80 VDC-4G80E VDC-9G80E
VDC-4G160 VDC-9G160 VDC-4G160E VDC-9G160E
VDC-4G250 VDC-9G250 VDC-4G250E VDC-9G250E
VDC-4G400 VDC-9G400 VDC-4G400E VDC-9G400E
Telephone 01252-851510
4
(with Ethernet)
9
(with Ethernet)

VDC Digital Recorder
Vdc601c.doc

VDC Digital Recorder
Contents:
Start Here ............................................................................................................................................1
1
1.1 Connecting Up........................................................................................................................................................................2
1.2 Setting Date and Time............................................................................................................................................................3
1.3 Recording ...............................................................................................................................................................................3
1.4 Routine Checks ......................................................................................................................................................................3
1.5 Care of the Hard Drive............................................................................................................................................................4
1.6 Critical Alerts...........................................................................................................................................................................4
1.7 Power On Reset .....................................................................................................................................................................5
2 Viewing Live Images ..........................................................................................................................6
2.1 Viewing Full Screen Images...................................................................................................................................................6
2.2 Quad Display..........................................................................................................................................................................6
2.3 9-way Multi-Screen (VDC-9 only) ...........................................................................................................................................6
2.4 Auto-Sequencing....................................................................................................................................................................7
2.5 Inhibiting Alarms.....................................................................................................................................................................7
3 Time/Date Search ............................................................................................................................... 8
4 Playback Controls..............................................................................................................................9
5 Sweep Mode......................................................................................................................................10
6 Event List...........................................................................................................................................11
7 Writing Incidents to CD.................................................................................................................... 12
8 Replaying a CD.................................................................................................................................13
9 Information Screens......................................................................................................................... 14
9.1 Drive Information ..................................................................................................................................................................14
9.1.1 Re-Scan Drives.................................................................................................................................................................14
9.2 Image Information.................................................................................................................................................................15
9.2.1 Live...................................................................................................................................................................................15
9.2.2 Play...................................................................................................................................................................................15
9.3 System Information...............................................................................................................................................................16
10 Using the Menu.................................................................................................................................17
11 Menu Reference................................................................................................................................19
11.1 Date/Time.............................................................................................................................................................................19
11.2 Record..................................................................................................................................................................................19
11.2.1 Days..................................................................................................................................................................................19
11.2.2 Cameras...........................................................................................................................................................................20
11.2.3 Quality...............................................................................................................................................................................20
11.3 Display..................................................................................................................................................................................20
11.3.1 Camera Titles ...................................................................................................................................................................20
11.3.2 Auto Sequence Dwell .......................................................................................................................................................20
11.3.3 Record Brightness............................................................................................................................................................20
11.3.4 Record Colour Boost ........................................................................................................................................................21
11.4 Alarms...................................................................................................................................................................................21
11.4.1 Activity Detection..............................................................................................................................................................21
11.4.2 Alarm Hold Time...............................................................................................................................................................21
11.4.3 Video Loss Alert................................................................................................................................................................21
11.4.4 Hard Drive Alert................................................................................................................................................................21
11.4.5 Clear Event List ................................................................................................................................................................21
11.5 Network.................................................................................................................................................................................22
11.5.1 Dial-Up Type .....................................................................................................................................................................22
11.5.2 IP Address........................................................................................................................................................................22
11.5.3 Sub-Net Mask...................................................................................................................................................................22
11.5.4 Gateway............................................................................................................................................................................22
11.5.5 Port...................................................................................................................................................................................22
11.6 Config ...................................................................................................................................................................................22
11.6.1 Upgrade from CD..............................................................................................................................................................22
11.6.2 Restore Factory Config.....................................................................................................................................................22
11.6.3 Erase Hard Drive..............................................................................................................................................................22
11.6.4 Password..........................................................................................................................................................................23
11.6.5 System Address................................................................................................................................................................23
Vdc601c.doc

VDC Digital Recorder
12 Changing the Hard Drive..................................................................................................................24
13 Remote Dial-Up.................................................................................................................................25
13.1 Fitting the VDC/PSTN or VDC/ISDN Option ........................................................................................................................ 25
13.2 Using the VDC/PSTN or VDC/ISDN Option......................................................................................................................... 25
13.3 Ethernet Local Area Network (LAN)..................................................................................................................................... 26
14 Specifications ...................................................................................................................................27
14.1 Connector Pin-Outs.............................................................................................................................................................. 27
14.1.1 Alarms.............................................................................................................................................................................. 27
14.1.2 Keyboard..........................................................................................................................................................................27
14.2 Image Capture and Storage.................................................................................................................................................28
14.3 Physical and Environmental.................................................................................................................................................28
14.3.1 Power Requirements........................................................................................................................................................ 28
14.3.2 CE Marking ...................................................................................................................................................................... 28
14.3.3 Dimensions and Weight...................................................................................................................................................28
14.3.4 Temperature and Humidity............................................................................................................................................... 28
14.3.5 Ventilation ........................................................................................................................................................................ 28
14.3.6 Safety............................................................................................................................................................................... 28
Vdc601c.doc
VDC Digital Recorder
1 Start Here
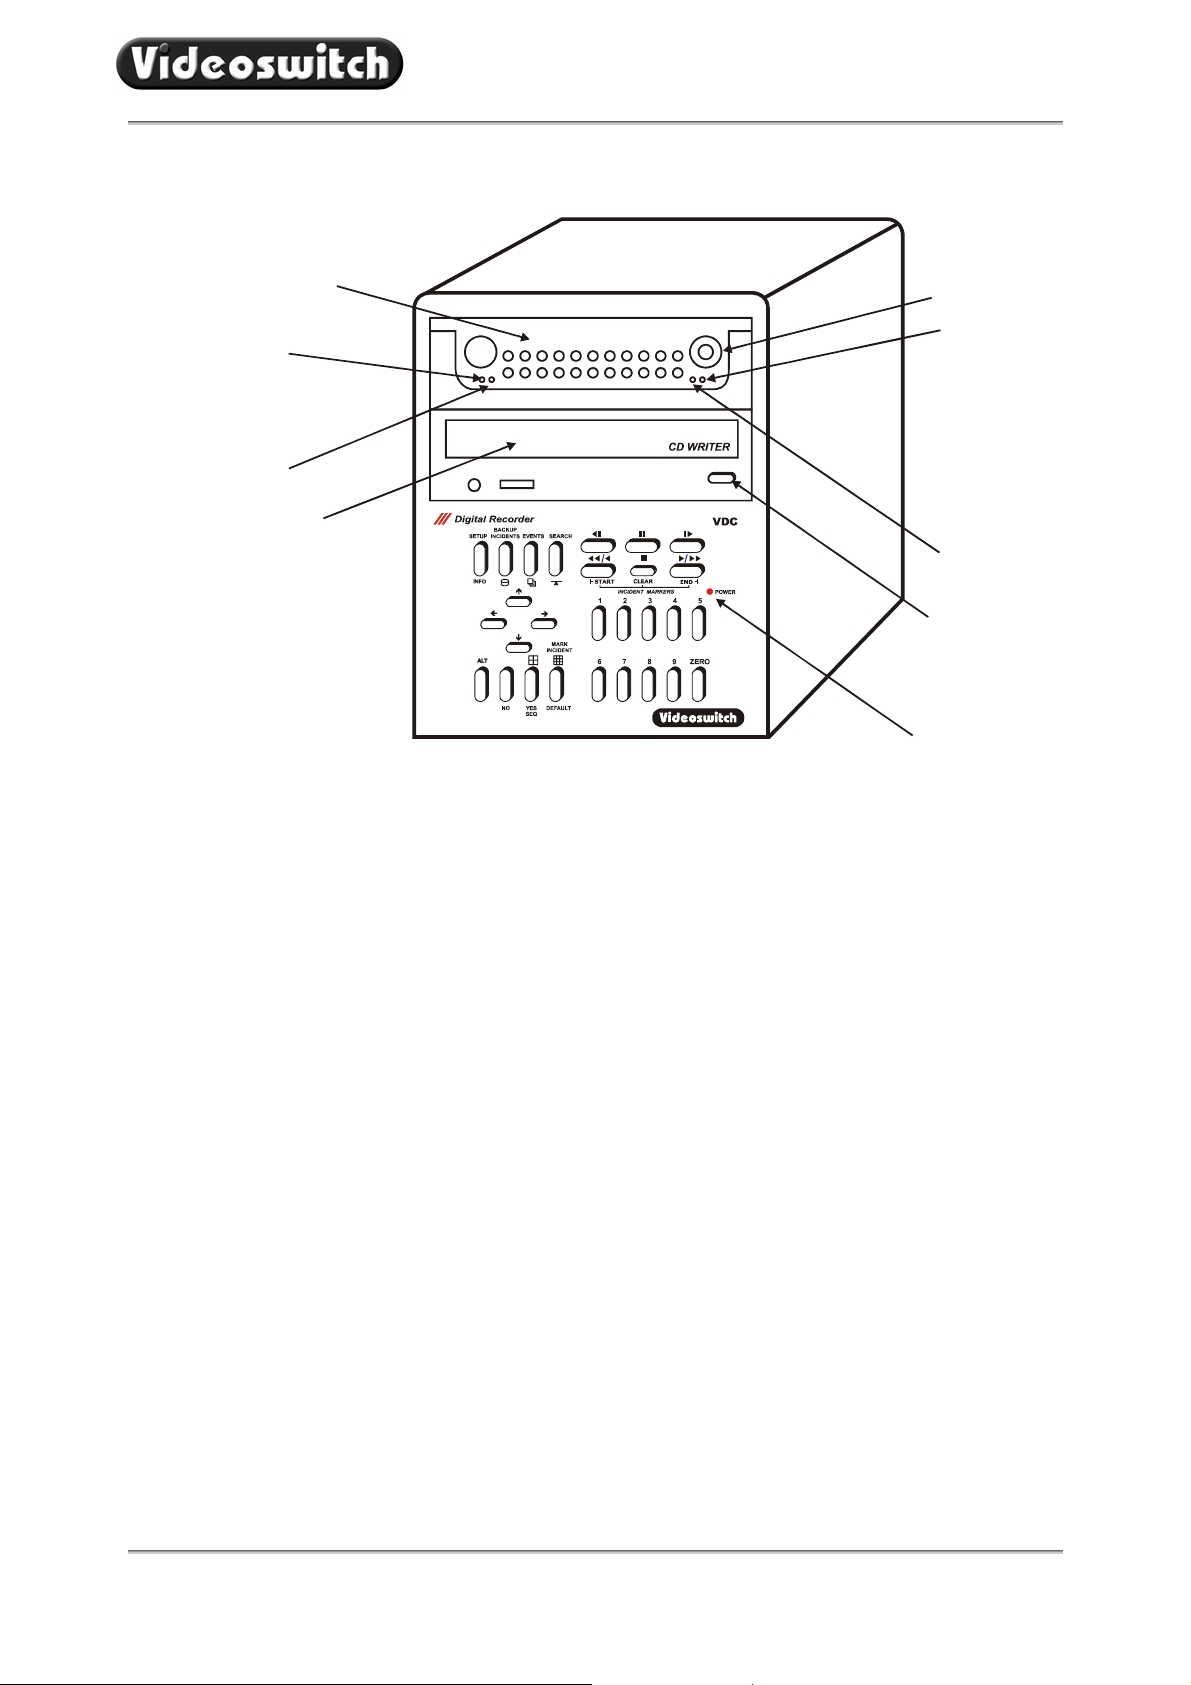
REMOVABLE HARD DRIVE
DISC ACTIVITY (GREEN)
FAN 1 OK (GREEN)
CD WRITER
The VDC Digital Recorder provides a one-box solution for multiplexing, digital recording of video images
from up to 9 cameras. It also includes a CD writer for backup and options for remote viewing via a dial-up or
Ethernet connection.
HARD DRIVE LOCK
DISC POWE R (R E D)
FAN2 OK (GREEN)
OPEN CD DRAWER
SYSTEM POWER (RED)
• All you need for a digital recording system is the VDC recorder, up to 9 cameras and a display
monitor. This set-up will permit the video images from all the cameras to be recorded onto hard disc
for a period of typically 31 days. Beyond that time, the oldest images will be over-recorded by new
images. The number of days is selected the user and the VDC automatically calculates the update
rate to achieve this target.
• Any images available on the hard disc can be played back without interrupting the recording
process. The active SEARCH facility allows images to be found by time and date.
• The SWEEP mode allows the contents of the hard drives to be rapidly scanned for the easy location
of particular areas of interest even when the date and time is not known.
• An EVENT list records alarms generated by the built-in activity detection and by external alarms
(e.g. PIR detectors). Events may be instantly recalled and replayed.
• For permanently archiving images, a CD writer is included as standard in all VDC recorders. An
INCIDENT list is used to mark any sections of video that you wish to archive onto CD. A CD-R disc
provides a permanent record suitable for police use.
• Incidents stored onto CD may be played back in any VDC, a VDM, or on a PC (no software
installation required)
• The CD drive is also used to install firmware updates to the system. These will be made available on
CD and on the Internet if new features become available.
• The removable hard drive provides the user with the ability to upgrade the drive capacity at any
time. Additionally, it also means minimal “down time” if the drive fails in service; a replacement drive
can be sourced and plugged in without the need for disconnecting the system.
Vdc601c.doc
1

VDC Digital Recorder
1.1 Connecting Up
ALARMS
ETHERNET (OPTION)
REMOTE KEYBO A RD
PSTN or ISDN (OPTION)
CAMERA INPUTS
MAINS POWER INPU T
MAINS VOLTAGE SELECT
• Connect the video input of the Monitor to the monitor output of the VDC using a BNC cable
• Make sure that the monitor termination is switched on (i.e. to 75 Ohms)
• Connect the first camera to Camera Input 1 on the VDC using a BNC cable
• Connect the next camera to Camera Input 2 on the VDC using a BNC cable
• Connect the next camera to Camera Input 3 on the VDC using a BNC cable
• Connect the next camera to Camera Input 4 on the VDC using a BNC cable
• Make sure that the voltage select switch is set to suit the mains supply voltage prior to applying
power otherwise damage may occur. The setting required in UK and Europe is 230Vac.
• Connect the mains power using the IEC cable supplied using an IEC to 13A plug cable (provided)
• When power is applied, the system will perform a self-test prior to displaying live images.
MONITOR OUT PUT
Vdc601c.doc
2

VDC Digital Recorder
1.2 Setting Date and Time
For proper operation of the VDC Digital Recorder it is essential that the date and time are set
correctly.
If the system clock has an invalid date or time when the VDC is powered up (or at any time during
operation), the date and time setting window will be automatically displayed
If this occurs, use the keys 0, 1, 2, 3, 4, 5, 6, 7, 8, 9 and 0 to enter the date and time.
The format for the date and time is DD/MM/YY HH:MM:SS where:
• DD is the day of the month (00 to 31),
• MM is the month (01 to 12),
• YY is the year (e.g. 04 for the year 2004),
• HH is the hour in 24-hour format (00 to 23),
• MM is the number of minutes past the hour (00 to 59) and
• SS is the number of seconds past the minute (00 to 59).
If you need to adjust the time and date at any time, enter the menu by pressing the SETUP key (see section
11). The time is automatically adjusted forwards or backwards by an hour at the appropriate dates to take
account of British Summertime so no user action is required.
1.3 Recording
The VDC Digital Recorder should now be fully operational and recording images from all cameras. The
default image retention period is 31 days. Refer to the following sections of this manual for details on
controlling and configuring the system.
If the system is not recording, the message STOP will be displayed on the screen. This should only happen
if no hard drive is fitted, or if you have de-selected all cameras in the record menu (Section 11.2.2).
1.4 Routine Checks
Although the system is intended for continuous un-attended operation, it is recommended that the user
regularly check that images from all cameras replay correctly. Any potential problems with the cameras
or recording system will then be detected as soon a possible, rather than continuing un-noticed until a critical
incident needs to be recalled from the system.
Similarly, when a CD has been created you should check that it plays back correctly
images are over-recorded on the VDC. The CD may be checked by either by playing it on a VDC or on a
PC.
Vdc601c.doc
, before the
3

VDC Digital Recorder
1.5 Care of the Hard Drive
The hard drive is a delicate mechanical item that should be handled with care. Before moving a VDC that
has been powered up, remove power and wait for 30 seconds for the drive to stop spinning. This is a
precaution to avoid possible damage to the hard drive.
1.6 Critical Alerts
The VDC constantly monitors the hard drive, camera inputs and system so that detected fault conditions will
be reported to the user as soon as possible by means of a “critical alert” message on the screen. Alerts are
also added to the event list.
Press the EVENTS key to view the event list (pressing the DEFAULT key automatically scrolls to the most
recent events.
Viewing the list will cancel the alert message. However if the condition persists, the message will re-appear.
• FailTest This alert indicates that the system self-test has failed.
o Press ALT and SETUP to call up the System Information screen. The positions
of any solid blocks displayed on the “Self Test” row indicate various fault
conditions.
o Try power cycling the VDC to see if the problem is fixed, or failing this.
o Try a power-on reset (See section 1.7).
o If the problem persists, cont act your supplier.
• VidLoss This alert means that video has been lost on one or more of the camera inputs.
o Make sure that the video loss setting in the menu (see section 11.4.3)
corresponds with cameras actually fitted.
o Check connections to all cameras.
o Check that each camera can be viewed in live, full screen mode.
o Swap a camera input that is working with the one that is not. Does the problem
move with the camera (i.e. faulty camera or cable) or stay with the input (possible
faulty VDC)
o If a camera is suspected as being faulty, connect it directly to a monitor to test it.
• HD1 Fail This alert indicates that the hard drive is not working.
o Check that the drive drawer is correctly fitted
o Check the lock in the drive drawer is turned full counter-clockwise
o Check the DISC ACTIVITY LED is flickering (see diagram in section 1)
o Check that the green FAN1 OK and FAN2 OK LEDs are lit.
o Check that the red DISC POWER led it lit.
• HD1 SMART This alert indicates that the hard drive may stop working soon
o The SMART monitoring detects imminent failure of a hard drive, so if this warning
occurs, the drive should be changed at the earliest opportunity.
Vdc601c.doc
4

VDC Digital Recorder
1.7 Power On Reset
If you wish to perform a power-on-reset to restore all settings to their factory defaults, press the ALT key
while you apply power, and keep pressing it until the VDC has powered up and displays FACTORY
RESET. Note that this process will reset all user settings, including titles and password.
Vdc601c.doc
5

VDC Digital Recorder
2 Viewing Live Images
Press this key to enter LIVE mode:
2.1 Viewing Full Screen Images
Select full screen views of different cameras by pressing the NUMERIC keys:
2.2 Quad Display
Select quad display by pressing the QUAD key (live display only):
2.3 9-way Multi-Screen (VDC-9 only)
Select x9 Multi-Screen display by pressing the MULTISCREEN key (live display only):
Vdc601c.doc
6
 Loading...