

Videon Shavano Product Manual

Videon Product Man ual
Shavano Encoder

Copyright © 2018 Videon Central, Inc.
All rights reserved. No part of this publication may be reproduced, distributed, or transmitted in
any form or by any means, including photocopying, recording, or other electronic or mechanical
methods, without the prior written permission of the publisher. For permission requests, write to
the publisher, addressed “Attention: Marketing Communications Manager,” at the address
below.
Videon Central, Inc.
2171 Sandy Dr.
State College, PA 16803
4kunder2k.com
Product Ordering Information for Videon products:
To order encoders and decoders, as well as other Videon products, call our Customer Care
team at (814) 235-1111 x303.
Table of Contents Page 2

Table of Contents
Table of Contents 3
Overview 4
Questions? Let Customer Care Help. 4
1. Setting up your Videon device(s) 5
1.1 Network Requirements 5
1.2 Equipment 5
1.3 Connecting Your Videon device(s) 6
1.4 Connection Diagram 6
1.5 Final Setup 6
2. Controlling your Videon Device(s) 7
2.1 Overview 7
2.2 Initial Setup: IP Address Discovery 7
2.3 LED Indicators 8
2.4 Basic Control Functions 8
2.5 Encoder Control 10
2.6 Device Settings 16
2.7 Advanced 17
2.8 Help 17
3. Hardware Reset Instructions 18
Still need help? 19
Table of Contents Page 3

Overview
Thank you for purchasing a Videon product.
This manual will describe device setup, configuration, technical specifications and
troubleshooting. All Videon devices are interoperable and controlled via a web user interface.
This manual is specific to Shavano H.265 Encoder, unless stated otherwise.
Questions? Let Customer Care Help.
Search the Videon Product Knowledge Base at https://kb.videon-central.com
help and tips!
If at any point you have questions or comments about your Videon product, or just need a hand
getting started, our Customer Care team would be happy to assist you. Submit a support ticket
through our Customer Help Desk.
Help Desk:
https://helpdesk.videon-central.com/customer
techsupport@videon-central.com
for troubleshooting
Overview Page 4

1. Setting up your Videon device(s)
1.1 Network Requirements
Your installation space must be equipped with a DHCP-enabled and multicast-enabled
Ethernet router. Dynamic Host Configuration Protocol (DHCP) refers to a method of assigning
unique IP addresses to devices on a network. Most routers have these capabilities and default
to these settings.
Upload bandwidth needs to be sufficient for the video bitrate that you’re encoding. See the
Suggested Bitrate Table in Section 2.5. (Use a network speed diagnostic tool such as
speedtest.net to determine your maximum upload bandwidth.)
1.2 Equipment
In order to set up a Videon encoder, you need:
• HDMI or SDI video source
• Computer with Google Chrome web browser (Chrome version 39 or newer is
recommended)
• DHCP- and multicast-enabled router connected to network
• HDMI or SDI cable to connect video source to encoder
• Ethernet cable to connect encoder to router
• Ethernet cable to connect control computer to router
With your device, you received a Videon power supply and a USB stick. On the USB stick,
you’ll find the Videon Discovery Application.
1. Setting up your Videon device(s) Page 5
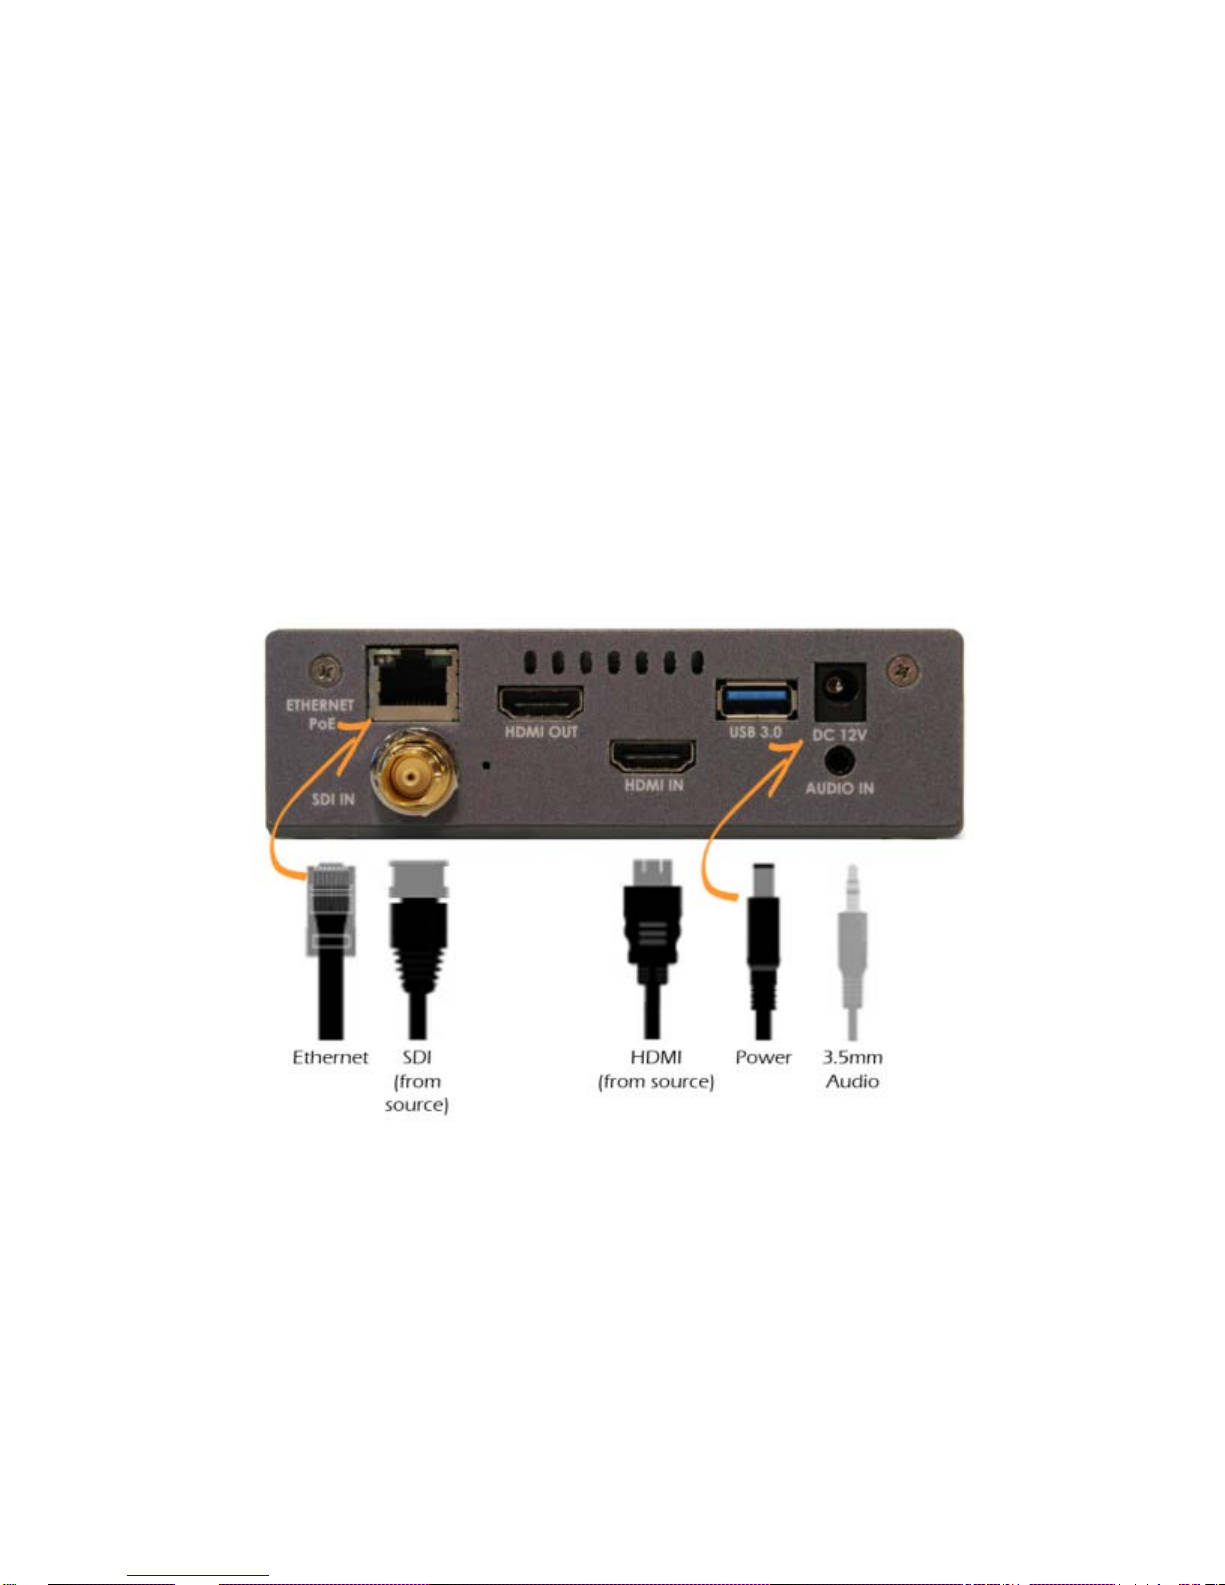
1.3 Connecting Your Videon device(s)
We recommend completing all hardware connections before powering on your device.
1. Connect the video source to the device’s HDMI IN port with an HDMI cable, or the SDI
IN port with an SDI cable. Connect an audio jack to the device’s AUDIO IN port to use
analog audio, rather than embedded audio.
2. Connect the device’s Ethernet port to the router with an Ethernet cable.
3. Connect the control computer to the router with an Ethernet cable.
4. Plug one end of provided power supply into the device’s 12V connector and plug the
other into the wall. This will power on the device. Alternatively, use Power over Ethernet
to power the device. Be sure to use a PoE switch.
1.4 Connection Diagram
1.5 Final Setup
Verify that the following components of your installation are turned on:
• Video source
• Control computer
• Router
1. Setting up your Videon device(s) Page 6
 Loading...