

Videology 20B709W, 21B709W Operation Manual
Operation Manual
CMOS
Wide Dynamic Range Camera
20B709W/21B709W
BOX CONTENTS
1. 20B709W (NTSC) or 21B709W (PAL) camera
2. Operation manual
3. CS lens (optional)
4. C ring adapter
5. Allen key
6. DC Iris connector and cover
SAFEGUARDS & WARNINGS
1. Read instructions before
operating camera.
2. Avoid mounting in direct sunlight.
3. Installation and repair should be
undertaken by authorized personnel
only.
INSTALLATION TIPS
If the camera is to be mounted
outdoors, or in hot, humid, or otherwise harsh
environments, a secondary enclosure should be
used.
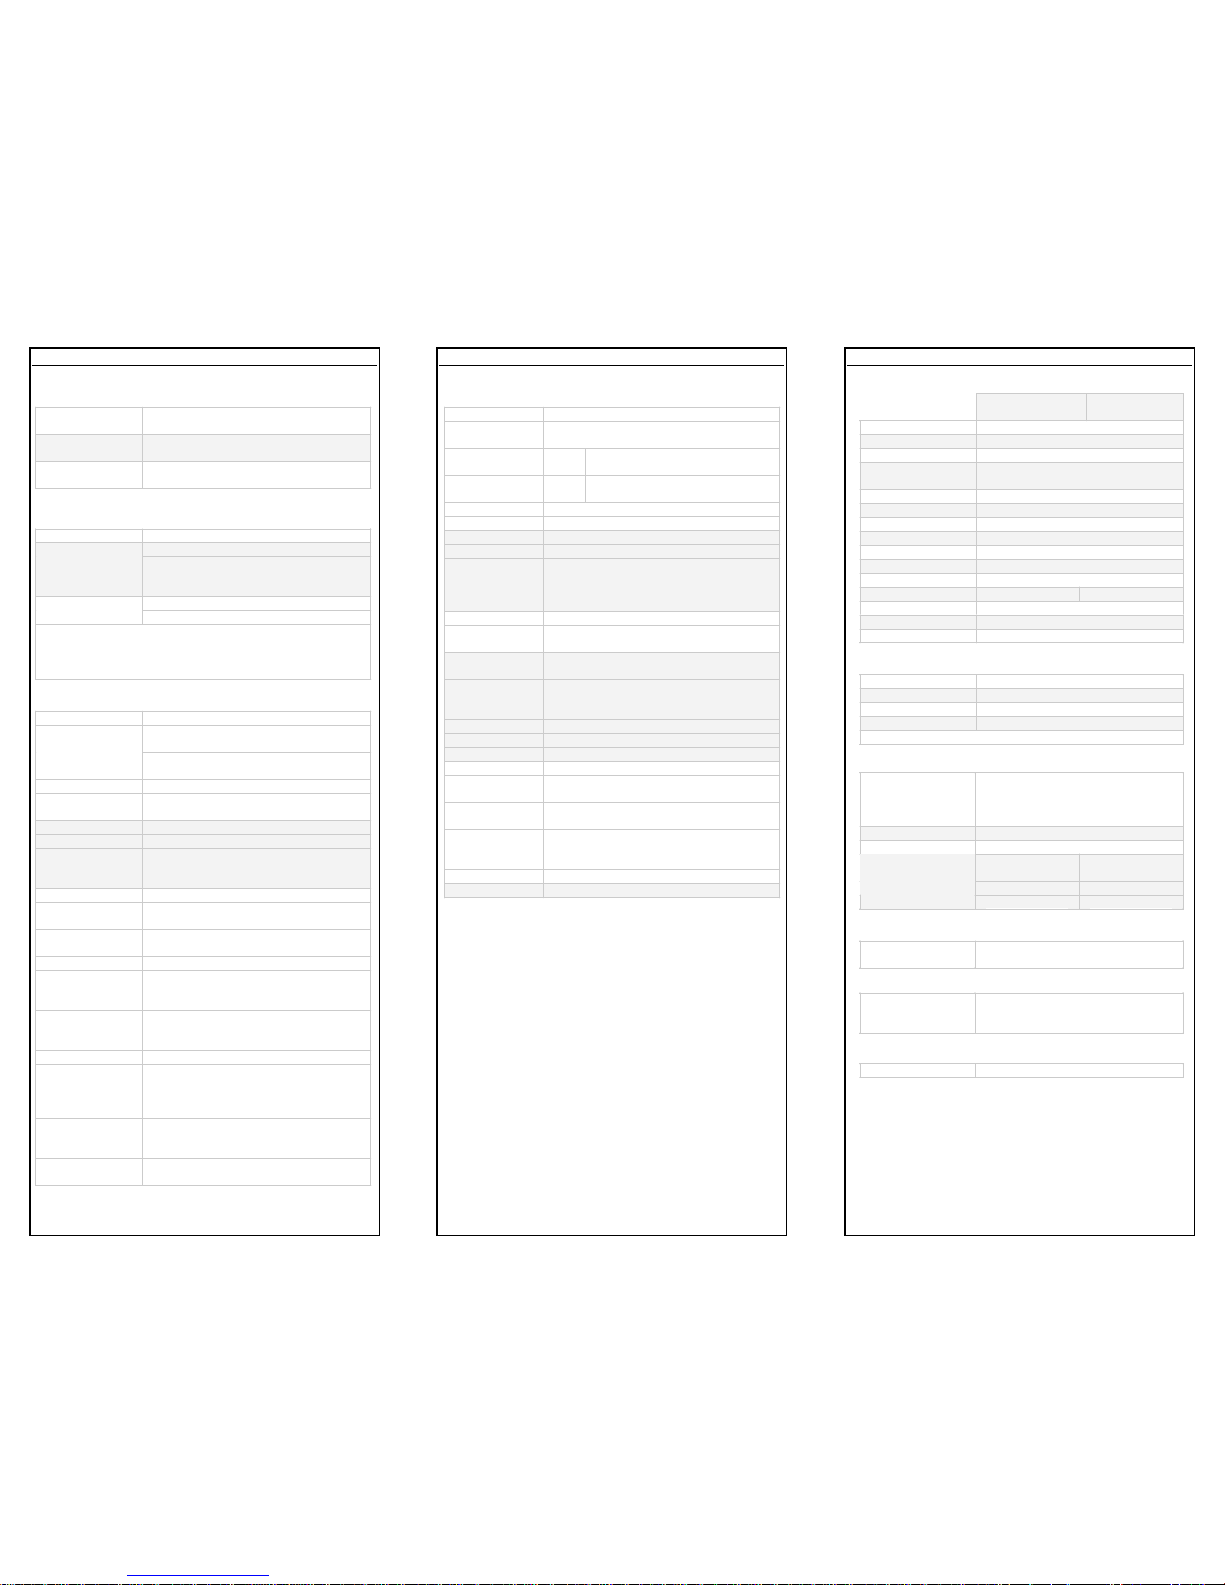
BACKFOCUS ADJUSTMENT
Manual Lens
1. If your camera has a lens on it already
chances are that is was pre-backfocused from
the factory. If not, screw the lens into the ring
on the front of the camera until it is fairly snug.
If the lens is varifocal bring it to the point
where it has the widest field of view (far). If
you are looking at objects close up adjust the
lens in the (near) distance not (far).
2. Loosen the two allen screws behind the CS
ring.
3. Backfocus the lens from the CCD until the
picture appears to be in focus.
4. If the lens has a focus ring, adjust that ring
to get your image in clear focus. Now tighten
the two allen screws so the lens does not come
loose.
DC Iris Lens
1. Perform the same functions as above Manual
Lens.
2. Make sure you plug in the DC Iris connector.
3. It is a good idea the check the lens performance under different lighting conditions.
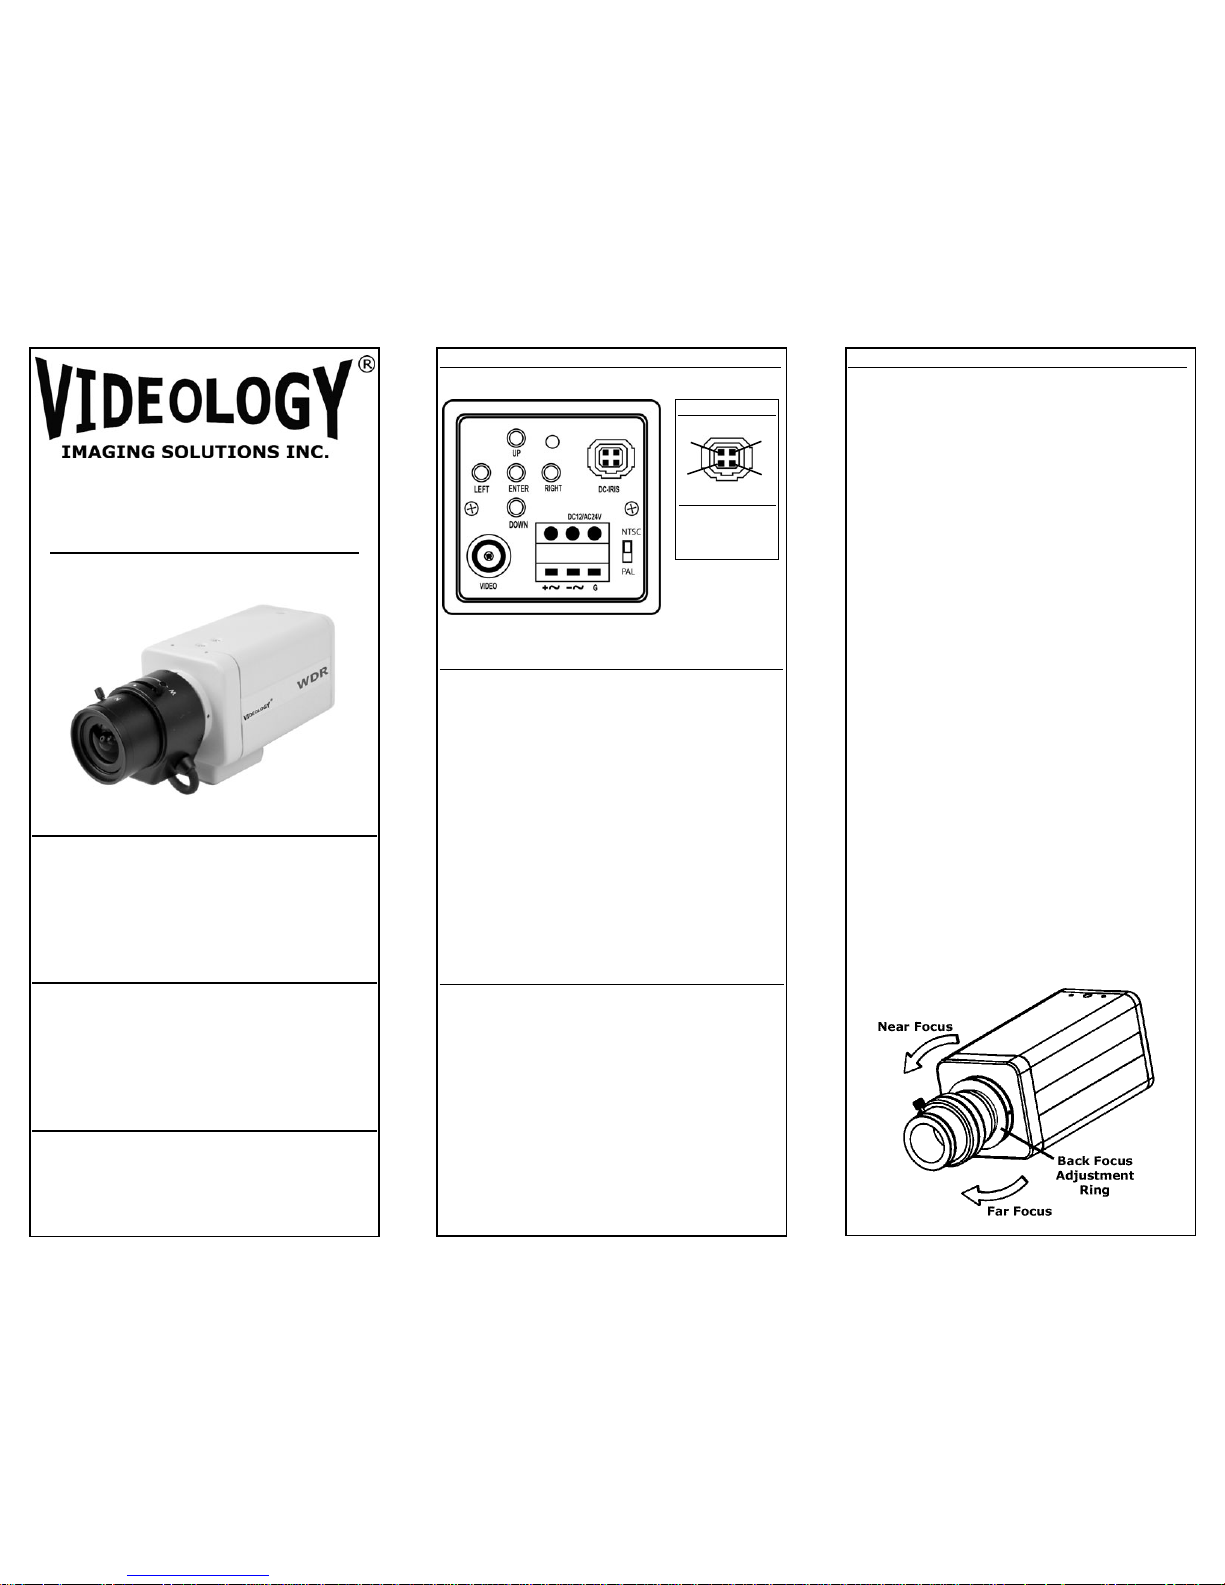
CONTROLS / CONNECTORS
CAMERA CONNECTION
Connect the coaxial cable (with pre-wired BNC
plug) to the BNC connector (Video) of the camera.
If you are using an DC auto iris lens with the
camera, the lens has to be connected to the
DC-Iris socket of the camera. If you are using a
lens with manual or fixed iris, this socket is not
used.
The operating voltage is connected to the designated terminal block either 12VDC or 24VAC.
Operation of the camera will be confirmed by
the power LED at the rear side of the camera.
NTSC/PAL SELECT
NTSC/PAL should be set by the factory before it
is shipped to the customer.
On some models, NTSC or PAL can be selected
manually by moving the switch on the back of
the camera up or down (shown above).
NTSC - switch position is up
PAL - switch position is down
DC Driven (DC)
1. Control -
2. Control +
3. Drive +
4. GND
Pin Assignment
DC-IRIS
1
2
3
4
LED
06/19/09 INS-20B709W Rev B
MENU & SETTING DETAILS MENU & SETTING DETAILS (cont.) TECHNICAL SPECIFICATIONS
Electrical
20B709W
(NTSC)
21B709W
(PAL)
Image Sensor
1/3” CMOS Digital Pixel System
Active Pixels (HxV)
742 x 552
Resolution
480 TVL
Sensitivit y
0.6 lux @ 30 IRE (F1.2)
0.08 lux (w/ DSS on)
Dynamic Range
120dB(max), 102dB (typical)
Signal To Noise Ratio
48 dB or more
Auto White Balance
On / Off
Gain
AGC max on / off
Synchronization
Internal / external
Gamma
0.45
Iris Control
DC iris / Ele ctric
Shutter Speed
1/60 to 1/100,000
1/50 to 1/100,000
Video Output
1V p-p composite 75 Ohms
Power Supply
12VDC/24VAC
Power Consumption
< 2.9W
Environmental
Operating Temp
-10°C ~ 55°C (-14°F ~ 122°F)
Storage Temp
-20°C ~ 70°C (-4°F ~ 158°F)
Operating Humidity
< 90% non-condensing
Storage Humidity
< 95% non-condensing
Mechanical
Dimensions WxHxD
With Connectors &
Mount
50 x 50 x 85mm
(1.97” x 1.97” x 3.35”)
50 x 60 x 102.6mm
(1.97” x 2.4” x 4.04”)
Weight
217.5g (0.48 lbs)
Lens Mounts
C, CS
Power
12VDC/24VAC
Terminal strip
Video Output
BNC (rear)
Iris
DCAI (4pin)
Accessories
Included
1 mounting plate: top or bottom
mountable
Certifications
RoHS Comp liant
CE & FCC in Process
(Others Available Upon Request)
Complementary Models
20B709TW
Optional WDR/TDN
06/19/09 INS-20B709W Rev B
OSD MENU CONTROL
CENTER KEY
Used to access menu mode, Also used
to confirm the setting.
UP/DOWN KEY
Used to choose the desired menu
selection.
LEFT/RIGHT KEY
Used to choose the desired menu
feature adjustment.
OSD MENU ENTER/EXIT
OSD MENU ENTER
Push Enter Key for 3 seconds.
Press EXIT Menu from Main Menu
OSD MENU EXIT
If Pressing Set Key (Enter Key) for 3
seconds, Main Menu appears. In t his
case, just press Set Key.
Left or Right Key - Selecting Menu
'SAVE' and 'QUIT'
Up or Down Key - Returning to Menu
1. Press the SET key to acce ss the main setup mode.
2. Select the desired feat ure using UP or Down keys.
3. Change the statu s of the selected feature using LEFT or
RIGHT keys.
MAIN MENU
SETUP ID
ON: The ID name will be displayed in
the monitor.
DISPLAY ID
OFF: The n ame will not b e displaye d in
the monitor.
CAMERA ID
Can be written to 12 characteristics.
ID POSITION
Select on screen position of the came ra
ID.
LENS
MANUAL
Use When using Manual lens.
DC
You can control the brightness of the
screen and adjust the desired D C level
from 10 to -42.
WDR
EXPO
(EXPOSURE) It has the e ffect of
lightening or darke ning the p icture.
WDR
(Wide Dynamic Range) You can adjust
the desired WDR level from 20 to -20.
WB CONTROL
ATW
(Auto Tracking White Balance) The
camera au tomatically control th e white
balance in any environment.
AWB
(Auto Whit e Balance ) The whit e balance
is automat ically adjus ted in a spe cific
environment.
AGC
MANUAL
Users can adjust the colors by adding or
reducing the WB level. You can adjust
the desired WB level from 2,500K to
9,500K.
ON
Activate automatic gain control feature.
You can adjust the desired AGC level
from 0 to 36dB.
OFF
Deactivate automatic gain control
feature.
MAIN MENU (cont.)
LOW LIGHT
SLOW SHUTTER
Control Image brightness by adjusting
shutter speed.
AGC
Shutter speed setting
(Range 28 - 42)
MAX
FIELD
Shutter open from min x2 t o max
x32 filed acc umulation period.
B&W SS
(B&W Slow Shutter) (Optional)
GAIN
To get brighter picture.
SYNC
INTERNAL
Internal synchronization
LINE LOCK
Phase adjustment may be nece ssary in
multiple cam era insta llations to p revent
picture r oll when swit ching bet ween
cameras.
RS485
CAMERA #
Selectable from 1 to 255 (Note: Pelco D is
the default)
DAY/NIGHT
(Optional)
AUTO
For automatic switchover from day mode
to night (Note: This setting is dependent
on the AGC setting.)
B/W
To keep a B/W image at all times
COLOR
To keep a color image at all times
CDS
External input signal control
EXIT MENU
EXIT
NO CHANGES
No change
SAVE NEW
AND EXIT
Save change
RESTORE
FACTORY
SETTINGS
Factory default
SW REV
PREVIOUS PAGE
Return page
 Loading...