


Contents 1
User Guide
&

2 Captivator Pro & Captivator ProTV User Guide
COPYRIGHT
Copyright 1994 by V ideoLogic Limited. All rights reserved. No part of this publication may
be copied or distrib uted, transmitted, t ranscribed, stored in a retrieval system, or translated
into any human or computer language, in an y form or by any means, electronic, mechanical,
magnetic, manual or otherwise, or disc losed to third parties without the express written
permission of VideoLogic Limited.
The trademarks and any copyright or other intellectual property r ights of whatever nature that
subsist or may subsist in the Software Package referred to in this publication (including b ut
not limited to all programs, compilation of command words and other syntax contained
therein) are and shall remain the property of VideoLogic Limited absolutely.
DISCLAIMERS
VideoLogic Limited mak es no representation or w arranties with respect to the content of this
document and specifically disclaims any implied warranties of merchantability or f itness for
any particular purpose. Further, VideoLogic Limited reserves the right to revise this
publication and to make changes in it from time to time without obligation of VideoLogic
Limited to notify any person or organization of such revision or changes.
CAPTURING AND REPURPOSING IMAGES
V ideoLogic Ltd recommends that you observe the rights of the original artist or publisher
of the images you capture. If you plan to use a previously published image, contact the artist
or publisher for information on obtaining permission to reproduce/repurpose the image.
TRADEMARKS
Microsoft is a registered tr ademark, W indows, V ideo for W indows, VidCap and VidEdit are
trademarks of Microsoft Corporation. Sound Blaster is a trademark of Creative Technology
Ltd. VideoLogic, the VideoLogic logo, Captivator Pro, Captivator ProTV, 928Movie,
PCI Movie, SmoothScale, and TV Snap are trademarks of VideoLogic Limited.
All other product names are trademarks of their respective companies.
P
RODUCT NOTICES
Ref er to Appendix D for inf ormation about radio and TV interference, EMC, pr oduct service,
warranty inf ormation, and details of the software license agreement.
CREDITS
This manual was written by Huw Geddes. It is a product of V ideoLogic Limited, Home Park
Estate, Kings Langley, Hertfordshire WD4 8LZ, United Kingdom.
Printed in Singapore 47131
First Edition 15 November 1994

Contents 3
Contents
Introduction .......................................................................5
About Capti v ator Pr o and Ca pti v a tor ProTV ....................................................... 5
About this guide ................................................................................................. 5
About the Captiv ator Pro and Captiv ator ProTV har dw are .................................. 6
About the Captiv ator Pro/TV softwar e ................................................................ 7
System requirements........................................................................................... 8
What you should know ....................................................................................... 9
Con ventions used in this guide ............................................................................ 9
Handling Captivator Pro/TV ..............................................................................10
Returning the r e gistration card ...........................................................................10
Installing Captivator Pro/TV ................................................... 11
Before you start .................................................................................................11
Captiv ator Pro/TV Setup....................................................................................12
Running the Setup program ...............................................................................13
Installing the Captiv a tor Pro/TV card .................................................................15
Connecting the external cables ...........................................................................18
Changing Captivator Pro/TV’s hardware settings .................................... 19
Ho w to change Captiv ator Pro/TV’ s base address or interrupt setting .................19
Displaying live video........................................................... 23
Ho w to display li v e video in a window ...............................................................23
Capturing Video for Windows clips........................................... 29
Capturing full screen and full motion video........................................................29

4 Captivator Pro & Captivator ProTV User Guide
Capture performance..........................................................................................30
Managing your hard disk ...................................................................................30
Mixing video and graphics.................................................................................31
Preview mode ....................................................................................................31
Snapping video stills........................................................... 33
Using TV Snap ..................................................................................................34
File formats supported .......................................................................................38
Tuning in TV channels ......................................................... 39
How to display the Captiv ator Pro/TV Tuner dialog ...........................................39
How to tune in TV channels...............................................................................40
Troubleshooting ................................................................ 43
Error messages ..................................................................................................47
Appendix A - VideoLogic Captivator Pro/TV MCI command set ........... 49
Appendix B - Captivator Pro/TV technical details ........................... 53
Specifications ....................................................................................................53
Connectors ........................................................................................................54
Base address settings .........................................................................................55
Appendix C - Technical support ............................................... 57
Captivator Pro/TV checklist...............................................................................58
Appendix D - Notices........................................................... 59
Index ............................................................................. 61

Contents 5Introduction
Introduction
About Captivator Pro and Captivator ProTV
Captivator Pro is a 16-bit ISA video-in-a-window and capture
card which, when connected to a graphics card that supports the
VESA Media Channel (VM-Channel), provides:
• Scaleable full motion video-in-a-window from Composite
and S-Video input in NTSC, PAL, or SECAM format. The
video window can be displa yed on top of other active
windows and mirrored horizontally.
• Capture of video clips when used with a Video for Windows
™
capture application.
• Still image capture from live input using TV Snap.
Captivator Pr o is available with a TV tuner, as Captivator ProTV,
allowing you to display live video directly fr om a TV ae rial,
cable set-top or satellite decoder. Captivator ProTV has an audio
output which can be connected to an external amplifier or
speakers, and an internal audio connector which can be
connected to a sound card. It is available in three variants which
provide suppor t for major TV broadcasting systems.
Captivator Pro and Captivator ProTV can be connected to any
VM-Channel enabled graphics card, such as VideoLogic’s
928Movie or PCI Movie.
About this guide
This guide explains how to install Captivator ProTV and use the
software. If y ou have a Captivator Pro, follow the instructions for
installing and using Captivator Pr oTV, ignoring references to the
TV tuner and audio connections. References to Captivator Pro/
TV apply to both Captivator Pro and Captivator Pr o/TV.

6 Captivator Pro & Captivator ProTV User Guide
About the Captivator Pro and Captivator ProTV hardware
The layout of Captivator Pro and Captivator ProTV is displayed
below.
phono
connector
3.5 mm jack
phono
connector
TV tuner
RF connector
16-bit ISA bus connector
16-bit ISA bus connector
Captivator ProTV
Captivator Pro
4-pin DIN
connector
4-pin DIN
connector
VM-Channel connector
VM-Channel connector
base address jumper
base address jumper serial number
internal audio connector

Contents 7
About the Captivator Pro/TV software
The Captivator Pro/TV software, which you use with
Captivator Pro and Captivator ProTV, includes a Setup program
that installs the following program items in the VideoLogic
VM-Channel Options program group:
• Video Control Panel—which you use to configure Captivator
Pro/TV for your input and to adjust the video picture.
• TV Snap—which you use to capture still images from live
input.
• Video Window—a resizeable floating video window which
can be displayed on top of other active windows.
• A ReadMe file , in text fo rmat, that contains information that
was not available when this guide was written.
• Help—online Help files which explain in detail how to use
the Captivator Pr o/TV Video Control Panel, TV Snap, and the
MCI commands that the VideoLogic Captivator Pro/TV driver
supports.
The VideoLogic Captivator Pro/TV driver, which controls
Captivator Pro/TV, supports Microsoft’s MCI video overlay
command set. This command set allows programmers to control
Captivator Pro/TV using applications developed with
programming languages or multimedia tools. The VideoLogic
Captivator Pro/TV driver also allows you to configure your
hardwar e without rerunning the Captiva tor Pro/TV Setup
program.
Introduction

8 Captivator Pro & Captivator ProTV User Guide
System requirements
Hardware
To run Captivator Pro/TV, you need a computer with a
33 MHz 386 SX processor or better, 4 MB of RAM, and a spare
16-bit ISA bus slot. You must have a graphics card with a
VM-Channel connector, such as VideoLog ic’s 928Movie or
PCI Movie, installed in your computer.
To capture video clips we recommend tha t you use a PC with a
66 MHz 486 processor or better and a VL bus 928Movie or
PCI Movie graphics card .
If you have a Captivator ProTV and intend to use the TV tuner, it
is worth supplying a good strong signal—70dB µV for best
results. If the picture is weak and snowy, you may need a better
aerial/antenna or a booster. If you use a booster do not place it
too close to your computer. Your local aerial/antenna specialist
will be able to advise you on the optimum position for your
booster. If you need to shar e an aerial/antenna feed with a TV or
VCR, it is best to use a booster with two or more outputs. If you
use a splitter, make sure it is a low loss type as cheap passive
splitters usually lose too much signal.
Software
To use Captiva tor Pro/TV you need Windows 3.1 or above
running in enhanced mode. Microsoft recommend DOS 5.0 or
above for Video for Windows. If you are using a 928Movie y ou
need version 1.1.1 or above of the 928Movie softwar e. If you are
using PCI Movie we recommend version 1.1 or above of the PCI
Movie software.
To capture video clips you need Video for Windows 1.1 and a
Video for Windows capture application.
To use T V Sn ap you need Video for Windows 1.1.
If you are capturing video clips to your hard disk, do not use
DoubleSpace, Stacker
™
or any similar disk-doubling application,
to compress the data on your hard disk. We also recommend that
you defragment your disk regularly using the Defrag command if
you are using DOS 6.0 or later, or an application such as
SpeedDisk
™
from the Norton Utilities.

Contents 9
What you should know
If you have never installed a card in your computer before, you
may need to refer to the documentation supplied with your
computer for instructions on removing the cover.
This guide assumes that you alread y have some knowledge of
Microsoft Windows 3.1 and are familiar with the Windows
User’s Guide.
If you are using Captivator Pro/TV to capture video clips and
you are not familiar with Video for Windows, it is important tha t
you have access to the Video for Windows User’s Guide and any
other documentation supplied with your Video for Windows
application.
If you are writing applications that use the MCI video overlay
commands, you should have access to the documentation for the
development system you are using. You may also want to refer to
Microsoft’s Digital Video Command Set for the Media Control
Interface. August 7 1992, Revision 1.0, Part # 098-37538. This
document is available on CompuSer ve (GO WINMM) in libr ary
2 (MDK) in the files DVMCI1.ZIP and DVMCIT.ZIP. These
files are the same, except that DVMCI1.ZIP is in Word for
Windows format and DVMCIT.ZIP i s in text fo rm at.
Conventions used in this guide
The following conventions are used throughout this document:
• Anything that y ou type appears in bold text.
• Text in italic is used for cross-ref erences, or to identify a
placeholder for information you need to supply.
• The names of keys appear in small capital letters. For
example:
ENTER, SHIFT, CTRL. A plus sign (+) between key
names indicates that you should press down the first key
while you press the second key.
Introduction

10 Captivator Pro & Captivator ProTV User Guide
Handling Captivator Pro/TV
Like other adapter cards, Captivator Pro/TV can be damaged by
electrostatic charges during handling. To minimize the risk,
follow these simple guidelines:
• Keep the card in its protective packaging until you are ready
to install it.
• Just before handling the card, touch the metal frame of your
computer to discharge any static electricity wh ich may have
built up on you or your clothes.
• Hold the card by the adapter bracket or by its edges; do not
touch the printed circuit board.
• Do not place the card on top of your computer or on any
other metal surface.
• Prevent the card being accidently touched by anyone else.
Handle the card with care to avoid damage to the fragile
electronic components mounted on both sides of the circuit
board.
Returning the registration card
All VideoLogic products come with a registration card. Please
complete and return this as soon as possible so that we can
provide you with the best possible support and up-to-date
product information.

Contents 11
Installing Captivator Pro/TV
Run the supplied Setup program from Windows before fitting
Captivator Pro/TV inside your computer. See pag e 12 fo r
detailed information on the Setup program.
Before you start
Check the ReadMe file on the Setup disk bef o re you install
Captivator Pro/TV. This file contains information that was not
availab le when this guide was printed.
Make a note of the serial number of Captiv ator Pro/TV on page
58.
Base address settings
Captivator Pro/TV is supplied with a base add ress jumper setting
of 350 hex that should suit most installations. If the jumper
position needs to be changed, the Setup program shows you how
to make the alterations befo re you install the card. Do not
reposition the jumper unless the Setup program recommends an
alternative setting . For further information on the jumper
settings, see Base address settings on page 55.
Installing VM-Channel enabled graphics cards with
Captivator Pro/TV
If you are installing a VM-Channel graphics card, such as
928Movie or PCI Movie, as well as Captivator Pro/TV, install the
graphics card with its software before installing the
Captivator Pro/TV software and card.
Installing multiple VM-Channel enabled cards
If you are installing more than one Captivator Pro/TV, or
Captivator Pro/TV with another VM-Channel enabled add-in
card, read the ReadMe on the Setup disk.
Installing Captivator Pro/TV

12 Captivator Pro & Captivator ProTV User Guide
Captivator Pro/TV Setup
Captivator Pro/TV is pr ovided with a Setup program that:
• scans your computer system to make sure that
Captivator Pro/TV will not conflict with any other
components.
• tells you what, if any, adjustment to make to the jumper
setting on your card.
• allows y ou to choose whether you want to install the
Captivator Pro/TV software or not.
You can run Setup in one of two modes: Express or Custom.
If you are unfamiliar with installing computer software or
hardware choose Express install. This installs all the
Captivator Pro/TV software.
Check the following table to see which mode to choose:
Express install Custom install
Yes.
Software installed
automatically.
No. You can choose
which components to
install.
Yes. Whole system
scanned.
System scanned
automatically.
No. You can choose
the parts of the
system that are
scanned.
Yes.
Program Group
created.
Yes.

Contents 13
Running the Setup program
Do not install the Captivator Pro/TV card before you run Setup.
If Captivator Pro/TV is installed first, Setup will not be able to
scan your system for free base address and interrupt settings.
Setup must be run from Windows. Befo re running Setup, close
any other a pplications that you have running as you will need to
switch off your computer after you have installed the software to
fit the Captivator Pro/TV card.
Follow these instructions carefully. We assume that you are using
drive A: as your default floppy drive. Substitute the correct dr ive
letter for your computer if necessary.
You can stop Setup by choosing the Exit button in a dialog box.
Press
F1 or use the Help button if you need further information on
any of the options.
1. Start Windows.
2. Insert the Captivator Pro/TV Setup disk into drive A: of your
computer.
3. Choose Run from the File menu in Program Manager.
4. At the command line type a:\setup. Choose OK.
5. Setup chec ks that your system meets or exceeds the minimum
requirements and then displays the Welcome dialog box.
Choose Continue.
6. The Installation Mode dialog box is displayed.
Choose Express or Custom depending on your requirements.
Follow the instructions in the dialog boxes.
Installing Captivator Pro/TV
14 Captivator Pro & Captivator ProTV User Guide
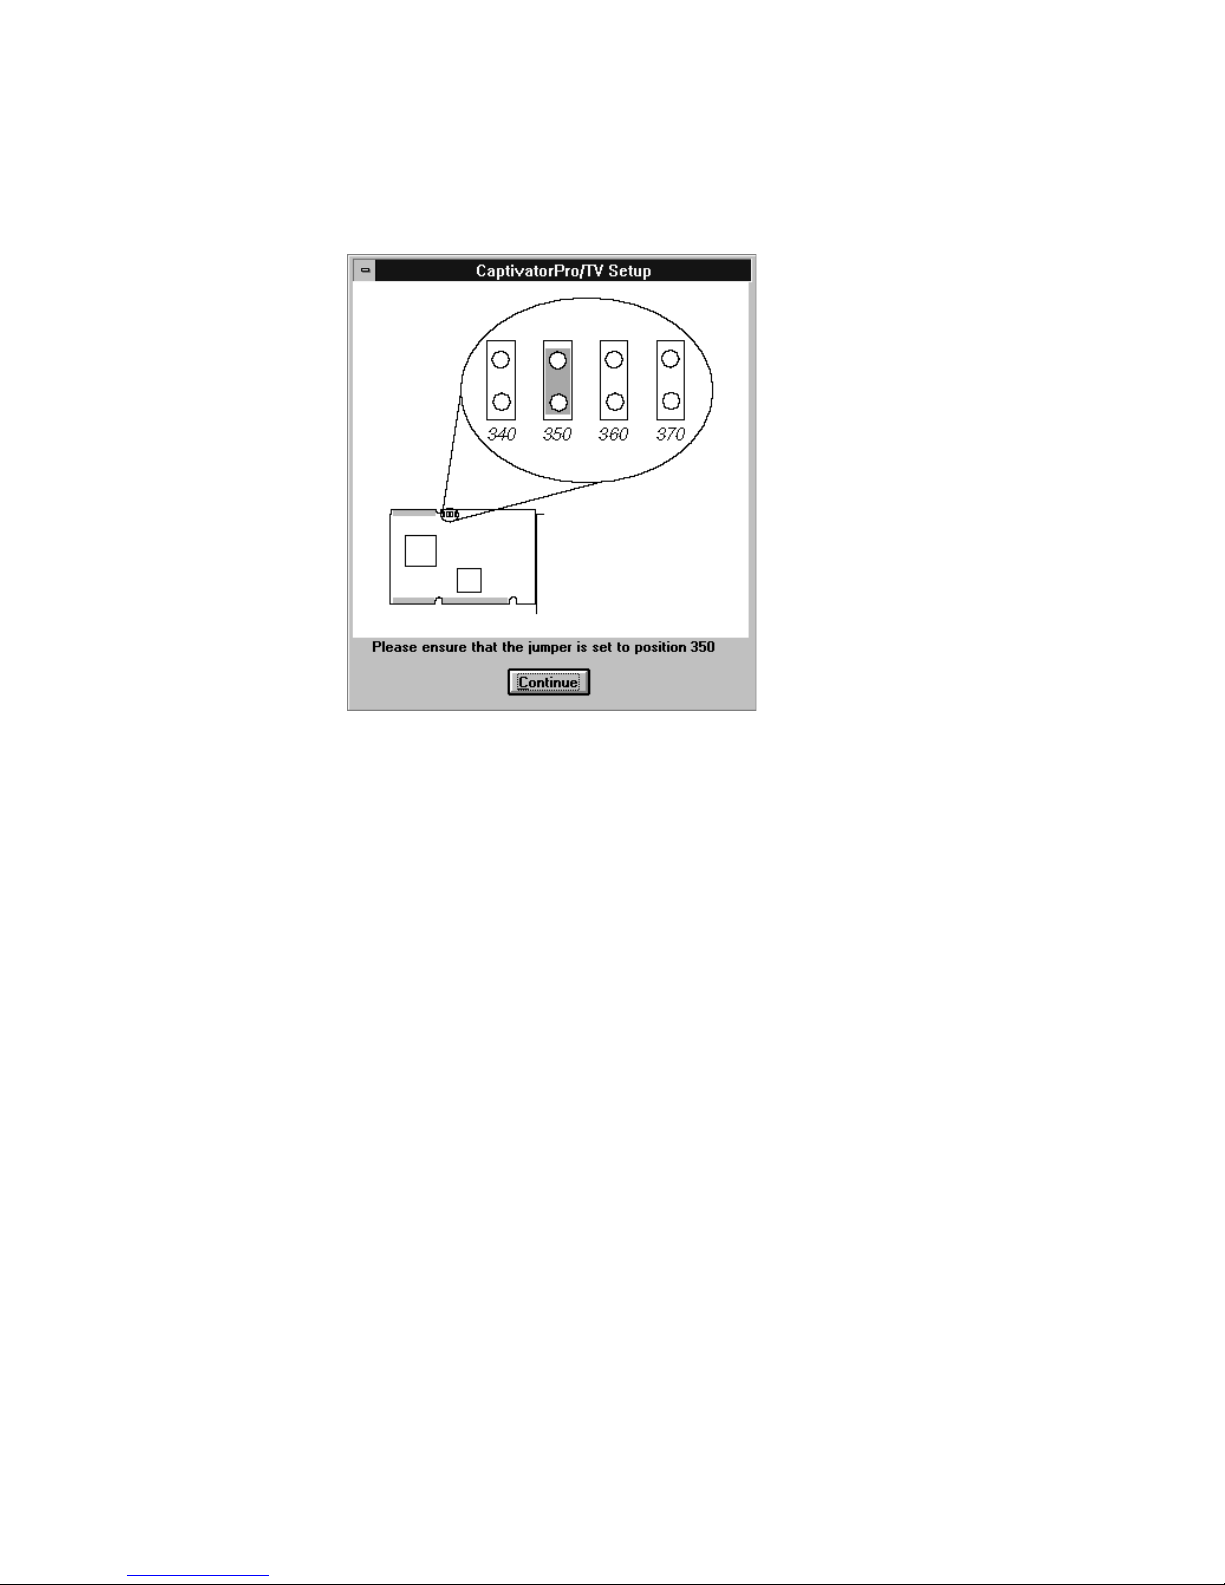
When Setup has installed the software, it scans your system.
The program displa ys a dialog box showing you the correct
position of the jumper for the current base address.
Remove the Captivator Pro/TV card from its envelope, taking
care to disc harge any static electricity from your body and
clothing beforehand. Compare the position of the jumper on
your card to that on the screen, and reposition the jumper as
necessary. Replace the card in its envelope.
Contents 15
Installing the Captivator Pro/TV card
War ning: Always switch off your computer before removing the
cover and observe the warnings specified in its documentation.
1. Exit Windows and s witch off your computer, monitor and any
other peripheral devices, suc h as printers, connected to your
computer. Leav e your computer power cable connected to the
outlet so that it is grounded.
2. Remove the cover from your computer. Refer to the computer
documentation if you are not sure how to do this.
3. Touch the bare metal chassis of your computer to discharge
any static electricity.
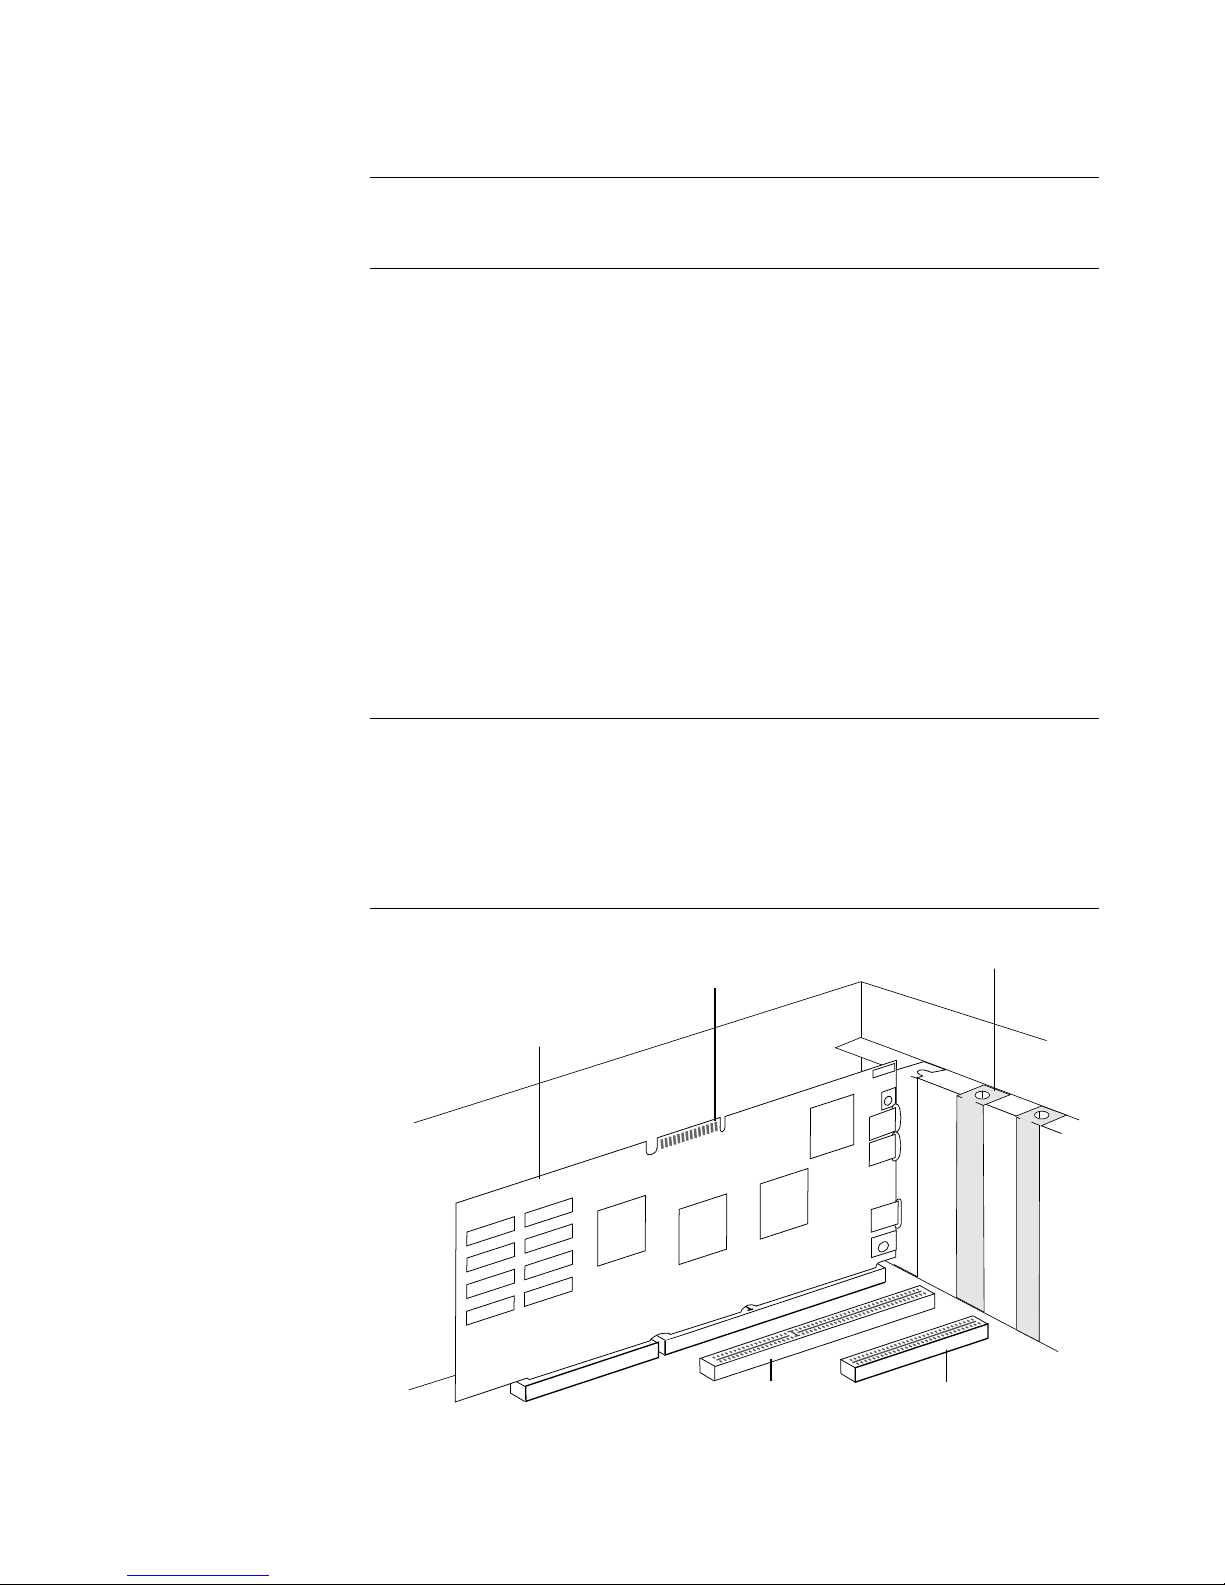
4. Locate an empty 16-bit expansion slot, preferably next to
your VM-Channel enabled graphics card. Remove the slot
cover and ke ep the screw.
If you are using Captivator ProTV and you intend to connect a
TV input to the TV tuner, install it next to your graphics card but
as far away as possible from the other cards in your PC. All PCs
and cards generate radio frequency (RF) noise and this noise can
affect the quality of your TV picture.
Installing Captivator Pro/TV
Expansion slot cover
VM-Channel connector
VM-Channel enabled graphics
card (e.g. 928Movie)
16-bit ISA bus slot
8-bit ISA bus slot

16 Captivator Pro & Captivator ProTV User Guide
5. Align Captivator Pro/TV with the slot you have chosen.
Firmly press the car d into the slot. You may need to use some
pressure to push the card into place, but do not use excessive
force.
6. Secure Captivator Pro/TV using the screw which you
removed from the expansion slot cover.
If you are using the TV tuner, make sure that you fit all the
adaptor card fixing screws—particularly to Captivator ProTV—
and expansion slot covers to all unused slots to minimize RF
noise.
Captivator ProTV
VM-Channel enabled graphics card
(e.g. 928Movie)
Contents 17
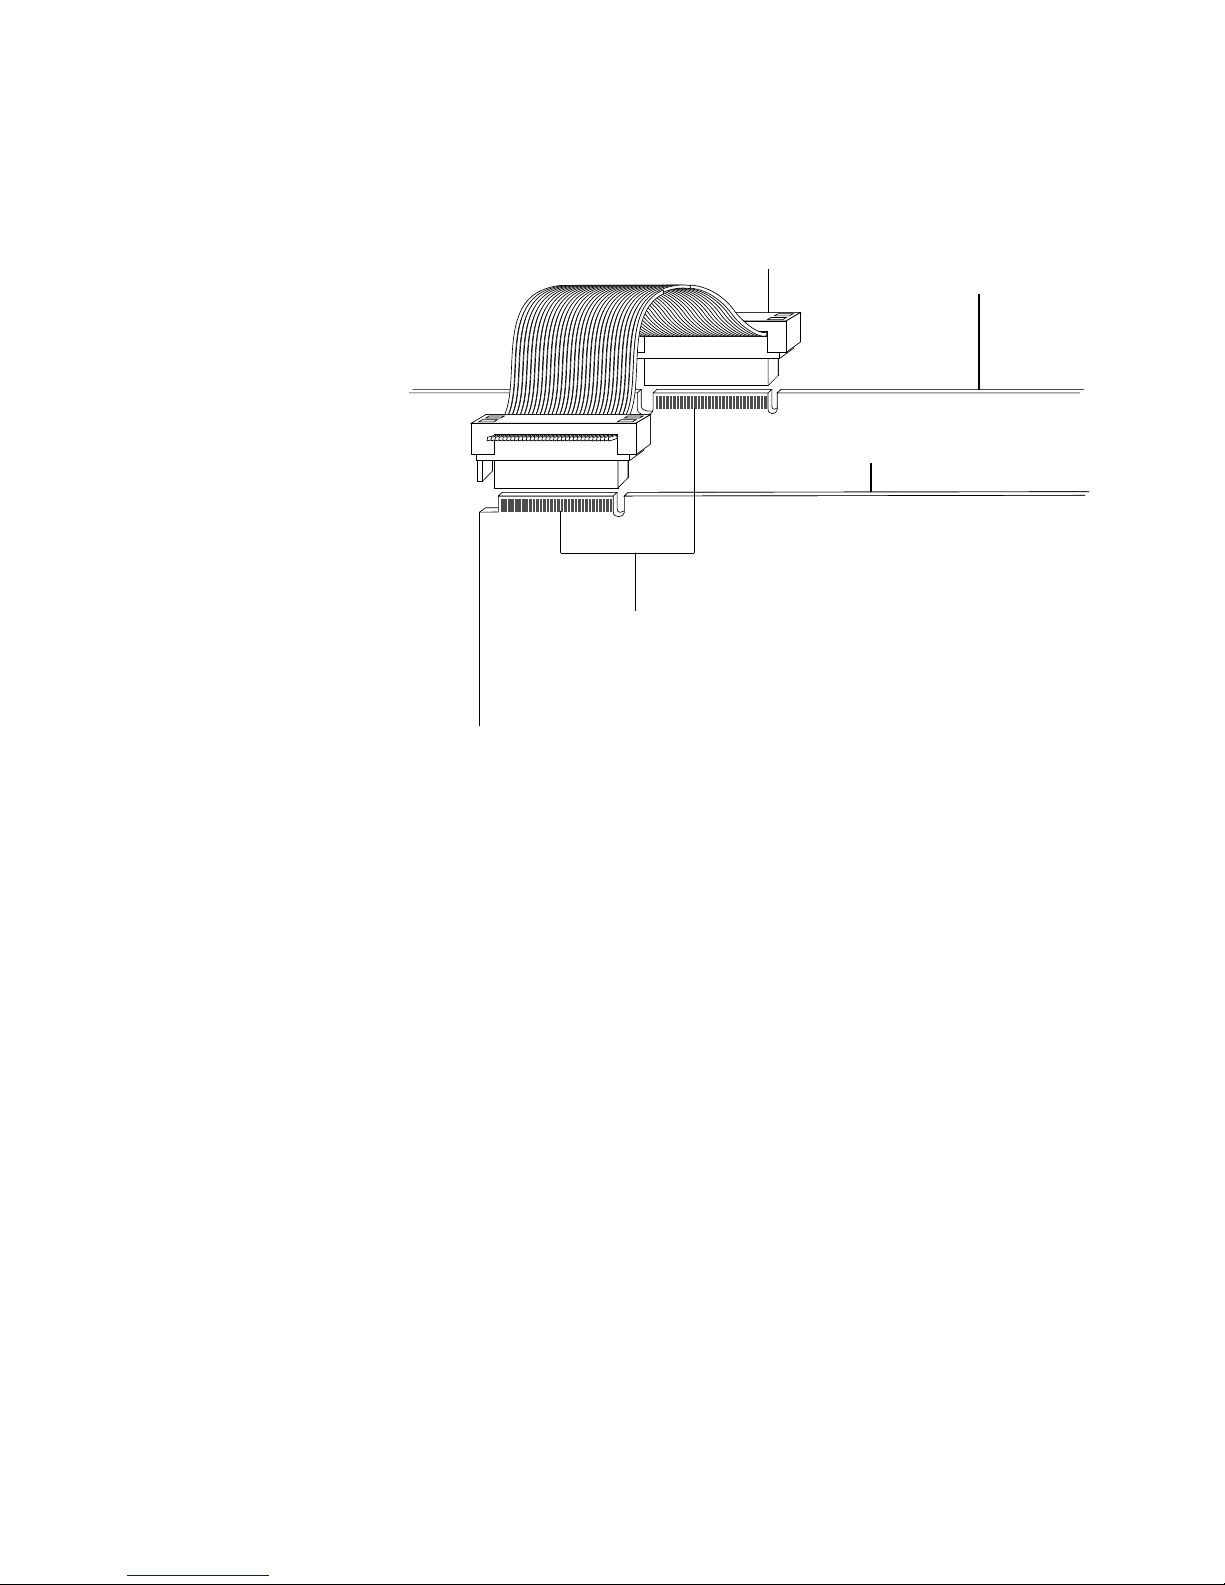
7. Connect Captivator Pro/TV to your VM-Channel graphics
card using the VM-Channel cable supplied. Make sure that
you do not twist the cable.
8. If you want to connect your Captivator ProTV’s internal
audio output connector to the CD-in connector on your sound
card, do so now. You need to pr ovide a cable—see Inter nal
audio connector on page 54 for fu rther details. Captivator
ProTV’s audio out connector is shown on page 6.
Note: If you want to control the audio output from
Captivator ProTV using your sound card software, but the
CD-in connector on your sound card is connected to a
CD-ROM drive, connect the audio-out jack on
Captivator ProTV to the audio-in jack on your sound card.
See page 18 for further details on connecting the external
cables.
9. Replace the cover of your computer.
10. Switch on your computer.
Installing Captivator Pro/TV
VM-Channel connectors
Captivator Pro/TV
VM-Channel cable VM-Channel enabled
graphics card

18 Captivator Pro & Captivator ProTV User Guide
Connecting the external cables
Warning: Permanent or temporary hear ing loss or impairment
may result from incorrectly running sound systems with
headphones. Before putting on a set of headphones, you should
set the volume while holding them away from your ears to avoid
injury from unexpected noise.
Connect a TV aerial, satellite decoder or cable set-top to the RF
socket at the top of the back plate. Connect a Composite video
source to the phono connector or the 4-pin mini-DIN connector;
an S-Video source to the 4-pin mini-DIN connector.
If you are using the external audio output on Captivator ProTV,
you can connect non-powered ‘Walkman’ type headphones,
self-pow ered speakers, or an amplifier to the 3.5 mm jack.
Altern atively, you can connect the audio-out jack on
Captivator ProTV to the audio-in jack on a sound card.
If you do not have a suitable cable, your computer supplier
should be able to supply one.
Composite in
(phono)
TV, satellite or cable in (RF
connector—Captivator ProTV
only)
Audio out (3.5 mm jack—
Captivator ProTV only)
S-Video or Composite in
(4-pin mini-DIN)

Contents 19
Changing Captivator Pro/TV’s hardware settings
This section explains how to reconfigure Captivator Pro/TV’s
base address and interrupt settings. Read this section if your
computer does not boot, Windows does not start, the
Captivator Pro/TV software is behaving in an unpredictable way,
or if you have installed another card which appears to conflict
with your Captivator Pro/TV.
Base address and interrupt clashes ar e t wo of the most common
problems that occur when installing cards. The symptoms for
each vary from one system to another, but typically:
• If you have just installed Ca ptivator Pro/TV and your
machine will not boot or run Windows, you probably hav e a
base address clash.
• If you have just installed the Captivator Pro/TV software and
card and your Captivator Pro/TV applications freeze or quit
unexpectedly, or if you cannot capture video clips, you
probably have an interrupt clash.
How to change Captivator Pro/TV’s base address or interrupt setting
You can c hange Captivator Pro/TV’s hardware settings using the
Captivator Pro/TV Configuration dialog box, which can be r un
directly from the Windows Control Panel. The following steps
explain how to change Captivator Pro/TV’s base address or
interrupt setting.
To pr event data-loss, w e recommend that you quit any other
applications before changing base address or interrupt settings.
Changing Captivator Pro/TV’s hardware settings

20 Captivator Pro & Captivator ProTV User Guide
1. In the Control Panel window, choose the Drivers icon.
The Drivers dialog box appears .
2. In the Installed Drivers list, select [MCI] VideoLogic
Captivator Pro/TV 1.0.
3. Choose the Setup button.
The Captivator Pro/TV Setup dialog box appears.
This dialog box shows the current base address and interrupt
settings.
You can scan your system to find out which base addresses
and interrupts are available. Some of the options shown in the
Captivator Pro/TV Setup dialog box may be grayed out.
If you already know a free base address or interrupt, ignore
steps 4 and 5.

Contents 21Changing Captivator Pro/TV’s hardware settings
4. Click the Suggest button.
The Captivator Pro/TV Address Scan dialog b ox appears.
This dialog box allows you to exclude base addresses from
the scanning process by unchecking the corresponding check
box.
If you know that a particular base address is being used by
another device, u nchec k the box for that address. Scanning a
base address that is in use by another card can cause your
system to lock up. Such conflicts are rare and although
inconvenient they do not do any harm. Once a conflict has
occurred the Captivator Pro/TV software automatically
excludes this base address from futur e scans, thus preventing
the same problem recurring. If you want to scan all the base
addresses including those that have been automatically
excluded, c hoose the Reset button first.
If you are only interested in scanning for free interrupts, you
should exclude all base ad dresses from the scan by
unchec king all the boxes.
If your system locks up, re-boot your computer by switching it
off, and then on again.
5. Choose the Scan button.

22 Captivator Pro & Captivator ProTV User Guide
Setup displays details of any device that occupies each of the
base addresses scanned, and chooses a base address and
interrupt setting that is suitable for your Captivator Pro/TV.
Although very reliable, the Scan option is not 100% accurate
as the configuration of your computer is not designed to be
read using software. This is particularly true of interrupts tha t
are used by d evice drivers that run under Windows—these
interrupts are only used intermittently, and so are very
difficult to detect.
6. Accept the setting or choose another base address or interrupt
from the available options, then choose OK.
If you have changed the original interrupt setting, restart
Windows so that your change can take effect.
If you have changed the base address, follow step 7 below.
7. Exit Windows. Switch off your computer, monitor, and any
hardware devices such as printers connected to your
computer. Leave the powe r cable connected to the power
outlet so that your computer is grounded.
Warning: Always s witch off your computer before removing the
cover and observe the warnings specified in the manufacturer ’s
documentation.
Remove the computer’s cover. Refer to the documentation
supplied with your computer if you are not sure how to do
this. Discharge any electrostatic charge that may have built up
on you or your clothes by touching the metal frame of your
computer—see Handling Captivator Pro/TV on page 10.
Reposition the jumper as necessary. The base address settings
are printed on the card. If you have to take the card out of its
expansion slot to reposition the jumper, carefully disconnect
the VM-Channel cable from Captivator Pro/TV. When you
have repositioned the jumper, reinstall your card following
the instructions on pages 15–18.

Contents 23
Displaying live video
This chapter describes briefly how to display live video in a
resizeable floating window and how to adjust the picture quality.
If you have a Captivator Pr oTV and are using a TV input, you
will need to refer to Tuning in TV channels on page 39.
Use a display mode with 65 thousand colors or more. The video
is displayed using the colors available in the current display
mode. For example, if you are using 256 colors (8-bit graphics)
the video is displayed using 256 colors.
How to display live video in a window
To display live video you must configure Captivator Pro/TV for
your source and open a video window. If you open the video
window first, it will be blank (or display interference if y ou are
using a TV input which has not been tuned) until you have
configured Captivator Pro/TV.
1. Make sure that you have connected your TV input or video
source to Captivator Pro/TV.
2. Open a video window by double-clicking on the
Captivator Pro/TV Video Window icon in the VM-Channel
program group.
If you are using a TV input, the window will display
interference and no picture. If you have a video source, the
video window will appear blank.
Displaying live video

24 Captivator Pro & Captivator ProTV User Guide
3. Start the Video Control Panel by choosing Control Panel from
the Options menu.
4. Select the Video Source radio button in the bottom left corner
of the Video Contr ol Panel to display the Video Source dialog
box , which you use to configure Captivator Pro/TV for your
input.
5. Select the Source radio button that matches your input—DIN,
Phono, or TV Tuner.

Contents 25
6. If you are using a TV input, c hoose the TV Tuner command
from the Video Window Options menu to display the
Captivator Pr o/TV Tuner dialog box. Tune in the TV
channels—see Tuning in TV channels on page 39.
If you are using a video source connected to the Phono or
DIN connector, click on the Detect Video button to
automatically configur e Captivator Pro/TV for your video
source. Alternatively, you can configure Captivator Pro/TV
manually by selecting the Standard and Signal radio buttons
that match your video source.
7. When you have tuned in your TV channel or configured
Captivator Pro/TV for your video source, live video should be
displayed in the Video Window. If you have any problems,
see the Troubleshooting section on page 43.
If your video signal produces a rolling or jittering display, try
selecting the VCR Compensation option. Avoid pausing your
input as this can cause the signal to become more unstable.
8. Use the Options menu in the Video Window to set the display
options, such as Always on Top and No Title.
Note: You can displa y the Video Window without a Title bar
by double-clicking the video window. Double-click the
window again to display the Title bar.
Displaying live video
26 Captivator Pro & Captivator ProTV User Guide
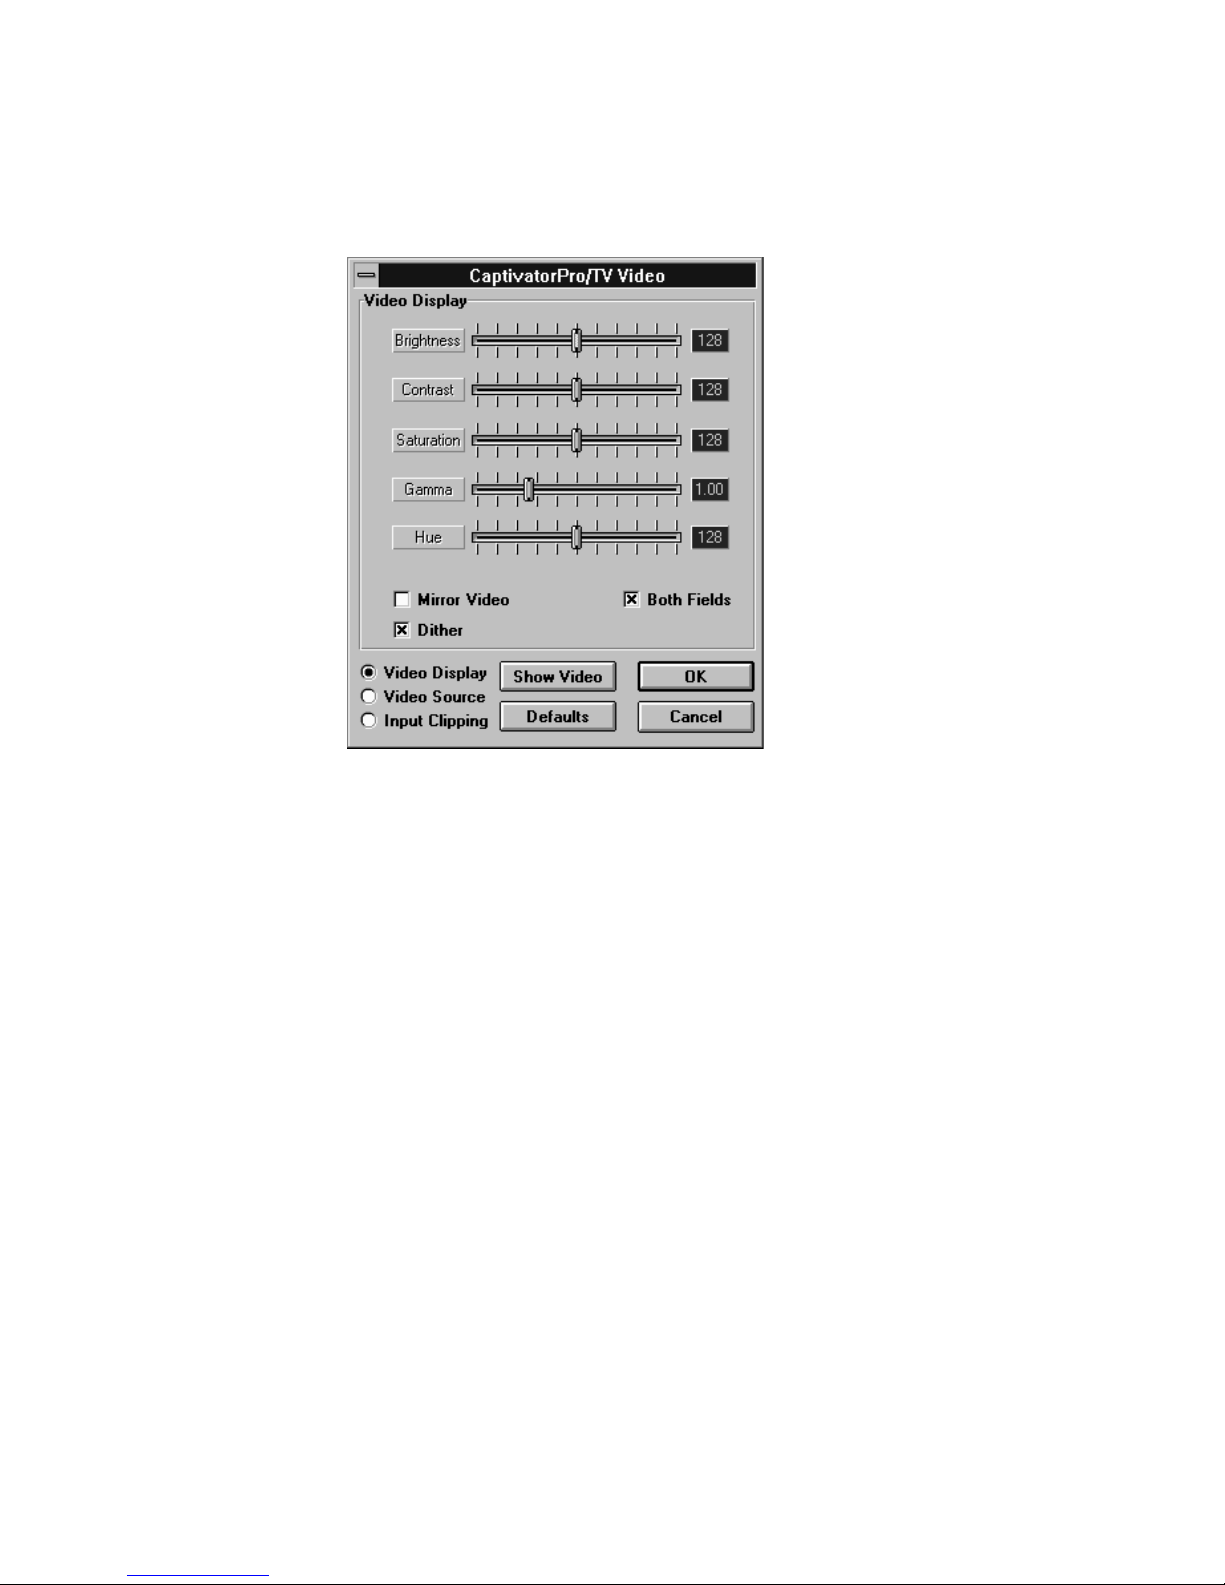
9. Select the Video Display radio button in the Video Control
Panel to display the Video Display dialog box, which you use
to adjust the video picture.
People g enerally find it easier to adjust their picture when
displaying a stilled image with flesh tones.
To set up the video image:
i Display an image with some white, some black, and some
middle tones.
ii. Tu rn Saturation to 0 to remove any color information.
iii. Use the Brightness control to set the black level. Try to set
the darkest part of the image to true black, not gray.
iv. Use the Contrast control to set the white level. Try to set
the lightest part of the image to true white, not gra y.
v. Use the Gamma control to adjust the mid-tone level. Try
to get a good spread of middle tones, so that the image has
the correct brightness.
vi. Use the Satu ration control to give the correct colors. Turn
Saturation up to at least 128.
vii. If you have an NTSC source, use the Hue control to
compensate for any blue or red tint.

Contents 27Displaying live video
10. The Both Fields check box allows you to display both fields
of each frame in the video image. If your video has a lot of
movement, it should play more smoothly if Both Fields is
unchecked. If your video is displaying a talking head or still
image it will look more natu ral if this option is checked.
11. Select the Mirror Video check box to reflect the video
horizontally.
12. The Dither chec k box allows you to dither your video image
when you are using a display mode with 256 colors (8-bit) or
65 thousand colors (16-bit). Dithered images look more
natural but grainier. If you are using a display mode with
16 million colors (24-bit) you do not need to dither the image.
13. Select the Input Clipping radio button in the Video Control
Panel to display the Input Clipping dialog box, which you use
to compensate for any flickering, break up, or black lines
around the edge of your video image.
Drag the handles in the clipping window or type the values in
the Clipping Offsets from Edge boxes. The o ffset value must
be positive—it works inwards from the edge of the window.
The effects of any changes can be seen in the live video
window.

28 Captivator Pro & Captivator ProTV User Guide
14. Use the OK or Cancel button to close the Video Control
Panel. Choose OK to save the current settings on exit. Choose
Cancel to abandon changes on exit. To close the Video
Window and Captivator Pro/TV Tuner dialog box, doub leclick on the Video Window Control menu box or choose the
Close command from the Control menu of the Video Window.

Contents 29Capturing Video for Windows clips
Capturing Video for Windows clips
The Captivator Pro/TV softwar e includes a Video for Windows
capture dr iver which can be used with a Video for Windows
capture application, such as VidCap
™
, to record AVI movies. Fo r
information on how to capture video clips refer to the
documentation supplied with y our Video for Windows
application.
Capturing full screen and full motion video
The Captivator Pro/TV Video for Windows capture driver
captures data in raw RGB format corresponding to the number of
colors used by your display mode—256 colors (8 bits per pixel),
65 thousand colors (16 bits per pixel), or 16 million colors (24
bits per pixel). The bit depth that you use determines the size and
frame rate of the AVI clip that you can capture without dropping
frames—the greater the bit depth, the smaller the image must be
and the lower the frame r ate.
Typically, a 486 66 MHz PC with a VL bus 928Movie should be
able to capture 320 x 240 16-bit images at 15 frames per second
to disk. (See Capture performance on page 30.)
It is not possible to capture full screen video at full frame rate
because your hard disk would quickly fill up. For example, an
8-bit 640 x 480 video clip, without audio, captured at 30 frames
per second generates more than 9 MB of data per second.
Therefore, when you capture video clips, you must decide
whether the size of the image or the frame rate at which you
want to play the clip is mor e important. If you are capturing a
clip which has little movement, such as a talking head, you do
not necessarily need a high frame ra te. However, a clip with a lot
of movement, will look better if it is recorded at a high frame
rate.

30 Captivator Pro & Captivator ProTV User Guide
If you need to capture full screen video to get the best quality
image, you should use a step capture method—capturing one
frame at a time—and then compress each frame separately
before playback. This will produce a full screen video clip at a
low frame rate. See the documentation supplied with your Video
for Windows capture application for further details on
compressing video clips.
If you requir e full motion video, however, you should use the
Captivator Pro/TV capture driver to capture live video at a
smaller size—such as 160 x 120—at full frame rate, and then use
the acceleration and SmoothScale features on VideoLogic’s
928Movie or PCI Movie to play the clip at full screen and frame
rate.
Capture performance
The quality of the video clips you capture is dependent on the
type of graphics card you are using and the maximum data rate
of your computer. The faster the graphics card bus, the quicker
the data can be passed across it, and the better the quality of the
movie that you can capture. Therefore to capture the best quality
movies, you should use a PCI Movie or VL bus 928Movie
graphics card in a 486 66 MHz or faster PC with a minimum of
8 MB of RAM.
Managing your hard disk
Do not use DoubleSpace, or a similar application, to compress
video data on your hard disk. DoubleSpace uses a considerable
amount of processor time to compress and decompress the data.
This results in a significant drop in the data rate that your PC can
maintain. If the data rate is low, your application will hav e to
drop frames as it is recording to keep up with the video source,
or you will have to record the clip at a smaller size or lower
frame rate.
We recommend that you defragment your hard disk bef ore you
capture video clips, and a t regular intervals afterwards, using the
Defrag command if you are running DOS 6.0 or la ter, or a disk
defragmenter such as Speed Disk from the Norton Utilities.
Defragmenting your disk improves the data rate of your
computer.

Contents 31Capturing Video for Windows clips
Mixing video and graphics
The video information that is passed across the VM-Channel is
mixed with the graphics and then displayed on your monitor.
Therefore what you see on your monitor is what is captured in
the movie. For example, the video clips you capture are recorde d
with the same amount of colors as the display mode you are
using; if you have a clock on top of the video window when you
capture an AVI clip, the overlapping por tion of the clock is also
captured as part of the video.
Preview mode
Preview mode—when an application captures a video image and
displays it on the scr een—is not available in Video for Window s
applications, such as VidCap. Always use Overlay mode.

32 Captivator Pro & Captivator ProTV User Guide

Contents 33
Snapping video stills
TV Snap is a simple a pplication that allows you to snap still
images from live video and TV input, w hich can be edited and
included in multimedia presentations or publications. Still
images up to 640 x 480 can be snapped in 24-bit, 16-bit or 8-bit
format and saved to a variety of file formats—see page 38.
The video is displayed in the same number of colors as your
display mode. Therefore, you must use a display mode which
uses the same number of colors (or more colors) than you need
in the image you are snapping. For example, if you want to snap
an image with 65 thousand colors (16-bit), you must use a
display mode with 65 thousand or 16 million (24-bit) colors.
This section briefly explains how to use TV Snap to snap and
save an 8-bit 320 x 240 BMP image from a live source, and how
to save part of the captured image using the marquee tool. For
detailed inform ation on TV Snap, refer to the online Help.
If you have a Captivator Pr oTV and are using a TV input, you
will need to refer to Tuning in TV Channels on page 39.
Note: Settings that you make in the Captivator Pro/TV Video
Control Panel are also set in the Video Source and Video Display
dialog boxes in TV Snap.
Snapping video stills

34 Captivator Pro & Captivator ProTV User Guide
Using TV Snap
1. Ma ke sure tha t you have a TV or video source connected to
Captivator Pro/TV.
2. Double-click on the TV Snap icon in the VM-Channel
Options program group to start the application.
The TV Snap window is displayed with a live video window.
You can resize either window by dragging the corner or
border. If the live window is displaying interference or is
black, you need to configure Captivator Pro/TV for your
input—see step 3.
3. Choose Video Source from the Options menu.

Contents 35Snapping video stills
Select the Source radio button that matches your input.
4. If you are using a TV input, choose the TV Channels button
to display the Captivator Pro/TV Tuner dialog box. Tune in
the TV channels—see Tuning in TV channels on page 39.
If you are using a video source connected to the Phono or
DIN connector, click on the Detect Video button to
automatically configur e Captivator Pro/TV for your video
source.
When you have tuned in your TV channel or configured
Captivator Pro/TV for your video source, live video should
appear in the Live Video window. If you have any problems,
see the Troubleshooting section on page 43.
5. If your video signal produces a rolling or jittering display, try
selecting the VCR Compensation option. Avoid pausing your
source as this can cause the signal to become more unstable.
6. Choose Video Display from the Options menu.
Use the Brightness, Contrast, Saturation, Gamma, and Hue
sliders to set up the video image—see page 26 for further
information.

36 Captivator Pro & Captivator ProTV User Guide
Select the Both Fields and Dither check boxes. Select the
Mirror Video chec k box if you want to ref lect the imag e
horizontally.
7. Choose Image Format from the Options menu.
Choose Half Video or 320 x 240 from the Image size list box.
Set the Capture Format list box to 8-bit Palettized.
When you select 8-bit Palettized format you should set a
palette—if you do not set a palette, the Windows default
grayscale palette is used. An 8-bit palette can contain up to
256 colors; TV Snap allows you to set 236 of the colors to
match the tone and hue of the image you want to snap, and 20

Contents 37
are reserved for the default Windows colors. If you are
snapping 16-bit or 24-bit images you do not need to set a
palette.
8. Choose Palette from the Options menu.
Type 236 in the colors box. Select the Frame button to set a
palette from the current fr ame. If you want to set a palette
from a sequence of frames select the Sequence button and
then click on the button again (the button changes to Stop
Video). TV Snap g enera tes a palette from the frames that
have been played.
9. Choose Snap New from the F ile menu or double-click on the
Live Window. The snapped image is displayed in an Image
window entitled ‘Image 1’ as a raw 8-bit RGB image. Save
the image as a BMP file using the Save As command from the
File menu.
10. To save an area of the image, move the cursor over the Image
window—the pointer changes to a cross. Click and drag the
cursor to define an area, and then choose Snap Reg ion from
the File menu. The snapped area is displayed in a separate
untitled Image window which can be saved using the Save As
command. Alternatively, when you have selected an area
using the marquee, you can save the area directly to disk by
choosing the Save Region command from the F ile menu.
Snapping video stills

38 Captivator Pro & Captivator ProTV User Guide
Note: You cannot snap an area of the live video window.
File formats supported
You can save
images that
you snap to
one of the
following file
formats using
the Save As
and Save
Region A s
commands
from the File
menu:
TIFF uncompressed
BMP uncompressed
PCX
TARGA
GIF
WPG
WMF
TIFF Huffman
TIFF G3 Fax
TIFF LWZ
TIFF G4 Fax
DCX
BMP compressed
JPEG
EPS
PICT
TIFF Pack bits
TIFF 2D

Contents 39Tuning in TV channels
Tuning in TV channels
Captivator ProTV can be connected directly to a TV aerial or
cable decoder, allowing you to watch live TV on your PC. The
Captivator Pro/TV software includes a TV Tuner function that
you use to tune in TV, satellite and ca ble channels for the local
area, select preset channels, and adjust the audio volume.
The TV tuner will scan different frequency ranges depending on
which tuner variant you have installed. The frequency range is set
when you install the Captivator Pro/TV software. If you need to
tune in to another frequency range, for example when displaying
broadcast TV in a different countr y, you need to run the Setup
program again, and choose the TV region that you want to scan.
How to display the Captivator Pro/TV Tuner dialog
There are three ways to display the Captivator Pro/TV Tuner
dialog:
• Captiv ator Pro/TV Video Control Panel—display the V ideo
Source dialog box; select the TV Tuner radio button and
choose the TV Channels button.
• Captiva tor Pro/TV Video W indo w—choose TV Tuner from
the Options menu.
• TV Snap—choose Video Source from the Options menu;
select the TV Tuner radio button and then choose the TV
Channels button.

40 Captivator Pro & Captivator ProTV User Guide
How to tune in TV channels
1. Open a live video window by double-clicking on the
Captivator Pro/TV Video Window icon in the VM-Channel
program group. If you do not have a window open, you will
not be able to see which TV channel you are tuning.
2. Choose TV Tuner from the Video Window Options menu. The
Captivator Pro/TV Tuner dialog box is displayed.
Note: The first time you open the Tuner dialog box, all the
channel options will be blank. The TV Region field displays
the region that Setup scanned during installation.
3. If you have a TV aerial or satellite decoder attached to
Captivator ProTV, select the Broadcast radio button at the
bottom of the dialog box. If yo u have a cable set-top
connected to Captivator ProTV, select the Cable button.
4. Choose the Tuning button to display the Captivator Pro/TV
Channel Setup dialog box, which you use to tune , save, name,
and rename the TV channels.

Contents 41
5. Choose the Scan button to automatically scan for TV
channels. The Tuner finds all the local channels and stores
them in the Channel name list box in the Tuner dialog box,
with their Channel ID numbers. After the channels have been
tuned in you can change the Channel name of each channel,
assign each a Button number, fine tune a channel, or delete
any that you do not want—see steps 7 and 8.
Note: You can tune into the channels manually by dragging the
handle along the Tuning slider until you find a channel. The
channel frequency is displayed besides the Tuning slider.
However, it is difficult to locate channels accurately, so tuning
channels manually can be slow.
6. Select a TV channel from the Channel name list box in the
Tuner dialog box. The TV picture should be displayed in the
live Video Window. Use the volume slider to set the output
volume. Select the Mute button to instantly cut the audio
output to 0.
7. To change the Channel name and assign a Button number for a
channel, display the Tuner dialog and the Channel Setup
dialog next to each other, and select a channel from the
Channel name list box in the Tuner dialog. The Channel ID is
displayed in the Channel ID and Channel name boxes in the
Channel Setup dialog. Type a channel name in the Channel
name box and a button number in the Button number box. You
can use this name and number to select the channel from the
Tuner dialog box.
Tuning in TV channels

42 Captivator Pro & Captivator ProTV User Guide
Use the Fine tuning slider if necessary to adjust the tuning—
the meter to the right of the Fine Tuning slider shows the
signal strength. The signal is strongest when all four blocks
are green.
Choose the Save Channel button to save the settings.
8. If you want to delete a channel from the Channel name list,
select the channel from the Channel name list box in the Tuner
dialog, and then choose the Delete Channel button in the
Channel Setup dialog.
9. When you have finished changing the channel attributes,
choose Close to close the Channel Setting dialog box.
10.When you have configured the TV channels, you can use the
Captivator Pro/TV Tuner dialog as a normal TV remote
control to change channels and alter the volume level.

Contents 43Troubleshooting
Troubleshooting
This chapter is divided into two sections which identify the most common
problems that can occur with Captivator Pro/TV. The first section covers
installing the Captivator Pro/TV card, displaying live video and capturing clips
and stills. The second section lists er rors that may appear when you use the Video
Control Panel.
Problem Computer does not start after installing Captivator Pro/TV.
Condition Captivator Pro/TV is not installed correctl y.
Solution Check that Captivator Pro/TV is correctly inserted in the
expansion slot.
Problem Computer does not wo rk correctly after installing
Captivator Pro/TV.
Condition Base address conflict with another card installed in your PC.
Solution Remove Captivator Pro/TV and r erun Setup. Make sure that the
jumper on the card matc hes the position shown in Setup.
Problem Live video window is black.
Condition Input is incorrectly connected to Captivator Pro/TV.
Solution Check that your input is correctly connected to
Captivator Pro/TV.
Condition Captivator Pro/TV is not configured for y our source.
Solution Select the Video Source radio button in the Video Control Panel.
Select the Detect Video button. If the Status field displays No
Video, make sure that the video source is correctly connected to
Captivator Pro/TV and turned on. If the Status field displa y s
Video Detected, check that the VM-Channel ribbon cable is
correctly connected to Captivator Pro/TV and your graphics
card.

44 Captivator Pro & Captivator ProTV User Guide
Problem L ive video window is black.
Condition Video input is very dark.
Solution Change the br ightness, contrast, saturation, and gamma sliders
until the video is visible.
Condition VM-Channel cable is connected incorrectly to your graphics
card or Captivator Pro/TV, or damaged.
Solution Select the Video Display radio button in the Video Contr ol Panel.
Set the Brightness, Contrast and Gamma sliders to maximum
value and then move the Gamma slider to its minimum value. If
the video window changes from black to gray to white, the
VM-Channel is OK. If the window stays b lack or displays a
pattern, the ca ble is connected incorrectly, or damaged.
Condition You have adjusted the VM-Channel cable connection on your
graphics card or Captivator Pro/TV, but not rebooted your PC.
Solution Close all open applications and re boot your computer.
Problem L ive video window is filled with diagonal stripes and no video is
visible.
Condition The application is set to Preview mode, not Over lay mode.
Captivator Pro/TV does not support P review mode.
Solution M ake sure that the a pplication displays video in Overla y mode.
Problem L ive video is displayed in bla ck and white.
Condition The Captivator Pro/TV software is configured for the wrong
video standard.
Solution Select the Video Sour ce radio button in the Video Control Panel
Select the Detect Video button to configure Captivator Pro/TV
automatically. If the picture is still displayed in black and white,
try selecting the Standard radio button that matches your input
manually. (If you have a TV input, the signal is converted to the
Composite standard, and the S-Video r adio button is grayed out.)

Contents 45Troubleshooting
Problem Live video is displayed in color, but captured clip/still is in black
and white.
Condition The Video fo rmat is set to 8-bit Palettized and a palette has not
been set for the clip/still. The Windows grayscale palette is used
by default.
Solution Set a palette for your clip/still. See the documentation supplied
with your capture application for details on how to set a palette.
Problem A large number of frames are dropped when capturing video
clips.
Condition The data rate required to capture the video clip is too high for
your system.
Solution Optimize your computer for streamed video capture as follows:
i. defragment your hard disk.
ii. make sure that the capture file, if required, is large enough for
the clip you are capturing.
iii. remove any disk caching pro grams, such as SmartDrive, if
you are capturing to hard disk.
iv. remove any disk-doubling software, such as Stacker and
DoubleSpace, if capturing to hard disk.
v. maximize the amount of conventional DOS memory by
removing any unused TSR programs or device drivers from
your AUTOEXEC.BAT or CONFIG.SYS files.
vi. capture the clip to memory if it is short enough.
If the number of frames dropped is still unacceptably high,
reduce the data ra te of the clip by changing the image quality.
Try one or more of the following:
i. reduce the size of the image you want to capture; for example
capture the image at 160 x 120 instead of 320 x 240.
ii. reduce the audio quality if you are capturing audio. You can
reduce the sample rate (usually 44, 22, or 11 kHz), number of
channels (stereo or mono), or bits per sample (usually 16-bit
or 8-bit).
iii. reduce the number of colors in the ima ge; f or example
capture the image in 65 thousand colors instead of 16 million.

46 Captivator Pro & Captivator ProTV User Guide
Problem Video clip was recorded without dropping many frames, but does
not play back smoothly.
Condition The data rate of the clip is too high for your system.
Solution Compress the video clip using a software compressor—such as
Indeo
™
, or Cinepak™—in V idEdit™ or a similar application.
Problem Quality of the captured clip is poor.
Condition Capture format is set to 8-bit (256 colors).
Solution To capture the best quality clips, set the capture fo rmat to 24-bit
(16 million colors). If this makes the capture files too big, or
causes too many frames to be dropped because of the increased
data rate, set the capture format to 16-bit (65 thousand colors).
This format offers a good compromise between color quality and
the size of your captured clips.
Condition You are using 8-bit video and palette is unsuitable for the clip.
Solution M ake sure that you use a palette which contains the same range
of colors as the video clip you want to capture. See the
documentation supplied with your capture application for details
on how to set a palette f or a clip.
Problem Captur ed clips/stills have Windows graphics in them.
Condition A nything within the boundaries of the video window is captured
when you capture a clip or snap a still.
Solution M ake sure that no other windows or dialog boxes overlap the
video window during capture.
Problem ‘Not enough memory’ or ‘Out of memory’ error message in
Video for Windows application.
Condition Not enough DOS or Windows memory available.
Solution Try one or more of the following:
i. Close all Windows applications apart from the capturing
application, and all clips or snapped image windows within
the capture application.
ii. Exit Windows and restart your computer.
iii. Increase the amount of DOS memory by removing TSR
programs or device drivers from your AUTOEXEC.BAT or
CONFIG.SYS files.

Contents 47Troubleshooting
iv. If the error message appears when you ca pture large video
images using Microsoft VidCap, reduce the size of the video
image using the Video Format dialog box.
Problem ‘Capture driver is not installed’ or ‘Cannot open ca pture driver.
Driver is not installed.’ error messag e when starting a Video for
Windows application.
Condition The base address setting does not match the jumper setting on
the card.
Solution Change the jumper setting on the card to correspond to the base
address shown in the Setup dialog box.
Condition The Captivator Pro/TV software is incorrectly installed.
Solution Remove the Captivator Pro/TV software—see the ReadMe file
on the Captivator Pro/TV Setup disk. Rerun the Setup program to
reinstall the Captivator Pro/TV software.
Error messages
“Error: 0x012a, VDI_ERR_NO_BOARD_EXISTS”
i. You have installed the software and scanned your system, but
the Captivator Pr o/TV card is not yet installed. Install the
Captivator Pro/TV card.
ii. The base address setting does not match the jumper setting on
the card. Change the jumper setting on the card to correspond
to the base address shown in the Setup dialog b ox.
iii. There is a base address conflict with another card. Scan your
system for a free base address.
iv. Software is configured incorrectly. Run Setup again and
reinstall the software. You do not need to remove Captivator
Pro/TV from your PC.
“Error: 0x0425, VLPPAPI Error: MW_DMSD_DLL_LOAD_ERROR”
Use a text editor such as Notepad to check that the following
section and line are included in your SYSTEM.INI file in the
WINDOWS directory:

48 Captivator Pro & Captivator ProTV User Guide
[DMSDDLL]
Driver=c:\vlpower\vlvidctl.dll
where c:\vlpower is the directory where the Captivator Pro/TV
software was installed. If it is not present, use the text editor to
add the section and line to the file, save the file, and then restart
Windows.
“Error: 0x0117, VDI_ERR_CANT_LOAD_PPSCALE”
i. You have not installed a VM-Channel graphics card, such as
928Movie or PCI Movie, in your PC. You must have a
graphics card that supports the VM-Channel installed in your
PC and working before you install Captivator Pro/TV.
ii. The component PPSCALE.DRV cannot be found. Make sur e
that you are using v1.1 or above of the PCI Movie software,
or v1.1.1 or above of the 928Movie software.
iii. The PPSCALE.DRV component is an old version or has been
corrupted. Run Setup again and reinstall the
Captivator Pro/TV software.
“Error: 0x0119, VDI_ERR_CANT_LOAD_INTERCEPTOR”
i. You have not installed a VM-Channel graphics card, such as
928Movie or PCI Movie, in your PC. You must have a
graphics card that supports the VM-Channel installed in your
PC and working before you install Captivator Pro/TV.
ii. The component PPSCALE.DRV cannot be found. Make sur e
that you are using v1.1 or above of the PCI Movie software,
or v1.1.1 or above of the 928Movie software.
iii. The PPINTER.DLL component is an old version or
corrupted. Run Setup again and reinstall the
Captivator Pro/TV software. You do not need to remove
Captivator Pro/TV from your PC.
“Error: 0x042a, VLPPAPI Error: MW_BASE_ADDRESS_CONFLICT”
This error may occur if your system is configured for more than
one VM-Channel option card, and two of the cards are
configured for the same base address. See the ReadMe file on the
installation disk for further information.

Contents 49Appendix A - VideoLogic Captivator Pro/TV MCI command set
Appendix A - VideoLogic Captivator Pro/TV MCI command set
This Appendix is a quic k reference to the MCI video overlay commands
supported b y the MCI VideoLog ic Captivator Pro/TV driver. Some of the
MCI commands, marked with an asterisk *, have been extended for use
with Captivator Pro/TV. For further inform ation on each of the
commands, see the Captivator Pro/TV MCI Commands Help file in the
VM-Channel program group.
The following conventions are used below: bold type shows a specific
term that must be typed exactly as shown; italic type identifies a
placeholder for information you must supply; [ ] surround optional flags
and parameters; | separates mutually exclusive arguments; { } enclose
required arguments.
The digital video driver supports notify and wait as optional flags. As all
commands are synchronous, however, the usefulness of these flags is
limited.
capability alias {can eject
| can freeze
| can lock
| can play
| can record
| can reverse
| can save
| can stretch [input]
| can test
| compound device
| device type
| has audio
| has video
| uses files
| windows}
capture alias as filename [at rectangle]

50 Captivator Pro & Captivator ProTV User Guide
close alias
configure alias
freeze alias [noupdate*]
info alias {file
| product
| still algorithm
| usage
| version
| window te xt}
list alias {still algorithm {count | number n}
| still quality algorithm {algorithm | curren t}
count
| video source {count | number n}}
load alias filename
open overlay alias { device_alias}
open alias [parent hwnd]
[shareab le]
[style {child | overla pped | popup}]
[boardtype type*]
[boardnum number*]
put alias {destination [at rectangle]
| window [ c lient ][at rectangle]}
restore alias from filename
[at rectangle]
save alias filename [ at rectangle]

Contents 51Appendix A - VideoLogic Captivator Pro/TV MCI command set
setvideo alias {bitsperpel to {8, 16, or 24}
| brightness to {integ er 0 to 1000}
| color to {integ er 0 to 1000}
| contrast to {integer 0 to 1000}
| contrast to {integer 0 to 1000}
| fieldmode* {dual | single}
| gamma to {integer 300 to 3000}
| off
| on
| mirror* {off | on}
| source to number {integer}
| source to* {ntsc | pal | secam}
| source to* {composite | svideo}
| source to* {DIN | Phono | TVTuner}
| still algorithm name
| tint to {integer 0 to 1000}
| vtr sync {off | on}}
status alias {bitsperpel
| brightness [nominal]
| color [nominal]
| contrast [nominal]
| field mode*
| gamma
| video mir ror*
| video source [number | standar d*]
| window [handle
| maximized | minimized |
visible]}
unfreeze alias
update alias [at rectangle] [hdc hdc] [paint]
wher e alias {destination [max]
| source [max]
| video [max]}

52 Captivator Pro & Captivator ProTV User Guide
window alias {handle [handle | default]
| state [hide
| minimize
| minimized
| no action
| restore
| show
| show maximized
| sh ow minimized
| s how min noactive
| show na
| show noactivate
| normal]
[text caption]}

Contents 53
Appendix B - Captivator Pro/TV technical details
Specifications
Dimensions
158 x 106 mm
Hardware interface
16-bit ISA bus
VM-Channel
Software interface
MCI video overlay driver
Video for Windows capture driver
Power requirements
Captivator Pro +12 V -12 V +5 V
Typical 0.96 W 0 W 4.5 W
Maximum 1.15 W 0 W 5.4 W
Captivator ProT V +12 V -12 V +5 V
Typical 3.6 W 0.22 W 5.0 W
Maximum 4.32 W 0.26 W 6.0 W
Operating temperature
Captivator Pro and Captivator ProTV can be used between 10°C
and 50
°
C inside the computer box.
Appendix B - Captivator Pro/TV technical details

54 Captivator Pro & Captivator ProTV User Guide
Connectors
Video input
Captivator Pro and Captivator ProTV acce pt video in Composite
and S-Video form at in the NTSC, PAL, or SECAM video
standard. Only one of the inputs can be used at one time.
The phono connector accepts video in Composite
format only.
The 4-pin mini-DIN connector accepts video in
Composite or S-Video format.
Pin S-Video Composite
1 Ground Video Return
2 Ground NC
3 Luma Composite
4 Chroma NC
Internal audio connector
To connect Captivator ProTV’s internal audio connector to y our
sound card’s CD-in connector you need an internal audio cable
(62575). This cable is suitable for 928Movie with audio, which
uses an ELCO 60 8283 3048 45 001 connector, or a Sound
Blaster
™
, which use Molex 70066-G or 70400-G connectors. You
can order this cable from your Captivator ProTV supplier.
If your sound card does not use the same connectors as a
928Movie with audio or a Sound Blaster, you should be able to
get your local computer supplier to make up a cable, using the
details of Captivator ProTV’s audio output connector given
below and the details of your sound card’s CD-in connector.
When making up a cable we recommend that you protect against
noise by using screened, twisted pair cable.
Captivator ProTV uses a Molex connector, par t number 70543.
The pin outs for this connector are as follows:

Contents 55
Pin Signal
1 Left channel
2 Ground
3 Ground
4 Right Channel
External audio connector
The 3.5 mm jack on Ca ptivator ProTV can be connected to an
amplifier, powered speakers, or ‘Walkman’ type headphones.
TV tuner
Captivator ProTV is available in the following variants using the
Philips 1200 series TV tuner.
Country Standard RF connector Part no.
UK/Ireland/Hong Kong PAL I IEC VL 60025
European except France PAL B/G IEC VL 60026
North America NTSC M F-Type VL 60024
Base address settings
The illustration above shows the location of the four pairs of
base address jumper pins and their add resses on Captivator Pr o/
TV. The default is 350 hex.
Appendix B - Captivator Pro/TV technical details

56 Captivator Pro & Captivator ProTV User Guide

Contents 57
Appendix C - Technical support
If you have a prob lem with Captivator Pro or Captivator ProTV,
the following sequence has been designed to provide you with
the fastest possible means of g etting your system up and running.
1. Check the Troubleshooting section starting on page 43.
2. Dial our FaxBack service where you will find a constantly
updated list of common questions and answers, as well as a
list of the latest software versions available (800 203 8587
from continental America, +1 617 374 0709 from anywhere
else worldwide).
3. Contact our bulletin board service at 617 494 4960 (up to
9600 baud, 8-N-1) in continental America, or +44 1923 271
301 (up to 14400 baud, 8-N-1) elsewhere. Altern atively, you
can drop in to our CompuServe forum (GO VIDEOLOGIC)
for the latest drivers, software versions and product new s
updates.
4. Contact your original supplier for technical help.
5. Ring one of our customer support groups at 617 374 0700 in
continental America, or +44 1923 271300 elsewhere. To help
us help you quickly and efficiently, please complete as much
of the next page as you can befo re you contact us.
For further information on VideoLog ic products and services,
contact us at one of the following addresses:
VideoLogic Inc, 245 First Street, Cambridge, Massachusetts
02142, USA. Tel ephone: 617 494 0530, Fax: 617 494 0534.
VideoLogic Limited, Home Par k Estate, Kings Langley,
Hertfordshire, WD4 8LZ, UK. Telephone: +44 1923 260511,
Fax: +44 1923 268969.
Appendix C - Technical support

58 Captivator Pro & Captivator ProTV User Guide
Captivator Pro/TV checklist
Captivator Pro/TV ser ial number ......................................................................
Software version number ......................................................................
Graphics card ......................................................................
Purchased from ......................................................................
......................................................................
......................................................................
......................................................................
......................................................................
Purchase date ......................................................................
Computer make and model ......................................................................
......................................................................
......................................................................
Monitor make and model ......................................................................
......................................................................
Hard disk capacity ......................................................................
RAM ......................................................................
Windows version number ......................................................................
DOS version number ......................................................................
Video for Windows version number ......................................................................
Other installed cards ......................................................................
......................................................................
......................................................................
......................................................................
......................................................................
......................................................................

Contents 59Appendix D - Notices
Appendix D - Notices
RADIO AND TELEVISION INTERFERENCE
This equipment has been tested and found to comply
with the limits for a Class B digital device, in accordance with Part 15 of the FCC Rules. These limits are
designed to provide reasonable protection against
harmful interference in a residential installation.
This equipment generates, uses and can radiate radio
frequency energy and, if not installed and used in
accordance with the instructions, may cause harmful
interference to radio communications. However, there
is no guarantee that interference will not occur in a
particular installation.
If this equipment does cause harmful interference to
radio and television reception (determined by turning
the equipment off and on) you can try to correct this
interference by one or more of the following measures:
• Adjust the angle and/or position of the receiving
antenna.
• Increase the distance between the equipment and
the receiver.
• Connect the equipment to an outlet on a different
power circuit from that to which the receiver is
connected.
• Consult your VideoLogic dealer or an experi-
enced radio/TV technician for help.
EN55022 AND IEC801 PARTS 2-4
This equipment has been tested, as a component part
of a system, to verify its capability to comply with the
European new approach directive on EMC (Directive
89/336/EEC). VideoLogic has demonstrated that the
unit can comply with the following standards when
installed:
EN55022
IEC801 Parts 2-4
It is the responsibility of the user or system integrator
to make sure that the system in which this product is
installed complies with the national requirements.
PRODUCT SERVICE
All VideoLogic products carry a 12 month warranty.
If you have a problem with a VideoLogic product,
contact your Reseller or place of purchase first. Authorized VideoLogic Resellers will be able to identify
faults for you. Products returned under warranty with
relevant proof of purchase are serviced or replaced
free of charge.
LIMITED WARRANTY
VideoLogic warrants the Product to be in good working order for a period of twelve (12) months from the
date of purchase (the “Warranty Period”), as indicated on the sales receipt. Should the product not be
in good working order VideoLogic will, at its option,
repair or replace the Product free of charge. This
Warranty does not cover damage that occurs as a
result of negligence in shipment or that results from
alteration, accident, misuse or neglect. Repair parts
and replacement Products will be furnished on an
exchange basis and will either be new, equivalent to
new or reconditioned. All replaced parts and Products will become the property of VideoLogic.
Warranty service may be obtained by delivering or
shipping the Product, postage prepaid, prior to the
expiration of the Warranty Period to a VideoLogic
Authorized Reseller for the Product, together with
proof of purchase and a description of the problem.
VideoLogic requests (but does not require) that you
complete and return the Warranty Registration Card
enclosed, in order to verify warranty status in the
event of a dispute.
THIS IS A LIMITED WARRANTY; VIDEOLOGIC MAKES NO
OTHER
WARRANTIES, EXPRESS OR IMPLIED, INCLUDING
BUT
NOT LIMITED TO THE IMPLIED WARRANTIES OF
MERCHANTABILITY
AND FITNESS FOR A PARTICULAR
PURPOSE
. IN NO EVENT WILL VIDEOLOGIC BE LIABLE
FOR
INCIDENTAL OR CONSEQUENTIAL DAMAGES EVEN
IF
IT HAS BEEN ADVISED OF THE POSSIBILITY OF SUCH
DAMAGES
.

60 Captivator Pro & Captivator ProTV User Guide
SOFTWARE LICENSE AGREEMENT
LICENSE
VideoLogic Ltd. (“VideoLogic”) agrees to grant and
Licensee to accept a non-exclusive non-transferable
license to use the software and any part of it (“Software”) contained in this product on the terms below.
ACCEPTANCE
The terms of this License are accepted by the
parties on Licensee commencing use of the product
and any requirement on Licensee to communicate
acceptance is hereby waived.
PERMITTED USE
The Licensee is hereby authorized:
1. to use the Software on a single computer system
(“system”) and to use (but not copy) the operational manuals relating to the software
2. to modify the Software or merge it in machine
readable form into another program, any merged
program to be subject to this License
3. to copy the Software for back-up purposes
provided no more than 3 copies are in existence at
any one time to store the Software on the system or
other storage unit on disk
4. to store the Software on the system or other
storage unit on disk
PROHIBITED USE
The Licensee shall not
1. use copy or modify the Software save as
provided herein and having reproduced on all
copies any copyright notice of VideoLogic or its
suppliers
2. provide or otherwise make available Software in
any form to any person other than in confidence to
Licensee’s employees
3. remove or obscure any trademark or copyright
notices
4. decompile disassemble or reverse engineer the
Software
5. copy the Software operating manuals additional
copies of which can be obtained from VideoLogic
or its distributors
WARRANTY
Software is not warranted to be error free and existence of errors will not breach this License. Subject
thereto and provided that non-compliance is not
caused by modification or addition to Software not
performed by VideoLogic nor by incorrect use abuse
or corruption nor by use with or on incompatible
software or hardware VideoLogic warrants Software
will for 90 days from delivery to Licensee comply
with VideoLogic’s then standard specification and in
event of breach will at its sole option either refund
license fee or endeavor to correct Software. Save as
otherwise provided all implied warranties conditions
or terms are excluded to the fullest extent permitted
by law. Except in respect of death or personal injury
caused by VideoLogic’s negligence VideoLogic shall
not be liable to the Licensee for consequential or
indirect loss (whether loss of profit or otherwise)
costs or expenses whatsoever arising in connection
with the supply of the Software its use or loss or
interruption of use.
INTELLECTUAL PROPERTY
The trademarks names copyright and other intellectual property rights whatsoever subsisting in the Software and operating manuals (including but not limited to all programs compilation of command words
other syntax contained therein) are and shall remain
the sole property of VideoLogic and its suppliers.
CONFIDENTIALITY
All information data drawings specifications software listings source and object codes are proprietary
and confidential and shall not be disclosed to any
third party without VideoLogic’s written consent.
TERMINATION
This License shall remain in force until terminated
(without prejudice to any other right or remedy of
VideoLogic) by written notice by VideoLogic to
Licensee if Licensee is in breach of any provision of
this License makes any voluntary agreement with its
creditors becomes subject to petition for an administration order or (being an individual or a firm) becomes bankrupt or (being a company) goes into
liquidation (otherwise than for the purposes of amalgamation or reconstruction) or if an encumbrancer
takes possession or a receiver is appointed of any
property or assets of Licensee. On termination Licensee shall forthwith return or destroy (as VideoLogic
directs) Software all copies and modifications thereof
and operating manuals and certify same has been
done.
GENERAL
This License which shall be construed in accordance
with laws of England shall not affect statutory rights
of customers. If any provision of this License is
invalid or unenforceable in whole or in part the
validity of other provisions of this License and remainder of the relevant provision shall not be affected. Headings are for convenience only and shall
not affect construction.

Contents 61Index
Index
Symbols
928Movie
audio connector 54
software version 8
A
about the guide 5
accelerating movies on playback 29
adjusting
base address jumper 12
input area 27
Always on Top 25
assigning a button number 41
audio connections
Captivator ProTV 18
B
base address 11
conflicts 19
jumper settings 55
black level 26
bold text 9
boosting TV signals 8
Both Fields 27
brightness 26, 35
bulletin board 57
Button number 41
C
cable TV input 40
Captivator Pro 5
Captivator Pro/TV
configuring 25
conflicts 19
connecting inputs 18
connecting to your graphics card17
installing 11, 15
reconfiguring 19
Captivator ProTV 5
audio connections 5, 18
connecting to a sound card 17
inputs 5
part numbers 55
TV inputs 39
capture performance 29
capturing
full motion video 30
full screen video 29
repurposing images 2
still formats 36
video 8, 29
CD-ROM connector, pin-outs 54
Channel name 41
Channel Setup dialog 40
channels, adjusting 41
checklist 58
colors
number of 23
vs frame rate 29

62 Captivator Pro & Captivator ProTV User Guide
CompuServe 9, 57
configuring, Captivator Pro/TV19, 25
conflicts with other cards 19
connecting the external cables 18
connectors, pin outs 54
contrast 26, 35
conventions used 10
copyright 2
correcting unstable images 25, 35
credits 2
Custom mode 12
Customer support 57
D
damage, electrostatic charges 10
defragmenting your hard disk 30
deleting channels 41
dimensions 53
disclaimers 2
display mode 11, 23, 33
displaying
TV tuner dialog 40
live video 23
Dither 27
dithering images 27
DoubleSpace 30
dropping frames 29
E
edition 2
electrostatic charges 10
EN55022 approval 59
errors, definitions 43
Express mode 12
extended MCI commands 49
external audio connections 18
F
FaxBack number 57
file formats, TV Snap 37
fine tuning channels 41
frame rate vs colors 29
frequency ranges, TV tuner 39
further reading 9
G
gamma 26, 35
graphics and video, mixing 31
graphics card
software version 8
expansion bus 30
grayscale palette 36
grounding your computer 15
H
handling Captiva tor Pro/TV 10
hard disk management 8
hardware requirements 8
help 43
hue 26, 35
I
IEC801 approval 59
Image windows 37
images, capturing and repurposing 2
Input Clipping 27
installing
Captivator Pro/TV 15
multiple VM-Channel cards 11
software 12
interfaces 53
interference 59
internal audio cable 54
internal audio connector 17, 54
interrupt, reconfiguring 19
italic text 9

Contents 63Index
M
marquee 37
MCI video overlay commands 9
Mirror video 27
multiple VM-Channel cards 11
N
naming a channel 41
No Title 25
NTSC - color distortion 26
O
online Help 7
operating temperature 53
Overlay mode 31
P
PCI Movie, software version 8
pin outs 54
power requirements 53
Preview mode 31
product service 59
R
radio interference 59
ReadMe file 7
reducing RF noise 15
reflecting video 27
registration card 10
removing the computer cover 15
requirements 8
RF connectors, TV tuner 55
running Setup 13
S
satellite TV input 40
saturation 26, 35
saving part of a snapped image 37
scanning
accuracy 22
base addresses 21
for interrupts 21
system lock up 21
TV channels 41
your computer 12, 20
selecting TV channels 41
setting
base address jumper 14
base addresses 11
color level 26
display modes 23, 33
mid-tones 26
palettes 36
picture characteristics 35
Setup program 12
small caps 9
SmoothScale 30
snapping video stills 33, 37
software requirements 8
Sound Blaster connector 54
T
technical details 53
technical support 57
telephone numbers 57
television interference 59
trademarks 2
troubleshooting 43
tuning TV channels 39

64 Captivator Pro & Captivator ProTV User Guide
TV channels, scanning for 41
TV inputs 39
TV signal, strength 8
TV Snap 7, 33
file formats 37
live video window 34
setting up 36
TV tuner dialog 39
TV Tuner
installing Captivator ProTV 15
frequency ranges 39
variants 55
dialog box 39
typographic conventions 10
V
VCR Compensation 25, 35
video, number of colors 23
video and graphics, mixing 31
Video Control Panel
Both Fields 27
closing 28
errors 43
TV tuner dialog box 39
Video for Windows
capture driver 29
clips, recording 29
software version 8
video images, setting up 26
Video Setup 7, 26
Input Clipping 27
Video Display 26
Video Setup 26
Video Window 7
No Title 25
TV tuner dialog box 39
video window, interference 23
VideoLogic Captivator Pro/TV
MCI commands 49
driver 7
VM-Channel graphics cards
installing with Captiva tor Pro/TV11
W
warranty information 59
white level 26
Windows Control Panel option 19
 Loading...