

Page 1
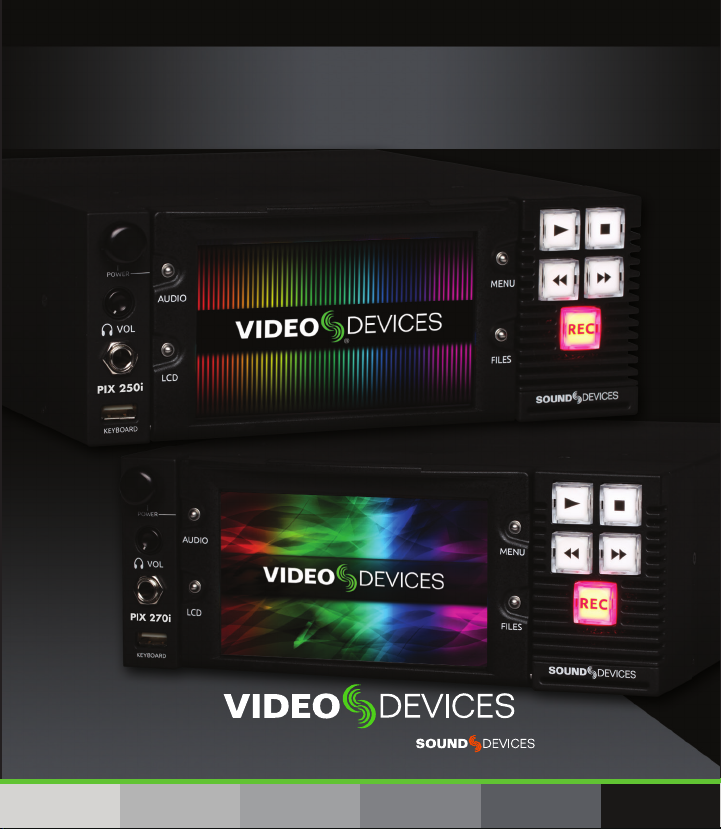
PIX 250i / PIX 270i
Rack-Mount Production Video Recorder
- QUICK START GUIDE -
VIDEO PRODUCTION TOOLS BY
Page 2

Welcome
Thank you for purchasing the Video Devices PIX 270i or PIX 250i video recorder.
This rack-mountable production video recorder and playback deck is extremely
scalable with extensive audio and video processing capabilities, such as 10-bit
video up/down/cross conversion, and hardware-based encoding to Apple ProRes
and Avid DNxHD codecs.
These features allow for fast, reliable acquisition of video (at any standard HD or SD
resolution and frame rate) and audio to ready-for-edit, industry standard QuickTime
.mov les. Audio acquisition on a PIX 250i is up to 16 tracks from analog, AES,
HDMI, or SDI sources, while a PIX 270i can record up to 64 tracks from analog,
AES, HDMI, SDI, Dante or MADI sources.
Your purchase includes:
QUANTITY ITEM
1 PIX 270i or PIX 250i video recorder
1 Power supply unit
1 10-pin Phoenix screw terminal black
4 Adhesive rubber feet
1 PIX-270i / PIX 250i Quick Start Guide
1 Product registration card
This Quick Start Guide provides the necessary steps to setup and begin using
your product right out of the box. It also provides a brief overview of features,
warranties, and licensing information.
2
Page 3

Read & Register
Sound Devices, LLC strongly encourages you to register your product. Registration
can extend your warranty and ensures you will receive timely product updates.
For a full description of all product features, user-based procedures, specications,
and any safety information, please refer to the product’s User Guide located on the
Video Devices website. Use the QR code or respective link below to access the guide.
Full User Guide
www.videodevices.com/download/
guides/PIX270iug_en.pdf
Email Support
support@sounddevices.com
Register Your Product
www.videodevices.com/
support/registration/
Call Support
1-608-524-0625
1-800-505-0625
For the PIX-250i User Guide, visit: www.videodevices.com/download/guides/PIX250iug_en.pdf
PIX 250i / PIX 270i - QUICK START GUIDE
3
Page 4

DC Input 1
DC Input 2
PIX 270i - Back Panel
1. Attach Power
The PIX 250i has a single DC input, and the PIX 270i
(shown) has two redundant DC inputs—both XLR-4M
connections—on the back panel. Both video decks feature
PowerSafe™ technology.
While two power sources may be attached simultaneously on
the PIX 270i, it will use only one source at a time. By default,
the video deck operates from the primary power source rst.
The primary power source is the one attached to DC Input 1.
If the primary power source is removed or drops below
9 volts, then the PIX 270i switches, without operational
interruption, to the secondary power source (DC input 2)
if available. Should the primary power source return, or its
voltage rise above 10.5 V, then the PIX 270i would revert
back to the primary source—again without interruption.
In the event that all power is lost, or voltage drops below
the threshold, PowerSafe circuitry will activate. The internal
PowerSafe battery will power the deck while the PIX 250i
or PIX 270i displays a warning, stops any active recordings,
nishes writing les, and safely shuts down. This feature
ensures that les are protected from unexpected power loss.
To connect external power:
1. Plug the XLR 4-pin connector at one end of the XL-WP4 power
supply (shown) into one of the recorder’s DC inputs, located
on its back panel.
2. Plug the other end of the power supply into a standard AC wall
outlet.
When on, the video deck displays the voltage levels of all
available power sources as part of the on-screen display
(OSD), beside the label DC In.
4
Page 5
2. Power Up
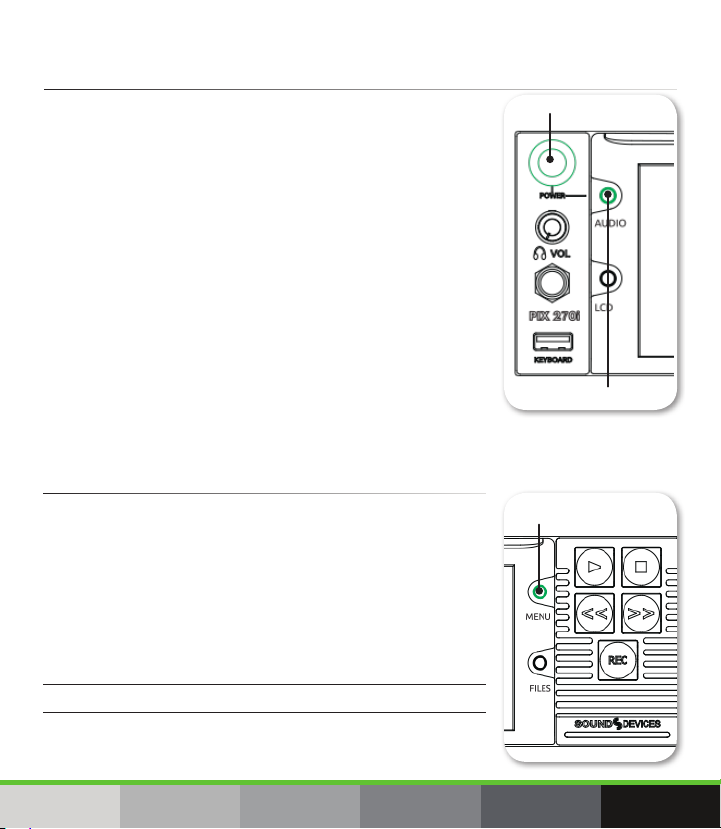
Control Knob
AUDIO Button
MENU Button
To turn on the video deck:
▶ Control + AUDIO: Simultaneously press the Control knob and
the AUDIO button.
Once the recorder is turned on, the Stop button
illuminates, and the Video Devices splash screen appears
on the 5-inch LCD. By default, the PIX recorder is set to be
always powered on, so long as a power source is attached.
However, this setting may be changed so that power can
be turned off with a simultaneous press of the Control
knob + AUDIO button.
To modify the power setting:
1. Press MENU.
2. Select System > Power.
Options include: Always On and Use Power Switch
3. Main Menu and Navigation
The PIX recorder’s 5-inch, color LCD on the front panel
provides a Main View that displays the live or playback video
with an informative on-screen display (OSD) superimposed
over it. Many items shown in the OSD are congured via the
Main Menu screen.
To view the Main Menu:
▶ Press the MENU button. You can then use the Control knob to
navigate the menu and select settings for adjustment.
Press the MENU button to exit and return to live view.
For more information on menus and system settings, see
either of the PIX 250i or PIX 270i User Guides.
PIX 250i / PIX 270i - QUICK START GUIDE
5
Page 6
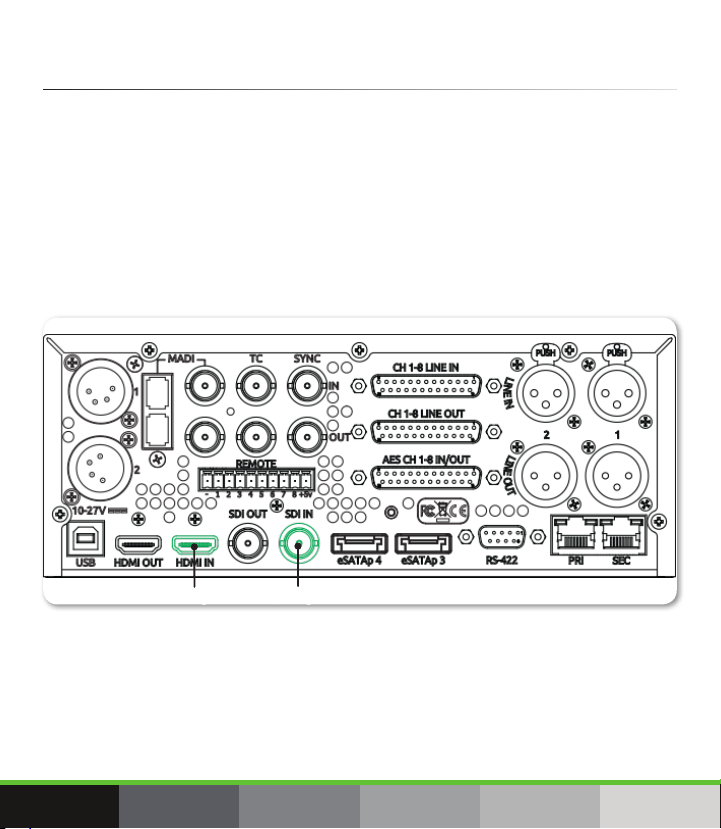
4. Connect Video Signal
PIX 270i - Back Panel
SDI InputHDMI Input
Video Input/Output ports are located on the recorder’s back panel. The PIX
recorders accept video input signals over HDMI, HD-SDI, and single link 3G-SDI
level A and B. Neither the PIX 270i nor the PIX 250i accepts analog video signals.
When the device is fully booted, the active video input signal, if present, will be
displayed full screen.
To connect video signal:
1. Attach one end of a video cable to the appropriate output connector on your camera.
2. Connect the other end of the video cable to the appropriate input of the PIX recorder.
To select the video input source to be monitored on the LCD:
1. Press the MENU button.
2. Turn and press the Control knob to select Video > Video Input.
3. Select a video input: SDI or HDMI, accordingly.
6
Page 7

5. Set up Audio
HP Volume
¼” HP Output
The PIX 250i can record up to 16 channels of audio via analog, AES, HDMI, or SDI
sources, while the PIX 270i is capable of recording up to 64 channels from analog,
AES, HDMI, SDI, Dante or MADI sources.
You may customize your audio setup by adjusting which channels are armed,
modifying their names, conguring input sources, and setting gain levels and/or
delays.
To set up audio:
1. Press the AUDIO button to view the Audio screen.
2. Use the Control knob to scroll up or down vertically, and press it in to select a channel.
3. Use the Control knob to scroll right or left horizontally, and press it in to select a setting
you want to modify.
4. Use the Control knob to adjust your chosen audio setting accordingly.
5. When nished modifying Audio settings, press MENU or ALT to exit the Audio screen.
Additional system-wide audio settings are available via MENU > Audio. For more information, see
the Audio chapter in the PIX 250i or PIX 270i User Guides.
To adjust your headphone settings:
1. Press the MENU button.
2. Select Audio > HP Source.
3. Select the option you want to use to route audio to your
headphones.
4. Press MENU to exit.
▶ Be careful of high levels when plugging in your headphones
to the recorder’s ¼-inch HP output. It is recommended you
adjust headphone volume to OFF — full counter-clockwise —
before plugging in your headphones; then, with headphones
on, carefully raise the gain until you reach your preferred
level. Push in the VOL knob to recess it and avoid accidental
adjustments.
PIX 250i / PIX 270i - QUICK START GUIDE
7
Page 8

6. Attach Storage
PIX 270i - Front Panel
Handle
LCD
eSATAp
2.5” drive slot
Screw
holes
PIX-CADDY 2
There are two PIX-CADDY drive bays on the front of the PIX 270i or PIX 250i, which
are accessed by pulling forward on the handle above the LCD and tilting down the
LCD. Additionally, on the PIX 270i, there are two eSATAp connections on the back
panel for attaching two additional drives.
PIX rack-mount recorders can record les to high-capacity, 2.5-inch SATA II and SATA
III solid-state drives in PIX-CADDY 2 accessories. Also acceptable are CompactFlash
memory cards in PIX-CADDY CF accessories.
To attach an SSD:
1. Install an approved 2.5-inch SSD into a PIX-CADDY 2, ensuring
the drive is rmly screwed in with the supplied screws.
Some thinner drives may require the use of the PIX-SHIM accessory
to ensure a solid fit.
2. Insert the caddy, drive first, into slot 1 or 2 of the front-panel
drive bays.
8
Page 9

If using a PIX-DRIVE BAY connected to the rear eSATAp connections on the PIX 270i, then the caddy
eSATAp
CF card slot
PIX-CADDY CF
may be inserted into slot 3 or 4 of a PIX-DRIVE BAY.
Drive connections are numbered 1 through 4 (1 through 2 on the PIX 250i), and
each deck will refer to its drives by these numerical identiers.
To install a CF card:
▶ Slide the CF card into the PIX-CADDY CF and insert the caddy
into an available drive bay.
Some approved mechanical drives may be used to record
QuickTime video files or Broadcast Wave polyphonic audio
files. Use only approved SSDs if recording to Broadcast Wave
monophonic file format is necessary. Visit www.videodevices.com/
support/approved-media for a list of approved storage options.
7. Format Storage
Drives and memory cards must be formatted by the PIX video recorder before used
with it.
To format a drive:
1. Connect the drive to be formatted; ensure the CF card in a PIX-CADDY CF or the SSD in a
PIX-CADDY 2 is properly inserted in one of the recorder’s drive bays.
2. Press the MENU button.
3. Turn and press the Control knob to select File Storage > Erase/Re-format.
4. Turn and press the Control knob to select the sub-option associated with the preferred
drive. These sub-options, which will vary based on PIX recorder model, include:
• For the PIX 250i — Drive 1, Drive 1, Both drives.
• For the PIX 270i — Drive 1, Drive 2, Drive 3 (eSATAp), Drive 4 (eSATAp), All drives.
5. A conrmation dialog will appear on screen asking if you want to continue. Turn and press the
Control knob to select OK to continue. An on-screen keyboard appears.
6. Either accept the default volume name (PIX) or use the keyboard to enter a new volume
name, and then select OK to continue.
PIX 250i / PIX 270i - QUICK START GUIDE
9
Page 10

8. Recording and Playback
Play Button Stop Button
Record Button
PIX video recorders support recording both Apple ProRes and Avid DNxHD codecs,
with ve levels of data compression for ProRes and four levels for DNxHD. Both
codecs are “edit-ready” and eliminate the need to transcode video before importing
into non-linear editing suites, such as Final Cut Pro (ProRes) or Avid (DNxHD or
ProRes).
To select a video codec:
1. Press the MENU button.
2. Select Video > Codec.
ProRes is a variable data rate codec; DNxHD is a xed rate
codec. The PIX recorders support all compression levels
and bit rates of both codecs, and automatically records
the correct bit rate dependent upon the video input
resolutions and frame rate.
During recording, the PIX 270i or PIX 250i writes to a
temporary le format with the extension .SDV and audio
les are written with the extension .SDA. When recording
is stopped, the le is “nalized” to a standard QuickTime
(.mov) le for video or a standard Broadcast (.wav) format
for audio takes.
To begin recording:
▶ Press the Record (REC) button.
The Main Menu screen is not available during recording and playback.
While recording, the REC button illuminates red as does the timecode, le name,
and absolute time—all three of which are visible as part of the OSD. Also, the drives
(D1, D2, etc.) will appear red on the OSD and LEDs inside the drive bay (and on PIX
caddies) will illuminate amber while les are being written to the drive.
▶ Do not remove the drives while the LEDs remain illuminated.
10
Page 11

To play recorded video les:
1. Press the Files button and use the Control knob to select a le.
2. Press the Play button. Other transport controls on the front panel include Rewind (<<) and
Fast Forward (>>).
Both PIX recorders allow for playback of .mov les (or .wav for the PIX 270i) whether
generated by the PIX recorder or elsewhere. Playback video is shown on the LCD
and sent to the video outputs. For more information, see the PIX 250i and/or PIX
270i User Guides.
9. Using the Monitoring Tools
The PIX 250i and PIX 270i also feature various monitoring tools to assist with
exposure and focus. These functions only affect signal on the LCD and never affect
the recorded video or the video output.
To activate a monitoring tool:
▶ Press any of the following combinations:
BUTTON COMBO DESCRIPTION
LCD + FILES Press LCD + FILES simultaneously to enable Exposure Assist. When enabled, False
LCD + MENU Press LCD + MENU simultaneously to enable Focus Assist. When enabled, Peaking
LCD + AUDIO Press LCD+ AUDIO simultaneously to toggle Zoom on and off. When on, the image
Color or Zebra stripes are overlaid on the LCD monitor signal, and EXP appears in
yellow on the OSD. There are two types of False Colors (12-step and 4-step) and
two types of Zebras (Zebra 1 level and Zebra 2 threshold). Enabling which tool is
determined by the LCD Monitor setting called Exposure Assist.
or Edge Enhance appears to mark sharp edges of the video image to help with
focusing. Also FOCUS appears in yellow on the OSD.
zooms to a 1:1 pixel ratio, and ZOOM appears in yellow on the OSD.
To view or adjust a monitoring tool’s settings:
1. Press the MENU button.
2. Use the Control knob to select LCD Monitor and modify settings accordingly.
PIX 250i / PIX 270i - QUICK START GUIDE
11
Page 12

Accessories
There are various accessories that can further enhance your video recording and
playback experience. These accessories may be purchased separately.
ACCESSORY PHOTO DESCRIPTION
PIX-CADDY CF This media caddy holds CompactFlash cards for use
with Video Devices rack-mount video recorders, the
PIX-DOCK, and the PIX-DRIVE BAY.
PIX-CADDY 2 This media caddy holds 2.5-inch SSDs and is compat-
PIX-DOCK The PIX-DOCK is a Thunderbolt® adapter that provides
PIX-DRIVE BAY This rack-mount dual PIX-CADDY 2 drive bay connects
12
ible with Video Devices rack-mount video recorders,
the PIX-DOCK, and the PIX-DRIVE BAY. The caddy has
Firewire 800, USB 3.0, and eSATAp connections for
high-speed data transfers.
A list of approved media is available online at:
http://www.videodevices.com/support/approved-media
high-speed transfer to and from a Thunderbolt-enabled
computer. It is designed for use with the PIX-CADDY 2
connected to SATA I/II/III drives.
to the PIX-270i with two attached 21-inch eSATA cables.
This half-rack, 2U chassis requires a PIX-RACK kit (sold
separately, not pictured) for mounting.
Page 13

ACCESSORY PHOTO DESCRIPTION
PIX-SSD6 This 2.5-inch SSD (SATA III) ts into the PIX-CADDY 2,
and is approved for use with camera- and rack-mount
PIX video recorders. It is pre-formatted exFAT and has a
240 GB capacity.
XM-CADDY
PACK
XL-ESATA A 36-inch eSATAp cable.
This table is not an all-inclusive list of accessories available for use with the PIX rack-mount
video recorders. For the most up-to-date product accessory information, visit the Video
Devices website at: www.videodevices.com.
This pack includes 2 PIX-SSD6 drives pre-mounted into
2 PIX-CADDY 2 media accessories.
PIX 250i / PIX 270i - QUICK START GUIDE
13
Page 14

Software License
End-user License Agreement for PIX 270i/PIX 250i Embedded Software / Firmware
Important Read carefully: This Sound Devices, LLC end-user license agreement (“EULA”) is a legal
agreement between you (either an individual or a single entity) and Sound Devices, LLC for the Sound
Devices, LLC software product identied above, which includes computer software, embedded software,
and may include associated media, printed materials, and “online” or electronic documentation
(“SOFTWARE PRODUCT”). By using, installing, or copying the SOFTWARE PRODUCT, you agree to be bound
by the terms of this EULA. If you do not agree to the terms of this EULA, do not use or install the
SOFTWARE PRODUCT.
Software Product License
The SOFTWARE PRODUCT is protected by copyright laws and international copyright treaties, as well as
other intellectual property laws and treaties. The SOFTWARE PRODUCT is licensed, not sold.
Grant of license. This EULA grants you the following limited, non-exclusive rights: In consideration of
payment of the licensee fee, Sound Devices, LLC, as licensor, grants to you, the licensee, a non-exclusive
right to use this copy of a Sound Devices, LLC software program (hereinafter the “SOFTWARE”) on a single
product and/or computer. All rights not expressly granted to licensee are reserved to Sound Devices, LLC.
Software ownership. As the licensee, you own the hardware on which the SOFTWARE is recorded or xed.
Sound Devices, LLC shall retain full and complete title to the SOFTWARE and all subsequent copies of the
SOFTWARE, regardless of the media or form on or in which the original copies may exist. The license is not
a sale of the original SOFTWARE.
Copyright. All rights, title, and copyrights in and to the SOFTWARE PRODUCT (including, but not limited
to, any images, photographs, animations, video, audio, music, text, and “applets” incorporated into the
SOFTWARE PRODUCT) and any copies of the SOFTWARE PRODUCT are owned by Sound Devices, LLC or
its suppliers. The SOFTWARE PRODUCT is protected by copyright laws and international treaty provisions.
Therefore, you must treat the SOFTWARE PRODUCT like any other copyrighted material, except that you may
make copies as only provided below. You may not copy the printed materials accompanying the
SOFTWARE PRODUCT.
Restrictions on use. Licensee may not distribute copies of the SOFTWARE or accompanying materials to
others. Licensee may not modify, adapt, translate, reverse engineer, decompile, disassemble, or create
derivative works based on the SOFTWARE or its accompanying printed or written materials.
Transfer restrictions. Licensee shall not assign, rent, lease, sell, sublicense, or otherwise transfer the
SOFTWARE to another party without prior written consent of Sound Devices, LLC. Any party authorized by
Sound Devices, LLC to receive the SOFTWARE must agree to be bound by the terms and conditions of
this agreement.
14
Page 15

Termination. Without prejudice to any other rights, Sound Devices, LLC may terminate this EULA if you fail
to comply with the terms and conditions of this EULA. In such event, you must destroy all copies of the
SOFTWARE PRODUCT and all of its component parts.
Limited Warranty
No warranties. Sound Devices, LLC expressly disclaims any warranty for the SOFTWARE PRODUCT. The
SOFTWARE PRODUCT and any related documentation is provided “as is” without warranty or condition of
any kind, either express or implied, including, without limitation, the implied warranties and conditions of
merchantability, tness for a particular purpose, or non-infringement. The entire risk arising out of use or
performance of the SOFTWARE PRODUCT remains with you.
No liability for damages. In no event shall Sound Devices, LLC or its suppliers be liable for any damages
whatsoever (including, without limitation, damages for loss of business prots, business interruption, loss
of business information, or any other pecuniary loss) arising out of the use of or inability to use this Sound
Devices, LLC product, even if Sound Devices, LLC has been advised of the possibility of such damages. In
any case, Sound Devices, LLC’s entire liability under any provision of this evaluation license shall be limited
to the greater of the amount actually paid by you for the SOFTWARE PRODUCT or U.S. $5.00. Because
some states/jurisdictions do not allow the exclusion or limitation of liability for consequential or incidental
damages, the above limitation may not apply to you.
Governing Law
This agreement and limited warranty are governed by the laws of the state of Wisconsin.
FCC Notice
This device complies with part 15 of the FCC Rules. Operation is subject to the following two conditions: (1)
This device may not cause harmful interference, and (2) this device must accept any interference received,
including interference that may cause undesired operation. FCC Part 15.19 (a) (3)
PIX 250i / PIX 270i - QUICK START GUIDE
15
Page 16

Warranty and Service
Sound Devices, LLC warrants the PIX 270i or PIX 250i against defects in materials and workmanship for a period of ONE (1) year
from date of original retail purchase. Users who register their product directly with Sound Devices Technical Support by mail,
online, or phone, will receive an additional ONE (1) year of warranty coverage, extending the complete warranty period to TWO (2)
years from the date of original retail purchase. In order to extend the warranty coverage period, registration must be completed
within the initial ONE (1) year warranty period. Products must be purchased through authorized Sound Devices resellers to
qualify for Warranty coverage.
This is a non-transferable warranty that extends only to the original purchaser. Sound Devices, LLC will repair or replace the
product at its discretion at no charge. Warranty claims due to severe service conditions will be addressed on an individual basis.
THE WARRANTY AND REMEDIES SET FORTH ABOVE ARE EXCLUSIVE. SOUND DEVICES, LLC DISCLAIMS ALL OTHER
WARRANTIES, EXPRESS OR IMPLIED, INCLUDING WARRANTIES OF MERCHANTABILITY AND FITNESS FOR A PARTICULAR
PURPOSE. SOUND DEVICES, LLC IS NOT RESPONSIBLE FOR SPECIAL, INCIDENTAL, OR CONSEQUENTIAL DAMAGES ARISING
FROM ANY BREACH OF WARRANTY OR UNDER ANY OTHER LEGAL THEORY. Because some jurisdictions do not permit the
exclusion or limitations set forth above, they may not apply in all cases.
For all service, including warranty repair, please contact Sound Devices for an RMA (return merchandise authorization) before
sending your unit in for repair. Product returned without an RMA number may experience delays in repair. When sending a unit
for repair, please do not include accessories, including SSD drives, CF cards, batteries, power supplies, carry cases, cables, or
adapters unless instructed by Sound Devices personnel. Sound Devices repairs and replacements may be completed using
refurbished, returned or used parts that have been factory certied as functionally equivalent to new parts.
Sound Devices, LLC
Service Repair RMA #XXXXX
E7556 State Road 23 and 33
Reedsburg, WI 53959 USA
telephone: (608) 524-0625
Technical Support / Bug Reports
For technical support and bug reporting on all Video Devices products contact Sound Devices, LLC at:
E-mail: support@sounddevices.com To report technical errors in this guide,
Website: www.sounddevices.com/support/ email: techpubs@sounddevices.com
Phone: +1 (608) 524-0625
Toll-free: +1 (800) 505-0625 — in USA only
Fax: +1 (608) 524-0655
16
Page 17

Fill In and Keep for Your Records
PRODUCT: _____________________________________________
SERIAL NUMBER: _____________________________________________
PURCHASE DATE: _____________________________________________
STORE/RETAILER: _____________________________________________
ADDITIONAL NOTES: _____________________________________________________________
_____________________________________________________________
_____________________________________________________________
_____________________________________________________________
_____________________________________________________________
_____________________________________________________________
Sound Devices, LLC recommends keeping your receipt, as well.
PIX 250i / PIX 270i - QUICK START GUIDE
17
Page 18

Legal Notes
Product specications and features are subject to change without prior notication.
Copyright © 2016
Sound Devices, LLC.
All rights reserved.
This document is protected under copyright law. An authorized licensee of this product may reproduce this publication for the
licensee’s own personal use. This document may not be reproduced or distributed, in whole or in part, for commercial purposes,
such as selling copies or providing educational services or support.
This document is supplied as a technical guide. Special care has been taken in preparing the information for publication;
however, since product specications are subject to change, this document might contain omissions and technical or
typographical inaccuracies. Sound Devices, LLC does not accept responsibility for any losses due to the use of this guide.
Limitation of Liability
LIMITATION ON SOUND DEVICES’ LIABILITY. SOUND DEVICES, LLC SHALL NOT BE LIABLE TO THE PURCHASER OF THIS PRODUCT
OR THIRD PARTIES FOR DAMAGES, LOSSES, COSTS, OR EXPENSES INCURRED BY PURCHASER OR THIRD PARTIES AS A RESULT
OF: ACCIDENT, MISUSE, OR ABUSE OF THIS PRODUCT OR UNAUTHORIZED MODIFICATIONS, REPAIRS, OR ALTERATIONS TO THIS
PRODUCT, OR FAILURE TO STRICTLY COMPLY WITH SOUND DEVICES, LLC’S OPERATING AND INSTALLATION INSTRUCTIONS. TO
THE FULLEST EXTENT PERMITTED BY LAW, SOUND DEVICES SHALL HAVE NO LIABILITY TO THE END USER OR ANY OTHER PERSON
FOR COSTS, EXPENSES, DIRECT DAMAGES, INCIDENTAL DAMAGES, PUNITIVE DAMAGES, SPECIAL DAMAGES, CONSEQUENTIAL
DAMAGES OR OTHER DAMAGES OF ANY KIND OR NATURE WHATSOEVER ARISING OUT OF OR RELATING TO THE PRODUCTS, THESE
TERM/S AND CONDITIONS OR THE PARTIES’ RELATIONSHIP, INCLUDING, WITHOUT LIMITATION, DAMAGES RESULTING FROM OR
RELATED TO THE DELETION OR OTHER LOSS OF AUDIO OR VIDEO RECORDINGS OR DATA, REDUCED OR DIMINISHED AUDIO OR
VIDEO QUALITY OR OTHER SIMILAR AUDIO OR VIDEO DEFECTS ARISING FROM, RELATED TO OR OTHERWISE ATTRIBUTABLE TO
THE PRODUCTS OR THE END USER’S USE OR OPERATION THEREOF, REGARDLESS OF WHETHER SUCH DAMAGES ARE CLAIMED
UNDER CONTRACT, TORT OR ANY OTHER THEORY. “CONSEQUENTIAL DAMAGES” FOR WHICH SOUND DEVICES SHALL NOT BE
LIABLE SHALL INCLUDE, WITHOUT LIMITATION, LOST PROFITS, PENALTIES, DELAY DAMAGES, LIQUIDATED DAMAGES AND OTHER
DAMAGES AND LIABILITIES WHICH END USER SHALL BE OBLIGATED TO PAY OR WHICH END USER OR ANY OTHER PARTY MAY
INCUR RELATED TO OR ARISING OUT OF ITS CONTRACTS WITH ITS CUSTOMERS OR OTHER THIRD PARTIES. NOTWITHSTANDING
AND WITHOUT LIMITING THE FOREGOING, IN NO EVENT SHALL SOUND DEVICES BE LIABLE FOR ANY AMOUNT OF DAMAGES IN
EXCESS OF AMOUNTS PAID BY THE END USER FOR THE PRODUCTS AS TO WHICH ANY LIABILITY HAS BEEN DETERMINED TO EXIST.
SOUND DEVICES AND END USER EXPRESSLY AGREE THAT THE PRICE FOR THE PRODUCTS WAS DETERMINED IN CONSIDERATION
OF THE LIMITATION ON LIABILITY AND DAMAGES SET FORTH HEREIN AND SUCH LIMITATION HAS BEEN SPECIFICALLY BARGAINED
FOR AND CONSTITUTES AN AGREED ALLOCATION OF RISK WHICH SHALL SURVIVE THE DETERMINATION OF ANY COURT OF
COMPETENT JURISDICTION THAT ANY REMEDY HEREIN FAILS OF ITS ESSENTIAL PURPOSE.
Trademarks
The “wave” logo and USBPre are registered trademarks, and SpeedDrive, FileSafe, PowerSafe, Wave Agent, and PIX Assist are
trademarks of Sound Devices, LLC.
Mac and OS X are trademarks of Apple Inc., registered in the U.S. and other countries. Windows is a registered trademark of
Microsoft Corporation in the United States and other countries. All other trademarks herein are the property of their respective
owners.
18
Page 19

Declaration of Conformity
Manufacturer’s Name: Sound Devices, LLC
Manufacturer’s Address: E7556 State Road 23 and 33
Reedsburg, WI 53959 USA
Declares under sole responsibility that the product as delivered
Product Name: PIX Video Recorder
Model Number: PIX 270i, PIX 250i
Description: Rack-mount audio and video recorders with 5-inch LCD.
Product Options: This declaration covers all options of the above product
complies with the essential requirements of the following applicable European Directives, and carries the CE
marking accordingly:
EMC Directive (2014/30/EU)
EN 55022:2010/AC:2011
EN 55103-1:2009
EN 55103-2:2009
This Declaration of Conformity applies to the above-listed product(s) placed on the EU market after:
January 29, 2014
Date Matt Anderson - Sound Devices, LLC President
PIX 250i / PIX 270i - QUICK START GUIDE
19
Page 20

www.videodevices.com
Part # 6580.000
 Loading...