

Page 1
Bring Home Innovation
Bring Home Videocon
Semi Automatic Washing Machine
Please read this manual carefully beforeinstruction
operating your machine. Retain it for future reference.
Record model name & serial number of the machine.
Please quote this information when you require service.
SAP CODE:1100083759
Model:- VS70M11 / VS70M12 / VS72N11 / VS72N12
VS72N13 / VS70L11 / VS72L12 / VS72L13
1800 881 40 40
Page 2
Message from the Vice Chairman & CEO
Page 3
Contents
1. Special Features
Safety Precautions
2.
Description of Control Panel
Washing Procedure
Laundry and Detergent Guide
3. Description of Parts
4. How to install
5.
6.
7.
8.
9.
Care and Maintenance
10.
Trouble Shooting
Specification Chart
1
2
3
3
4
5
7
8
8
9
Page No.
1
The primary concerns that drive our efforts to design and develop quality products are your Health and
Pleasure. This is one such washing machine that has been designed specially with advanced features for
your convenience, to provide brightest and hygienic wash in an effortless way. So go ahead and enjoy the
pleasure of VIDEOCON Washing Machine at your service.
=
Germ Free #
VIDEOCON Washing Machines are lined with a protective antibacterial additive. The antibacterial additive
evolves its activity on the cell wall and disrupts the metabolic process of micro-organisms and thus influences
their ability to function, grow and reproduce. This action totally stops the grime, fungus, germs and other
microbial elements building empires in the wash tub. Thus giving a clean wash tub for a longer period.
= Rust Free*
This machine is made of Hi Impact Polymer Fiber which is rust free. This gives your machine a longer life.
= Unique Auto Soak**
A specially designed soak system for better soaking
Soaking is an important element of the washing process. It enhances and optimizes the detergent’s action
on the clothes. With this washing machine you can forget about soaking the clothes manually. Just put your
clothes in the machine, add water and detergent, the rest will be taken care of by the Unique Auto Soak
feature. The Unique Auto Soak option provides you the benefit of an ideal soak, which is better than the
manual soak. It supplements soaking with intermittent agitation to ensure that all your clothes receive
uniform soaking and better detergent action.
= Unique Spin Fountain
When the washed clothes are transferred into the spin tub, there are chances of the detergent still remaining
in the clothes. This washing machine has a special inlet in the spin tub through which water is showered onto
your clothes. This ensures that any traces of detergent left on the clothes are removed before drying.
* Not applicable for VS70K11 / VS70K12
** Not applicable for VS60A11 / VS60A13 / VS60B11 / VS68E11 / VS70K11
Advantages
1.Put dirty clothesinto thewashing machine withan EcoWonder Wash(EWW) Ball.
2.Adjust the washingmachine toproper setting.EWW Ball worksbetter inwarm water.
3.Soak with EWWfor alonger duration, forbetter washresults.
4.Wash theclothes with EWWBall inwash tub alongwith clothes.
5.
6.For betterperformance of EWWBall, rinsethe ball inrunning waterand dry itin the
sunlightfor 1-2hrs atleast oncein month.
Afterwashing, remove theEWW Ballfrom the machineand washthe ball infresh water.
1.Keep out of thereach of children eventhough Ball donot contain anychemicals.
2.
EWW
Donot put theEWW Ballin the Spindryer.
1.Sponge Ball helpsto removeodour, germsand harmfulbacteria present inyour clothes.
2.EWW Ball hasno chemicalsand is safefor environment.
How to Use
Not to Do
Applicable in VS72N13 Model Only.
Special Features
# Not applicable for VS60A11
11.
Product Disposal Guidelines
9
Page 4
3
Do not place the washing machine in steamy rooms
or where the washing is directly exposed to rain.
Moisture may destroy the electrical insulation and cause
an electrical shock hazard.
- Push it with force further to the bottom of the drain outlet.
- Check the drain hose for not getting apart from the
outlet by drawing it.
Insert the drain hose(A) and push it tightly to be
connected as arrow direction
As plastic and electrical components are affected by direct
heat, never place washing machine near heaters, boilers etc.
Do not place washing machine under direct sunlight.
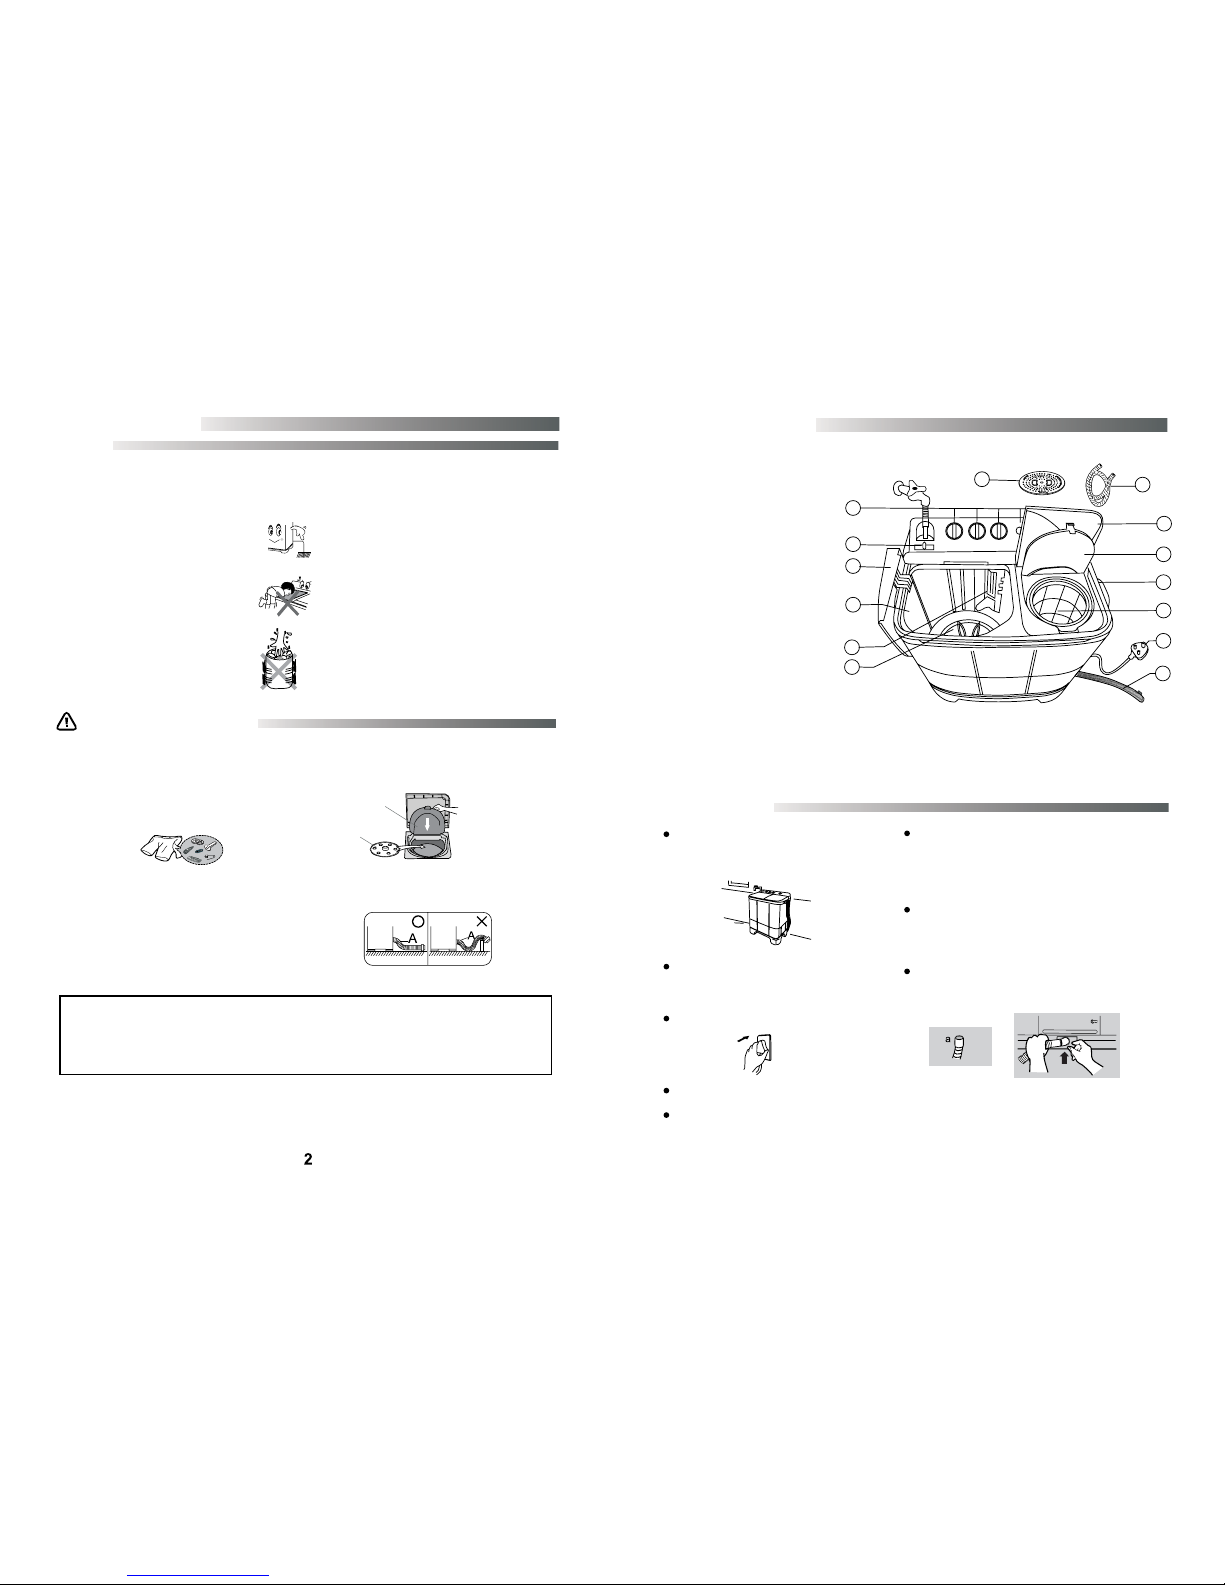
1. Control Panel of Machine
2. Inlet Hose
3. Water Inlet Selector
4. Wash Tub Lid
5. Wash Tub
6. Overflow Filter
7. Pulsator
8. Spinner Lid
9. Inner Lid
10. Drain Hose Hanger
11. Spinner Tub
12. Power cord
13. Drain Hose
14. Spinning Cap
(Please do not match this figure with your machine as it may be different from your model.
These are schematic diagrams only).
1
2
3
4
5
6
7
8
9
12
10
11
13
14
Description of Parts
Be careful that the machine should not be dropped
Machine should not be move when loaded
Insert the power plug firmly into the main supply
How to Install
If the washing machine is placed on an uneven or weak surface
Connecting the Drain Hose
Never install the washing machine near water
Avoid direct sunlight or heating devices.
noise or vibration may be occurred (Allowable tilt 2 )
°
Leave some space
Place the washing machine on a sturdy flat surface
Space at least 15cm between the washing machine
and the wall.
Cautions
NOTE :
“This appliance is not intended for use by persons (including children) with reduced physical, sensory or
mental capabilities, or lack of experience and knowledge, unless they have been given supervision or
instruction concerning use of the appliance by a person responsible for their safety. Children should be
supervised to ensure that they do not play with the appliance.”
Do not use Washing Machine to wash items other
than Clothes, Blankets, Curtains, Towels etc.
Never disassemble, Repair or Remodel this washing
machine. This can cause fire or irregular action that
may Result in injury.
Do not place flammable substances near the machine
such as Kerosene, Benzine, Paint Thinner
and Alcohol.
Do not put clothing with such substances in the tub.
There is a risk of Explosion of Fire
= It is recommended to drain all the water from wash
tub if any, after completion of your wash cycle.
When the washing machine gets dirty, wipe it with
the slightly wet cloth.
Do not use machine when power cord is torn or
damage, Removing the power plug from the power
outlet, you should remove it by pulling its insulated
body not its cord. And do not place the machine or
any heavy objects on the power cord; it may cause
the damage to the power cord. If the power plug or
power cord is damaged, contact your nearest service
centre.
= Be Sure that the washing machine grounded
=
=
=
=
=
- To avoid electrical shock
- Use Metal pipe for ground connection
- Don’t use Gas pipe or Telephone lines for connection.
= Keep away children from washing machine
- While playing child may fall into washing tub
- Rotating mechanism can cause harm to child
Safety Instructions
= Never touch Laundry during Wash & Spin
- Rotating tub may cause injury to your hand
Precautions When Operating
= Do not use water hotter than 50°C for washing clothes.
= Never splash water on control panel.
= Close wash lid, to avoid water splashes.
= Use detergent quantity as specified in manual.
= Be sure the drain hose lay down as shown in fig.
- Clothing may be deformed or decolored
= When spinning always use the spinning cap.
- Press spin cap tightly against the clothes
- While spinning maintain horizontal level of clothes
Inner lid
Spin cap
= Before washing, check all pockets
- If nails or pins remain in pockets, they may damage
the washing machine or clothes
- Plastic parts may be deformed or damaged
- Do not touch laundry until tub has
completely stopped.
Page 5
Note : Do not rotate the knobs more then prescribed limits.1)
Above graphics is just for representation, it may not match with you machine.2)
Refer specification chart3)
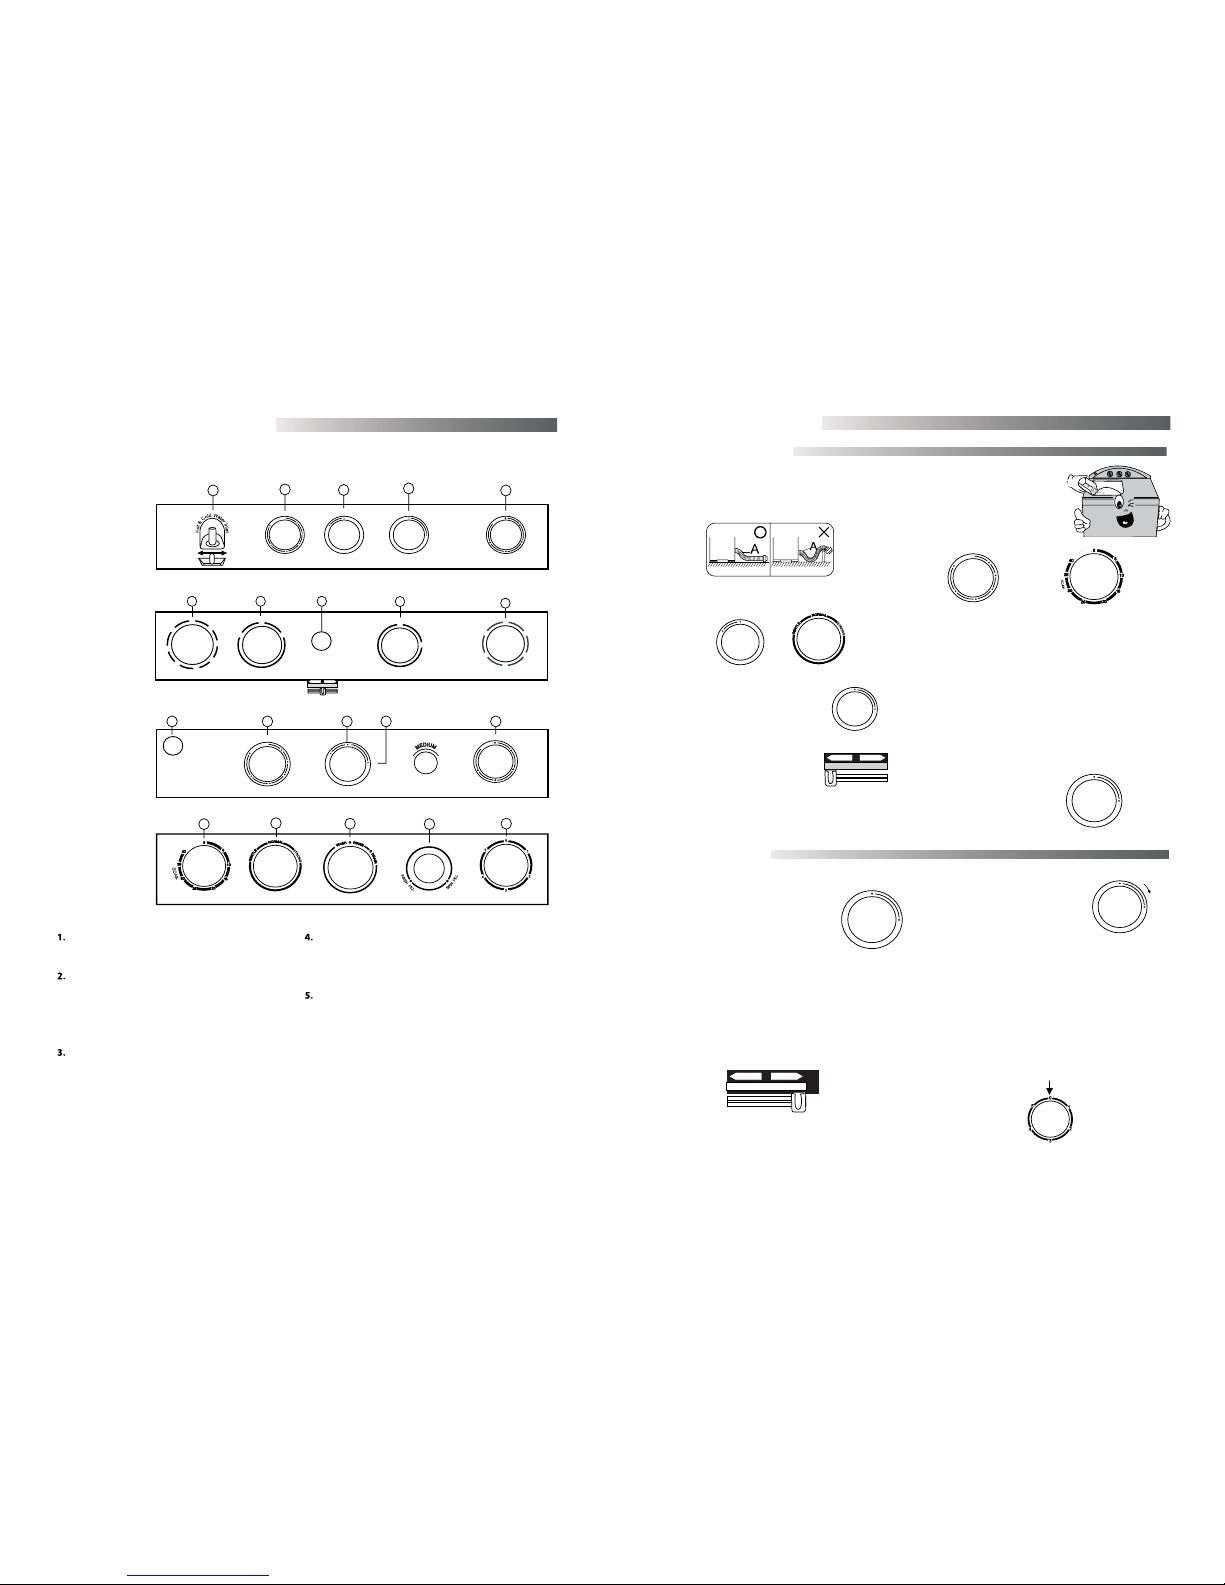
Description of Control Panel
SPIN TIMER
This is used to set the spin time,
1-5 minutes
WATER SELECTOR
DRAIN SELECTOR
This is used to set the wash time,
1-15 minutes(Wash)
1-40 minutes (Wash with 20 min Soak)
1-40 minutes (Wash with 25 min Soak)
During Washing, Water Selector Knob should be selected
to wash.
During Spin Rinsing, Water Selector Knob should be selected
to Spin
This is used to select wash action
WASH SELECTOR
WASH TIMER
This is used to select the Washing/Rinsing or
Draining
VS60A11
VS60A12
VS60B11
2
5
4
4
TO WASH
TO SPIN
WATER SUPPLY
/
R
N
I
H
S
S
A
E
W
D
R
A
I
N
3
2
1
0
5
4
1
0
5
10
15
20
25
30
35
SOAK
RST ONG
T
N
L
EG
E
A
L
O
N
R
M
WASH SELECTORWASHTIMER
SPIN TIMER
WATER INLET
CYCLE SELECTOR
VS70K11
1
5
2
3
4
35
5
10
15
0
2
3
4
5
1
0
S
O
A
K
R
O
N
T
G
S
WASH SELECTOR
WASHTIMER
SPIN TIMER
R
A
I
N
D
H
/
R
I
N
S
A
S
E
W
CYCLE SELECTOR
WASHTUB SPINTUB
E
L
T
N
E
G
VS68E11
VS72E12
VS72H11
4
VS70K12
4) Buzzer is not applicable in VS68E11 / VS70K11.
5
2 1
3
4
35
5
10
15
0
S
O
A
K
2
3
4
5
1
0
CYCLE SELECTORWASHTIMER SPIN TIMER
BUZZER
R
O
N
T
G
S
E
L
T
N
E
G
R
A
I
N
D
OFF HI
5
time and water. (However, if water from the tap contains rust and / or dirt, do not perform spin shower.)
1. Direct water to spin tub by turning knob / lever.
3. Turn OFF the tap and then spin for about 1 ~ 5 minutes.
Washing Procedure
35
5
10
15
0
S
O
A
K
WASH TIMER
WASH TIMER
Set the Wash Timer 1-15 min.
Set the Wash Timer 1-35 min.
(Set the Wash Timer to a point between 15 to 35 and
SOAK FUNCTION
If the WASH TIMER is set to a point between
“15" to "35" or "15" to "40" (Refer Specification Chart)
t.he washing machine start the wash (15 min),
a.fter the soak is completed
Set the Wash Timer 1-40 min.
15 to 40 min for soak function).
- Connect the water supply hose and open the water tap
- Connect the power cord to the power supply outlet
- Lay the drain hose (A) down toward a sinkhole
Step 1- WASHING
R
A
I
N
D
H
/
R
I
N
S
A
S
E
W
DRAIN SELECTOR
Step 2- RINSING
R
A
I
N
D
H
/
R
I
N
S
A
S
E
W
DRAIN SELECTOR
R
A
I
N
D
H
/
R
I
N
S
A
S
E
W
DRAIN SELECTOR
With spin shower, the remaining detergent in the clothes will be removed and you can save on additional rinsing
Spin Shower Rinsing
TO WASH
TO SPIN
WATER SUPPLY
2. Make sure that SPIN TIMER is at "0" (zero) position
(spin tub not rotating),turn on the tap for about 1 minute.
SPIN TIMER
Note : During Soak, Pulsator rotates intermittently
R
O
N
T
G
S
WASH SELECTOR
E
L
T
N
E
G
WASH SELECTOR
2. Supply of the proper amount
of water as not to overflow
the top of the washing tub.
1. Set the Drain Selector
Knob to “Wash/Rinse”
5. Repeat this cycle until drain water
is clean.(2-3 minutes)
6. Be sure lay the drain hose down.
4. To Drain the Water
Set the Drain Selector Knob to Drain
3. Set the Wash Timer 2- 3 minutes.
4. Set the Water Selector
Knob to WASH.
5.Load laundry in the
wash tub.
3. Set the Drain Selector
Knob to WASH/RINSE
2. Set the Wash Selector
desired mode.
Knob to the
6. Fill water in the wash tub
and add the detergent.
7.Set the Wash Timer.
1. Before starting washing, check the following;
8.After washing, set the
Drain Selector Knob
to “DRAIN”
R
A
I
N
D
H
/
R
I
N
S
A
S
E
W
DRAIN SELECTOR
TO WASH
TO SPIN
WATER SUPPLY
4. During spin shower if water is coming to wash tub.
Then reduce the water flow.
VS60A13
5
2
1
3
4
CYCLE SELECTORWASH SELECTOR SPIN TIMER
WATER INLET
WASHTIMER
VS70M11/VS70M12
VS72N11/VS72N12
VS72N13/VSA70L11
VS72L12/VS72L13
Page 6
7
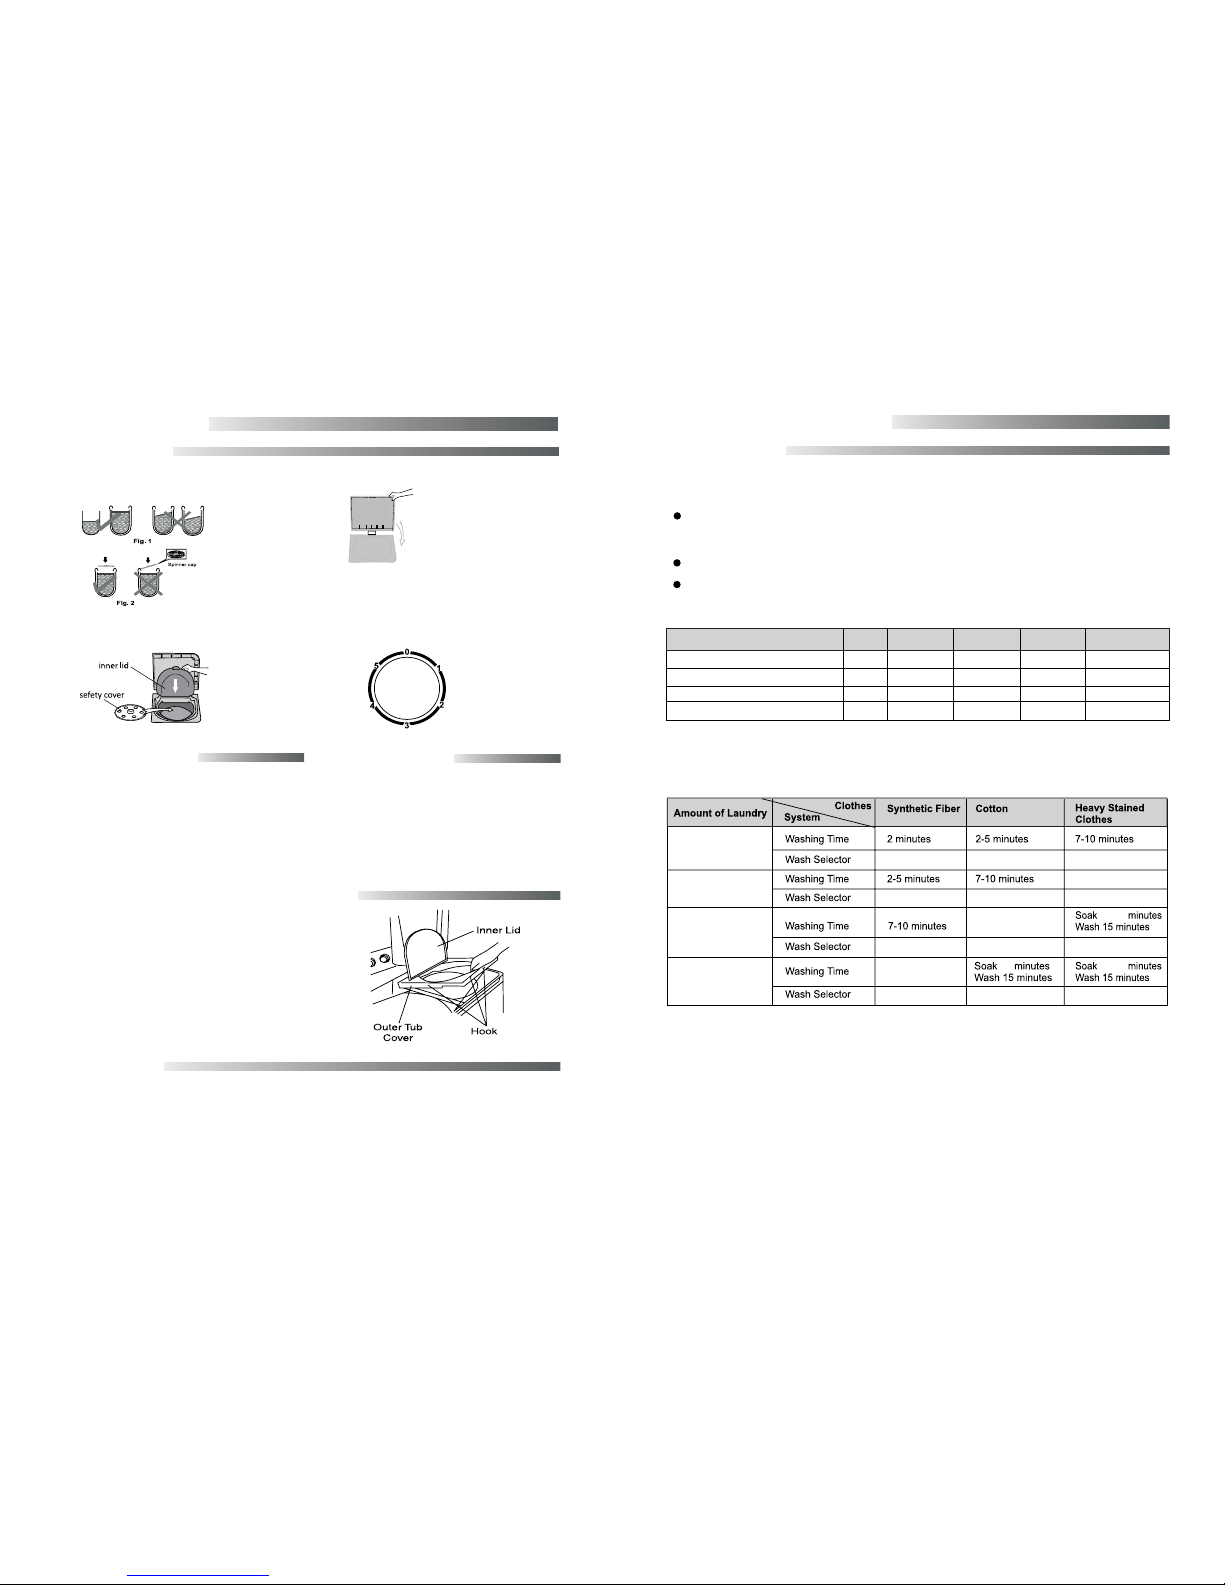
Laundry and Detergent Guide
USE OF DETERGENT
For Quick Dissolving
1) Prepare warm water of 30°C.
2) Follow the above process.
For different brand, dosage is different.
Use detergent as specified by Washing Machine Manufacturer
Note : 1. Actual quantities of load may very depending on the material size of laundry items.
2. If movement of cloth is too slow, remove some of the cloth until a steady movement is observed.
Table 1: Detergent Guide
Table 2: Laundry Guide
1.2 Kg 1.2~2.5 Kg 2.5~3.8 Kg 3.8~5.0 Kg
5.0 Kg or ABOVE
LOW LOW Medium High Over Flow
25 gm 40 gm 50 gm 60 gm 64 gm
Amount of Detergent
16 gm 25 gm 30 gm 38 gm 40 gm
Amount of concentrate Detergent
17 ml 22 ml 26 ml 29 ml 35 ml
Amount of Softener
WASH LOAD
Water Level
* Applicable for VS60A11 / VS60A12 / VS60B11 /VS60A13 /
VS70M11 / VS70M12 / VS72N11 / VS72N12 / VS72N13
VS70L11 / VS72L12 / VS72L13.
20~25
Less than 1.2 kg
3.8 kg and above
GENTLE
GENTLE
GENTLE
NORMAL*/STRONG STRONG
STRONG
STRONG
STRONG
20~25
GENTLE
Wash 10-15 minutes
10-15 minutes
20
10-15 minutes
Soak 20 minutes
1.2 ~ 2.5 kg
2.5 ~ 3.8 kg
#
#
NORMAL*/STRONG
NORMAL*/STRONG
NORMAL*/STRONG
1.FIll water into wash tub at desired level.
2.Add detergent as per cloth load as specified in Table 1,then run machine for 30 sec.
3.Add clothes into wash tub and fill water as specified in Table 1.
Spinning Time For Laundry
1. Cotton clothes : 5 min.
2. Delicate clothes (Thin synthetic fiber, sarees etc.): 2 min.
3. Sweater (Synthetic fiber): 2 - 3 min.
4. Underwear (Knitting clothes): 3 ~ 5 min.
1. Remove the power plug from main power supply.
2. Open the INNER LID and OUTER TUB COVER.
3. Pick up the laundry.
4. While placing the OUTER TUB COVER back, be
sure to push it firmly until front hook is engaged
securely.
In case of the laundry falling from the spinner tub
Washing Procedure
4. Set the SPIN TIMER
1-5 min Spin Timer
Step 3:- SPINNING
SPIN TIMER
Remove the clothes from spin tub then turn the drain
selector knob to ‘DRAIN’ to discharge the washing water
completely drain out. Then remove power plug from main
power supply.
Step 4:-Final Step
and turn the knob to 'WASH/RINSE' when water is
1. Transfer the clothes into the spin basket
the clothes evenly.
arrange
2. Be sure to attach the safety cover and close the
inner lid
3. Close the Spin Lid
1.If there is a sound from the spinner tub, open the
then try to lay the laundry evenly.spinner lid
2.If the lid is open while the spinning function is
working, the machine will stop within 5-10 seconds.
running, contact service center.If it is still
3.If the spinner lid is not closed, the machine will not
work even the timing is set..
Precautions while spinning
6
4. During spin shower if water is coming to wash tub.
Then reduce the water flow.
# 25min. soak can be selected for
VS70M11 / VS72N11 / VS72N12 / VS72N13 /
VS70L11 / VS72L12 / VS72L13.
Page 7
9
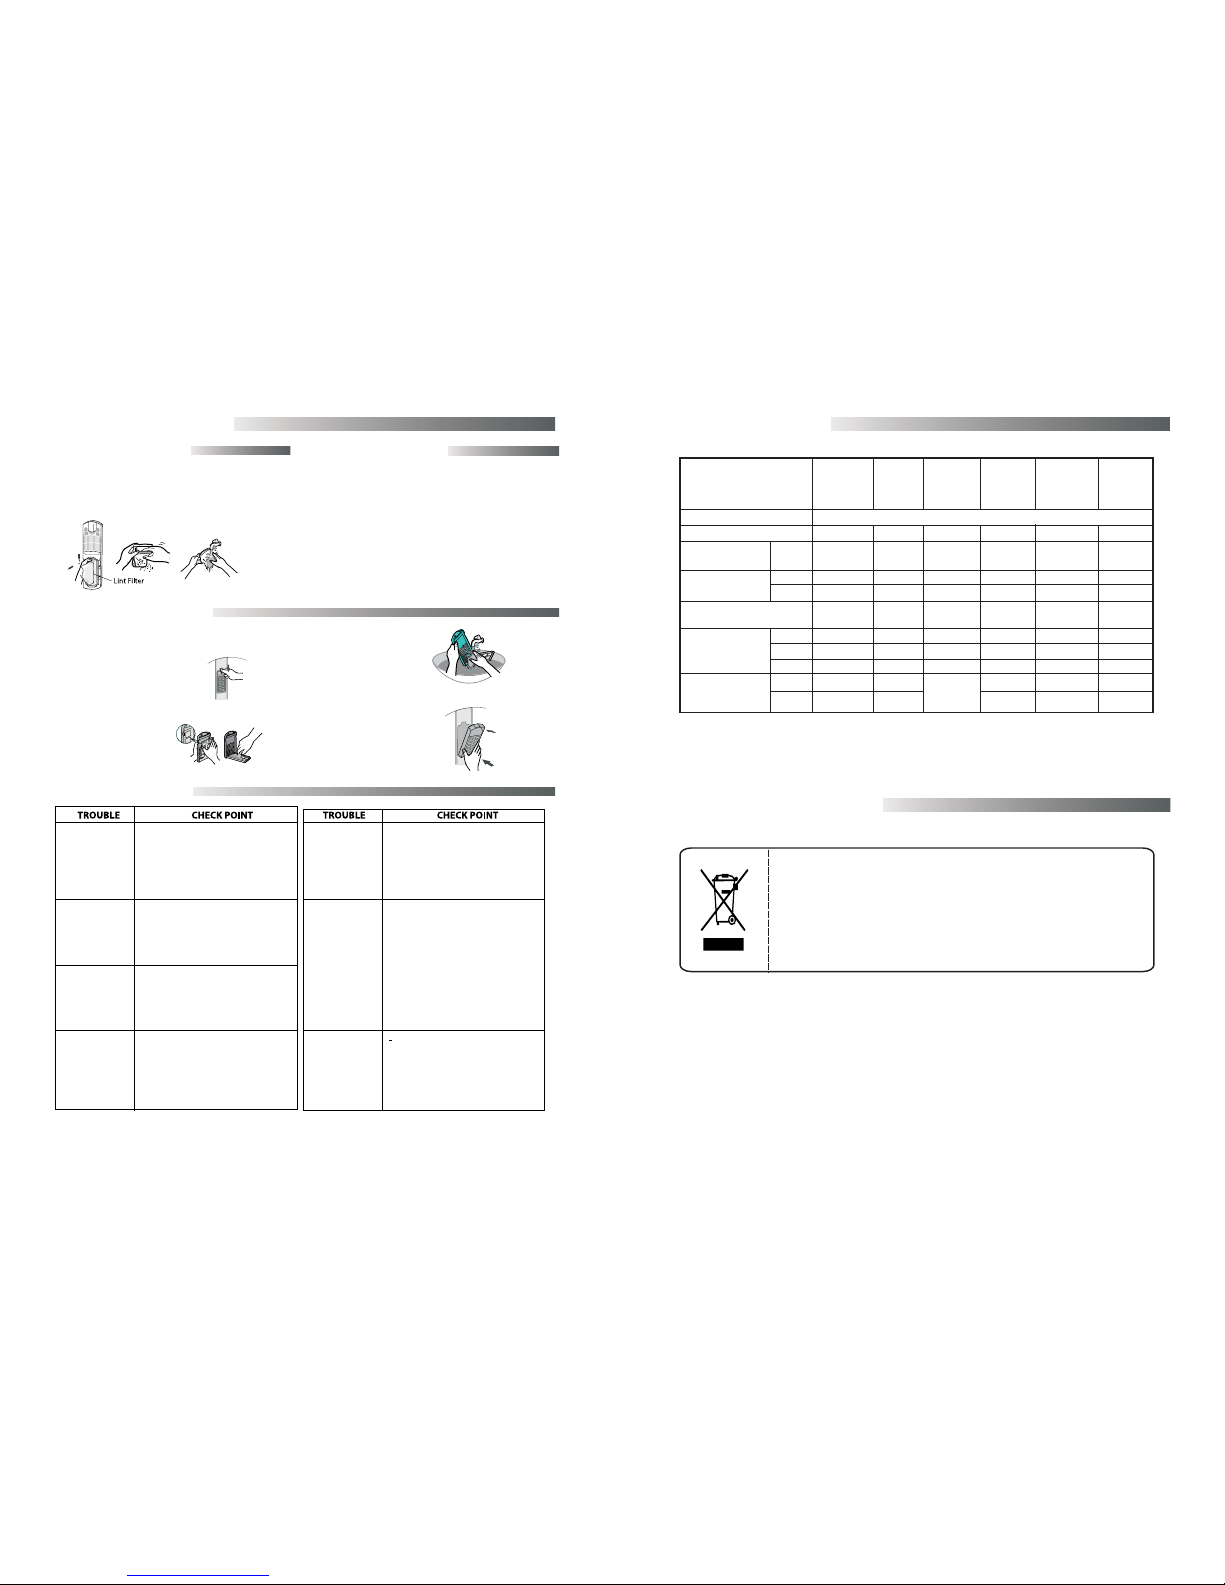
Specification Chart**
Note : 1) ** Due to continues R&D, the above specification may change without any prior notice.
2) * Not available in VS60A11 / VS60B11 / VS68E11 / VS70K11 / VS70M12.VS60A13 /
230V, 50 Hz AC
Washing Capacity
Water Level
(Liters)
Rated Power
Consumption
Power Supply
Weight of
the Machine
Overall
Dimensions
(in mm)
MODEL /
SPECIFICATION
Timing
VS60A11
VS60A12
VS60A13
Wash
Spin
Max.
Length
Width
Height
Wash
Soak
6.0 kg
60
340 W
180 W
22.5 kg
750
435
890
15 Min
20 Min*
7.0 kg
55
340 W
180 W
28.0 kg
743
465
943
15 Min
20 Min
7.2 kg 7.2 kg
60 60
350 W
350 W
180 W 180 W
23.0 kg 23.0 kg
780 790
480 500
960 975
15 Min
15 Min
20 Min
25 Min
23.0 kg
6.8 kg
60
350 W
180 W
780
480
960
15 Min
VS68E11
7.0 kg
60
350 W
180 W
23.0 kg
790
500
975
15 Min
25 Min*
VS72E12
VS72H11
VS70K11
VS70K12
Cleaning the Lint Filter
Cleaning the Wash Tub
Clean the filter net often to keep the
washing machine clean
A.
B.
Cleaning the Magic Filter
Care and Maintenance
Trouble Shooting
Is the Drain Selector set to drain?
If all the above points have been checked and no abnormality is found but the machine still works improperly,
please contact the nearest SERVICE CENTER or Call Customer Care No provided on back page
1. Push the upper part
of the magic filter
and pull in
Is the laundry overloaded?
Make sure that clothes are evenly
spread into tub
-Be sure lay the drain hose down
Check that the power cord is
connected to a power outlet well.
Power shortage?
1.The washing
machine does
not work.
2.Clothes will
not move.
5.The spin tub will
not run
6.The water drain
out immediately.
7.Pulsator is not
moving.
3.Incomplete
spinning.
(severe
vibration or
unbalance)
4.Water does not
drain
Is the spin dryer lid closed
completely?
Are laundry falling out of the
spin dryer basket and clinging
to the axle?
Is the drain hose clogged with
scrap?
Hang up drain hose over the drain
hose hook. Half fill the wash tub
with the water and try for drain
again.(Scrab will be removed by
water drain pressure)
Although the machine may stay
still, maximum 5 minutes. if the
Wash Timer indicates in excess
of 15 minutes. It is just in the
process of soaking
2. Open the cover as
shown in figure
4. Close the cover and insert the
lower part of the filter in the
basket first and then push
the filter with click sound
3. Clean the magic filter
If the dirts are filled up the lint filter after finishing
the wash, push down(A) and (B) as shown in
figure.
Remove the collected lint and rinse the filter net.
- Wipe off stains on the cabinet and operation panel with
soft cloth.
- Do not use benzene, thinners, cleanser or wax nor scrub
the washing machine with a brush due to that painted
surface or plastic parts will be damaged
- When cleaning don’t spray water directly to the parts
of the washer. It may make its life span shorter. Also
an electric shock or fire may take place
8
VS60B11
VS70M11
VS70M11
VS70M12
VS70L11
VS72N11
VS72N12
VS72N13
VS72L12
VS72L13
For the purpose of recycling to facilitate effective utilization of resources, please
return this product to a nearby authorized collection center, registered dismantler,
recycler, service center when disposing of this product.
In case of further assistance, you may contact nearest authorized service center.
Or
Please see the Company website for further information on collection centers etc.
Visit-http:// www.videoconworld.com
Product Disposal Guidelines
 Loading...