

Page 1
Page 2
PAGE i
Legal Notices ...................................................... v
Safety Precautions.............................................1
Software Update Information. .........................3
Getting started. ..................................................4
Assembling the device .........................................4
Charging the battery .............................................6
Know Your device...............................................8
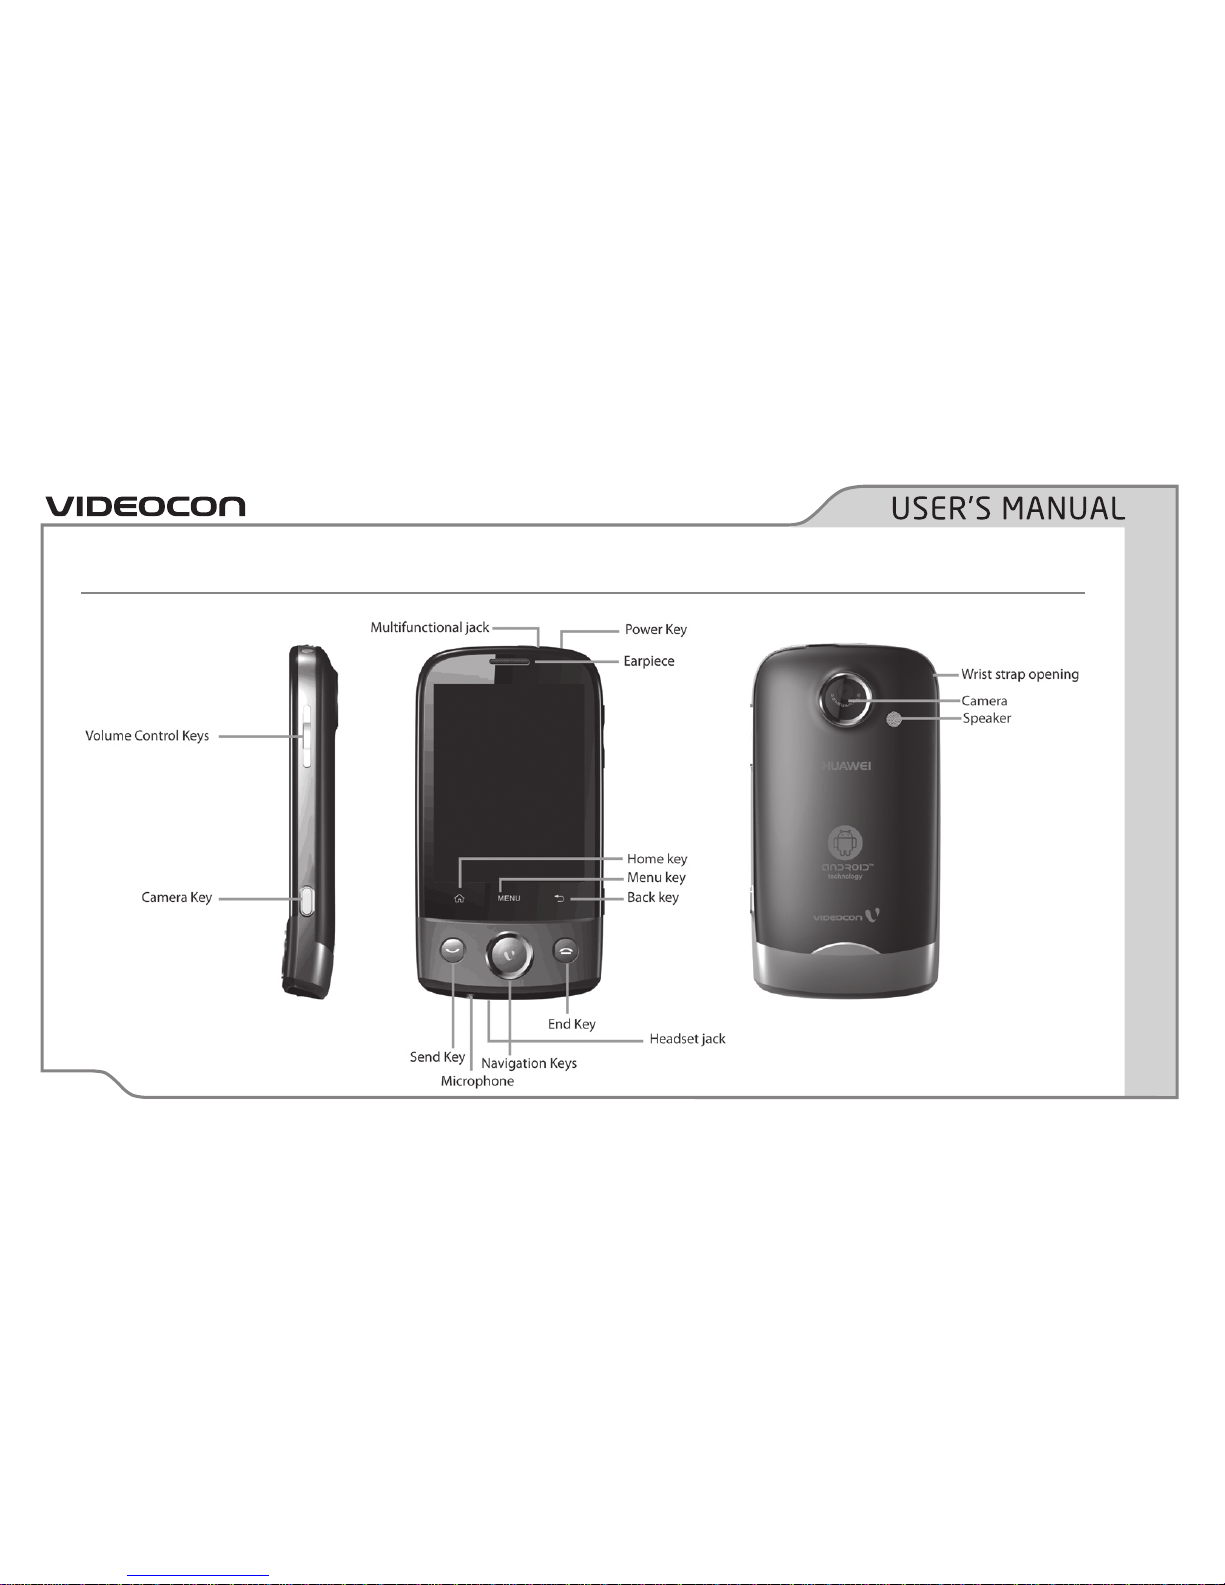
Phone Layout ...........................................................8
Button layout ...........................................................9
Soft buttons ..............................................................9
Notifications icons ..............................................10
Using the touch screen .....................................12
Basic Operations .............................................. 13
Switch the phone on or off ..............................13
Screen lock/unlock ..............................................13
Make a call ..............................................................14
Composing messages .........................................17
Adjusting volume .................................................19
Customizing the Home screen ...................... 22
Working with shortcuts .....................................22
Working with widgets ........................................22
Changing Wallpapers ..........................................23
Contacts ............................................................ 24
Viewing Contacts .................................................24
TABLE OF CONTENTS
Page 3
PAGE ii
Adding contacts ...................................................24
Importing contacts .............................................25
Entering Information ...................................... 28
Display virtual keypad .......................................28
Working with Input Methods ...........................28
TouchPal ..................................................................28
Android Keypad ....................................................30
Messaging ......................................................... 33
Message Functions .............................................33
SMS settings ..........................................................36
MMS Settings ........................................................36
Notification settings ..........................................37
Working with Email ......................................... 38
Adding an Email account ..................................38
Adding other Email account ............................38
Customizing Email setting ...............................39
Connectivity ..................................................... 40
Using GPRS/3G .....................................................40
Network Connection ...........................................40
Data Connection ...................................................41
Wi-Fi ..........................................................................41
Browsing Web pages ..........................................43
Bluetooth ................................................................45
Connecting with a Computer ..........................47
TABLE OF CONTENTS
Page 4
PAGE iIi
Modem ......................................................................48
Entertainment ................................................. 49
Camera .....................................................................49
Camcorder ...............................................................51
Using the Gallery .................................................52
Music ........................................................................53
Listening to the FM Radio ................................55
Google Mobile Services .................................. 56
Gmail .........................................................................56
Google Talk.............................................................56
Market ......................................................................57
Using Other Applications ............................... 59
RoadSync Calendar .............................................59
RoadSync Mail .......................................................59
Servo Search ..........................................................64
Calendar ...................................................................64
Alarm .........................................................................66
Sound Recorder ....................................................68
File manager ..........................................................68
Calculator ................................................................71
Notepad ...................................................................71
Documents To Go ................................................72
Facebook .................................................................75
Maps ..........................................................................75
TABLE OF CONTENTS
Page 5
PAGE IV
Youtube ...................................................................76
SIM Toolkit ..............................................................76
Netmanager ...........................................................76
Managing your Device .................................... 77
Call Settings ...........................................................77
Date & Time Settings .........................................78
Sound & Display Settings .................................79
Managing Applications ......................................81
Configuring Wi-Fi Settings ...............................82
Privacy Settings ..................................................82
Reset Phone ..........................................................83
Managing phone functions
using a computer ............................................. 84
Start Mobile Modem ............................................86
Start PC Suite ........................................................88
File Transfer...........................................................94
TABLE OF CONTENTS
Page 6
PAGE v
All rights reserved. Reproduction, transfer,
distribution or storage of part or all of the
contents in this document in any form without
the prior written permission of VIDEOCON is
prohibited.
VIDEOCON operates on a policy of continuous
development. VIDEOCON reserves the right to
make changes and improvements to any of the
products described in this document without
prior notice.
Under no circumstances shall VIDEOCON be
responsible for any loss of data or income or
any special, incidental, consequential or indirect
damages howsoever caused.
The contents of this document are provided
“as it is. Except as required by applicable law,
no warranties of any kind, either expressed or
implied, including, but not limited to, the implied
warranties of merchantability and fitness for a
particular purpose, are made in relation to the
accuracy, reliability or contents of this document.
VIDEOCON reserves the right to revise this
document or withdraw it at any time without
prior notice.
The availability of particular products may
vary by region. Please check with VIDEOCON
Executive.
LEGAL NOTICES
Page 7
PAGE 1
Please comply with these precautions / measures
to avoid actions that may endanger your safety
and those of other road users, and maximize
device performance.
Road safety
The use of a mobile phone while driving is illegal,
as it may endanger your safety and that of the
other road users. If you need to make or receive
a call, move your vehicle to the left side of the
road and allow it to come to a complete stop
before using your phone.
Aircraft safety
Switch your phone off while boarding an aircraft.
Signal from your phone can interfere with the
aircraft’s navigation and communication system.
You are legally obliged to comply with this
recommendation.
Potentially hazardous environments
Switch your phone off when entering any
enclosure which may be storing explosives or
materials that are explosive in nature, such as
refueling stations, or a construction site where
explosives are being used to create room for
new construction. Comply with any provided
guidelines, regulations and restrictions.
Emergency calls
In the event of an emergency, you may dial 100
(Police), 101 (Fire Brigade), and 102 (Ambulance).
SAFETY PRECAUTIONS
Page 8
PAGE 2
Even if you are out of the coverage area of your
home mobile network, the device is programmed
to connect to any available network and place
your call.
Battery Use
To extend the battery life of your device:
• Use the standard wall charger while charging
the phone for the first time.
• During the first 3-4 charge cycles, charge
the battery until the battery indicator on the
display stops scrolling.
• Avoid partial charging. Wait for the battery
to discharge completely before charging it
again.
• Use the USB cable to charge the device only
during an emergency.
SAFETY PRECAUTIONS
Page 9
PAGE 3
To enhance device performance, we recommend
that you get in touch with the nearest Videocon
Authorized Service Center, regarding the
availability of updated firmware for your device.
Please see the enclosed Service Center Directory
for the Videocon Authorized Service Center
nearest to your location.
SOFTWARE UPDATE INFORMATION
Page 10
PAGE 4
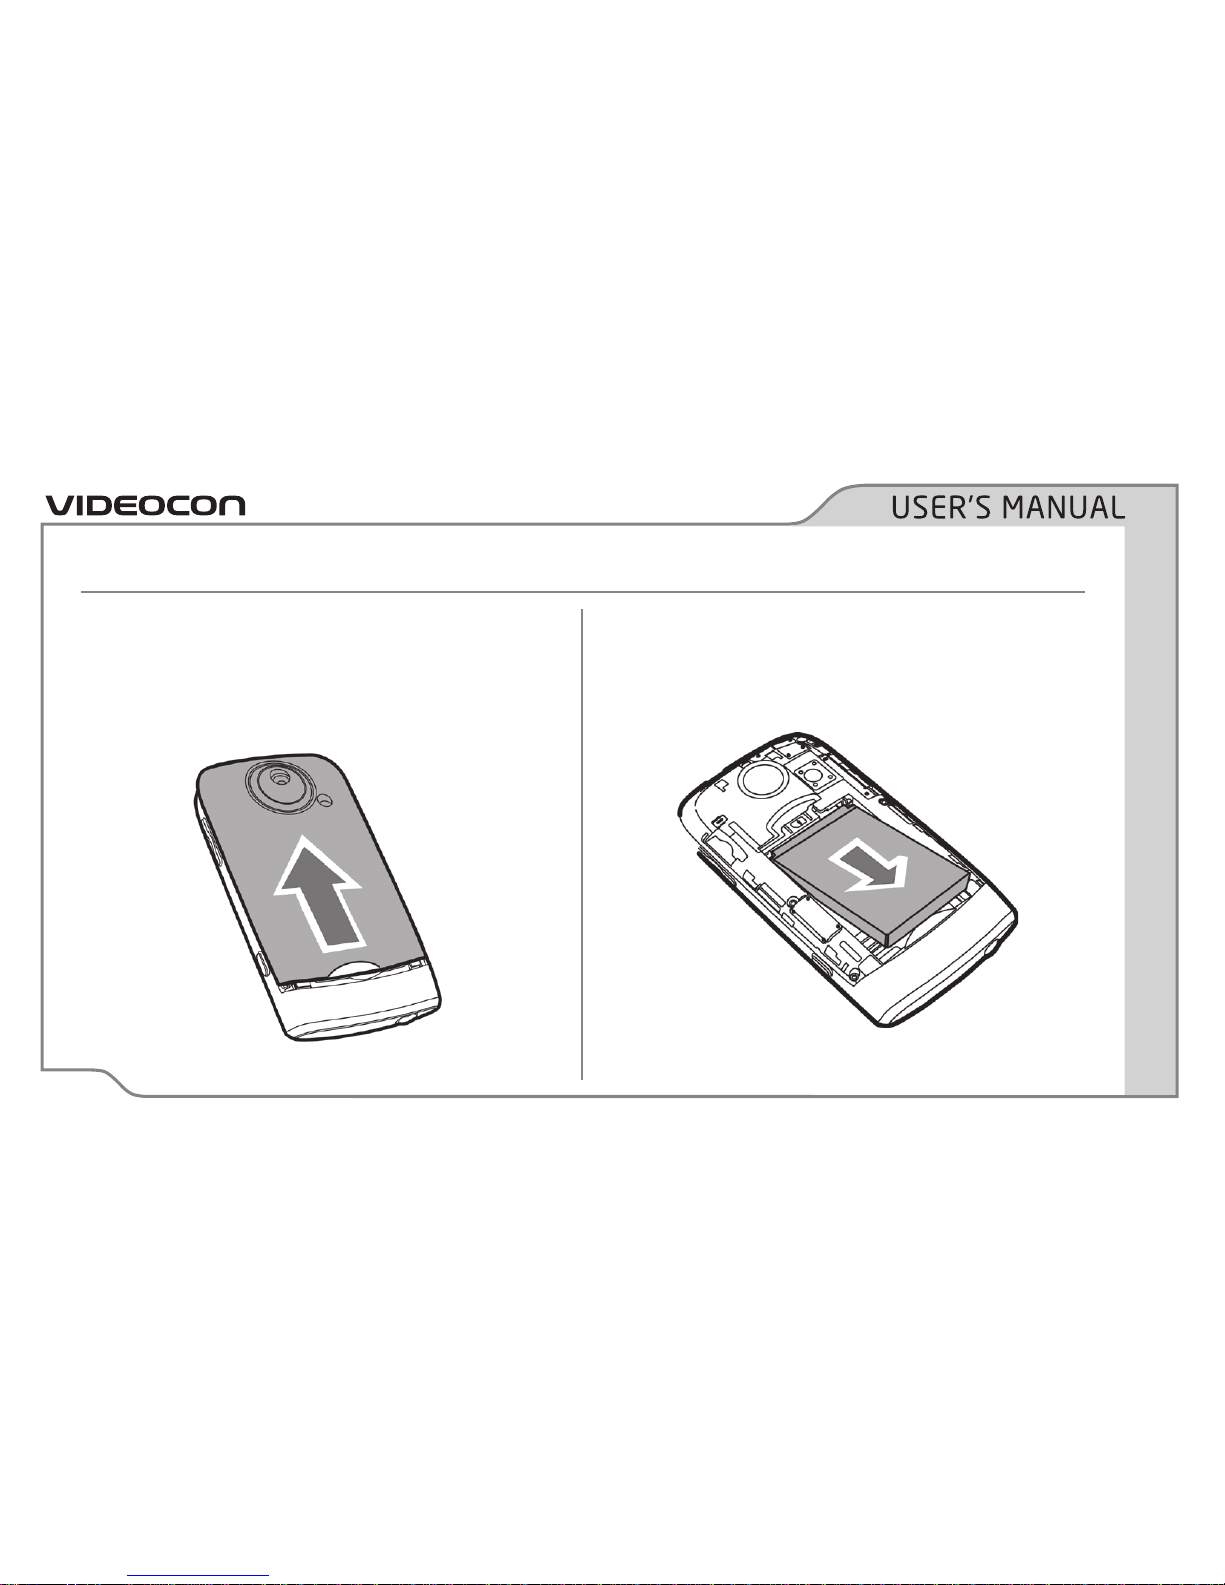
Assembling the device
1. Press gently the back cover and slide in
upward direction to open.
2. If the battery is in the compartment, lift and
pull it out in the direction of an arrow.
GETTING STARTED
Page 11
PAGE 5
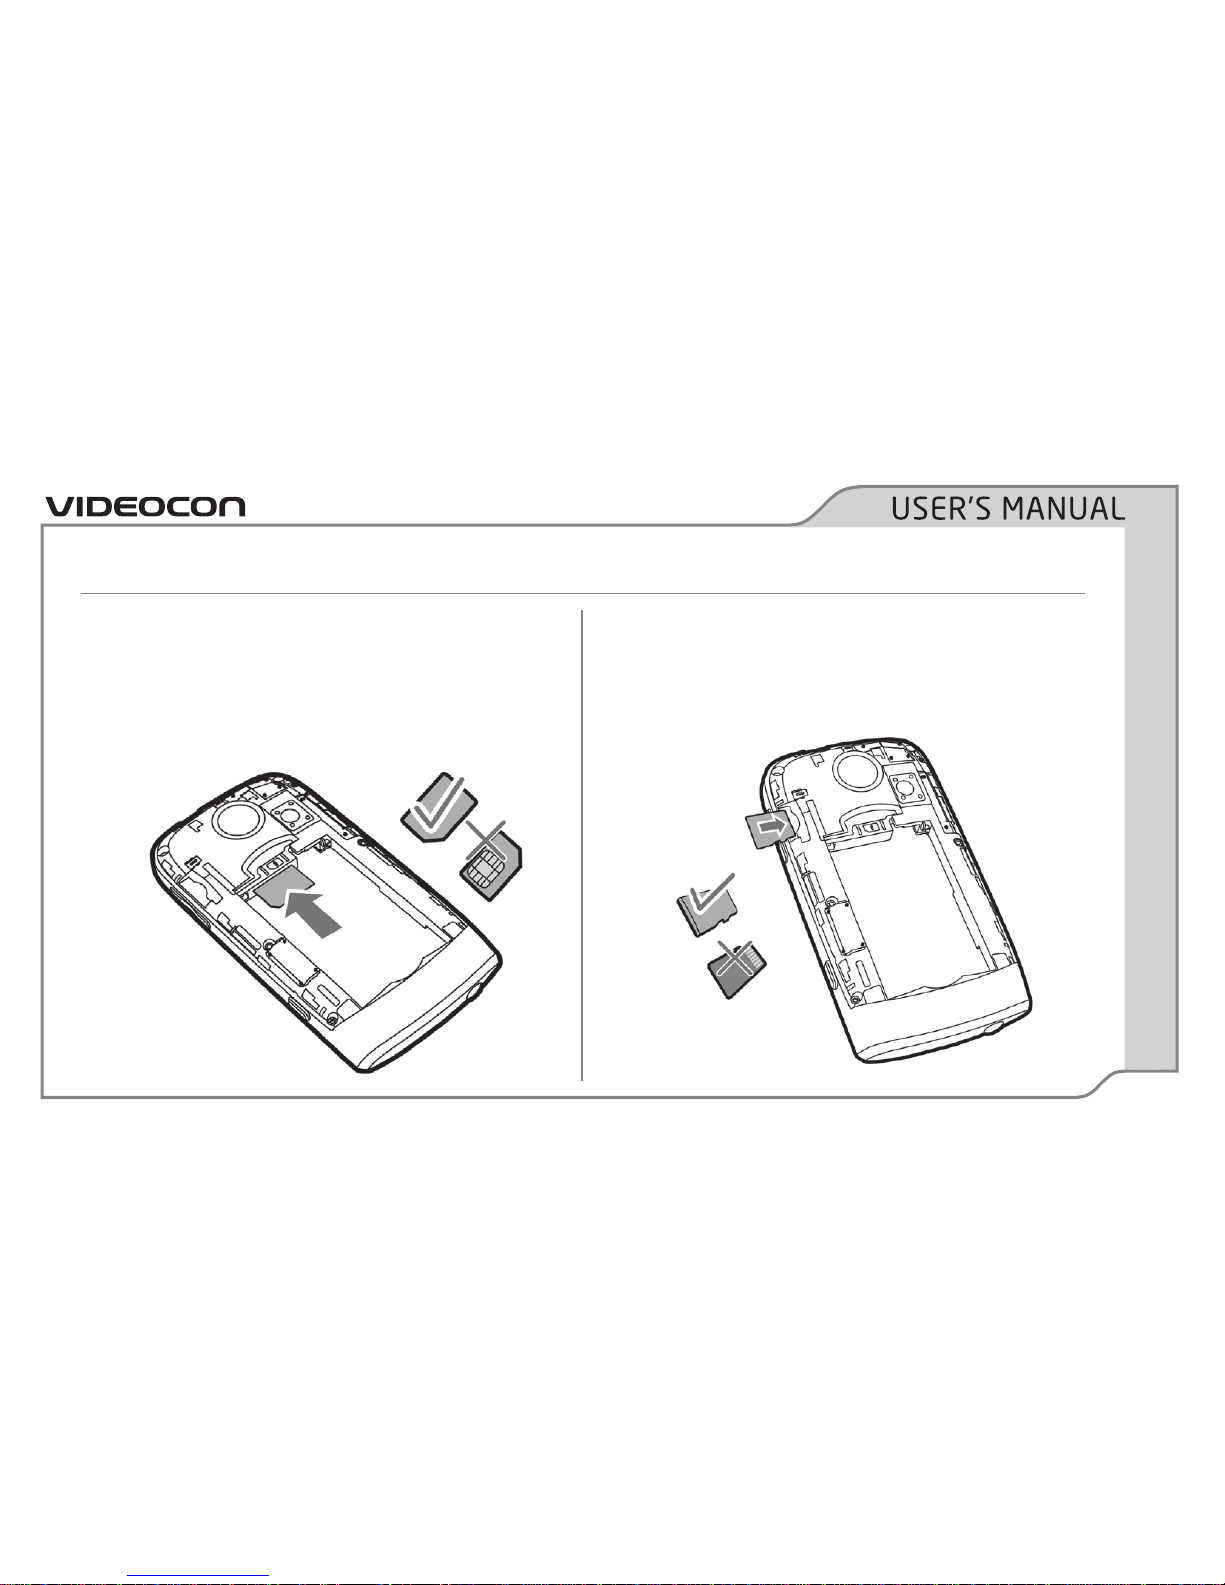
3. Insert the SIM card in the given slot. Make
sure that the contact area on the card is
facing the connectors on the device and that
the bevelled corner is facing the top of the
device.
4. Insert memory card. Insert the micro SD card
by aligning it and then sliding it into its slot,
until it clicks into place.
GETTING STARTED
Page 12
PAGE 6
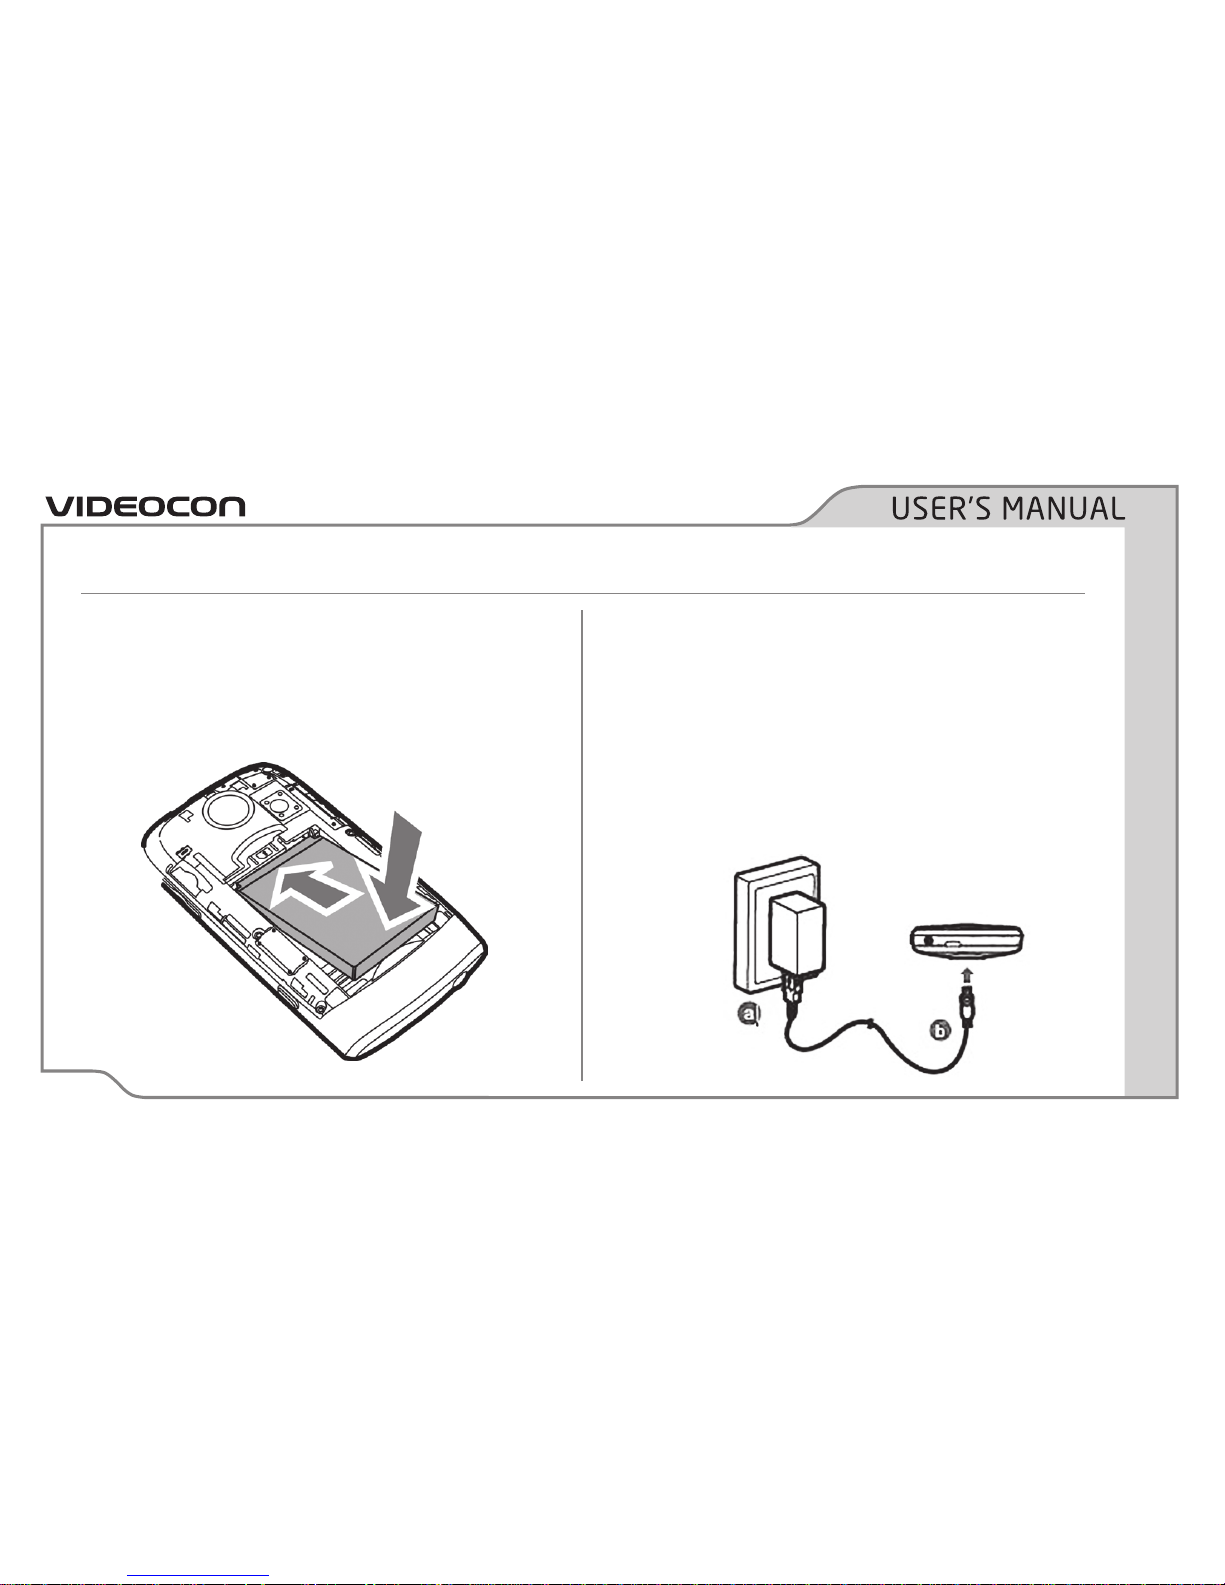
5. Insert the battery. Align the connectors of the
battery with the corresponding connectors
on the battery compartment and insert in the
direction of the arrow.
Charging the battery
Before using the phone for the first time, you
must charge the battery.
To charge the battery:
1. Insert the smaller end of the travel charger
into the multifunctional jack at the top of the
phone.
GETTING STARTED
Page 13
PAGE 7
2. Put the adaptor end of the travel charger
into a standard AC wall socket.
3. When the battery is charged completely, the
battery indicator icon on the screen becomes
stable and stops scrolling.
4. Unplug the travel adaptor from the phone.
GETTING STARTED
Page 14
PAGE 8
KNOW YOUR DEVICE
Phone Layout
Page 15
PAGE 9
Button layout
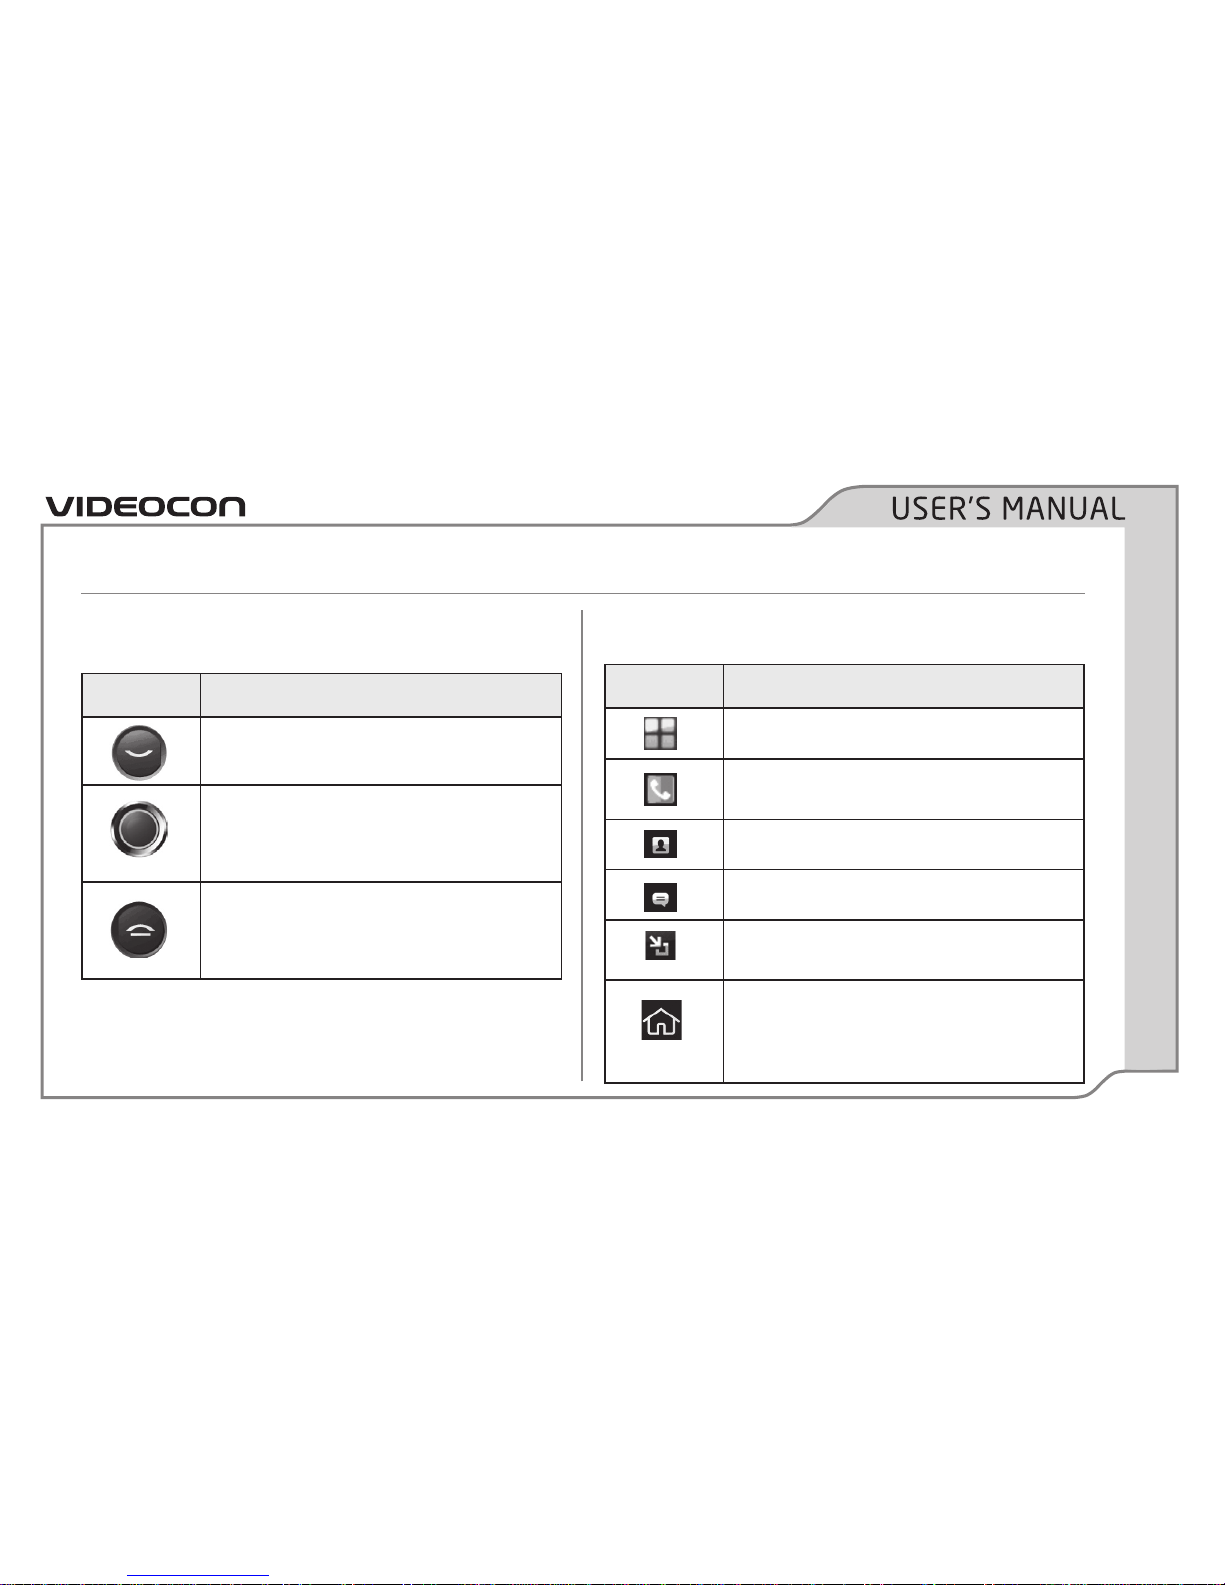
Button Action
Dial/Send key. In idle mode, press to
view recently dialed contacts.
Scroll in all four directions to select on-
screen items or menu. Press to launch
the selected icon or menu.
Press to End or Reject a call, or exit
active application and return to the
Home screen.
Soft buttons
Button Action
Display Phone menu
In idle mode, touch to launch virtual
keypad.
Display phone contacts
Launch Messaging
Touch to view thumbnails of the
possible 15 home screens.
Return to the home screen. If you are
viewing the left or right extended
home screens, press Home to return to
the central Home screen.
KNOW YOUR DEVICE
Page 16
PAGE 10
Button Action
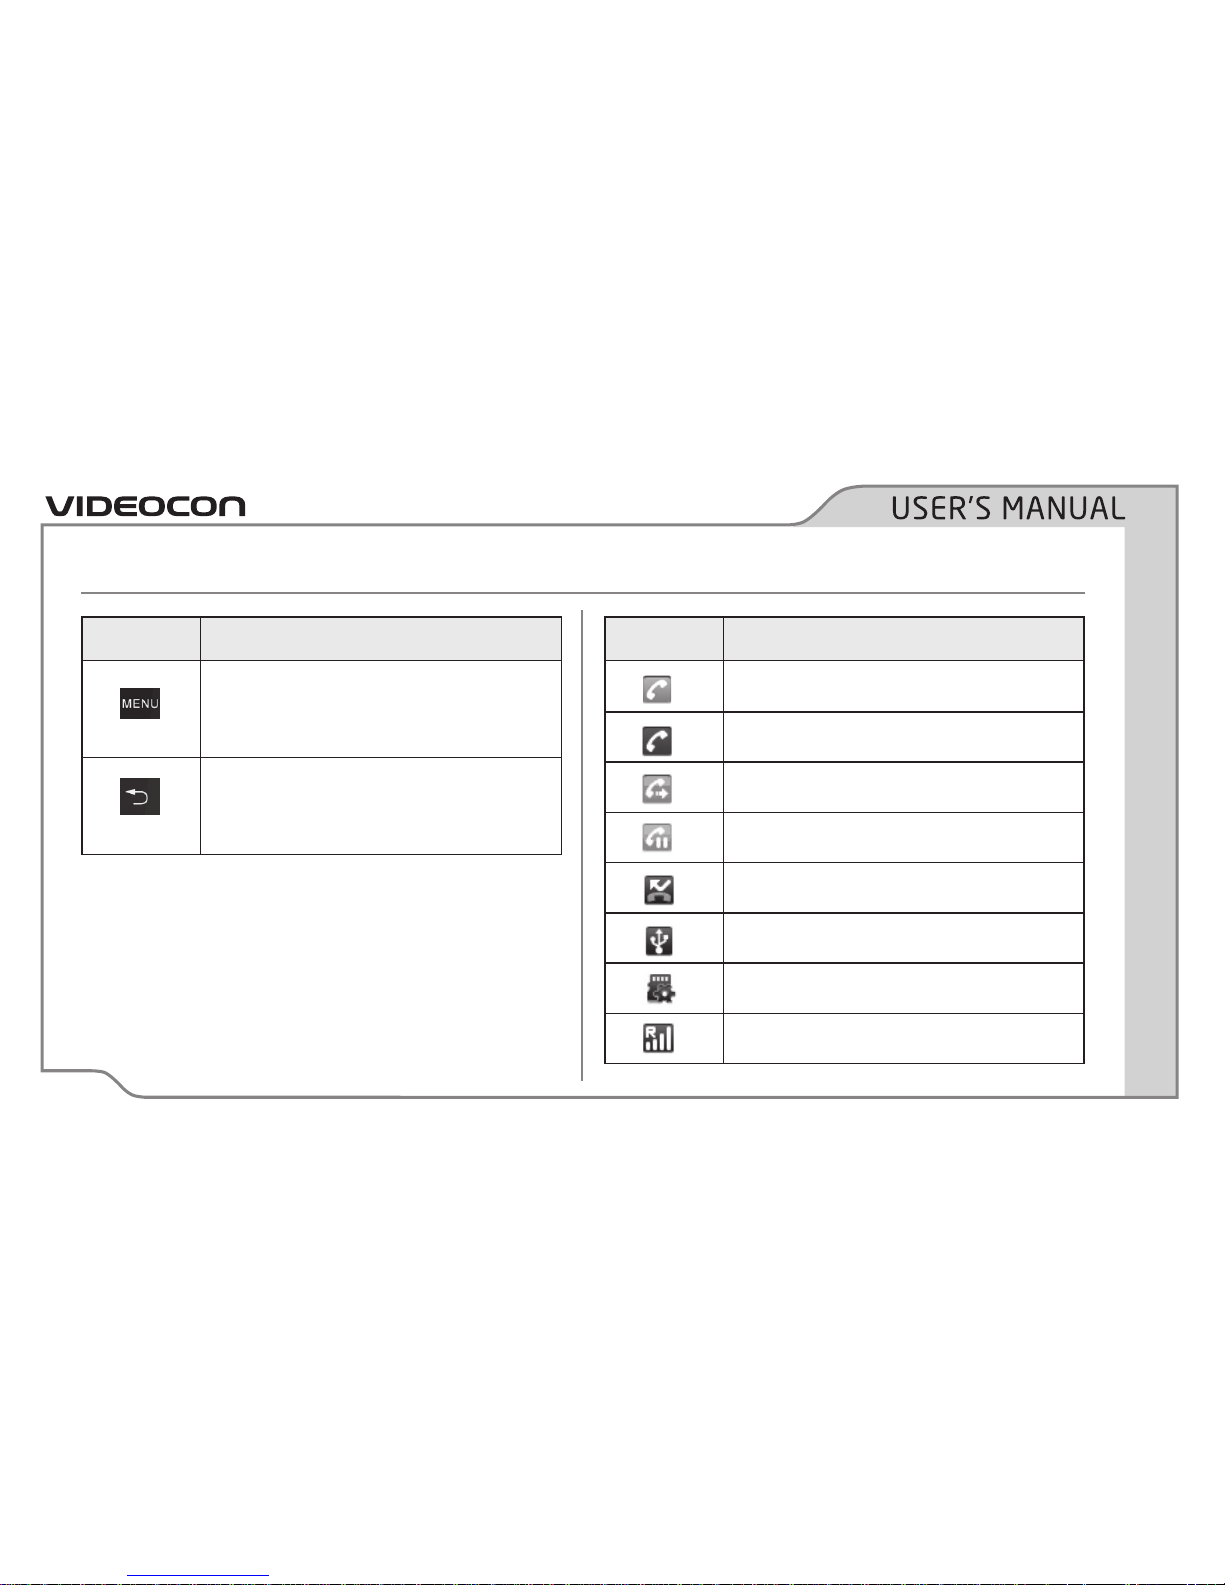
Displays panel with functions that
affect the currently active screen or
application.
Go back to the previous screen you
were working on. Press to close virtual
keypad.
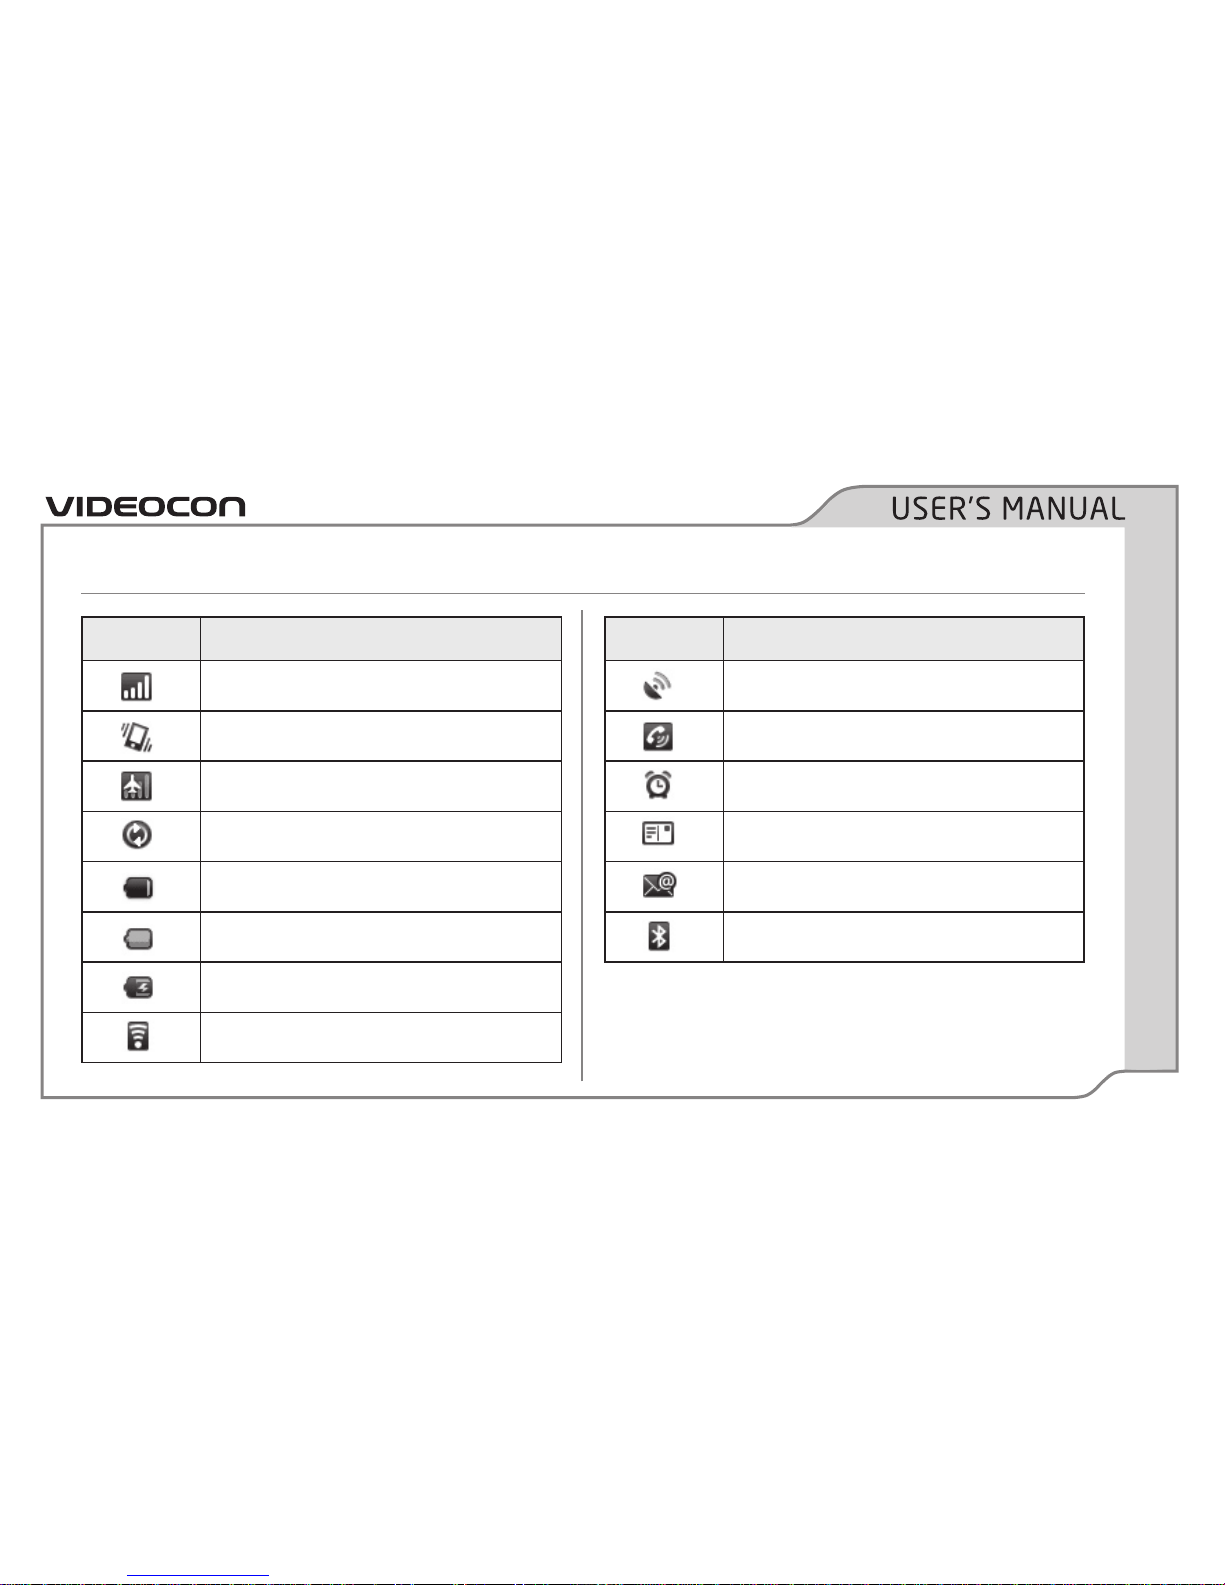
Notification Icons
Indicator icons provide useful information about
the device, including battery level, network
signal strength, current date & time, Bluetooth
status and so forth.
Icon Description
Call in progress
Call in progress using Bluetooth device
Call forwarding
Call on hold
Missed call
Connected to PC
Micro SD card inserted
Roaming signal
KNOW YOUR DEVICE
Page 17
PAGE 11
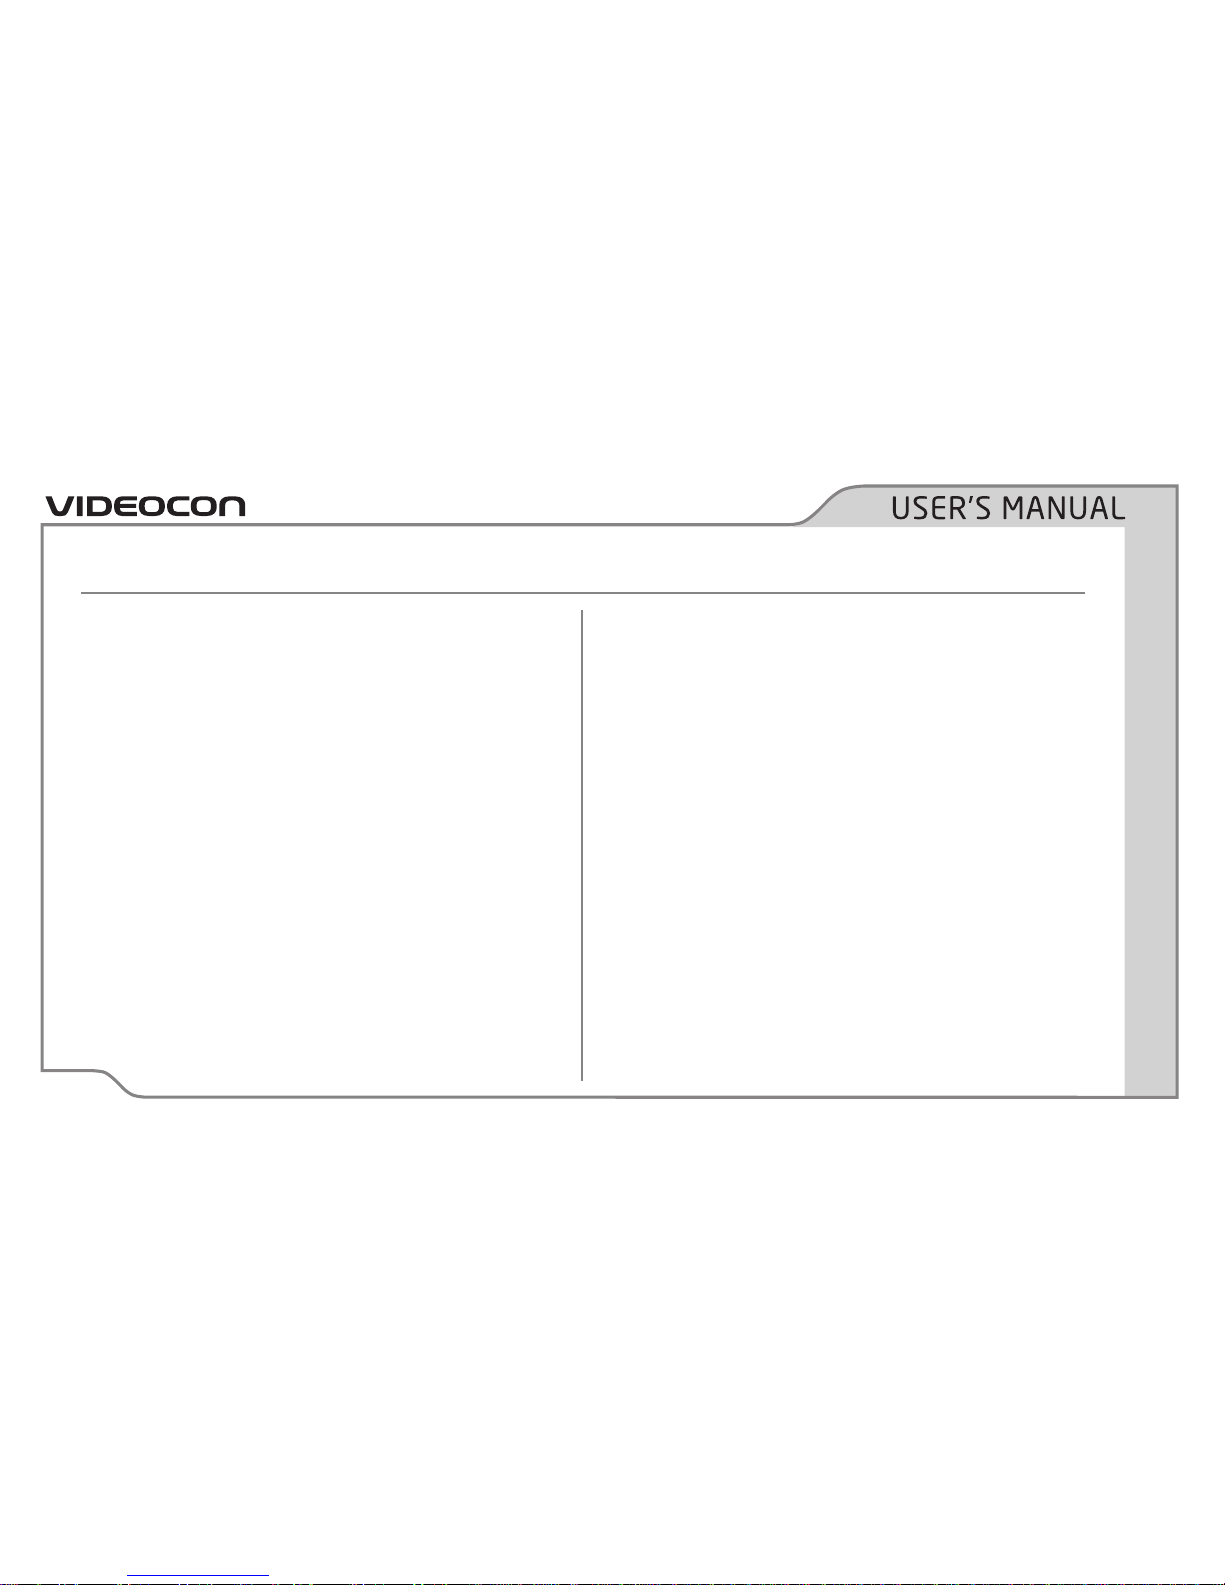
Icon Description
Signal strength
Vibration mode
Airplane mode
Synchronizing data
Low battery
Full battery
Battery is charging
Wi-Fi connected
Icon Description
GPS connected
Speaker on
Alarm is activated
New text message
New email message
Bluetooth active
KNOW YOUR DEVICE
Page 18
PAGE 12
Using the touch screen
Use your finger to use the icons, buttons, menu
items, the onscreen keyboard, and other items
on the touch screen.
• Touch: Launch screen items such as
application and settings icons enter text
using the onscreen keyboard.
• Touch & hold: Touch & hold an item on the
screen by touching but not lifting your finger
until an action occurs. For example, touch
and hold an application to display application
options, or touch and hold an application icon
to move it to the Home screen.
• Drag: Touch & hold an icon for a few seconds
and then, without lifting your finger, move
your finger on the screen until you reach
the target position. For example, drag the
Camera icon to move its position on the
Home screen.
• Swipe: Place your finger on an empty area of
the Home screen, and quickly move it left or
right to view the extended home screens.
• Double-tap: Tap quickly twice on a webpage
or a map screen to zoom in. For example,
double-tap an area on a webpage to make it
fit the screen width.
KNOW YOUR DEVICE
Page 19
PAGE 13
Switch the phone on or off
Press and hold the power key (top of the phone)
to switch on the phone.
To power off your phone:
1. Press and hold the Power key (top of the
phone) to display Phone options menu.
2. Touch Power Off followed by OK to
confirm.
For information about using the touch screen,
see the “Using the touch screen” section earlier
in this document.
Screen Lock/Unlock
When your phone isn’t in use, lock the touch
screen so that only you can unlock it to make
calls, or access your private data.
Configure your phone to automatically lock the
touch screen if it is left unused for certain time
duration.
Simple lock and unlock
To prevent launching applications inadvertently,
press the power key to lock the touch screen.
To unlock the touch screen, press the power key
to wake up the device. Drag the lock icon from
the left to the right of the touch screen.
BASIC OPERATIONS
Page 20
PAGE 14
Secured screen lock
If you are concerned about securing your phone
data, you can choose to set a more complex lock
for the touch screen.
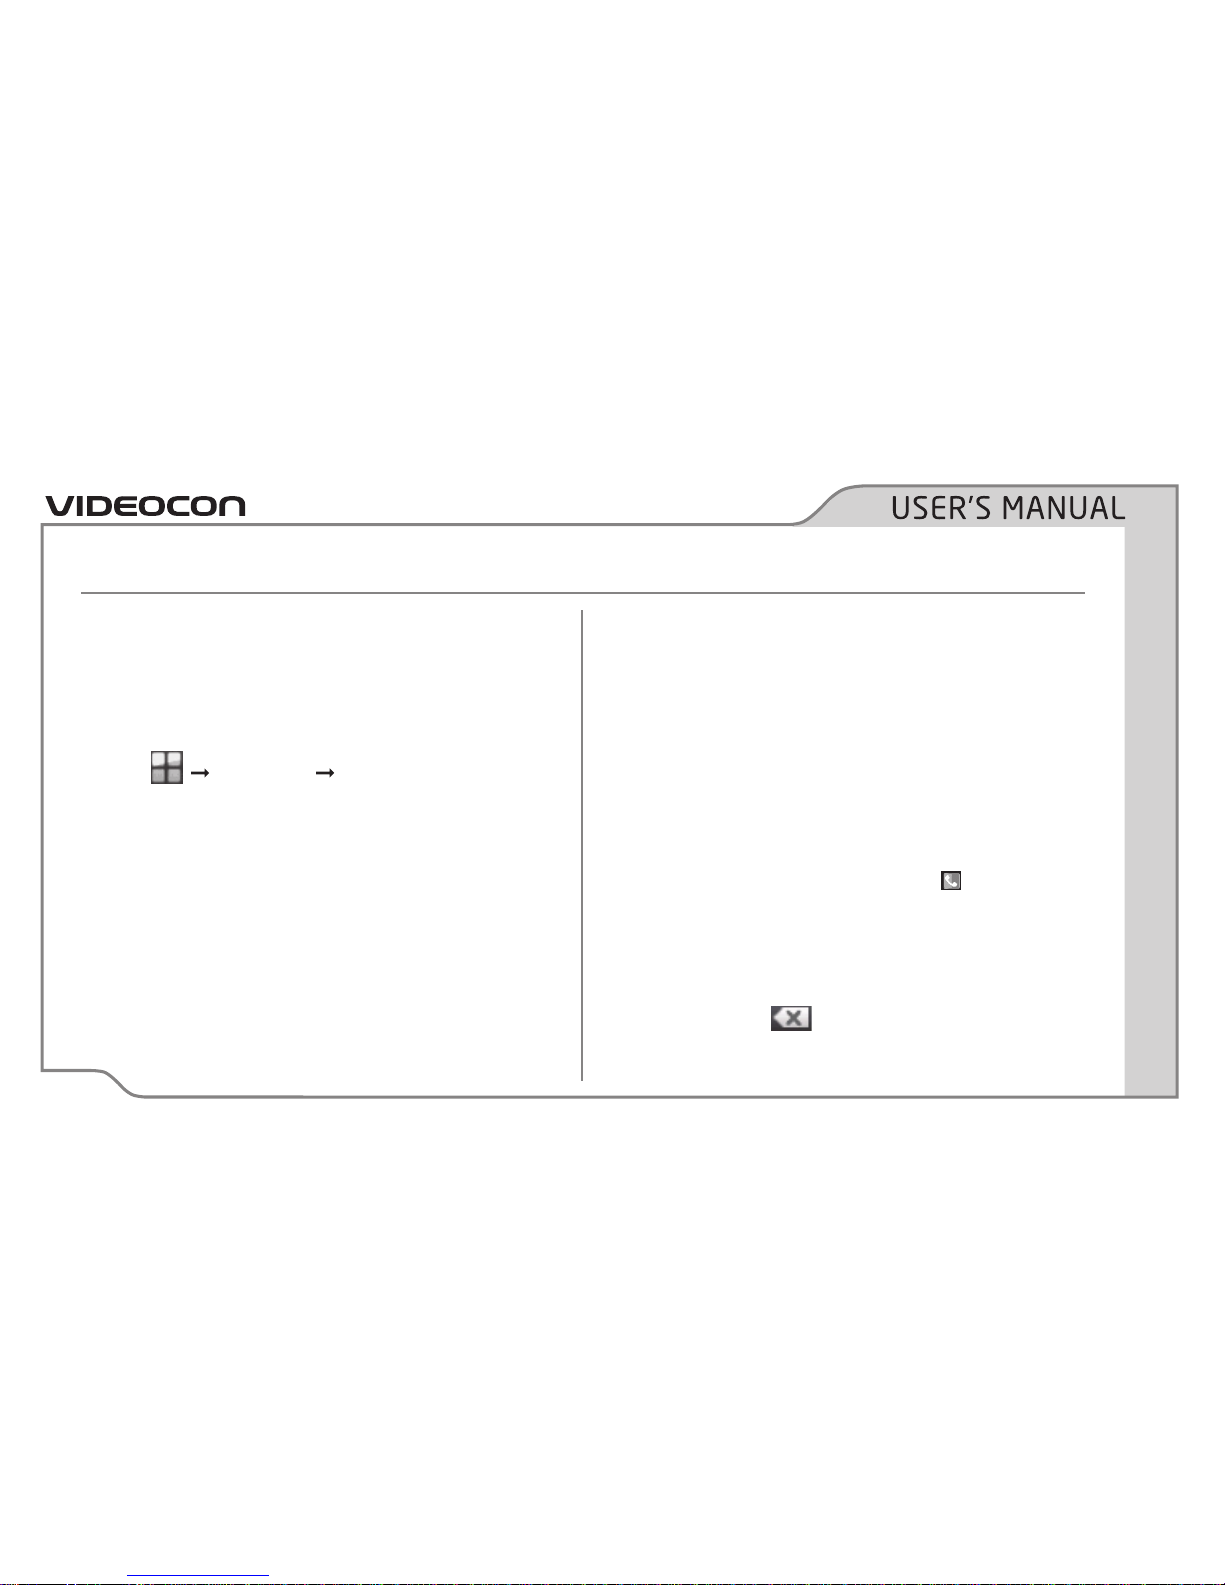
Touch
Settings
Location & Security,
and touch Set Screen Unlock Pattern (Screen
Unlock Pattern section).
Follow the on-screen instructions to choose an
unlock pattern for unlocking the touch screen.
Once enabled, press the power key to lock the
touch screen. The next time you turn on your
phone or wake up the touch screen, and draw
the unlock pattern you selected above.
WARNING: If you forget the unlock pattern, you
will not be able to use your phone. Approach
the nearest Videocon Service Center for further
assistance.
Make a Call
Using virtual Keypad
In the idle mode:
1. On the Home screen, touch
adjacent to
the Phone menu icon to display the virtual
numeric keypad.
2. Enter the phone number including the area
code. Touch
to erase a digit.
3. For international calls, insert the ‘+’sign
BASIC OPERATIONS
Page 21
PAGE 15
followed by the country code, area code
(without the initial zero) and phone number.
4. To make a call, press the dial key on the
phone. Alternately, after entering the
contact number, you can touch green phone
icon visible in the virtual keypad to make a
call.
From Contacts
Touch Contacts icon on the home screen to view
the contacts. Scroll up and down to select the
contact you wish to call, and then press the Dial
key to make a call.
Using Call log
Touch
Call log, select the contact to call,
and press the Dial key.
Initiating a conference Call
If you accept a new call when you’re already on
a call, you can switch between the two callers
or merge the two calls into a single conference
call. You can also set up a conference call with
multiple participants.
To initiate a conference call:
1. Place a call to the first participant.
2. Once connected, touch Menu
Add Call
to put the first call on hold and you are
BASIC OPERATIONS
Page 22
PAGE 16
prompted to dial the second participant.
3. Place the next call, using the Phone tab, the
Call log, or your contacts.
4. Once you are connected to all participants,
Menu
Merge calls to begin the conference
call.
5. To drop a participant from the call, or to talk
privately to only one participant, touch Menu
Manage conference call
6. To end the conference call and disconnect
everyone, press End key.
Switching between calls
If you receive a new call while you are already on
a call, you can switch between the two calls.
1. While you are on two calls, press Menu, and
then touch Swap calls.
2. The current call is placed on hold and you are
connected to the other call.
Answer Calls
To answer an incoming call, press the Dial/Send
key. Alternately, drag the green phone icon to
the right.
Select End key to end or reject the call.
Alternately, drag the red phone icon to the left.
Working with Call Options
During a call, the phone allows you to perform
various functions.
BASIC OPERATIONS
Page 23
PAGE 17
• Hold Single Call: Place the active call on
hold.
• End Single Call: End the active call.
• New Call: Place a new call to start a
conference (network service).
• Phonebook View: View the phonebook.
• Messages: View the Messages menu.
• Mute: Turn on/off the Microphone.
• DTMF (Dual-tone Multi-frequency(: You can
choose on/off; which is to send dual-tone
multi-frequency sound. This can offer dialing
to the telephone numbers with extensions
or IVR systems installed for menu driven
options.
Composing messages
This device offers several ways to create and
send text message.
Using Messaging interface
1. Touch New message to display the compose
message screen.
2. In To field, enter the recipient’s phone number
or e-mail address. Alternately, touch ‘;; to
select a contact. Enter a few characters of
the contact name to display list of matching
contacts, and select the required contact.
3. Touch the Type to compose area, enter the
message.
BASIC OPERATIONS
Page 24
PAGE 18
4. Press Menu
Attach and browse for an
image, video, or audio file to attach with the
message, and return to the New message
screen.
5. Touch Send to transmit the message.
From Contacts
1. In idle mode, touch
Contacts.
2. In the list of contacts, touch a contact to
view its information.
3. Touch the messaging icon to view the
new message screen. As you have already
selected a contact, you do not need to add a
contact once again.
4. Touch the Type to compose area, enter the
message.
5. Press Menu
Attach and browse for an
image, video, or audio file to attach with the
message, and return to the new message
screen.
6. Touch Send to transmit the message.
From Call log
1. From Home screen, touch Contacts.
2. Touch the Call log tab to view all call
history.
3. Touch a call from the Call log.
4. Touch Send a text message.
BASIC OPERATIONS
Page 25
PAGE 19
5. Press Menu to view additional options such
as attach multimedia files, add a subject and
so forth.
6. Compose the message and touch Send.
NOTE: If you exit Messaging before sending,
unsent message are automatically saved as a
draft.
Requesting message delivery
notification
1. In Messaging, touch Menu
Settings to
access SMS settings.
2. Touch to check Delivery reports check box.
3. Touch the return key to exit the menu.
Adjusting Volume
Three types of volume controls are available;
each caters to a different set of applications or
modules:
• Media volume: Set the volume for music and
videos.
• Ringer volume: Set the volume for incoming
calls and notifications.
• In-call volume: Set the volume during a call.
NOTE: In silent mode, all sounds (including
call and notification ringtones) are turned
off. However, audio video sounds, and sound
of any alarm you may have set are not turned
off.
BASIC OPERATIONS
Page 26
PAGE 20
Ringer volume
To increase/decrease ringer volume:
1. Touch
Settings
Sound & display
Ringer volume.
2. Drag the slider left to make the volume
softer, or right to make it louder.
3. Touch OK to save the adjustment.
On the Ringer volume screen, if you do not select
Use incoming call volume for notifications, you
can set Incoming call volume and Notification
volume separately.
Alternately, press the device’s Volume Up/Down
buttons at the right side of the device. A panel
opens to show the current ringer volume; the
indicator moves as you adjust the volume.
Call volume
When a call is in progress or active, use the
Volume Up/Down buttons on the right side of
the device to increase or decrease the volume.
Media volume
To adjust media volume:
1. Touch
Settings
Sound & display
Media volume.
2. Hold the slider and move it left or right to
control the volume.
BASIC OPERATIONS
Page 27
PAGE 21
Alternately, while listening to music or watching
a video, press the device’s Volume Up/Down
buttons to adjust the volume. A panel opens to
show the current ringer volume; the indicator
moves as you adjust the volume.
BASIC OPERATIONS
Page 28
PAGE 22
The Home screen is your starting point to access
phone features. It displays application icons,
widgets, shortcuts, and other components. You
can customize the Home screen by changing
the wallpaper, or add or remove shortcuts and
widgets from the Home screen.
Working with shortcuts
To add a shortcut to the Home screen:
1. Touch
to display the list of installed
applications.
2. Touch and hold an application to add it to the
Home screen.
To remove a shortcut:
1. Touch & hold the shortcut you want to
remove.
2. Drag the shortcut and drop it in the trash
can visible at the bottom right side of the
screen.
3. When the icon turns red, lift your finger.
Working with Widgets
A widget works as a shortcut to let you preview
or use an application. You can add any of a variety
of miniature applications (widgets) to your Home
screen, including a clock, a music player, a picture
frame, the Google search bar, a power manager,
a calendar that shows upcoming appointments,
and so forth.
CUSTOMIZING THE HOME SCREEN
Page 29
PAGE 23
To add a widget:
1. Touch and hold the blank area on the Home
screen.
2. In the displayed menu, select Android widgets
or Emotion widgets you want to use.
3. Touch your desired widget.
NOTE: You can also download widgets from
Android Market.
Changing wallpapers
To change the wallpaper, touch and hold the
blank area of the Home screen to display the
Add to Home screen menu.
1. Touch Wallpapers to display the Select
wallpaper from menu.
2. Touch Live wallpaper to select animated
wallpapers installed on your phone as
wallpaper. Some live wallpapers change
according to the current time, display current
time, or display other useful information
Touch Pictures to set a picture you clicked
with the phone camera, or use an image you
copied to your phone from a computer.
Touch Wallpaper gallery to select a
wallpaper form images that came with the
phone. Slide the image thumbnails left or
right to view the images, or touch a thumbnail
to view a larger version.
3. Touch Save or Set Wallpaper to finish
changing the wallpaper.
CUSTOMIZING THE HOME SCREEN
Page 30
PAGE 24
The Contacts function enables you to save and
manage information such as phone numbers and
addresses of your contacts. Once you save the
contact information on your phone, it gives you
easy access to the people with whom you want
to communicate.
Viewing contacts
To access contacts, Touch
Contacts to
display the contacts arranged alphabetically.
Touch a contact to view its details, such as
phone number, email adders, and a list of recent
calls made or received from the contact.
Adding a contact
To add a contact:
1. In the contacts list press Menu, options panel
is displayed. Alternately, touch the create
contact button on the upper left side of the
contacts screen.
2. Touch Create contact. Create contact under
account screen is displayed.
3. Choose the option of to save the contact
either to SIM card or Phone memory.
NOTE: If you have added your Gmail account
to the phone, you will also be prompted t add
the contact to your regular Gmail account.
4. Enter Name and Number for the desired
contact.
CONTACTS
Page 31
PAGE 25
5. If you have more than one account with
contacts, touch the account to which you
want to add the contact.
6. Touch a category of contact information,
such as phone numbers and email addresses,
to enter that kind of information about
your contact. Scroll the page to view all
categories.
7. Touch the Picture Frame icon to select a
picture to display next to the name in your
lists of contacts and in other applications.
Importing Contacts
If you have contacts stored as vCards on a micro
SD card or SIM, you can import them into your
phone. Similarly, you can export contacts in vCard
format onto a micro SD card, to back them up
In the contacts list press Menu, Options panel
is displayed.
1. Touch Manage contacts. Manage contacts
screen is displayed.
2. Choose the appropriate option from the
following options like; Copy from SIM card,
Copy contacts, Backup to SD card Restore
from SD card, and Memory Status.
3. Touch Copy from SIM card. Wait for the SIM
card contents to be loaded.
4. Select the check box of the contact you want
to import.
CONTACTS
Page 32
PAGE 26
5. Touch Copy. If you have more than one
account on your phone, touch the account
into which you want to import the contacts.
Adding Contact Favorites
To add a contact to your favorites list, touch and
hold a contact, then touch Add to Favorites.
Touch Favorites tab to access the favorites list.
Searching for a contact
1. In the contacts list press Menu, Options
panel is displayed.
2. Touch Search option. Search contacts
screen is displayed.
3. Enter the name of the contact for which you
are searching.
4. As you type, contacts with matching names
displays below the Search box.
Note: In the contacts list, you can also touch
to search for a contact.
Editing a Contact
You can always make changes to the information
you have stored for a contact.
To edit a contact:
1.
In the contacts list, touch and hold the contact
whose details you want to edit, and then
touch Edit contact in the options menu.
CONTACTS
Page 33
PAGE 27
2. You can also press Menu, and then touch Edit
contact while viewing a contact’s details.
3. Touch a category of contact information, such
as contact’s name, phone number or email
address, to enter that kind of information
about your contact.
4. Change the contact information and touch
Done.
5. To cancel the changes, touch Cancel.
Deleting a contact
To delete contact:
1. In the contacts list, touch and hold the
contact you wish to delete, and then touch
Delete contact in the options menu.
2. Touch OK to confirm that you want to delete
the contact.
CONTACTS
Page 34
PAGE 28
Enter text using the onscreen keypad.
Displaying the virtual keypad
Some applications launch the keypad
automatically. In some applications, touch an
editable field to display the keypad.
To hide the keypad, press Back key.
Working with Input Methods
Touch and hold an editable field to select an
alternate input method.
1. On the message screen, touch and hold a
text field until Edit text menu displays.
2. Touch Input Method, and choose TouchPal
or Android keyboard.
TouchPal
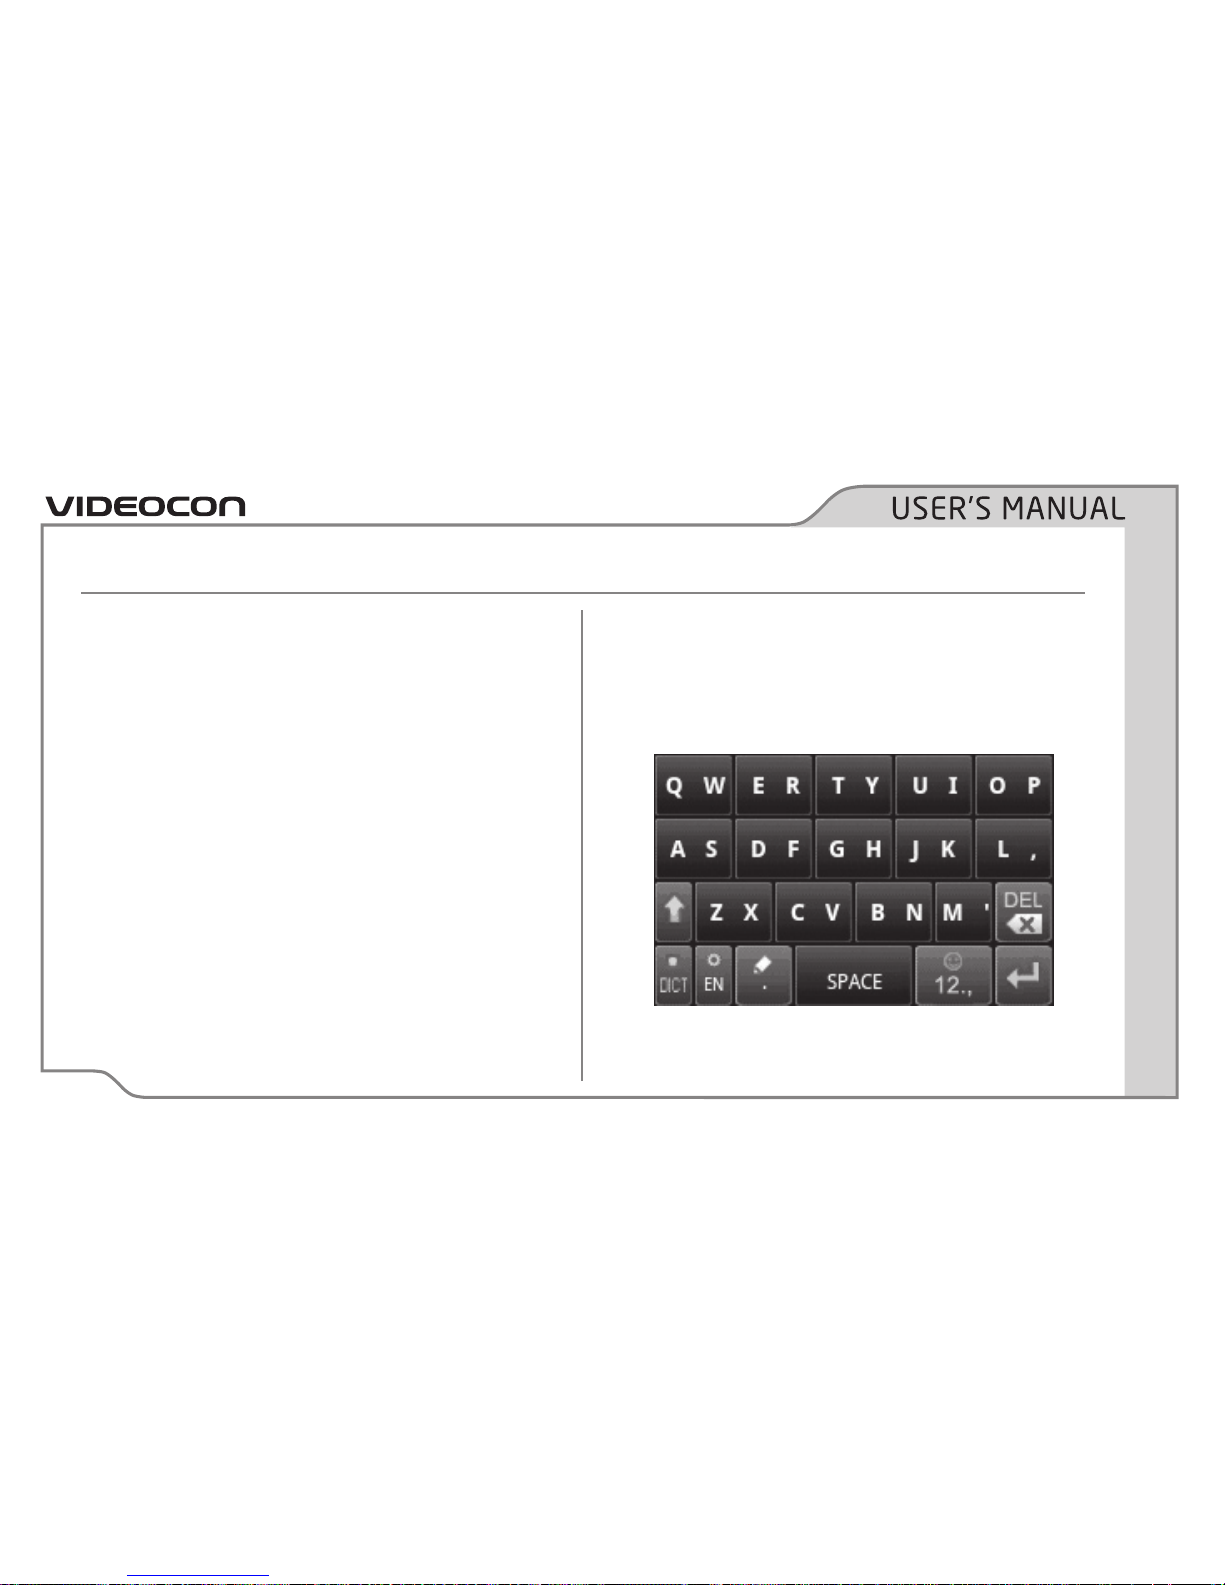
Touch TouchPal to display the uppercase keypad
style.
ENTERING INFORMATION
Page 35
PAGE 29
TouchPal keypad layouts
To facilitate typing, the phone let’s you choose a
customized keypad. Each keypad is suited for a
certain category of users to enable faster typing
based on the type of keypad they have used
most often.
The following keypad layouts are supported;
• Full QWERTY; keys are arranged in an order
similar to the computer keyboard.
• 12–Key PhonePad; Keypad similar to the
one used in pre-QWERTY phones.
Switching layouts
To switch the keyboard layout, touch and hold
ENTERING INFORMATION
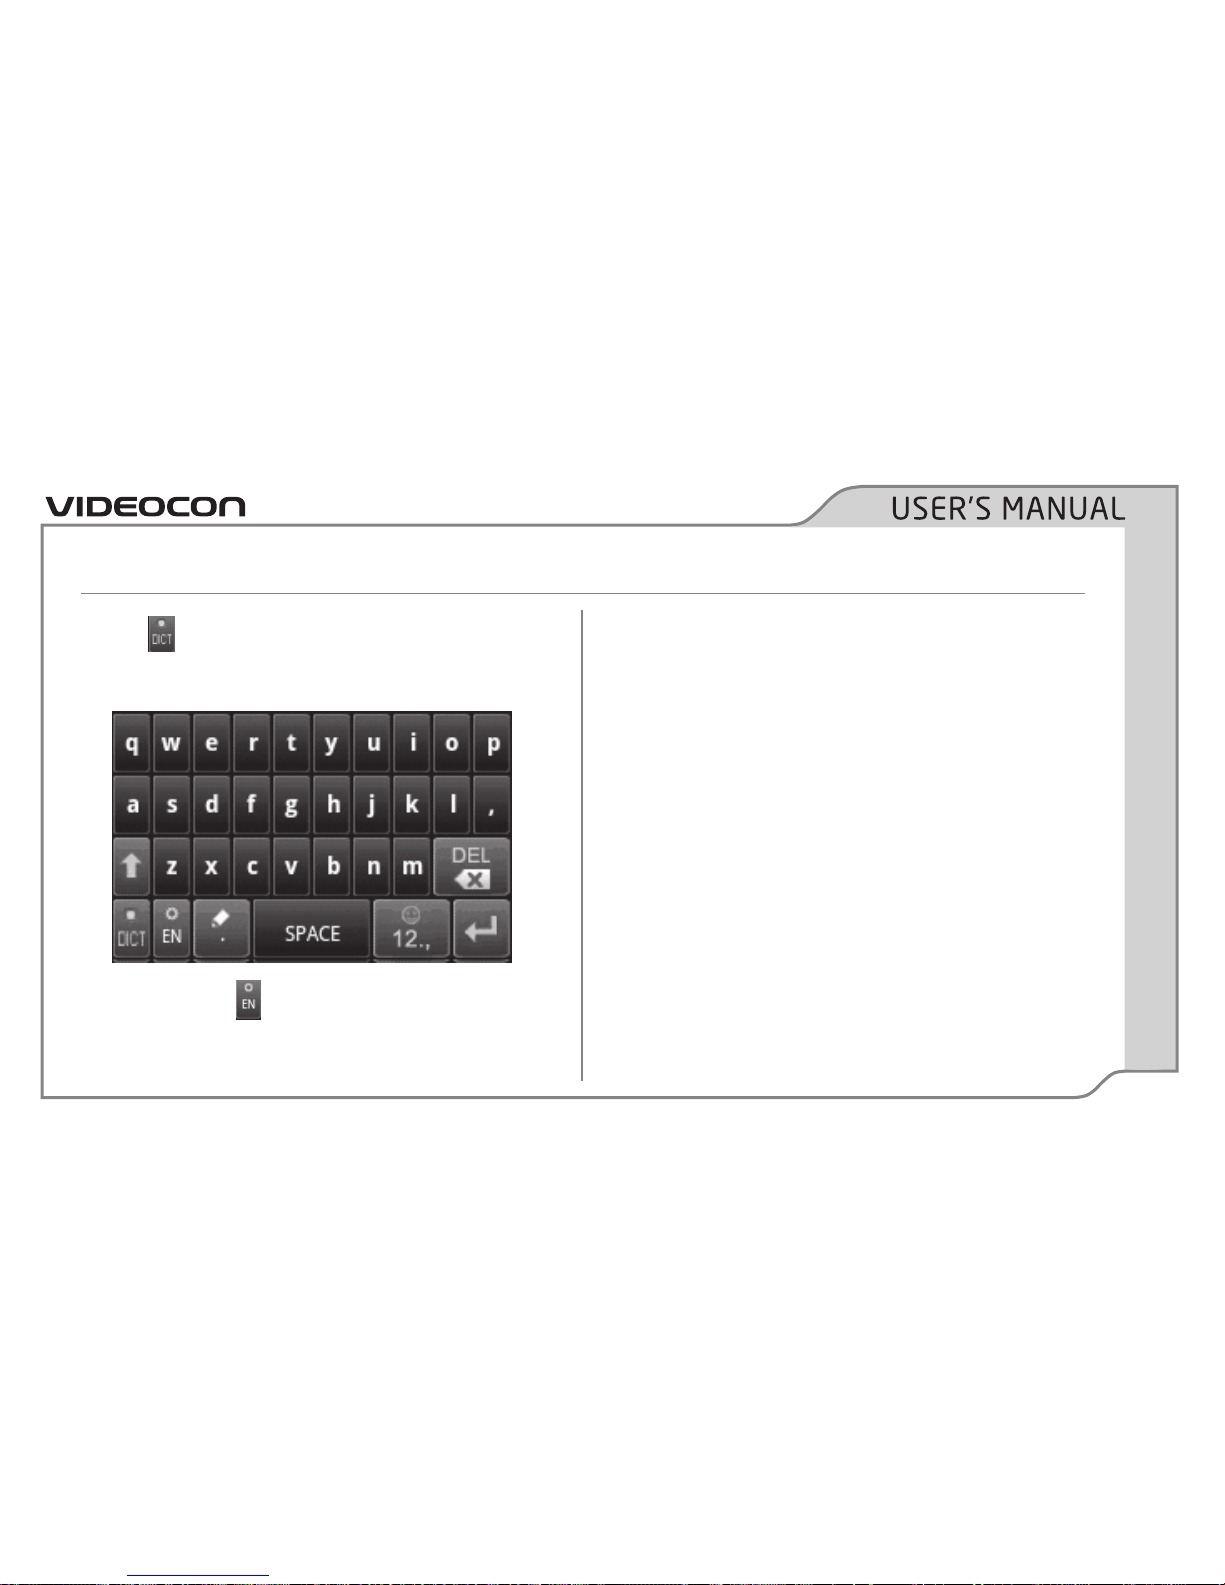
Touch to toggle between the uppercase and
the Lowercase keypad style.
Similarly, touch
to change the input language.
Supported languages include ditch, English,
French, and so forth.
Page 36
PAGE 30
one side of the keypad, and flick it towards the
edge of the screen.
Android keypad
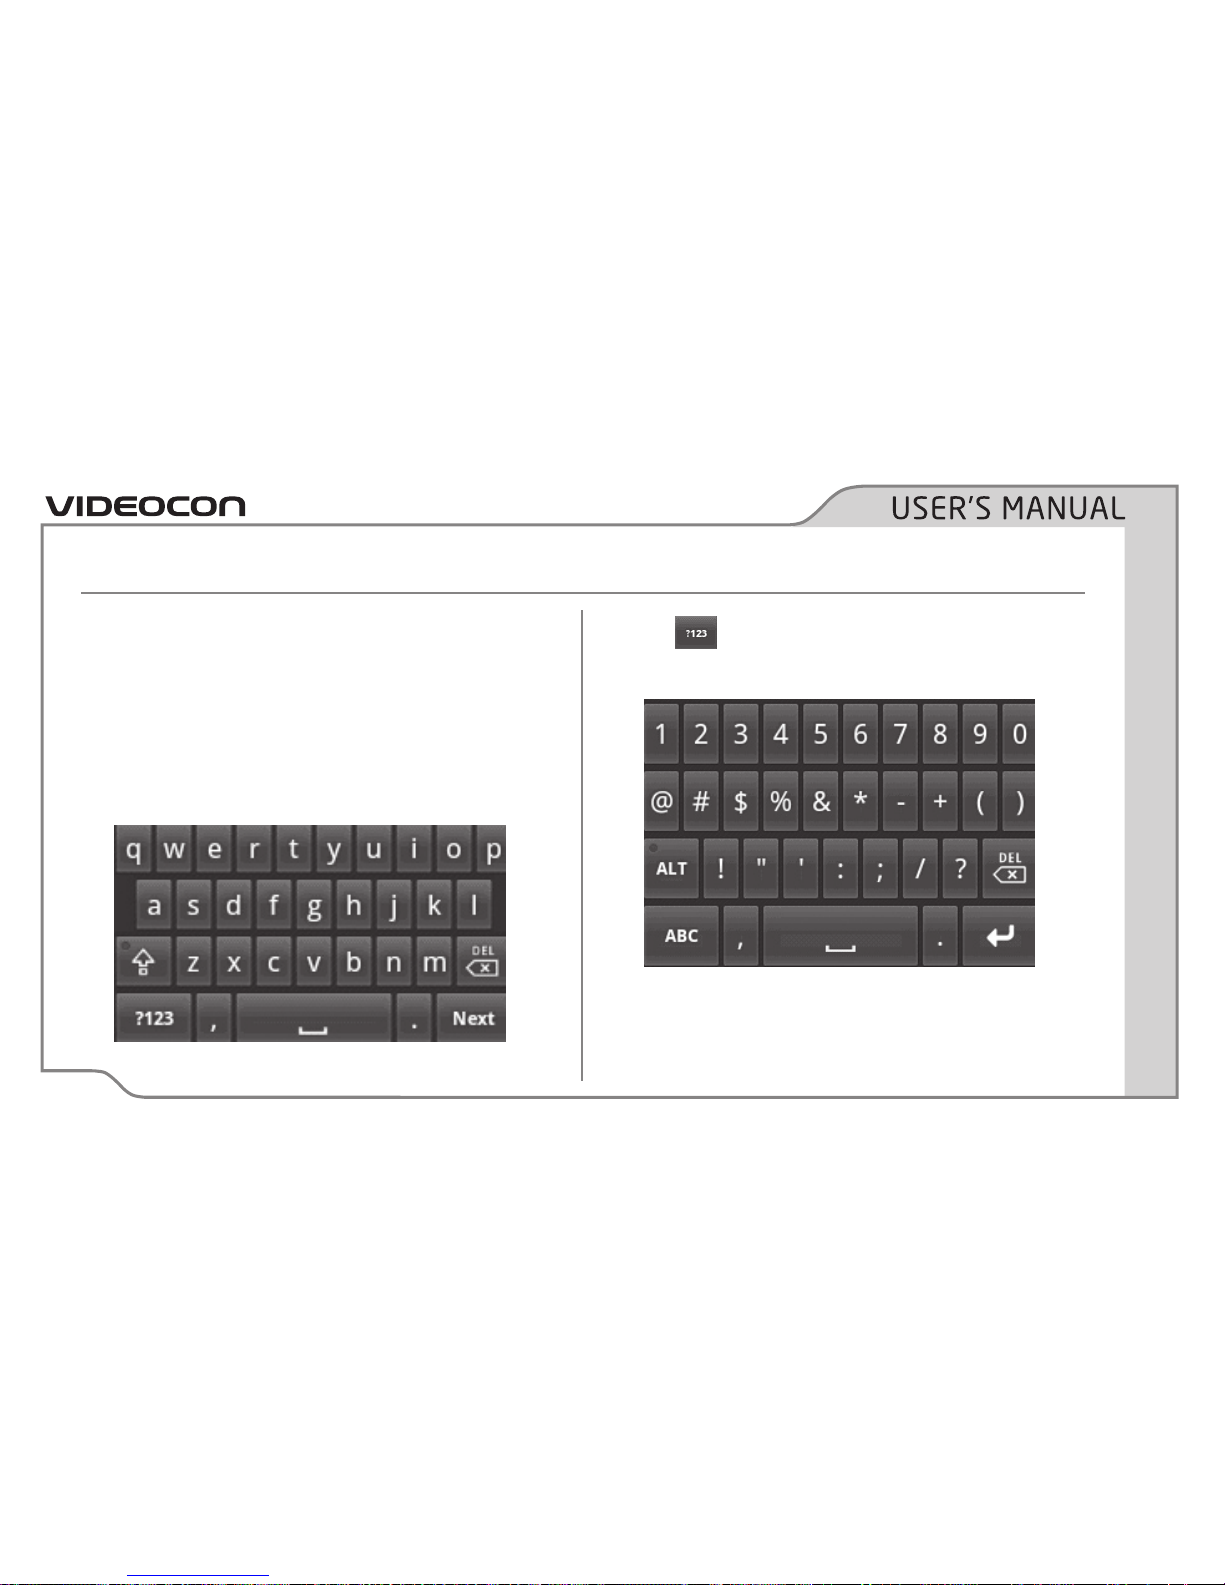
Touch Android keyboard to view the default
keypad.
Touch
to display the numeric and special
character keypad.
Turn your phone sideways to have a wider
keyboard layout. The screen will present the
keyboard with a landscape orientation.
ENTERING INFORMATION
Page 37
PAGE 31
Customizing keypad Settings
TouchPal Settings
Touch
Settings
Language & keyboard
TouchPal, to customize the TouchPal
settings. The screen displays various options
grouped under Basic settings and Prediction and
Gestures.
The options in Basic settings are:
• Word prediction: Enable the word prediction
while typing.
• Key press sound: Play a brief sound each
time you touch a key on the onscreen
keyboard.
• Key press vibration: Have the phone vibrate
briefly each time you touch a key on the
onscreen keyboard.
• Layout in portrait mode: Select the layout
to display in portrait mode.
• Layout in landscape mode: Select the layout
to display in landscape mode.
• Swipe to switch layout: Select check box
to be able to swipe horizontally over the
keyboard to switch layout.
• Mixed language input: Select check box
to enable mobile phone to auto detect
language if no more than 3 languages have
been selected.
ENTERING INFORMATION
Page 38
PAGE 32
• Select languages: Select the languages you
want to use.
The options under Prediction and Gestures are:
• Predict next word: Select check box to
enable the ability to predict the next word
when you are typing.
• Correct mistyping: Select to automatically
correct some common misspellings as you
type.
• Slide-down symbols: Select check box to
enable you to slide down on keys to enter
symbols.
• Relevant words: Select check box to enable
you to slide on candidate words for synonyms
or other relevant.
• Help: Access the online user manual for
using TouchPal.
• TouchPal: View the version of TouchPal.
ENTERING INFORMATION
Page 39
PAGE 33
Use Messaging to exchange messages (text,
multimedia, or e-mail) with contacts.
Touch
Messaging to display the Messaging
window. Use the messaging window to create
a new message or open an ongoing message
thread.
Messaging functions
Creating a message
For information on creating a text message, a
multimedia message, or an email, see “Creating
and sending messages” earlier in this document.
Replying to a message
In the Messaging window:
1. Touch a message thread to open it, and touch
to view the available options.
2. Touch Reply or Reply to All
• Touch Reply to reply just to the sender
of the message.
• Touch Reply to All to include all recipients
of the message.
• Touch Forward to send the conversation
to a contact.
3. Touch Type to compose and enter your
message.
4. Touch Send.
MESSAGING
Page 40
PAGE 34
Forwarding a message
In the Messaging window;
1. Touch a message thread to open it, and touch
to view the available options.
2. Touch Forward to send the message to
another recipient.
3. In To field; enter the recipient’s phone
number or touch the ‘+’ to choose one from
the contacts.
4. Touch Send.
Deleting a message thread
1. Touch a message thread to open it, and touch
to view the available options.
2. Scroll to the end of the message and touch
Delete. Touch OK when prompted to
confirm.
Deleting all message threads
1. In the Messaging window, touch a message
thread to open it.
2. Touch Menu
Multiselect
Select all
Delete.
3. Touch OK when prompted to confirm.
Delete a message from within a thread
1. Touch the message thread to open it.
MESSAGING
Page 41
PAGE 35
2. Highlight the message to delete by flicking
your finger upward or downward across the
message screen.
3. Touch and hold the highlighted message.
4. Touch Del. message.
Copy message text
You can use this function to copy the text from a
message to a new message you are composing.
1. Touch a message thread to open it.
2. Touch and hold the message to display the
submenu options.
3. Touch Copy message text.
4. Go to New Message.
5. Touch and hold Type to compose.
6. Touch Paste to paste the copied texts to
your new message.
Changing Messaging settings
You can change a number of Messaging settings.
To change Messaging settings, open a Messaging
window, press Menu
Settings.
Storage settings
• Delete old messages: Check to delete older
messages in a thread when the Text message
limit or Multimedia message limit is reached.
Uncheck to keep all messages.
MESSAGING
Page 42
PAGE 36
• Text message limit: Touch to set the
number of messages to save per thread of
text messages. When the limit is reached,
older messages are deleted if Delete old
messages is checked.
• Multimedia message limit: Touch to set
the number of messages to save per thread
of multimedia messages. When the limit
is reached, older messages are deleted if
Delete old messages is checked.
SMS settings
• Delivery reports: Check to receive delivery
reports for the messages you send.
• Manage SIM card messages: Touch to open
a window where you can work with messages
stored on your SIM card—for example, if you
used the SIM card in another kind of phone
where you exchanged text messages.
• SMS Center Number: The number for
your provider’s SMS gateway. If someone
sends you a message while your number is
unavailable, the SMS gateway keeps the
message with it till the time your phone
becomes available again.
MMS settings
• Delivery reports: Check to receive a report
on the messages you send.
• Read reports: Check to receive reports when
your messages are read or deleted.
MESSAGING
Page 43
PAGE 37
• Auto-retrieve: Uncheck to download only
the heading of multimedia messages, which
you can then touch to open a menu to
download the whole message. This is useful
for controlling how much data you download,
for example, when connected to a slow data
network.
• Roaming auto-retrieve: Uncheck to
download only the header of multimedia
messages when connected to other carrier’s
data networks. This is useful for avoiding
unexpected charges, if your contract has
limits on data roaming.
Notification settings
• Notifications: Check to receive a notification
whenever you receive a new message.
• Select ringtone: Opens a dialog where you
can select the ringtone to sound when you
receive new message notifications.
• Vibrate: Check to have the phone vibrate
when you receive a new message
notification.
MESSAGING
Page 44
PAGE 38
Adding an Email Account
Before you can start using the Email function
of the phone, you must configure your email
account.
When you launch Email for the first time, a wizard
displays to help you add your account for many
popular email systems, so you can read and work
with the same email that you do on a computer.
1. Touch
Email.
2. Answer the on-screen prompts and then
touch Next. Or touch Manual setup if you
prefer configuring it yourself.
3. Enter the name for your account and the
name you want other people to see when
they receive an email from you.
Note: For Manual Setup, you would need to
know the server type that the provider uses,
such as POP3, IMAP, or MS Exchange. If your
provider is using a POP3 setup, you would
need to know the incoming and outgoing
server address, and their respective port
numbers.
4. Touch Done. Your phone starts downloading
your email messages and you can start using
the phone to send and receive messages.
Adding Other Email Accounts
After creating your initial email account, press
WORKING WITH EMAIL
Page 45
PAGE 39
on the Your accounts screen, and then touch
Add account to create another email account.
Tip: When adding a subsequent email account,
you can also select the option to use the new
account to send all outgoing messages.
Customizing E-mail settings
You can change a number of settings for an
account, including how often you check for
emails, how you are notified of a new mail, and
details about the servers the account uses to
send and receive emails.
Note: Your account’s incoming and outgoing
settings depend on the kind of email service
for your account: IMAP, or POP3. You can enter
the necessary details manually, although you
will typically need to contact your email service
provider to determine the right settings for the
account.
1. Touch
Email to view the accounts
screen.
2. Touch and hold the email account you want
to change.
3. Touch Account settings.
4. Change General settings, Notification
settings, or Server settings.
WORKING WITH EMAIL
Page 46
PAGE 40
GPRS/3G
Your device supports 3G and GPRS. Both of these
technologies use packet data technology to send
data over the mobile network. The difference
between 3G and GPRS is that 3G offers highspeed data transfers.
To establish data connections, various access
points are needed:
• MMS access point: Send or receive
multimedia messages.
• Access point for the Web application to view
WML or XHTML pages.
• Internet access point (IAP) to send and
receive e-mail, or browse the Internet.
• Check the type of access point you need with
your service provider for the service you want
to access. For availability and subscription
to packet data connection services, contact
your network operator.
Checking Network Connection
To check network connection:
1. Touch
Settings
Wireless &
networks
Mobile networks. Mobile
network settings screen is displayed.
2. Touch Network operators or Access Point
Names to check the network connection.
Note: Generally your phone automatically read
the access point of the SIM card. For this reason,
CONNECTIVITY
Page 47
PAGE 41
do not change the parameters of the access
point, or you might not be able to access network
sources.
Turning on Data Services
To activate data services:
1. Touch
Settings
Wireless &
networks
Mobile networks. Mobile
network settings screen is displayed.
2. Select the Data Service check box to turn on
the data connection.
Wi-Fi
Wi-Fi gives you wireless access to broadband
Internet access. To use Wi-Fi on your phone, you
need access to a wireless access point called a
“hotspot”. The range of a Wi-Fi signal is affected
by the obstacles that may be in its way.
Accessing Wi-Fi
To access Wi-Fi:
1. Touch
Settings
Wireless &
networks. Wireless & network settings
screen is displayed.
2. Select the Wi-Fi check box to turn on the WiFi.
Connecting to Wireless Network
To connect wireless network:
1. After turning on the Wi-Fi, touch
CONNECTIVITY
Page 48
PAGE 42
Settings
Wireless & networks
Wi-Fi
settings.
2. List of detected Wi-Fi networks in the Wi-Fi
settings screen is displayed.
3. Touch a Wi-Fi network to connect to it.
• If you select an open network, you will be
automatically connected to the network.
• If you select a network that is secured
with Wired Equivalent Privacy (WEP),
enter the password, and then touch
Connect. If you connect to a secured
wireless network that you have already
used, you will not be prompted to enter
the WEP/WPA key again unless you reset
your mobile phone to its default settings.
3. On the Wi-Fi settings screen, touch Add Wi-
Fi network to add a new Wi-Fi network.
Wireless Tether
For information on setting up and using Wireless
Tether, see the “Wireless Tether” document.
Getting Connected
To be able to browse the Internet on your phone,
you must have access to at least one out of 3G,
EDGE, or GPRS services. If you are in the vicinity
of a wireless network that has Internet access,
you may also connect to it using the phone’s
connecting to Wi-Fi capability. For this you
CONNECTIVITY
Page 49
PAGE 43
would need to have the necessary credentials to
connect to this wireless router.
To launch the Browser:
1. Touch
Browser to open the browser.
By default Google homepage displays.
2. Press Menu, the option panel displays with
the following options:
• New window: Touch to open a new
window.
• Bookmarks: Touch to open a favorite
folder.
• Windows: Touch to go to the web preview
screen. You can switch to another web
page or open a new web page on the
screen.
• Refresh: Touch to refresh the current
page.
• Forward: Touch to browse the next web
page.
• More: Touch to open other menus and
perform operations such as Opening the
homepage, Search for text, View page
info and so forth.
Browsing a web page
To open a web page:
1. Touch the URL field, and use the virtual
keypad to enter the URL.
CONNECTIVITY
Page 50
PAGE 44
2. As you enter the URL, the browser displays
matching URLs in a list.
3. Touch an address to go directly to that web
page or continue entering the web page
address.
4. Touch Go. Homepage of the URL is
displayed.
Defining Homepage
To do the homepage setting:
1. On a browser window, press Menu.
2. Touch More
Settings
Set homepage.
Set homepage pop-up is displayed.
3. Enter the homepage address, and then touch
OK.
Using browser history
As you browse the web, the browser keeps track
of the pages you visit, to help find your way back
later.
To view browser history:
1. On a browser window, touch the bookmark
icon at the top of the screen, and click the
History tab to view the pages you have
visited.
2. Touch a link to reopen it.
3. Touch the Most visited tab to view the
pages you have visited most frequently.
CONNECTIVITY
Page 51
PAGE 45
Adding a Bookmark
To add bookmark:
1. On a browser screen, go to the web page you
want to bookmark.
2. Press Menu, and then touch Bookmarks
Add Bookmarks. The Add bookmark screen
displays.
3. Edit the bookmark name if needed and then
touch OK.
Note: The number of bookmarks that you can
store on the phone memory cannot be more than
the available phone memory.
Bluetooth
Your mobile phone has Bluetooth, which allows
you to create a wireless connection with
other Bluetooth devices so that you can share
files with your friends, talk hands-free with a
Bluetooth headset, or even transfer your phone
data, videos, and music and so forth to your PC.
If you are using Bluetooth, remember to stay
within 10 meters of other Bluetooth devices.
Be aware that obstacles may interfere with the
connection, including walls or other electronic
equipments.
Turning On Bluetooth
To activate Bluetooth:
CONNECTIVITY
Page 52
PAGE 46
1. Touch
Settings
Wireless &
Networks. Wireless & network settings
screen is displayed.
2. Select the Bluetooth check box to turn on
Bluetooth. Bluetooth icon displays on the
notification bar.
3. Touch Bluetooth settings, and then touch
Discoverable to set whether the phone
is Hidden, Visible for 120 seconds, or
Always discoverable to other Bluetooth
devices.
Pairing and Connecting to a Bluetooth
Device
To pair and connect Bluetooth device:
1. Ensure that the Bluetooth function on your
mobile phone is enabled.
2. Touch
Settings
Wireless &
networks
Bluetooth settings.
3. The phone scans for Bluetooth devices in the
vicinity. Alternatively, press Menu
Scan
for devices to scan for Bluetooth devices.
4. Touch the device you want to pair with your
phone.
5. Enter the pairing password to complete the
connection.
6. Your phone is connected to media audio,
trusted message is displayed in the phone’s
screen.
CONNECTIVITY
Page 53
PAGE 47
Note: Before you use Bluetooth, you need to
pair your phone with another Bluetooth device
as explained earlier.
Sending Files via Bluetooth
You can share pictures, videos, or music files
with your family and friends. To send files via
Bluetooth, do as follows:
1. Touch
File Manager to open the file
manager.
2. Touch and hold the file to be sent. The File
options menu is displayed.
3. Touch Share, and then touch Bluetooth to
select a paired device.
4. To disconnect the Bluetooth device, touch
and hold the connected device. You can also
just touch a connected device to disconnect
it.
5. Touch Disconnect or Unpair to disconnect
the device.
Connecting to a Computer
To transfer all your favorite music and pictures
from your PC onto your mobile phone’s micro SD
card, set the micro SD card as USB mass storage
for your PC.
1. Connect your phone to your PC with the USB
cable.
CONNECTIVITY
Page 54
PAGE 48
2. Open the notification panel, and then touch
USB connected.
3. Touch Mount in the dialog box that opens
to confirm that you want to transfer files.
Your PC will detect the micro SD card as a
removable disk. You can now transfer files
from your PC to your phone’s micro SD card,
and vice versa.
4.
Alternatively Settings General info
& option
, and then select the USB Mass
Storage check box to use the micro SD card
as the USB mass storage.
5. Touch
Settings
SD card & phone
storage
Unmount SD card.
6. Carefully remove the micro SD card from your
phone.
Configuring Modem
Connect your phone to a computer (using the USB
data cable or over Bluetooth) and act as a modem
to browse the internet on your computer.
For more information on setting up the device as
a modem, see the “Using PC Suite” later in this
document.
CONNECTIVITY
Page 55
PAGE 49
In addition to being a communication device
and personal assistant, your mobile phone
also provides you with endless entertainment
possibilities. You can take photos, create videos
and audio clips, and download and listen to
music.
The camera is a combination of camera and
camcorder that you can use to shoot and share
pictures and videos.
Using the Camera
To launch camera:
1. Touch
Camera to launch the camera.
The camera opens in landscape mode, ready
to take a picture or shoot a video.
2. Press Back key to close the camera.
3. On the capture screen, touch the screen to
show the zoom in or out controls.
Clicking a Photo
To take a photo:
1. Access your camera, and then switch to the
camera mode.
2. Press Menu to display the options panel. If
necessary, change the camera settings. The
preview image changes as you change the
settings.
3. On the photo capture screen, frame the
photo within the screen.
ENTERTAINMENT
Page 56
PAGE 50
4. Touch and hold the Capture key. When the
frame turns green, the content of the frame
is in focus.
5. Release the Capture key to take your photo.
6. The photo you just took is displayed for
a moment. You can take another photo or
preview your photos.
NOTE: In the Options panel, touch the Camcorder
icon to switch to the video recorder application.
Viewing images
1. After taking a photo, a thumbnail of the
photo you have just taken is shown in the
upper right corner of the Capture screen.
Touch the thumbnail to view it.
2. Touch the onscreen buttons to do any of the
following:
• Touch DELETE to delete the photo.
• Touch SHARE to send the photo in a
message or post it online.
• Touch SET AS to set the photo as
wallpaper or a contact icon.
3. Press Menu, to edit the photo, view the
details of the photo, or show the photo on
Maps.
4. If you want to view more photos, touch the
screen, and then touch Previous or Next
button.
ENTERTAINMENT
Page 57
PAGE 51
Using the Camcorder
To capture a video:
1. Open the camera, and then switch to
camcorder mode. Alternately touch
Camcorder.
2. If necessary, press Menu to change the
camcorder settings.
3. Frame the scene where you want to start.
4. Swipe the round icon from left to right, and
then touch camcorder icon, to (which on the
extreme left of the phone’s screen) start
capturing the video.
5. Touch again the Camcorder icon to stop
recording. You can capture another video or
preview your videos.
Viewing Videos
To view video:
1. After recording a video, a thumbnail of the
video you have just recorded is shown in
the upper right corner of the Capture screen.
Touch the thumbnail to view it.
2. Touch the onscreen buttons to do any of the
following:
• Touch DELETE to delete the video.
• Touch SHARE to send the video in a
message or post it online.
ENTERTAINMENT
Page 58
PAGE 52
• Touch PLAY to play the video. On the
video playing screen, touch the controls
to skip forward or back or to play or
pause.
3. Press Menu to view the details of the video.
4. If you want to view more videos, touch the
screen, and then touch Previous or Next
button.
Using the Gallery
Your Gallery application can automatically search
for pictures and videos on your mobile phone and
micro SD card. It can also sort them into folders,
and let you view and edit pictures, watch videos,
and set a picture as the wallpaper or photo for
a contact.
Launching the Gallery
To access gallery:
1. Touch
Gallery to open the viewer. The
Gallery application categorizes your pictures
and videos by storage location and stores
these files in folders.
2. To view pictures or videos, touch one of the
folders to view pictures or videos.
3. Press Menu to display the Gallery panel.
Rotating a Picture
To rotate a picture:
1. When viewing a picture, press Menu to
display more operations panel.
ENTERTAINMENT
Page 59
PAGE 53
2. Touch Rotate.
3. Select either Rotate left or Rotate right. The
picture is saved with the new orientation.
Cropping a Picture
To crop a picture:
1. When viewing a picture, press Menu to
display the more operations panel, and then
touch Crop.
2. Use the cropping tool to select the portion
of the picture to crop. The available options
are:
• Drag from the inside of the cropping tool
to move it.
• Drag an edge of the cropping tool to
resize it to any proportion.
• Drag a corner of the cropping tool to
resize it with fixed proportions.
3. Touch Save to save the cropped picture or
touch Rotate to rotate the onscreen picture
or touch Discard to discard the changes.
Music
You can download music files from your PC and
copy the files to your micro SD card so that you
can listen to music on your phone.
Playing Music
To play music:
ENTERTAINMENT
Page 60
PAGE 54
1. In the Gallery, touch an audio track that you
want to listen to.
2. To use any other phone application and
continue playing music in the background,
touch
3. Home.
4. To return to the music controls, open the
notification panel and then touch the song.
Alternately, touch
Music to play
music.
Adding tracks to Playlist
To add music to playlist:
1. Touch a category on the music library
screen.
2. List of songs are displayed. Use the
Navigation key to reach the song you want
to add to the playlist.
3. Touch and hold the song, and then touch Add
to playlist from the available options;
• Touch Current playlist to add the song
to an existing playlist.
• Touch New to create a playlist and add
the song to it.
Playing Music from Playlist
To play music from playlist:
1. Touch the Playlists tab on the music library
screen.
ENTERTAINMENT
Page 61
PAGE 55
2. Touch and hold the playlist you want to
play.
3. Touch Play icon to play the playlist.
Listening to FM Radio
FM Radio lets you listen to FM radio stations
on your mobile phone. Since FM Radio uses the
provided wired stereo headset as the antenna,
connect the headset first to the audio jack of
your phone before you open the radio.
To access FM Radio:
1. Touch
FM Radio, to open the
application.
2. The first time you open FM Radio, touch
Auto tuning, which automatically scans for
available FM channels, save them as presets,
and play the first FM channel found.
3. Press Menu to display the operations panel
and set more FM Radio options.
Tuning FM Radio
Open the FM Radio, and then press Menu to do
the following:
• Touch Inching tuning, touch the tuning
button to tune the frequency by –0.05 MHz
or +0.05 MHz, and then touch OK.
• After tuning, press Menu, and then touch
Save channel to save it.
• Touch Auto tuning to automatically scan for
available FM channels.
ENTERTAINMENT
Page 62
PAGE 56
Sign-in to Google Applications using your Google
credentials to gain access to the following
features:
Gmail
Gmail is Google’s web-based email service.
Google Mail is configured when you first set up
this device. Depending on your synchronization
settings, Google Mail on this device is
automatically synchronized with your Google
Mail account on the web.
To open Gmail:
1. Touch
Gmail.
2.
Touch Create or Sign in your Google account.
3. Follow the on screen instructions to login or
create your Gmail username and password.
4. Once logged in, you can begin reading and
sending emails from your Gmail account.
Google Talk
Google Talk is Google’s instant messaging
program.
To Sign in to Google Talk
1. Touch
Google Talk.
2.
Touch Create or Sign in your Google account.
3. Follow the on-screen instructions to login or
create your Gmail username and password.
4. Once logged in, you can begin using Google
Talk.
GOOGLE MOBILE SERVICES
Page 63
PAGE 57
5. Press Menu. Options panel is displayed and
do any of the following:
• View friend’s list: Select All friends. List
of Friends is displayed.
• Add friend: Select Add friend from the
options panel to add new friends.
• Blocked: Select Blocked from the options
panel and blocked the person whom you
do not want to talk.
• To switch to different chats: Touch
Menu
Switch chats.
• To invite a person to your chat: Touch
Menu
Invites.
• To configure Google Talk settings:
Touch Menu
More Settings.
• To Sign out: Touch Menu
More
Sign
out.
• To view terms and privacy: Touch Menu
More
Terms & Privacy.
Market
Android Market is an online store, developed and
licensed by Google. Here you can browse and
download third party applications, both paid and
for free.
To start using Android market:
1. Touch
Market.
GOOGLE MOBILE SERVICES
Page 64
PAGE 58
2. Touch Next to setup your Google account.
3. Touch Create to create a new account or Sign
in to sign in your existing Google account
(same as Gmail, Picasa, etc.).
4. Once you are signed in, you can start
searching and downloading applications
from the Android Market. Touch Apps to
view the list of applications available and
touch Games to view the list of games
available. You can also touch Downloads to
view the applications you have previously
downloaded.
GOOGLE MOBILE SERVICES
Page 65
PAGE 59
RoadSync Calendar
Use the RoadSync Calendar to view and add
events or appointments on your calendar.
Note: RoadSync must be set up first to use this
application. For more information, refer “Using
RoadSync,” later in the document.
To open RoadSync calendar:
1. Start synchronization first. For more
information, refer “Start Synchronization,”
later in the document.
2. Touch
RoadSync Calendar.
3. Do any of the following:
• To add an event, touch Menu New event.
• Slide your finger on screen to pan the
calendar.
• To change the calendar view, touch Menu
Agenda, Day, Week, or Today.
• To edit e-mail settings, touch Menu
Settings.
RoadSync Mail
Use the RoadSync Mail to send and receive
Emails on your device.
NOTE: RoadSync must be set up first to use this
application. For more information, refer “Using
RoadSync Calendar,” later in the document.
To open RoadSync Mail:
USING OTHER APPLICATIONS
Page 66
PAGE 60
1. Touch
RoadSync Mail.
2. Do any of the following:
• To view a message, touch the message.
• To create a new message, touch Menu
New message.
• To reply to or forward a message, touch
Menu
Reply / Forward.
• To flag a message, touch Menu
Flag.
• To manually sync Email, touch Menu
Sync.
• To delete Email, touch Menu
Delete.
• To view other folders, touch Menu
More Folders, then the folder.
• To edit e-mail settings, touch Menu
More Settings.
• To view on-line help, touch Menu
More
Help.
Using RoadSync
RoadSync provides secure, wireless and direct
push synchronization of corporate Email,
calendar, contacts and attachments.
To set up RoadSync for the first time:
1. Touch
RoadSync Calendar.
2. The setup wizard displays. Touch Next, then
follow the on-screen instructions.
3. Read and accept the license agreement.
Touch Accept.
USING OTHER APPLICATIONS
Page 67
PAGE 61
4. Enter your name and Email to register
RoadSync, and then touch Register.
5. Enter your Exchange account information
User Name, Password, Server address,
Domain and SSL option.
6. Touch Finish.
Customizing RoadSync
After registering RoadSync and Calendar for the
first time, the Preferences screen is displayed
automatically. Use the Preferences screen to
customize synchronization settings.
Server settings
Touch to edit server settings such as User name,
Password, Server address, Domain, and enable or
disable SSL.
Data Sync Settings
Touch to choose the data to synchronize. Touch
to select the check boxes of the following:
• E-mail: To sync Inbox messages and
attachments.
• Calendar: To sync Exchange appointments
to RoadSync Calendar application.
• Contacts: To sync Exchange contacts to
built-in Contacts application.
• Show status icon: To display the
RoadSync icon on the notification bar when
synchronization is in progress.
USING OTHER APPLICATIONS
Page 68
PAGE 62
Sync Schedule
Touch to set the synchronization schedule.
• Peak schedule: To set the time interval for
synchronization during a peak schedule.
• Off peak schedule: To set the time interval
for synchronization during an off peak
schedule.
• Peak start time: To set the peak start time.
Touch the [+] or [-] buttons to adjust the time,
select AM or PM, and touch Set to complete.
• Peak end time: To set the peak end time.
Touch the [+] or [-] buttons to adjust the
time. Touch to select AM or PM. Touch Set
to complete.
• Peak days: Touch to choose the days of the
week to set the peak day(s).
• Sync when roaming: Touch to enable
synchronization even when roaming.
NOTE: Additional charges may be incurred
when you use this function.
Email Options
Touch to configure the e-mail settings.
• Email download size: To set the maximum
size of the e-mail to download.
• Auto download: To automatically download
incomplete message upon opening it.
• Signature: To customize and add your
signature to e-mails you send.
USING OTHER APPLICATIONS
Page 69
PAGE 63
• My Email Address: To enter the e-mail
address to exclude when sending or replying
Emails to all.
• Status bar: Select this check box to display
notification on the status bar when a new
Email arrives.
• Select ringtone: To set the Email notification
ringtone.
• Vibrate: To enable the device to vibrate
when a new Email arrives.
• LED Indicator: To set the color of the LED
indicator that is lit when a new Email arrives.
Calendar Options
Touch to configure the calendar settings:
• Calendar date range: To set the date range
to synchronize.
• Set alerts & notifications: To turn alerts and
notifications on or off when an appointment
is due.
• Select ringtone: To set the calendar
notification ringtone.
• Vibrate: To enable the device to vibrate
when an appointment is due.
• Set default reminder: To set the default
reminder time before an appointment is due.
USING OTHER APPLICATIONS
Page 70
PAGE 64
Start Synchronization
1. Touch
RoadSync Calendar.
2. On the RoadSync main screen, touch Start
Sync to start synchronization.
3. To manually stop synchronization, touch
Stop Sync.
Update RoadSync
Touch
RoadSync Calendar
Check For
Updates.
Servo Search
As you store more information on your
phone, finding the required information can
be a challenge. First you need to search the
phonebook then messages, and then the micro
SD card, which takes ages to complete.
Servo Search offers a single window interface
to search information stored anywhere on your
phone (including phonebook, messages, and
micro SD card) or over the Internet.
Calendar
The Calendar lets you schedule and set sound
alarms for appointments, meetings and other
events. Scheduled appointments for the day can
be displayed on Home screen.
Accessing Calendar
Touch
Calendar. Calendar screen is
displayed in your device screen.
USING OTHER APPLICATIONS
Page 71
PAGE 65
Creating an Event
To create an event:
1. Touch
Calendar.
2. Press Menu
New event and enter event
details.
3. Select the dates and enter in From and To
field.
4. Enter the location in Where field.
5. Enter event description in Description field.
6. To set Repetition, select the repetition from
the list.
7. To set Reminders, select the reminder time
from the list.
8. When finished, touch Save to return to the
calendar.
Setting an Event Reminder
To set an event reminder:
1. On any calendar view, touch an event to view
its details or event summary.
2. Touch Add reminder button to add a
reminder. Or touch the reminder’s “-” button
to delete it.
3. Touch the selected reminder time, and then
touch the length of time before the event
when you want to be reminded. When the
time comes, you will receive a notification
about the event.
USING OTHER APPLICATIONS
Page 72
PAGE 66
Customizing Calendar Settings
To customize calendar settings:
1. On any Calendar view, press Menu. Calendar
Menu is displayed.
2. Touch More
Settings. The lists of options
are:
• Hide declined events: Select to hide
events for which you have declined
invitations.
• Set alerts & notifications: Touch to set
event reminders to alert you, send you a
notification, or turn off event notifications
on your mobile phone.
• Select ringtone: Touch to select the
ringtone to sound when you receive an
event reminder.
• Vibrate: Select to vibrate the mobile
phone when you receive an event
notification.
• Default reminder time: Touch to select
the default time before an event for
event reminders to occur.
Alarm
Learn to set and control alarms. You can set a
new alarm and modify an existing alarm.
Adding an Alarm
Touch
Alarm. Alarm screen is displayed. To
set an alarm:
USING OTHER APPLICATIONS
Page 73
PAGE 67
1. On the Alarm screen, press Menu
Add
alarm
Set alarm screen is displayed.
2. To set the Alarm, lists of options are;
• Time: Touch time to set the time of the
alarm.
• Ringtone: Touch ringtone to select the
tone of the alarm.
• Vibrate: Select the vibrate checkbox, to
have the phone vibrate, in addition to
playing the ringtone.
• Repeat: Touch Repeat to set the days
when you want the alarm to sound.
• Label: Touch Label to enter a name for
the alarm.
Customizing Alarm Settings
To access alarm settings:
1. On the Alarm screen, press Menu
Settings.
Settings screen is displayed for the alarm.
2. The options for the settings of the alarm
are:
• Alarm in silent mode: Select to sound
alarms even when the phone is in silent
mode.
• Alarm volume: Touch to open a dialog
where you can set the volume of all
alarms.
• Snooze duration: Touch to open a dialog
where you can set how long the alarm
USING OTHER APPLICATIONS
Page 74
PAGE 68
waits before it sounds again.
• Side button behavior: Touch to open a
dialog where you can set what happens if
you press the side buttons when an alarm
sounds.
Sound Recorder
Sound recorder is useful for quickly recording
sounds. You can also record your voice and set
it as a ringtone.
Start Recording
To start recording:
1. Touch
Sound Recorder. Sound
Recorder screen is displayed.
2. Touch Start button to start recording.
Recording time is also displayed in the
screen.
3. Record your desired message.
4. Touch the Stop button to stop recording.
5. Touch Menu, and then touch Recordings to
listen to the voice clip.
File Manager
File Manager is like having a pocket-sized
personal assistant that lets you organize, edit,
and delete files and folders.
Accessing File Manager
Touch
File Manager. Two tabs displayed
under File Manager are:
USING OTHER APPLICATIONS
Page 75
PAGE 69
• Phone Memory: Displays files and folders in
your mobile phone memory.
• Micro SD card: Displays files and folders in
your micro SD card.
Creating Folder
To create a folder:
1. On the File Manager screen, access the
directory of the folder, where you want to
create New folder.
2. Touch Menu, to open the options panel, and
then touch New folder.
3. Enter Name of the new folder in the text
box.
4. Touch Save, New folder is displayed with the
desired name.
Moving or Copying a File
To move or copy a file:
1. On the File Manager screen, touch Menu to
show the options panel, and then touch Cut
or Copy.
2. Touch the file or folder you want to move
or copy. When selected, a check mark is
highlighted with the selected folder.
3. To select all files, again touch Menu to open
the options panel, then touch Select all, to
select all files in a folder (touch Unselect all
to cancel the selection).
USING OTHER APPLICATIONS
Page 76
PAGE 70
4. Touch Menu to open the options panel, and
then touch Done to cut or copy the file.
5. Now select the path to where you want the
file to be copied or moved. Touch Menu to
open the options panel, and then touch Paste
to move or copy the file to the selected
path.
Using file search
To quickly search for a file:
1. On the File Manager screen, touch a folder
to access the directory where the file is
located.
2. Touch Menu to open the options panel, and
then touch Search.
3. Write a key word of the name of your file or
folder in the search box.
4. Touch Search. Your device starts the search.
5. A list of search results displayed in the
screen. Touch a file in the list to open it.
6. Touch New search or press the Back key to
return to the file manager screen.
Check Memory Utilization
To view memory status:
1. On the File Manager screen, press Menu to
open the options panel.
2. Touch Memory Status from the displayed
options. The memory management screen is
displayed.
USING OTHER APPLICATIONS
Page 77
PAGE 71
3. This screen allows you to view the memory
status and available memory on your phone
and micro SD card.
Calculator
Learn to perform mathematical calculations
directly on your device like a desktop calculator.
To use calculator:
1. In the idle mode, touch
Calculator.
2. Use the keys that correspond to the calculator
display to perform basic mathematical
operations.
3. Press Menu, to open options panel. The
available options area;
• Clear history: To remove the previous
calculation from the calculator.
• Advanced panel: Touch Advanced panel
to view Scientific calculator.
Notepad
Notepad function is a simple text processor and
lists all notes in a linear structure. You can add,
edit, and delete notes.
To use Notepad:
1. Touch
Notepad, Notepad screen is
displayed.
2. Press Menu, Add note option is displayed in
the screen.
USING OTHER APPLICATIONS
Page 78
PAGE 72
3. Touch Add note, to create a note virtual
QWERTY Keypad is displayed on the screen.
4. You can create note with the help of virtual
QWERTY keypad.
5. After writing a note press Menu, Save and
Discard options are displayed on the screen.
6. Touch save option to save the Note. You can
discard the note by touching discard options
also.
Documents To Go
Documents To Go allows you to open Microsoft®
Office and Adobe file formats.
Word To Go® Viewer
Word To Go® Viewer allows you to view
Microsoft® Word documents (.doc and .docx). It
supports embedded pictures, font color, bold,
italics, underline, bulleted, numbered list and
more. To open Word To Go Viewer:
1. Tap
Documents To Go Word To Go
Viewer.
2. Tap Open File.
3. Tap the file you want to open. Swipe your
finger on the screen to pan or go through
other pages. Touch return to close the file..
Note: To create a new document or edit an
existing document, purchase the full version
of Documents To Go.
USING OTHER APPLICATIONS
Page 79
PAGE 73
Sheet To Go® Viewer
Sheet To Go® Viewer allows you to view
Microsoft® Excel spreadsheets (.xls and .xlsx).
It supports cell and number formatting, row and
column alignment, formulas, and fast fingerfriendly panning.
To open Sheet To Go Viewer:
1. Tap
Documents To Go Sheet To Go
Viewer.
2. Tap Open File.
3. Tap the file you want to open.
• Swipe your finger on screen to pan
through the sheet.
• To view other worksheets on file, tap
Menu ; View ; Worksheets, then tap the
worksheet name you want to view.
4. To close the file, tap Return.
Note: To create a new spreadsheet or edit
an existing spreadsheet, purchase the full
version of Documents To Go.
Slideshow To Go® Viewer
Slideshow To Go® Viewer allows you to view
Microsoft® PowerPoint presentations (.ppt
and .pptx). It supports slide view, outline view,
speaker notes, images, charts, font formatting,
and effortless slide “flick” navigation.
To open Slideshow To Go Viewer:
USING OTHER APPLICATIONS
Page 80
PAGE 74
1. Tap
Documents To Go Slideshow
To Go Viewer.
2. Tap Open File.
3. Tap the file you want to open.
4. To close the file, tap Return.
To create a new presentation or edit an existing
presentation, purchase the full version of
Documents To Go. PDF To Go® Lite
PDF To Go® Lite allows you to view Adobe® PDF
files (.pdf). It supports page view, word wrap,
multiple zoom levels, auto-rotate, embedded
images, and more. To open PDF To Go Lite
1. Tap
Documents To Go PDF To Go
Lite.
2. Tap Open File.
3. Tap the file you want to open.
• Tap the screen to bring up the zoom
controls.
• Swipe your finger up or down to view the
next or previous page.
4. To close the file, tap Return.
Purchase Documents To Go
To get the full version of Documents To Go;
1. Tap the lock tab .
2. Tap Buy. Browser is launched and you will be
redirected to www.dataviz.com.
USING OTHER APPLICATIONS
Page 81
PAGE 75
3. Follow the on-screen instructions to complete
purchase.
FACEBOOK
To launch Facebook, touch
Facebook. Use
your Facebook user name password to access
your Facebook profile from the phone.
Maps
Maps are Google’s mapping service to search for
places of interest.
To open Maps:
Touch
Maps. Do any of the following:
• To search for a place of interest: Touch
MenuSearch, and then type the name of
the place search.
• To get direction: Touch Menu
Directions.
•
To select a Map mode: Touch Menu Layers,
then touch Traffic, Satellite, or Latitude.
• To go back to my location: Touch Menu
My Location.
• Join Latitude: Touch Join Latitude, and then
touch Allow & share to share your location
with friends.
• To clear the map: Touch Menu
More
Clear Map. To view terms, privacy, and for
notices, you can touch Menu
More Terms,
Privacy & Notices.
USING OTHER APPLICATIONS
Page 82
PAGE 76
• To view information about Google Map:
Touch Menu
MoreAbout.
YouTube
YouTube is an online video streaming service
that allows you to view, search, and upload
videos.
To start using YouTube:
1. Touch
YouTube.
2. Videos are grouped into categories, such as
Featured, Most popular, Most viewed, Top
rated, and more. Touch a category to see the
available videos for that category.
3. Touch a video to play it.
SIM Toolkit
Directly connect to and use services provided by
your mobile service provider.
Touch
SIM Toolkit.
NetManager
Use NetManager to control which applications
can access network services such as GPRS, Email
and so on. If an application is denied network
access, it will stop functioning.
USING OTHER APPLICATIONS
Page 83
PAGE 77
Call Settings
Use Call settings to configure settings such as
call forwarding, call waiting, and other special
features offered by your service provider. You
can also use Call settings to configure the phone
so that it can place outgoing calls only to a fixed
set of phone numbers.
Call settings screen
Voicemail service: Opens a dialog where you can
select your carrier’s voicemail service or another
service, such as Google Voice.
Voicemail Settings: If you are using your carrier’s
voicemail service, opens a dialog where you can
enter the phone number to use for listening to
and managing your voicemail. You can enter a
comma (,) to insert a pause into the number—for
example, to add a password after the phone
number. If you are using Google Voice, opens
a screen where you can view the Google Voice
number or sign out of Google Voice.
Voicemail settings: Opens a screen where you
can configure your selected voicemail service.
Additional settings
• Call forwarding: Opens a screen where you
can configure how your calls are forwarded
when you’re on the phone, when you don’t
answer, and so on.
• Caller ID: Opens a dialog where you can set
whether your phone number is displayed to
the people you call.
MANAGING YOUR DEVICE
Page 84
PAGE 78
• Call waiting: Check to see and respond to
new calls when you’re already on a call.
Fixed Dialing Numbers
Use the settings on this screen to configure your
phone so it can place outgoing calls only to the
fixed dialing numbers (FDN) that you save on the
phone’s SIM card.
• Enable FDN: Opens a dialog that prompts
you to enter your PIN2and then places the
phone in FDN mode. When FDN is enabled,
this setting changes to disable Fdn.
• Change PIN2: Opens a series of dialogs that
prompt you to enter your current PIN2 and
then enter and confirm a new PIN2.
• FDN list: Opens a screen that lists any FDNs
saved on your SIM card. Press
and touch
Add Contact to add an FDN number to your
SIM. Press Menu on that screen to import a
number from your Contacts to the FDN list,
or to delete a number from the FDN list.
Date & time settings
By default, your device automatically uses
the date, time zone, and time provided by the
network. Access and change the following
settings to control how time and date are
displayed on your device.
To manage date & time settings:
1. Touch
Settings
Date & time. Date &
time settings screen is displayed.
MANAGING YOUR DEVICE
Page 85
PAGE 79
2. To manually set the dates clear the
Automatic check box.
3. Touch Set date. On the set date screen,
touch the up or down button to adjust the
date, month, and year.
4. Touch Select time zone, and then select the
desired time zone from the list. Scroll down
the list to view more time zones.
5. Touch Set time. On the set time screen, touch
the up or down button to adjust the hour and
minute. Touch Set when the configuration is
complete.
6. Select or clear the Use 24-hour-format
check box to switch between using a 24hour or 12-hour format.
7. Touch Select date format to select how you
want the date to display on your phone.
Sound & display settings
Touch
Settings
Sound & display. Sound
& display settings screen is displayed.
Change the settings for various sounds on your
device and for the display. The available options
are:
• Silent mode: Activate the silent mode to
mute all sounds except media sounds, and
alarm ringtones.
• Ringer volume: Adjust the volume level for
the call ringtone and notification ringtone.
• Media volume: Set the default volume for
music and videos.
MANAGING YOUR DEVICE
Page 86
PAGE 80
• Phone ringtone: Touch to display the
Ringtones dialog box. In the Ringtone dialog
box, check the ringtone you want to use as
an alert for incoming calls. Touch a ringtone
to listen to it.
• Phone vibrate: Check to have the phone
vibrate when you receive an incoming call,
independent of your ringtone or volume
settings.
• Notification ringtone: Select a ringtone
to alert you to events, such as incoming
messages, missed calls, and alarms.
• Audible touch tones: Set the device to
sound when you touch the keys on the
dialling screen.
• Audible selection: Set the device to sound
when you select an application or option on
the touch screen.
• Haptic feedback: Check to have the phone
vibrate briefly when you touch soft buttons
and perform other actions.
• SD card notifications: Set the device to
sound when a memory card is recognized.
• Calibration: Calibrate the screen if don’t have
right response while working on the screen.
• Orientation: Set whether or not to rotate
the content automatically when the device is
rotated.
• Animation: Set the device to display
MANAGING YOUR DEVICE
Page 87
PAGE 81
animation when you switch between
windows.
• Brightness: Set the brightness of the
displayed screen.
• Screen timeout: Set the duration of time
the device waits before turning off the
backlight.
Managing Applications
Manage and remove installed applications.
View Installed Applications
1. On the Settings screen, touch Applications
Manage applications.
2. In the applications list:
o Press Menu, and then touch Sort by size.
Then touch an application to view its
details.
o Press Menu, and then touch Filter. Select
All, Running, or Downloaded from the
options menu. Then touch an application
to view its details.
o Touch an application to view its details
directly.
Removing an installed application
1. On the Settings screen, touch Applications ;
Manage applications.
2. Touch an application, and then touch
Uninstall to remove the application from your
mobile phone.
MANAGING YOUR DEVICE
Page 88
PAGE 82
Configuring Wi-Fi settings
•
Wi-fi settings: Set up and manage wireless
access points.
• Bluetooth settings: Manage connections,
set device name, and discoverability of the
device.
• Mobile networks: Set options for roaming,
networks, and Access Point Names.
• Airplane mode: Disable all wireless
connections.
Privacy Settings
•
Use My Location: Allow the phone t display
your current location while using Google
search and other Google services.
• Back up my settings: Enable to backup
phone settings and data to Google servers
using your Google Account. This back will
come in handy when you misplace your
phone, or upgrade to a newer model of this
phone. The backup includes various settings
such as you Wi-Fi passwords, bookmarks,
installed a list of applications, and a majority
of settings you configure using the Settings
application.
• Factory data reset: Reset phone to factory
settings.
Securing SIM data
Activate SIM card lock to have the phone to
request for a personal identification number (PIN
MANAGING YOUR DEVICE
Page 89
PAGE 83
code each time the device is switched on.
To enable SIM card lock:
1. Touch
Settings
Location & security
Set up SIM card lock.
2. Check Lock SIM card, and use the virtual
keypad to choose a personalized PIN and
press OK.
Touch Change SIM PIN to change the PIN.
Reset phone
If you reset your phone to the settings that
were in place when it left the factory All of
your personal data from internal phone storage,
such as your account information, system and
application settings, contacts, messages and all
third-party applications will be lost.
WARNING; Resetting the phone does not erase
any system software updates or information
that is stored in your memory or SIM card.
To reset the phone, touch
Settings
Privacy (Personal data pane), touch Factory
data reset.
MANAGING YOUR DEVICE
Page 90
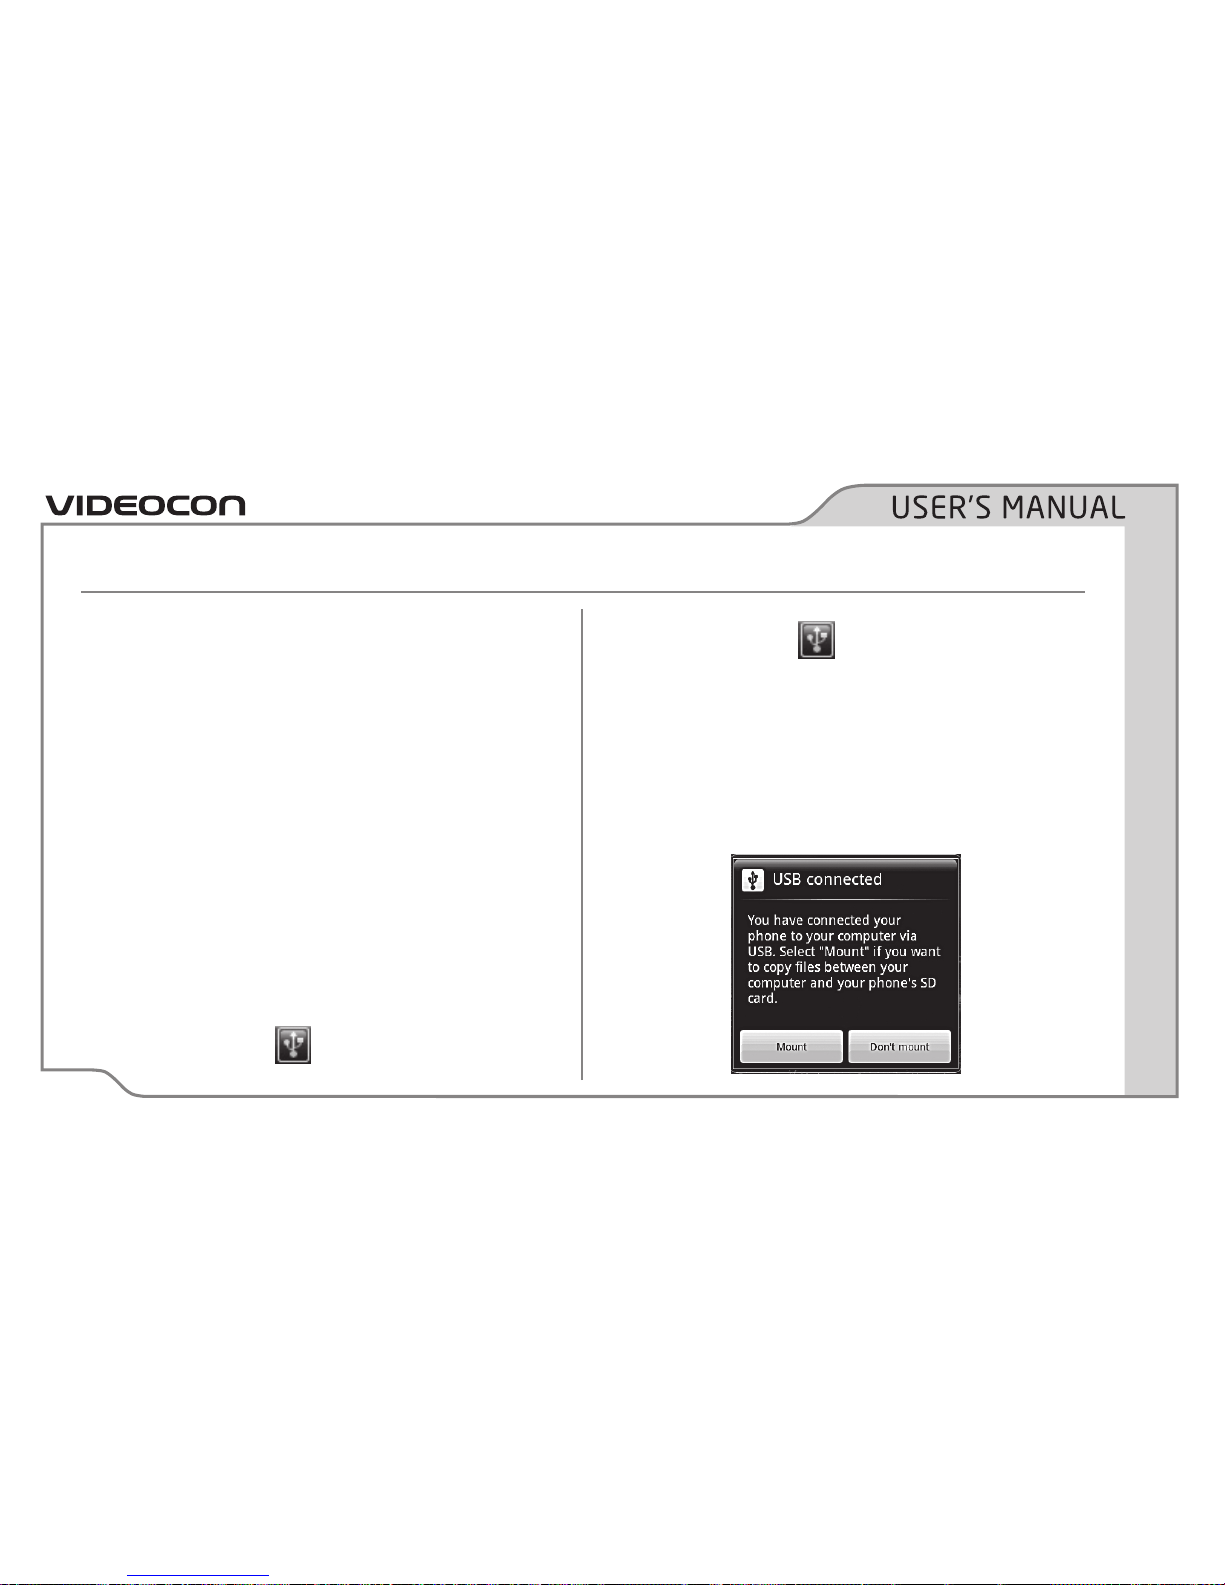
PAGE 84
Use PC Suite to synchronize data between your
phone and computer, use the phone as a modem
for the computer, or view this user manual in the
electronic form.
Before you begin
Connect the micro USB connector of the cable,
to its designated port on the device (top of the
device).
On the phone
Attach the other end to a compatible USB port on
your computer.
1. Once you connect the device to your
computer, the
displays on the device
screen.
MANAGING PHONE FUNCTIONS USING A COMPUTER
2. Touch and drag
to view the Notifications
dialog-box.
The Notification screen confirms that device
is now connected to a computer.
3. Touch USB connected to display the Mount/
Don’t mount screen.
Page 91
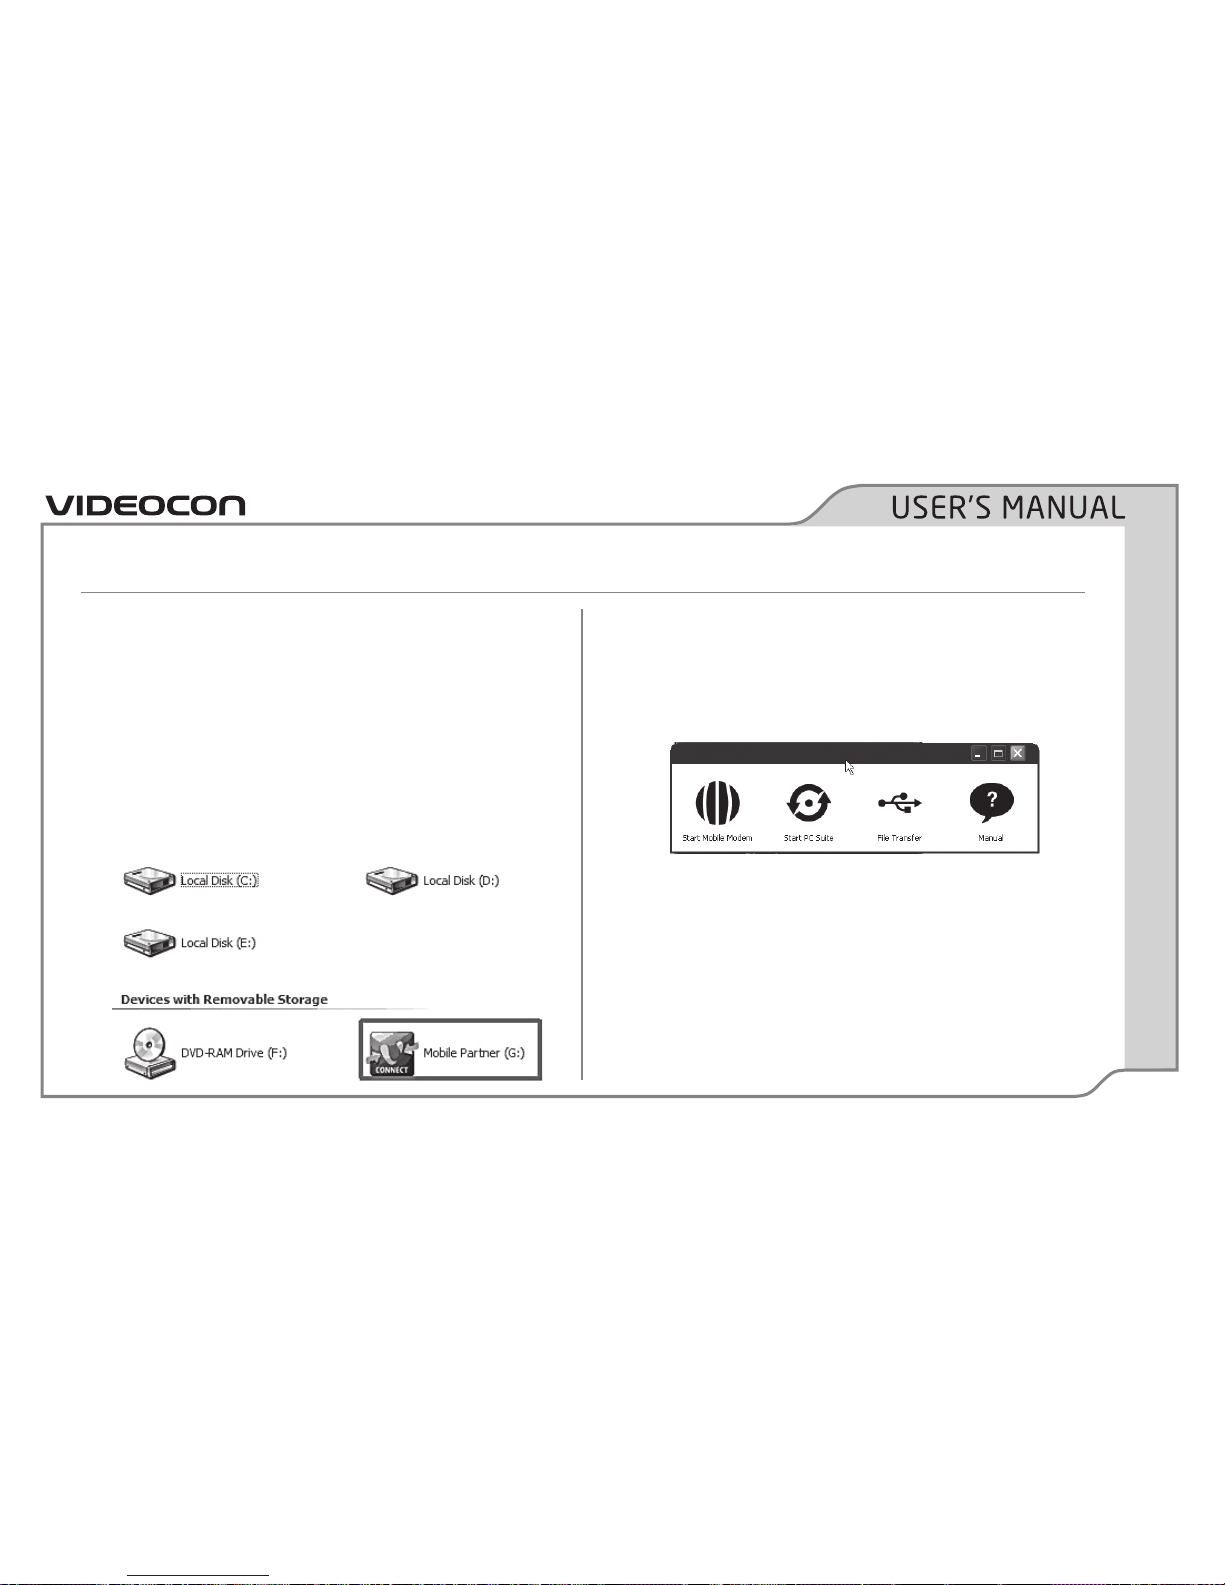
PAGE 85
Touch Mount to have the computer read the
contents of the memory card (if inserted in the
device.)
On the computer
1. On the Windows Desktop, double click
My Computer to view its drives and disk
partitions
MANAGING PHONE FUNCTIONS USING A COMPUTER
2. In the My Computer window, doubleclick V-Connect (icon in the Devices with
Removable Storage pane) to display the
options dialog box.
In the options dialog box:
• Start Mobile Modem: Use the phone as
a modem to browse the Internet from a
computer.
• Start PC Suite: If Use the messaging
functions using the computer.
Page 92
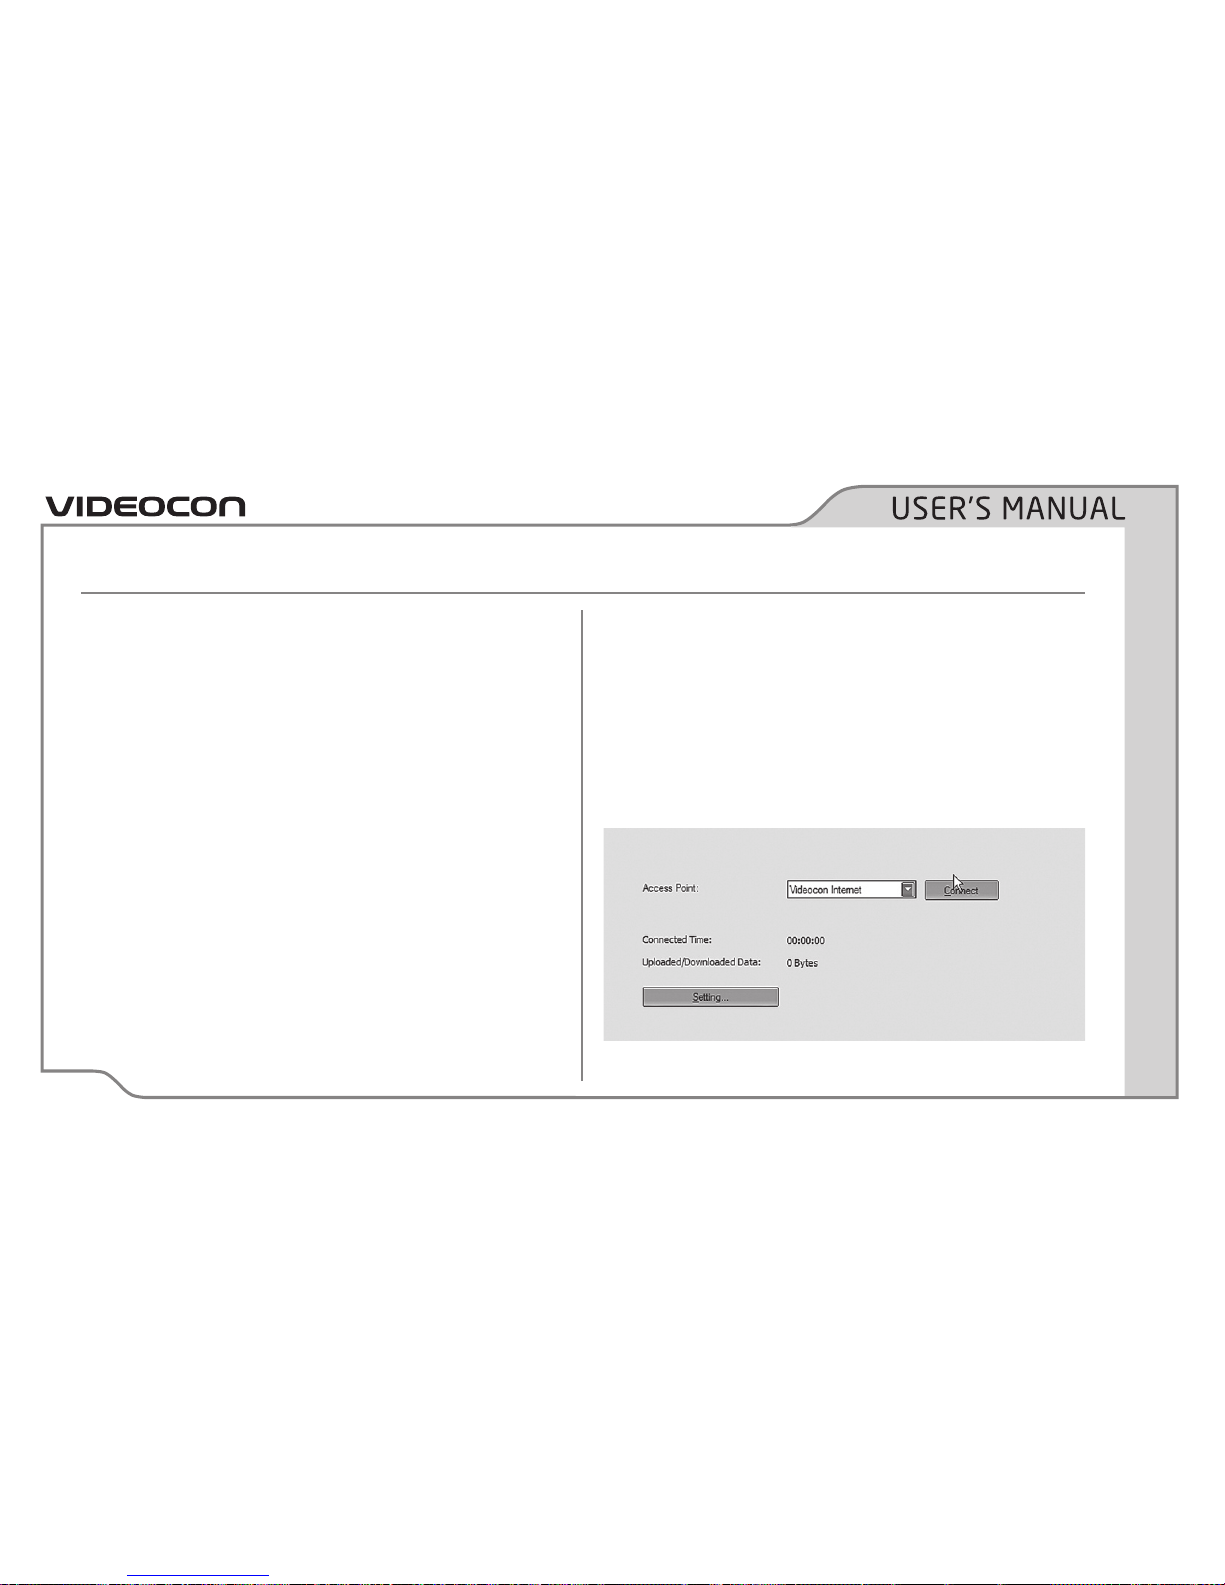
PAGE 86
• File Transfer: Move or copy files between the
phone and the c9omputer. For information on
transferring files between the phone and the
computer, see “Connecting to a computer”
earlier in this document.
• Manual: Click to see an electronic version of
this document.
Start Mobile Modem
Before you can use the phone as a modem, you
must install the necessary driver files on the
computer on which you want to sue the phone
as a modem.
Install modem driver files
To install driver files, click Start Mobile Modem
to begin instilling the drive files. Follow the onscreen instructions to complete the installation.
Once the installation is complete, the Dialup for
Android phones dialog box displays.
MANAGING PHONE FUNCTIONS USING A COMPUTER
Page 93
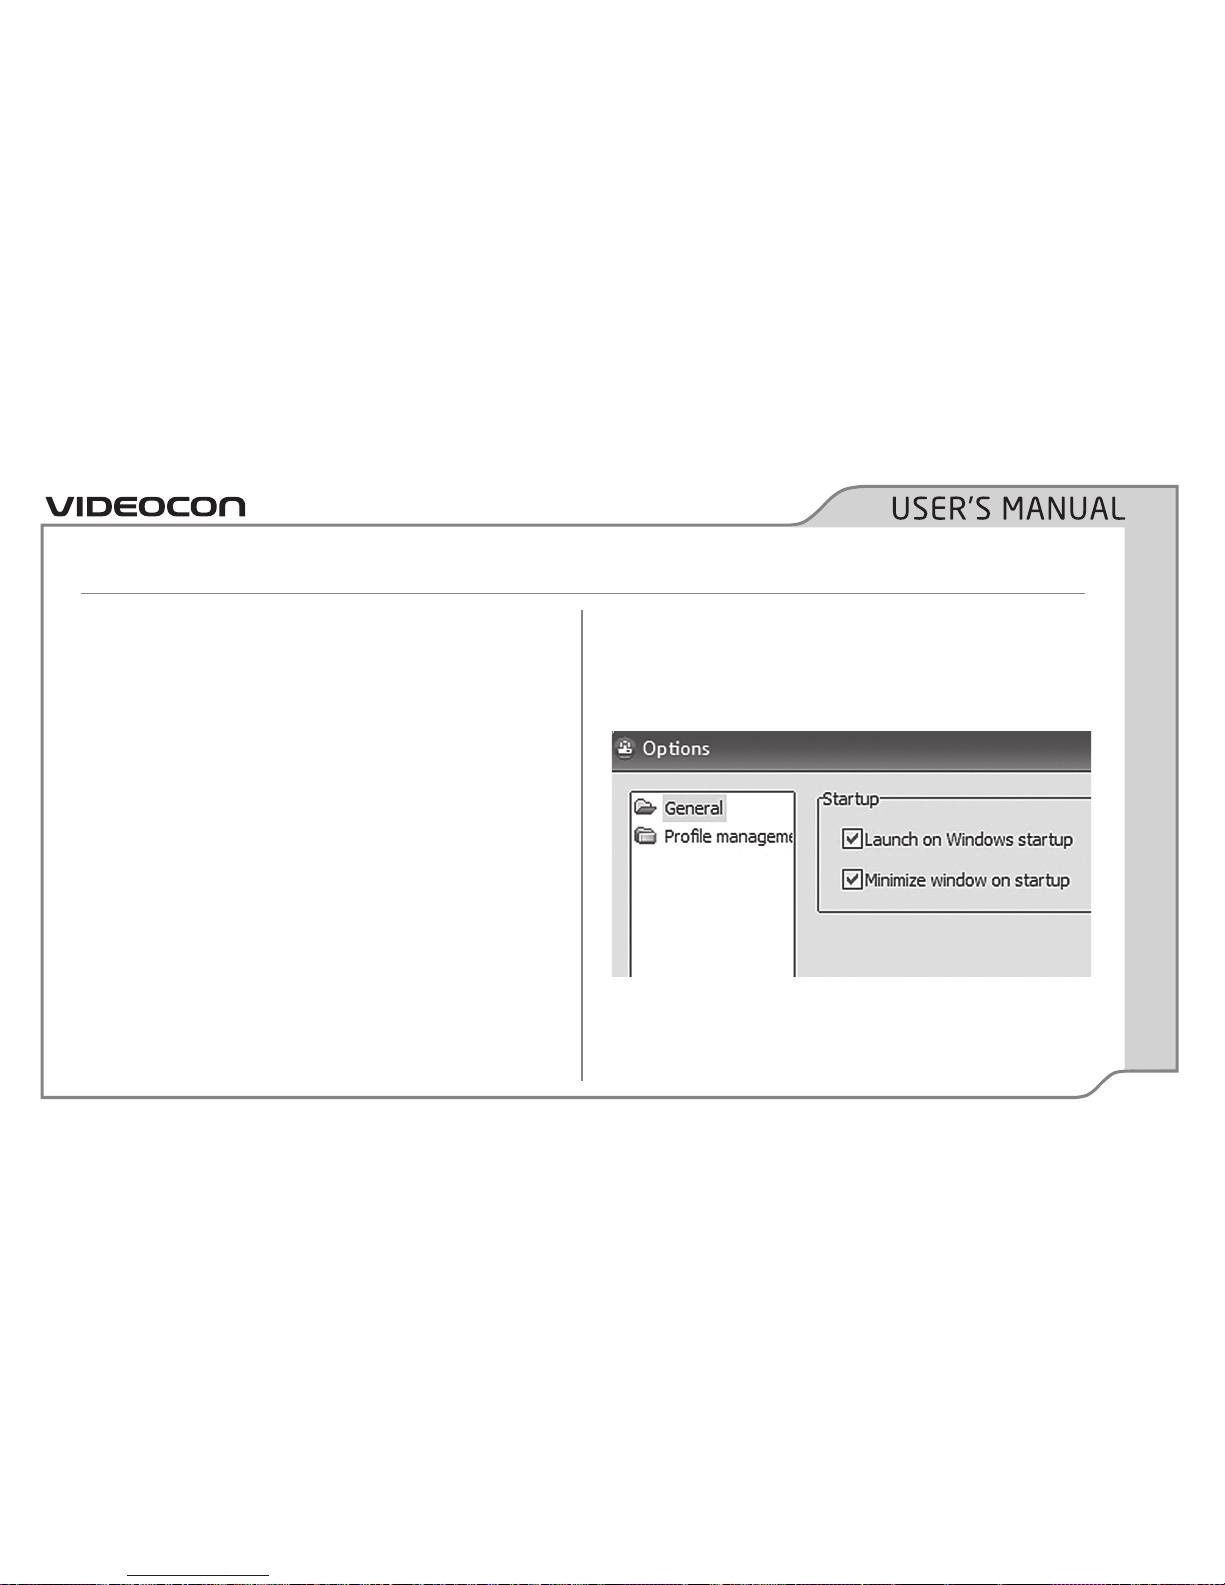
PAGE 87
NOTE:
• You will need to perform the installation
once only.
• Make sure that you have subscribed to the
GPRS data service. Please get in touch with
your network service provider for more
information.
In the Dialup for Android phones dialog box:
• Select the Access Point point that you want
to use.
• Click Settings to customize the access point.
Modifying Settings
1. In the Dialup for Android Handset (on the
computer) click Phone as Modem to display
the Options dialog-box.
2. In the left pane, select General, to view
available options.
Check Launch on Windows Startup to have the
phone automatically each time the computer
is started, provided the phone is connected to
MANAGING PHONE FUNCTIONS USING A COMPUTER
Page 94
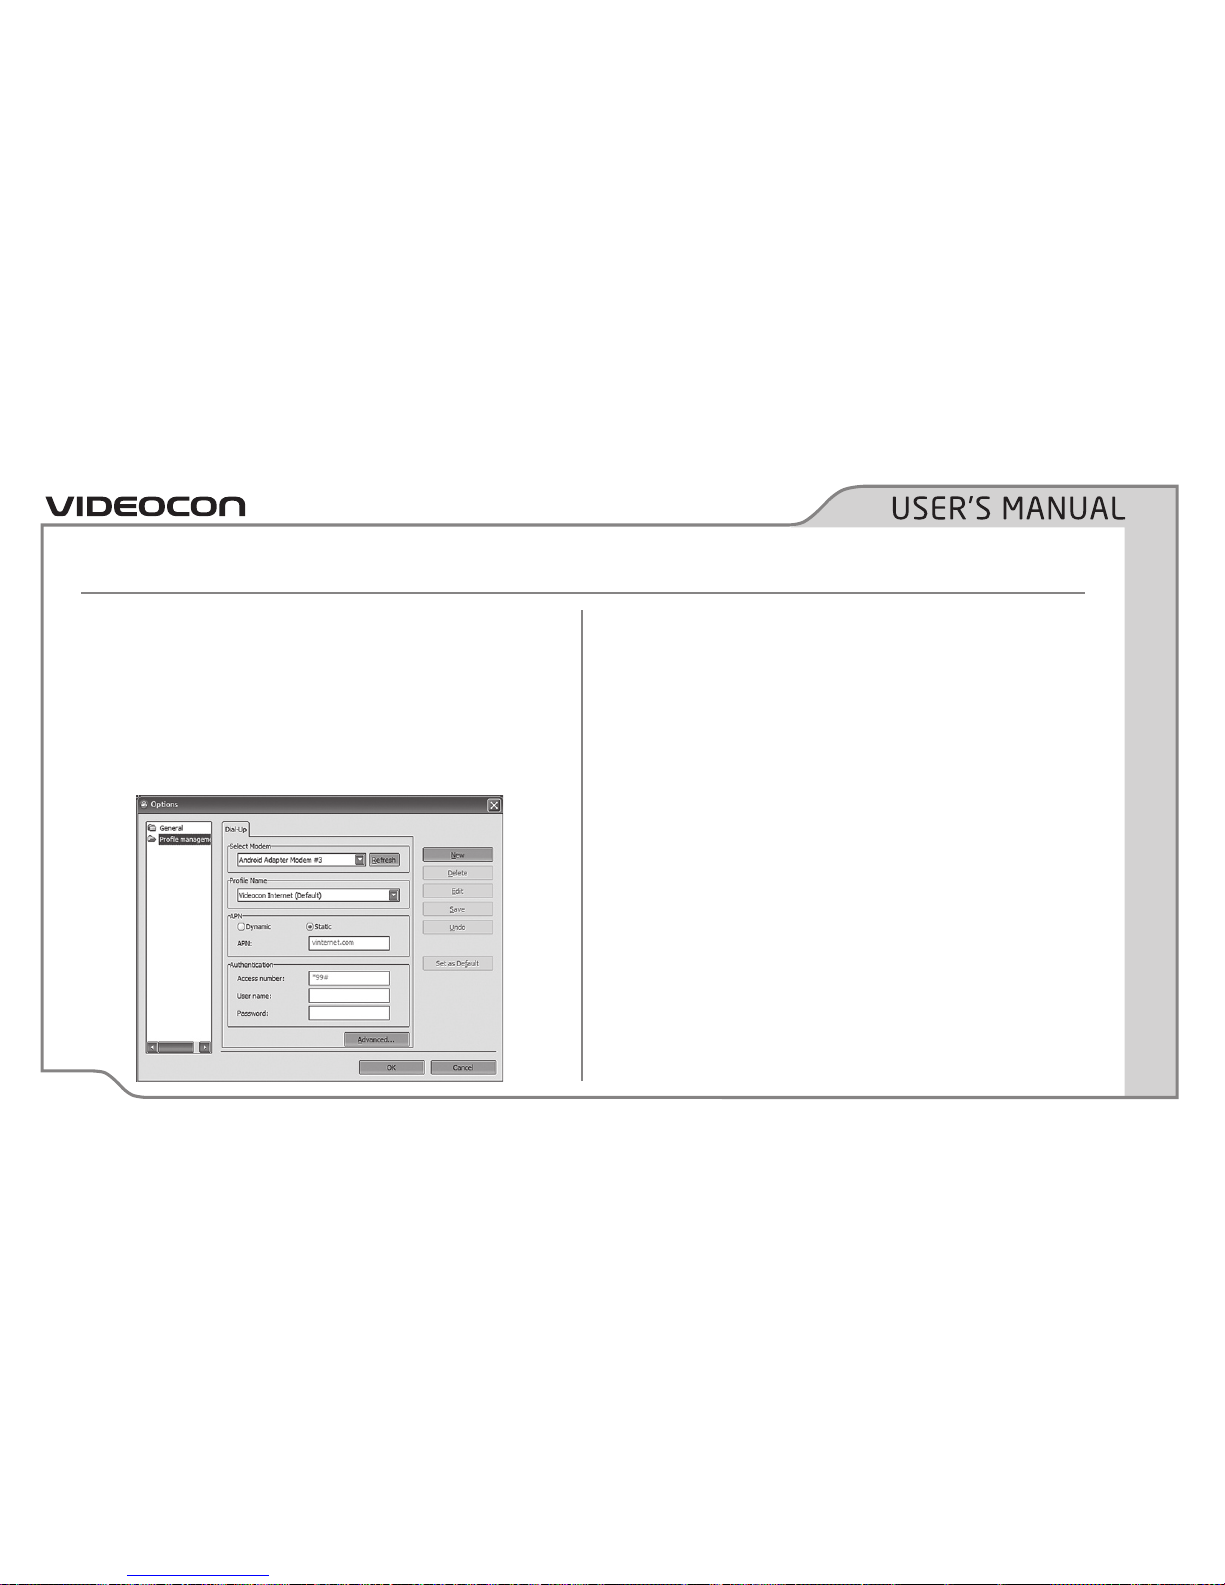
PAGE 88
the computer. Similarly, check Minimize window
on startup to allow the connection window to
minimize to the Windows System tray as an icon
once the connection is established.
3. Click Profile Management to view or edit the
access point settings.
MANAGING PHONE FUNCTIONS USING A COMPUTER
Make the required changes, and click OK to
exit the settings dialog box.
4. Click Connect to dial the connection. Click
Statistics to view the data download a
history, and the r;duration for which you
were connected.
Start PC Suite
Before you can start using the application, you
need to first install it on your computer.
Installing PC Suite
If using for the first time, click Start PC Suite in
the options dialog box to install the application on
the computer. Follow the onscreen Instructions
to complete the installation and display the PC
Page 95
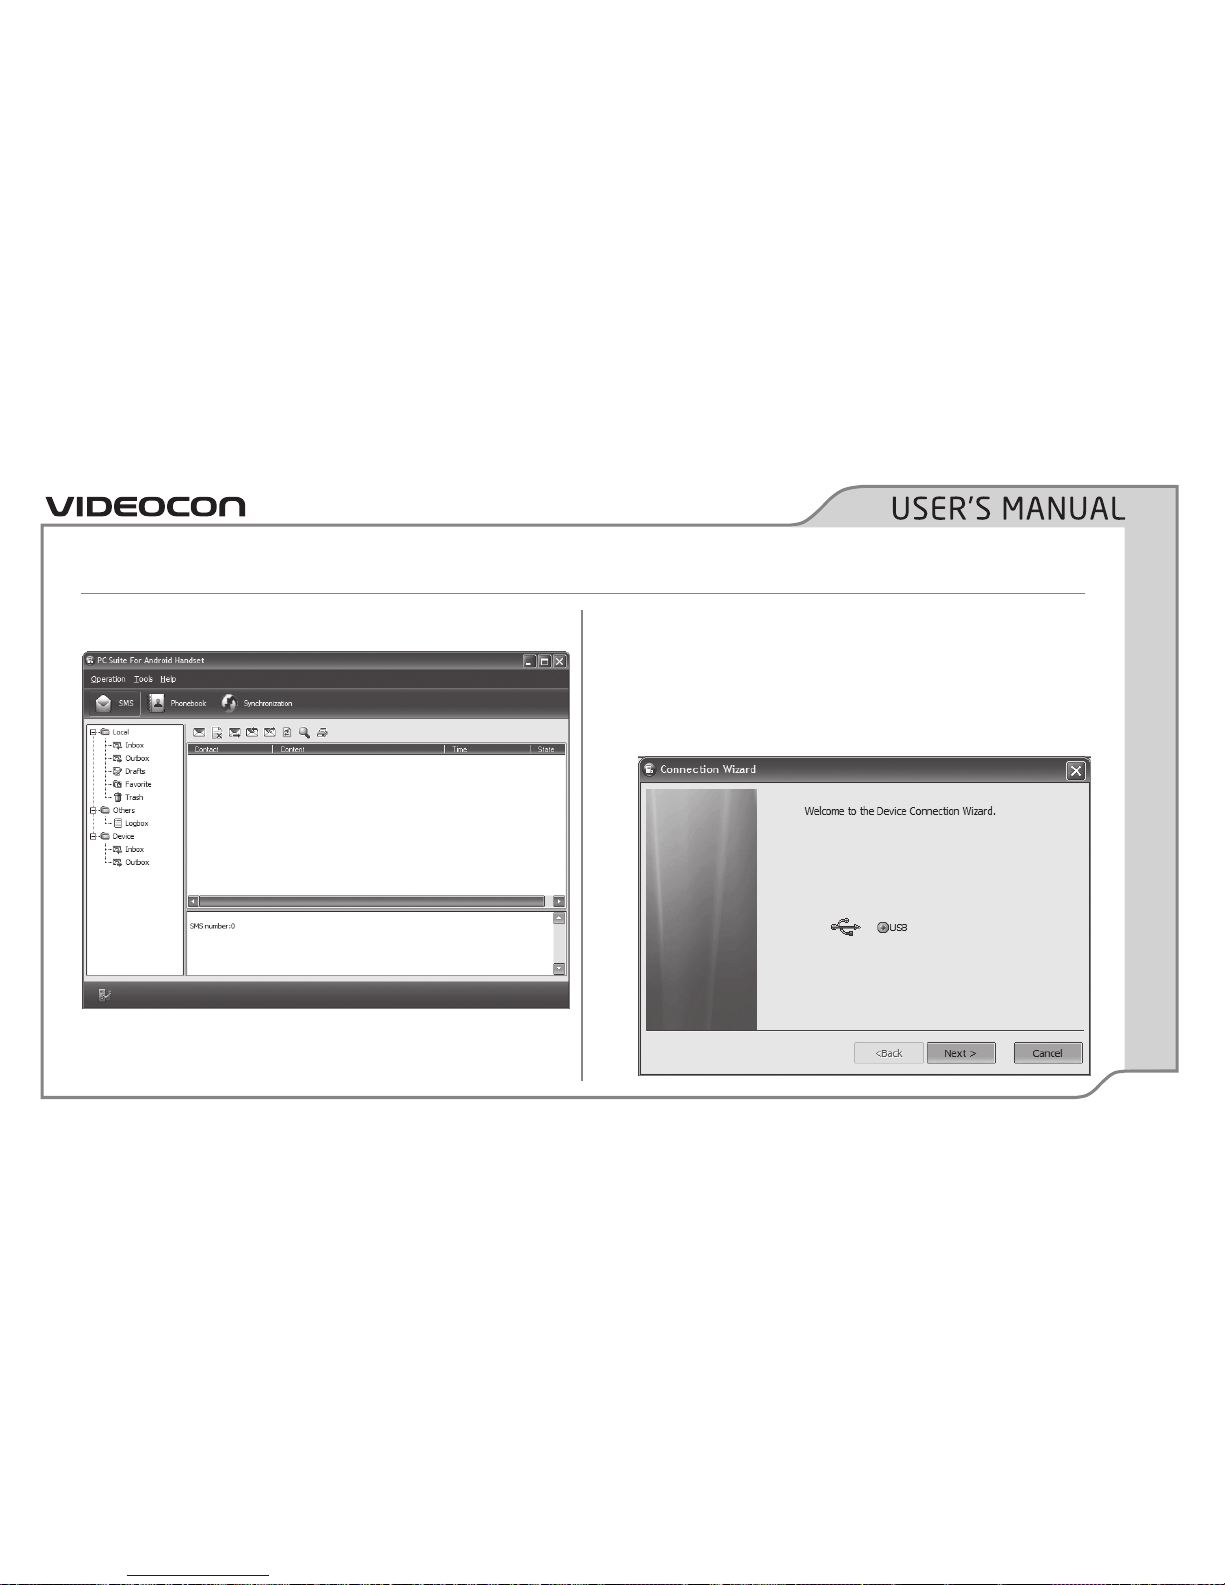
PAGE 89
Suite for Android Handset window.
MANAGING PHONE FUNCTIONS USING A COMPUTER
Now to connect the phone to the computer:
1. In the PC Suite for Android Handset
window, click Tools; Connect Guide start the
Connection Wizard.
Page 96
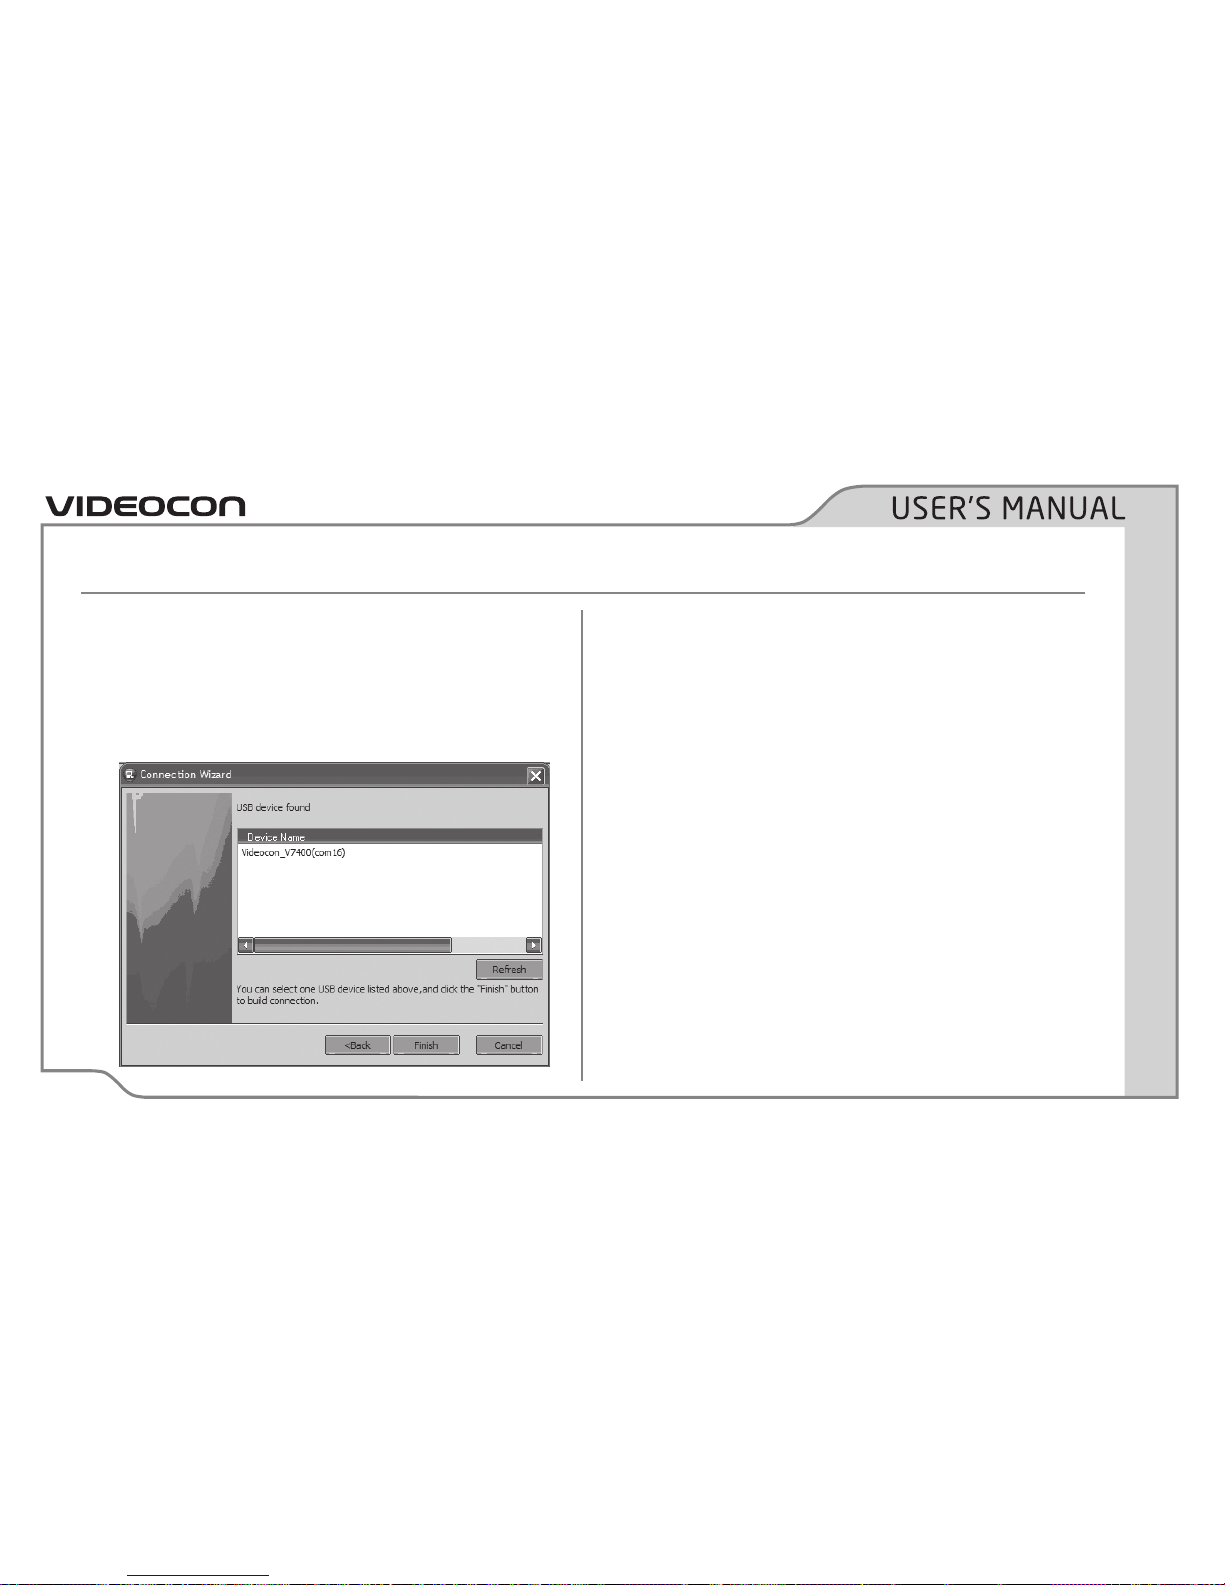
PAGE90
MANAGING PHONE FUNCTIONS USING A COMPUTER
3. Select a device from the phone list, and click
Finish to complete the connection.
NOTE: If you cannot see your device listed,
repeat the process after you restart
2. Click USB as the mode of communication
between the phone and the computer. Click
Next to have the application automatically
search for all devices connected to the
computer.
Page 97
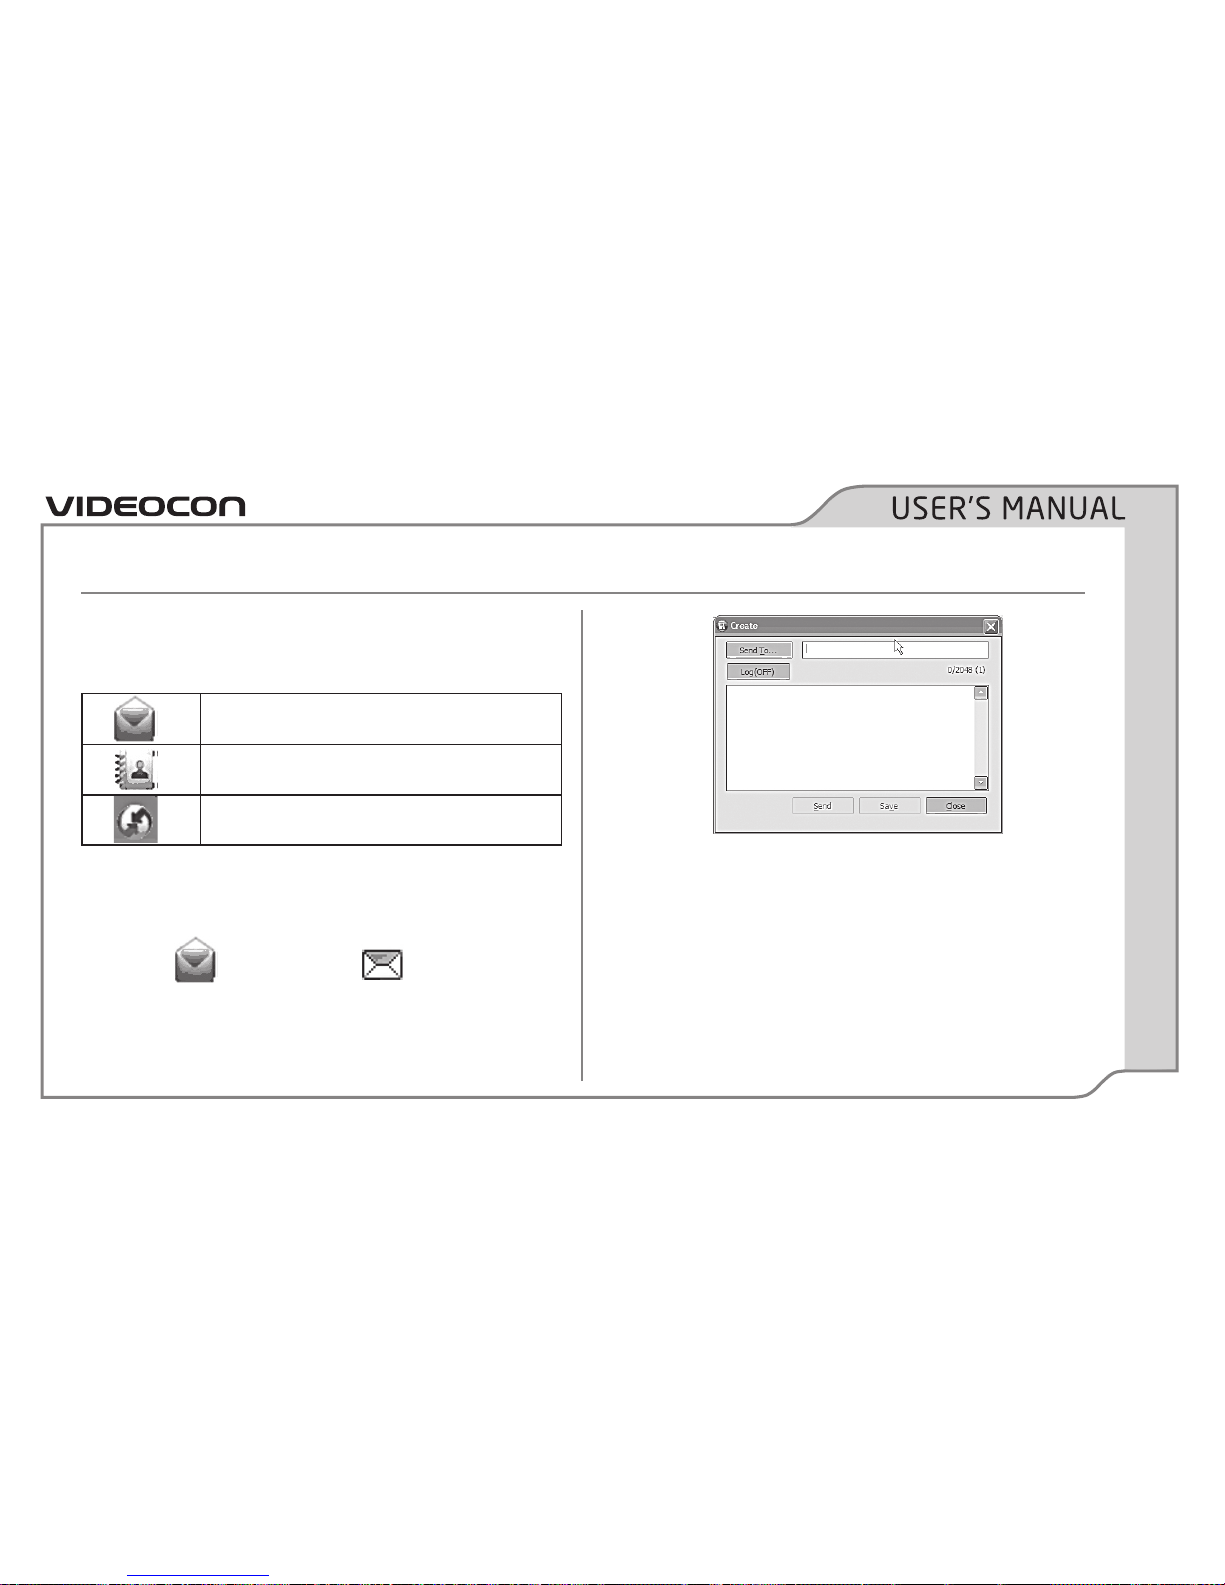
PAGE 91
Working with PC Suite
In the PC Suite window
Manage SMS
View Phonebook
Synchronize data
Composing messages
In the PC Suite window:
1. Click
followed by to display the
Create dialog box.
MANAGING PHONE FUNCTIONS USING A COMPUTER
2. Enter the recipients’ number. You may either
enter it manually or click Send to select one
from the Phonebook.
• Type the message, and click Send to
transmit the message.
• Save to save the message as a draft.
Page 98
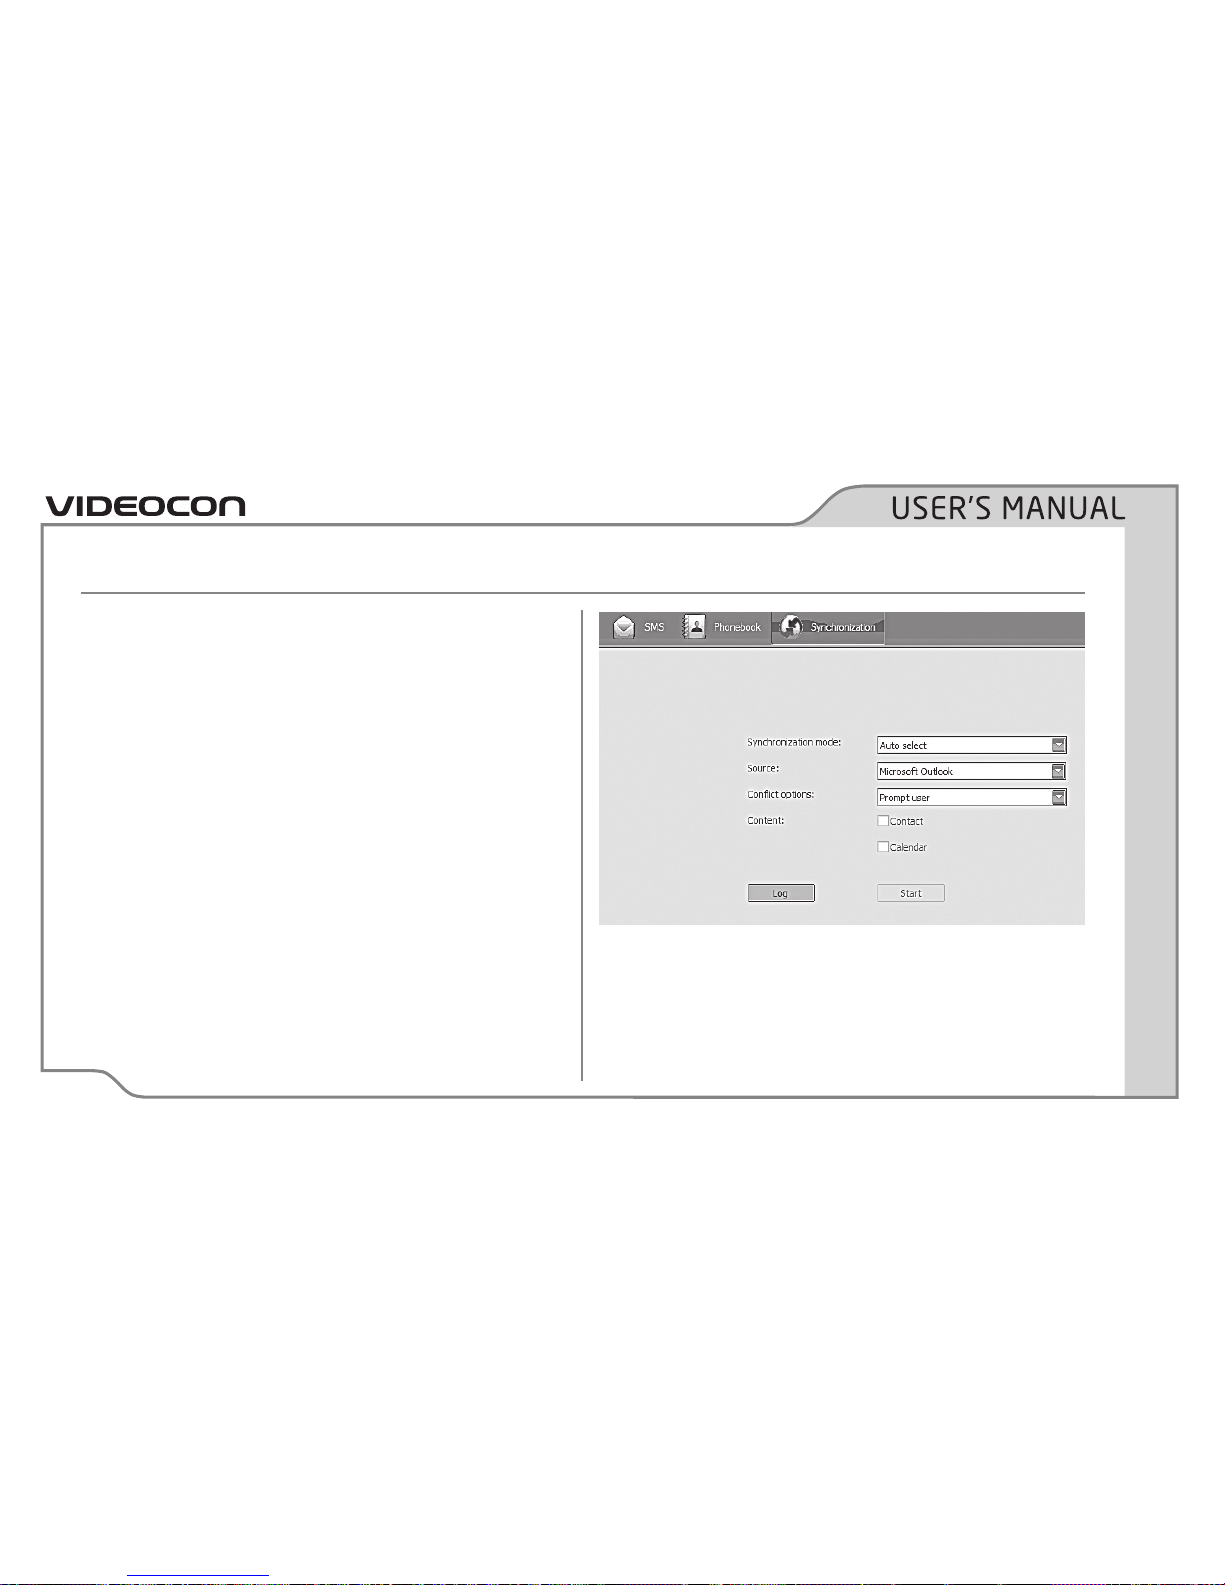
PAGE 92
• Click Cancel to exit the Create a dialog
box without sending a message.
You may also view or delete messages that
are stored in various messaging folders on the
phone, such as Inbox, Drafts, Trash and so forth.
View Phonebook
In the PC Suite window, click Phonebook to
display the contacts stored the phone memory.
You can crate, view, edit, or delete contacts from
the phonebook just as you would use the phone.
Synchronization Tool
In the PC Tools window, click Synchronization to
display the items that you can synchronize.
MANAGING PHONE FUNCTIONS USING A COMPUTER
Your options are:
1. Synchronization modes:
o Auto select: Select an option from the
Conflict options drop-down menu.
Page 99
PAGE 93
o Slow synchronization: Updated contents
on the phone are synchronized to the PC
and vice versa.
2. From the Source drop-down menu, select
the of the email client to use while
synchronizing.
3. From the Conflict options drop-down menu,
select what you want the application to do
if either the computer or the phone already
has the contact or the calendar entry that is
being synchronized. The available options
are:
o Same as PC: Retain the entries that are
available on the computer.
o Same as phone: The entry on the phone
gets preference.
o Ignore: Do not synchronize
o Prompt user: The application will prompt
you to choose a suitable action if it
encounters duplicate entries.
4. Check what data you want to synchronize,
the options are Calendar and Contacts.
5. Click Start to begin synchronization.
NOTE: The time that will be taken to
synchronize depends on the amount of data
that is being synchronized.
6. Click logs to view the information of previous
synchronization jobs.
MANAGING PHONE FUNCTIONS USING A COMPUTER
Page 100
PAGE 94
File Transfer
Add the device as a removable drive on your
computer. Use Windows Explorer on the
computer and work with files and folders as you
would on a standard hard disk partition.
MANAGING PHONE FUNCTIONS USING A COMPUTER
 Loading...