

Page 1

1
User Manual
Pocket PC - V2950
Page 2

2
Table of Contents
PREFACE..............................................................................................................8
SAFETY INFORMATION ...................................................................................... 9
PHONE LAYOUT ................................................................................................ 12
1 GETTING STARTED ....................................................................... 13
1.1 SIM CARD ....................................................................................... 13
1.1.1 Installation........................................................................................ 13
1.1.2 Cautions........................................................................................... 13
1.1.3 PIN and PUK ...................................................................................13
1.2 STORAGE CARD ............................................................................ 14
1.3 ACCESSORIES ............................................................................... 14
1.4 THE BATTERY ................................................................................ 14
1.4.1 Battery use....................................................................................... 14
1.4.2 Battery Charge Level ....................................................................... 15
1.4.3 Charging Batteries ........................................................................... 15
2 BASIC FUNCTIONS ....................................................................................... 17
2.1 SWITCHING ON/OFF ...................................................................... 17
2.2 NETWORK AUTO SETTINGS ........................................................ 17
2.3 MAIN SCREEN ................................................................................17
2.3.1 The Start Menu ................................................................................ 18
2.3.1.1 General functions............................................................................. 19
2.3.1.2 Shortcuts.......................................................................................... 19
2.3.1.3 Major functions ................................................................................ 19
2.3.1.4 The Status Bar ................................................................................. 19
2.3.2 The Display ...................................................................................... 20
2.3.3 Selection of Functions .....................................................................20
2.4 SMART TODAY ............................................................................... 20
2.5 LOCK SCREEN AND KEYPAD ....................................................... 21
2.6 ACTIVESYNC .................................................................................. 21
2.6.1 Installation........................................................................................ 21
2.6.2 To synchronise with PC ................................................................... 22
3 CALL FEATURES ........................................................................................... 23
3.1 MAKING A CALL .............................................................................. 23
3.1.1 From The Display ............................................................................ 23
3.1.2 From Contact List ............................................................................23
3.1.3 From Speed Dial .............................................................................. 24
3.1.4 From SIM Card ................................................................................ 26
3.1.5 From Call History ............................................................................. 26
3.1.6 From Short Messages .....................................................................26
3.1.7 Emergency Calls.............................................................................. 26
3.1.8 International Calls ............................................................................ 27
Page 3

3
3.1.9 Dial Voicemail Number .................................................................... 27
3.2 ANSWER A CALL ............................................................................ 27
3.3 DURING A CALL .............................................................................. 28
3.3.1 Hold ................................................................................................. 28
3.3.2 Mute ................................................................................................. 29
3.3.3 Loudspeaker On .............................................................................. 29
3.3.4 Hands-free ....................................................................................... 29
3.3.5 Notes ............................................................................................... 29
3.4 SIMULTANEOUS CALLS ................................................................ 30
3.4.1 Make A Second Call During The First .............................................. 31
3.4.2 Switch Calls ..................................................................................... 31
3.4.3 Conference Call ............................................................................... 31
4 CONTACTS..................................................................................................... 33
4.1 VIEW CONTACT DETAILS .............................................................. 33
4.2 EDIT A CONTACT ............................................................................ 33
4.3 ADD NEW CONTACT ...................................................................... 34
4.4 SPEED DIAL FOR CONTACT ......................................................... 34
4.5 SEND CONTACTS VIA BLUETOOTH ............................................. 34
4.6 DELETE CONTACTS ...................................................................... 35
4.7 SIM MANAGER ............................................................................... 35
4.7.1 Phone Contacts ............................................................................... 36
4.7.2 SIM Contacts ................................................................................... 36
5 INPUT METHOD .............................................................................................37
5.1 SIMULATION KEYBOARD .............................................................. 37
5.1.1 Use The Keyboard ........................................................................... 38
5.1.2 Use Letter Recogniser ..................................................................... 38
5.1.3 Use Block Recogniser .....................................................................38
5.1.4 Use Transcriber ............................................................................... 39
5.1.4.1 Write Using Transcriber ................................................................... 39
5.1.4.2 Enter Punctuations And Symbols .................................................... 39
5.1.4.3 Edit Text ........................................................................................... 40
5.1.4.4 Rewrite The Text ..............................................................................40
5.1.4.5 Transcriber Gestures ....................................................................... 40
5.1.4.6 The Transcriber Toolbar ................................................................... 41
6 MESSAGING .................................................................................................. 42
6.1 TEXT MESSAGE .............................................................................42
6.1.1 Read Text Messages ....................................................................... 42
6.1.2 Edit Text Message ........................................................................... 43
6.2 OUTLOOK ....................................................................................... 45
6.2.1 Add New E-mail Account ................................................................. 45
6.2.2 Send E-mail ..................................................................................... 47
6.2.3 Send E-mail From Outlook ..............................................................47
6.3 MMS ................................................................................................ 47
Page 4

4
6.3.1 Chang MMS Settings ....................................................................... 49
6.3.2 Receive MMS .................................................................................. 50
6.4 MENU FOR MESSAGING AND E-MAIL.......................................... 50
6.5 FOLDERS FOR MESSAGING AND E-MAIL ................................... 50
7 MULTIMEDIA .................................................................................................. 52
7.1 WINDOWS MEDIA PLAYER MOBILE ............................................. 52
7.1.1 Play .................................................................................................. 52
7.1.2 Now Playing ..................................................................................... 53
7.1.3 Library .............................................................................................. 53
7.1.3.1 Update Library ................................................................................. 54
7.1.3.2 Play From Library ............................................................................55
7.1.3.3 Add File Into Playlist ........................................................................ 55
7.1.3.4 Delete From Library ......................................................................... 55
7.1.4 Options ............................................................................................ 56
7.1.4.1 Playback .......................................................................................... 56
7.1.4.2 Video ................................................................................................ 56
7.1.4.3 Network ............................................................................................ 56
7.1.4.4 Library ..............................................................................................57
7.1.4.5 Skins ................................................................................................ 57
7.1.4.6 Buttons............................................................................................. 57
7.1.5 Supported File Formats ................................................................... 57
7.2 CAMERA .......................................................................................... 58
7.2.1 Cautions In Using Camera............................................................... 58
7.2.2 Shooting Photos .............................................................................. 58
7.2.3 Shooting A Video Clip ...................................................................... 59
7.2.4 Where Photos And Video Files Are Stored ...................................... 59
7.2.5 Options ............................................................................................ 59
7.3 RADIO ............................................................................................. 60
7.3.1 General ............................................................................................ 60
7.3.2 Auto Search ..................................................................................... 60
7.3.3 Listen ............................................................................................... 60
7.3.4 Fine Tune ......................................................................................... 60
7.3.5 Search A Channel ............................................................................ 61
7.3.6 Sound .............................................................................................. 61
7.3.7 Frequency Settings ......................................................................... 61
7.4 RECORDER .................................................................................... 61
7.5 PICTURES AND VIDEOS ................................................................ 62
7.5.1 View Pictures ................................................................................... 62
7.5.2 Options ............................................................................................ 62
7.6 JAVA ................................................................................................ 63
7.7 GAMES ............................................................................................ 64
7.7.1 Bubble Breaker ................................................................................ 64
7.7.2 Solitaire ............................................................................................ 65
7.7.3 Marble Gamer .................................................................................. 65
Page 5

5
8 PROGRAMMES .............................................................................................. 66
8.1 OFFICE MOBILE ............................................................................. 66
8.1.1 Word Mobile ..................................................................................... 67
8.1.2 OneNote Mobile ............................................................................... 68
8.1.3 Excel Mobile .................................................................................... 68
8.1.3.1 New .................................................................................................. 69
8.1.3.2 Skills ................................................................................................ 69
8.1.4 Power Point Mobile .......................................................................... 69
8.2 INTERNET EXPLORER .................................................................. 71
8.2.1 Starting Internet Explorer ................................................................. 72
8.2.2 Menu ................................................................................................ 72
8.3 WINDOWS LIVE ..............................................................................73
8.3.1 Messenger ....................................................................................... 74
8.3.2 Sign In.............................................................................................. 74
8.3.3 Add Participants............................................................................... 76
8.3.4 Block And Unblock Contact ............................................................. 76
8.3.5 Change Online Status...................................................................... 76
8.3.6 Hotmail ............................................................................................. 77
8.3.7 Live Mobile Homepage .................................................................... 77
8.3.8 Windows Live Help .......................................................................... 77
8.4 ACTIVESYNC .................................................................................. 77
8.4.1 Use ActiveSync ................................................................................ 77
8.4.1.1 Sync With PC ................................................................................... 77
8.4.1.2 Sync With Server ............................................................................. 78
8.4.2 Synchronisation ............................................................................... 78
8.4.2.1 Synchronising Inbox ........................................................................ 78
8.4.2.2 Synchronising Appointment ............................................................. 79
8.4.2.3 Synchronising Contacts ................................................................... 79
8.4.2.4 Synchronising Via Bluetooth ............................................................ 79
8.4.2.5 Installing Software On The Phone ................................................... 79
8.5 CALENDAR ..................................................................................... 79
8.5.1 Calendar Views ................................................................................ 79
8.5.2 New Appointment............................................................................. 80
8.5.3 Settings ............................................................................................ 80
8.6 TASKS ............................................................................................. 80
8.6.1 Synchronising Tasks On PC ............................................................ 80
8.6.2 Adding A Task On Your Phone ......................................................... 80
8.7 NOTES ............................................................................................ 80
8.7.1 New Notes ....................................................................................... 80
8.7.2 Adding Voice In Notes ..................................................................... 81
8.7.3 Creating Voice Notes ....................................................................... 81
8.8 INTERNET SHARING ..................................................................... 81
8.9 CALCULATOR ................................................................................. 82
8.10 SEARCH .......................................................................................... 82
8.11 FILE EXPLORER............................................................................. 83
Page 6

6
8.12 GETTING STARTED ....................................................................... 83
8.13 TASK MANAGER ............................................................................ 83
8.14 SPB HOME ......................................................................................84
8.14.1 Quick Dial ........................................................................................ 85
9 SETTINGS ...................................................................................................... 86
9.1 PERSONAL ..................................................................................... 86
9.1.1 Owner Information ........................................................................... 86
9.1.2 Today ............................................................................................... 86
9.1.3 Sounds And Notifi cations .................................................................86
9.1.4 Buttons............................................................................................. 86
9.1.5 Phone .............................................................................................. 87
9.1.6 Menus .............................................................................................. 88
9.1.7 Input ................................................................................................. 88
9.1.8 Lock ................................................................................................. 88
9.2 SYSTEM .......................................................................................... 88
9.2.1 Device Information .......................................................................... 88
9.2.2 Memory ............................................................................................ 88
9.2.3 Remove Programmes ...................................................................... 88
9.2.4 Regional Settings............................................................................. 89
9.2.5 Master Clear .................................................................................... 89
9.2.6 Clock And Alarms............................................................................. 89
9.2.7 Power ............................................................................................... 89
9.2.8 Backlight .......................................................................................... 89
9.2.9 Certifi cates .......................................................................................89
9.2.10 Screen ............................................................................................. 89
9.2.11 Error Reporting ................................................................................ 89
9.2.12 Encryption ........................................................................................ 90
9.2.13 About ............................................................................................... 90
9.2.14 Motion Sensor.................................................................................. 90
9.2.15 GPS ................................................................................................. 92
9.2.16 AGPS Settings ................................................................................. 92
9.3 CONNECTIONS .............................................................................. 93
9.3.1 Beam ............................................................................................... 93
9.3.2 Wireless Manager ............................................................................ 93
9.3.3 Wi-Fi ................................................................................................ 95
9.3.4 Bluetooth.......................................................................................... 95
9.3.5 Connections ..................................................................................... 99
9.3.5.1 GPRS ............................................................................................... 99
9.3.5.2 Dial-Up ...........................................................................................101
9.3.5.3 Connect To PC Through USB ........................................................ 102
10 HELP .......................................................................................................... 103
Page 7

7
PREFACE
V2950 is a communication product running Microsoft® Windows Mobile 6
Professional. To experience the optimum performance of your phone, please read
this users guide thoroughly.
Your phone contains numerous powerful offi ce applications and entertainment
software which help you at work and fulfi l your spare time. Please follow the
guidelines given below:
• To use this phone safely and legally, read the section “Safety Information”
carefully;
• Before using the phone for very fi rst time, charge the battery with the
original charger for 8 to 10 hours. A new battery may reach its peak
performance only after two or three cycles of full charging and discharging.
• Similar to a computer, your phone will perform best when enough memory
is present. Reboot the phone to clear the memory to store its peak
performance.
• Running multiple programmes at the same time may prolong the response
time of the phone. If it starts to react slowly, try rebooting the phone to
recover.
• In the event that the contents of this manual are not consistent with menu
options on the phone, follow the prompts on the phone.
• Some services described in this manual may not be supported by all the
networks. Contact your network operator or service provider for details.
Page 8

8
SAFETY INFORMATION
To use your phone safely and effectively, please read these guidelines carefully:
HANDLING THE PHONE
When you are using the phone, keep a distance of at least 2.5 cm away from your
body. In case there is a need of phone slipcover, belt clip or other accessories
to carry your cell phone, ensure that the accessories are approved by the
manufacturer. Otherwise, it may exceed the upper limit of radio frequency leakage.
ENERGY LEAK OF RADIO FREQUENCY
Your phone is a low-power, wireless transmitter and receiver. After being powered
on, it will periodically send and receive radio signals while its transmission power
is controlled by the network. This device complies with local standards restricting
energy leak of radio frequency.
IN PUBLIC
Some public places, such as hospitals, health resorts or other medical facilities,
post signage prohibiting the usage of cell phones. Heed such warnings and power
off your phone in designated public places.
COMPATIBILITY OF RF INTERFERENCE
Your phone may interfere with other devices that are not properly designed for RF
shielding or confi gured for RF compatibility.
IN AIRCRAFT
Switch the device off and remove the battery when you are in or near an aircraft. It’s
illegal to use cellular equipment on board aircraft since it may cause interference
to aircraft navigation systems and/or networks. Violators may be suited or face
severe penalties.
PACEMAKERS
If you are using a pacemaker, do not carry your phone (while switching on) in a
breast pocket. A minimum separation of 15 cm should be maintained between the
wireless phone and a pacemaker. Use the ear opposite the pacemaker to minimise
the potential for interference. If you have any reason to suspect that interference is
taking place, switch off your phone immediately.
HEARING AIDS
Wireless phones may interfere with some hearing aids. In the event of such
interference, you may consult to your service provider.
OTHER MEDICAL EQUIPMENTS
For other personal health care equipments, consult your service provider.
Consult the manufacturer of the medical device to determine if they are
adequately shielded from external RF energy or if you have any queries.
Page 9

9
ROAD SAFETY
Please comply with local traffi c laws and regulations. If the driving condition is
getting worse, pull off from the road before you make or receive calls. If your
vehicle has airbags keep your phone away from where the infl ated airbags can
reached. Otherwise, you may be seriously hurt by the phone once the airbags
expands.
POTENTIALLY EXPLOSIVE ATMOSPHERES
Switch off your phone when present in any area with a potentially explosive
atmosphere and obey all signs and instructions. These areas include fuel depots
(below deck on boats, fuel or chemical transfer or storage facilities), areas where
the air contains chemicals or particles such as grain, dust or metal powders. They
are usually marked with signs, but not always so.
BATTERY
Any contact of the battery’s exposed electrodes with a conductor, such as jewellery
or keys, may cause damage to possessions or bodily injury.
OTHERS
The phone is comprised of precise electronic circuits, magnets and a battery
system. Caution is advised when handling the components, particularly with
regard to the following:
• Keep the phone and its accessories dry. Your phone is not water-proof.
• Keep the phone away from extreme temperatures.
• Do not place it near a fl ame or a lit cigarette.
• Do not scratch on it.
• Avoid dropping or severe knocking of the phone to prevent damage.
• Keep the device away from computer disks, credit cards, traveling cards or
other magnetic objects, otherwise the message stored in the magnetic disk
may be affected.
• Do not place it on an automobile dashboard, window or where the sun rays
can penetrate.
• Do not remove the battery when the power is on.
• Do not discard the battery in fi re. It may explode.
• Do not place the battery in mouth. It may be poisonous.
• Do not try to disassemble the phone or its accessories.
• Use only approved model applicable batteries. Incorrect batteries may cause
explosion. Follow the manufacturer’s instructions to dispose used batteries.
• Heat is generated by prolonged usage of the headphones and by prolonged
charging of the cellular device.
• A moist or anti-static cloth may be used to wipe or clean the phone. Do not
use a dry cloth that attracts static current.
• Do not use a chemical reagent or a cleanser containing abrasives.
• Avoid damage to the phone’s casing.
• The metal material contained in the phone may cause you in hyper
Page 10

10
susceptibility, which depends on your physique or health status.
• Parts such as liquid crystal display and pick-up head belong to fragile parts,
keep them carefully such that the phone may not be impacted or squeezed.
Page 11
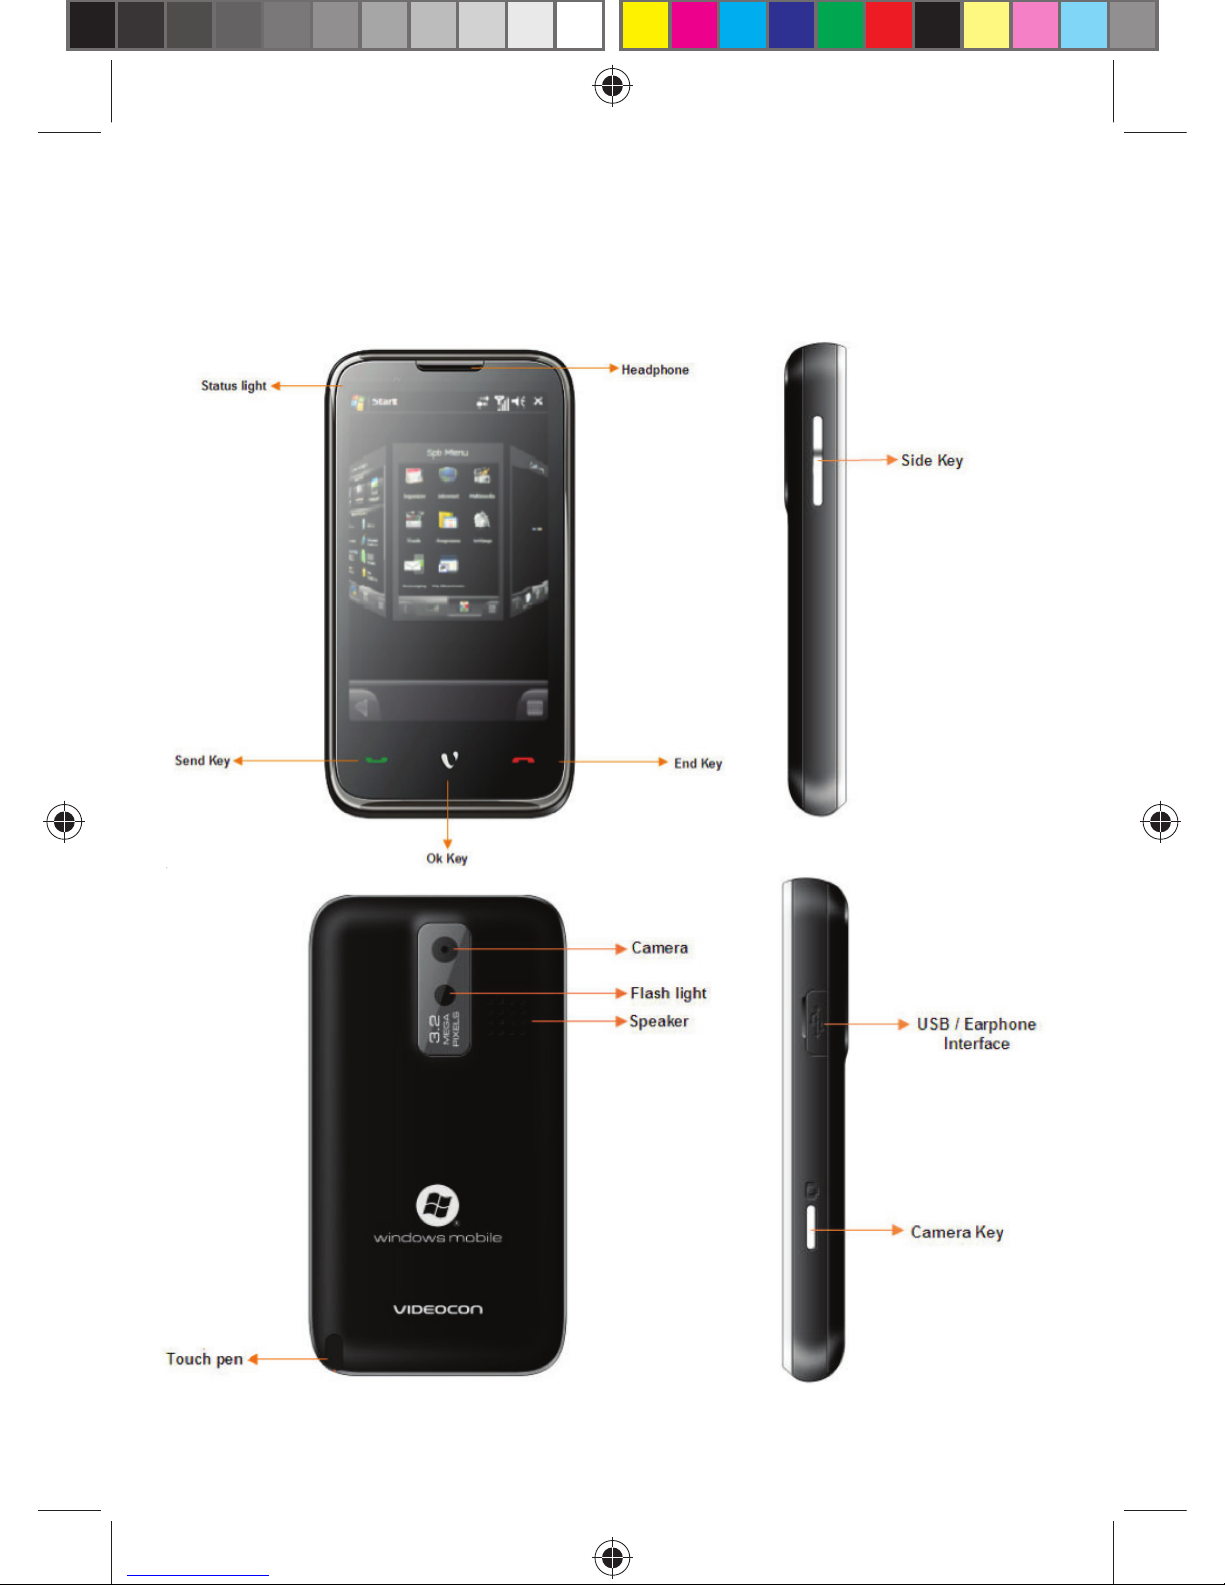
11
PHONE LAYOUT
Page 12

12
1 GETTING STARTED
1.1 SIM CARD
1.1.1 Installation
1. Keep he phone facing down, hold it tightly with both of your hands.
2. Press the battery cover with thumbs, slide it down and then remove the
battery.
3. Insert the SIM card into the slot keeping the contact area of the facing
down.
4. Place the battery back in the groove and make sure its properly
installed.
5. Attach the back cover, slide it until it clicks.
1.1.2 Cautions
• If there’s fault with the SIM card, contact your service provider.
• Keep all SIM cards out of the reach of small children.
• SIM card and its metal contact are susceptible to scratches and it gets
damaged by bending.
• Keep the SIM card away from static electricity, dust and water.
1.1.3 PIN And PUK
PIN
PIN is an identifi cation code that is provided with the SIM card. You
are protected by the PIN from unauthorised use of your SIM card. After
initiating the PIN protection, you are required to enter the PIN everytime
you switch on the phone. After three consecutive incorrect PIN code
entries, the SIM card will be blocked. Nobody can then access the data in
the card or use its services.
PUK
When the SIM card is locked, a PUK (Personal Unlock Key) is required
to unlock it. Ten consecutive incorrect PUK entries will cause permanent
lockup of the SIM card. PUK is usually provided with the SIM card. If you
have lost your PUK or its not provided, contact your service provider.
1.2 STORAGE CARD
A storage card can be plugged into your phone to expand the storage
capacity.
Page 13
13
To install a storage card, simply insert memory card into the slot. If it can’t
be inserted, fl ip it and try again.
To remove the card, push it inwards with your fi nger. It will pop out from the
slot. Do not pull it forcefully.
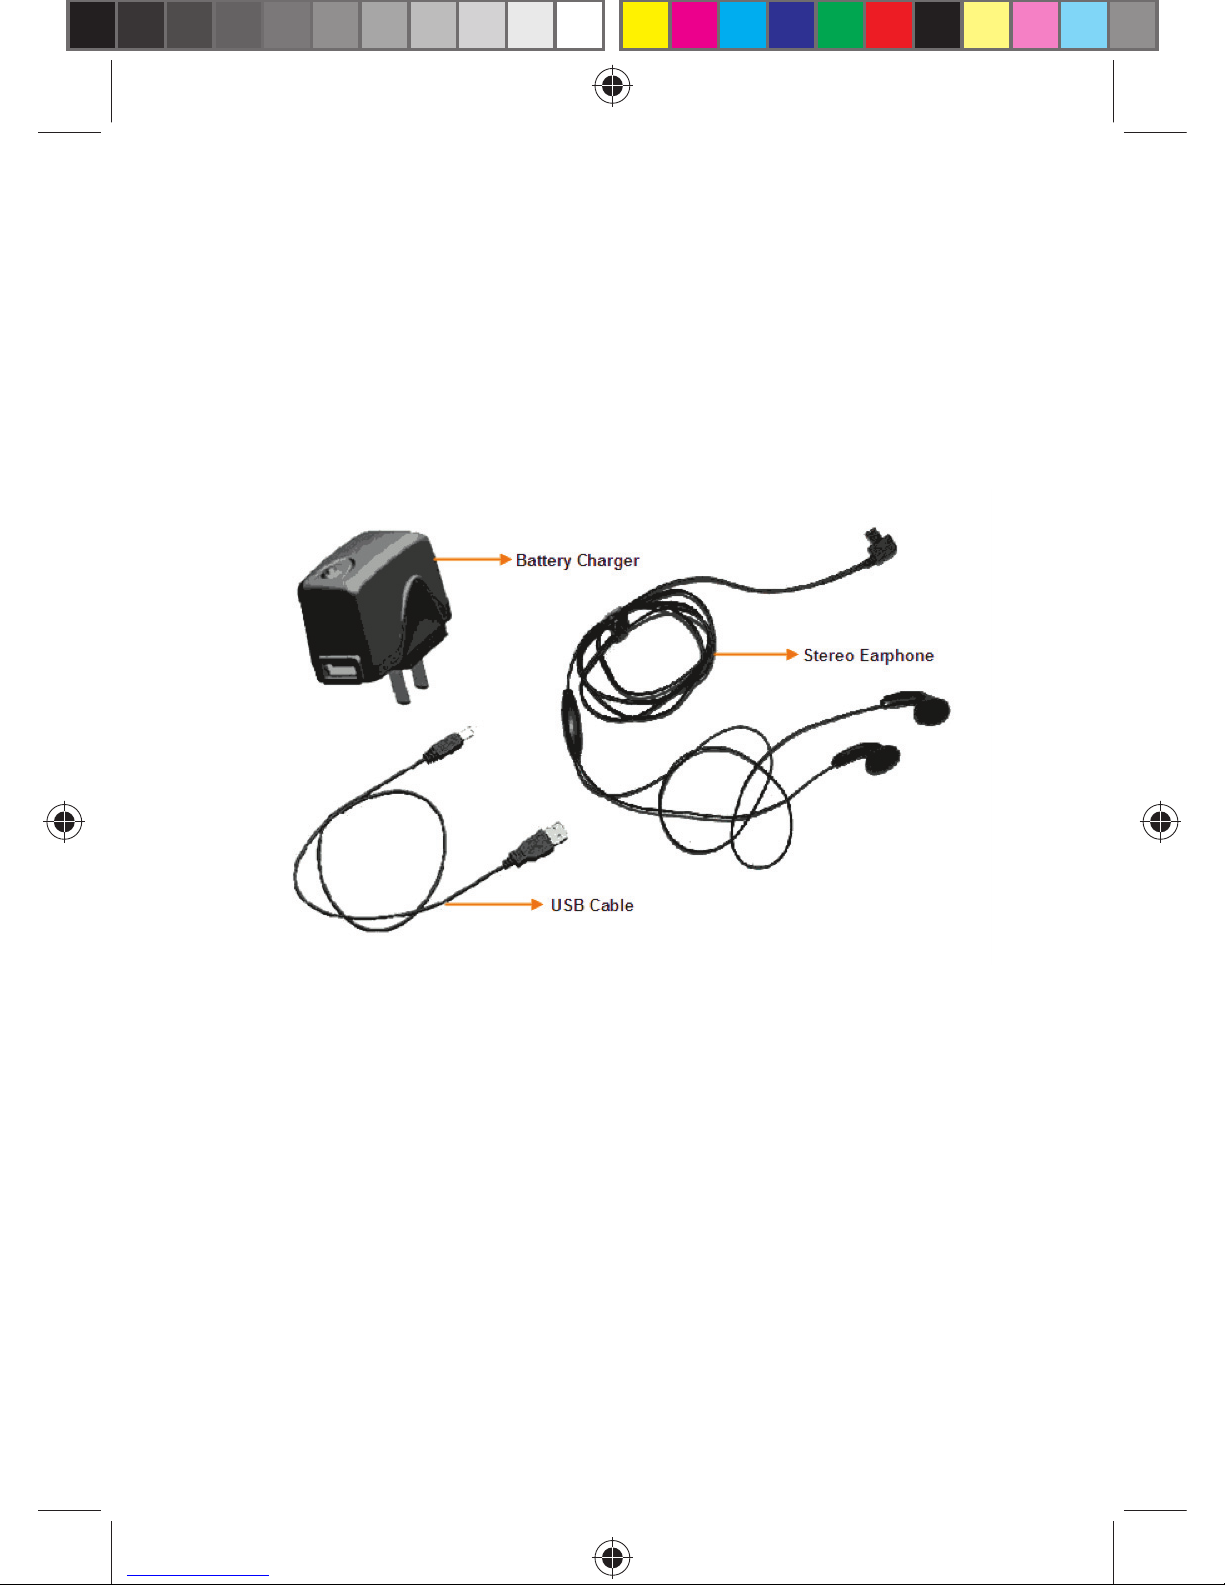
1.3 ACCESSORIES
The main accessories included in the phone are depicted in the fi gure:
1.4 THE BATTERY
1.4.1 Battery Use
• Your phone is powered by a battery which has a limited life. When a
battery has a signifi cant decrease in its working time, replace it.
• Switch off your phone before removing the battery.
• Do not leave the battery on charge for too long, since it may reduce the
battery’s life.
• Excessively high or low temperature will have an impact on the
charging capability. Maintain its working temperature at 0-45°.
• Do not use the battery for other purposes.
• Do not discard the battery in fi re or in water.
• Do not try to disassemble or fi x a battery. Choose the certifi cated or
approved batteries by the manufacturer.
Page 14
14
• Avoid short circuit. Do not use damaged chargers or batteries.
• Hot or cold weather will decrease the battery’s capacity and life.
Excessively high or low temperature may result temporary system halt,
even though the battery is full.
• Dispose used batteries properly. Do not throw them into a dustbin.
1.4.2 Battery Charge Level
1. Tap the battery icon on “Today” screen;
2. To check the charge level, select Start -> Settings and tap Power in
System.
1.4.3 Charging Batteries
If the charge level goes lower than the working voltage, a reminder of low
battery will be prompted on the screen as an alert soun. Data may be lost
and the phone will power off if the battery is not charged or replaced on
time.
A Lithium-ion battery comes with this phone. Its recommended to use the
manufacturer’s charger and batteries for best performance.
1. Plug the charger carefully into the USB charger slot.
2. Connect the charger to the AC outlet while the phone is powering on.
The status indicator is shown in red light. The battery icon on the screen
shows the charging progress. When the phone is powering off and its
still put on charge, the screen shows the charging icon.
3. Before using the battery fi rst time, charge the battery with the original
charger for 8 to 10 hours. A new battery may reach its peak performance
only after two or three cycles of full charging and discharging.
4. After the charging completes, the status indicator shows the charging
stat. If the phone is off, the screen displays a notifi cation of completion.
5. Disconnect the charger with the AC outlet and the phone.
A USB cable can be used to charge the battery. The voltage on
the PC’s USB port, however, does not fully meet the requirement
for charging the battery therefore it can have a negative impact
on the battery’s life span. Thus, a battery charger is preferred.
!
Note:
Page 15
15
2 BASIC FUNCTIONS
2.1 SWITCHING ON/OFF
To switch on or off your phone, press and hold the On/Off key for a couple
of seconds.
If there’s no SIM card when switching on, a reminder prompts.
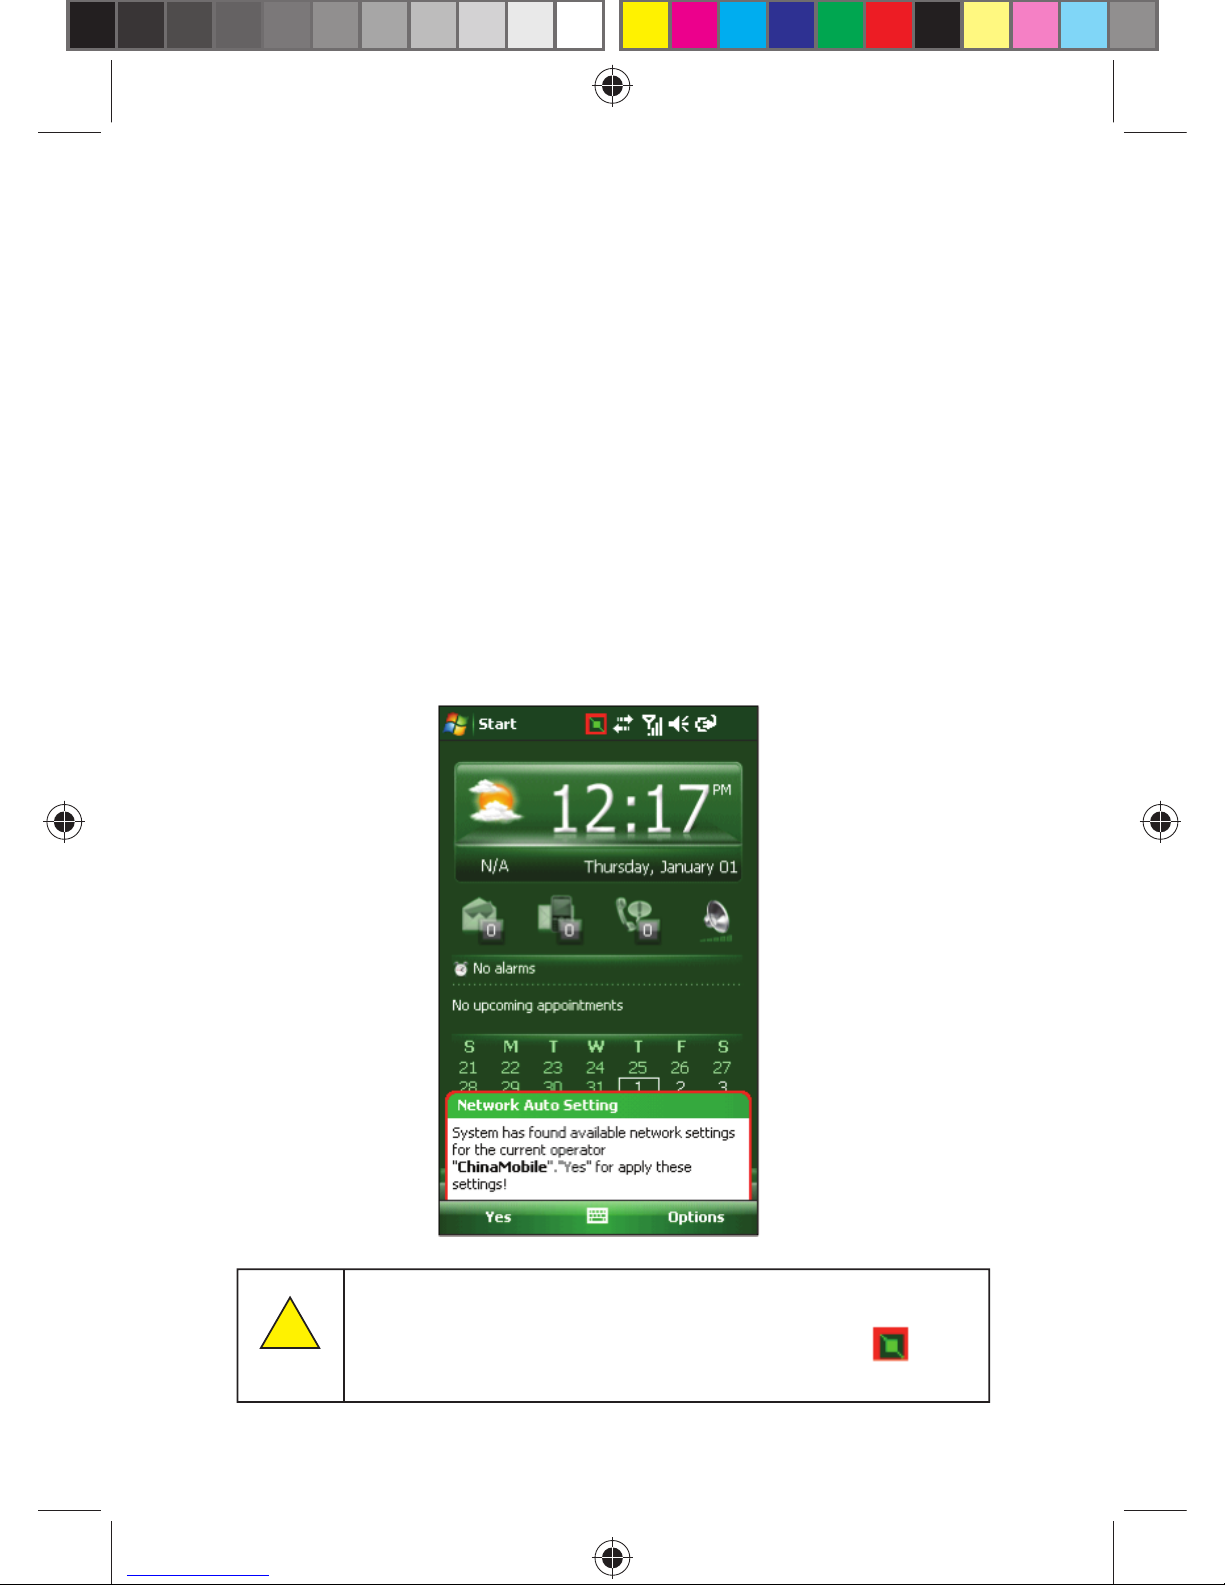
2.2 NETWORK AUTO SETTING
When you fi rst switch on your phone the power supply will pop-up on
screen to automatically setup the network.
Network confi guration can automatically setup all kinds of connections,
such as: GPRS, WAP and MMS, the user need not manually set the
network confi guration.
Internet pop-up box is automatically set, when prompted, choose yes to
access.
If you do not see the prompt box, click on the title bar .
!
Note:
Page 16
16
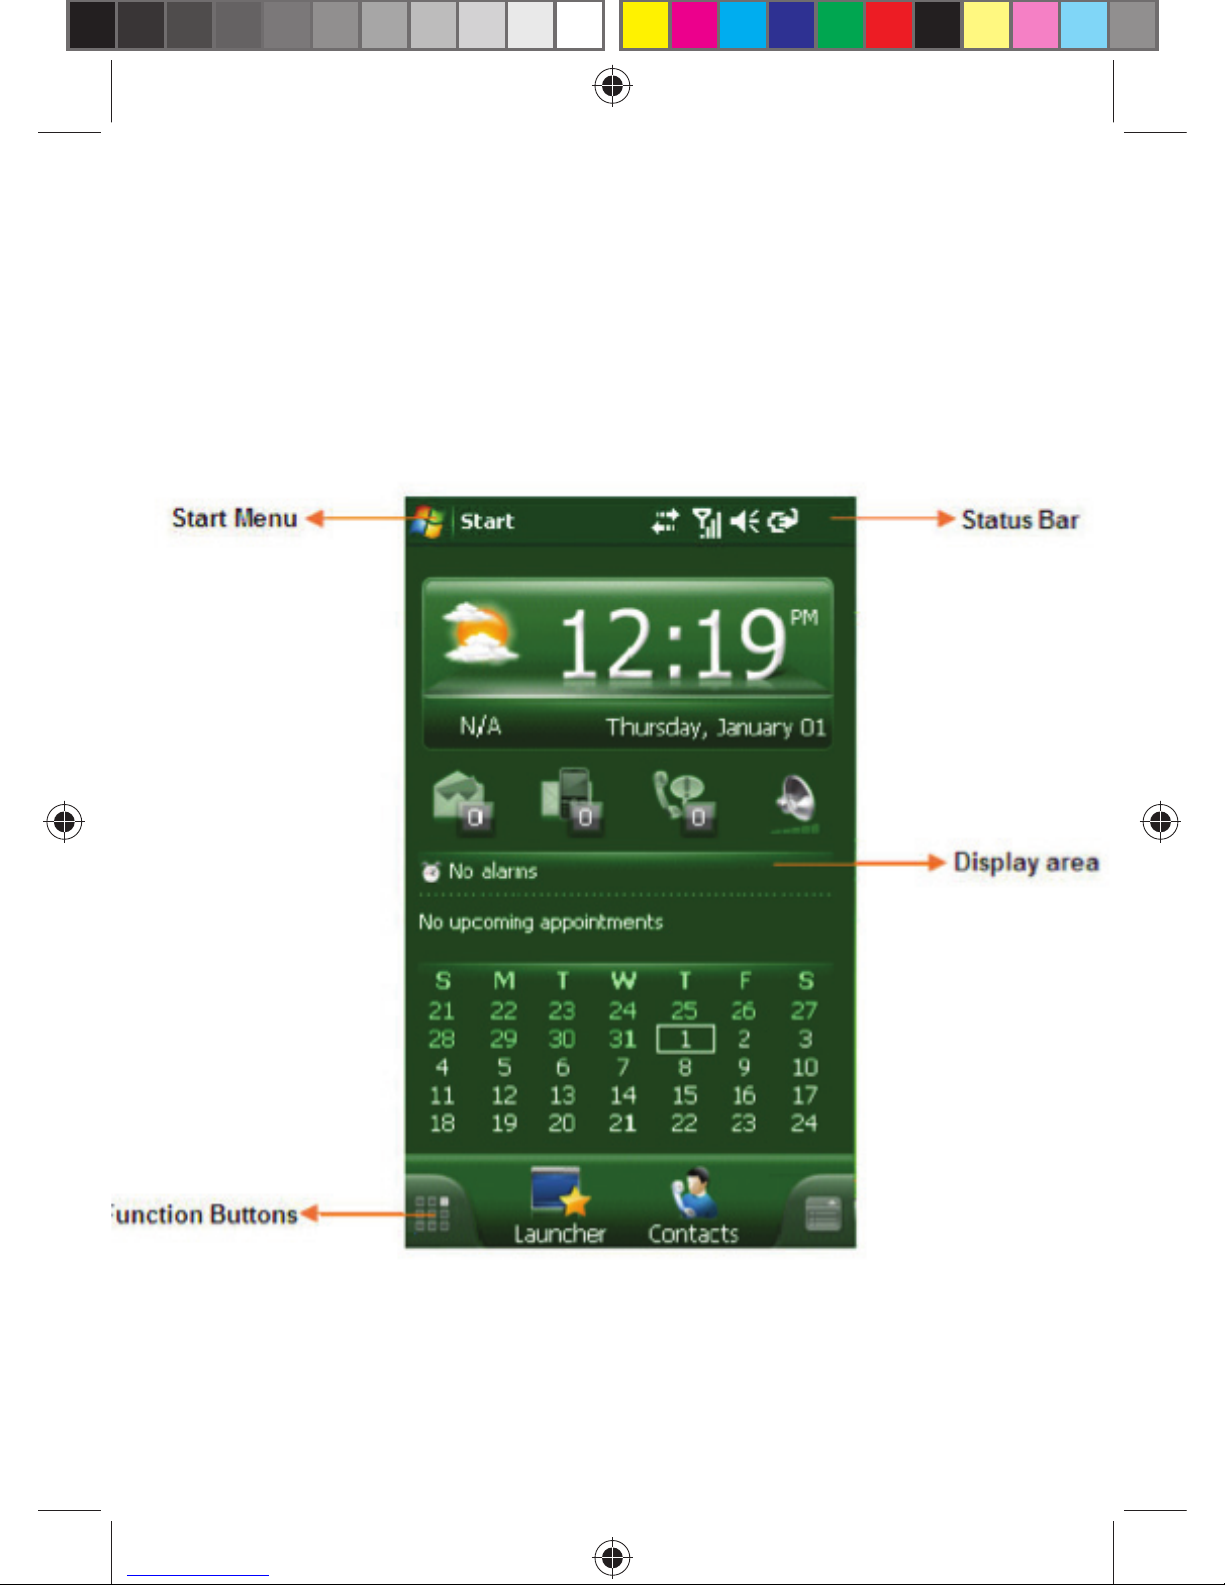
2.3 MAIN SCREEN
After the phone is switched on, the “Today” screen gets displayed.
Page 17
17
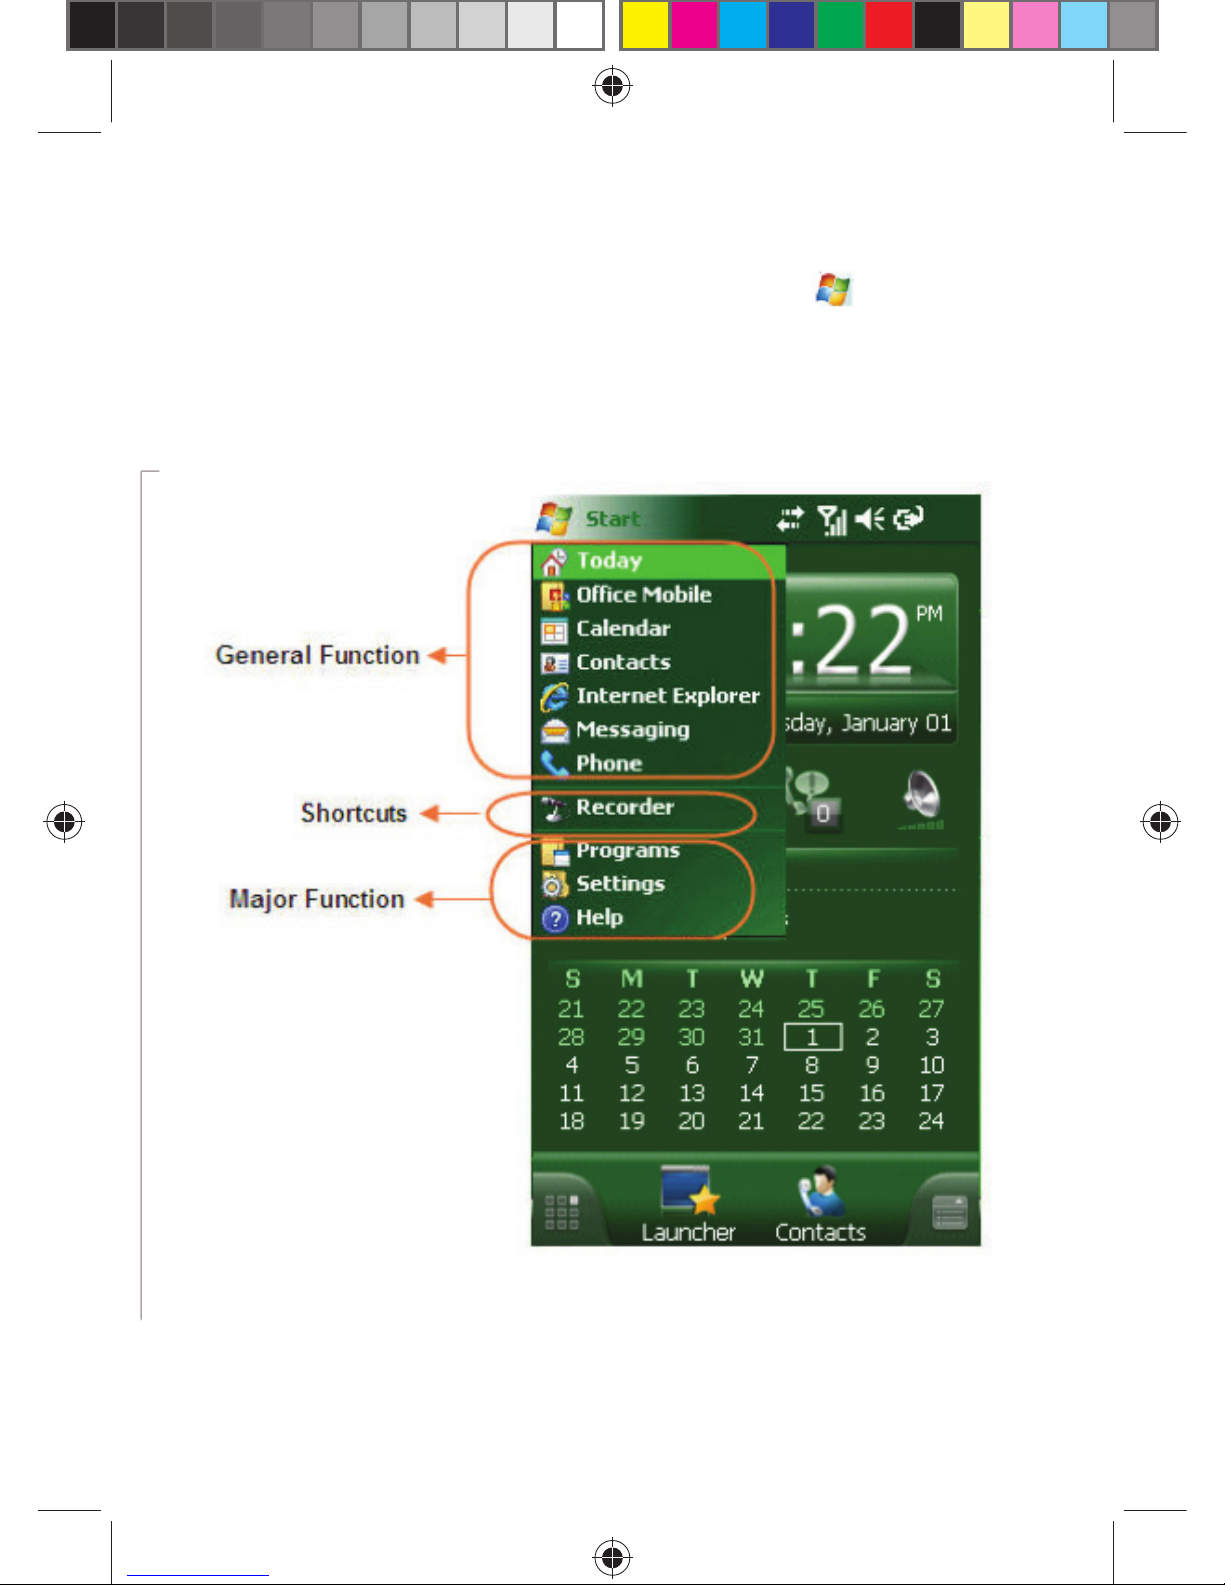
2.3.1 The Start Menu
All the functions can be found in the Start menu. Click on the top left
corner of the screen with the touch pen to display the menu which includes
shortcuts, general and major functions.
Page 18
18
2.3.1.1 General functions
General functions are listed. Tap with the touch pen or press the navigation
key to select an option. For more information on these functions, refer to
the following sections.
2.3.1.2 Shortcuts
It shows the shortcut icons of the latest fi ve functions performed, which
may vary everytime you use the phone. Tap with the touch pen or press
the navigation key to select an option.
2.3.1.3 Major Functions
You can browse all the applications that have been installed and
confi gured on the phone and get instructions on how to use the device.
Options are:
Programmes – View and use all the available features.
Settings – Confi gure functions of the phone.
Help – View the online-help.
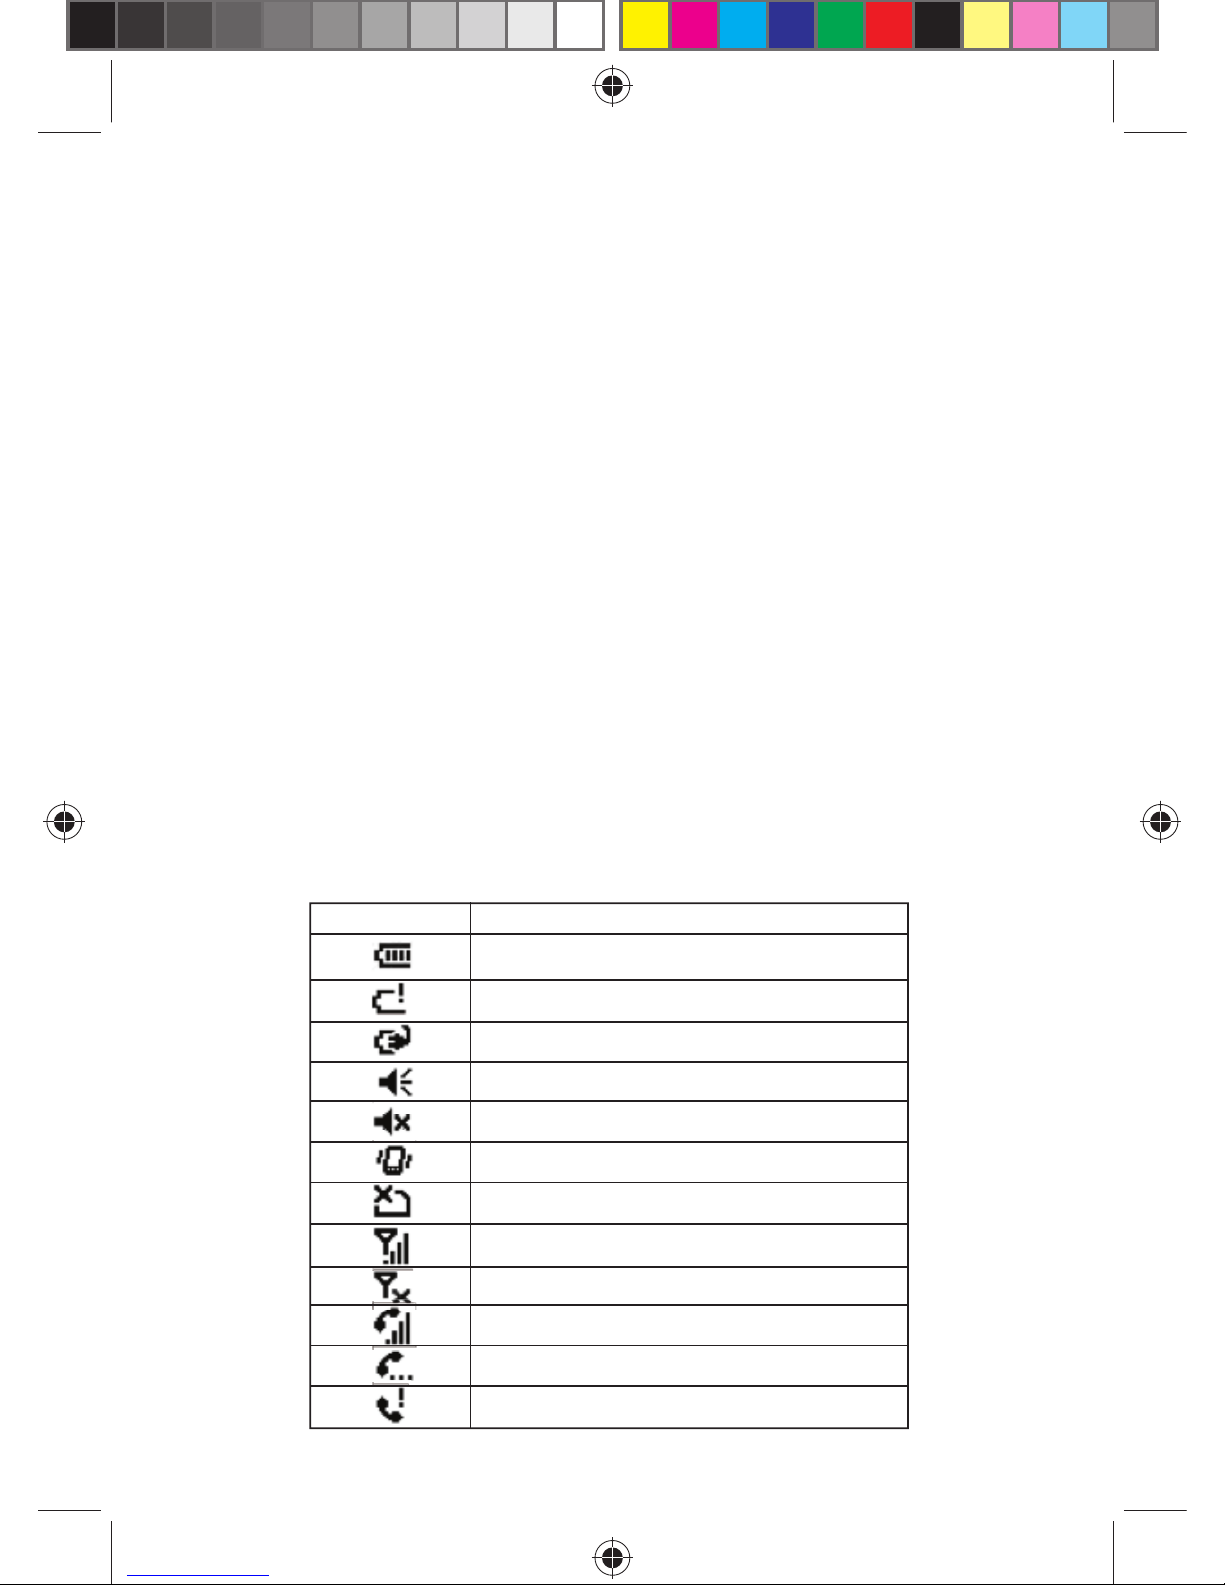
2.3.1.4 The Status Bar
Icons in the status bar are shown to display working status including
battery charge level, signal strength, GPRS and Bluetooth. The status bar
icons are listed below:
Icon Description
Indicates the battery is fully charged
Indicates the battery is very low
Battery charging
Sound on
Sound off
Ring in vibration mode
No SIM card
Indicates maximum signal strength
No Signal
Voice call in progress
Call on hold
Missed call
Page 19
19
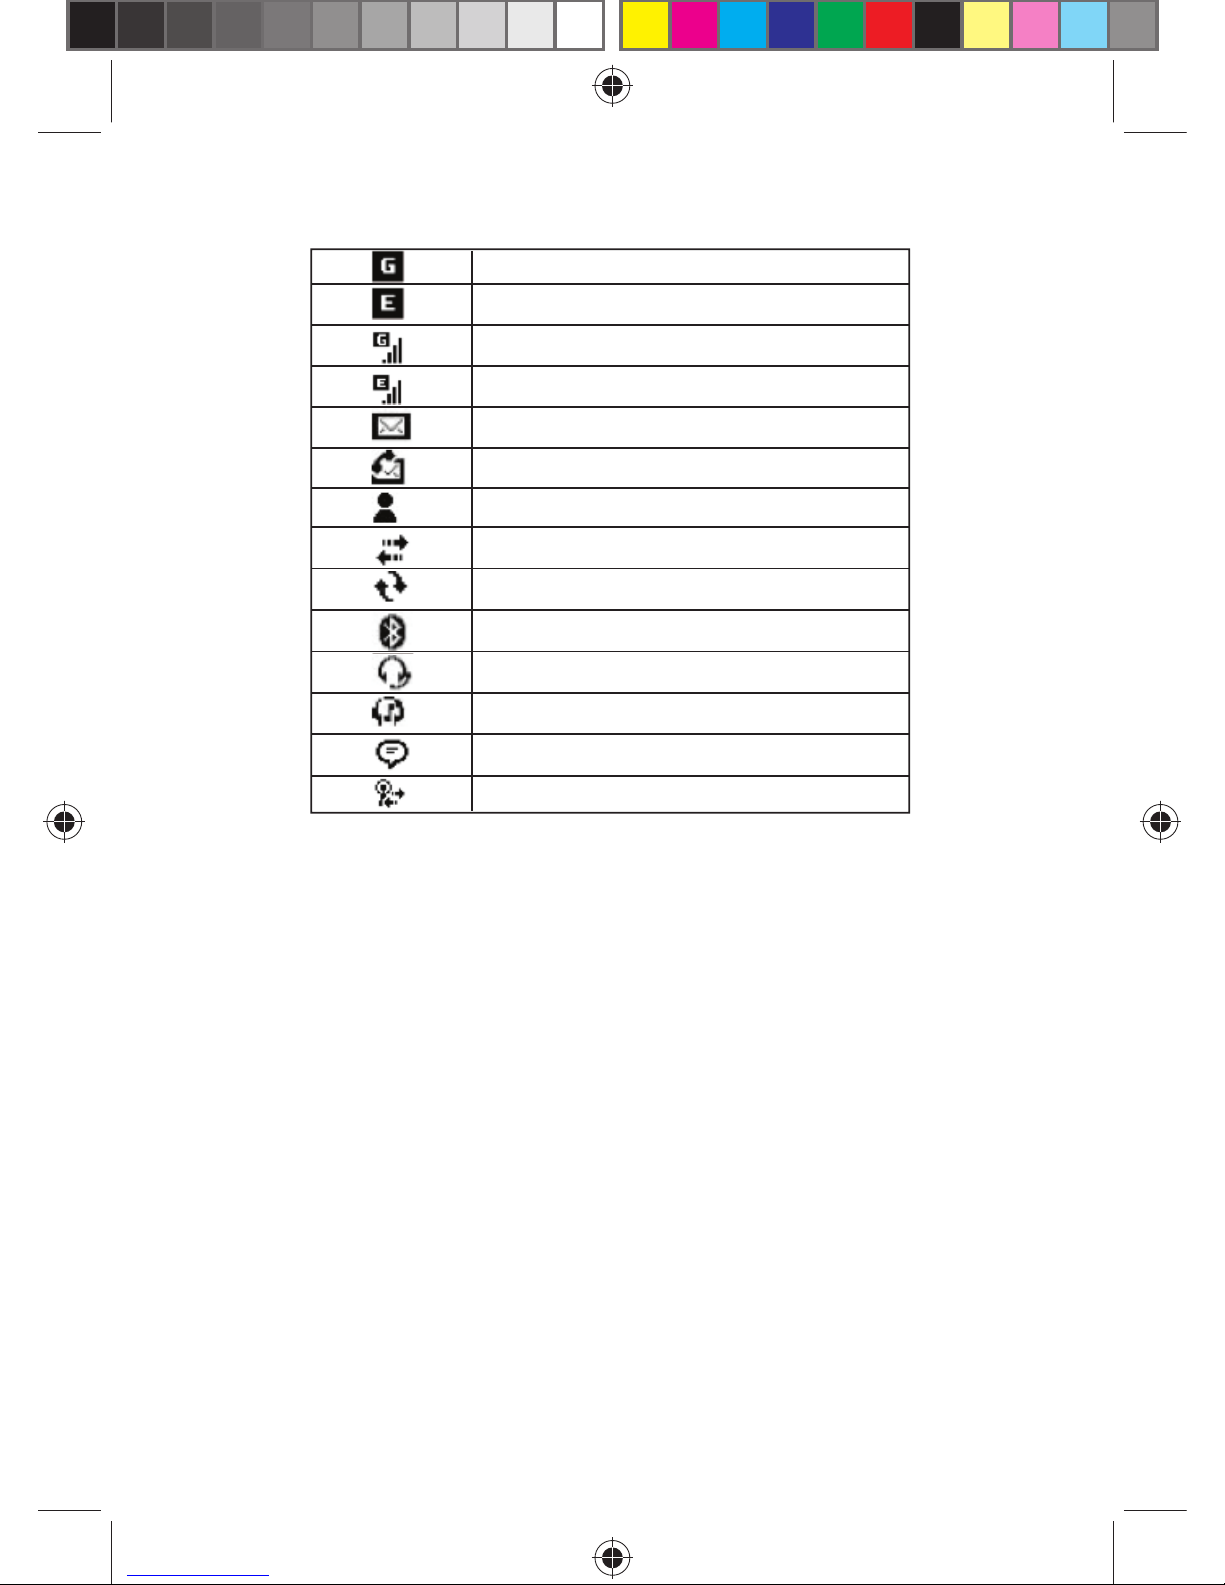
GPRS available
EDGE available
GPRS connected
EDGE connected
Unread message
New voice message
New IM
Connection is active
Synchronisation in progress
Bluetooth enabled
Bluetooth voice gateway
A2DP
Multiple reminders
Wi-Fi connected
2.3.2 The Display
You can see information about the phone on the display. Use the touch
pen to select an option.
2.3.3 Selection Of Functions
The functions may vary with the phone’s state and features.
Page 20
20
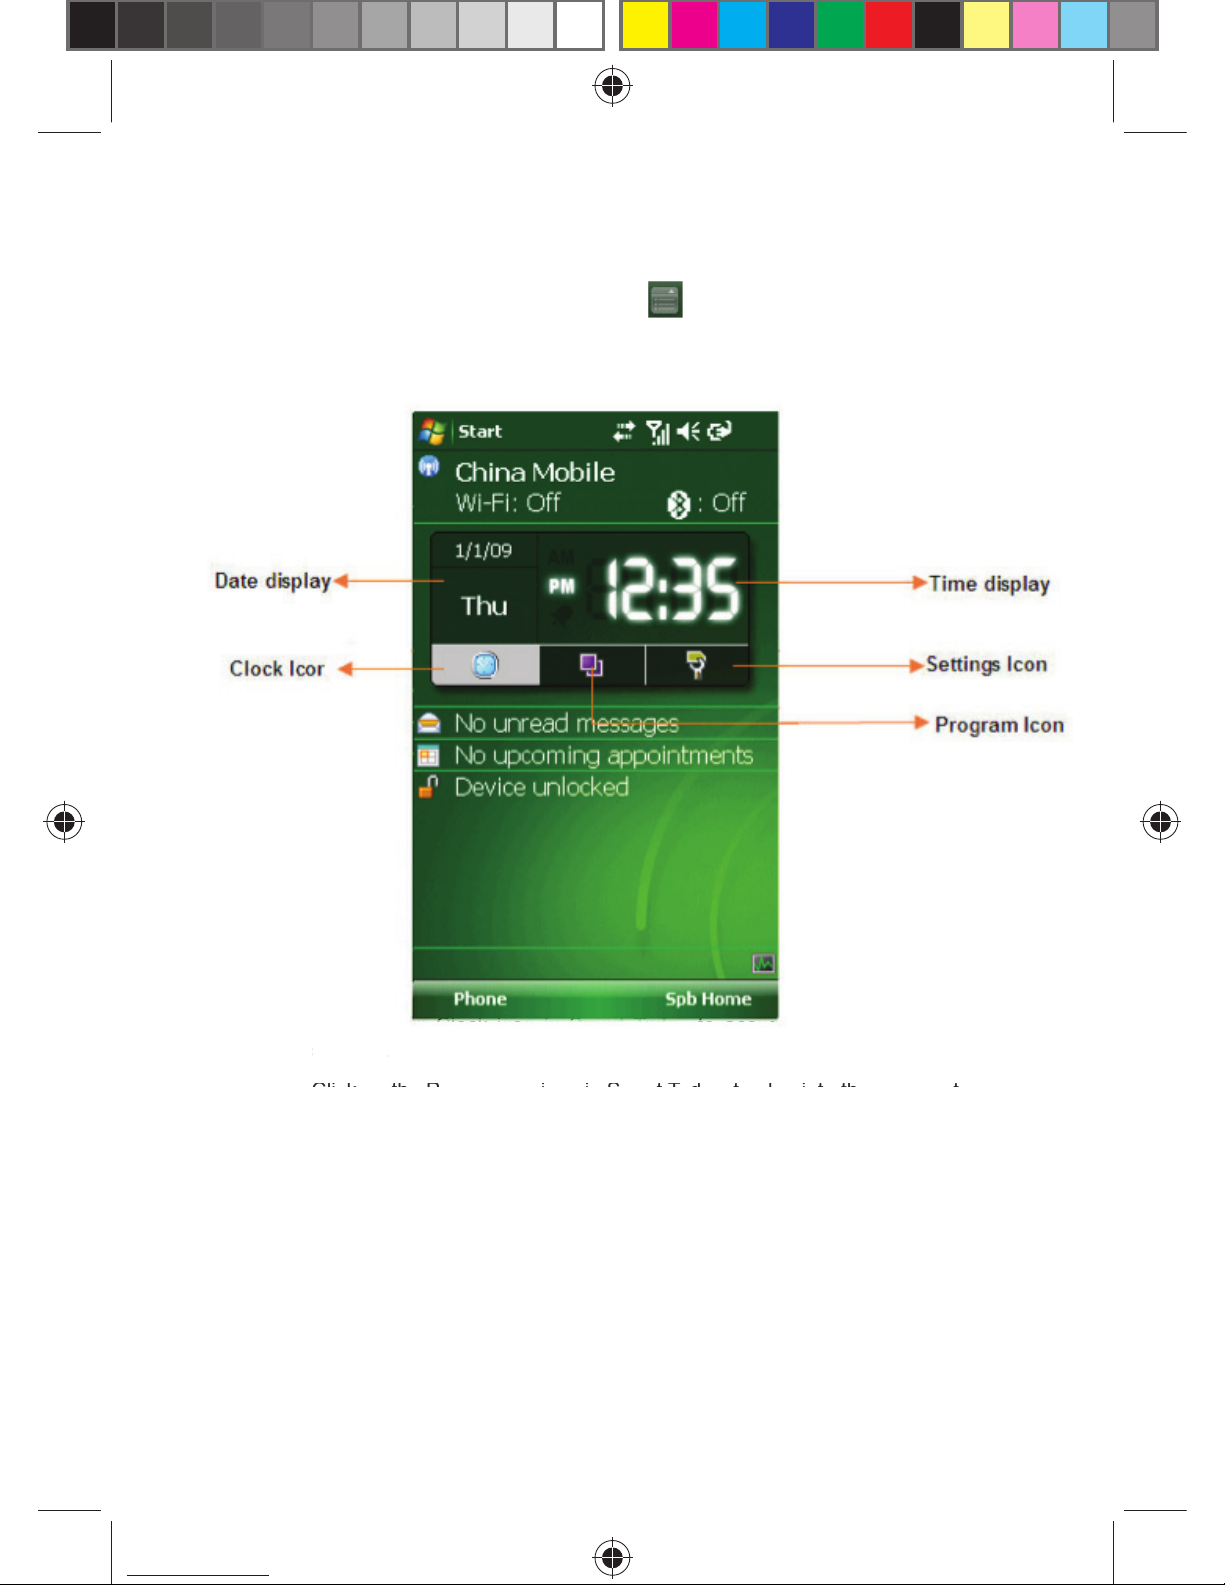
2.4 SMART TODAY
In SPB interface, press/click on icon, choose “Show Today”
when Smart Today is displayed.
Click on the Clock icon in Smart Today to access the clock and alarm
settings.
Click on the Programme icon in Smart Today, to plug into the programtme
interface.
Click the Settings icon in Smart Today to enter the settings of plug-in
interface.
Click on t
he C
lock
ico
n in
Sma
rt T
oday
to
acce
ss t
he clock and alarm
s
ettings.
Page 21
21
2.5 LOCK SCREEN AND KEYPAD
Select Device lock to lock the screen and the keypad, thereafter no
operations will be allowed.
To unlock, click Unlock on the lower left corner, and then tap Unlock.
If a call comes in the lock mode, you can answer it without unlocking the
phone. You phone will remain locked after the call is over.
2.6 ACTIVESYNC
With Microsoft® ActiveSync®, the data in your phone can be synchronised
through a USB cable with the PC.
ActiveSync® will make sure the information in the phone can be updated
with that in the PC.
2.6.1 Installation
Your phone has an in-built ActiveSync and you need to install the software
in your PC. You should follow the prompts on the screen to install
ActiveSync from the CD-ROM.
2.6.2 To Synchronise With PC
By default, contacts in OUTLOOK, calendars and tasks in the PC will be
automatically synchronised to your phone. You can use this information in
your phone as in the PC. Select options to synchronise before plugging in
the cable and then tap OK to proceed.
Follow the prompts on the screen and click Next to start. During the
process, a sync icon on the phone will keep rotating and the sync progress
and items will be shown.
Once the synchronisation is done, press the left soft key to change
from “Sync” to “Stop”. Press the right soft key to check for the sync
information. Press the left soft key again to start another round of
synchronisation.
If your PC runs Windows Vista, you need to install it from
Windows Mobile Device Centre. Refer to the user guide of
Windows Mobile Device Centre for more information.
!
Note:
Page 22
22
3 CALL FEATURES
3.1 MAKING A CALL
A few options are available to make calls.
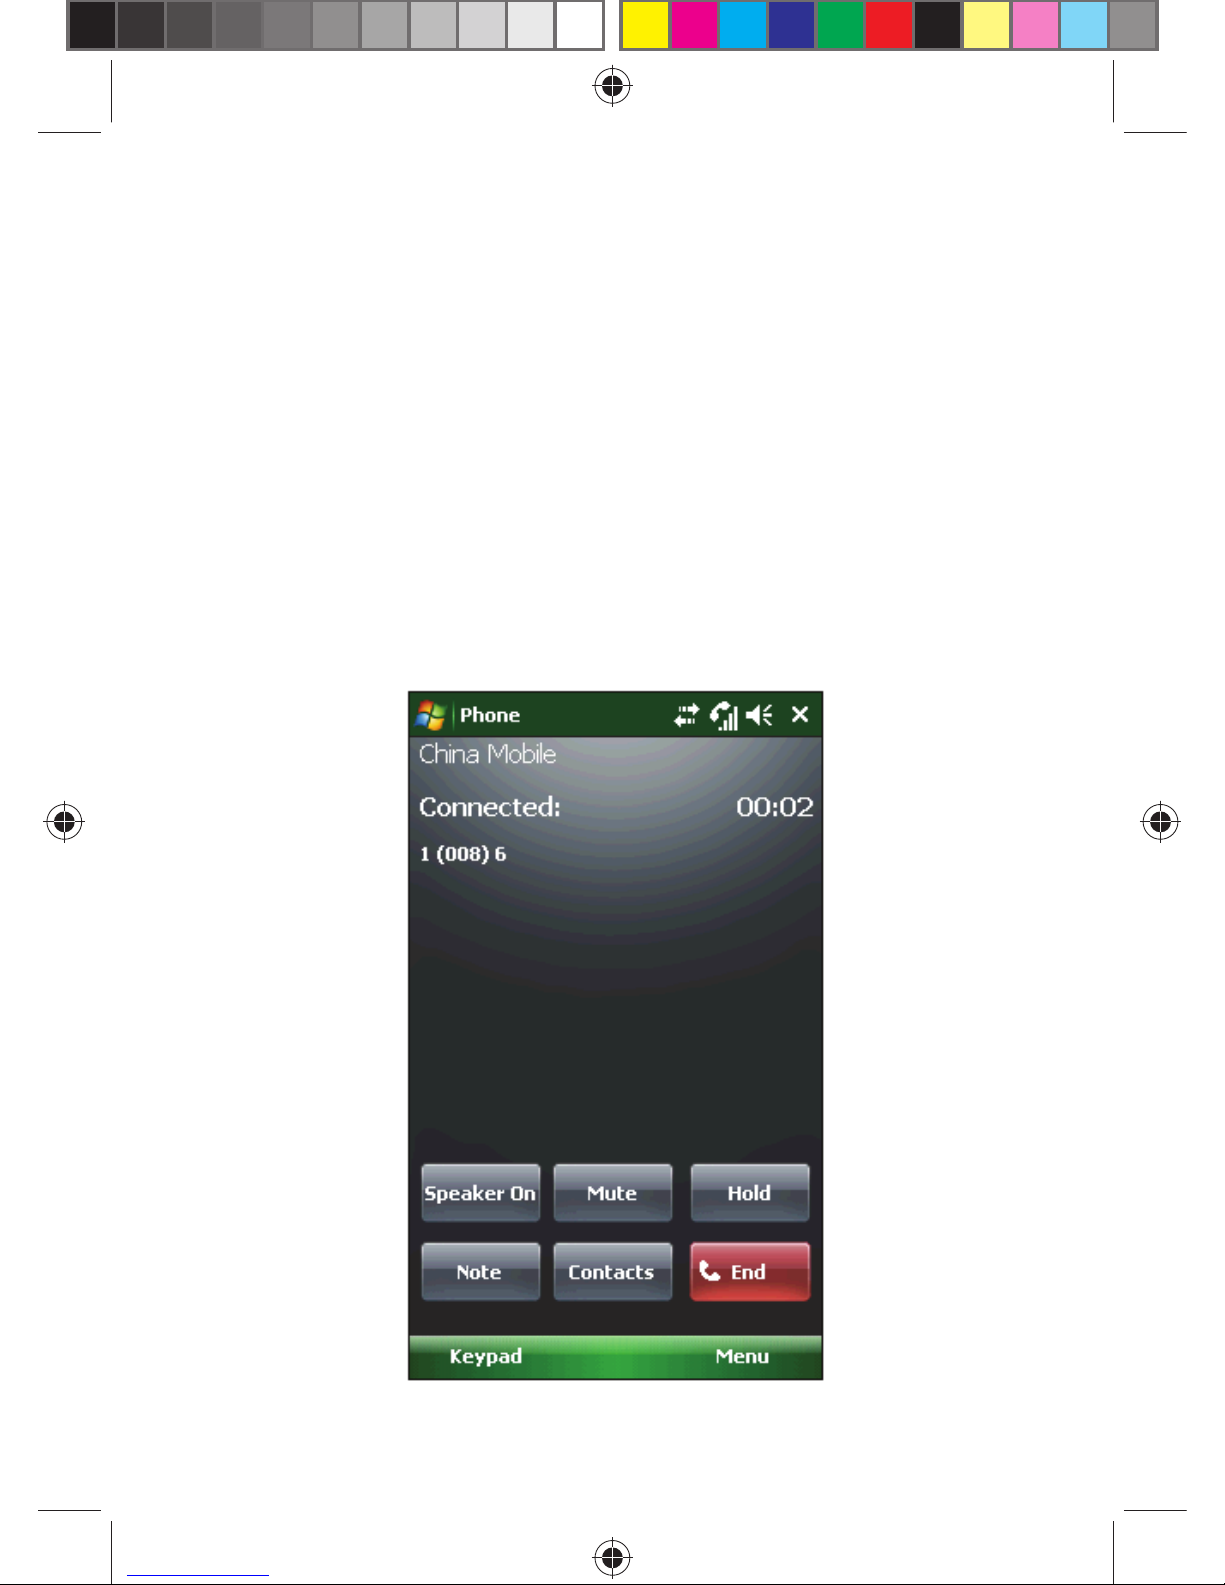
3.1.1 From The Display
• On the standby screen, tap Phone or press the Send key to open the
phone keypad;
• Tap the Keypad key and then tap Talk or press Send key to dial the
phone number;
• To redial, tap Talk or press Send key to dial if the phone number
already appears on the screen;
• Tap End or press End key to end the call.
Page 23
23
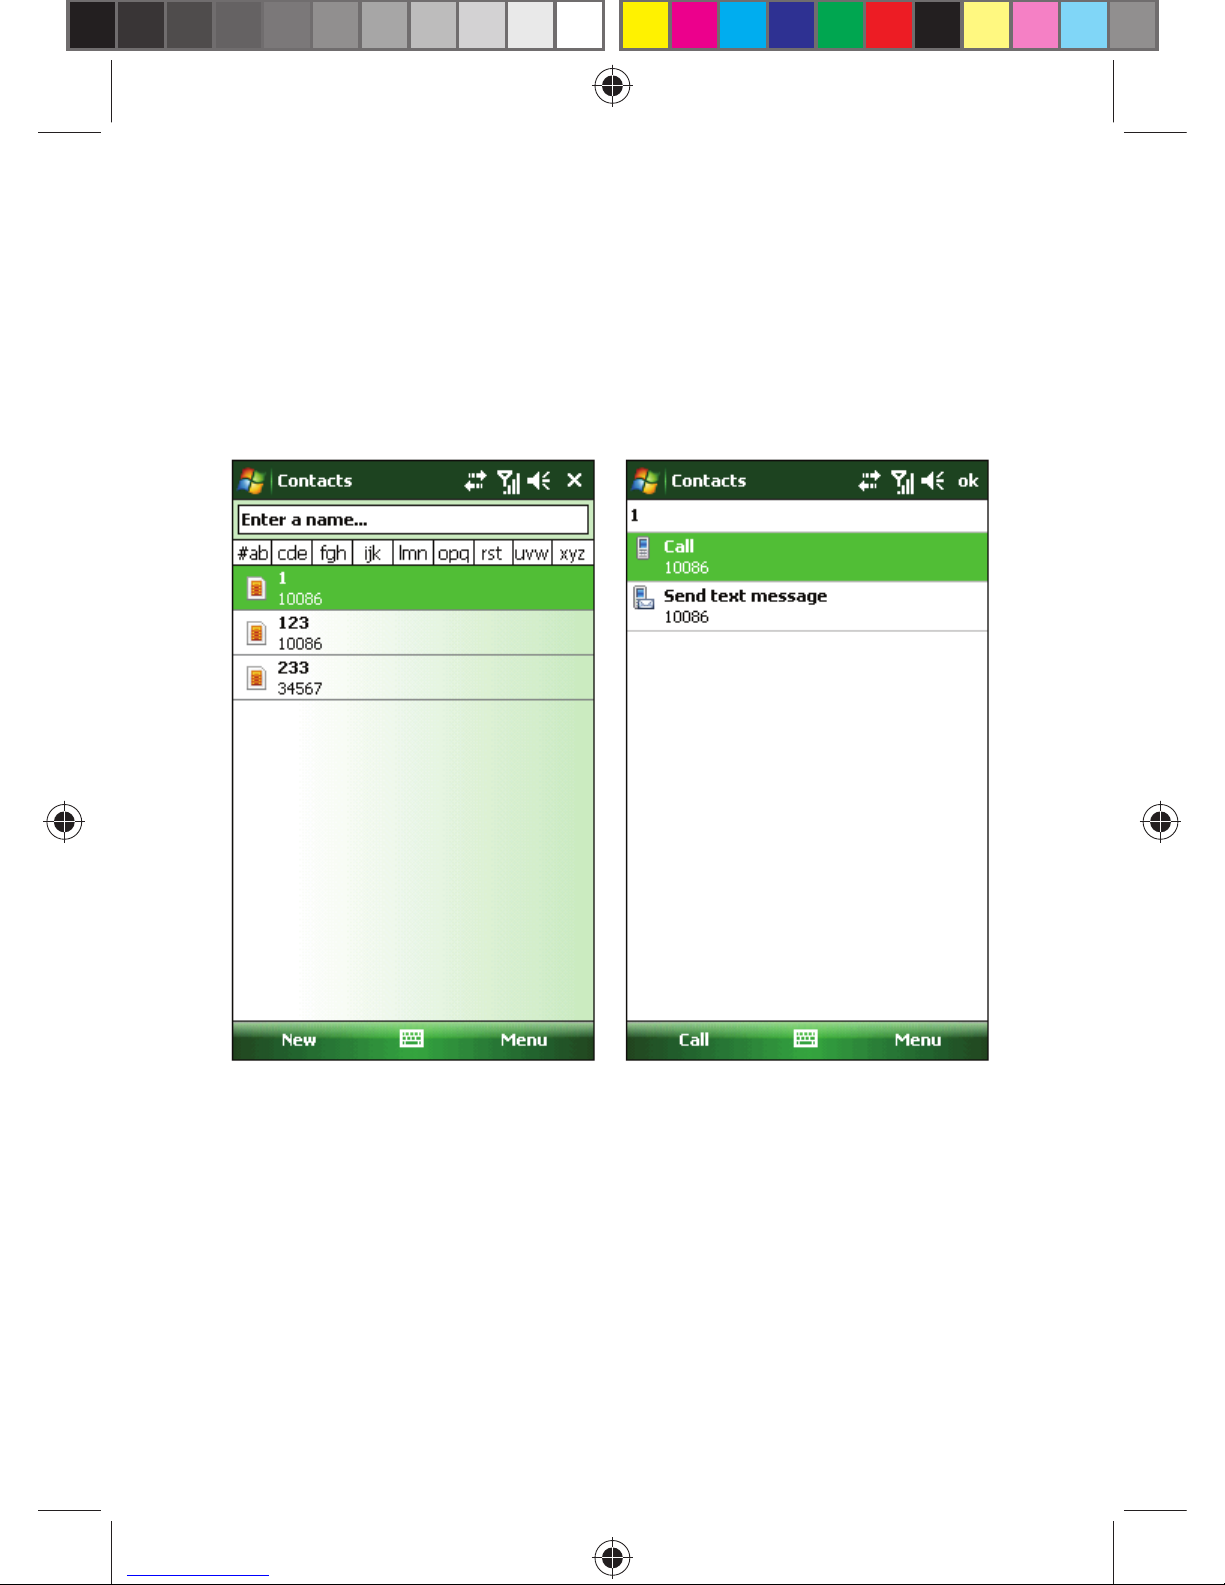
3.1.2 From Contact List
Tap Contacts on the lower right of your screen to open the contact list.
Select a contact and then dial in one of the two ways mentioned below:
• Highlight the contact and then tap Send;
• Open the window displaying details of the contact, select one number
(if there are several) and then tap Call, to make a call.
Page 24
24
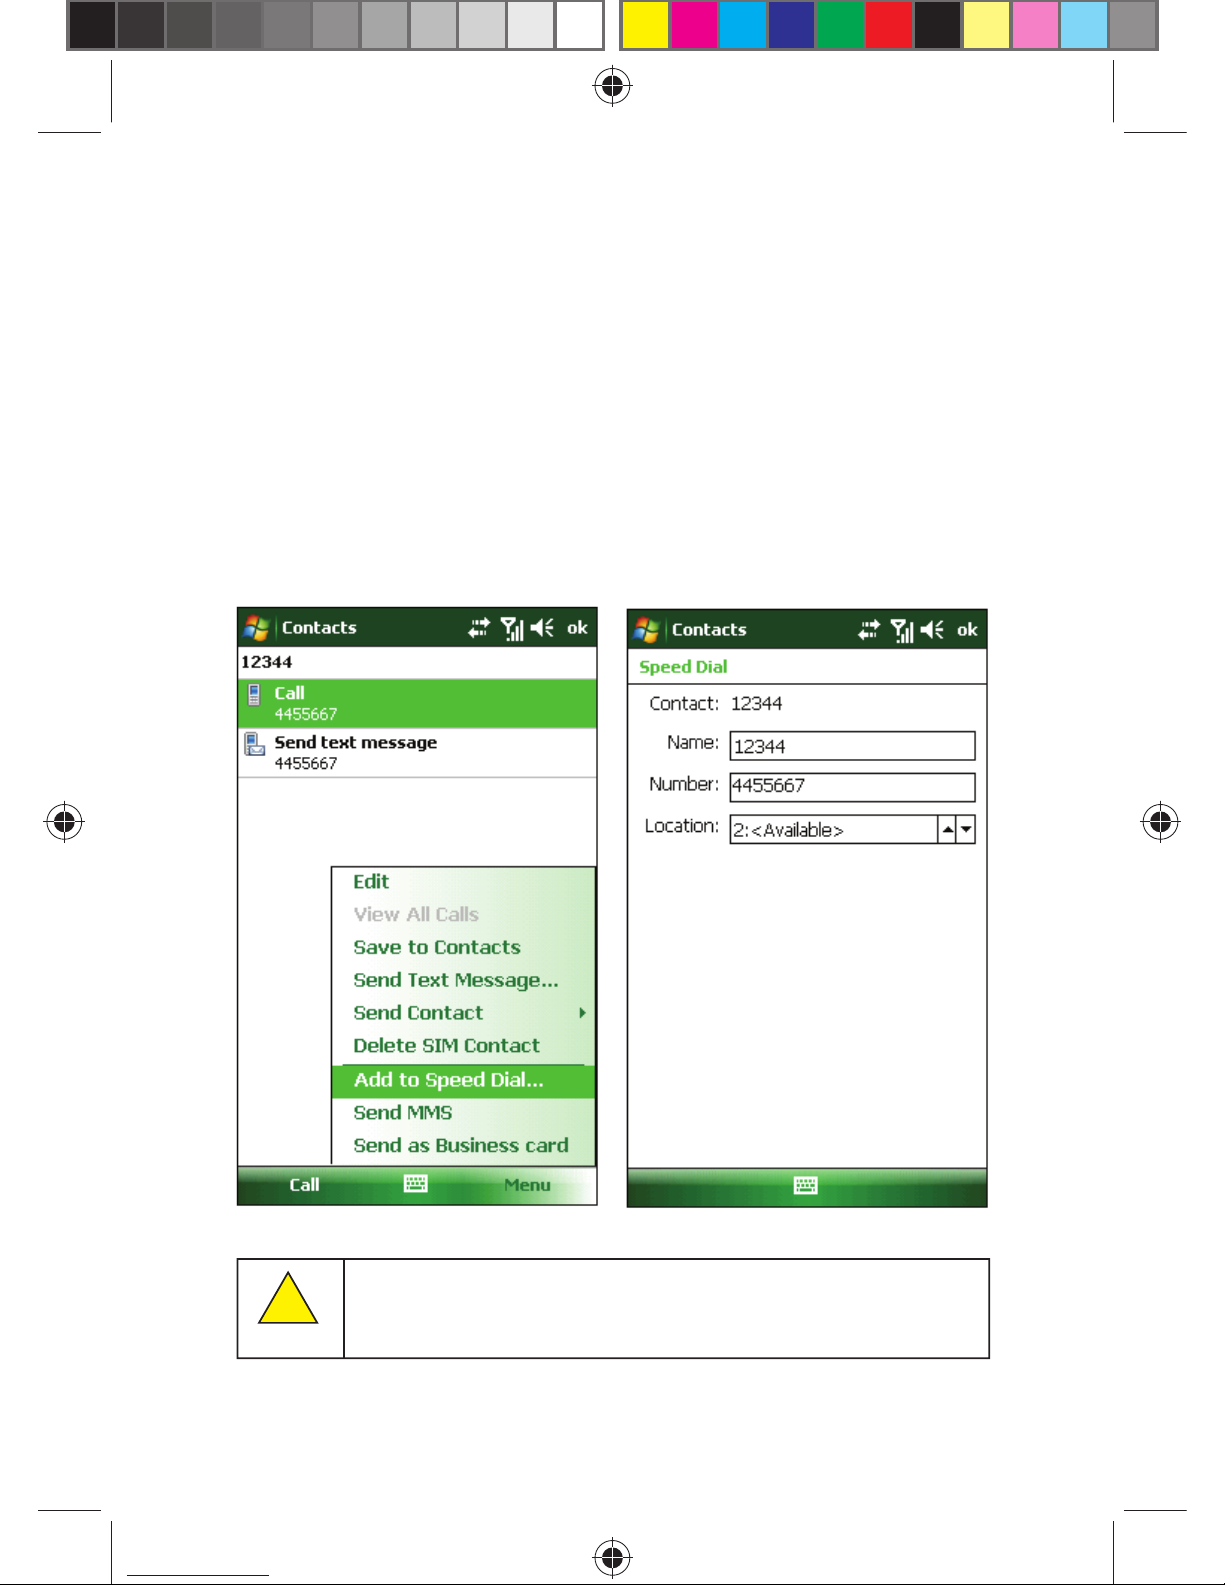
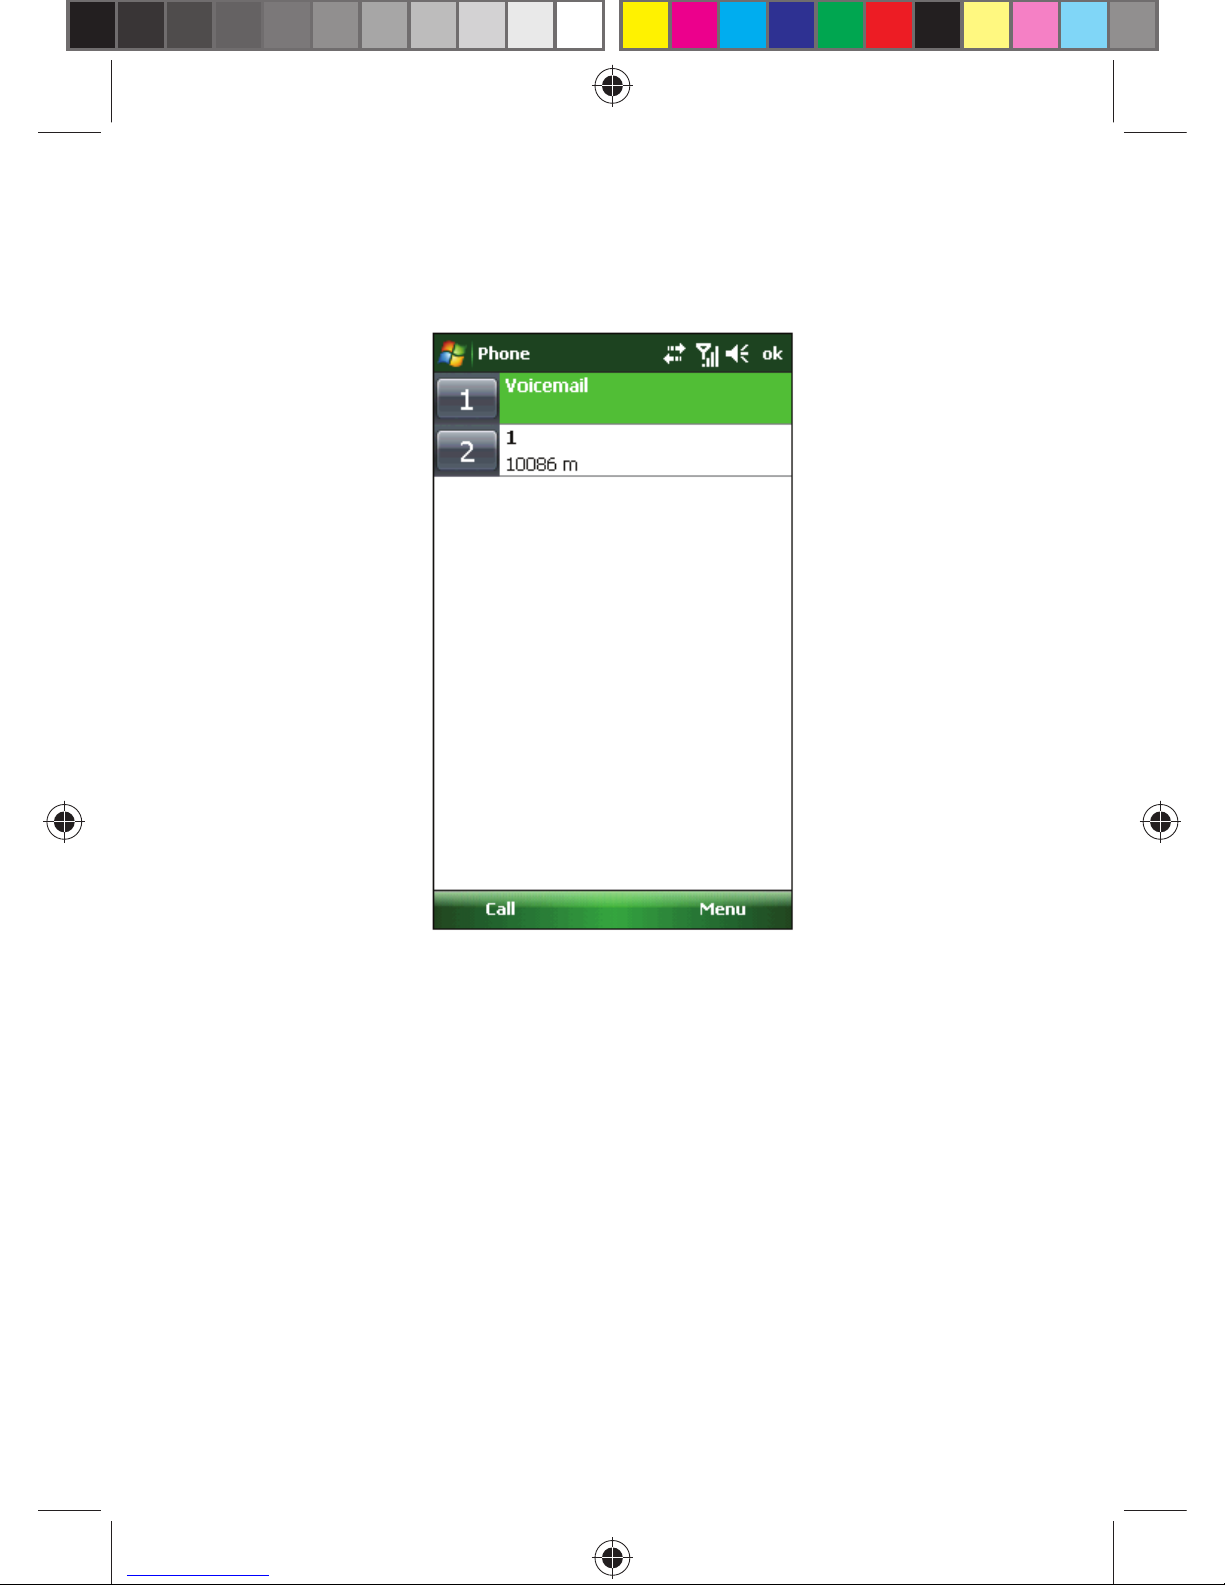
3.1.3 From Speed Dial
You may create speed dial number for the phone numbers in the contact
list. To dial, press and hold the key on the screen that corresponds to a
speed dial number (if the speed dial number is set with two digits, enter the
“tens” digit and then press and hold the “units” digit).
To set a speed dial number, use one of the following two ways:
1. Select an entry from the contact list; press the centre key to view its
details. If there are several phone numbers, highlight one of them and
then select Add to Speed Dial from Menu. Select a speed dial number
in the settings page.
“0” and “1” cannot be used as speed dial numbers since both the
digits are reserved by the system.
!
Note:
Page 25
25
2. Tap Speed Dial from Menu to display the speed dial list. Select New from
Menu to show the contacts list and then choose the numbers to be added
in the speed dial.
3.1.4 From SIM card
All the records stored in the SIM card have a secret key (the key can’t be
changed). To dial a phone number, you only need to enter the secret key
followed by “#”.
3.1.5 From Call History
Press Send key at the main page to open the calling screen, tap Call
history to show the call records including answered, unanswered and
dialed calls. Highlight an entry and then press Center key or tap Call, to
make a call.
Page 26
26
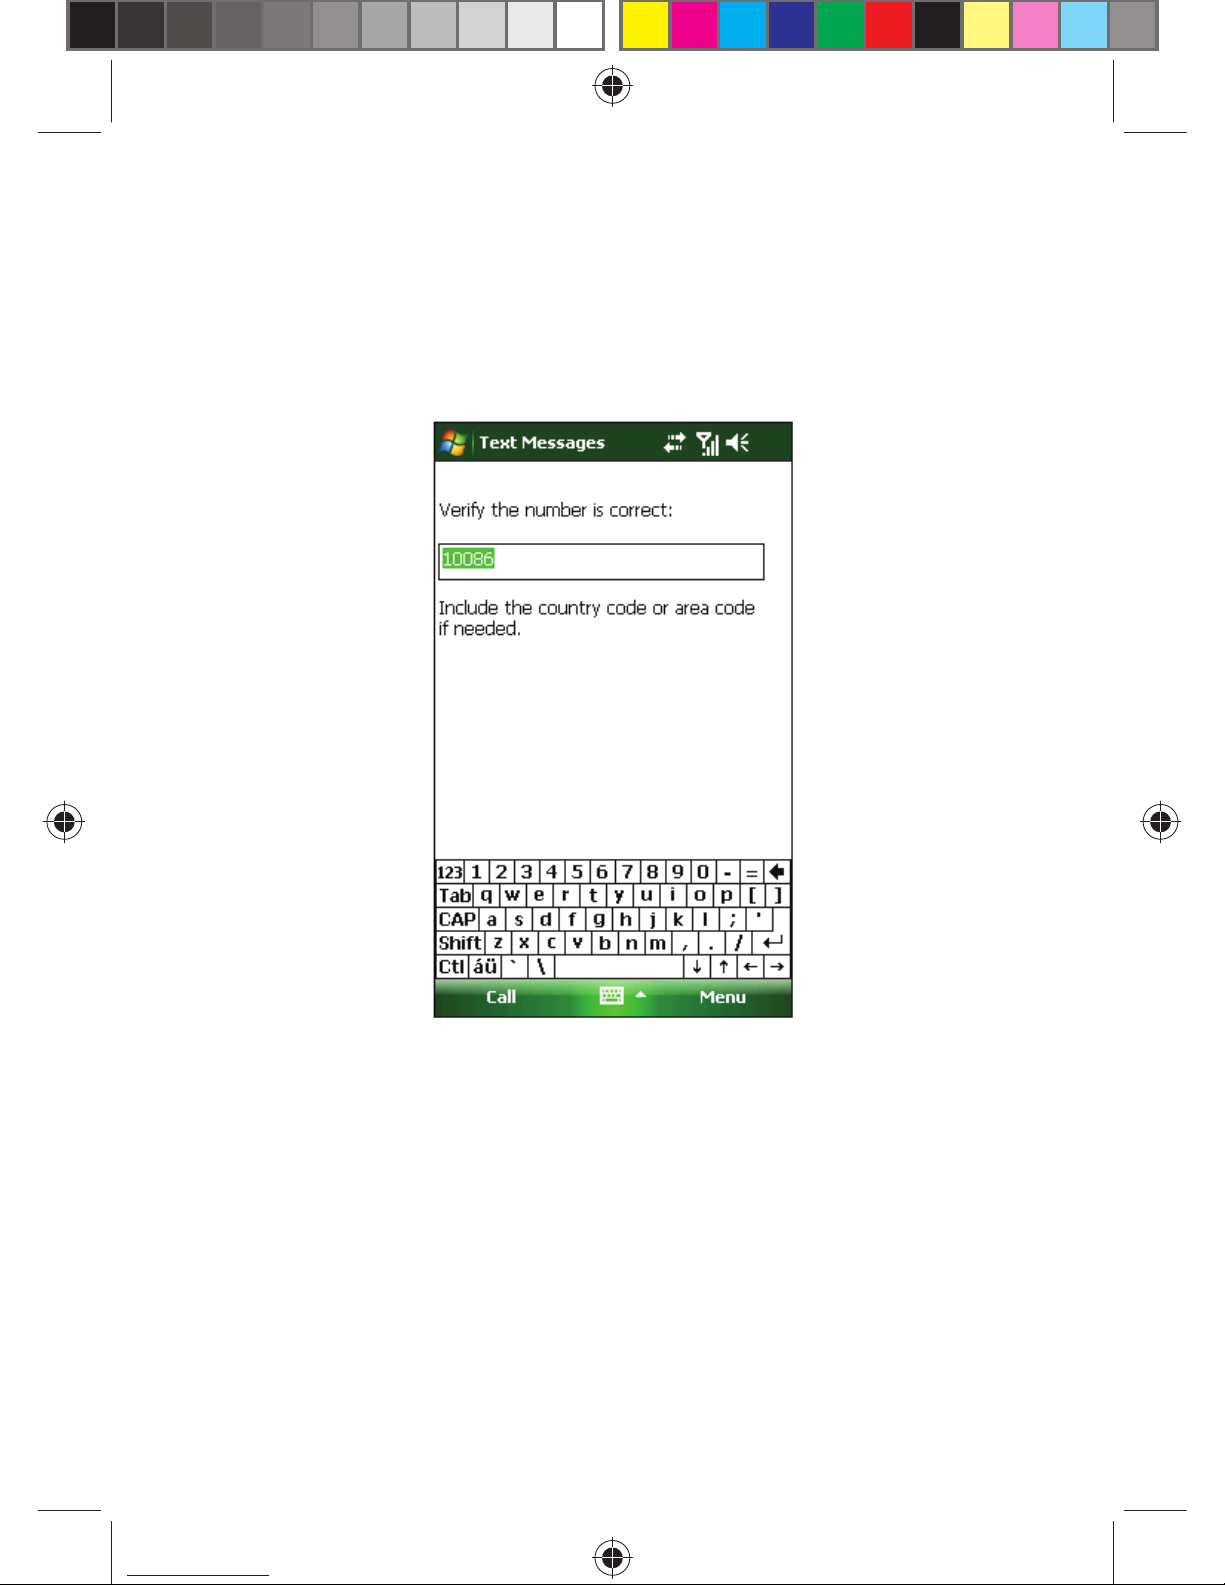
3.1.6 From Short Messages
Scroll the highlight bar in the short message list, locate the person you
want to call and then press the Send key. A message is then prompted
for confi rming the phone number, tap Call or press Send key to start the
dialing operation.
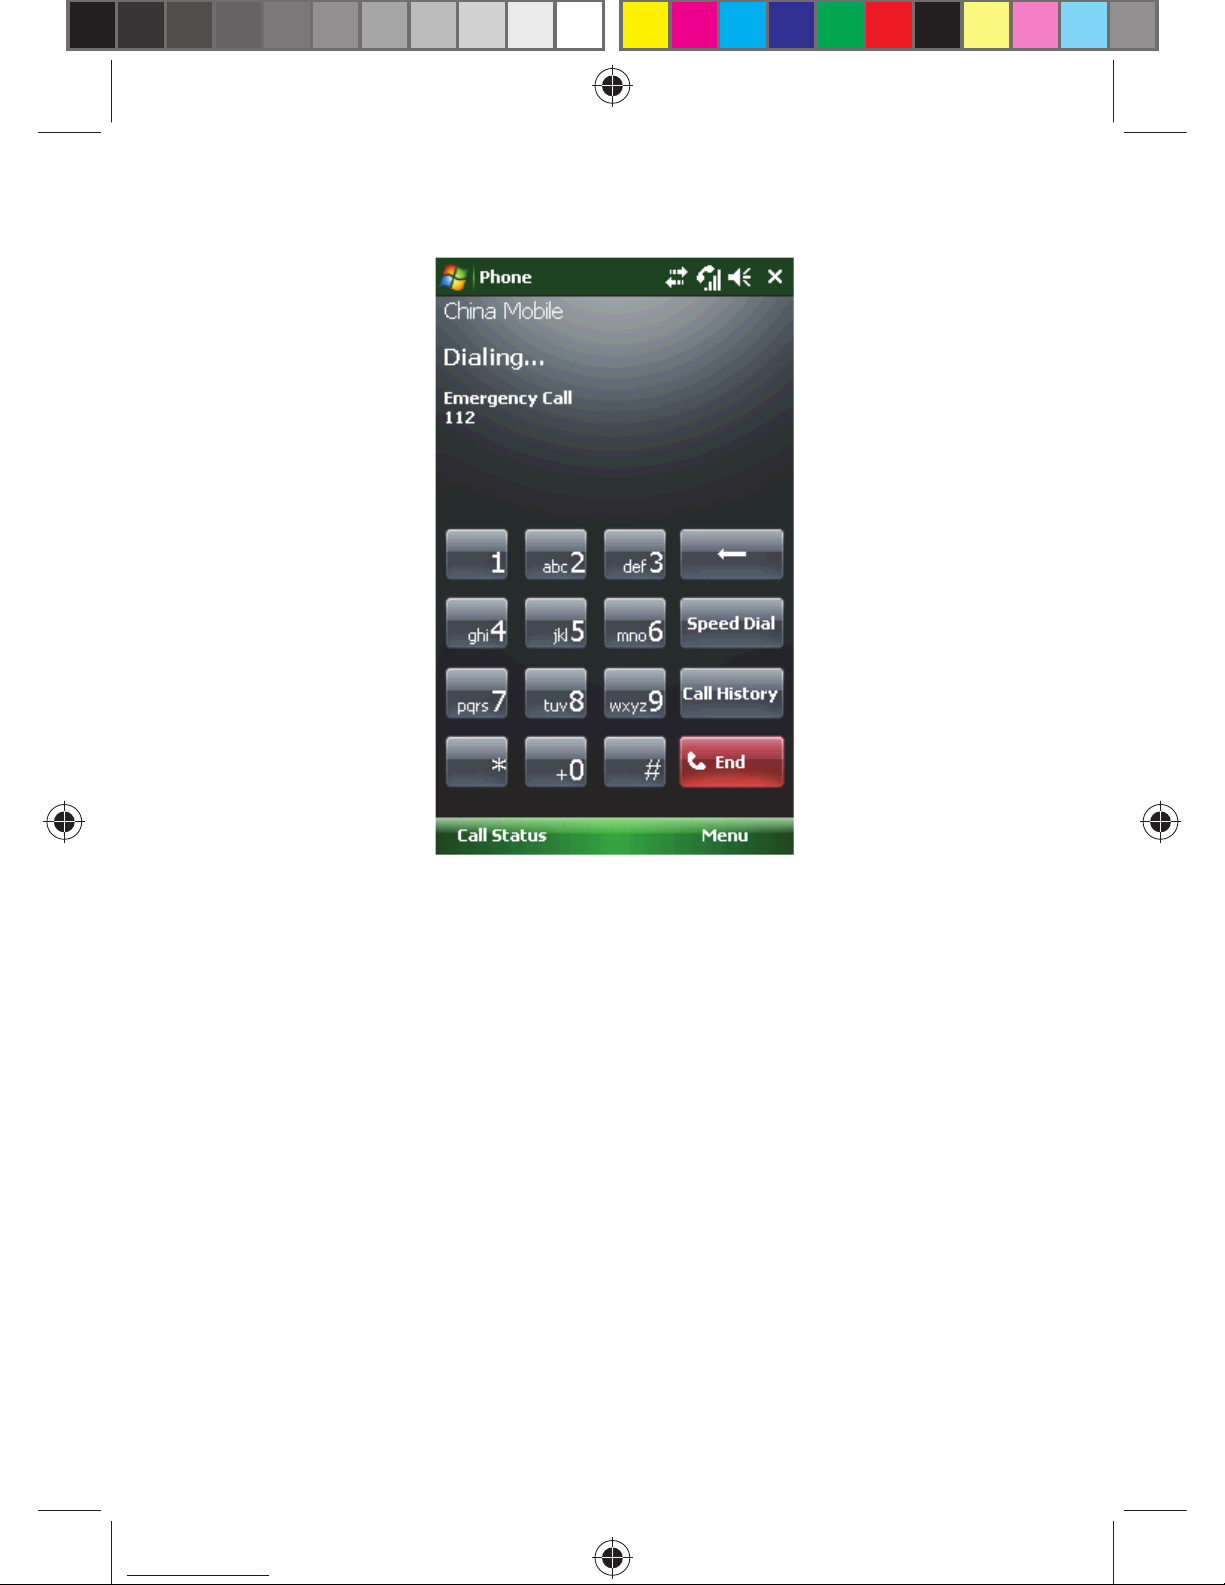
3.1.7 Emergency Calls
Your wireless service provider provides one or more emergency phone
numbers (such as 112) that you can call under any circumstances. As long
as you are within the service area, you can make emergency calls even
without a SIM card.
Page 27
27
3.1.8 International Calls
Open the phone keypad, press and hold key “0”, release and then enter
prefi x “+”, input the country code, area code and the phone number and
then press the Send key.
3.1.9 Dial Voicemail Number
Voicemail is a type of network service. If you have enabled call forward
to voicemail box, unanswered calls will be directed to the voicemail
messages.
Press and hold key “1” on the display and then your phone will dial the
voicemail number. Contact your network operator to obtain the voicemail
number.
Page 28
28
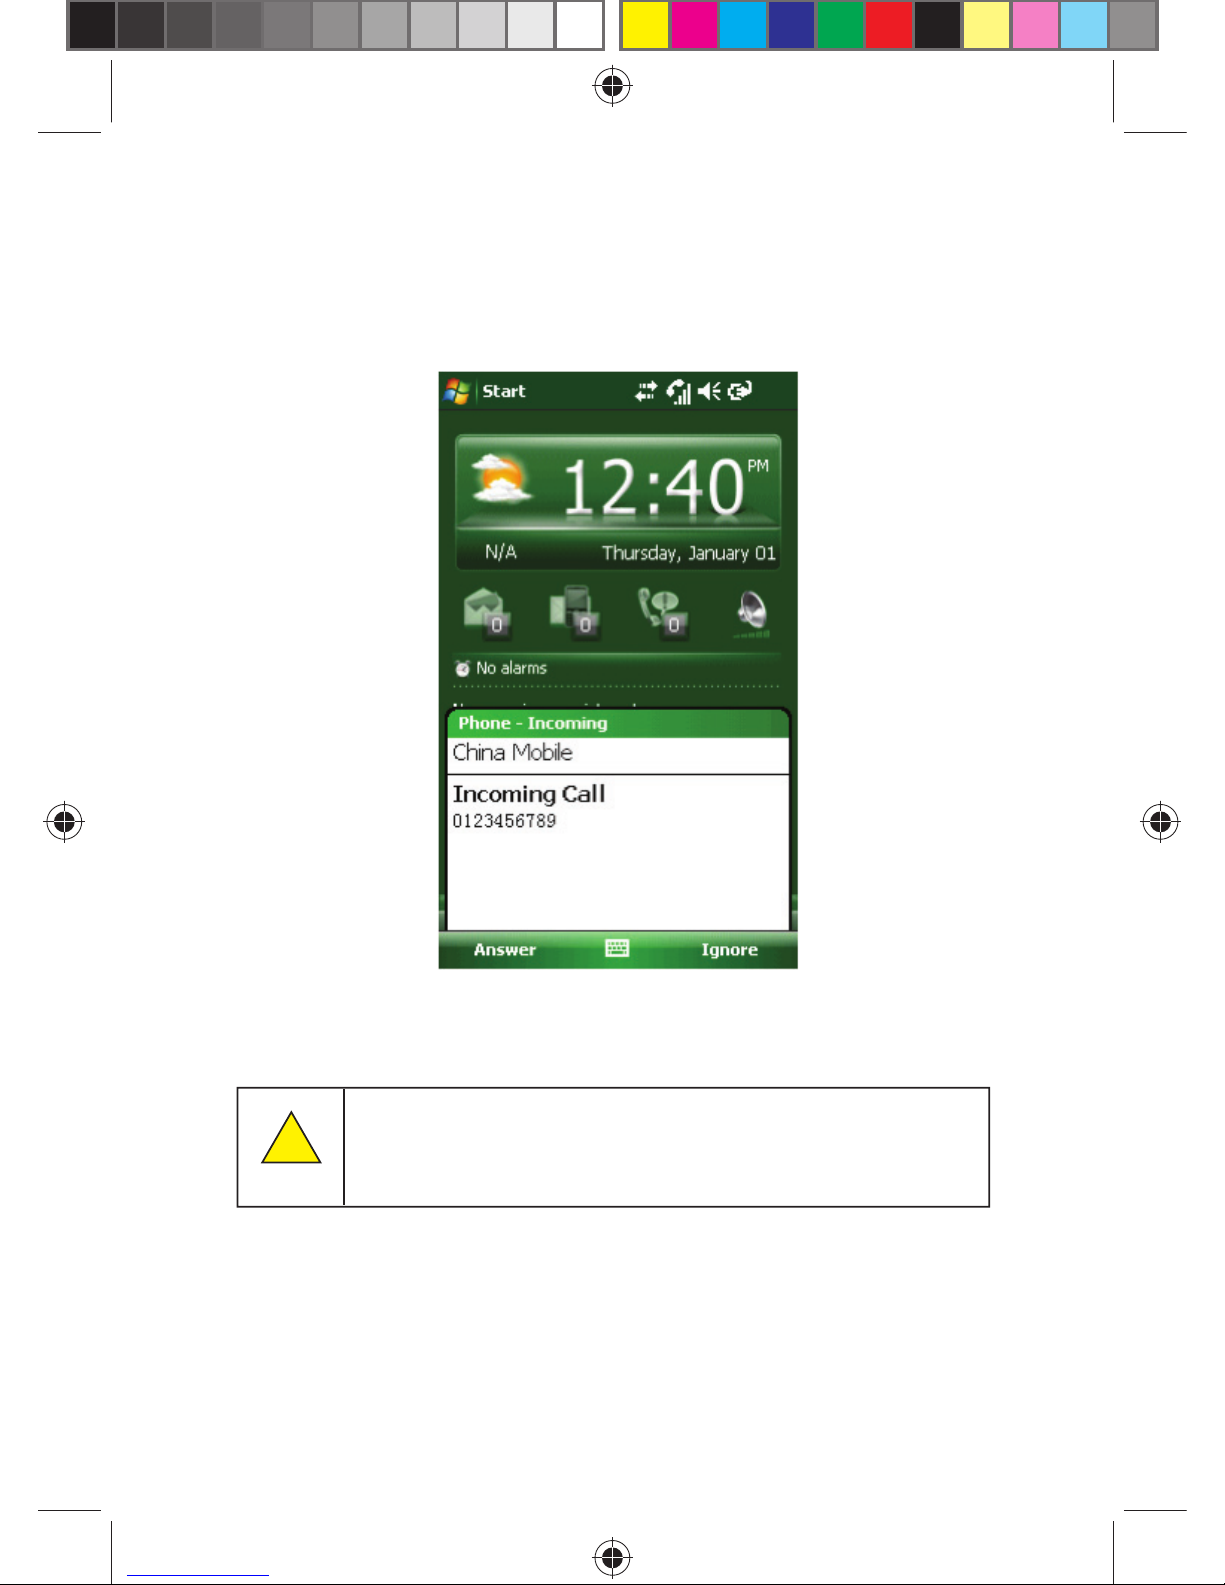
3.2 ANSWER A CALL
When there’s an incoming call, press the left soft key, Send key or tap
Answer to answer a call. Press the right soft key, End key or tap Ignore to
reject a call.
3.3 DURING A CALL
During a call, select options on the screen or in the Menu for accessing
more functions.
The availability of these features depend on your service provider
and whether you have subscribed to them or not.
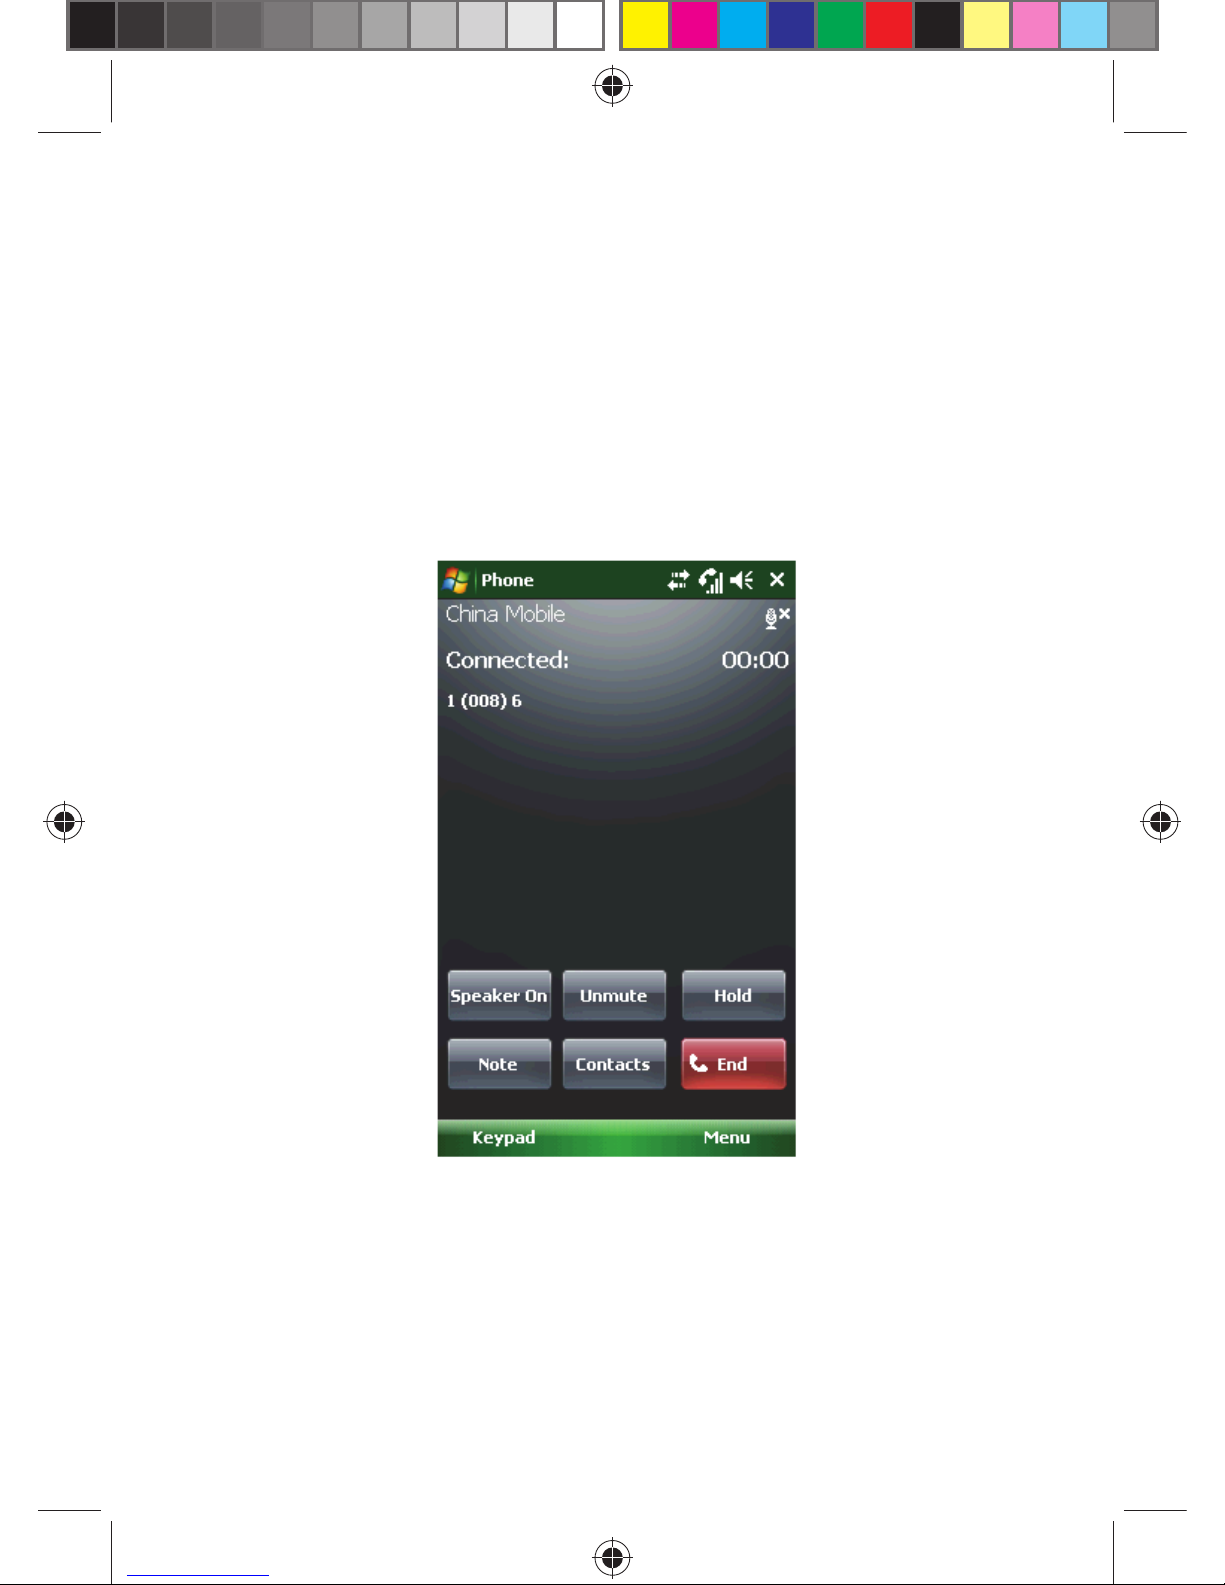
3.3.1 Hold
If you tap Hold during a call, the party you are talking to and you will not be
able to hear each other anymore. However, the call will not be suspended.
It will be retrieved after you tap Unhold.
!
Note:
Page 29
29
During a call, tap the lower left part of your screen and then enter another
phone number on the keypad and press Send key for putting the fi rst call
on hold.
After the second call gets through, press Center key or tap Swap to switch
between the two calls. But the one you are talking to can hear you only
and the one put on hold can’t.
3.3.2 Mute
If you need to turn off the Mic for a while during a call, tap Mute. You can
hear what the other party says but he/she won’t be able to hear you. Tap
Unmute to restore.
3.3.3 Loudspeaker On
After the loudspeaker is on, the sound will be amplifi ed.
3.3.4 Hands-Free
Select Turn Speakerphone On in Menu to turn on Hands-free. It enables
you to hear the cal clearly without holding the phone near the ear. Select
it again to turn it off.
Page 30
30
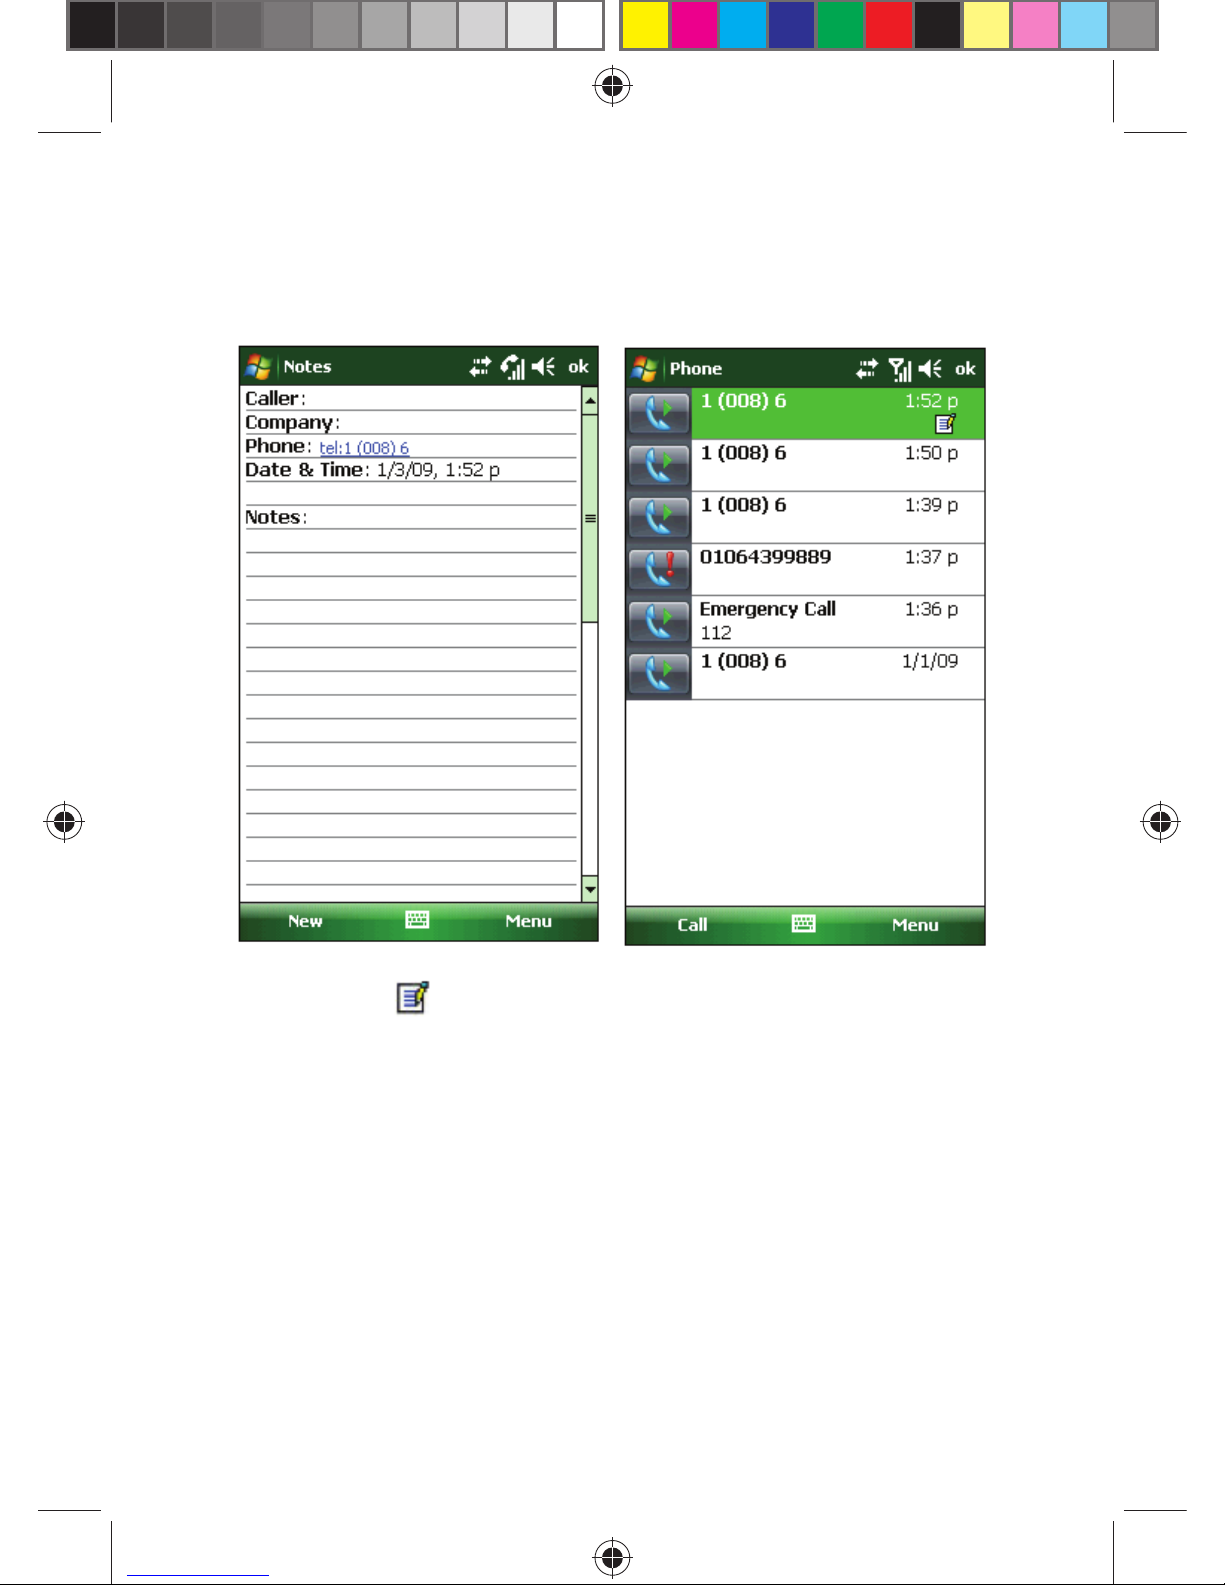
3.3.5 Notes
You may make notes during a call. Tap Note to open the window (as given
in the picture below); write your notes and then tap OK to save it.
In the call history, calls with notes To read notes, select
show an icon as
. Start → Programmes → Note.
3.4 SIMULTANEOUS CALLS
If there’s an incoming call while you are on the other call, a notifi cation
will be prompted. You may answer or reject it. If you answer it, you may
switch between these two calls or converse with them in a conference call
in which you can talk to boht the callers at a time. Up to 6 parties can be
involved in a conference call.
3.4.1 Make A Second Call During The First
You can make a second call while you are on the other call, doing so will
put the fi rst call on hold.
Perform the above mentioned as follows:
• Tap Keypad and then enter the phone number;
• Press the Send key.
Page 31
31
3.4.2 Switch Calls
If there’s an incoming call while you are in the fi rst call, tap Answer to
answer it. The fi rst call will be on hold. The other party in the fi rst call can’t
hear while you are talking to the second caller.
Tap Swap to talk to either of the callers. After you put on call on hold, the
other will be put on unhold.You can also put both calls on hold.
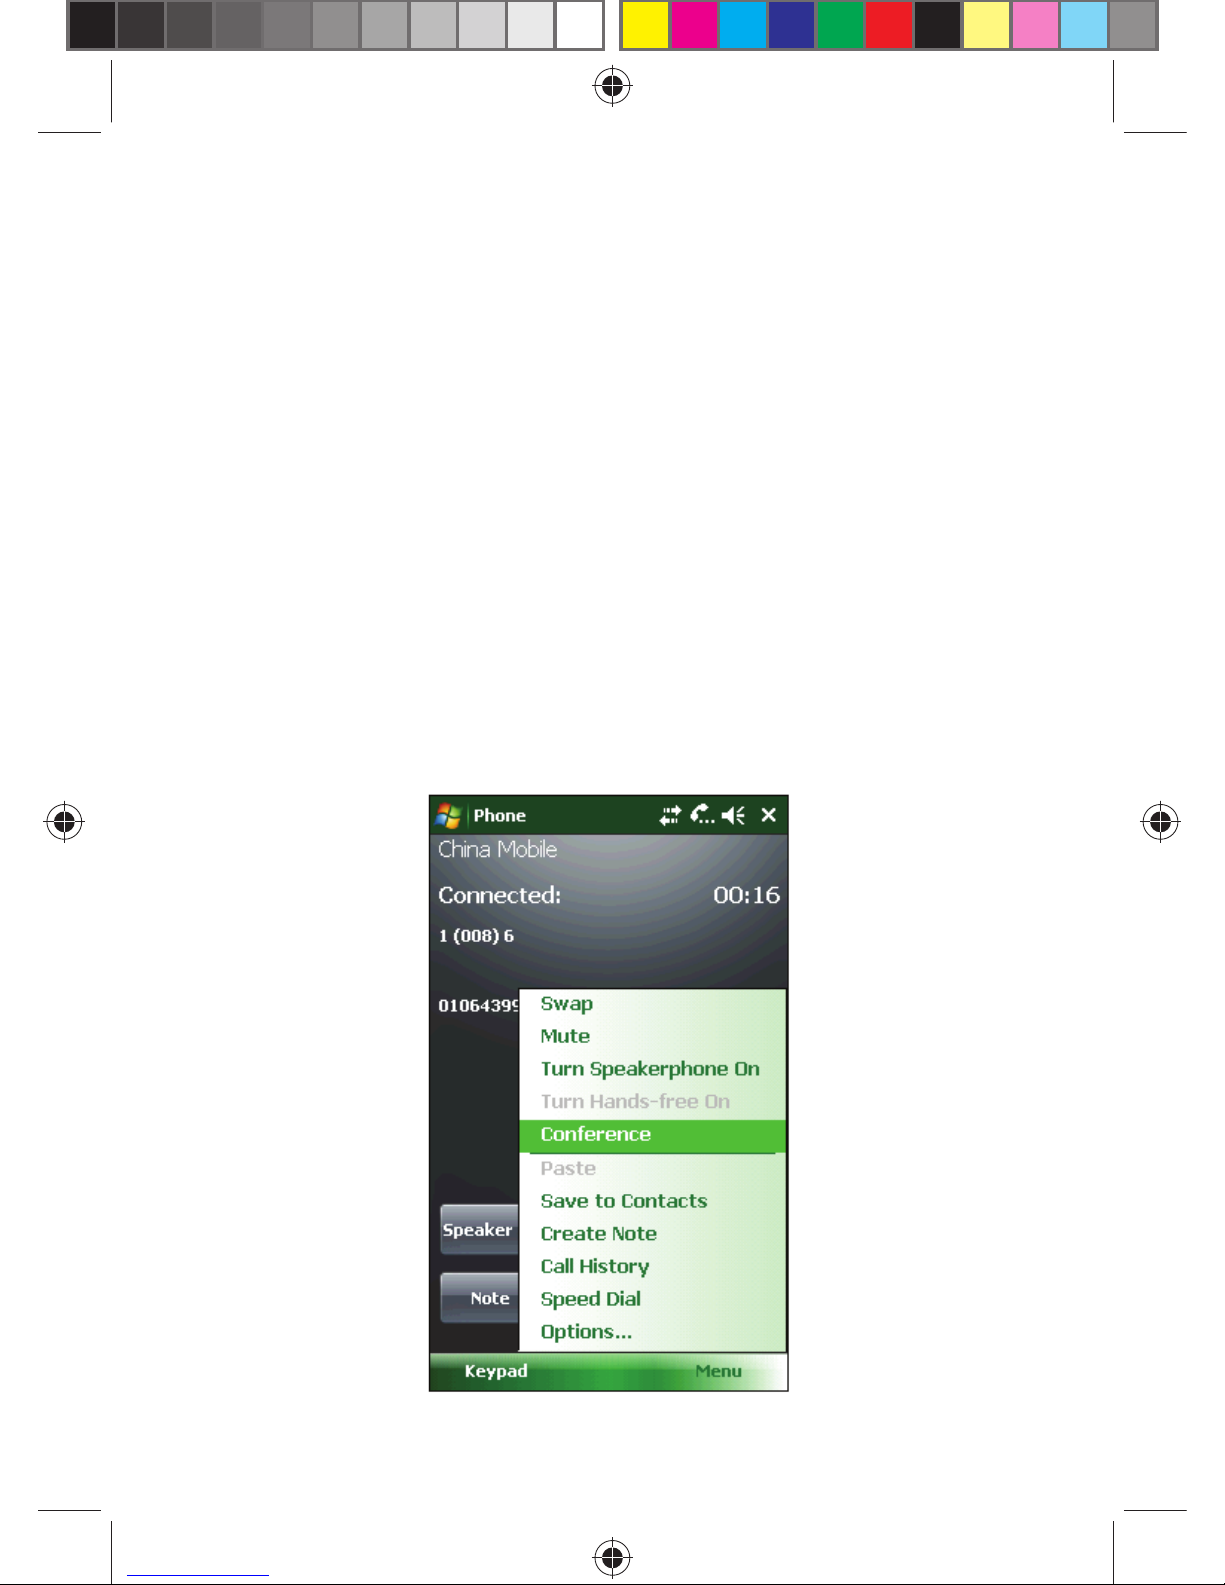
3.4.3 Conference Call
Your phone supports conference call with up to 6 parties. All the fi ve
callers can listen to each other.
To initiate a conference call, do the following:
1. Make or receive a second call during the fi rst call;
2. After doing the above mentioned, select Conference in Menu, the
ongoing call and the call on hold will be thus, put on the conference call
mode. Repeat step 1 and 2 to add more parties.
3. If you need to talk privately with one of the parties in conference call,
select Private in Menu. A list of the parties in the conference call
Page 32

32
will appear on the screen, select the one with whom you want to talk
privatel. You can talk with him/her while the conference call is put on
hold. Other parties in the conference call can proceed normally.
4. During the conference call, press the End key to end the whole
conference.
Page 33
33
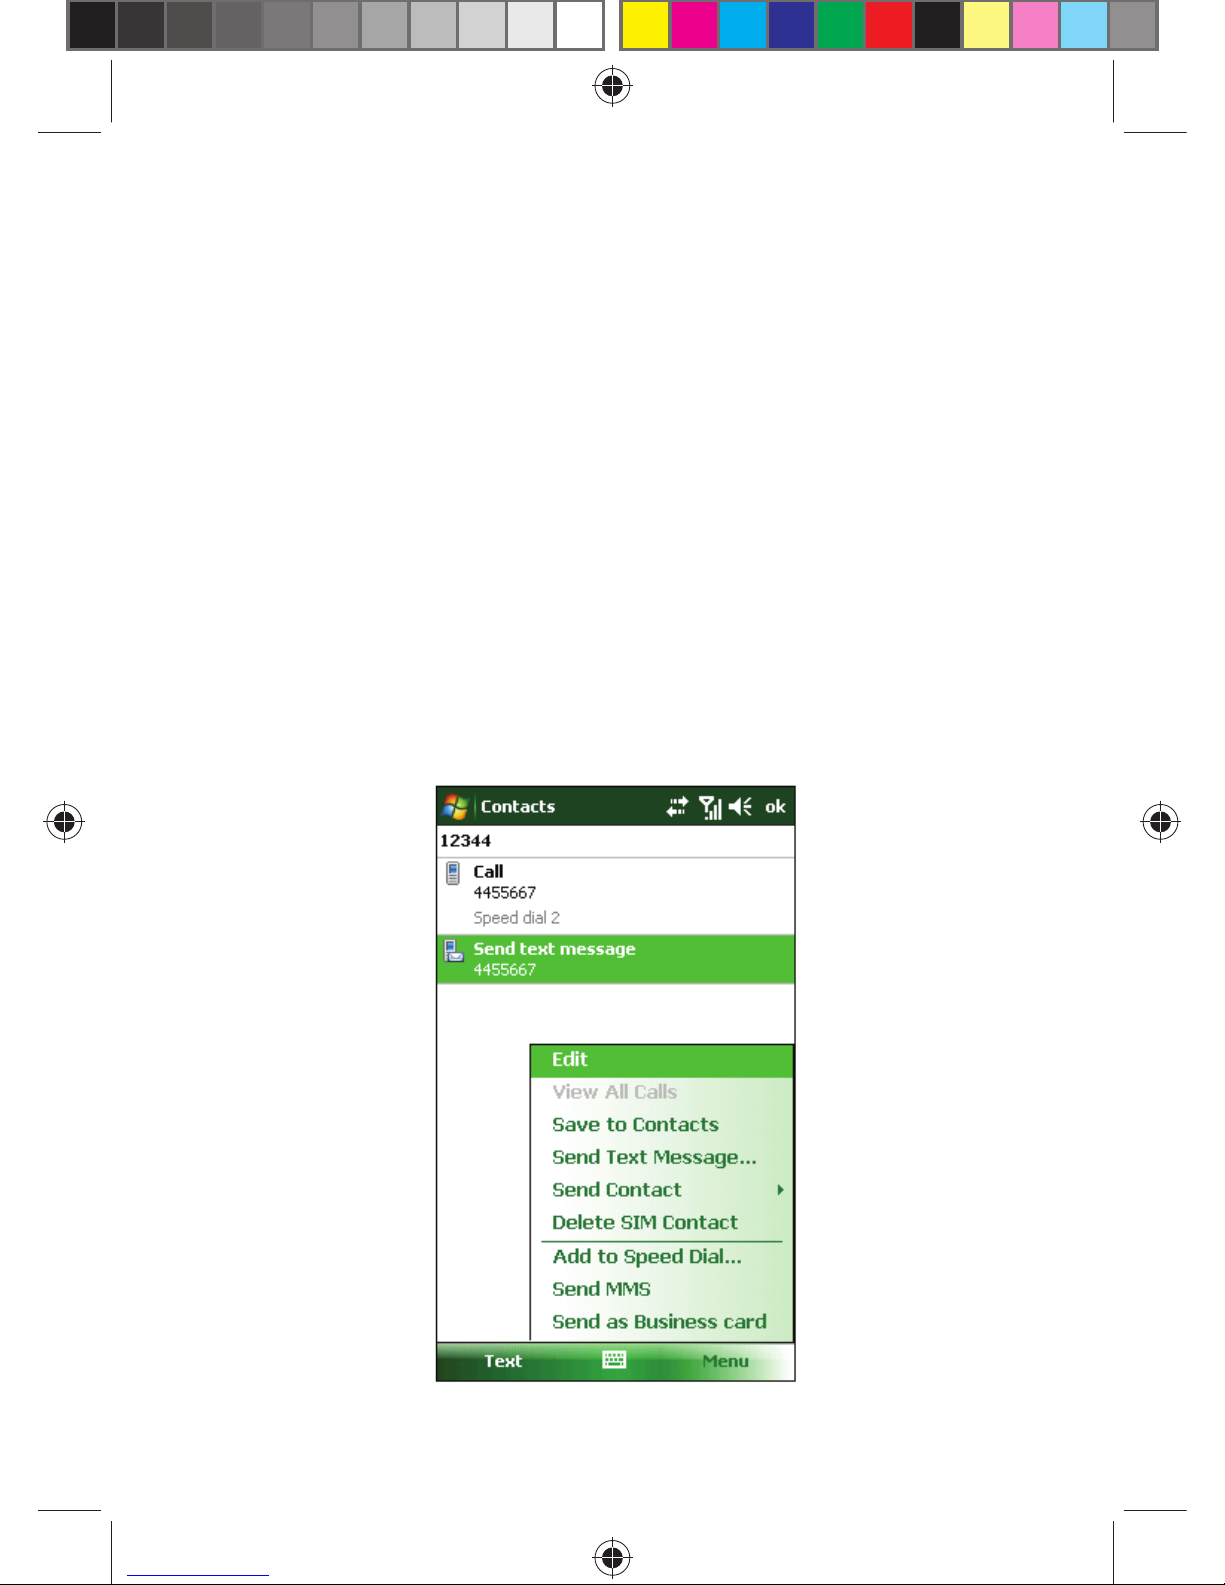
4 CONTACTS
You may view or update information about contacts.
The contacts information can be saved in the SIM card or in the phone.
Such information in the SIM card usually includes one name and one
phone number (depends on the type of the SIM card and service). You
can store much more in your phone like – contact’s name, multiple phone
numbers, e-mail addresses and mailing addresses, as well as other
information such as birthdays and holidays.
4.1 VIEW CONTACT DETAILS
A list of contacts will appear on the screen.
• Contacts are sorted in alphabetical order;
• Scroll the highlight bar to locate a contact for its details;
• If there are several phone numbers for one contact, the numbers and
their attributes will be displayed.
4.2 EDIT A CONTACT
Select a contact from the list and then tap Edit in Menu.
Page 34

34
4.3 ADD NEW CONTACT
Tap New to add a new contact, fi ll in each item and then tap . The new
contact will then be shown in the list.
If you are about to make an international call or a call with an extension,
you may need to pause for a bit after dialing the phone number, and then
continue to dial the extension or other following numbers. If it is the case,
you have the option to insert a pause sign “p” from the menu between the
phone number and the extension number. Insert one or more “p” makes
length of the pause time long. To dial manually after the pause, insert a
Wait from the menu.
You can add a contact during a call, or from the received text message or
email, or from the call history.
4.4 SPEED-DIAL FOR CONTACT
A one or two-digit speed-dial number can be set for contacts stored in
the phone. Press and hold the speed-dial number (for two-digit, press the
“tens” digit and then press and hold the “units” digit) until it dials.
To set the speed-dial number, select the phone number in the page
showing contact details, tap “Add speed-dial” in the menu, and then tap
“OK”.
The range for speed-dial numbers is between 2 and 99. 0 and 1 are
reserved by the system.
Page 35
35
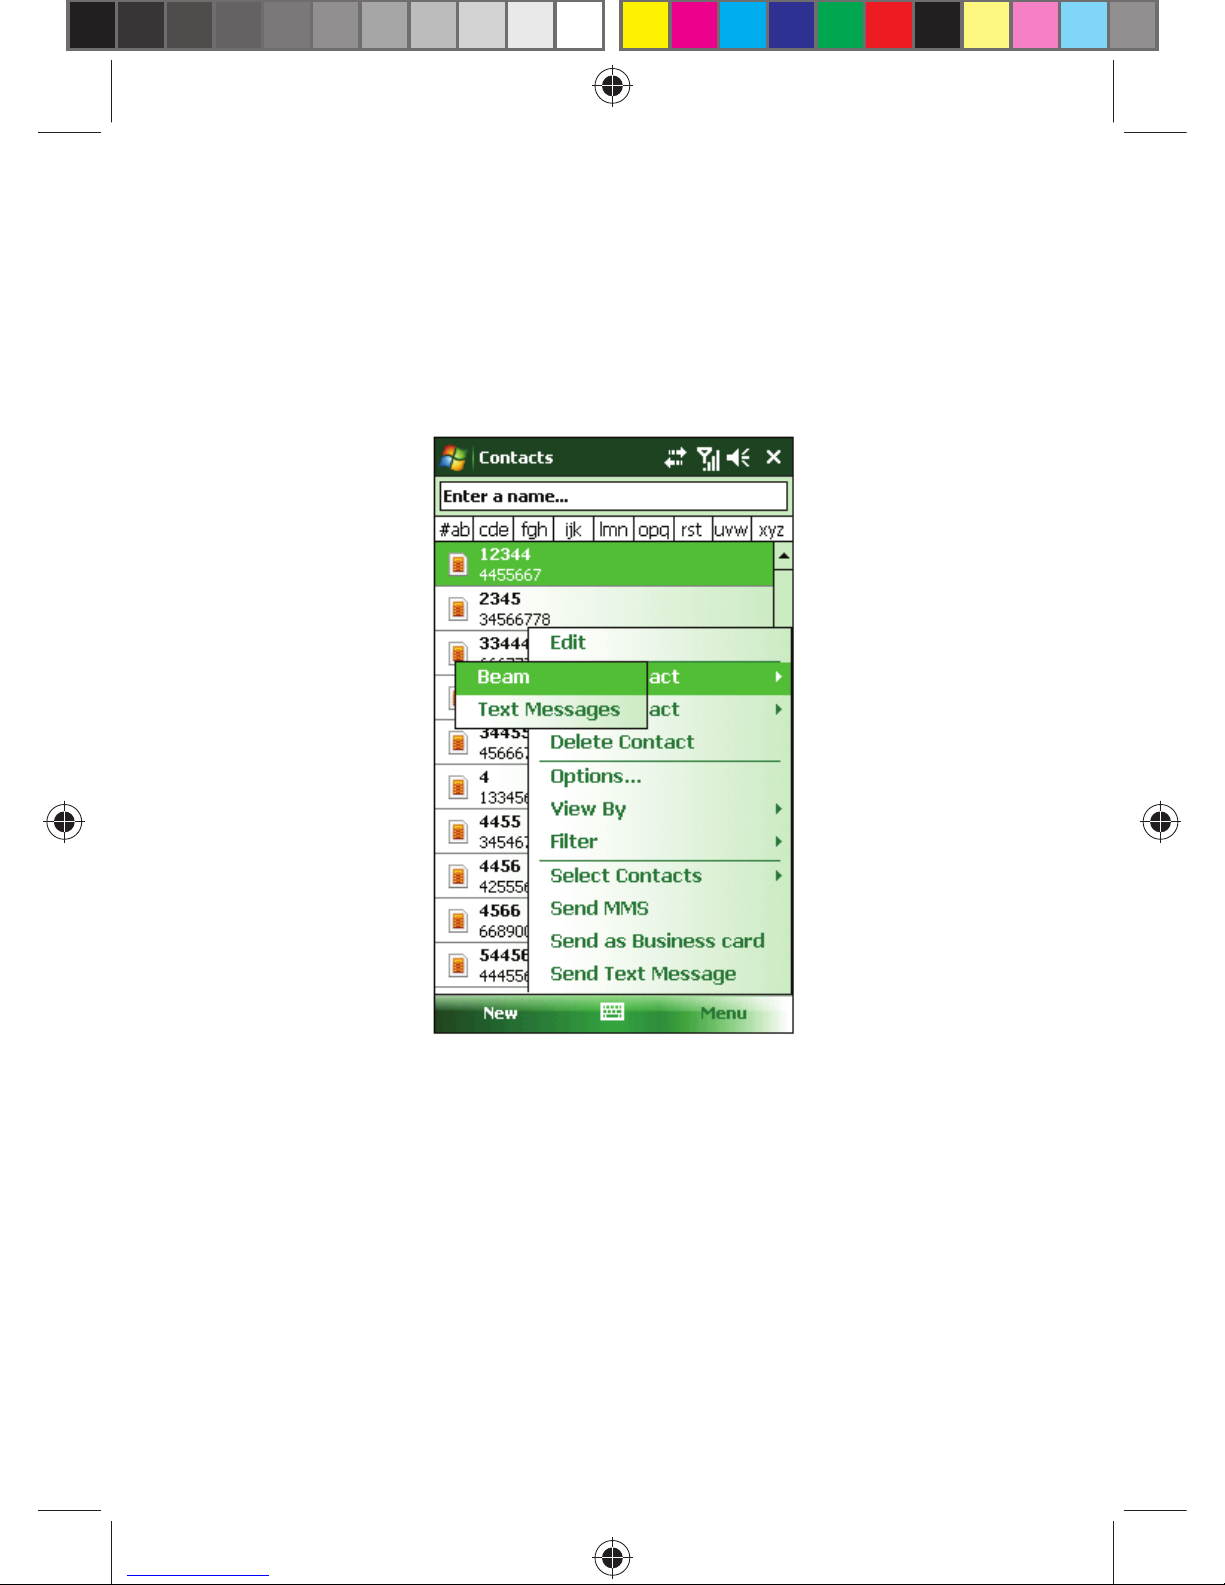
4.5 SEND CONTACTS VIA BLUETOOT
h
With Bluetooth, you may send the information of contacts to other phones
In the contact list, select Send Contact in the Menu, and then tap Beam.
The phone will then start to search for Bluetooth device. After it’s been
detected, tap Send.
4.6 DELETE CONTACTS
You may delete contacts either from the contact list or on the page
showing details.
Page 36
36
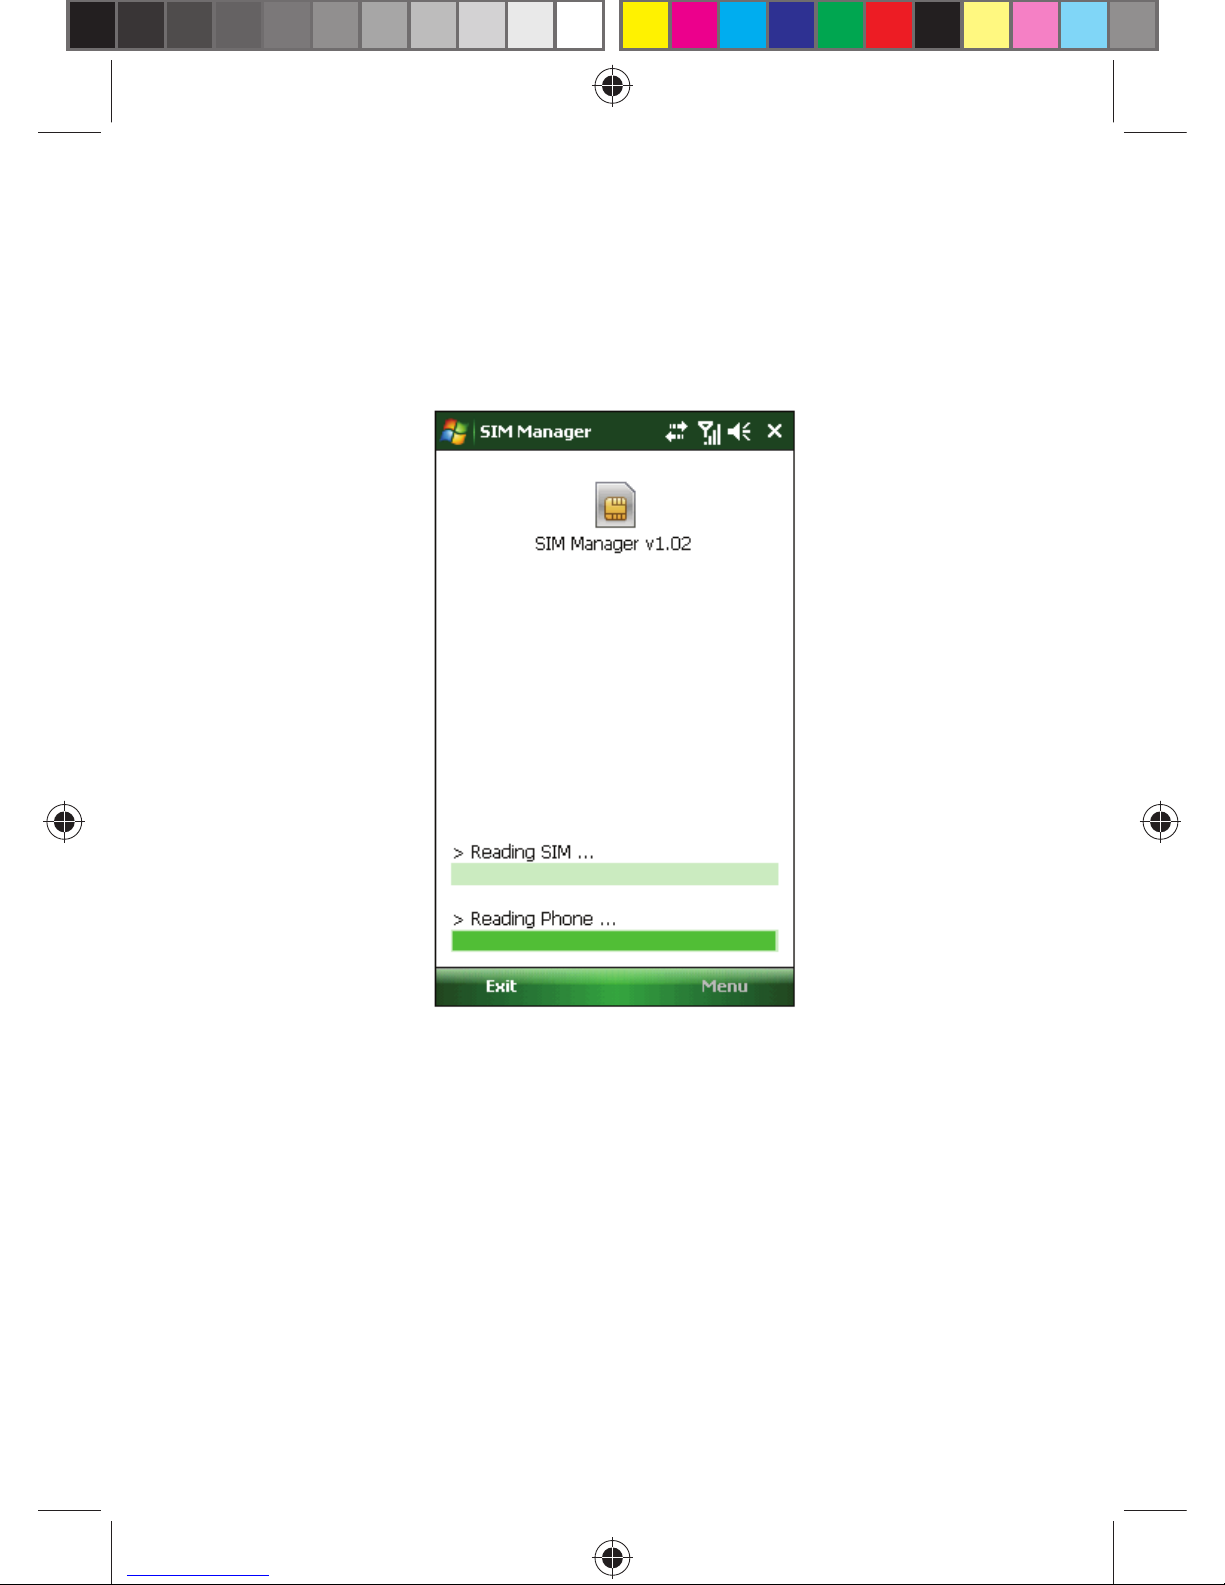
4.7 SIM MANAGER
Select Contact Admin from Programs. The contacts in the SIM card can
be saved into the phone, and vice versa. It may take a while to access
contacts information in the SIM card. After it’s done, the screen displays
contacts in the phone with a number at the top-right corner.
4.7.1 Phone Contacts
1. If there’s no contact stored in the phone, options for all other items are
grey except setting and SIM.
2. If there’re one or more contacts in the phone, you may copy all or some
of them to the SIM card or delete all or some of them.
4.7.2 SIM Contacts
The contacts in the SIM card are allowed to save only phone number. To
copy a contact to the phone, choose “Mobile”, “Home” or “Business”.
1. If there’s no contact stored in the SIM, options for all other items are
grey except setting and phone.
2. If there’re one or more contacts in the SIM, you may copy all or some of
them to the phone or delete all or some of them.
Page 37
37
5 INPUT METHOD
5.1 SIMULATION KEYBOARD
When you start a program or select a fi eld that requires text or numbers
Input Panel becomes available automatically. Input Panel provides
various input methods which is available on your device, including Block
Recognizer, Keyboard, Letter Recognizer, and Transcriber. By default, the
Input Panel icon appears on the menu bar to indicate which input method
is currently selected. The Input Selector arrow (shown at the right side of
the Input Panel icon) opens a list of available input methods.
Show or hide Input Panel
• Tap the Input Panel icon on the menu bar.
Example:
Icon Input Method
The On-Screen Keyboard.
Letter Recognizer or Block Recognizer.
Transcriber
Page 38

38
5.1.1 Use the Keyboard
To enter text, symbols, and numbers, you can use the standard On-
Screen Keyboard.
Use the standard On-Screen Keyboard.
The On-Screen Keyboard is available when text entry is possible. You
can enter text by tapping keys on the keyboard that are displayed on the
screen.
Enter text using the On-Screen Keyboard.
1. In a program, tap the Input Selector arrow, and tap Keyboard.
2. Enter text by tapping keys on the On-Screen Keyboard.
Enlarge the On-Screen Keyboard.
1. Tap the Input Selector arrow, and then tap Options.
2. In the Input Method list, select Keyboard.
3. Tap Large Keys.
5.1.2 Use Letter Recognizer
With using Letter Recognizer, you can write individual letters, numbers,
and punctuation, which can be converted into typed text.
1. Insert numbers and symbols in the designated writing area.
• Enter capital letters by writing in the ABC (left) area of the box.
• Enter lower case letters by writing in the abc (middle) area of the box.
• Enter numbers by writing in the 123 (right) area of the box.
• Enter punctuation and symbols by tapping in either area of the box and
then writing the desired characters.
5.1.3 Use Block Recognizer
With Block Recognizer, single stroke can be used to write letters, numbers,
symbols, and punctuation, which can be converted into typed text.
1. In a program, tap the Input Selector arrow, and then tap Block
Recognizer.
2. Write characters, numbers, and symbols in the designated writing area.
• Enter letters by writing in the abc (left) area of the box.
• Enter numbers by writing in the 123 (right) area of the box.
Page 39

39
• Enter symbols and punctuation by tapping in either area of the box and
then writing the desired character.
5.1.4 Use Transcriber
Transcriber is a handwriting recognition program that allows you to write
in cursive, print, or a combination of both. Transcriber works transparently
in the background of programs, recognizing words with its integrated
dictionary. When Transcriber is turned on, it interprets stylus movement
anywhere on the screen as handwriting input. For more information about
using Transcriber, see Help on your device.
Start Transcriber
1. Start a program that accepts user input, such as Word Mobile.
2. Tap the Input Selector arrow, and tap Transcriber. The Transcriber
introductory screen appears.
5.1.4.1 Write using Transcriber
1. In a program, position the cursor where the text should be appear.
2. Use the stylus to write anywhere on the screen. The handwriting will be
converted to text shortly after you lift the stylus from the screen.
5.1.4.2 Enter punctuation and symbols
Transcriber comes with an on-screen keyboard that provides an easy way
to add punctuation or a special symbol to existing text.
• In a program, tap on the Transcriber toolbar. The keyboard remains
visible the button is tapped again.
Tips:To reposition the keyboard, tap and hold the title bar, then drag to
the desired location. When no text is selected, you can also open the
keyboard by doing the Gesture.
5.1.4.3 Edit text
1. In a program, draw a line across the text which is desired to edited.
2. After you lift the stylus from the screen, the line will disappear and the
selected text will be highlighted.
5.1.4.4 Rewrite the text
Use gestures to capitalize letters, insert a space, and so on. For information
about using gestures, see “Transcriber Gestures” in this chapter.
o
Page 40
40
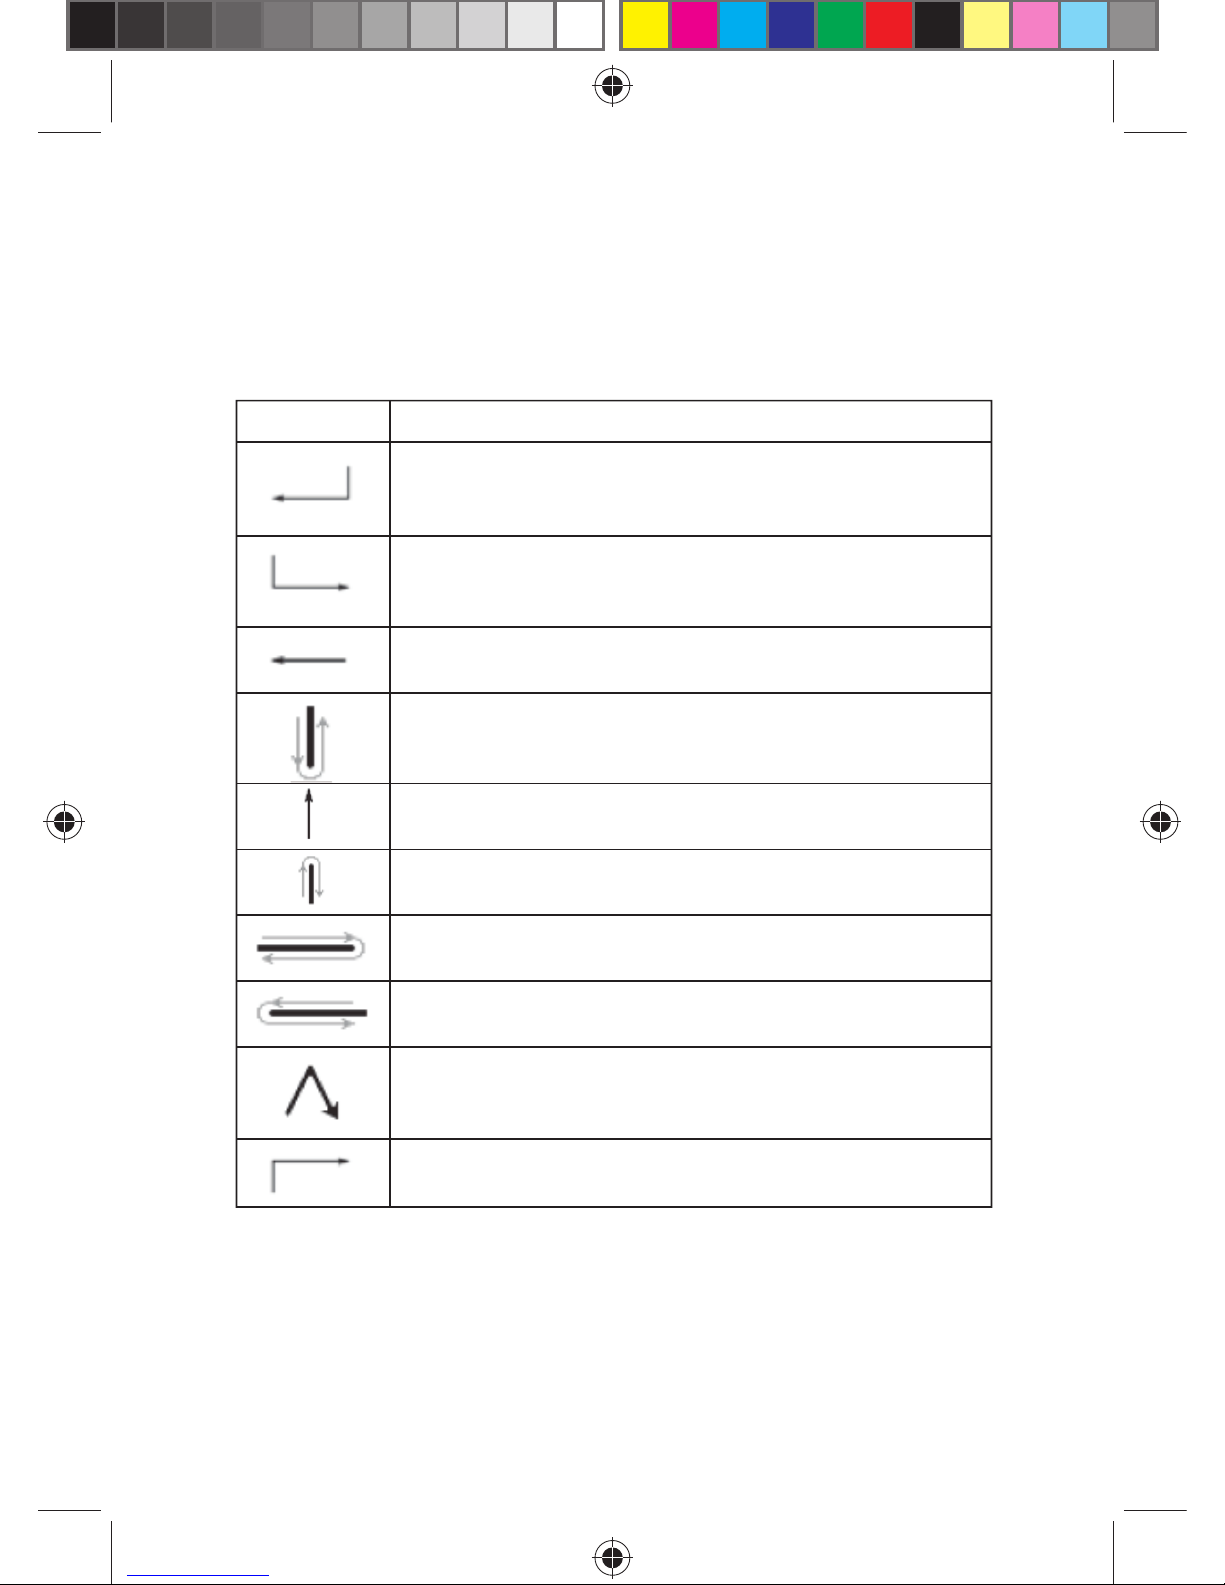
5.1.4.5 Transcriber Gestures
Use quick strokes of the stylus to edit your text or to insert returns, spaces,
or tabs.
Tip Enter, Space, and Backspace buttons can also be used with the
Transcriber toolbar.
Do To
Insert a paragraph return at the cursor. The horizontal portion
of the gesture must be at least two times longer than the
vertical portion.
Insert a space at the cursor. The horizontal portion of the
gesture must be at least two times longer than the vertical
portion.
Move the cursor one space back and erase any text. Do the
gesture by drawing a line from right to left.
Open the menu of alternate words if a word is selected or the
on¬screen Transcriber keyboard if no text is selected. Do the
gesture by drawing a line straight down and back up.
Change the capitalization of a selected letter, word, or block
of text. Do the gesture by drawing a line straight up.
Undo the last action. Do the gesture by drawing a line straight
up and back down.
Copy the selected text. Do the gesture by drawing a line from
left to right and back.
Cut the selected text. Do the gesture by drawing a line from
right to left and back.
Paste copied or cut text. Do the gestures by drawing a line
from the lower left of the screen diagonally up toward the right
and back down to the right.
Insert a tab. The horizontal portion of the gesture must be at
least two times longer than the vertical portion.
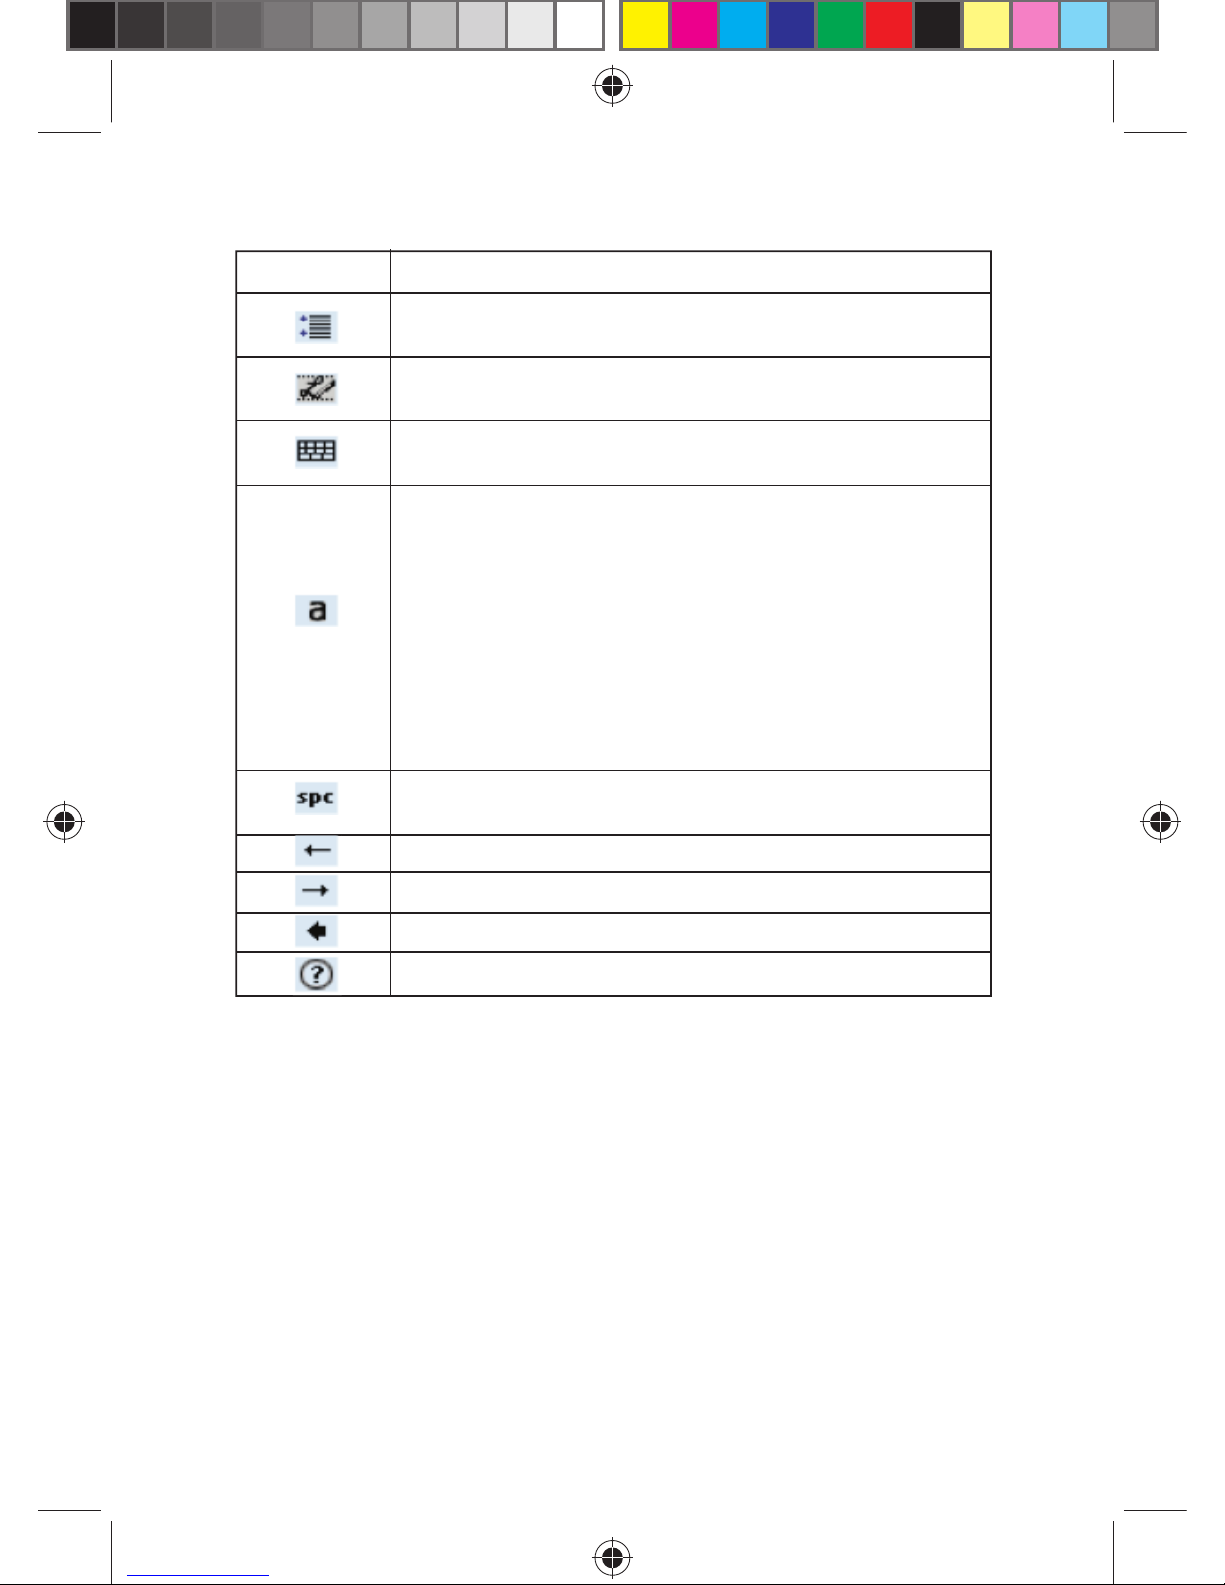
5.1.4.6 The Transcriber toolbar
The Transcriber toolbar, which appears at the bottom of the screen when
Transcriber is open, provides easy access to several tools, Enter, Space,
Backspace buttons, Left and Right arrow buttons.
Page 41
41
Tap To
Open the Options dialog box, where you can set options such
as writing direction, text entry, and shorthand.
Open Letter Shapes, where you can set your personal writing
styles to maximize recognition.
Use the miniature keyboard to quickly enter numbers,
punctuation, and other symbols.
Change the character recognition mode.
• a mode. This is the default for optimum handwriting
recognition.
• 123 mode. Numbers and some letters are allowed and the
calculator is activated.
• A mode. All letters are automatically capitalized.
If you are in A or 123 mode, recognition returns automatically
to the default mode once you lift the stylus.
Insert a space at the cursor.
Insert a paragraph return at the cursor.
Move the cursor one space to the left.
Move the cursor one space to the right.
Move the cursor one space back and erase any text.
Open Transcriber Help.
Page 42
42
6 MESSAGING
You may edit, send and receive text messages, MMS or emails.
6.1 TEXT MESSAGE
The service for text messaging is offered by your service provider.
Wireless subscribers can send and receive brief text messages.
Before sending the fi rst text message from your phone, make sure the
number of SMSC has been set. Contact your service provider for the local
number.
6.1.1 Read Text Messages
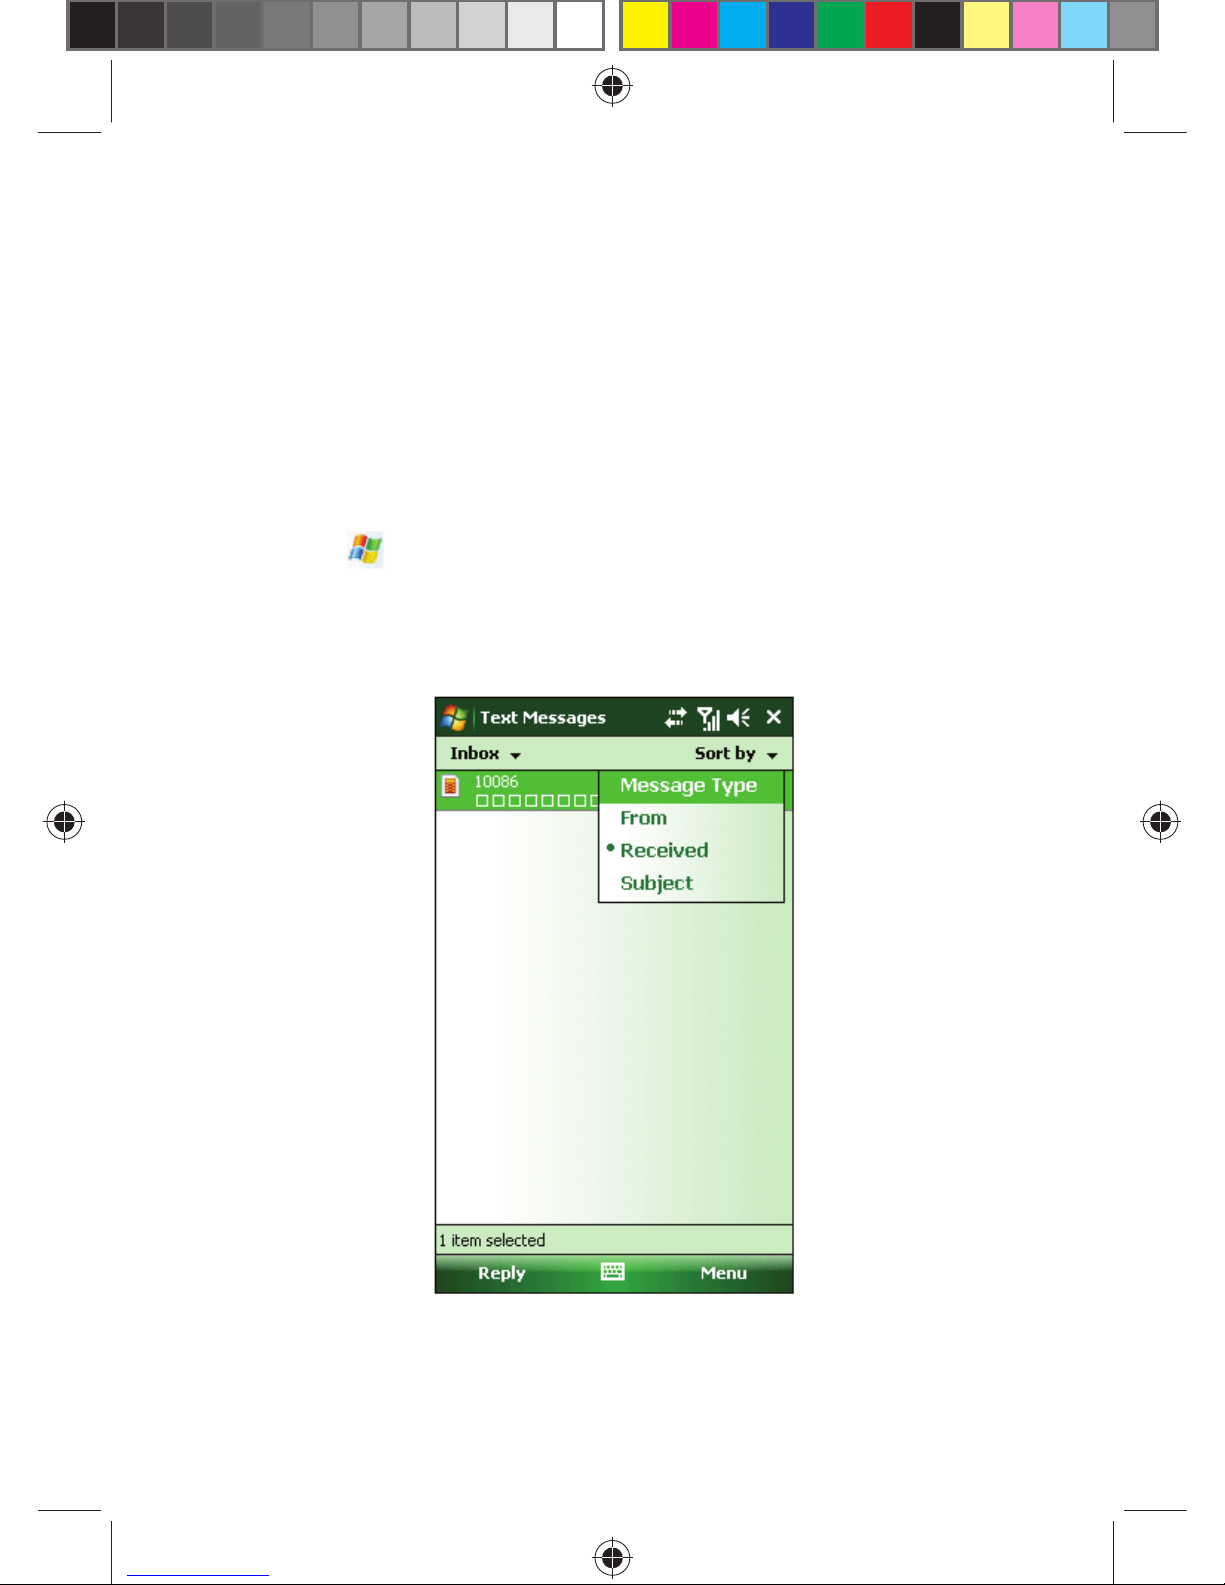
Tap and then select Messaging. By default, the text message Inbox
appears.
The message list displays part of the text.
In the Inbox, tap Received to sort text messages
To open a message, tap it with the touch pen, or press the navigation key
to scroll the highlight bar and then press the Center key. Tap Menu for
other options.
Page 43
43
6.1.2 Edit Text Message
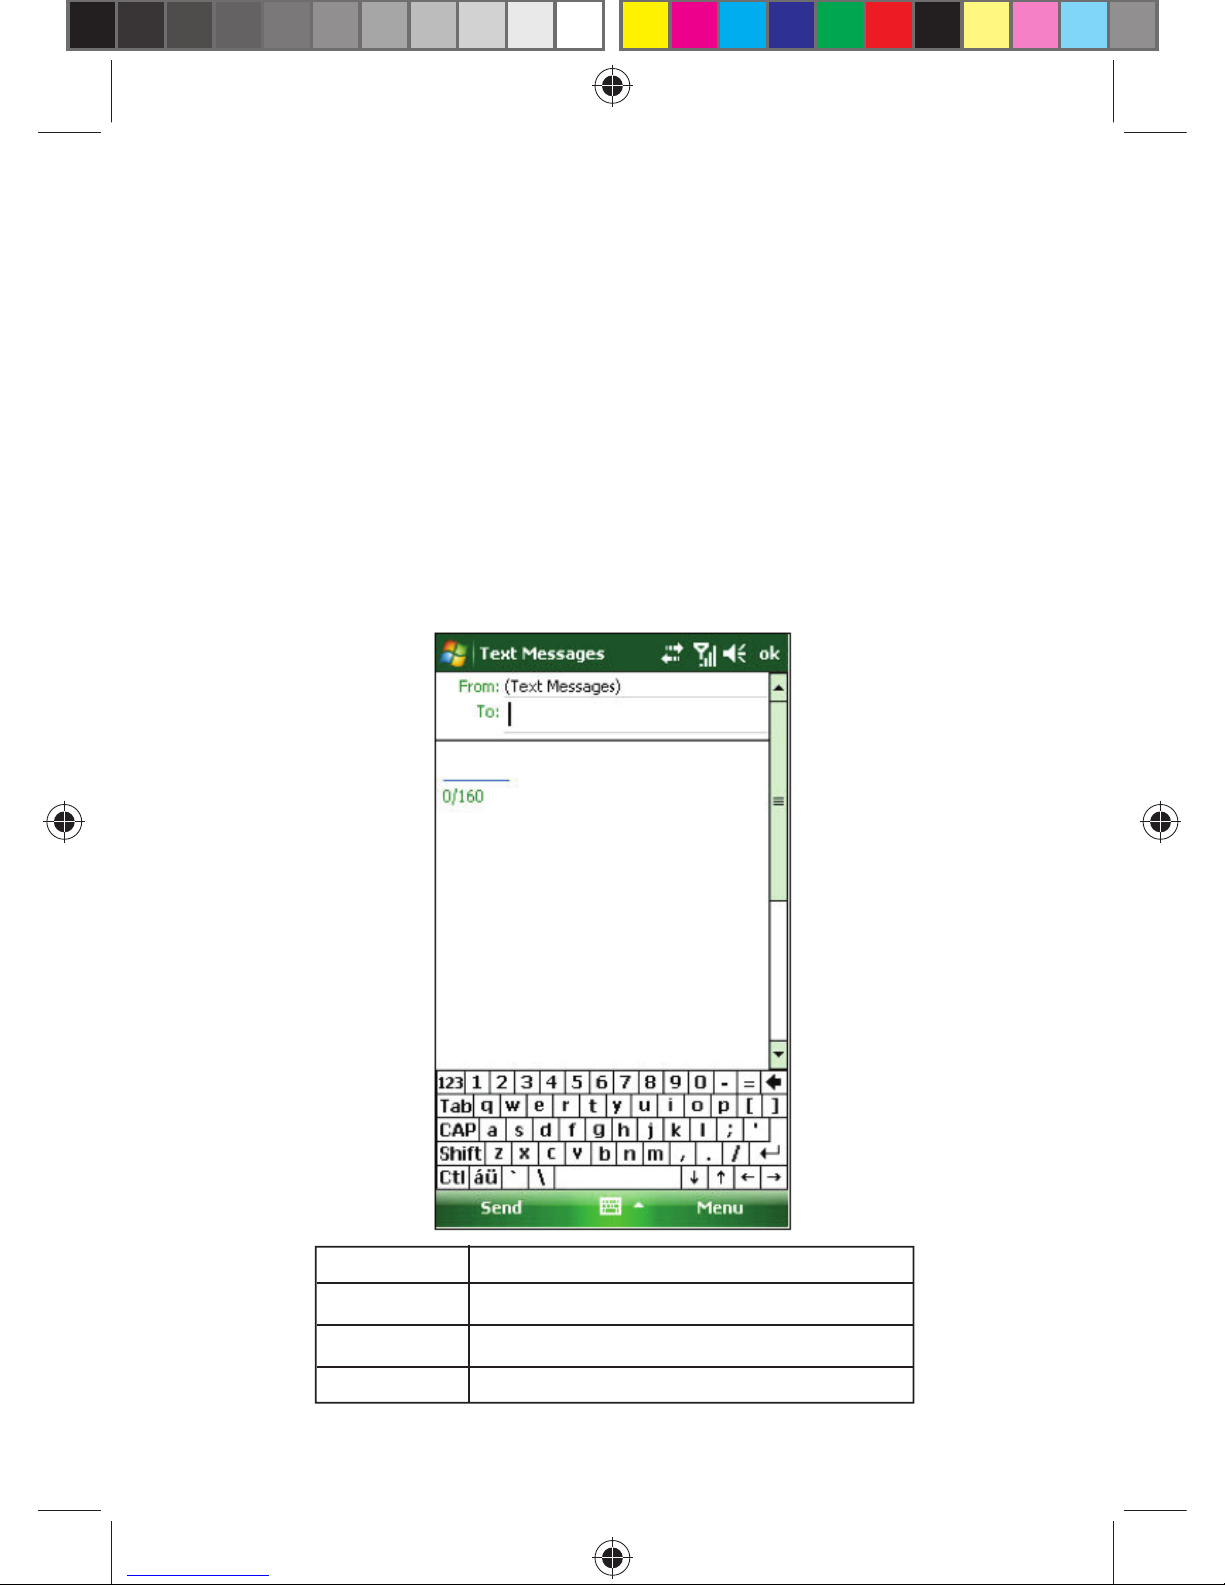
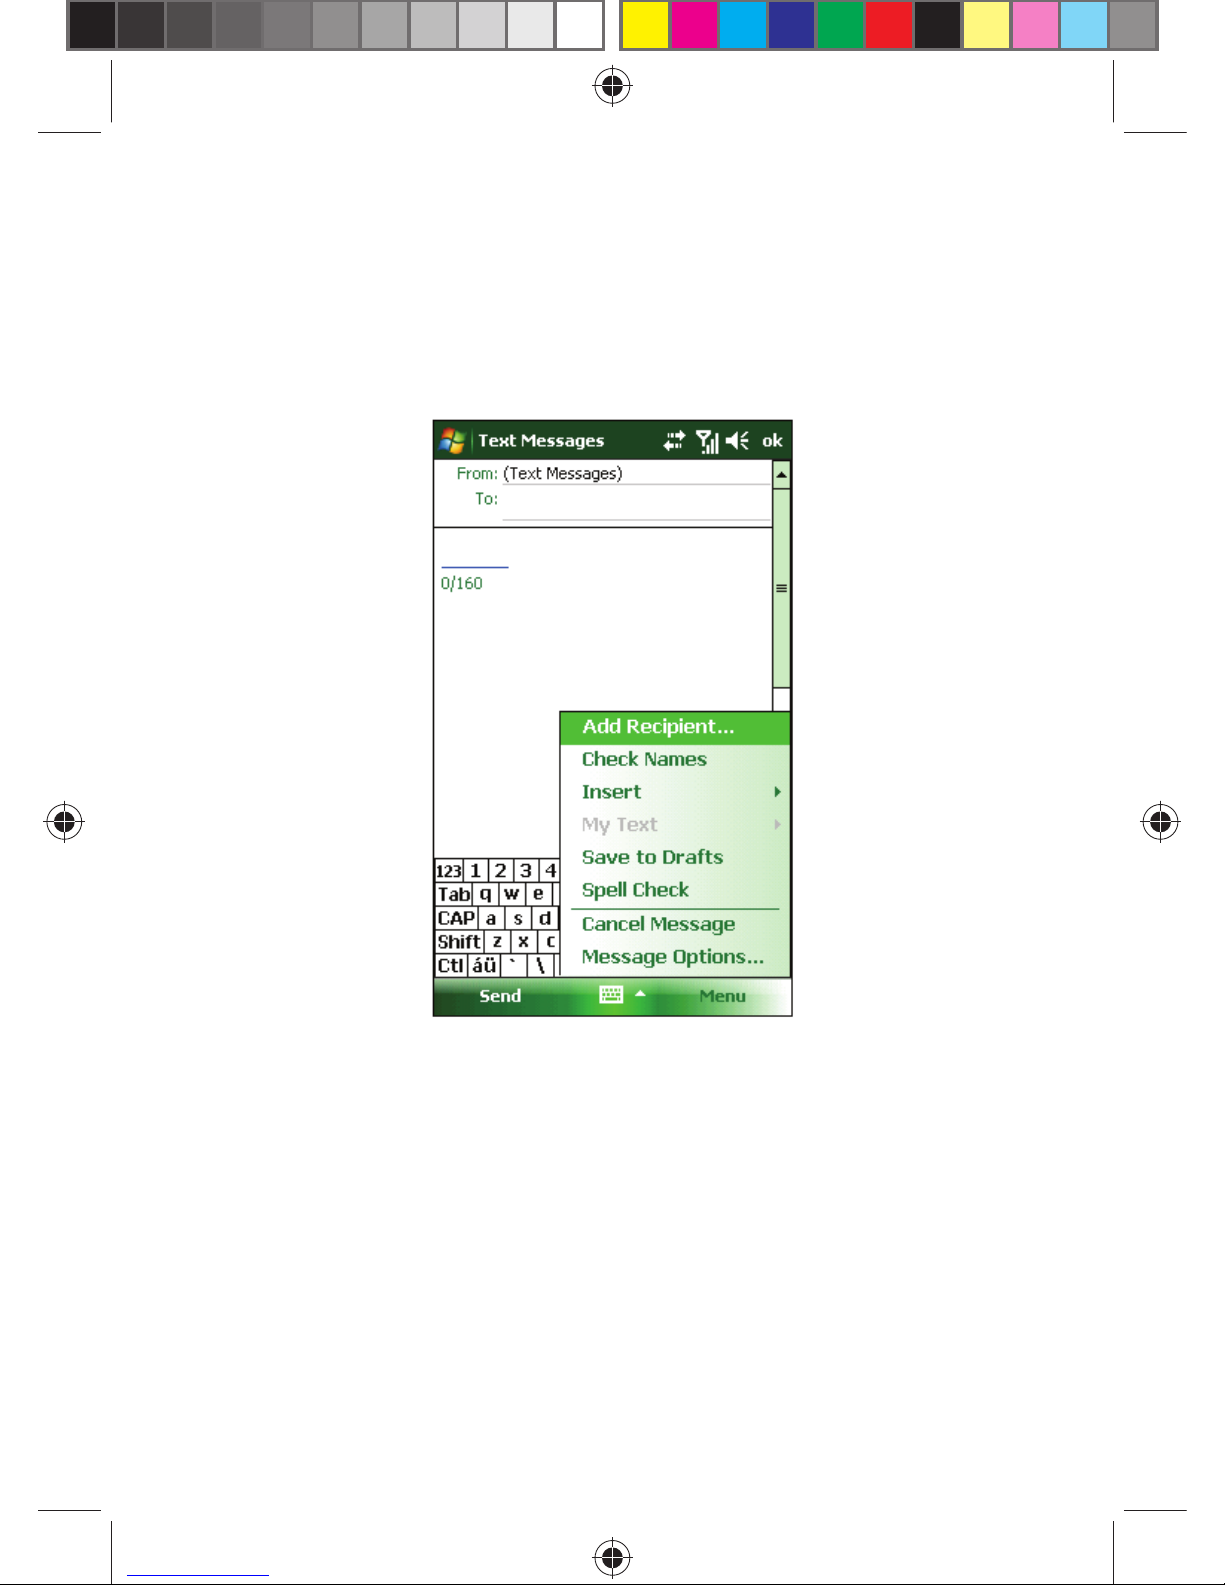
In the Inbox, tap Menu; select New to open the editing box.
Enter the recipient’s phone number in the “To” box, or select Add
Recipient… in the Menu and then choose a phone number. Your phone
supports group sending to multiple recipients.
After specifying the recipient, press the navigation key to move the cursor
to the editing box.
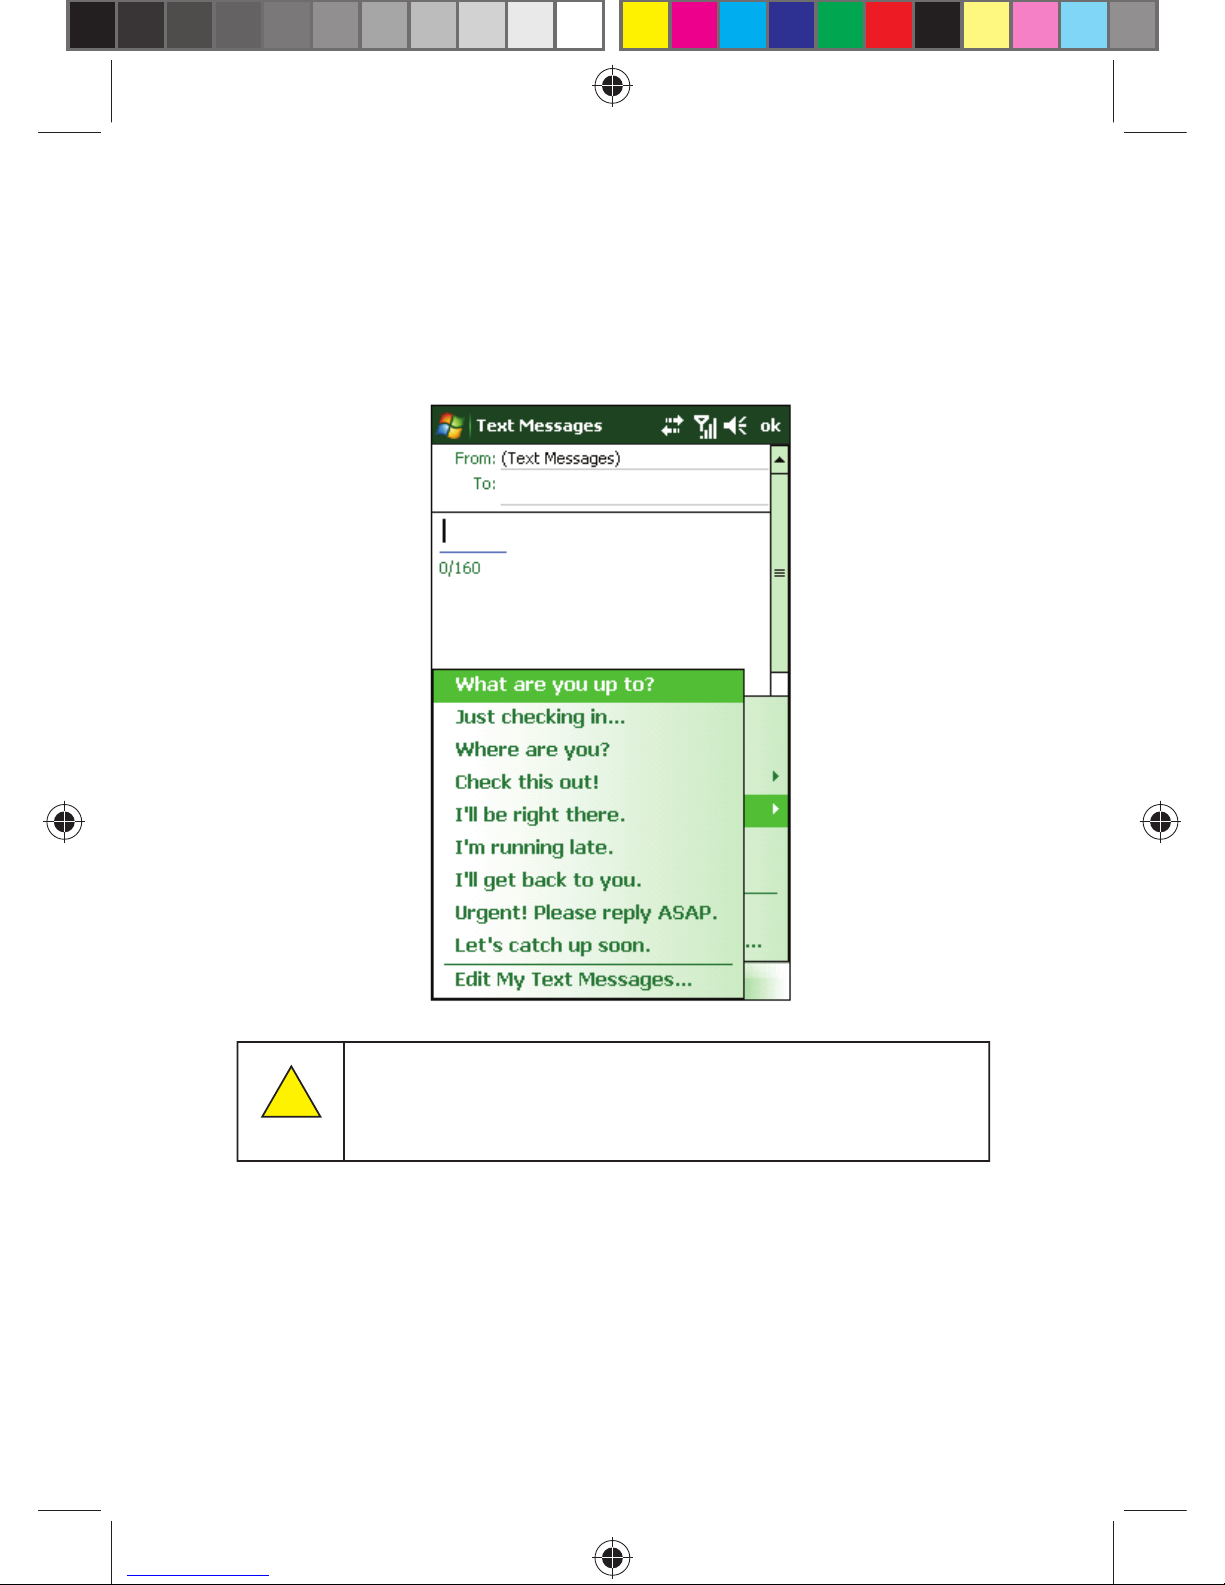
Select My Text in the Menu to display common phrases for you to choose
from.
Page 44
44
At the lower-left of the editing area shows the number of characters
already entered and the total number allowed.
After fi nishing your text message, tap Send. By default, the message will
be saved in the Sent Items.
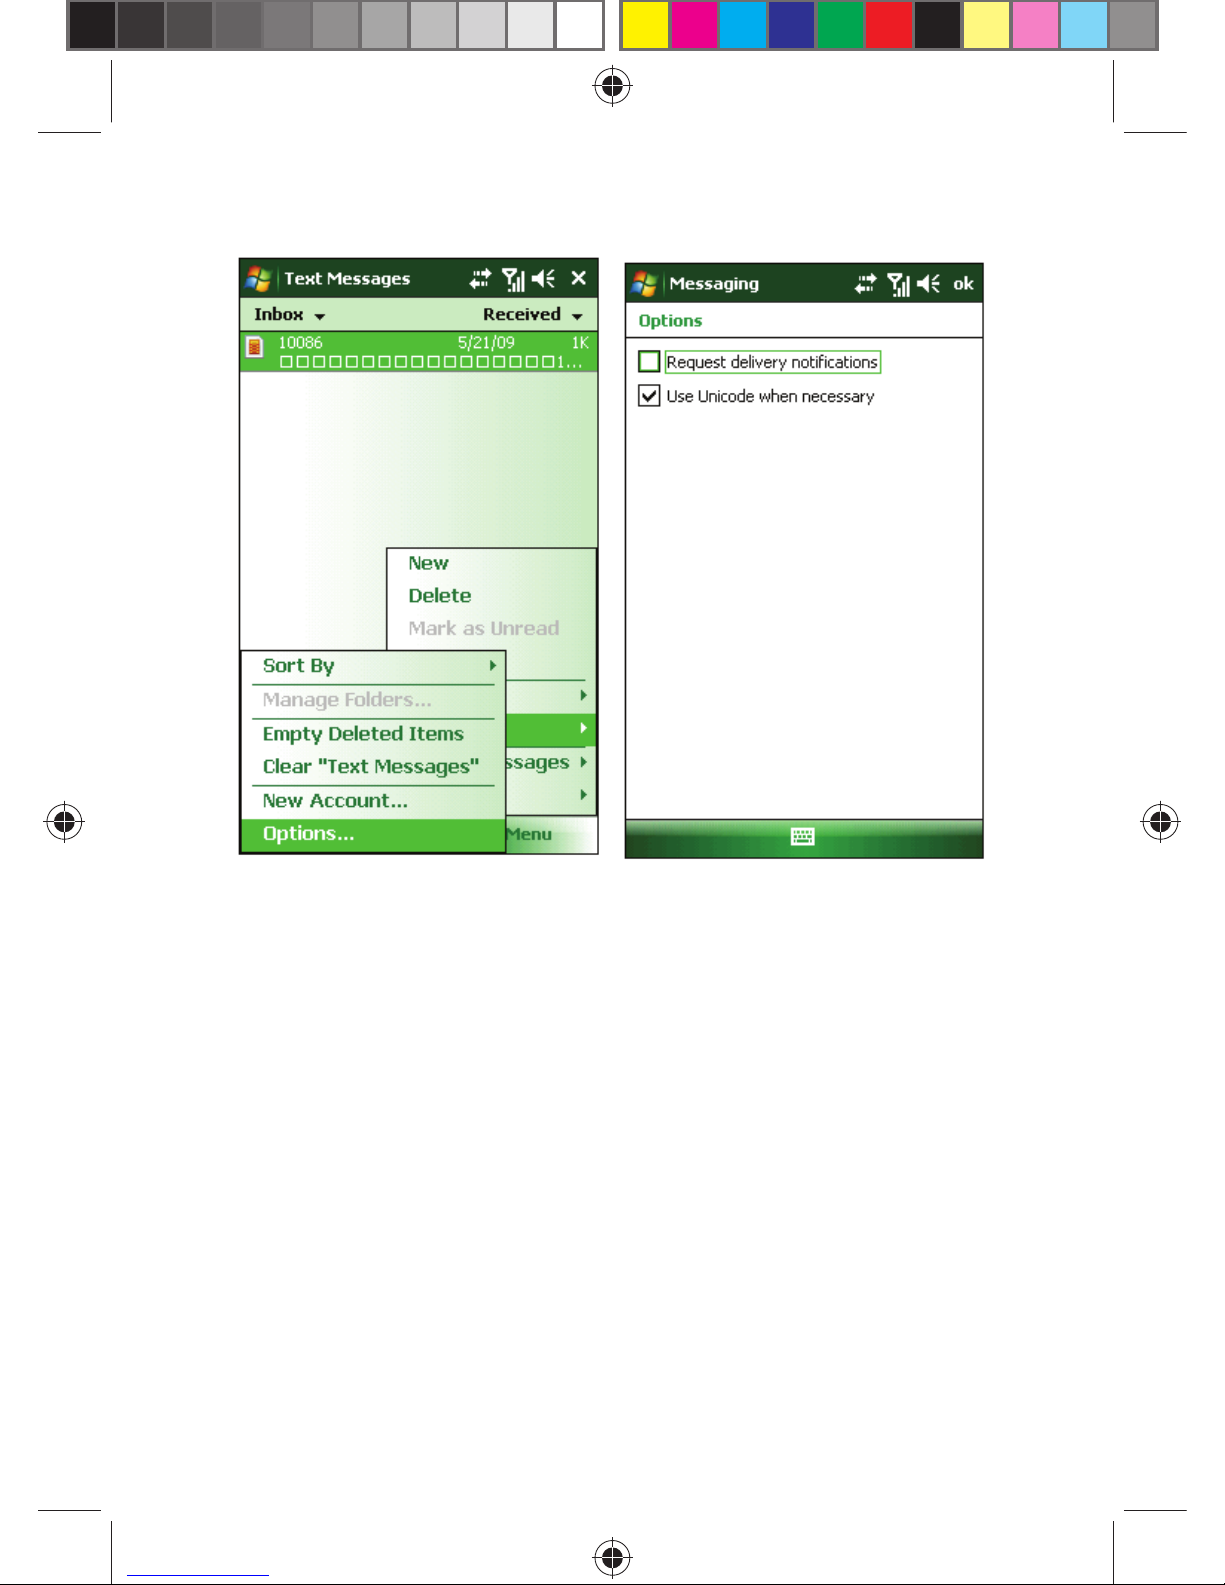
If you have problems sending or reading text messages check
the following settings – tap Menu -> Tools -> Options, tap
“Text Messages”, and then make sure “Use Unicode When
Necessary” is selected.
!
Note:
Page 45
45
6.2 OUTLOOK
Your phone can send and receive emails as long as your service provider
supports this feature. Connect the phone with your PC through a USB
cable and use ActiveSync to synchronize with the Outlook.
Page 46
46
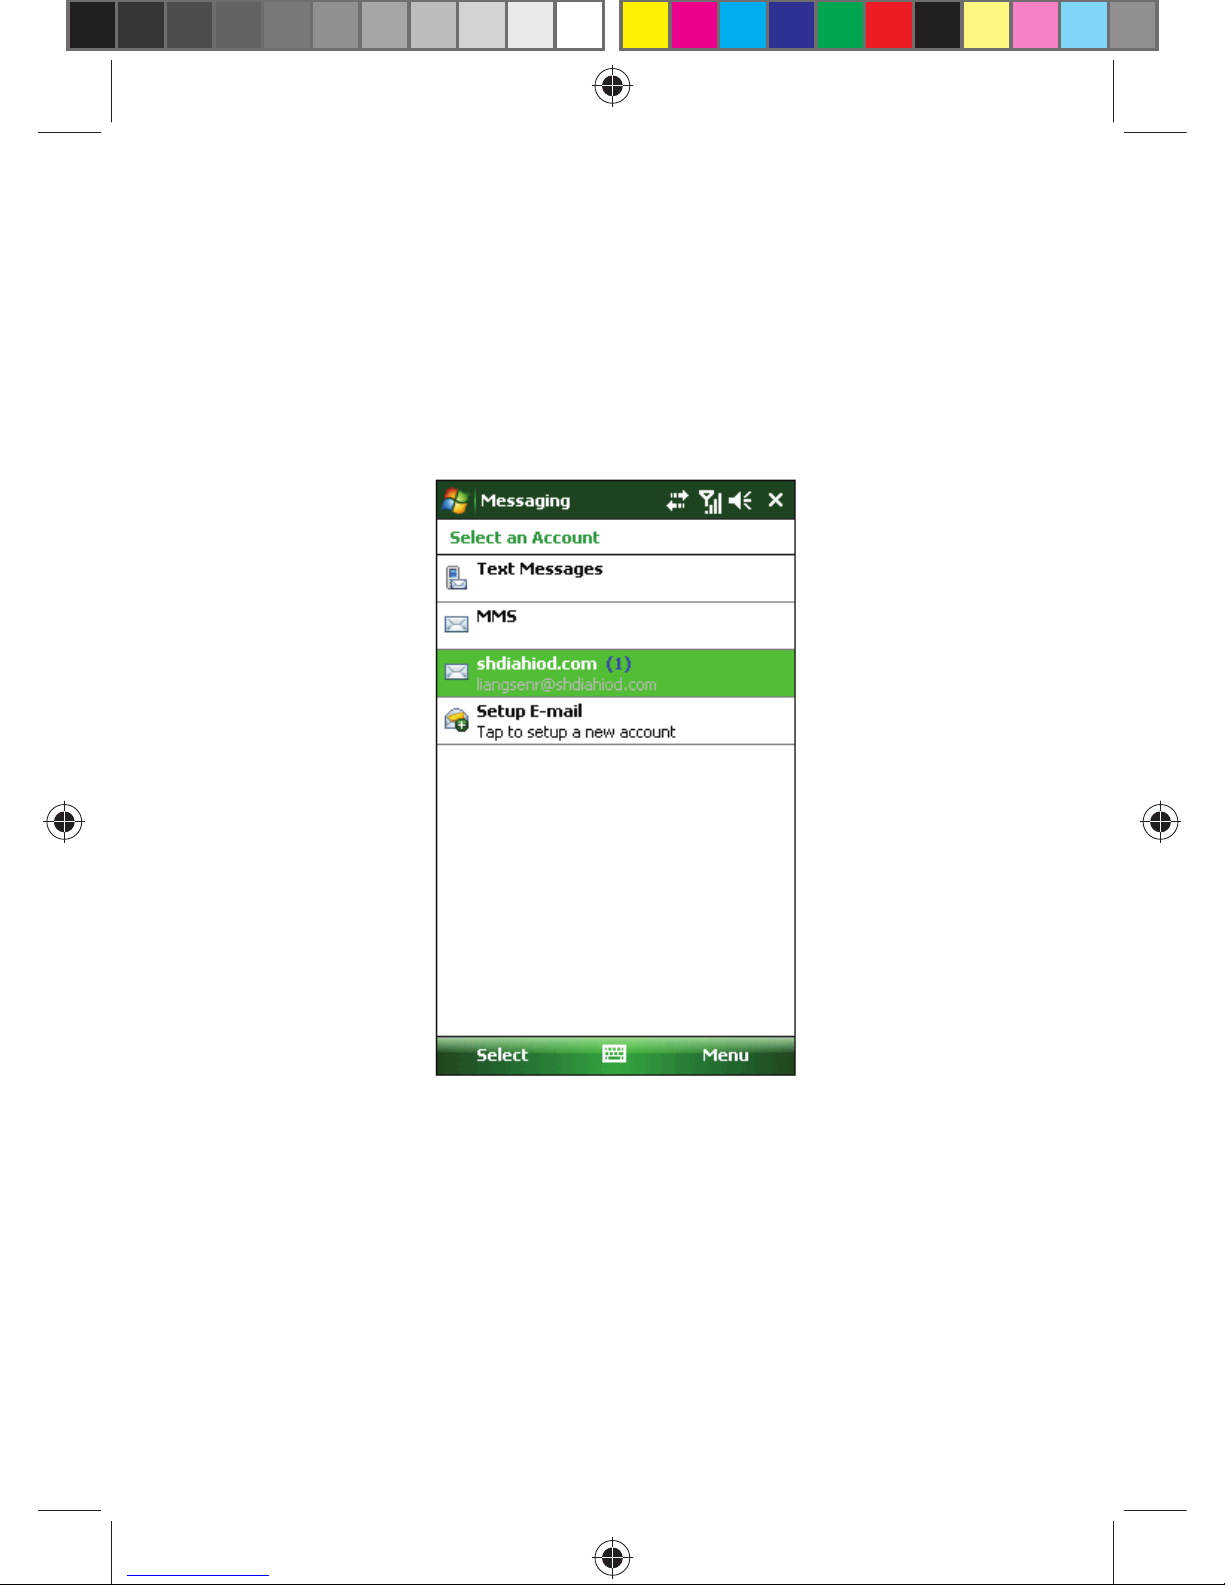
6.2.1 Add New E-mail Account
Your phone supports POP3/IMAP4.
Follow the steps shown below. If you have any questions, contact your
service provider.
To set up a POP3 mailbox,
Select Start -> Messaging -> New E-mail Account;
• Enter your E-mail address;
• The phone will try to set up the E-mail account;
• Select your provider;
• Enter your name and the account display name;
• Specify the server addresses for sending and receiving E-mails. You
may obtain these addresses from your provider;
• Enter your name, E-mail address and password;
• Enter the server address for sending E-mails;
Page 47

47
• Tap Option on the last screen where you can specify the time interval
to connect and check for new mails;
• To send an E-mail, you are required to select ID verifi cation ;
• Tap Review All Download Settings on the last screen where you can
specify the time interval to connect and check for new mails; tap Finish
to exit;
• Tap Send/Receive in the Menu to receive new E-mails and send the
E-mail(s) in the Outbox.
6.2.2 Send E-mail
Before you send or receive the fi rst E-mail from this phone, set up your
account (refer to settings) and the network (it’s ready with default values).
1. In Outlook, tap New to edit a new E-mail;
2. Enter the recipient’s E-mail address. If the contact’s information
contains the E-mail address, you may tap Add Recipient… in the Menu.
Multiple recipients can be added.
3. After entering the E-mail address and the subject, press the navigation
key to move the cursor to the editing box. To write an E-mail, refer to
Input method
4. After compiling the E-mail, tap Send to move it to the Outbox; select
Send/Receive in the Menu before it can be actually sent out. By default,
a copy will be kept in Sent Items.
6.2.3 Send Email from Outlook
If your service provider or the SIM in your phone does not support E-mail,
you may send it through Outlook on your PC that has access to the
Internet.
1. Compile an E-mail in Outlook E-mail and then tap Send. The E-mail is
kept in the Outbox.
2. Launch ActiveSync in your PC, and connect your phone to the PC
through a USB cable.
3. After the PC has detected your phone, it shows the connection on the
screen. Tap Next.
4. On the item selection screen, select E-mail and then tap Next until
fi nish.
5. The synchronization starts. After it’s done, the E-mail(s) in the Outbox
are transferred to the Outbox in Outlook.
6. Press Send/Receive in Outlook to start sending.
Page 48
48
6.3 MMS
MMS contains text, pictures, audio and other multimedia that can be
transmitted instantly between mobile devices, or between mobile device
and the Internet. Before sending or receiving an MMS, confi gure the MMS
center.
Edit and send MMS
• Tap Menu, and select New to open the editing box. You can customize
the template or choose favorite send MMS, MMS to open the editor
interface. Options include BCC, CC, To, Subject, Insert Image or Video,
Audio and Insert Text.
• Enter the recipient’s phone number in “To” or click on the “recipient”
to enter from the contact list. Your phone supports group sending to
multiple recipients.
• Specify BCC, CC and Subject, tap Insert Image or Video, Insert Text
or Insert Audio, depending on your choice. To discard the message,
select Cancel Message in the Menu.
• Select Add Recipient in the Menu to display the contact list (of both the
SIM card and the phone), and then choose a contact or phone number.
The contact’s name will then automatically be inserted into “To”. Of
Page 49
49
course, you can also choose to contact the lower right corner of the
menu Click Interface to create a new contact.
• Select Insert in the Menu; the sub-menu contains Image or Video,
Audio, Record Audio, Test, Frames, Templates and Attachment.
Select one of them to display the screen for fi le selection. If the fi le list
is empty, you may create a new one.
• Select Priority in Menu; choose High, Normal, Low Priority.
• From the Menu in the MMS, you can also choose Recipients, Insert, My
Text, Slide, Remove, Preview, Save To and cancel message. Process
each of which there are specifi c operation.
• After editing, tap Send.
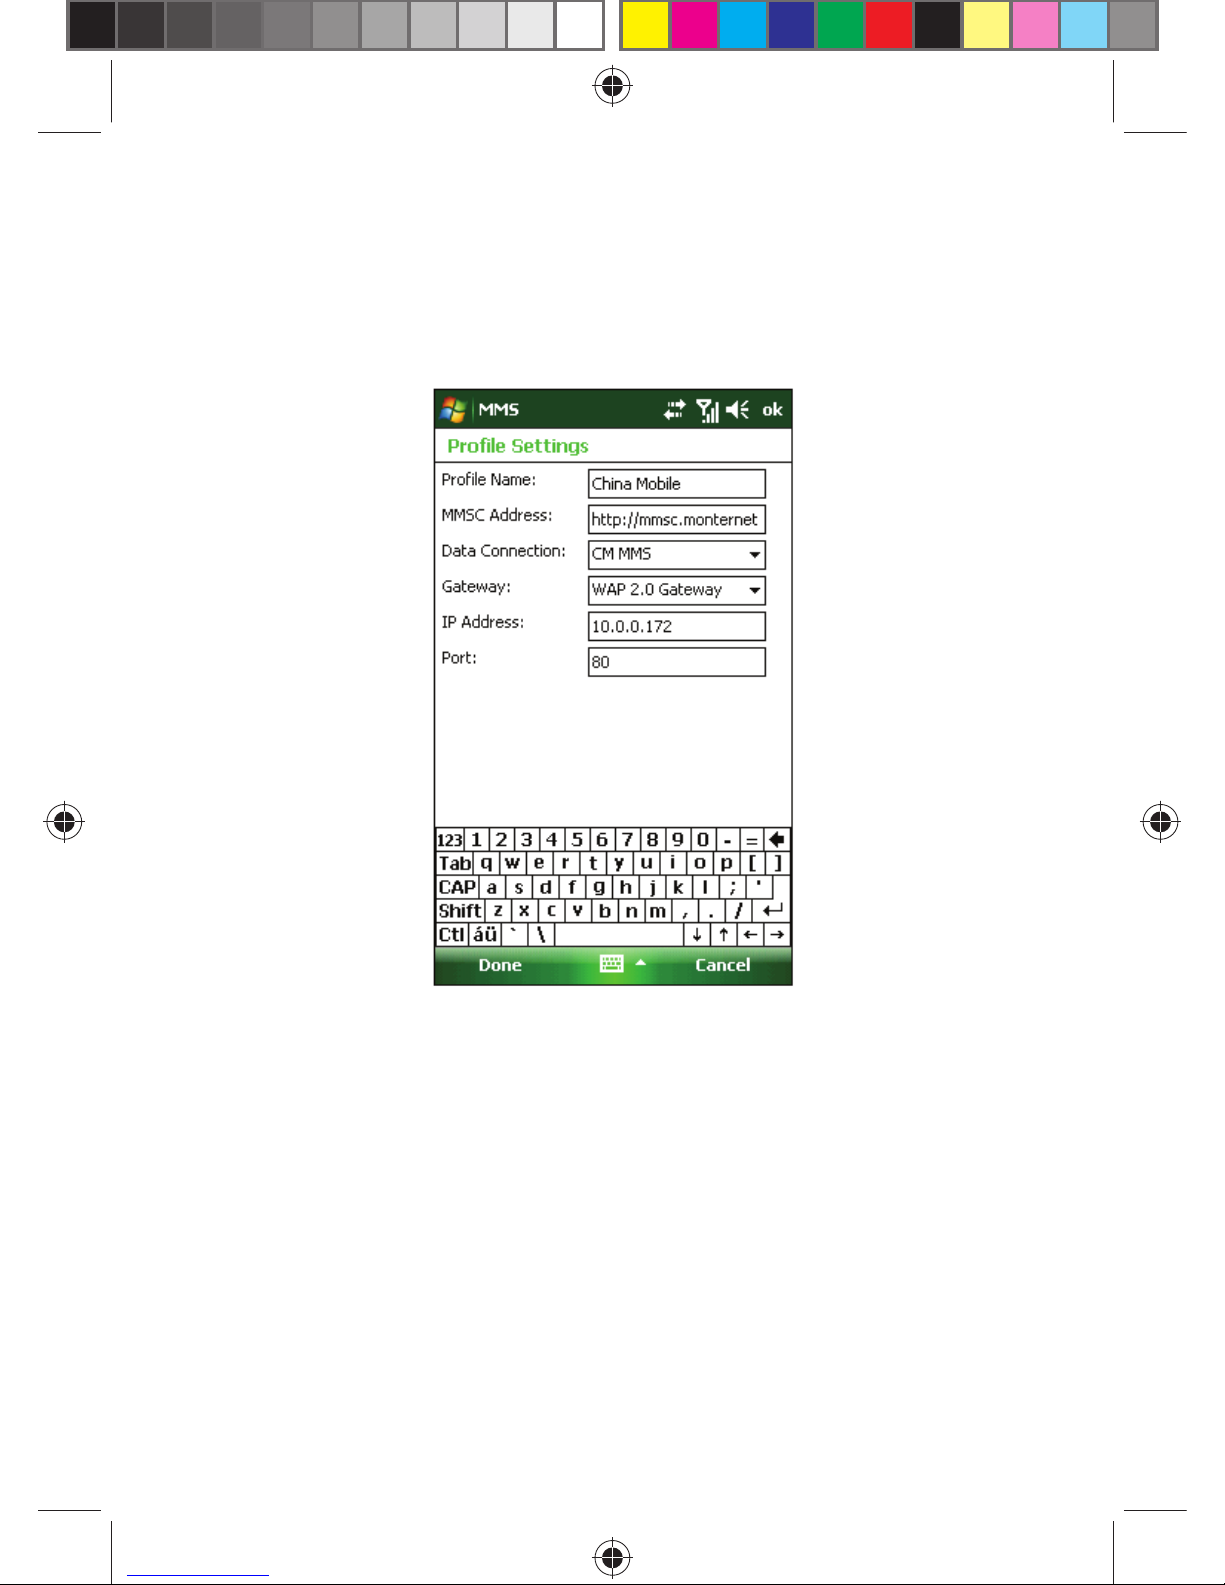
6.3.1 Change MMS settings
Check your device to see if it is confi gured with your wireless service
provider’s MMS settings. If the MMS settings are not yet confi gured on
your device, you can add the settings while composing an MMS message.
To confi gure MMS message settings
1. Tap Start->Messaging
2. Tap Menu->Options->MMS
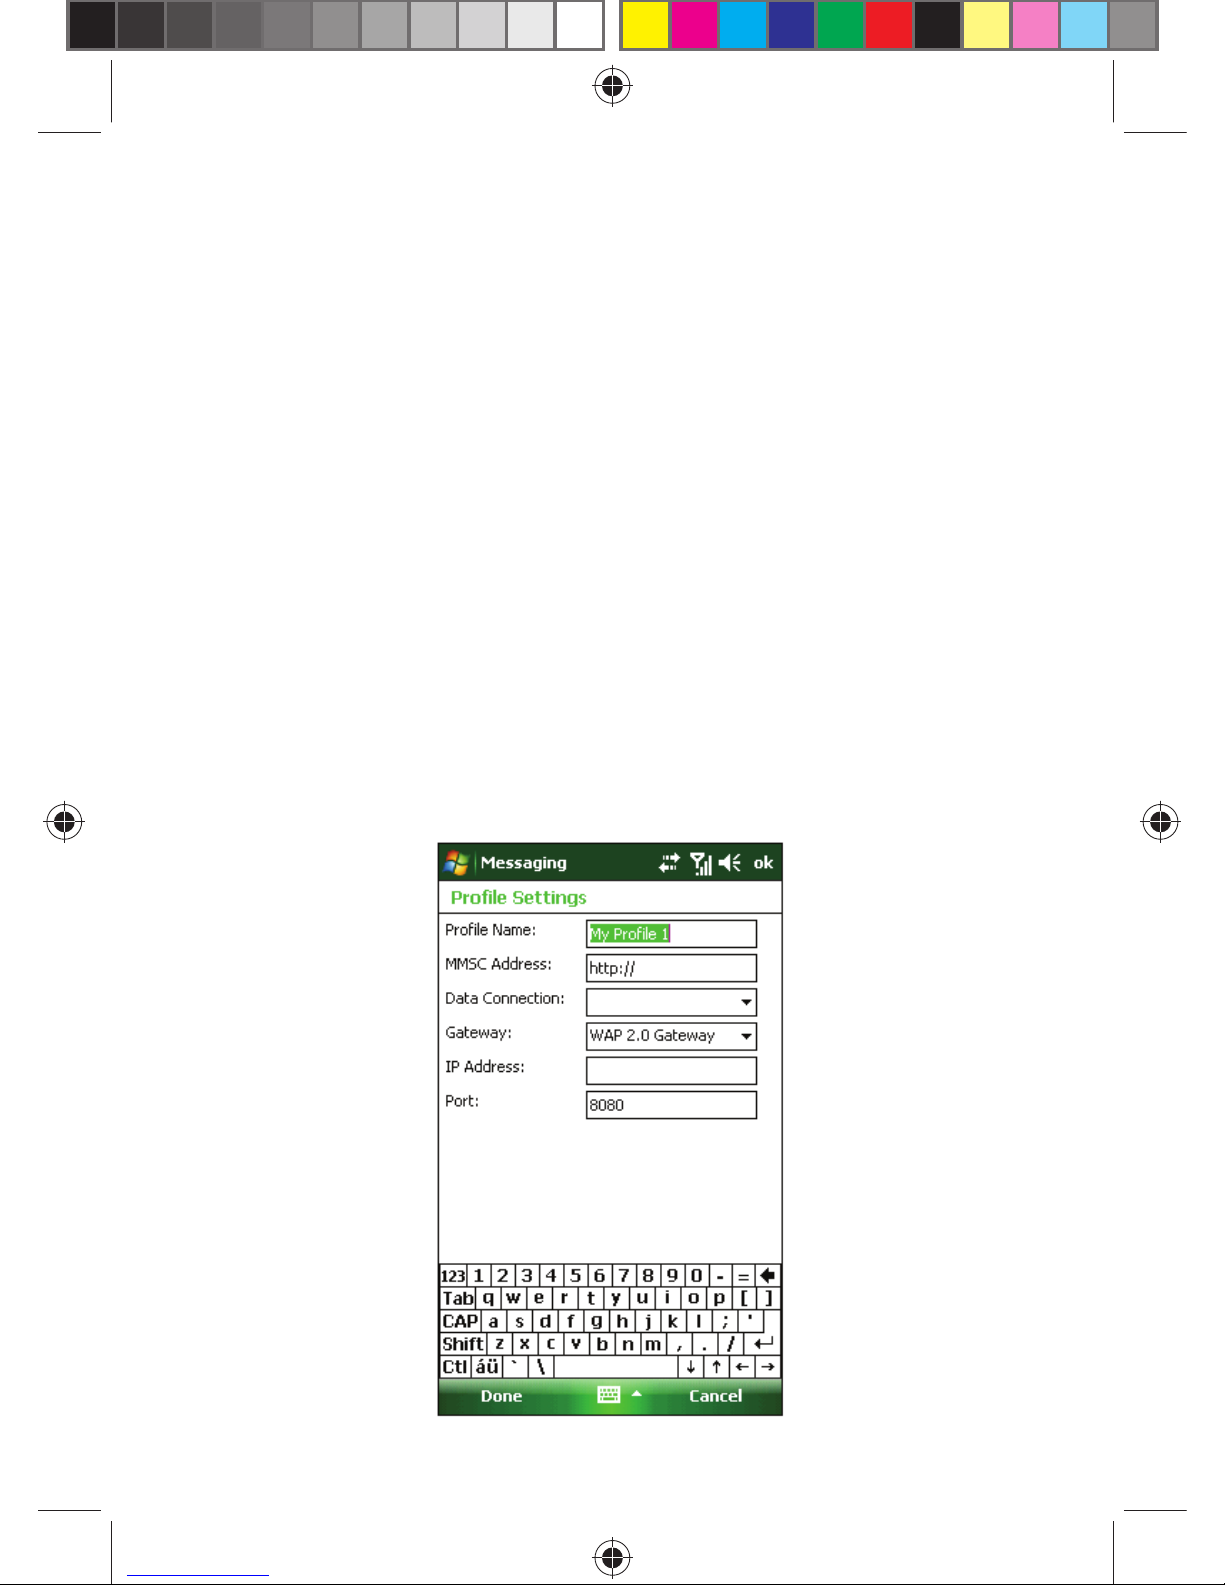
3. Tap MMS Profi les
4. Tap NEW
Page 50
50
• MMSC - URL address of the server where MMS messages are stored.
• Data Connection - Select the connection that your device uses for
MMS messages.
• Gateway - Select either WAP 1.0 or WAP 2.0, depending on which one
is being used by your other Wireless Service Provider.
• IP Address - Location of the MMS server, which is usually in the form
of an IP address.
• Port - HTTP port number used for connecting to the MMS server and
for fi le transfer.
• If your device already has preset MMS settings, it is
recommended that you do not change these settings. If you
change the preset settings, your device may not be able to
send and receive MMS messages.
• If you add several MMS message - service providers to
the settings screen, you can choose one as your default
provider.
6.3.2 Receive MMS
When there’s an incoming MMS, your phone will display alert. Download
and read the MMS in the Inbox.
6.4 MENU FOR MESSAGING AND E-MAIL
The following options are available in the Menu for messaging and E-mail:
New – To create a new message.
Reply – To reply to the sender.
Reply All – To reply to the sender and all the recipients.
Forward – To forward this message to others.
Move – To move this message to another folder (Draft, Outbox, Inbox,
Sent Items or Deleted).
Mark as read (unread) – To mark the message as read or unread.
Download (E-mail) – Only for E-mail. Since a phone only receives an
E-mail’s header and subject, you may want to download the whole E-mail
for details.
Send/Receive – To send and receive messages and E-mail(s).
!
Note:
Page 51
51
Switch to – To switch between text message, MMS and E-mail, or to other
folders.
Tools – To administrate folders and set up features.
MMS Settings – To set features for MMS.
Copy to SIM – To copy the data in the phone to the SIM card.
6.5 FOLDERS FOR MESSAGING AND E-MAIL
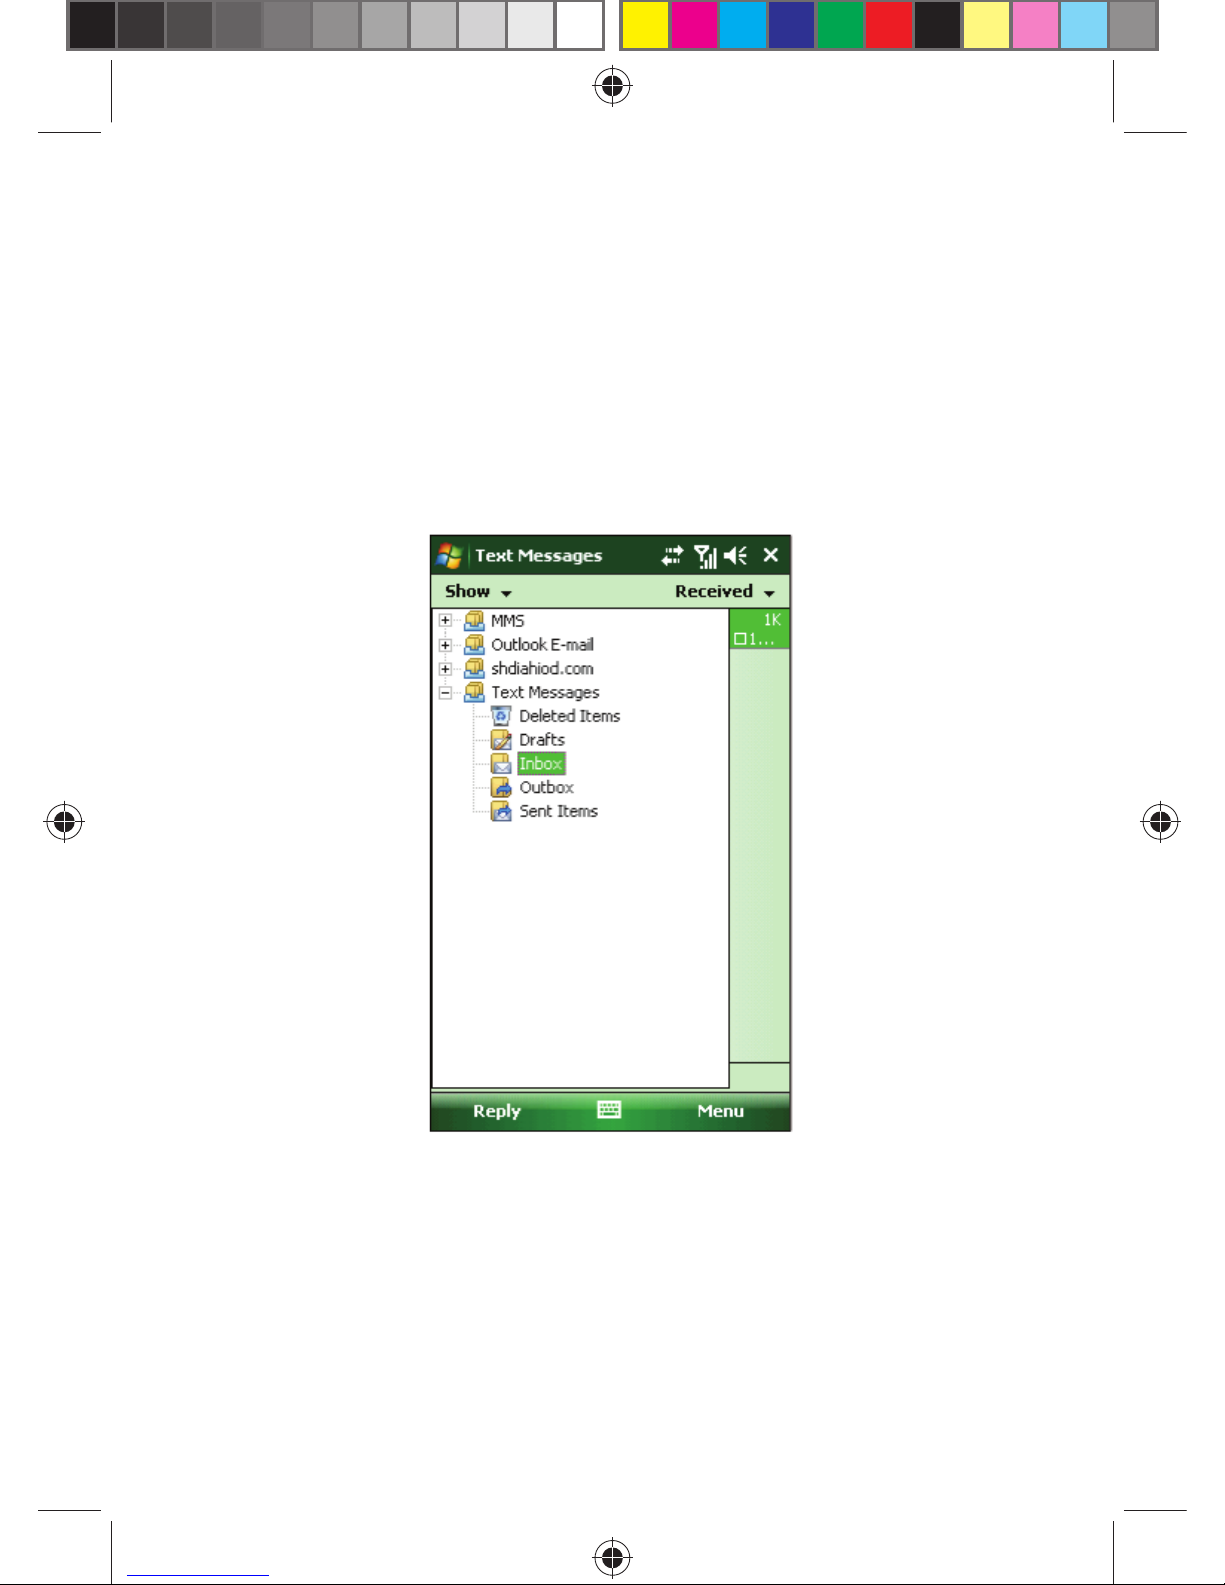
Drafts, Inbox, Outbox, Sent Items, Deleted Items
Drafts – To store messages to be sent later.
Outbox – To store messages failed to send out.
Inbox – To store received messages.
Sent Items – To store messages already sent out.
Deleted Items – To store messages deleted from other folders. Messages
deleted in this folder will be permanently removed.
Page 52
52
7 MULTIMEDIA
7.1 WINDOWS MEDIA PLAYER MOBILE
The build-in Windows Media Player® Mobile can play audio and video
fi les stored in the phone or the storage card.
7.1.1 Play
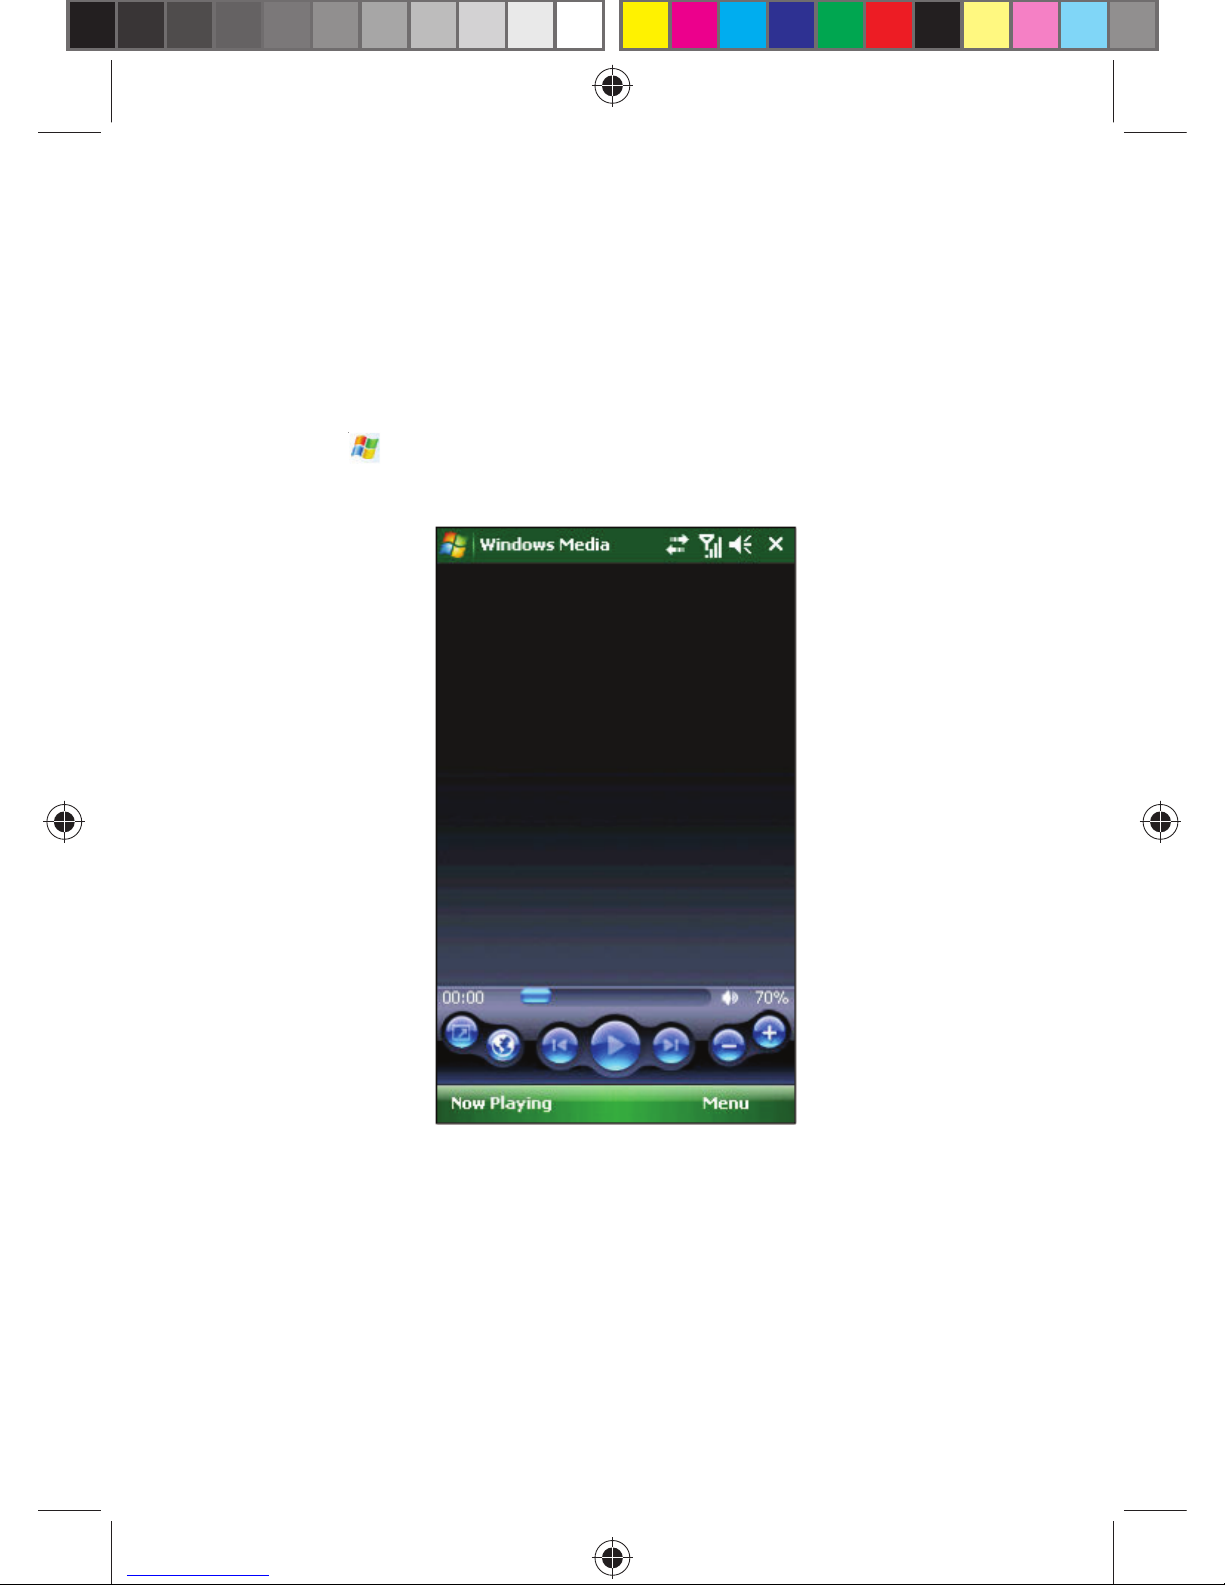
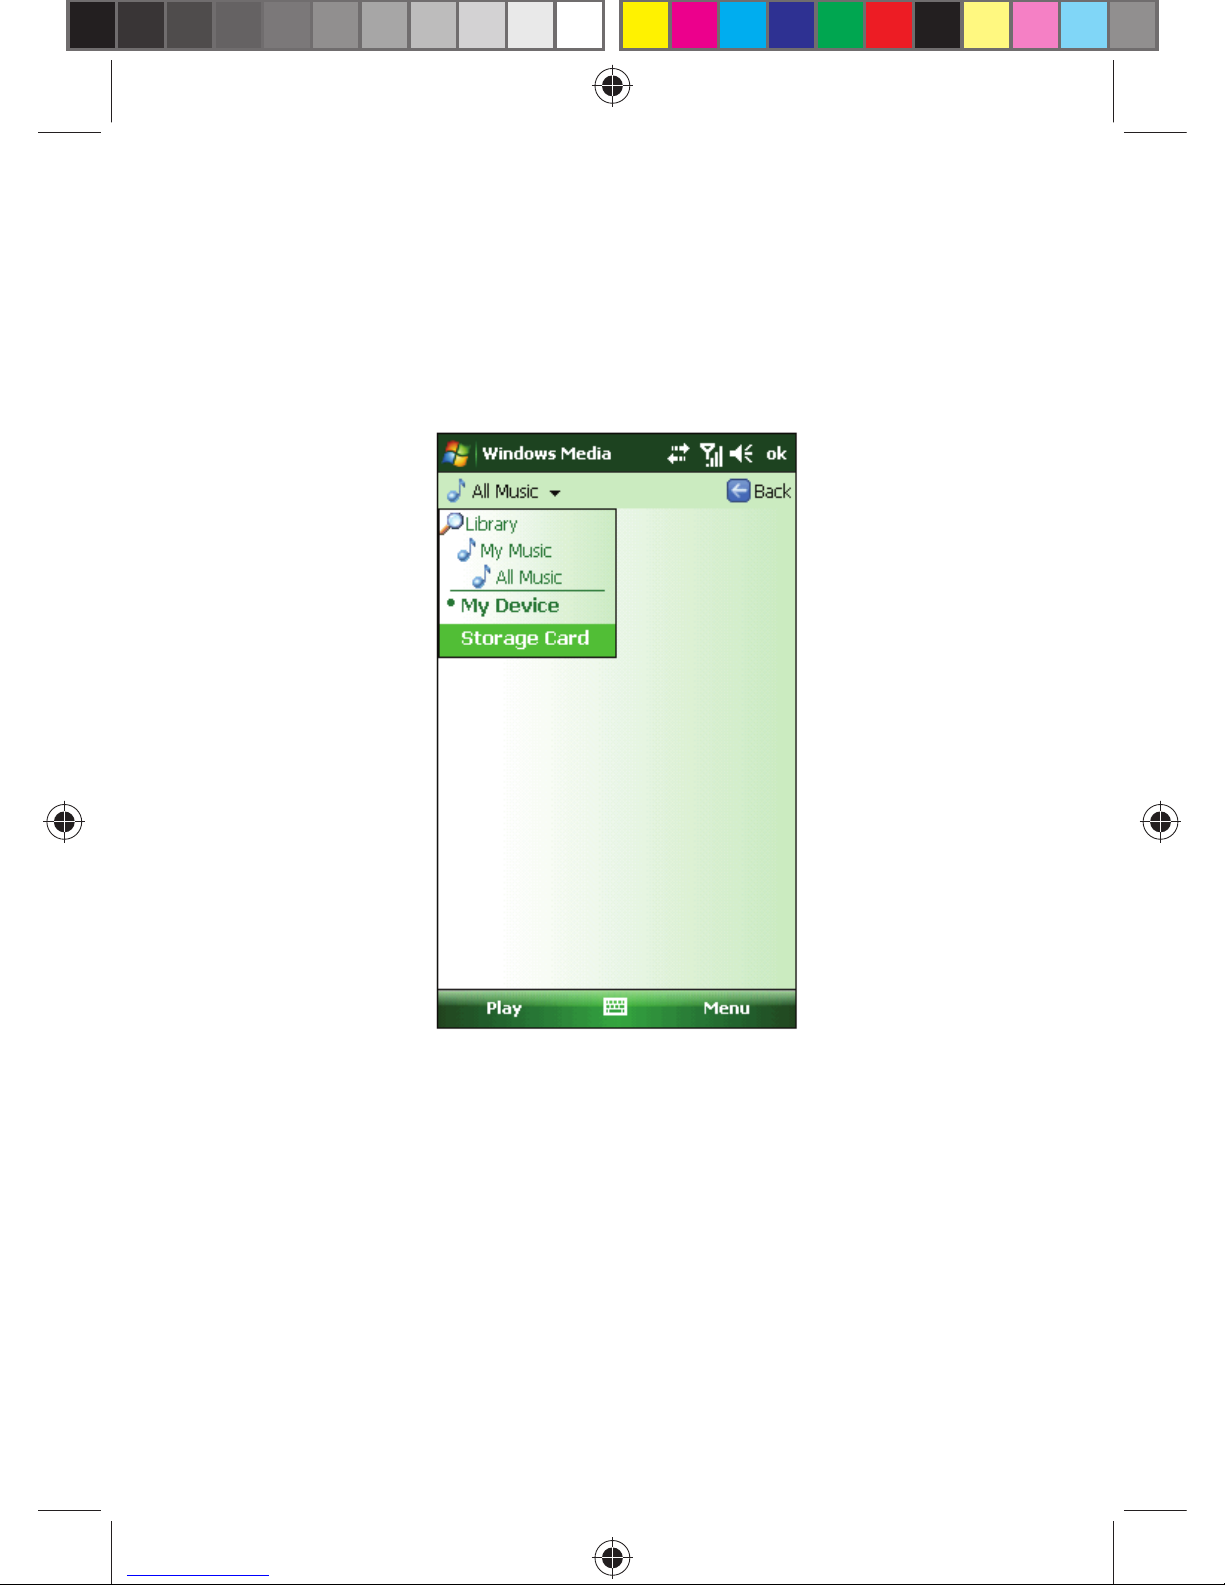
Tap and then select Windows Media. The default screen shows the
media library. Select the fi le to play by type, tap Back to open the window
as shown below, and then select Now Playing to display the playlist.
• While playing, adjust volume by pressing the navigation key up or
down.
• While playing, select the previous or the next fi le by pressing the
navigation key left or right.
Tap Menu as shown below:
Library – To view available fi les in the library.
Play/Pause – To play or pause a fi le.
Page 53

53
Stop – To stop playing;
Shuffl e/Repeat – To play randomly or repeatedly fi les in the list;
Full Screen – To play video fi les or stream video on full screen (It’s not
available for audio fi les);
Options – Settings of the player (refer to Settings);
Properties – To display details of the fi le;
About – To view the version of Windows Media.
7.1.2 Now Playing
Tap Now Playing. A list of media fi les shows.
Tap Menu, the following options are available.
Library – To view available fi les in the library.
Move Up – To move a fi le up by one row.
Move Down – To move a fi le down by one row.
Remove from Playlist – To remove a fi le from the list. But the fi le remains
in the library.
Shuffl e/Repeat – To play randomly or repeatedly fi les in the list.
Clear Now Playing – To clear all the fi les in the list. But the fi les remain in
the library.
Error Details – To show the details of an error.
Properties – To display details of the fi le.
Page 54
54
7.1.3 Library
All the audio and video fi les are stored in the library. You may select and
add one or more fi les to the playlist.
If you want to check audio or video fi les stored in the SIM card from the
library, tap Library and select Storage Card.
On the main page of library or folders, tap Menu to select options to
process fi les in the library.
Page 55
55
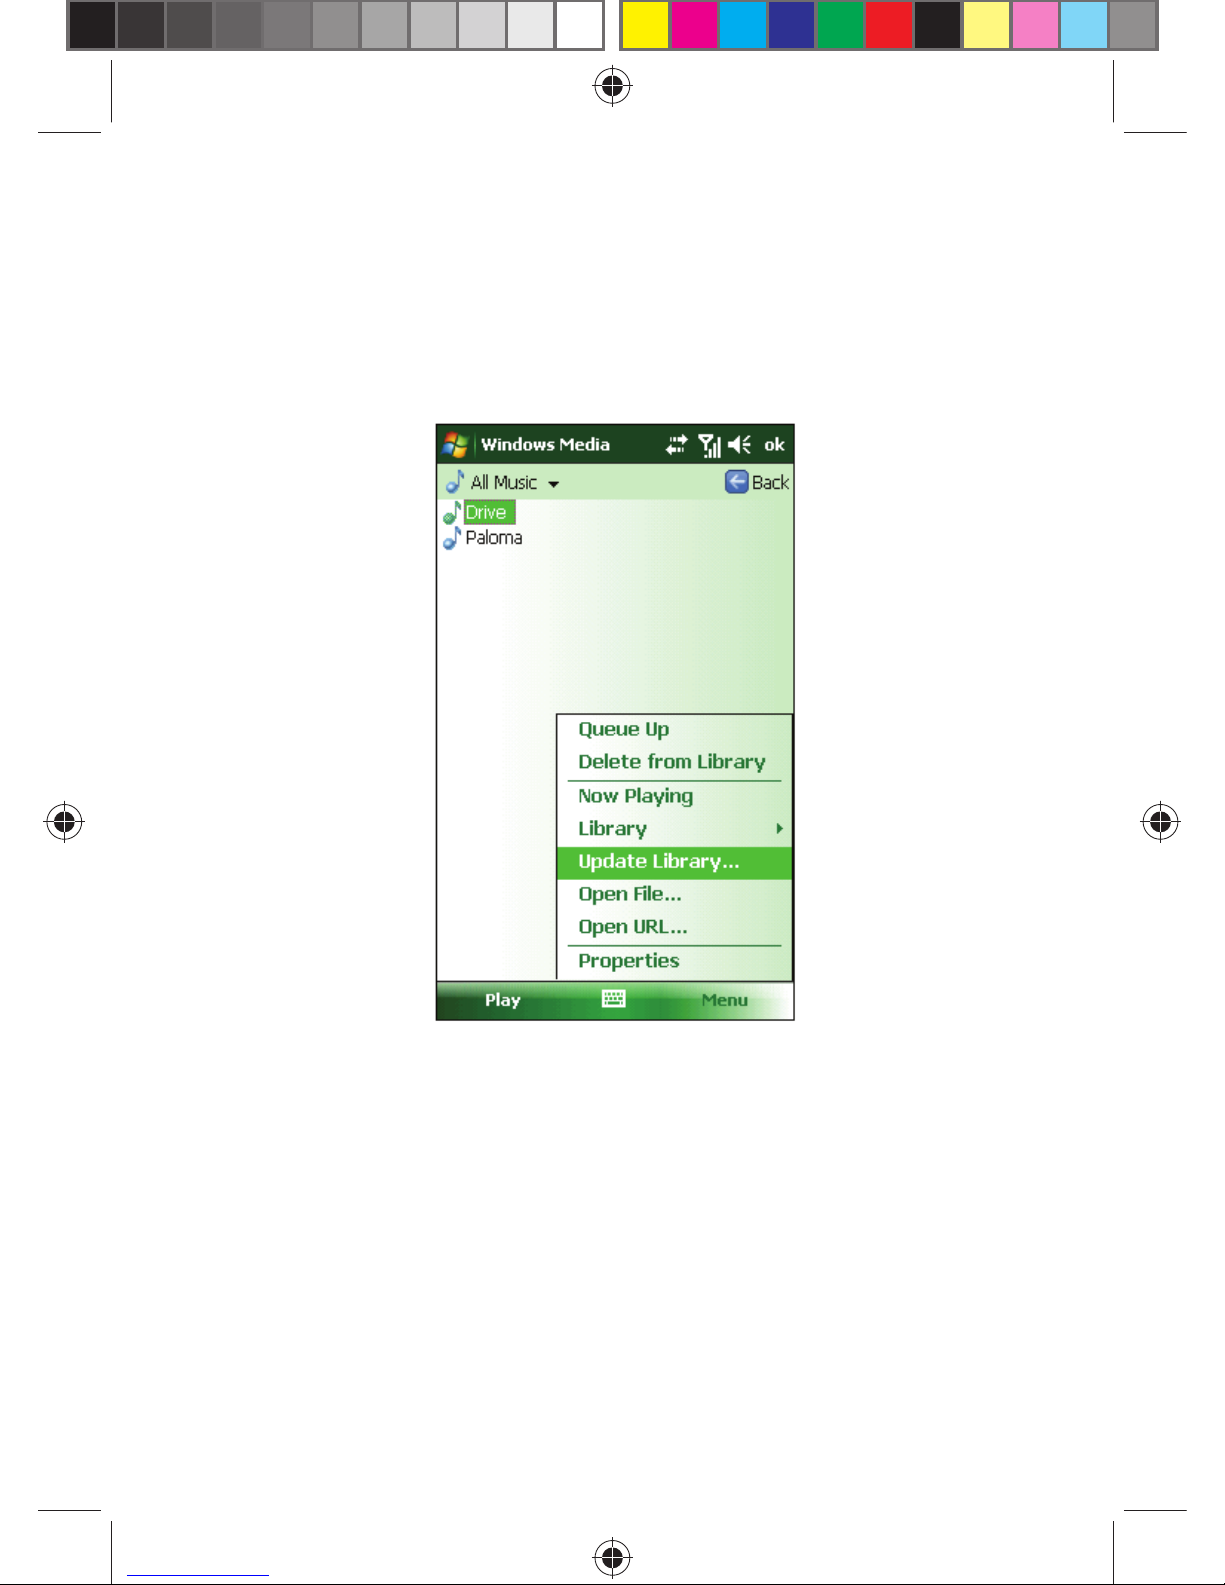
7.1.3.1 Update Library
If there’re additional media fi les, you need to update the library. Otherwise,
the new fi les can’t be located in the library.
In the library, select Update Library… in Menu. The new fi les will then be
automatically searched and added into the library.
7.1.3.2 Play from Library
You may select a fi le in the library and then play it.
Scroll the highlight bar in the library with the navigation key, locate a fi le,
and then press the left soft key or the center key.
7.1.3.3 Add Files into the Playlist
Windows Media Player can only play fi les added into Now Playing
playlist.
After the library has been updated with new fi les, and if you want to
add them into the playlist, locate the fi les in the library folder using the
navigation keys, select Add to List in the Menu to add them into Now
Playing playlist.
Page 56
56
If you have selected a folder in the library, tapping Add to List will add all
the fi les in the folder into the playlist.
7.1.3.4 Delete from Library
Locate the fi le to be deleted, select Delete from Library, and tap Yes to
remove it from the library and the phone; or tap No to remove it from the
library only.
7.1.4 Options
Select Option for settings of the player.
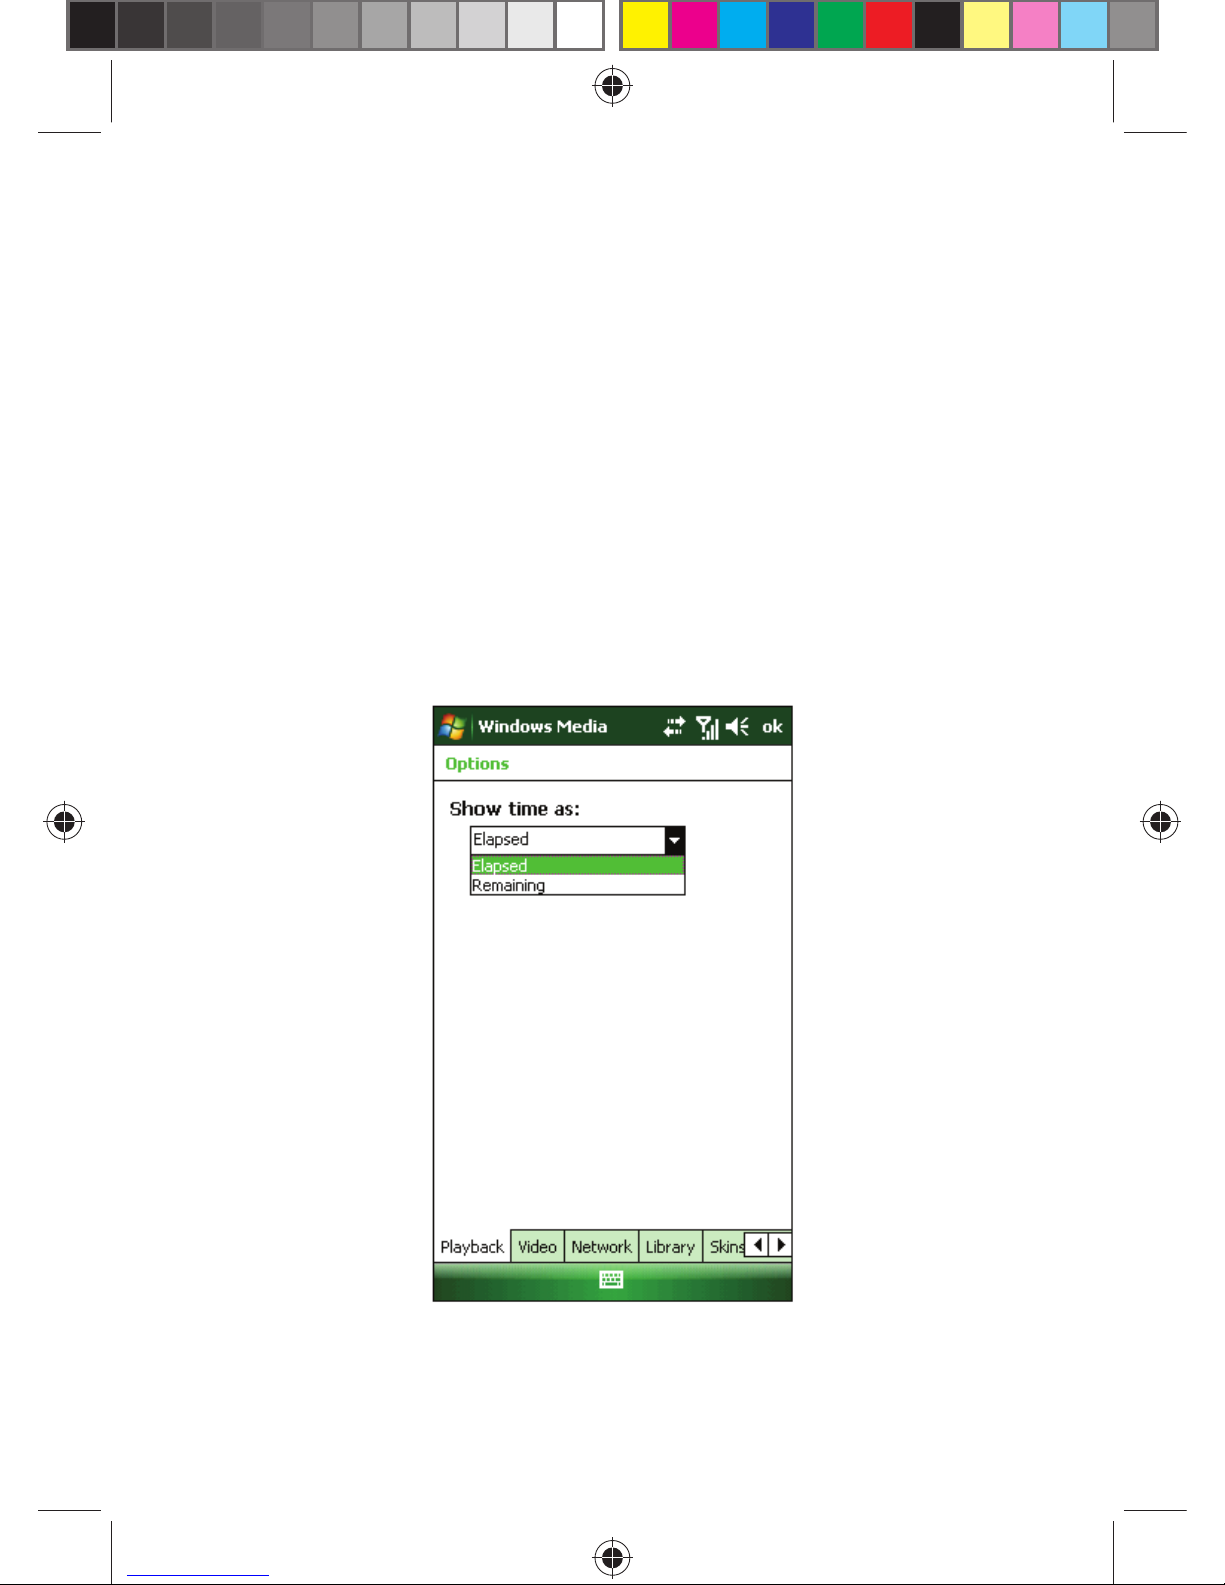
7.1.4.1 Playback
Options for playback:
Show time as
The time displaying mode
Page 57
57
7.1.4.2 Video
Options for screen displaying mode:
Play video in full screen
If the resolution of the fi le is larger than that of the screen, play video in full
screen.
Scaling to meet the window
If the resolution of the fi le is larger than that of the screen, scale the video
size to fi t the screen.
7.1.4.3 Network
Select the protocol and connection speed from network for better audio
and video effect.
7.1.4.4 Library
In this feature you can set it in the media library on the screen to start
player.
7.1.4.5 Skins
You can choose different skins for the player.
7.1.4.6 Buttons
You may re-defi ne the function for buttons in Windows Media Player.
Highlight the button you need to re-defi ne, select Assign, and then tap
the button of new defi nition by following prompts. Or, tap Reset to restore
default settings.
7.1.5 Supported File Formats
Video format Extension
Windows Media Video .wmv,.asf
MPEG4 .mp4
H.263 .3gp,.3g2
Audio format Extension
Windows Media Audio .wma
WAV .wav
MP3 .mp3
MIDI .mid, .midi
AMR Narrow Band .amr
AMR Wide Band .awb
AAC, AAC, eAAC .aac,.mp4,.m4a
MPEG4 audio .mp4,.m4a
Page 58

58
7.2 CAMERA
7.2.1 Cautions in using Camera
• The camera included with your phone is produced and assembled with
superior and high precision technologies. However, you should pay
particular care when shooting pictures in dimly lit areas to avoid the
amount of impurities (e.g., white lines, bright dots, dim dots, etc.).
• Fingerprints, debris or oil present on the lens may result in diffi culties in
focusing or obscurities in picture quality. Before taking pictures, clean
the lens with a lens tissue for optimal results.
• Exposure to high temperatures may result in extremely poor quality
picture output.
• Exposure to sunlight may change colors of the built-in color fi lter which
may lead to poor color quality picture output.
• Excess motion while focusing may result in poor quality picture output.
• Do not aim directly into the sun or light source to avoid poor quality
picture output.
• Use caution when taking pictures of copyrighted or restricted materials.
Even though some pictures are purely for personal use, laws with
regard to photo reproduction may protect entertainment events and
similar scenarios. When in doubt, ask or look for posted signage.
• Use caution to protect others’ privacy while shooting pictures with your
phone.
7.2.2 Shooting Photos
Enter the Camera mode by pressing the Camera key or selecting Camera
from the Start. The screen shows the picture captured by the camera.
Press the center key or the camera key to shoot.
• If you select not to preview after shooting, the system will save the
photo automatically and returns to the shooting screen.
• If you select to preview after shooting, the system opens the preview
screen where you can save or delete the photo.
• To shoot photos for a tiny object or an object close to the camera, select
Macro for better quality.
7.2.3 Shooting a Video Clip
This phone supports video recording. You need to change to its shooting
module when you prepare to shoot a video.
Page 59

59
Tap Mode icon on preview screen. Select Video to switch to video mode.
Now press center key or capture key to start shooting.
Length of 30-second, 60t-second and no-limit can be selected. Video
length of unlimited is determined by the capacity of memory.
7.2.4 Where Photos and Video Files are Stored
By default, all photos and video fi les taken are saved to the phone.
However, to ensure that there is always enough space left for the system
to run other applications, we suggest you to save photos and videos to
your storage card.
Perform the following to change the store position:
First, be sure that a storage card has been inserted into the phone.
In the shooting screen, select Setting -> Storage.
Change Save to storage card and then tap OK.
7.2.5 Options
Tap icons on Preview screen to set various aspects of the camera options
Zoom – Select different levels of lens focus.
Brightness – Select a brightness level.
Album – View pictures and videos.
Exit – Exit from camera feature.
Mode – Click the mode icon to switch between Photo and Video mode.
Portrait – Click the Portrait icon to change the shooting time.
Burst – Click the Burst icon to change the number of continuous shooting.
Tap icons on Preview screen to set various aspects of the camera options.
Settings – Set the portrait time and the number of continuous shooting.
Storage – Set the storage position.
Environment – There are several different environments to choose from
to obtain the best effect of the viewfi nder.
Adjust – Select different shooting effects for the photo.
Capture Setting – Set properties and parameters.
Page 60

60
7.3 RADIO
Select FM Radio in Programs
The following window shows:
7.3.1 General
You have to plug in the earphone before opening the main screen.
Two groups of channel can be saved, with 12 channels in each of them.
It supports features such as Auto Search, search a Channel, Volume
Adjustment, Mute, Frequency Fine Tune, Frequency Setting, Switch
Sound Track and Loud Speaker.
Tap the button on the top-right corner to minimize it.
7.3.2 Auto search
Tap Search to start searching channels.
Channels will be saved in the current group; channels already in the group
will be cleared.
Up to 12 channels can be searched, and the search will stop.
To search for higher-frequency channels, tap Search Higher Frequency
Channels.
7.3.3 Listen
Tap one of the channels (1~12) to start listening.
The current frequency, current group and current channel are shown as in
the fi gure above – “5”, “6” and “7”.
7.3.4 Fine Tune
You may fi ne-tune the radio frequency.
Tap Reduce Frequency by 0.1MHz or Increase Frequency by 0.1MHz.
After tuning, Current Channel shows nothing since the current frequency
is different from the one saved. Press and hold any channel button to save
the frequency into it.
7.3.5 Search a Channel
Tap Search Lower Frequency Channels or Search Higher Frequency
Channels to start searching until one channel found.
After stop searching, Current Channel shows nothing since the current
frequency is different from the one saved. Press and hold any channel
button to save the frequency into it.
Page 61
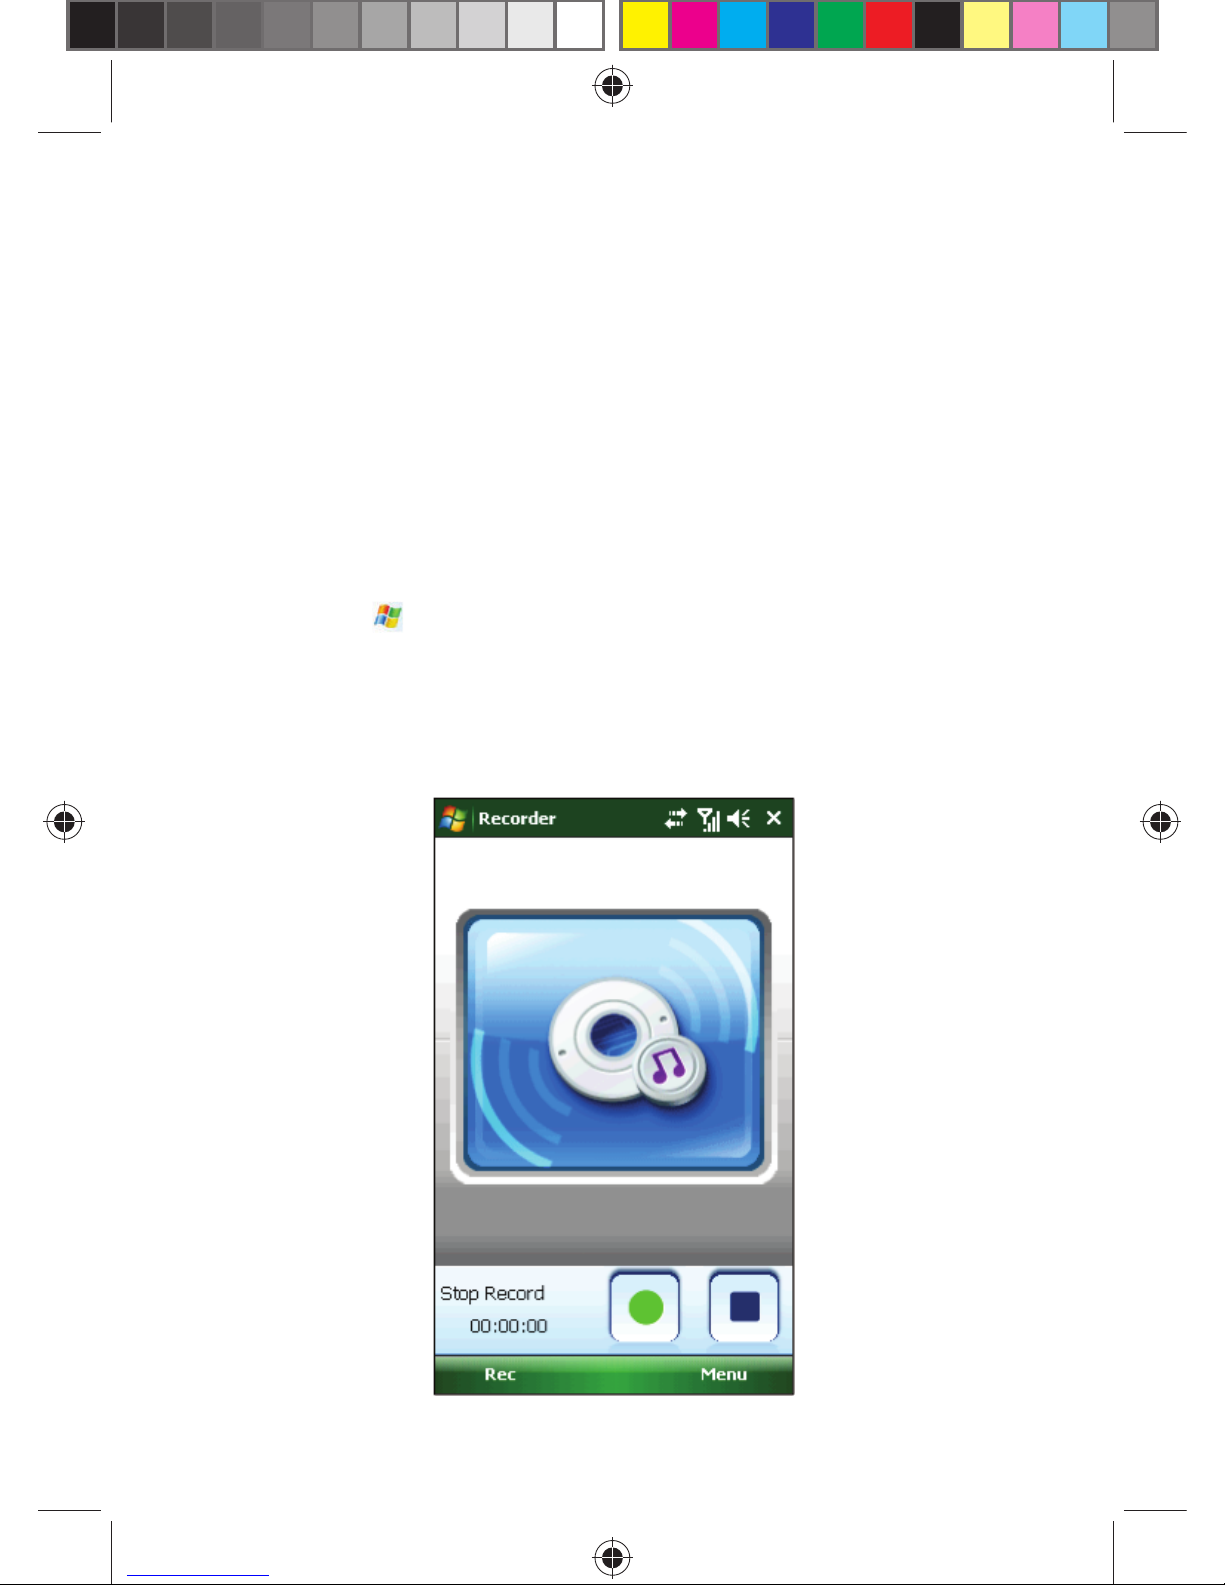
61
7.3.6 Sound
This feature enables to set:
Earphone/Loud Speaker
Mute
Volume – level 0~8 (default is 4)
7.3.7 Frequency Setting
Select Menu -> Setting, and then specify a frequency (in MHz).
7.4 RECORDER
You can record your favorite sound, and set it to Incoming Call Ring,
Alarm, and Message Remind sound through this feature.
• Tap select Programs Tap Recorder, you can enter recorder screen,
and tap the bottom left corner of the Rec and start recording. You can
stop the record via taping Pause, and you also can stop it by taping
Stop, the fi le will be saved automatically.
• Tap Menu, select save to storage or save to memory, the recording will
be automatically saved in the choice of the path.
Page 62
62
• Long tap an item in the Record File Screen, a menu will pop up and it
will display: Play - set as Ring (including Set Incoming Call Ring, Alarm,
and Message Remind) and Property.
• In the Record File Screen, select a fi le, tap Menu, we can see record,
set as Ring, Play, and stop, fi le Explorer and Property.
During recording, the record will be stopped and saved
automatically when there is an incoming call / alarm / notifi cation
or low battery reminder.
7.5 PICTURES AND VIDEOS
View the images in the phone and the storage card, save one of them as
the background, or send it to others.
7.5.1 View Pictures
Tap Pictures and Videos to display the list of pictures stored in the phone
and storage card.
Tap a picture to open it. Press the left or right navigation key to view the
previous or the next image.
7.5.2 Options
The following options are available in the Menu:
Send – To send the image in an MMS or E-mail.
Wireless Exchange – To send the image to others device via Bluetooth;.
Save as Contact – To set a picture as an icon representing a specifi ed
contact.
Delete – To delete the image.
Edit – To edit the image.
Slide Show – To view the images as a slide show.
Save as “Today” background – To set the image as the desktop
background.
!
Note:
Page 63
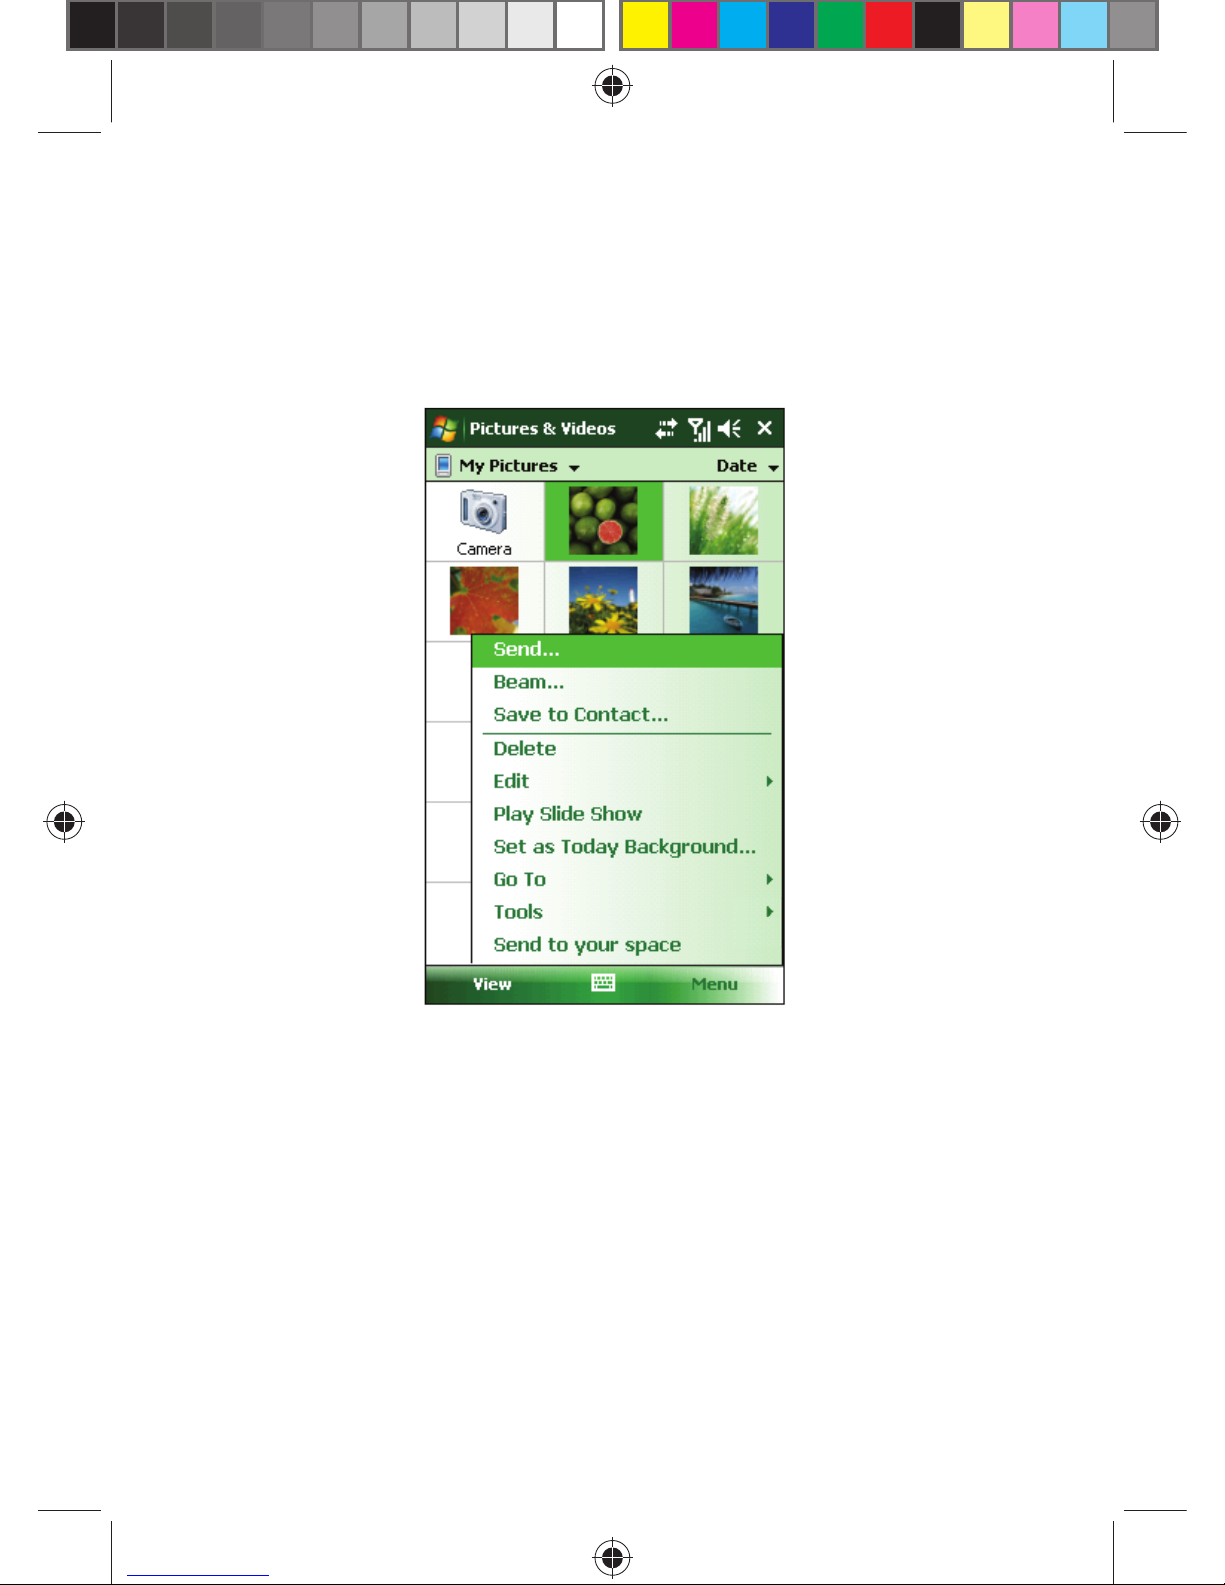
63
Go to –To other directories.
Tools - To view the detail of image and sorting the pictures.
Send to your Space – To send the image to a shared space on the
Internet.
Page 64
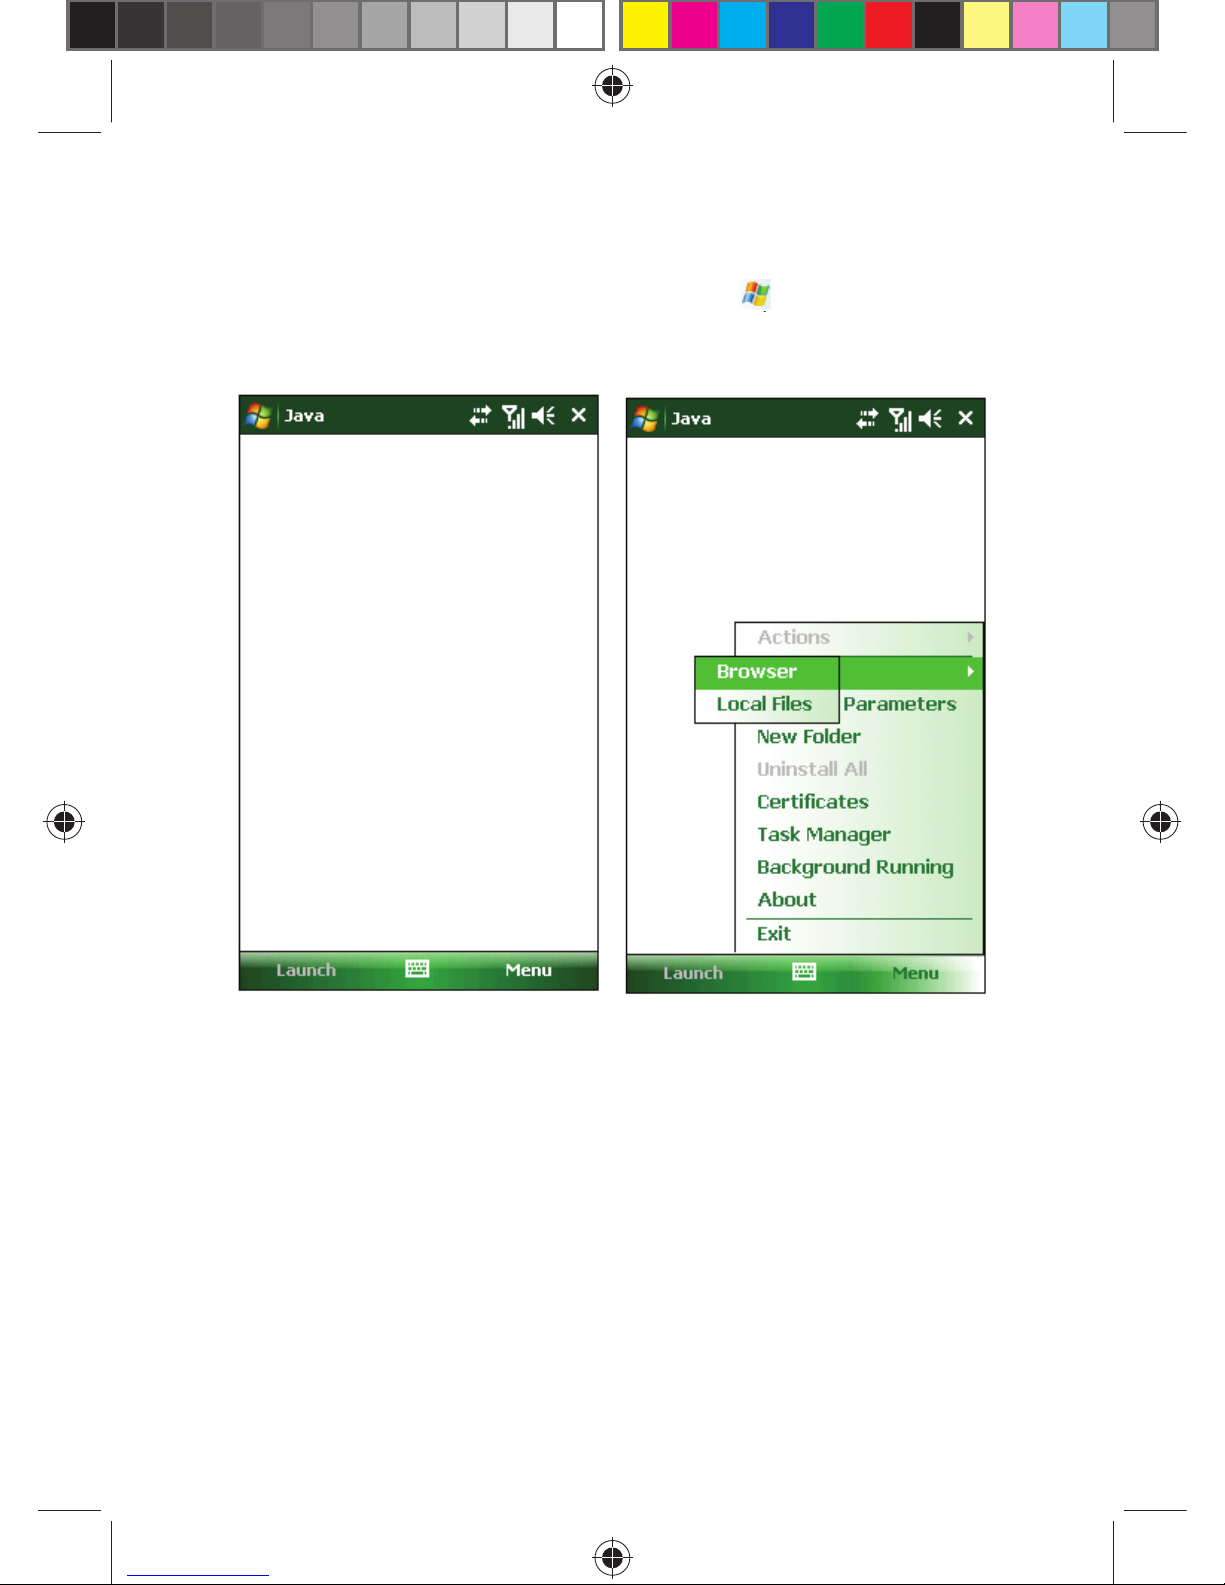
64
7.6 JAVA
This phone supports JAVA applications. Tap and Select Programs,
and then Java; All the JAVA application gets displayed.
You may select the installation path or other operations in the menu.
7.7 GAMES
Mobile phones have built-in games:
• Bubble Breaker
• Solitaire
• Marble Gamer
7.7.1 Bubble Breaker
The objective is to align same color bubbles to form large blocks of
bubbles before bursting them. The more bubbles you have in the block
before they are burst, the greater number of points you will receive.
To burst a bubble, the bubble must be connected to other similar bubbles
on the playing board. If you select a bubble that is connected, those
Page 65
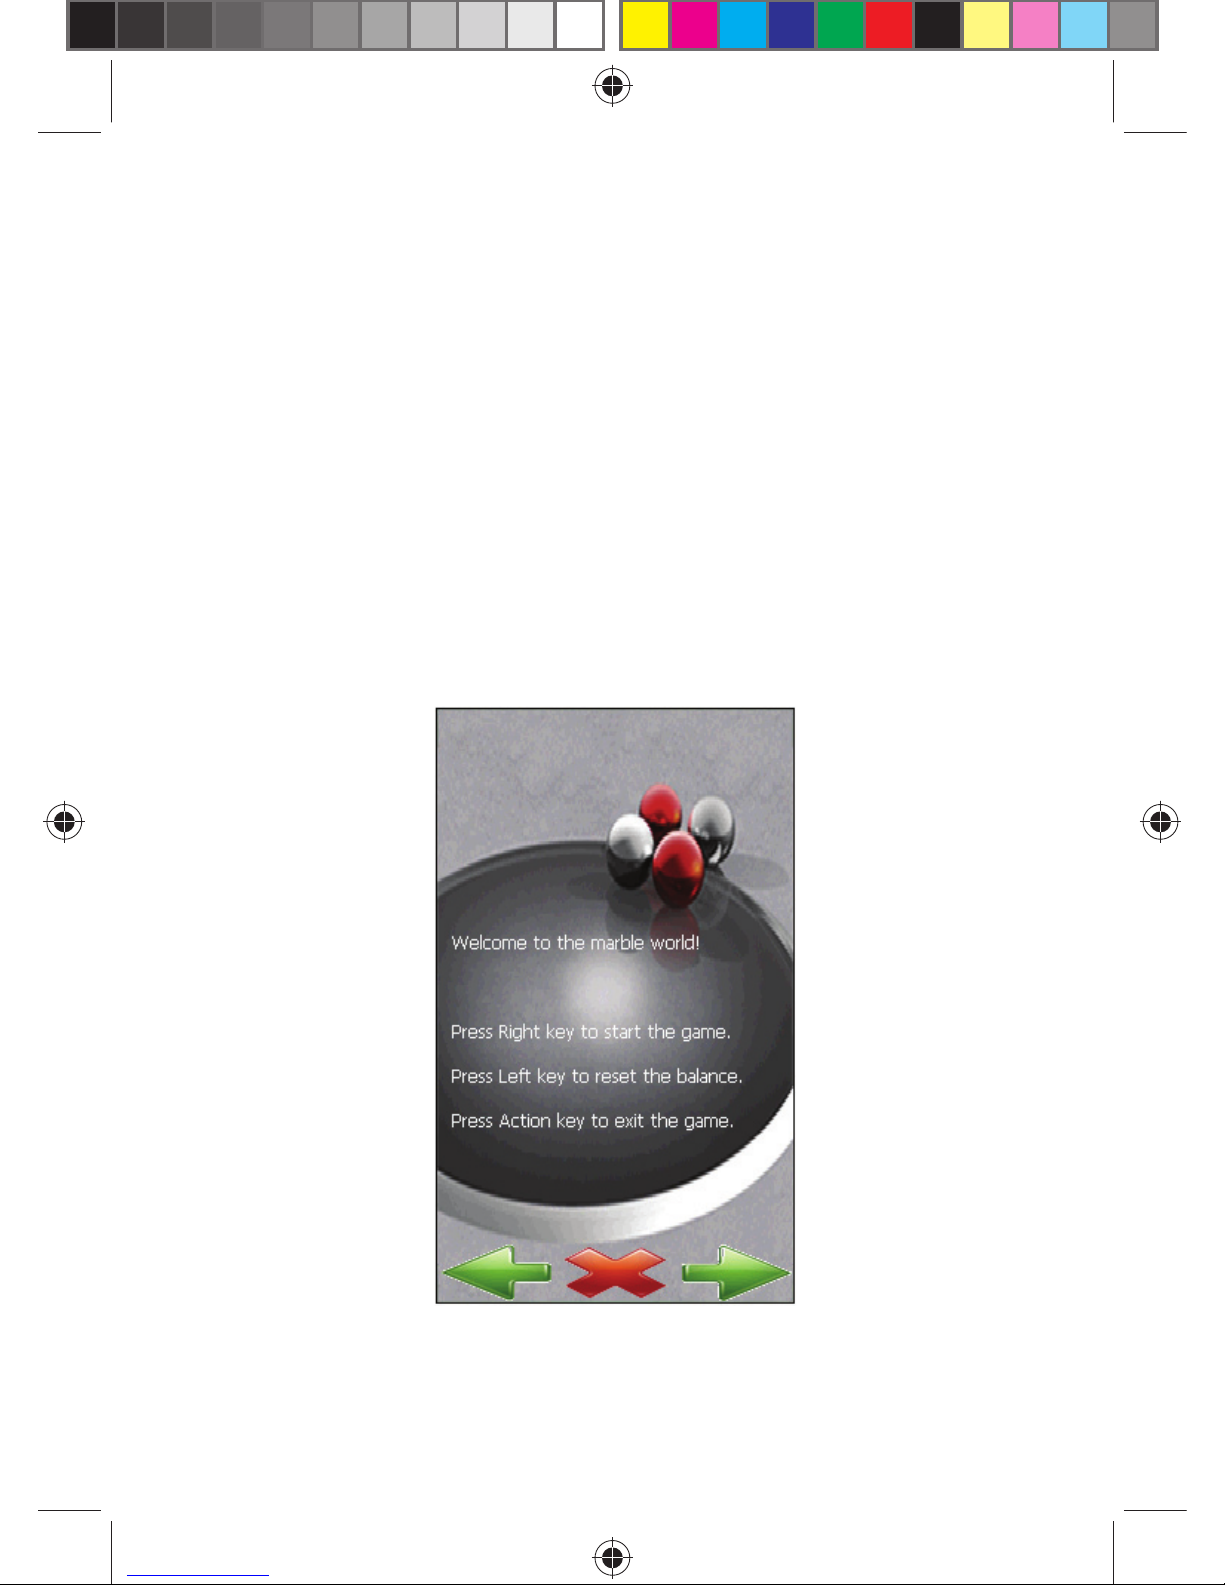
65
connected bubbles will be highlighted and a new bubble will pop up,
displaying that block’s potential bubble points. Click your selection again
to burst the bubbles.
7.7.2 Solitaire
The objective is to move all the cards in ascending order, from Ace to King,
in the four suit stacks at the top.
Use the touch pen to drag and drop the card, or turn the cards facing
down.
7.7.3 Marble Gamer
Game Objective: To be smiling grey red marble to move to the location of
the marble.
Game approach: First, set the Motion Sensor balance-oriented mobile
phone that is where the marble rolling.
Page 66
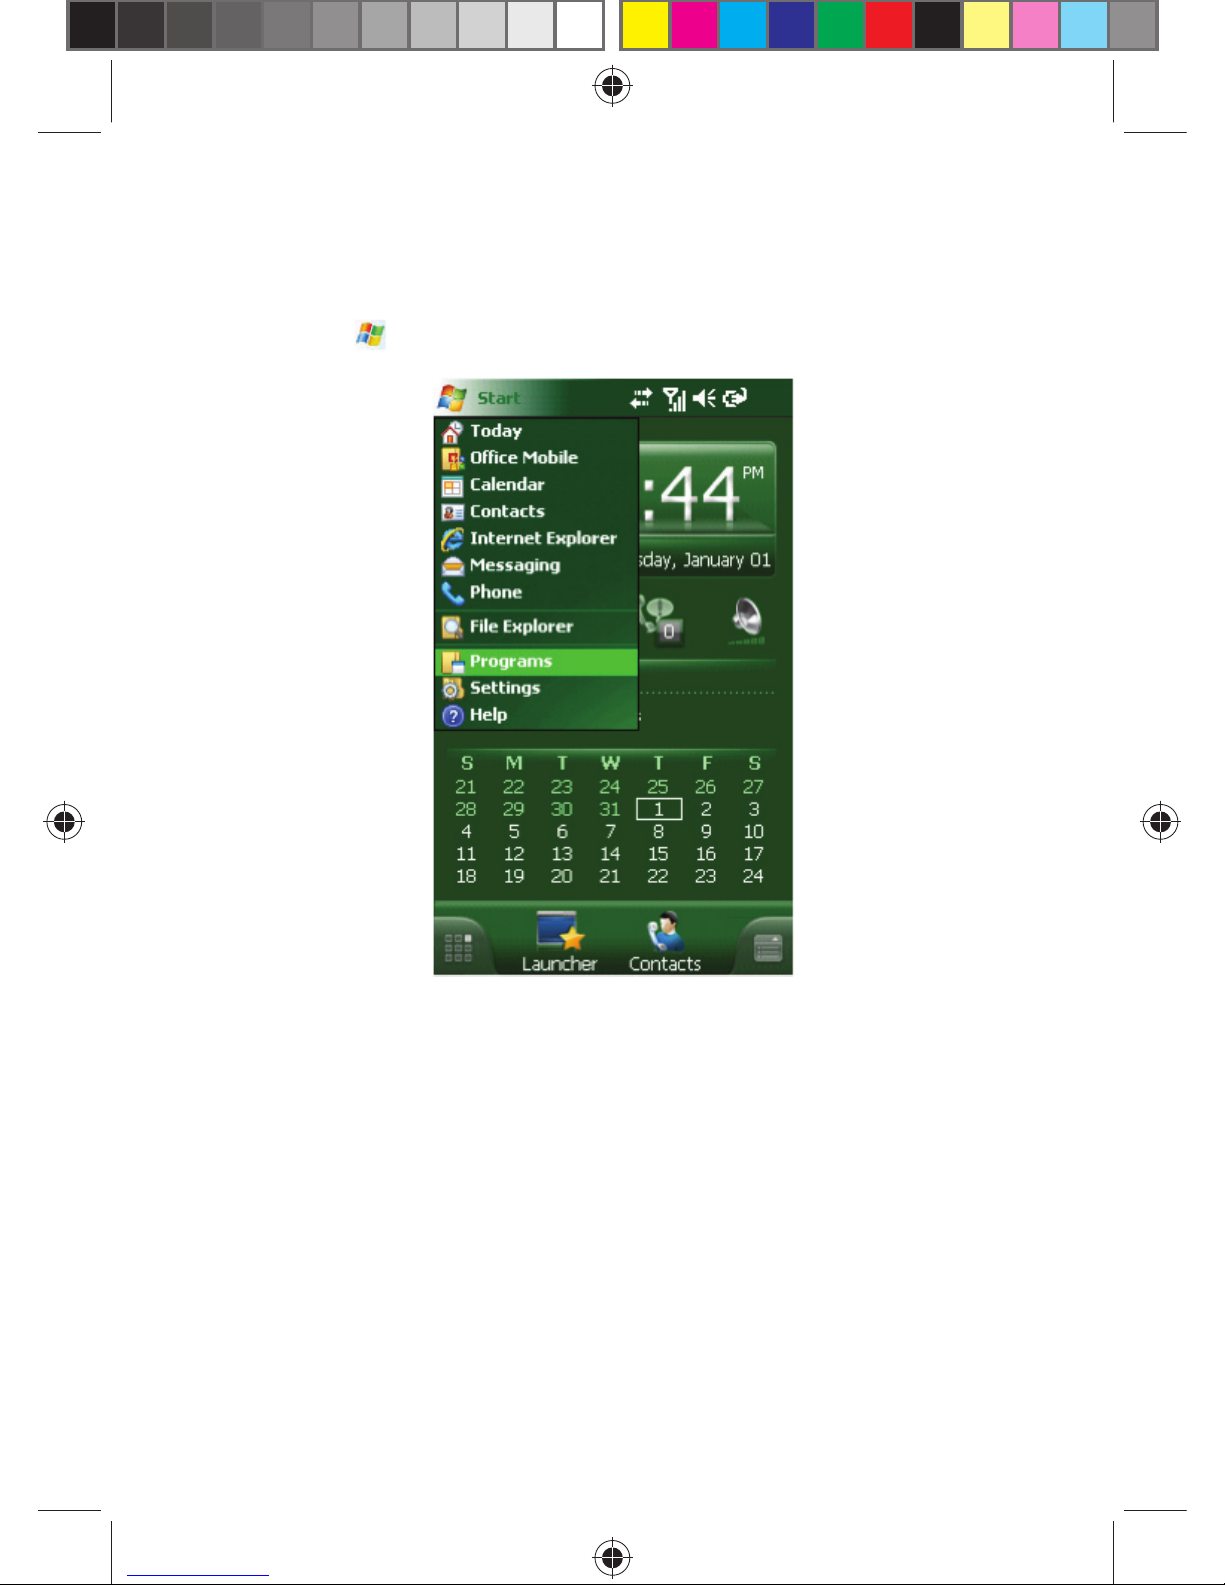
66
8 PROGRAMS
Find all the programs in your phone from Menu -> Programs.
Tap and then Programs.
Page 67
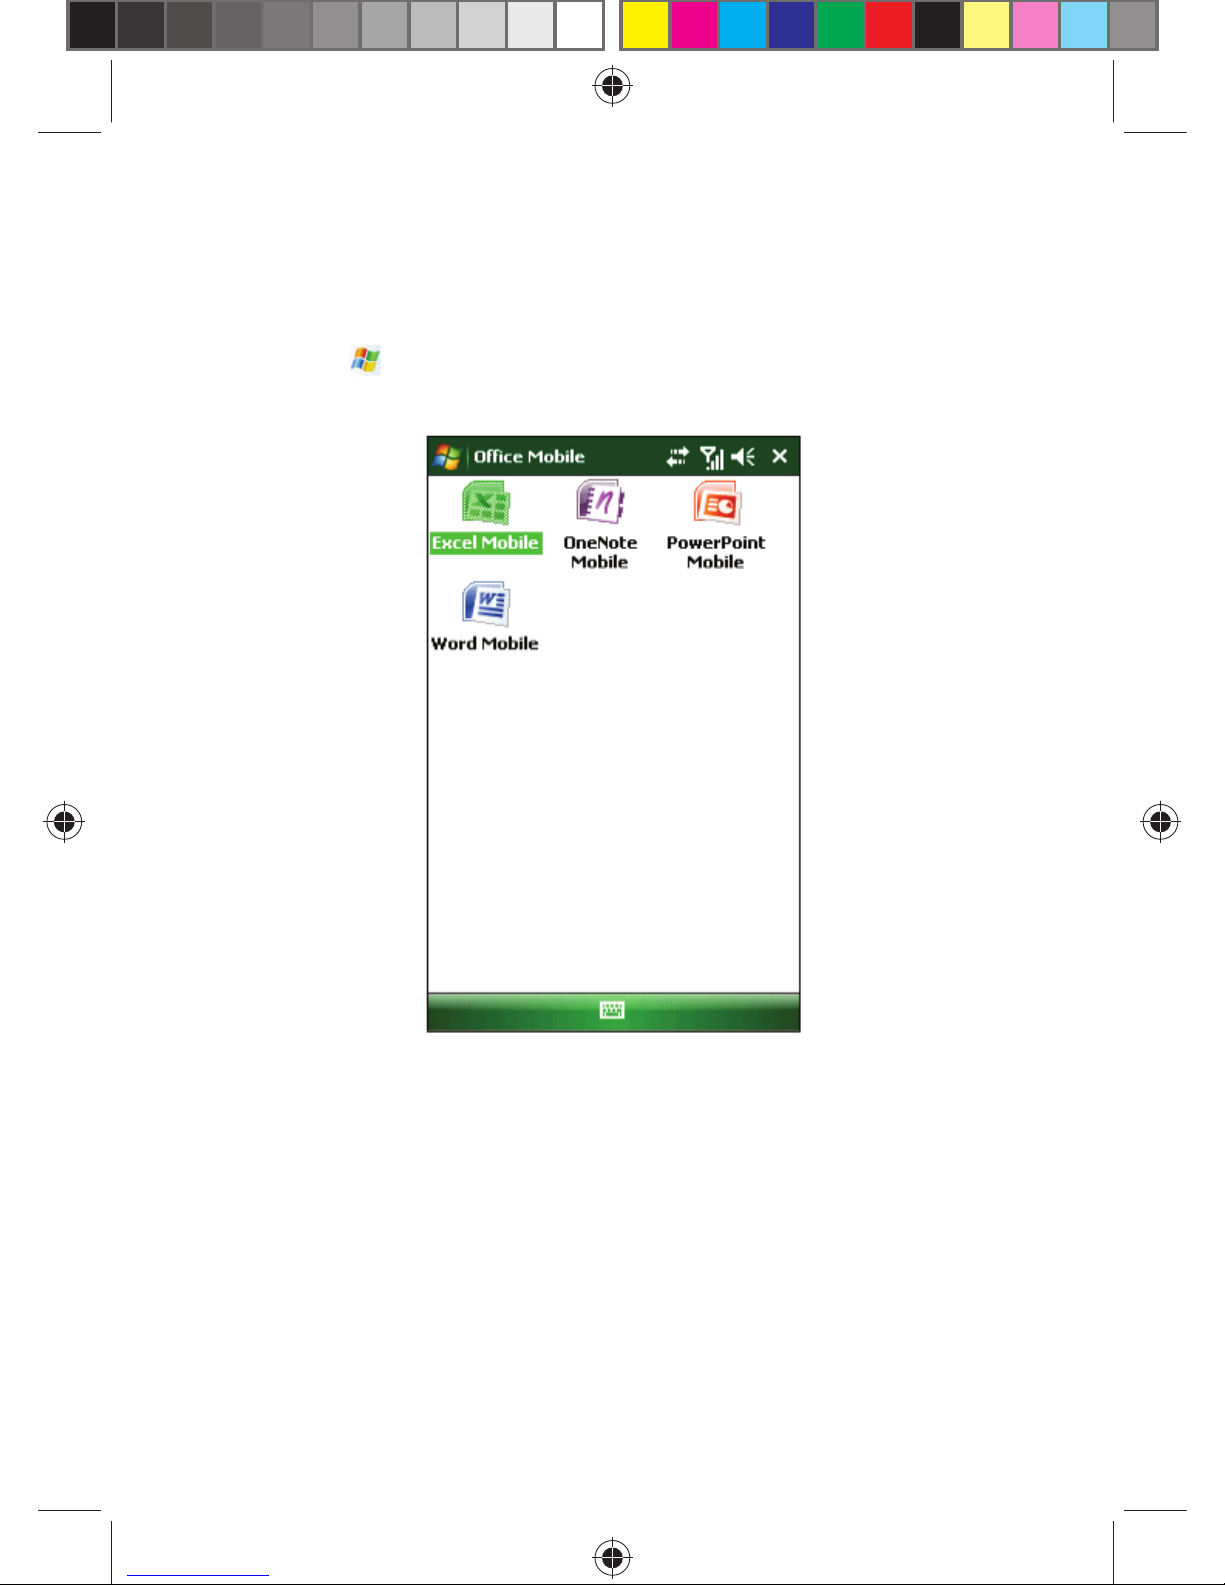
67
8.1 OFFICE MOBILE
You can compile Word and Excel fi les, or open a PowerPoint fi le (you may
edit a PowerPoint fi le in certain circumstances).
Tap , and then select Offi ce Mobile from Start. Choose Word mobile,
PowerPoint Mobile or Excel Mobile.
Page 68
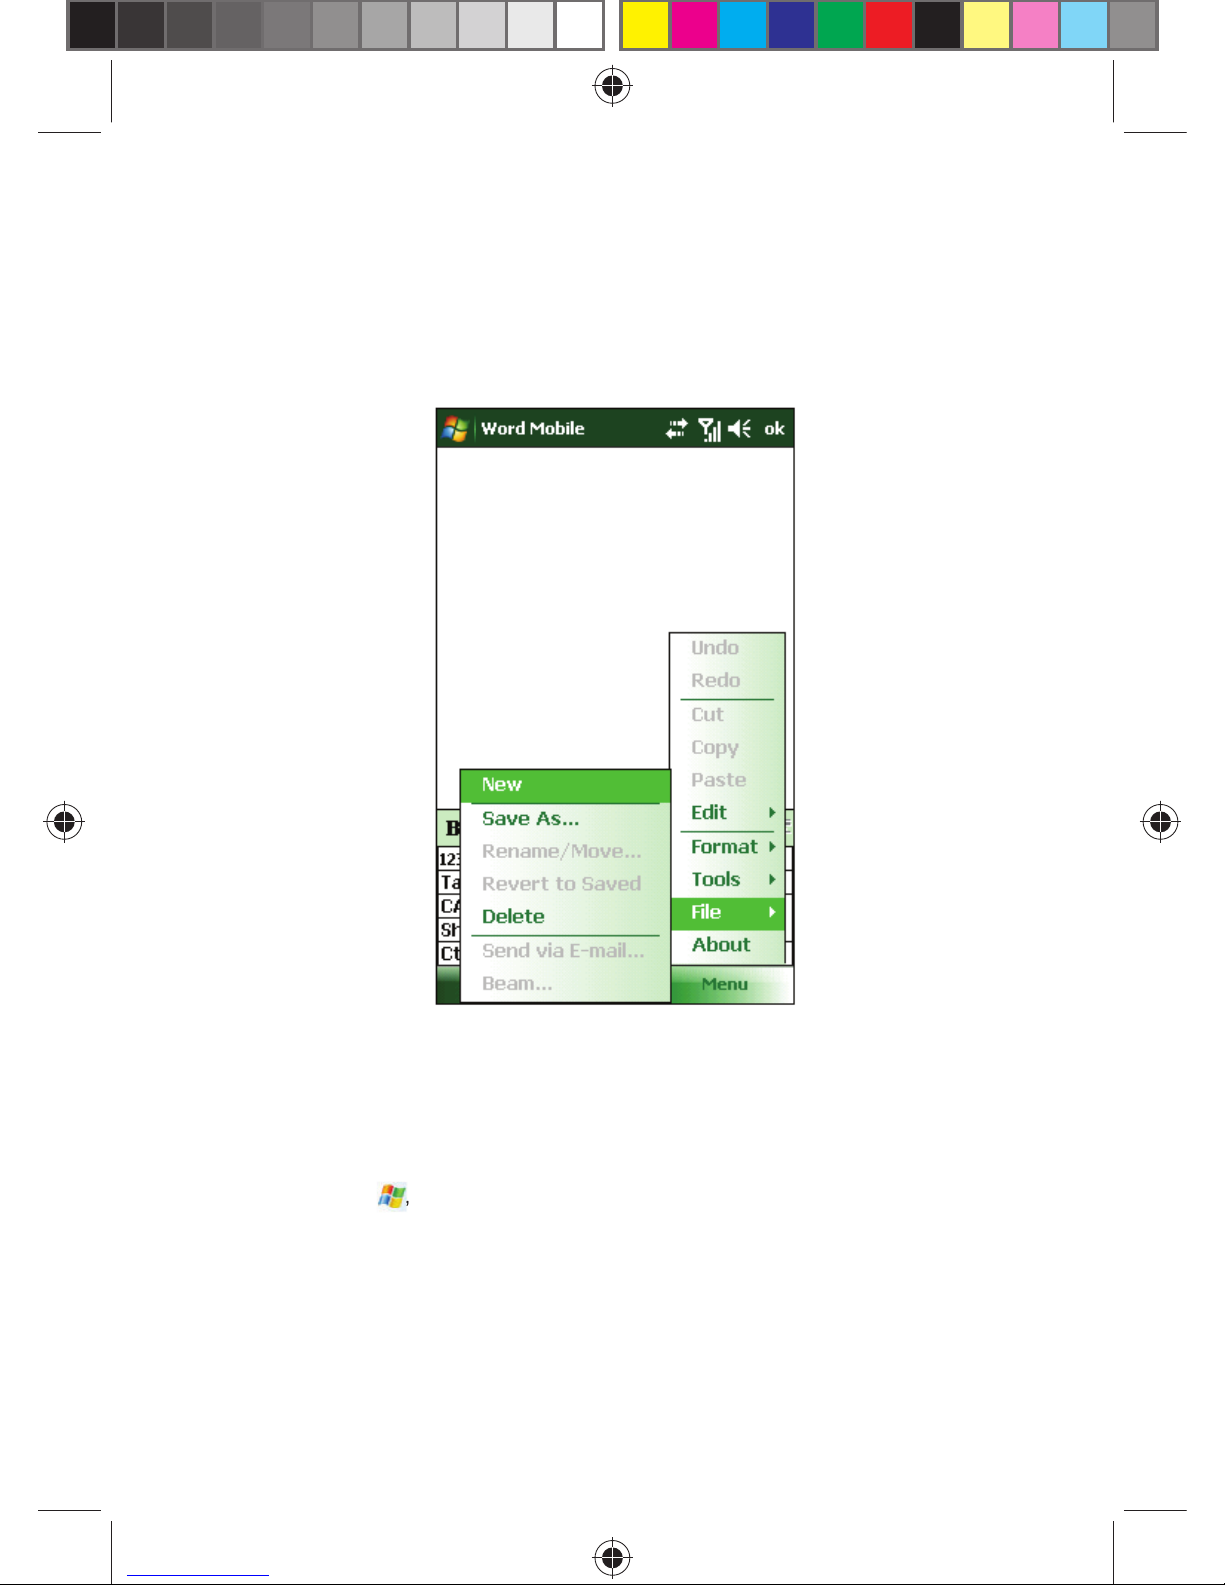
68
8.1.1 Word Mobile
In Word Mobile, choose a fi le to open.
• Tap All Folders, and fi nd a fi le from those folders.
• Tap New to create a new fi le.
• You can open Word fi les in several types, including .txt, .doc and .psw.
• If you need the toolbar, tap View on the editing screen, and then select
Toolbar.
• After compiling, tap to save and exit.
8.1.2 OneNote Mobile
• Tap , select Offi ce Mobile from Programs, and then tap OneNote
Mobile.
• In OneNote Mobile, choose a fi le to open.
• In OneNote fi le list, tap New to open a new note.
• If you need the toolbar, tap Menu on the editing screen, and then select
Toolbar.
,
Page 69
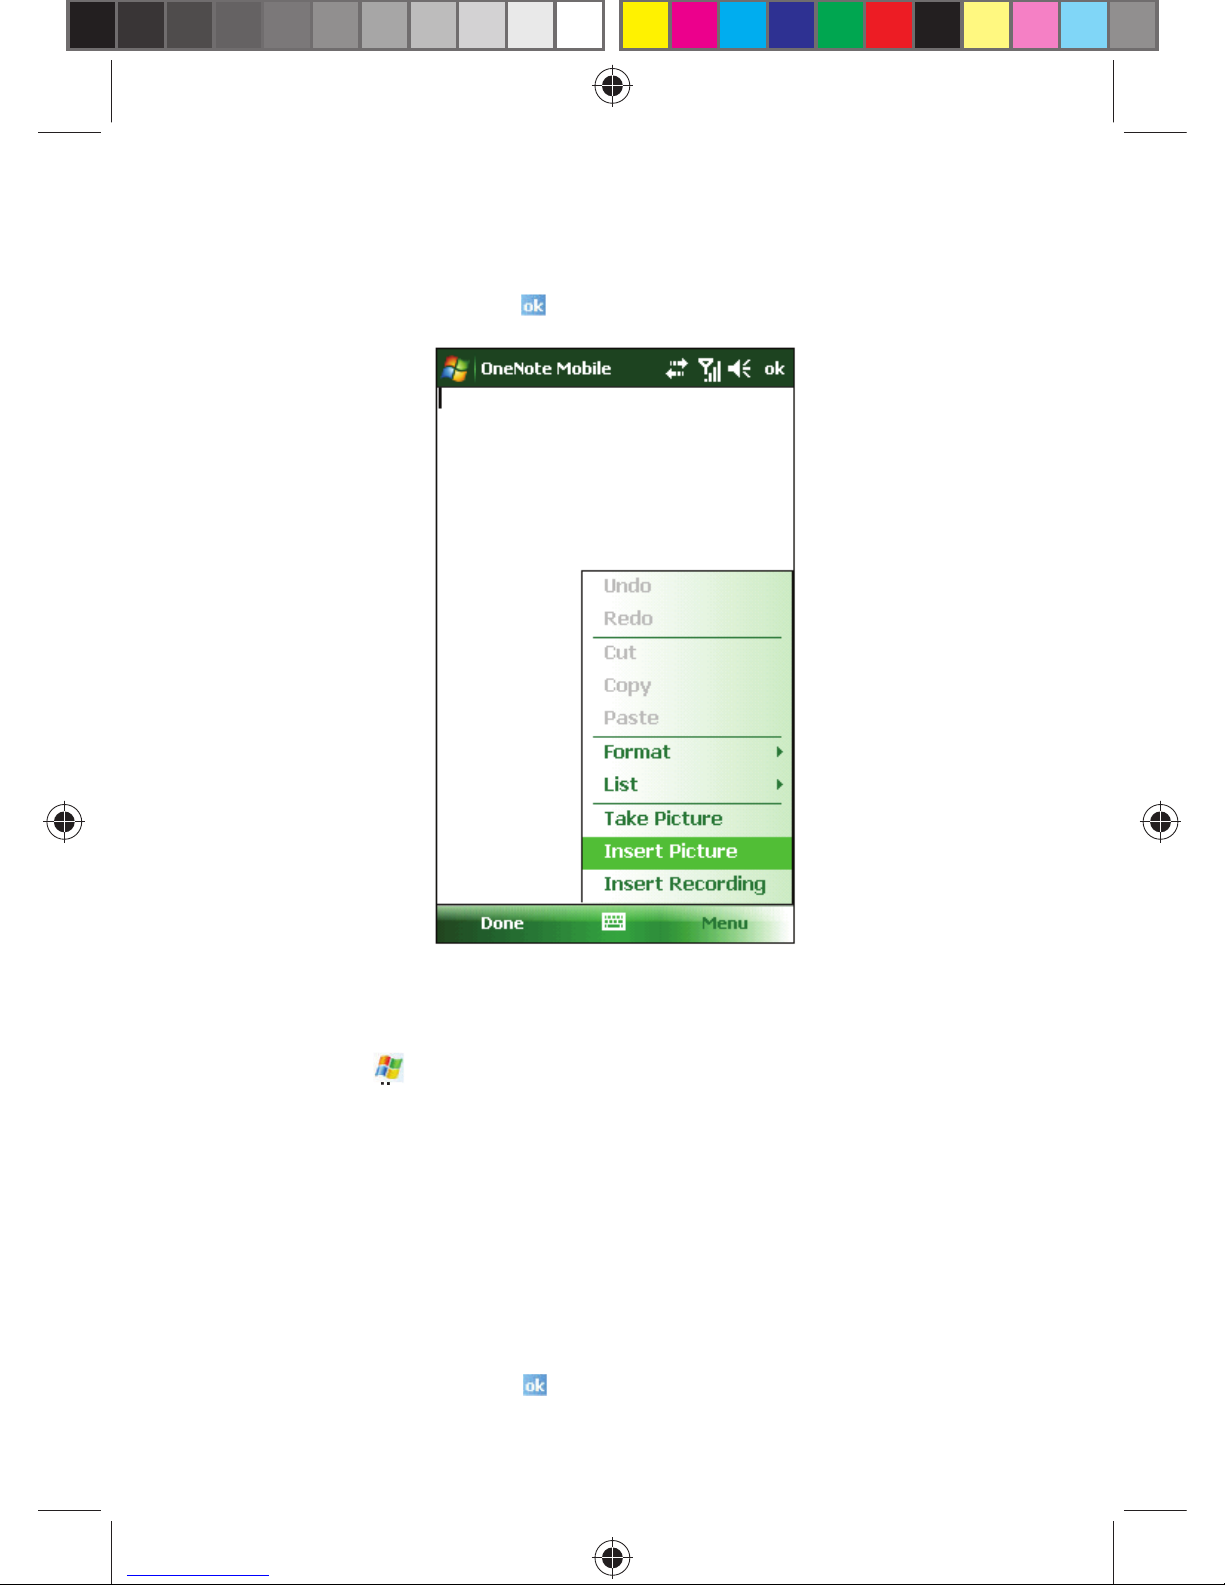
69
• In OneNote Mobile, you can insert picture and sound recording.
• After compiling, tap to save and exit.
8.1.3 Excel Mobile
Using Excel to create a spreadsheet or to open and edit an Excel fi le from
your PC.
• Tap , select Offi ce Mobile from Programs, and then tap Excel
Mobile.
• In Excel Mobile, choose a fi le to open.
• Tap All Folders, and fi nd a fi le from those folders.
8.1.3.1 New
• In Excel fi le list, tap New to open a new spreadsheet.
• Excel Mobile contains basic tools, such as equation, function and fi lter.
• If you need the toolbar, tap View on the editing screen, and then select
Toolbar.
• After compiling, tap to save and exit.
Page 70
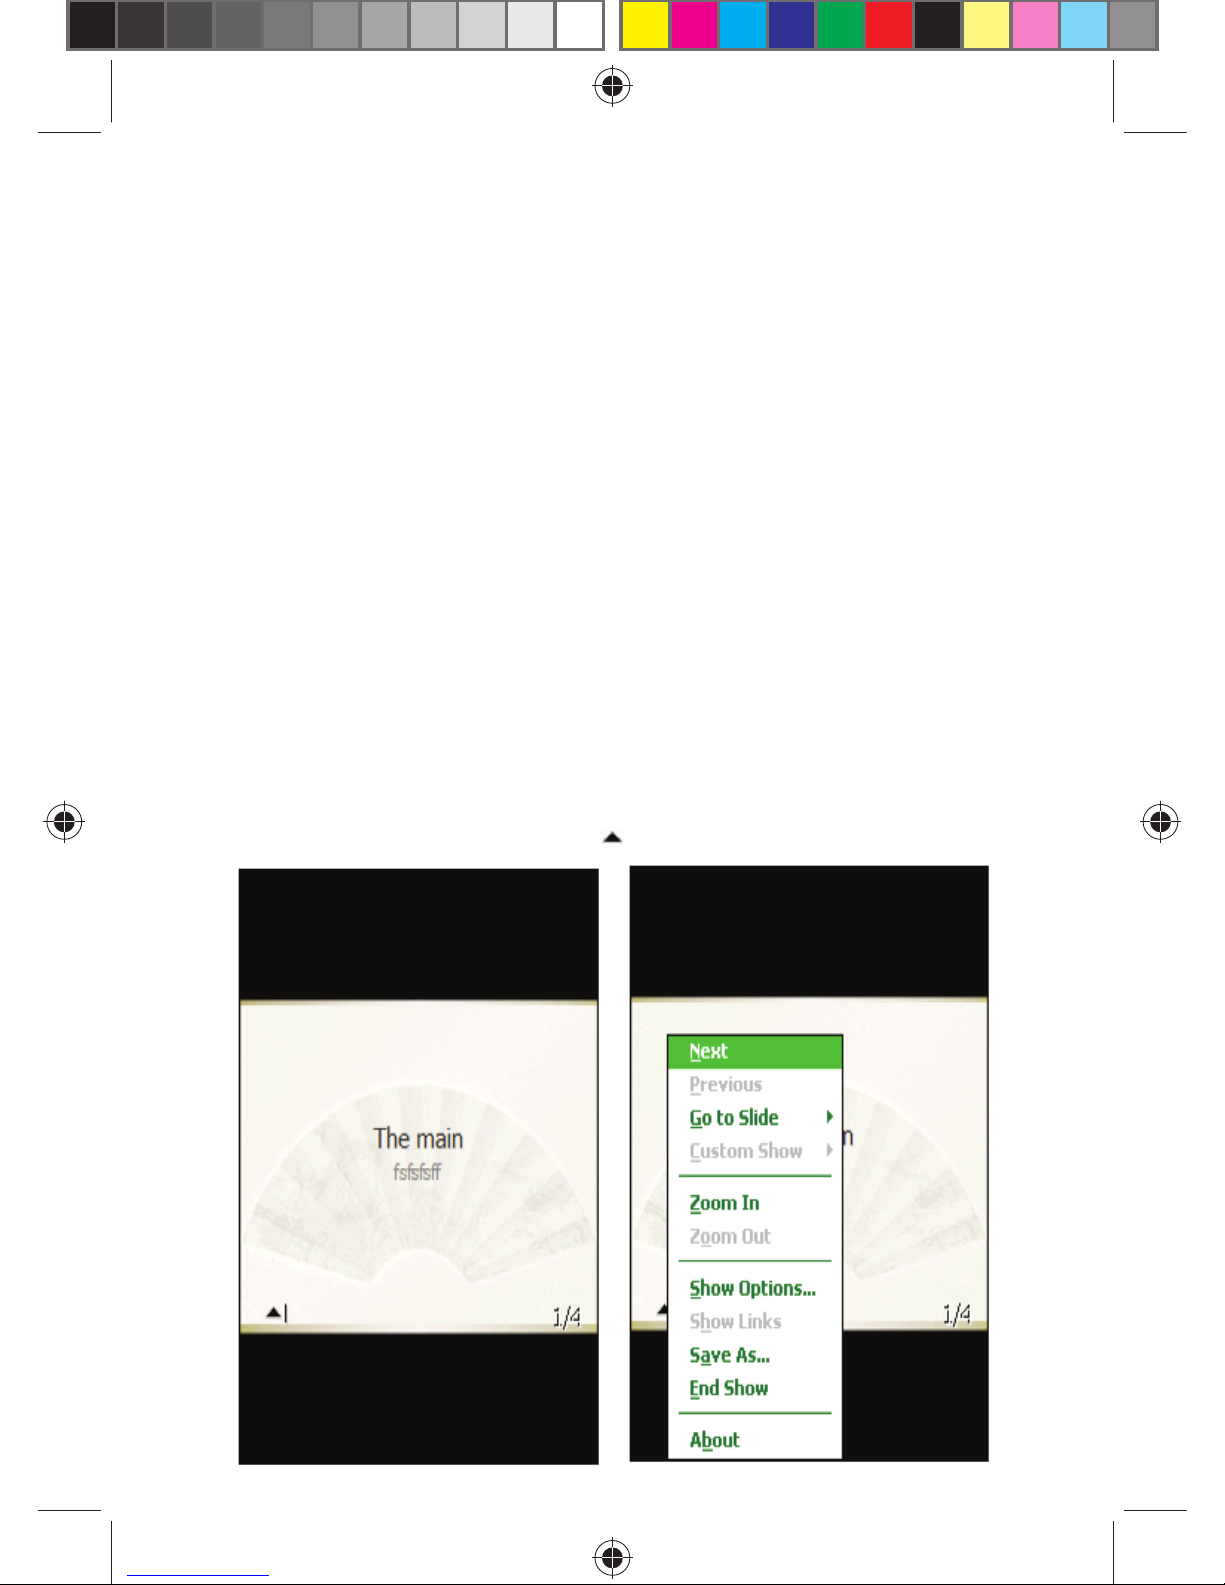
70
8.1.3.2 Skills
Here are a few suggestions in case you need to use Excel Mobile to create
a large fi le:
• View in Full Screen. Tap View on the editing screen and then select Full
Screen. Tap it again to cancel Full Screen.
• Select Zoom to scale your spreadsheet to a proper size.
• Use Split to display different editing areas. Select Split in View; drag
the split box edge to a proper position. Select Remove Split in View to
restore.
• You may freeze the split pane so that its column and row number can
be seen while scrolling. After splitting, select Freeze Panes in View. To
unfreeze, select Unfreeze Panes.
• You can hide the rows or columns in the spreadsheet. Select a cell in
the column or row you are about to hide, select Format in the Menu,
choose row or column, and then tap Hide in the submenu. Follow the
same steps and select Unhide to restore.
8.1.4 PowerPoint Mobile
In PowerPoint Mobile, the system shows a list of slides stored in the
phone. Use the touch pen to select and open a fi le to play it in the full
screen.
• During the play of slides, tap to open a menu.
7
Page 71
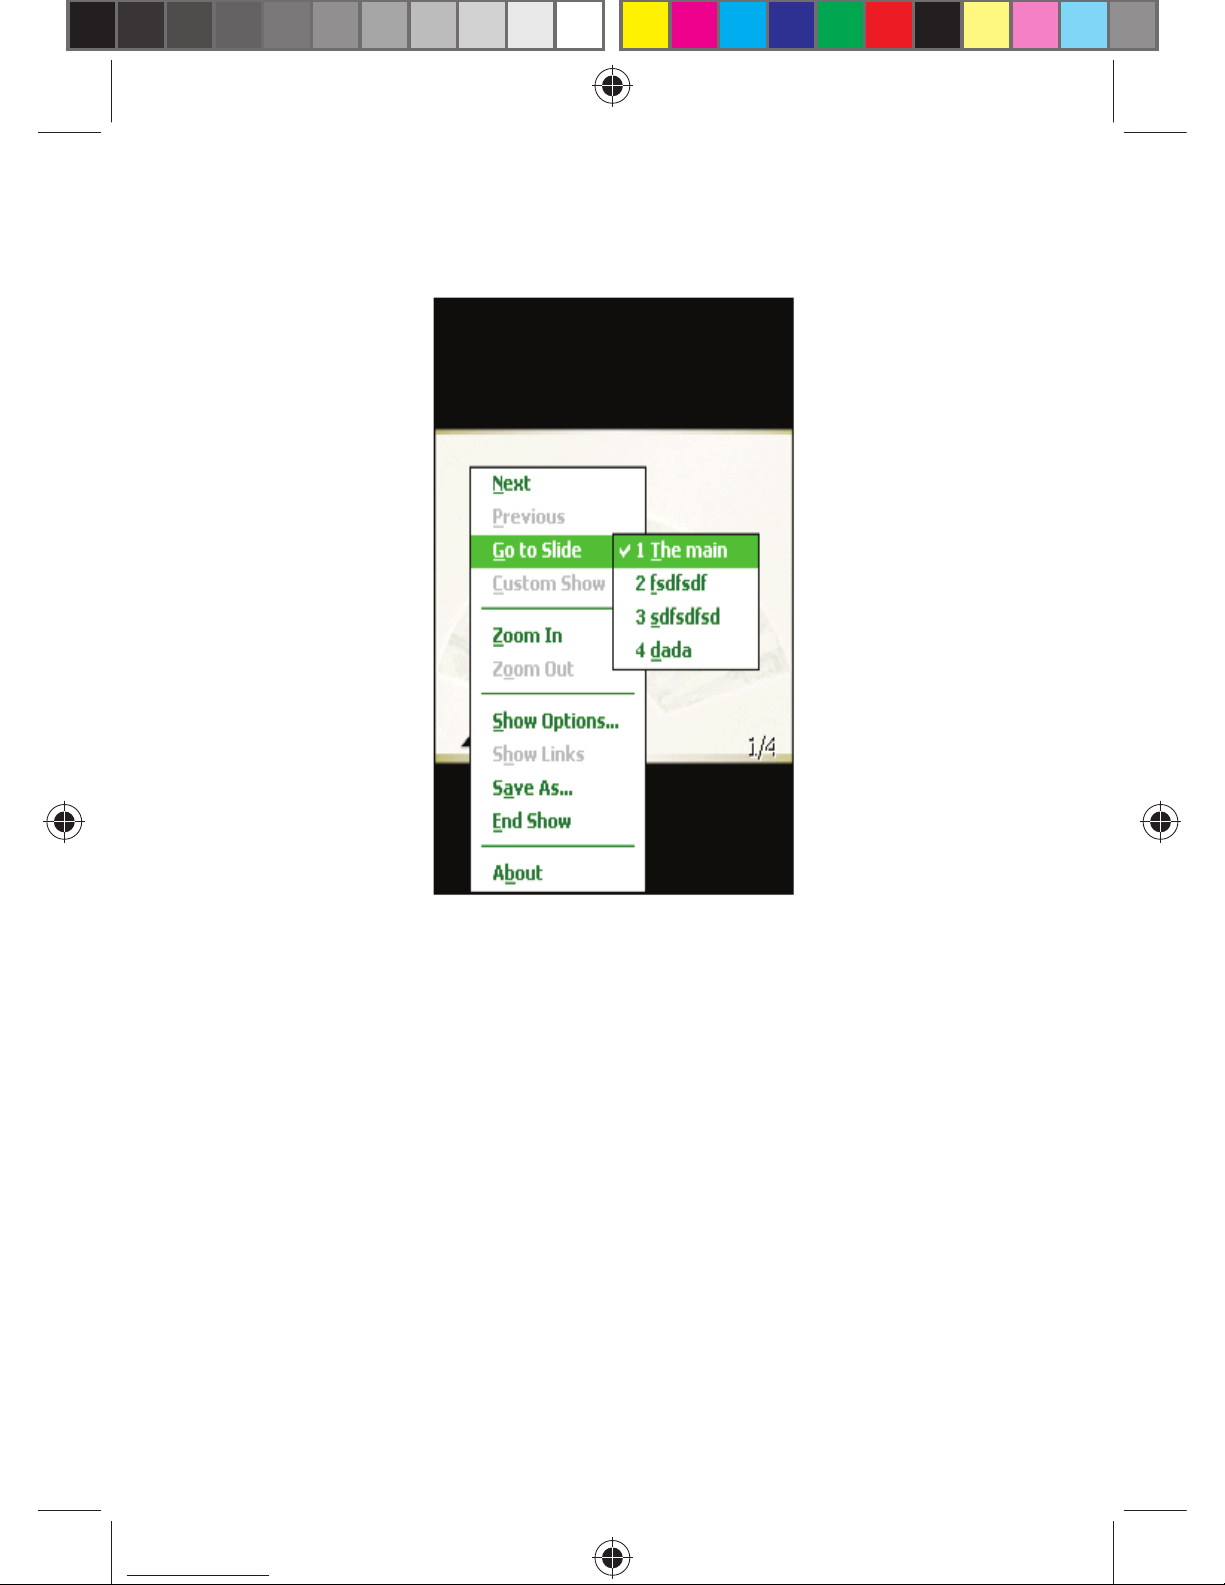
71
• Tap Go to Slide to view a selected slide.
Page 72
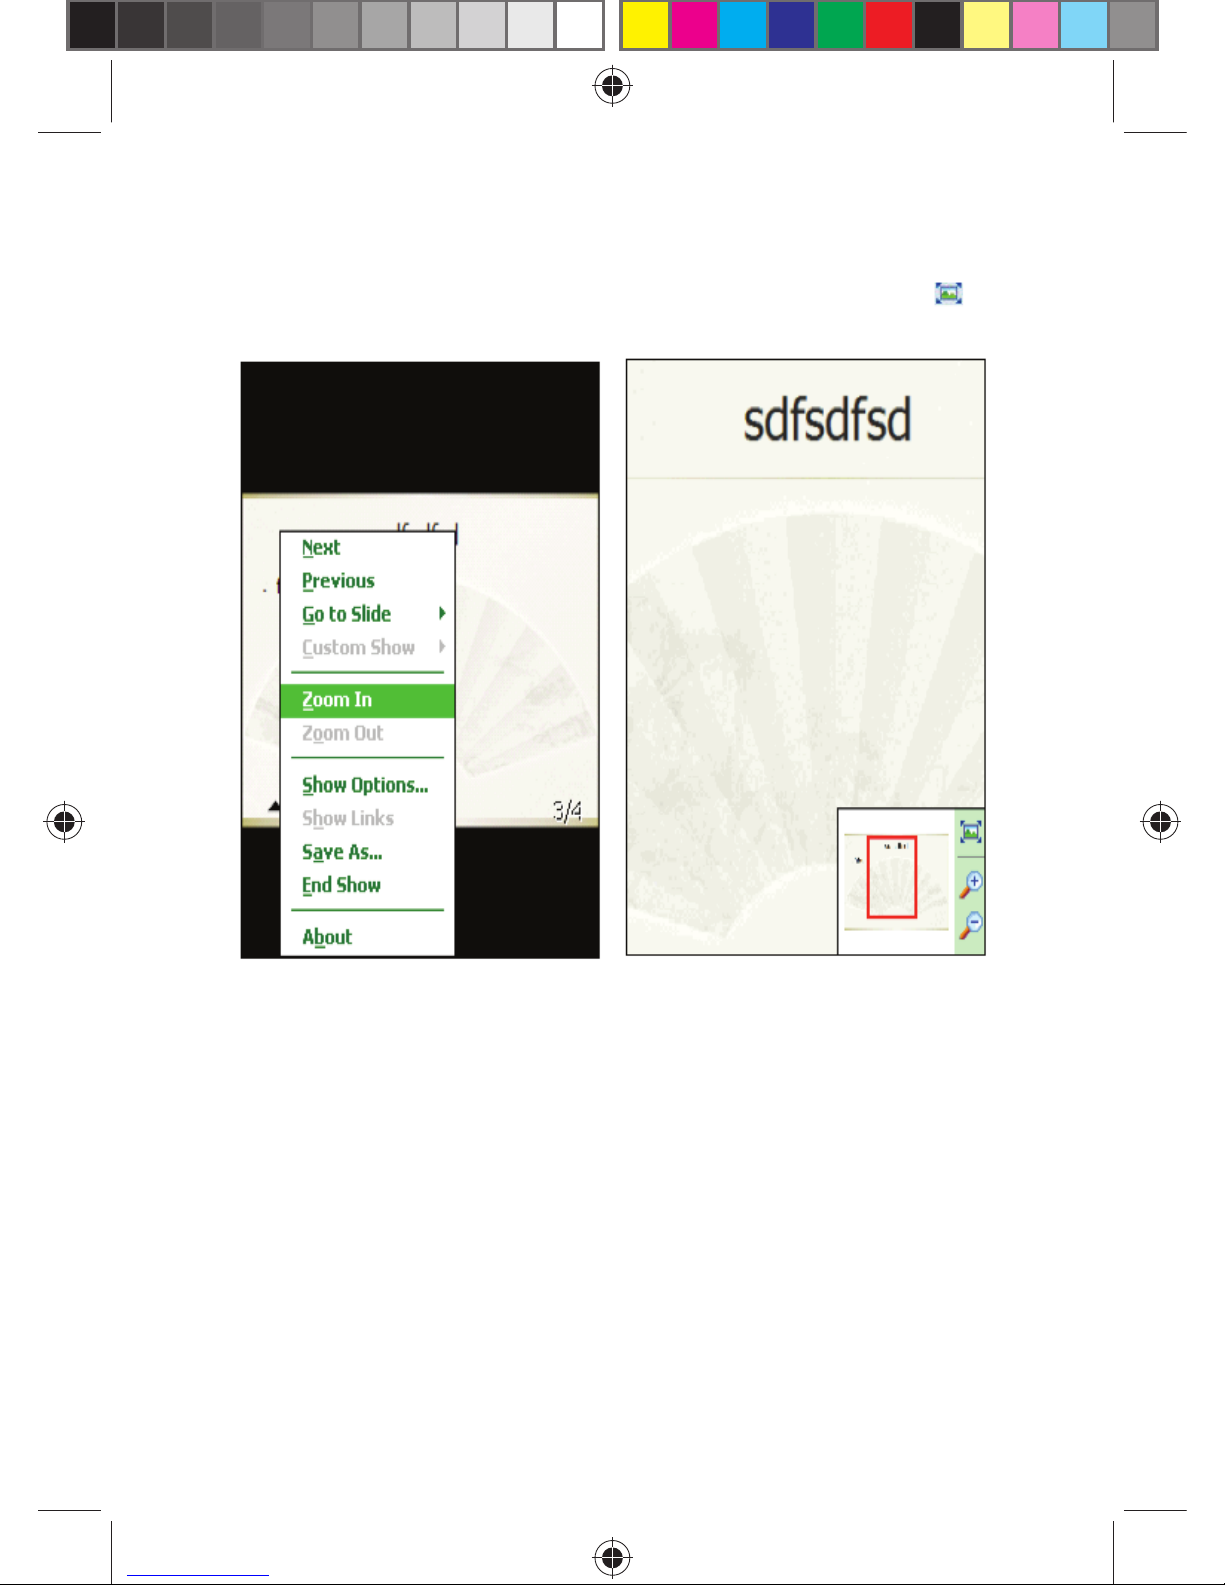
72
• Tap Zoom In to watch the slides in full screen. In the preview window
(at lower right corner), drag the slide to the section to view. Tap to
exit from Zoom In.
Page 73
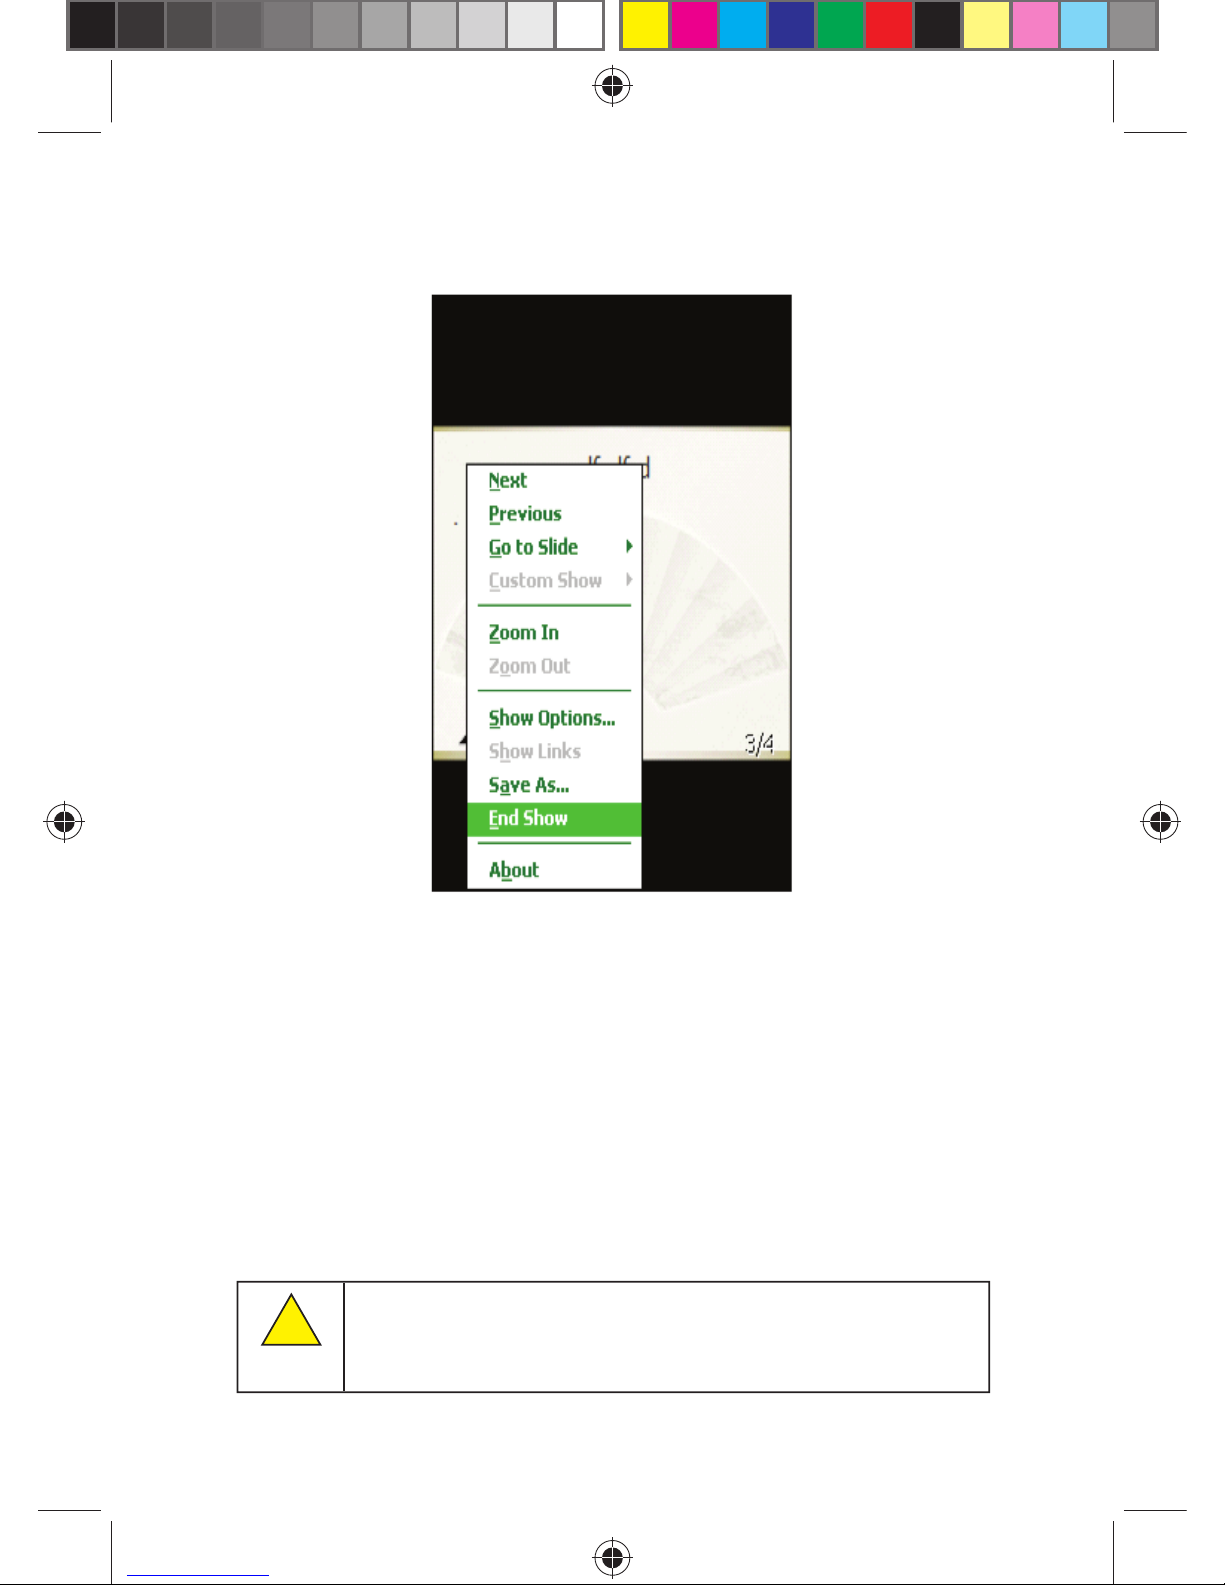
73
• Tap End Show to return.
8.2 INTERNET EXPLORER
Using Internet Explorer (IE), you can connect your phone to the Internet
or network-based applications. Your phone supports connection to the
Internet via a common data call, or surfi ng the Internet through GPRS
on a GSM network. Deploying any of these powerful functions keeps
you connected to the world at any given time.
To connect your phone to a network with IE, you need to:
• Make sure that your SIM card supports Internet connection. Contact
your service provider for confi rmation.
• Subscribe data or GPRS service from your service provider.
• Set up the functions for IE on your phone.
The ability to access WAP depends on the service provider and
whether you have subscribed the service.
!
Note:
Page 74
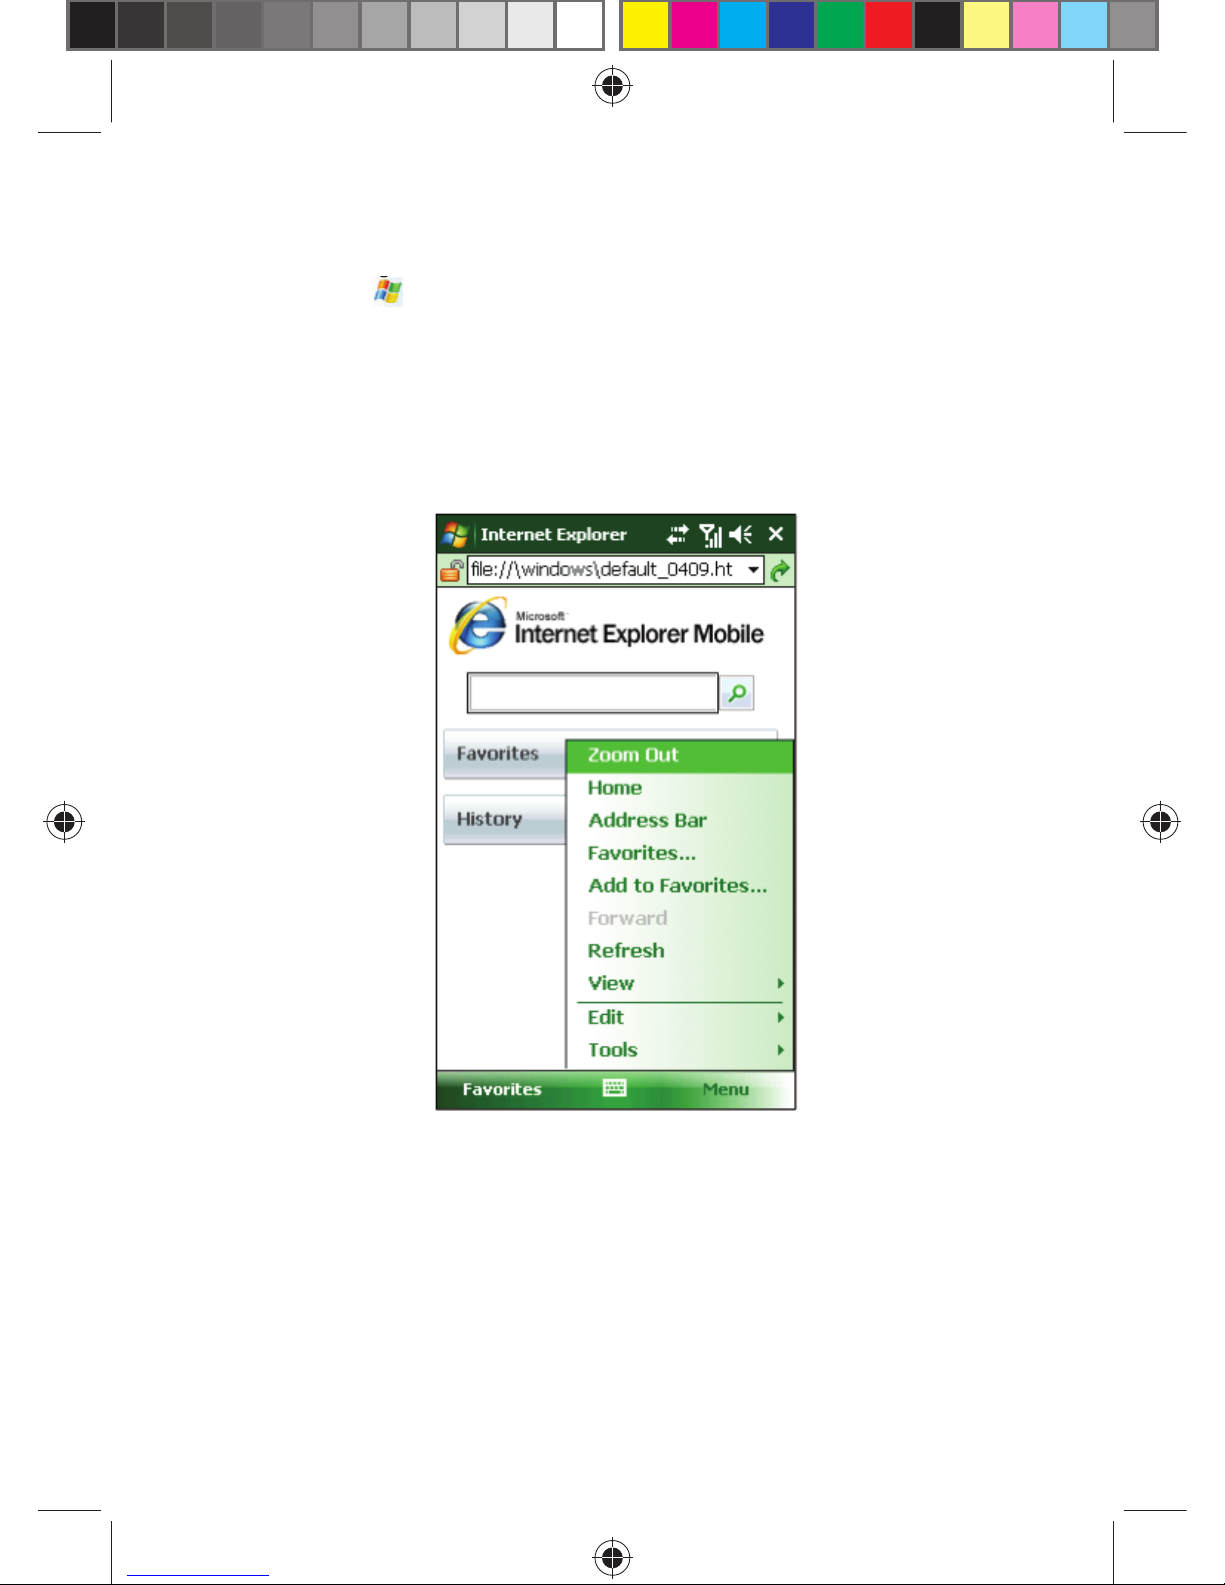
74
8.2.1 Starting Internet Explorer
• Tap and then select Internet Explorer.
• The system will connect to the homepage.
• You may enter a website address in Address Bar and then tap the green
arrow or press the center key.
8.2.2 Menu
While online, tap Menu for the following options:
Zoom Out - Zoom out the page for displaying web pages.
Home - Go back to the homepage.
Go to Web Address – To enter a website address in address bar.
Favorites - To open the list of your favorites.
Add to Favorites – To add a new entry, such as a website name or
address and the folder’s name.
Forward - To go to the next webpage.
g
g
g
Page 75
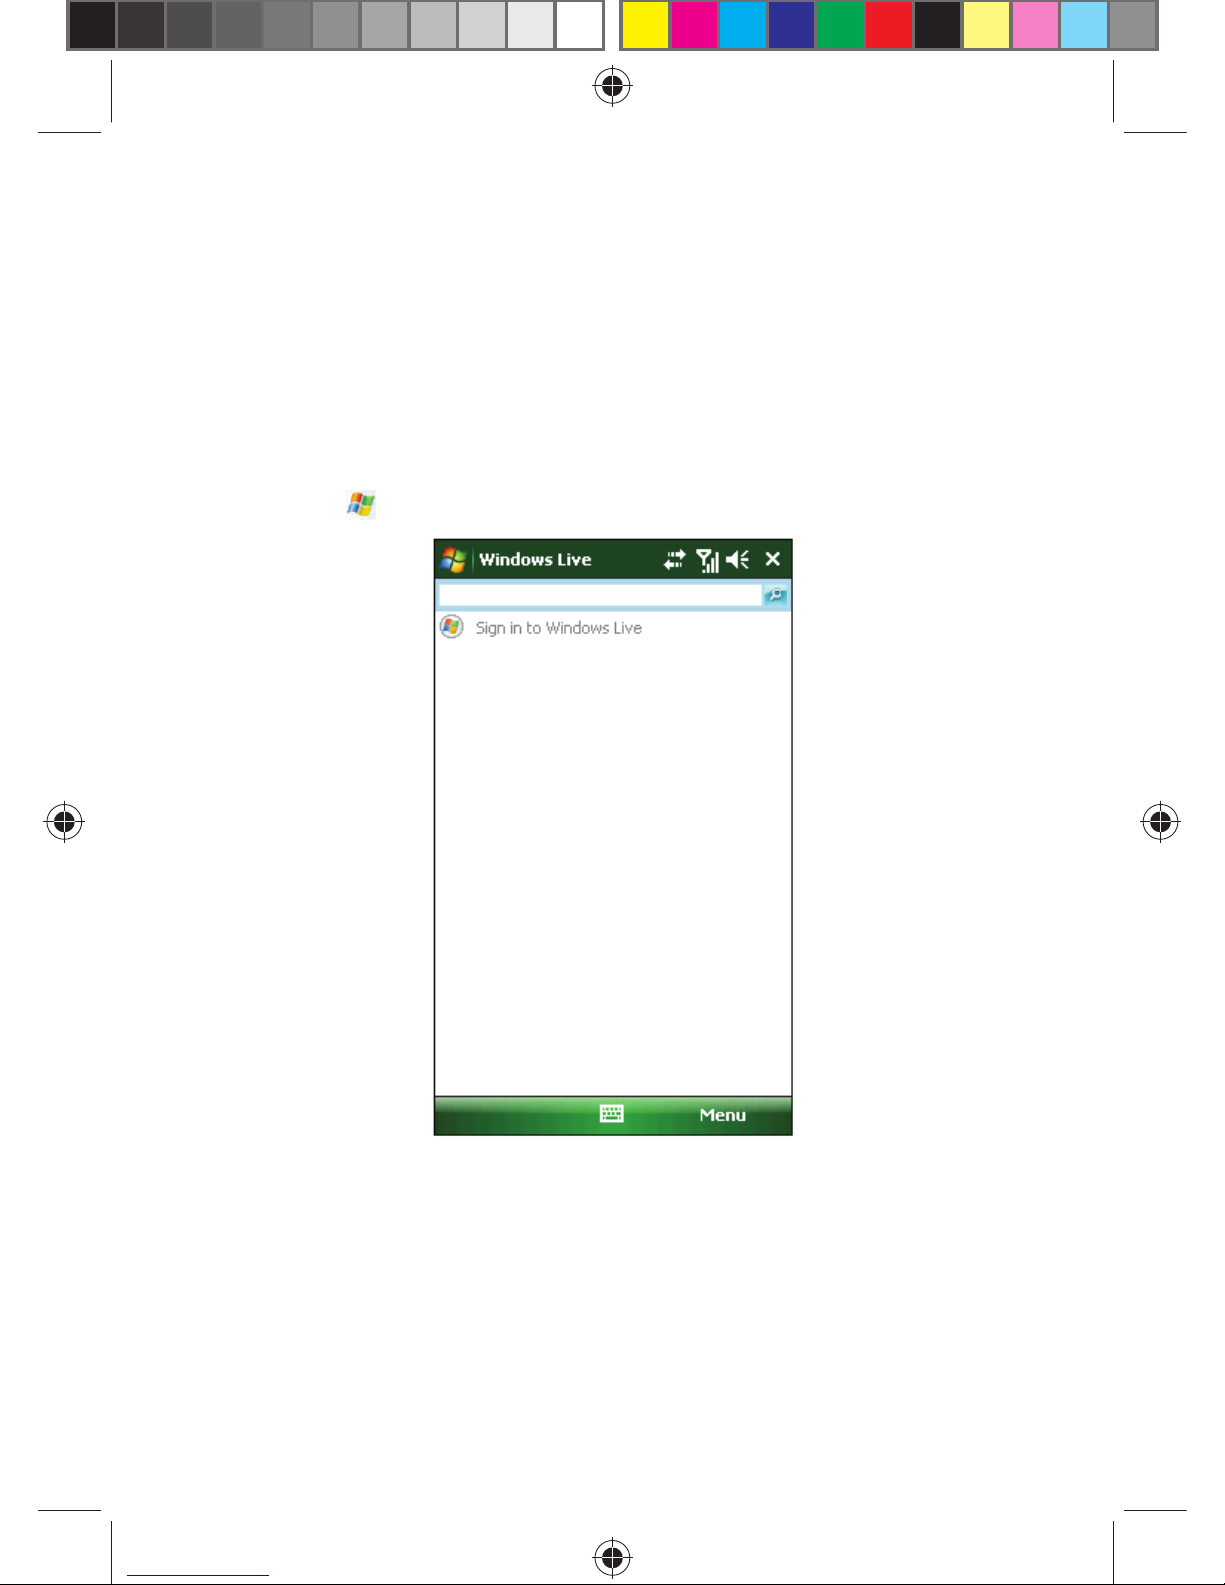
75
Refresh - To reload the webpage.
View - Select a view mode for browsing pages.
Edit - To cut / copy or paste text on the webpage.
Tools – To show the list of the recently visited Webpages, send a hyperlink
via message, view the properties of the webpage, or set up the browser.
8.3 WINDOWS LIVE
Tap and then select Windows Live in Programs.
Page 76
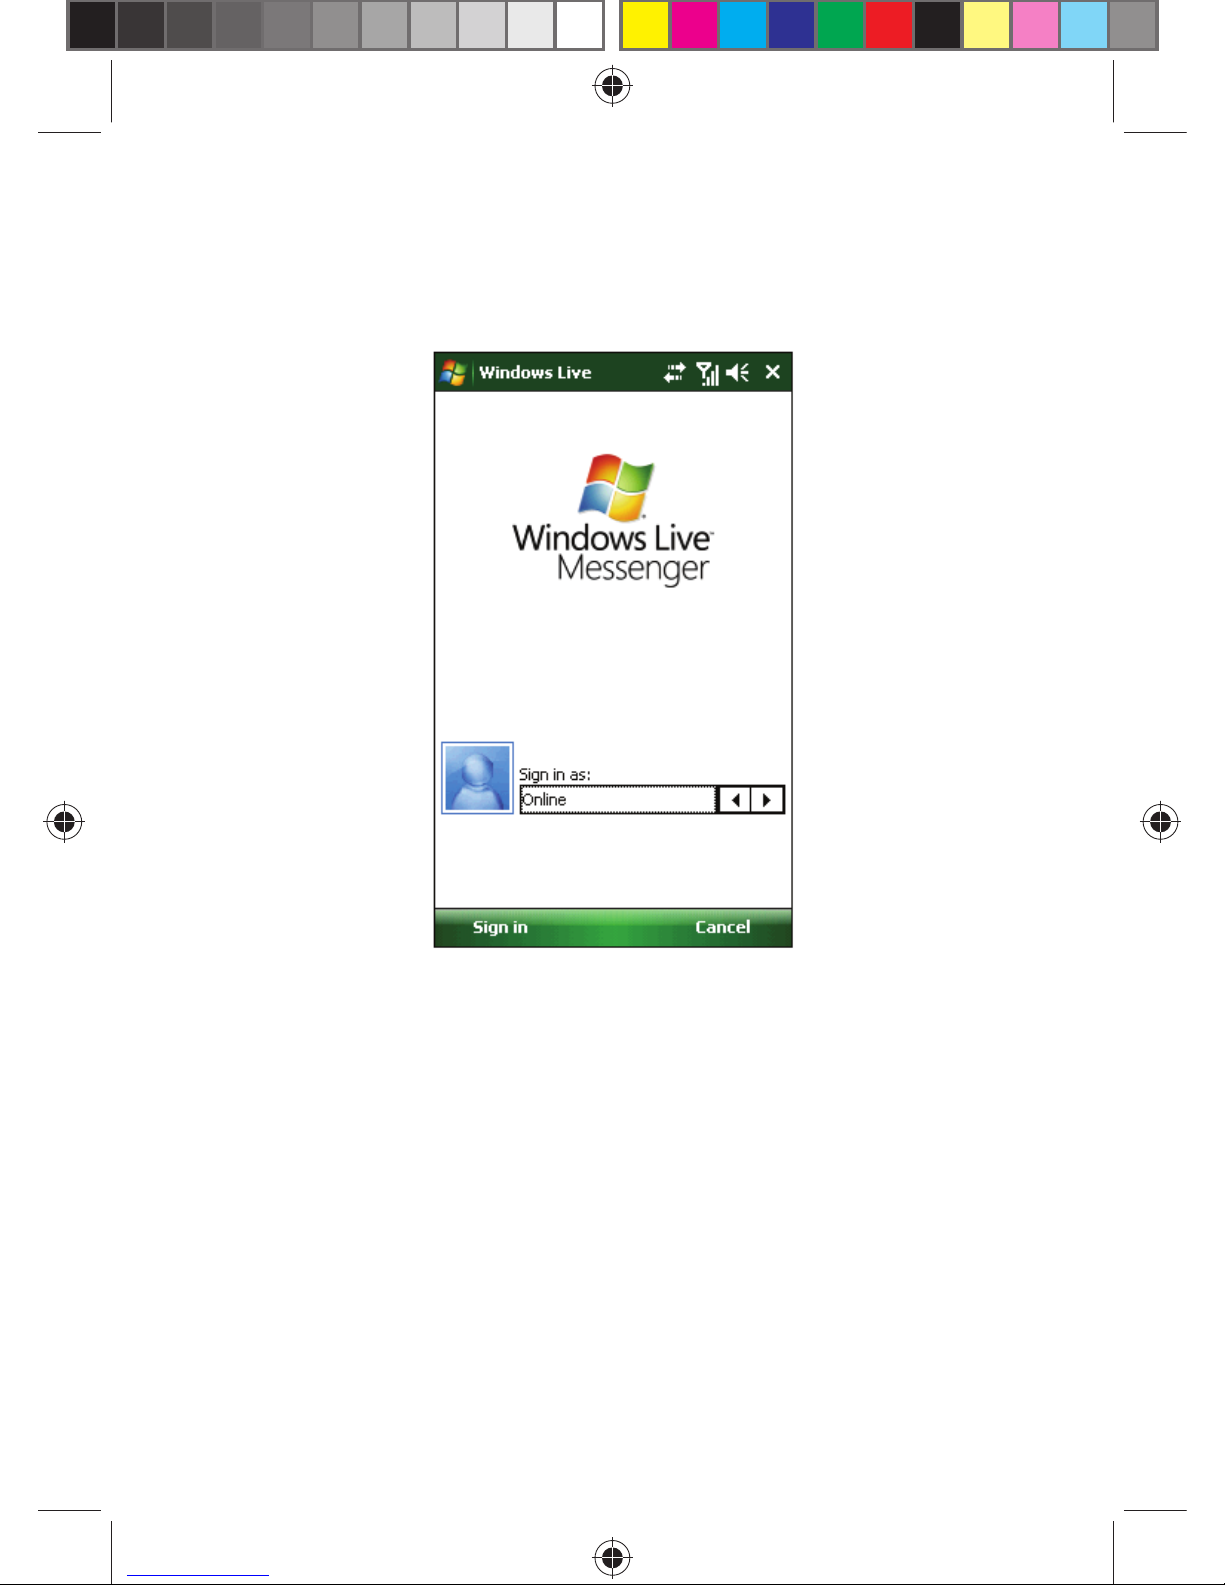
76
8.3.1 Messenger
Chat with your friends with Messenger. You need to have an account of
MSN, Hotmail or Yahoo.
8.3.2 Sign in
Set up your username and password before signing in to Messenger.
• Tap Sign In.
• Enter your E-mail address and password, and then tap Sign In again.
Page 77
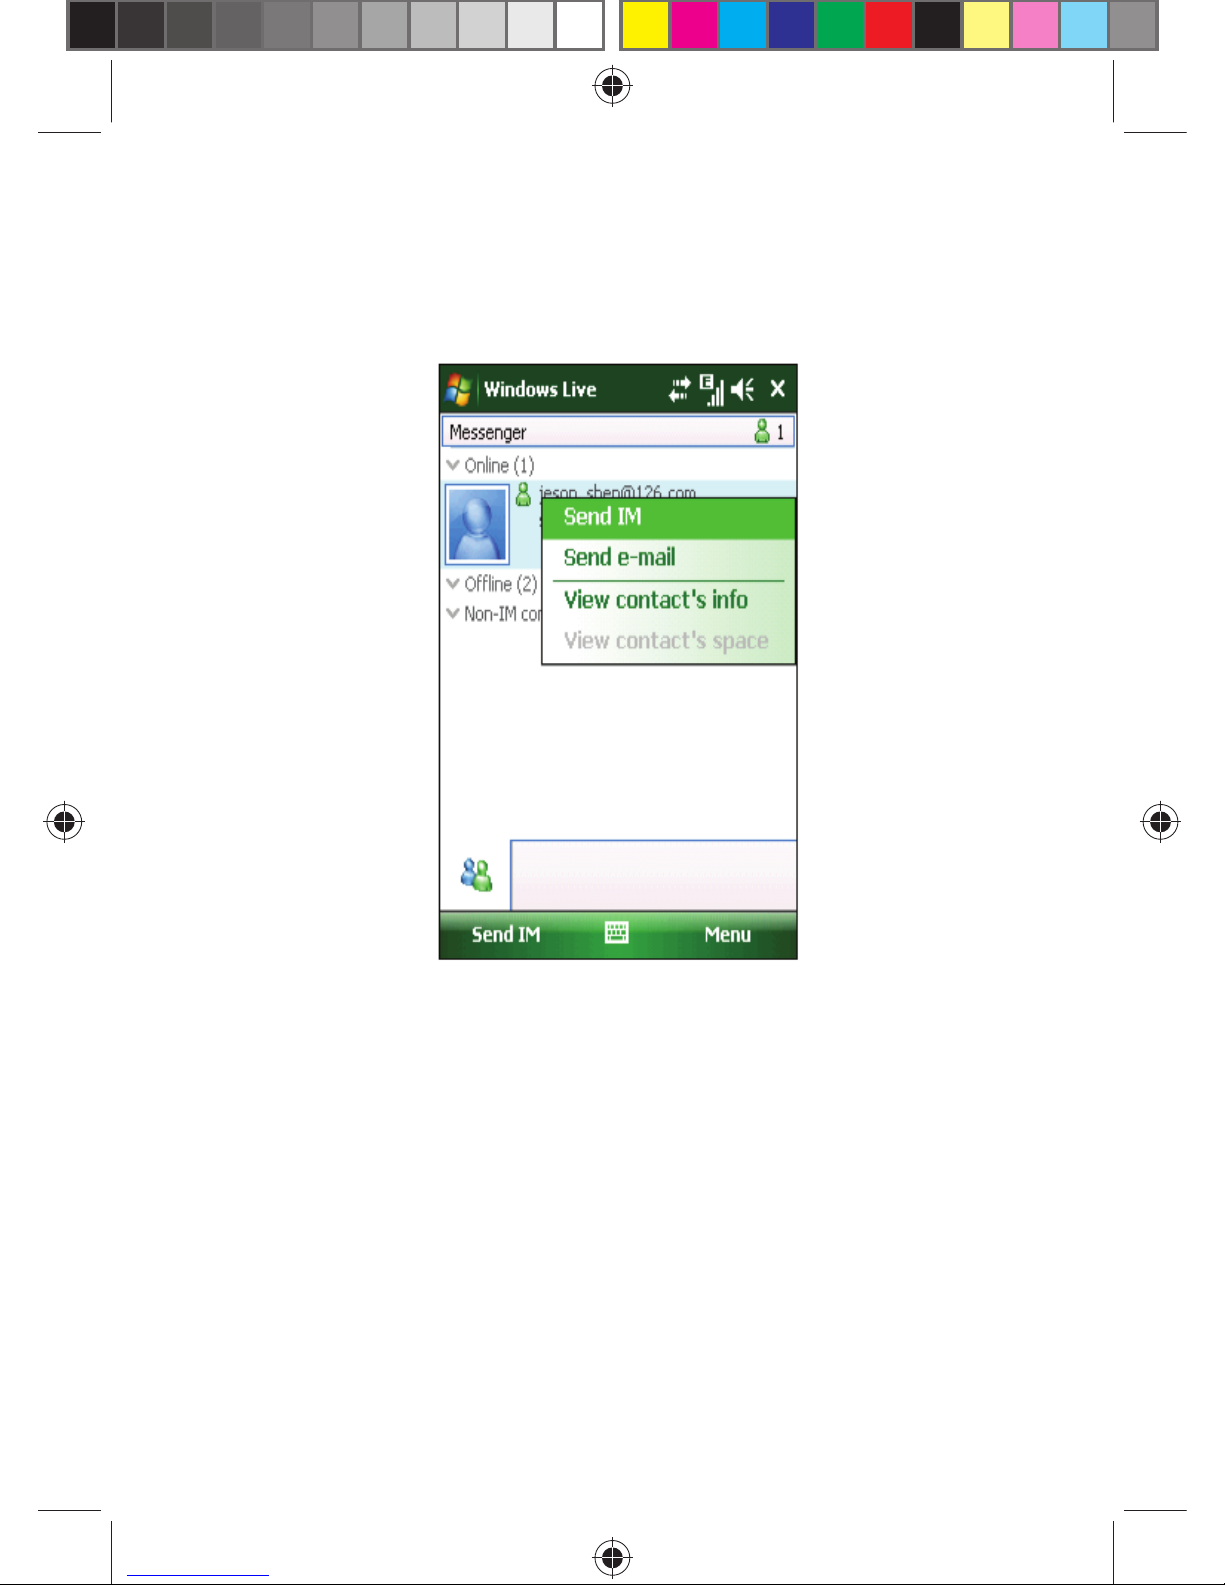
77
Send a Message
• After logging in to MSN, select a friend online; a dialog box will appear.
You can send your messages now.
Page 78
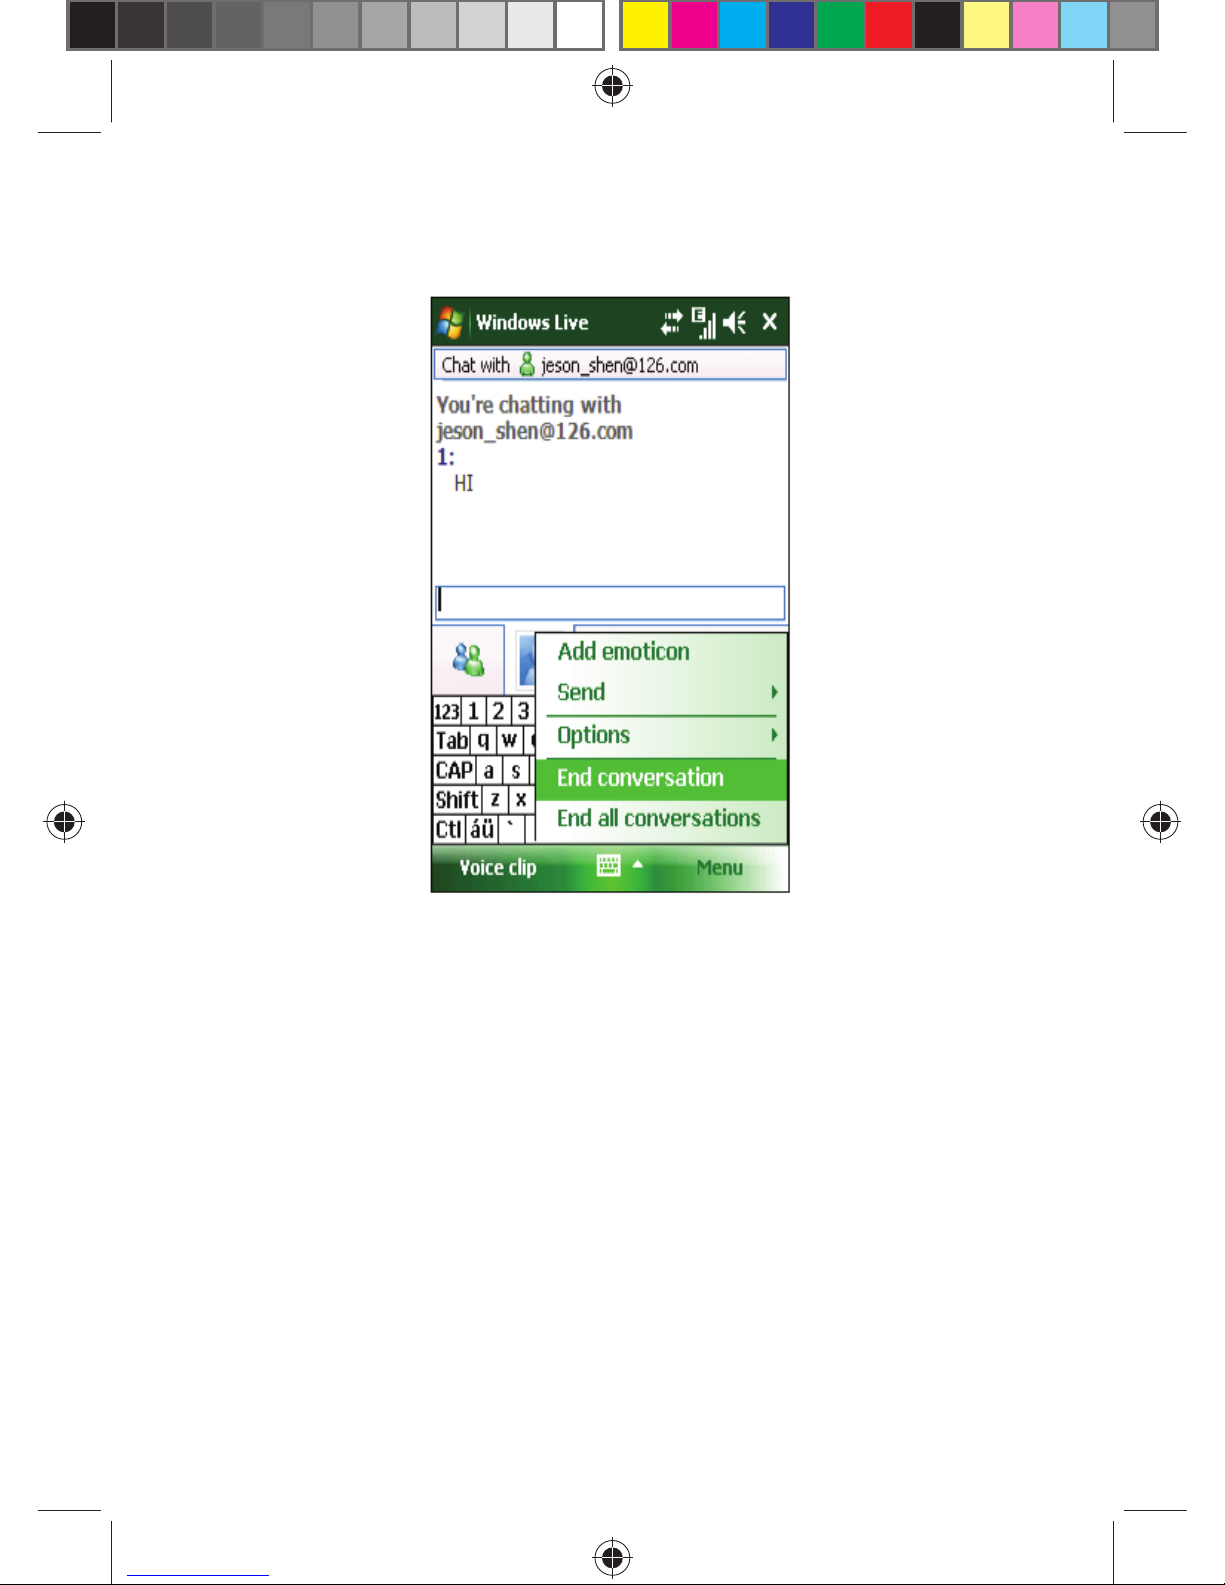
78
• To exit, select Menu -> End conversation in the dialog box.
8.3.3 Add Participants
While you are chatting with a friend, you may invite another one.
Select Menu -> Options -> Add participant, and then tap Add.
While there are several people in chatting, select Menu -> End all
conversations to go back to the friend list. You may select a friend for a
private conversation.
8.3.4 Block and Unblock Contact
After you have blocked a contact, he/she can’t view your online status or
send you instant messages.
Select the contact to be blocked from the list, and then select Menu ->
Block; Select Unblock to restore.
Page 79
79
8.3.5 Change Online Status
Select Menu -> Online Status, choose a status from the list, and then
press the center key.
You can change your online status only after you have signed in
to MSN.
8.3.6 Hotmail
You can compile or read your Hotmail.
Refer to Messaging for editing, sending or receiving E-mail(s).
Write a new Hotmail.
You may open the editing screen.
Refer to Messaging for editing and sending E-mail(s).
8.3.7 Live Mobile Homepage
Select to go to Live Mobile Homepage.
8.3.8 Windows Live Help
Select to get help on Windows Live.
8.4 ACTIVESYNC
With Microsoft® ActiveSync®, the data in your phone can be synchronized
through a USB cable or Bluetooth with the PC.
ActiveSync® will make sure the information in the phone can be updated
with that in the PC.
You should follow the prompts on the screen to install ActiveSync from the
CD-ROM to your PC.
8.4.1 Use ActiveSync
8.4.1.1 Sync with PC
After having ActiveSync installed, connect your phone through a USB
cable to the PC.
Follow the on-screen instructions to establish the relationship between the
PC and the phone. The synchronization process will start automatically
when the relationship has been established. Outlook Contacts,
Appointments, Tasks, E-Mail(s), etc. will be synchronized to the phone.
Standard Partnership allows synchronization and transmission of data
between your phone and the PC, while Guest Partnership can be
!
Note:
Page 80
80
selected if you want to only transmit information.
On ActiveSync status window, click Sync to start the sync process, or click
Stop to end syncing.
.
By default, not all the Outlook information will be synchronized.
You have to select from the available options.
8.4.1.2 Sync with Server
Before synchronization, contact your administrator or service provider for
such information as the server name, username and password.
1. From the ActiveSync screen, select Menu -> Add Server Source.
2. Enter the mobile information server’s address in Server Address.
3. Enter Username and Password.
4. Enter the domain name of your Exchange server in Domain.
5. Press Done, and then Synchronize.
Hint: After setting up a relationship between the phone and the PC, you
may connect the server remotely.
The password is case sensitive.
8.4.2 Synchronization
8.4.2.1 Synchronizing Inbox
• By default, only the mails (each with the fi rst 500 bytes) in Inbox on the
PC or on the server that were received in the latest three days will be
synchronized. To read the complete e-mail, you have to download it.
• Mails in the phone and mails in the PC are in-sync. For example,
deleting a mail in the phone or in the PC will have the mail deleted in
the PC or in the phone during the next-time synchronization.
• To synchronize mails in other folders or directories, select them in the
phone.
Text messages and MMS can’t be synchronized.
!
Note:
!
Note:
!
Note:
Page 81
81
8.4.2.2 Synchronizing Appointment
• You can synchronize Appointments in the phone with those in Outlook
or the Mobile Information Server 2002 (or higher) on the PC.
• By default, only the Appointments in the past two weeks and the future
appointments will be synchronized.
8.4.2.3 Synchronizing Contacts
• All contacts are synchronized by default.
• Adding or deleting a contact in the phone or in the PC will have the
same result in the PC or in the phone.
8.4.2.4 Synchronizing via Bluetooth
Via Bluetooth, your phone can connect and synchronize with other mobile
devices or PCs.
8.4.2.5 Installing Software on the phone
You may use ActiveSync to install software on the phone from your PC.
1. Connect the phone and the PC through ActiveSync.
2. Run the setup fi le in the PC.
3. Select a setup path in the phone, and then start installing. If there’s a
storage card, the system will alert you to choose a location.
8.5 CALENDAR
Use Calendar to remind you of meetings and anniversaries, and to keep
track of your tasks and other notes.
8.5.1 Calendar Views
Tap and then select Calendar to display an appointment list.
Tap Day to switch among Day, Week, Month, Year and Agenda.
8.5.2 New Appointment
Tap Menu -> New Appointment, and then create an appointment
reminder.
8.5.3 Settings
Select Options in the menu to change the settings for your calendar.
8.6 TASKS
Use Task to track what you have to do. Most of the tasks come from
Microsoft Outlook® after synchronization.
8.6.1 Synchronizing Tasks on PC
To synchronize Microsoft Outlook’s Task entries from your PC to your
phone, launch ActiveSync®, and connect your phone with the PC through
a USB cable. The system will automatically start synchronizing.
Page 82
82
Tap a task entry to view its details.
8.6.2 Adding a Task on your phone
• Tap Menu -> New Task to open the screen adding a new task.
• Fill in details, tap to save and exit.
8.7 NOTES
You may take Notes or voice Notes.
• Tap , select Programs -> Notes to display a list of notes in the
phone; tap Name to change the sorting type.
• Tap a fi le in the list to open it.
• Tap All Folders to search for a fi le in those folders.
8.7.1 New Notes
• Tap New to create a new note.
• To write a note, you may either use the build-in IME, or draw with the
touch pen (select Menu -> Draw).
• Tap Menu -> Draw Again to cancel drawing.
• Tap Menu -> Undo Typing to remove the last character; tap Redo
Typing to store.
• After compiling, tap to save and exit.
Page 83
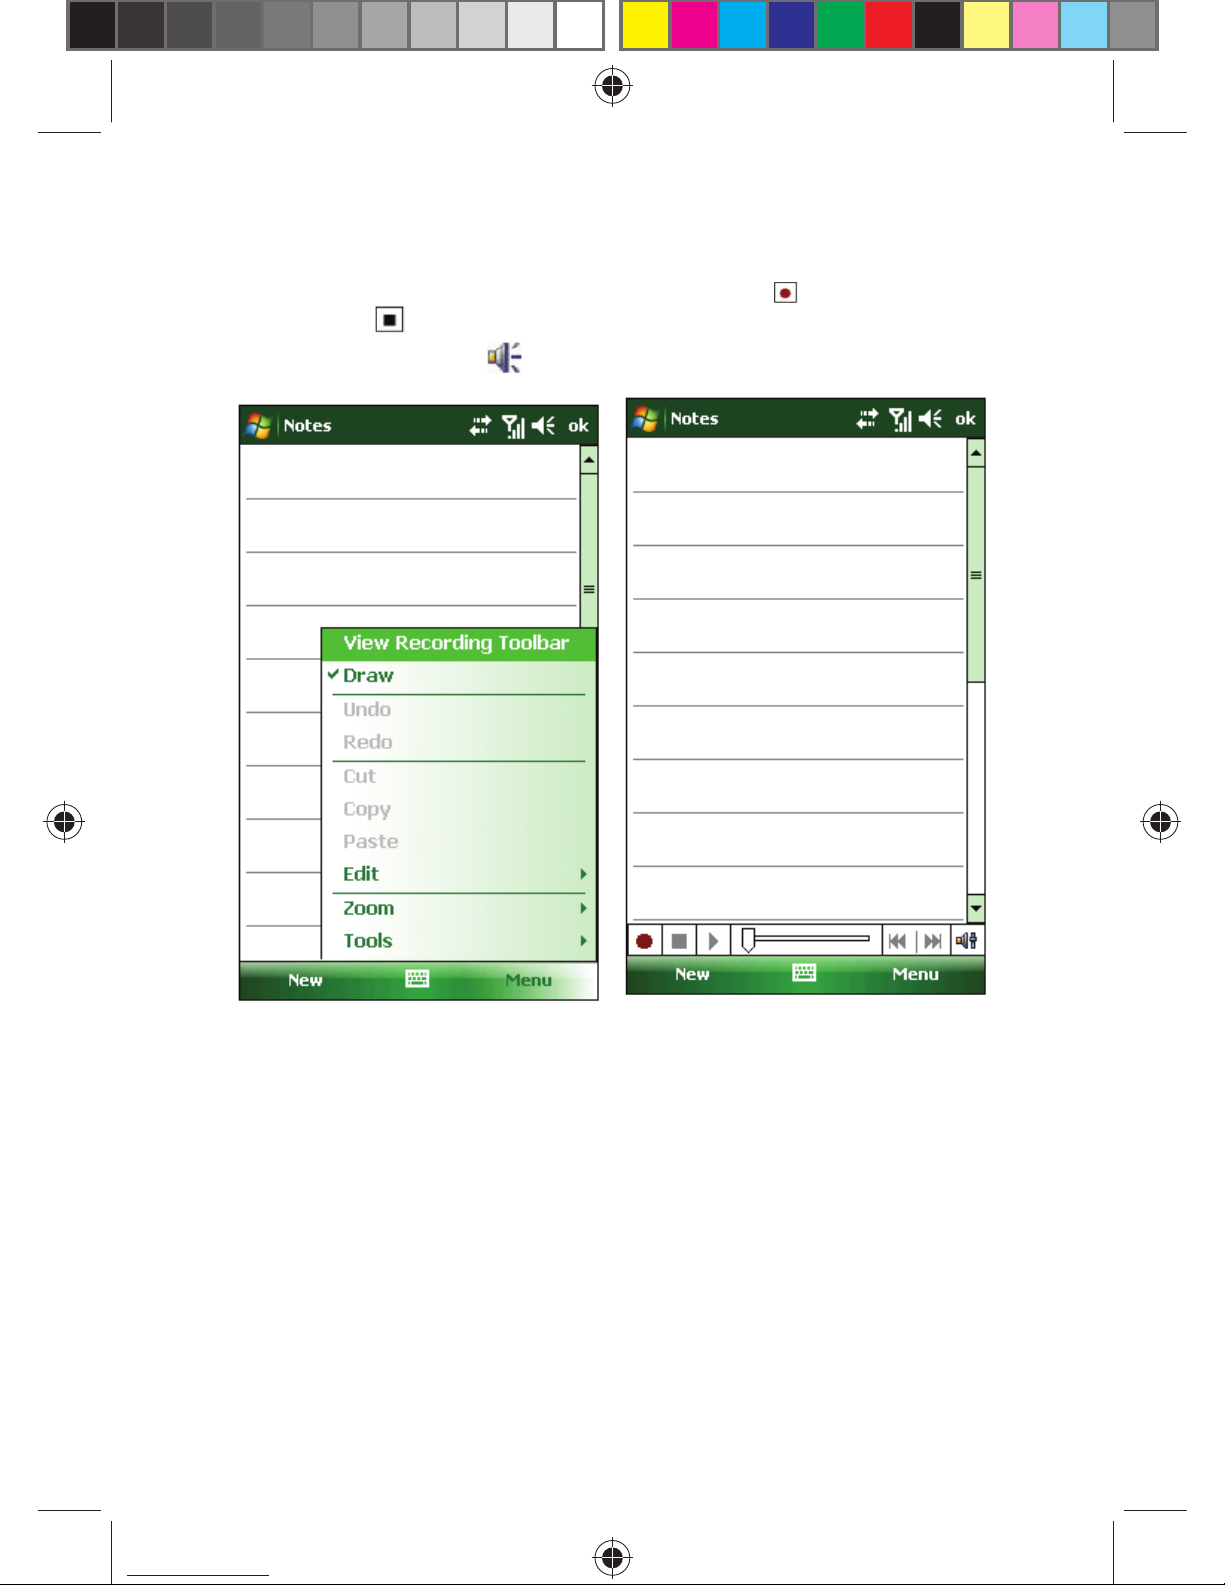
83
8.7.2 Adding Voice in Notes
• Tap Menu -> View Recording Toolbar; tap to start recording.
Tap to stop.
• After recording, shows in the note. Tap it to playback.
8.7.3 Creating Voice Notes
To create a voice note, tap Menu -> View Recording Toolbar and then
record.
Page 84
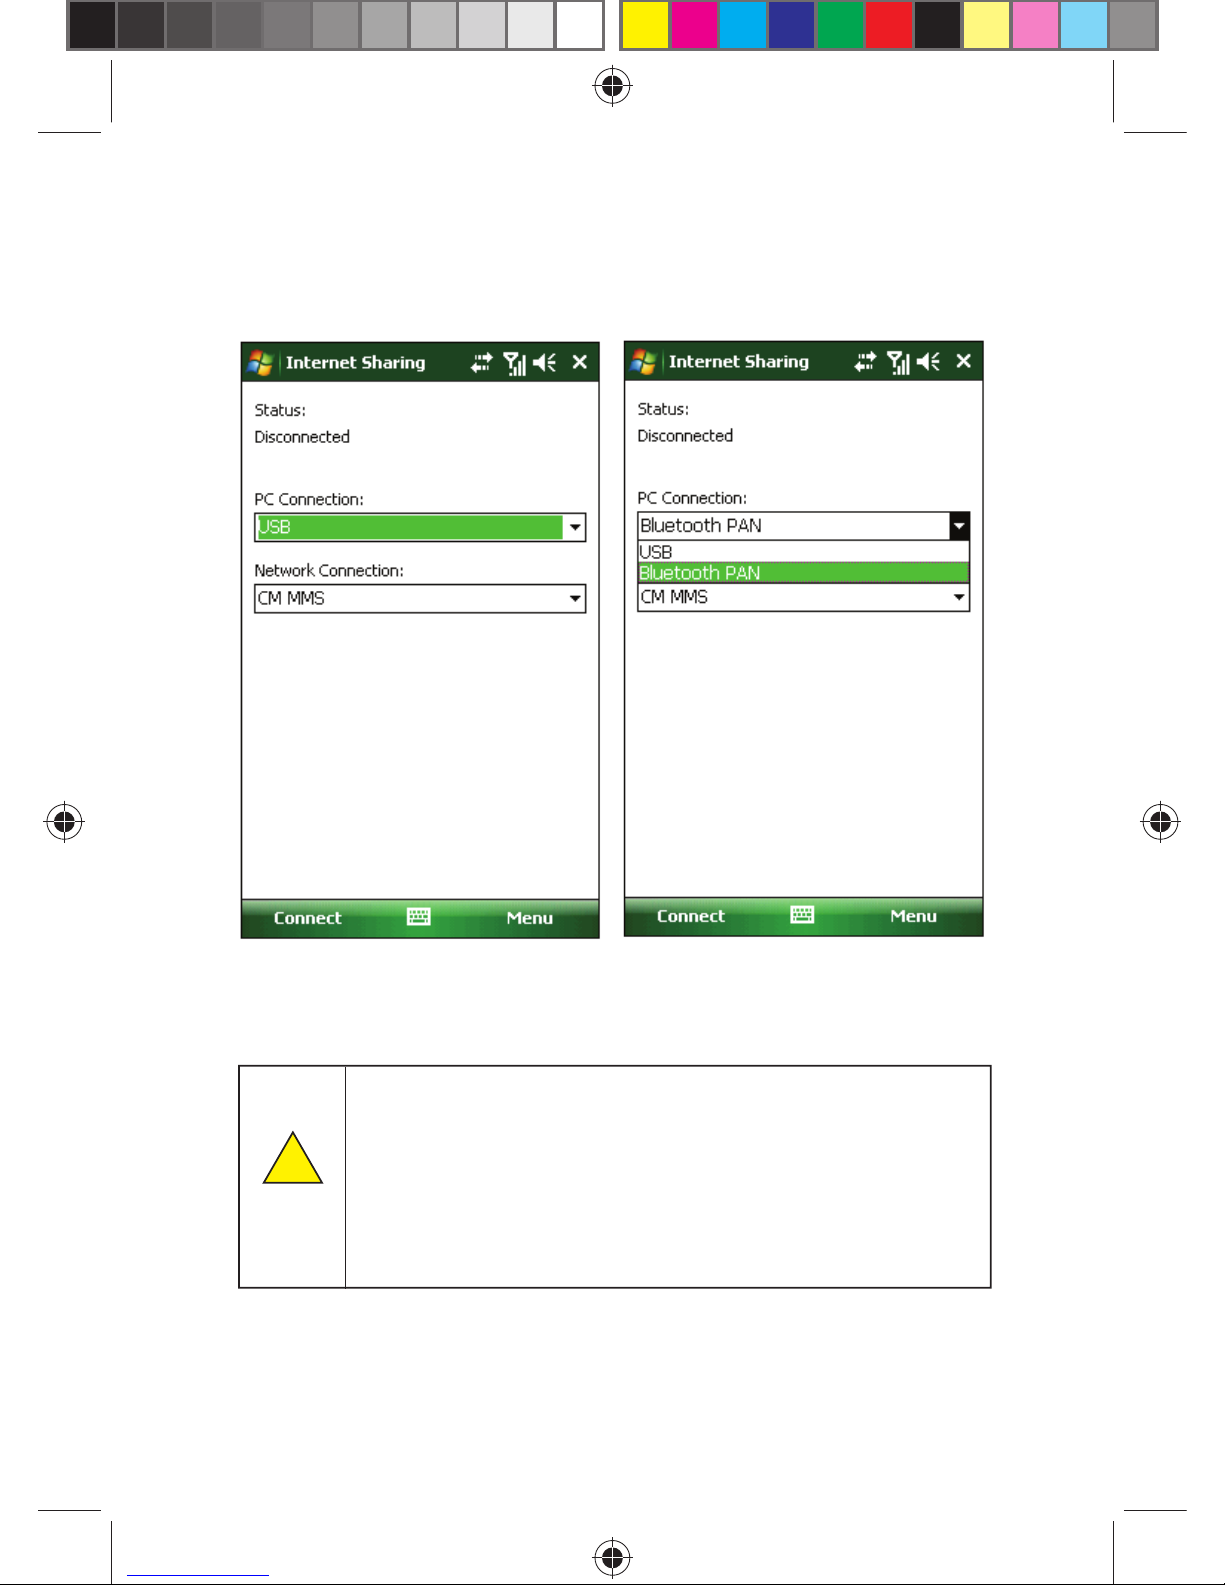
84
8.8 INTERNET SHARING
After the phone connects to the PC through a USB cable, it can work as
an external Modem.
Select Start -> Programs -> Internet Sharing, and then choose PC
connection and Network connection.
But fi rst, you have to make sure your phone can access the Internet.
• To connect via Bluetooth, use a Bluetooth Adapter.
• Disable the network connection on your PC before using the
connection through the phone.
• While the Modem mode is on, synchronization is disabled.
• The availability of modem function depends on your service
provider.
!
Note:
Page 85
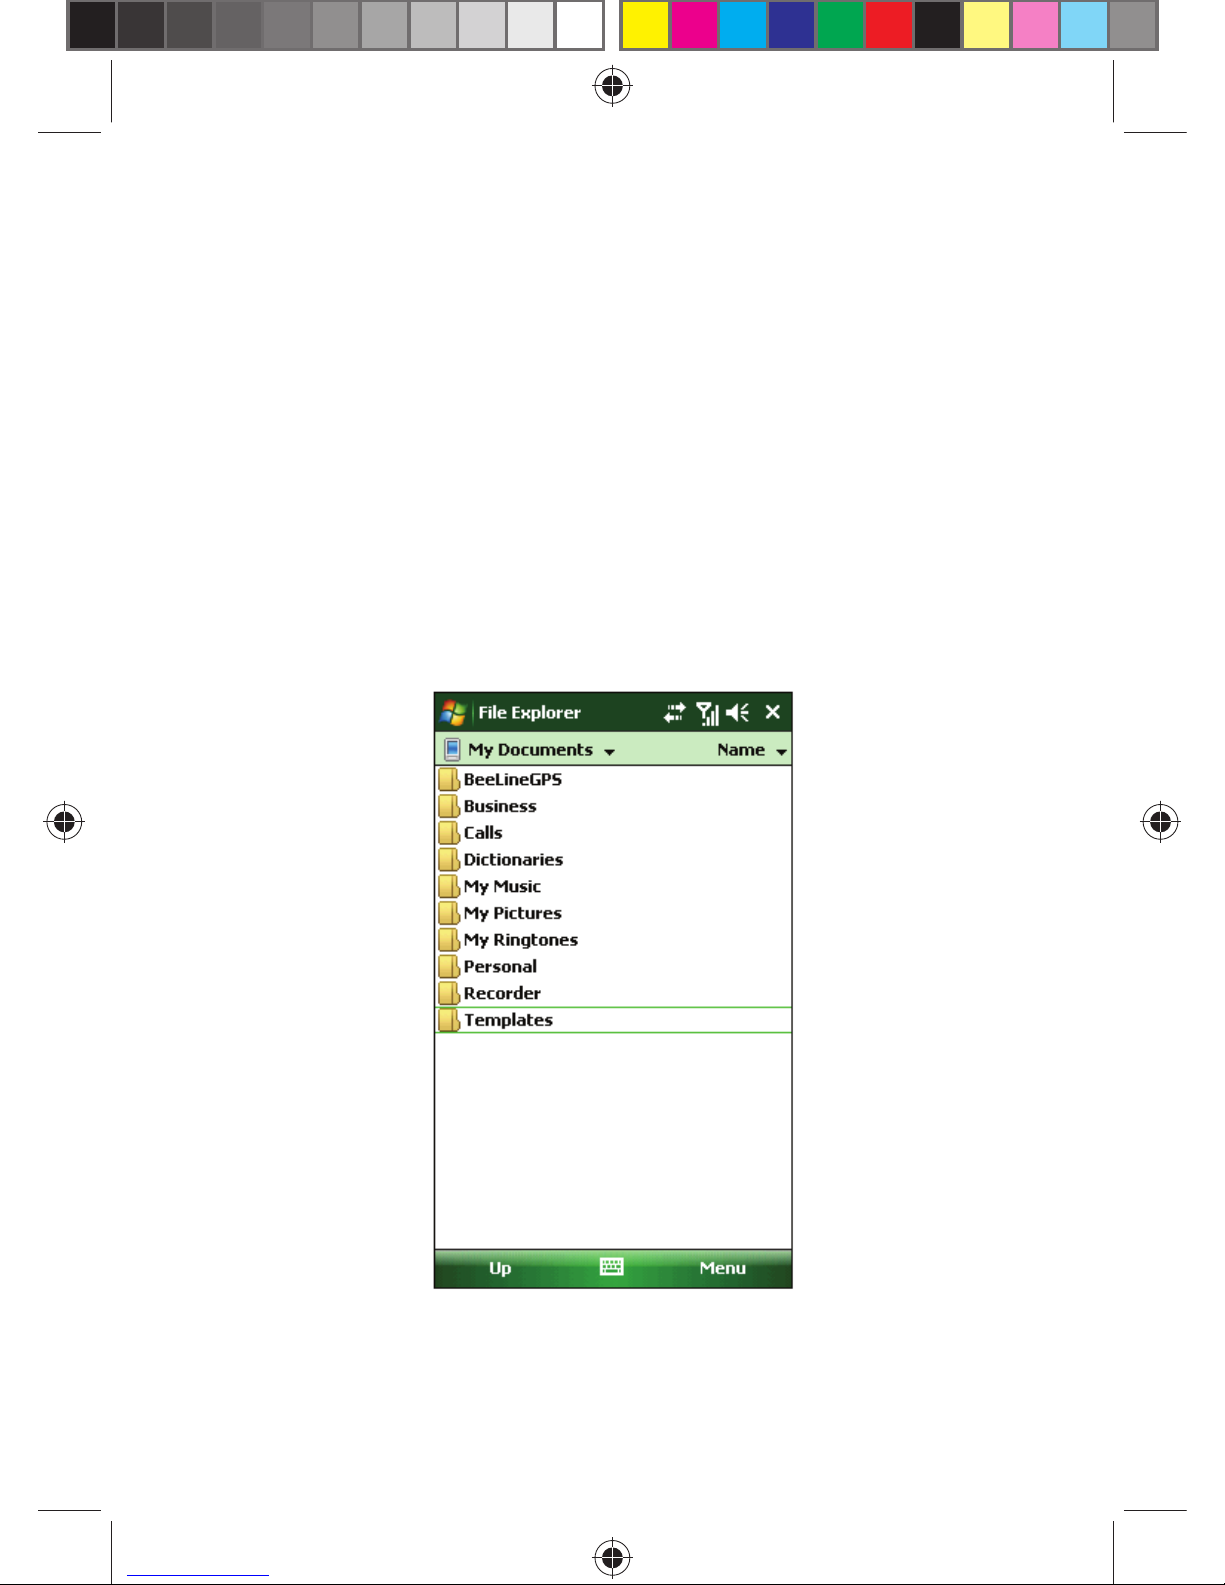
85
8.9 CALCULATOR
You can make calculations including addition, subtraction, multiplication,
division and percentage.
Enter the numbers and operator on the panel, and tap = to have the result.
C key can be used to clear the input number or the result.
8.10 SEARCH
You can quickly search any fi les in the phone.
Enter the fi le name and select the fi le type, and then tap Search.
8.11 FILE EXPLORER
You can manage fi les in the phone. However, it’s recommended not to
modify or delete system fi les.
Options are available to change the displaying mode and system
operation.
8.12 GETTING STARTED
You can realize some modules function in the phone, include the following
function: make a Call; set Date and Time; set up E-mail; set up a device
Page 86
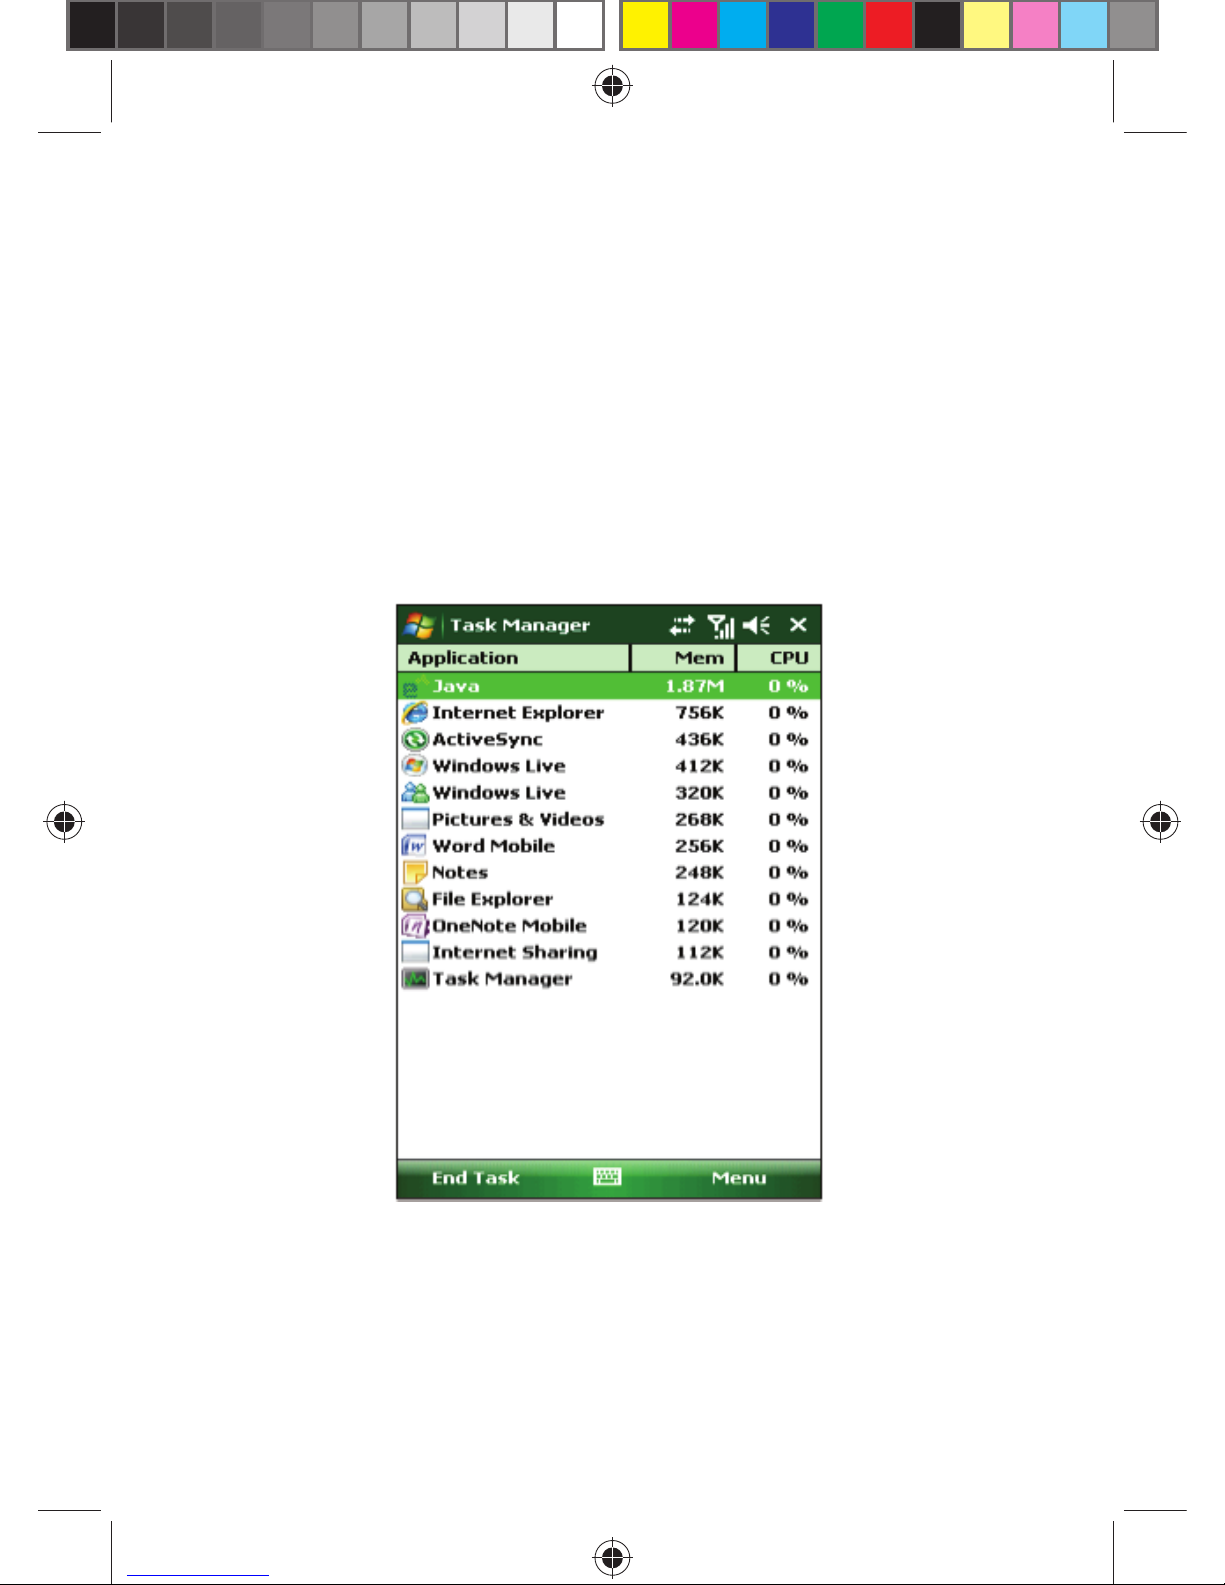
86
Password; set up a Bluetooth Headset; set Background; set Ring Tone;
transfer Music; add/remove getting started.
You can tap one item/view, or press left soft key, then enter the option
function describe interface.
8.13 TASK MANAGER
Task Manager displays detailed application about all running processes;
this program will be useful to those looking for an extra layer of system
protection. You can look for and end the program.
Select Start->Program->Task Manager, then tap Menu, you can switch
to or end all tasks; view applications or processes; sort by memory or CPU
or name.
8.14 SPB HOME
The SPB Home have same shortcut menu you can expediently to use.
The main window has a new and fresh design for the Windows Mobile
Interface, thumb optimization icons at the bottom for quick access,
changing panel with gesture, and animated transitions. The three user
interface panels are the Now Screen, SPB Home, and Quick Dial.
Page 87
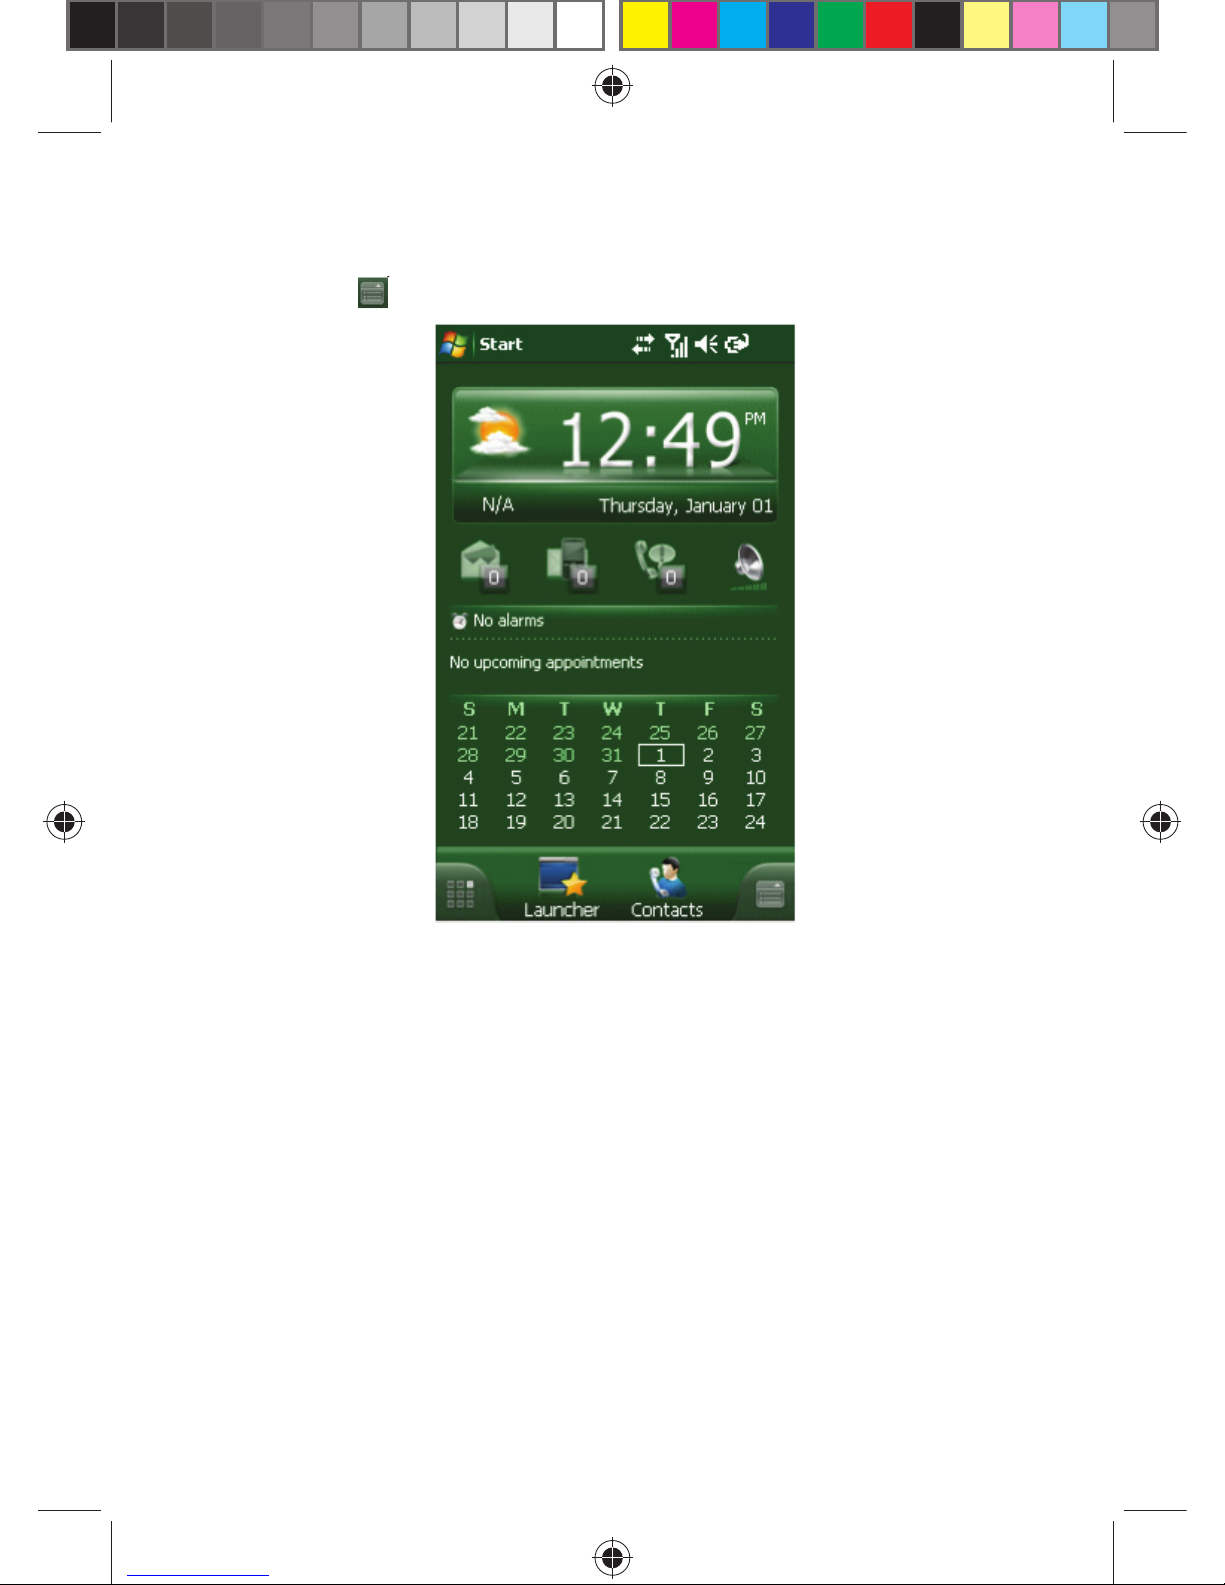
87
When open the phone while showed the SPB Home, In SPB interface,
drop icon, choose “Show Today”, while showed the Smart Today.
p
p
p
Page 88
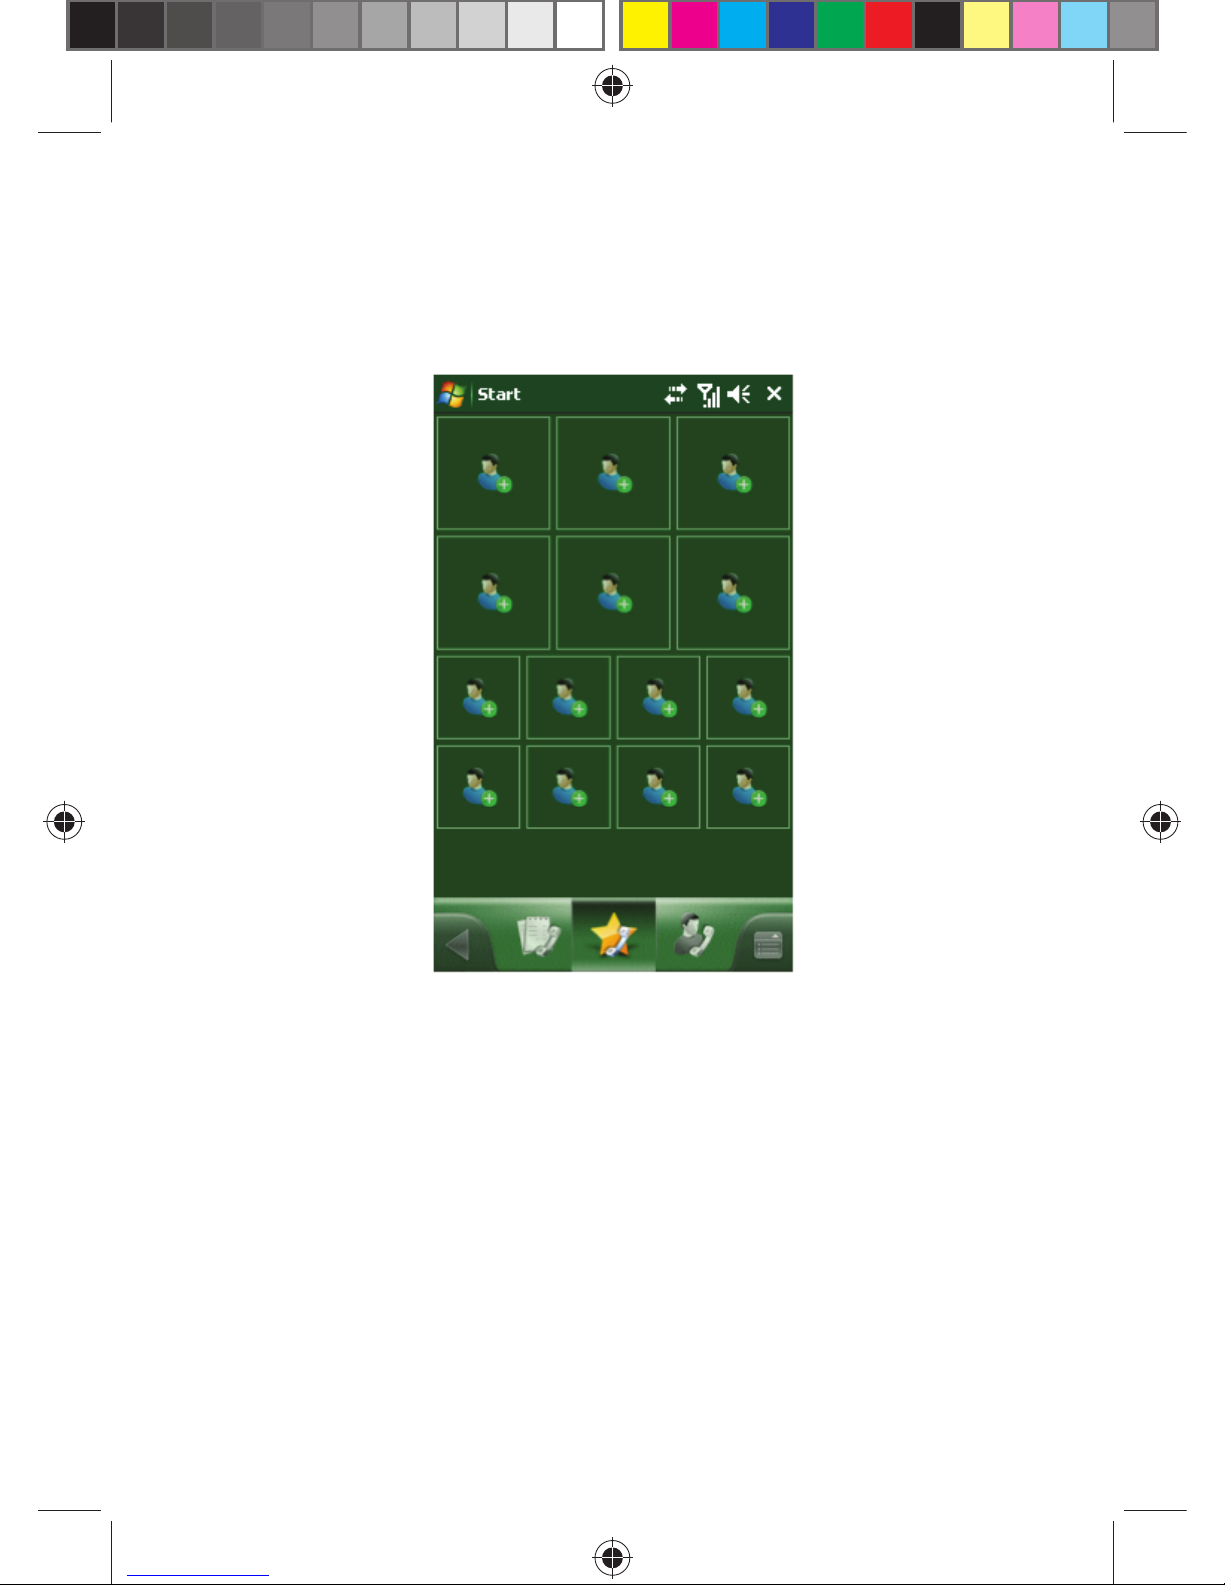
88
8.14.1 Quick Dial
This option lets you make out the quick dialing for any contact available in
the phone.
Page 89
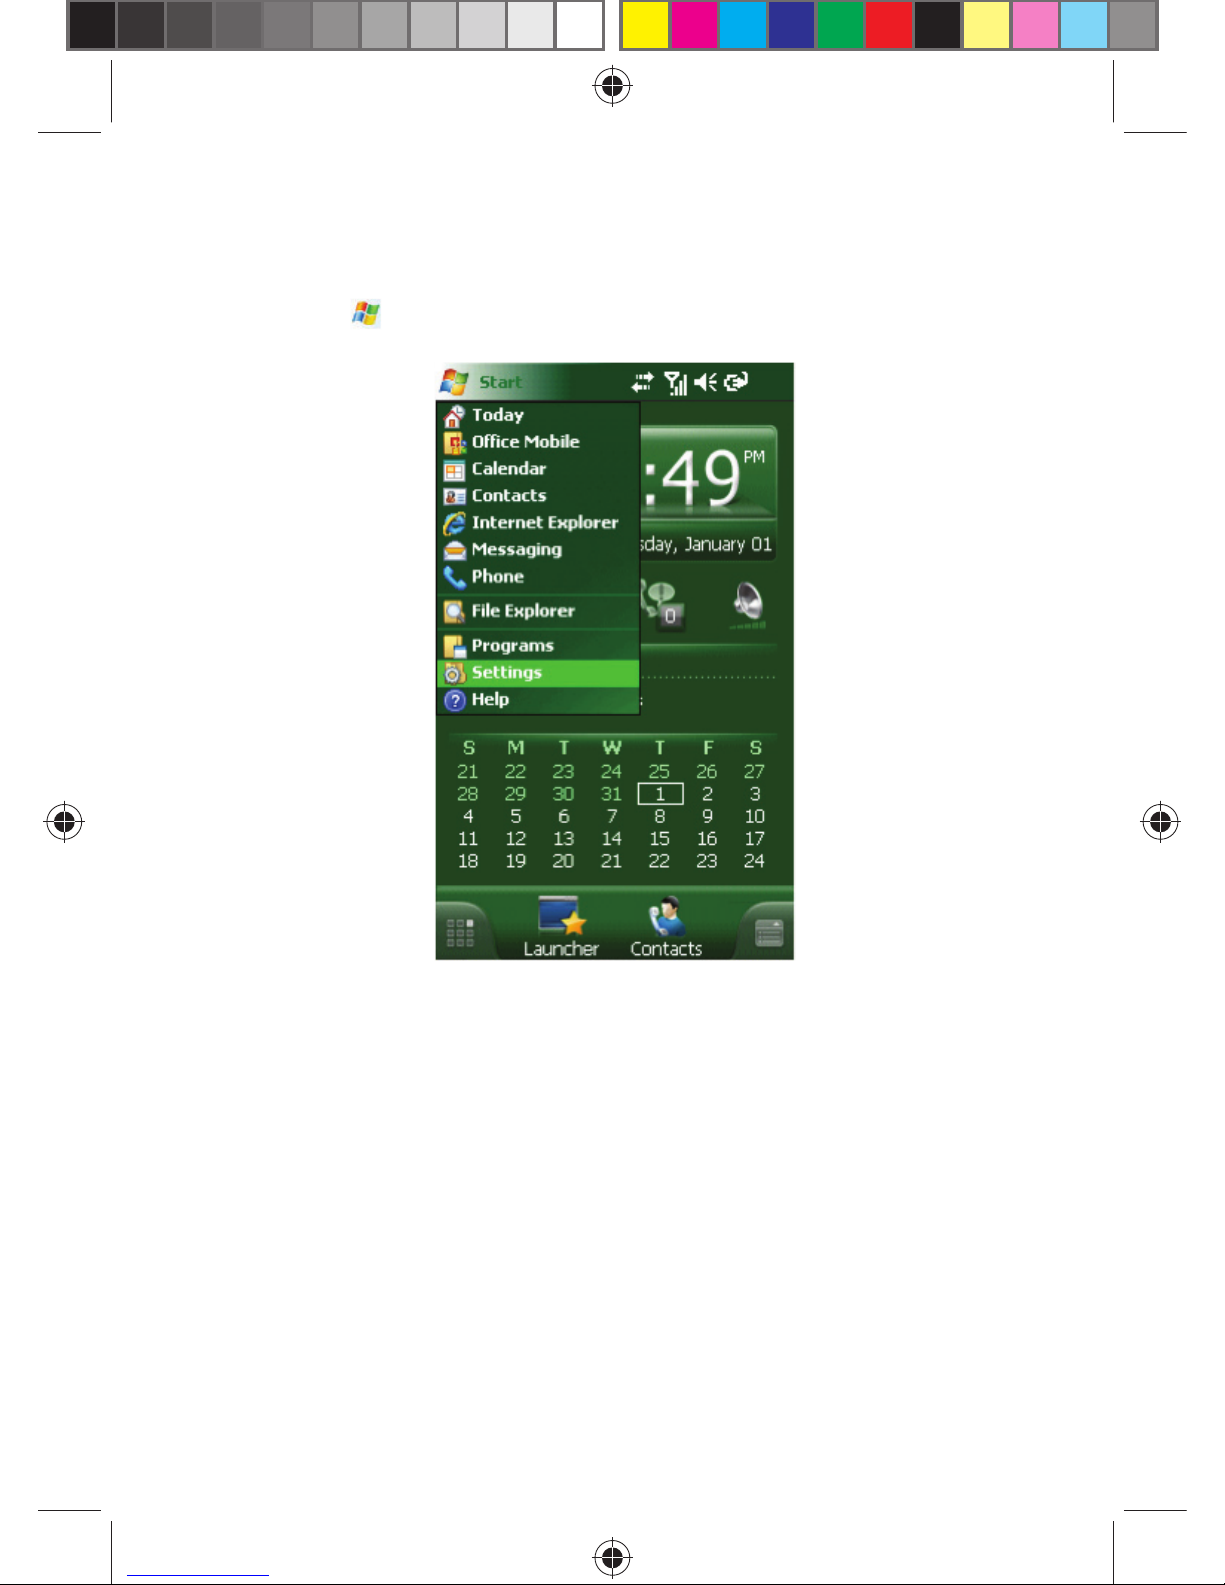
89
9 SETTINGS
Tap and then select Settings.
9.1 PERSONAL
In Personal, you can customize your phone.
9.1.1 Owner Information
Specify your Name, Telephone Number, E-mail and other information.
9.1.2 Today
Select a theme for your device and items on the Today screen.
9.1.3 Sounds & Notifi cations
Specify the sound and notifi cation for events, programs, screen taps and
hardware buttons.
Page 90

90
9.1.4 Buttons
Defi ne the button for programs for quick launch.
• In Program Buttons, select a button, assign a program, and then tap .
• Select Camera in Select a button, assign a program, and then
tap . Now, press the Camera key to quickly launch the program.
• If the screen scrolls too fast or too slow, change it in Up/Down Control.
9.1.5 Phone
Phone
Select the ring type and ring tone, or choose whether to have buzz sound
when pressing keys.
Security
You can require PIN when the phone is used, and change PIN /PIN2.
Services
Get settings for Call Barring, Caller ID, Call Forwarding, Call Waiting, and
Voice Mail and Text Messages.
Network
Find out the network serving your phone; or tap Find Network or Set
Networks to list other available networks.
Fixed Dialing
Fixed Dialing feature allows users to restrict their outgoing calls and
messages to selected phone numbers, included in a fi xed dialing list.
Once the service is activated the user can only call and send messages
to the phone numbers from the list. The capacity of the fi xed dialing list
depends on the capacity of the SIM card. The list is protected by a PIN
code.
Cell Broadcast
As a network service, Cell broadcast is provided by your service provider
to broadcast weather, traffi c and other text-based messages. To use this
service, set the channel from the service provider. The availability of the
service depends on your local provider.
From Start -> Settings -> Phone, select Cell Broadcast. Tap Cell
Broadcast to display a list with options:
New: To add a new channel.
Edit: To modify a channel.
Page 91

91
Delete: To delete a channel.
Delete All: To delete all the channels.
Cancel: Cancel the settings and return to the previous screen.
Select Enable Cell Broadcast and then tap OK to enable Cell Broadcast.
9.1.6 Menus
Select items to add into Start Menu. Up to 7 shortcuts can be added.
9.1.7 Input
Select a default input method, specify the usage of input methods, and
select fi le format for recordings.
9.1.8 Lock
Lock the phone automatically after it’s been idle for a while. A password is
required every time to activate or switch on your phone.
9.2 SYSTEM
Set up functions in System.
9.2.1 Device Info
View the hardware/software and GPRS Traffi c information about your
phone.
You can view the GPRS Traffi c by different connection mode, and it will be
cleared when you point Reset.
9.2.2 Memory
View the allocation of memory for storage and programs, and memory
in-use and remains of the phone and the storage card.
9.2.3 Remove Programs
Remove un-necessary programs to release storage space. System
programs cannot be removed.
In the program list, select a program and then tap Remove.
9.2.4 Regional Settings
Specify the region you are at and the local number, currency, time and
date.
9.2.5 Master Clear
Your phone will be resumed to default factory settings and all the user data
will be formatted. Back up important data.
9.2.6 Clock & Alarms
Adjust the date and time or set your alarm.
• Set the time zone, date and time.
Page 92
92
• Set the alarm, select the box to activate it. Your phone will alarm you
every day at the time.
9.2.7 Power
Show the battery level and the time to turn off the device if not used.
9.2.8 Backlight
Set the time to turn on or off backlight.
9.2.9 Certifi cates
Manage certifi cates in the phone.
9.2.10 Screen
Align the screen if it is not responding accurately to stylus taps.
Adjust the text size to see more content or increase the readability in many
programs.
9.2.11 Error Reporting
To help Microsoft improve the products you use, your device can collect
information on software operation for later reporting in the event of a
serious error. Reporting this information when errors occur is completely
voluntary and confi dential.
9.2.12 Encryption
Encrypt documents when saving to the storage card.
1. Tap Start -> Settings -> System -> Encryption.
2. Select the document to be encrypted to the storage card.
Encrypted documents can only be read on the phone encrypts
them.
9.2.13 About
View the Version Device ID and Copyrights information about your phone.
9.2.14 Motion Sensor
Select Start -> Settings -> Motion Sensor, Motion sensor property page.
!
Note:
Page 93
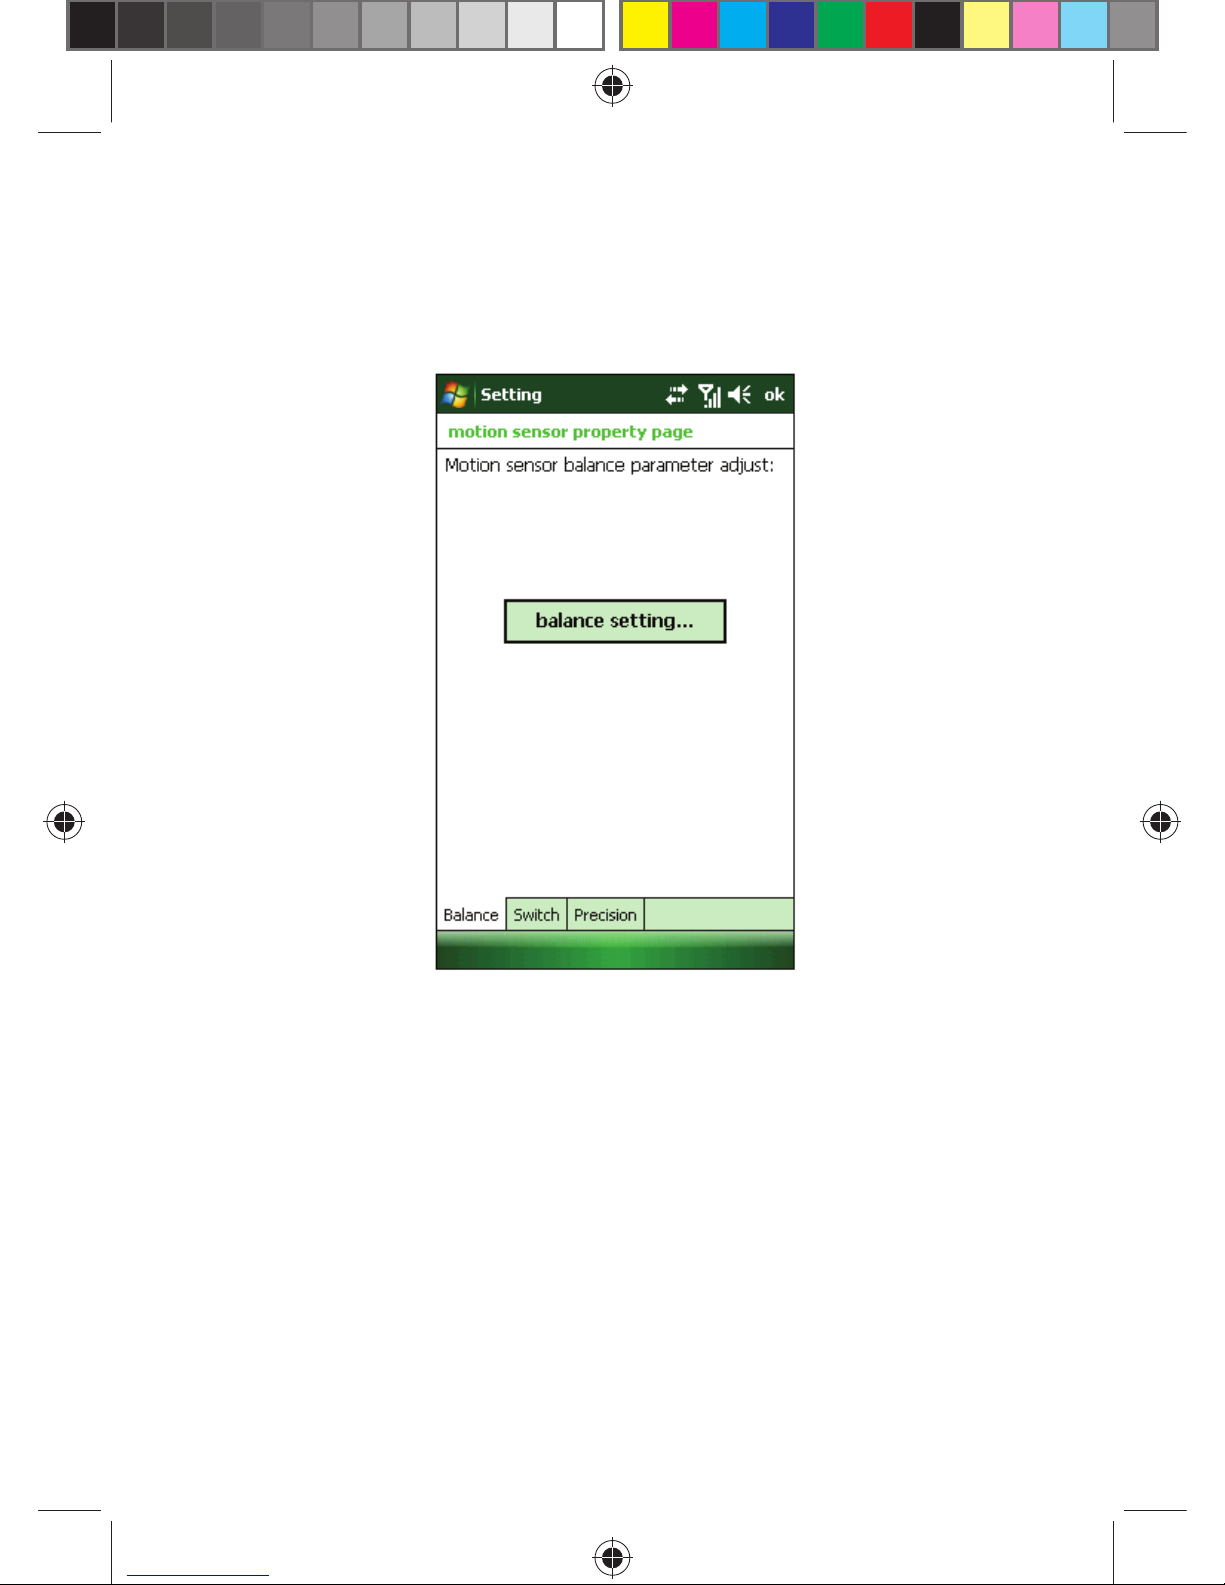
93
Balance
Select Balance Setting, please put your pocket PC on the horizontal
panel and then click OK button.
Page 94
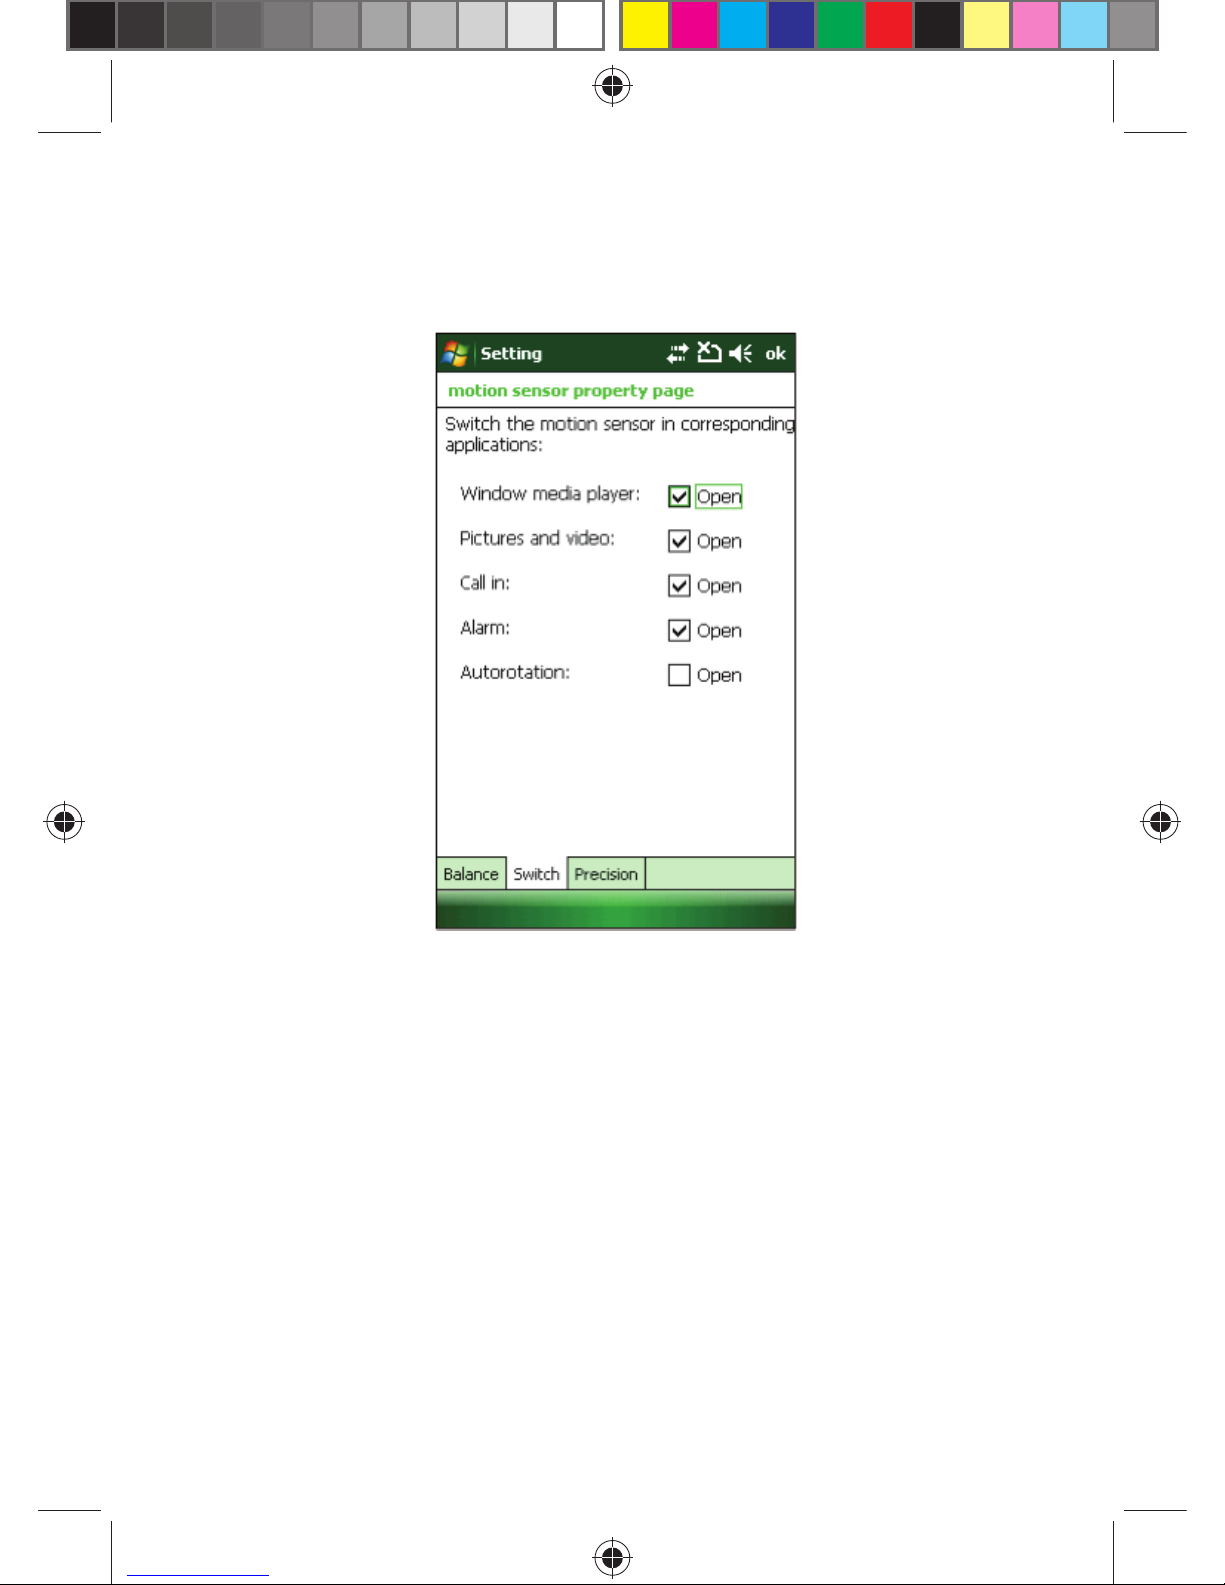
94
Switch
Switch the motion sensor in corresponding applications.
1. Open the above four feature, Window media player you can shake the
phone to the next one and on the realization of a function; pictures
& videos mobile phone you can picture shaking switch; calls you can
shake the phone to answer the call If you want to mute calls, as long
as the rock face down a mobile phone handset can be realized; alarm
clock when cell phone to cell phone as long as the rock face down to
cancel the alarm.
2. Autorotation default state is closed, while you want to use please open
that function in Motion Sensor Settings.
Page 95
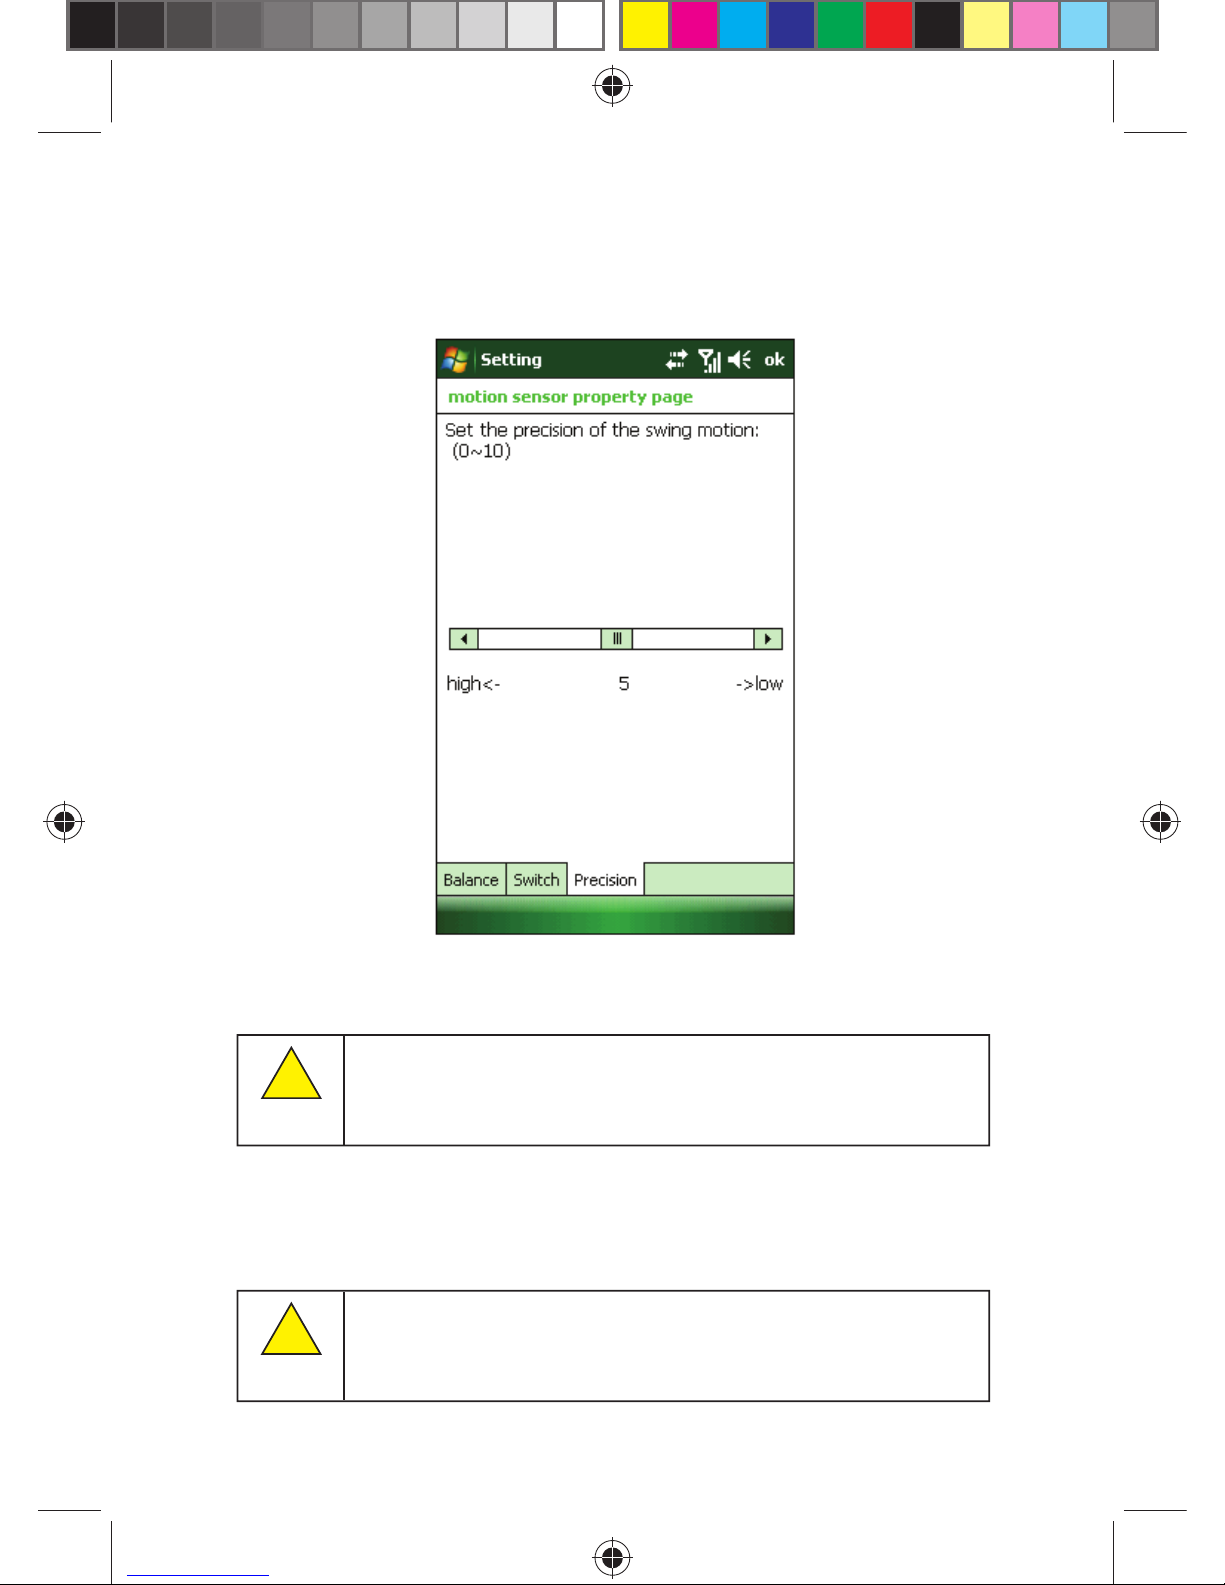
95
Precision
Set the precision of the swing motion.
9.2.15 GPS
Your phone has a GPS receiver that uses satellite signals to calculate your
location.
If you cannot use some GPS features, please confi gure your
Internet Explorer settings
Using GPS
Your location can be found when you have a clear view of the sky. If your
location is not found after a few minutes, move to another location. To help
the search, stand still and do not cover the GPS antenna.
If you are using GPS for the fi rst time, it may take up to 10
minutes before your location is found.
!
Note:
!
Note:
Page 96
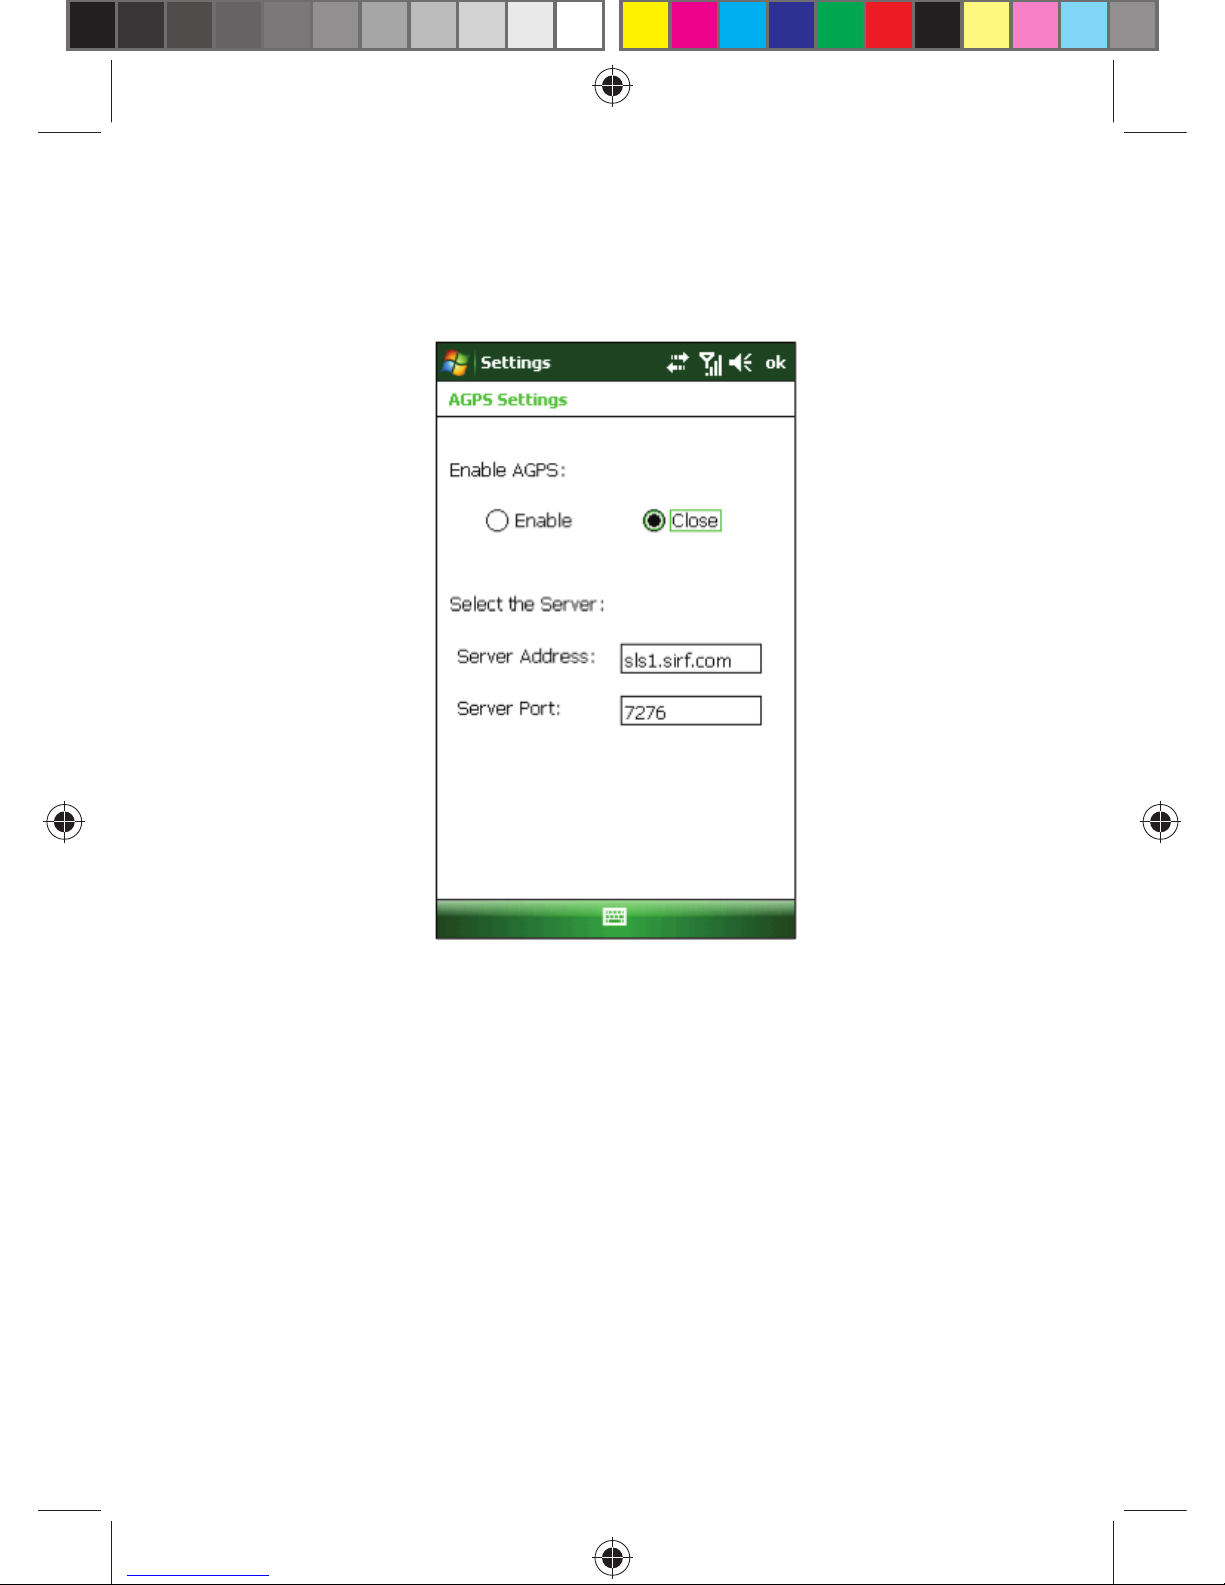
96
9.2.16 AGPS Settings
Select Start -> Settings -> AGPS Settings, enter into AGPS Settings
Interface.
Open AGPS Function
1. Enter in to AGPS Settings Interface.
2. Select Enable in Enable AGPS option.
3. Click OK.
4. Open any GPS program, the phone will auto download satellites’
coordinate, when download completes, you will be able to quickly fi nd
the stars and positioning.
9.3 CONNECTIONS
Set up connections for your phone.
9.3.1 Beam
Transfer data to other wireless devices via Bluetooth.
Page 97
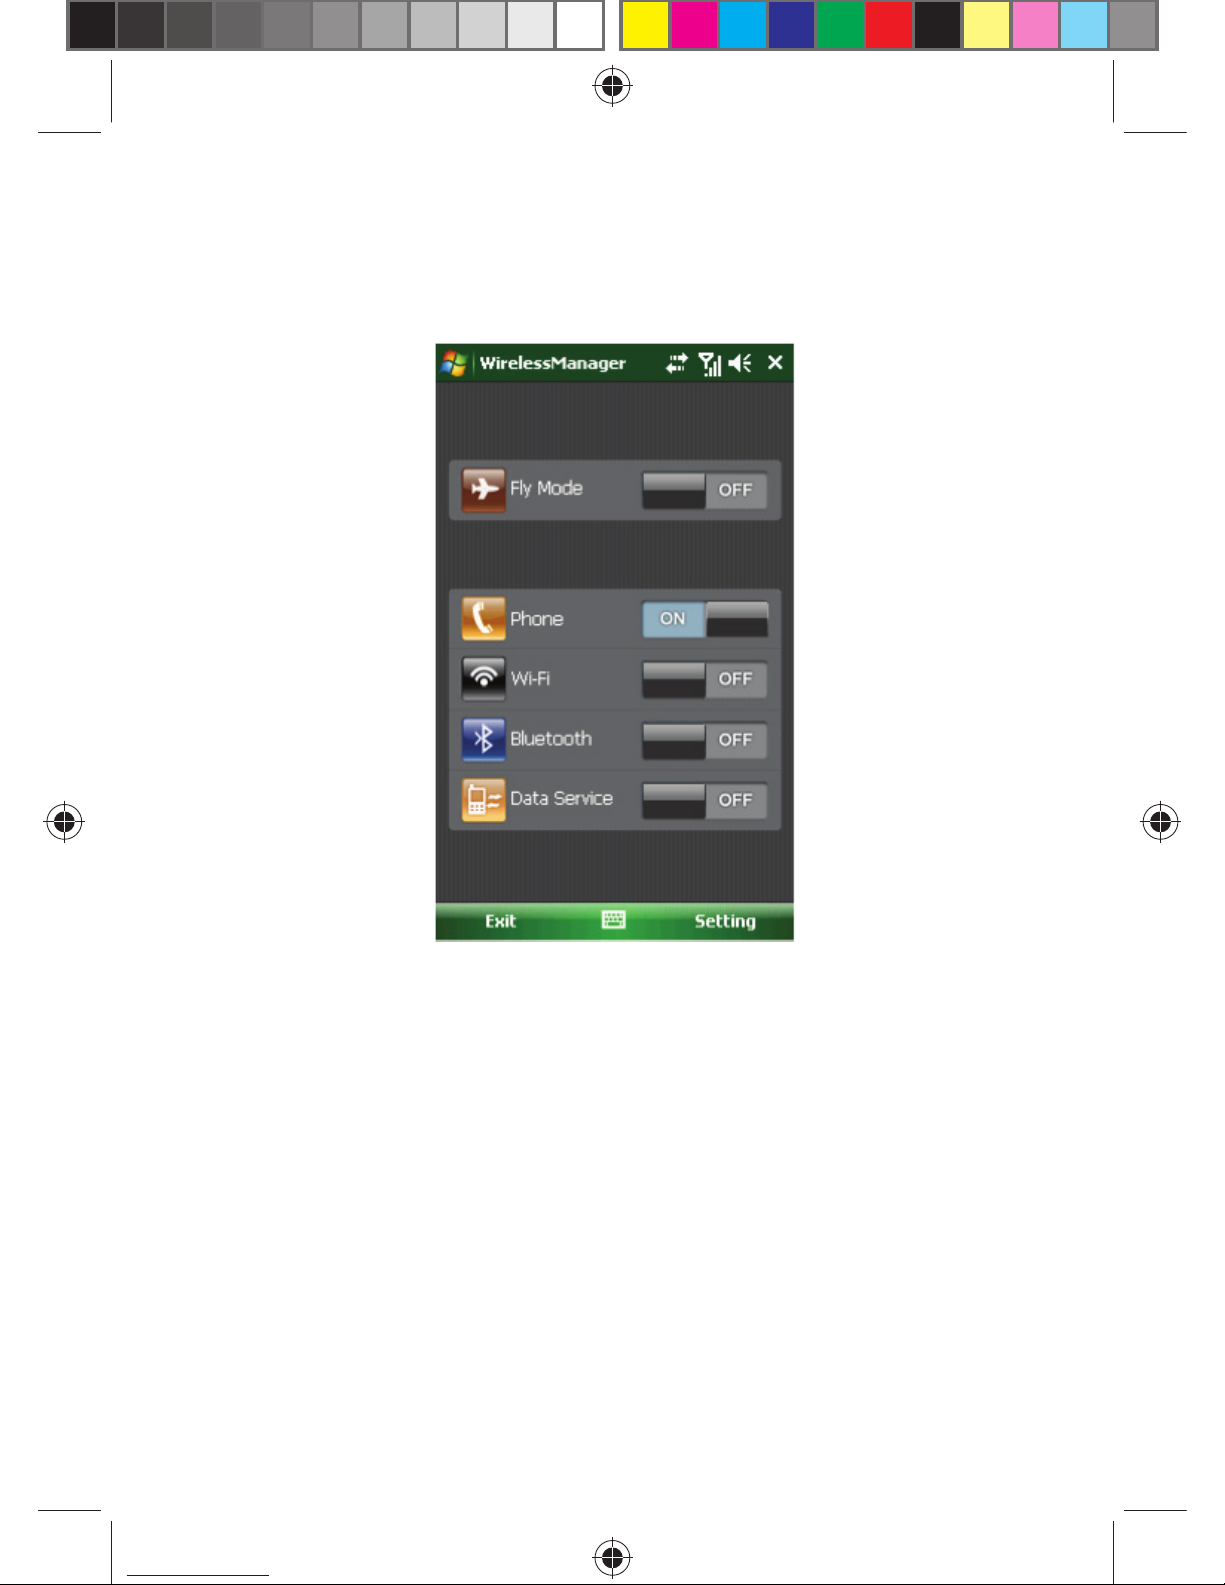
97
9.3.2 Wireless Manager
Enable/disable Bluetooth, Wi-Fi, data transmission and Fly mode, as
shown below:
• Tap Fly Mode, then Bluetooth, data transmission, phone and Wi-Fi are
disabled. Calls can’t get through this phone. Tap Bluetooth, Phone
and Wi-Fi to enable or disable all or some of them.
• Select Bluetooth or Phone and Wi-Fi, and press center key to switch
it on/off.
• Select Bluetooth Setting, Phone Setting or Wi-Fi Setting.
• When there is data transmission or GPRS traffi c, Data transmission
icon is on. After the transmission is over, the icon turns off.
Page 98
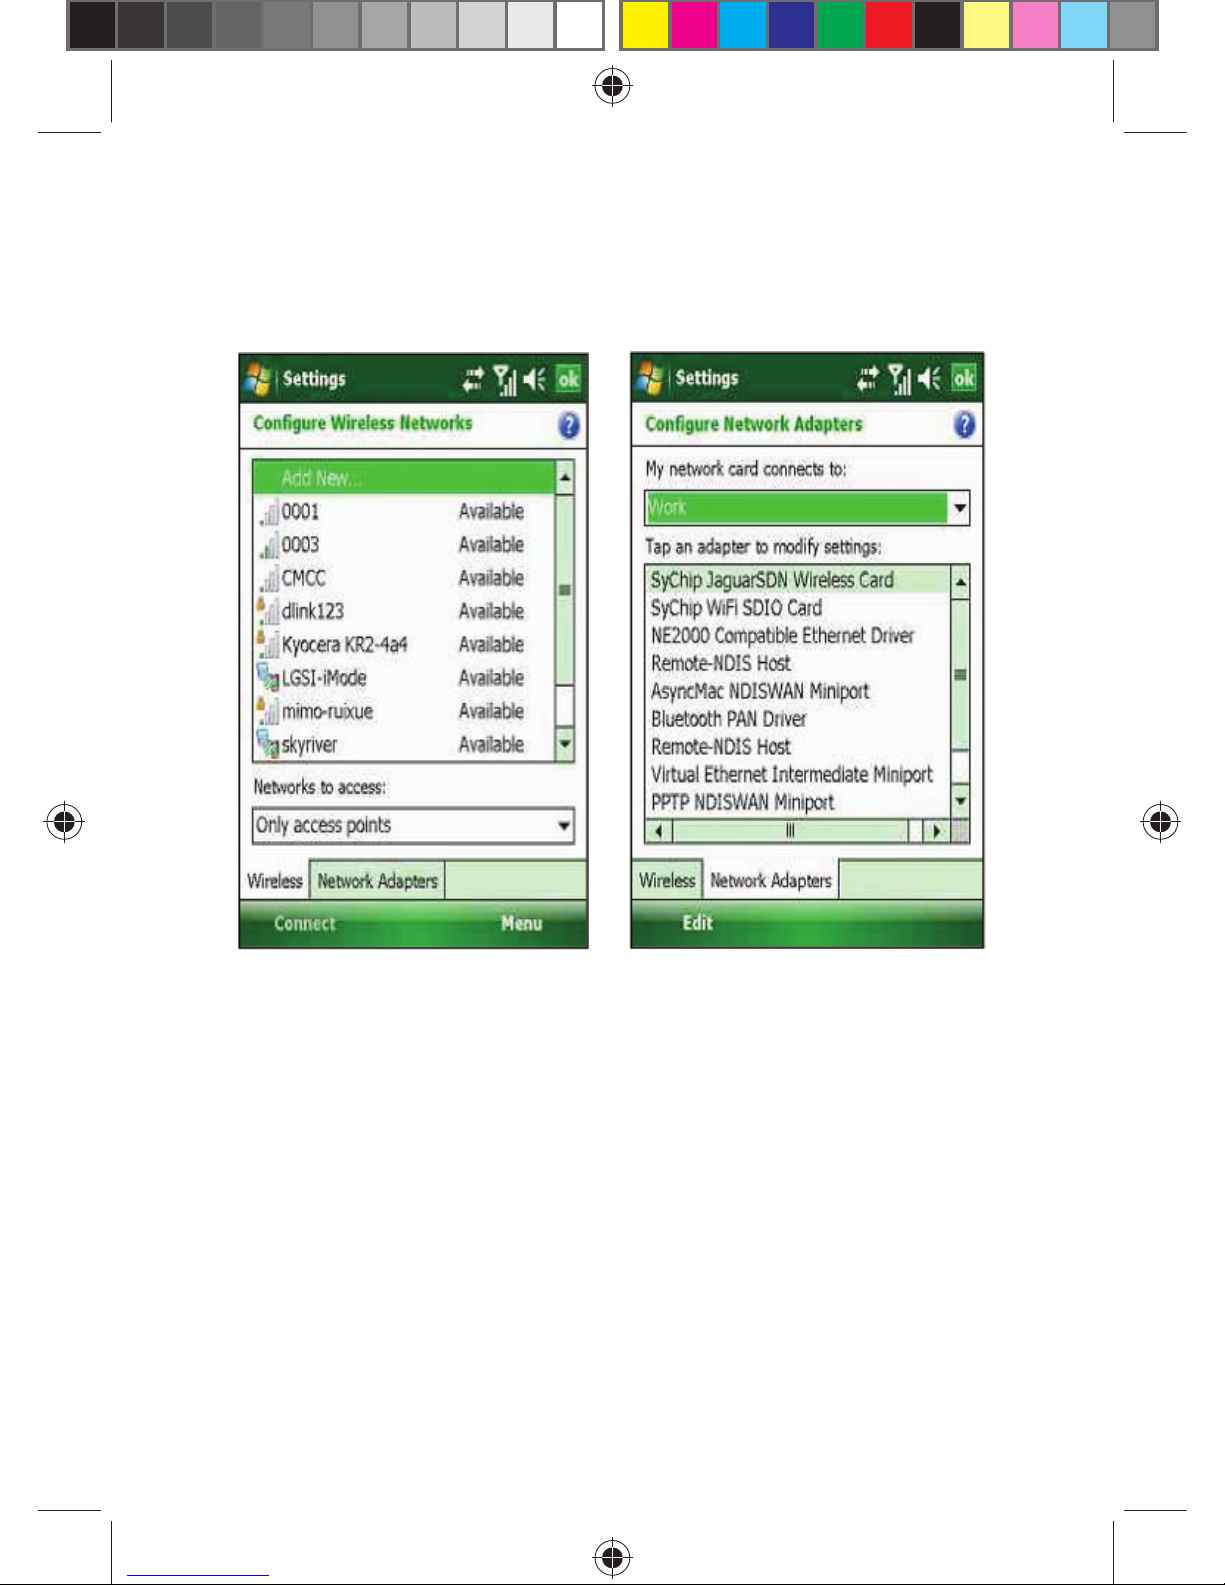
98
9.3.3 Wi-Fi
Set up Wi-Fi and the network card. The setting page shows only after
Wi-Fi is on.
9.3.4 Bluetooth
As a short-distance wireless transmission technology, Bluetooth can
communicate with a phone that is within 10 meters.
• Enable or disable Bluetooth.
• If Make this device visible to other devices is selected, your phone
will receive all the Bluetooth connection requests, both from your
Bluetooth device and from others’. Select it with caution.
Page 99
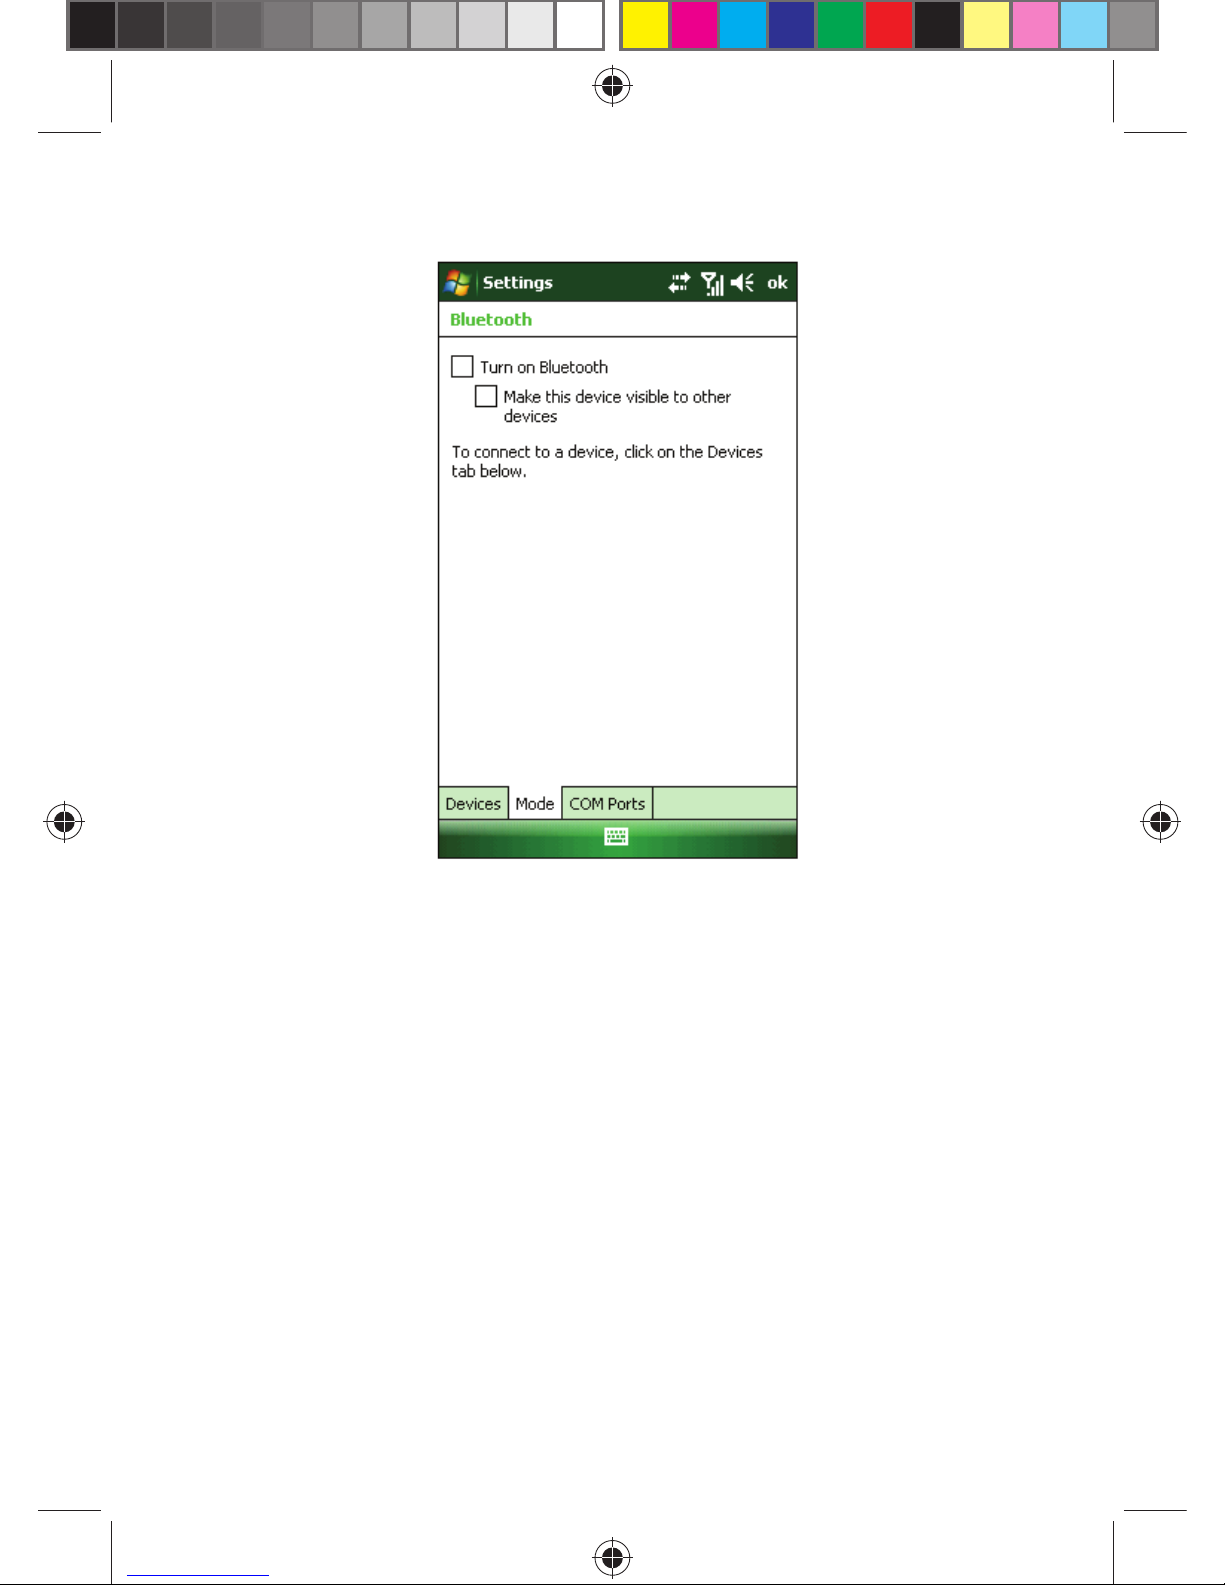
99
• Select Devices -> COM Ports, add new device to search for other
Bluetooth devices or a COM port.
Need authentication when receiving data via Bluetooth.
Page 100
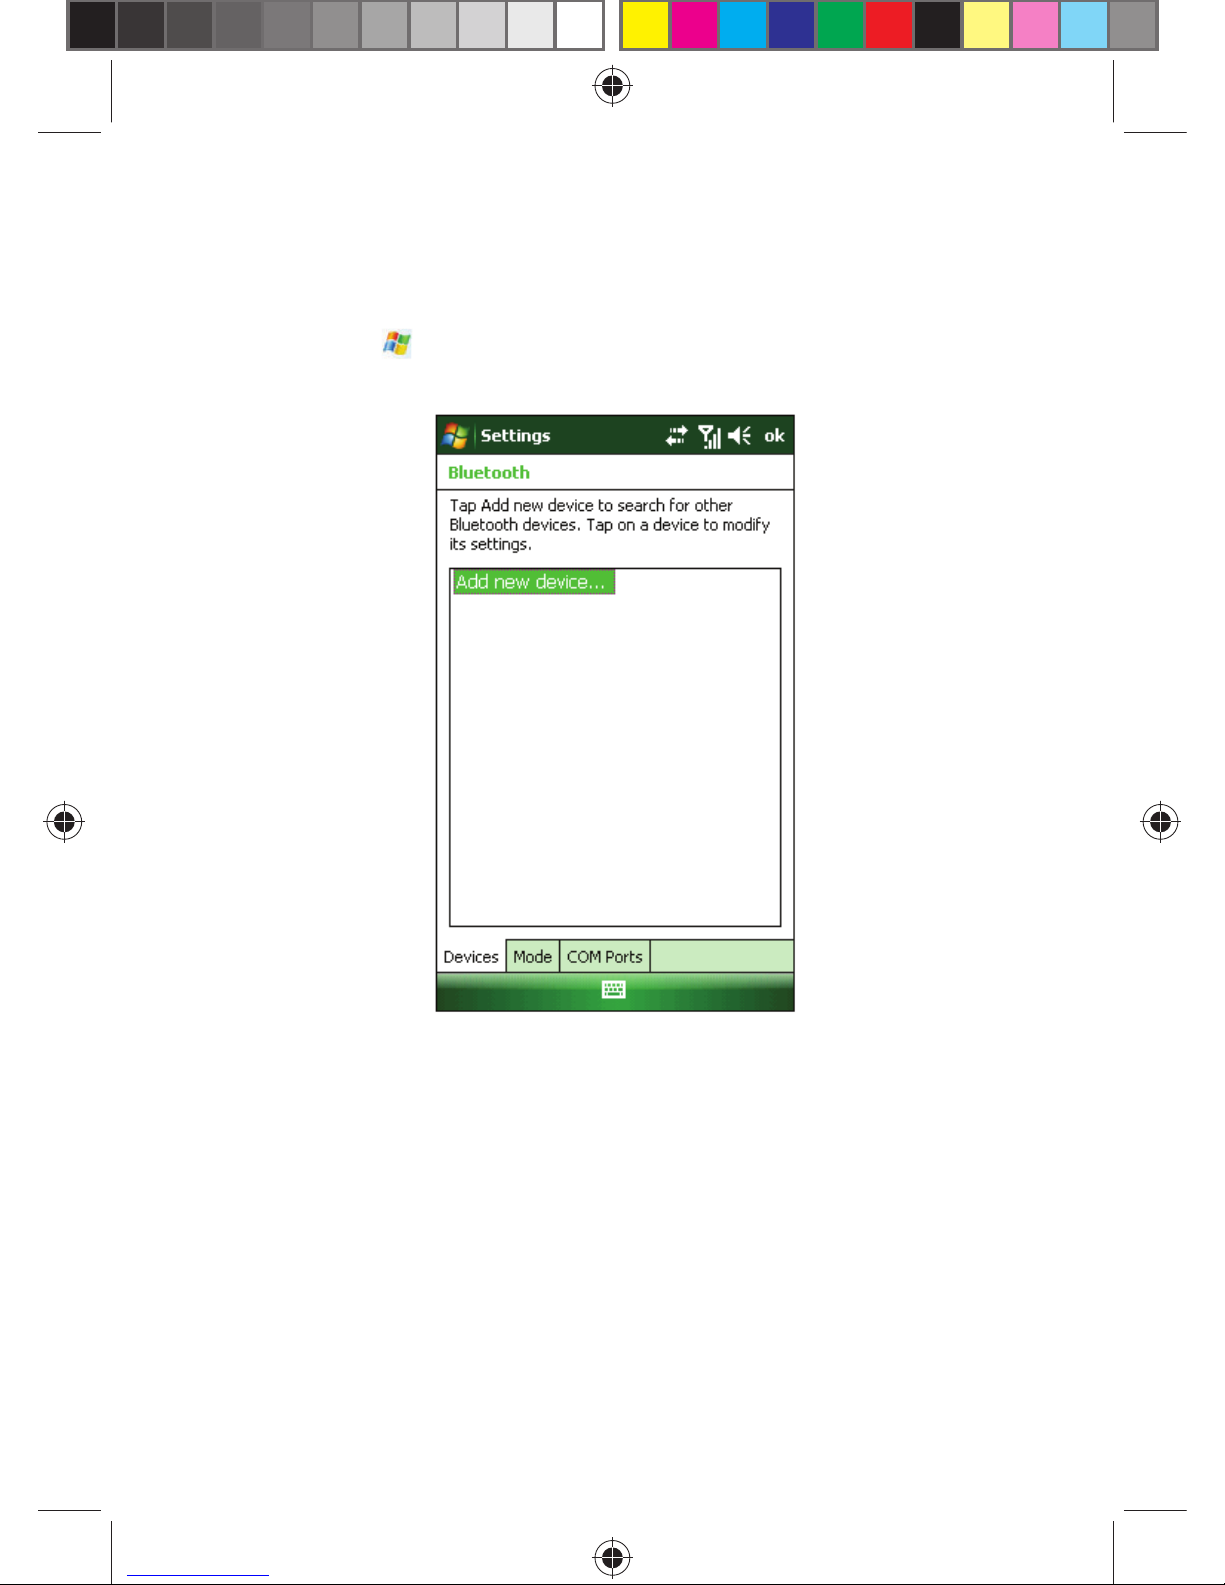
100
Bind a Bluetooth device:
Switch on the Bluetooth device within effective range.
Select Start-> Settings -> Connections -> Bluetooth -> Devices,
tap Add New Device.
The system starts to search for Bluetooth devices.
After a Bluetooth device has been found, you are prompted to enter the
secret-key. The key can be obtained from the Bluetooth dealer or specifi ed
by you. Once the secret-key is entered, the binding process is done.
 Loading...