

Page 1

User‟s Manual
V1655
Page 2

Table of Contents
Legal Notices ....................................................... i
Introduction ....................................................... 1
Getting Started ................................................... 4
Inside the Box.......................................................... 4
Inside the CD ............................................................ 5
Installing and Removing the Battery ............... 6
Inserting SIM Cards ................................................ 7
Inserting the Memory Card.................................. 9
Charging the Device .............................................10
Connecting to the PC ...........................................11
My V1655 .......................................................... 13
Phone Layout .........................................................13
Widgets ...................................................................18
Basic Operations ............................................. 19
Make a Call ..............................................................19
Send a Message .....................................................20
Add a Number to Phonebook ...........................21
Page 3

Making a Call using Call History........................21
Call history ....................................................... 23
Phonebook ....................................................... 25
Phonebook Settings ............................................26
Profiles.............................................................. 29
File manager .................................................... 30
Messages .......................................................... 31
Organizer ......................................................... 34
Games ............................................................... 36
Media tools ...................................................... 37
Camera .....................................................................37
Camera Settings .............................................37
Video recorder .......................................................40
Music.........................................................................40
Video player ...........................................................42
Photo viewer .........................................................42
FM Radio ..................................................................44
Page 4

Voice memo ...........................................................45
Applications ..................................................... 46
E-book ......................................................................46
JAVA...........................................................................46
Tools ................................................................. 47
Calculator ................................................................47
Converter.................................................................47
Stopwatch...............................................................47
Timer ........................................................................48
World clock .............................................................48
Shortcuts .................................................................48
BMI ............................................................................48
Bluetooth ................................................................49
Settings ............................................................ 50
General ....................................................................50
Personalization...............................................50
Date/Time.........................................................51
Power on/off ...................................................51
Information .....................................................51
Page 5

Security .............................................................52
Restore Settings .............................................56
Phone .......................................................................56
Call settings......................................................56
Call divert ..........................................................56
Call barring .......................................................57
Network Settings ...........................................57
Switch mode....................................................58
Default SIM .......................................................58
Speed Dial .........................................................58
Connection .............................................................59
Data Accounts .................................................59
WAP Settings ...................................................59
MMS Settings ...................................................60
JAVA Settings ...................................................60
Services ............................................................. 61
WAP explorer .........................................................61
SIM applicator / STK .............................................61
Event center ...........................................................61
Page 6

i
Legal Notices
All rights reserved. Reproduction, transfer,
distribution or storage of part or all of the
contents in this document in any form
without the prior written permission of
VIDEOCON is prohibited.
VIDEOCON operates on a policy of continuous
development. VIDEOCON reserves the right to
make changes and improvements to any of
the products described in this document
without prior notice.
Under no circumstances shall VIDEOCON be
responsible for any loss of data or income or
any special, incidental, consequential or
indirect damages howsoever caused.
The contents of this document are provided
"as it is". Except as required by applicable
law, no warranties of any kind, either
Page 7

ii
expressed or implied, including, but not
limited to, the implied warranties of
merchantability and fitness for a particular
purpose, are made in relation to the
accuracy, reliability or contents of this
document. VIDEOCON reserves the right to
revise this document or withdraw it at any
time without prior notice.
The availability of particular products may
vary by region. Please check with VIDEOCON
Executive.
Page 8

1
Introduction
Safety Precaution / Measures
Please comply with these precautions /
measures to avoid dangerous or illegal
situation and ensure peak performance of
your phone.
Road safety
The use of a mobile phone while driving is
illegal and should be avoided at all costs. If
you need to make or receive an urgent call,
move your vehicle to the side of the road
and allow it to come to a complete stop
before using your phone.
Switch off in potentially hazardous
environments
Switch your phone off while boarding an
aircraft. Signal from your phone can affect
aircraft system. You are legally obliged to
comply with this recommendation.
Page 9

2
Switch your phone off when entering any
explosive area. Observe any provided
guidelines or regulations.
Emergency Calls
In case of an accident or an emergency, dial
100 (Police), 101 (Fire) or 102 (Ambulance)
from your phone. Being emergency
numbers, these are toll free and can be
reached even from areas where the network
signal strength is very poor.
Battery Use
First time charging must be done using the
regular charger and not using the USB cable.
During the first 3-4 charge sessions, charge
the battery until it has been fully charged
according to the battery level indicator. This
ensures higher battery backup and extends
the battery life.
Page 10

3
Avoid partial charging. Wait for the battery
to discharge completely before charging it
again.
Charging through the USB Cable should be
reserved during an emergency.
Use the device in vibrating mode only on
rare occasions.
Page 11

4
Getting Started
Inside the Box
The device package consists of:
Transceiver
2 Battery units
Headset
Extra back cover
Car charger
Travel charger
USB data cable
CD
2 Stylus units
Page 12

5
Carry pouch
User‟s Manual
Warranty Card
Inside the CD
You can install the PC suite from the CD
provided with the contents. The CD contains
the following:
Modem driver
Service centre directory
User‟s manual
Page 13

6
Installing and Removing the Battery
To install the battery:
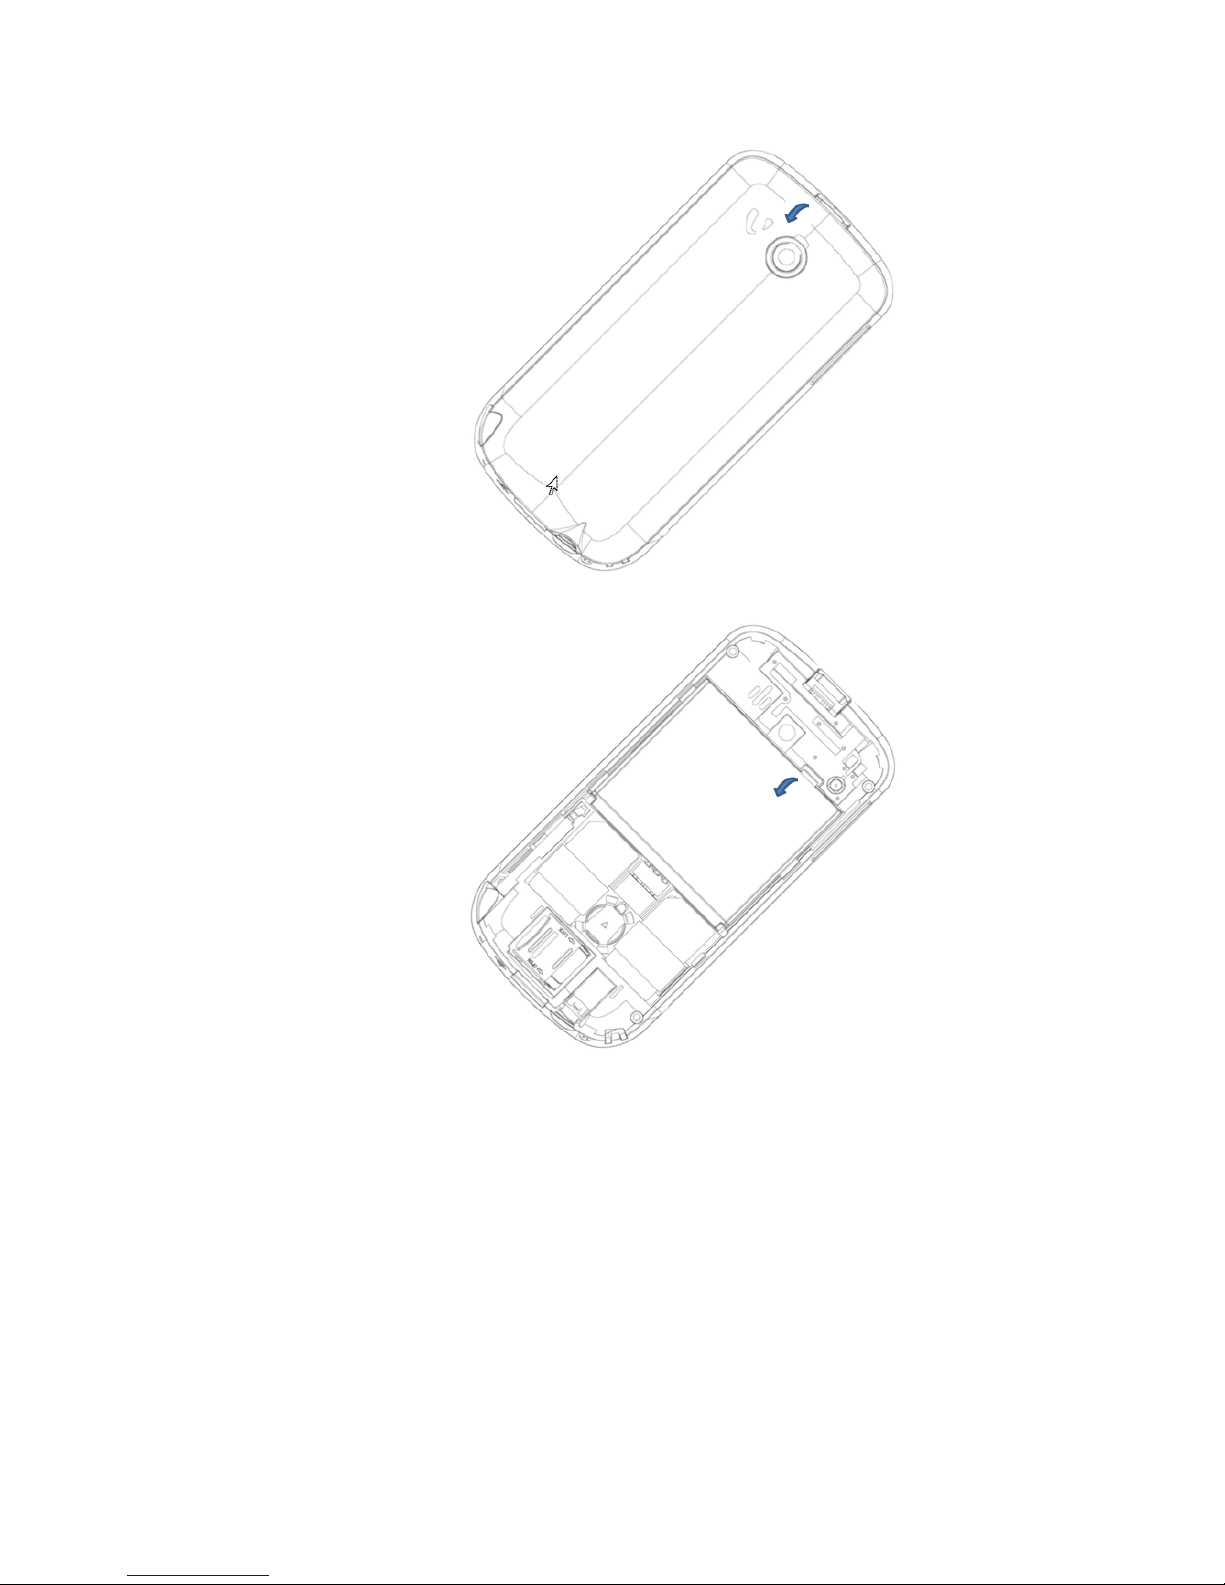
1. Locate the groove at the top of the
phone and pull out the back cover
from the phone.
2. Push the battery in the battery
compartment in such a way that the
connectors of the phone are aligned
with the connectors on the battery.
To remove the battery:
1. Turn off the phone, if it is connected
to an external power source, unplug
it.
2. Remove the back cover.
3. Pull out the battery from the battery
compartment.
Page 14
7
Inserting SIM Cards
The V1655 supports dual-SIM cards. The
procedure for inserting both SIM cards is
Page 15
8
identical, only the slot for each is different.
To insert SIM cards:
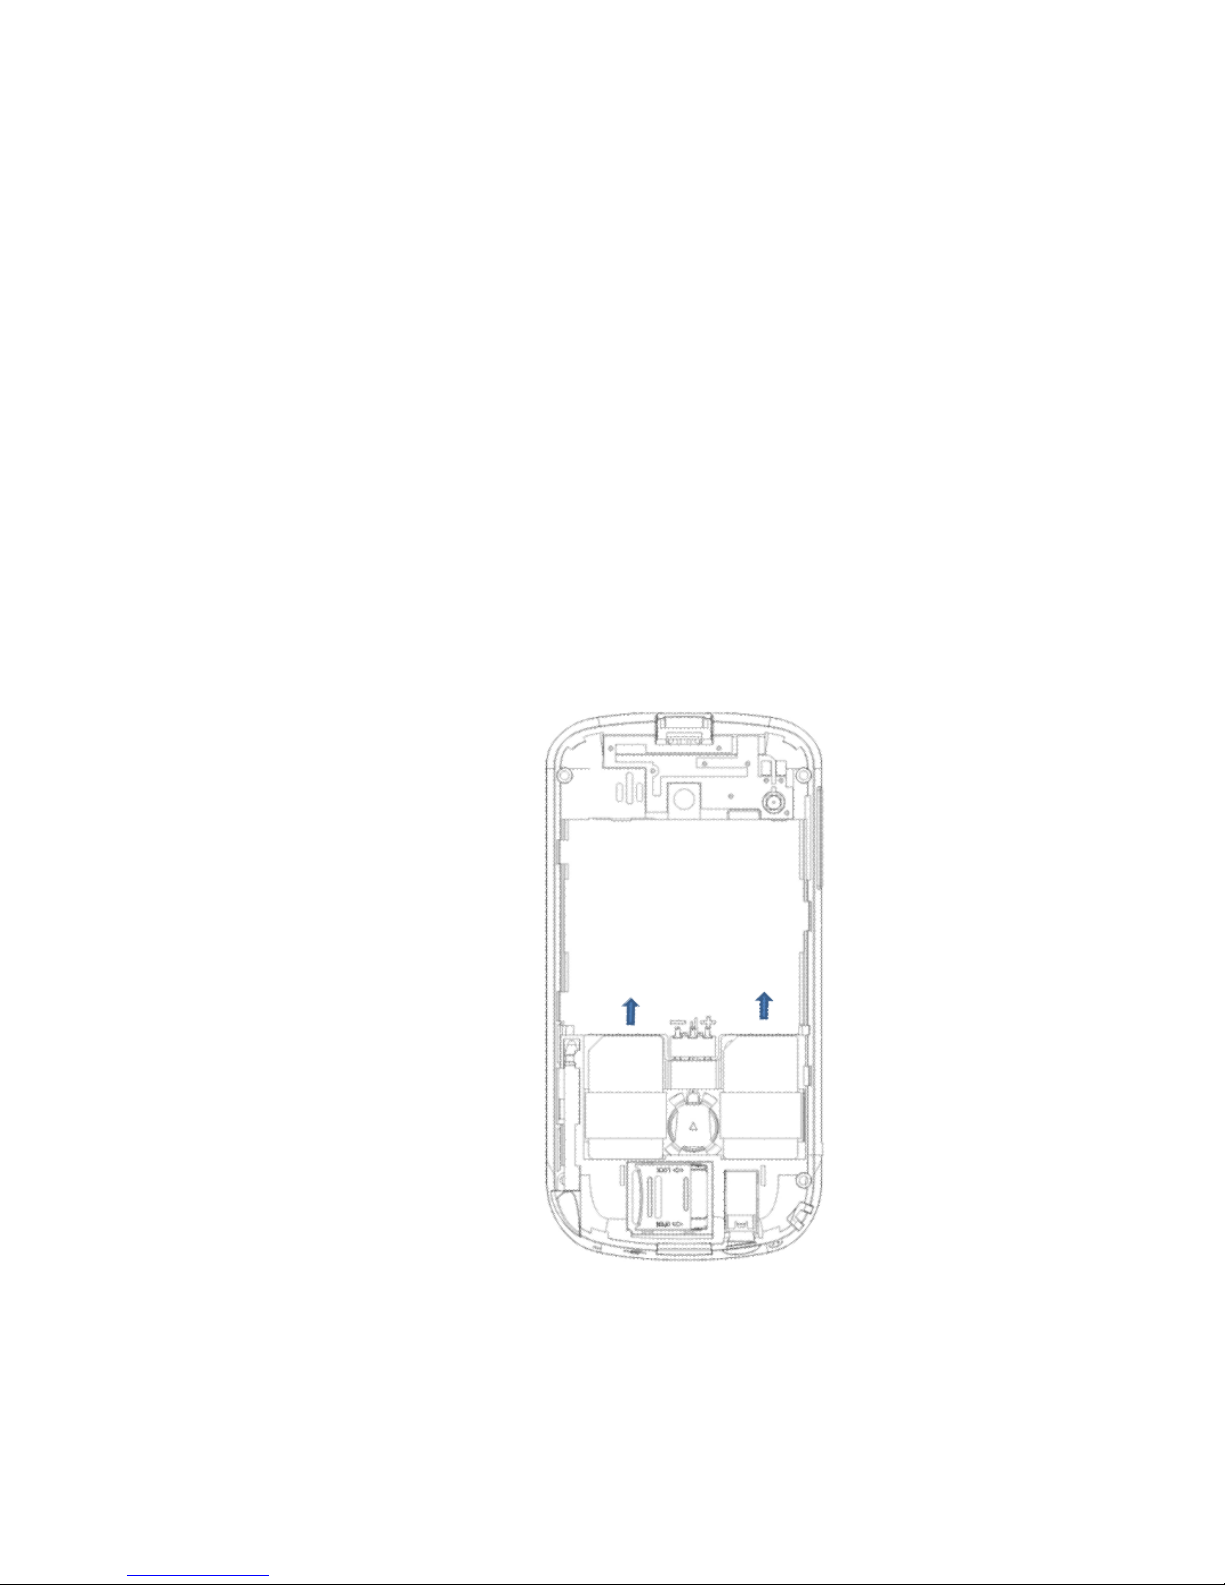
1. Remove the back cover, and pull out
the battery from the battery
compartment.
2. Slide the SIM card in the slots in such
a way that the metal connectors of
the SIM card are facing down.
Page 16

9
Inserting the Memory Card
Use a microSD card of up to 4GB capacity to
store personal files such as photos, audio
files, and videos. To insert the memory card:
1. Switch off the device, and remove
the back cover, and pull out the
battery.
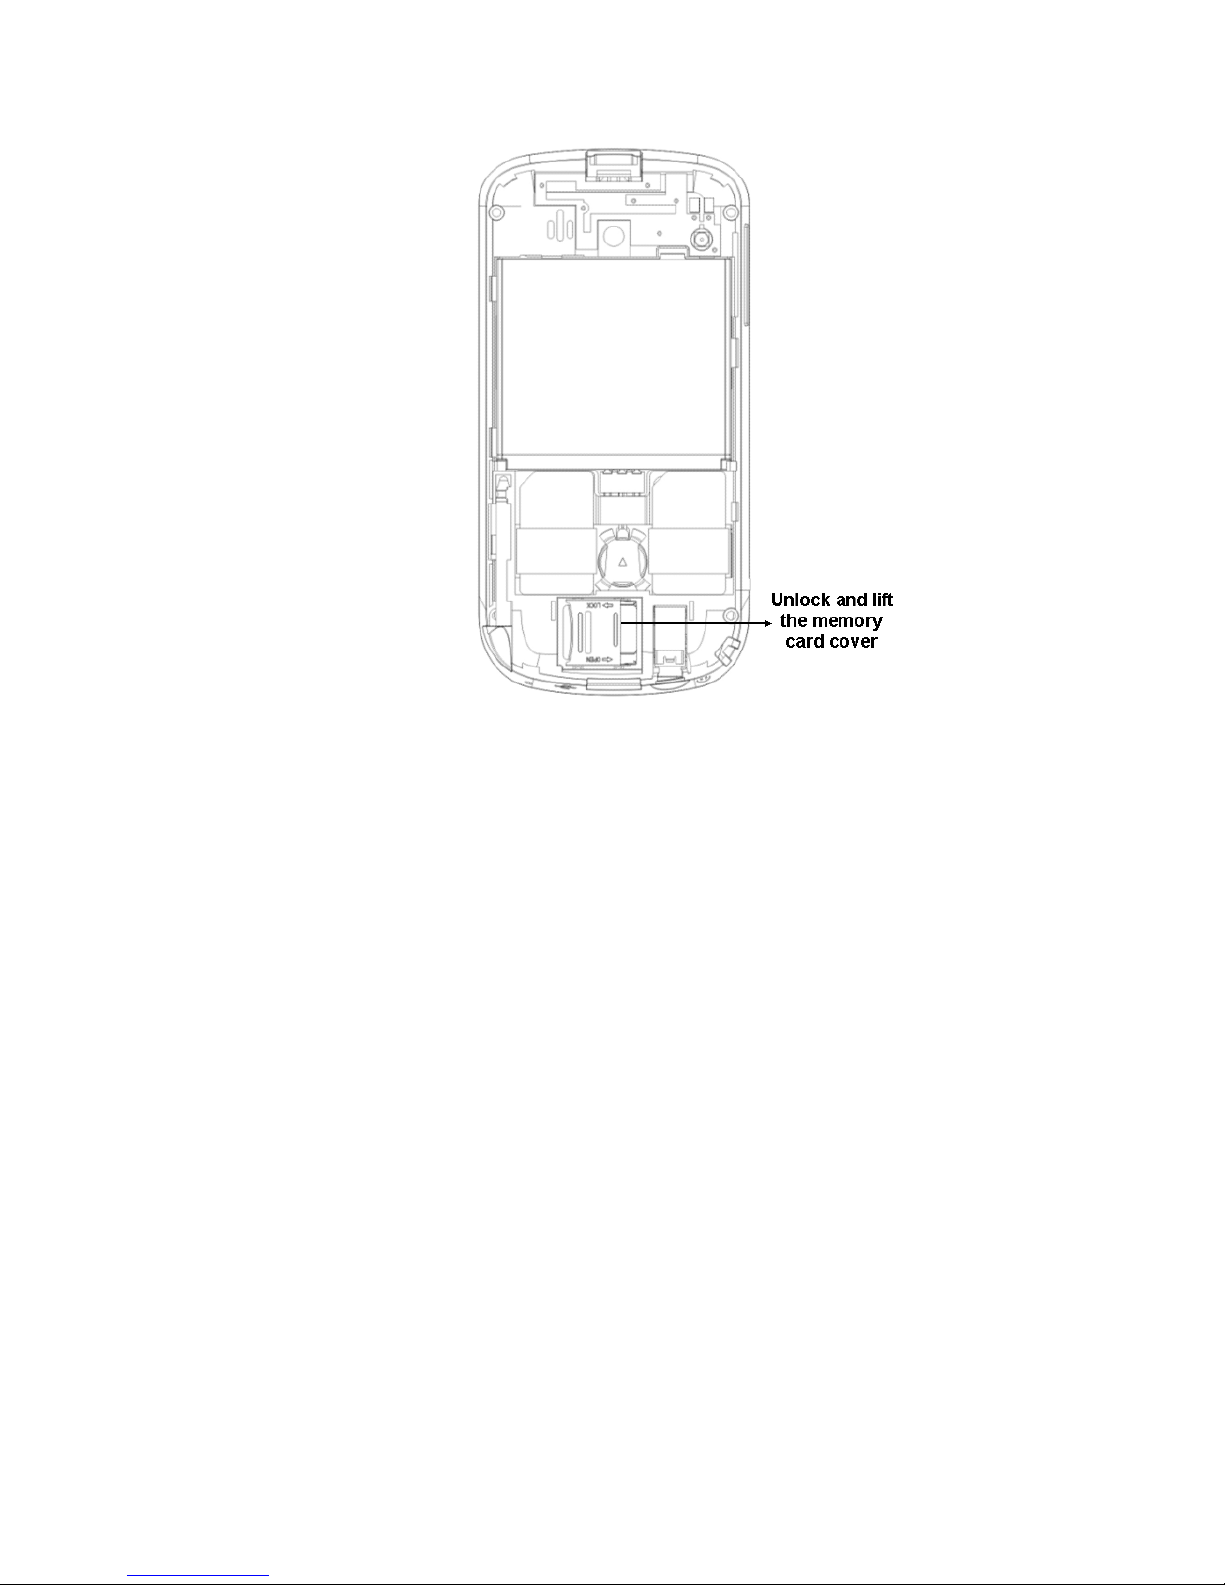
2. Unlock and lift the memory card
cover.
3. Place the memory card with metal
connectors facing down.
4. Lock the memory card cover.
Page 17
10
Note: Remove the battery while inserting or
removing the memory card to be able to
detect the memory card.
Charging the Device
Insert the plug of your charger to the
charging port at on the side of the phone.
When you begin to charge the battery, the
stripe of battery on the right corner of the
Page 18

11
screen starts to roll. When battery gets fully
charged, the stripe becomes stable and
stops rolling.
Connecting to the PC
The Videocon V1655 handset can be
connected to any computer using the
provided USB cable. Connect the smaller end
of the cable to the input slot at the bottom
of the phone, and the other end to a USB
port on your computer. Once connected to
the computer, the V1655 displays an alert
asking you to choose the preferred option:
Mass storage: Map the device as a
drive on the computer and transfer
files between the PC and phone.
Great feature to backup phone data
to your computer.
Page 19

12
Modem Choose to use the device as a
modem. This feature allows you to
use your phone‟s GPRS connection to
surf the Internet on your computer.
Webcam: Use the device as a web
camera to voice chat on your favorite
instant messaging application.
If you wish to charge your phone, click
Cancel to return to the idle screen.
Page 20
13
My V1655
Phone Layout
Page 21
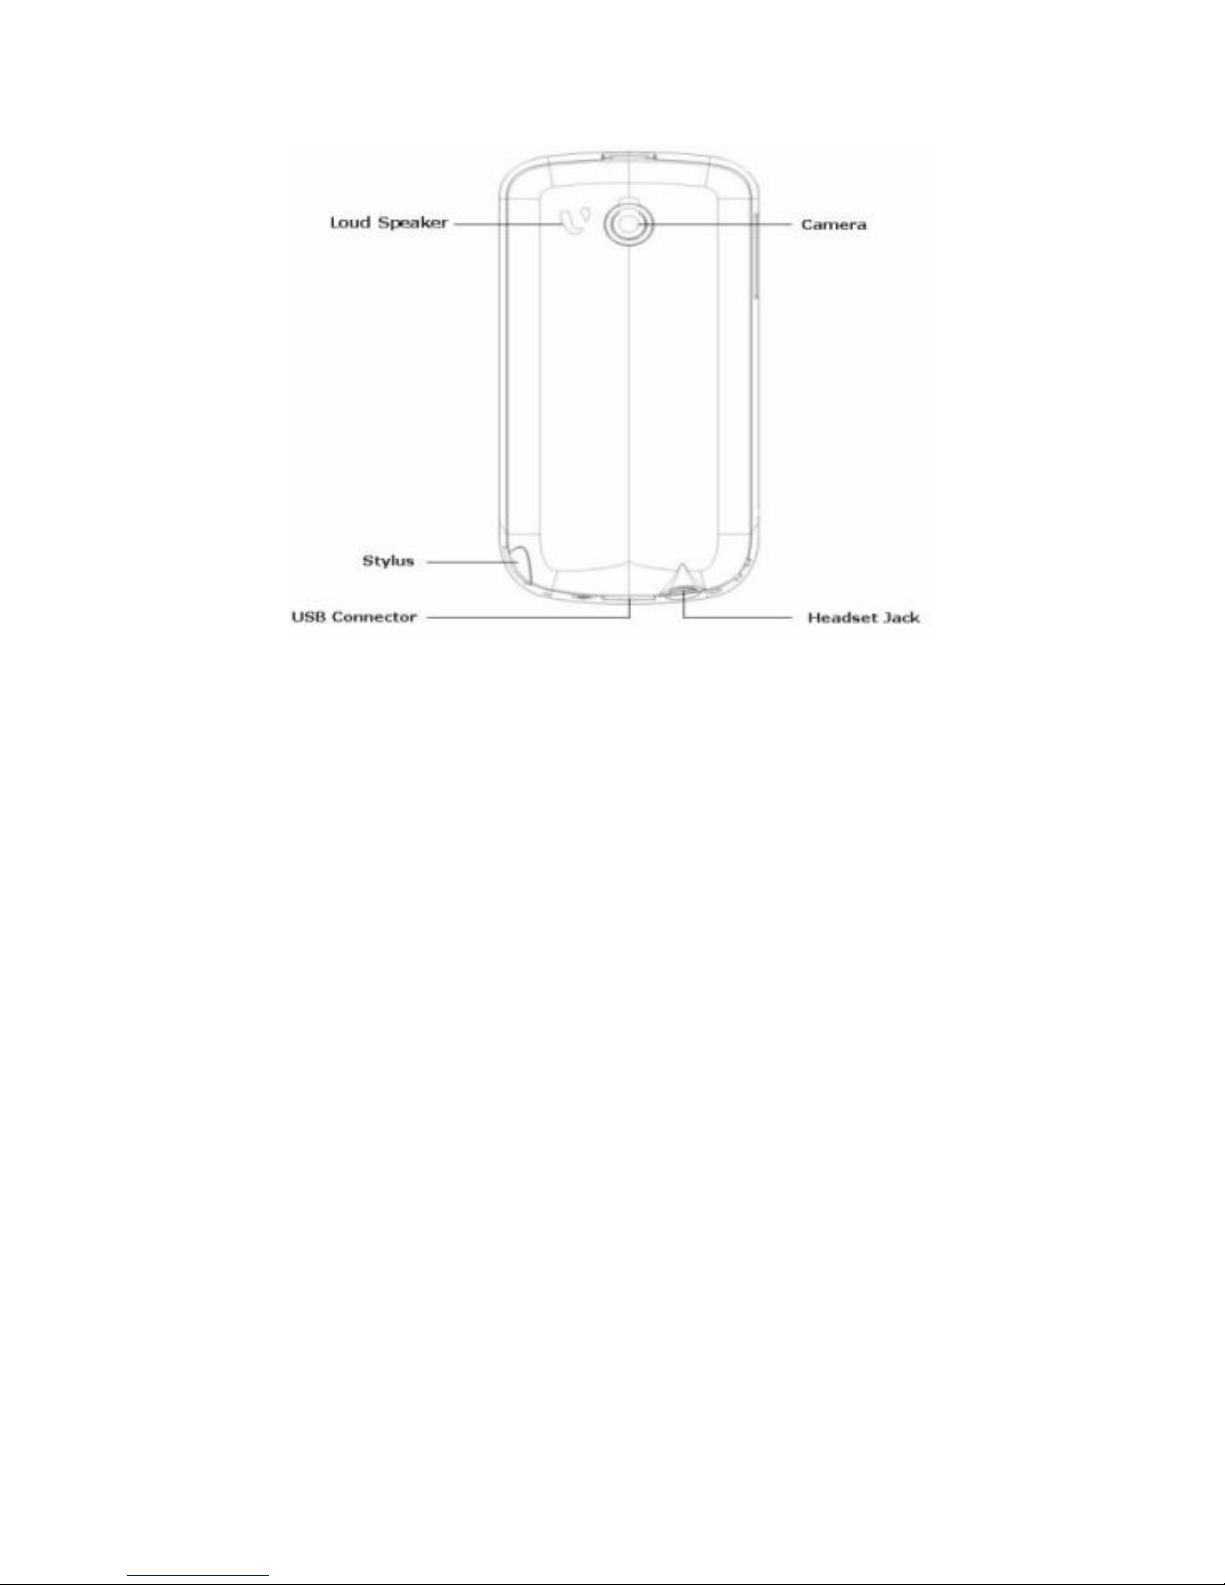
14
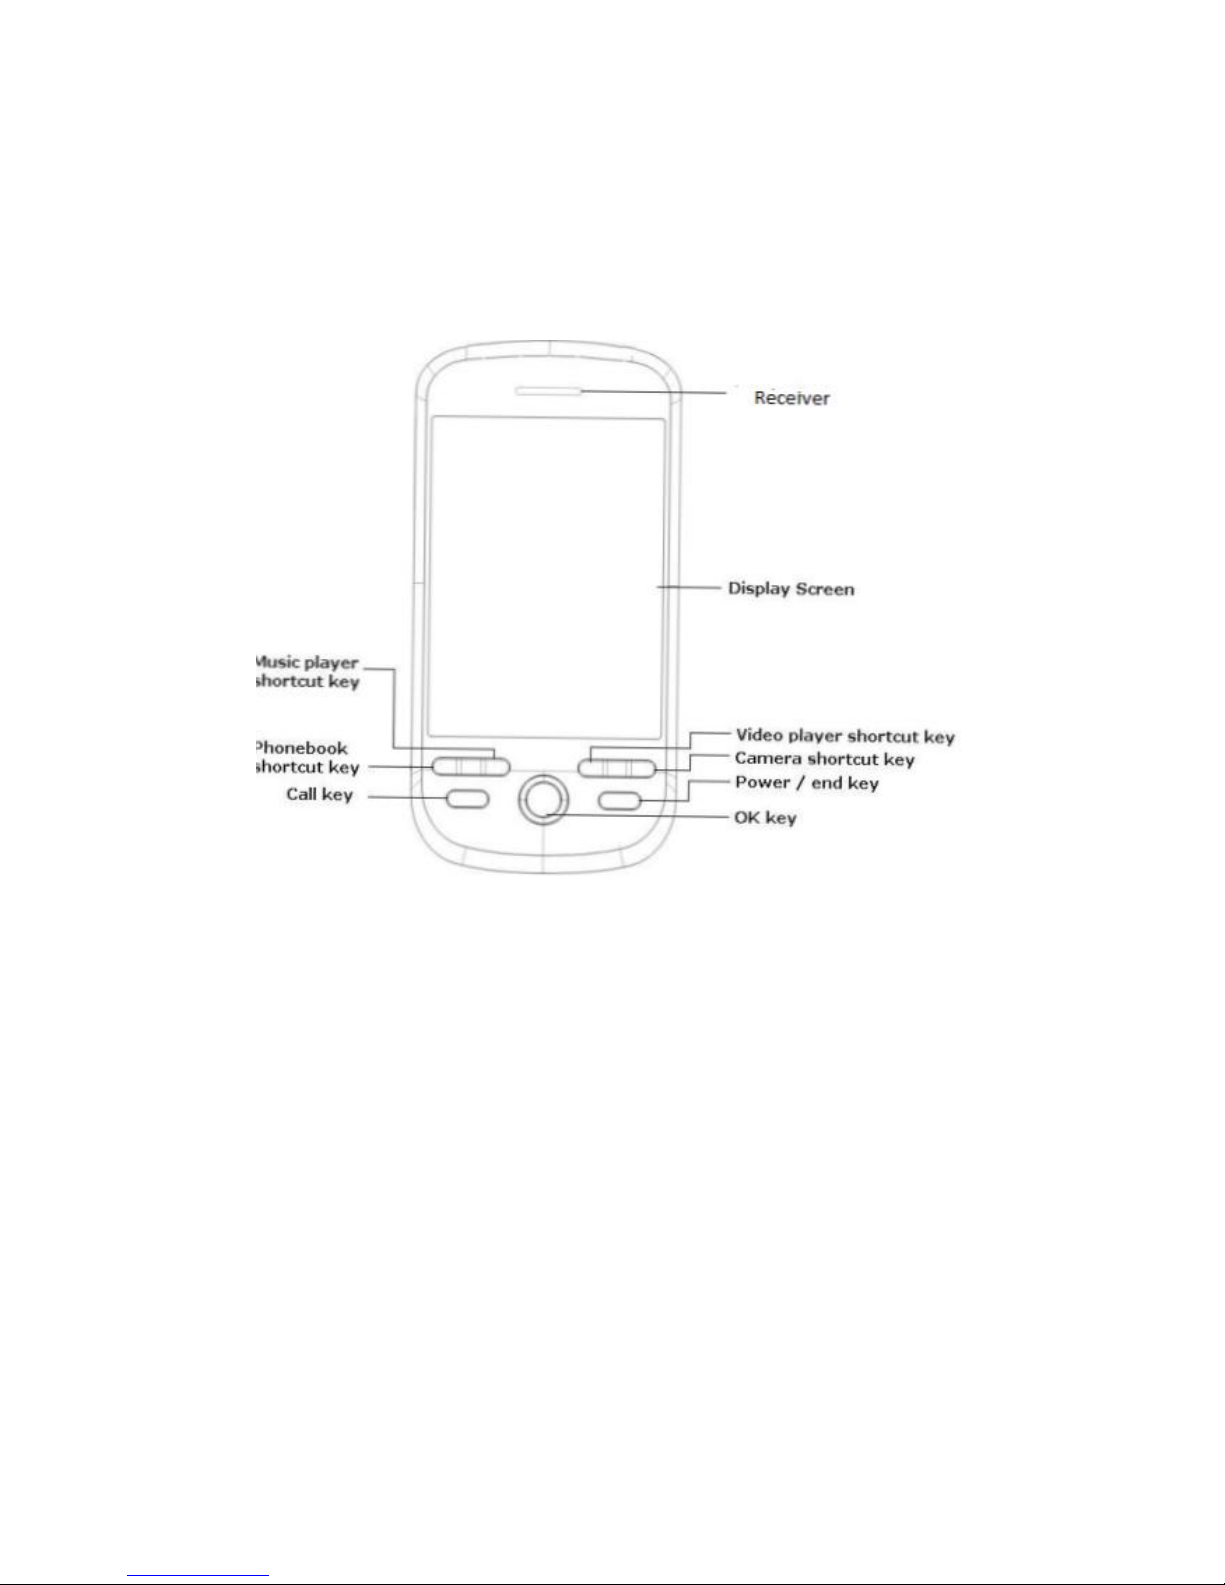
Send Key
Press send key in idle screen to view the Call
history.
End Key
End or reject calls; Press and hold this key to
turn phone on/off; cancel function and
return to the idle screen.
Page 22

15
OK Key
In idle mode, press to open the
Menu.
In menu, use to perform the
functions that display in the middle
lower of the display screen.
Phonebook Key
Press this key on the extreme left to directly
access the phonebook menu.
Music Key
Press the Music key (left of the OK button on
your device) to launch the music player. The
device automatically searches for music files
on the memory card and creates playlists
automatically.
Video Player Key
Press the Video player key (right of the OK
button on your device) to launch the video
Page 23

16
player. The device displays all the recorded
videos that are stored in the camcorder
folder.
Camera Key
Press this key on the extreme right to
directly access the camera application.
End Key
End or reject calls; Press and hold this key to
turn phone on/off; cancel function and
return to the idle screen and lock the phone.
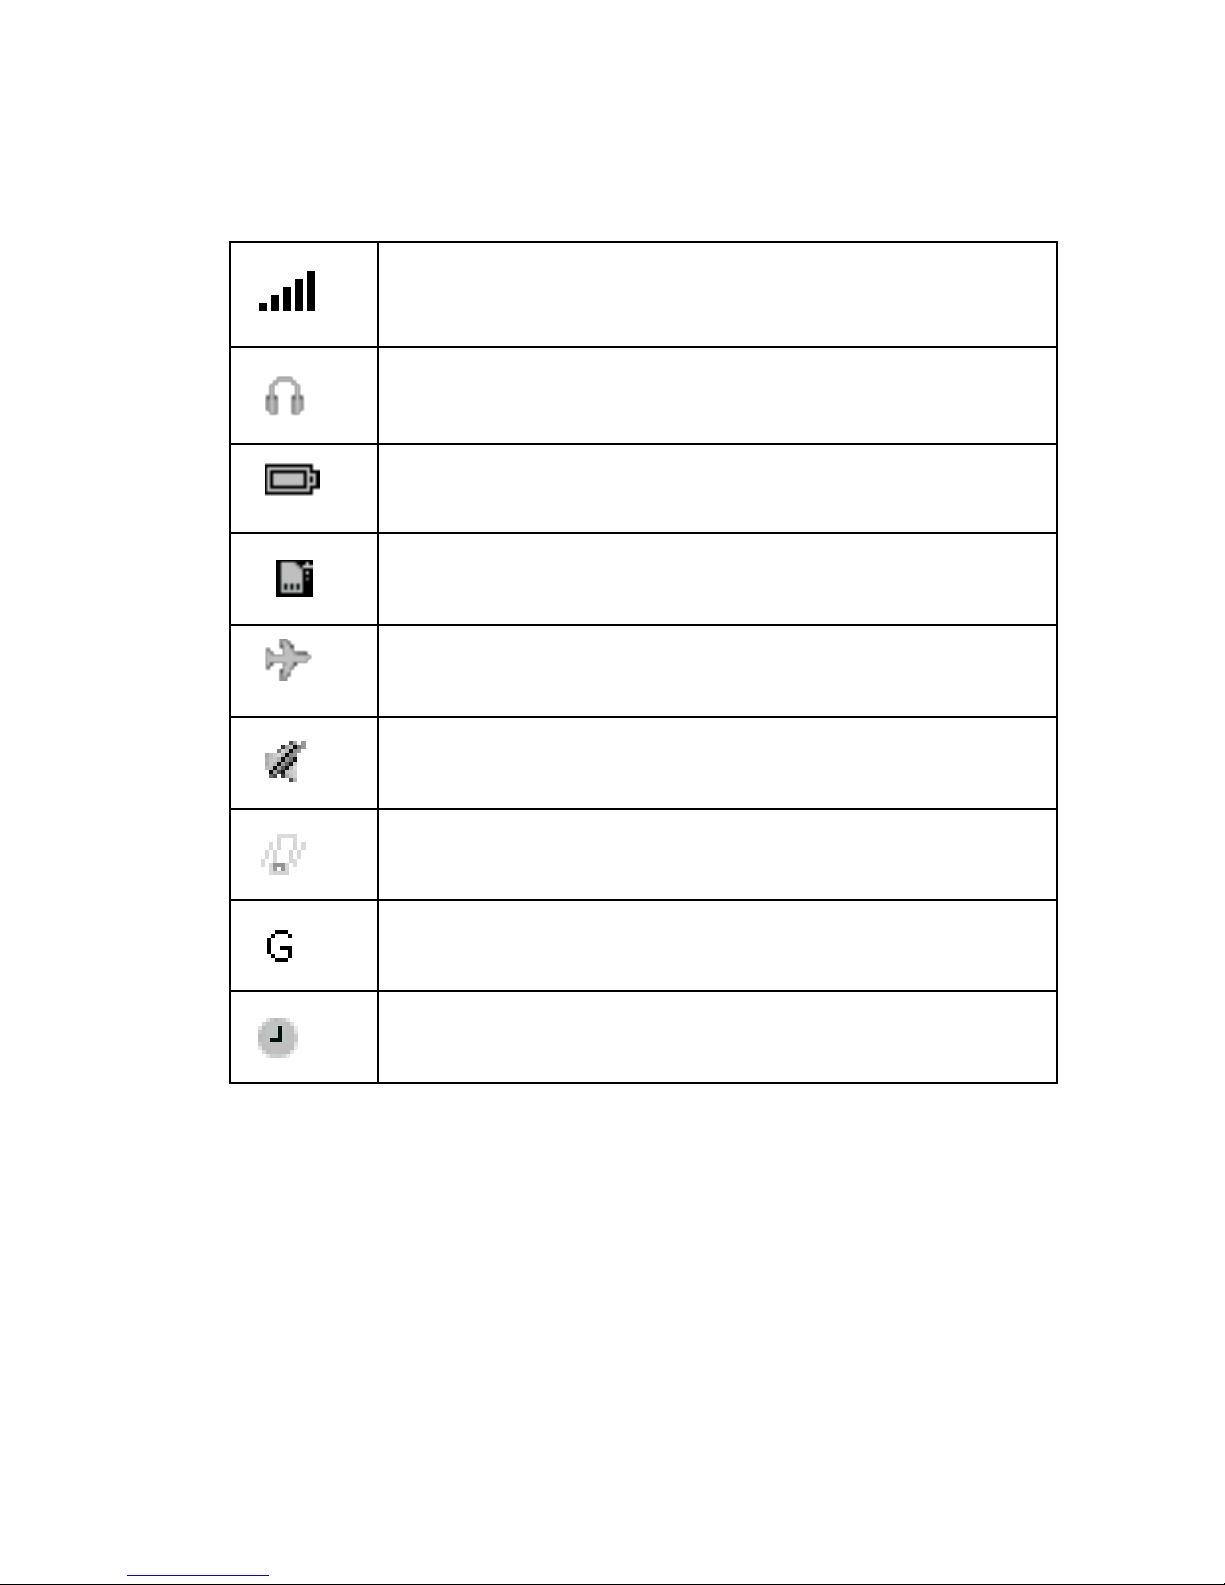
Screen Icons
Indicator icons provide information such as
battery level, network signal strength,
current date & time and so forth.
Page 24
17
Network signal strength
Headset connected
Battery Strength indicator
Memory card detected
Airplane mode active
Silent mode activated
Vibrate mode activated
GPRS connected
Alarm active
NOTE: Depending on your country or service
provider, the icons shown on the display
may vary.
Page 25

18
Widgets
In the V1655, widgets are provided for quick
access to applications on the idle screen. For
instance, the music player widget let‟s you
play audio tracks from the idle screen itself.
The available widgets are analog clock,
digital clock, calendar, memo, music player,
games, profiles and FM Player.
Page 26

19
Basic Operations
Make a Call
In idle mode:
Touch the phone icon at the bottom
of the display screen to access the
virtual keypad.
Enter the phone number including
the area code. Press Clear to erase a
digit.
For international calls, insert the „+‟
sign followed by the country code,
area code (without the initial zero
and phone number.
Press the dial key. Once the call is
complete, press the End key.
Page 27

20
To receive a call, press the Option Answer
or receive it directly by pressing the Dial key.
Send a Message
In idle mode:
Touch the phone icon at the bottom
of the display screen to access the
virtual keypad.
Enter the phone number including
the area code. Press Clear to erase a
digit.
Touch the message icon at the
bottom of the display screen to
quickly send a text or a multimedia
message.
Page 28

21
Add a Number to Phonebook
In idle mode:
Touch the phone icon at the bottom
of the display screen to access the
virtual keypad.
Enter the phone number including
the area code. Press Clear to erase a
digit.
Touch the phonebook icon at the
bottom center of the display screen
to quickly add a number to the
phonebook.
Making a Call using Call History
The number and time of each call that you
make or receive is stored in the Call history
module of the device. You can retrieve a
Page 29

22
number from call history and initiate a new
call. To do so:
1. Press the Dial key to view a list of
recent call history.
2. Scroll to select the number you wish
to call, and press the Dial key to
select the SIM from which you wish
to make a call.
Page 30

23
Call history
Use this menu to view the missed, received
or dialed calls. On the Idle screen, touch
Menu Call history. The call history sub-
menu comprises of the following options:
View: view the details of the selected
number.
Call: make a call to the selected
number.
Send: send a text or a multimedia
message to the selected number.
Save: save the selected number to
the phonebook.
Delete: delete the selected number
from the call history.
Page 31

24
Delete all: delete all the numbers
from the call history.
Call timer: view the duration of the
last call, received call or the dialed
call of both the SIM cards. You can
also reset the time.
Call cost: view the cost of the last call
and total cost and so forth of the SIM
card. You can also reset cost for the
SIM card.
Page 32

25
Phonebook
Phonebook is a location in your phone‟s
internal memory on which you can store
names and numbers of contacts. The SIM
cards also allow you to store phone
numbers, though the service provider
decides the capacity. Even though, the SIM
card and the phone‟s internal memory are
physically separate, they are used as a single
entity known as the Phonebook on the
phone.
Use the tabs at the top of the screen to
switch between the contacts stored on the
two SIM cards, and Phone. Phonebook also
provides an option to assign a number to a
group, or blacklist a number. View the list of
groups and the blacklisted numbers from
the respective tabs in the phonebook.
Page 33

26
To search a contact,
a. Touch the Search field to display the
virtual keypad.
b. Start entering the contact's name.
The device suggests matching
contacts. Scroll to the desired
contact.
Phonebook Settings
Touch Menu Phonebook Options. The
available sub-options are:
View: Displays all details of the
selected contact.
Call: Place a call to the selected
contact using SIM1 or SIM2.
Send: Send a text or a multimedia
message to the selected contact.
Page 34

27
New: Add a new contact to the
phonebook.
Delete: Delete selected contact.
Mark: Highlight the selected contact.
Useful if the same action needs to be
performed on multiple contacts.
Copy to phone/SIM: Copy the selected
contact(s) from SIM to phone
memory or vice versa.
Assign to group: Assign the selected
contact to a group or blacklist.
VCard: You can forward the selected
contact‟s information to another
contact, import vCards, and backup
to a memory card.
Page 35

28
Memory details: View the available
memory for contacts on phone and
SIM.
Page 36

29
Profiles
This menu allows you to set the ring tone,
alert type, ring volume, , etc when you
receive an incoming call or a new message
so that you can adapt the use of your phone
to different types of call environments. The
available profiles are, General, Meeting,
Outdoor, Silent, Personal and Headset.
Page 37

30
File manager
View the files stored in the phone memory
and on the microSD card.
Page 38

31
Messages
In Messages, you can send and receive text
and multimedia messages. To launch
messages, on the idle screen, select Menu
Messages to view the available functions.
Message functions are available depending
on network services that your service
provider supports. The options are:
Create new: Create and send a text
or a multimedia message.
Inbox: Messages received using text
or multimedia are stored in the
Inbox folder.
Draft box: Saved messages are
stored in the Draft box.
Outbox: Messages that are waiting to
be sent are saved in the Outbox.
Page 39

32
Sent box: Sent messages are stored
in the Sent box.
Template: Your phone contains pre-
defined templates for frequently
used text messages.
Voice mail: Voice mail server is an
interactive system for storing,
processing and reproducing verbal
messages through a voicemail
server. The service is operator
dependant and the settings are
provided by the operator upon
activating the service on the SIM
card.
Cell broadcast: Your phone is capable
to receive and store broadcast
messages. You can set the receive
status to ON/OFF. These messages
are stored I the Cell Broadcast folder.
Page 40

33
Settings: You can edit the settings of
the text and multimedia message,
cell broadcast message and the voice
mail from this option.
Memory status: View the available
and the used memory in phone as
well as in the memory card.
Page 41

34
Organizer
Use this menu to keep track of your
schedule. To access this menu, press [Menu]
in Idle mode and select Organizer. The
available options are:
Calendar: helps you to keep track of
your monthly schedule.
Alarm: Set the alarm to ring at a
specific time.
To-do list: You can use your phone to
keep track of all your Date, Call and
Anniversary.
Notepad: Add a note to your phone
and edit existing notes.
Sketch note: Colorize your notes for
identification.
Page 42

35
My cash: Application to help manage
your finances.
Page 43

36
Games
Select Menu Games, to access the Games
menu. Game interface offers option to select
a game, user can select the following game
from the interface:
NES games
Fruit
Pacman
Page 44

37
Media tools
Camera
Your phone is equipped with a camera on
the back of the device that can be used to
take still photographs. Select Menu Media
tools Camera to launch the camera
application. Once the camera application is
enabled, press the OK key to capture the
image.
Camera Settings
Image size – You can take and store
pictures in various sizes. The
different size offered by the phone
are:
o 320 x 240
o 640 x 480
Page 45

38
o 800 x 600
o 1024 x 768
o 1280 x 1024
o 1600 x 1200
o 2048 x 1536
Image quality - You can set quality of
your images by selecting option
from Normal/High/Low.
Night mode – You can select the
night mode using this option to
capture images in dark.
Effect – You can select different
options for your images such as
normal, mono, sepia, Negative,
Sketch, Oil painting, Emboss, Mosaic,
Zipper and Blur.
Page 46

39
Continues – You can choose to click
continuous images using this option.
The different cont. shot are 4, 6, 9
shots or Off.
Timer – The different delay time
options are 5secs, 10secs, 15secs and
off.
White balance - You can make your
photo look cooler or warmer by
adjusting the color balance.
Banding –The different banding
options are 50 and 60 Hz.
Sound – You can on/off the shutter
sound of the camera.
EV - You can adjust the exposure
value to improve the image quality
according to environmental
Page 47

40
conditions. The different options are:
EV -2, EV -1, EV 0, EV 1 and EV 2
Video recorder
Select Menu Media tools Video recorder
to access Video recorder. Press the OK Key to
start and stop the recording. The recorded
videos are automatically saved to camcorder
folder in File Manager.
Music
Your phone provides you a friendly audio
player device for entertainment purpose.
You may enter the audio player via main
Menu. The music player detects and lists the
music tracks from your memory card. You
may listen to the music through the headset
or loudspeaker. The user-friendly interface is
specially designed to allow easy access to
common functions. The various functions
that you can access are:
Page 48

41
Play: play the selected music track.
Stop: stop the selected music track.
Repeat: put the music player in
repeat mode to repeat the songs.
You can choose to repeat a single
song or all the music tracks in the
playlist.
Shuffle: put the music player to play
the songs in random order.
Equalizer: modify the tone of the
music playback.
3D surround: switch on/off the 3D
sound.
Lyric: display the lyric with the song,
if the lyric file is provided with the
song.
Page 49

42
Song info: display the information of
the song, such as song name, artist,
album, track number and year.
View details: view the details of the
song, such as name, file type, size,
date, duration and the location of
the song.
Video player
Use Video Player to watch videos. The
supported formats are 3GP, MP4 and RMVB.
Photo viewer
Photo viewer stores all your pictures which
are captured by the phone camera. It
provides you the following options:
View: view the selected image.
Page 50

43
Set as: set the selected image as
wallpaper or contact image.
Send: send the selected image via
MMS or Bluetooth.
Rename: rename the selected image.
Mark: mark the selected/multiple
images for deletion or to send via
MMS or Bluetooth.
Slideshow: view the images as
slideshow.
View details: view the details of the
selected image, such as the name,
file type, size, date, resolution, and
the location of the image.
Page 51

44
FM Radio
The FM Radio application turns the mobile
phone into a portable FM Radio device. It
primarily provides users the interface to a
single-chip electronically turned FM stereo
radio for listening to live-broadcast stations.
You must connect the hands free to your
phone as it works as an antenna. The
various options that you can access are:
Radio off: switch off the radio.
My channel: lists the saved channels.
Add to my channel: manually input
the channel name and the frequency.
Search channel: search the channel
automatically and reset the channel
list. You can add the channels to my
channels list, after the search is
Page 52

45
complete. You can also manually
input the channel frequency.
Background play: switch on/off the
background play for the FM radio.
Speaker: switch on/off the speaker of
the FM radio.
Voice memo
You can use your phone to record sounds.
The supported format is AMR. A call may also
be recorded and saved to the phone or the
memory card.
Page 53

46
Applications
E-book
Your phone can be used to read the books
by storing them in *.txt file format. Go to
Menu E-book to access/read the books
stored in your E-book folder. You can delete,
set scroll type, language mode and
information from the options menu.
JAVA
The V1655 handset supports the JAVA
platform. This will allow you to download
and install JAVA games to the microSD card.
Page 54

47
Tools
Calculator
Your phone comes with a built-in conversion
application that you can use to perform
calculations that we perform on a daily
basis, such as addition, subtraction, division,
and multiplication.
Converter
Using Convertor, you can perform Currency,
Length, Energy, Speed, Mass, Volume, Area,
Date (Solar to Lunar) Power, Time, Pressure,
and Temperature conversions.
Stopwatch
Use stopwatch to time events. For example,
use it to calculate the time it takes for you to
reach your home from the office.
Page 55

48
Timer
Use a timer to count down to an event
based on a preset time length (hours,
minutes, and seconds).
World clock
Use world clock to see the time in any part
of the world.
Shortcuts
You can set the shortcuts for the functions
that you use frequently so that they can be
accessed from a single place.
BMI
For the health conscious, calculate your Body
Mass Index (BMI)
Page 56

49
Bluetooth
Your phone is enabled with Bluetooth
technology, which allows you to connect
your device to a compatible Bluetooth
device within 10 meters. You can set the
visibility and the device name from the
Bluetooth settings.
Page 57

50
Settings
General
Personalization
Display
Use this menu to Calibration touch screen.
Use Backlight to adjust the level of
brightness for your device. You can also
choose the time after which the backlight
will turn itself off.
Standby mode
Choose a wallpaper to display while the
phone is in standby mode.
Ringtone settings
Choose ringtones for incoming calls,
messages, calendar events, and alarms.
Page 58

51
Display language
Choose the required language to be used on
the phone.
Date/Time
This option enables you to set the time, time
zone, time format, date and the date format.
Power on/off
This option enables you to set the auto
power on/off and the auto power on/off
status.
Information
This option displays the information related
to your phone such as your IMEI number,
memory details and the software version
installed in your phone.
Page 59

52
Security
SIM1/2 PIN code
This option enables you to set a Personal
Identification Number (PIN) for your SIM
card that is required each time you switch
on your phone. You can also change your
PIN from this option.
Phone lock
This option enables you to set a lock for your
phone that is required each time you change
the SIM card of the phone.
SIM lock
This option enables you to set a lock for your
SIM card that is required each time you
switch on your phone.
Page 60

53
Auto keypad lock
This option enables you to set the auto lock
time for the keypad.
Mobile Tracker
This function enables you to track your
phone in case it gets lost. The default
password for the mobile tracker is “0000”. If
someone inserts another SIM card in your
mobile, you will receive an SMS to the
assigned number from the new SIM card to
know who is using your mobile.
In addition to tracking your mobile phone,
you can also control your phone such as
retake phonebook, call divert, lock phone,
delete all data and format T card. To control
the phone, you have to send the message to
SIM that is using your phone in the following
formats: MSRC+mobile tracker password
+control function.
Page 61

54
The control passwords for different options
are:
Retake phonebook: QHDHB
Call divert: ZJDH
Power off: GJ
Lock phone: SS
Unlock phone: JS
Delete all data: SCQBNR
Format T card: GSHTK
For example, if you want to lock the phone,
then you have to input MSRC0000SS.
The different options which are to be
configured in mobile tracker are:
Page 62

55
Set switch: power on/off the mobile
tracker.
Set number: assign the bonding
phone to control the phone.
Set password: change the mobile
tracker password.
Set mode: set the mode whether you
want to control the phone from a
single number or from any number.
Mod SMS: enter the text that you
want to receive if the SIM is changed.
Help: contains the list of control
passwords to control the phone.
Page 63

56
Restore Settings
All settings can be restored to factory
settings with this function. The Lock code for
the phone in factory setting is 0000.
Phone
Call settings
Use Call Settings to configure your device‟s
response to each time you initiate a new
call, or receive an incoming call. You can also
choose to set minute reminders, receive calls
by touching any key, enabling automatic
redial etc.
Call divert
Specify an alternate number to which all
incoming calls are diverted. Once enabled,
call divert also diverts all incoming data
connections.
Page 64

57
Call barring
In order to activate this service, it requires
the services provided by the network service
provider. When you change barring
password, you need to input the old
password.
Network setup gives the user the option to
select a desired network and addition of a
new network to the network list. The
network setup gives you the following
options:
Network Settings
Choose an alternate network service
provider if your primary provider does not
provide services in a particular area. You can
also keep your device on during a flight by
setting up the Aircraft mode.
Page 65

58
Switch mode
You have following options listed under
switch mode:
Dual mode: This option activates
both the SIM cards.
Enable SIM1 only: This option
activates only SIM1.
Enable SIM2 only: This option
activates only SIM2.
Default SIM
This enables you to select the default SIM
card for the phone.
Speed Dial
Enable or disable speed dial, and associate
contacts to the numbers available in the
speed dial list.
Page 66

59
Connection
Data Accounts
Edit Account name, APN, User name,
Password and Auth. Type.
WAP Settings
WAP or Wireless Application Protocol
browser provides all the basic services of a
computer based web browser but is
simplified to operate within the restrictions
of a mobile phone.
To make WAP browsing easier, the V1655
com e with pre0defined settings for various
service providers, simply choose the
operator you have subscribed to. You need
to select desired operator settings for each
SIM card.
Page 67

60
MMS Settings
To make multimedia messaging easier, the
V1655 comes with predefined settings for
various service providers, simply choose the
operator you have subscribed to. You need
to select desired operator settings for each
SIM card.
JAVA Settings
Comprises the JAVA profiles and the Profile
settings sub-menus. JAVA profile are the
network profiles that JAVA will use while
accessing GPRS network for running JAVA
applications, such as Games.
Page 68

61
Services
WAP explorer
WAP function enables you to use the phone
to surf the Internet. You can select the SIM
card and the associated profile from the
Settings option.
SIM applicator / STK
STK (SIM Tool Kit) is shown only if it is
provided by your SIM card. For further
details, please contact your network
operator.
Event center
Event center keeps track of the events that
you have missed such as messages; cell
broadcast messages, voice mail and so forth.
 Loading...