

Page 1
Page 2
PAGE i
Table of contents
Legal Notices ..................................................... iii
Software Update Information ......................... iv
Getting Started ...................................................1
Safety Precautions ................................................1
Assembling the device .........................................2
Charge the battery .................................................5
Know your Device .............................................6
Phone Layout ...........................................................6
Dual SIM Card ............................................................8
Flight Mode ...............................................................8
Screen Icons ..............................................................9
Basic Operations ............................................. 10
Make a Call ..............................................................10
Answer calls ...........................................................10
Composing text messages ...............................11
Working with E-mail ............................................11
Lock the keypad ...................................................12
Connecting to the PC .........................................12
V-Connect ........................................................ 14
Wireless Access Protocol (WAP) ....................14
Data account..........................................................15
Call history ........................................................ 16
Multimedia ........................................................ 17
Camera .....................................................................17
Image viewer .........................................................17
Video recorder.......................................................17
Video player ...........................................................18
Audio player ...........................................................19
Sound recorder .....................................................19
Page 3
PAGE ii
Table of contents
FM radio ...................................................................19
Games ............................................................... 21
Messages ......................................................... 22
Fie manager .................................................... 24
Settings ............................................................ 25
Display settings ....................................................25
Phone settings .....................................................25
Security settings ..................................................25
Language ................................................................27
Call settings ...........................................................28
Network settings .................................................30
Phonebook ...................................................... 31
Organizer ......................................................... 34
Alarm .........................................................................34
Calendar ...................................................................34
Calculator ................................................................35
Bluetooth ................................................................35
World Clock .............................................................36
Ebook reader ..........................................................36
Shortcuts .................................................................36
Torch .........................................................................36
Page 4
PAGE iii
Legal Notices
All rights reserved. Reproduction, transfer,
distribution or storage of part or all of the
contents in this document in any form without
the prior written permission of VIDEOCON is
prohibited.
VIDEOCON operates on a policy of continuous
development. VIDEOCON reserves the right to
make changes and improvements to any of the
products described in this document without prior
notice.
Under no circumstances shall VIDEOCON be
responsible for any loss of data or income or
any special, incidental, consequential or indirect
damages howsoever caused.
The contents of this document are provided
“as it is”. Except as required by applicable law,
no warranties of any kind, either deselected or
implied, including, but not limited to, the implied
warranties of merchantability and fitness for a
particular purpose, are made in relation to the
accuracy, reliability or contents of this document.
VIDEOCON reserves the right to revise this
document or withdraw it at any time without
prior notice.
The availability of particular products may vary by
region. Please check with VIDEOCON Executive.
Page 5
PAGE iv
Software Update Information
To enhance device performance, we recommend
that you get in touch with the nearest Videocon
Authorized Service Center, regarding the
availability of updated firmware for your device.
Please see the enclosed Service Center Directory
for the Videocon Authorized Service Center
nearest to your location.
Page 6
PAGE 1
Getting Started
Safety Precautions
Please comply with these precautions to
avoid putting yourself or other around you in a
dangerous or illegal situation, and ensure peak
performance of your phone.
Road safety
The use of a mobile phone while driving is illegal,
as it may endanger your safety and that of the
other road users. If you need to make or receive a
call, move your vehicle to the left side of the road
and allow it to come to a complete stop before
using your phone.
Aircraft safety
Switch your phone off while boarding an aircraft.
Signal from your phone can affect aircraft
system. You are legally obliged to comply with
this recommendation.
Potentially hazardous environments
Switch your phone off when entering any
enclosure which may be storing explosives or
materials that are explosive in nature, such as
refueling stations, or a construction site where
explosives are being used to create room for
new construction. Comply with any provided
guidelines, regulations and restrictions.
Emergency Calls
In case of an accident or an emergency, dial 100
(Police), 101 (Fire) or 102 (Ambulance) from your
phone.
Being emergency numbers, all calls to them are
toll-free. They may be reached even from areas
where the network signals strength or your
primary service provider is poor. Use the virtual
keypad to enter the emergency number, and
select the Send key.
Page 7
PAGE 2
Getting Started
Battery Use
To extend the battery life of your device:
• Use the standard wall charger to charge the
battery for the first time.
• During the first 3-4 charge cycles, charge
the battery until the battery indicator on the
display stops moving up and down.
• Avoid partial charging. Also, wait for the
battery to discharge completely before
charging it again.
• Charge the battery using the USB cable on if
the recommended wall charger isn’t readily
available.
• Avoid keeping the device on vibrate mode.
Assembling the device
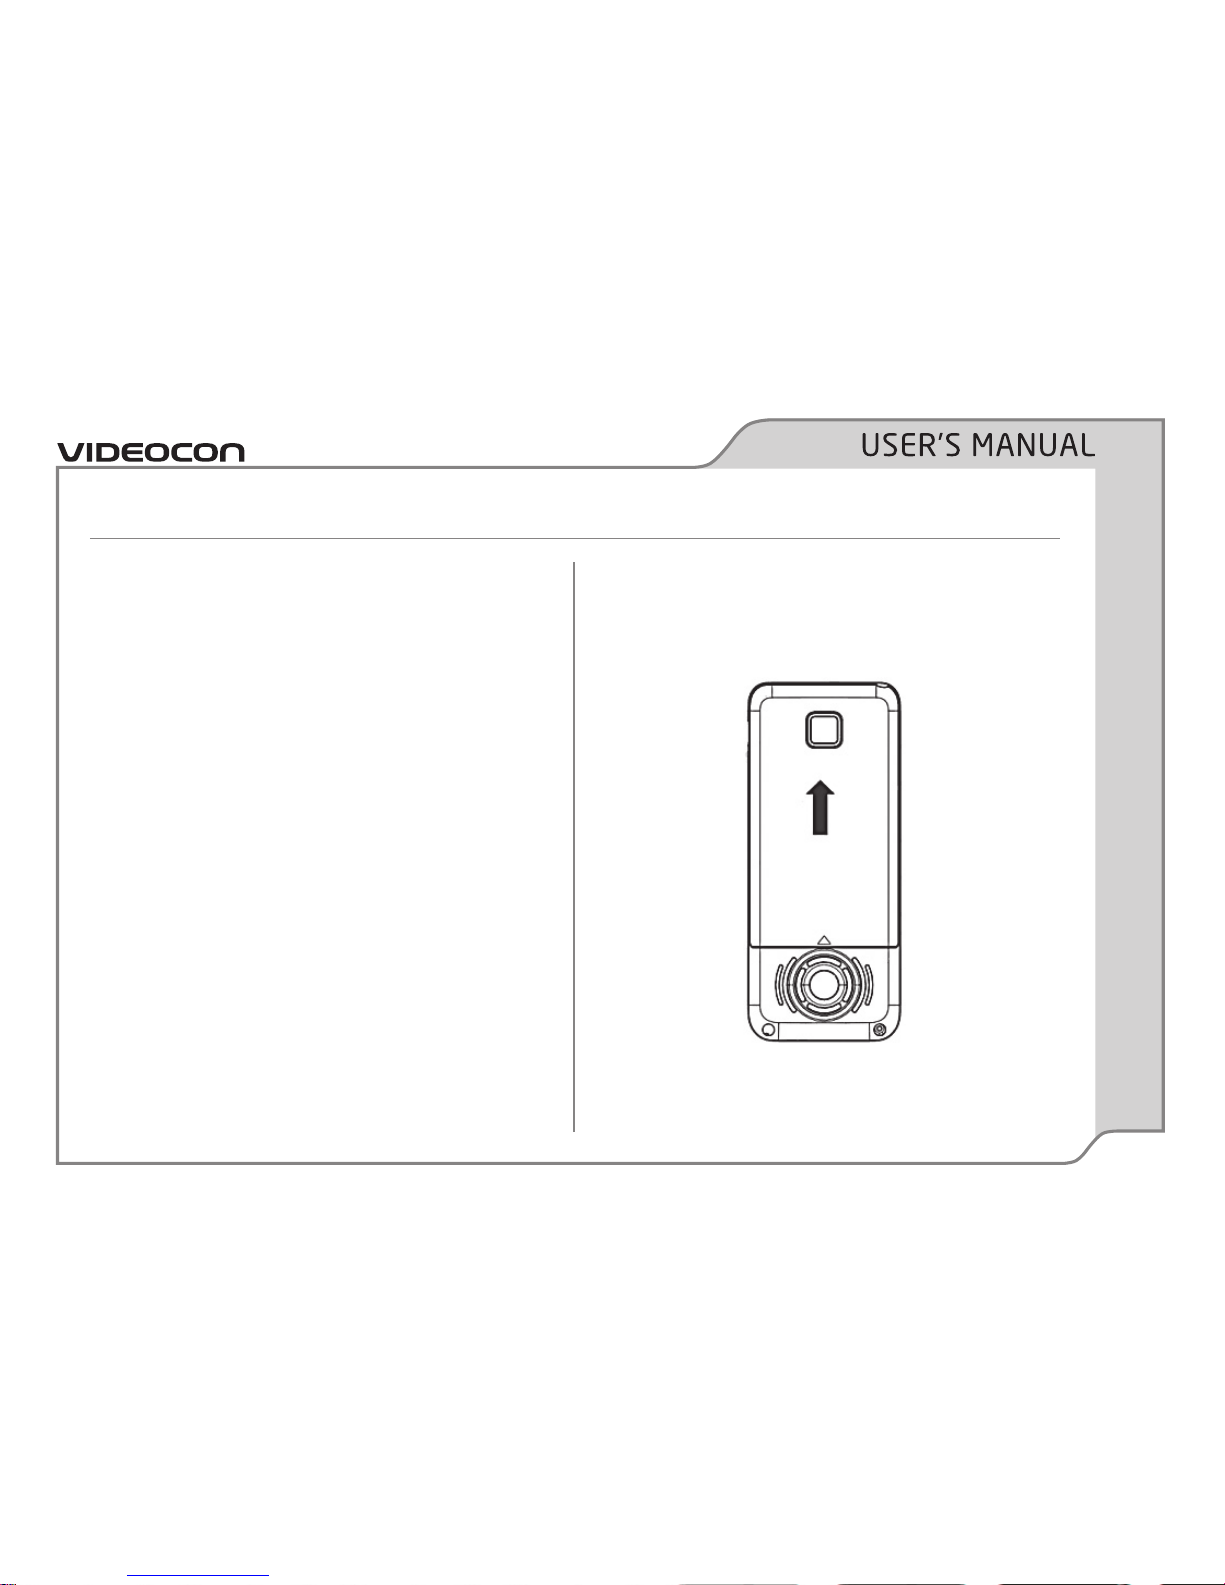
1. Hold the back cover and gently slide in upward
direction to open.
Note: If the phone is powered on, switch off the
phone before inserting the SIM card.
Page 8
PAGE 3
Getting Started
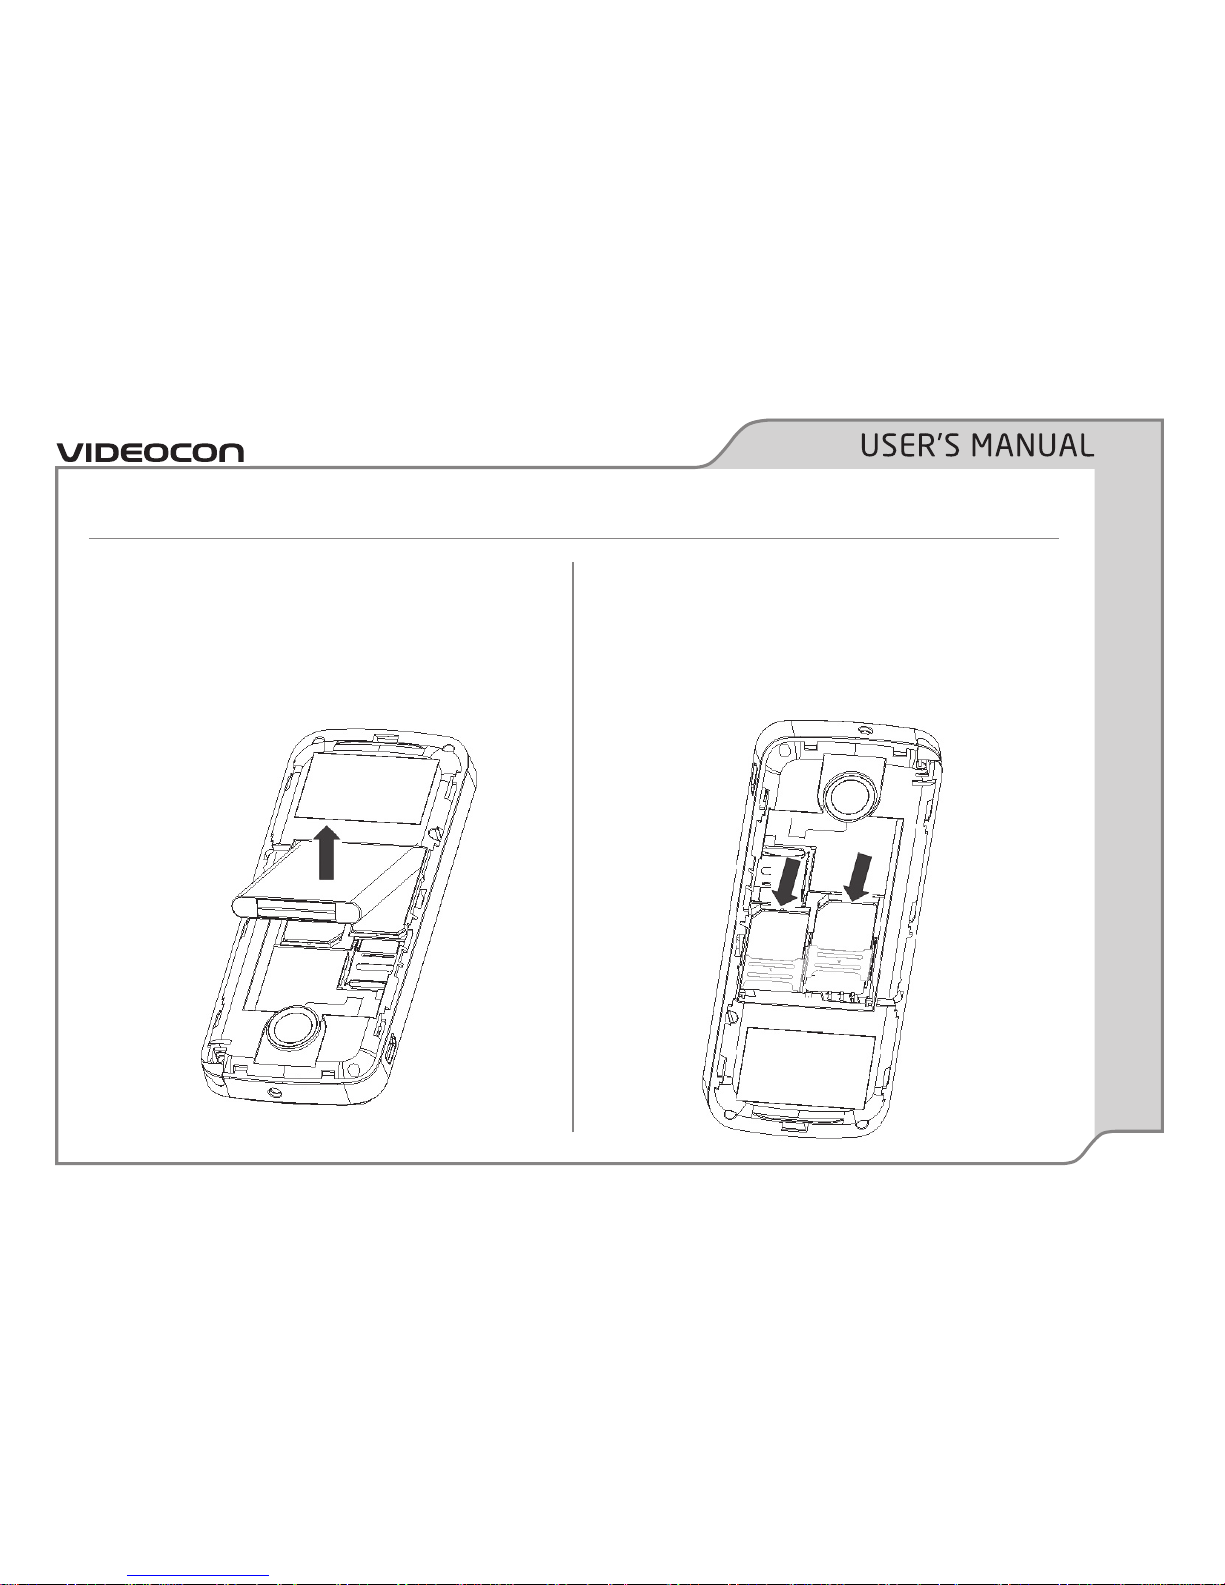
2. If the battery is in the compartment, lift and
pull it out in the direction of the arrow (shown
below).
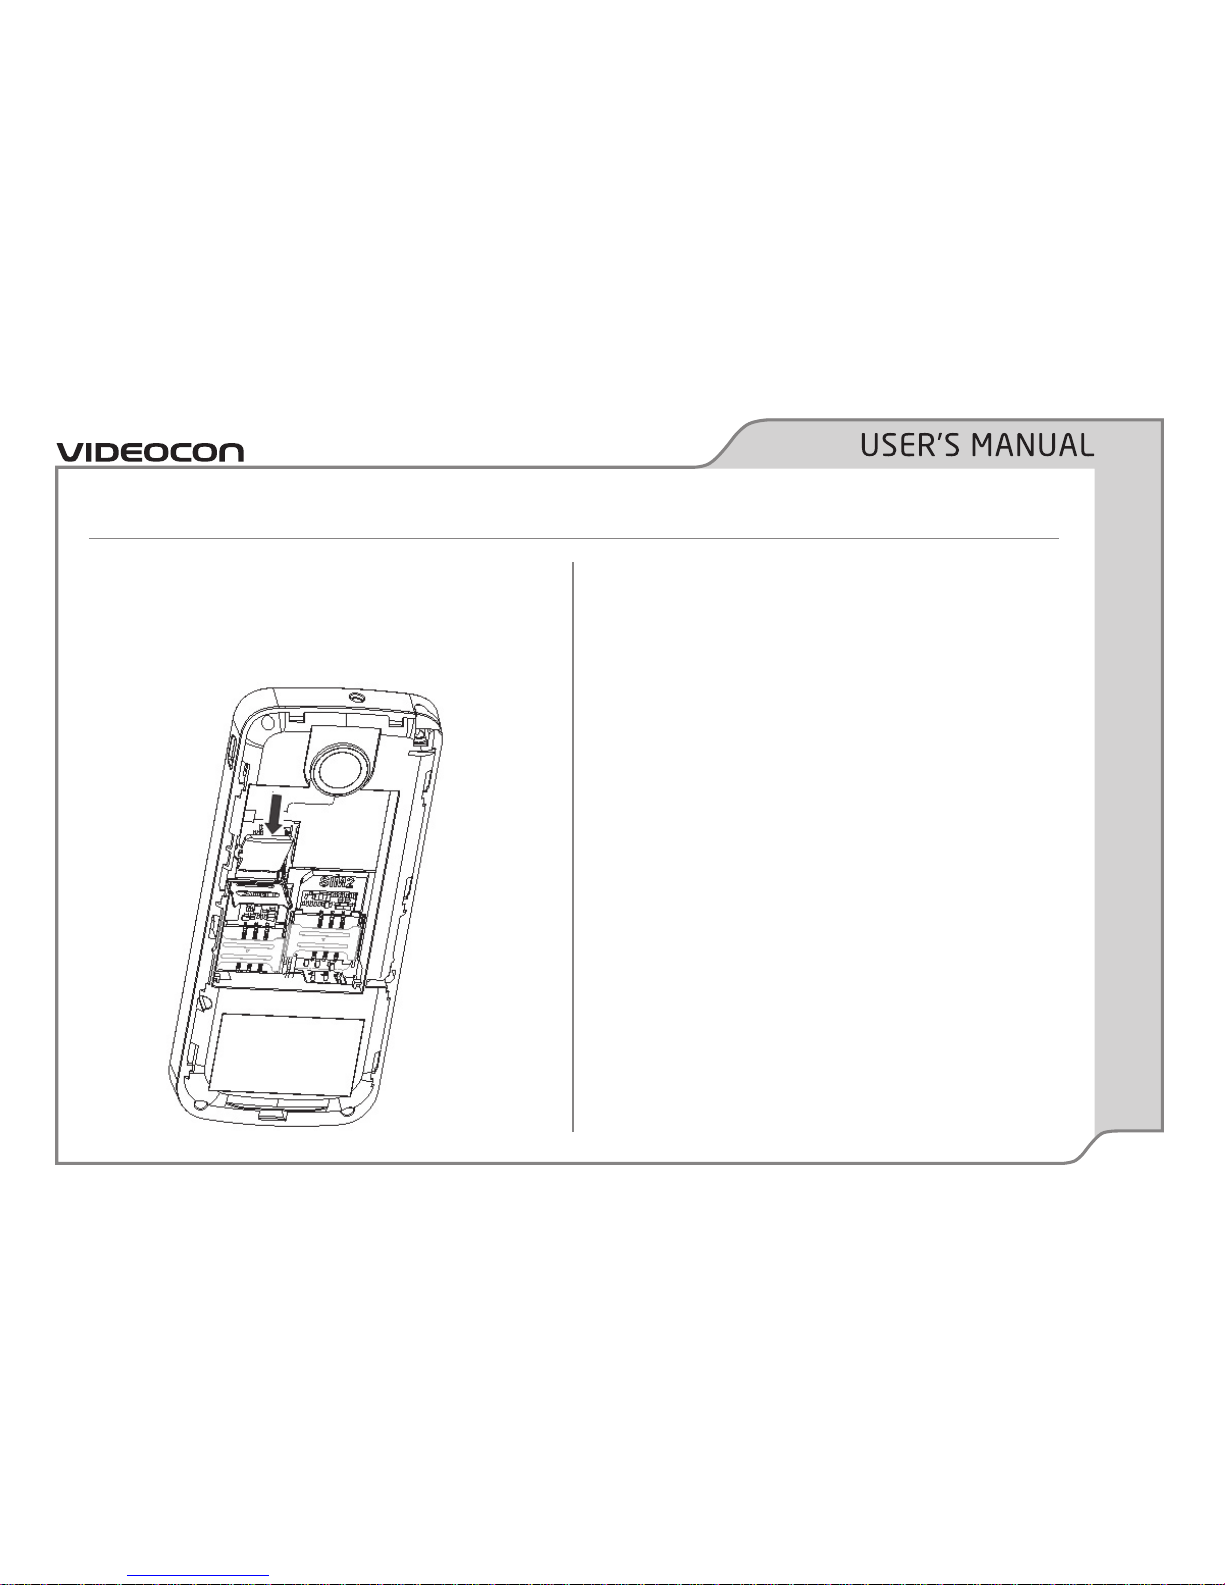
3. Insert the SIM card into its respective slot.
Make sure that the contact area on the card
is facing the connectors on the device, and
that the bevelled corner of the SIM card is
positioned upwards (as shown below).
Page 9
PAGE 4
Getting Started
4. Insert memory card. Take a compatible
microSD card, and place it into the memory
card slot..
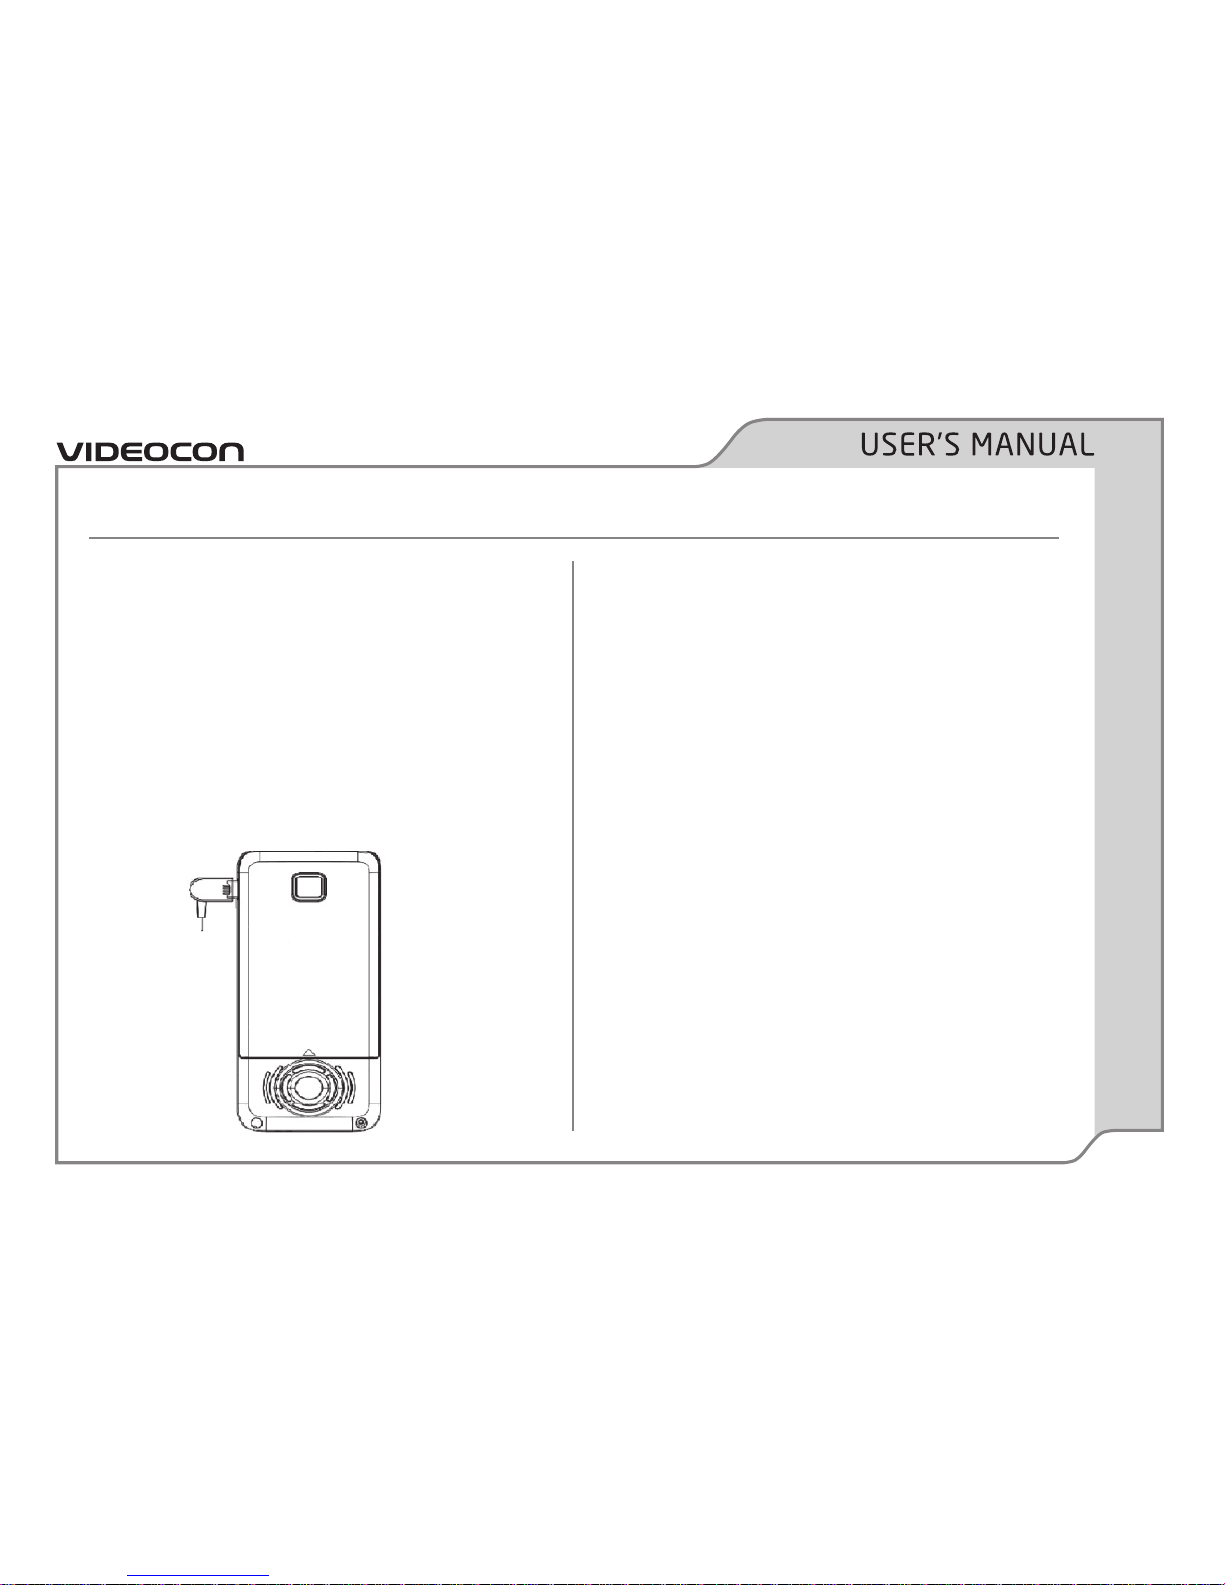
5. Replace the battery. Align the contacts of the
battery with the corresponding connectors
on the battery compartment.
Page 10
PAGE 5
Getting Started
Charge the battery
To charge the device battery:
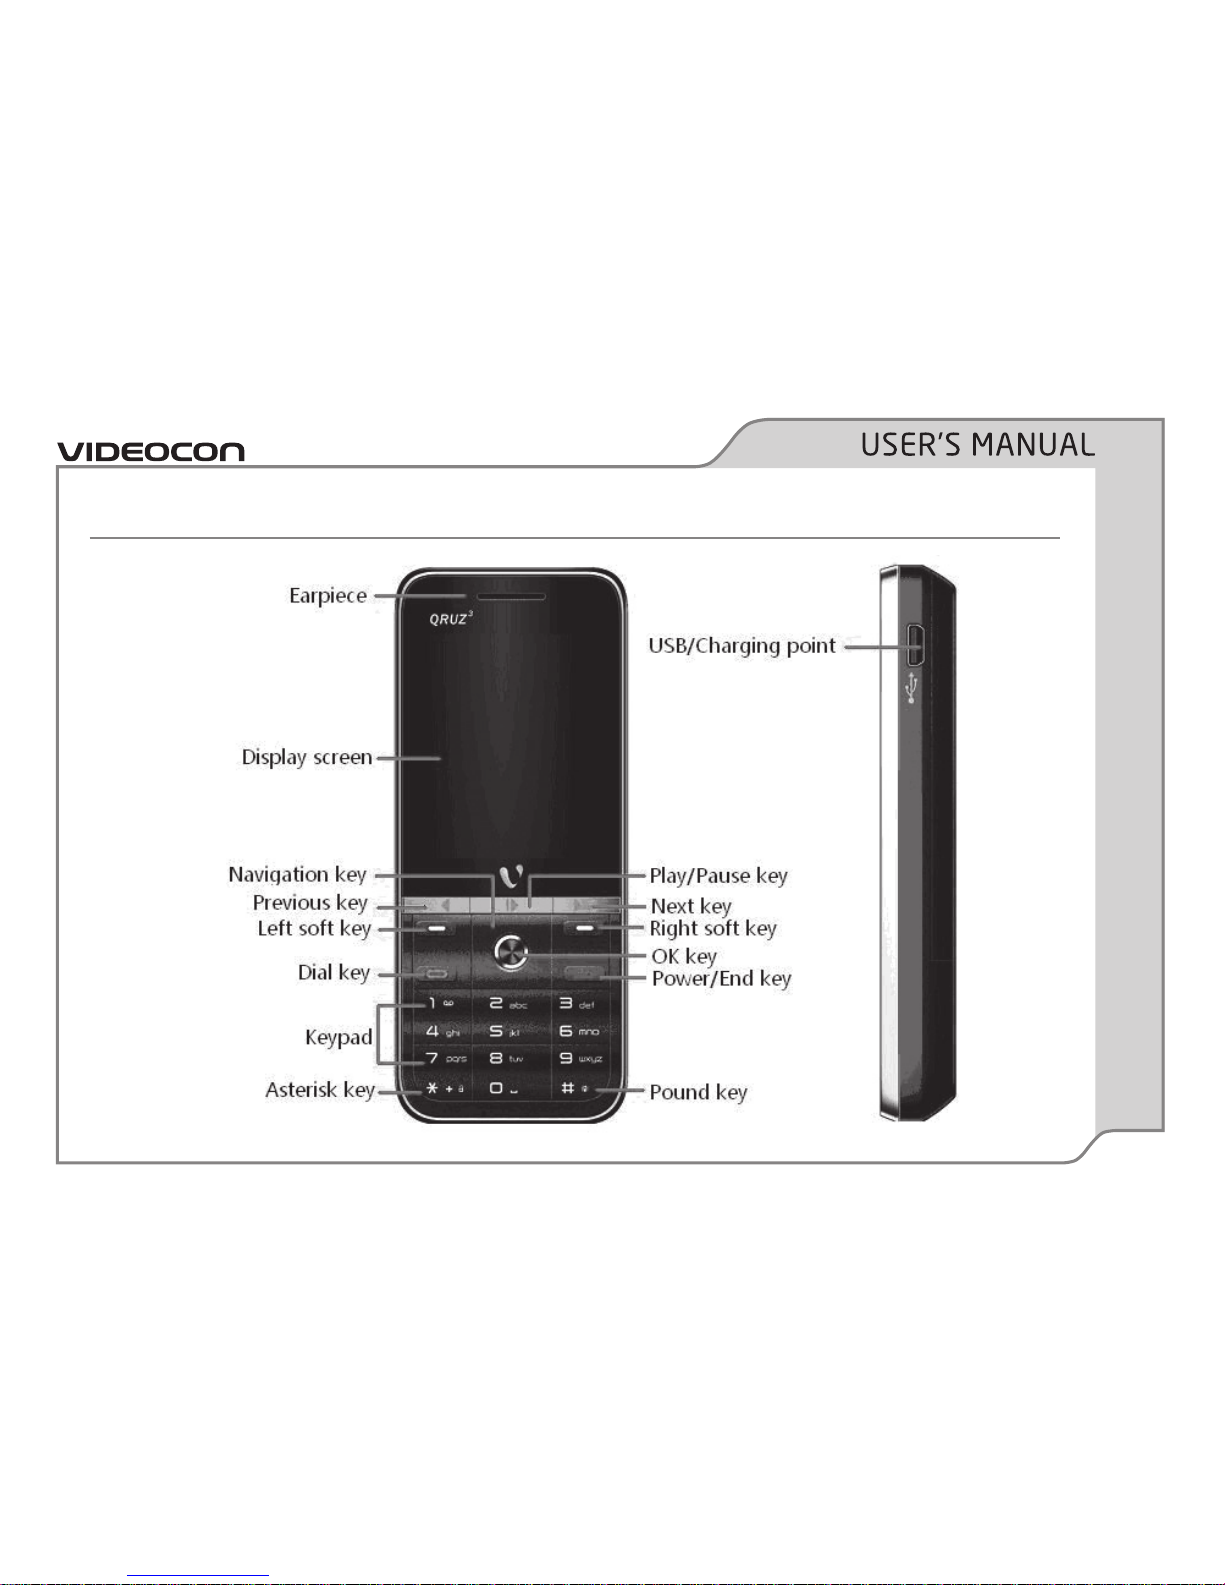
1. Take the USB cable from the device packaging,
and attach it to power adapter. Now connect
the power adapter into a standard AC wall
outlet.
2. Connect the micro USB connector on the
cable into its designated port on the device.
3. The battery level indicator on the device
screen start scrolling vertically to indicate
that the battery is being charged.
NOTE: Exercise extreme caution while
connecting the charger to the device. The
connectors on the charger and on the phone
and may get damaged if too much force is
applied while connecting them.
If the battery is completely discharged, it may
take a while before the on-screen charging
indicator starts scrolling.
4. When the battery is fully charged, the battery
level indicator on the device screen will stop
scrolling vertically.
Once charging is complete, disconnect the
charger from the device, and then from the
wall outlet.
Page 11
PAGE 6
Know your device
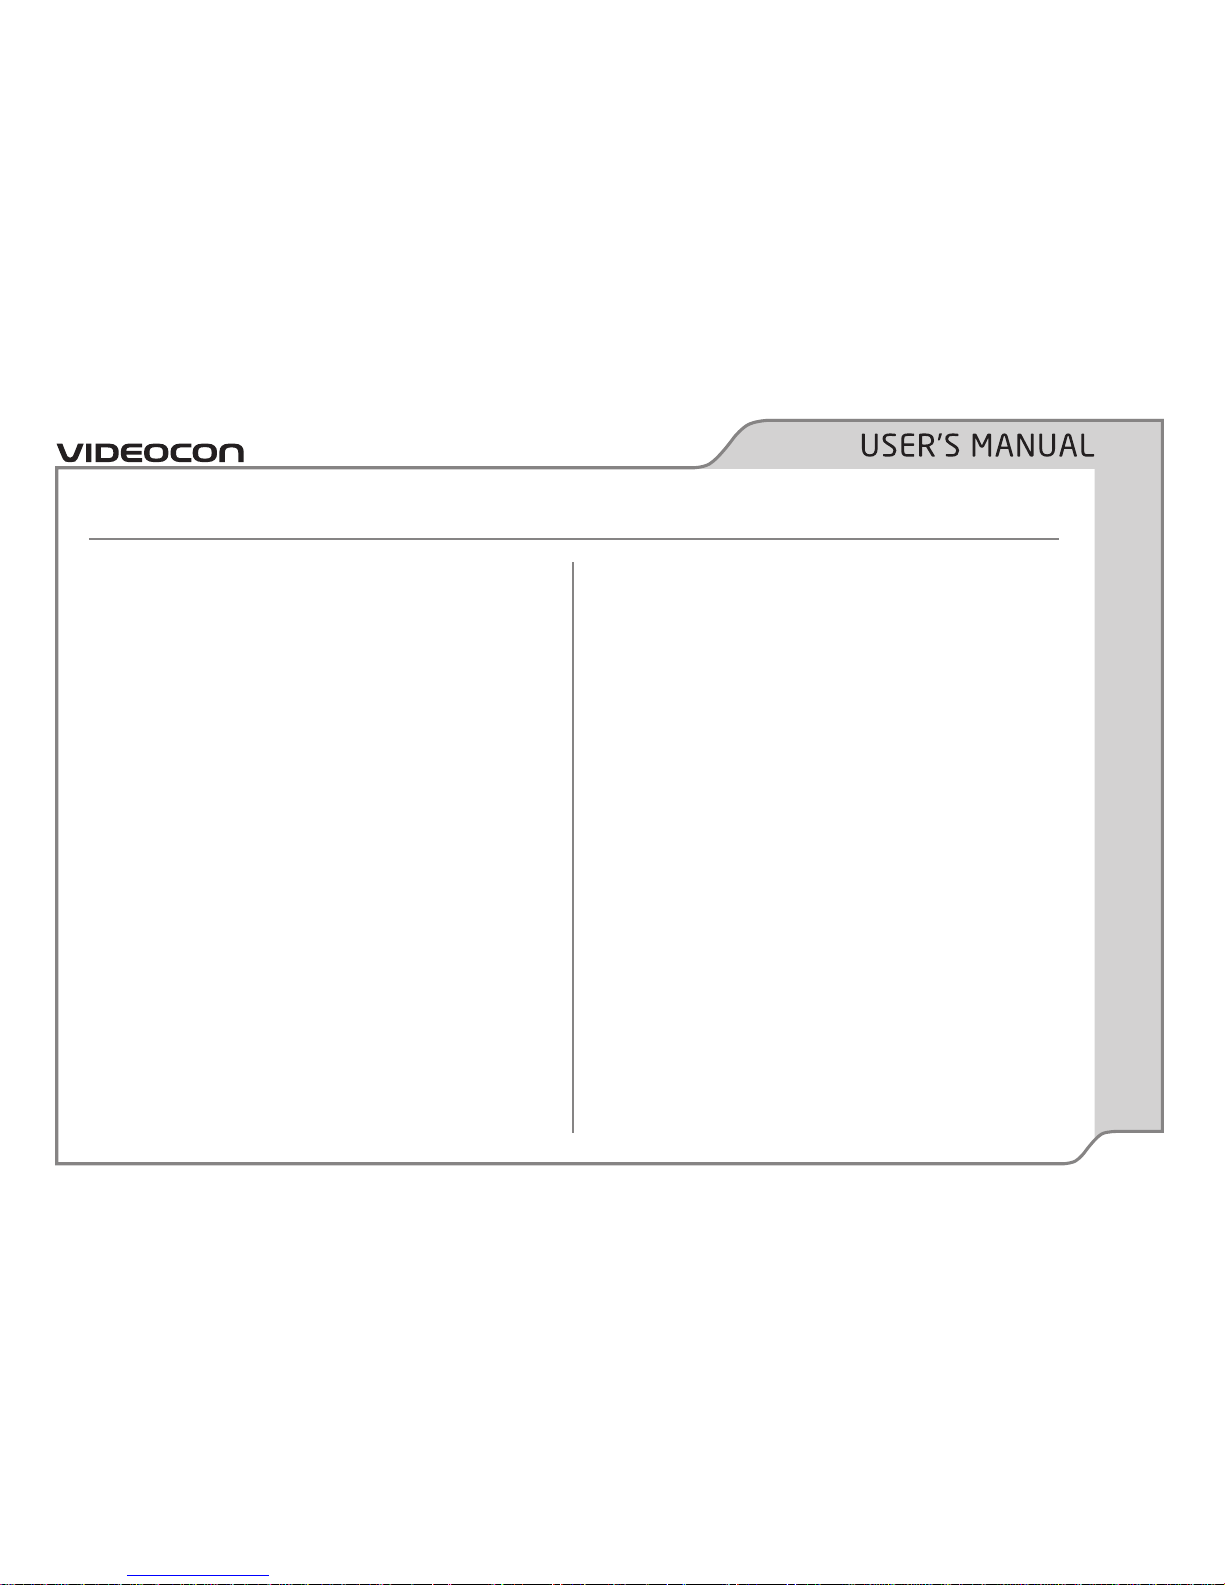
Phone Layout
Page 12
PAGE 7
Know your device
Left Soft Key
In idle mode, click Left soft key to access the
phone menu.
Right Soft Key
Use to perform functions that display in the lower
right of the display screen. For example, it works
as a key to navigate to the previous screen. In idle
mode, click to access the Contact list.
SIM1 & SIM2 Dial Keys
a. In idle mode, enter the phone number to call,
and select SIM1 or SIM2 to initiate the call.
b. Select either key to answer an incoming call.
c. Select SIM1 and SIM2 dial keys to view the
call history.
End Key
• End or reject calls.
• Select and hold to turn on or off the device.
• Cancel active menu and return to the idle
screen.
Miscellaneous Keys
Functions vary in different situations or function
menus:
• While writing a text message, select * to view
available symbols.
• In idle mode, select and hold # key to change
the active profile to vibrating mode. Select
and hold * again to activate the previously
active profile.
• In the Video player, select and hold * to switch
between full screen and normal modes.
Number Keys (0-9)
• In idle mode, use the 0-9 keys to enter a
number to call.
Page 13
PAGE 8
Know your device
• Select and hold a digit key to dial its
associated speed dial contact.
• In idle mode, select and hold “1” key to enter
Voice mailbox.
• In the application menu, select the
corresponding number to quickly go to its
corresponding menu.
Dual SIM Card
Your phone supports dual SIM cards, allowing
you to use two different phone numbers on one
mobile phone.
Flight Mode
Enable flight mode to suspend your device’s
signal transmitting functions, such as capacity
to place or receive calls or text messages; while
still permitting use of other functions that do not
require signal transmission (e.g., games, built-in
camera, and MP3 player).
Page 14
PAGE 9
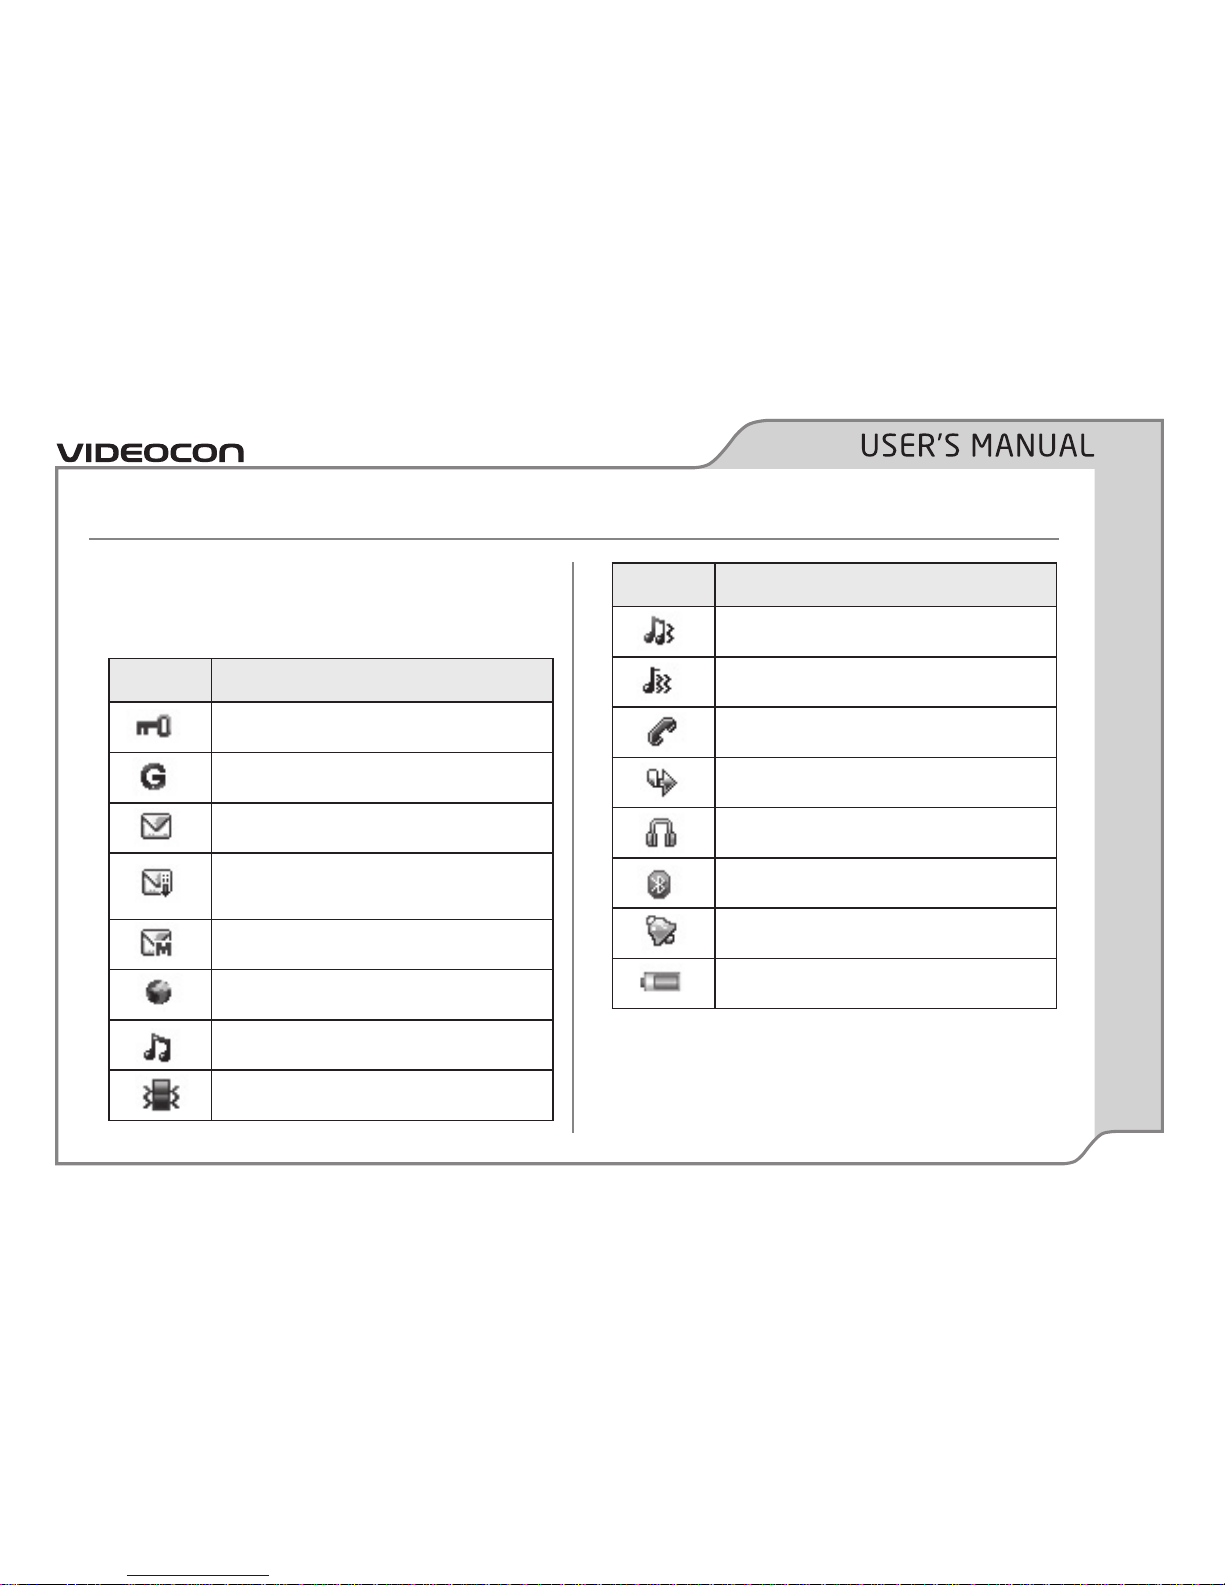
Screen Icons
Screen (indicator) icons provide information such
as battery level, network signal strength, current
date & time and so forth.
Icon Definition
Phone is locked
Connected to network
New SMS
Sending or downloading MMS
messages
Unread MMS message
Unread service message
Alert type is ring only
Alert type is vibrate only
Icon Definition
Alert type is first ring and then vibrate
Alert type is first vibrate then ring
Missed call alert
Call divert is active for voice calls
Headset inserted
Bluetooth is enabled
Alarm set
Battery level indicator
Page 15
PAGE 10
Basic Operations
Make a Call
Using Keypad
To make a call using the keypad, enter the phone
number including the area code. Select Clear to
erase a digit.
For international calls, add the ; character that
replaces the international access code, and enter
the country code, area code (omit the leading 0,
if necessary), and phone number. Select SIM1 or
SIM2 dial key based which SIM you want to use
to make the call.
From the Phonebook
Select Menu Phonebook to view the contacts.
Use the up and down navigation keys to select
the contact you wish to call, and select either of
the dial keys.
Making a Call using Call history
Select Menu Call History and select the SIM
for which you want to display the call history.
Use the up and down navigation keys to select
a contact, and select the SIM1 or SIM2 Dial keys
based on which SIM you want to use for this call.
Answer calls
To answer an incoming call, press either of the
dial keys.
Select End key to end or reject the call.
Working with Call Options
During a call, select Options to view the following
options;
• Hold single Call: Place the active call on
hold.
• End single Call: End the active call.
• New call: Place a new call to start a
conference (network service).
• Phonebook: View the phonebook.
Page 16
PAGE 11
Basic Operations
• Messaging: View the Messages menu.
• Sound recorder: Record the active call.
• Mute: Switch the microphone on or off.
• DTMF (Dual-tone Multi-frequency(: You can
choose on/off; which is to send dual-tone
multi-frequency sound. This can offer dialing
to the telephone numbers with extensions
or IVR systems installed for menu driven
options.
Composing text messages
Your device supports text messages beyond
the limit for a single message. Longer messages
are automatically split and sent as two or more
messages.
To write a text message;
1. Select Menu
Messages, and choose SMS
or Media message.
2. Enter a recipient’s number, or select Home
Add from Phonebook to add a recipient
from the Phonebook. Move up or down to
select additional recipients, and select Add
when done.
Alternately, separate the numbers with a
semicolon.
3. Enter the text of the message. To use a
message template, select Options
Insert
Template. Select Options
Send.
Working with E-mail
Before you can send an e-mail, you need to
configure your device to check for and download
e-mails from your corporate mail server, or from
a Web-based e-mail service provider, such as
Hotmail, Yahoo and so on.
For information on setting up an e-mail account,
see “Working with E-mail” later in this document.
Page 17
PAGE 12
Basic Operations
1. Select Home Messages Email/
2. Enter the recipient’s e-mail address, or select
a recipient from the Phonebook.
3. Enter a subject for your e-mail, select Subject
Edit and enter few words describe your
e-mail.
4. Enter the message text, select Options
Send to complete.
Lock the keypad
The keypad of your device locks automatically to
prevent accidental dialing. To
Enable auto lock for the keypad or to change the
period after which the keypad is locked, select
Home
Settings Security setup Auto
keypad lock. Your options are:
• Select Off to disable keypad auto lock.
• Select On, and then select the period after
which the keypad is locked automatically.
To lock the keypad manually from the idle screen,
or in a menu, select and hold the ; character till
the device flashes a message.
Connecting to the PC
You can connect this handset to a computer’s
USB port using the cable provided with the device
packaging. To do so:
1.
Connect the smaller end of the cable to the input
slot at the left side of the phone, and the other
end to a standard USB port on your computer.
2. An on-screen dialog prompts you to select
the connection mode. The options include;
• Mass storage: Access the phone and
memory card of your phone as a regular
hard drive partition on your computer.
Display Map the device as drive on the
computer and transfer files between the
PC and phone. Great feature to backup
phone data to your computer.
Page 18
PAGE 13
Basic Operations
• Webcam: Use the device as a web camera
to voice chat on your favorite instant
messaging application.
• COM port: Use this device as a modem
to browse the Internet on your computer
using your phone’s GPRS connection.
Page 19
PAGE 14
V-Connect
Wireless Access Protocol (WAP)
WAP or Wireless Application Protocol browser
provides all basic services of a computer based
web browser but simplified to operate within the
restrictions of a mobile phone. The WAP Browser
has the following options;
• Homepage: Homepage allows you to enter
the default URL on the phone. This will enable
you to go to the same page every time you
access the homepage.
• Bookmarks: Bookmarks enable you to mark a
place in an electronic document or a pointer
(primarily to an internet URL) in an Internet
web browser.
• Recent pages: Recent pages store the list
of URLs which have been recently visited by
you on the WAP browser.
• Offline pages: Offline pages store the list of
URLs which you have saved.
• Input address: Enter the desired address
(URL) of the website or webpage in this
column.
• Service inbox: Service inbox receives and
stores URLs through text messages from the
operator. You can read them and accept to go
to the web page and browse.
•
Settings: You can vary the following settings:
o Select SIM: Select the SIM on which the
GPRS service is activated.
o Profiles: The various access points that is
available on the device by default.
o Browser options: Enable or disable
browser cache and cookies, set webpage
timeout duration, and show or hide images
on web pages.
o Service message settings: Choose to
allow or disallow receipt of promotional
messages from the service provider.
Page 20
PAGE 15
V-Connect
o Clear cache: Clear the temporary storage
space on your device where recently
viewed Web pages are stored.
o Clear cookies: Delete the files that
websites leave on your device to offer
you personalized content when you next
access the website.
o Trusted certificates: View the
certificates store don the device when
you tried to access a secure website, such
as a shopping or Internet banking.
Data account
Data account contains configuration settings for
using the MMS and GPRS services provided by
your network service provider.
The available options are:
• GSM data: Settings needed to browse the
Internet over your operators GSM network.
This is a more costly medium for accessing
the Internet.
• GPRS: Connection settings to acces your
service providers data services. These are
necessary to browse the Internet, access
e-mail, or work with multimedia messaging
using your device.
NOTE: This device is equipped with access points
for popular service providers. Select the set that
is most appropriate to your service provider and
activate it.
Page 21
PAGE 16
Call history
Use Call history to view the dialled, received or
missed calls. On the Idle screen, select Home
Call history. If two SIM cards are inserted, the call
history for each is displayed separately.
• Dialled calls: Displays the list of recently
dialled calls.
• Received calls: Displays the list of latest
received calls.
• Missed calls: List of calls you were unable to
answer.
• SIM call timers: View the approximate
duration of calls to and from your device.
• SIM call cost: Approximate cost of the
outgoing calls.
• SIM text message counter: Total number of
messages sent or received by your phone.
• SIM GPRS counter: View the amount of data
transferred during packet data connections.
Page 22
PAGE 17
Multimedia
Camera
Use the in-built camera to take and save pictures.
Select Menu
Multimedia Camera to launch
the camera application. To take a picture, focus
the camera towards the object you wish to click
and press OK.
NOTE: Do not move your hand until the captured
photo displays on the screen as a still image.
Select Options to display the following:
• Photos: View captured images.
• Camera settings: Choose shutter sound, EV,
Anti-flicker, Delay timer and Cont. shot for the
camera.
• Image settings: Set the Image size (in pixel)
and Image quality.
• White balance: Increase or decrease the
white balance to get image colors to display
as accurately as possible.
• Scene mode: Select Auto or Night for the
camera to capture images in dark.
• Effect settings: Set the effects that you
wish to use for the captured images.
• Storage: Choose a location for storing
captured images.
• Restore default: Undo all customizations,
and restore to factory settings.
Image viewer
Image viewer stores all your pictures which are
captured by the phone camera. To view photos
stored on your phone, select Home
Multimedia
Image viewer.
Video recorder
Select Home Multimedia Video recorder.
Position the camera towards the moving object,
and select the OK key or Camera key. The video
that you record can be of 3GP or AVI formats. To
stop recording, select OK once again.
Page 23
PAGE 18
Multimedia
To watch the recorded videos, select Video
player. The options available for video recorder
settings are:
• Switch to camera: You can directly go to
camera to take the images.
• Switch to Video Player: View the recorded
videos.
• Camcorder settings: Set the White balance,
EV, Night mode, and Banding of the video
recorder.
• Video settings: Set the quality of the video
as Normal, High or Low.
• White balance: Select the white balance
for the camera to increase the intensity of
white light. You can choose; Auto/Daylight/
Tungsten/Fluorescent/Cloudy/Incan-descent.
• Effect settings: Select different effects
for your recorded videos, such as normal,
grayscale, Sepia, Sepia green, Sepia blue and
so forth.
• Storage: Choose a folder to store the recorded
video file.
• Restore default: Restore the default settings
of the camcorder.
Video player
Play videos stored on the microSD card or the
phone memory.
If you are a first-time user, select Player List to
have the device automatically search for tracks
stored on the memory card and then add them
to the default player list. The supported audio
formats include MP3, MIDI, AMR, WAV, AAC,
and AAC;. Select Options to perform additional
functions.
NOTE: Select “5” to take the snapshots while
playing the video player.
Page 24
PAGE 19
Multimedia
Audio player
Your phone provides you a friendly audio player
device for entertainment purpose. You may
enter the audio player via phone menu. Music
tracks must be saved in File manager in order
to be automatically detected and added into the
default playlist. You may listen to music through
the headset or loudspeaker. The user friendly
interface is specially designed to allow easy
access to common functions such as play, pause,
and stop.
NOTE: To access different tabs while playing
music, Select “4” to move from right to left and
Select “6” to move from left to right.
Sound recorder
With Sound recorder, you can record voice
conversations and save the voice recordings as a
sound clip, and play the sound clip.
Select Options for other options:
• New record: Start recording sound.
• List: Lists all recorded sounds.
• Settings: Set the output format and the
storage location for the recorded sound files.
You may store the recorded audio clips as
AMR, and WAV file formats, and also adjust
the Audio quality as Low and High.
FM radio
Transform your device into a FM Radio device.
You must connect the earphone to your phone as
it works as an antenna. The options are;
• Channel list; Displays the list of channels you
have saved.
• Manual input; Manually enter the frequency
of the channel you want to listen.
• Auto search; Automatically search for
available radio channels.
Page 25
PAGE 20
Multimedia
• Settings
o Background play: To on/off the FM
background play.
o Loud speaker: Switch loud speaker on or
off.
o Record format: Choose the file type
in which the radio will be recorder. The
supported formats are; WAV, AWB, and
AMR.
o Audio quality: Set the quality of the audio
to Low or high.
o Record storage: Choose the medium
where the recorded radio will be stored.
Options are Phone and Memory card.
• Record: Start recoding the radio broadcast.
• Append: Continue recording at the end of a
previously recorded sound file.
• File list: View list of recorded tracks.
Page 26
PAGE 21
Games
Press Menu Game, to access the Game menu.
You may play Raiden 1944 and Tetris game.
Page 27
PAGE 22
Messages
In Messages, you can send and receive text
messages, multimedia messages and emails.
From the idle screen, select Home
Messages
to view the available functions of messaging.
Message functions are available depending on
network services that your service provider
supports. The messaging options are:
• Write message: Compose text message.
• Outbox: Stores outgoing messages.
• Inbox: View received text messages.
• Drafts: View messages that you wish to send
at a later time.
• Templates: Templates are preloaded/pre-
written messages for ready usage. If required,
you can edit the templates. Archive: Backed
up messages.
• Archive: Allows you to save inbox messages.
• Scheduled SMS: Sends the SMS automatically
on the scheduled date and time.
• SMS signature: Set the status to On/Off
if you want to attach a signature to your
messages.
• SMS backup: Export or import messages.
• SIM message settings:
o Profile settings: Create profiles to
customize the sending options, such as
message center number, message validity,
and message type (text, E-mail, Fax and
so forth.)
o Common settings: Enable or disable
delivery reports for messages.
o Memory status: Space available on device
for storing messages. Preferred storage;
Select folder for storing sent and received
messages.
Page 28
PAGE 23
Messages
• Sort SMS: You can sort SMS by time, name or
number.
MMS
The device supports multimedia messaging,
which allows you to send rich content (images,
videos, sounds and so on) as message attachment
to recipients. The various options are;
• Write message:Create and send a multimedia
message.
• Inbox: Messages you received using MMS are
stored in the Inbox folder.
• Outbox: Stores outgoing multimedia
messages.
• Drafts: Partial or complete text messages
that you wish to send at a later time.
• MMS settings: You can edit the settings for
Compose, Send, Retrieve, Filter and the Proxy
setting. You can also check the memory
status of the phone.
Voicemail
Voice mail server is an interactive system for
storing, processing and reproducing verbal
messages through a voicemail server.
Broadcast message
Broadcast messages on several topics such as
horoscopes, traffic conditions. You can set the
receive mode to ON/OFF. The messages are
stored in Read message folder.”
Page 29
PAGE 24
Fie manager
View files and folders stored on the device
memory and the external micro SD card. You
can open, create, move, copy, rename, send, and
search for files and folders.
Page 30
PAGE 25
Settings
The phone provides you the option to change the
settings for various features of the phone.
Display settings
Customize the look and feel of your device. The
options are:
• Wallpaper: Change the background image
for the idle screen.
• Screen saver: Conserve device battery.
• Show date and time: Display current date
and time on the idle screen.
• Show owner number: Display the number of
the currently activated SIM card.
• Show operator name: Displays the name of
the operator on the screen.
• LCD backlight: Set time-out to switch off
background light. Also set its brightness.
Phone settings
Dual SIM settings
• Dual SIM active: Activate both SIM cards.
• SIM1active: Activate SIM1 only.
• SIM2 active: Activate SIM2 only.
• Flight mode: Enable flight mode to suspend
your device’s signal transmitting functions,
such as capacity to place or receive calls or
text messages; while still permitting use of
other functions that do not require signal
transmission (e.g., games, built-in camera, and
MP3 player).
Security settings
Adjust settings to secure your device and data.
SIM1/2 security settings
• SIM lock: Activate or deactivate the SIM lock
feature to require a password before using
the phone.
Page 31
PAGE 26
Settings
• Fixed dial: Limit outgoing calls to specific
numbers only.
• Barred dial: Request a password to make or
receive the type of call(s) you have barred.
User profiles
Switch profiles to suit different types of call
environments.
The available profiles are:
Phone Lock
Request entering a password each time the
device is switched on.
Auto keypad lock:
Keypad lock automatically locks the keypad after
a preset time interval. You can set the time from
10 seconds to 5 minutes.
Mobile tracker
Use Mobile tracker feature to help locate your
device if it is lost or stolen. When someone
inserts a new SIM card in your device, the Mobile
tracker feature automatically sends a message to
preset recipients, so that you can initiate steps
to recover it.
To activate Mobile Tracker, select Home/
Settings
Security Settings Mobile Tracker.
NOTE: You will be required to enter your phone
lock password (or create one) to access the
Mobile tracker feature.
1. Change status to On.
2. Select Receive Stolen SMS number and
specify two recipients for your mobile tracker
messages. Enter the phone numbers manually
or choose from the device phonebook.
Change password
Change your SIM lock password, as long as you
know the current password. If this is the first
time you are changing your password, then use
the default password “0000” when prompted to
enter the current password.
Page 32
PAGE 27
Settings
Privacy lock
Make phonebook contacts or received messages
private.
User profiles
Switch profiles to suit different types of call
environments.
The available profiles are; General, Meeting,
Outdoor, Indoor, Silent mode, Headset, and
Bluetooth Some profiles give you the option
to customize ringing tone, volume, alarm clock,
keypad, and so forth.
Time and date
Let you set home city, time and date on the
phone.
Schedule power on/off
Set your device to turn on and off automatically.
Language
Select Hindi or English as device language.
Pref. input methods
Select preferred input method.
Greeting text/
Edit the message that greets you when you turn
on your device.
Dedicated key
This option helps you dedicate/map certain
key features of the phone with the Directional
keys (UP/DOWN/LEFT/RIGHT) of the phone. At
anytime you can change the mapping and select
a new feature from the list of features available.
Auto update of date and time
Set the status On/Off to automatically update
the date and time.
Page 33
PAGE 28
Settings
Low Battery protection
Set the status on/off to avoid use of multimedia
function when battery is low.
Restore factory settings
Selecting this option will ask you to enter the
password to restore the phone to factory settings.
The default password is set as 0000.
Call settings
This option enables you to set the general call
settings of the phone. The options are:
SIM1/2 call settings
Enable you to set the call settings for SIM1 and
SIM2. The options are:
o Caller ID –Set by network, Hide ID or Send ID.
o Call waiting - You can activate this function
or deactivate it, and also view the current
settings via query.
o Call divert – You can set to forward the
incoming call in different conditions and
enable to Activate/Deactivate call diversion
and check the Query status.
o Call barring - In order to activate this service,
it requires the services provided by the
network service provider. When you change
barring password, you need to input the old
password.
o Line switching –Enables you to select Line
1/2 for the phone.
Call filter
Call filter contains Blacklist and White list feature.
Phone number stored in black list with ON status
is not able to reach your phone. Phone number
stored in white list with ON status will only able
to reach your phone.
Page 34
PAGE 29
Settings
Voice changer
Set different voice mode during the call.
Call Reject SMS
You can reject a call by sending an SMS.
Background sound
You can set background sound when making a
call, select Volume of background sound, and also
select the options of Effect list.
Auto call record
Set the Auto call record to On/Off.
Answering machine
Configure your phone to automatically play a prerecorded message each time you are unable to
attend a call.
Advance settings
Customize advanced settings to Enable you to
set advance settings. The options are;
• Auto redial: You can select to redial the
number automatically when a call is not
connected.
• Speed dial: Enable or disable speed dial, and
associate contacts to the numbers available
in the speed dial list.
• Call time display: After setting this function
on, you can view the call time displayed on
the screen.
• Call time reminder: After setting this
function to ‘on’, it will offer a warning tone
towards the single or periodic setting as your
own during the call process, so you will be
reminded of the call time at periodic intervals
during a call.
• Auto quick end: Can be set to open or
close the function, duration of time 1-9999
seconds.
Page 35
PAGE 30
Settings
Network settings
Network settings provide user the option to
select a desired network and addition of a new
network to the network list. The network settings
give you the option:
• SIM network settings: The options available
under network setup are:
o Network selection
o Preferences
Note: These options are available for both the
SIM cards.
Page 36
PAGE 31
Phonebook
Save and update contact information, such
as phone numbers, home addresses, or e-mail
addresses of your contacts. Add an image or
a personal ringing tone to a contact. You can
also create contact groups, which allow you to
communicate with several contacts at the same
time, and send contact information (business
cards) to or receive it from compatible devices.
The phonebook comprises two tabs, the
Phonebook list, and the Caller groups.
Phonebook list
Select Menu ; Phonebook ; Phonebook list
to view the contacts available in the device’s
phonebook. Use the up and down navigation keys
to select the required contact, and press the Dial
key initiate a call to this contact.
Phonebook Options
Select a contact and choose Options to view the
actions you can perform for the contact. You can
view contact details, send an SMS or MMS, delete,
copy, or move the contact between the SIM and
phone memory.
• View: Open the contact to view details.
• Send SMS: Create and send a text message.
• Send multimedia message: Send images,
videos, sounds and so on, provided this
service is activated on your SIM card.
• Mark several: Select several contacts to
perform same function on them. For example,
select multiple contacts and then choose
Delete to remove them from phonebook.
• Edit: Modify contact information. For
example, you can edit the name or number
for the selected contact.
• Delete: Remove selected contact from
phonebook.
• Copy: Duplicate contact to an alternate
storage location.
Page 37
PAGE 32
Phonebook
• Move: Move selected contact from phone
memory to SIM card or vice versa.
• Send card: Send the details of the selected
contact as a card to another contact.
• Copy contacts: Duplicate contact to phone or
SIM card and vice versa.
• Move contacts: Move contacts stored on the
SIM cards to phone memory and vice versa.
• Delete all contacts: Erase all data in
phonebook.
• Phonebook backup: Use this option to export
or import a phonebook. The available options
include Phonebook backup and Phonebook
restore. You may choose to backup or restore
contacts stored on SIM1, SIM2, or phone.
• Phonebook settings: The available options
in phonebook settings are;
o Preferred storage: Choose a location to
store contacts. You may choose SIM1,
SIM2, phone memory or All.
o V card: Send your contact details as a
vCard to a contact.
o V card version: A vCard is a file format
standard for sharing electronic business
cards. However, not all mobile phones
support the same vCard version. This
device supports versions 2.1 and 3.0.
Therefore, this device will be unable to
identify vCards that are of any other
version.
o Other numbers: It has the following
options:
o SIM1(2 owner number: You can Edit or
Remove the owner number as required.
o Check memory status: View the used and
available memory for storing contacts.
Page 38
PAGE 33
Phonebook
• Add to Blacklist: Block incoming calls from
selected contact.
• Add to Whitelist: Set the status of the white
list function. If you set the status Yes, you
will receive the call only from the numbers
that you edit in the white list.”
Page 39
PAGE 34
Organizer
Alarm
Set the alarm to ring at a specific date and time.
Press Edit to access the following sub-options;
• Status: Set the status of the alarm.
• Time: Set the time at which you wish to ring
the alarm.
• Type: Select the repeat format of the alarm,
whether you wish to ring the alarm once,
every day, or at specific day.
• Alarm tone: Set the tone of the alarm.
• Snooze: Set the time (in minutes) at which
the alarm should snooze.
• Alert type: Set the alert type of the alarm
whether you wish the phone to vibrate or
not.
Calendar
You can use the calendar to keep track of
important meetings. To access calendar press
Home ;Organizer ;Calendar. You can select
year, month and date using direction keys. On a
selected date you can select to view;
• View: If there is a special background color
on a date, it means there is some task on
that day. You can also view any Note/Remark
mentioned by you for a task stored by you
earlier.
• View all: View all the events.
• Add event: When you add a new event you
can do the following;
o Start Date and Time - Set start date and
time for the event.
o End Date and Time - Set end date and
time for the event.
o
Subject - Add the description for the event.
o Alarm - Set the alarm status On/Off.
Page 40
PAGE 35
Organizer
o Repeat - Set the alarm to repeat Once,
Everyday, Weekly, and Monthly, and so
forth.
o
Location - Enter the location of the event.
o Priority - Set priority of the event as
Medium, High, or Low.
• Delete: Delete an event of a selected period,
Overdue or All.
• Jump to date: Enter a date, and then press OK
to go to a specific date for entry/edit/viewing
of task for that date.
• Go to weekly view: Toggle between week/
month of the calendar.
Calculator
Your phone comes with a built-in conversion
application. You can use it for calculations that
we perform on a daily basis, such as addition,
subtraction, division, and multiplication.
Bluetooth
You can communicate with other compatible
device through wireless Bluetooth connection.
Compatible devices may include: Mobile Phones,
Personal Computers, Bluetooth headsets. Via
Bluetooth, you can send or receive pictures,
videos or music files.
To access this menu, Press Menu
Organizer
Bluetooth. The available options are:
• Activate Bluetooth: Select power on
to activate Bluetooth and Power off to
deactivate it. Bluetooth needs to be activated
to perform all aforementioned functions.
• Inquiry audio device: Locates other Bluetooth
activated audio devices in the vicinity.
• Search for Bluetooth devices: Locates active
Bluetooth devices in the vicinity.
• Connecting devices: Allows you to connect
other devices with your device.
Page 41
PAGE 36
Organizer
• Settings: You can set Mobile Phone Bluetooth.
The available option are;
o This device is visible - Set the Visibility of
the Bluetooth.
o Name of this device - Lets you know the
Bluetooth device name.
o Set audio path - To set whether the audio
to be transfer to headset or stay at phone
while Bluetooth audio connected.
o Storage - Set whether the audio to be
stored at Phone memory or microSD card.
• My Bluetooth: It is a list of devices which
have been paired with your phone before.
Tasks
You can use your phone to keep track all of your
Date, Call and Anniversary.
World clock
World clock can be used to know the time in
various cities across the world. You can see a
world map and immediate time in those cities
using world clock. Press Menu
Organizer
World clock, to view a particular city time using
the direction keys.
Ebook reader
The Ebook reader can read .txt electronic
documents. You can connect the phone via a USB
line to a PC and then place .txt documents in the
Ebook folder on the phone or the T-Flash card.
Choose Menu
Organizer Ebook reader,
find a .txt document and then select Open Ebook
to directly read the .txt document.
Shortcuts
Set the shortcuts for various functions so that
they can be accessed from a single place.
Torch
Switch the torch on or off.
 Loading...