

Page 1

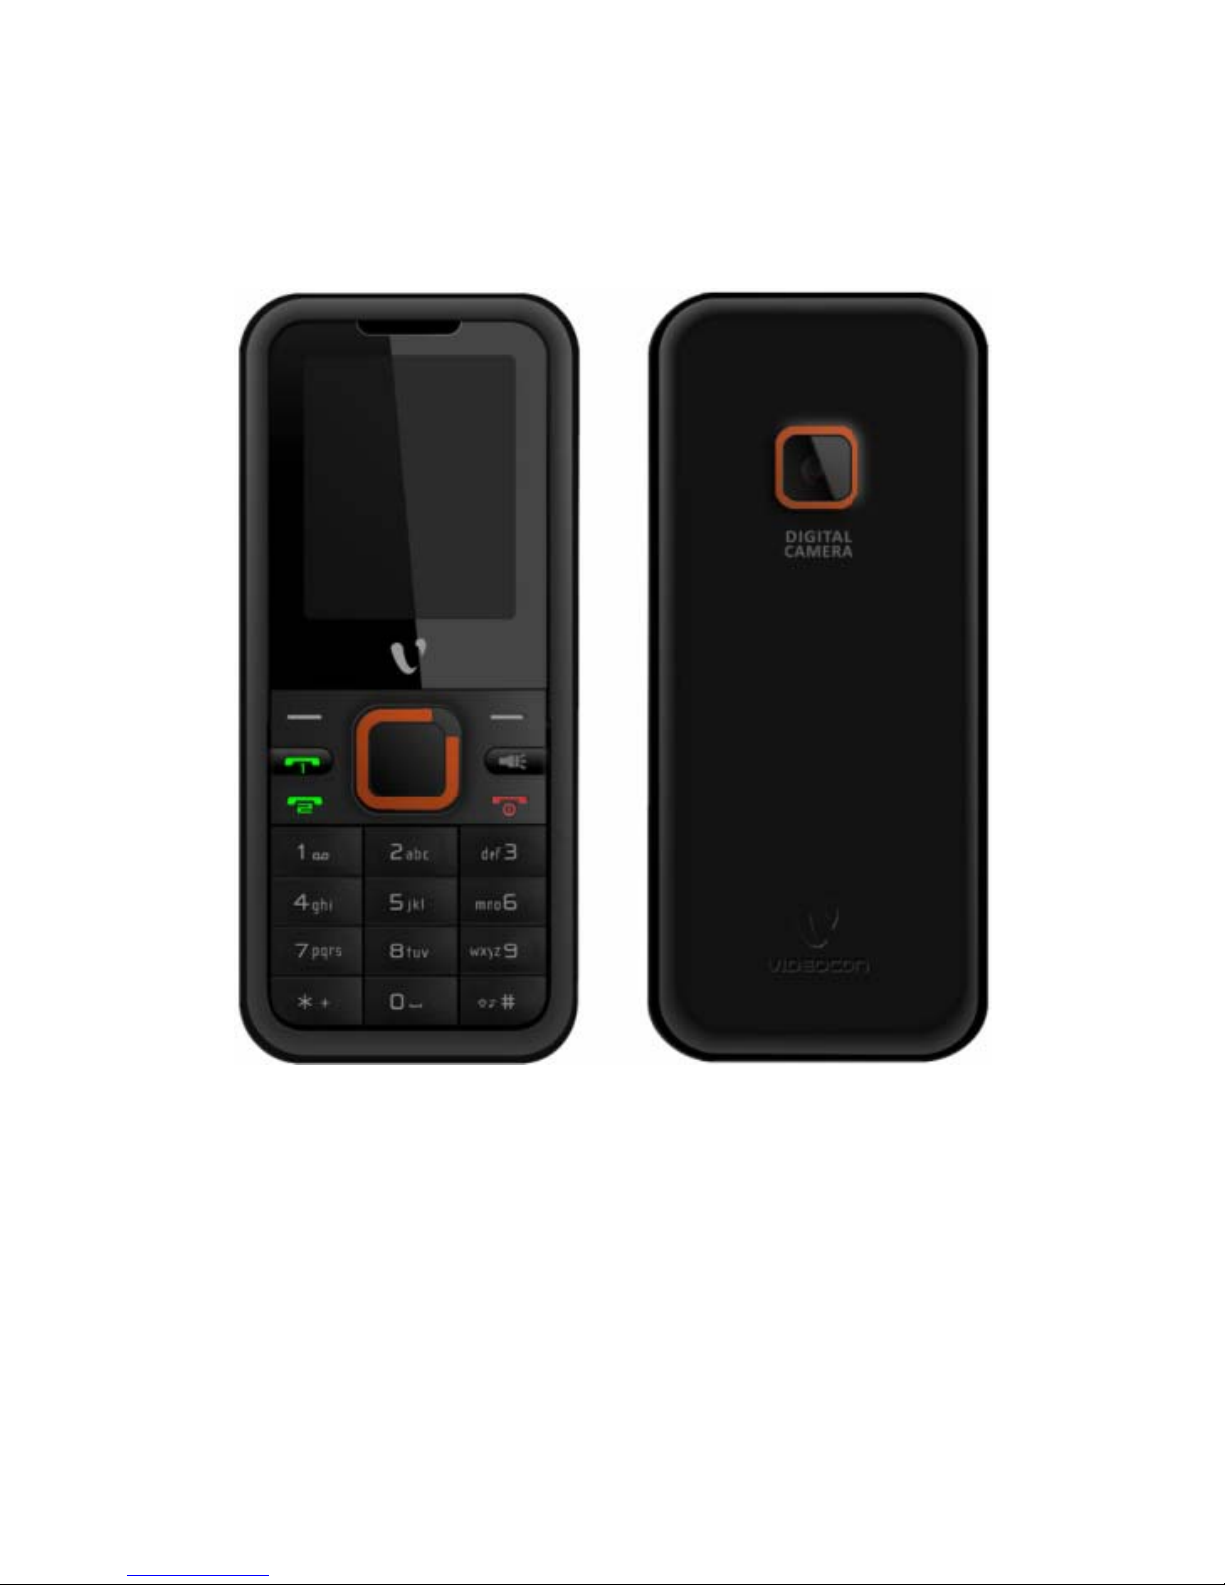
VIDEOCON V1402
User Manual
Page 2
Page 3

Contents
1. Legal Information................................... 1
2. Important Notice.................................... 2
3. Getting Started...................................... 4
3.1. Packing Contents ............................. 4
3.2. Installing SIM, Battery and Attaching
other Accessories ................................... 4
SIM Card, Memory Card & Battery
Installation......................................... 4
Connecting Hands-free Kit (Ref Figure 2) 6
Connecting the charger/Charging the
Battery (Ref Figure 3).......................... 7
3.3. Phone Keypad Layout (Figure 4)......... 8
Left Soft Key ...................................... 9
Right Soft Key .................................... 9
Dial Key............................................. 9
End Key............................................. 9
Up and Down Direction Keys................. 9
Left and Right Direction Keys................ 9
0-9 Keys............................................ 9
* & # Key ........................................ 10
3.4. Important Phone Icons.................... 10
Page 4

Signal Strength Icon.......................... 10
Battery Meter Icon ............................ 11
Keypad Lock Icon.............................. 11
3.5. Basic Functions.............................. 11
Make a Call ...................................... 11
Making a Call Using Call logs............... 12
Answering a Call ............................... 12
Call Option....................................... 12
4. Menu Layout ....................................... 14
4.1. Phonebook.................................... 15
Quick search..................................... 15
Search contacts ................................ 17
Add new contacts.............................. 17
Copy or delete .................................. 17
Caller groups.................................... 17
Extra number ................................... 18
Phonebook settings ........................... 18
My vCard ......................................... 18
4.2. Call history.................................... 19
4.3. User profiles.................................. 19
4.4. Multimedia.................................... 20
Page 5

Camera............................................ 20
Image viewer ................................... 21
Video recorder.................................. 22
Video player ..................................... 22
Audio player..................................... 22
Sound recorder................................. 23
FM Radio.......................................... 24
Schedule FM recording....................... 25
4.5. Messages...................................... 25
SMS ................................................ 25
MMS................................................ 26
Schedule SMS................................... 27
Chat................................................ 27
Voice mailbox ................................... 27
Broadcast message............................ 27
4.6. Game........................................... 27
Copter............................................. 27
Game settings .................................. 27
4.7. Organizer...................................... 28
File manager .................................... 28
Calendar.......................................... 28
Page 6

Tasks .............................................. 29
Alarm .............................................. 29
Calculator ........................................ 29
E-book reader................................... 30
Stopwatch........................................ 30
World clock ...................................... 30
Currency converter............................ 30
4.8. Services........................................ 30
STK................................................. 30
WAP................................................ 30
Data account.................................... 32
4.9. Settings........................................ 32
Call settings ..................................... 32
Dual SIM settings.............................. 34
Phone settings.................................. 34
Network settings............................... 36
Security settings ............................... 36
Restore factory settings ..................... 38
Page 7

1. Legal Information
All rights reserved. Reproduction, transfer,
distribution or storage of part or all of the contents
in this document in any form without the prior
written permission of VIDEOCON is prohibited.
VIDEOCON operates on a policy of continuous
development. VIDEOCON reserves the right to make
changes and improvements to any of the products
described in this document without prior notice.
Under no circumstances shall VIDEOCON be
responsible for any loss of data or income or any
special, incidental, consequential or indirect
damages howsoever caused.
The contents of this document are provided "as it is".
Except as required by applicable law, no warranties
of any kind, either expressed or implied, including,
but not limited to, the implied warranties of
merchantability and fitness for a particular purpose,
are made in relation to the accuracy, reliability or
contents of this document. VIDEOCON reserves the
right to revise this document or withdraw it at any
time without prior notice.
The availability of particular products may vary by
region. Please check with VIDEOCON Executive.
1
Page 8

2. Important Notice
Important Safety Precautions
• Do not use the device while driving. In some
countries, it is illegal to use such devices
while driving.
• Switch off when refueling. Do not use the
device at a refueling point (service station)
or near fuels or chemicals.
• Switch off in aircraft. Mobile phones and
GSM devices can cause interference. Using
them on aircraft is both illegal and
dangerous.
Follow Special Regulations
• Special Regulation. Follow any special
regulations in force in any area and always
switch off your device whenever it is
forbidden to use it, or when it may cause
interference to the surrounding.
• Radio Interference. All mobile phones
cause radio interference within the specified
Limits of GSM standards.
• Qualified service. Only qualified service
personnel must repair the equipment. Use
only approved accessories and batteries.
• Emergency calls. Ensure that the phone is
switched on and in service. Enter the
emergency number (112 or another official
emergency number) and press the "Dial" key.
2
Page 9

• Use only approved accessories. The use
of any other power accessory will violate
warranty conditions that apply to the phone.
Safe Operation Instructions
• Before Installing or operating this product,
read this manual carefully.
• Do not expose unit to rain or moisture.
• Do not place unit on or close to any heat
source.
3
Page 10

3. Getting Started
3.1. Packing Contents
Before using VIDEOCON V1402 mobile phone,
carefully remove the contents from the shipping
carton and check for any damages or missing
contents. Incase you find any, contact your
Authorized Distributor or shipping agent immedi ately.
The standard packing contents are as follows:
• Base Trans-receiver
• Battery
• Charger
• Hands free Kit
• User Manual
• Service Guide
3.2. Installing SIM, Battery and
Attaching other Accessories
SIM Card, Memory Card & Battery
Installation
Always turn off the phone and detach the charger
when you insert or remove a SIM card or battery
from the phone.
1. Lift the battery cover
up to open as shown in
figure.
4
Page 11
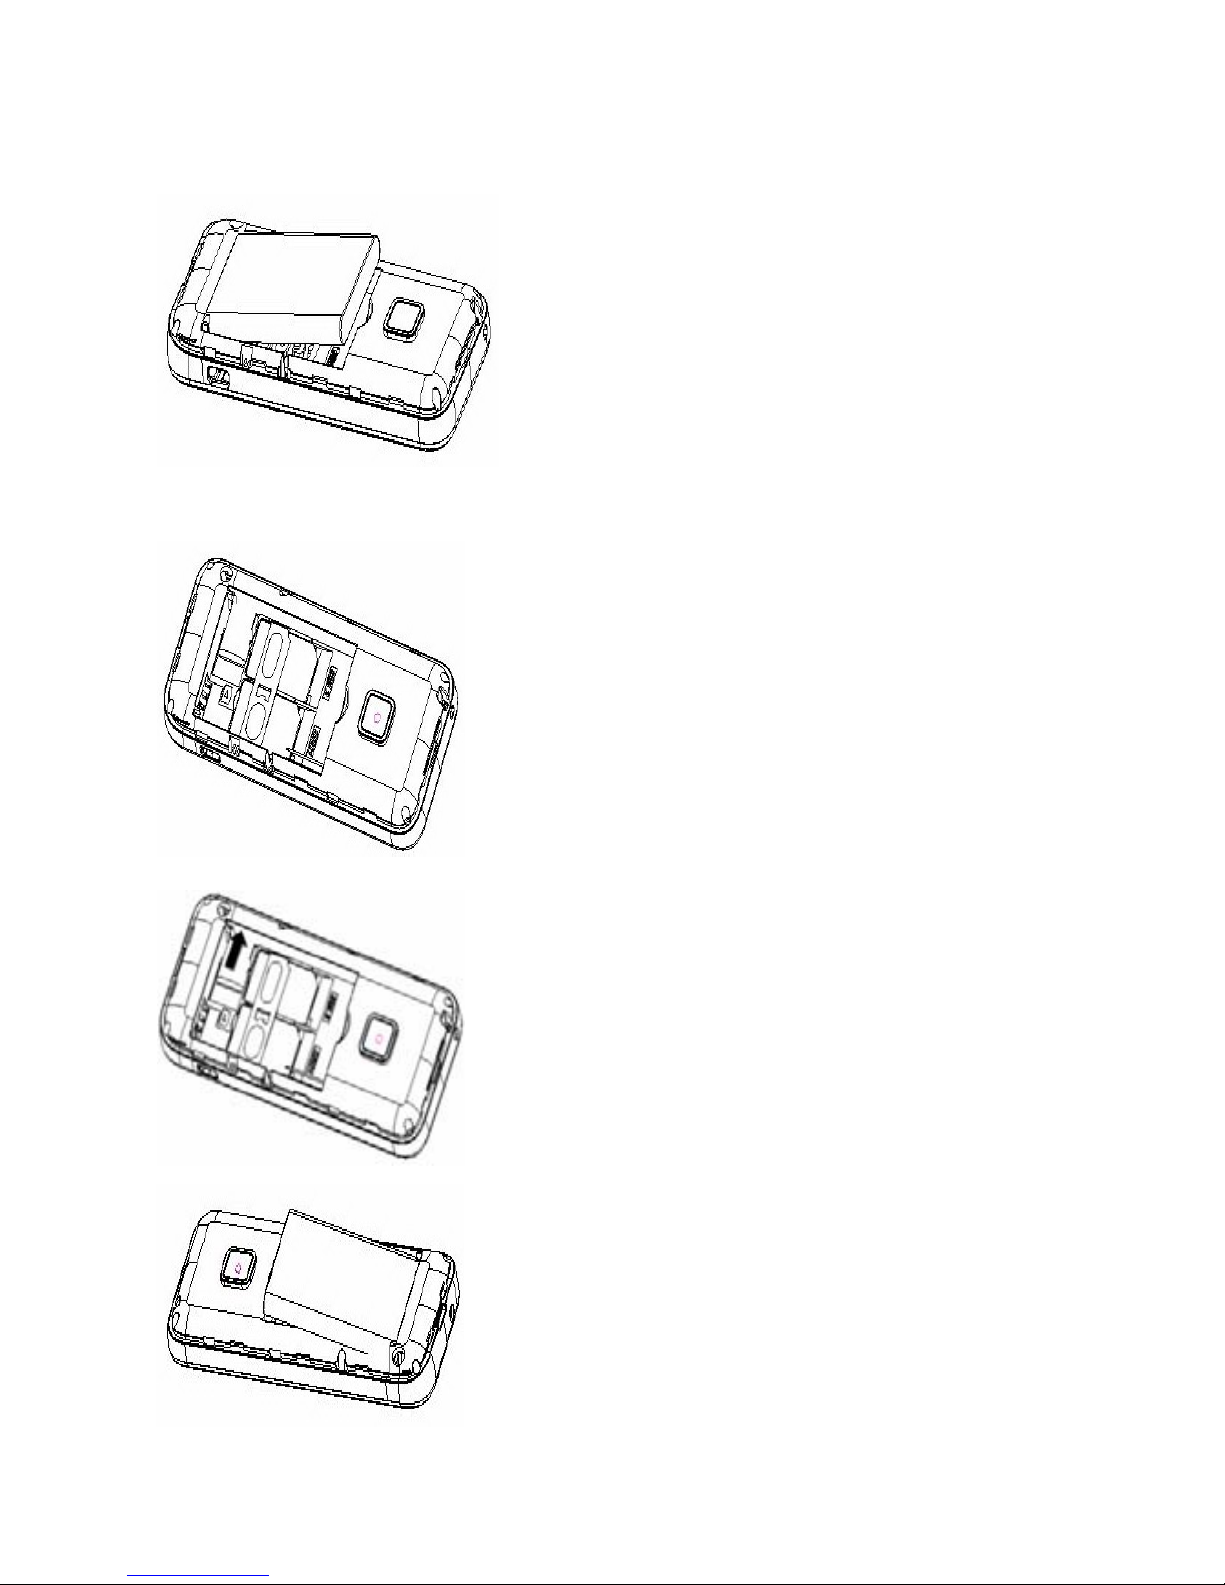
2. Locate the battery
groove at the bottom
middle of the battery
compartment and lift
the battery up with
your fingers, remove
the battery out from
the phone.
3. Locate the SIM card into
socket, slide the SIM
Card into its holder.
Make sure that metal
contacts of the SIM Card
are facing down, and the
cut off corner is correctly
figure.
4. Locate the memory card
slot at the bottom of
battery compartment,
slide the memory card
into its slot with the
metal connector facing
down.
5. Place the battery in the
back of the phone with
the label side up and the
connectors facing each
other.
5
Page 12
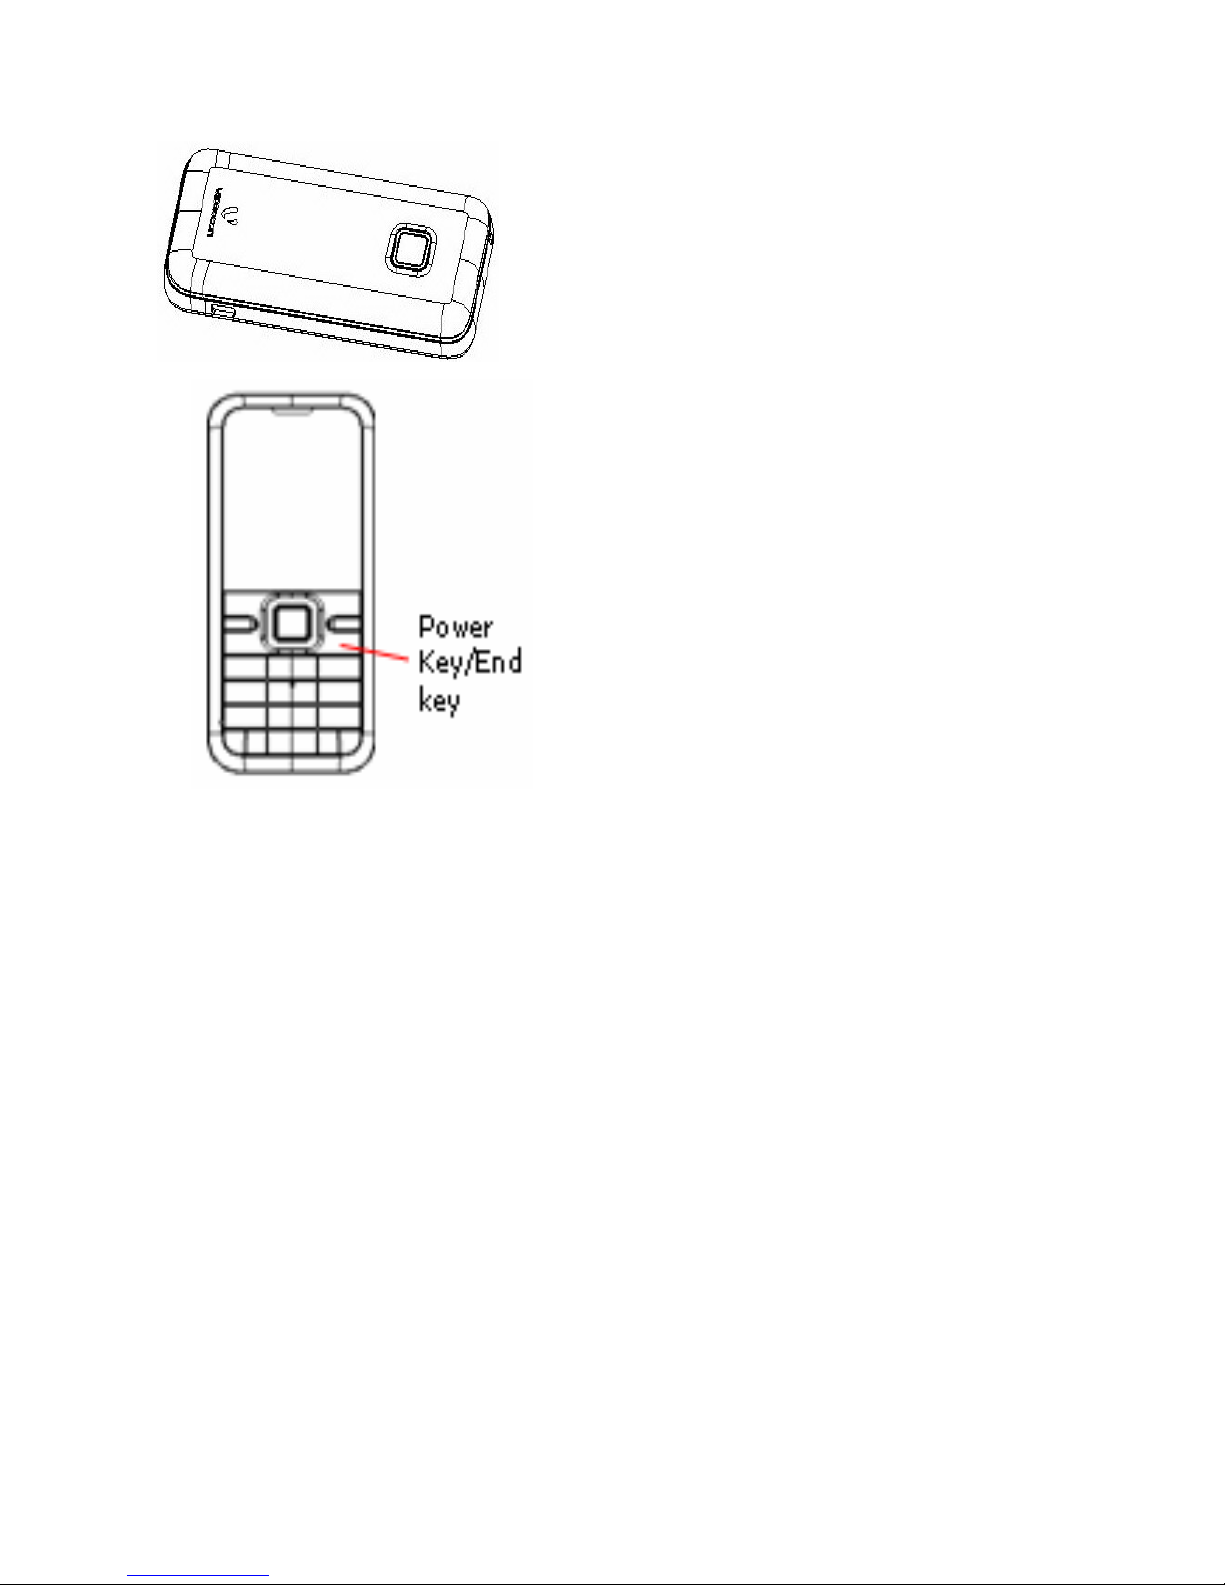
6. Place the battery cover
as shown in the picture
and push it into place.
7. To Power your phone
ON or OFF, press
and hold the End key
for at least 3
seconds or until the
display lights goes
up or goes off. Enter
the lock code if
necessary and select
OK to Power ON.
Connecting Hands-free Kit (Ref Figure
2)
You are provided with a hands-free earpiece set with
your phone. The same can be used to listen to your
mp3 songs and listen and speak while on a call. To
connect the hands-free earpiece, simply connect the
connector into the connecting socket as shown in
the figure. When properly connected, the phone will
display a message ‘Earphone Plugged In!’ with an
icon displayed on top of the screen.
NOTE: Only use VIDEOCON specified accessories.
6
Page 13
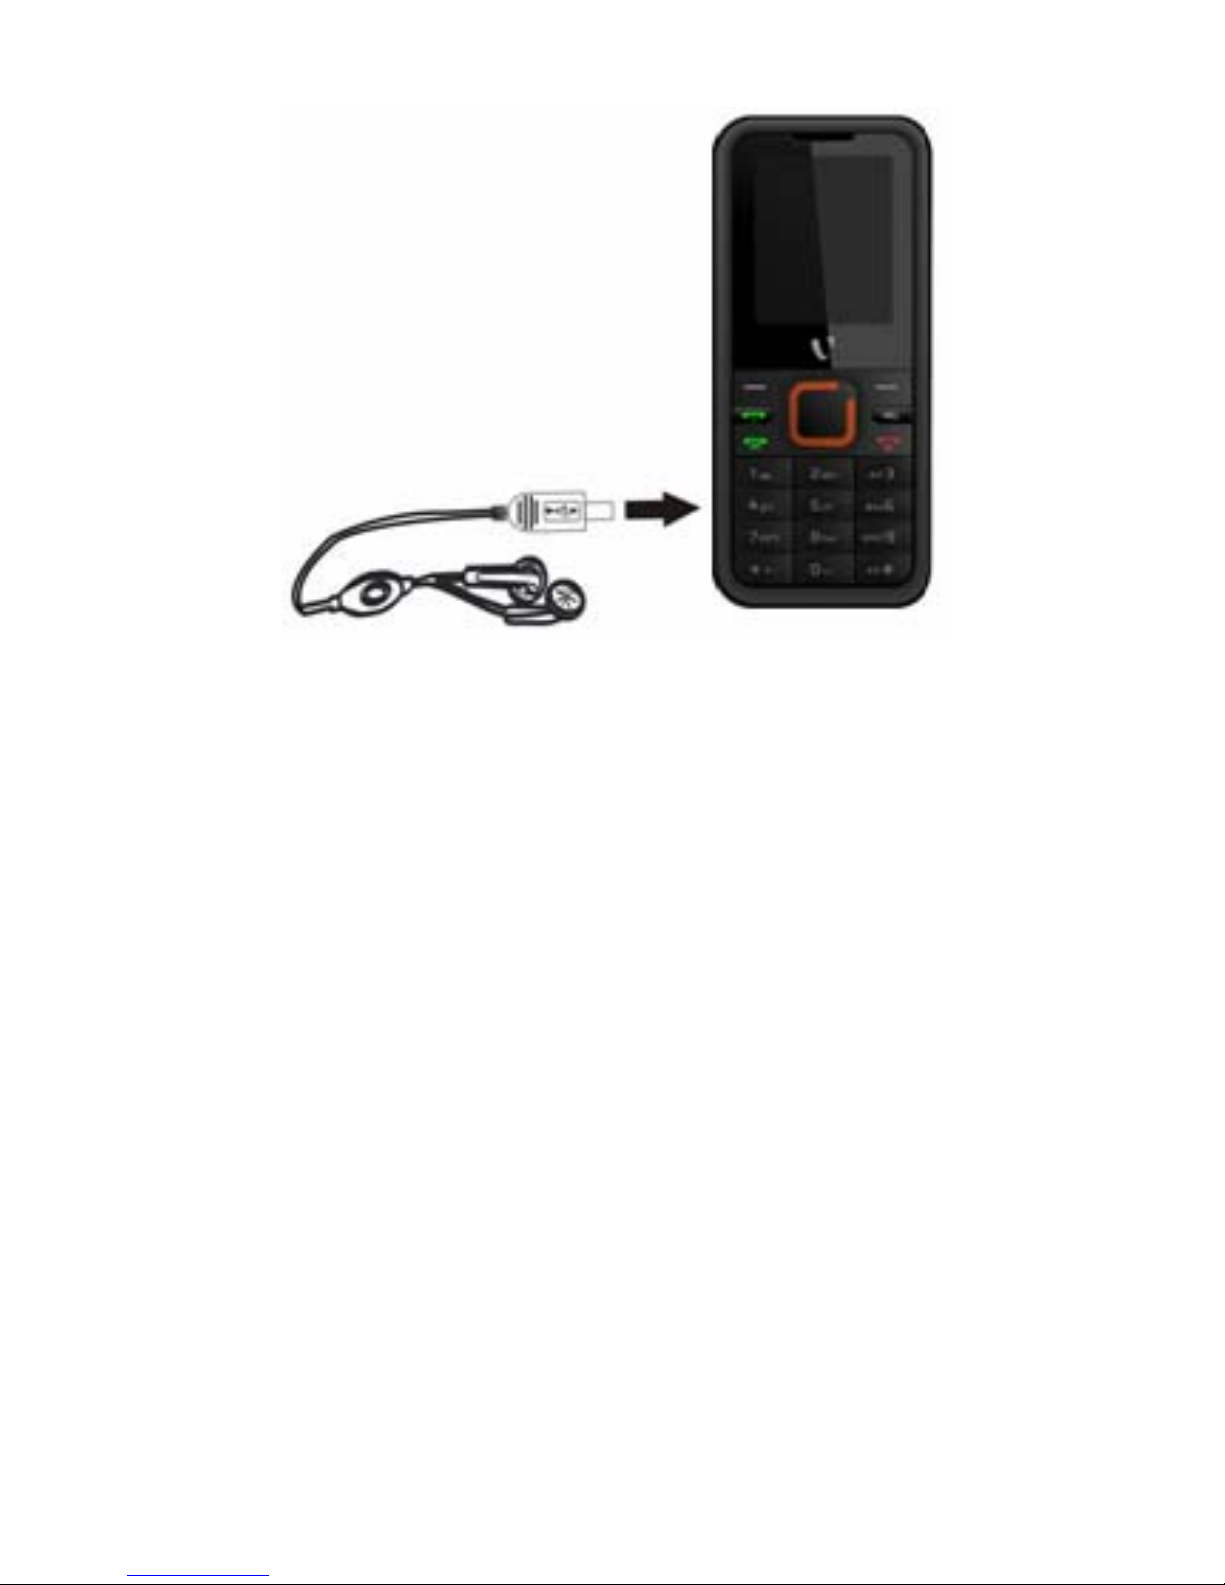
Figure-2
Connecting the charger/Charging the
Battery (Ref Figure 3)
1. Plug the charger’s transformer into a
standard AC outlet.
2. Insert the charger’s output plug into the
phone’s connecting socket as shown in
figure-4.
NOTE: The battery icon/charging icon would appea r
on the screen while charging.
7
Page 14
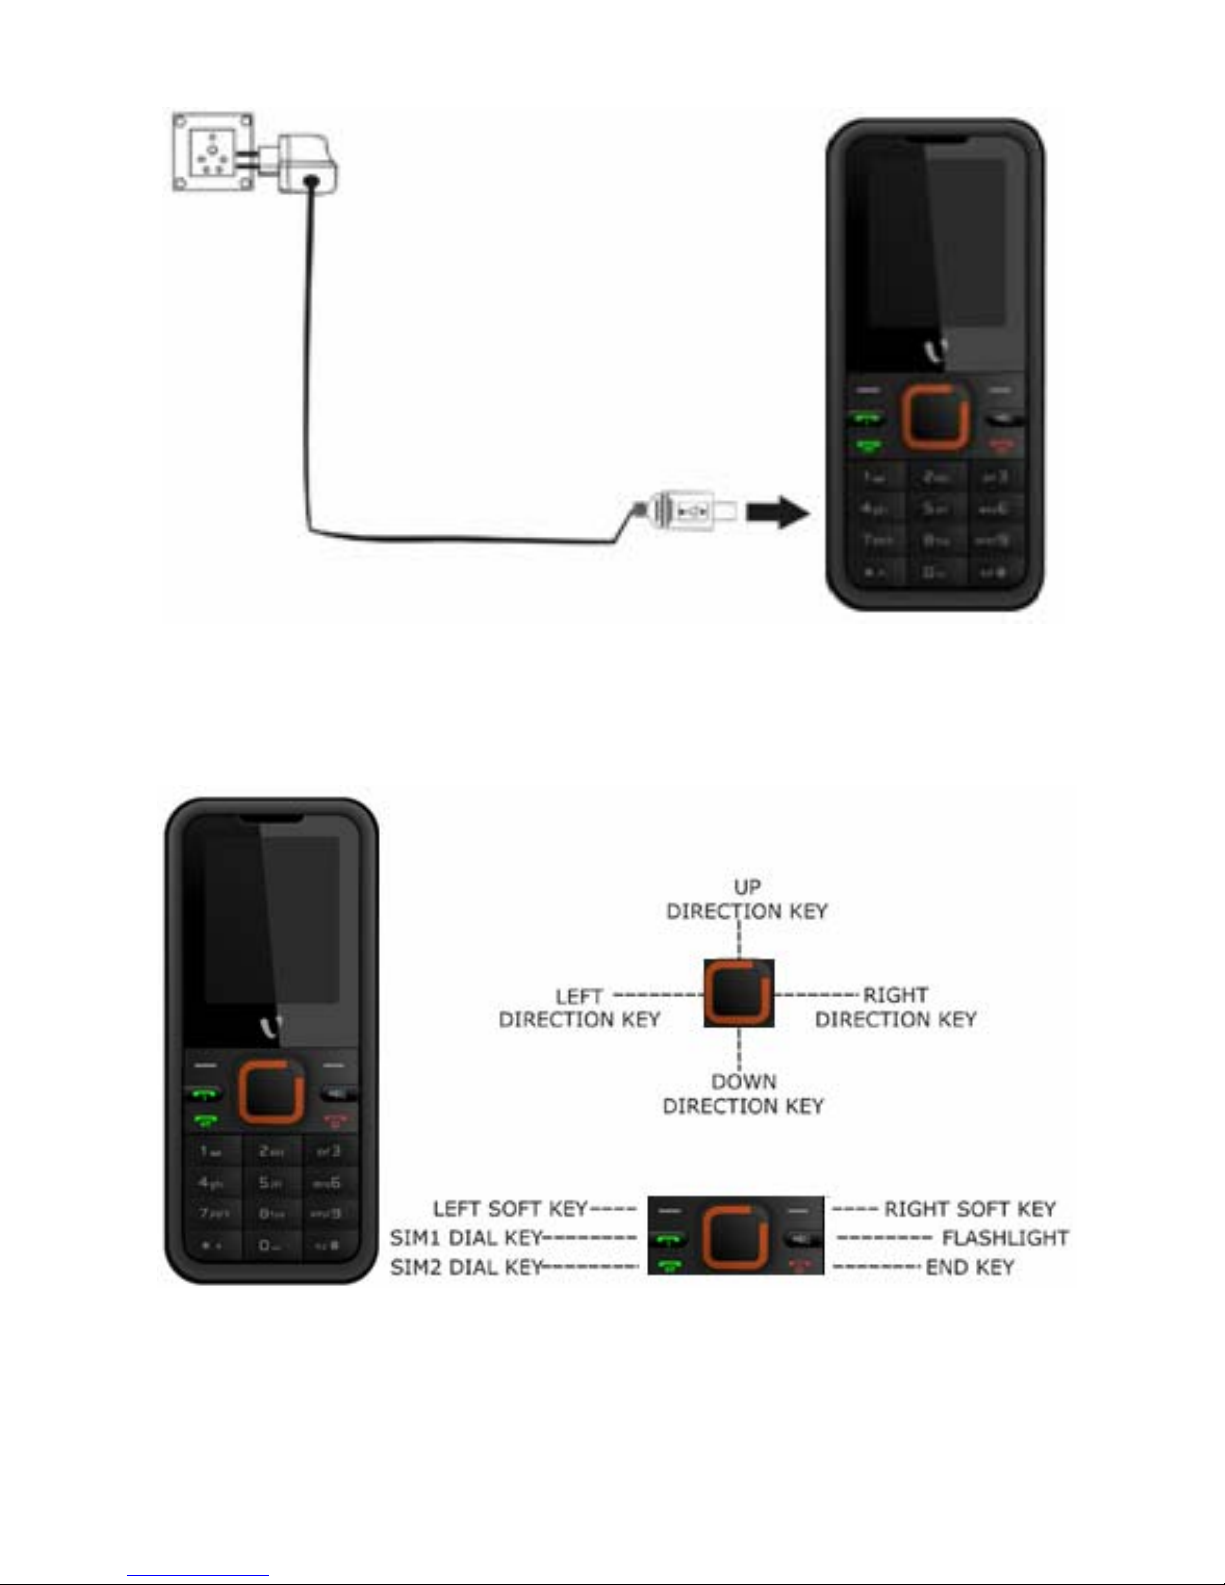
Figure-3
3.3. Phone Keypad Layout (Figure 4)
Figure-4
8
Page 15

Left Soft Key
Performs functions in lower left display. In standby
mode, press OK key to open main menu.
Right Soft Key
Performs functions in lower right display.
Dial Key
• Make calls
• Answer calls
• Press when idle to see the call history.
End Key
End or reject calls; Press and hold this key to turn
phone on/off.
Up and Down Direction Keys
• Scroll to select options
• In standby mode press to open shortcut
applications.
• In edit message status, press to select the
required word.
• In function menu, scroll to open desired
function.
Left and Right Direction Keys
• Scroll to select options
• In standby mode press to open shortcut
applications
• In edit message status, press to select the
required word.
0-9 Keys
In standby mode, press number keys to input dialing
number. In standby mode, press and hold 1 key to
9
Page 16

enter Voice mailbox, press and hold 2-9 key to
directly call the number set before, in the speed dial
list. In edit status, press to input numbers,
characters and phonetic notation. In edit mode,
except input number, press 0 key to input space. In
functional menu, press numbers to speed select
submenu items.
* & # Key
Functions vary in different situations or function
menus: On Input Screen, press "*" for symbols. In
standby and dial mode, press and hold "*" to input
+ for an international call. On Input Screen, press
"#" to switch between different inputting methods.
In standby mode, press and hold # key to switch
between silent mode and previous mode. Press Left
soft key/OK key and hold * key to lock/unlock the
keypad.
3.4. Important Phone Icons
Signal Strength Icon
The Signal Strength Icon is seen on the top
leftmost corner of the screen. The icon helps you to
identify the strength of the network; the phone has
latched on to, at that particular instance. It has a
maximum of 4 bars with a minimum as no bar. 4
bars signify strongest network strength and
subsequently minimizes with each diminishing bar.
No bar signifies least or no network strength.
10
Page 17

Battery Meter Icon
The Battery Meter Icon is seen on top rightmost
corner of the screen. The icon signifies the battery
strength available at that instance.
NOTE: At very low battery levels, the phone will
prompt ‘Low Battery’ message on the screen.
Keypad Lock Icon
The Keypad Lock Icon is seen on top of the screen
at various positions depending on the number of
icons displayed. A closed lock signifies that the
keypad is locked. You can unlock the keypad by
pressing Left soft key/Ok key and holding * key on
the phone. Similarly for locking the keypad, press
Left soft key/Ok key and hold * key.
3.5. Basic Functions
Make a Call
To make a call, unlock the keypad, if locked, enter
the desired phone number and press the Dial key.
NOTE: Your service provider program s one or more
emergency phone numbers, such as 112, 100, that
you can call under any circumstance, even when
your phone is locked or the SIM card is not inserted.
Check with your service provider, as emergency
numbers vary by country. Your phone may not work
in all locations, and sometimes an emergency call
cannot be placed due to network, environmental or
interference issues.
11
Page 18

Making a Call Using Call logs
All dialed and incoming numbers are saved in call
logs and categorized into Missed Calls, Received
Calls and Dialed Calls. To check the logs, please
follow these steps:
In standby mode, press the Dial key to view Call
logs. Use the scroll keys to scroll among Missed Calls,
Received Calls and Dialed Calls.
Answering a Call
• To receive an i ncomi ng call , press the Opti on
key and select ‘Answer’ or receive it directly
by pressing the Dial key.
• If headset is available, user can choose
headset keys to answer the call.
Call Option
The VIDEOCON V1402 phone offers multiple
functions during a call. During a call, the following
functions can be actualized if you operate according
to the instructions on the screen. Press up and down
direction keys to choose the function you want and
press select key to enter.
• Voice changer: Set different voice mode
during the call.
• Hold single: To hold an active call.
• End single: End the present active call only.
• New call: To make a new call.
• Phonebook: To explore the Phonebook for
phone numbers.
• Messages: To explore Messages menu.
12
Page 19

• Sound recorder: To record a conversation
between the active members of the
conversation.
• Background sound: You can select whether
to set background sound when making a call
and select effect list.
• Mute: Turn on/off the Microphone during an
active call.
• DTMF (Dual-tone Multi-frequency): You can
choose on/off; which is to send dual-tone
multi-frequency sound. This can offer dialing
to the telephone numbers with extensions or
IVR systems installed for menu driven
options.
NOTE: This feature is network dependent.
13
Page 20

4. Menu Layout
Phonebook
Quick search
Search contact
Add new contact
Copy or delete
Caller groups
Extra number
Phonebook settings
My vCard
Call history
SIM1 call hi story
SIM2 call hi story
User profiles
Multimedia
Camera
Image viewer
Video recorder
Video player
Audio player
Sound recorder
FM Radio
Schedule FM recordin g
Messages
SMS
MMS
Schedule SMS
Chat
Voice mailbox
Broadcast message
Game
14
Page 21

Copter
Game settings
Organizer
File manager
Calendar
Tasks
Alarm
Calculator
E-book reader
Stopwatch
World cl ock
Currency converter
Services
STK
WAP
Data account
Settings
Call settings
Dual SIM settings
Phone settings
Network settings
Security settings
Restore factory settings
4.1. Phonebook
Quick search
Quick search allows you to quickly search an entry
in the Phonebook by entering the key letters or
words of the name. After finding the desired number
the user gets the following options:
15
Page 22

• Dial: Selecting the option will dial the
number found by quick search.
• Send SMS: Selecting this option will enable
the user to send an SMS on the number
selected.
• Send MMS: Send Number allows the user to
send the selected entry’s details to another
recipient as a multimedia message.
• View: View option gives you the details of
the number selected.
• Edit: Edit option gives you the option to edit
the details of the selected number. The
details including Name, number, Home
number etc.
• Delete: The option allows you to delete the
selected entry.
• Copy: The option allows you to Copy the
entry selected entry to the phone or to the
SIM card depending on where the entry was
stored before.
• Move: The option allows you to move the
entry from Phone to SIM or from SIM to
phone depending on where the entry was
selected from. The moving entry will be
automatically deleted from the last storage
device.
• Duplicate: The duplicate option enables you
to duplicate the same entry in the same
storage device (Phone or SIM) depending on
the last storage device.
16
Page 23

• Send vCard: This option will enable you to
send a business card of the selected entry
via SMS, MMS or save as a file.
• Send to blacklist: This option is used to
black list the selected entry. Once blacklisted,
your phone will reject all calls from those
numbers that before they reach the phone.
Search contacts
Unlike ‘Quick search’, ‘Search contacts’ option
enables the user to search an entry by its complete
name.
Add new contacts
Select this option in order to add a new entry into
the SIM memory or to the phone memory.
Copy or delete
You can copy or delete the contacts whichever you
select from the Phone memory to SIM memory and
vice-versa.
Caller groups
Caller Groups contains five default groups:
• Friends
• Family
• VIP
• Business
• Others
Selecting any group allows you to edit the options
available with it. For example:
17
Page 24

o Setting the ring tone associated with
the group.
o Photo associated with the group.
Extra number
It has the following options to edit:
• SIM1/SIM2 owner number
• Emergency number
The phone gives you an option to dial three
numbers for contacting in case of any
emergency.
Phonebook settings
The following fields are listed under sett ings:
• Memory Status: This option enables you to
check the memory status of the phone and
the SIM card.
• Fields: Giving you an option to select the
fields to be edited at the time of adding a
new entry in the Phonebook. The fields
include:
• Home number
• Company name
• E-mail address
• Office number
• Fax number
• Birthday
• Contact photo
• Choose ring
• Caller groups
My vCard
Edit vCard contacts saved in micro SD card.
18
Page 25

4.2. Call history
You can check all Calls/SMS related information
under Call history menu. Call history menu has
details for:
• All calls
• Missed calls
• Dialled calls
• Received calls
• Delete call log
• Call timer
• Call cost
• SMS counter
• GPRS counter
You can also delete call lists by selecti ng “Delete call
log” option.
4.3. User profiles
All the different profiles are listed under this menu:
• General: The profile gives you an option to
activate and customize the settings. You can
customize the following features:
o Tone setup – Tone setup enables
you to set up different music tones
to different functionalities of the
phone like Incoming call, Alarm,
Message tone and Keypad tone.
o Volume – You can vary the volume
levels for Ring tone and Key tone.
o Alert type – Alert type lets you
choose the way you want to be
alerted. You can choose from Ring,
19
Page 26

Vibrate only, Vibra and ring, Vibrate
then ring.
o Ring type – Ring type lets you
select the type of ring to alert you.
You can choose from Single, Repeat
and Ascending.
o Extra tone – Extra tone is added to
a number of incidences such as
Warning tone, Error, Network
connecting tone and Connect.
o Answer mode – Answer mode
gives you the choice to select any
key to answer a call. Any key
enables you to receive a call using
any key of the phone except the End
key.
o Backlight settings – You can set
brightness, time, keypad and lamp.
• Meeting
• Outdoor
• Indoor
• Headset
• Power saving
4.4. Multimedia
The VIDEOCON V1402 comes with a host of
multimedia applications to provide you with
unlimited entertainment.
Camera
By pressing the left soft key to select Option, you
can go to following options:
20
Page 27

• Image viewer: Open the Image viewer to
view the photos. You can set the photo
default storage path to phone or memory
card.
• Camera settings: Carry out such related
settings as the Shutter sound, EV, Banding,
Delay timer and Cont shot.
• Image settings: Set size and quality of
photos.
• White balance: You can select Auto,
Daylight, Tungsten, Fluorescent and
Incandescence.
• Scene mode: You can select from Auto and
Night mode.
• Storage: You can set the photos default
storage path to phone or memory card.
• Restore default: Restore to default settings.
Image viewer
Image viewer stores all your pictures which are
preloaded as well as those taken by the phone
camera. It gives you the following options.
• View: To view the selected file.
• Use: The images selected can be forwarded
to ‘set as wallpaper’, to put it as screen
saver, to associate it with any phonebook
entry (provided the image size is not more
than 20K).
• Send: The images selected can be sent via
MMS.
21
Page 28

• Rename: You can rename the image
according to your own choice.
• Delete: To delete the selected file.
• Delete all files
• Sort: The images stored can be sorted by
Name, Type, Time and Size.
• Storage path: You can set the photos
default storage path to phone or memory
card.
Video recorder
You can record videos on your V1402 phone. Press
the OK Key to start and stop the recording. Press
the left soft key, and you can carry out such
operations as Camcorder setting, Storage and
Restore default.
Video player
The VIDEOCON V1402 comes with an inbuilt video
player that plays all your favorite videos stored in
the phone or the micro SD card.
NOTE: It supports all AVI format video files, and
does not support 3GP/MPEG4 with AAC sound or
above, it may appear to be silent.
Audio player
The VIDEOCON V1402 comes with an inbuilt music
player that plays all your favorite songs stored in the
phone or micro SD card. It gives you a host of
setting options to make your listening experience
interesting.
22
Page 29

The player gives you an option to select from a list
of songs already stored in phone/the micro SD card,
to be played, added to your ring tones.
The player has the following setting options:
o Play list – Player setting gives you
an option to select your play list
source (Phone memory or Card
memory).
o Auto generate list – It also offers
to generate the play list
automatically.
o Repeat – You can also select to
repeat the song or complete play list
(Off/One/All).
o Shuffle – You can shuffle the order
of your songs to play. If you put this
mode to ‘ON’, then the songs will be
played in a random fashion
otherwise, a sequential pattern will
be followed.
o Background play – Background
play option allows you to enjoy your
music even if the player is minimized
to use other functions of the phone.
o Lyric display – You can set on/off.
Sound recorder
You can record sound/voice on your VIDEOCON
V1402 phone. Just select sound recorder, go to
option and press record. Select Stop to save it.
23
Page 30

Select ‘pause’ to pause the recording and ‘continue’
to resume the recording.
FM Radio
The VIDEOCON V1402 comes with an in-built FM
Radio Receiver/Recorder Player. Press Option to find:
• Channel list: Store all the channels that the
FM Radio can receive. You get options to
play or edit them.
• Manual input: You can store and register
your channel frequency and play it by
pressing OK.
• Auto search: On selecting this, the FM tries
to scan all the available channels provided
by the network. To start the search, make
sure that the radio is power ON.
• Settings: Under settings, you have options
for Background play (ON/OFF), Loud speaker
(ON/OFF), Recording format (AMR/WAV),
Audio quality (Low/High) and Storage device
(Phone/Memory card).
• Record: You can record your favori te music
or program.
• Append
• File list: Select File list to check your
previously stored recording files.
The FM Radio also gives you an option to change th e
settings through shortcut keys available on the main
window. Such as ‘To Power ON’, to ‘Skip to next
channel’ and to ‘skip to previous channel’ using the
direction keys on the keypad.
24
Page 31

Schedule FM recording
VIDEOCON V1402 comes with a unique feature of
FM Scheduling. This feature enables you to schedul e
the radio to power ON itself and record your favorite
program. You can set the time, date, and channel
and record functions to record the desired program.
It can record 4 programs for you to enjoy them
anytime later at your own wish. On pressing Edit,
you will have the following functions to set:
• ON/OFF
• Date and Time
• Repeat
• Channel settings
• Recording settings
4.5. Messages
Your phone supports various messaging services.
You can create, send, receive, edit and organize text
messages.
SMS
Under SMS, the phone has the following folders
listed.
• Write message: Input content by selecting
preferred input method.
• Inbox: This folder stores all the received
messages.
• Outbox: This folder contains all the
messages sent from your phone.
• Template: Templates stores 10
preloaded/pre-written text messages for
ready usage. You can edit the templates
25
Page 32

according to your wish and also store the
messages that you send frequently.
• SMS settings: SMS settings stores all the
different settings responsible for sending
and receiving messages.
• Mode setting: It contains modes
which include Folder name, Service
Centre address, Validity period and
Message type.
• Common settings: These settings
include the following - Delivery
report, Reply path.
• Memory status: Memory status
gives you the information about the
storage status of the phone memory
as well as the SIM memory.
• Preferred storage: Lets you select
the default storage location of the
messages between Phone and SIM.
• SMS blacklist: Set SMS blacklist on/off, and
edit black list.
MMS
The phone has the capability to support Multi Media
Services. You can send and receive multimedia files
by using this feature, provided, you have this
service activated on your SIM card. It has the
following folders listed:
• Write Message
• Inbox
• Outbox
26
Page 33

• Draft
• Template
• Message settings
Schedule SMS
You can pre-edit a message to be sent in the
specified time to the selected person.
Chat
Chat enables you to enter 2 different user’s default
settings (Chat room 1 and Chat room 2) to enable
sending and receiving the messages. Chat option
enables you to see the complete conversation on a
single window.
Voice mailbox
The Voice mailbox is an interactive system for
storing, processing and reproducing verbal
messages through a voicemail server. The service is
operator dependant and the settings are provided by
the operator upon activating the service on the SIM
card.
Broadcast message
Your phone is capable to receive and store broadcast
messages. You can set the receive status to ON/OFF.
Read Message folder stores the received messages.
4.6. Game
Copter
Game settings
These settings enable you to vary from settings in
background music and sound effect to ON/OFF,
27
Page 34

allow you to put the vibration mode to ON/OFF and
allows you to increase/decrease the volume levels.
4.7. Organizer
File manager
As the name suggests, File manager allows you to
manage all the files stored in the phone and the
memory card (up to 2GB).
1. You can view the remaining memory and
available memory in phone/micro-SD card.
2. You can open and navigate the directories
and files in the storage.
3. You can View, Play and Setup files in the
storage disks.
The options available are:
• Open
o Ebook
o Images
o Audio
o My music
• Create folder
You can create a new folder to store files.
• Format
NOTE: Formatting the phone or Memory card will
erase all existing data from them.
Calendar
You can use the calendar to keep track of important
meetings. After entering the cal endar function menu
you can select year, month and date using direction
keys. On a selected date you can select to view:
28
Page 35

• View tasks: If there is a special background
color on a date it means there is some task
on that day. You can also view any
Note/Remark mentioned by you for a task
stored by you previously.
• Add task: When you add a new task, you
can do the following:
o Input task duration time.
o Add a Note for that task.
o Set alarms on/off.
• Go to date: Input a date, and then press
OK to go to a specific date for
entry/edit/viewing of task for that date.
• Week view: Select this option to view tasks
in weekly format.
Tasks
All tasks saved in calendar, can be viewed in Tasks.
Alarm
The Alarm can be set to ring at a specific time on
several days. There are five different default alarms.
You can set these alarms to wake you up at different
time on specific day(s) of a week. The alarm can use
radio as an alarm tone also.
Calculator
Keep your calculations on your finger tips with the
calculator.
29
Page 36

E-book reader
You can read the e-book stored in the phone or
micro SD card.
Stopwatch
The phone comes with 2 types of Stopwatch.
• Typical stopwatch
• nWay stopwatch
Now, burn the track while you keep every move
traced and counted.
World clock
World clock can be used to know the time in various
cities across the world. You can see a world map and
immediate time in those cities using world clock.
Enter world clock to view a particular city’s time
using the direction keys.
Currency converter
Use this feature for the exchange rate conversion.
4.8. Services
STK
STK stands for SIM Tool Kit. This service is provided
by the network provider and is used to initiate
various Value Added Services, provided the SIM and
the operator supports this feature.
WAP
WAP or Wireless Application Protocol browser
provides all the basic services of a computer based
web browser but is simplified to operate within the
30
Page 37

restrictions of a mobile phone. The WAP Browser has
the following options:
• Homepage: Homepage allows you to
enter the default URL on the phone. This
will enable you to go to the same page
every time you access the homepage.
• Bookmarks: Bookmarks enables you to
mark a place in an electronic document or
a pointer (primarily to an internet URL) in
an Internet web browser.
• Recent pages: Recent Pages stores the
list of URLs which have been recently
visited by you on the WAP browser.
• Offline pages: Offline Pages stores the
list of URLs which you have saved.
• Enter address: Enter the desired address
(URL) of the website or webpage in this
column.
• Service inbox: Service Inbox receives
and stores URLs through text messages
from the operator. You can read them and
accept to go to the web page and browse.
• Settings: You can vary the following
settings:
o Select SIM
o Edit profile
o Browser options
o Service message settings
o Clear cache
o Clear cookies
31
Page 38

Data account
Data account contains two types of accounts used to
establish GSM/GPRS connections for WAP, MMS and
www browsing.
• GSM data
• GPRS
NOTE: Select the appropriate setting from the list
for using a particular feature depending on the
availability of the operator services.
4.9. Settings
Under settings, the phone gives you the option to
change the settings for various features of the
phone.
The following list is available in Settings:
Call settings
• SIM1/2 call settings
o Call waiting - you can activate this
function or deactivate it, and can
also view the current settings via
query.
o Call forward - You can set to
forward the incoming calls in
different conditions.
o Call barring - In order to activate
this service, it requires the services
provided by the network service
provider. When you change Barring
password, you need to input the old
password.
32
Page 39

o Closed user group - several
numbers can be listed to form a user
group. Use this option to specify
restrictions to the communication of
a user group.
• Blacklist: Set whether to activate the
incoming call filter, and edit the blacklist.
• Voice changer: Set different voice mode
during the call.
• Auto redial: You can select to redial the
number automatically when a call is not
connected.
• Speed dial: Set speed dial on/off, and edit
the speed dial list number.
• Background sound: You can select
whether to set background sound when
making a call and select effect list.
• More…
o Call time display - After setting
this function on, you can view the
call time displayed on the screen.
o Call time reminder - After setting
this function to ‘on’, it will offer a
warning tone towards the single or
periodic setting as your own during
the call process, so you will be
reminded of the call time at periodic
intervals during a call.
33
Page 40

o Auto quick end - Can be set to
open or close the function, duration
of time 1-9999 seconds.
Dual SIM settings
You have following options listed under Dual SIM
settings:
• Dual SIM open: This option activates both
the SIM cards.
• Only SIM1 open: This option activates only
SIM1.
• Only SIM2 open: This option activates only
SIM2.
• Flight mode: This option disables all RF
communication for both SIM1 and SIM2,
however, enables you to use other
features/functions of the phone.
Phone settings
You have following options listed under phone
settings:
• Time and date: Let you set the Time and
date on the phone.
• Schedule power on/off: Let you set a
particular time on the phone when the
phone should Power on/off itself.
• Language: The VIDEOCON V1402 currently
supports English.
• Preferred input methods: This enables
you to select the text input method: They
34
Page 41

are – Smart ABC/abc, Multitap ABC/abc,
Numeric input.
• Display settings: Under Display settings,
you can set a host of different characteristics
of the phone. Like
o Wallpaper – Set your favorite
wallpaper on the phone.
o Screen saver – Lets you set an
image as a screen saver.
o Show date and time – Enables you
to see the date and time on the idle
screen.
• Greeting text: Let you set your own
greeting message when you power ON the
phone.
• Shortcut: Assign shortcuts as per your
requirements to specific keys.
• Dedicated key: This option helps you
dedicate/map certain key features of the
phone with the Directional keys
(UP/DOWN/LEFT/RIGHT) of the phone. At
anytime you can change the mapping and
select a new feature from the list of features
available.
• Auto update of date and time: This
feature automatically updates the date and
time on the phone, receiving it from the
network.
NOTE: This feature is network dependant.
35
Page 42

Network settings
Network setup gives the user the option to select a
desired network and addition of a new network to
the network list. The network setup gives you the
following options:
• Network selection (Automatic/Manual)
• Preferred networks – Will list down all the
network IDs (depending on the SIM card
used).
Security settings
Under Security settings, we have the following
options available:
• SIM1/2 Security settings
• SIM1/2 lock: press OK key to enable PIN
lock, which will require you to input a
password when the mobile phone is
switched on. Otherwise, the SIM card is
unavailable.
During setup, it requires to enter the correct PIN
code. If a wrong code is entered for three times,
the PUK (Personal Unlock code) will be required,
PUK is used to unlock and change the locked PIN
code. If PUK code is not provided, please contact
your local network service provider.
• Fixed dial: Outgoing calls from your
phone can be restricted by making a fixed
dialing list that allows only numbers on
that list to be dialed from the phone.
• Barred dial: Barred Dialing is a SIM
card/Network dependant feature If your
36
Page 43

operator supports it, then you can use the
facility in the phone.
• Change password: Change Password
option gives you the options to change
PIN1, PIN2 password.
• Mobile
tracker: if you lose your phone,
this function may probably help you to get
back your phone.
1. First you should insert SIM card.
2. Enter Settings → Security Settings → SIM1
security settings → Mobile tracker.
3. Enter the password (The password is 0000,
same as Phone lock password).
4. Status is ON.
5. Enter “Recepient number”. You can add two
numbers. For example, add number
8613764205302 and 8613564952956 (“86” is
the country code).
6. Finish.
7. Power off. Pull off the SIM card, and insert
other SIM card. (If you set SIM1 Security, you
will pull off the SIM1 and insert another SIM1).
8. Power on. The handset will send a message
to the numbers (You enter the numbers in
“Recepient number”). You will know which
number is using your handset. If you insert
former SIM card, the handset will not send the
message.
37
Page 44

• Phone lock: Phone lock protects your
phone from any unauthorized usage or
unauthorized access to information stored in
the phone. When phone lock is activated,
the phone would ask for the phone lock code
every time you power-on the phone. Enter
the lock code (default as 0000) to use the
phone. You can simply unlock the phone by
going into Security settings > Phone lock >
enter the lock code and put it off.
• Keypad lock: Auto Keypad lock
automatically locks the keypad after a preset
time interval. You can set the time from 5
seconds to 1 minute.
• Data security:
By inputting the
password (default as 0000), you can
protect your Phone book, Call history,
SMS, MMS and File manager data.
• Change password: Change password
option gives you the option to change phone
lock password and data security password.
Restore factory settings
• Selecting this option will ask you to enter
the password to restore the phone to factory
settings. The default password is set as
0000.
38
 Loading...