

Page 1

1
User Manual
- V1302
Page 2

2
Table of Contents
SAFETY PRECAUTIONS/MEASURES ................................................................ 6
PHONE LAYOUT .................................................................................................. 7
1 GETTING STARTED......................................................................................... 8
1.1 Removing the battery cover ............................................................... 8
1.2 Removing the battery ........................................................................ 8
1.3 Inserting the SIM card........................................................................ 8
1.4 Inserting the Memory card ................................................................. 9
1.5 Re-Inserting the battery ..................................................................... 9
1.6 Putting back the battery cover ........................................................... 9
1.7 Switching On/Off the handset ............................................................ 9
2 BASIC FUNCTION ......................................................................................... 10
2.1 MAKING A CALL .............................................................................. 10
2.1.1 Making domestic calls...................................................................... 10
2.1.2 Dialing international calls ................................................................. 10
2.1.3 Dialing phone numbers in the call records....................................... 10
2.2 EMERGENCY CALLS ..................................................................... 11
2.3 ANSWERING A CALL ...................................................................... 11
2.4 CALL RECORDS ............................................................................. 11
2.5 CALL OPTIONS ............................................................................... 11
2.6 INPUT METHOD ............................................................................. 12
2.6.1 Keyboard ......................................................................................... 12
2.6.2 Navigation keys (Up/Down and Left/Right keys) .............................12
2.6.3 Pound key ........................................................................................ 13
2.6.4 Number keys .................................................................................... 13
2.6.5 Asterisk key ..................................................................................... 13
2.6.6 Communication control keys............................................................ 13
2.6.7 Connection jack ............................................................................... 13
3 PHONEBOOK ................................................................................................. 14
3.1 QUICK SEARCH ............................................................................. 14
3.2 SEARCH CONTACT ........................................................................ 14
3.3 ADD NEW CONTACT ...................................................................... 14
3.4 COPY ALL........................................................................................15
3.5 DELETE ........................................................................................... 15
3.6 CALLER GROUPS .......................................................................... 15
3.7 EXTRA NUMBERS .......................................................................... 15
3.8 SETTINGS ....................................................................................... 15
3.8.1 Memory status .................................................................................15
3.8.2 Preferred storage ............................................................................. 15
3.8.3 Fields ............................................................................................... 16
Page 3

3
3.8.4 My vCard ......................................................................................... 16
3.8.5 vCard version................................................................................... 16
4 MESSAGES .................................................................................................... 16
4.1 SMS ................................................................................................. 16
4.1.1 Inbox ................................................................................................16
4.1.2 Outbox ............................................................................................. 17
4.1.3 Drafts ............................................................................................... 18
4.1.4 Write message ................................................................................. 18
4.1.5 Templates ........................................................................................ 18
4.1.6 Text message settings ..................................................................... 18
4.2 MMS ................................................................................................ 19
4.2.1 Write message ................................................................................. 19
4.2.2 Inbox ................................................................................................20
4.2.3 Outbox ............................................................................................. 20
4.2.4 Drafts ............................................................................................... 20
4.2.5 Template .......................................................................................... 20
4.2.6 MMS settings ................................................................................... 20
4.3 CHAT ............................................................................................... 21
4.4 VOICE MAIL SERVER.....................................................................21
4.5 BROADCAST MESSAGE ................................................................ 21
5 CALL SETUP .................................................................................................. 21
5.1 CALL HISTORY ............................................................................... 21
5.1.1 SIM 1 call history .............................................................................21
5.1.1.1 SIM1 missed calls ............................................................................ 21
5.1.1.2 SIM 1 dialed calls............................................................................. 21
5.1.1.3 SIM 1 received calls......................................................................... 22
5.1.1.4 Delete SIM 1 call logs ...................................................................... 22
5.1.1.5 SIM 1 call timers .............................................................................. 22
5.1.1.6 SIM 1 call cost ................................................................................. 22
5.1.1.7 SIM 1 text message counter ............................................................ 22
5.1.1.8 SIM 1 GPRS counter ....................................................................... 22
5.1.2 SIM 2 call history .............................................................................22
5.2 CALL SETTINGS ............................................................................. 22
5.2.1 SIM 1 call settings............................................................................ 22
5.2.1.1 Caller ID ........................................................................................... 22
5.2.1.2 Call waiting ...................................................................................... 22
5.2.1.2.1 Activate ............................................................................................ 22
5.2.1.2.2 Deactivate ........................................................................................ 22
5.2.1.2.3 Query Status .................................................................................... 23
5.2.1.3 Call divert ......................................................................................... 23
5.2.1.4 Call barring ...................................................................................... 23
5.2.1.5 Line switching ..................................................................................23
5.2.1.6 Closed user group ........................................................................... 23
5.2.2 SIM 2 call settings............................................................................ 23
Page 4

4
5.2.3 Blacklist ............................................................................................23
5.2.3.1 Mode ................................................................................................ 23
5.2.3.2 Blacklist Number .............................................................................. 23
5.2.4 Auto redial........................................................................................ 23
5.2.5 Speed dial ........................................................................................ 23
5.2.6 IP dial ............................................................................................... 23
5.2.7 Background sound ........................................................................... 23
5.2.8 Call time display............................................................................... 23
5.2.9 Call time reminder ............................................................................24
5.2.10 Auto call disconnect .........................................................................24
5.3 VOICE CHANGER ........................................................................... 24
6 FILE MANAGER ............................................................................................. 24
7 MULTIMEDIA .................................................................................................. 25
7.1 IMAGE VIEWER .............................................................................. 25
7.2 VIDEO PLAYER ............................................................................... 25
7.3 AUDIO PLAYER .............................................................................. 25
7.4 SOUND RECORDER ...................................................................... 26
7.5 FM RADIO ....................................................................................... 26
7.6 SCHEDULE FM RECORD ..............................................................26
7.7 MELODY COMPOSER .................................................................... 26
8 GAMES ........................................................................................................... 27
9 SERVICES ...................................................................................................... 28
9.1 STK .................................................................................................. 28
9.2 WAP ................................................................................................. 28
9.3 DATA ACCOUNT ............................................................................. 28
10 ORGANISER .................................................................................................. 29
10.1 E-BOOK READER ...........................................................................29
10.2 CALENDAR ..................................................................................... 29
10.3 CALCULATOR ................................................................................. 29
10.4 UNIT CONVERTER ......................................................................... 30
10.5 CURRENCY CONVERTER ............................................................. 30
10.6 TO DO LIST ..................................................................................... 30
10.7 STOPWATCH .................................................................................. 30
10.7.1 Typical stopwatch ............................................................................ 30
10.7.2 nWay stopwatch .............................................................................. 30
10.8 ALARM ............................................................................................31
10.9 WORLD CLOCK .............................................................................. 31
10.10 HEALTH ........................................................................................... 31
10.10.1 BMI (Body Mass Index) ...................................................................31
10.10.2 Menstrual ......................................................................................... 31
10.11 FLASHLIGHT ................................................................................... 31
Page 5

5
11 SETTINGS ...................................................................................................... 32
11.1 DUAL SIM SETTINGS ..................................................................... 32
11.2 PHONE SETTINGS ......................................................................... 32
11.3 USER PROFILES ............................................................................ 33
11.4 NETWORK SETUP ......................................................................... 33
11.4.1 SIM 1 network setup ........................................................................ 33
11.4.1.1 Network selection ............................................................................ 33
11.4.1.2 Preferred networks .......................................................................... 33
11.4.2 SIM 2 network setup ........................................................................ 33
11.5 SECURITY SETUP .......................................................................... 33
11.5.1 SIM 1 security setup ........................................................................ 33
11.5.1.1 SIM 1 lock ........................................................................................ 33
11.5.1.2 Fixed dial ......................................................................................... 34
11.5.1.3 Barred dial ....................................................................................... 34
11.5.1.4 Change password ............................................................................ 34
11.5.2 SIM 2 security setup ........................................................................ 34
11.5.3 Phone lock ....................................................................................... 34
11.5.4 Auto keypad lock ............................................................................. 34
11.5.5 Change password ............................................................................ 34
11.5.6 Mobile Tracker ................................................................................. 34
11.5.6.1 Setting Status .................................................................................. 34
11.5.6.2 Guard Number ................................................................................. 34
11.5.6.3 Trace Content .................................................................................. 34
11.5.7 Long distance control....................................................................... 34
11.6 RESTORE FACTORY SETTINGS ................................................... 35
12 DISCLAIMER .................................................................................................. 36
APPENDIX I: TROUBLESHOOTING .................................................................37
APPENDIX II: ABBREVIATIONS AND EXPLANATION .................................... 39
Page 6
6
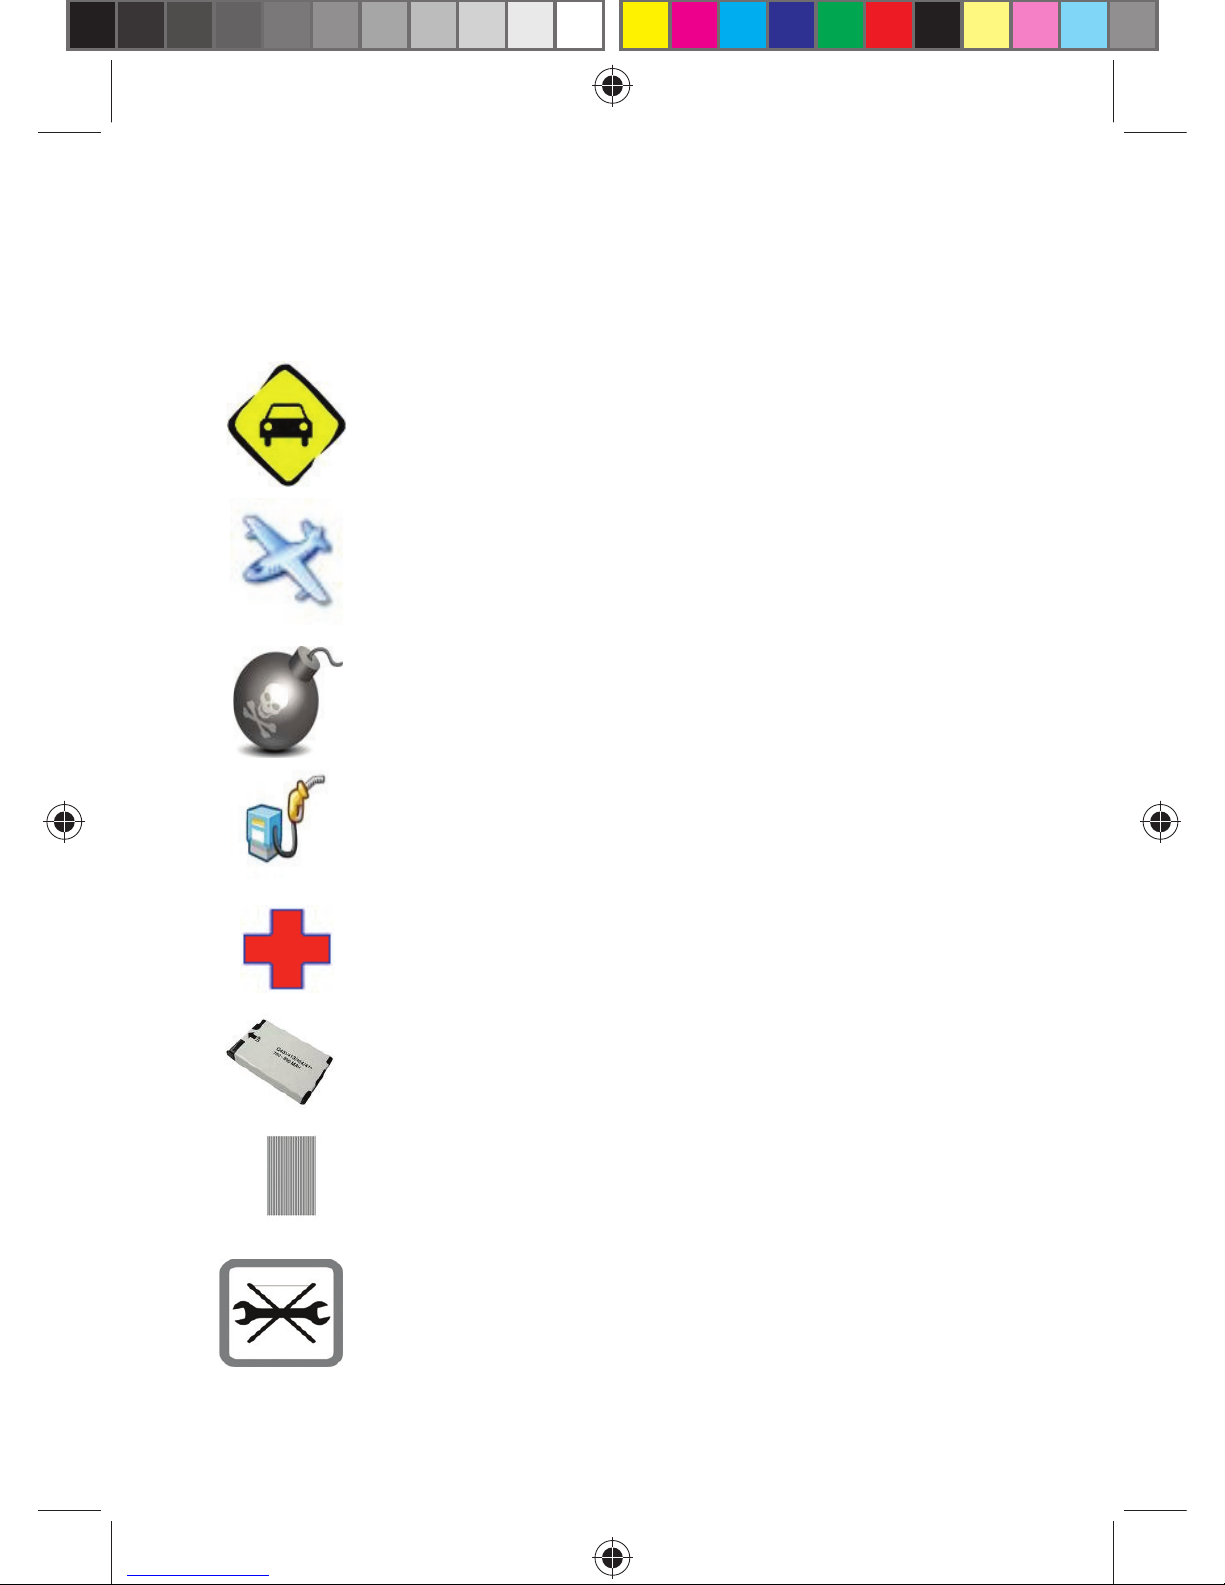
SAFETY PRECAUTIONS/MEASURES
Please comply with these precautions/measures to avoid dangerous or illegal
situations and to ensure peak performance of your phone.
ROAD SAFETY COMES FIRST
Do not use the phone hand-held while driving. Park the vehicle on
the road side, if phone is hand-held.
SWITCH OFF IN AIRCRAFT
Switch your phone off while boarding an aircraft. Signal from your
phone can affect aircraft system. You are legally obliged to comply
with this recommendation.
SWITCH OFF NEAR EXPLOSIVES
Switch your phone off when entering any explosive area. Observe
any provided guidelines or regulations.
SWITCH OFF WHEN REFUELING
Do not use your phone when refueling. You should keep your
phone away from fuel and chemicals.
SWITCH OFF IN HOSPITALS
Switch the phone off in hospitals. Follow any instructions if
provided.
ENHANCEMENTS AND BATTERIES
Use only approved enhancements and batteries. Do not connect
incompatible products.
AVOID INTERFERENCE WITH PACEMAKERS
Maintain a minimum distance of 15 cm between the mobile phone
and pacemaker to avoid potential interference.
USE QUALIFIED SERVICING
Only open the phone to replace the battery, SIM and microSD card.
You must not open the battery under any other circumstances.
All other changes to this device are strictly prohibited and will
invalidate the guarantee.
Page 7
7
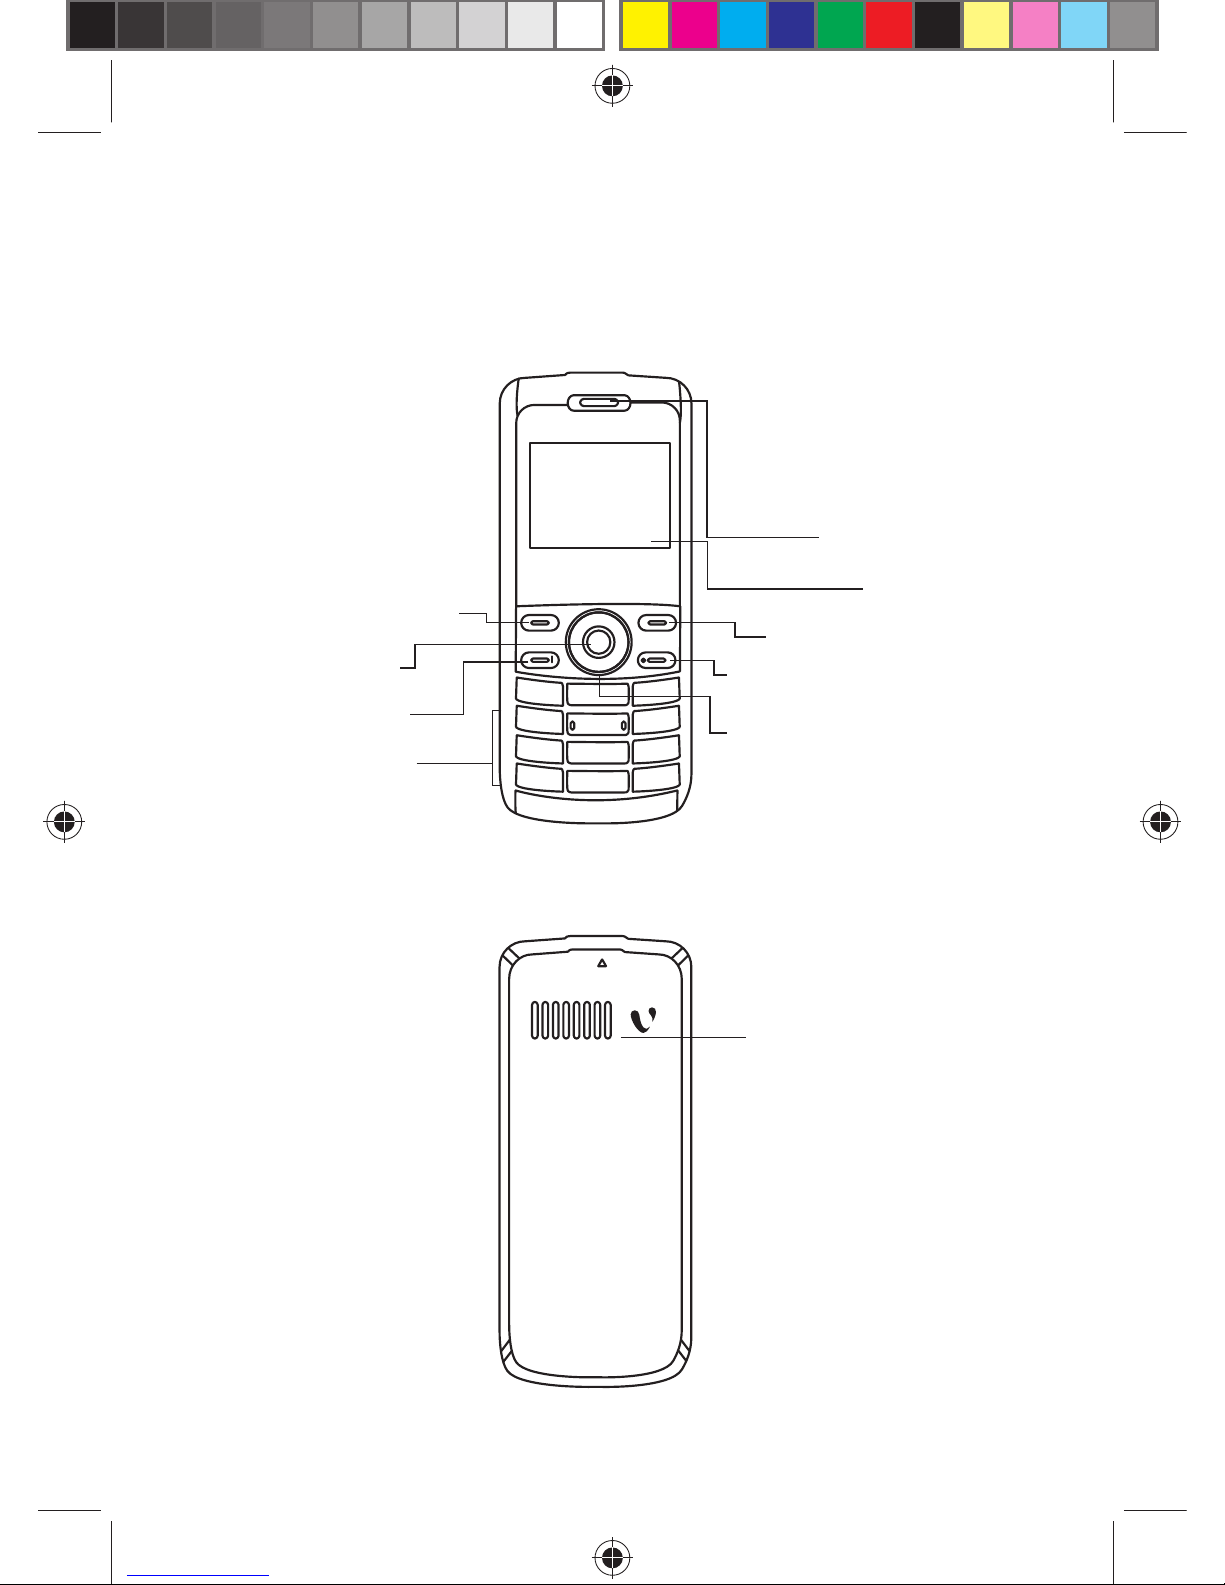
PHONE LAYOUT
Speaker
LCD
Right Soft Key
Power Key/End Key
4-way Scroll Button
(up, down, left, right)
Front
Left Soft Key
OK Key
Call Key
Keypad
Back
Speaker
Page 8
8
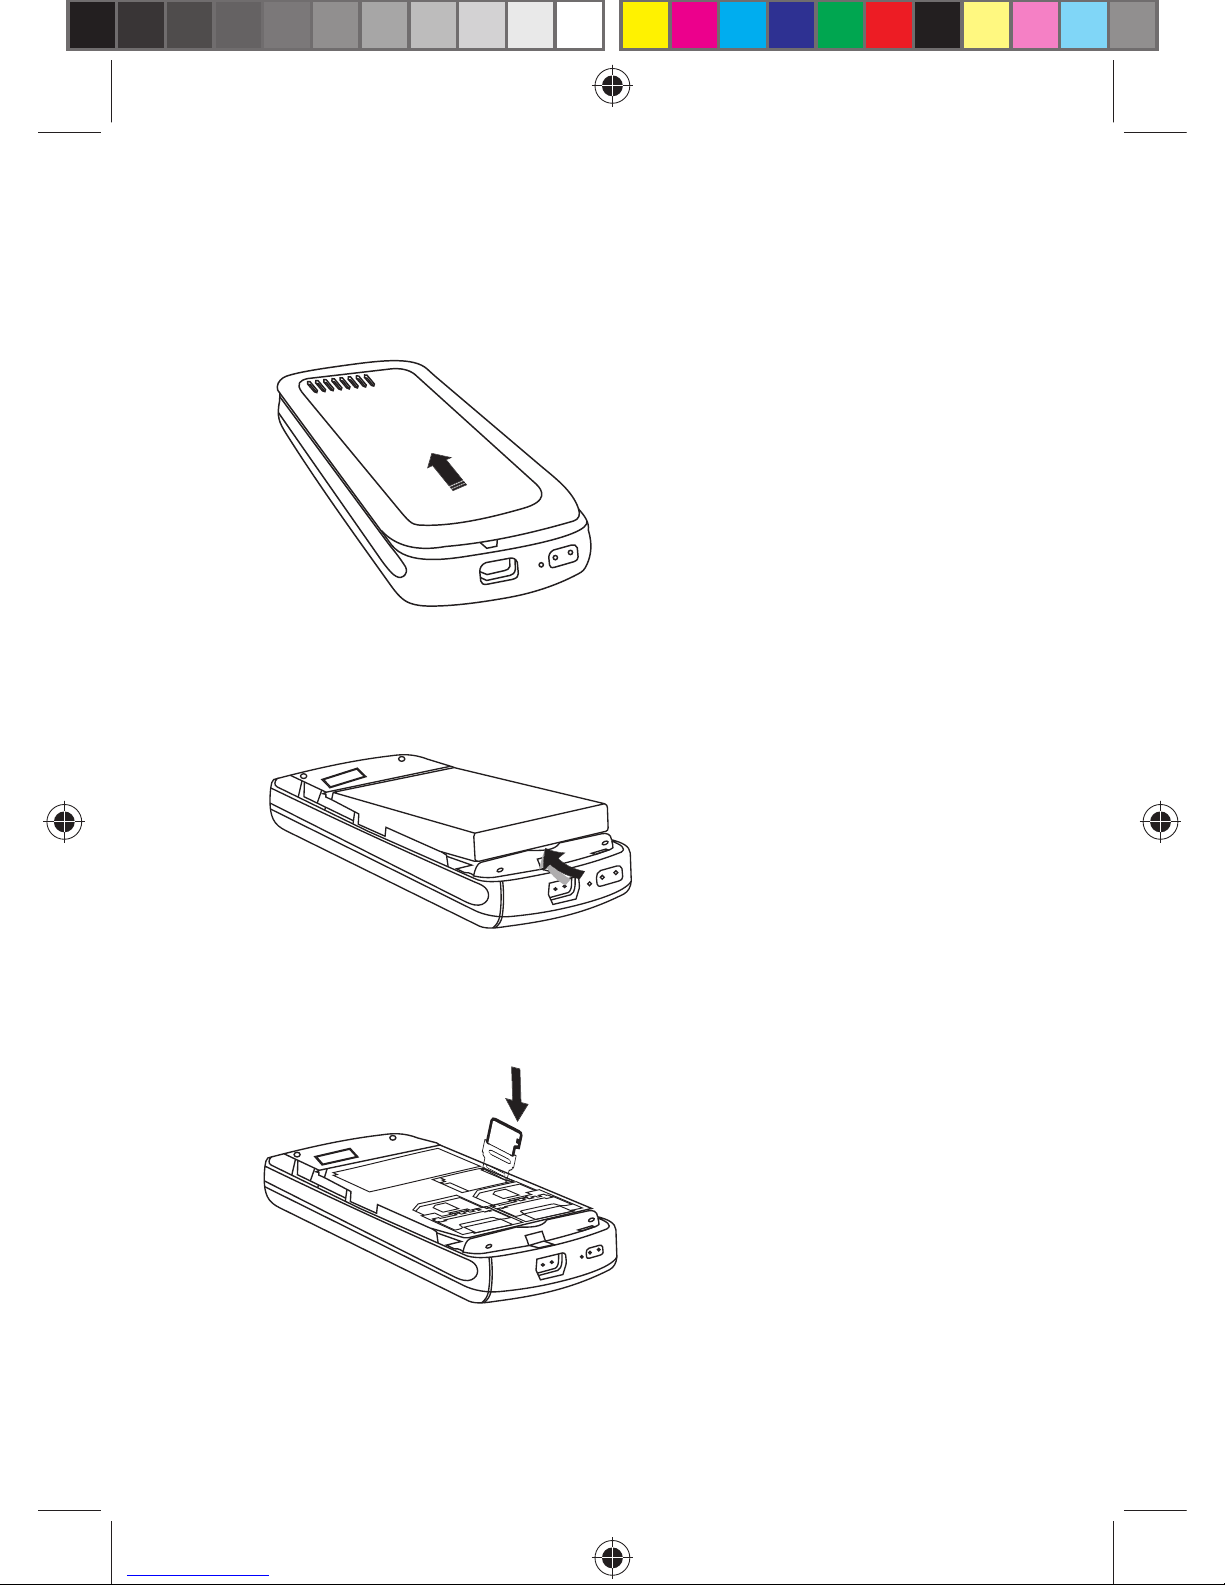
1 GETTING STARTED
1.1 Removing the battery
cover:
1.1.1 Ensure that the phone is
switched off
1.1.2 Press and slide the battery
cover in the upwards
direction to unlock the
battery
1.1.3 Lift the battery cover up to
open
1.2 Removing the battery
from the compartment:
1.2.1 Locate the battery groove
at the bottom middle of the
battery compartment
1.2.2 Lift the battery up with your
fi ngers
1.2.3 Remove the battery out
from the phone
1.3 Installation of Memory
Card:
1.3.1 Locate the Memory Card
slot at the bottom of the
battery compartment
1.3.2 Push the Memory Card
cover in right direction to
unlock and pull it upwards
to open
1.3.3 Place the Memory Card
into Memory Card slot with
the metal connectors of the
Memory Card facing down
1.3.4 Close the Memory Card
cover and push it in
left direction to lock the
Memory Card cover
Page 9
9
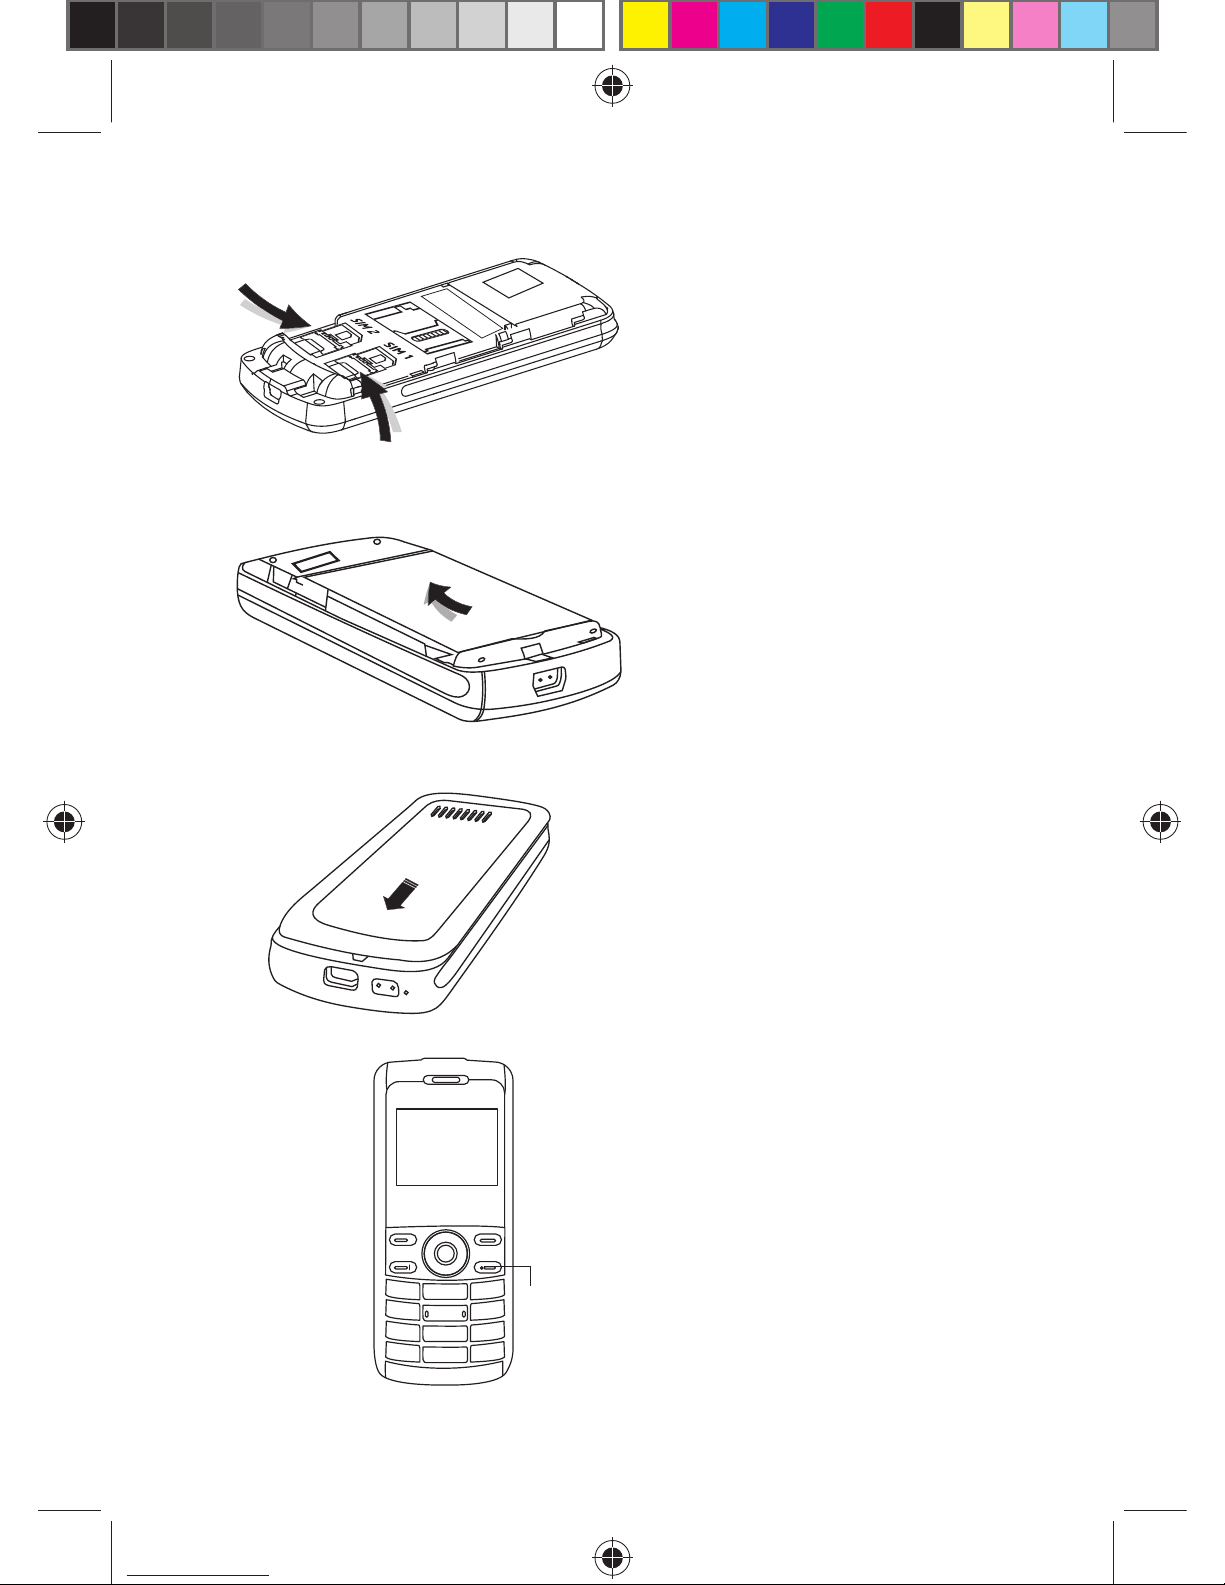
Power Key/
End Key
1.7 Switch On/Off the
handset by gently
pressing the Power Key/
End Key:
1.7.1 Gently press the Power/
End Key and keep it
pressed for 3-5 seconds to
Switch On/Off the handset
1.4 Installation of SIM Card:
1.4.1 Locate the SIM Card
sockets
1.4.2 Slide the SIM Cards into
SIM Card sockets (as
shown below)
1.5 Installing the battery:
1.5.1 Slide the battery into the
compartment in such
a way that the metal
connectors of the battery
are aligned with the metal
connectors of the phone
1.5.2 Push the battery down
into the compartment and
ensure that the battery
is securely placed in the
compartment
1.6 Putting the battery cover:
1.6.1 Place the battery back
cover over the phone
squarely with arrow on the
battery cover facing up
1.6.2 Slide the back cover in
downward direction to
engage the locks
Page 10

10
2 BASIC FUNCTION
2.1 Making a Call
When the logo of the service provider appears on the display screen, you
can dial or receive calls. The information bar at the upper left corner of
the display screen shows the network signal strength (when there are 5
information bars, the signal is at its strongest).
The call quality is very likely to be affected by obstructions, therefore
movement in a small area can effectively improve call performance.
2.1.1 Making domestic calls
Enter phone number, and then press the Dial Key to make a call. If you
want to change the entered phone number, press right soft key to delete
the numbers. Call state information will be shown on the screen after
the called party ends the call. To enter and dial domestic call, follow the
order:
1. Area code
2. Phone number
3. Dial key
2.1.2 Dialing international calls
To make an international call, you may press * key to power continually, till
the screen displays the pre-digit symbol “+” for international long distance
call, which will enable you to make a call from any country without knowing
the local international access code. Enter numbers in the following
sequence to make an international call:
1. The pre-digit symbol, +
2. Country code
3. Complete phone number
4. Dial key
2.1.3 Dialing phone numbers in the call records
Every phone number you have dialed or received will be stored in the list
of phone call records. The latest dialed, received and missed numbers will
be listed, according to their types, in the respective menu of dialed calls,
received calls and missed calls. When the call record list gets full, the
old numbers automatically get deleted. To view the call record list, do the
following:
1. In standby state press Dial 1/2 key to view the call record list of dialed
calls.
2. All phone numbers in the list can be dialed directly by pressing the Dial
key.
3. When the list is displayed, press “OK” to read the details, then “Options”
to Save or Delete the number.
Page 11

11
2.2 EMERGENCY CALLS
As long as in the network service range (which can be confi rmed by
checking the signal strength bars on the top left corner of the screen),
you can always call emergency service. If your network supplier does not
provide roaming service in your area, the screen will display “Emergency”,
to inform you that only emergency call is permitted. If you are within the
network service range, you can make emergency calls even without the
SIM card.
2.3 ANSWERING A CALL
To answer any incoming call, press “dialing” key or “answer” key. If an
earphone has been connected, use the button on the earphone to answer
a call, and if it is not convenient for you to press it, set automatic answer
as on, assuring that the earphone is plugged on, so as to answer the
calls automatically while the phone rings or vibrates. If “Any” key answer
function is chosen, by pressing any key, other than “Ring off” key and “right
soft” key, can answer an incoming call.
2.4 CALL RECORDS
Your phone can store call records of the latest missed calls, received calls,
dialed calls, the time of last call as well as total amount of received calls
and total dialed calls, for you.
2.5 CALL OPTIONS
In connected state, press left soft key to view call options or press right
soft key for “H-free” and activate the speaker. Under activated hands-free
condition, press right soft key for “H-hold” and power off the speaker.
Operation methods of call options are similar to that of the Function
menu.
The call options can only be viewed during call process, moreover, the
functions of call waiting, call holding, and conference calls need service
support. Please contact your service provider for more details. Under call
options, you can perform the following operations:
• Hold Single: Put the current call on hold.
• End Single: End the current call.
• New Call: Enter new dialing interface.
• Phonebook: Enter phonebook menu.
• Messages: Enter short message menu. Owing to restrictions of
network engagement, MMS function is barred during call process.
• Sound Recorder: Record a call.
• Background Sound: Set the background sound for a call.
• Voice Changer: Set voice changer for a call.
• Mute: Enables you to make your voice response mute.
Page 12
12
• DTMF: Power on/off the operations of DTMF.
• Conference*: Enter multiple party conference call state. By following
the prompts, you can have the following functions: receive waiting calls,
add them into multiple party call, maintain the multiple party call, talk
privately with one party of the conference while maintaining all other
callers, connect one party in the call conference with another party
while exiting the multiple party call oneself, maintain one party of the
multiple party call and end current call and all other maintained calls.
The menu marked * items will only appear in special
circumstances. For conference function, it is necessary to apply
for service supply to corresponding service operator.
2.6 INPUT METHOD
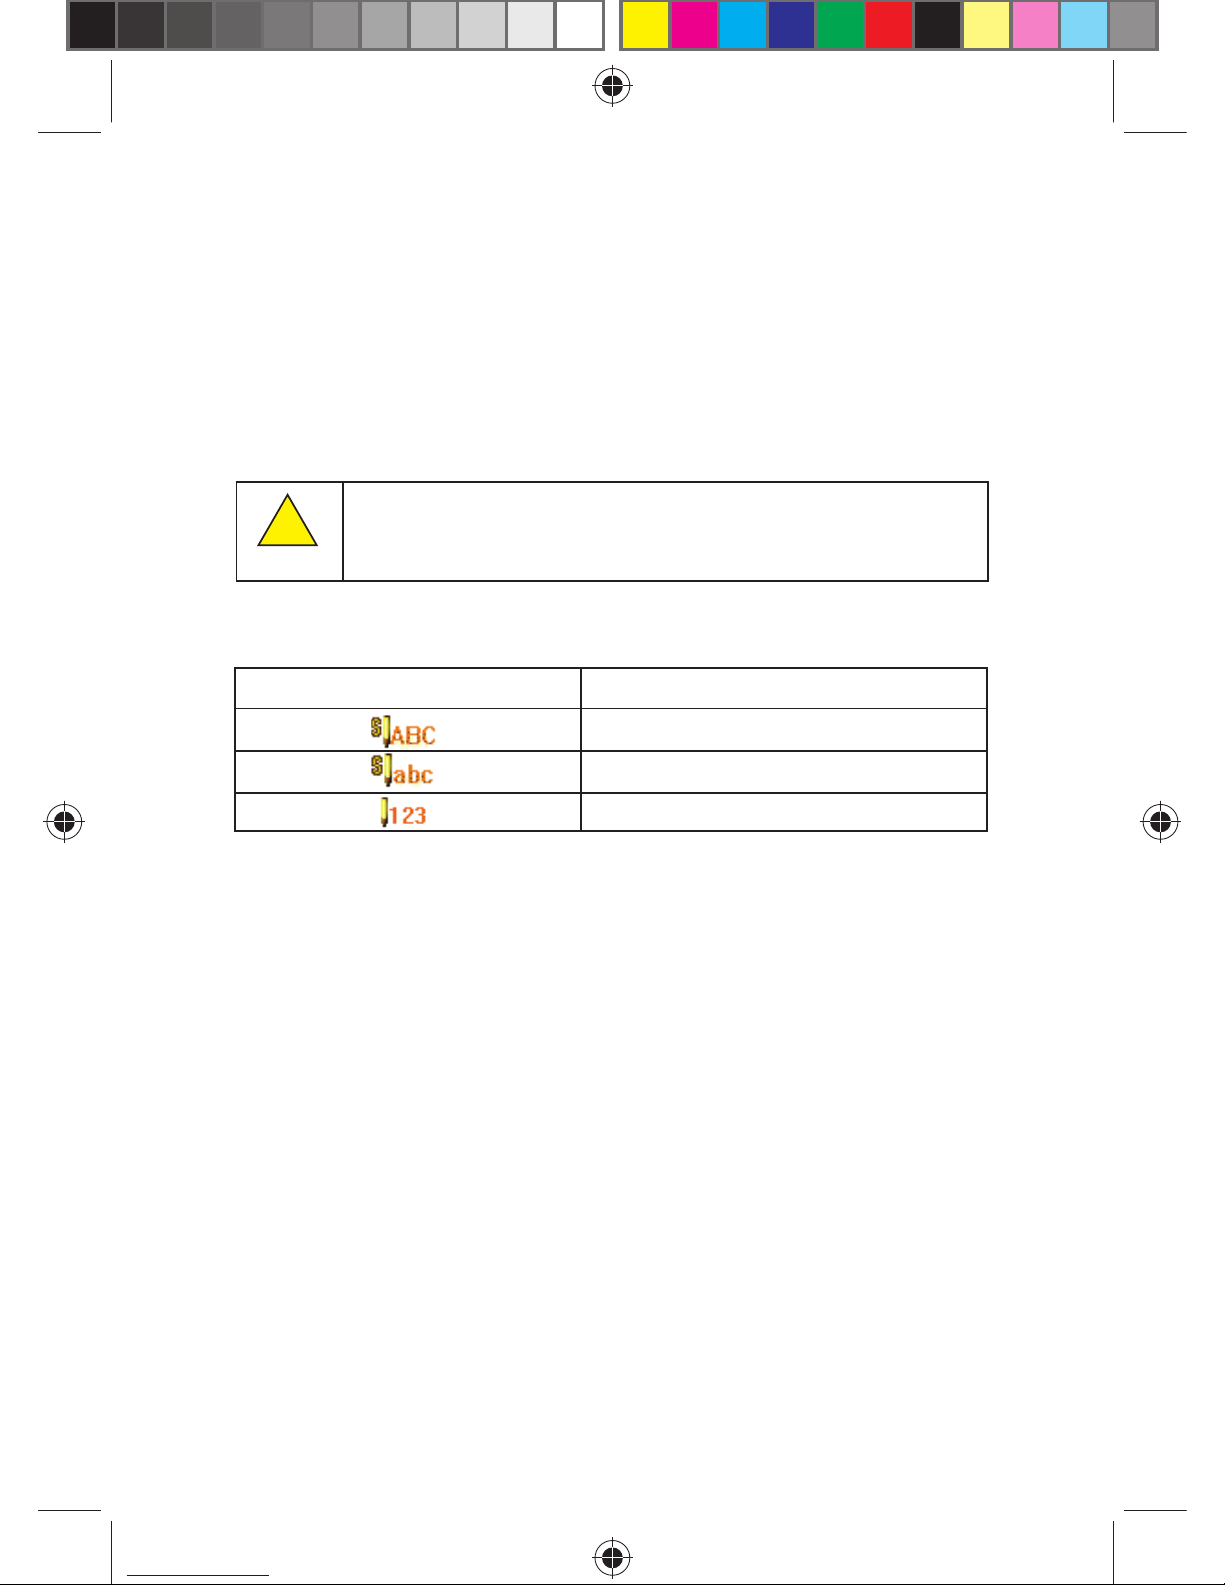
This mobile phone provides the following input methods:
Input Method Icon Explanation
Upper case English input method
Lower case English input method
Digit input method
2.6.1 Keyboard
In idle screen, press the left soft key to directly access the Menu. In idle
screen, press the right soft key to directly access the Phonebook list.
While accessing menu, the current functions of the left and right soft keys
will be shown in the bottom line of the screen, as they are closely related
to the current status of the phone.
2.6.2 Navigation keys (Up/Down and Left/Right keys)
Direction keys are used to readily access different functions which can be
assigned by dedicating the keys by Dedicated Keys option in Settings.
2.6.3 Pound key
Press the pound key to enter “#”.
Press and hold the pound key in idle screen to activate/deactivate the
Silent mode.
While working on the editing screen, press the pound key to change the
input method.
Note:
!
Page 13
13
2.6.4 Number keys
Press number keys (0-9) to enter numbers.
Press and hold number keys (2-9) to start speed dial.
You can also use number keys to select menu. If a number is shown
before an option in the menu list, you can select the option quickly by
pressing the corresponding number key.
2.6.5 Asterisk key
Press the asterisk key to enter “*”.
Press the asterisk key twice in a row to enter “+”, to make an international
call.
2.6.6 Communication control keys
Calling key is used to make a call after a number has been entered or
selected from the phonebook or to answer an incoming call.
Ending key is used to end a call during calling or conversation, or to quit
the menu and return to idle screen. Press and hold the ending key for
about fi ve seconds to turn on/off the phone.
2.6.7 Connection jack
The connection jack is used to connect charger and headset.
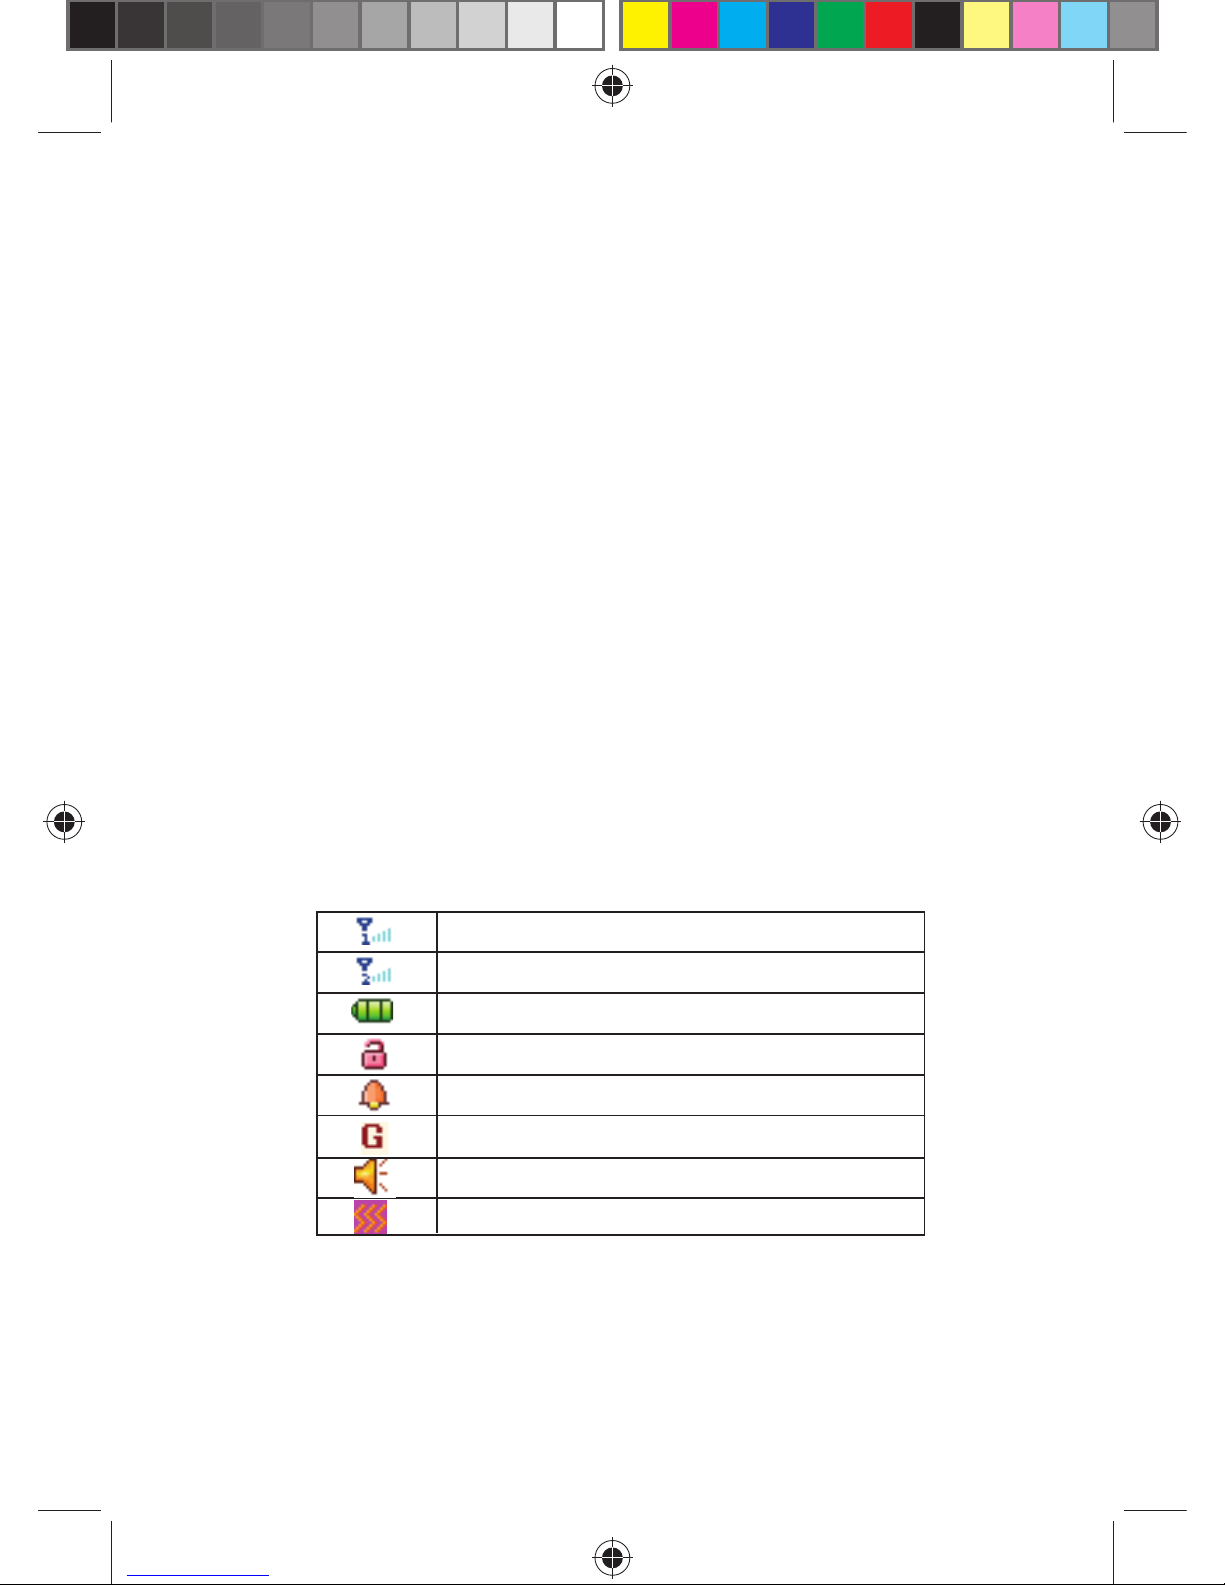
The following icons may be displayed in the fi rst line of the screen.
Signal strength for SIM 1
Signal strength for SIM 2
Battery status
Keypad locked
Alarm activated
Connected to the GPRS network
Ring
Vibration only
Page 14

14
3 PHONEBOOK
You can store information such as names, phone numbers, and e-mail
addresses in the phonebook. Phone numbers can be stored in your mobile
phone or SIM card. The mobile phone can store up to 1000 records, the
amount of phone numbers that SIM card can store vary with its capacity.
In standby state, you can access this interface with the help of right soft
key.
3.1 QUICK SEARCH
Quick Search allows you to quickly search an entry in the Phonebook by
entering the key letters or words of the name.
You can quickly locate the number of the person you want to contact.
Enter the initial letter of the person’s name, and related records about it will
display on the screen. Please use the Up / Down key to select the number
as desired, and then press Talk Key to make a call.
3.2 SEARCH CONTACT
Search contact allows you to search the specifi ed contact by entering
some words in the edit interface and searching out that specifi ed contact.
3.3 ADD NEW CONTACT
You can add a new contact entry to the phonebook of SIM 1, SIM 2 and
phone memory.
On selecting SIM 1 and SIM 2 to save the phone number, you get the
following fi elds to edit:
• Name
• Number
On selecting Phone memory to save the phone number, you get the
following fi elds to edit:
• Name
• Number
• Home Number
• Company Name
• E-mail Address
• Offi ce Number
• Fax Number
• Birthday
• Associated Picture
• Associated Video
• Associated Sound
• Caller Group
Page 15
15
!
3.4 COPY ALL
This function enables you to copy all entries both from the SIM card to
Phone / Other SIM and vice versa.
3.5 DELETE
You can delete entries from the SIM card and Phone.
To delete entries from SIM card or Phone select “From SIM 1”, “From SIM
2” (if both are inserted in the phone) and “From Phone” respectively.
You can select “One by One” to delete entries by selecting a particular
phone number.
3.6 CALLER GROUPS
This mobile phone supports incoming call group function. You can
select groups, view and edit group details under incoming call group list
interface.
Member addition or reduction of incoming groups is only limited
to phone record on the mobile phone.
3.7 EXTRA NUMBERS
This feature enables you to enter Service Dialing Numbers and SOS
Numbers in SIM 1 and SIM 2.
3.8 SETTINGS
This function enables you to check memory status and preferred storage
location.
3.8.1 Memory status
It is the default storage location of the phone number. You can also select
different storage location when saving a phone number.
3.8.2 Preferred storage
It enables you to select your preferred storage location as “SIM memory”
or “Phone memory”.
If either of your storage location gets full, the phone will
automatically save your message at an alternate location.
Note:
Note:
!
Page 16

16
3.8.3 Fields
It enables you to set vCard details, such as Home number, Company
name, E-mail address, etc.
3.8.4 My vCard
You can create your own card via vCard method. The options available
are:
Edit my vCard: Enables to edit the vCard by entering details in the
following fi elds:
• Name
• Number
• Home Number
• Company Name
• E-mail Address
• Offi ce Number
• Fax Number
Send my vCard: Enables you to send your vCard.
3.8.5 vCard version
This function enables you to set the version of your vCard.
4 MESSAGES
4.1 SMS
The phone supports Short Message Service (SMS). Picture, animation,
melody and sound can be added in the short message. Short message
can also be created by using templates.
4.1.1 Inbox
All received messages are saved in the inbox. You can further edit or
forward these messages.
Select SMS > Inbox, for accessing SIM1 and SIM 2 messages and to
select the SIM use the navigation key. On selecting the message, press
Option and the following options will display:
Reply: Enables to reply to the sender of the message.
Delete: Enables to delete the current message.
Edit: Enables you to edit and forward the current message.
Forward: Enables you to forward the current message.
Copy to Phone/SIM: Enables to copy the messages to SIM/Phone.
Page 17

17
Move to Phone/SIM: Enables to move the messages to SIM/Phone.
Chat: Enables to chat with the sender of the current message.
Delete All: Enables to delete all the messages in the inbox.
Copy All: Enables to copy all the messages from SIM/Phone.
Move All: Enables to move all the messages from SIM/Phone.
Use Number: Enables you to extract the number from the message and
then provides the option to dial or save the number in the phonebook.
Use URL: Enables you to extract/use the URL address from the
message.
Use USSD: Enables you to extract/use the USSD from the message.
4.1.2 Outbox
This folder contains the saved messages which are successfully sent
to the destination. On selecting outbox, press Option and the following
options will display:
Send from SIM 1: Enables you to send the current message from SIM 1.
Send from SIM 2: Enables you to send the current message from SIM 2.
Edit: Enables you to edit and forward the current message.
Delete: Enables to delete the current message.
Copy: Enables you to copy the current message to Phone/SIM.
Move: Enables you to move the current message to phone/SIM.
Delete All: Enables you to delete all the messages from outbox.
Copy All: Enables you to copy all the messages from SIM to Phone and
Phone to SIM.
Move All: Enables you to move all the messages from SIM to Phone and
Phone to SIM.
Use Number: Enables you to extract the number from the current
message and then provides the option to dial or save the number in the
phonebook.
Use URL: Enables you to extract/use the URL address from the current
message.
Use USSD: Enables you to extract/use the USSD from the current
message.
Page 18

18
4.1.3 Drafts
This folder temporarily contains the messages which are saved to be sent
or edited later.
4.1.4 Write message
You can create and send messages by this option:
Select Menu > Messages > SMS > Write Message. You can write a
message maximum of 612 characters. It also displays the length indicator
which counts backwards from 160 to 0, but it varies from page to page as
you can write a 4 page message too.
Selecting Option provides the following sub-options:
SIM 1 done: This option provides you with various options to send the
message using SIM 1.
SIM 2 done: This option provides you with various options to send the
message using SIM 2.
Use Templates: It provides option to insert the templates available in the
phone.
Insert Object: It provides option to insert object such as Picture,
Animation, Melody and Sound from their respective folders.
Format Text: It enables you to defi ne Text style, Alignment and New
paragraph.
Insert Number: Enables you to insert number in the message from the
phonebook.
Insert Name: Enables you to insert a name in the message from the
phonebook.
Insert Bookmark: Enables you to insert a bookmark in the message.
Input Method: It enables you to select the method of editing the
message.
4.1.5 Templates
Your phone contains 10 SMSes which can be used commonly. You can
Edit or Erase them.
4.1.6 Text message settings
SMS settings help in to edit the settings for the text messages. It provides
the following options:
Page 19
19
SIM 1 message settings
Profi le settings:
Enables to select the profi le you have confi gured in your mobile phone.
Common settings:
• Delivery report: Enables to get the delivery notifi cation by making the
status ON/OFF.
Memory status:
It enables to check SIM and Phone memory status.
Preferred storage:
It enables you to select your preferred storage location as “SIM memory”
or “Phone memory”.
If either of your storage location is already full, the phone will
automatically save your message to the corresponding location
SIM 2 message settings:
Please refer to the content in “SIM 1 message settings”.
4.2 MMS
MMS stands for Multimedia Message Service, whose largest feature is its
support for multimedia function, capable of transmitting multimedia format
information such as texts, images and voice.
MMS service needs service provider support, before use. Please confi rm
whether your SIM card supports this service or consult relevant service
provider. If your phone supports MMS function, you need to make
some necessary MMS settings for receiving and sending multimedia
information.
4.2.1 Write message
You can create multimedia messages by this option. You can edit all the
fi elds with the help of left soft key. The fi elds which can be entered are:
To: Enables you to insert the main recipient number.
Cc: Enables you to enter carbon copy recipient.
Bcc: Enables you to enter blind carbon copy recipient.
Subject: Enables you to enter and edit subject.
Edit Content: Enables you to edit the content.
Note:
!
Page 20
20
4.2.2 Inbox
This folder contains multimedia messages received from other users.
4.2.3 Outbox
This folder contains the saved messages which are delivered to the
recipient.
4.2.4 Drafts
This folder is a temporary storage place for MMS that are waiting to be
sent.
4.2.5 Template
Your phone contains a default template of multimedia messages.
4.2.6 MMS settings
MMS settings help in to edit the settings for multimedia messages. The
different options are:
Compose: Enables to compose a multimedia message, including Creation
mode, Picture resizing, Auto signature and Signature.
Send: Enables to set Validity period, Delivery report, Read report, Priority,
Slide timing, Delivery time for sending multimedia messages.
Retrieve: Enables to set Home network, Roaming, Read report and
Delivery report for receiving multimedia messages.
Filter: Enables to set allow/reject multimedia messages on some criteria:
Anonymous – Allow/Reject
Advertisement – Allow/Reject
Server Profi le: Enables to activate and edit the server profi le. Please
contact your service provider for settings.
Memory Status: Enables to view the memory usage ratio i.e. used space
and free space for multimedia messaging.
1. Cases of delivery report and anonymous transmission are
related to the service provided by your service provider, for more
information contact your service provider.
2. Your phone has specially reserved certain space for storing
MMS. Saving a large amount of MMS might totally occupy this
available storage capacity, therefore your phone might prompt
your storage capacity as full. At this time you must fi rst delete
redundant information in all the MMS mail directories, so as to
ensure there is suffi cient space for saving new MMS.
Note:
!
Page 21

21
4.3 CHAT
It is possible to set up two Chat rooms by formulating “My Nickname” and
“Remote Number”, in this way chatting through short messages with the
other party becomes possible.
4.4 VOICE MAIL SERVER
When you cannot answer a call, you can request the caller to leave a
message through Voice mail service which you can listen to, by accessing
your Voice mail. Voice Mail Server is a network service to which you may
need to subscribe. For more information, contact your service provider.
Select Messages > Voice Mail Server, to access this option.
4.5 BROADCAST MESSAGE
Broadcast Message enables you to receive messages on various topics,
such as weather or traffi c conditions from your service provider (network
service). For available topics, relevant topic numbers and more information
contact your service provider.
The options available under it are:
Receive Mode: Enables to make receiving mode ON/OFF.
Read Message: Enables to read the messages received.
Languages: Enables to set out the preferred language.
Channel Settings: Enables to set out the preferred channel.
5 CALL SETUP
On standby mode, press the calling key to directly access the call logs of
the SIM 1 card, and press the left soft key to directly access the dialed call
logs of the SIM 2 card.
5.1 Call history
You can view SIM 1’s/SIM 2’s information related to call records, including
Missed Calls, Dialed Calls, Received Calls, Delete Call Log, Call Time,
Call Cost, SMS Counter and GPRS Counter. If you have inserted only one
SIM card, you can see only one of the SIM card’s phone records.
5.1.1 SIM 1 call history
5.1.1.1 SIM 1 missed calls
You can see the latest missed calls.
5.1.1.2 SIM 1 dialed calls
You can see the latest dialed calls.
Page 22

22
5.1.1.3 SIM 1 received calls
You can see the latest received calls.
5.1.1.4 Delete SIM 1 call logs
You can delete Missed calls, Dialed calls, Received calls and All calls from
SIM 1 card.
5.1.1.5 SIM 1 call timers
You can view time of the Last call, Dialed calls, Received calls and Reset
all call’s time on SIM 1 card.
5.1.1.6 SIM 1 call cost
You can view call cost of the Last call and Total call cost on SIM 1 card.
You can also Reset cost and set the Maximum cost and the Price per unit
on SIM 1 card. It requires network support.
5.1.1.7 SIM 1 text message counter
View and reset the numbers of short messages sent and received on
SIM 1 card.
5.1.1.8 SIM 1 GPRS counter
View the volume of GPRS last sent, last received, all sent and all received
on SIM 1 card. You can also reset the counter on SIM 1 card.
5.1.2 SIM 2 call history
Please refer to the content in “SIM 1 call history”.
5.2 CALL SETTINGS
5.2.1 SIM 1 Call Settings
5.2.1.1 Caller ID
This option enables you to set your caller ID by network, hide your caller
ID or send your caller ID. You can hide your caller ID only if it is supported
by your network provider.
5.2.1.2 Call waiting
This option enables you to Activate/Deactivate call diversion and check
the query status.
5.2.1.2.1 Activate
If activated, an incoming call is signaled by a call waiting tone when
you are on another call. The number/name of the incoming call will be
displayed simultaneously.
5.2.1.2.2 Deactivate
Enables you to cancel all the call waiting functions.
Page 23

23
5.2.1.2.3 Query Status
Enables to enquire the current status of your query from the network.
5.2.1.3 Call divert
Enables to set Divert all voice calls, Divert if unreachable, Divert if no
answer, Divert if busy, Divert all data calls and Cancel all diverts.
5.2.1.4 Call barring
It allows you to restrict the calls that you make and receive on your phone.
You can set outgoing calls, incoming calls, cancel all calls or change the
call barring password. It is a network based service.
5.2.1.5 Line switching
This option enables you to change the phone line in use.
5.2.1.6 Closed user group
Enables you to create group of contacts and confi gure them for various
tasks.
5.2.2 SIM 2 Call Settings
Please refer to the content in “SIM 1 call settings”.
5.2.3 Blacklist
This function enables you to add the number in the blacklist and activating
it enables you to block calls from that number.
5.2.3.1 Mode
Enables you to set the mode to On or Off.
5.2.3.2 Blacklist Number
This function enables you to add the number in the blacklist to block calls
from that number.
5.2.4 Auto redial
This option enables you to set auto redial on/off.
5.2.5 Speed dial
This option enables you to set the speed dial phone numbers. You can set
8 speed dial options on number keys 2-9.
5.2.6 IP dial
Set and activate the IP* dial to dial a phone number with an automatically
added IP prefi x. This function needs network support.
5.2.7 Background sound
This option enables you to play a background sound during an active call.
You can also add your own sound.
5.2.8 Call time display
It enables you to power on/off the call time display.
Page 24

24
5.2.9 Call time reminder
This function enables you to set the call time reminder as Single time or
Periodic.
5.2.10 Auto call disconnect
It enables you to disconnect the current call automatically after certain
duration of time. You can on/off this option and set the time between 1 and
9999 seconds.
5.3 VOICE CHANGER
Voice changer is the unique feature of the phone which let you to change
the voice. You can set the voice changer On/Off and select different kinds
of voices.
6 FILE MANAGER
You can use File Manager to organise your fi les in folders, in the phone
and memory card. If a memory card is inserted, the fi les stored on it are
organised separately.
Select Phone or Memory card and then select Options to browse, copy,
delete, and move fi les in folders. Depending on the size and type of
memory card the read time will differ.
Page 25

25
7 MULTIMEDIA
7.1 IMAGE VIEWER
Image Viewer provides you with a quick view of the picture functions. You
can view the pictures from the photo’s folder.
View: Enables you to view the captured images.
Browse Style: You can view images in List style or Matrix style.
Use: Enables you to send the image to wallpaper, screensaver or to the
phonebook.
Send: Enables you to send the images via MMS or Bluetooth.
Rename: Enables you to change the name of the image.
Delete: Enables you to delete the current image.
Delete all Files: Enables you to delete all the image fi les stored in the
image viewer folder.
Sort By: Enables you to sort the images in the Image Viewer by name,
type, time and size.
Storage: Enables you to set the storage location for the image.
7.2 VIDEO PLAYER
Video player enables you to play the video fi les stored on your Phone or
Memory card. Select a video fi le that you want to play using direction keys
“Up” and “Down” and then press OK key to enter the options menu. The
option enables you to perform operations such as Play, Forward, Rename,
Delete, Delete All Files, Sort and Store.
In the playing interface, press OK key to play current video fi le. Press “OK”
key again to pause playing. Press right soft key to stop playing. Press up
or down key to adjust volume and left or right key to quickly adjust the
speed of video playing. Your phone supports AVI video and certain 3GP
video formats.
7.3 AUDIO PLAYER
Audio player allows you to play audio fi les. The phone supports T-Flash
Memory card. You need to save music fi les to My Music folder to have a
direct access.
• Play: Play the music fi les.
• Detail: Check the details of music fi les.
• Add to Ringtones: Add the music to ringtones.
• Refresh List: Enables you to update the play list.
• Settings: Settings includes Auto generated list, Repeat, Shuffl e,
Background play and Sound effects.
Page 26
26
!
7.4 SOUND RECORDER
Your phone supports two kinds of recording formats: AMR and WAV.
Select a format from settings in options. You can also record and save a
call in the Phone or the Memory card.
7.5 FM RADIO
You can use your phone to listen to FM radio stations once the original
Headset is plugged into the accessory’s connector.
Select Menu > Multimedia > FM Radio, to access radio controls, it also
provides the following options:
• Channel List: Enables you to check out the list off all the available
channels.
• Manual Input: Enables you to receive and set the channels manually.
• Preset Auto Search: Enables you to search for channels automatically
and reset the channel list.
• Settings: Enables to set the settings for “Background Play”, “Loud
Speaker”, “Record Format”, “Audio Quality” and “Record Storage”.
• Record: Enables you to record FM programmes, while you are
enjoying them. It can be processed by pressing OK Key.
• Append: If there is any record, then you can append record after it.
• File List: Enables to scroll over all of the records available in phone.
7.6 SCHEDULE FM RECORD
You can schedule to record one or more FM programmes at a time, as per
you confi gure. You can set up to four sets of recordings.
Make sure you have enough free memory on your Phone or the
Memory card to store the recordings.
7.7 MELODY COMPOSER
You can compose your own ringtones and music by using this option.
Note:
Page 27

27
8 GAMES
Select Menu > Games, to access the games.
Game interface offers option to select a game, the user can select the
following games from the interface:
• F1 race
• Riches
• Puzzle
On selecting a game the user will receive the following options:
Start Game: To start the game
Game Level: Enables to confi gure the game level.
Best Grades: Enables to see best grades/score.
Game Help: Displays the introduction about how to play the game.
Game interface also displays the Game settings option:
Game Settings: You can confi gure your game settings such as
background music and sound effect by this option
Page 28

28
9 SERVICES
9.1 STK
STK (SIM Application ToolKit) is shown only if it is provided on your SIM
card. For further details, please contact your network operator.
9.2 WAP
WAP function enables you to use the phone to surf the internet.
Homepage: Enables to connect browser to the homepage, you have set.
Bookmarks: The phone displays a list of stored bookmarks. To add a
page to bookmarks go to Bookmarks > Options > Add bookmark.
Recent Pages: Displays the recent web pages visited.
Offl ine Pages: Displays the list of web pages, previously visited, while
you are working offl ine.
Enter Address: Enables you to enter the website address for visiting a
particular web page.
Service Inbox: This folder stores all the messages from the operator and
the WAP functional messages.
Settings: Enables to set the browser settings, including SIM selection,
Profi le editing, Browser options, Service Message settings, Clearing
cache, Clearing cookies and Trusted certifi cates.
9.3 DATA ACCOUNT
This function enables you to set the account information:
GSM Data: Enables you to set Account name, Number, User name,
Password, Line type, Speed and DNS.
GPRS: Enables to set Account name, APN, User name, Password and
Authentication type.
Page 29
29
10 ORGANISER
10.1 E-BOOK READER
Your phone can be used to read the books by storing them in *.txt fi le*
format. It supports view of UCS-2, ASCII and UTF-8 encoding documents.
Select Menu > Organiser > E-Book Reader, to access/read the books
stored in your E-Book folder.
10.2 CALENDAR
You can use the phone’s calendar to keep track of reminders, calls you
need to make, meetings and birthdays. You can set the calendar to sound
an alarm for your task.
Pressing the left soft key for “Option” which enables you to View Tasks,
Add task, Jump To Date and Go to weekly view.
View Tasks: Enables you to view task’s list and add tasks.
Add Task: Use Navigation keys for moving to the day you want and
press Options to Add Task. You can select task type such as: Reminder /
Meeting / Course / Date / Call / Anniversary.
Jump to Date: Enables you to input a date to jump to a particular date.
Go to Weekly View: Enables you to access monthly view and weekly
view.
10.3 CALCULATOR
You can use your phone’s calculator to add, subtract, multiply and divide.
1. Press the # key to enter decimal point.
2. Press the up, down, left and right key and OK key to select +, -, x, /, +
and = respectively.
3. Press Clear to delete the fi gures.
This calculator is limited in accuracy and rounding off, thus,
errors might occur.
Note:
!
Page 30

30
10.4 UNIT CONVERTER
You can make the units conversion for weight and length.
In the fi rst entry fi eld, select the format from which unit you want to convert
and to which. In the second entry fi eld, enter the value to be converted.
After entering the value, press OK to automatically convert it into required
value.
10.5 CURRENCY CONVERTER
You can use your phone for converting currency. You have to select the
amount and currency to which it has to be converted.
10.6 TO DO LIST
Use your phone to keep a track of Reminder, Meeting, Course, Date, Call
and Anniversary. It displays all schedules for present and the future days,
under the option menu, it is possible to Browse, Add, Edit, Delete, and
Delete All the entries.
10.7 STOPWATCH
10.7.1 Typical stopwatch
• Split Timing: Enables you to take intermediate timings in a sequence.
To start the time observation, press Start. Press Split every time you
want to record an intermediate time. To stop the time observation, press
Stop. To start the time observation again, press Resume, the new time
will be added to the previous time.
• Lap timing: To record repetitive lap timing, reset each period to zero.
To start the time observation, press Start. Press Lap every time you
complete a lap and want to reset time for the next lap. To start the time
observation again, press Resume and the new time will be added to the
previous time.
• View Record: Enables you to View, Add, Edit, Delete and Delete all the
list of records.
10.7.2 nWay stopwatch
It offers to take the intermediate time for all the directions by pressing up/
down/left/right key. The total time is displayed on the top of the screen.
Page 31

31
10.8 ALARM
You can set the device to sound an alarm at a desired time. The mobile
phone can set upto fi ve alarms, and supports shutdown alarm.
Select Menu > Extras > Alarm, to access the alarm.
To set the Alarm, select the time and set the Options: On /Off, Time,
Repeat Type, Snooze time and Alert type.
You can repeat the alarm Once, Everyday or as User Defi ned.
10.9 WORLD CLOCK
You can scroll to browse every city’s time zone in the world map. The
related date and time will be displayed at the bottom of the screen.
10.10 HEALTH
Your phone is a complete health calculator, it offers two different
calculations:
10.10.1 BMI (Body Mass Index)
This feature enables you to calculate Body Mass Index, by entering the
details in the fi eld:
Select Male / Female.
Height: Enter the height in Cm.
Weight: Enter weight in Kg.
10.10.2 Menstrual
This feature enables you to perform menstrual calculations, by entering
the details in the fi eld:
Last Menses Date: Enter the last menstrual date.
Average Period: Enter the average period in days.
10.11 FLASHLIGHT
Your phone is equipped with fl ashlight and you can switch ON/OFF as per
your convenience.
Page 32

32
11 SETTINGS
11.1 DUAL SIM SETTINGS
You can set the dual SIM mode on your mobile phone, according to the
following options:
• Dual SIM Active
• Only SIM 1 Active
• Only SIM 2 Active
• Flight Mode
11.2 PHONE SETTINGS
Select Menu > Settings > Phone Settings, to get access to these
options:
Time and Date: Enables to set time and date by setting home city, time,
date and format.
Schedule Power: Enables to set the time for automatic power on/off.
Language: Enables to select the desired language for the display text.
Preferred Input Methods: Enables to select the desired input method for
the default input method.
Display Properties: Enable to set display characters such as Wallpaper,
Screen saver, Date and Time.
Greeting Text: Enables you to enter words as your greeting text once you
switch on the phone.
Sound Effect: Enables you to set the audio effects.
Shortcuts: Enables you to set the shortcuts for the functions you use
frequently.
Dedicated Key: Enables to dedicate specifi c keys for specifi c functions.
Auto Update of Date and Time: Enables to update the date and time
automatically.
Page 33
33
!
11.3 USER PROFILES
You can select your own user profi le for the phone.
Select Menu > Settings > User Profi les, to access different profi les.
• General
• Meeting
• Outdoor
• Indoor
• Headset
• Save Power
You can activate and customise them as per your need.
Activate: Enables to select a particular profi le and activate it.
Customise: Enables to set Tone setup, Volume, Alert type, Ring type,
Extra tone and Answer mode.
11.4 NETWORK SETUP
11.4.1 SIM 1 network setup
11.4.1.1 Network selection
Search or select network can help search the network where you are. You
can select the network selection mode as: Automatic or Manual. When you
select automatic, the phone will make the preferential selection according
to the network. When you select manual, you are required to select the
same network as the registered network.
11.4.1.2 Preferred networks
Select your preferred network. The default network is the service provider
of your SIM card.
11.4.2 SIM 2 network setup
Please refer to the content in “SIM 1 network setup”.
11.5 SECURITY SETUP
11.5.1 SIM 1 security setup
11.5.1.1 SIM 1 lock
The PIN number can prevent the illegal use of your SIM card. You can set
SIM 1 lock On/Off by this feature.
If you input the wrong PIN code thrice you will be asked for the
PUK code. PUK is used to release and modify the locked PIN.
If the PUK code is not provided or missed, then please contact
your network operator.
Note:
Page 34

34
11.5.1.2 Fixed dial
This function enables you to set the fi xed dial option On or Off.
11.5.1.3 Barred dial
This function enables you to set the barred dial option On or Off.
11.5.1.4 Change password
This option let you to change the password of your phone.
11.5.2 SIM 2 security setup
Please refer to the content in “SIM 1 security setup”.
11.5.3 Phone lock
You can lock or unlock the phone. Enter the password to activate or
deactivate the phone lock. When the phone is locked, you will be required
to enter the phone password.
11.5.4 Auto keypad lock
You can lock or unlock the phone keyboard and set the key lock time
between 5 sec. – 5 min.
11.5.5 Change password
This option lets you change the password of your phone.
11.5.6 Mobile Tracker
This function enables you to trace the phone incase it gets lost. Your
default password is “0000”. If someone inserts another SIM card in to your
lost mobile, you will receive an SMS from the new SIM card indicating the
new user. The different options which have to be confi gured are:
11.5.6.1 Setting Status
Enables to set the Status to On or Off.
11.5.6.2 Guard Number
Enables you to specify the bonding number to which the message should
be sent in case the SIM is changed.
11.5.6.3 Trace Content
Enables you to specify and edit the contents of the message mean’t to be
received, incase the SIM is changed.
11.5.7 Long distance Control
This function is useful when you lose your mobile. You can control your
lost mobile from a distance. Your default password is “0000”. You can
also change the password for your security. To set a new password go to
Settings > Security Setup > Change Password.
Page 35
35
!
You can execute the following functions in long distance control:
Control Functions:
• Power Off - It will power off the lost mobile.
• Disk Format – It will format the disk.
• Delete Phonebook – It will delete all phone book entries.
• Delete SMS – It will delete all SMSes.
• Phone lock – It locks the phone.
Control Number:
Control Number Mode:
• Appoint Mode - You need to defi ne a specifi c mobile number as the
Appoint Number for instance +91**********, from which you can control
your lost phone.
• Random Mode – If you select random, you will be able to control your
lost phone from any mobile.
Appoint Number:
You can defi ne up to 5 mobile numbers with +91********** from which you
can control your lost mobile.
Receive Content:
It enables you to send content to your lost mobile through SMS.
11.6 RESTORE FACTORY SETTINGS
All settings can be restored to factory settings with this function. The Lock
code for the phone in factory setting is 0000.
On restoring, the phone to factory settings, the default network
settings will remain the same which was previously confi gured.
Note:
Page 36

36
12 DISCLAIMER
Features and specifi cations specifi ed in this manual are subject to
change without prior notice. Certain mobile phone features may not be
activated by your service provider, and/or their network settings may limit
the feature’s functionality. Services and some features such as GPRS,
e-mail may be dependent on the network, SIM card, as well as on the
compatibility of the devices used and the content formats supported,
and may require network/service subscription/solutions. Data transfer
speeds are network dependent. You must use the same Bluetooth
Profi le to enable the Bluetooth devices to communicate with one
another. To determine the profi les supported by other Videocon products,
visit http://www.videoconmobiles.com For other devices, contact
their respective manufacturers. Certain Bluetooth features including
those listed may not be supported by all compatible Bluetooth enabled
devices, and/ or the functionality of such features may be limited in certain
devices, or certain wireless carriers. Always demand for original Videocon
mobile phones to protect yourself from buying tinkered and/or used or
tampered phones. Buy Videocon tested and Videocon certifi ed compatible
accessories and add-ons. The warranty is applicable only for Videocon
phones, the company is not responsible for any loss or theft. Always use
Videocon original Enhancements (including batteries) for safety. The use of
any other type may invalidate warranty applicable to the mobile phone and
can also be dangerous. The phone is designed to operate using Lithium-
ion batteries approved by the Videocon phone manufacturers. Using non
approved batteries with the phone may result in poor performance and
can cause damage to the phone or its enhancements or attachments.
The display and products visualisation here are for illustrative purposes
only. All features, functionality and other product specifi cations are based
on the latest available information and are correct at the time of printing,
however such product specifi cations are subject to change without notice
based on newer versions and enhancements. The unauthorised copying
of copyrighted material is not legal and is inimical to the provisions of the
Copyright Laws of India and other countries.
Kindly refer to http://www.videoconmobiles.com website for knowing
newer versions of information provided in this manual, which might be of
further use.
Page 37
37
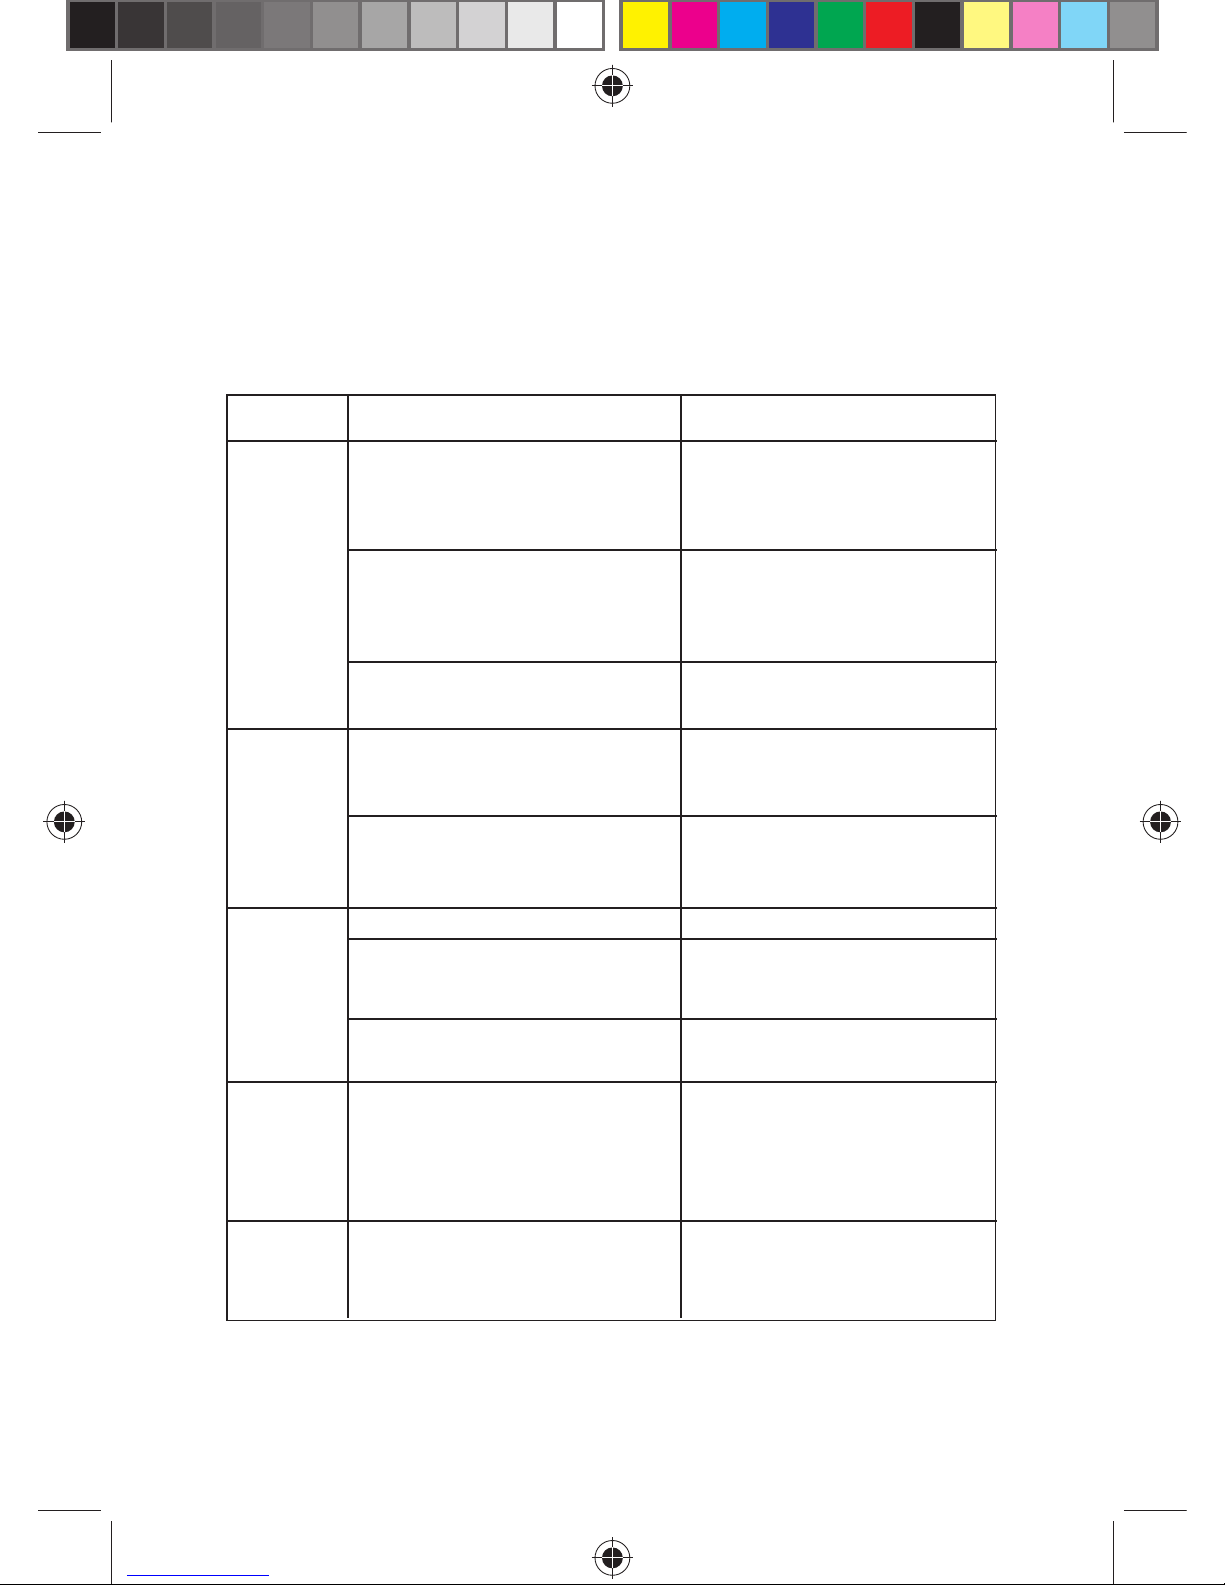
APPENDIX I: TROUBLESHOOTING
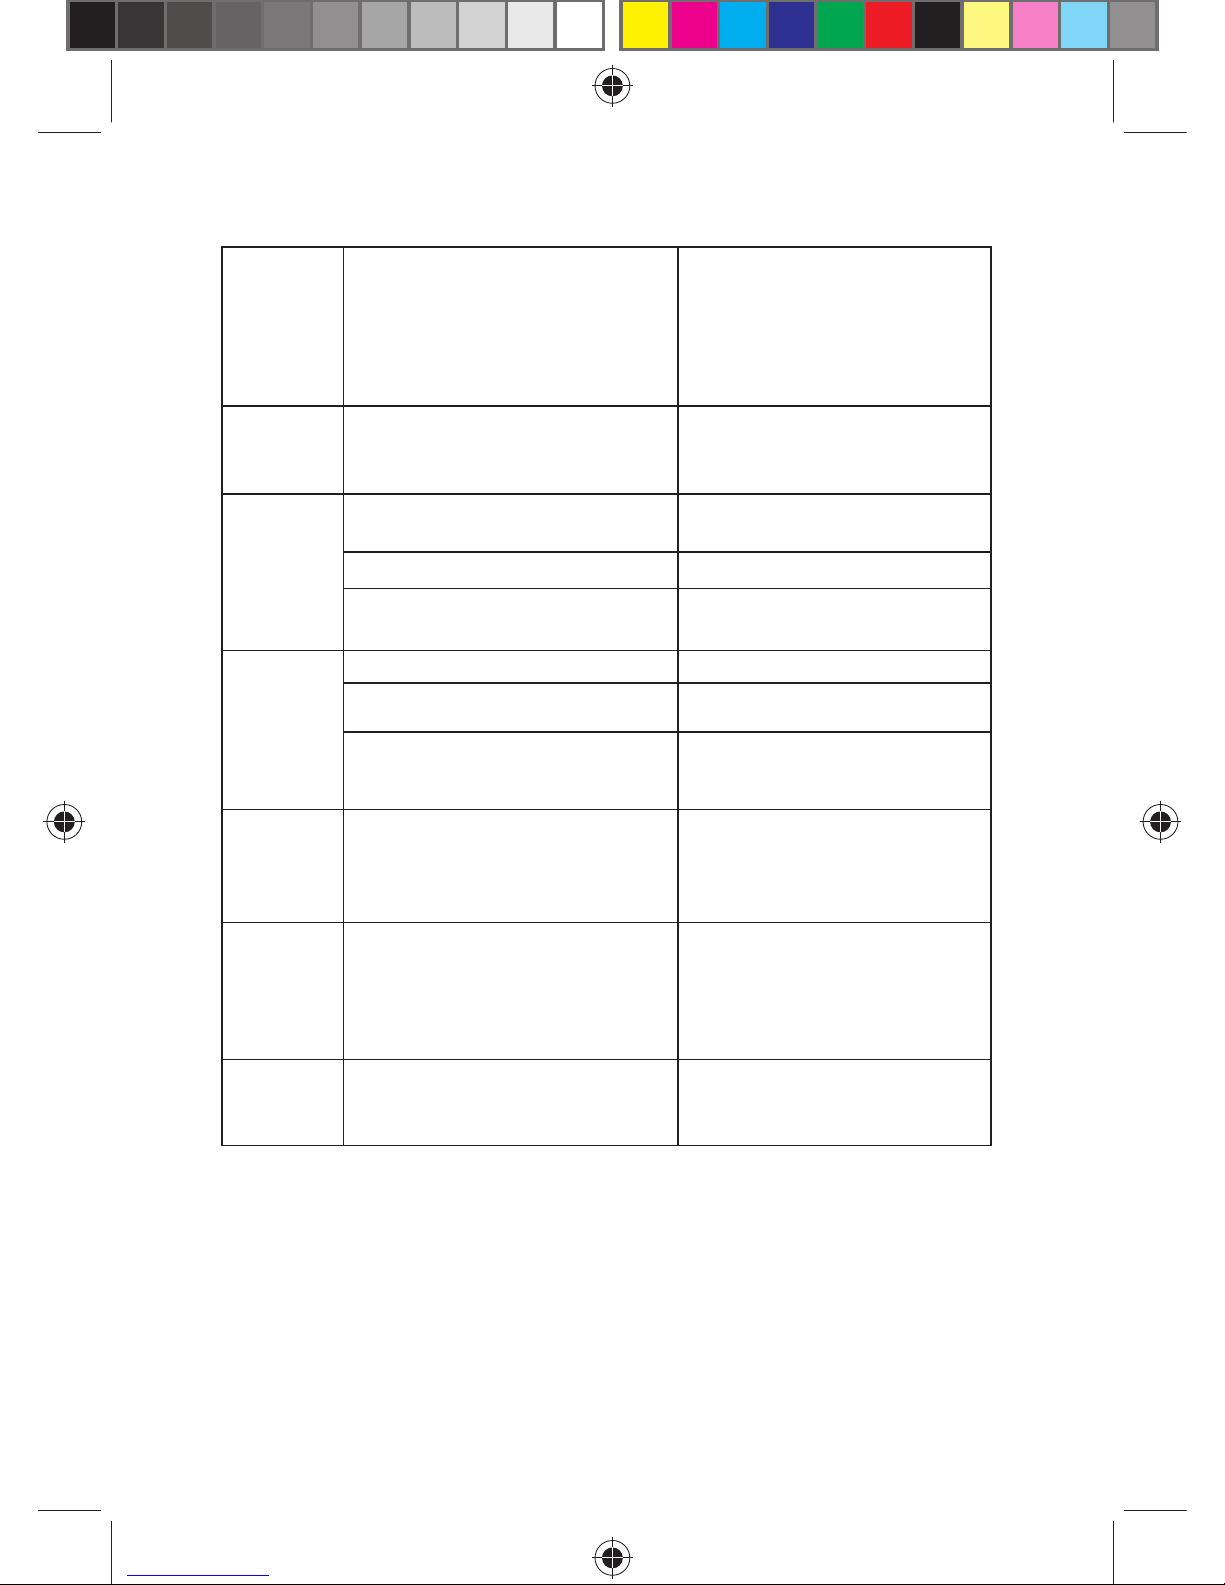
If you encounter problems while using the phone or if it performs erratically, you can consult the
information in the following table. If a particular problem cannot be resolved by using the following
information, contact the dealer from whom you purchased the phone.
Problems Possible causes Possible solutions
Poor The network signal is too weak at your Move to a location where you can
reception current location, for example, in a receive the network signal properly.
basement or near a tall building, wireless
transmissions cannot reach effectively.
The network is busy at the current time, Avoid using the phone at such time or
for example, during the peak times, there try again after waiting for a while.
may be too much of network traffi c to
handle additional calls.
You are too far from a base station You can request a service area map
for your service provider. from your service provider.
Echo or noise Poor network trunk quality on the part of Press the ending key and dial again.
your service provider. You may be switched to a better quality
network trunk or phone line.
Poor local telephone line quality Press the ending key and dial again.
You may be switched to a better
quality network trunk or phone line.
Battery The battery or battery charger is damaged. Contact the dealer.
not charging The temperature of the phone is below - Adjust the battery charging
properly 10°C or higher than 55°C. environment to avoid extremes of
temperature.
Poor contact between the battery and Check all connectors to make sure all
charger. connections have been made properly.
Shortened The standby time is related to your If you are located in an area where
service provider system confi guration. signaling is weak, temporarily switch
The same phone used with different off the phone.
service providers’ systems will not provide
exactly the same length of standby time.
The battery is depleted. In high Use a new battery.
temperature environments, battery life
gets shortened.
Page 38
38
If you are not able to connect to the Change your location to one where
network, the phone will continue to the network is accessible or temporarily
send out signals as it attempts to turn off your phone.
locate a base station. Doing so
consumes battery power and will
consequently shorten the standby time.
You cannot Battery power has exhausted. Recharge the battery.
switch your
phone on
SIM card SIM card malfunctioning or damaged. Take the SIM card to your service
error provider for testing.
SIM card is inserted improperly. Insert the SIM card properly.
Debris on the SIM card metal area. Use a soft and dry cloth to clean the
SIM card metal area.
Unable to SIM card invalid. Contact your service provider.
connect to You are not within the service area of Check the service area with your
the network the network. service provider.
Poor signal. Move to an open space or if you are
inside a building, move closer to a
window.
PIN code is You have entered an incorrect PIN Contact your service provider. If the
blocked code for three consecutive times. service provider provides the PUK code
of the SIM card, use the PUK code to
unlock the SIM card.
Unable to The memory of the phonebook is Delete unnecessary data from
enter already full. the phonebook.
information
into the
phonebook
Unable to Your service provider does not support Contact your service provider.
select certain these features or you have not applied
features for services that provide these features.
Page 39
39
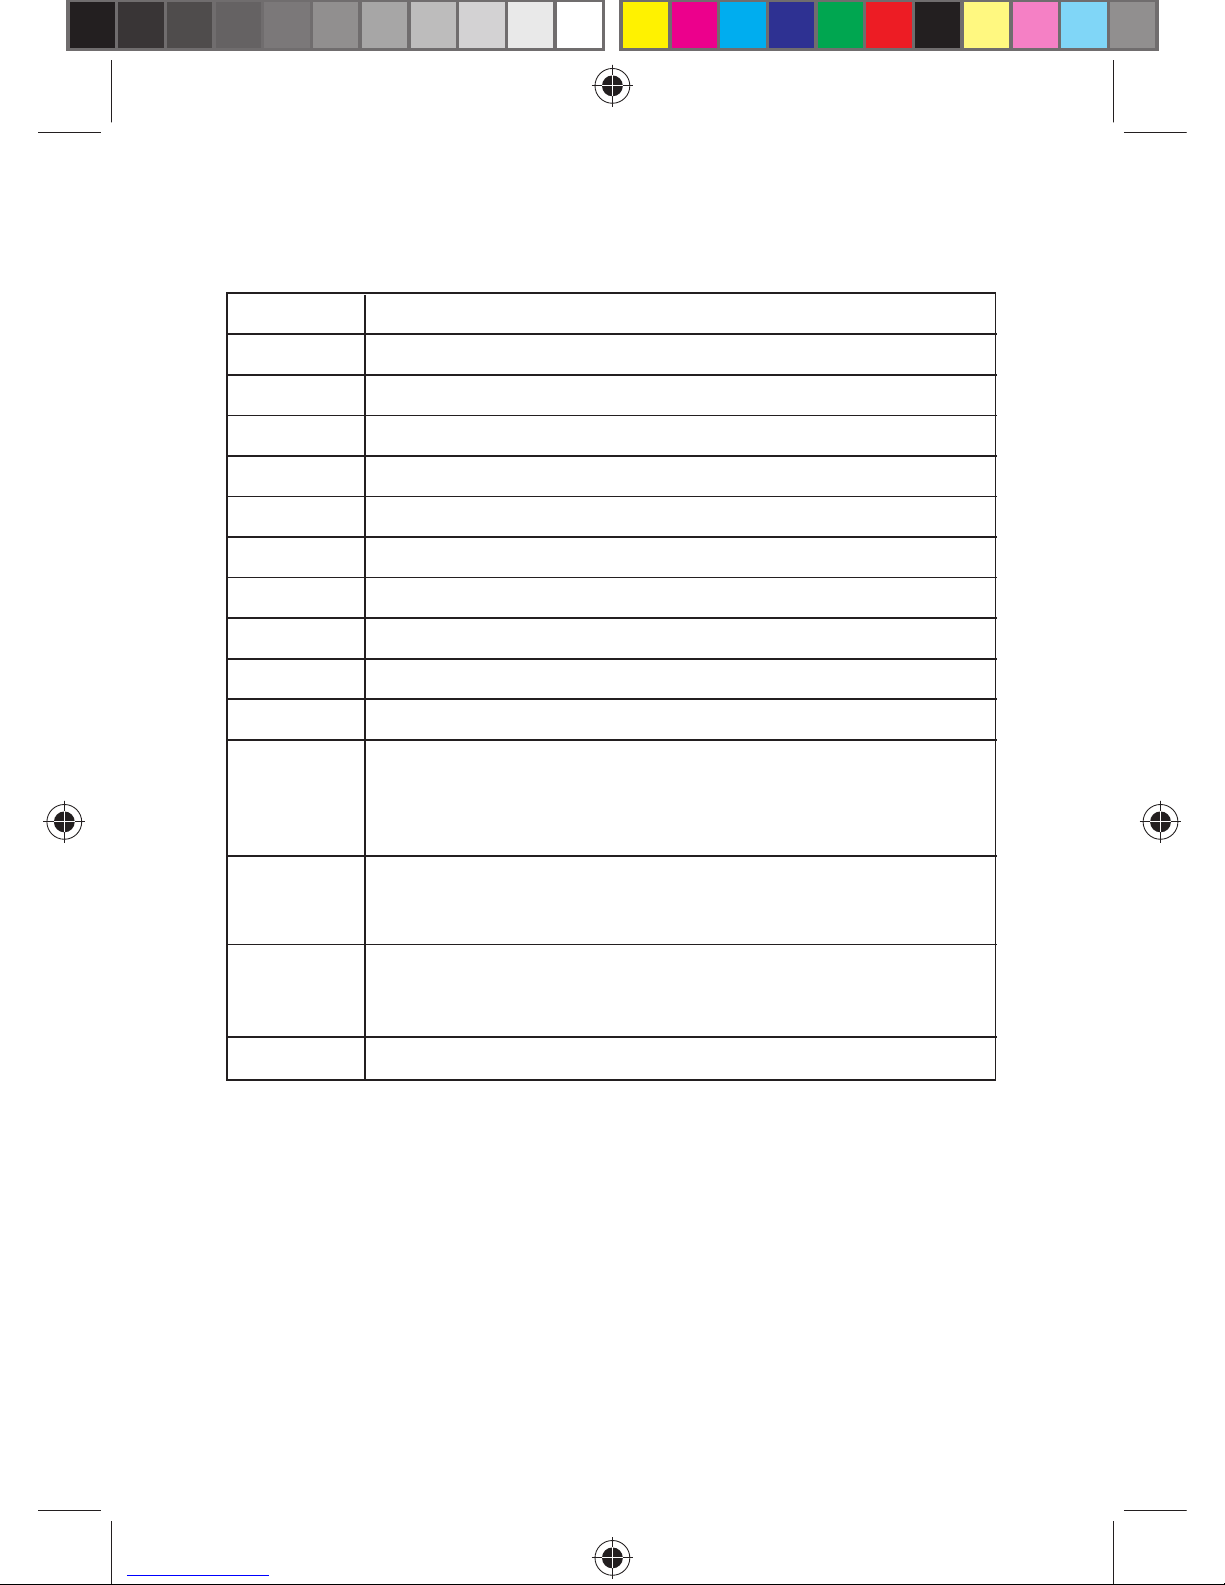
APPENDIX II: ABBREVIATIONS AND EXPLANATION
GSM Global System of Mobile Communication
GPRS General Packet Radio Service
SMS Short Message Service
WAP Wireless Application Protocol
FDN Fixed Dialing Numbers
SIM Subscriber Identity Module
PIN Personal Identifi cation Number
PUK Personal Unblocking Key
IMEI International Mobile Equipment Identity
MCC Mobile Country Code
MNC Mobile Network Code
Call waiting A service provided by the network, which allows you to answer
another incoming call without interrupting the active call,
but it is different from a conference call. You can only talk to
one party at a time while another party is put on hold.
Call divert A service provided by the network, which allows you to divert
an incoming call to a specifi ed number according to different
circumstances.
Roaming The phone is not used in the area of its local registered
network. It includes international and domestic roaming.
In this manual it refers to international roaming only.
STK SIM Application Toolkit
 Loading...