

Page 1

User Manual
A55 HD
Page 2

Table of Contents
Legal Notices ............................................................ 1
Safety Precautions ................................................... 1
Important safety measures...................................... 2
Software Update Information.................................. 3
SAR ........................................................................... 4
Getting Started ........................................................ 4
Assembling the device ............................................. 4
Charge the battery ................................................... 5
Battery Use .............................................................. 6
Know your device .................................................... 6
Phone Layout ........................................................... 6
Key Layout ............................................................... 7
Using the touch screen ............................................ 7
Soft Buttons ............................................................. 8
Home Screen............................................................ 8
Notification Icons ..................................................... 8
Managing Widgets ................................................... 9
Add Functions to Home Screen ............................. 10
Changing Wallpaper ............................................... 10
To change the wallpaper on the Home screen: ..... 10
Using Headset ........................................................ 10
Enter text using the onscreen keypad ................... 11
Basic Operations .................................................... 11
Switch On or Off the Device................................... 11
Screen Lock and Unlock ......................................... 11
Secured screen lock ............................................... 12
Make a Call ............................................................ 12
Using Contact ......................................................... 12
Using Call Log ......................................................... 12
Answer Calls ........................................................... 13
To Set Home Page .................................................. 14
To use the Google Search Widget .......................... 15
Using the CAMERA ................................................. 16
Clicking a Photo ..................................................... 16
Viewing Images ...................................................... 17
Viewing Videos ...................................................... 17
To Add a Contact ................................................... 18
Importing Contacts ................................................ 18
Searching contacts ................................................. 18
Editing a Contact .................................................... 18
Deleting a contact .................................................. 19
Contact groups ....................................................... 19
Account Synchronize ............................................. 22
Facebook ................................................................ 23
Maps ...................................................................... 23
Places ..................................................................... 24
Navigation .............................................................. 24
YouTube ................................................................. 24
G-Talk ..................................................................... 24
Music ..................................................................... 26
Sound Recorder ..................................................... 27
Wireless and networks .......................................... 27
Device .................................................................... 28
Personal ................................................................. 29
Accounts ................................................................ 29
System ................................................................... 29
Care and maintenance ........................................... 30
Page 3
1
Legal Notices
All rights reserved. Reproduction, transfer,
distribution or storage of part or all of the contents in
this document in any form without the prior written
permission of VIDEOCON is prohibited.
VIDEOCON operates on a policy of continuous
development. VIDEOCON reserves the right to make
changes and improvements to any of the products
described in this document without prior notice.
Under no circumstances shall VIDEOCON be
responsible for any loss of data or income or any
special, incidental, consequential or indirect damages
howsoever caused.
The contents of this document are provided as it is.
Except as required by applicable law, no warranties of
any kind, either deselected or implied, including, but
not limited to, the implied warranties of
merchantability and fitness for a particular purpose,
are made in relation to the accuracy, reliability or
contents of this document. VIDEOCON reserves the
right to revise this document or withdraw it at any
time without prior notice.
The availability of particular products may vary by
region. Please check with VIDEOCON Executive.
Safety Precautions
Please comply with these precautions to avoid
putting yourself or other around you in a dangerous
or illegal situation, and ensure peak performance of
your device.
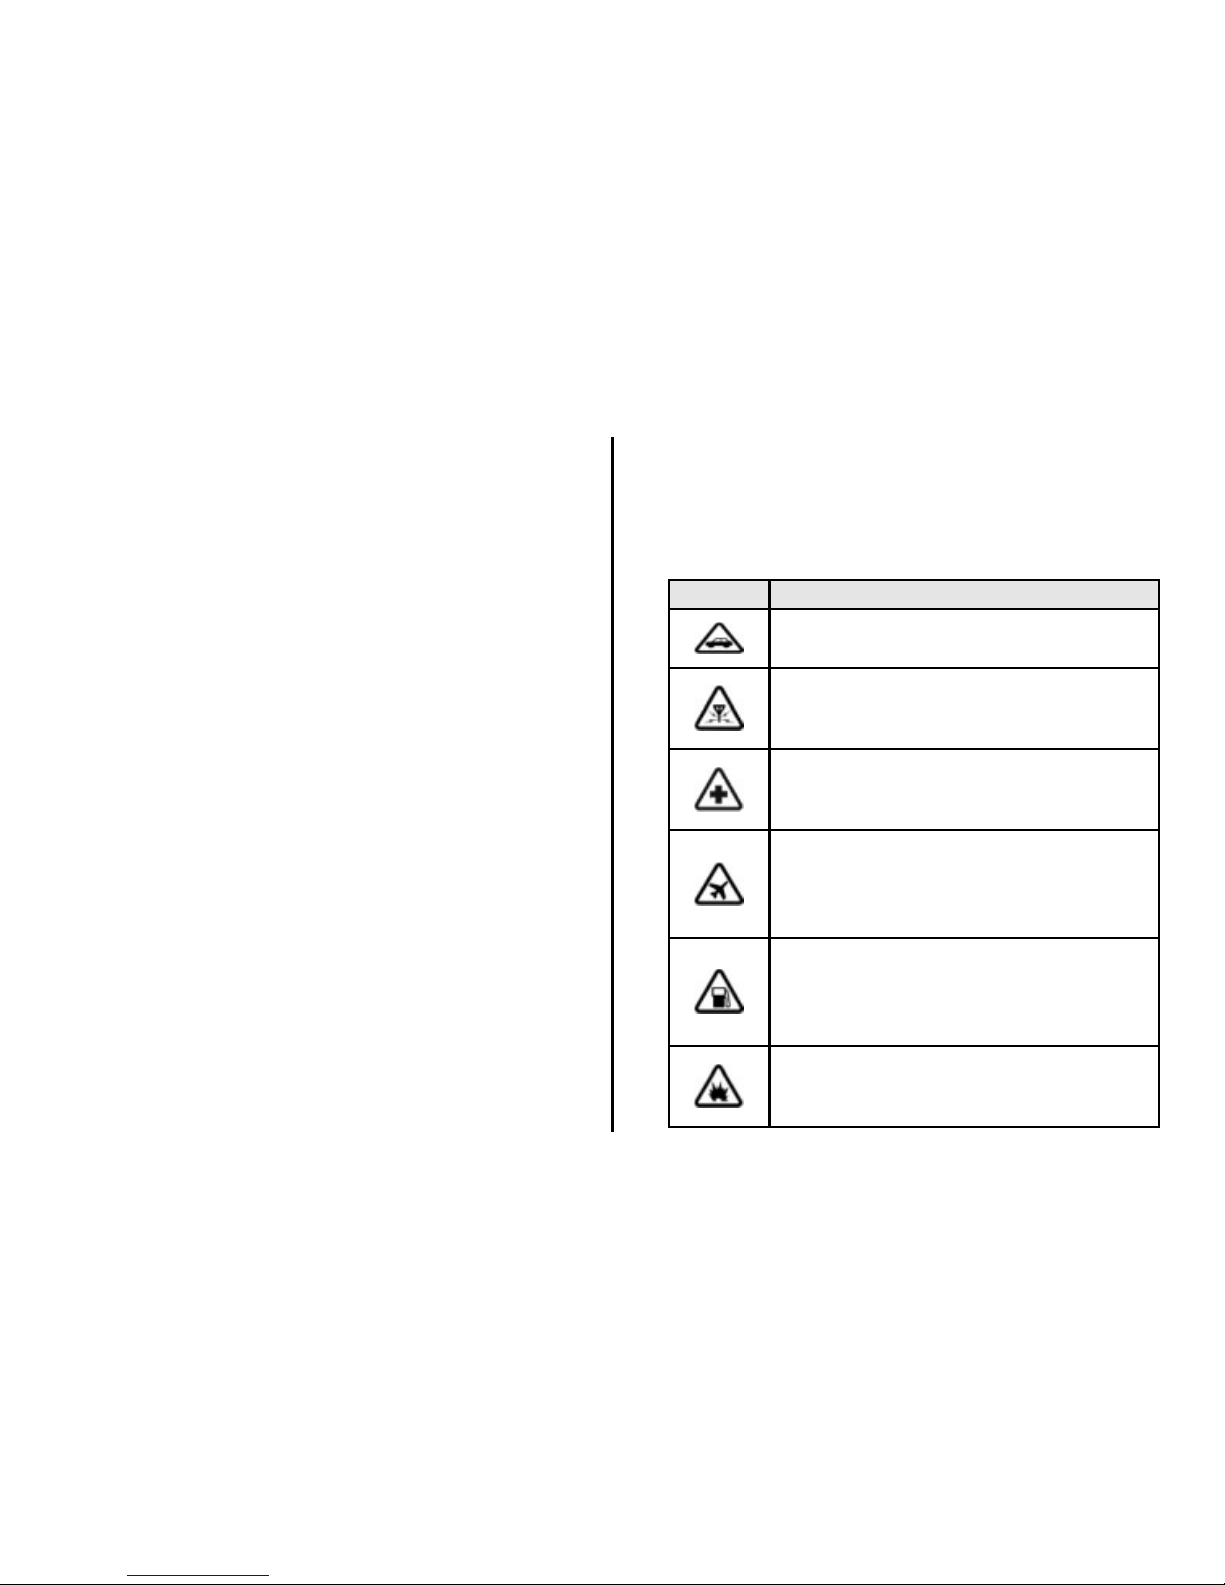
Icon
Description
ROAD SAFETY
Do not use your phone while driving.
INTERFERENCE
All wireless devices could affect your
device performance.
HOSPITALS
Switch off your device near hospitals
and medical equipment.
AIRCRAFT
Switch off your device in aircraft.
Wireless devices can cause
interference in aircraft.
REFUELLING
Switch off the device when refueling.
Do not use the device at refueling
point.
BLASTING AREAS
Switch off the device near blasting
areas.
Page 4
2
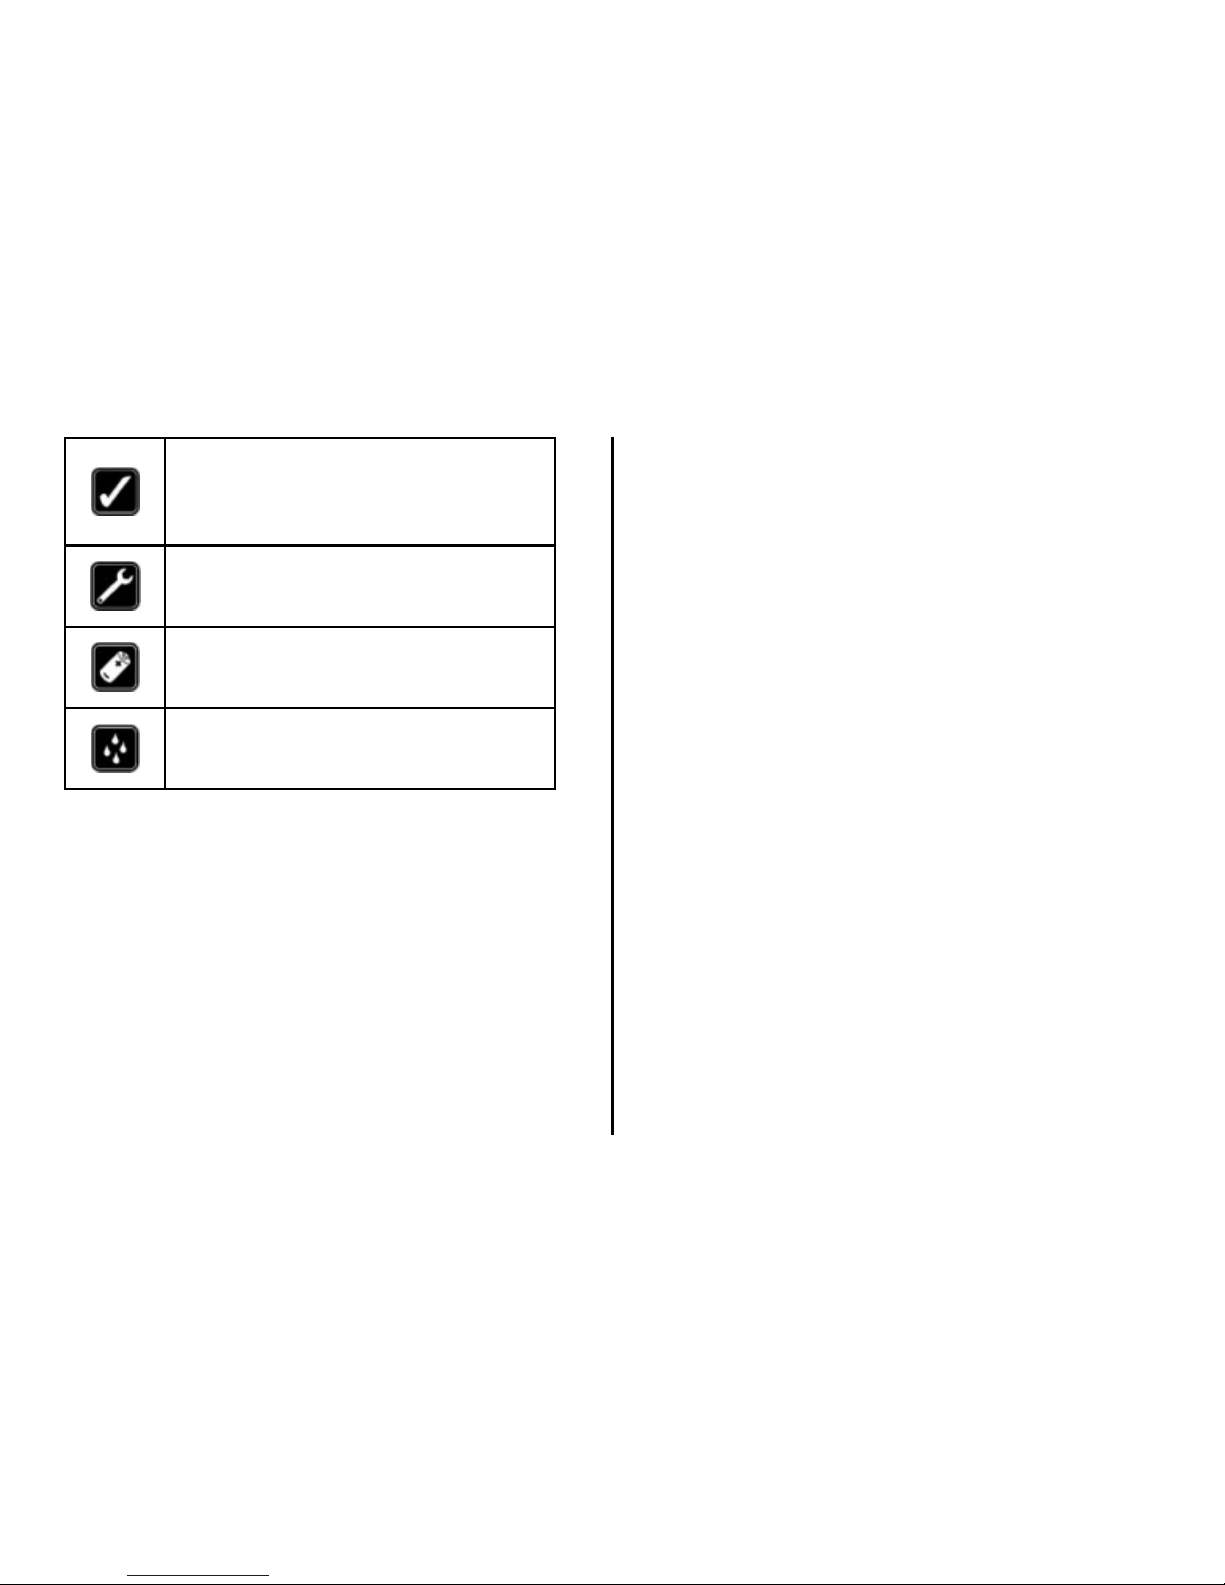
USE SENSIBLY
Use in normal condition, as explained
in the User’s manual. Do not touch
the antenna unnecessarily.
QUALIFIED SERVICE
Only qualified personnel may install or
repair phone.
BATTERIES
Use only approved batteries. Do not
connect incompatible products.
WATER-RESISTANCE
Your device is not water-resistant.
Keep it dry.
Important safety measures
Your phone is designed to comply with all the
necessary precautions and requirements and should
be treated with care. The suggested safety measures
will help you to use this product without causing you
any health hazards.
Your phone is designed to comply with all the
necessary precautions and requirements and should
be treated with care. The suggested safety measures
will help you to use this product without causing you
any physical hazards.
When buying a cell phone, make sure it has a low
SAR (Specific Absorption Rate).
Use a wireless hands-free system (headset) with a
low power Bluetooth emitter.
Either keep calls short or send a SMS instead. This
advice applies especially to children, adolescents and
pregnant women.
Whenever possible, use cell phone only when the
signal quality is good.
People having active medical implants should keep
their cell phone at least 15cm away from the implant.
The FCC advice: “Many people mistakenly assume
that using a cell phone with a lower reported SAR
value necessarily decreases a user’s exposure to RF
emissions, or is somehow “safer” than using a cell
phone with a high SAR value. While SAR values are an
important tool in judging the maximum possible
exposure to RF energy from a particular model of cell
phone, a single SAR value does not provide sufficient
information about the amount of RF exposure under
typical usage conditions to reliably compare
individual cell phone models.”
World Health Organization (WHO) Advice:
Organizations such as the World Health Organization
and the US Food and Drug Administration have stated
Page 5

3
that if people are concerned and want to reduce their
exposure they could use a hands-free device to keep
the phone away from the head and body during
phone calls, or reduce the amount of time spent on
the phone.
Software Update Information
To enhance device performance, we recommend that
you get in touch with the nearest VIDEOCON
Authorized Service Center, regarding the availability
of updated firmware for your device. Please see the
enclosed Service Center Directory for the VIDEOCON
Authorized Service Center nearest to your location.
Third Party Applications Disclaimer
Some applications accessible through your mobile
belong to third parties and are protected by patent,
copyright, trademark and/or other intellectual
property laws. Those applications are provided solely
for your personal non-commercial use. You may not
use any application in a manner that has not been
authorized by the application owner or provider.
Without limiting the foregoing, unless expressly
authorized by the applicable content owner or service
provider, you may not modify, copy, republish,
upload, post, transmit, translate, sell, create derivate
works, exploit, or distribute in any manner or
medium any content or services displayed through
this device.
“Third party content and services are provided “as is”.
VIDEOCON does not warrant content or services so
provided, either expressly or impliedly, for any
purpose. VIDEOCON expressly disclaims any implied
warranties, including but not limited to, warranties of
merchantability or fitness for a particular purpose.
VIDEOCON does not guarantee the accuracy, validity,
timeliness, legality, or completeness of any content
or service made available through this device. Under
no circumstances, including negligence, shall
VIDEOCON be liable, whether in contract or tort, for
any direct, indirect, incidental, special or
consequential damages, attorney fees, expenses, or
any other damages arising out of, or in connection
with, any information contained in, or as a result of
the use of any content or service by you or any third
party, even if advised of the possibility of such
damages.”
Third party services may be terminated or
interrupted at any time, and VIDEOCON makes no
representation or warrantee that any content or
service will remain available for any period of time.
Videocon reserves the right, in its sole discretion to
change/modify/update the software (including
Page 6

4
without limitation, the availability of any feature or
content) of the phone at any time without prior
notice.
Content and services are transmitted by third parties
by means of networks and transmission facilities over
which VIDEOCON has no control. Without limiting the
generality of this disclaimer, VIDEOCON expressly
disclaims any responsibility or liability for any
interruption or suspension of any content or service
made available through this device.
VIDEOCON is neither responsible nor liable for
customer service related to the content and services.
Any question or request for service related to content
or services should be made directly to respective
content and service providers.
“It is recommended to install the third party
applications on memory card rather than phone
memory for best performance.”
“Memory Capacity - Memory capacity is dependent
on Operating System usage. Available storage
capacity may be less as it includes pre-installed
operating system, such as Android and/or preinstalled applications, or media content, shared
video/system memory.”
SAR
Your phone meets the SAR requirements for
exposure to radio waves, recommended by Govt. of
India. Your mobile phone is a radio transmitter and
receiver. It is designed and manufactured so as not to
exceed the limits for exposure to radio-frequency (RF)
energy, as recommended by the Govt. of India. These
limits are part of comprehensive guidelines and
establish permitted levels of RF energy for the
general population. The limits include a substantial
safety margin designed to ensure the safety of all
persons, regardless of age and health.
The exposure standard for mobile phones employs a
unit of measurement known as SAR (Specific
Absorption Rate). The SAR limit recommended by the
Govt. Of India is 1.6 Watt/kg taken over a volume
containing a mass of 1 gram of tissue. The highest
SAR value for A55 is 0.000 W/Kg. Press *#07# to
check the SAR value on your phone display.
Getting Started
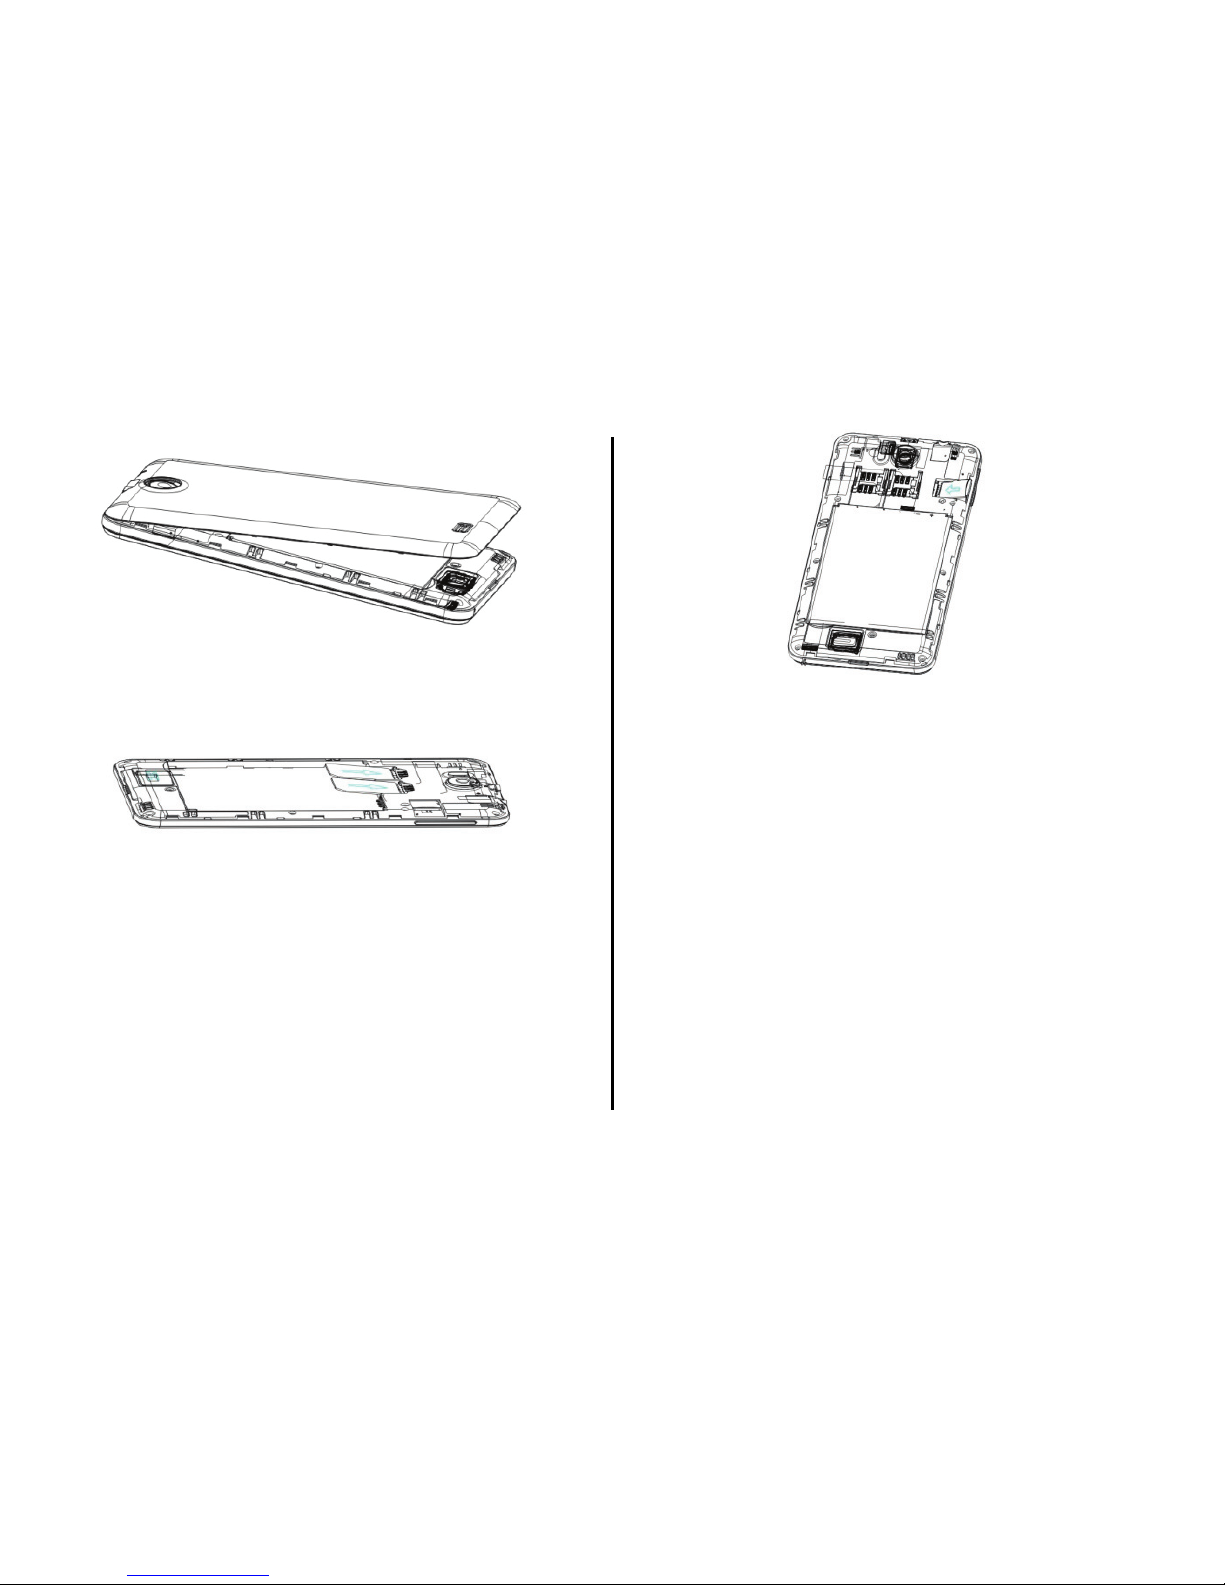
Assembling the device
1. Locate the groove at the bottom of the device and
gently remove the back cover by pulling it up from
the device.
Page 7
5
2. Insert the SIM cards into their respective slots as
shown below.
3. Insert memory card. Take compatible micro SD
card, and place it into its respective slot.
4. Replace the battery. Align the contacts of the
battery with the corresponding connectors in the
battery compartment & place the back cover.
Charge the battery
To charge the device battery:
1. Take the USB cable from the device packaging, and
attach it to power adapter. Now connect the power
adapter into a standard AC wall outlet.
2. Connect the mini USB connector on the cable into
its designated port in the device. The battery level
indicator on the device screen will start scrolling
horizontally to indicate that the battery is being
charged.
Page 8
6
Note: Exercise extreme caution while connecting the
charger to the device. The connectors on the charger
and on the phone may get damaged if too much force
is applied while connecting them.
If the battery is completely discharged, it may take a
while before the on-screen charging indicator starts
scrolling.
3. When the battery is fully charged, the battery level
indicator on the device screen will stop scrolling.
4. Once the charging is complete, disconnect the
charger from the device and then from the wall outlet.
Battery Use
To extend the battery life of your device:
Use the standard wall charger to charge the
battery for the first time.
During the first 3-4 charge cycles, charge the
battery until the battery indicator on the display
stops scrolling.
Avoid partial charging. Also, wait for the battery to
discharge completely before charging it again.
Charge the battery using the USB cable only if the
recommended wall charger isn’t readily available.
Avoid keeping the device on vibrate mode.
Know your device
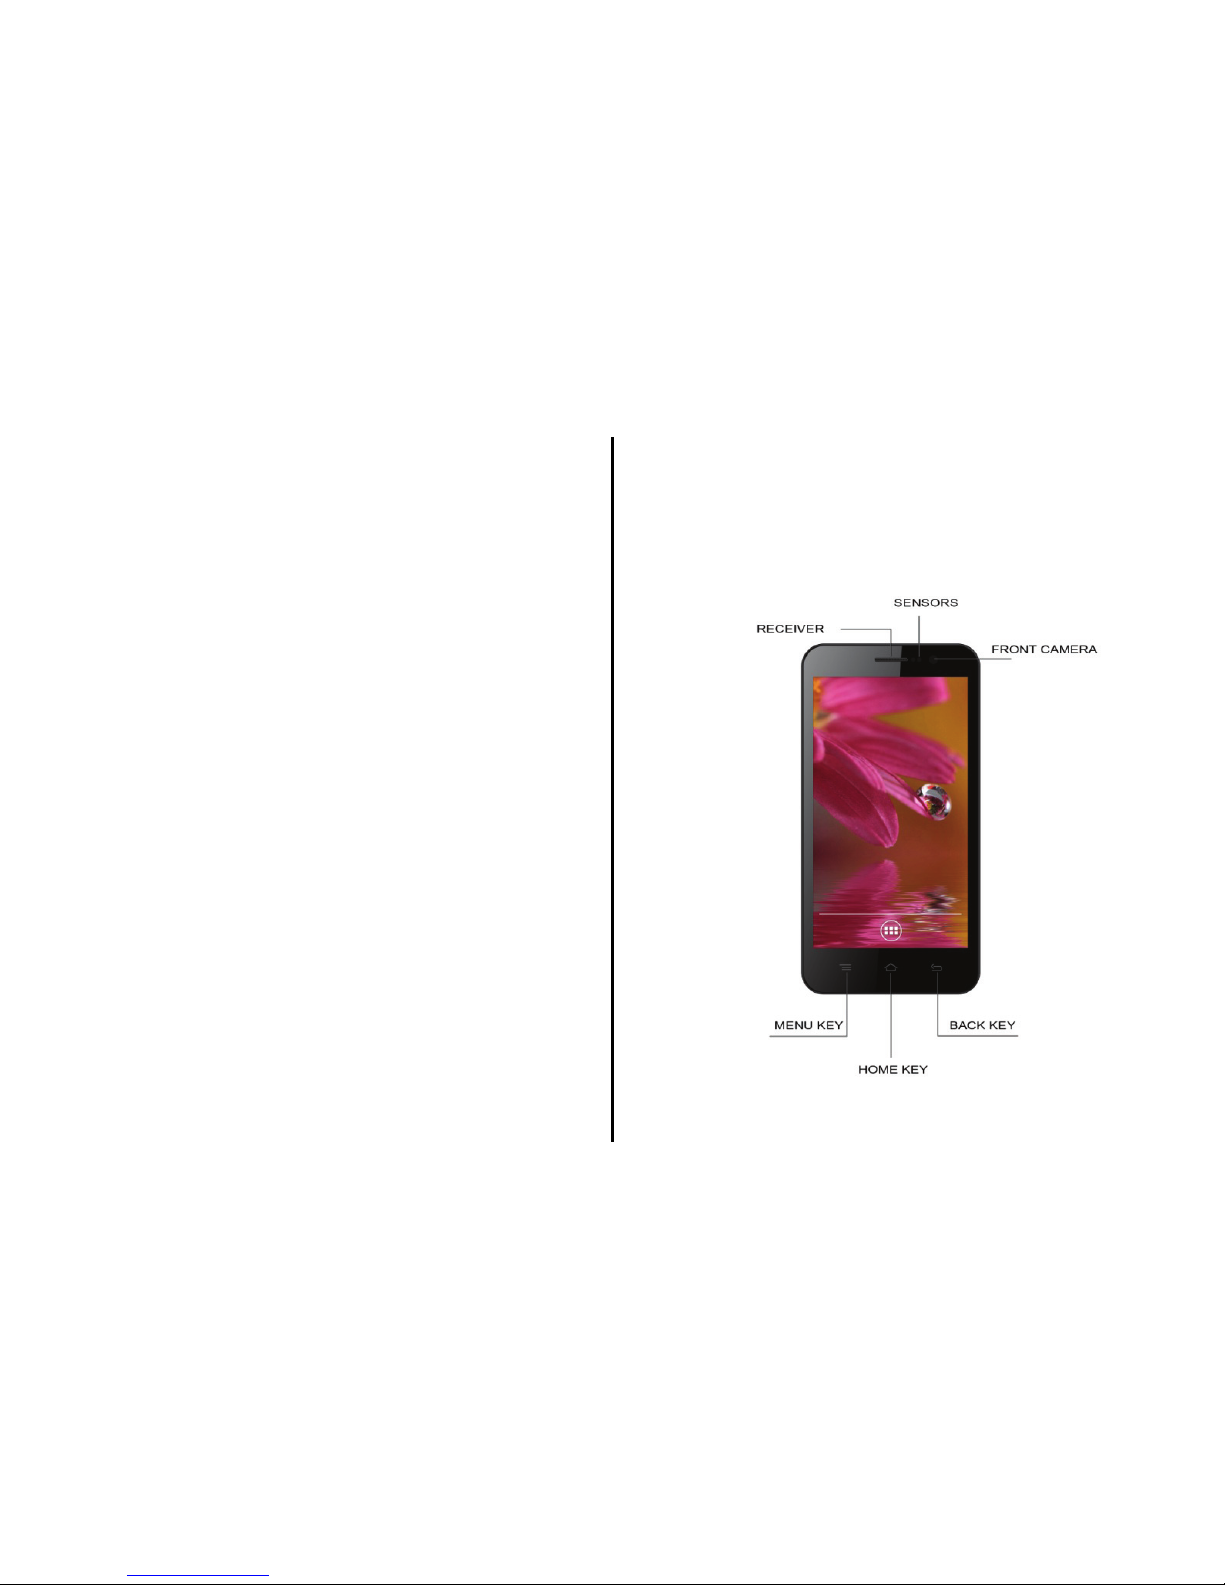
Phone Layout
Page 9
7
Key Layout
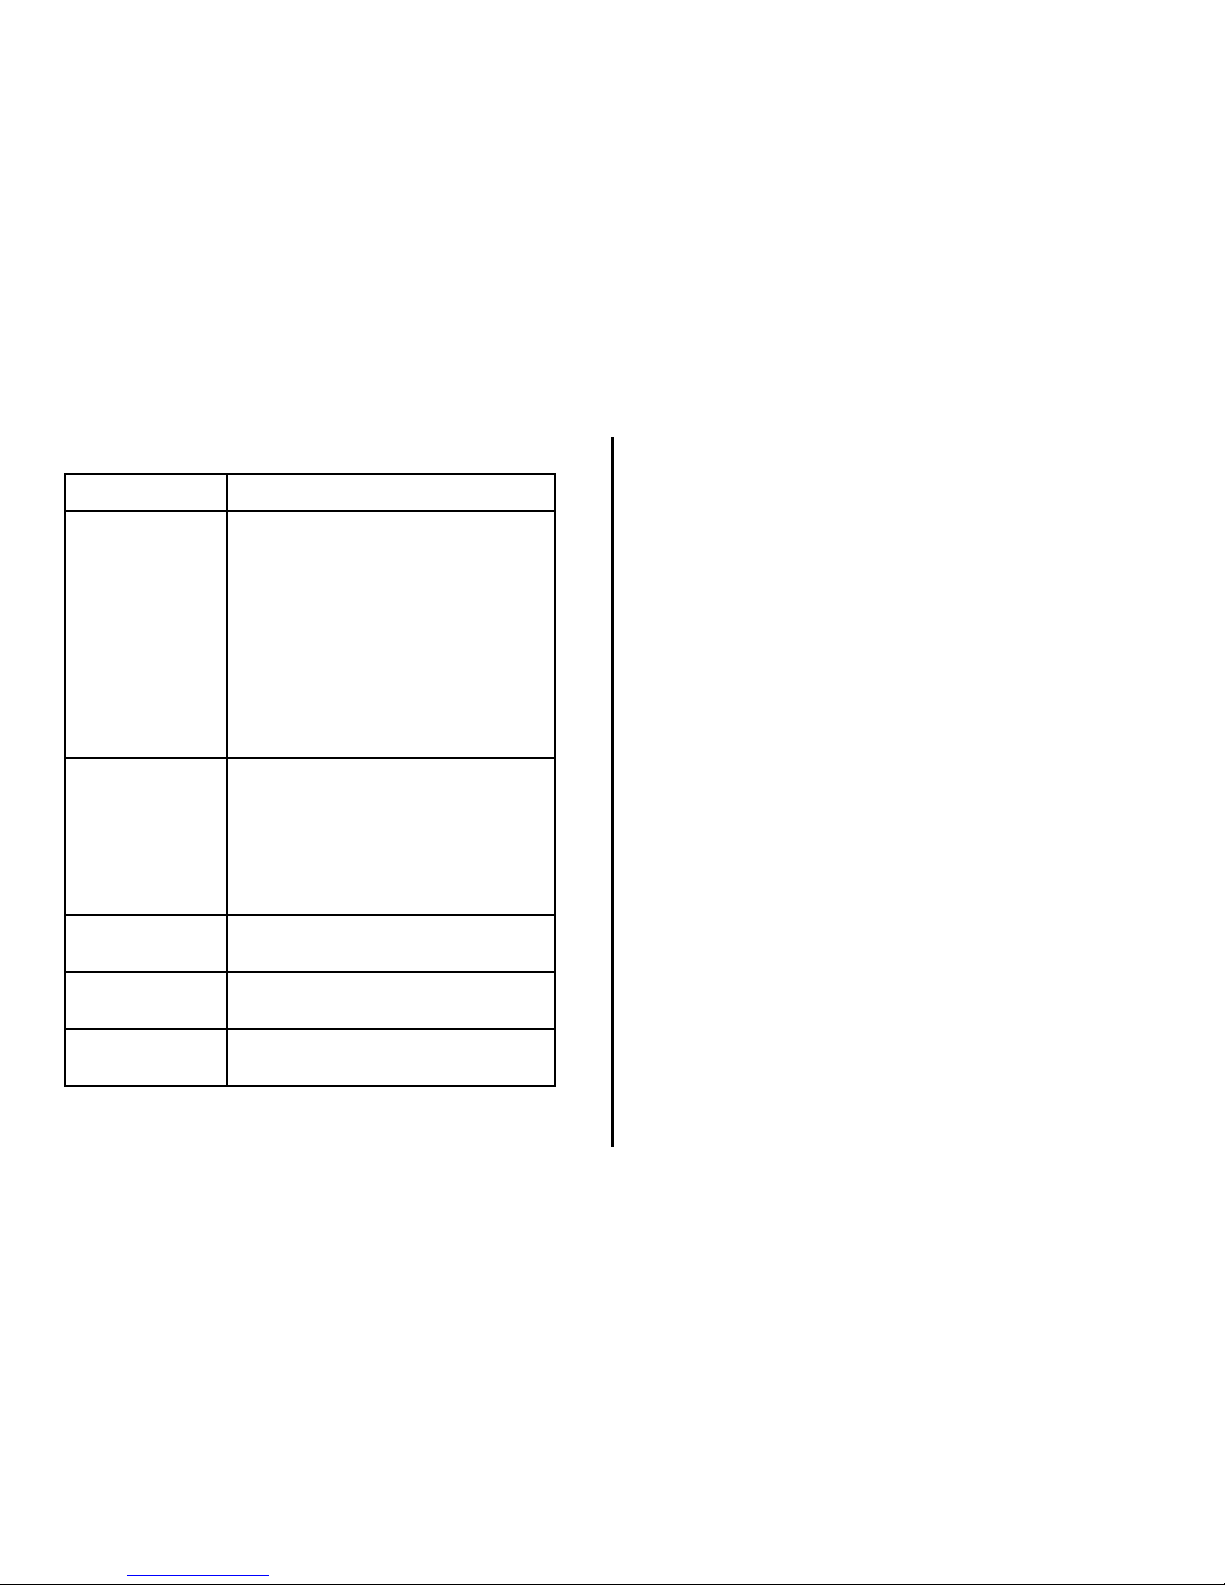
Key
Function
Power Key
Hold to switch audio
profiles, or to turn on or off
Airplane mode, or to power
off.
Press to switch your
phone to Sleep mode.
Press to wake up your
phone.
Home Key
Press to return to the
Home Screen from any
application or screen.
Hold to see recently used
applications
Menu Key
Press to get the options for
the current screen.
Back Key
Press to go to the previous
screen.
Volume
Keys
Press or hold to turn the
volume up or down.
Using the touch screen
Use your finger to use the icons, buttons, menu items,
the onscreen keyboard, and other items on the touch
screen.
Touch: Launch screen items such as application
and setting icons. You can enter the text via onscreen keyboard.
Touch & hold: Touch and hold an item on but not
lifting your finger until an action occurs. For example,
touch and hold an application to display its options.
Drag: Touch and hold icons for a few seconds and
then, without lifting your finger, move your finger on
the screen until you reach the target position.
Swipe or Slide: To swipe or slide, you quickly move
your finger across the surface of the screen, without
pausing when you first touch it.
Double-tap: Tap quickly twice on a webpage, map,
or other screen to zoom.
Pinch: In some applications (such as Maps,
Browser, and Gallery), you can zoom in and out by
placing two fingers on the screen at once and
pinching them together (to zoom out) or spreading
them apart (to zoom in).
Page 10
8
Rotate the screen: On most screens, the
orientation of the screen rotates with the phone as
you turn it from upright to its side and back again.
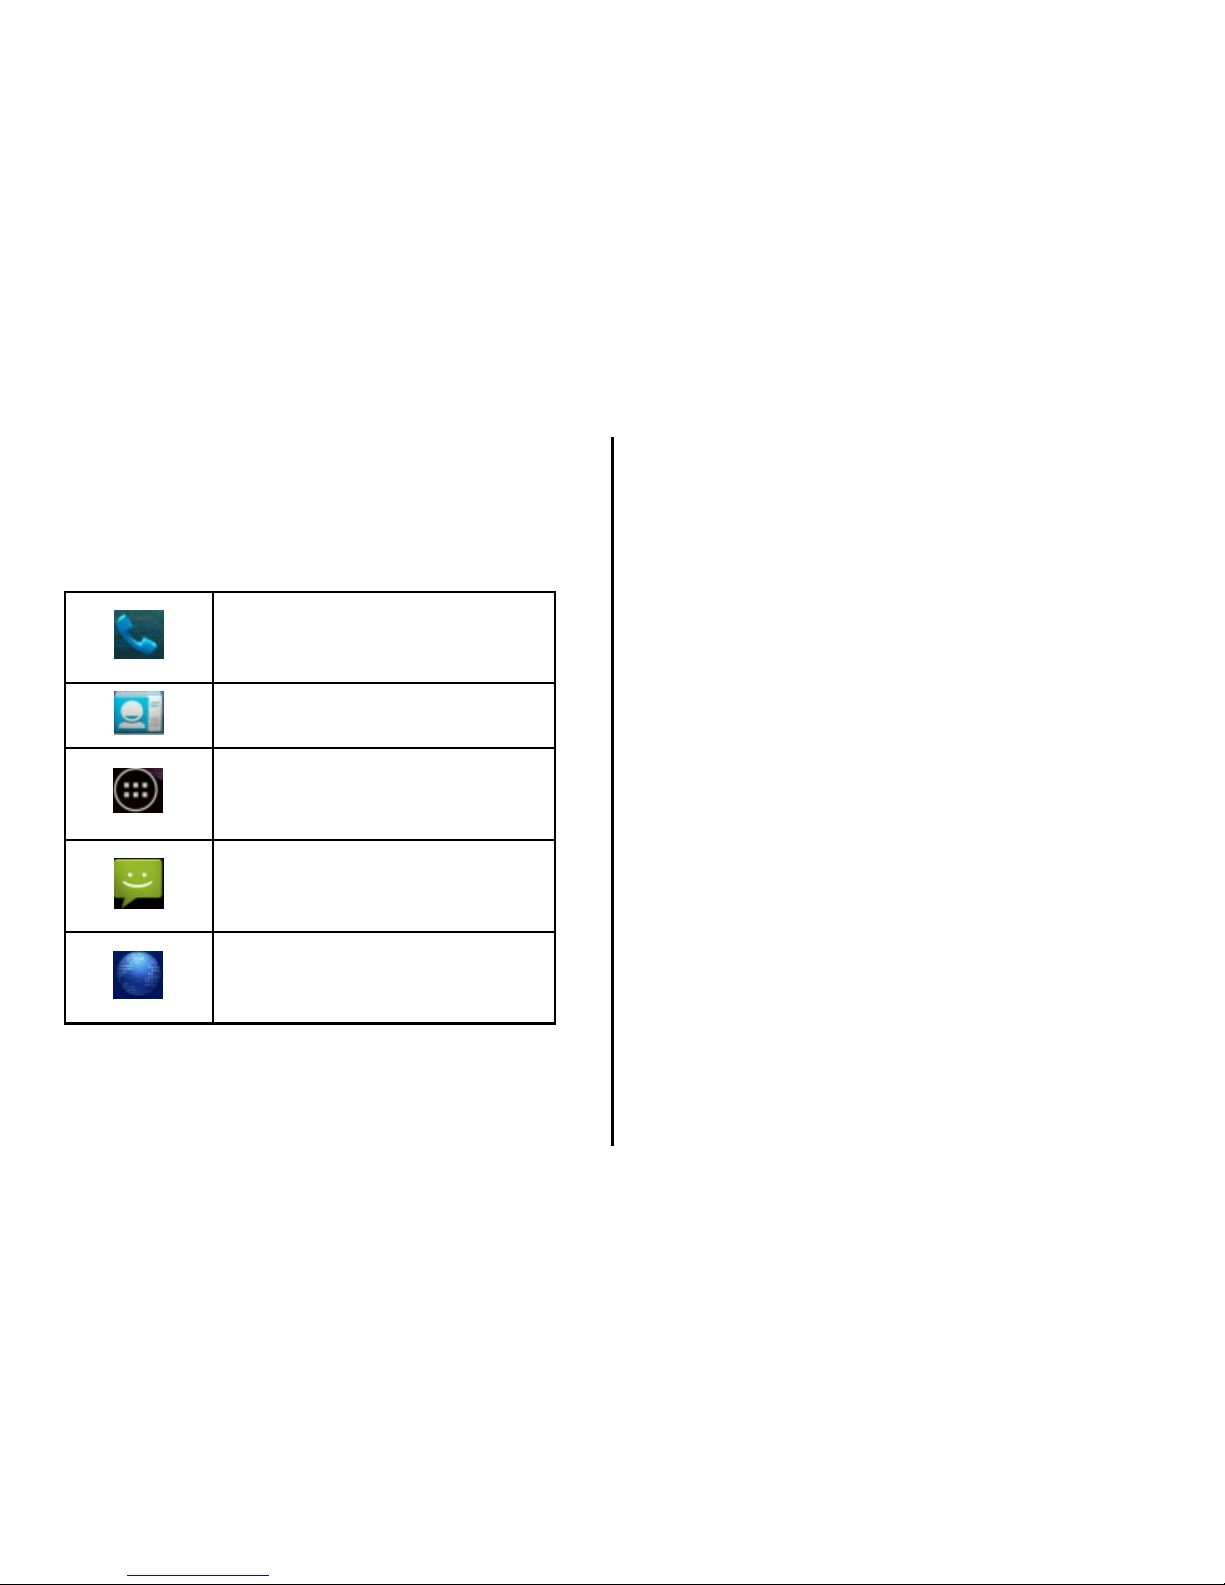
Soft Buttons
Dialer
In Home Screen, touch to launch
virtual Dialing Keypad.
Contacts
Touch to display Contacts screen
Menu
Touch to display Menu
applications
Messages
Touch to display Messages
screen
Browser
Touch to display Internet
Browser
Home Screen
The Home screen allows you to quickly access menu
applications, such as Dialer, Contacts, Menu,
Messages, and so forth.
Navigating the Home screen
Touch and scroll horizontally on the home screen to
display the available screens in your device. On the
extended Home screen, you can add, delete and
access other menu applications and phone functions.
Touch and hold Home key to view recently used
applications.
Extending the Home screen
Touch and swipe your finger horizontally to view the
extended Home screen. These extensions provide
additional space for icons, widgets, shortcuts, and
other items.
Deleting applications from the Home screen
To delete an application, touch and hold an
application, the icon of the application enlarges, and
Remove displays at the top of the Home screen.
Without lifting your finger, drag the widget over
Remove to delete it.
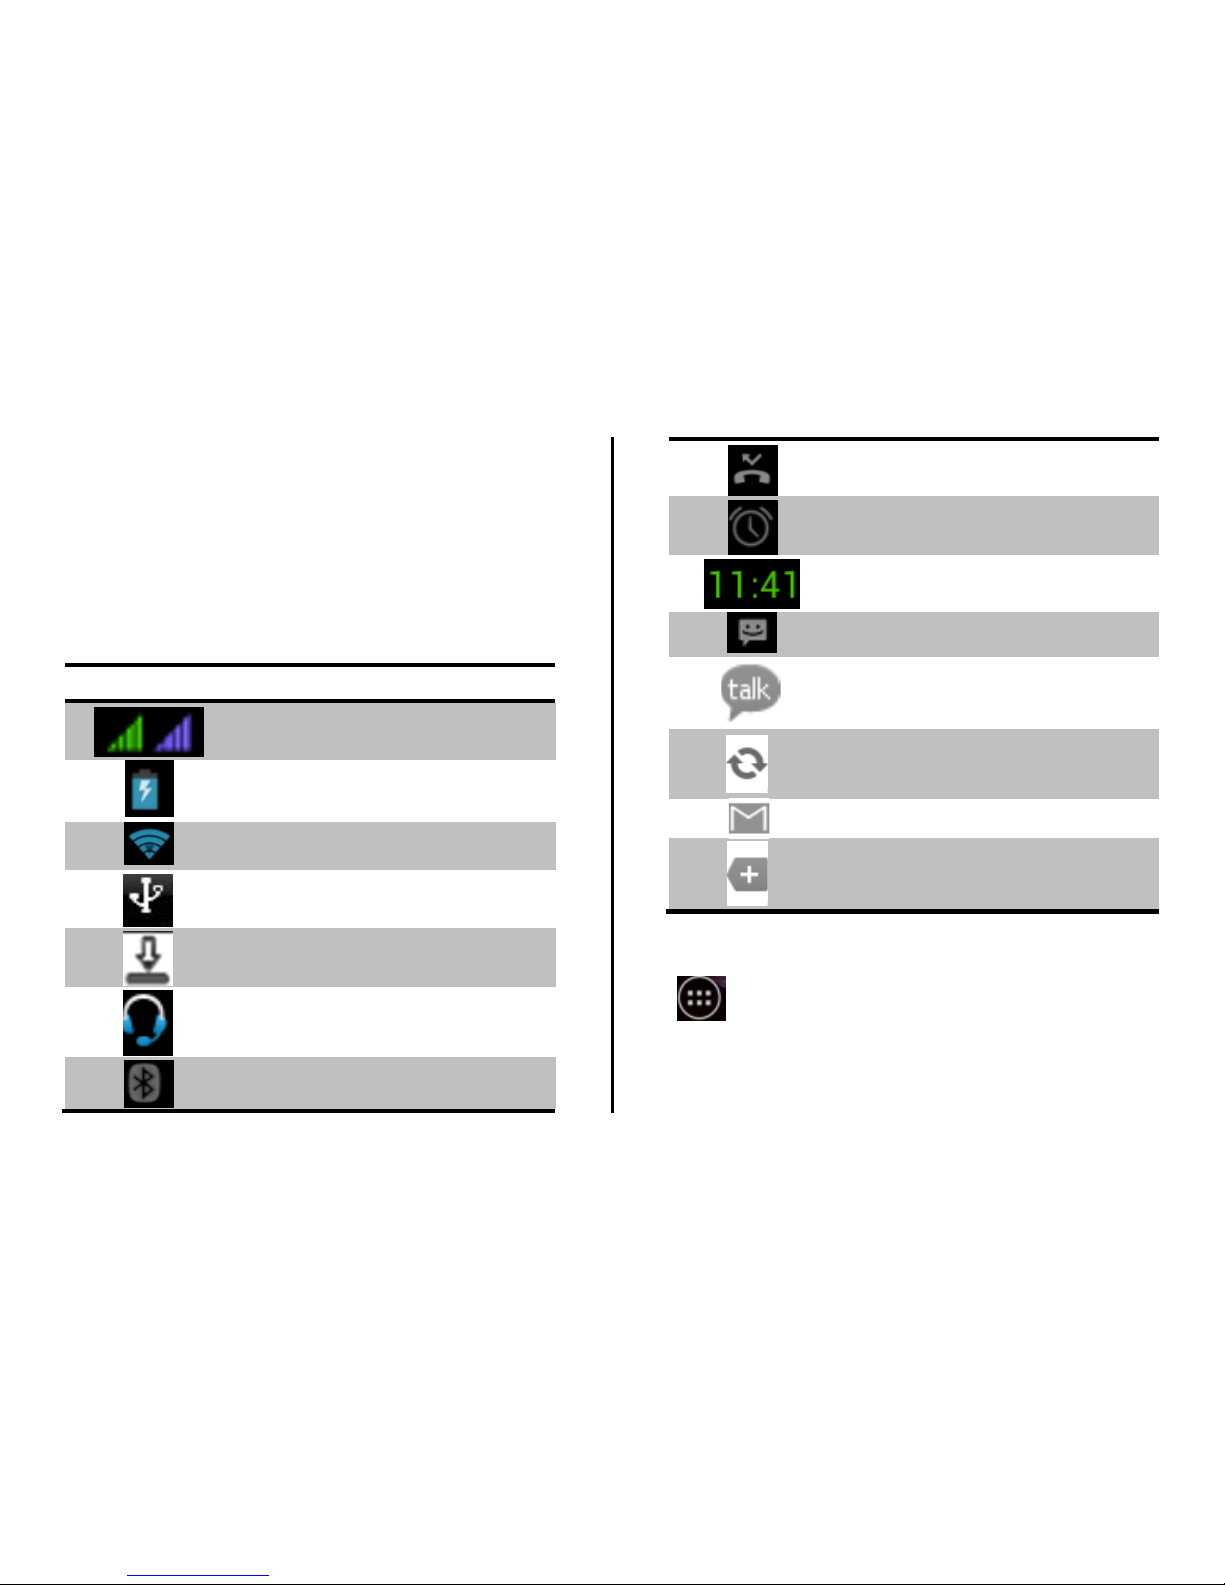
Notification Icons
Notification icons on the status bar state the arrival of
new messages, shows calendar events, alarm
activation, and so forth. You can also view ongoing
settings, such as call forwarding or current call status.
Page 11
9
You can open the message, reminder, or an event
notification in the Notification Panel. It also allows
you to see the name of mobile operator.
When a new notification icon displays in the status
bar, press and hold the status bar, then slide your
finger tip in the direction of arrow to open the
Notification icons panel.
Icon
Description
Network Signal Strength
Battery Level Indicator
Connected to Wi-Fi
Phone is connected to the
Computer via USB cable
Data is Downloading
Headset is connected
Bluetooth is On
Missed Call
Alarm is activated
Time
New Message is received
New Google Talk Message
Synchronization is in progress
New Gmail Message
More Notifications
Managing Widgets
Widgets are like windows into your apps. Touch
Widgets tab to access widgets.
From the main Widgets screen, you can:
Move between screens by swiping horizontally.
Page 12
10
Drag a widget to a home screen by touch and hold
the Widget’s icon, slide your finger where you want
to place it and lift your finger. Note that, you can only
drag and place the widget at the available space on
the home screen.
Add Functions to Home Screen
You can add the different functions to the blank
Home screen by pressing Wallpaper, Manage
apps and system settings.
Wallpapers: Add wallpapers to your Home screen.
Changing Wallpaper
To change the wallpaper on the Home screen:
Touch Wallpaper to select Wallpaper from
Gallery, Live Wallpapers and Wallpapers. You can
use the images captured via phone, images saved on
memory card, images that have been transferred
from your computer to your phone.
Touch Wallpapers to open a screen which displays
default Wallpapers.
Slide the images horizontally to view all available
options. Touch a wallpaper option to view its large
image.
Touch Set Wallpaper to change the wallpaper.
Manage Applications: Access the list of the
applications installed on the device and check the
application information.
System Settings: Allows you to customize your
system settings.
Using Headset
Use the headset for hands-free conversations or
listening to music. Take the headset from the product
packaging and plug it in its designated slot on the top
of the phone.
NOTE:
Using a headset limits your ability to hear outside
sounds. Therefore, the use of the headset while
driving may endanger you or other commuters on the
road.
Setting the headset volume to its maximum levels
may impact your hearing.
To accept a call, press & hold answer/end button
on the headset. To end a call, press the answer/end
button again.
Page 13

11
Enter text using the onscreen keypad
Displaying on-screen keypad
Touch an editable field in an application to display
the on-screen keypad. To hide the keypad, touch .
Copy and Paste Text
While you are entering text, you can use the copy and
paste feature to use text in other applications.
1. Place the cursor from where you want to start
typing the text.
2. Tap and hold the text input field.
3. Select the Select text from the option list.
4. Drag your finger across the text you want to
highlight.
5. Select Copy to copy, or Cut to cut the text onto the
clipboard.
6. In another application, tap and hold the text input
field.
7. Select Paste to insert the text from the clipboard
into the text field.
Basic Operations
Switch On or Off the Device
To switch on your device,
Press and hold the Power key of the phone.
To switch off your device
Press and hold the Power key to display Phone
Options menu. Touch Power Off followed by OK to
confirm.
Screen Lock and Unlock
The device phone screen is set to lock automatically
after configurable time delay when the device is in
the idle mode and no function has been used. It is
recommendable to lock the screen, when it is not in
use to avoid any unwanted device operations.
Lock the Screen
To prevent launching applications inadvertently,
press the Power Key once to lock the touch screen.
The touch screen is set to lock automatically after
configurable time delay when it is in the idle mode
and no function has been used.
Page 14
12
Unlocking the Screen
To unlock the device screen, press the Power Key
once to wake up the device and then, swipe the Lock
Icon to the right to Unlock the phone.
Secured screen lock
If you are concerned about securing your phone data,
you can choose to set a more complex lock for the
touch screen.
Touch Settings Security Screen Lock
Touch to configure your phone to require a Pattern,
PIN, password & so forth to unlock your screen.
Follow the on-screen instructions to choose a Pattern
for unlocking the touch screen.
Once enabled, press the Power key to lock the touch
screen. The next time, when you turn on your phone
or wake up the touch screen, draw the unlock pattern
as selected by you to unlock the screen.
WARNING: If you forget the unlock pattern, touch
Forgot Pattern. It will request you to login on your
primary Google account, which is configured on the
phone and this will unlock the screen lock.
Make a Call
Using Virtual Keypad
In the idle mode
On the Home screen, touch to display virtual
numeric keypad.
Enter the phone number including the area code.
Touch to erase a digit. For international calls,
insert the “+” sign followed by the country code, area
code (without the initial zero) and phone number.
After entering the number, you can touch and
then select desired SIM to make a call by the desired
SIM card.
Using Contact
Touch People icon on the Home screen to view the
contacts list. Scroll, touch and tap to select the
contact you wish to call, and then tap on the contact
number to make a call after choosing the desired
SIM card.
Using Call Log
Touch the Home screen, and then touch ,
select the phone number to call by choosing the
Page 15
13
desired SIM card. You can also send a message and
add the number to the Contacts list.
Answer Calls
If the phone is on ringing mode, press the Volume
keys on the left side of the phone to put the phone
on silent mode.
To answer an incoming call, drag the to the right
until it reaches at the .
To cancel an active call, touch on the display
panel.
Reject a Call
To reject an incoming call, drag to the left until it
reaches at the .
Reject With Message
When you can't receive a call or don't want to talk to
the caller, you can just send them a quick SMS with
pre-programmed message or can type your own
message.
During an incoming call, you can drag to the
upwards until it reaches at and the SMS
templates will pop up. You can select the message
from the templates list or can Custom Message your
own message. Touch Send to send the message to
the caller.
Working with Call Options
During an active call, your phone allows you to
perform various actions:
You can press Volume keys on the right side of the
phone to increase and decrease the call volume.
Call options are:
: Allows you to open Virtual Dialing Keypad to
initiate conference call, a new call or to view Contacts
list or call logs.
: To put the call on speaker, touch Speaker.
: Touch Mute to enable and disable the
microphone during an active call.
: Use to put the call on Hold.
: Use to initiate a new call during an existing
call.
: Use to disconnect an active call.
Page 16
14
Clock
Enables you to view time and date and set the alarm.
To Set an Alarm
Touch the Clock .The available options in alarm
are:
Turn on alarm: Touch to turn On the alarm.
Time: Touch to set the alarm time.
Repeat: Touch Repeat to set the days when you
want the alarm to be repeated.
Ringtone: Touch and browse a sound file, which
will play when the alarm is activated.
Vibrate: Touch to let the phone vibrate in addition
to playing the ringtone.
Label: Touch to enter a name for the alarm.
Bluetooth
Touch Settings Bluetooth to access
Bluetooth. Touch Toggle button at the top right
corner of the display screen to turn on or off the
Bluetooth.
Once the Bluetooth is on, you will see the list of
available Bluetooth devices.
Touch and tap on the searched device to pair.
Touch on the Name of your device to make your
device visible to other Bluetooth devices.
Touch to perform additional functions:
o Rename phone – Allows you to rename your
Bluetooth name.
o Visibility timeout – Allows you to select the
visibility timeout time.
o Show received files – Allows you to show the
received files via Bluetooth.
Browser
Touch Browser, or you can also open Browser
from the Home screen, by touching .
On the displayed Address Bar, enter the URL of the
webpage you want to visit, and then touch “Go”
(blue Go button on the Android keyboard).
To Set Home Page
1. While viewing a webpage, touch Settings
General Set homepage. You can choose from
current page, blank page, default page, most visited
sites and other.
Page 17
15
2. Choose other and then enter the URL of the page
that you want to set as home page. Touch OK to Save.
While browsing a webpage, touch to access
additional options like Refresh, Bookmarks, Share
page and so forth.
To use the Google Search Widget
Surf the Internet or the device data from the Home
screen.
1. On Home screen, Press to display the Google
search box.
2. Enter what you want to search for either the
device data or on the web.
3. Touch again.
Calculator
Learn to perform mathematical calculations directly
on your device like a desktop calculator.
To use calculator:
In the idle mode, touch Calculator.
Use the keys that correspond to the calculator
display to perform basic mathematical operations.
Touch to Clear history and open Advanced
panel. Use Advanced panel to use Scientific
calculator.
Calendar
The Calendar lets you schedule and set sound alarms
for appointments, meetings and other events.
Scheduled appointments for the day can be displayed
on Home screen.
Accessing Calendar
Touch Calendar. Calendar screen is displayed
in your device screen.
Creating an Event
To create an event:
Touch Calendar.
Touch New Event to enter event details.
o Enter the name of event in Event Name field.
o Enter the location in Location field.
o Select the dates and enter in From and To field.
o Touch to select All Day.
o Select the Time zone
Page 18
16
o Enter event description in Description field.
o To set Repetition, select the repetition from the
list.
o To set Reminders, select the reminder time from
the list.
o Touch Done to return to the calendar.
Setting an Event Reminder
To set an event reminder:
On any calendar view, touch an event to view its
details or event summary.
Touch Add reminder, to add a reminder. Touch the
(X) button to delete it.
Touch the Selected Reminder Time, to choose
from the list of time. When the time comes, you will
receive a notification at the selected reminder time
about the event.
Touch Delete to delete the selected event.
On any Calendar view, touch . Calendar Menu is
displayed. You can add new event, refresh the
calendar, search the event, choose calendars to
display and configure the calendar settings.
Using the Camera and Video
In addition to being a communication device and a
personal assistant, your mobile phone also provides
you with endless entertainment possibilities. You can
take photos, create videos and audio clips, and
download and listen to music.
The camera is a combination of camera and
camcorder that you can use to shoot, and share
pictures and videos.
Using the CAMERA
To access Camera:
From the Home screen, touch Camera. Or, you can
also quickly access Camera application, by pressing
Camera key on the right-side of the device. Or, you
can also touch Camera.
Touch to close the camera.
On the camera screen, pinch to show Zoom in or
out.
Clicking a Photo
To take a photo:
Access your Camera, and then switch to the
camera mode.
Page 19
17
Touch Camera settings to customize settings for
capturing the image. The preview image changes as
you change the settings.
To click the image, touch Capture icon located
on the phone.
The photo you just took is displayed for a moment.
You can preview the photos at right end corner
thumbnail.
NOTE: Do not move your hand until the image is
captured.
NOTE: You can touch and toggle between Camera
and Camcorder icon.
Viewing Images
On the Camera screen, touch Gallery button. Touch
and scroll the images to choose.
After taking a photo, a thumbnail of the photo you
have just taken is shown in the upper right corner of
the Captured screen. Touch the thumbnail to view it.
Touch the on-screen buttons to do any of the
following:
Touch top-right corner icon to share the photo in a
message or post it online.
Touch to perform additional functions, such as
delete, slideshow, edit, and so forth.
Recording Videos
Touch Camera switch to video to
launch the video camera.
To start recording, touch Icon.
To stop recording, touch the same again.
Click on the to click a photo while recording.
Viewing Videos
To view video:
After recording a video, a thumbnail of the video you
have just recorded is shown in the lower right corner
of the Capture screen. Touch the thumbnail to view it.
Touch the video to view it in full screen.
If you want to view more videos, touch and scroll
on the screen to left and right to view recorded
videos.
Touch to perform additional functions, such as
delete and details.
Page 20

18
People
The people application lets you store names, phone
numbers, e-mail addresses, and other information.
Phone contacts are stored in the phone memory. You
can save information such as names, pictures, phone
numbers, e-mail addresses, and so forth.
You can also add the frequently used contacts to the
favourites list.
To Add a Contact
In Contacts,
1. If you have more than one account with contacts,
touch the account to which you want to add the
contact.
2. Enter Name and Number for the desired contact.
3. Touch a category of contact information, such as
phonetic given name and email address, address, to
enter that kind of information about your contact.
Importing Contacts
If you have contacts stored as vCard on a micro SD
card or SIM, you can import them into your phone.
Similarly, you can export contacts in vCard format
onto a micro SD card, to back them up.
To import contacts, in the contacts list, touch
Import/Export. Select required option from, Import
from SIM card, Import from SD card, or Export to SD
card.
Note: You can add contacts on your phone and
synchronize them with the contacts in your Google
Account.
Searching contacts
Touch in the name of the contact you are
searching.
As you type, contacts with matching names get
displayed below the Search box.
Editing a Contact
You can always make changes to the information you
have stored for a contact.
In the contacts list, touch the contact whose
details you want to edit, and then touch Edit
in the options menu. Alternatively, you can also touch
, and then touch Edit while viewing a contact’s
details.
Page 21

19
Touch a category of contact information, such as
contact’s name, phone number or email address, to
enter that kind of information about your contact.
Change the contact information and touch Done.
To cancel the changes, touch Cancel
Deleting a contact
To delete a contact:
In the contacts list, touch Delete in the
options menu. Touch and tap to select the contact
numbers need to be deleted.
Touch OK to confirm that you want to delete the
contact.
Contact groups
In People, touch Contacts to display and
touch an account to open the groups associated with
it.
Downloads
Downloads allows you to view the download history
of the phone.
Email
Adding an Email Account
Before you can start using the Email function of the
phone, you must configure your email account.
Configuring an Email Account
When you launch Email for the first time, a wizard
will display, which will help you to add your account
for many popular email systems, so that you can read
and work on the same email as you do on a computer.
Touch Email.
Answer the on-screen prompts and then touch
Next. Or touch Manual setup if you prefer
configuring it yourself.
Enter the username and password for the account.
Note: For Manual Setup, you would need to know the
server type that the network service provider uses,
such as POP3, IMAP, or MS Exchange. If your provider
is using a POP3 setup, you would need to know the
incoming and outgoing server address, and their
respective port numbers.
Touch Done. Your phone starts downloading your
email messages and you can start using the phone to
send and receive email messages.
Sending an Email
To send an email from the account added to E-mail
account:
Page 22
20
From Home screen, touch Email.
Touch the icon Compose.
Touch To, Subject and compose mail sections to
compose the Mail and send.
Receiving emails
E-mails are automatically received in Inbox folder
when the device is connected to the network.
Checking emails manually
Launch the email application and touch
Refresh.
Attaching files as attachments
Before sending your message, touch
Attach File.
Browse to the folder in which the file you want to
attach is stored.
NOTE: Do not delete the attached file you attached
before the message is completely sent (sent label
displays, and not the Outbox label).
Touch Send.
Reply or forwarding an Email
Open the Inbox folder and click a message to read
it. The options are:
Touch Reply to send a reply for the email.
Touch Forward or Reply all, and enter the
recipient in the To field.
Compose your message, touch Send to finish.
Managing Email folders
Each account has Inbox, Outbox, Sent, Drafts and
Trash folders. Depending on the features supported
by your account’s service provider, you may have
additional folders.
To view an account’s folders, while viewing its Inbox
or other folder, open the account from the Email
screen. Touch a folder to view a list of the messages it
contains.
File Explore
File Explorer is a pocket-sized personal assistant,
which lets you organize, edit, and delete files and
folders.
Accessing File Explorer
Touch File Explorer. Tab displayed under File
Explorer is:
Page 23
21
Phone: Display files and folders saved in your phone
memory.
Micro SD card: Displays files and folders saved in your
micro SD card.
Creating Folder
To create a folder:
On the File Explorer screen, access the directory of
the folder, where you want to create New folder.
Touch to open the options panel, and then
touch New Folder.
Enter Name of the new folder in the text box.
Touch OK, and then new folder is displayed with
the desired name.
Copying a File
To copy a file:
On the File Manager screen, touch hold the file or
folder you want to copy, and then touch Copy icon.
FM Radio
Listening to FM Radio
FM Radio uses the wired stereo headset, which
comes in product packaging as the antenna,
therefore, connect the headset first to the audio jack
of your phone before accessing FM radio.
To access FM Radio:
• Touch FM Radio, to open the application.
• If you are the first time user, the device will
automatically scans for available FM channels, save
them as presets, and play the first FM channel found.
• Touch to display the operations panel and
settings of FM Radio options.
• Touch the arrows buttons to search and play next
searched FM stations.
• Touch button to stop FM radio broadcasting.
Gallery
Viewing Photos & Videos
To view photos in the album:
• Touch Gallery.
• Touch Camera to view the images in thumbnails.
• Touch an image to view.
• To view previous/next image, touch and scroll the
images horizontally on the screen.
Launching slideshow
Page 24
22
Touch key to access camera options like
slideshow.
Playing Video files
In the Gallery application, touch the Video thumbnail
which you like to play.
Gmail
Google Mail is configured when you first set up this
device. Depending on your synchronization settings,
Google Mail on this device is automatically
synchronized with your Google Mail account on the
web.
To open Gmail:
Touch Gmail.
Touch Create or Sign in your Google account.
Follow the on screen instructions to login or create
your Gmail username and password.
Once logged in, you can begin reading and sending
emails from your Gmail account.
Organize email by labels
You can organize your email by labeling your
messages or adding stars to mark important
messages. You can sort messages by label filter.
Add a label to a message
From the Inbox screen, tap and hold a message.
Select Change labels.
Select a label to add and select OK.
Filter messages
From the Inbox screen, touch Go to labels.
Select the label of the messages you want to view.
Customizing email settings
You can configure the general settings of your email
account such as account name, email checking
frequency, default account, notifications, and server
settings.
For more information on how to modify email
settings, see “Accounts & Sync Settings”.
Account Synchronize
Configuring account sync and display options
You can configure background data use and
synchronization options for all of the applications on
your phone.
You can also configure what kinds of data you want
to synchronize for each account. Some applications,
such as Gmail and Calendar, have their own
synchronization settings. Applications, like Contacts,
Page 25

23
Gmail, and Calendar, can sync data from multiple
applications. Others sync data only from the first
Google Account, you sign into on your phone, or from
an account associated specifically with that
application. For some accounts, syncing is twodirectional; changes that you make to the
information on your phone are made to the copy of
that information on the web. Your Google Account
works this way. Other accounts support only one-way
sync; the information on your phone is read-only.
To change an account’s sync settings:
Open the Accounts option in Settings.
Touch the account whose sync settings you want
to change.
The Data and Synchronization screen appears,
displaying a list of information the account can sync.
Checked items are configured to sync to your phone
Check or uncheck the kinds of information you want
to sync to the phone. The Unchecked option will not
remove the information from your phone; it will
simply stop it from being kept in sync with the
version on the web. To remove the information
previously synced with the account, you must remove
the account.
Internet Applications
Facebook
To launch Facebook, touch Facebook. Use
your Facebook username and password to access
your Facebook profile from the phone.
Maps
Maps are Google’s mapping service to search for
places of interest.
To open Maps:
Touch Maps. Do any of the following:
• To search for a place of interest, touch
Search, and then type the name of the place search.
• To get direction, touch Directions.
• Join Latitude, touch Join Latitude.
• To clear the map, touch More Clear Map.
• To view terms, privacy, and for notices, you can
touch More Terms, Privacy & Notices.
• To view information about Google Map, touch
More About.
Page 26

24
Places
Places are a shortcut menu from the Map or Latitude,
which is used to search for a place around you.
This feature may be unavailable depending on your
region or service provider.
• In Idle mode, open the application list and select
Places.
• Select a category. Your device searches for places
around your current location that are related to the
category.
• Select a place name to view its details.
Navigation
Navigation is a shortcut menu from the Map or
Latitude. In Idle mode, touch Navigation; you
can get directions to a specific destination.
YouTube
YouTube is an online video streaming service that
allows you to view, search, and upload videos. To
start using YouTube:
Touch YouTube.
Videos are grouped into categories, such as
Featured, Most popular, Most viewed, Top rated, and
more. Touch a category to see the available videos of
that category.
Touch a video to play it. You can play video on
YouTube only in Normal mode.
To view video in Normal mode, check the HQ option
displayed on top right corner in landscape mode.
G-Talk
G-Talk is Google’s instant messaging program.
To Sign in to Talk
Touch Talk.
Touch Create or Sign in your Google account.
Follow the on-screen instructions to login or to
create your Gmail username and password.
Once logged in, you can begin chatting by using
Talk.
Play Store
The Play Store helps you to discover the perfect
applications for your mobile.
Play Store can guide you to the highest quality, most
ideal apps for your interests, needs, and tastes at any
given moment.
Messages
Text Messages
Page 27
25
Use Messages to exchange messages (text,
multimedia, or email) with contacts.
Composing text message
Touch Messages to display the Messaging
window. Touch to compose a new message or
open an ongoing message thread.
Receiving and Managing Messages
Messages sent to and received from a contact are
grouped as a message thread. A message thread
looks like an exchanged conversation.
Replying to a text message
• Touch Messages and touch a message
thread to open it. Touch Type message to enter your
message.
• Touch to transmit the message.
Forwarding a text message
• Touch Messages.
• Touch to view a message thread.
• Touch and hold a message to display the message
options.
• Touch Forward.
• In To field enter the recipient’s phone number.
• Touch to transmit the message.
Deleting messages
To delete an entire thread, open the message and
touch Delete thread, and touch Delete to
confirm.
To delete a message in a thread:
• Touch the message thread to open it.
• Touch and hold the message, and touch Delete
message and touch Delete to confirm.
Multimedia Message
Attach audio, video, or image files with a message to
send it as a multimedia message.
Composing MMS
On the Messages screen:
• Touch to compose a new message and enter
a phone number in the To field. As you start typing,
the matching contacts display in a list. Touch the
required contact. You can also enter the name of a
contact.
Page 28
26
• Touch Type to compose to start typing your
message. Touch to add pictures, capture picture,
videos, capture video, audio, record audio and so
forth. It converts the message in multimedia message.
• Touch to transmit MMS.
Changing Message settings
• In Messages window, touch Settings. Use
the Settings screen to modify settings specific to
storage, SMS, MMS, and notifications etc.
Music
You can transfer music files from your computer to
your phone.
Playing Music
To play audio files on your device:
• Touch Music.
• Touch Songs, and all songs on the device are
displayed.
• Touch to select the song. The music playback starts
automatically.
Changing Playback Options
• While in Playback screen, touch .
• Touch Library to go to the Music Library screen.
• Touch Add to playlist to add the song to a
preferred playlist.
• Touch Use as ringtone to set this song as ringtone.
• Touch Delete to delete this song.
• Touch Sound effect for equalizer settings.
• Access more options like shuffle & Search.
Creating a Playlist
Add songs to a specific playlist or create a playlist.
• Touch Music.
• Touch and hold the song you want to add.
• Touch Add to playlist.
• Select from the current playlist or touch New to
create a new playlist.
• The song has been added to the playlist.
Removing tracks from a playlist
• Touch Music.
• Touch and hold the song you want to delete.
• Touch Delete.
Page 29
27
• The song is now removed from the playlist
SIM Toolkit (STK)
Short for SIM Toolkit, it is a standard for providing
value added services and e-commerce over the GSM
networks, using the phone to make the necessary
transactions. Services depend on your network
service provider.
Sound Recorder
Sound recorder is useful for the quick recording of
sounds. You can also record your voice and set it as a
ringtone.
Start Recording
To start recording:
• Touch Sound Recorder. Sound Recorder
screen is displayed.
• Touch to start recording. The recording time
is also displayed in the screen.
• Record your desired message.
• Touch to stop recording.
Settings
To launch settings, touch Settings.
The available options for customizing settings are:
Wireless and networks
Change the settings for wireless & network
connections.
SIM management
Access & change your SIM information, Call settings &
other settings.
WI-FI
Touch the toggle button to turn on/off the WI-FI.
Once WI-FI is on, the list of available WI-FI will show.
Touch and tap on the selected network to set up the
connection. Touch to perform additional
functions:
Bluetooth
Allows you to turn on or off the Bluetooth device. To
read more information about Bluetooth, please refer
to the “Bluetooth” section mentioned earlier in this
document.
Data Usage
Allows you to view the data usage by your phone.
Data is network service provider based service. For
more information on plans and costing, check with
your network service provider.
Page 30

28
Touch More to perform more functions:
Airplane mode
Disable all wireless functions on your device. You can
use only non-network services.
VPN settings
Set up and manage Virtual Private Networks (VPN).
Tethering & portable hotspot
• USB tethering: Activate the USB tethering feature
to share your device's mobile network connection
with PCs via USB. When connected to a PC, your
device is used as a wireless modem for a PC.
• Wi-Fi hotspot: Activate the WI-FI hotspot to use
the phone as a WI-FI modem and connect to other
devices like PC, Laptop, and Phones. Configure WI-FI
hotspot for different types of security.
• Bluetooth tethering: Activate the USB tethering
feature to share your device's mobile network
connection with PCs via Bluetooth.
Note: Drivers can be downloaded from
www.videoconmobiles.com
Mobile Networks
Allows you to manage Network connection settings
and Data settings. You can enable data usage and
data usage in roaming.
Device
Audio profiles
Change the settings for various profiles on your
device.
Customize your profiles ringtones, volumes Vibrate,
notification sounds etc.
Display
Brightness: Set the brightness of the display.
Wallpaper: Allows you to select the wallpaper.
Lock screen notification: It notifies you with
arrived/ missed messages, calls & mails on locked
screen.
Flip silent: Flip your device to silent during calls.
Auto-rotate screen: Check to automatically switch
the orientation of the screen as you turn the phone
sideways or even upside down.
Sleep: Set the length of time the device waits
before turning off the display's backlight.
Brightness: Set the brightness of your device..
Font size: Allows you to choose the font size of all
the icons in phone display.
Storage
Page 31

29
Check memory information of memory cards and
your device, and format the external memory.
Battery
Allows you to check the battery status, battery level
and batter usage.
Applications
Change the settings for managing installed
applications.
Manage applications: Access the list of the
applications installed on the device and check the
application information.
Personal
Location access
Allow Google’s location service, GPS satellites and
location & Google search for determining your
approximate location.
Security
Set the unlock security by Screen lock, and set up SIM
card lock settings. You can also administrate device
and credential storage option.
Language & input
Language: Open the Language screen, where you
can select the language to use for the text input on
your phone. You can also select Spelling correction
and Personal Dictionary
Keyboard & input methods: Allows you to choose
default language, enable voice search and pointer
speed.
Reset
Allows you to factory reset the device.
Accounts
Change the settings for the auto sync feature or
manage accounts for synchronization.
System
Date & time
Access and alter the following settings to control how
time and date are displayed on your device:
Automatic date and time: Automatically update
the time when you move across time zones.
Automatic time zone: Set the time zone.
Use 24-hour format: Set the time to be displayed
in 24-hour format.
Choose date format: Select a date format.
Accessibility
Check to enable all installed accessibility plug-ins.
About phone
Page 32

30
Access information about your device, check the
device’s status, and so forth.
Care and maintenance
Thank you for choosing our phone. Should you
encounter any problem with the phone, please
contact our dealer or qualified service provider.
Your phone is a finely designed and crafted product.
Please use it with care. The following instructions will
help you comply with the terms of the warranty and
enjoy this product for many years:
Keep the phone and all its parts and accessories
out of the reach of children.
Keep the phone dry, all kinds of liquid will erode
the electronic circuit.
Do not use or store the phone in a dusty place to
avoid damaging the removable parts.
Keep the phone away from hot places, high
temperature can shorten the life of electronic device,
warp or melt certain plastic and damage batteries.
Do not attempt to open or disassemble the phone,
non-expert handling may damage it.
Do not drop, crush or shake the phone to avoid
damaging the internal circuit board.
Do not use harsh chemicals, cleaning solvents or
strong detergent to clean the phone.
Do not paint the phone or the paint may obstruct
the removable parts and affect operation.
Use only the supplied or an approved replacement
antenna. Unauthorized antennas, modifications, or
attachments could damage the phone Do not hold
the external antenna when the phone is in use.
Holding the external antenna affects call quality and
may cause the phone to operate at a higher power
level than needed. In addition, use of unauthorized
antennas may result in non-compliance with the local
regulatory requirements in your country.
The above instructions apply to your phone,
battery, charger and other accessories. If any of them
does not work properly, please send it to a qualified
service provider.
 Loading...