

Page 1

User Manual
LCD Television
Model No: 325LDF
323LD
263LD
Series 3/5
Page 2
Welcome
Thank you for purchasing a Videocon LCD Television. Please take time to carefully read this user
operating manual paying special attention to the section detailing “Warnings and Safety Precautions”.
Being familiar with all of the operational functions of your new TV will greatly improve your viewing
enjoyment. Please keep this guide safe for your future reference.
Do not touch any parts inside the TV or make changes to any settings not described in this user guide!
Table of Contents
1. - Specifications........................................................................... 02
2. - Warnings and Safety Precautions............................................ 03
3. - Initial Setup.............................................................................. 05
4. - Operating Controls and Connections ...................................... 07
5. - Basic Connection and Switching the TV On............................. 10
6. - Tuning in to Digital TV and Analogue Broadcasts.................... 11
7. - General Troubleshooting......................................................... 15
8. - Using your TV........................................................................... 16
9. - Menu Operation (Adjusting Settings)..................................... 19
10. - Connecting External Equipment to the TV.............................. 24
2
11.-Warranty Certificate
–
Service Contacts..................................
28
12. - Disposal Instructions................................................................ 29
1. Specifications
Screen size(diagonal) 26” 32”
FULL HD
32”
Display Resolution 1366x768 1366x768 1920x1080p
Viewing Angle 160° (H), 150° (V) 178° (H), 178° (V) 178° (H), 178° (V)
Brightness 500 cd/m2 (Typical) 450 cd/m2 (Typical) 450 cd/m2 (Typical)
Display Colours 16.2 Million 16.7 Million 16.7 Million
Response Time 8 msec 6 msec 8 msec
Back Light Life (normal setting) Approx. 60,000 Hours minimum
Colour System PAL / SECAM.
BG / I / L / L’ / DK.NTSC (3.58 & 4.43) only for AV inputs
Channel coverage
VHF – 2 -12
UHF 21-69
CATV – X ~Z+2, S1~S41
Nominal input voltage 100-240 V~ 50/60 Hz
Antenna input Impedance 75 Ohms unbalanced
Power consumption 135 W 150 W 150 W
Audio output (Rated output 2 X 10 W (+/- 1W) (RMS)
This receiver supports only free to air channels
Accessories : Remote handset, User Guide book, Power cord
THE COMPANY RESERVES THE RIGHT TO BRING TECHNOLOGICAL, AESTHETICAL AND DIMENSIONAL CHANGES, FOR
PRODUCT IMPROVEMENT OR FOR MANUFACTURING NEEDS, WITHOUT NOTICE.
Page 3
2. Warnings and Safety Precautions
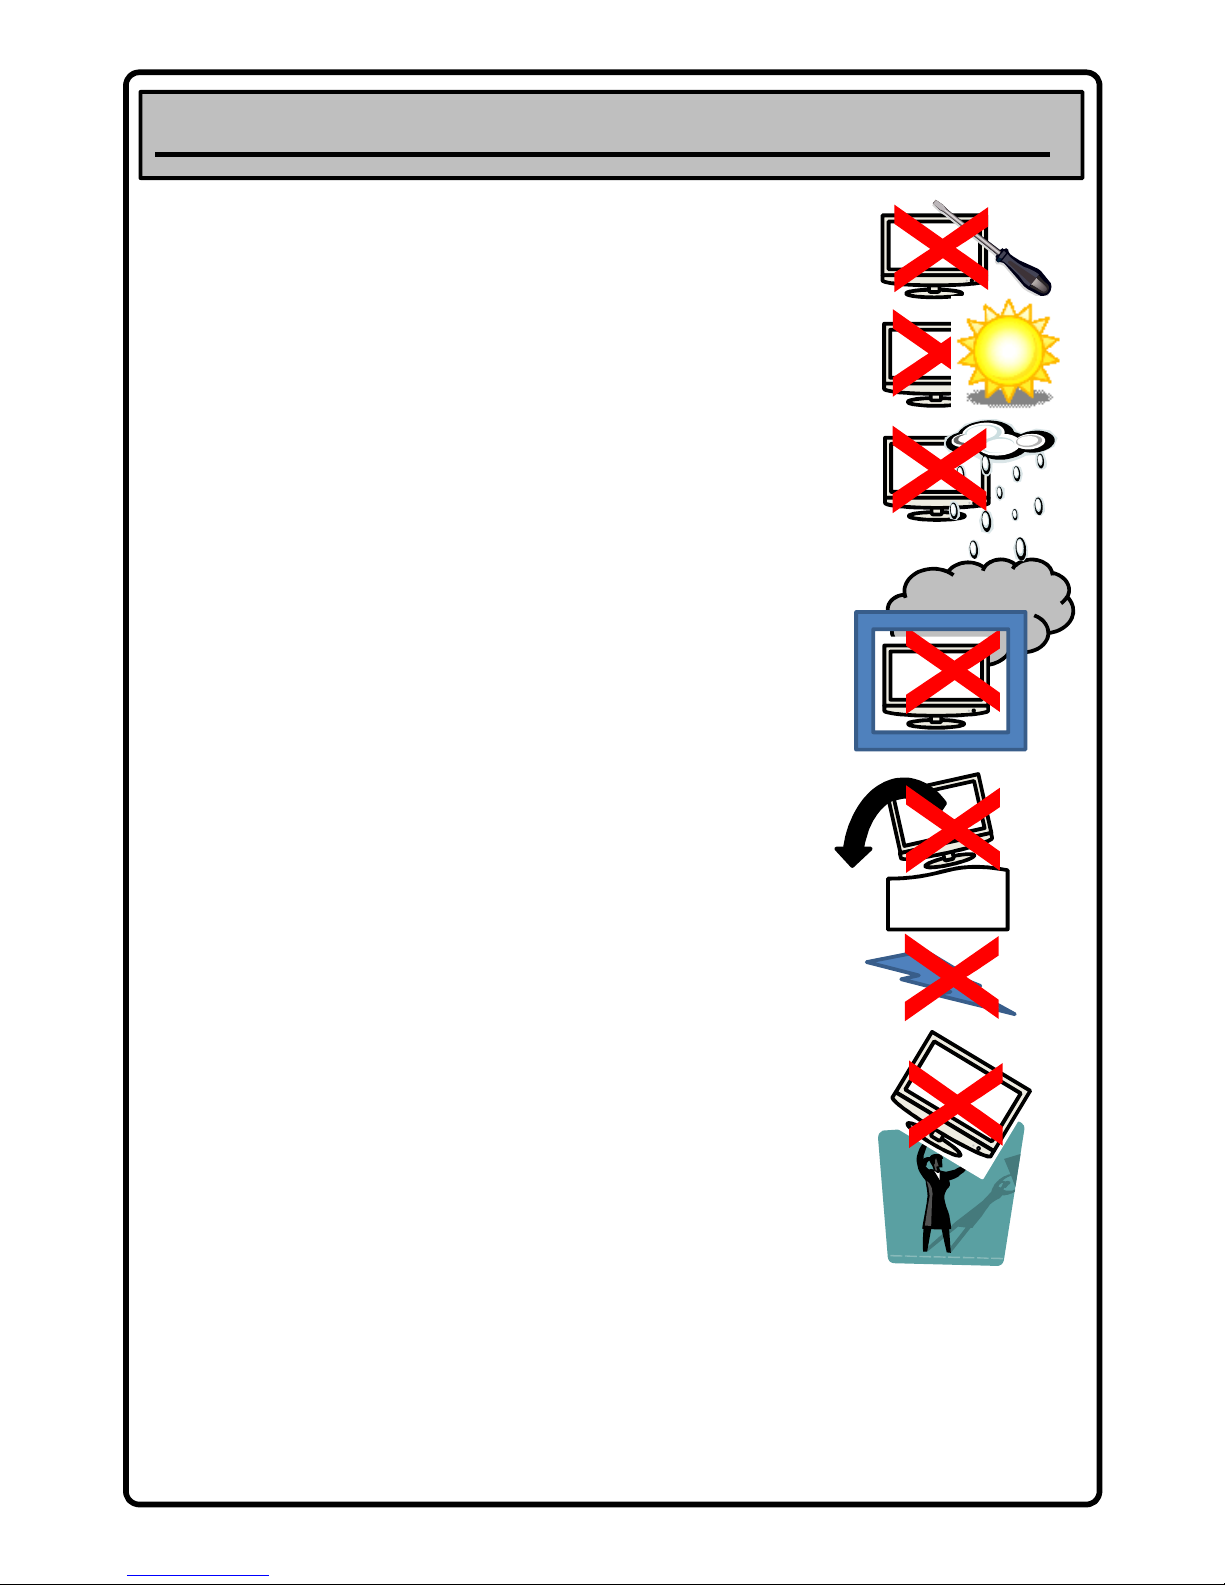
Do not remove the rear cover – do not attempt to service the product yourself.
Removing covers can expose you to high voltage and other dangerous conditions
leading to serious injury or death. Request a qualified agent to perform servicing.
Do not expose TV to direct sunlight or other heat sources – to prevent fire, never place
any type of candle or naked flame on the top or near to the TV set. Keep the product
away from heat sources such as radiators, heaters, stoves and other heat generating
products including amplifiers.
Do not expose to rain or moisture – do not use the product near water, such as a
bathtub, washbasin, kitchen sink, laundry tub, swimming pool or in a wet basement.
Do not place vases or any other water filled containers on this product. The water may
spill onto the product causing fire or electric shock leading to serious injury or death.
Do not block ventilation openings – adequate ventilation is essential to prevent set
failure. The vents and other openings on the cabinet are designed for ventilation. Do
not cover or block these vents and openings since insufficient ventilation can cause
overheating and/ or shorten the life of the product.
Do not place the TV on a bed, sofa, rug or other similar soft surface since they can block
ventilation openings. This product is not designed for built-in installation , do not place
the TV in an enclosed place such as a book case or rack, unless proper ventilation is
provided . You should leave at least 5cm space around all sides of the TV.
3
Do
not
locate
theTVon
unstable,
sloping
or
uneven
surfaces
–
this
can
cause
the
product to fall resulting in serious personal injuries as well as damage to the product.
Do not place the product on an unstable cart, wall mount, stand, tripod or table. When
relocating the product placed on a cart, it must be moved with utmost care. Sudden
stops, excessive force and uneven floor surfaces can cause the TV to fall causing
damage and possible serious injury.
The LCD Panel used in this product is made of glass – therefore, it can break if the unit
is dropped or an impact applied. If the LCD panel is broken, be careful not to be injured
by broken glass and remove the power lead before touching the unit.
Lifting and carrying the TV requires two people – when moving the TV it should always
be carried in both hands, be careful not to apply pressure on the display.
Do not allow anyone to pull, push or climb on the TV – this may cause the product to
fall . In particular , ensure children do not hang over or destabilize the TV; doing so may
cause the TV to tip over, causing serious injuries or death.
Power lead cautions – Use only the mains lead supplied with the TV. Contact your local
dealer for a replacement if required. The TV must be connected to a mains socket
having a protected earth connection. The mains socket must be installed by a qualified
electrician. If the earthing on the socket is not provided then there is a possibility of
electrical shock. Do not connect earthing to water pipes, gas pipes, telephone lines or
lightening rods.
Do not place the AC main cord under the TV - or other heavy item, this could lead to
fire or electric shock hazard.
Page 4
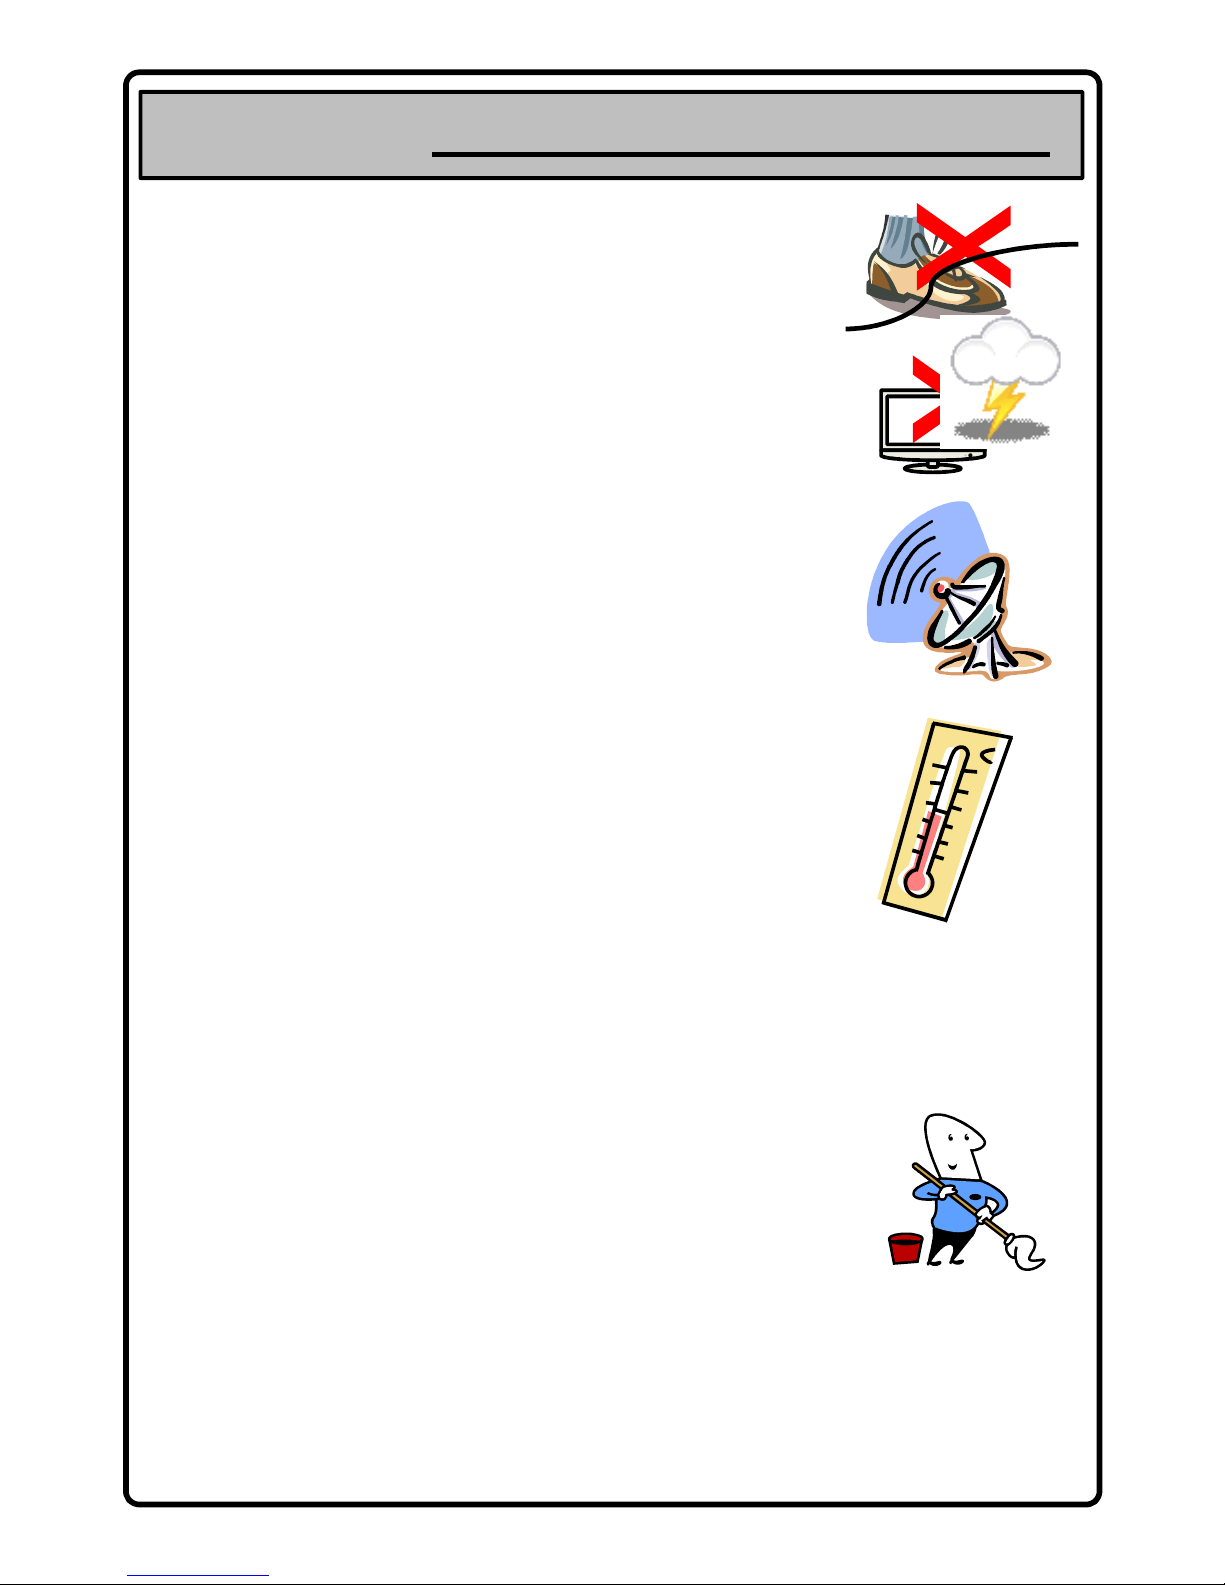
Do not allow anything to rest upon or roll over the power cord – and do not place the
TV where the power cord is subject to damage or left trailing in a position that could
cause someone to trip leading to injury and/ or damage to the product.
Remove the AC plug from the wall outlet – when the TV is not in use for a prolonged
period of time and before going to bed. Ensure that the mains plug is easily accessible
at all times. The power switch on this model does not fully disconnect the TV from the
mains supply – unplug to fully switch off and save electricity.
Unplug the TV in the event of a thunderstorm. Both the mains and the aerial should be
disconnected under these conditions.
Unplug the TV in case of abnormal operation – smoke, odd sounds or smells.
The TV is designed for operation on a 100 – 240V (50Hz/ 60Hz) AC power source.
Aerial Information – connect the antenna cable from your antennal/ cable socket or
the (room/ roof) antenna to the ANT IN terminal on the back of the TV to be able to
receive both Digital and Analogue broadcast transmissions. For proper operation/
performance we recommend you use an antenna cable with a ferrite filter at both
ends.
Cautions regarding use in high and low temperatures – when the unit is used in low
temperature conditions the picture may leave trails or appear slightly delayed. This is
not a malfunction, and the unit will recover when the temperature returns to normal.
Warnings and Safety Precautions
4
Do not leave the unit in a hot or cold location – as previously discussed – do not leave
in direct sunlight or near a heater as this may cause the cabinet to deform and the LCD
panel to malfunction.
NO WARRANTY CLAIMS ARE ACCEPTED FOR DAMAGE CAUSED BY UNSUITABLE USE
This TV product is designed to receive and display video and audio signals and for use
as a PC monitor.
ANY OTHER USE IS PROHIBITED____________________________________________
Maintenance & Notes
Cleaning – Unplug the AC cord from the AC outlet before cleaning the product. Use a
soft, non abrasive cloth to clean the product. Do not use liquid cleaners or aerosol
cleaners. If required slightly dampen the cloth with a drop of water – to aid in removing
stubborn marks on the cabinet. For the screen we recommend the use of a specialist
LCD screen cleaner which can be purchased from your local electrical dealer.
Don’t display a still image on the screen for too long a period as this can cause an after
image to remain on screen.
Despite the high quality of the television, random disturbances or interference may
cause occasional malfunctioning. In this case the correct function of the TV can be
restored by switching off the TV using the power button, removing the mains plug, then
switching on the unit as soon as the LED light disappears.
?
Page 5
3. Initial Setup
Before Starting
Please note the following important points!
1. Two people should lift or carry the TV!
2. Ensure you have plenty of space to work in safely!
3. A screw driver is required to fit the stand!
4. When fitting the stand ensure that the area you lay the TV face down on, is flat, stable and cushioned to prevent
damage to the screen!
5. Carefully remove the TV and accessories from the box supplied in – retain this and any packaging for 28 days
before disposing of.
In the Box/ Standard Accessories
1 x LCD Television 2 x AAA Batteries (Remote)
1 x Stand Mount 4 x Stand Mount Screws
1 x Quick Start Guide 1 x Mains Cable
1 x User’s Manual 1 x Remote Control
If any of the above items are missing please consult your retailer or contact service on the number below!
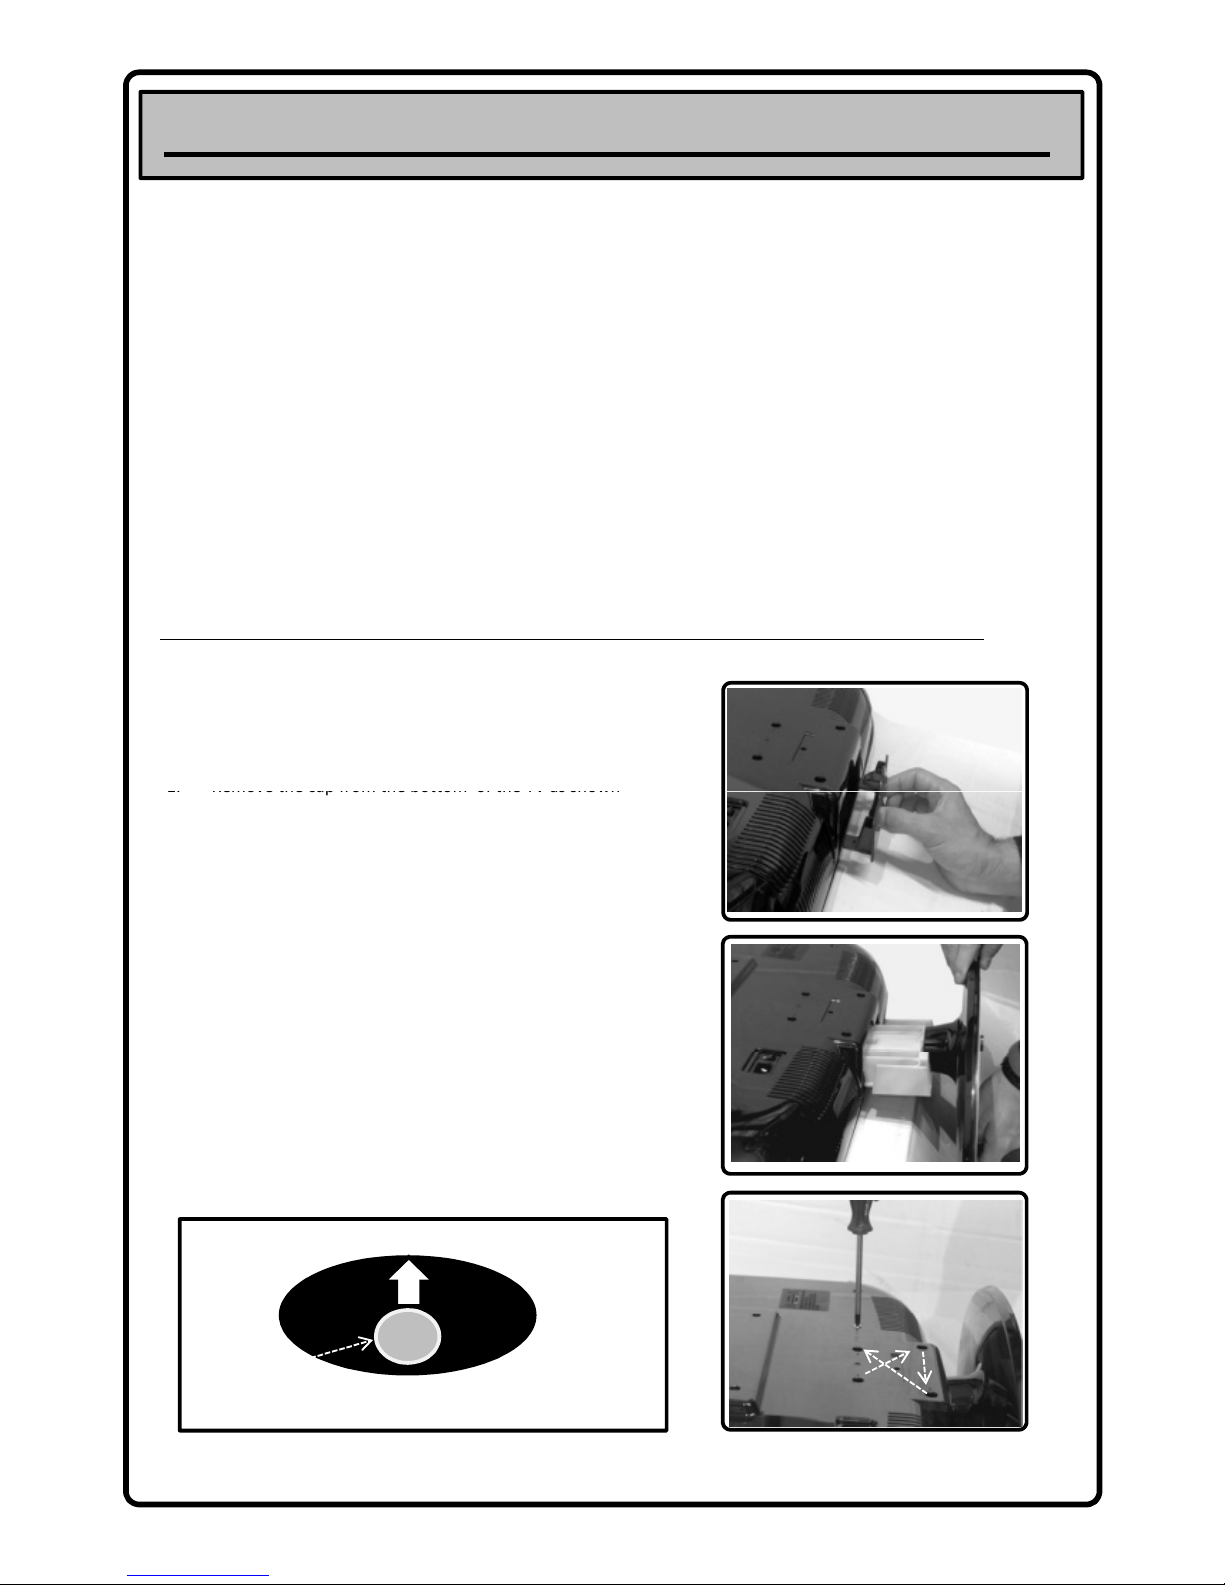
Fitting the Stand Mount to the TV
Remove the TV panel from the box and place face down on a
flat, cushioned surface (take care not to damage the screen)
5
fig 1
1.
Remove the cap from the bottom of the TV as shown
in fig 1 – retain for possible future use.
2. Insert the stand mount into the opening of the TV as
shown and carefully slide into position – fig 2. Please
ensure you correctly orientate the stand see fig 4.
3. Align the screw holes on the mount with the screw
apertures of the TV .
4. Insert and tighten the four screws (supplied) at the
rear of the TV as shown in fig 3 - take care not to over
tighten the screws.
5. Carefully lift the TV upright and position on a flat,
stable surface for viewing.
6. To detach the stand, perform the above steps in
reverse order.
fig 2
fig 3
1
2
4
3
fig 4
Front
Back
Stand – Top View
Stand Column
Page 6
Initial Setup
Notes on wall mounting the TV
Wall mount items (sold separately) allow you to wall mount this TV onto a wall.
For detailed information on installing the wall mount, please see the instructions provided with the specific bracket.
Contact a technician for assistance when installing the TV on a wall mounted bracket.
• DO NOT install your wall mount while the TV is turned on. It may result in personal injury due to electric shock.
• Remove the stand and cover the stand mount recess with the cap originally supplied with the TV (see previous page)
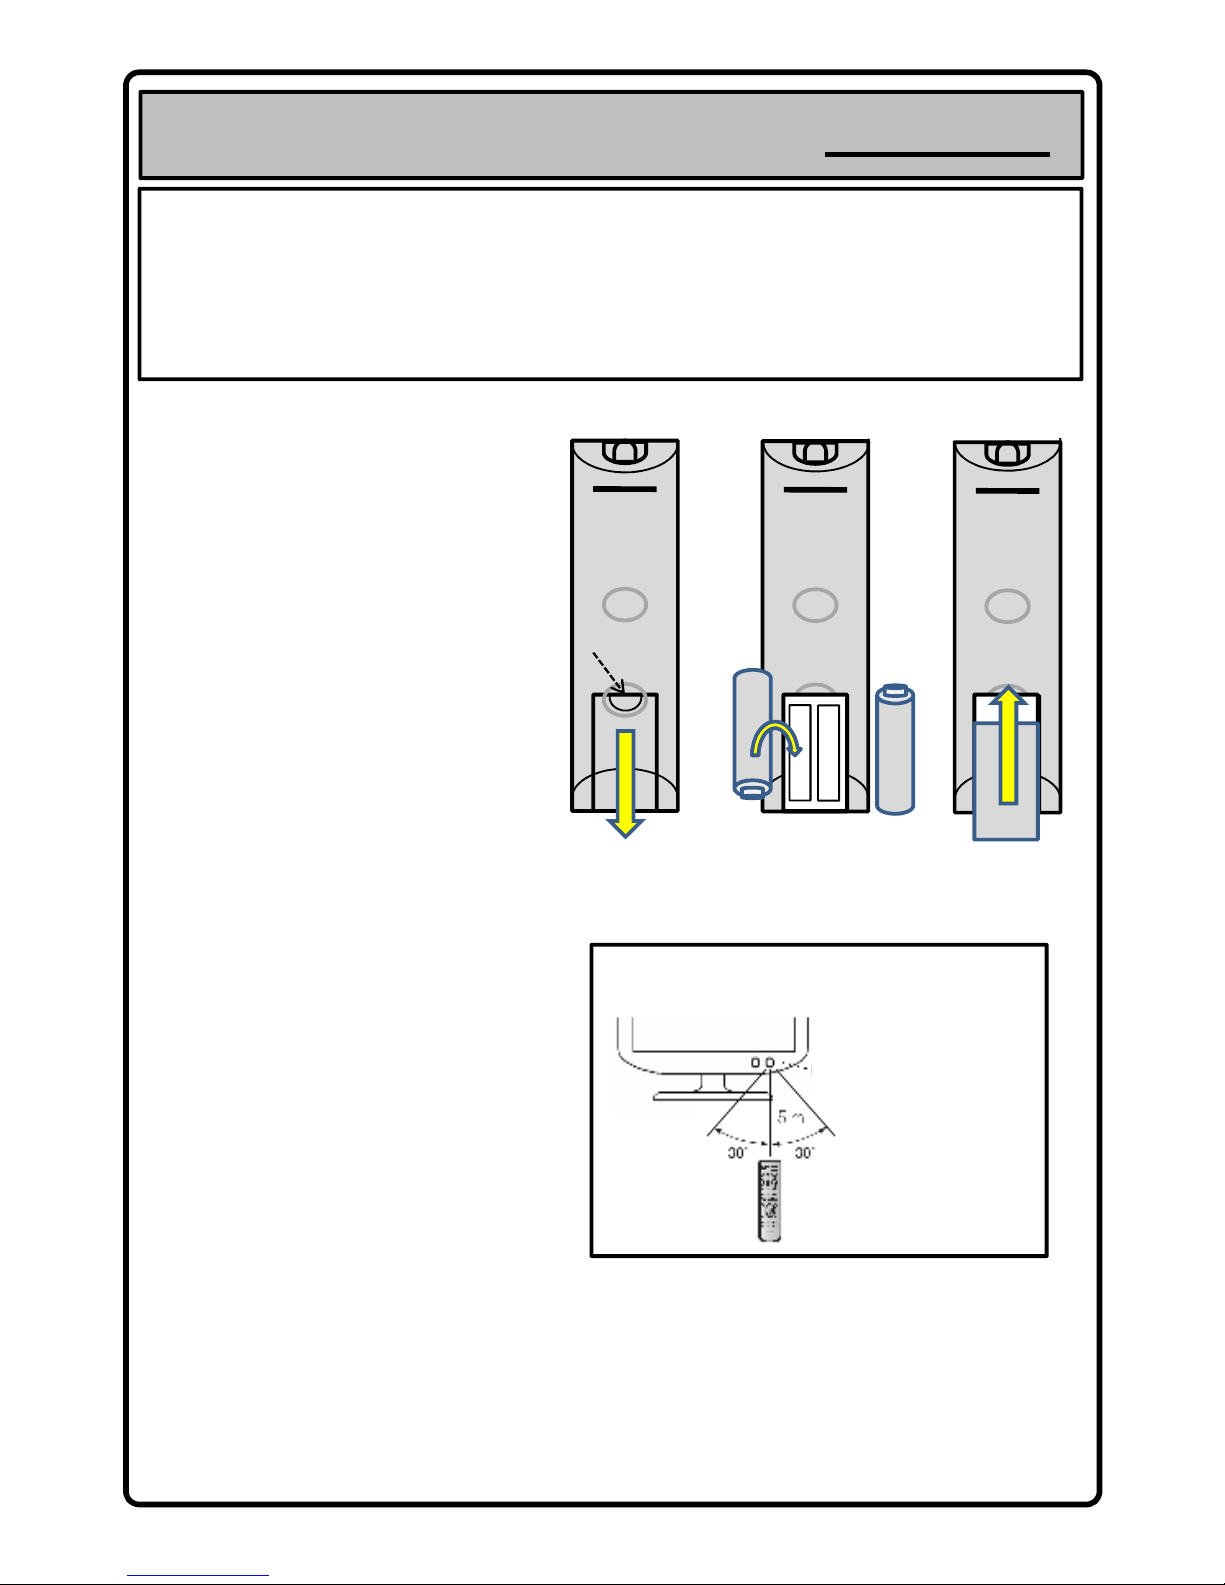
Remote Control: Battery Installation
The remote control uses 2 x 1.5V AAA batteries.
For battery installation and replacement please
follow the instructions below..
1. Turn the remote control unit upside down.
Carefully press down on the grip of the
battery compartment - slide back and
remove the cover in the direction of the
arrow – see fig 1 and 2.
2. Install the new batteries making sure that
the battery polarity matches the + and –
guide inside the battery compartment . The
unit can be damaged if the batteries are not
positioned correctly – see fig 3
1. Press
-
+
+
+
-
“Click”
6
3. Close the battery compartment cover
carefully by sliding it in the direction
indicated – fig 4. It should click into place
once secured.
Cautions regarding the remote control unit
• Do not expose the remote control to
impacts – dropping, sitting on etc...
• Do not spill liquids on the remote control
and do not place in areas of high humidity.
• Do not leave in direct sunlight – the heat
may cause deformation of the unit.
• Remove the batteries from the remote
control if you are not using it for a long
period of time (several weeks)
• Do not throw away used batteries with
normal household waste.
• Do not mix new and used batteries.
• Do not use rechargeable batteries.
• Do not mix battery types – (alkaline with
carbon, zinc etc)
• Do not expose batteries to excessive heat,
throw them on the fire, recharge them or
try to open them as this could cause them
to leak or explode.
2. Slide and remove
-
+
-
+
3. Fit the batteries
4. Slide and Close
(These figures are just for reference.)
Use the remote control by pointing it towards the
remote control sensor on the TV.....
Remote control sensor
If the remote control doesn’t work, check the following:
Is the TV power on?
Are the batteries fitted correctly – plus and minus terminals ?
Are the batteries drained?
Is there a power outage, or is the power cord unplugged?
Are there objects between the remote and the TV sensor?
Ensure the remote is in TV Mode – Press the TV key.
The remote control may not
work properly if the remote
control sensor on the TV is in
direct sunlight or bright lighting.
In such case , change the angle
of the lighting or TV, or operate
the remote control unit closer to
the remote sensor.
Page 7
4. Operating Controls and Connections
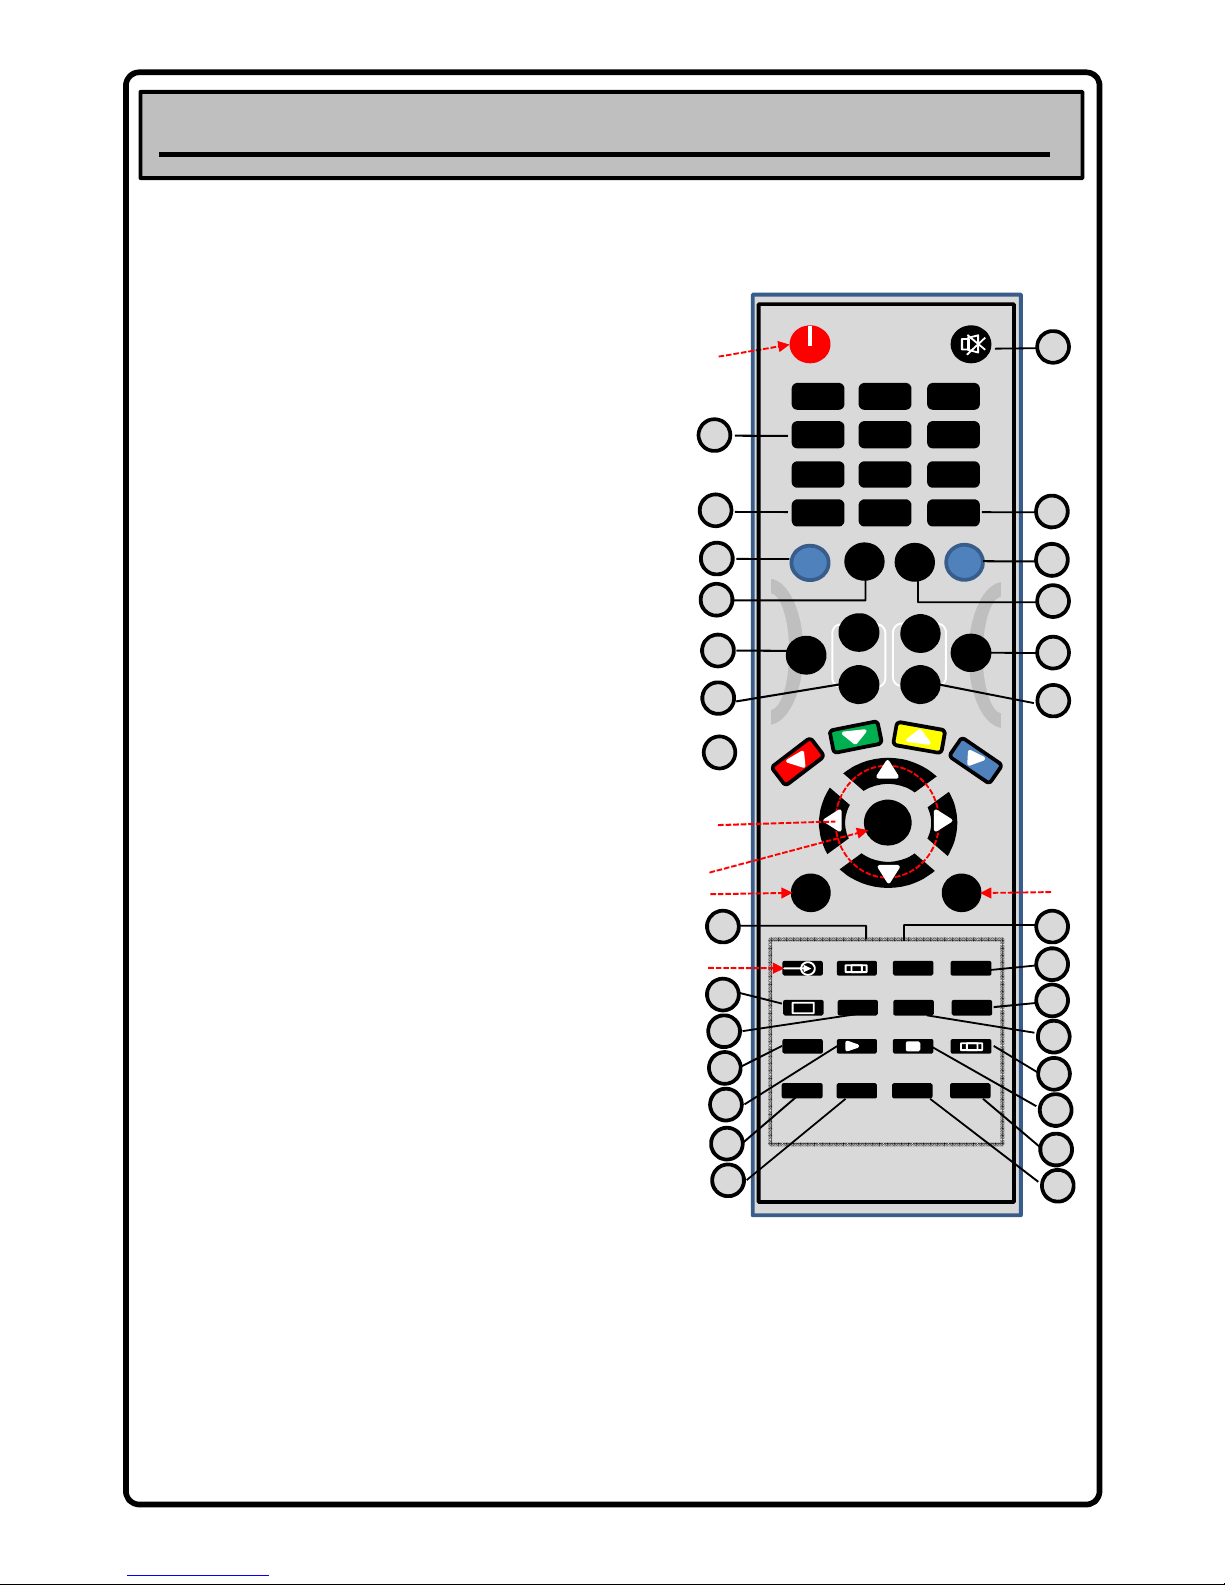
A. POWER: To switch the TV onto standby or power on
B. DTV MENU: To display the Digital TV Menu
C. ARROW KEYS: Used to navigate the menu’s
D. SOURCE: To display TV input source menu.
E. ENTER or OK: Used to confirm menu selection
F. ATV MENU: To display the TV settings menu (+ Analogue
tuning)
1. MUTE: To disable or enable sound
2. NUMBER KEYS: 0 – 9 For direct access to channel selection.
For a 2/3 digit channel number press the 2nd/ 3rddigit
without hesitation. Also use these keys for text entry options
within the menu – e.g. channel naming in ATV
3. TV/ RADIO: Switches the TV between current TV channel and
the current radio channel (DTV)
4. SUBTL: In DTV mode used to turn subtitles on/ off and toggle
through subtitle language options (if available).
5. TV: Press this to have the remote operate the TV
6. SKY: Press this to have the remote operate a SKY box – all
blue key functions become active and normal TV operation is
disabled. Please note that this feature will only work with
certain SKY box models. (not Sky+ or HD)
A
Remote Control Unit
The information on this page will help you to identify remote control function keys. Keys A – F highlight the
important keys used for tuning and Menu selection and is referenced further in the user’s manual as a guide.
o
1 2 3
4
5
6
7
8
9
10+
0
ABC DEF GHI
JKL
MNO
PQR
STU VWX YZ
TV GUIDE
BOX OFFICE
+ -
MENU INTERACTIVE
TV
SKY
EPG
MUTE
POWER
SUBTL
VOL
CH
+ +
-
-
QV
PREV
AUDIO
LANG
TV/
RADIO
FAV
NEXT
2
6
1
3
7
5
4
8
10
9
11
13
12
7
7.
AUDIO LANG
: if the TV channel has multi lingual/ alternate
audio tacks use this key to select which track to listen to.
8. EPG: Electronic Programme Guide – In DTV mode only - calls
up the TV guide system showing you what’s on.
9. QV PREV: Selects the previously viewed channel
10. FAV NEXT: To select your favourite channel list.
11. VOL +/-: To adjust sound level
12. CH +/-: To view the next or previous TV channel.
13. Colour Keys: Used to access Fastext options (Analogue TV)
14. ZOOM: Selects between 4:3 – 16:9 aspect ratio viewing
options
15. PICTURE: Recall default picture settings
16. SOUND: Recall default sound settings.
17. DISPLAY: Use to display TV and source information on screen
18. EXIT (I/II): Use to exit menu’s and teletext – I/II used to
switch between NICAM Stereo/ Mono options and NICAM
dual I/ dual II/ or mono - when in non menu operation.
19. PAGE+: Press to view the next EPG program (DTV)
20. PAGE-: Press to view the previous EPG program (DTV)
21. TEXT: Used to enter “Teletext” mode (Analogue and DTV)
22. INDEX: Use to go to text a – z index page.
23. CANCEL: Text option, used to temporarily display TV picture
until text page refreshes – gives notification on screen.
24. SIZE: Used to increase text size in teletext mode – press to
displays top half of text screen enlarged, press again to
display bottom half and press again to display normal.
25. MIX: Mix TV picture and text as an overlay
26. HOLD: Freeze text subpage on screen
27. SUBPG: Subpage Index Key
28. REVEAL: Use to display/ hide information on certain text
pages – quiz game solutions etc.
B
C
D
E
ENTER
ATV MENU
DTV MENU
SOURCE ZOOM
PICTURE SOUND
DISPLAY
EXIT REV
P
PAGE -
PAGE +
I/II
SEARCH
REPEAT
RETURNPROG
USR/ CR
SIZE
CANCEL
INDEX
TEXT
MIX SUBPG
REVEAL HOLD
HELP
P / TXT
i
ESC
II
T
T
T
T
S
+
FWD
VST-DTV
18
14
17
16
15
F
20
19
22
21
24
23
27
25
28
26
For illustration purposes only –
some functions apply to this brand
of VCR and DVD players only and as
such are not explained here.
Page 8
Operating Controls and Connections
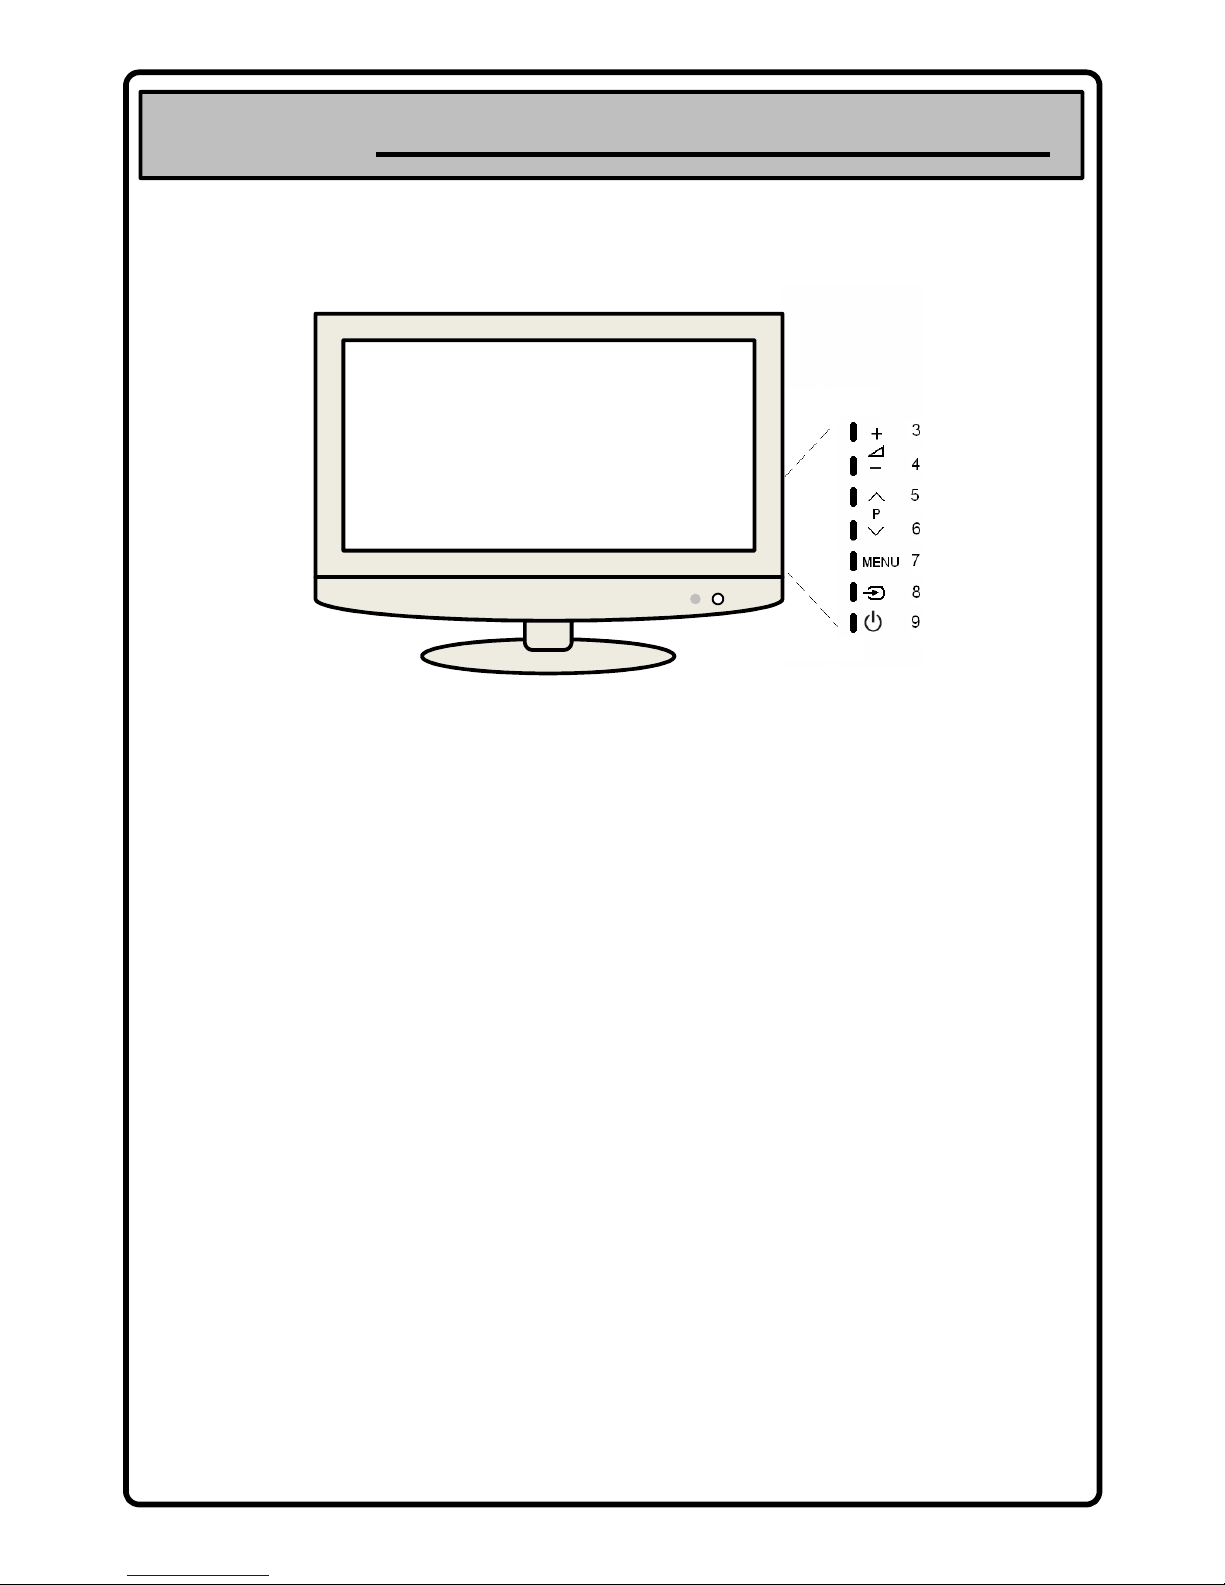
Operating Controls/ Names and Functions
Front (Right Side) Controls
1 2
8
1.
LED
INDICATOR
the light is blue when the power is on and red
when TV is in stand-by mode.
3. VOLUME UP
increase the volume
5. CHANNEL UP (CH+)
access next TV channel
7. MENU
press to display On Screen Menu of the TV’s
features and settings
9. STAND-BY
press to switch the TV stand-by on/off
2.REMOTE
CONTROL
SENSOR
aim the remote control at this spot on the TV
4. VOLUME DOWN
decrease the volume
6. CHANNEL DOWN (CH-)
access previous TV channel
8. SOURCE
press to display on screen menu of TV’s input
sources - enables you to select from – TV, SCART 1
– 2, S VIDEO, Component, VGA, HDMI 1 – 3, DTV
(These figures are just for reference.)
Page 9
Operating Controls and Connections
Operating Controls/ Names and Functions
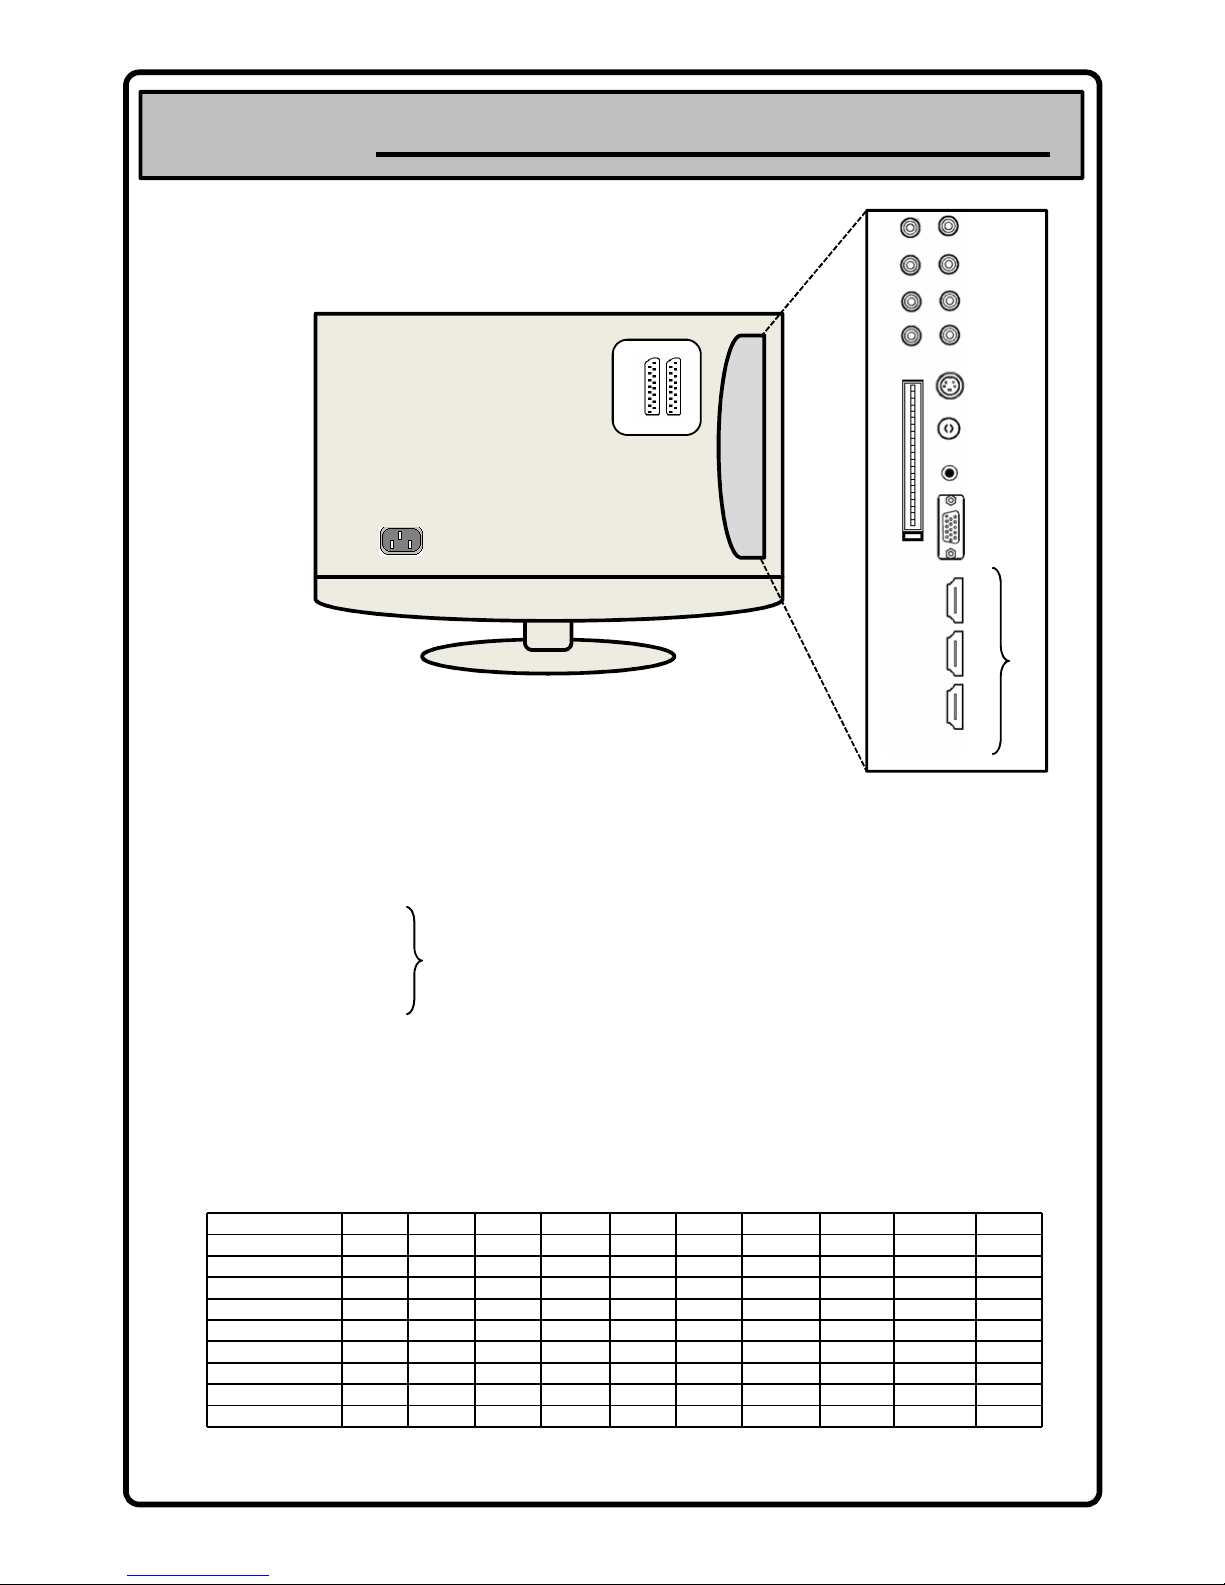
Rear Connections
10
10. AC INPUT TERMINAL 11. SCART 1/ SCART 2
11
12
13
14
15 16
17
18
19 20
22
21
23
24
25
26
fig 2
9
12. SIDE CONNECTION PANEL - see fig 2 - expanded
14. AUDIO IN R2 (For Component) – RIGHT
16. Pr/ Cr Component In
18. Pr/ Cb Component In Component In
20. Y Component In
22. CI Slot (common interface)
24. VGA Audio In (PC Sound)
26. HDMI 1/ HDMI 2/ HDMI 3 Connections
13. AUDIO IN L2 (For Component) - LEFT
15. AUDIO IN R1 (For Video/ S Video) - RIGHT
17. AUDIO IN L1 (For Video/ S Video) - LEFT
19. Video In (Composite)
21. S-Video In
23. ANT In (Antenna Input Terminal)
25. VGA In (D-sub 15pin)
(These figures are just for reference.)
VCR Set top box DVD Player DVD Recorder Blu Ray SKY HD Digital Camera Video Camera Games Console
PC
SCART 1 (RGB) o o o o o o
SCART 2 o o o o o o
COMPONENT IN o o o o
VIDEO IN o o o o
S-VIDEO IN o o o o o
VGA IN o o
HDMI 1 o o o o o o
HDMI 2 o o o o o o
HDMI 3 o o o o o o
Connections – where external products would typically connect (o = can be connected)
Page 10
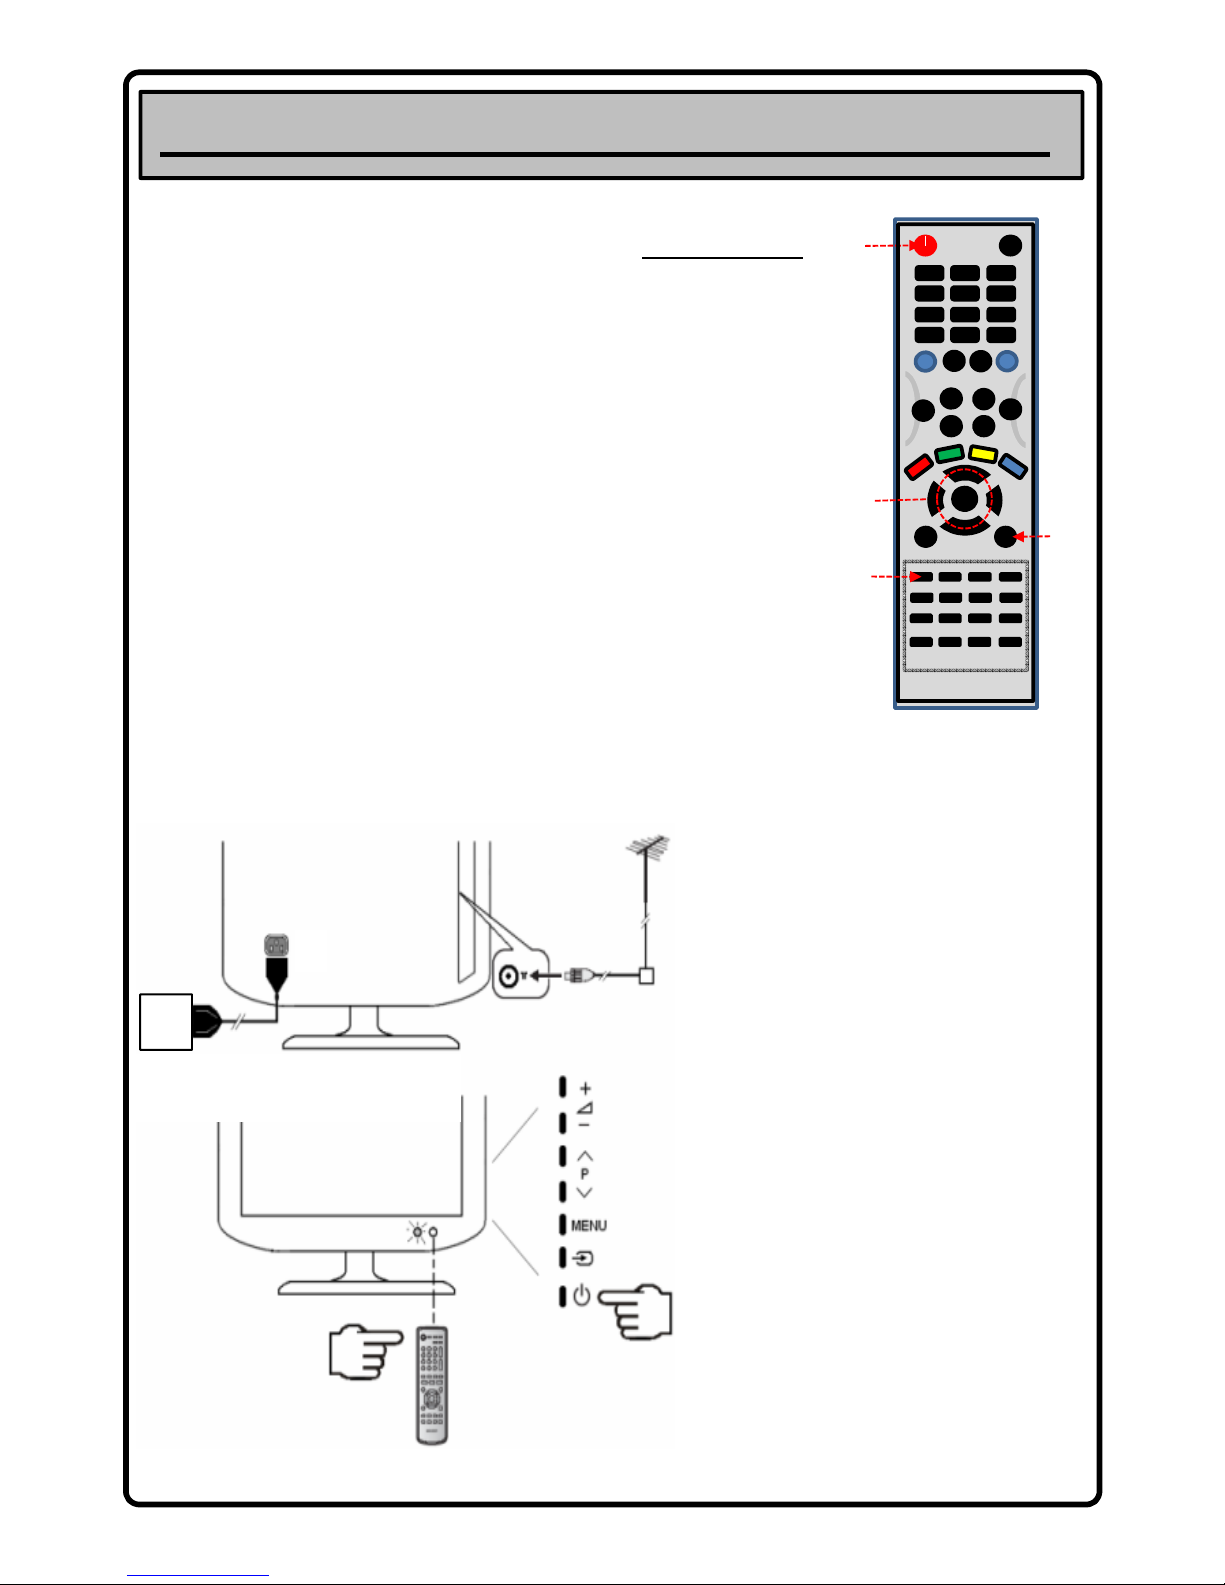
5. Basic Connection and Switching the TV On
Basic TV Connection and Switching On/ Off
1. Connect your aerial lead into the ANT IN socket
on the rear of the TV – see fig 2.
2. Connect the mains lead (supplied) into the TV
and plug into an appropriate household socket.
Use AC 100 ~ 240V power outlet for the TV
power supply. The apparatus must be connected
to a mains outlet with a protected earthing
connection - see fig 2.
3. The red standby light on the front of the TV will
illuminate.
4. Point the remote control at the front of the TV
set and press the POWER key (A) fig 1. – the blue
power light illuminates on the front of the TV –
(replacing the red standby light) and the unit
switches on. You can also press the standby key
on the side of the TV to turn on the unit from
standby – see fig 2.
KEY CONTROLS
A – POWER KEY
B – DTV MENU
C – ARROW KEYS
D – SOURCE KEY
E – ENTER or OK KEY
A
C
D
B
o
E
fig 1
Standby Mode
10
Place the TV close to the AC outlet,
and keep the power plug within reach.
TV Front
TV Rear
2
1
3
4
4
I
I
I
Your TV can be placed into standby mode in
order to reduce power consumption – this is
useful when you wish to interrupt viewing
temporarily.
• Press the POWER key (A) on the remote
control or the standby key on the TV set.
• The screen is turned off and a red standby
indicator light replaces the blue power light
on the front of the TV.
• To switch the TV back on , simply press the
POWER key (A) on the remote control or
Standby on the TV set.
• Once in Standby - to fully switch off the TV
remove the AC plug from the power outlet
– when the TV is not in use for a prolonged
period of time and before going to bed.
• Ensure that the mains plug is easily
accessible at all times. The power control on
this model does not fully disconnect the TV
from the mains supply – unplug to fully
switch off. Do not leave on standby or
switched on when you leave the house!
fig 2
Page 11
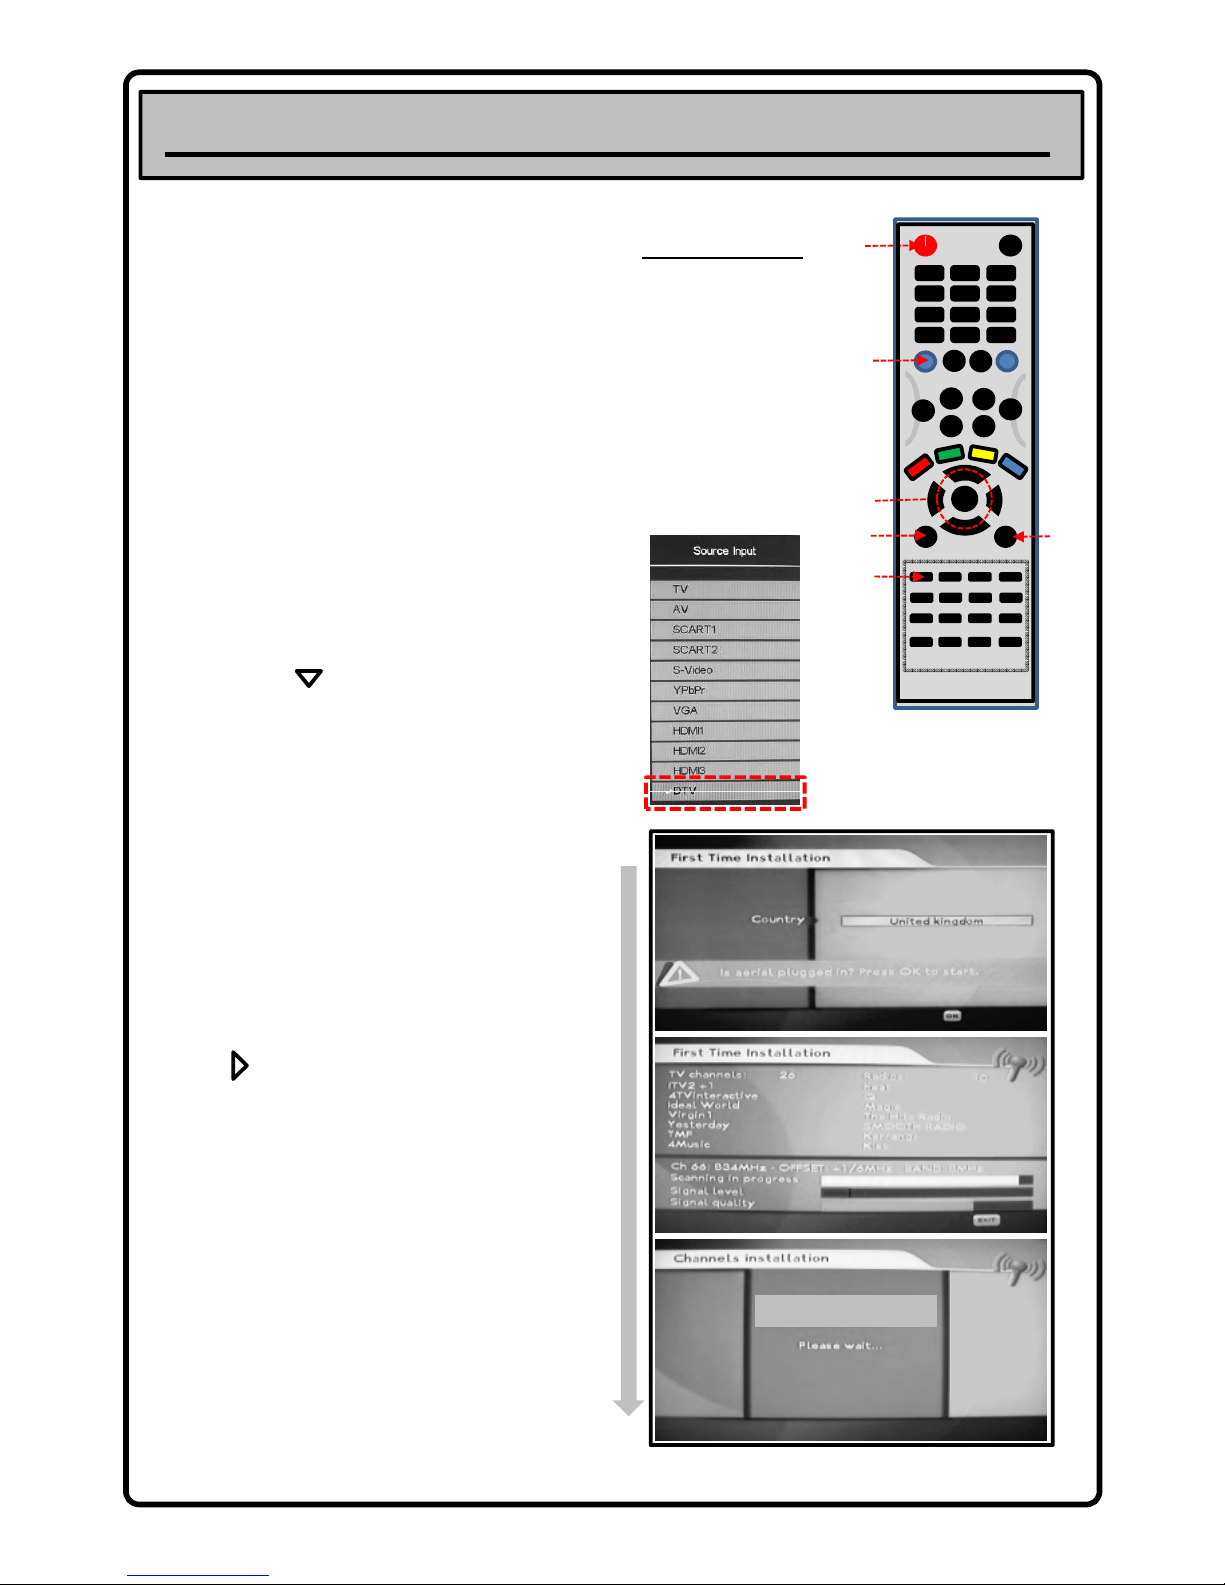
When the TV is switched on for the first time it may default
to Analogue Tuner Mode (Standard TV) – To start Digital
Tuning you must switch the TV into DTV Mode.
6. Digital Tuning: First Installation
KEY CONTROLS
A – POWER KEY
B – DTV MENU
C – ARROW KEYS
D – SOURCE KEY
E – ENTER or OK KEY
F – ATV MENU
G – TV KEY
A
C
D
B
o
E
G
F
fig 1
1. Press the SOURCE key (D) on the remote control –
the source input menu appears on screen (fig 2) –
this will only remain on screen for a few seconds for
you to select your option – if the menu disappears
simply press the SOURCE key again to display.
2. Use the down ARROW key (C) on the remote to
highlight the DTV option. Once highlighted press the
ENTER/ OK key (E)
First Installation
Remote Control Unit: Ensure that the remote control is in
TV mode – press the TV key (G - fig 1) – the remote will now
operate the TV..
With the TV connected and switched on as described
previously follow the steps below to tune into Digital TV
broadcasts.
DIGITAL TV TUNING
11
3. An onscreen message – “DTV Initial...” Appears
followed by a Welcome message – after a few
moments the “First Installation” screen (fig 3)
appears.
4. As per the On screen display - ensure your aerial is
connected to the TV – The country option should
default as “United Kingdom”– otherwise use the
right ARROW key (C) to select “United Kingdom”
5. Press ENTER/ OK (E) – The TV will now auto-tune
displaying a progress bar and listing channels as they
are found (fig 4) – this will take a few moments to
complete. Once finished an “installation completed”
message will be displayed (fig 5).
6. After a few moments the TV will display a TV picture
(BBC1 usually) – and is ready to use – all done.
7. If the TV channels appear in an unusual order, or you
have TV channels missing, please perform a factory
reset on the TV and follow steps 3 – 6 again – for
instructions on how to do this please see the trouble
shooting section in this user guide book.
fig 2
United Kingdom
fig 5
fig 3
fig 4
Installation Complete
Page 12
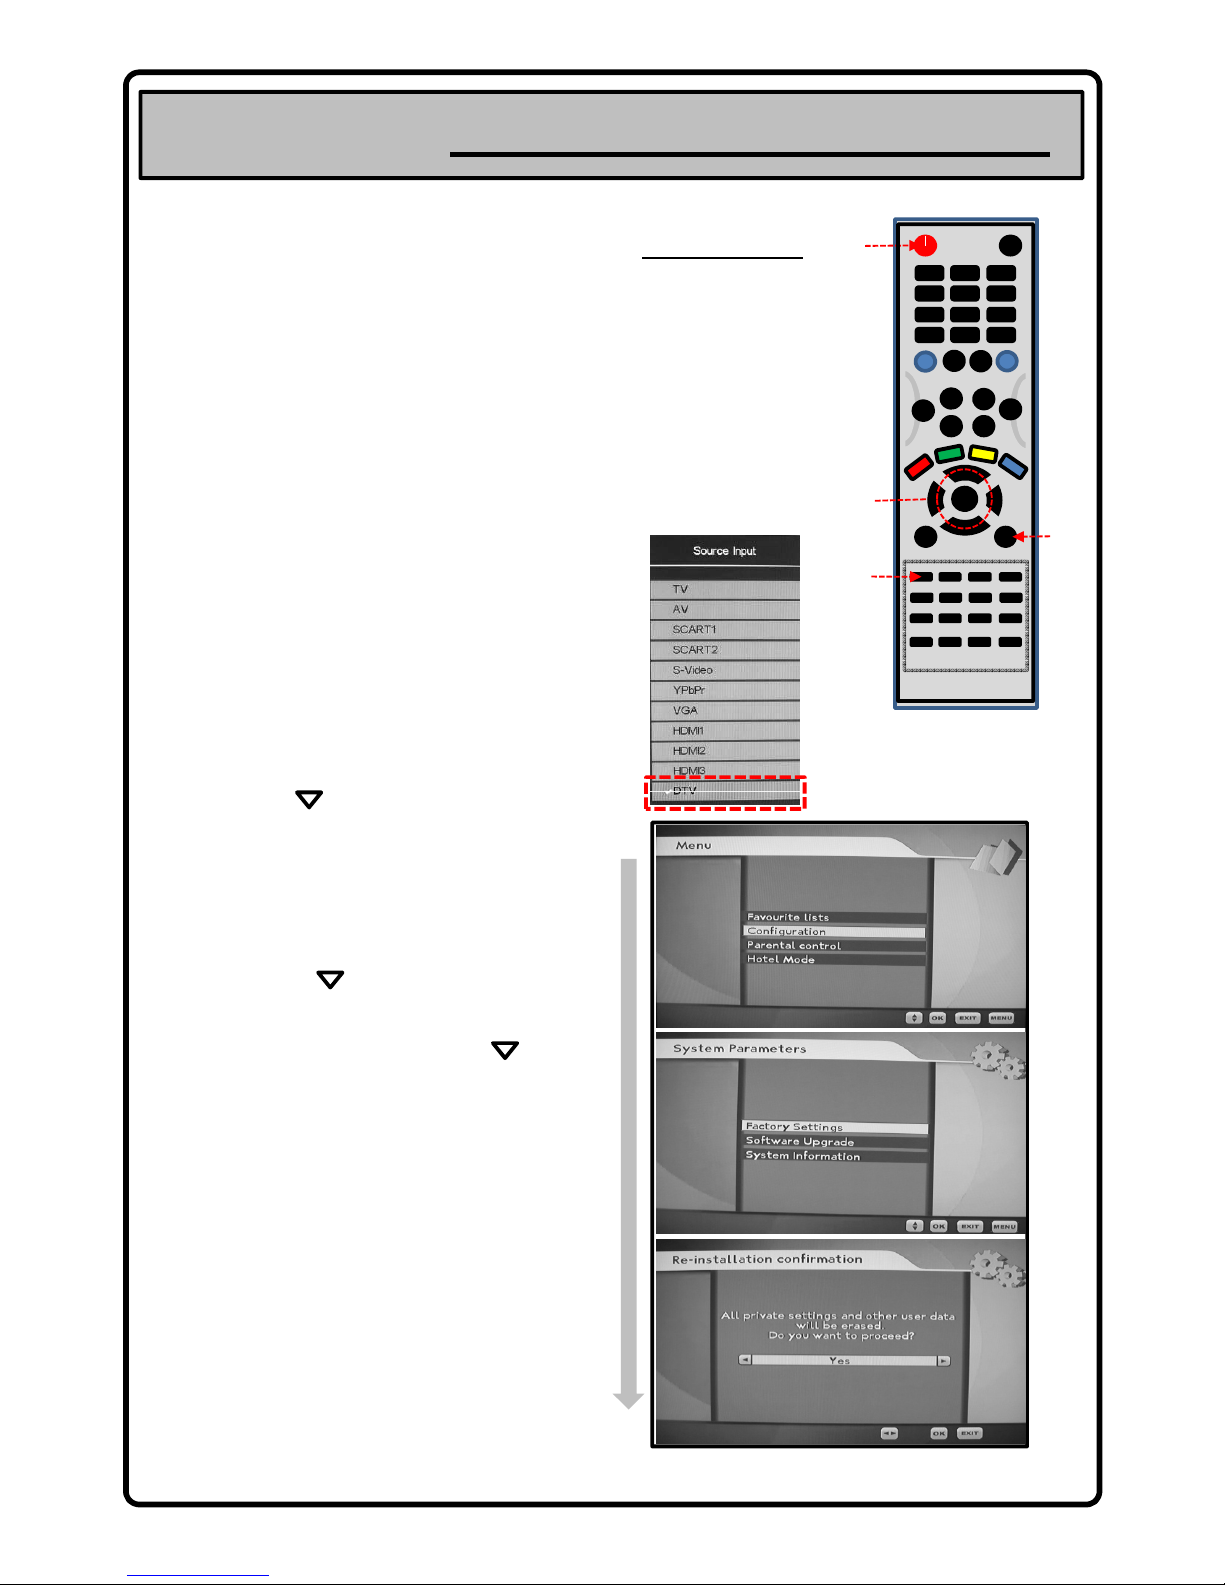
1. The TV should already be in DTV mode – if it is skip
to step 4. If not follow he next steps and continue.
2. Press the SOURCE key (D) on the remote control –
the source input menu appears on screen (fig 2) –
this will only remain on screen for a few seconds for
you to select your option – if the menu disappears
simply press the SOURCE key again to display.
Digital TV Tuning Issues
TV Stations Stored in an Incorrect Program Position
If after initial DTV Tuning is complete, channels are stored in
an unusual or incorrect order (e.g. BBC1 on program 7), or
certain channels seem to be missing from the usual free to
air line up - you may need to initiate first installation again.
To do this you will need to perform a Factory Reset on the
DTV Tuner memory. All DTV Tuner data will be erased
(doesn’t affect analogue tuning memory) and you will be
prompted to start the “First Installation” process for a
second time. This should resolve the problem. Follow the
instructions below.
Factory Reset the DTV Tuner
Digital Tuning - Troubleshooting
KEY CONTROLS
A – POWER KEY
B – DTV MENU
C – ARROW KEYS
D – SOURCE KEY
E – ENTER or OK KEY
A
C
D
B
o
E
fig 1
3.
Use
the
down
ARROW
key
(C)onthe
remote
to
highlight the DTV option. Once highlighted press the
ENTER/ OK key (E)
4. You are now in DTV Tuner mode. Press the DTV
Menu key (B) the DTV menu will be displayed with a
list of options see fig 3.
5. Use the down ARROW key (C) to highlight
“Configuration” and press the ENTER/ OK key (E)
6. On the following menu use the down ARROW
key (C) to highlight “System Parameters” and press
the ENTER/ OK key (E).
7. On the following menu use the ARROW keys (C) to
select “Factory Settings” and press ENTER/ OK (E)
see fig 4.
8. You will be asked to confirm the operation – press
the ENTER/ OK key (E) see fig 5 - this will delete all
current DTV Tuner settings and re initialise the TV
which will automatically go into “First Installation”
auto tuning mode after a few moments.
9. Please select “United Kingdom” with the ENTER/ OK
key (E) and the TV will start tuning all digital TV
stations and should put them in the correct/ usual
order. If you are still having problems call our service
number below.
12
fig 2
fig 5
fig 3
fig 4
Image DTV Menu
Page 13
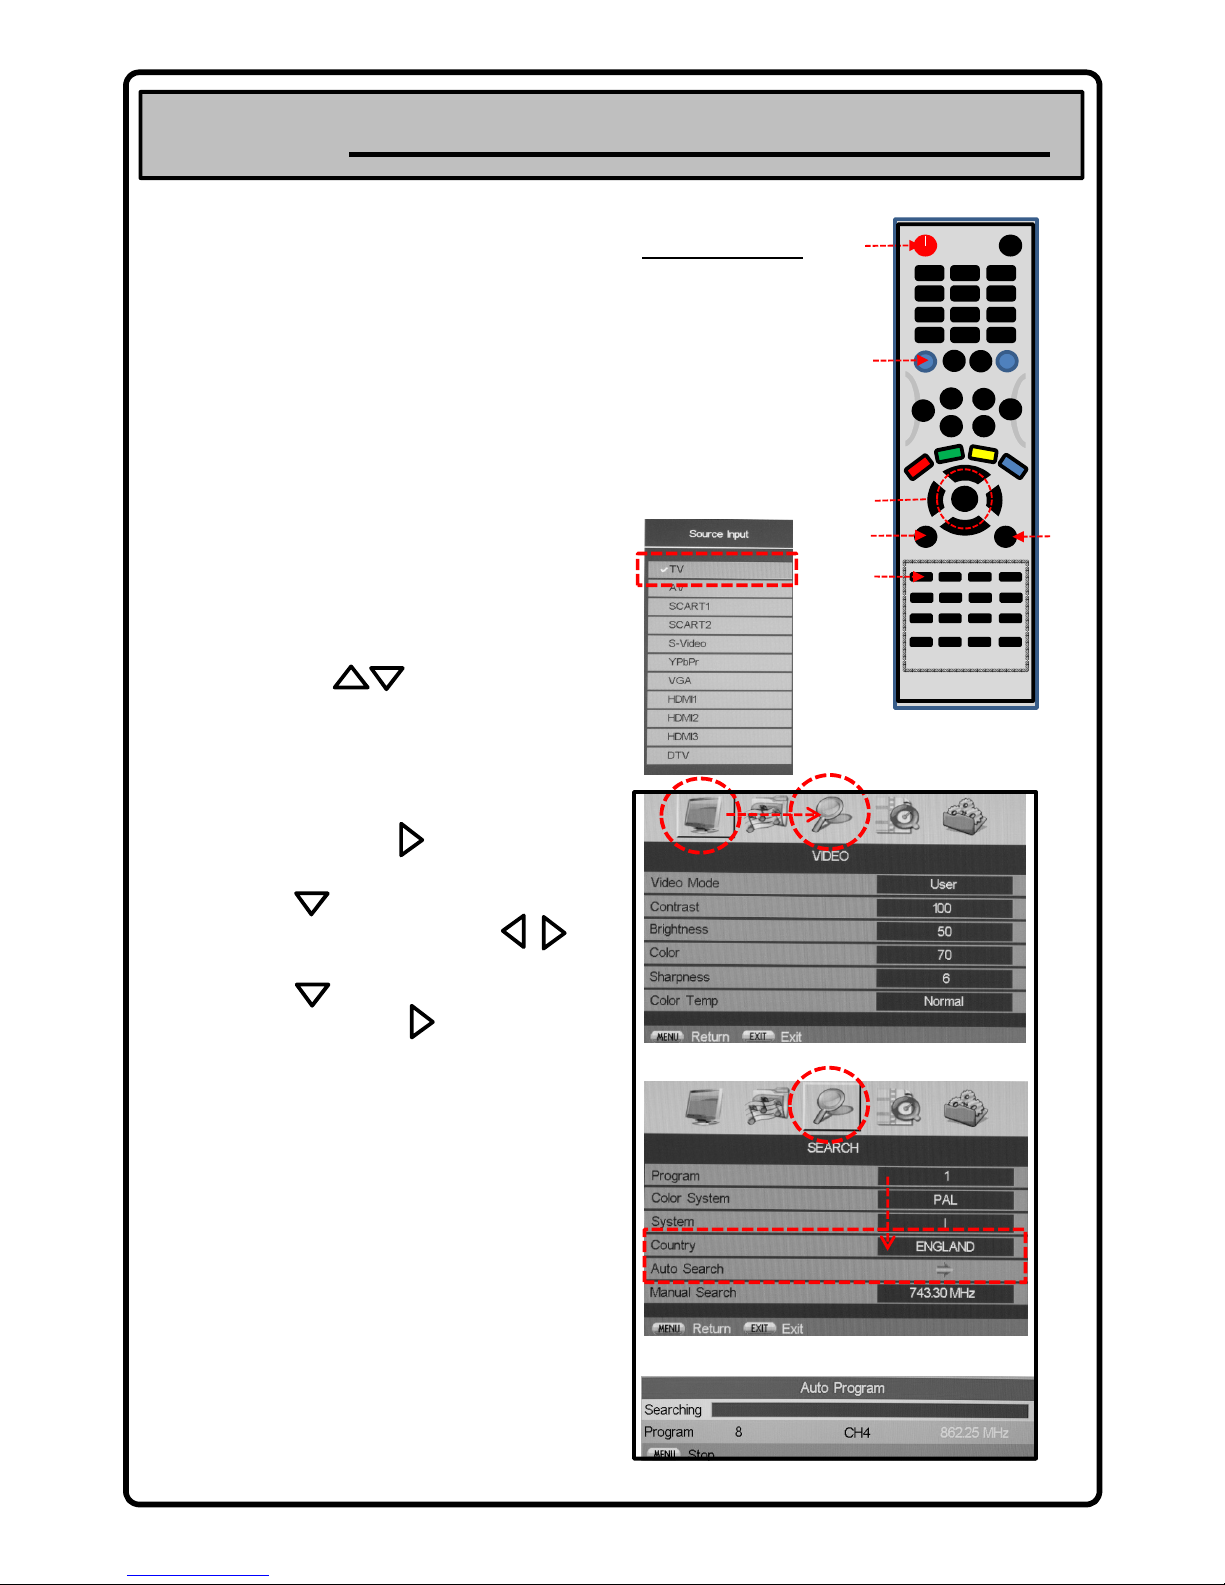
When the TV is switched on for the first time it may default
to Analogue Tuner Mode (Standard TV) – if not, to start
Analogue Tuning you must switch the TV into the TV Mode.
First Installation
Remote Control Unit: Ensure that the remote control is in
TV mode – press the TV key (G - fig 1) – the remote will now
operate the TV.
With the TV connected and switched on as described
previously, follow the steps below to tune your TV into
standard terrestrial TV broadcasts'
ANALOGUE (STANDARD) TV TUNING
Analogue TV Tuning: First Installation
1. Press the SOURCE key (D) on the remote control –
the source input menu appears on screen (fig 2) –
this will only remain on screen for a few seconds for
you to select your option – if the menu disappears
simply press the SOURCE key again to display.
2. Use the up/ down ARROW keys (C) on the
remote to highlight the TV option. Once highlighted
press the ENTER/ OK key (E) The TV will switch into
analogue tuner mode.
F
KEY CONTROLS
A – POWER KEY
B – DTV MENU
C – ARROW KEYS
D – SOURCE KEY
E – ENTER or OK KEY
F – ATV MENU
G – TV KEY
A
C
D
B
o
E
G
fig 1
fig 2
13
3.
Press
the
ATV
MENU
key
(F)todisplay
theTVmain
menu. The menu will default to the Video menu –
see fig 3 - Use the right ARROW key (C) to
highlight the “Search” menu – see fig 4.
4. Press the down ARROW key (C) to highlight the
“Country” option and use the left or right
ARROW key (C) to select “ENGLAND”
5. Press the down ARROW key (C) to highlight “Auto
Search” and press the right ARROW key (C) to
begin tuning.
6. An “Auto Program” banner will appear on the screen
- see fig 5 displaying a progress bar. All available
tuner frequencies will be searched and any channels
found, stored automatically to the tuner’s memory.
7. This process will take a few minutes to complete.
When finished the TV “Auto Program” banner will
disappear and the TV will display a normal TV picture
(usually BBC 1). The TV is now ready to display all
available analogue TV broadcasts.
8. Provided the broadcast signal is strong enough, the
TV will automatically place all TV channels in the
correct order and label the channels BBC1, BBC2,
ITV, CH4, CH5. If the signal is weak then channels
may not be named and may be stored on the wrong
program position. If this is the case follow the
instructions on the next page.
fig 5
fig 3
fig 4
Page 14
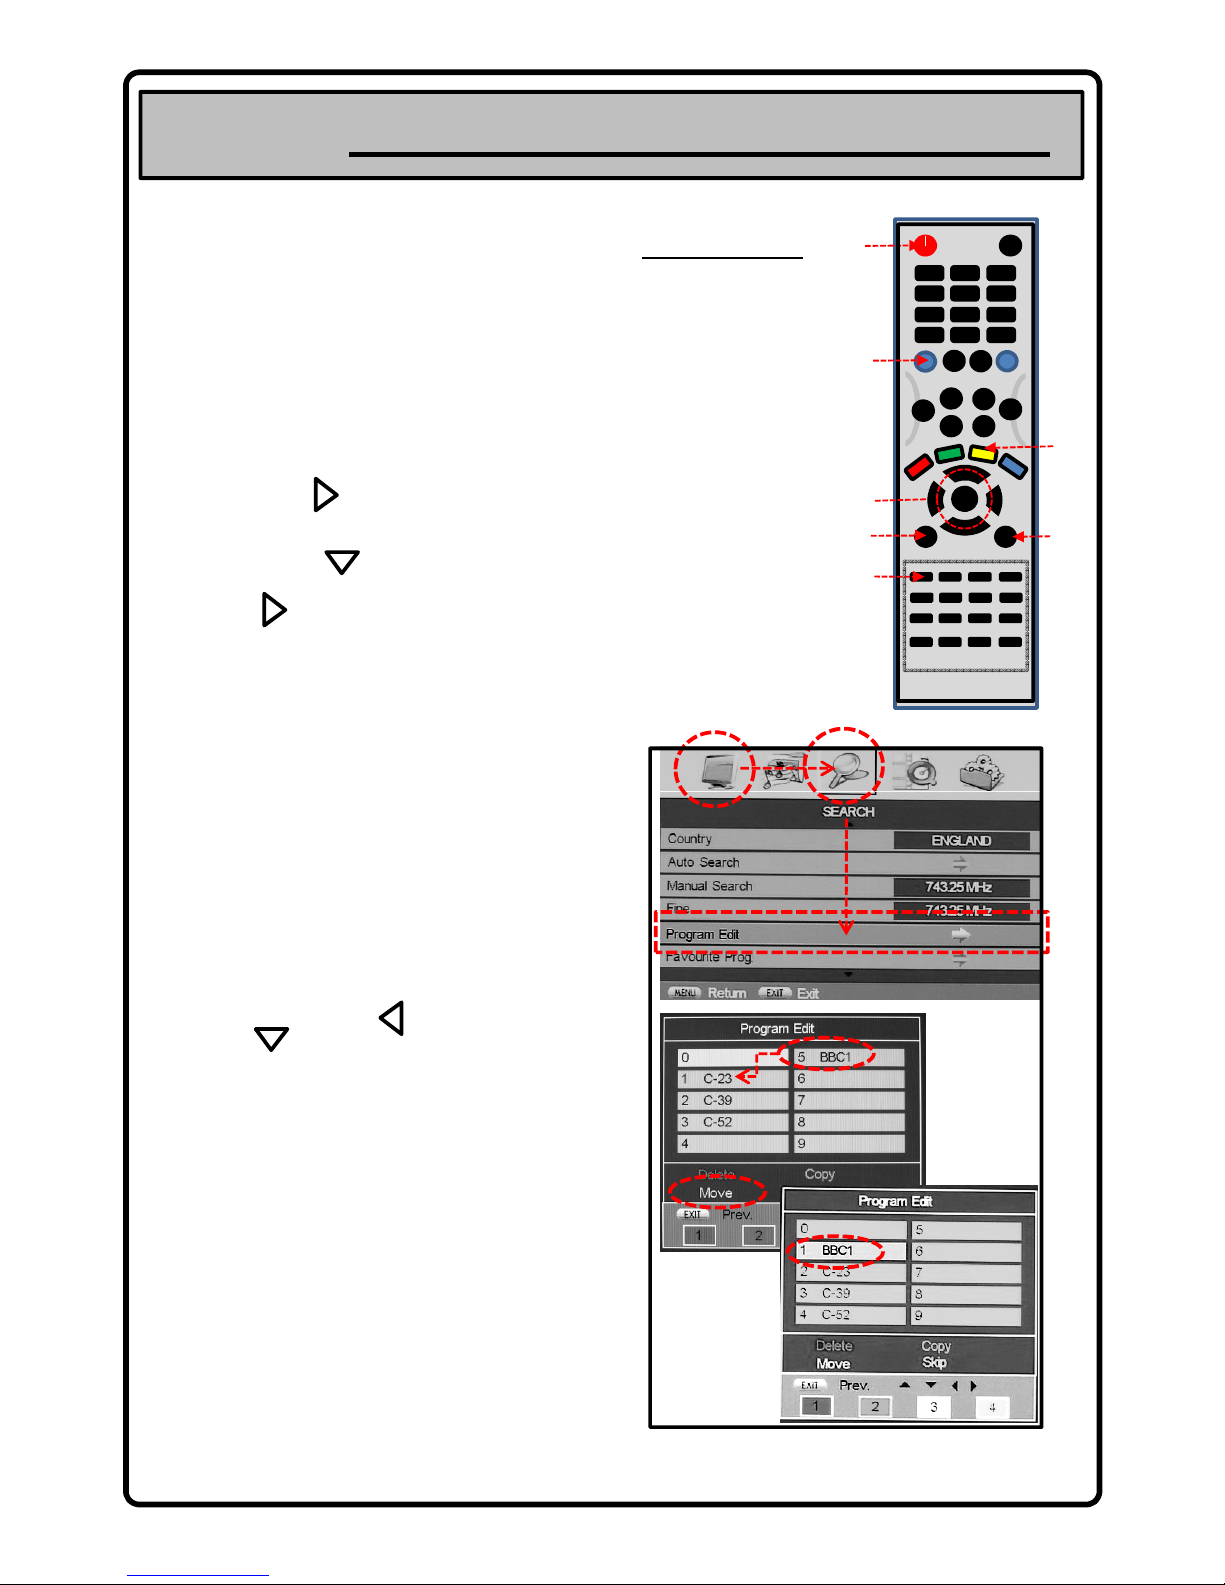
Analogue TV Tuning: First Installation
First Installation
ANALOGUE (STANDARD) TV CHANNEL SORTING
If, after auto tuning, the TV Channels received are stored in
an incorrect order you will need to manually sort them into
the correct program position. Please follow the steps below.
You should already be in the TV Tuner mode – following on
from the previous page.
1. Press the ATV MENU key (F), the ATV Menu appears on
screen displaying the “Video” menu.
2. Use the right ARROW key (C) to highlight the
“Search” menu icon – see fig 2.
3. Press the down ARROW key (C) repeatedly to
highlight the “Program Edit” option and press the right
ARROW key (C) to access. Note that this option is
not viewable until you scroll down past the bottom of
the initial “Search” menu screen.
4. The “Program Edit” menu appears – see fig 3. Use the
ARROW keys (C) to highlight the channel you wish to
move to another position and press the ENTER/ OK key
(E) on the remote control.
KEY CONTROLS
A – POWER KEY
B – DTV MENU
C – ARROW KEYS
D – SOURCE KEY
E – ENTER or OK KEY
F – ATV MENU
G – TV KEY
H – FASTEXT KEY
A
C
D
B
o
E
G
fig 1
F
fig 2
H
14
5. As per the yellow “Move” prompt on screen – see fig 3
– press the “YELLOW” Fastext key – the channel you
wish to move will be highlighted yellow.
6. Use the ARROW keys (C) to move the highlighted
channel to the desired program position you wish to
store it on – see fig 3.
7. In our example BBC1 is on program position 5. By
pressing the left ARROW key (C) once, and the down
ARROW key (C) once, it has now been moved to
program position 1 – see fig 4.
8. Press the ENTER/ OK key (E) to store the channel in the
position selected – the highlight changes to orange.
9. Copy steps 4 – 8 for all other channels you wish to
move. When finished Press the ATV MENU key (F) a
couple of times to exit from the menu.
10. You have now successfully sorted all of the channels
stored in your preferred order.
As well as the “Move” option you can use the “Program
Edit” menu to “Copy “ a stored channel and “Delete” a
stored channel - these commands are accessed with the
colour FASTEXT keys (H) – using the same process as
above however using the RED FASTEXT key (H) to delete
a selected program and GREEN to copy.
fig 4
fig 3
Page 15
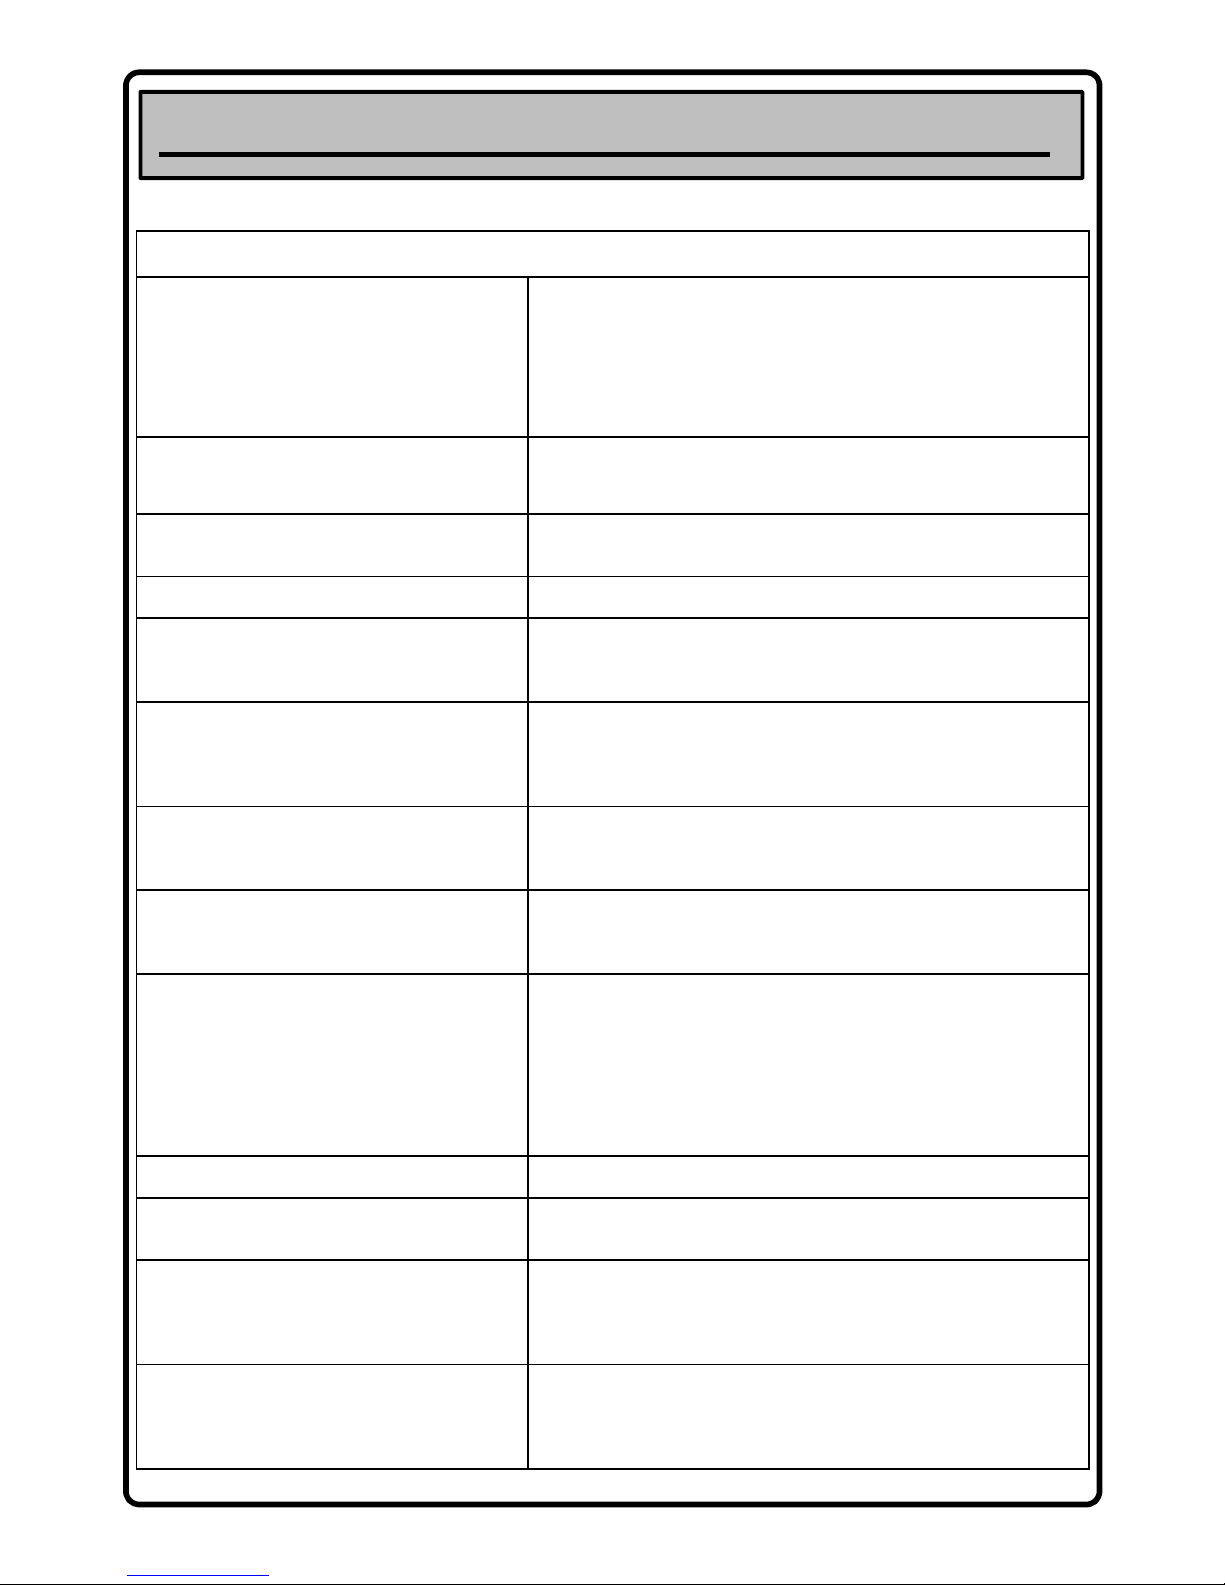
7. General Troubleshooting
PROBLEM POSSIBLE CAUSES/ RESOLVE
No picture, no sound.
Mains adapter not plugged in to mains socket or back of TV ? Is the standby light on?
Is the aerial connected ?
Is the TV switched on ? Is it in standby (red light) ?
Is the TV input source on an AV input ? - Select DTV or TV from the input source menu
If on an AV source check the HDMI/ SCART connection etc - is firmly in place on the
external device and in the socket on the TV .
Picture, but no sound.
Volume is set to minimum or mute.
Incorrect sound system setting on ATV search menu (should be I - country "ENGLAND")
Ensure that sound level has not been limited in the Hotel Mode option in ATV menu
No TV picture.
TV is switched to AV
Antenna has not been plugged into the TV
TV is not installed correctly - recheck connections/ install instructions
Picture has pale colours, is too dark or is blurred.
Set colour, brightness and contrast on ATV video menu
There is no colour on all channels.
Ensure colour is turned up on the ATV video menu screen
Antenna cable does not contact adequately
Antenna cable is damaged or broken
Aerial system is faulty
Bad picture on standard TV with interference.
Interference caused by outside source – other electronic equipment/ fluorescent lights
Microwave oven/ Hairdryer, or car/ motorcycle
Aerial system is faulty
TV situated in poor reception area
Before you call the service agent, please check the following points.
Please bear in mind that malfunctions can also be caused by external influences or equipment.
15
Try fine tuning individual channels
Interference or blocky disappearing images on DTV channels.
Antenna cable does not contact adequately to TV ANT in socket
Antenna cable is damaged or broken
Aerial system is faulty
TV situated in poor reception area
Teletext missing or corrupted/ faulty.
TV station does not transmit teletext
Weak bradcasting signal
Receiving broadcast in a poor reception area
Aerial system is faulty
Remote control does not work.
Check that the remote is in TV mode and not Sky mode by pressing the blue TV button
TV is not switched on
The remote batteries are flat or inserted incorrectly - remove batteries and re insert
correctly.
Bright external light is falling on the TV remote sensor or remote control signals
Obstacles between the remote control and the TV remote sensor can affect data
transmission
Switch off the TV by disconnecting from the mains. Wait 10 seconds and try again.
TV does not respond to commands or images unstable.
Switch off the TV by disconnecting from the mains. Wait 10 seconds and try again.
DTV tuning - channels ordered incorrectly.
Go into DTV menu and perform factory reset - auto tune will start automatically once
reset is complete and order channels correctly on the second attempt.
DTV - some digital TV channels missing from the expected
available list.
Poor reception of signal caused by any of the following
Antenna cable does not contact adequately to ANT in on TV
Antenna cable is damaged or broken
Aerial system is faulty
TV situated in poor reception area - low signal level
HD images are displayed but the visual quality is not good.
Check that the HDMI/ VGA or Component input connecting the device is connected
properly and secure
Check that the particular connecting cable is not faulty (try another if possible)
Check that the device's output is set to HD and that HD is enabled.
Ensure the media is HD standard
Page 16
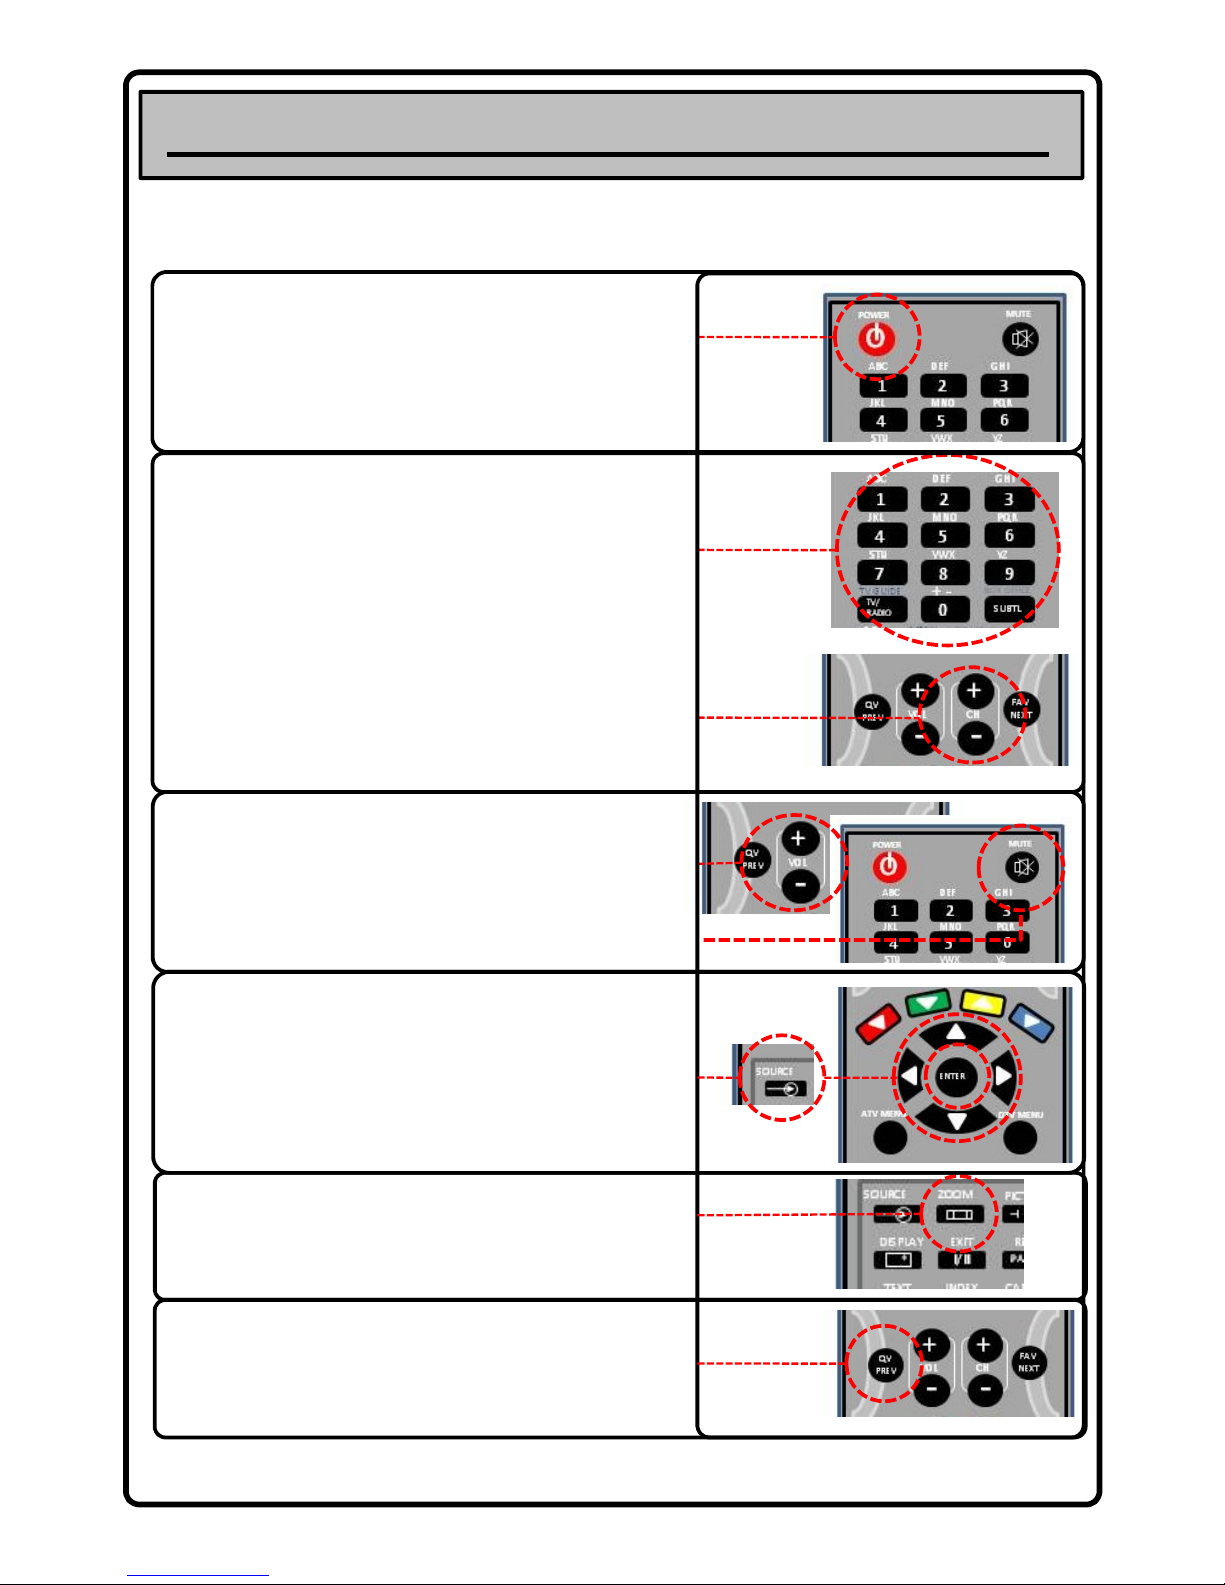
8. Using your Television
Controls Applicable for Digital and Analogue TV Viewing
This section details how to operate your TV set now it is installed and tuned in. The first section highlights the key
controls applicable to both Digital TV and Analogue TV viewing.
ON/ OFF STANDBY
Turn on the TV as previously explained using the POWER key on
the remote control or the Standby key on the side of the TV unit
– these are also used to switch the TV back into standby mode
CHANGING CHANNELS
There are several ways to change the TV channel.
You can use direct digit number selection keys 0 – 9
Select programs 0 – 199 directly by using direct digit keys
To select single digit program number press desired digit - 1, 2, 3
etc – after a few moments the channel will appear.
To select 2 digit or 3 digit program number e.g. 83 or 132 press
1st, 2ndor 3rddigit within 2 seconds.
You can also use the CH+ and CH- keys to select the next/
previous TV channel available in a stepped sequence.
16
VOLUME CONTROL & MUTE
Increase/ decrease sound level with VOL + and VOL – keys – On
Screen Display shows visual representation.
Use MUTE to cut off the sound – useful if the phone rings . To
turn the sound on press the MUTE key again (On/ Off)
SOURCE SELECTION (TV, DTV, AV, PC)
Use to change the input source of the TV – from “Digital Tuner”
mode to “Analogue Tuner” mode and to view connected devices
– via SCART, HDMI etc – DVD Player, Camcorder etc.
Menu driven; use the SOURCE key to open “Input Source” menu
then use ARROW keys up and down to navigate to desired source
selection - press ENTER/ OK to confirm selection – source will be
displayed. TV is ANALOGUE tuner mode. DTV is Digital TV mode.
ZOOM
Use to change the aspect ratio of the screen 4:3, 16:9, Full and
Original/ Native Modes available (depending on broadcast)
Each press of the key will cycle through the alternative options.
QUICK VIEW (PREVIOUS CHANNEL)
Pressing this key will change the TV channel to the station viewed
previously – very handy when switching between two particular
TV programs you want to keep an eye on.
Page 17
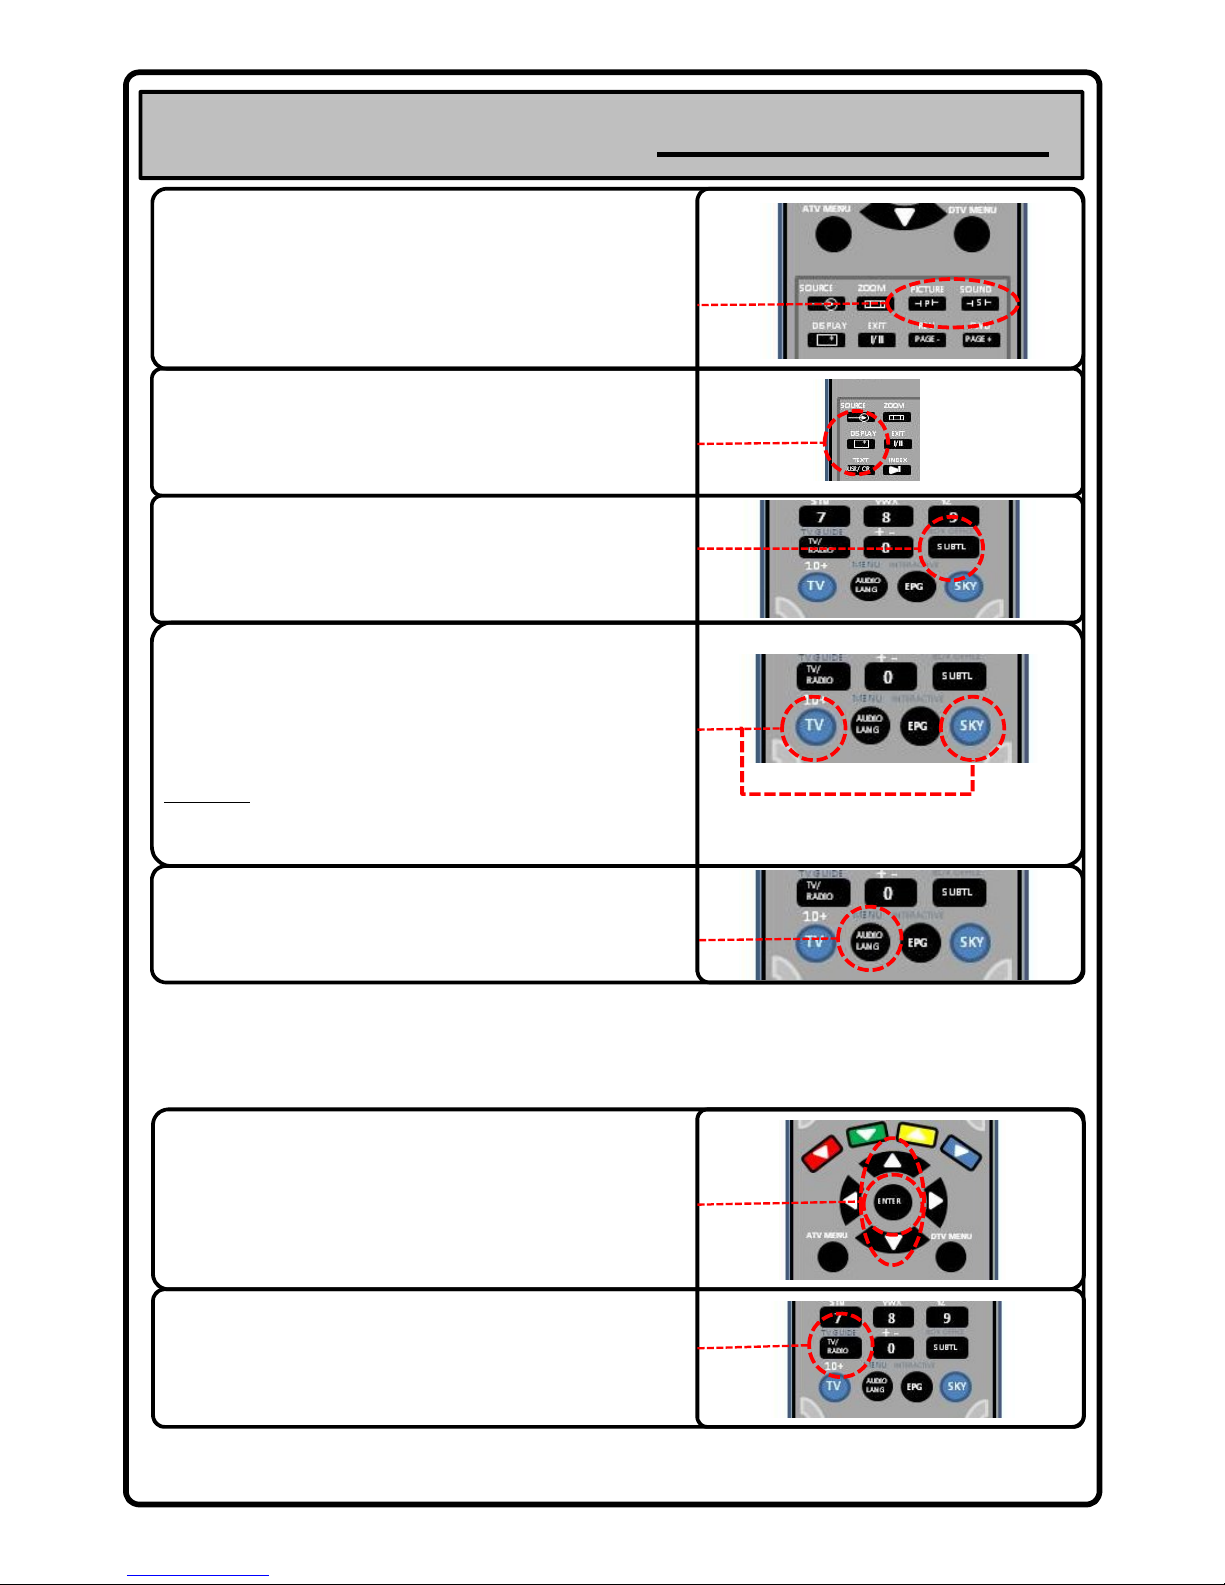
Using your Television
PICTURE/ SOUND RECALL
Press the “Picture” key to reset picture colour/ contrast/
brightness levels etc to previous settings.
Press the “Sound” key to reset audio – treble/ bass/ balance
levels etc to previous settings .
DISPLAY
Calls up “on screen” information of TV status - display source,
program/ channel, and programme information etc. To turn off
OSD press the DISPLAY key again or await timeout.
SUBTL
Press the SUBTL key to enable or disable subtitles. Please note
that subtitles are only available on certain programmes/ channels
and coverage is dependent on the broadcaster.
TV AND SKY REMOTE CONTROL
Press the TV key to use the remote unit to function with the TV.
This is “Normal Operation” mode! - If the remote does not seem
to be operating the TV – press this button and retry.
Press the SKY key to use the remote unit to function with
17
compatible
set
top
system’s
or
sky
receivers
.
Compatibility
is
limited to certain models sold in the EU – (not digital/plus or HD)
All TV functions are disabled in this mode –press TV to enable.
AUDIO LANG
If the current channel you are viewing has several audio tracks, or
multilingual options the AUDIO LANG key allows you to choose
between those audio tracks/ languages available.
Controls Applicable for Digital TV Viewing Only
The following features are applicable when you are in the DTV Tuner mode only.
CHANNEL LIST
As well as being able to use the CH+ / CH- and direct number
access you can change channel by selecting from a channel list
accessed via the ENTER key when in DTV Tuner Mode. Press
ENTER – a channel list appears on screen - use the ARROW keys
up and down to select a channel from the list on screen and press
ENTER to access that channel.
TV RADIO KEY
When pressed, this key alternates between the last TV channel
viewed and the stored radio channels available on Digital
Broadcasting. The key will always switch to the previous radio or
TV channel used.
Page 18
Using your Television
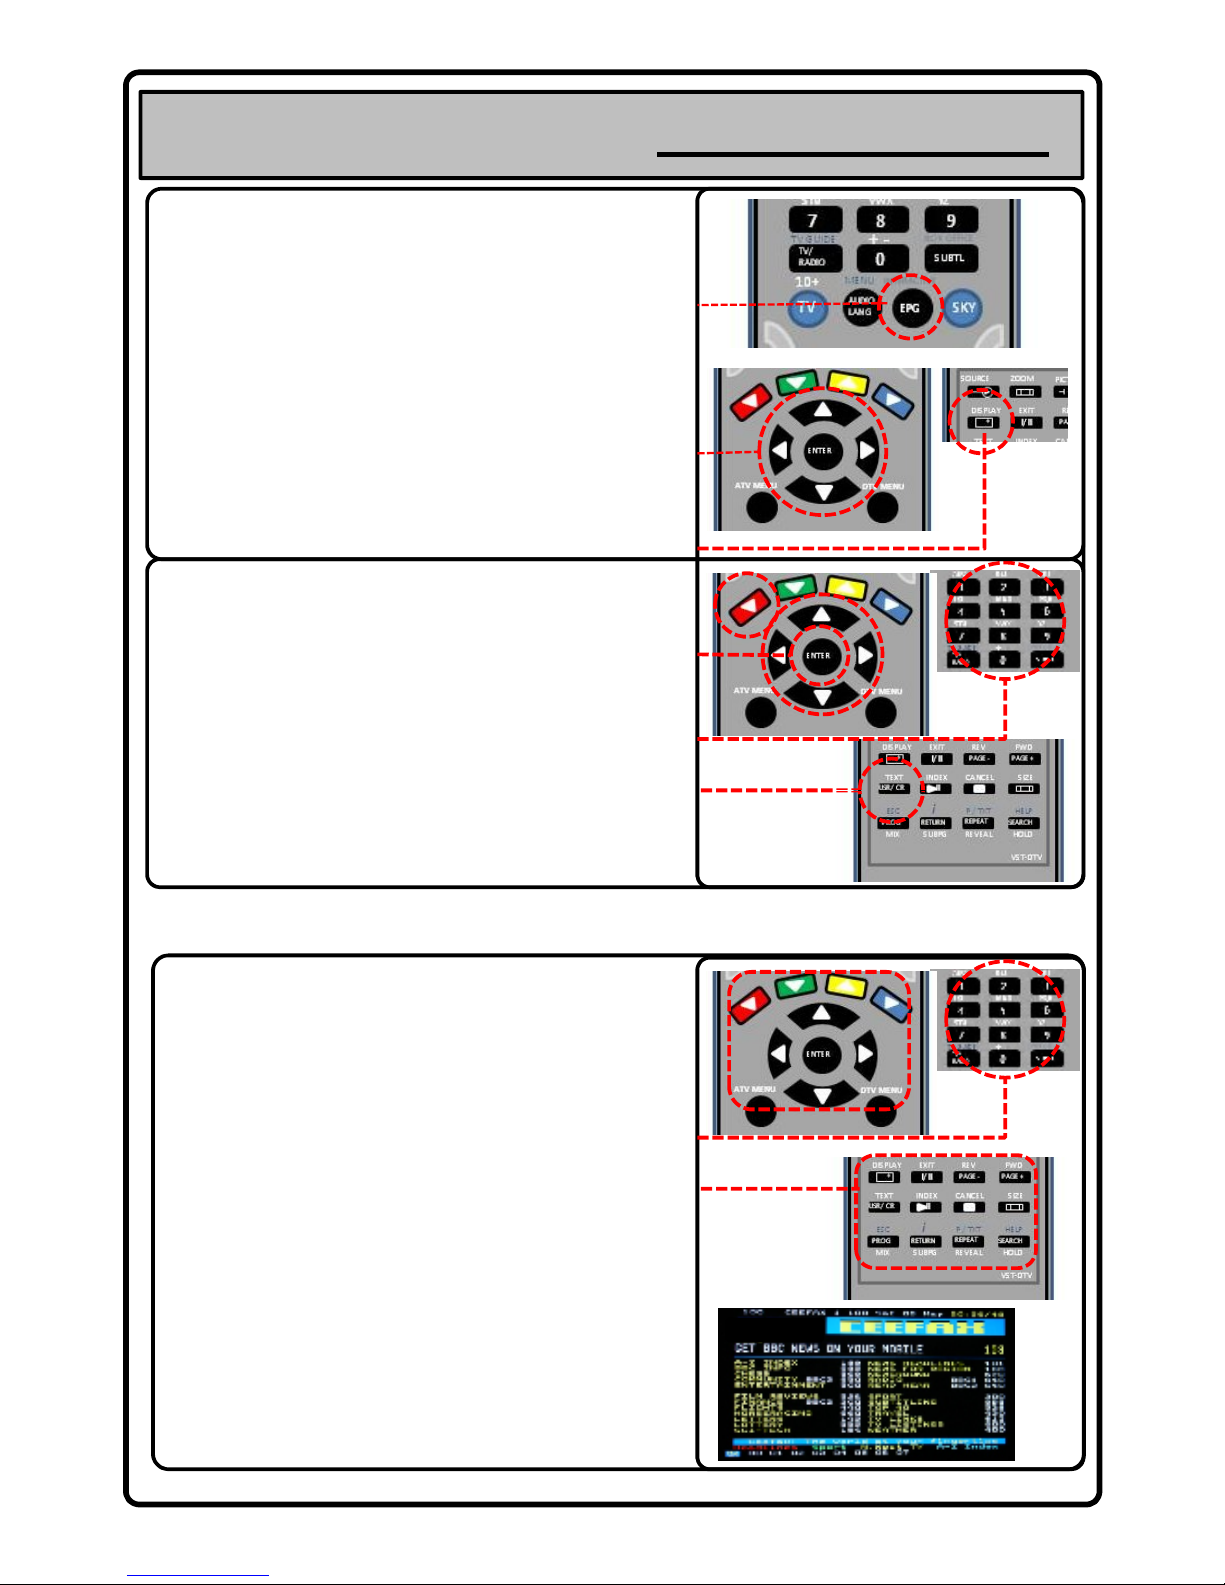
EPG (ELECTRONIC PROGRAMME GUIDE) – DTV Only!
Press this button to access the Electronic Programme Guide. An
“On Screen Display” appears detailing the programme schedule
listings for the remainder of that day.
Use the left/ right ARROW keys to select a different day – the EPG
system stores 8 days worth of information for each channel.
Use the up/ down ARROW keys to scroll through the days listings
– as a programme is highlighted information about it will be
displayed. Press the DISPLAY key for more information.
PAGE +/ PAGE – access next/ previous channel listings.
Press EPG to return to normal viewing.
DIGITAL TELETEXT
Some digital broadcasting channels offer a digital text service. To
access digital text where available you may be prompted to press
the red FASTEXT key otherwise, press the TEXT key.
You can either use the ARROW keys to select subjects from a
menu pressing the ENTER/ OK key to confirm, or key in a page
number (if known) to directly access – e.g. page 300 - type 3,0,0 .
18
Afterashort
period
the
requested
page
willbedisplayed
.
Follow
the on screen prompts to navigate through each service
available.
Controls Applicable for Analogue TV Viewing Only
The following features are applicable when you are in the Analogue Tuner mode only.
TELETEXT/ FASTEXT
Press TEXT to operate TELETEXT services
You can access pages of information in multiple ways.
Use 0 – 9 Keys for direct selection of 3 digit page number as per
the text index – e.g. for page 301 key in 3,0,1
Use colour FASTEXT keys - press the colour button corresponding
to the item you wish to view – e.g. If “Headlines” is displayed in
red – press the red FASTEXT key to display that item.
Use either CH+/ CH- keys or ARROW keys up/ down to go to the
next/ previous page number. Use ARROW keys left/ right to
access subpages where applicable.
INDEX press to access main TEXT index service
CANCEL display TV picture with notification of updates
SIZE display top/ bottom and full page – enlarge text
MIX text overlay on TV picture – press again to
normalise
SUBPG see above
REVEAL display hidden text – used for text quiz/ games
HOLD current page is held on screen giving you time
to read the page/ advertisement etc press
again to release.
Page 19
9. Menu Operation
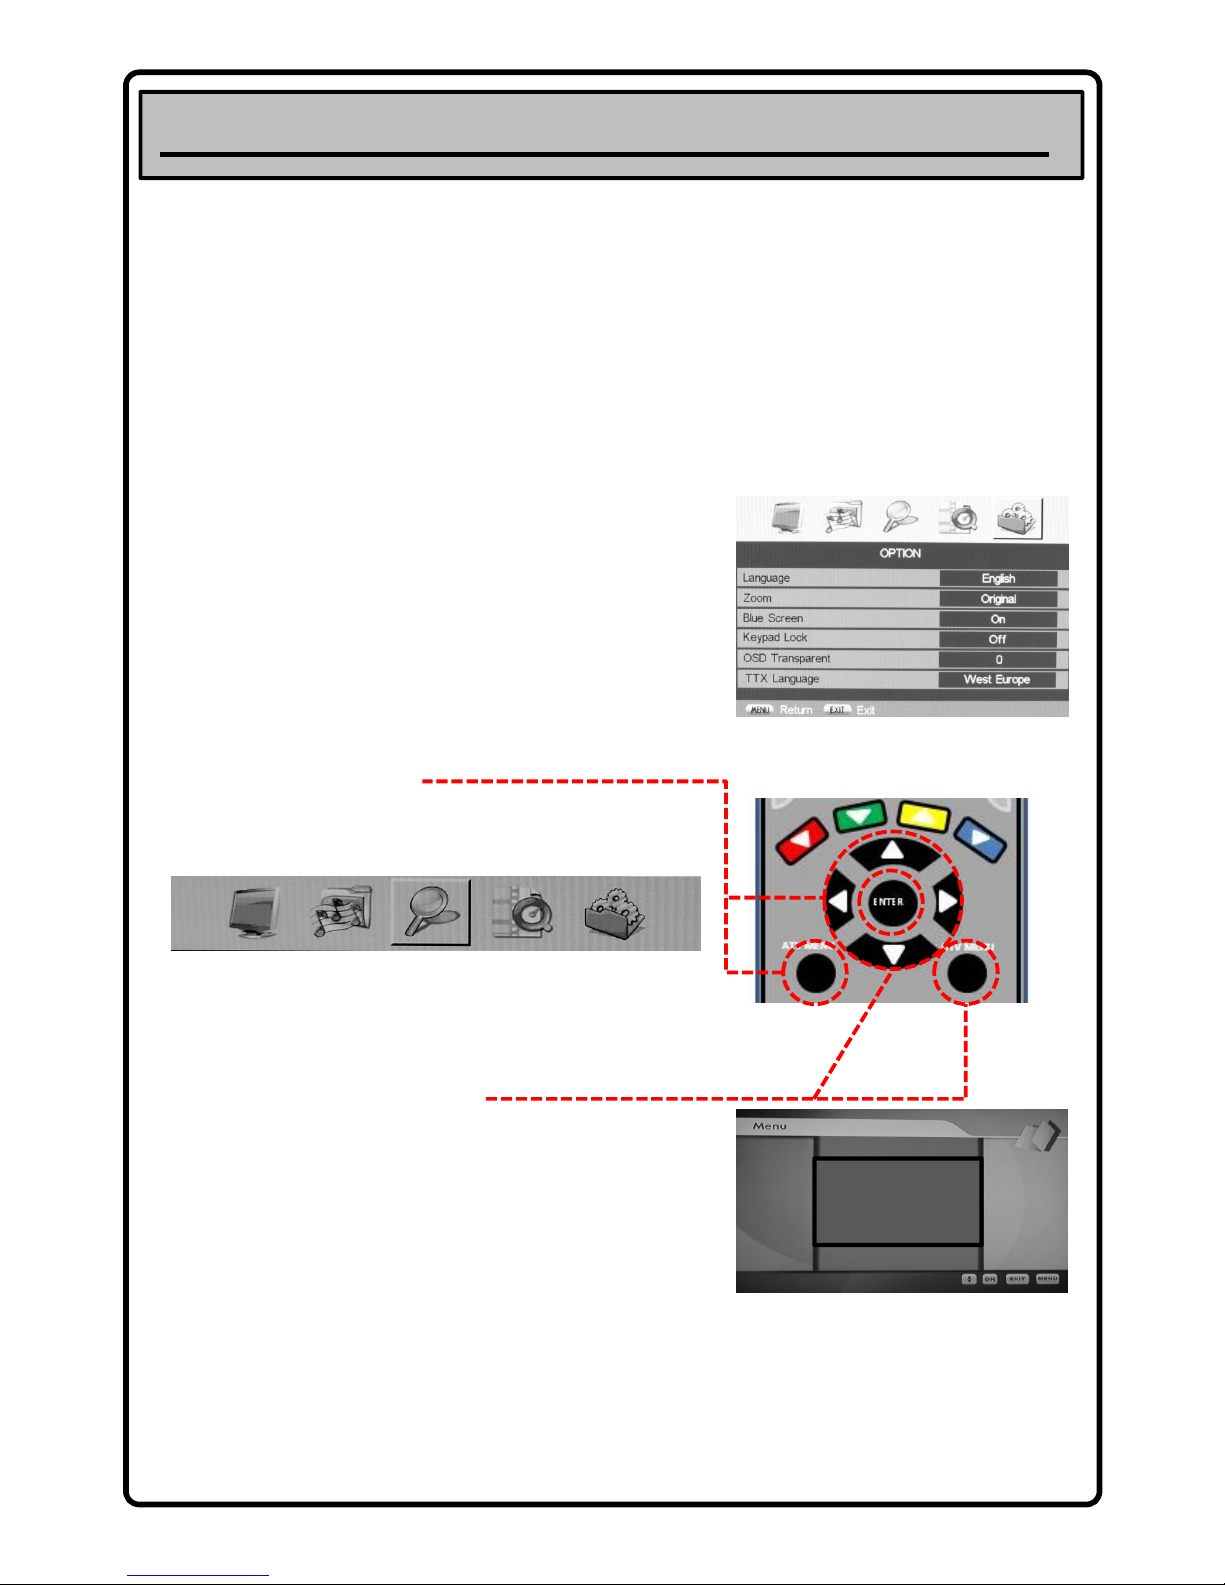
ADJUSTING TV SETTINGS
This section will help you in navigating the menu systems used for adjusting TV parameters.
The On Screen Menu’s are very easy to operate, simply use the ARROW keys and ENTER key on the remote control to
access all functionality.
There are two menu’s on this TV.
1. ATV Menu - Available when the TV is in ANALOGUE (TV) or DIGITAL (DTV) mode
• For general picture/ sound/ analogue tuning and timer/ child lock/ hotel mode options.
2. DTV Menu - Available when the TV is in DIGITAL (DTV) mode only.
• For Digital TV configuration, personalising DTV channel favourites, DTV child lock and hotel modes .
ATV MENU OPERATION/ NAVIGATION
The ATV Menu allows you to alter general TV settings – and is used to
customise standard picture, sound, timer - etc parameters.
1. Press ATV MENU to access the ATV main menu screen – see fig 1.
2. Use ARROW keys left/ right to highlight the submenu you wish to
enter - Video, Audio, Search, Time and Options – see fig 2..
3. Press the down ARROW key to enter the selected submenu.
4. Use ARROW keys up/ down to select a parameter e.g. “colour” etc
5. Use ARROW keys left/ right to adjust the selected parameter.
6. Press the ATV MENU key to step back to previous menu/ submenu.
7. To exit to TV keep pressing the ATV MENU key until the main menu
disappears off the screen.
fig 1
Before starting , please press [TV] key on the remote control
19
DTV MENU OPERATION/ NAVIGATION
The DTV MENU is only accessible when the TV is in DTV mode, and
is used to customise digital tuner options.
1. Press DTV MENU to access the DTV main menu screen – fig 3.
2. Use ARROW keys up/ down to make a selection
3. Press ENTER to confirm selection / proceed
4. (Use ARROW keys left/ right to adjust a setting in a menu)
5. Press the DTV MENU key to exit from the DTV menu.
The tables on the following pages detail the options available in both the ATV MENU and the DTV MENU. The key
functions are listed with details of the parameters that can be adjusted and what they are used for.
The menu layout in this user guide may differ slightly from your TV
Favourite lists
Configuration
Parental Control
Hotel Mode
ATV Main Menu
Video
(Picture Settings)
Audio
(Sound Settings)
fig 2
Search
(ATV Tuning)
Time
(Timer Settings)
Options
(General Settings)
fig 3
Page 20
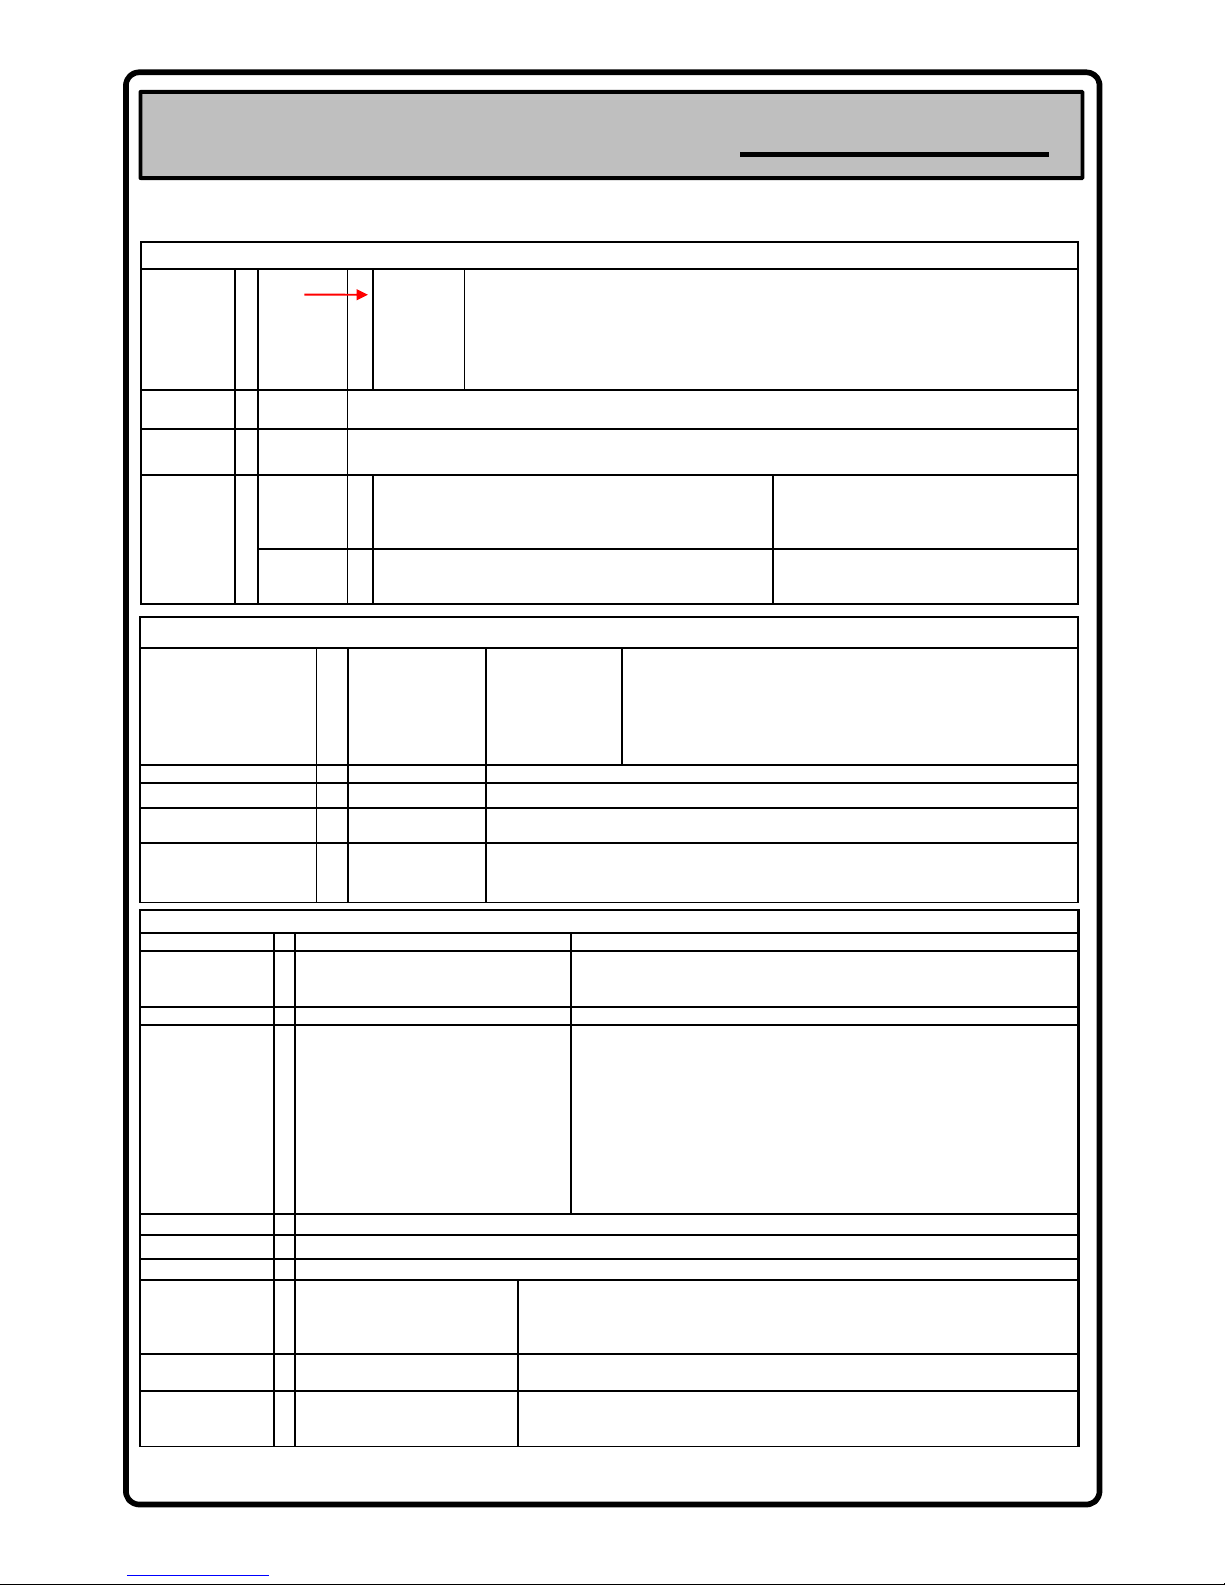
ATV MENU LIST - For Main Menu – (Press ATV MENU Key)
Menu Operation
VIDEO MENU
Video mode
User
Dynamic
Standard
Mild
Game
Contrast
Brightness
Colour
Tint
Sharpness
This menu is for selecting the pre-set picture settings. Pre programmed settings are available as
well as the user settings also available in addition you can also use PICTURE button on remote to
select various picture settings. In User mode you can alter colour, contrast, brightness etc to your
own personal preference.
NOTE: TINT is available only for NTSC. This function is to adjust tint of picture for NTSC signal.
Color Temp
Cool
Warm
Colour Temperature adjusts the colour temperature of the picture to , Warm (reddish) or Cool (bluish).
Noise
Reduction
On
Off
Noise reduction parameter is used for reducing the noise level present in video.
Advance
Flesh Tone
Green Tone
Blue Tone
Mode1
Mode2
Mode3
These parameters are used to increase
corresponding Red, Green or Blue colour of
picture.
Cinema
mode
On
Off
Cinema Mode is algorithm for auto detect and
Cinema mode enable. User can enable or
disable Cinema mode .
AUDIO MENU
Audio mode
User
Surround
Flat
Music
Movie
Sports
User
This menu is for selecting the pre-set Audio setting.
Pre programmed settings are available as well as the user setting
In addition you can also use SOUND button on remote to select preset
sound settings
Balance
-50 … 0 … +50 By using balance parameter user can adjust balance for sound output.
20
Treble
0,1,2,…50,…100
This parameter is used to adjust higher frequency level in sound output.
Bass
0,1,2,…50,…100 This parameter is used to adjust the low frequency level of sound output.
AVL
(Auto Volume Level)
On
Off
This parameter is used for automatic volume cont.
If it is ON then sound volume level is adjusted automatically.
In case of distorted audio due to high audio modulation index, turn Auto Volume Control “On”
SEARCH MENU
Program
0,1,...,199 These parameters indicate current program number.
Color System
AUTO
PAL
SECAM
This setting is necessary if picture is not reproduced correctly. Auto is the best
setting, however select PAL for UK TV signals.
System
BG/I/DK/L/L’ This setting is necessary if sound is not reproduced correctly. I for the UK
Country
OTHERS, AUSTRIA, BELGIUM, INDIA,
CROATIA, CZECH, DENMARK, FINLAND,
FRANCE, GERMANY, GREECE,
HUNGARY, ITLAY, LUXEMBOURG,
NETHERLAND, NORWAY, POLAND,
PORTUGAL, SLOVENIA, SPAIN,
SWEDEN, SWITZERLAND, TURKEY,
ENGLAND, RUSSIA, SAUDI ARABIA
Select the country as per your requirement.
By selecting Country, TV set will automatically adjust colour and sound system
corresponding to that country automatically
Auto Search
This is Auto Searching Mode that will tune all channels available automatically
Manual Search
This parameter is used to tune in channels manually in case new channel is broadcast not already stored in Auto Search.
Fine
This parameters allow you to fine tune channel manually in case of weak signal.
Program Edit
0,1,2,…,99,199
This parameter is used for sorting of program position.
Copy, Delete, Skip, Move
Select the matching colour key to select the edit option.
Press [Enter] to confirm.
Favourite Program
0,1,2,…,7
Favourite program parameter is used for arranging the favourite program. Press [FAV] key
repeatedly on the Remote to access all favourite programs stored, one after another.
Program Label
0 to 9
A to Z
+, -
Program Label is used to assign a label to a program channel – e.g. BBC 1.
Press the ARROW keys on the remote control to move the cursor or change the letters.
Once finished press the [ATV MENU] key to confirm your choice.
Page 21
Menu Operation
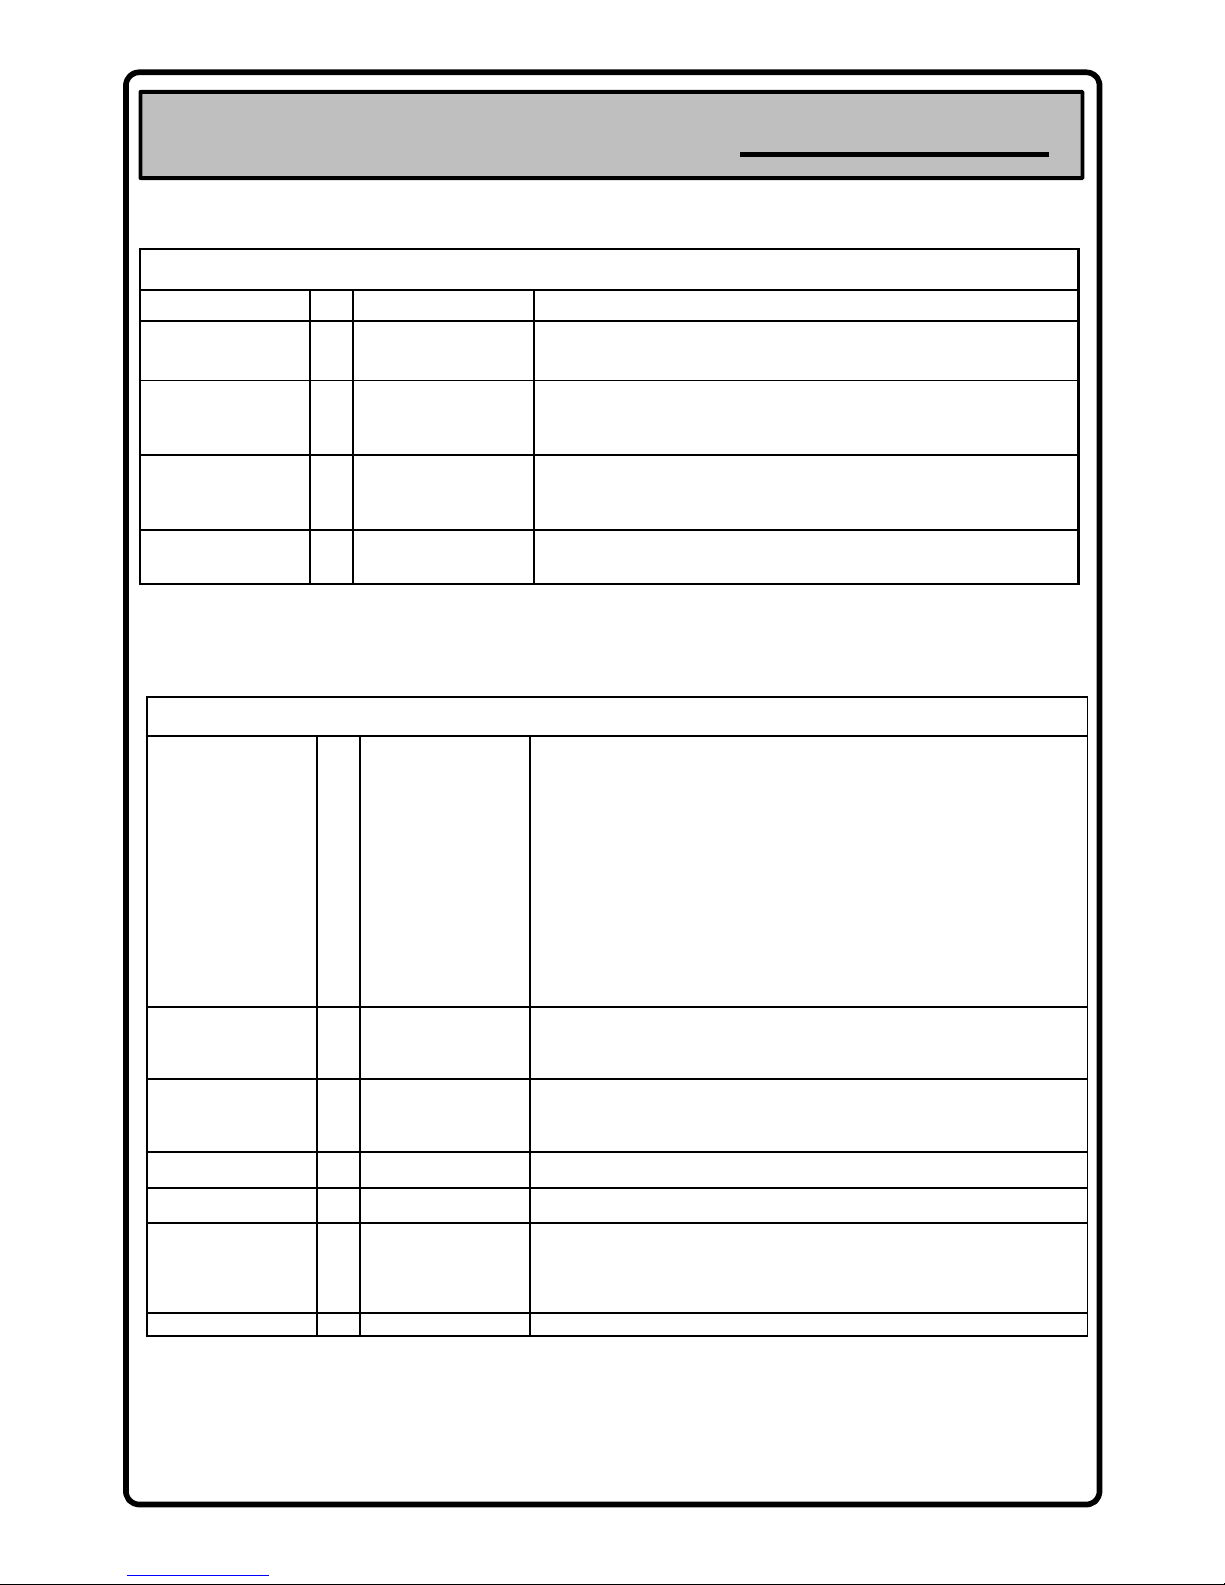
ATV MENU LIST - (Continued)
TIME MENU
Current Time
00:00 to 23:59 This setting displays the time set by user as a Current Time.
Off Time
00:00 to 23:59
This parameter used to switch the TV set into standby at time preset by the user.
NOTE: Off Time is deactivated when set is switch to standby or mains power supply is
switched off.
On Time,
On Program
00:00 to 23:59,
0 to 199
These parameters are used to switch the TV set On from standby at a preset time and
preset program channel. To execute the On Time and On Program set should be in
standby mode.
NOTE: On Time gets deactivated when set is switched off by mains power supply.
Reminder Channel,
Reminder Time
0 to 199,
00:00 to 23:59
This is reminder and presently viewed channel gets changed to the preset program
when Reminder Time reach’s Current Time.
NOTE: Reminder Time gets deactivated and Reminder Channel resets to ‘1’ when set is
switched off by mains power supply.
Auto Sleep
0,10,20,30,60,90,
120,180,240
Minutes
TV set goes to standby after the preset time in Auto Sleep.
NOTE: Auto Sleep is deactivated when set is switched to standby or mains power
supply is switched off.
OPTION MENU
English
French
German
21
Language
Spanish
Italian
Russian
Greek
Portugese
Polish
Romanian
Hungarian
Bulgarian
Czech
Serbian
Turkish
Language is used to select OSD display language as per requirement.
Zoom
16:9
Original
4:3
Zoom
This parameter is used to select Aspect Ratio for picture.
Blue Screen
On
Off
This parameter is used to control screen display in absence of signal. If it is ON then
displayed sreeen is Blue and if it is OFF then displayed screen is raster when source is TV
and in case of other source displayed screen is Black.
Keypad Lock
On
Off
Keypad Lock function is used to lock the operation of the front keys of TV set.
OSD Transparent
0,1,2,…,9,10 This parameter is used to adjust transparency of menu OSD window.
TTX Language
Russian
Greek
Arabic
Farsi
This function is used to set TTX Language as per requirement.
BackLight
0,1,…,9,10 This parameter is used to adjust the brightness level of panel.
Page 22
Menu Operation
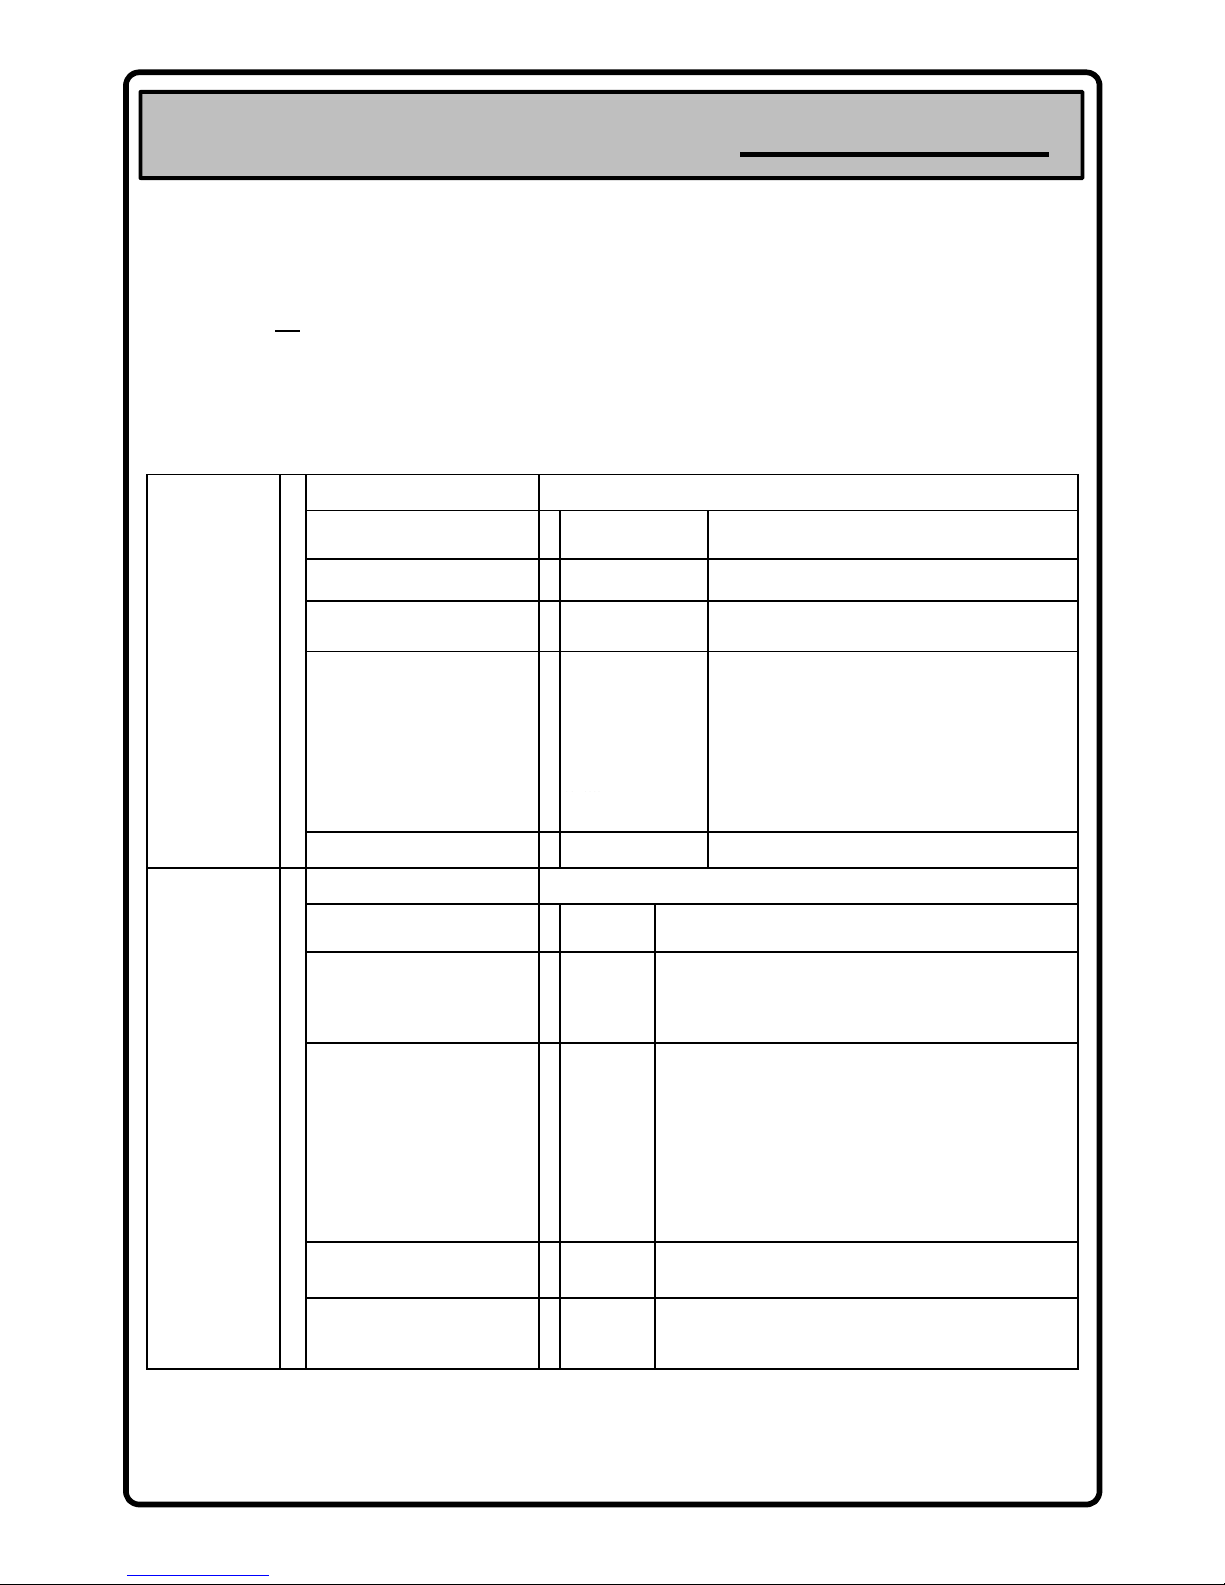
ATV MENU LIST - (Option Menu Continued) Child Lock/ Hotel Mode
Child Lock
The password is
“000000” by default
Change Password
This feature is used to change the default password (000000) to any user defined
password – please remember this password/ keep a written note in a safe place.
Child Lock Enable
On
Off
By using this parameter user can Enable or Disable the
Child Lock either by selecting On or Off.
Channel Number
0 - 199
This parameter is used to lock specific channels when
Child Lock Enable and Channel Lock is On.
Channel Lock
On
Off
By using this parameter user can Enable or Disable the
Channel Lock either by selecting On or Off.
Source
TV
SCART1
SCART2
S-Video
YPbPr
VGA
HDMI1
HDMI2
This parameter used to lock any input source’s when
Child Lock Enable and Source Lock is On.
ATV MENU Child Lock and Hotel Mode Notes.
For any Child Lock/ Hotel Mode parameters to function – the Child Lock ENABLE and Hotel Mode ENABLE (ON/ OFF)
option must be ON
. Channel Lock/ Source Lock will only function if these ENABLE commands are ON
You can select as many individual channels/ sources to lock out – simply select each channel/ source and select
Channel/ Source LOCK – ON
Force Position in Hotel Mode is only applicable to a single source/ channel
22
HDMI2
HDMI3
DTV
Source Lock
On
Off
By using this parameter user can lock any source by
selecting On or Off.
Hotel Mode
The password is
“000000” by default
Change Password
This feature is used to change the default password (000000) to any user defined
Password – please remember this password/ keep a written note in a safe place.
Hotel Mode Enable
On
Off
By using this parameter user can Enable or Disable the Child Lock
either by selecting On or Off.
Force Pos
0-199
This parameter is used to set the channel / program number on
which set goes forcefully when switched on from standby or mains
supply when Hotel Mode Enable is ‘On’ & Force Video is set to TV
.
Force Video
TV
AV
SCART1
SCART2
S-Video
YPbPr
VGA
HDMI1
HDMI2
HDMI3
DTV
This parameter is used to set the source that is forcefully selected
when TV is switched on from standby or mains power supply when
Hotel Mode Enable is ‘On’.
Search Disable
On
Off
This parameter is used to lock the SEARCH (tuning) menu when
Hotel Mode Enable is ‘On’.
Max Volume
0 – 100
When Hotel Mode Enable is ‘On’, user can set a maximum volume
limit .A viewer can increase the volume up to this level only and no
higher. Adjust Max Volume parameter to set limit.
Page 23
Menu Operation
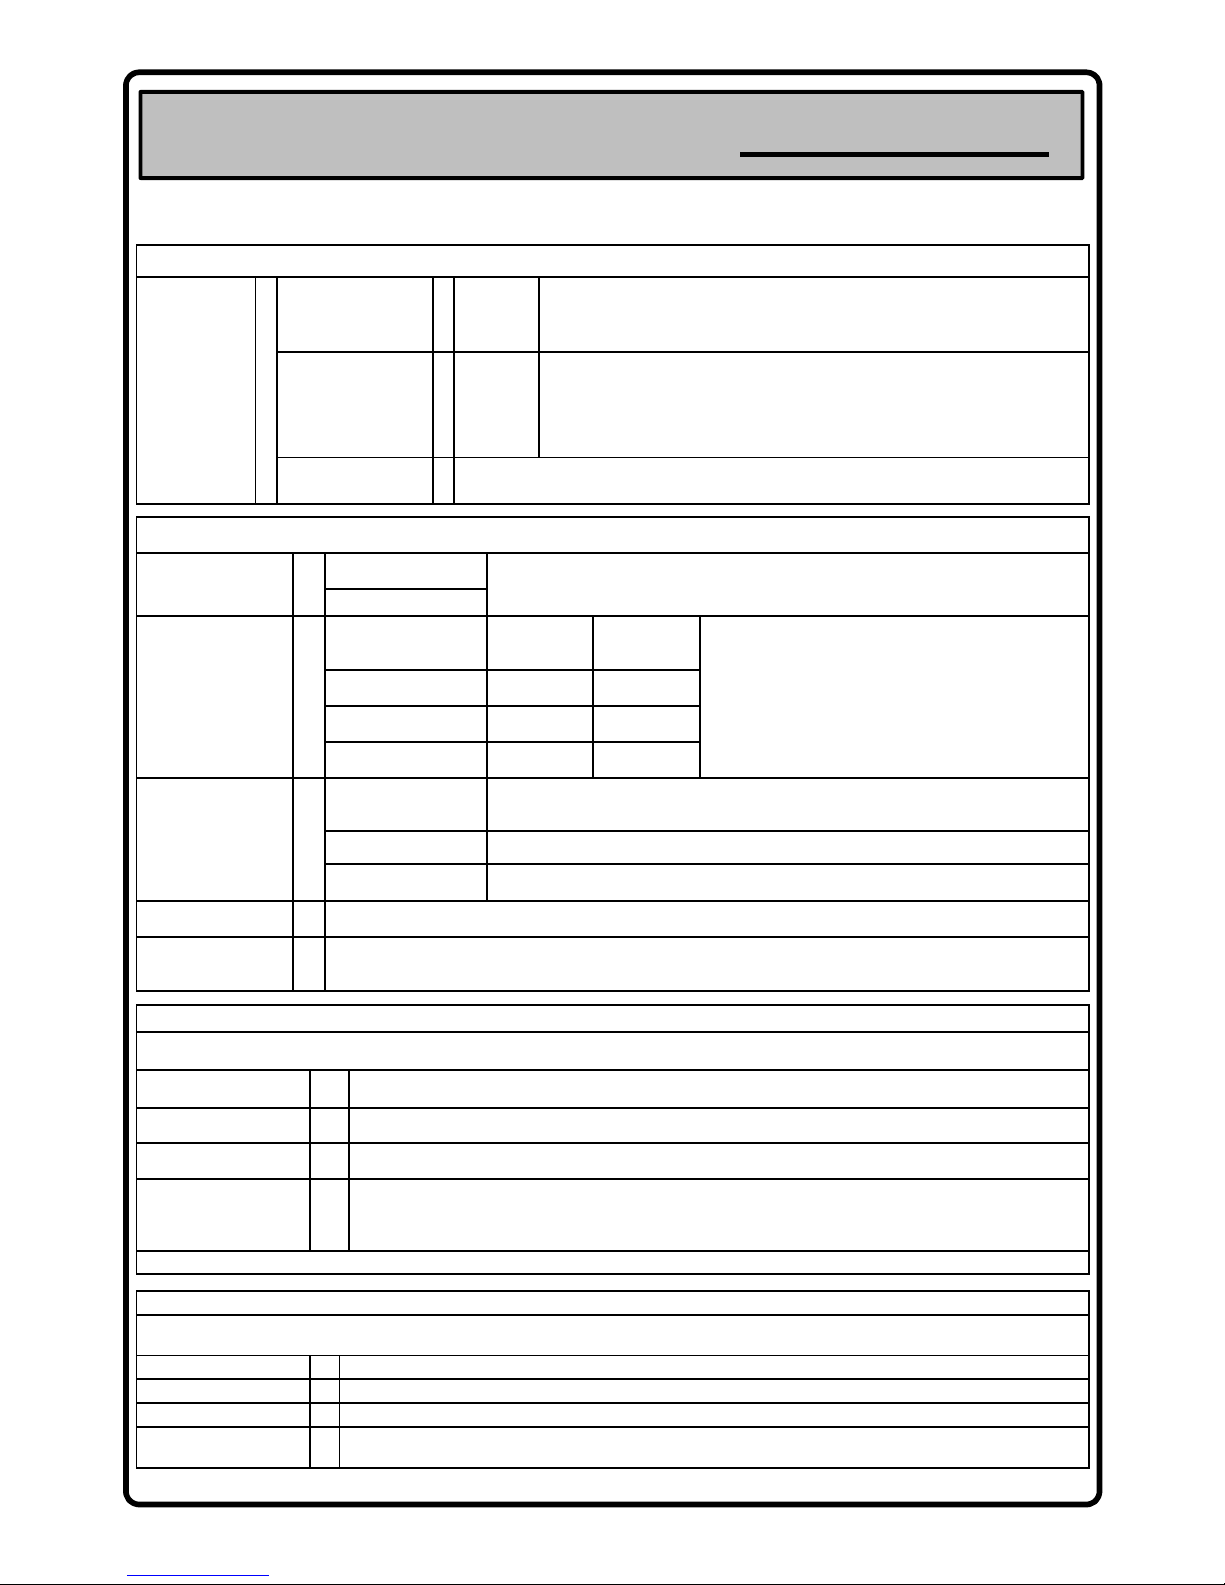
1. FAVOURITE LISTS
FAVOURITE LISTS
Create a Favourite List
Name
Channels
This screen allows you to create a new favourite channels list with selection criteria.
The name of the list is set to “FAV 1/2” for TV services and “RFAV 1/2” for Radio.
Modify a Favourite List
Radio
TV
This screen allows you to modify a favourite list.
The current favourite list name is displayed on the top of the screen. User can modify
the channel list by Lock, Skip/Delete, Sort/Move or Skip All/Add All the channels.
NOTE: Channels deleted from the favourite list will also get deleted from the actual list.
Delete a Favourite List
This screen allows you to delete a complete favourite list.
2. CONFIGURATION
Channel Installation
Auto Installation
This screen allows you to install channels with two type : New or Add in Auto and Manual
Installation. The Installation can be new one or can be an addition to the current installation.
Manual Installation
User Settings
Info languages
Audio languages
Subtitle languages
English
Gàidhlig
Cymraeg
This screen allows you to customize the TV set. You can set
your preferred language (Info, Audio, Subtitle Languages),
modify the subtitle display, opacity level and LCN On/Off.
Subtitle Display
On
Off
Opacity level
Opaque
70%-90%
LCN
On
Off
DTV MENU LIST - For Main Menu – (Press DTV MENU)
23
3.PARENTAL CONTROL
PIN Code
The pin code is “0000” by default.
Parental Control
If the Parental Locking is Disabled then all the parental locking features are deactivated.
If it is Enable then all the parental locking features are applied according to to your choice.
Receiver Lock
If this item is set to YES, each time the TV set turns to running mode, the PIN code has to be input.
Menu Lock
This item allows you to protect access to the menu screen and all sub-screens.
Maturity Level
You can apply a parental maturity level up to 18 years of age.
In this case all services which are over age limit become inaccessible unless the viewer enters the PIN code.
This system depends on the information forwarded by the broadcaster.
A press on RED button allows you to modify the PIN code from default (“0000”) to any user defined PIN code.
4. HOTEL MODE
PIN Code
The pin code is “0000” by default.
Hotel Mode
The Hotel Mode sub menu allows you to Enable/ Disable Hotel Mode.
Force Position
You can use this feature to force the TV to switch on to a particular DTV Programme number
Not Install
This item can enable or disable the channel Install menu.
Change Password
This parameter used to change the default password (0000) to any user defined password.
System Parameters
Factory Settings
This
option
allows you to erase all
DTV parameters
–
clearing all DTV memory.
If it
is activated
all
DTV Channels and user preferences are deleted. DTV will restart for a ”First Time Installation”.
Software Upgrade The software can be automatically updated with a new release during the standby of the TV set.
System Informations
This screen gives you some information about the TV
(Device Version and Software Version).
Signal Information
This parameter indicates channel number, channel frequency and quality of signal in terms of Bit Error Rate(BER
Conditional Access
- Insert Card Adapter into CI slot.
- CI-CA will be detected and displayed in the “Multi CI-CA List” menu.
- Insert the Card then press [Enter] to enter in the Main menu.
Page 24
10. Connecting External Equipment to the TV
SOURCE INPUT/ CONNECTION PANEL
The sockets on the back of the panel are used when connecting external products to your TV, for example a DVD
Player, VCR, Blu Ray Player, PVR, Games Console, Camcorder, Digital Camera and even a PC or Laptop Computer!
Please note, whenever you connect an external device to your TV, make sure that the power on the unit is turned OFF !
Carefully read the instruction manual supplied with the particular product you are connecting to the TV before you start
– this should ensure that you connect the device correctly and get the most enjoyment out of it!
Viewing a Connected External Device on the TV – (SOURCE INPUT)
Once the device is correctly fitted to the right connection on the TV, and both the TV and the peripheral unit are
powered on you will need to access the Input Source menu and select the input option the device you want to view
is connected – to do this....
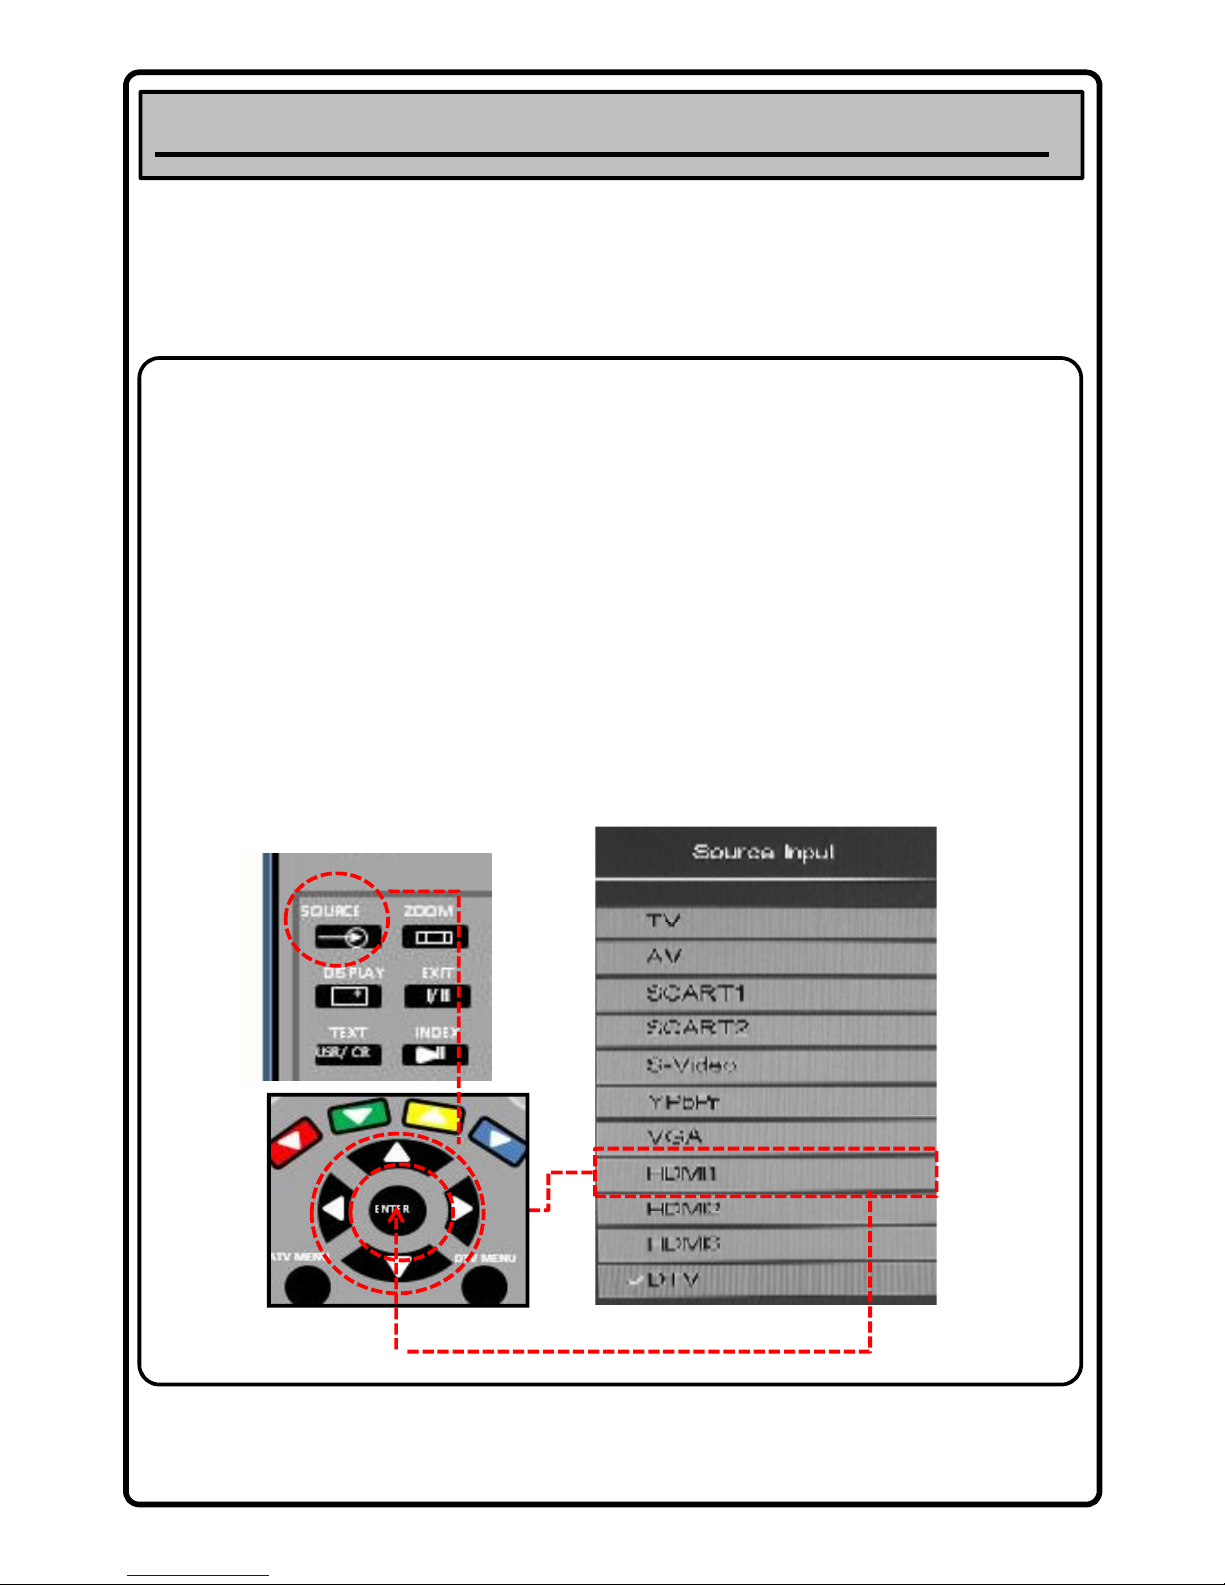
1. Press the SOURCE key on the remote control – fig 1 – the “Source Input” menu appears on screen.
2. Use the ARROW up/ down keys to select the relevant connection the device you want to view is connected to.
3. Press ENTER to confirm
4. The TV screen will now display the signal from the external device.
5. This is the same process to view all devices you connect.
6. For example if you connected a DVD player to the TV using HDMI 1, press the SOURCE key on the remote control,
use the up/ down ARROW keys to highlight HDMI 1 and press the ENTER key to confirm – see fig 3.
24
(Please note that certain devices connected to the TV via SCART or HDMI connections will automatically switch to the
correct input source and be displayed automatically on the TV screen – when the external device is turned on. When
the device is turned off the TV will revert back to its original channel setting)
fig 1
fig 2
fig 3
7.
To go back to TV Channels select TV for Analogue Tuner mode and DTV for Digital Tuner mode!
Page 25
Connecting External Equipment to the TV
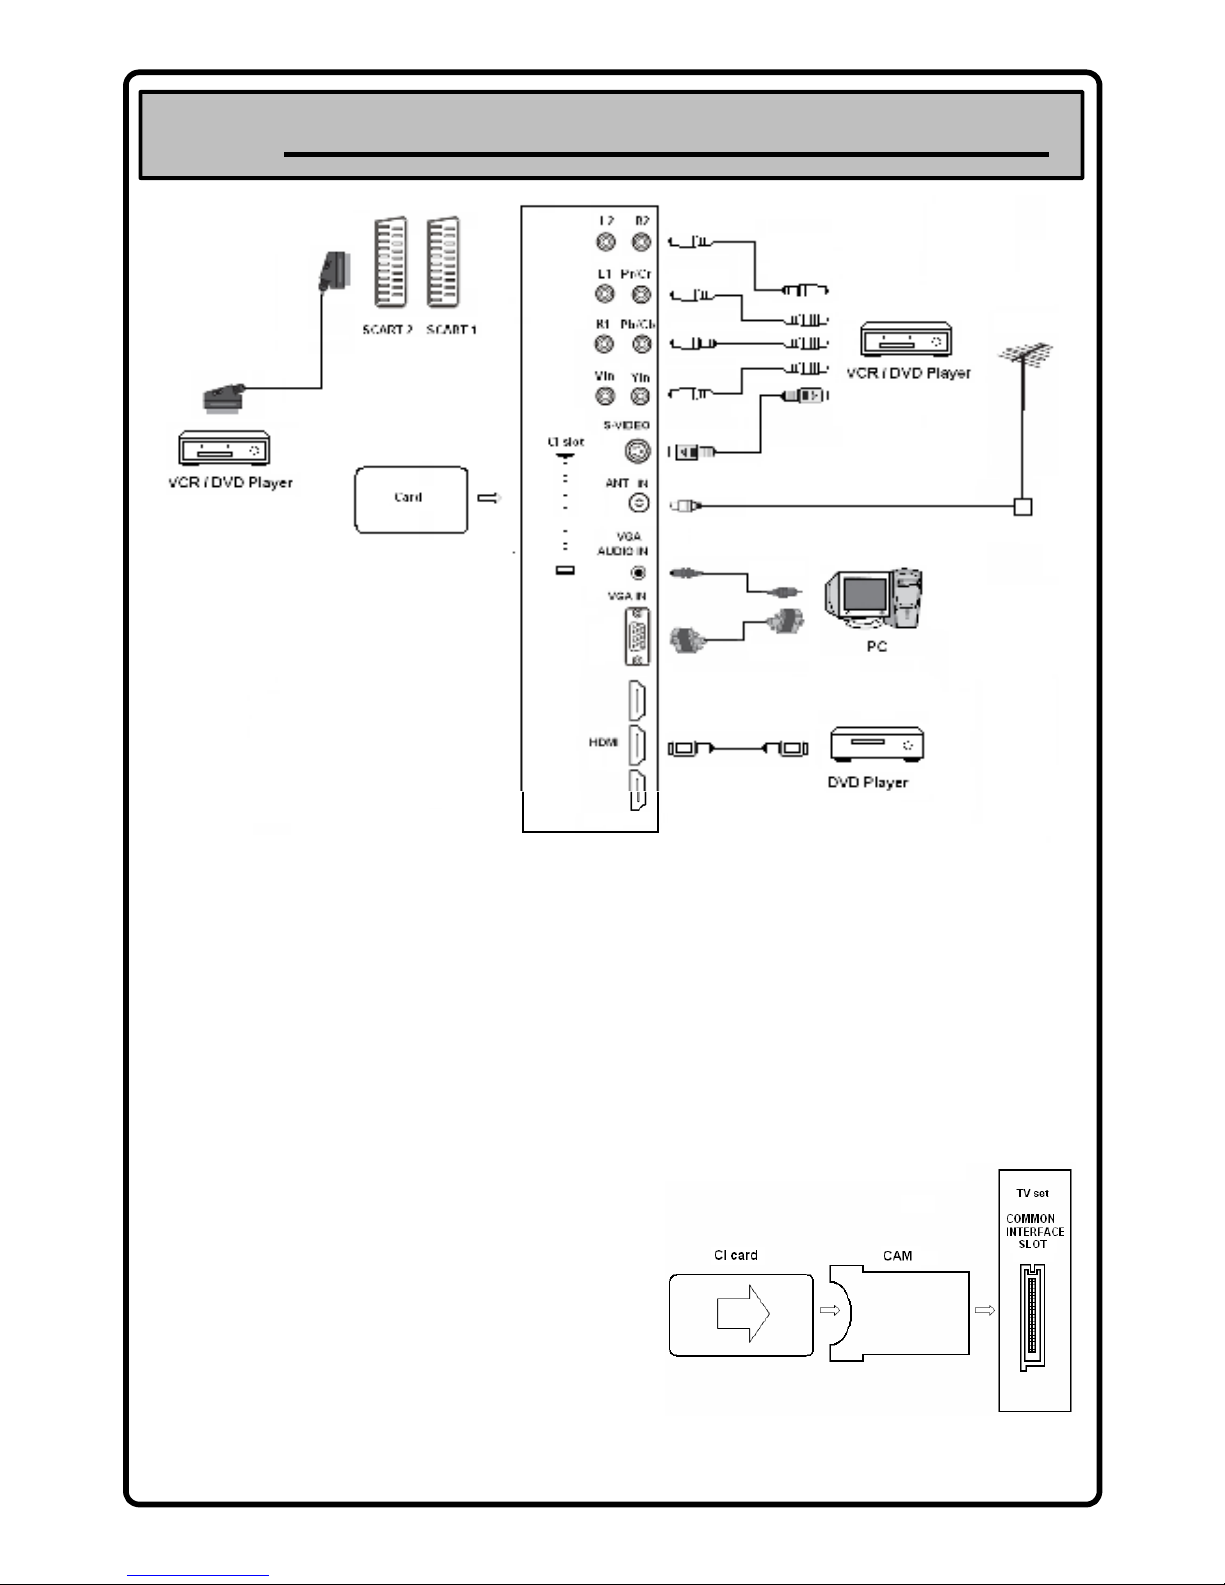
These figures are just for reference
25
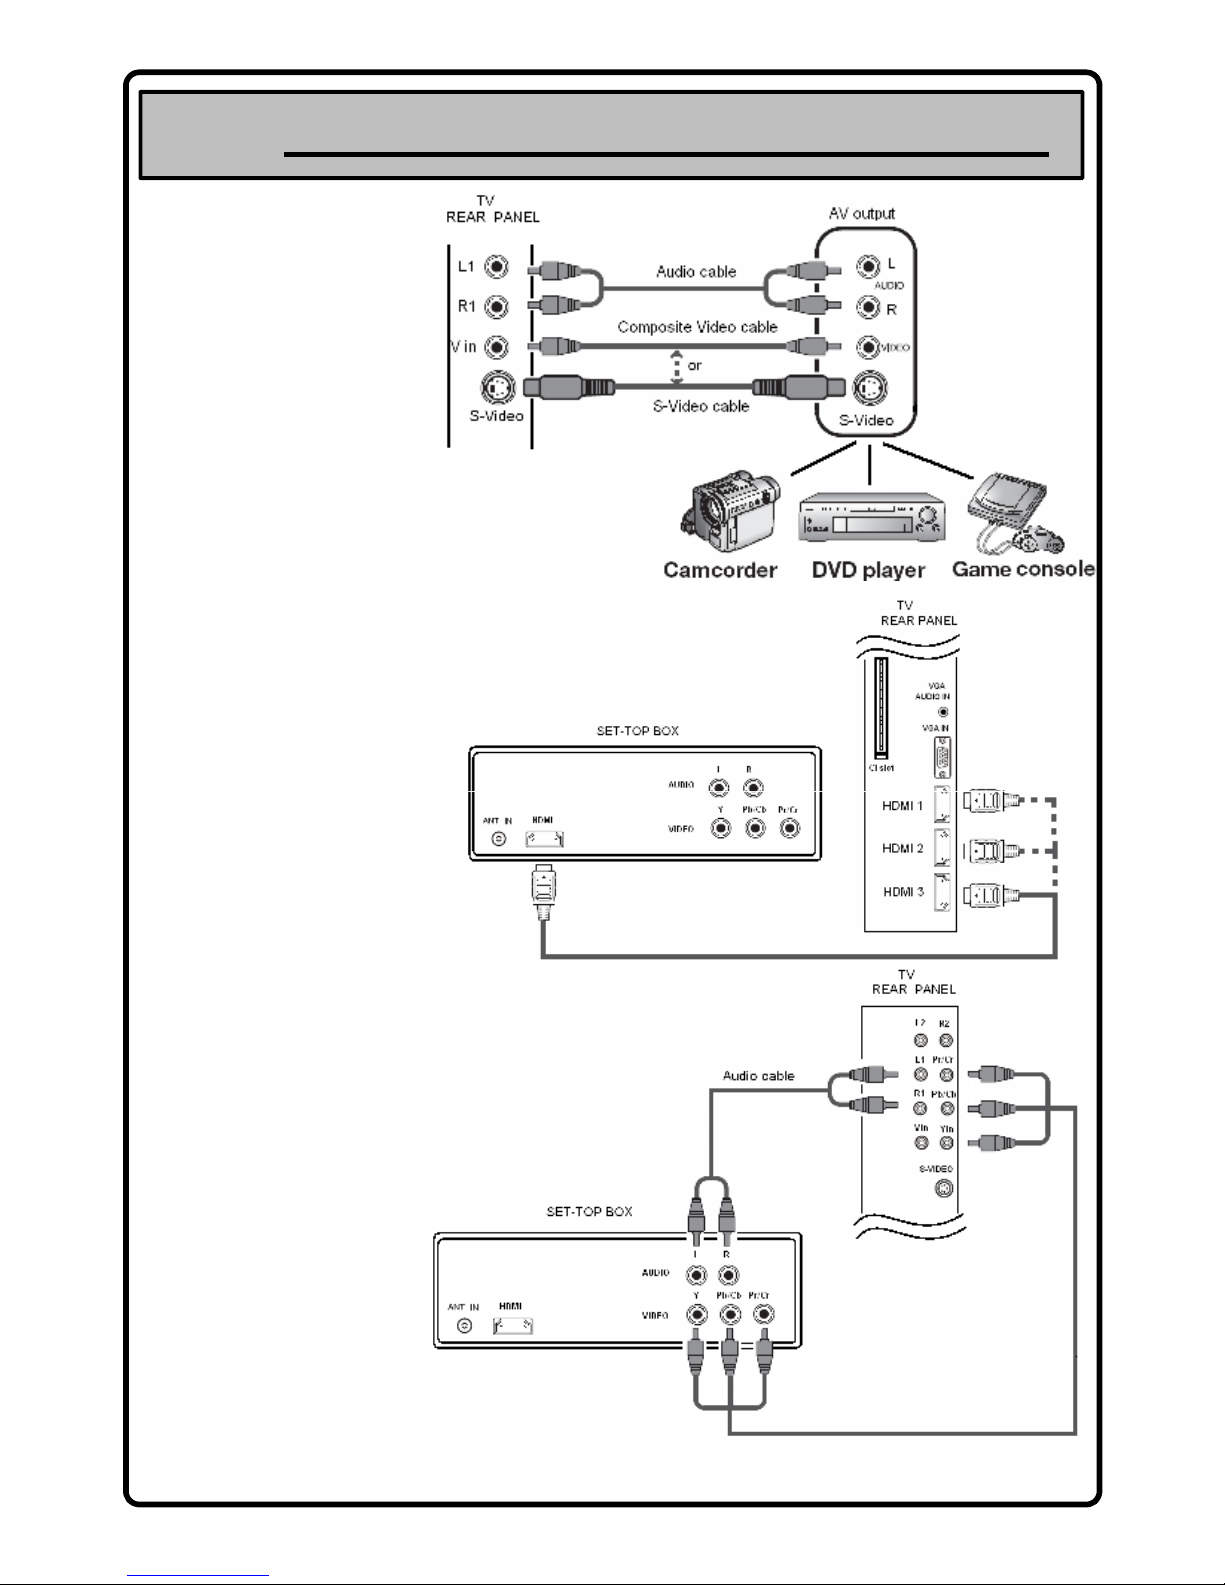
ANT IN :To view television channels correctly, a signal must be received by the set from one of the following sources:
An outdoor aerial / A cable television network / A satellite network
COMPONENT IN: Connect component video cables (not supplied) to component connector ("PR", "PB", "Y") on the rear
of your set and the other ends to corresponding component video out connectors on the DTV or DVD. The PR, PB and Y
connectors on your component devices (DTV or DVD) are sometimes labelled Y, B-Y and R-Y or Y, Cb and Cr.
Connect RCA audio cables (optional) to "R - AUDIO - L" on the rear of your set and the other ends to corresponding audio
out connectors on the DTV or DVD.
HDMI IN 1, HDMI IN 2, HDMI IN 3: Supports connections between HDMI-connection-enabled AV devices (Set-Top Boxes,
Blu Ray Player, Games Console etc).No additional Audio connection is needed for an HDMI to HDMI connection.
FOR TOP UP TV (PAY TV)
Certain Digital TV Stations will be inaccessible – and a “Scrambled Signal” message is displayed on screen.
These channels require you to have a (current/ valid) TOP UP TV card inserted into the TV to view them.
You will need a CI CAM unit (sold separately) to insert a TOP UP card into the TV
– see a suitable electrical retailer for more details.
• Insert the TOP UP card into the CI CAM adapter as shown
• Insert the CAM unit into the Common Interface Slot on the TV
• Insert the CAM in the direction of the arrow
• Insert the CAM right up to the end so it is parallel with the slot
You can install the CAM anytime whether the TV is ON or OFF.
Page 26
Connecting External Equipment to the TV
S-VIDEO or VIDEO / R-AUDIO-L
Connect RCA or S-VIDEO cable (not
supplied) to an appropriate
external A/V device such as VCR,
DVD or Camcorder. Connect RCA
audio cables (not supplied) to "RAUDIO-L" on your set and the other
ends to corresponding audio out
connectors on the A/V device.
AUDIO OUT [R-AUDIO-L]
Connect RCA audio cables (not
supplied) to AUDIO OUT [R-AUDIOL] on the rear of your set and the
other ends to corresponding audio
in connectors on the Amplifier or
DVD Home Theatre.
CABLE BOX/SATELLITE RECEIVER (SET-TOP BOX)
Connecting a Set-Top Box via Hdmi
Connect an HDMI Cable (Not supplied) between the HDMI IN (1, 2, or 3) jack on
the TV and the HDMI jack on the Set-Top Box.
26
No additional Audio connection is
needed for an HDMI to HDMI
connection.
1. Connect a Component Cable (Not supplied) between the
COMPONENT IN [Y, PB, PR] jacks on the TV and the
COMPONENT jacks on the Set-Top Box.
2. Connect Audio Cables (Not supplied) between the
COMPONENT IN [R-AUDIO-L] jacks on the TV and the AUDIO
OUT jacks on the Set-Top Box.
Connecting a Set-Top Box via Component Cables
Page 27
Connecting External Equipment to the TV
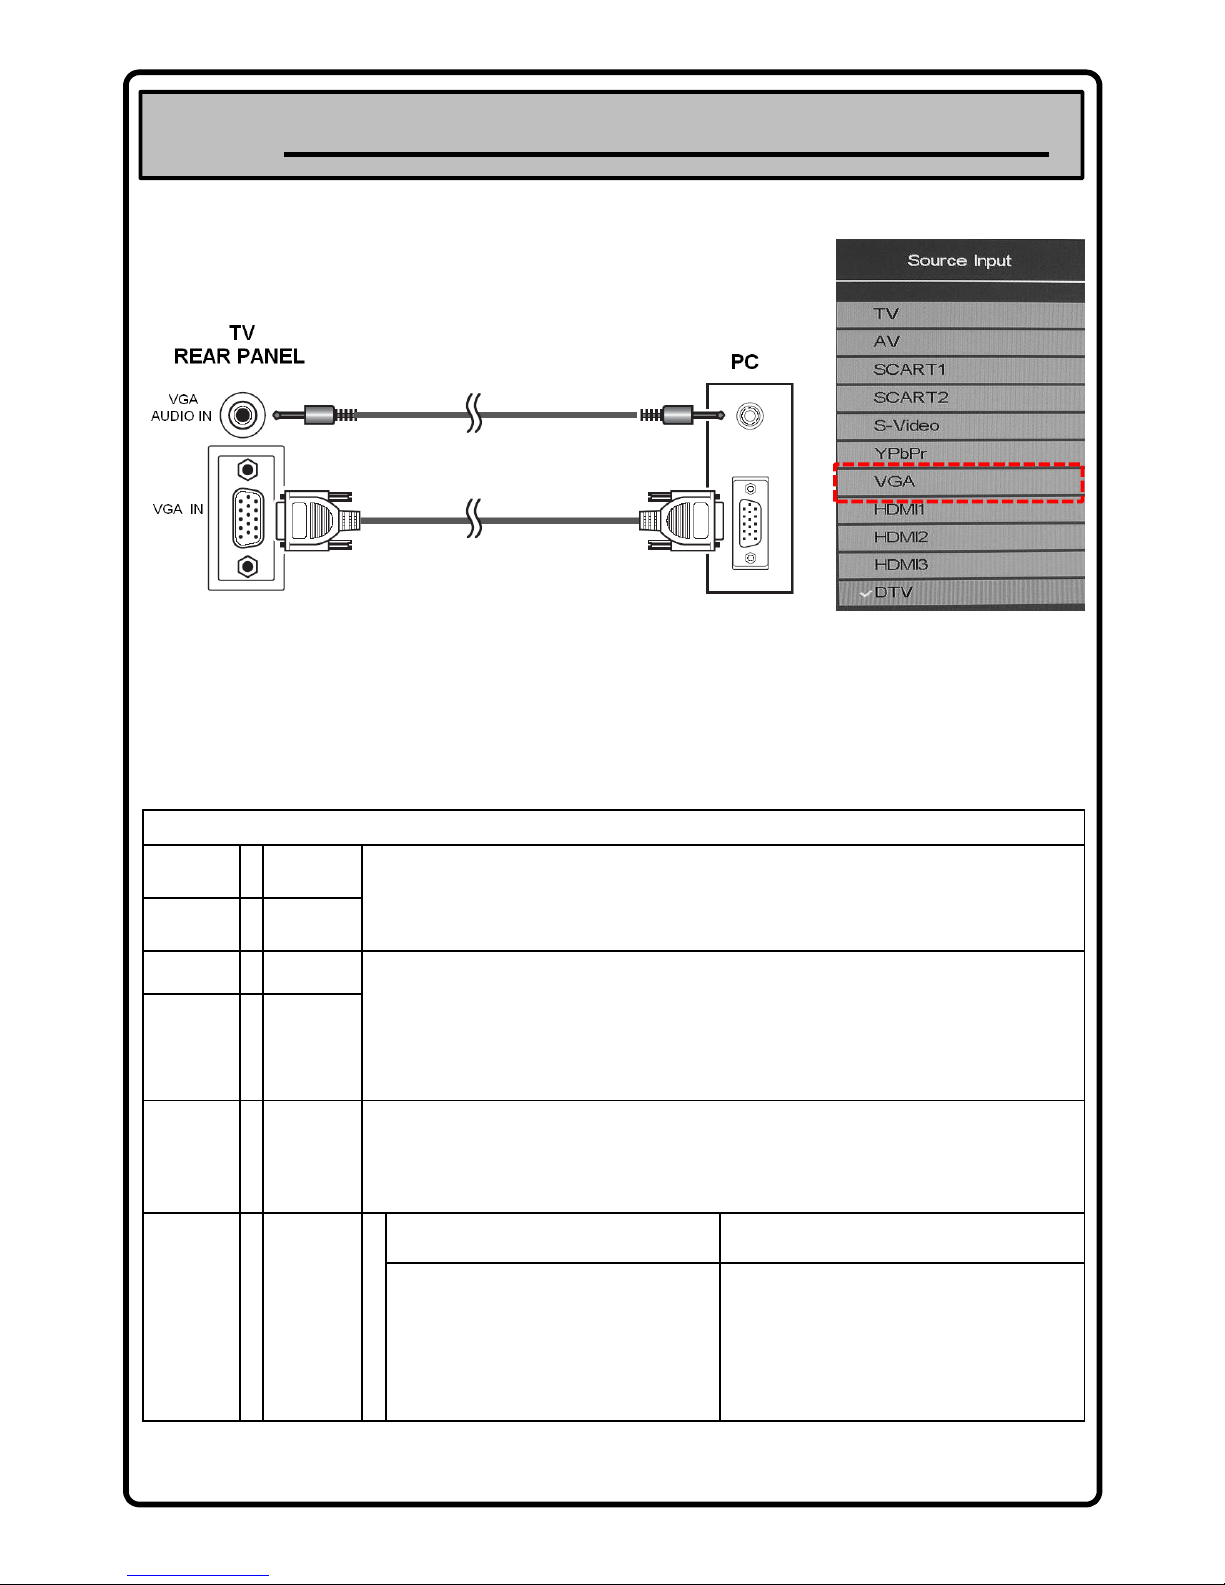
PC IN [PC] / [AUDIO]: Connect to the video and audio output jack on your PC or Laptop.
1. Press the SOURCE key on the remote control
2. Use the up/ down ARROE keys to select VGA
3. Press ENTER to display PC
SETTING UP THE TV WITH YOUR PC/ LAPTOP
SCREEN menu is available only for VGA input and deactivated for other input sources.
The actual screens on your PC may be different depending upon your particular version of Windows and your particular
video card. Even if your actual screens look different, the same, basic set-up information will apply in almost all cases.
(If not, contact your computer manufacturer)
To access Screen menu you must be in VGA Mode – as per above.
27
SCREEN MENU
H Position
- 5..0..+ 5
Adjust the PC’s screen positioning if it does not fit the TV screen.
Press the ▲ or ▼ button to adjusting the Vertical-Position.
Press the ◄ or ► button to adjust the Horizontal-Position.
V Position
- 5..0..+ 5
Phase
0 ~ 63
The purpose of phase and clock adjustment is to remove or reduce picture noise. If the noise
is not removed by Phase alone, then adjust the frequency as best as possible with clock.
After the noise has been reduced, readjust the picture so that it is aligned on the center of
screen.
Press the ▲ or ▼ button to select "Phase" or "Clock", then press the [ENTER] button.
Press the ◄ or ► button to adjust the screen quality.
Clock
- 3..0..+ 3
Auto
Config
To set
Auto Config allows the PC screen of set self-adjust to the incoming PC video signal.
This automatically sets the H-Position, V-Position, Phase and Clock.
If picture is not ok with Auto Config then adjust H-Position, V-Position, Phase and Clock
manually to adjust to the desired picture settings.
PIP setup
Option
ON / OFF
Select this option to activate/deactivate the
PIP function (picture in picture)
PIP input
You can display a sub picture within the PC
main screen.
In this way, you can watch the picture of set
programme or video input from any
connected equipment while PC sceen is
active.
Press ATV MENU on the remote
–
use the right ARROW key to select SCREEN Menu and the down ARROW to access
Page 28
CORRECT DISPOSAL OF THIS PRODUCT
(Waste Electrical & Electronic Equipment)
This marking shown on the product or its literature, indicates that it should not be
disposed with other household wastes at the end of its working life.
To prevent possible harm to the environment or human health from uncontrolled
waste disposal, please separate this from other types of wastes and recycle it
responsibly to promote the sustainable reuse of material resources.
Household users should contact either the retailer where they purchased this
product, or their local government office, for details of where and how they can take
this item for environmentally safe recycling.
12. Disposal Instructions
28
This product should not be mixed with other commercial wastes for disposal.
This symbol certifies that the product has been manufactured in
compliance with the European Standards.
Page 29

Helpline Number
0845 293 7697
 Loading...