

VIDAR SIERRA plus film digitizer Installation Manual

1-1
VIDAR Film Digitizer Installation Guide
Installation guide for
SIERRA plus film digitizers
Single film
Multi-film

1-2
VIDAR Film Digitizer Installation Guide
VIDAR Part Number 14422-002
December 2000
© Copyright 2000 by VIDAR Systems Corporation. All rights reserved.
Printed in the USA.
No part of this publication may be reproduced, stored in a retrieval system, or
transmitted, in any form or by any means, electronic, mechanical, photocopying,
recording or otherwise, without the prior written permission of VIDAR Systems
Corporation.
Terms denoted by the trademark symbol ( or ®) used in this publication are trademarks
or service marks registered in the United States or other countries. Sierra is a registered
trademark of VIDAR Systems Corporation.
This equipment has been tested and found to comply with the limits for a Class A digital
device, pursuant to Part 15 of the FCC Rules. These limits are designed to provide
reasonable protection against harmful interference when the equipment is operated in a
commercial environment. This equipment generates, uses, and can radiate radio
frequency energy and, if not installed and used in accordance with the instruction manual,
may cause harmful interference to radio communications. Operation of this equipment in
a residential area can cause harmful interference, in which case the user will be required
to correct the interference at his or her own expense.
Product compliance testing was conducted using VIDAR shielded cables. Modifications
to VIDAR shielded cables or the use of cables other than those available from VIDAR
could void the user’s authority to operate the equipment.
Caution: No operator-serviceable parts inside. Refer servicing to qualified personnel.
Achtung: Gehäuse nicht öffnen. Wartung uno reparatur nur durch eletrofachkräfte.
Attention: Aucune piece ne peut etre remplacee par l’utilisateur. Toute operation de
maintenance doit etre effectuee par une personne qualiee.
Atencion: Acceso interno solo autorizado a personal tecnico cualificado.
Attenzione: Non appire. Rivolgersi a personale qualificado.
460 Spring Park Place
Herndon, VA 20170 U.S.A.
Sales: 1-800-471-SCAN or 1-800-471-7226
Email: sales@vidar.com
Phone: (703) 471-7070
Fax: (703) 471-1165
Internet: www.vidar.com
Technical Support:
1-888-INFO-471 or 1-888-463-6471
E-mail: medtech@vidar.com

1-3
VIDAR Film Digitizer Installation Guide
Contents
Unpacking............................................................................................................5
1. Look for damage. ..............................................................................6
What’s inside the shipping carton? ...................................................6
2. Unpack the inner carton....................................................................7
Standard items.................................................................................. 7
Optional items ...................................................................................8
3. Unpack the film digitizer.................................................................... 9
4. If anything is missing....................................................................... 10
5. Activate your product warranty. ...................................................... 10
Configuring SCSI settings................................................................................11
1. Set the digitizer’s SCSI ID ...............................................................11
2. Set the digitizer’s SCSI termination. ............................................... 13
3. Record important information. ........................................................15
Table-top stand .................................................................................................16
Before you start............................................................................... 16
Dimensions with table-top stand.......................................................... 17
1. Identify the parts. ............................................................................ 18
2. Assemble the stand and mounting bracket. ................................... 19
3. Mount the digitizer...........................................................................21
4. Route and connect the power cable. ..............................................22
5. Connect the SCSI cable. ................................................................ 23
6. Install the exit tray. ..........................................................................24
7. Install the film damper assembly. ...................................................25
8. Install the entrance tray...................................................................27
9. Install the entrance tray film guide assembly..................................28
10. Place the digitizer in its working location....................................... 29
11. Connect the power cord to the power supply................................ 30
Wall mounting ...................................................................................................31
Before you start............................................................................... 31
1. Select proper wall space.................................................................32
2. Determine best mounting bracket height. .......................................34
Dimensions for wall-mounted digitizer ................................................. 35
3. Attach the mounting bracket to the wall.......................................... 36
4. Mount the digitizer...........................................................................37
5. Route and connect the power cable. ..............................................38
6. Connect the SCSI cable. ................................................................ 39

1-4
VIDAR Film Digitizer Installation Guide
7. Install the exit tray. ..........................................................................40
8. Install the film damper assembly. ...................................................41
9. Install the entrance tray...................................................................43
10. Install the entrance tray film guide assembly. ............................... 44
11. Connect the power cord to the power supply................................ 45
Installing SCSI hardware..................................................................................46
1. Unpack the SCSI accessory box. ...................................................46
2. Install the SCSI card. ......................................................................48
Installing SCSI software ...................................................................................50
Apply power: digitizer first, then PC..................................................... 51
Computers with Windows 2000 ........................................................... 52
Computers with Windows 98 ............................................................... 53
Computers with Windows 95 ............................................................... 54
If the “New Hardware Found” window appears... ...........................54
If the “Update Device Driver” wizard appears.................................54
Computers with Windows NT 4.0 ........................................................55
Using the SCSI Utility ..........................................................................56
Operating...........................................................................................................59
Apply power—then leave on continuously........................................... 59
About films and their orientation ..........................................................60
Loading a single film ............................................................................ 61
Loading multiple films ..........................................................................63
Troubleshooting................................................................................................65
Normal operation .................................................................................65
Power supply information ....................................................................65
In case of difficulty ............................................................................... 66
Error conditions...............................................................................66
Operational problems......................................................................67
How to reset the digitizer .....................................................................71
RECOMMENDED RESET procedure.............................................71
ALTERNATE RESET procedure ....................................................72
Managing power ..................................................................................73
Applying and removing power ........................................................73
Using power strips ..........................................................................74

1-5
VIDAR Film Digitizer Installation Guide
Unpacking
the SIERRA™ plus film digitizer
In this chapter, you will:
Unpack and inspect the digitizer’s parts.
Identify the digitizer’s parts.
Unpacking the SIERRA™ plus film digitizer 1-6
VIDAR Film Digitizer Installation Guide
1. Look for damage.
Before unpacking the SIERRA™ plus film digitizer, examine the
shipping carton for damage.
If the carton is damaged, notify the shipper immediately.
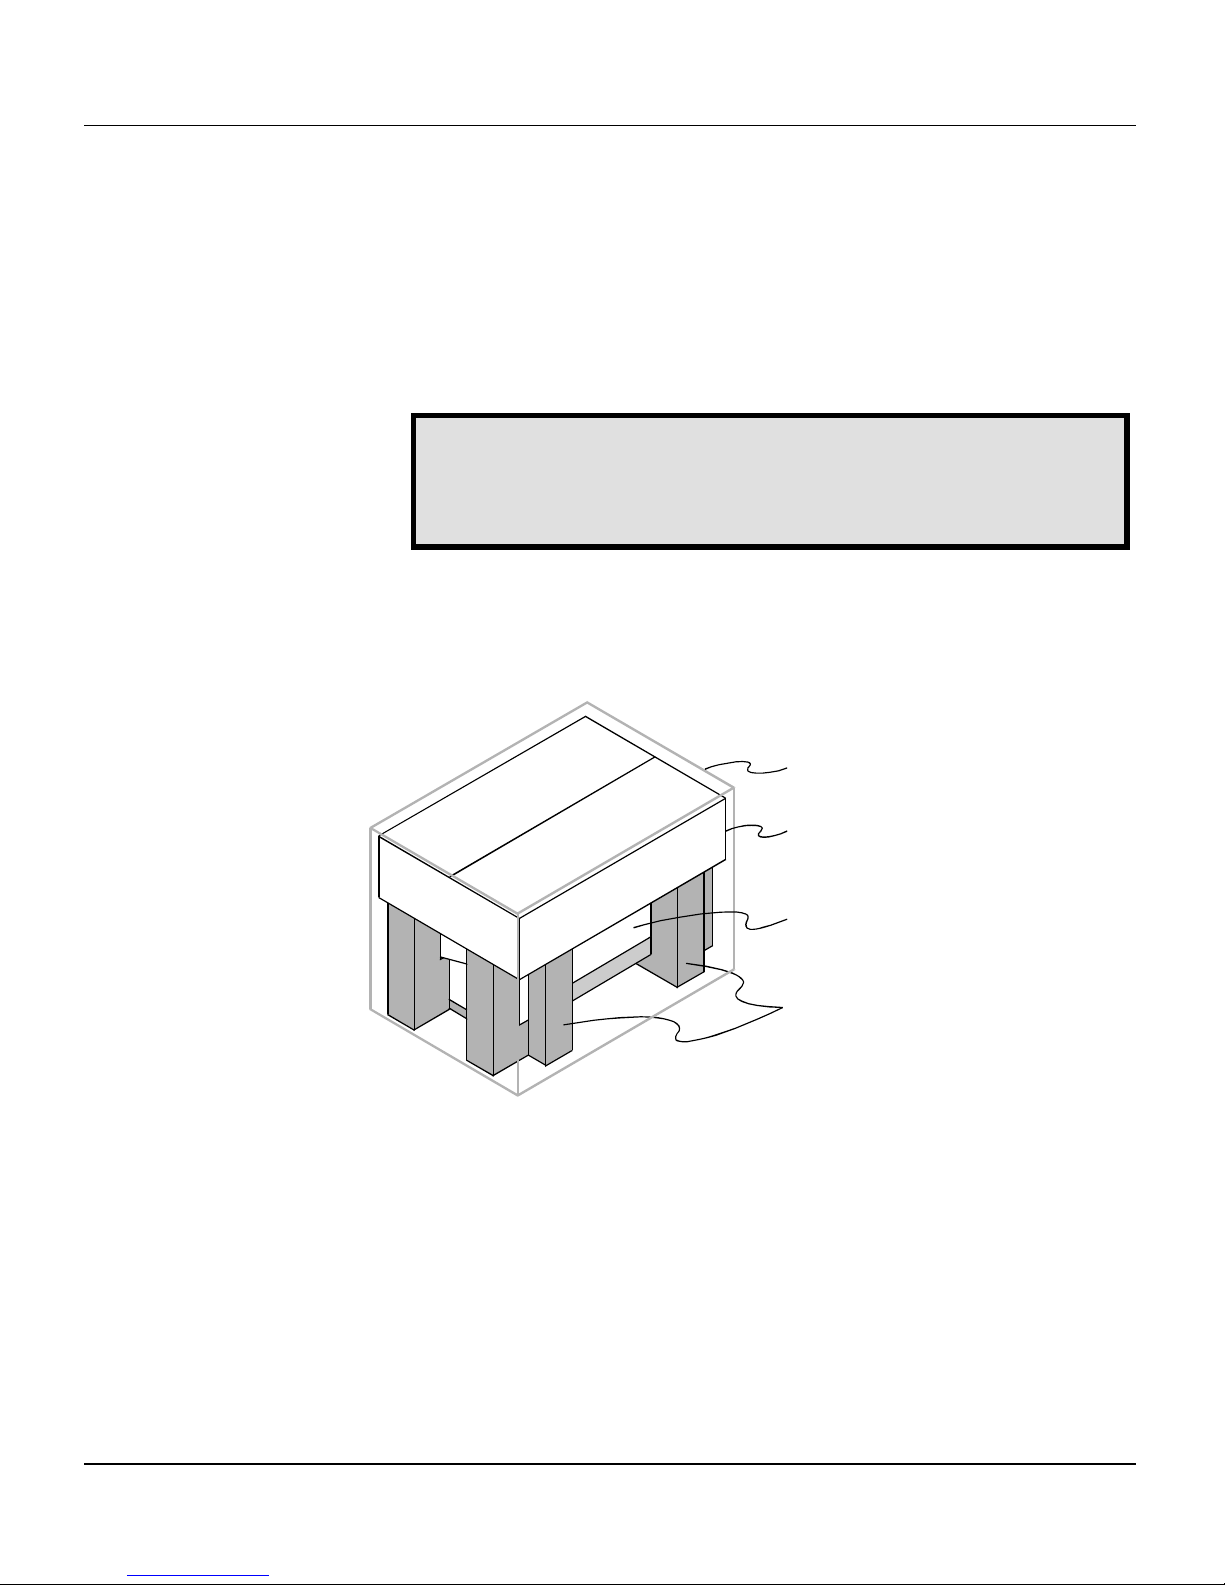
IMPORTANT:
Save the outer carton, inner carton, cardboard
separators, foam end supports and cardboard shutter-lock. If
you need to ship the digitizer later, you should repack it in the
original materials as shown below.
What’s inside the shipping carton?
Inner carton
Digitizer
(in foam end supports)
Shipping (outer) carton
Foam end supports
Unpacking the SIERRA™ plus film digitizer 1-7
VIDAR Film Digitizer Installation Guide
2. Unpack the inner carton.
Remove the inner carton from the outer shipping carton and open it.
Check carefully to assure you received the items listed below.
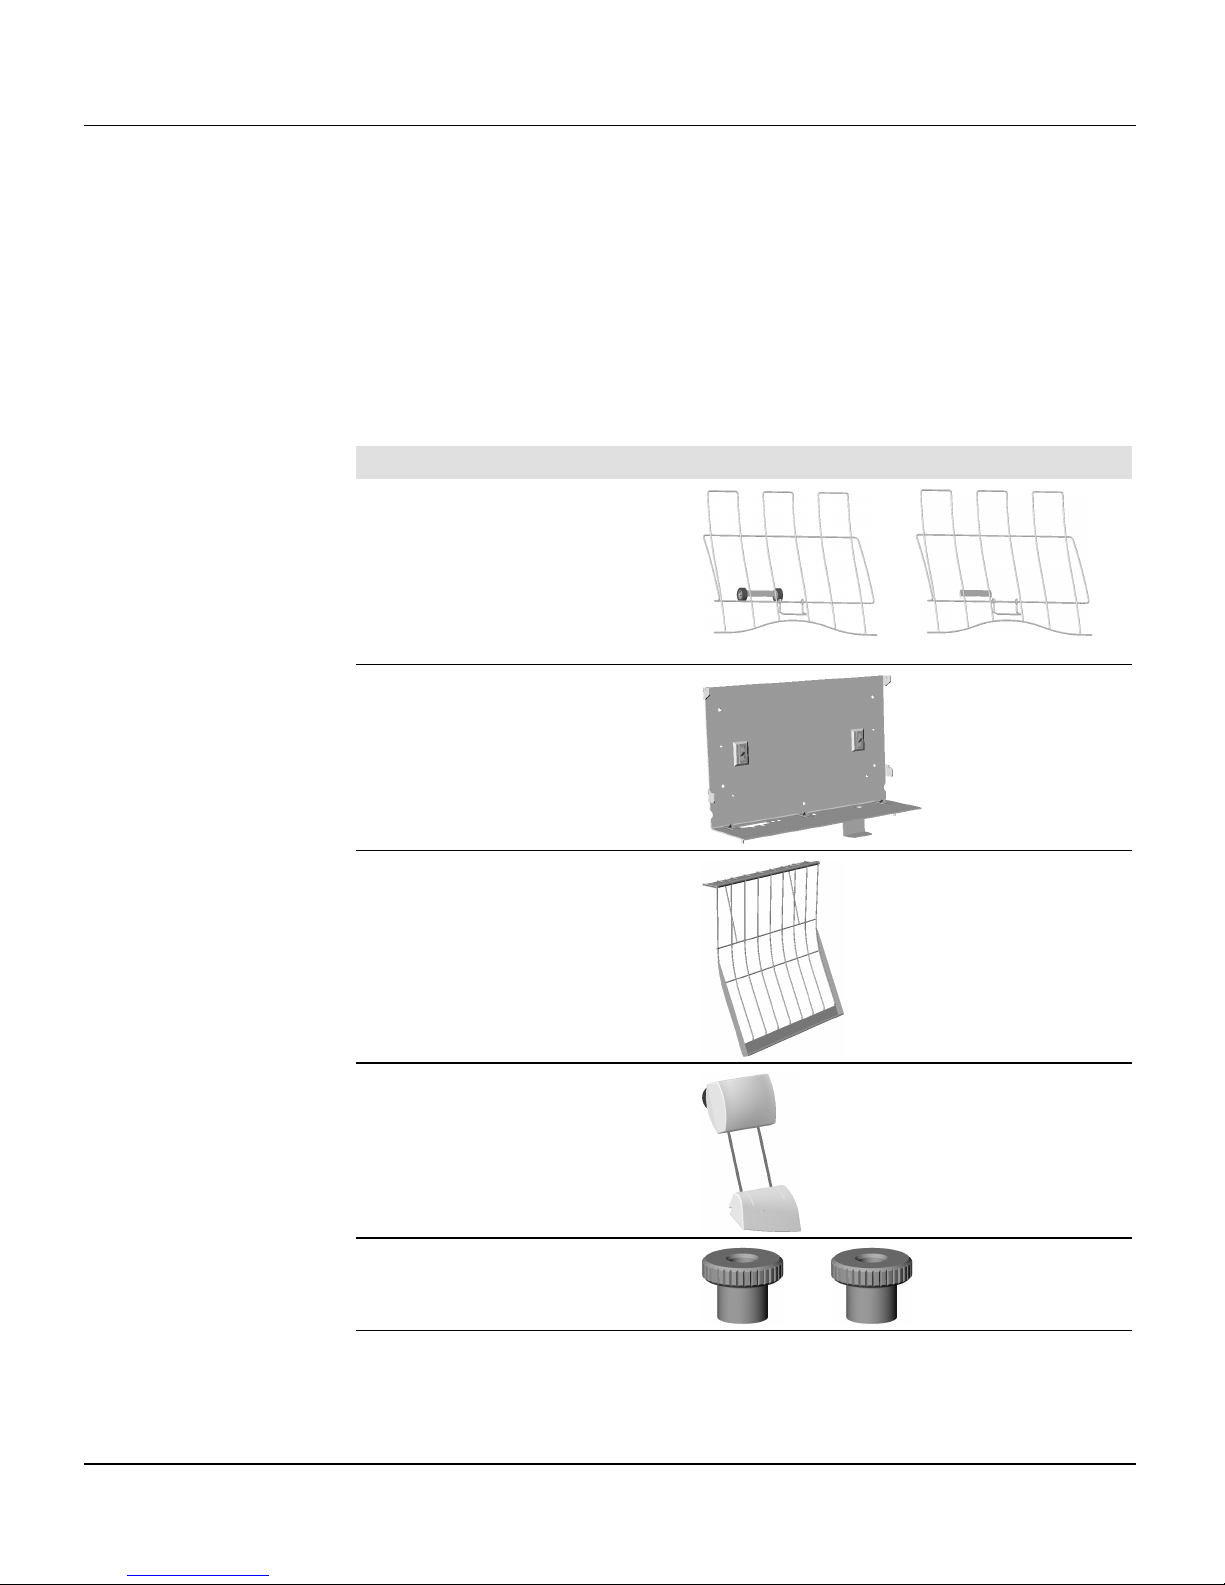
Standard items
Description
(Note: items are not shown to same scale.)
Entrance tray assembly
(Multi-film or single film)
Multi-film Single film
Mounting bracket
assembly
Exit tray
Entrance tray film guide
assembly
Thumb nut (2)
continued
Unpacking the SIERRA™ plus film digitizer 1-8
VIDAR Film Digitizer Installation Guide
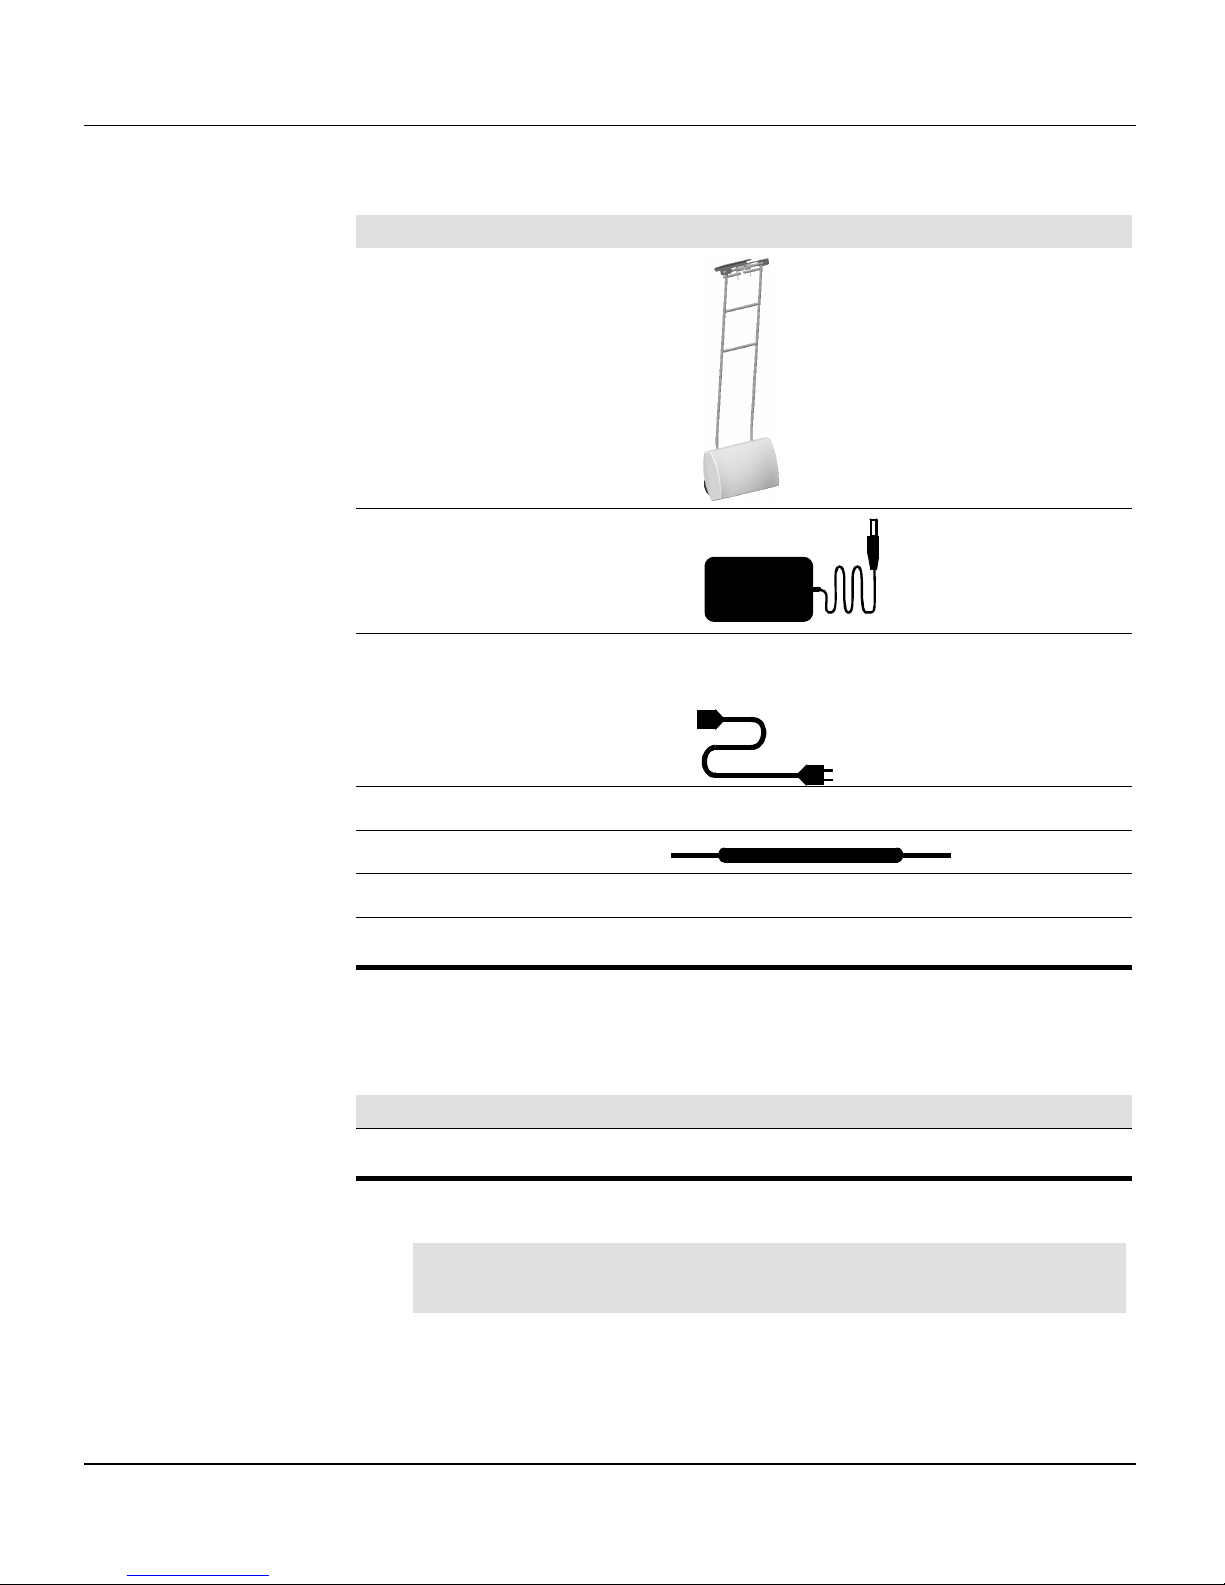
Description
(Note: items are not shown to same scale.)
Film damper assembly
Power Supply
Electrical power cord; either U.S. medical power cord, or Euro-style
power cord
SCSI box (Adaptec 2930 SCSI card and software)
Switch adjusting tool
Quick start guide card
Mini SCSI to mini SCSI cable
Optional items
Description
Third-party software instructions
Note:
If you plan to use the table-top stand, you will identify its
parts later, in the “Table-top stand” chapter.
Unpacking the SIERRA™ plus film digitizer 1-9
VIDAR Film Digitizer Installation Guide
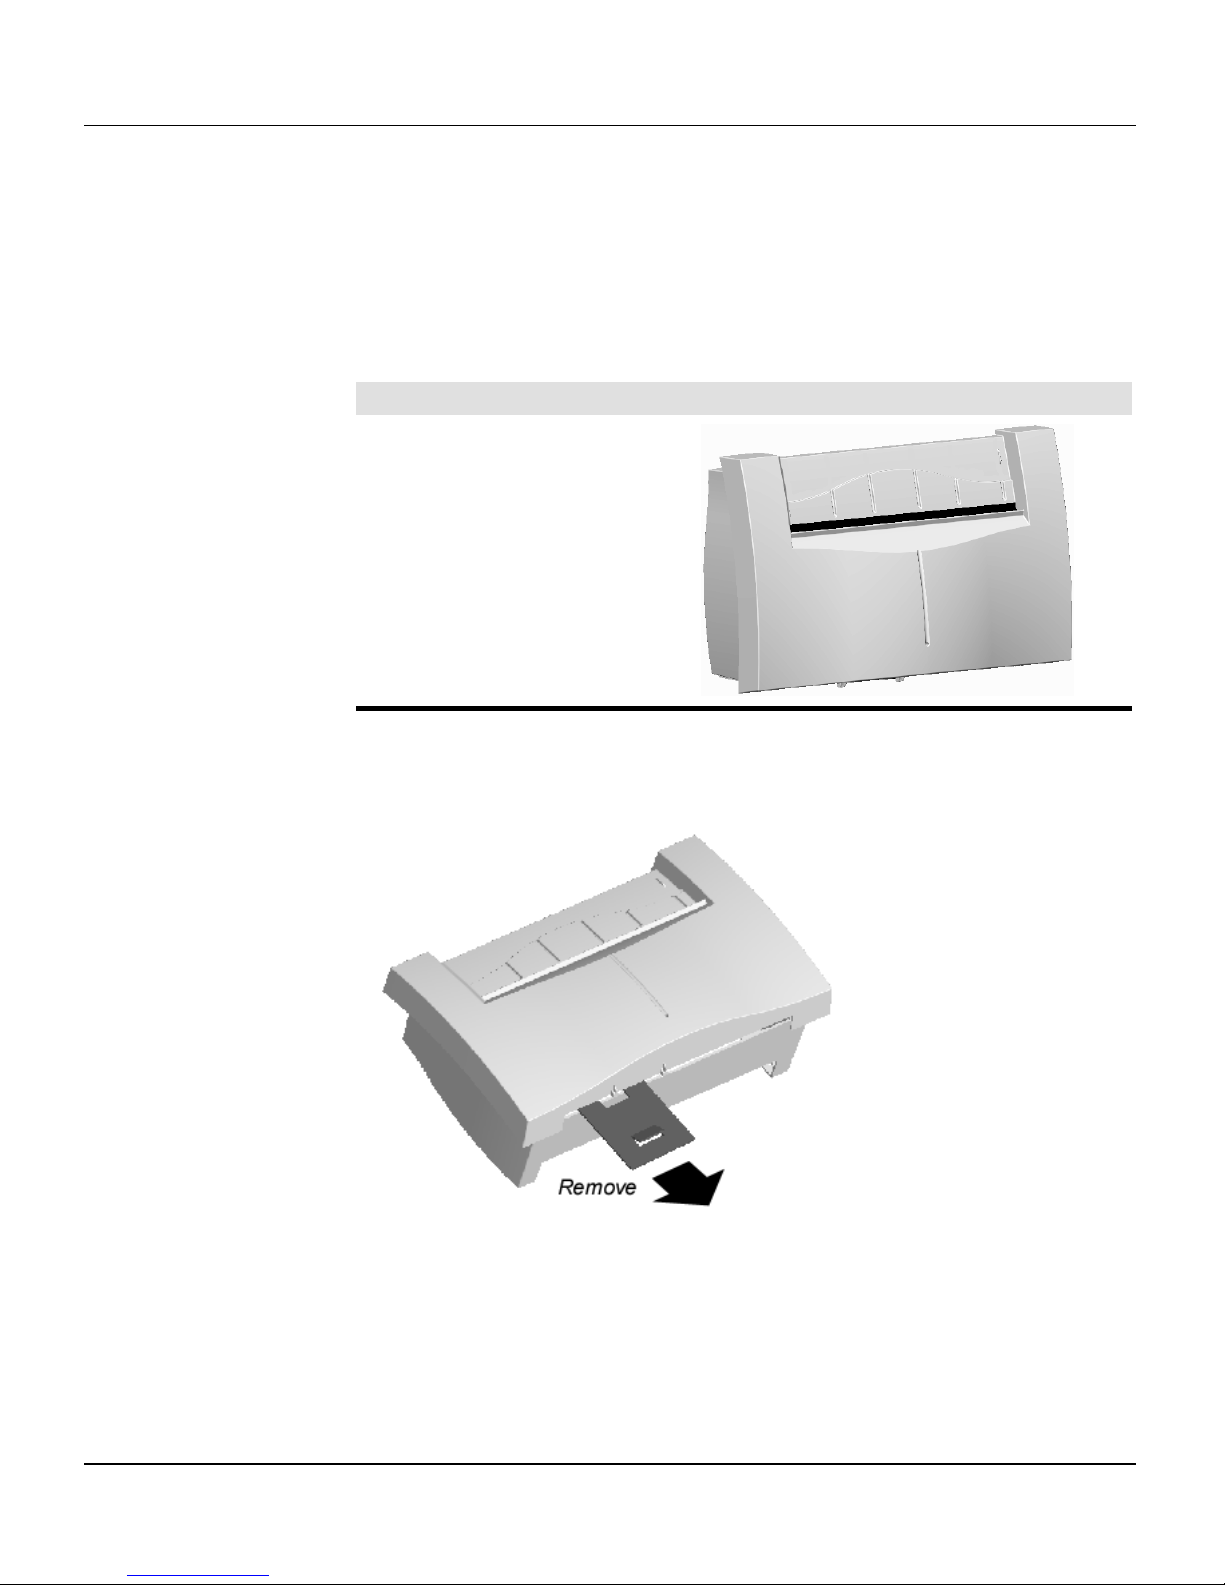
3. Unpack the film digitizer.
a. Carefully lift the film digitizer from the shipping carton, remove the
plastic wrapping and then the foam end-supports.
Description
SIERRA™ plus film
digitizer
b. Remove the cardboard shutter-lock from the scanner.

Unpacking the SIERRA™ plus film digitizer 1-10
VIDAR Film Digitizer Installation Guide
4. If anything is missing...
Immediately contact your VIDAR supplier.
5. Activate your product warranty.
Complete the warranty information/customer survey form at the back of
this manual and mail it to VIDAR Systems Corp.
If your digitizer needs service, this information should be on file at
VIDAR.
Contact VIDAR Technical Support
if you have any questions
about installing or using your VIDAR film digitizer:
Phone: 1-888-INFO-471 (1-888-463-6471)
+1-703-471-7070 outside the U.S.
E-mail: medtech@vidar.com
NEXT: Configure the SCSI settings

1-11
VIDAR Film Digitizer Installation Guide
Configuring SCSI settings
for the SIERRA™ plus film digitizer
In this chapter, you will:
Set the digitizer’s SCSI ID number.
If necessary, activate the digitizer’s SCSI termination.
Record important information about the digitizer.
1. Set the digitizer’s SCSI ID
A computer equipped with a SCSI bus can communicate with multiple
SCSI devices (for example: a film digitizer, a scanner and a disk drive).
Each device must have a unique SCSI ID number so the computer can
distinguish it from other SCSI devices. Valid SCSI ID numbers range
from 0 to 7.
When selecting SCSI ID numbers:
The SCSI Card 2930U is preset to SCSI ID 7 and should not be
changed.
Set the film digitizer to any SCSI ID between 0 and 6, as long as that
number is not used by another SCSI device attached to the computer.
Note:
The SIERRA™ plus is shipped from VIDAR with the
SCSI ID preset to 5.
If the system is configured to boot from a SCSI disk drive, it’s best to
set the disk’s SCSI ID to 0 or 1. Most SCSI disks are preset to SCSI
ID 0 at the factory.
continued
Configuring SCSI settings for the SIERRA™ plus film digitizer 1-12
VIDAR Film Digitizer Installation Guide
CAUTION:
The digitizer and computer MUST be turned off
before changing the SCSI ID.
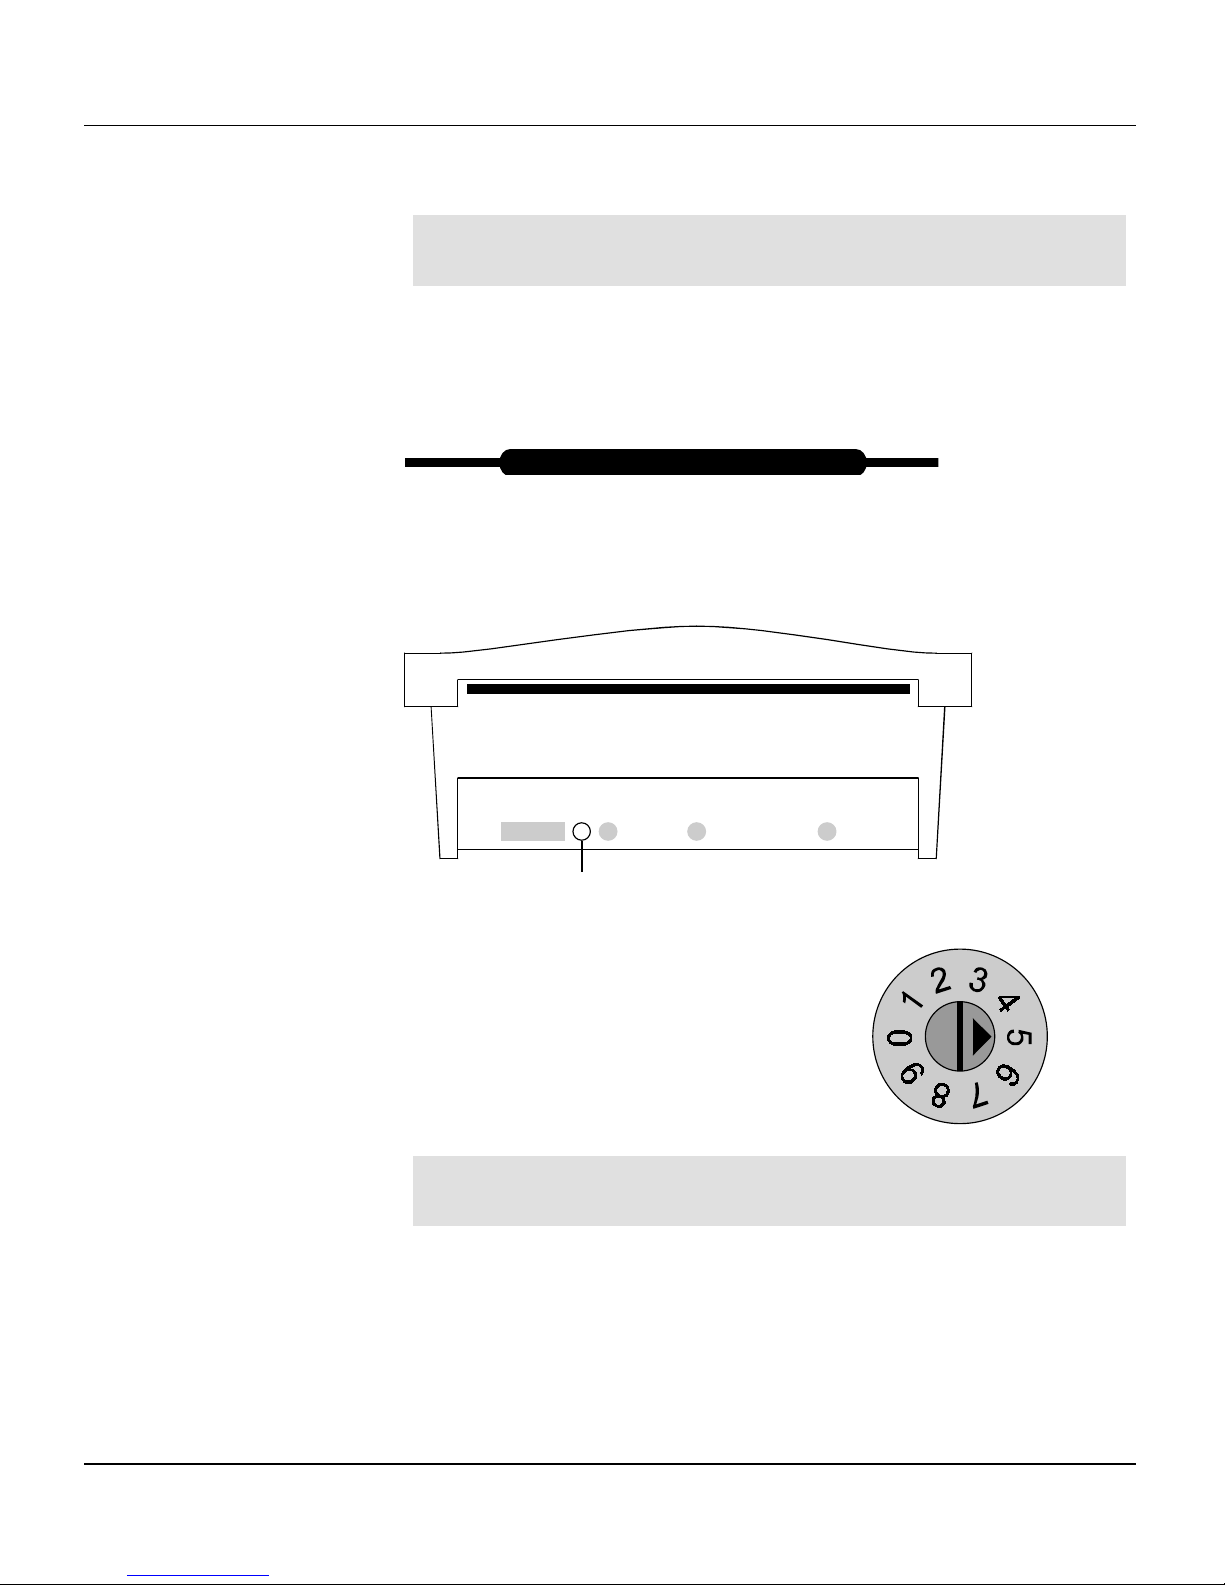
To set the digitizer’s SCSI ID:
a. Locate the switch adjusting tool.
b. Lay the digitizer on its back, with its bottom surface toward you.
c. Locate the SCSI ID switch.
d. Use the tool’s flat tip to rotate the SCSI
ID switch to the desired SCSI ID number.
Note:
Do not set the switch to position 8 or 9, as these are
not valid
SCSI ID numbers.
SCSI ID switch

Configuring SCSI settings for the SIERRA™ plus film digitizer 1-13
VIDAR Film Digitizer Installation Guide
2. Set the digitizer’s SCSI termination.
The SIERRA™ plus is configured to be placed at the end of the SCSI
chain. The SCSI termination switch is on (termination activated).
Note:
VIDAR recommends that the Adaptec 2930CU SCSI
controller be used
only
for the digitizer. Do not connect internal
disk drives to the SCSI controller.
Note:
VIDAR does not recommend daisy-chaining multiple
SCSI devices with the film digitizer. If you are considering using
the digitizer in daisy-chain configurations, please first contact
VIDAR Technical Support (medtech@vidar.com).
continued

Configuring SCSI settings for the SIERRA™ plus film digitizer 1-14
VIDAR Film Digitizer Installation Guide
To change the digitizer’s SCSI termination:
Note:
The SIERRA™ plus is shipped from VIDAR with the
SCSI termination switch set to
internal termination on
.
a. Lay the digitizer on its back, with its bottom surface toward you.
b. Locate the SCSI termination switches on the bottom of the digitizer.
c. To deactivate SCSI termination, slide
Switch 1 to position shown using the
flat tip of the switch-adjusting tool.
(Switch 2 has no function.)
SCSI termination switches
12
12
Switch 1 set
for no internal
termination
Switch 1 set
for internal
termination

Configuring SCSI settings for the SIERRA™ plus film digitizer 1-15
VIDAR Film Digitizer Installation Guide
3. Record important information.
a. Locate the “Warranty information and customer survey” form at the
back of this manual.
b. In the “System configuration” section, under “Hardware,” find the
“Digitizer” section.
c. In the “Digitizer” section, record this information:
Digitizer serial number.
SCSI ID.
SCSI termination (on/off).
NEXT: Mount the digitizer on the table-top stand
or
Mount the digitizer on a wall
Note:
You must record this information now. After you mount
the digitizer, you will not be able to read the serial number and it
will be difficult to see the SCSI switches.
STOP

1-16
VIDAR Film Digitizer Installation Guide
Table-top stand
for the SIERRA™ plus film digitizer
The table-top stand is for use in situations where the SIERRA™ plus
film digitizer cannot be mounted on a wall. The stand was designed to
be placed on a table, desk or countertop up to 36" (91cm) high.
SAFETY WARNING
Never place the SIERRA™ plus with table-top stand on the floor.
In brief, to assemble the SIERRA™ plus film digitizer with the table-top
stand you will:
Assemble the stand and mounting bracket.
Install the digitizer on the mounting bracket.
Place the stand-mounted digitizer in a suitable working location.
Attach power and SCSI cables.
Install the exit tray, film damper, entrance tray and film feed assembly
(multi-film only).
Instructions are provided in this chapter.
Before you start...
Be sure you have already set the SCSI ID and SCSI termination
switches (see the “Configuring SCSI settings” chapter, earlier in this
manual). It’s easier to see and set these switches before the digitizer is
attached to the table-top stand.
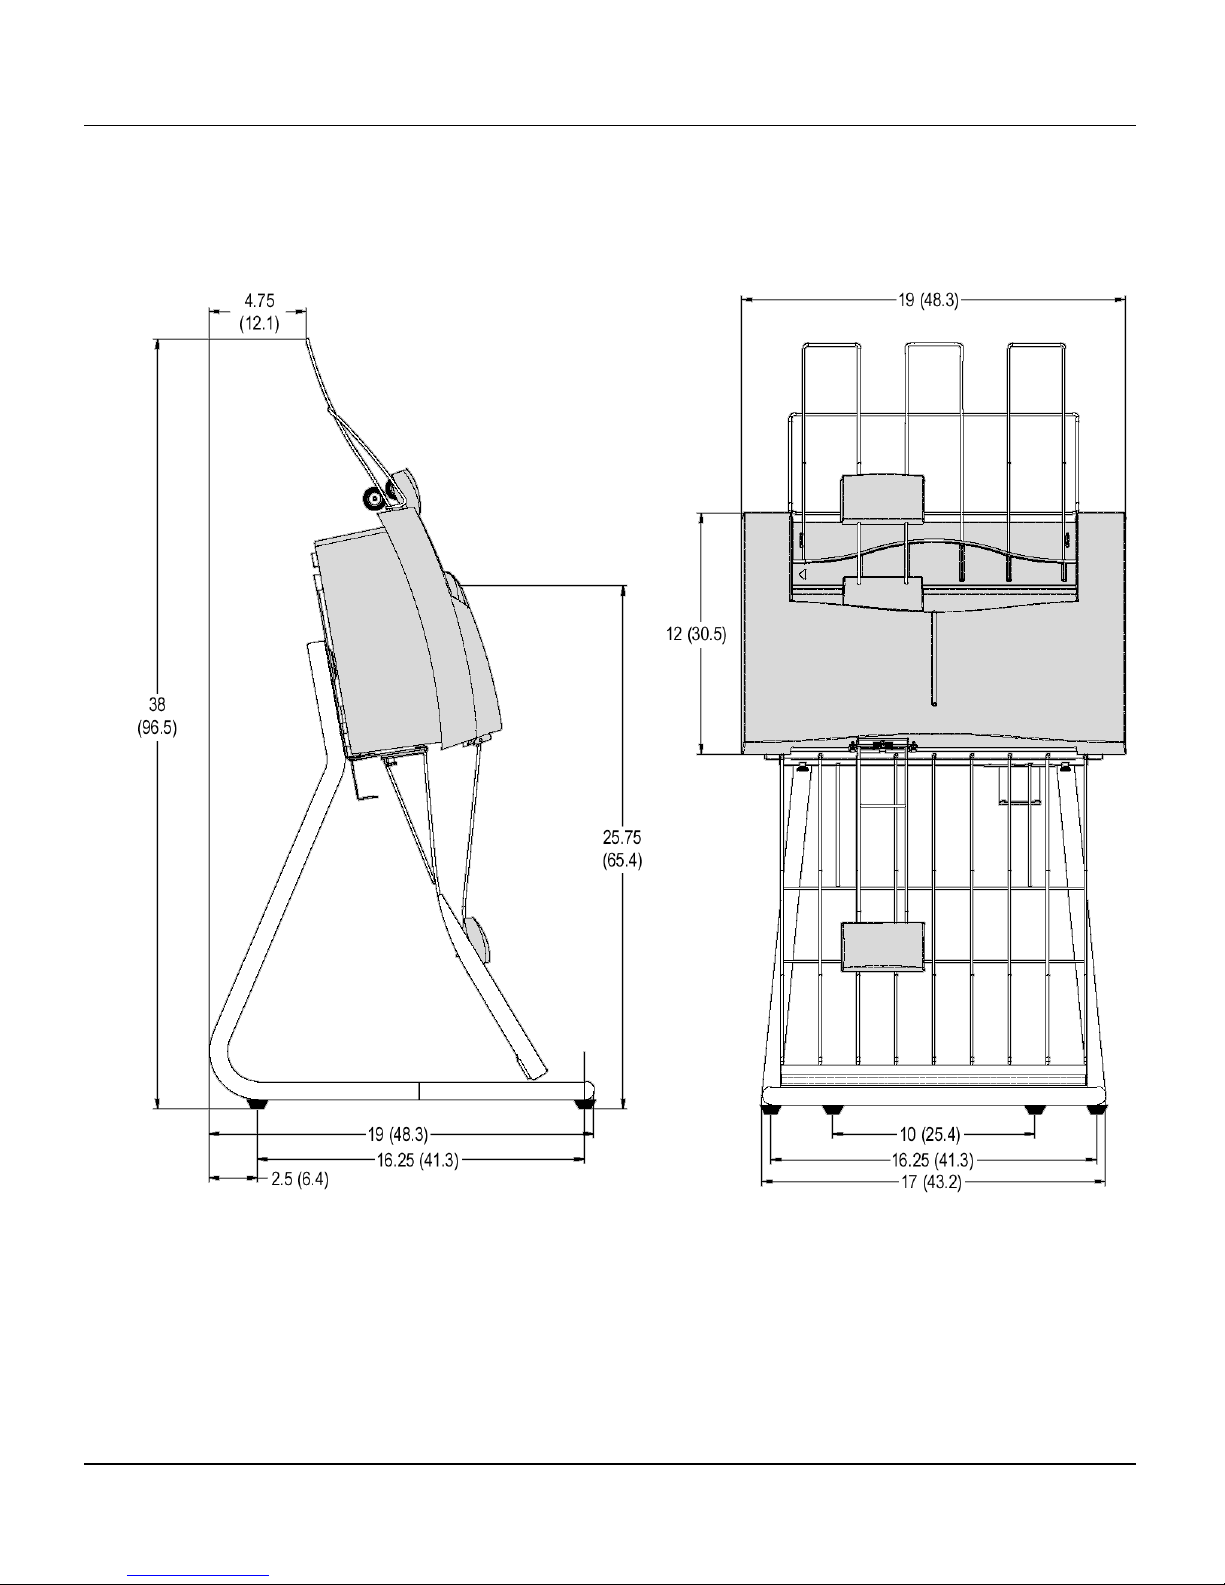
Table-top stand for the SIERRA™ plus film digitizer 1-17
VIDAR Film Digitizer Installation Guide
Dimensions with table-top stand
Dimensions are in inches (dimensions in parentheses are in centimeters)
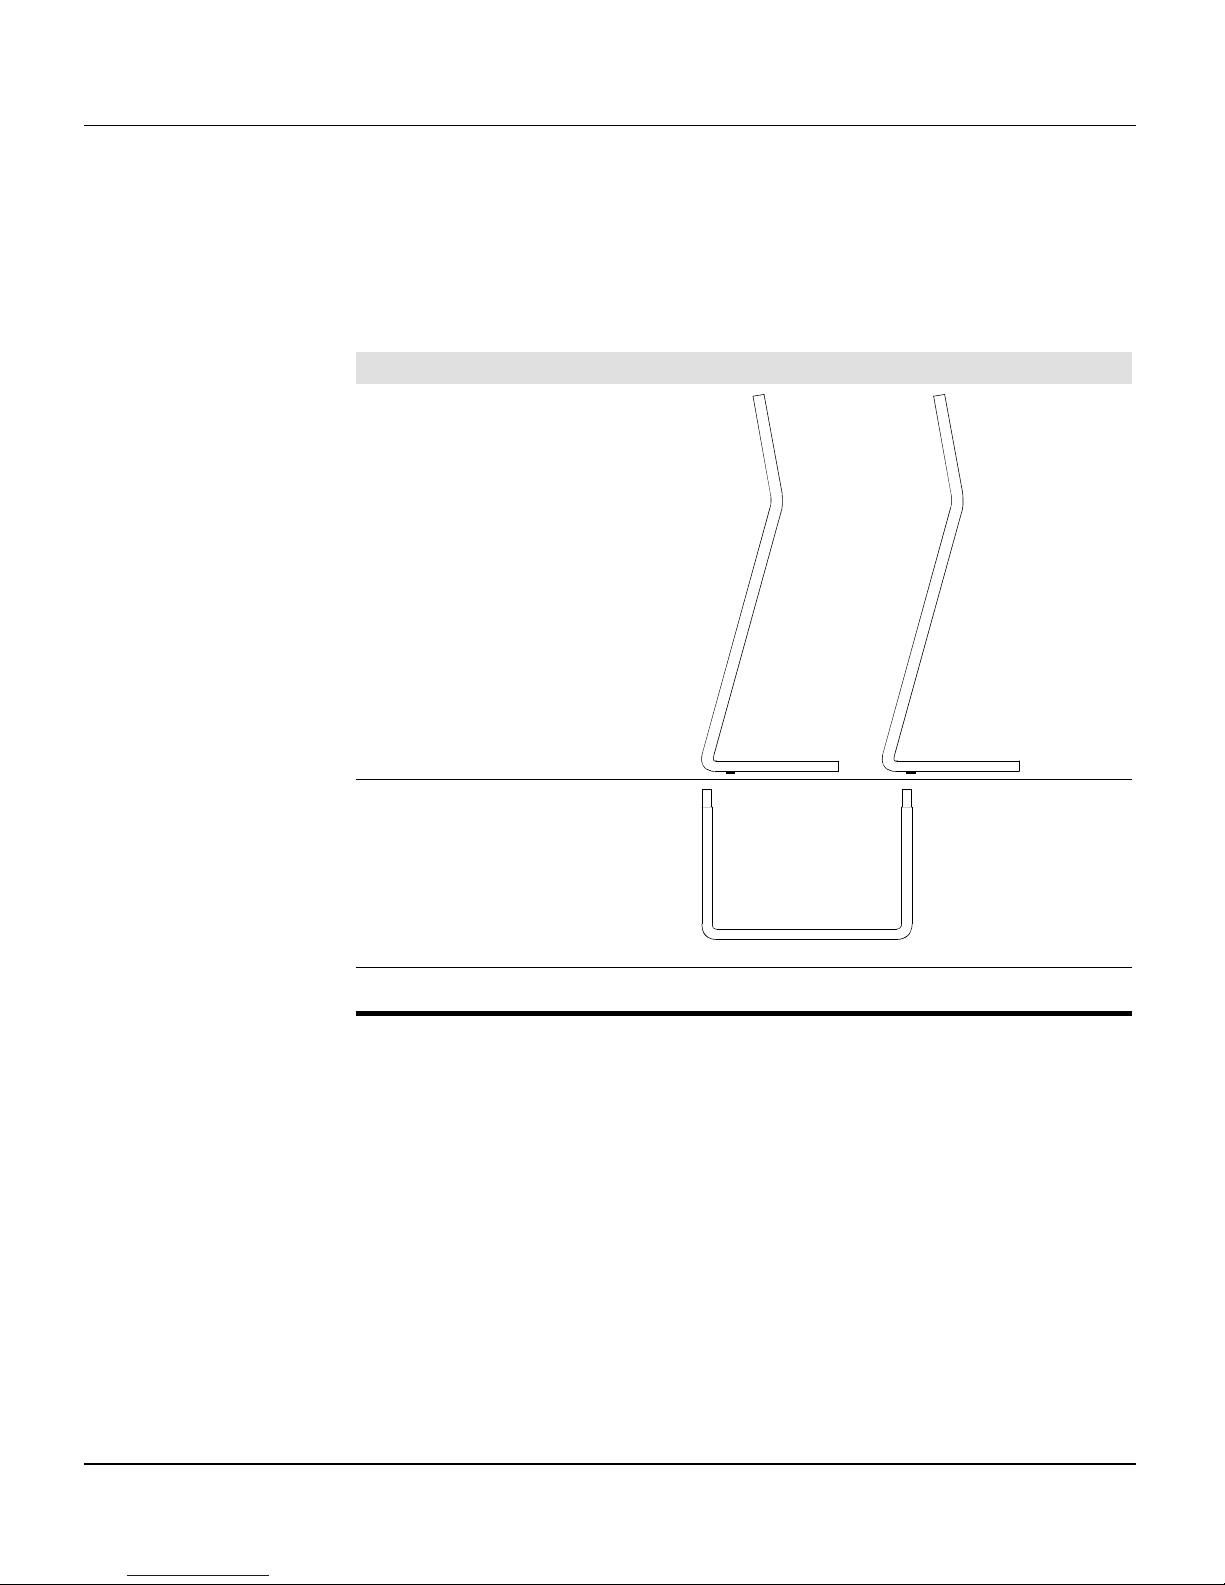
Table-top stand for the SIERRA™ plus film digitizer 1-18
VIDAR Film Digitizer Installation Guide
1. Identify the parts.
Identify these items:
Description
Two leg tubes
“U” tube
Six 8-32 x 3/8" screws
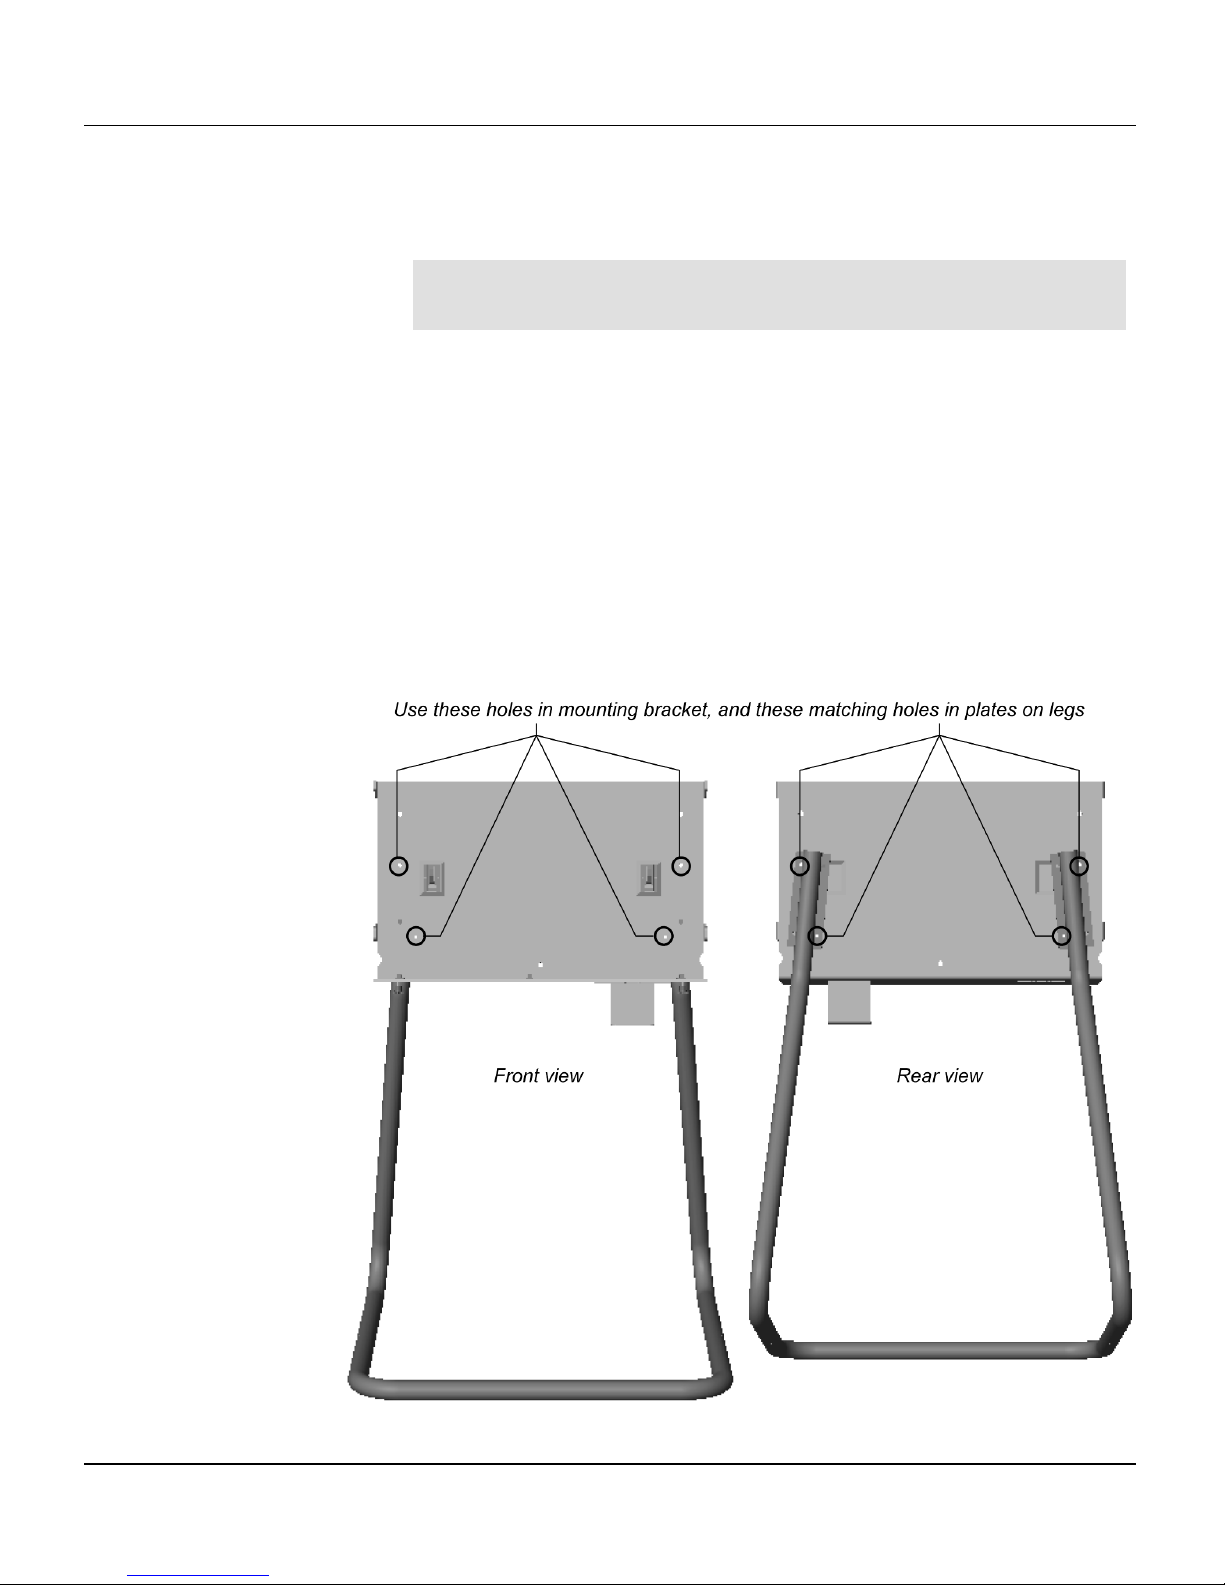
Table-top stand for the SIERRA™ plus film digitizer 1-19
VIDAR Film Digitizer Installation Guide
2. Assemble the stand and mounting bracket.
Tip:
It’s easiest to assemble the mounting bracket to the stand
while the stand is on its back, as shown on the next page.
a. Insert the “U” tube into both leg tubes. All rubber feet should be on
the same side (see next page). Secure the “U” tube with two 8-32 x
3/8" screws. Do not tighten the screws yet.
b. Secure the mounting bracket to the plates on the legs with four 8-32
x 3/8" screws. The diagram below shows which holes to use.
c. Tighten all screws.
d. Place the stand on its feet.
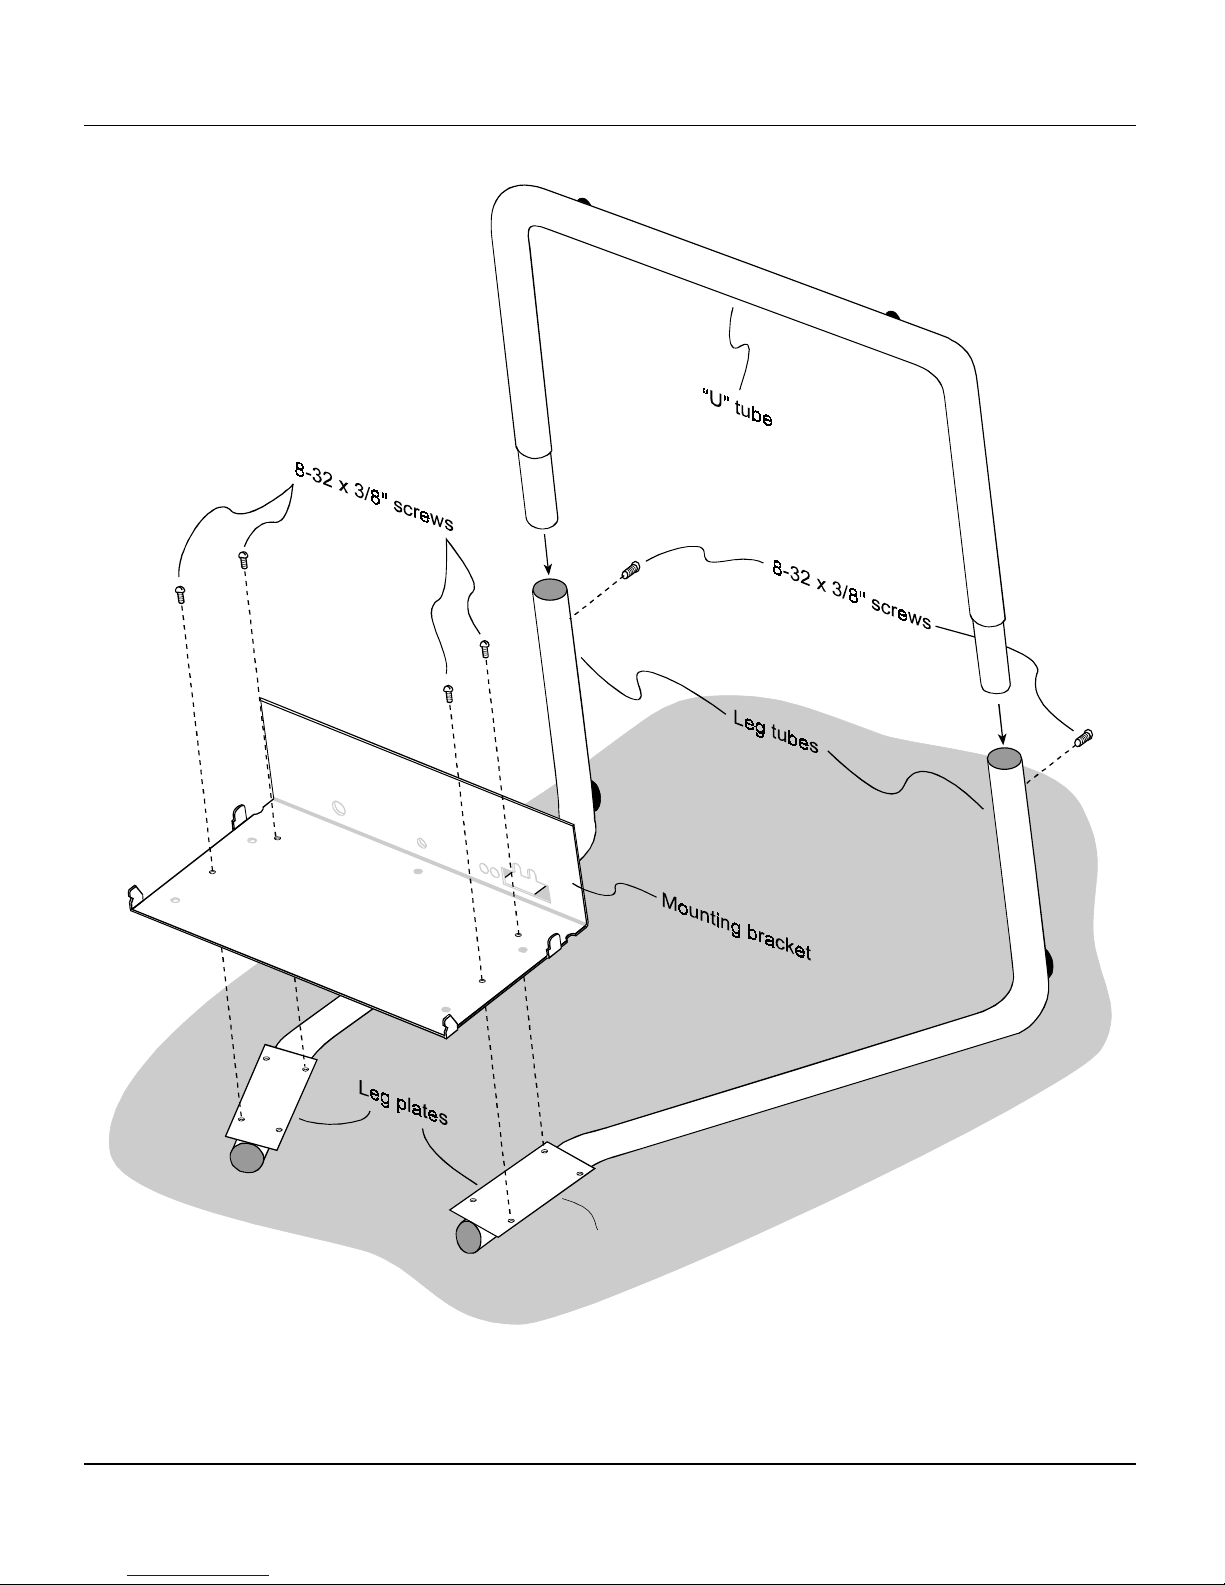
Table-top stand for the SIERRA™ plus film digitizer 1-20
VIDAR Film Digitizer Installation Guide
Note: Only two of the four holes in each leg plate
are used to secure it to the mounting bracket.
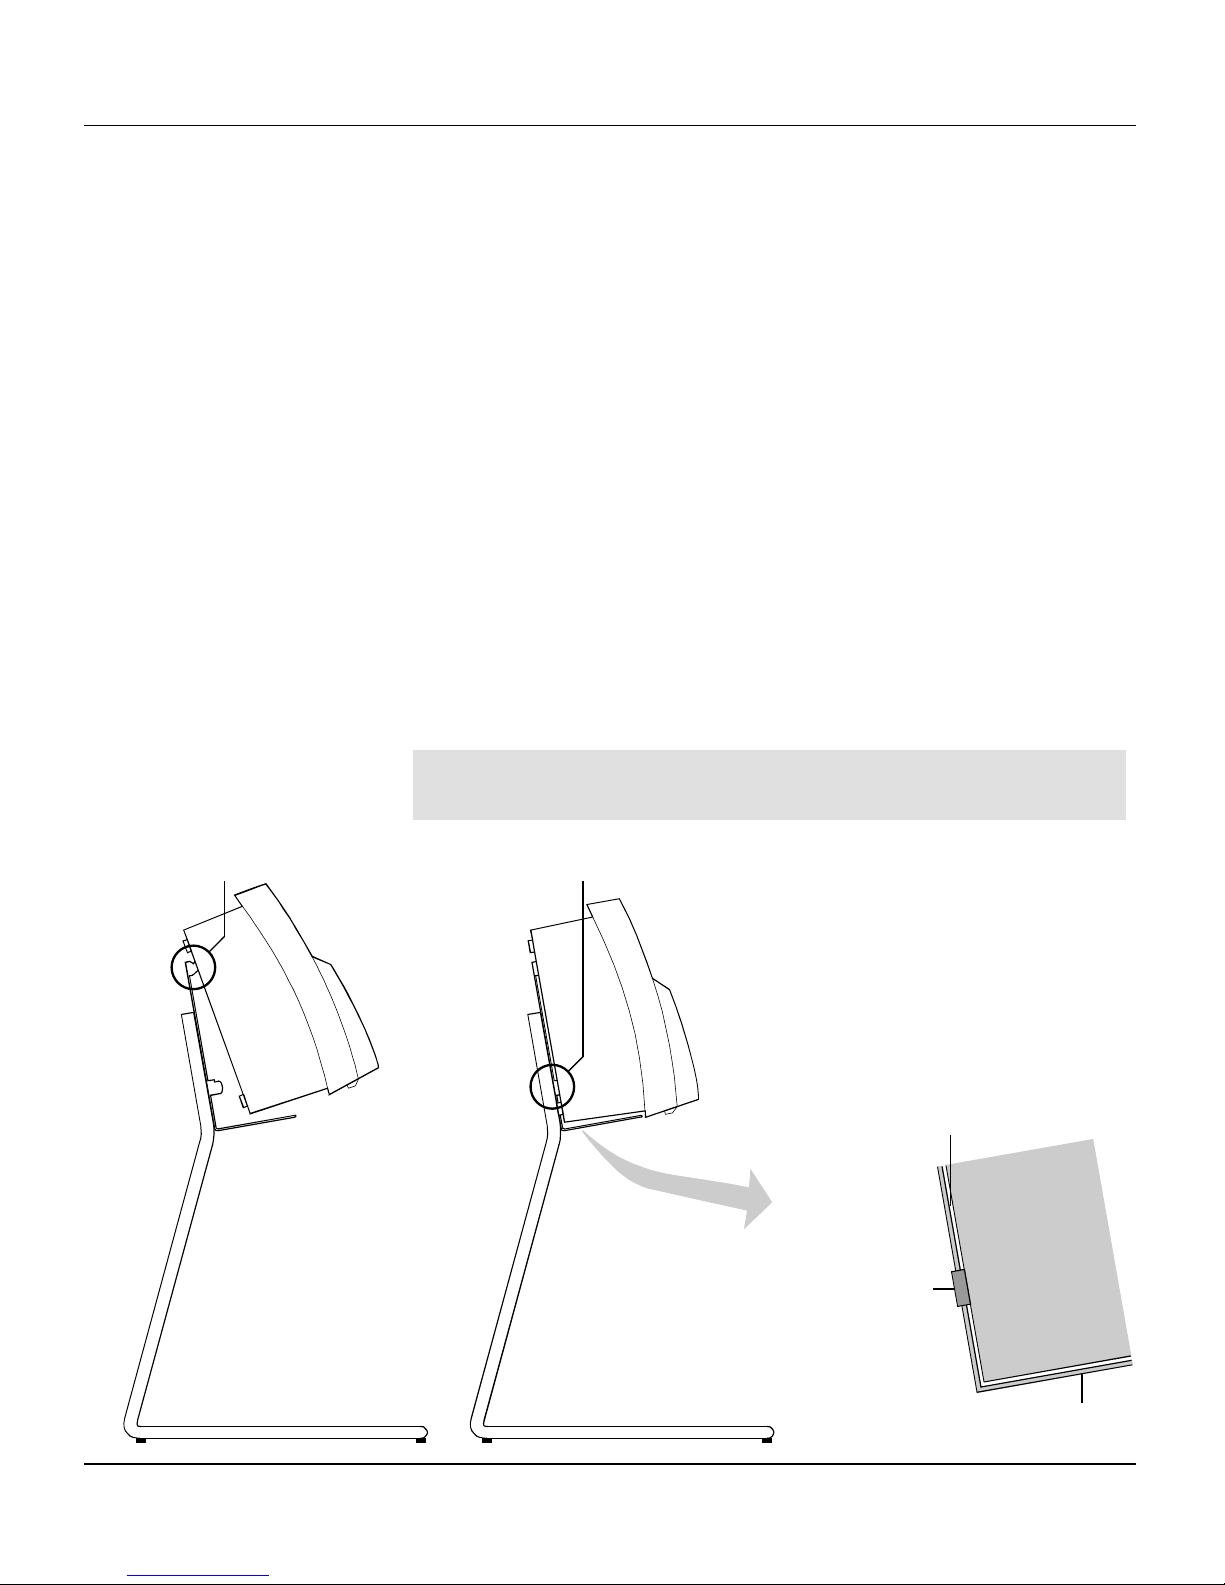
Table-top stand for the SIERRA™ plus film digitizer 1-21
VIDAR Film Digitizer Installation Guide
3. Mount the digitizer.
a. Locate the four mounting slots on the back of the digitizer. These
slots match the four tabs on the mounting bracket.
b. Position the digitizer so its front is facing you (VIDAR logo is
visible).
c. Grasp the digitizer by its sides.
d. Slide the digitizer’s upper mounting slots over the upper tabs on the
mounting bracket (as shown below left). Assure that the slots drop
into the notches in the tabs.
e. Rotate the bottom of the digitizer toward the mounting bracket, so the
bottom mounting slots slide over the bottom tabs on the mounting
bracket (as shown below center).
Note:
When the digitizer is properly mounted, its rear panel is
in full contact with the grounding tabs on the bracket.
Digitizer
Mounting bracket
Lower plastic foot should extend
slightly beyond mounting bracket
Back of digitizer should be
parallel to mounting bracket
Hook top slots over top tabs... then slide bottom slots over bottom tabs

Table-top stand for the SIERRA™ plus film digitizer 1-22
VIDAR Film Digitizer Installation Guide
4. Route and connect the power cable.
a. Locate the power supply. Identify the power cable
(permanently attached to the power supply) and
the power connector at its end.
WARNING:
Do not connect the AC power
cord at this time.
b. About 10 inches (25cm) from the end of the power
cable form a partial loop (see below left).
c. Insert the loop into the rectangular hole in the bottom of the mounting
bracket, and slide it into the cutouts toward the front (below, left, #1).
Note:
Make sure the power cable is clear of the rectangular
hole and doesn’t block the SCSI connector.
d. Plug the end of the power cable into the jack near the right end of the
mounting bracket (below, left, #2).
IMPORTANT:
Never force the power connector. If you have
difficulty attaching the power connector, assure that the
digitizer’s power jack is aligned with the mounting bracket hole.
To power supply
To power supply
For clarity, the digitizer and other details
have been omitted from these figures
To
SIERRA
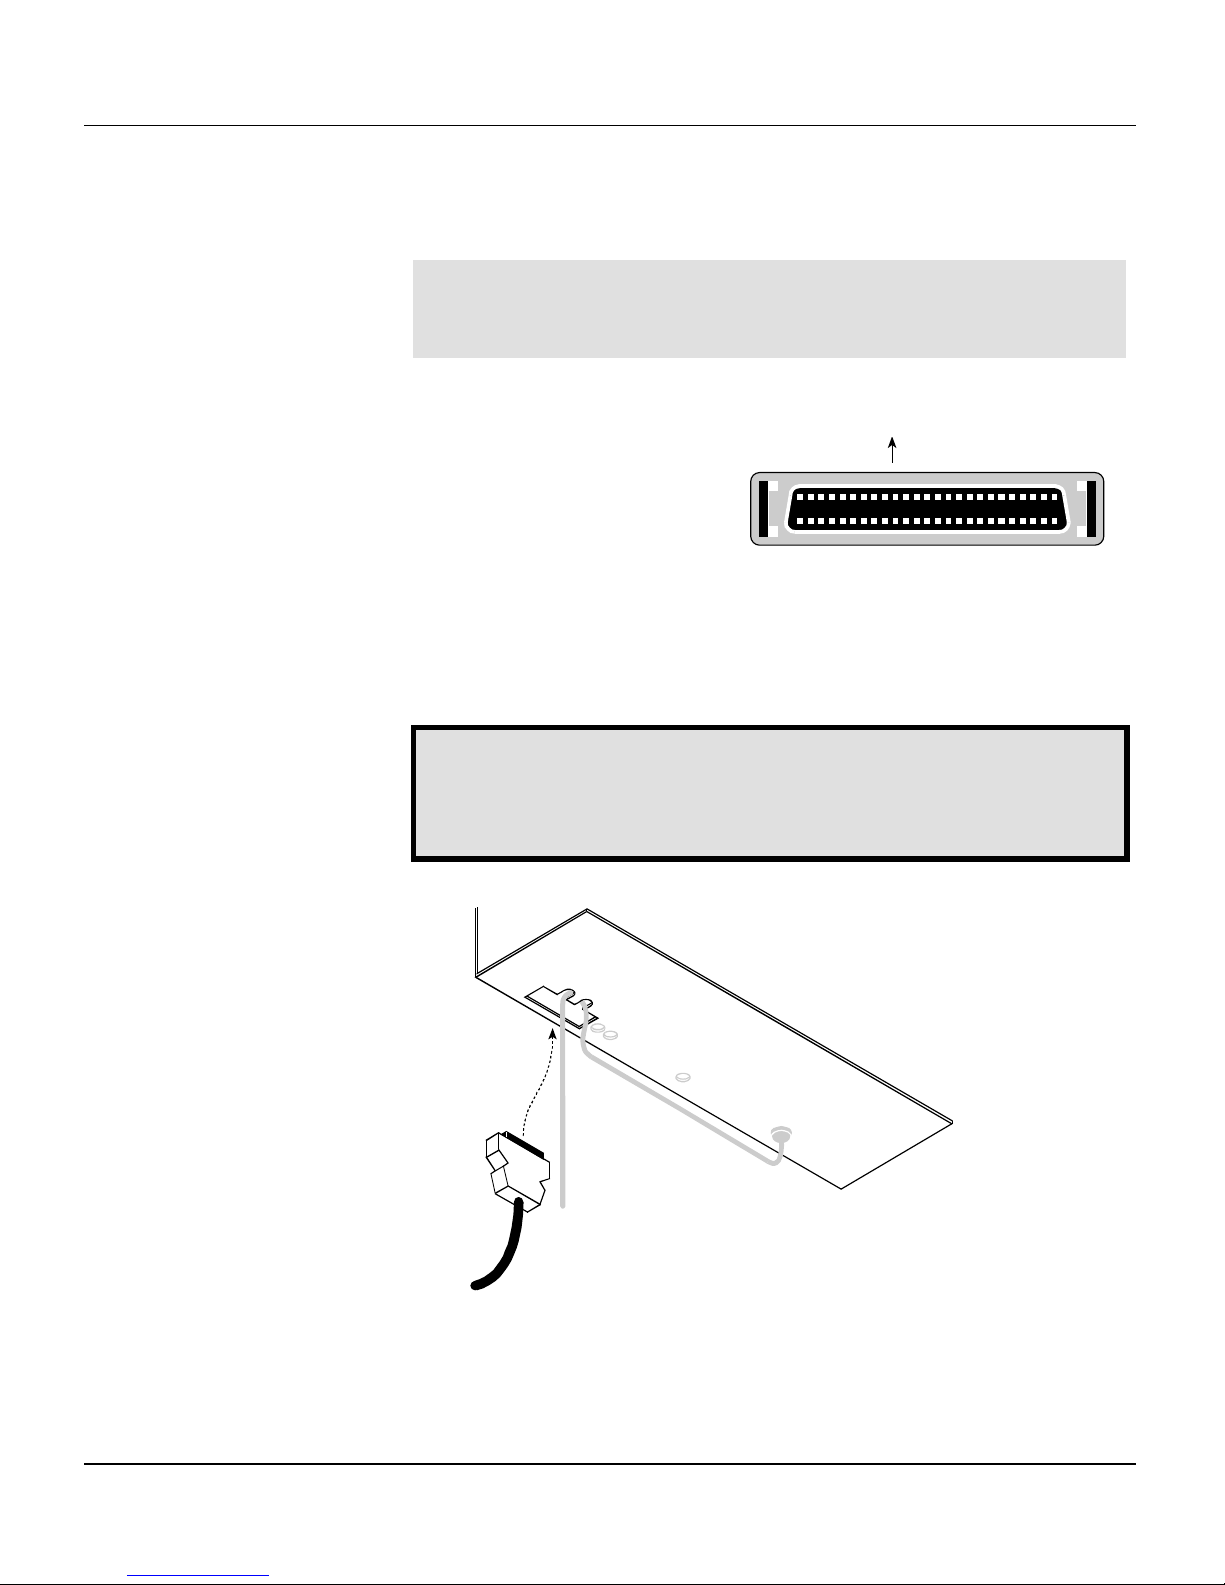
Table-top stand for the SIERRA™ plus film digitizer 1-23
VIDAR Film Digitizer Installation Guide
5. Connect the SCSI cable.
Note:
Before connecting the SCSI cable, be certain that the
SCSI cable isn’t connected to anything else and the digitizer
power supply is unplugged.
a. Locate the SCSI cable.
b. Orient the SCSI connector as
shown here.
c. Carefully attach the SCSI connector to the digitizer’s SCSI port
connector (located inside the rectangular hole in the mounting
bracket). Apply even pressure to avoid bending SCSI connector pins.
Do not force the connectors together.
WARNING:
If the SCSI connector has bent pins, it will damage
the SCSI port in the digitizer. Do not attempt to straighten bent
pins. Discard any SCSI cable with bent pins and replace it with
a new cable.
For clarity, the digitizer and other details
have been omitted from this figure
SCSI cable
and connector
Toward rear of digitizer
 Loading...