

Page 1

!!
!!!!!!
!!!!!!
9” Touchscreen Tablet
User Manual
Model: V9TAB16D
If you are experiencing a problem with the operation of this
Tablet – Do not return it to the retailer!
Your Touchscreen Tablet includes Free Technical Support by
Phone or Internet and we are glad to help you with any Problems.
For Technical Support by Internet, simply touch the Customer Help
icon on the lower right–side of the home screen to immediately be
directed to our Technical Support website. For Technical Support by
Phone, please call 855-850-3832, Monday to Saturday 10:00 AM to
7:00PM.
Page 2
!
2! WARNINGS
• To reduce the risk of fire or electric shock, do not expose this appliance to rain or moisture.
• To reduce the risk of electric shock, do not open the cabinet. No user serviceable parts are inside. Refer servicing to
qualified personnel.
• This product should not be exposed to excessive heat such as direct sunlight, fire, or other heat sources.
• Caution: Do not expose this appliance to dripping or splashing liquids. Do not put objects filled with liquid, such as
vases on or near the appliance.
THE LIGHTNING FLASH WITH
ARROWHEAD SYMBOL, WITHIN
AN EQUILATERAL TRIANGLE,
IS INTENDED TO ALERT THE
USER TO THE PRESENCE OF
NON-INSULATED "DANGEROUS
VOLTAGE" WITHIN THE
PRODUCT'S ENCLOSURE THAT
MAY BE OF SUFFICIENT
MAGNITUDE TO CONSTITUTE
A RISK OF ELECTRIC SHOCK
TO PERSONS.
CAUTION
DO NOT OPEN
WARNING: TO REDUCE THE
RISK OF ELECTRIC SHOCK, DO
NOT REMOVE THE FRONT OR
REAR COVER. NO USER
SERVICEABLE PARTS ARE
INSIDE. REFER SERVICING TO
QUALIFIED SERVICE
PERSONNEL.
THE EXCLAMATION POINT
WITHIN AN EQUILATERAL
TRIANGLE IS INTENDED TO
ALERT THE USER TO THE
PRESENCE OF IMPORTANT
OPERATING AND MAINTENANCE
(SERVICING) INSTRUCTIONS IN
THE LITERATURE
ACCOMPANYING THE
APPLIANCE.
FCC WARNINGS
WARNING: Changes or modifications to this unit not expressly approved in this manual could
void the user’s authority to operate the equipment.
NOTE: This equipment has been tested and found to comply with the limits for a Class B digital
device, pursuant to Part 15 of the FCC Rules. These limits are designed to provide reasonable
protection against harmful interference in a residential installation. This equipment generates,
uses, and can radiate radio frequency energy and, if not installed and used in accordance with
the instructions, may cause harmful interference to radio communications. However, there is no
guarantee that interference will not occur in a particular installation. If this equipment does cause
harmful interference to radio or television reception, which can be determined by turning the
equipment off and on, the user is encouraged to try to correct the interference by one or more of
the following measures:
• Reorient or relocate the receiving antenna.
• Increase the separation between the equipment and receiver.
• Connect the equipment into an outlet on a circuit different from that to which the receiver
is connected.
• Consult the dealer or an experienced radio/TV technician for help.
IMPORTANT SAFETY INSTRUCTIONS
1. Read these instructions.
2. Keep these instructions.
3. Heed all warnings.
4. Follow all instructions.
5. Do not use this apparatus near water.
6. Clean only with dry cloth.
7. Do not block any ventilation openings. Install in accordance with the manufacturer's
instructions.
8. Do not place near any heat sources such as radiators, heat registers, stoves, or other
apparatus (including amplifiers) that produce heat.
9. Do not defeat the safety purpose of the polarized or grounding-type plug. A polarized plug has
two blades with one wider than the other. A grounding type plug has two blades and a third
grounding prong. The wide blade and/or the third prong are provided for your safety. If the
provided plug does not fit into your outlet, consult an electrician for replacement of the
obsolete outlet.
10. Protect the POWER cord from being walked on or pinched particularly at plugs, convenience
receptacles, and the point where they exit from the apparatus.
11. Only use attachments/accessories specified by the manufacturer.
12. Unplug this apparatus during lightning storms or when unused for long periods of time.
13. Refer all servicing to qualified service personnel. Servicing is required when the apparatus has
been damaged in any way, such as POWER-supply cord or plug is damaged, liquid has been
spilled or objects have fallen into the apparatus, the apparatus has been exposed to rain or
moisture, does not operate normally, or has been dropped.
14. Do not use this device while operating a motor vehicle.
Page 3
!
3!
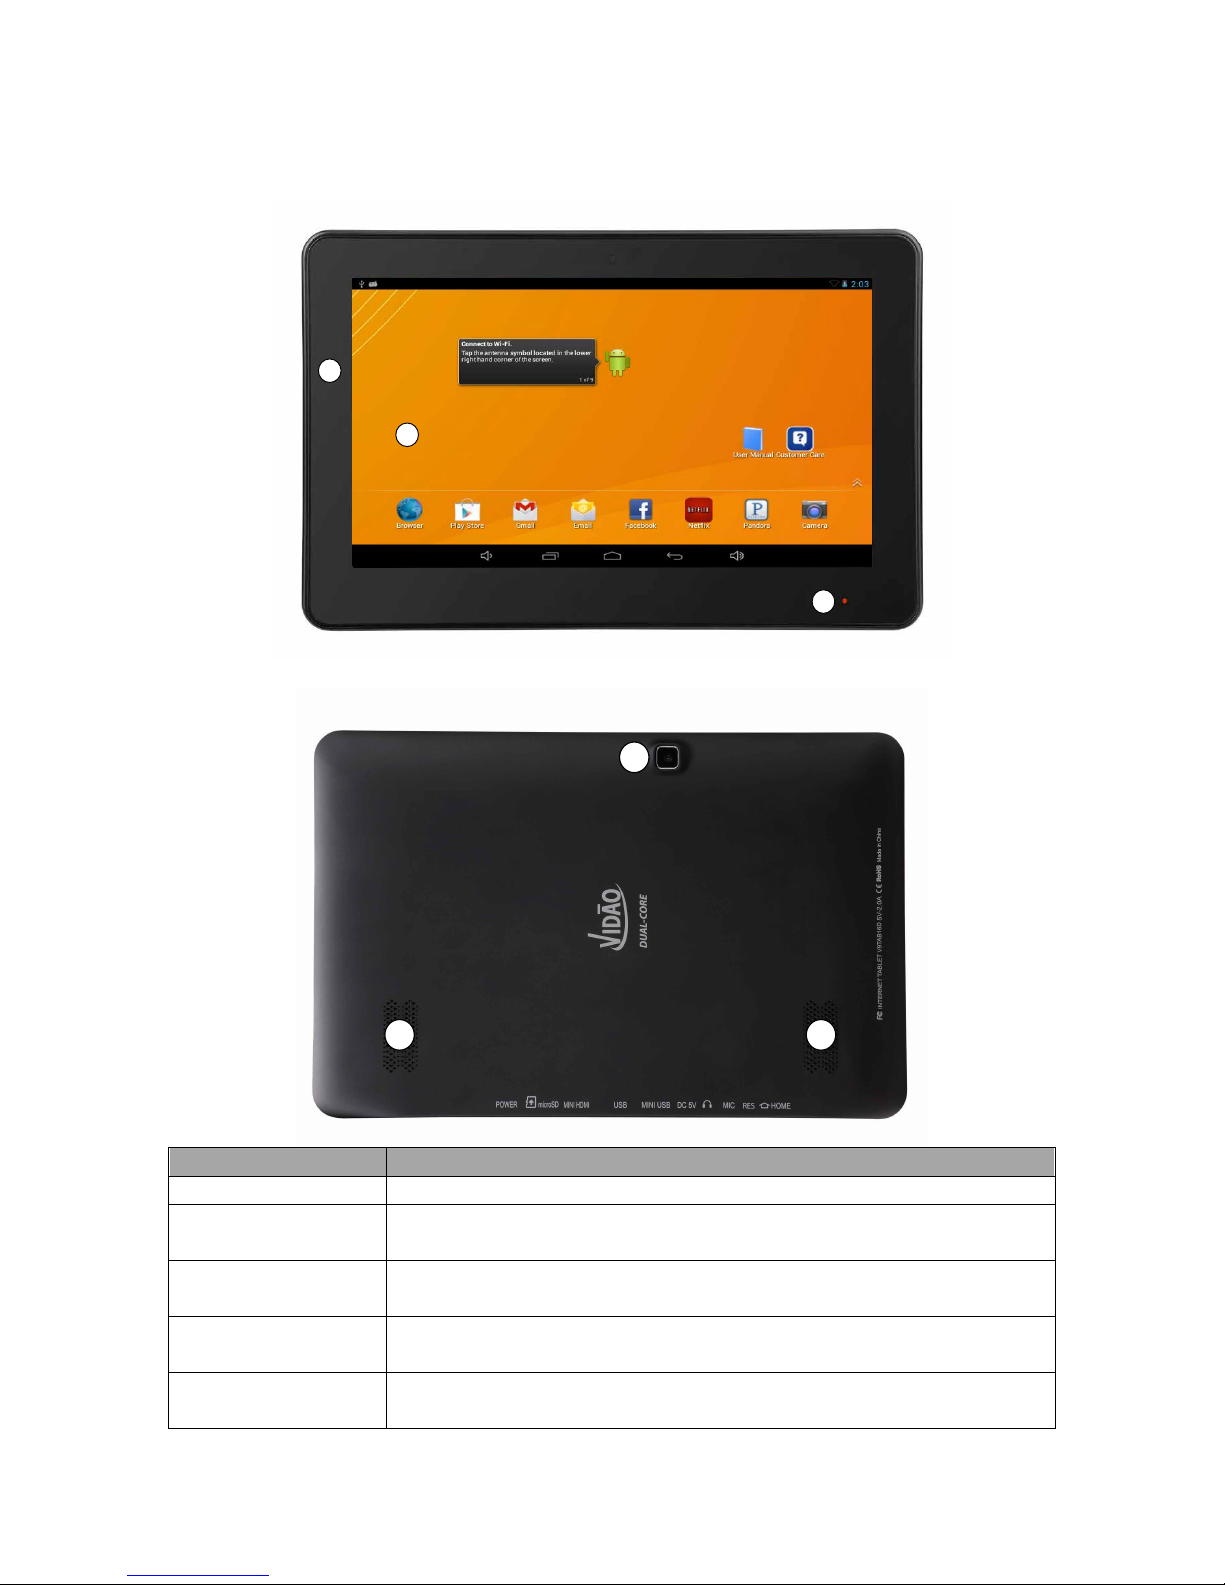
1. Getting to know your device
Front
3
1
2
Back
4 4
5
Part Name
Description
1. Touch Screen
Use a finger to control the system & application.
2. Front Camera
A built-in webcam allows you to capture still images, record
videos, chat online and capture panorama pictures.
3. Charge
Indicator
A Red indicator light will appear while the device is charging.
After the device has fully charged, the light will turn off.
4. Speakers
Produces sounds from music files, movies, games, system
notifications and more.
5. Rear Camera
A built-in 2 Megapixel camera to capture still images, record
videos, and capture panorama pictures.
Page 4
!
4!
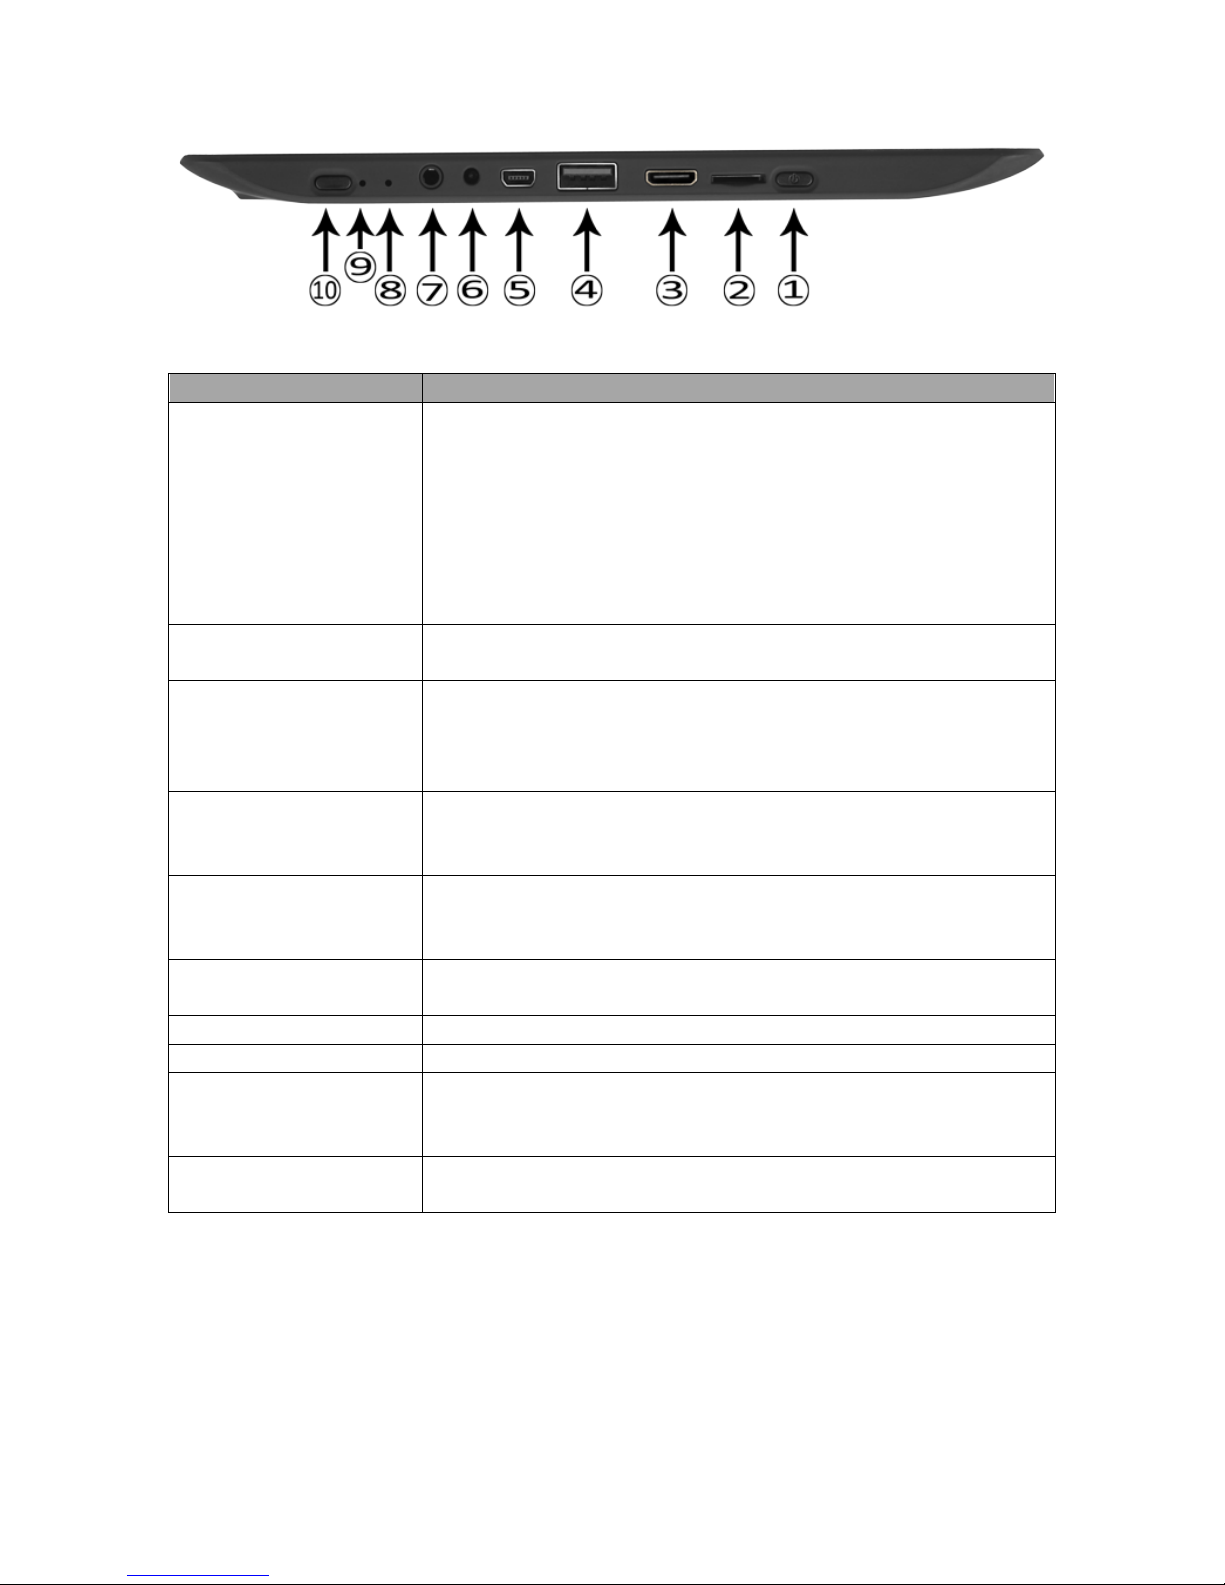
Ports and Buttons
Port & Button Name
Description
1. Power button
Press and hold the power button for 2-3 seconds to
power ON your device.
Press and hold the power button for > 3 seconds to turn
OFF the device.
Press and release the power button if you want to put the
tablet into a sleep mode.
If the tablet is in a sleep mode, press and release the
power button to wake the tablet from of sleep mode.
2. microSD® Card
Slot
Supports SDHC/SDXC cards up to 64 GB
3. Mini-HDMI port
A Mini HDMI to HDMI cable (Not included) connects to
video and audio devices, such as television, or any
compatible digital or audio component that uses a HDMI
connection.
4. USB port
Connects peripherals such as mice, digital cameras,
MP3 players and more that use a Full-size USB
connection.
5. Mini-USB port
Connects peripherals such as mice, digital cameras,
MP3 players, and more that use a Mini-USB connection.
Use to charge your tablet from a Computer
6. Power Jack
Connects AC power supply to power the device and
charge the battery.
7. Headphone Jack
For external headphone connection with a 3.5mm jack.
8. Microphone
Receives sounds and voice for recording.
9. Reset
When the system is not responding or is inoperative,
insert a thin, straight object (such as a paper clip) in the
manual reset hole to perform a soft reset on your device.
10. Home Button
Press to return to the Home screen. Press again to open
the Application Drawer.
1.1. Accessories
The carton contains:
• a 9" Dual–core Touchscreen Tablet
• a mini USB to USB cable,
• an AC to DC Power Adapter.
Upon opening the box, if anything is missing or damaged, immediately return
the tablet, all accessories, & packaging to the dealer.
Page 5

!
5!
1.2. microSD® Card
Your Tablet comes with 16GB of built-in memory for storage. You can add up
to an additional 64GB of storage space to your device by using a SDHC or
SDXC microSD card. Data can be saved to the built-in memory or to the
microSD card. In addition files can also be transferred to a microSD card from
your personal computer and then imported into your Tablet.
o To install the microSD card
o Insert the microSD card, making sure the gold contacts are
facing down.
o Push the microSD card in gently into the slot (2) until it locks
into place.
o To remove the microSD card
o Push in gently on the microSD card and it will pop out slightly
from the slot. Pull the card out of the slot. (2)
o Warning: Follow the instructions for safe removal of the
microSD card from the tablet. Improper removal of the microSD
card may cause data loss or unpredictable system issues. For
safe removal, tap > Settings > Storage >Unmount microSD
card.
1.3. Charging Battery
When you first receive your device the battery will only be partially charged.
To fully charge the battery, allow it to charge for 5 hours to ensure it’s fully
charged before using the tablet.
1. Connect one end of the AC adaptor to the power jack (6) of the device.
2. Plug the other end of the AC adaptor into a wall outlet to start charging.
3. The red LED on the front of the device will turn off when it is fully
charged.
Tips: To increase battery life
• Lower the screen brightness
• Reduce the time until the device enters the Sleep mode
• Turn off the Wi-Fi when an Internet connection is not required
• Close any applications when finished using them or they will
continually run in the background.
• Turn your device completely off when finished using.
1.4. Turning the Device ON or OFF
o To turn ON your device:
o Press and hold the Power button (1) for at least 2 seconds until an
image appears on the screen.
o To turn Off your device:
1. Press and hold the Power button (1) for at least 2 seconds
2. A pop-up window will appear, tap OK to confirm power shutdown or
tap CANCEL to return to the main screen.
Page 6
!
6!
o To put your device into the Sleep (Power Saving) mode:
o Press & release the Power (1) button. This will turn the display off
and put the tablet into a power saving Sleep mode.
o To wake your device from the Sleep mode, press & release the
Power button (1).
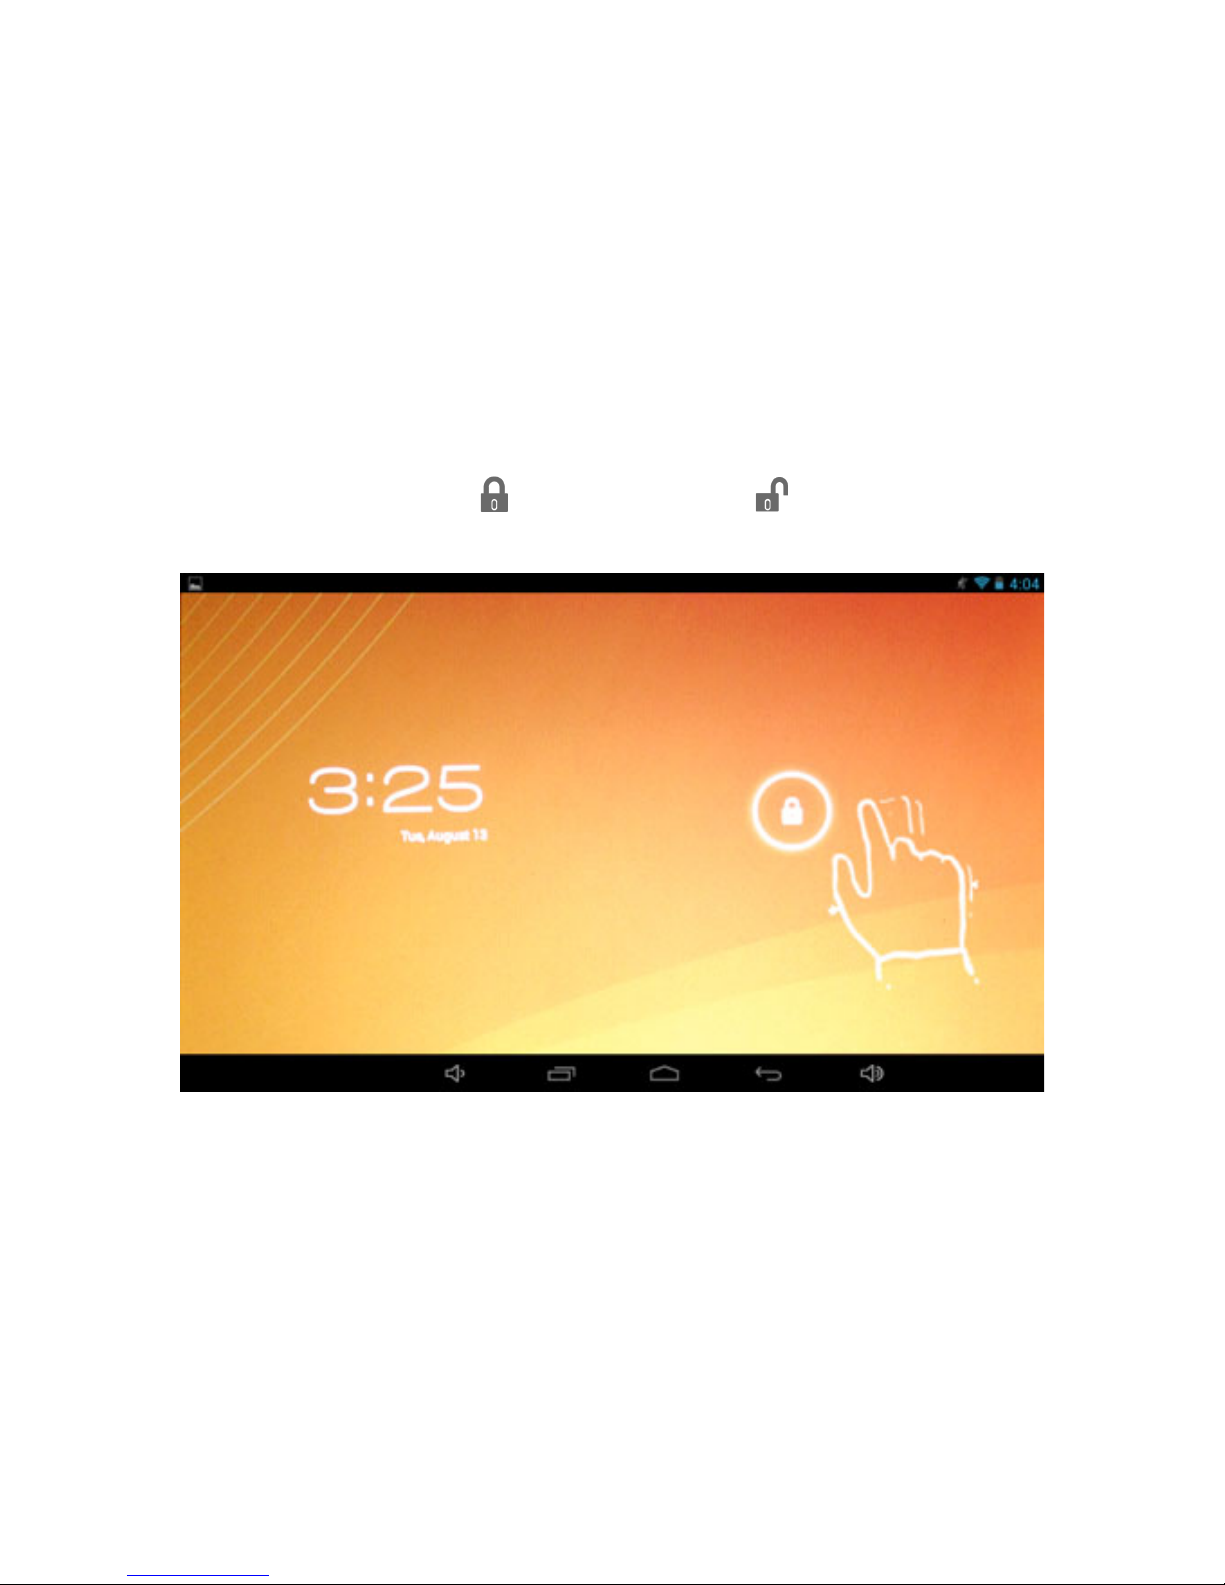
1.5. Unlocking the Screen
By default, the screen automatically locks after a period of inactivity. You can
set the length of time until the screen locks in the System Settings.
o To unlock the screen
1. Press the Power button to turn the tablet ON or to wake the tablet from
the Sleep mode.
2. Tap and hold the icon and slide it to the symbol on the right side
of the screen to unlock the device.
If you are having a problem with the operation of this Tablet – Do not return
it to the retailer!
Your Touchscreen Tablet includes Free Technical Support by Phone or
Internet and we are glad to help you with any problems.
For Technical Support by Internet, simply touch the Customer Help icon on the
lower right–side of the home screen to immediately be directed to our Technical
Support website. For Technical Support by Phone, please call 855-850-3832,
Monday to Saturday 10:00 AM to 7:00PM.
Page 7

!
7!
2. Setting up your device for the first time with the Guided Setup Process
Note: For proper setup, make sure you have access to a wireless network
and your device is fully charged.
Before attempting to setup your device, you will need the name and password
(if used) of your wireless network. Please have all of this information handy
before setting up your device.
Step 1 – Turn ON your Device
o Turn ON and unlock your device as described in the above
section
Step 2 - Language Selection
o Tap the Language list to scroll through the list of available
languages.
o Select the default language for your device by tapping it.
o Confirm your choice by tapping the Start icon.
! It may take a minute to set the language.
Step 3 – Set-up your WI-FI
! Note: A wireless (WI-FI) network connection is
required to complete many of the steps detailed in
the following pages of this manual. If you choose to
Skip the Set-up Your WI-FI step, you will not be able
to configure many of the Google services in the
Guided Setup Process, and you will be taken directly
to Step 9. You will also need to manually set your Time
Zone, Date, and Time before completing the Guided
Setup Process.
o A list of wireless networks your tablet is receiving will appear on
the screen.
o Select the name of your WI-FI network from the list by tapping
it.
o If your WI-FI network is password protected, you will need to
enter a password and a dialog box will appear for you to enter
your password.
o Tap the password line to make the tablet keyboard appear.
! Check the “Show Password” box if you want to view your
password instead of seeing, ******
! Passwords are case-sensitive and must be typed exactly
as they were created.
o After you type your password, tap the “Connect” icon
! Wait for the network to connect as this may take 15-20
seconds. When the device has successfully connected
to your WI-FI, the device automatically moves to the next
step.
Page 8

!
8!
! If you are having problems connecting to your WI-FI
network, contact our Customer Support Team.
Step 4 – Got Google?
A Google Account lets you organize and access your personal
information from any computer or mobile device:
• Never lose your contacts again. When you sign in to your device
with a Google account, all the contacts you associate with that
account in the People app are automatically backed up. As a
result, they're always accessible through your Gmail account from
any computer.
• Synchronize and back up everything. Whether you draft an email,
add a contact's phone number, add an event to your calendar,
work gets backed up continuously by Google and synchronized
with any computer where you use the same Google Account.
• Access from anywhere. Check your latest calendar, email, text
messages, or social stream, wherever you are, no matter what
computer or mobile device you're using.
• Use other Google services. Your Google Account also lets you take
full advantage of any other Google apps and services that you may
want to use, such as Gmail, Google Maps, Navigation, Google
Play, YouTube, Google Talk, Messaging, and many more.
Note: If you currently have an existing Gmail account, then you already
have a Google Account. Your full Gmail email address and password will
be used as the Sign In information for your Google Account.
If you do not already have a free Google account, it is strongly
recommended you set-up a free Google account when using the Setup
wizard on this device in order to get the optimum use from this tablet.
o Your device is designed to work with Google Mail (Gmail). If
you don’t have a free Google account it is recommended you
sign up for one.
o If you already have a Google account tap the “Yes” icon
o If you do not have a Google account tap the “No” icon and you
will be taken to the Make it Google screen.
Step 5 - Make it Google
o To create a free Google account, tap the “Get an Account” icon.
! On the next screen you will create a Username for your
Google account.
! Your Google account Username can also be used as a
new email address which will be
(YourUsername)@gmail.com
• Note: If you don’t want to use Google Mail (Gmail)
as your email provider, you can use a different
email account from almost any provider with this
Page 9

!
9!
tablet. This is explained fully in the E-mail section
of this manual.
o If you don’t want to create a Gmail account, tap the “Not Now”
icon.
o After you made your selection you will be taken to the Wi-Fi
setup.
If you are having a problem with the operation of this Tablet – Do not return
it to the retailer!
Your Touchscreen Tablet includes Free Technical Support by Phone or
Internet and we are glad to help you with any problems.
For Technical Support by Internet, simply touch the Customer Help icon on the
lower right–side of the home screen to immediately be directed to our Technical
Support website. For Technical Support by Phone, please call 855-850-3832,
Monday to Saturday 10:00 AM to 7:00PM.
Step 6- Sign in
o Type in your Gmail address and your password
o Tap the “NEXT” icon
o Note: a dialog box will appear asking you to agree to the
Google User License Agreement (ULA).
! Tap “Yes” to agree
! Tap “Cancel” to not agree and you will not be able to
access the Google email system, or other related
Google Apps.
Step 7 – Entertainment
You can quickly, easily, and securely purchase items from the Google
Play store by safely storing your credit card information with 128-bit
encryption in the Google Wallet System.
o Tap the “Setup Credit Card” icon to securely & safely enter your
credit card information.
! Please review Google’s Privacy Information by tapping
the icon before entering your personal information.
o Tap the “Not Now” icon if you do not wish to use the Google
Wallet feature, and move on to the next screen.
! Note: If you do not use Google Wallet you will need to
enter your complete credit card information every time
you wish to make a purchase from the Google Play
Store.
Page 10

!
10!
Step 8 – Backup and restore
You can easily and automatically backup your apps, settings, music,
photos, videos, books, website bookmarks, and other data to your Google
account.
o Check the options you would like to use. You can change them
in your Settings at anytime.
o When finished tap the “Right” arrow at the right hand bottom of
the screen to continue.
Step 9 – Use Google location
You can use the Google location services to use the location data from
your Wi-Fi network to help apps determine your approximate location
when it’s available. This location data is used to: provide driving
directions, find the nearest shops, restaurants, movie theaters, & more.
o Check the options you would like to use. You can change them
in your Settings at anytime.
o When finished tap the “Right” arrow at the bottom of the screen
to continue.
! If you skipped Step 3 (Set-up your WI-FI), you will arrive
at a screen where you will need to enter your Time &
Date settings. Tap the Time Zone, Date, and Time fields
to choose the correct settings. When finished tap the
“Right” arrow at the bottom of the screen to continue.
Step 10 – Setup Complete
Your tablet is now setup and ready to use.
o Tap the “Back” arrow to make additional changes.
o Tap the “Finish” arrow to start using your tablet.
If you are having a problem with the operation of this Tablet – Do not return
it to the retailer!
Your Touchscreen Tablet includes Free Technical Support by Phone or
Internet and we are glad to help you with any problems.
For Technical Support by Internet, simply touch the Customer Help icon on the
lower right–side of the home screen to immediately be directed to our Technical
Support website. For Technical Support by Phone, please call 855-850-3832,
Monday to Saturday 10:00 AM to 7:00PM.
Page 11

!
11!
1
2
3
4
5
6
7
8
9
10
3. Identifying the Home Screen
The Home Screen consists of 5 areas, which can be customized to include
different Apps and Widgets. The image above shows the layout of the Main
Screen of the tablet. This image is labeled with many of the items on the
Home Screen that are referred to throughout this manual.
Name
Descriptions
1. Home Screen
The Main screens for adding Apps and
Widgets. There are 5 pages to the Home
Screen which are reached by swiping the
screen left or right.
2. Widget
A Widget is an application that can be
placed on any of your home screens, for
quick and easy access.
3. Application Drawer Arrow
Swipe upward, or Tap to reveal all your
applications or apps
4. Favorites Bar
Apps that remain on your Home screen
5. Back Navigation Icon
Opens the previous screen you were
viewing.
6. Home Navigation Icon
Returns you to the main Home Screen
7. Recent Apps Navigation Icon
Opens a list of thumbnail images of apps
you’ve recently viewed and apps you
frequently use.
8. Battery Status Icon
Current percentage of battery charge
9. Wi-Fi Connection Status Icon
Strength of Wi-Fi signal
Swipe downward from the top right of the
screen (8 & 9) to show the Quick Settings
Page 12

!
12!
dropdown.
10. Notification Area
An area, which displays new notifications
such as when a new e-mail, arrives.
Swipe downward from the top left of the
screen to open the notification dropdown.
4. Quick Settings
The Quick Settings dropdown allows you to adjust or change your device
settings quickly right from your home screen by swiping the Quick Settings
icons (8 & 9) in a downward motion.
You can adjust the following items:
o Brightness – Drag left or right to increase or decrease screen brightness
o Settings – Tap to access the full Settings App
o Smart Wi-Fi Connect – Tap to turn your Wi-Fi On or Off right from your
Home Screen
o Auto Rotate – Tap to stop screen from rotating when turned
o Battery – Displays the percentage of the remaining battery power
o Airplane Mode – Tap to turn On or Off
5. Common gestures:
o Tap - To select or activate something, lightly touch and release the
selection.
o Type - To type something, such as a name, password, or address, just
touch the field where you want to type in and a keyboard will pop up to let
you type into the field.
o Touch & hold - Touch & hold. Touch an item and do not lift your finger
until an action occurs.
Page 13

!
13!
o Drag - Touch & hold an item for a moment and then, without lifting your
finger, move your finger on the screen until the item reaches the target
position.
o Swipe or slide - Quickly move your finger across the surface of the
screen, without pausing after touching (so you don’t drag something
instead). For example, to slide the Home screen left or right to view the 4
alternative screens, just touch the home screen and move your finger left
or right to rotate through the different screens.
o Double-tap – Quickly Tap twice on a webpage, map, or other screen to
zoom. For example, double-tap a picture in Chrome to zoom in, and
double-tap again to zoom out.
o Pinch - In some apps (such as Maps, Chrome, and Gallery), you can
zoom in and out by placing two fingers on the screen at once and pinching
them together (to zoom out) or spreading them apart (to zoom in).
o Rotate the screen - The screen image of most applications will rotate with
your device as you turn it. Some apps may only display the screen image
in one mode and not allow rotating.
6. Using Applications
6.1. Browsing the World Wide Web on your device
Your device comes with two web browsers. A basic web browser app called,
“Browser” and Google’s own web browser called “Chrome.“
Note: Make sure the device is connected to a Wi-Fi network
1. Open either Browser or Chrome by tapping on the app’s icon. Note:
You can find the apps either on the Favorites Bar or in the App Drawer.
Open the App Drawer by tapping the Application Drawer Arrow (3)
2. To visit a website touch the web Address box to access the keyboard
and type the address of the website. You can also search for websites
using search words or phrases. After you have typed in your website
address or search word(s), tap the “Go” button on the keyboard.
3. You can scroll through the web page by dragging your finger up and
down on the touchscreen to move the web page.
4. If the web page is too large to fully fit on your tablet screen, you can
pan up, down, left, or right by dragging your finger on the touch screen
just like scrolling.
5. To Zoom IN you can pinch the touchscreen by touching and holding
two fingers on the screen and pinching the fingers toward each other.
To Zoom OUT touch and hold two fingers on the screen and move
your fingers away from each other.
6. To reload a webpage, tap the Refresh Icon on the left of the
Address box. When a webpage is loading from the Internet, an “X”
icon will replace the Refresh Icon. Tap the “X” and the page will stop
loading.
7. To “bookmark” a favorite page, tap the Favorite icon to right of the
favorite bar. The “Add Bookmark” window will appear and you can edit
Page 14

!
14!
the bookmark name if you’d like to make it shorter, or to use an easier
name to remember. When finished, tap the Save or OK button.
8. Setting a home web page
The home page is the first website you see when you start a web
browser app.
1. Browse to the page you want to set as your home page.
2. Touch the Menu icon.
3. Choose “Settings” and the Settings screen will appear.
4. Choose the “General” category.
5. Choose “Set Home Page” and the Set Home Page menu will
appear.
6. Touch the “Current Page” button and your home website is now
set.
Note: Many places you visit on the web can be accessed directly using
specific apps. Facebook, Gmail, Twitter, YouTube, and other popular web
destinations have apps that you may find already installed on your tablet or
are otherwise available from the Google Play Store.
6.2. Google Play
With hundreds of thousands of apps, the Google Play store has the right ones
for you. When you download apps, they are delivered directly to your device.
You can also find your next book, a hot new song, or a great movie from a
catalog that includes everything from movie blockbusters and best selling ebooks to millions of songs.
6.3. E-Mail
Your device comes with two e-mail readers. A basic E-Mail app called “Email”
and Google’s own E-Mail called “Gmail.“
To get the best experience using this device, we recommend creating a free
Gmail account and using Gmail for your e-mail.
6.4. Setting up a Non Gmail Email account
The Email app is used to access web-based e-mail, or webmail, from Yahoo!
Mail, Windows Live, and others. It also lets you read e-mail provided by your
Internet Service Provider (ISP) and even your work E-mail if allowed.
Note: Before you setup your E-Mail account you will need several key pieces
of information. If you are setting up email from your work, you may need to
contact your IT department to see if there are additional instructions or
requirements you will need to follow as E-Mail settings and security will vary
from company to company.
1. The Email app is located in the Apps Drawer. You may also find
shortcuts to the apps on the Home screen or Favorite Bar.
2. Start the Email app by tapping on it.
3. The E-Mail Account Setup screen will appear.
4. Type the e-mail address you would like to setup on this device.
Page 15

!
15!
5. Type your password for this account.
6. Touch the Next button.
7. Select Account Type
• You will need to know if your e-mail account is a Pop3, IMAP, or
Microsoft Exchange.
• Select the correct account type and follow the onscreen
instructions to finish setting up your e-mail account.
• Changing the Inbox Checking Frequency setting to something
longer than 15 minutes will save battery life.
After tapping “Next” you will be taken to your E-Mail account inbox. Your
tablet synchronizes any pending e-mail you have in your account. Depending
on how much e-mail you have, it may take a few minutes to synchronize all
your mail.
6.5. Adding more e-mail accounts
The Email app can be configured to have multiple accounts. (E.g. Personal,
Work) Follow these steps to add an additional E-Mail account:
1. Start the E-mail app.
2. Choose Add Account from the Setting icon
3. Follow the steps 4-7 from the previous section to setup the additional
E-Mail accounts.
6.6. Adding music, photos and video on to your device via a USB drive
or microSD Card
1. Copy the files you would like to transfer to a USB or microSD card.
These files can be photos, music files and video files.
Note: Your device can’t display every type of media files but it will
display the most popular formats. Please check the Technical
Specifications section to make sure the file format is supported.
2. Insert the USB or microSD card into either the USB port or the
microSD slot on the bottom of the device.
3. Open the Gallery or FileManager app to view, play, delete or copy files
to your device.
4. Un-mount the USB drive or microSD card before removing it from your
device. For safe removal, tap > Settings > Storage >Unmount
Storage. You are now safe to remove your USB drive or microSD card.
6.7. Adding music, photos and video to your device from a Windows PC
1. Connect your device to your PC using the included USB cable.
2. Once you have connected the device to your PC, an AutoPlay dialog
box will appear on the PC prompting you to choose how to add items
to your device from the Windows storage system.
3. The simplest way to move files is to select “Open device to view files.”
4. Your device will show up on the PC as a mounted drive icon.
Page 16

!
16!
5. Double click the mounted drive icon and simply drag and drop the files
you would like to copy from your PC, to the appropriate folder on your
Tablet. (E.g. Photos, Music, Movies, etc.)
6. After the files have completed copying to your device, you can unmount your device from your PC and disconnect the USB cord.
Note: You can also copy files from your device to your PC following
the same steps.
6.8. Transferring files using a Mac OS
1. Connect your device to your computer with the included USB cable.
2. Swipe downward on the Notification Area (10) and tap on the “USB
Connected” notification.
3. You will arrive at the “USB Connected” screen. Tap the “Turn on USB
storage” icon on the bottom of the screen
4. After your device is connected your touchscreen will change to “USB
storage in use”
5. Your device will now appear just like a USB thumb drive on your Mac
OS
6. Open the device in Finder just like any other USB device. Drag and
drop files to or from your device.
7. After the files have completed copying to your device, you can unmount your device from your Mac by tapping the “Turn off USB
storage” icon. Eject the drive from your Mac OS Device list and then
disconnect the USB cord.
6.9. Viewing your music, photos and video files on your device
1. Use the Gallery app to view your photo or video files
2. Open the Gallery app in the Application Drawer by tapping on it.
3. You will see your files are automatically organized into picture or
movies folders.
4. To view a photo or video just tap on the item you wish to view.
5. If you have more than one picture or video you can slide right and left
with your finger on the touchscreen to view them all.
6. To view a video, tap the “Play” icon. To pause a video, tap the video
again.
7. To delete or edit a photo or video simply tap the photo, and then tap
the setting icon that will appear in the upper right corner.
8. A series of editing features will appear. Choose the one you would like
to perform.
If you are having a problem with the operation of this Tablet – Do not return
it to the retailer!
Your Touchscreen Tablet includes Free Technical Support by Phone or
Internet and we are glad to help you with any problems.
For Technical Support by Internet, simply touch the Customer Help icon on the
Page 17

!
17!
lower right–side of the home screen to immediately be directed to our Technical
Support website. For Technical Support by Phone, please call 855-850-3832,
Monday to Saturday 10:00 AM to 7:00PM.
7. Using Your Device
7.1. Apps
Short for "Applications." Apps are the programs you can download to your
device from the Google Play Store. Apps can either be free, or for sale.
• To launch an App
o To start an app simply tap it to open the item or launch it.
• Application Drawer
o The Application or App Drawer is where all your applications
are stored. It acts like a garage door and swings up to show
you all your stored apps. You can access it two ways:
1. Swipe upward or tap the Application drawer arrow (3) at
the bottom right side of your screen to open the
Application drawer.
2. Or double tap the Home Navigation Icon (6) on the
bottom of your screen. This will bring you back to the
Home Screen and open the App Drawer.
• To move an App from your App drawer to your Home Screen
o Open the Application drawer
o Tap and hold down the App icon you would like to move.
o The App icon will appear to float. Continue to hold down the
icon and drag it up to the home screen.
Page 18

!
18!
o Once you have selected the spot you would like to have the
App sit on your Home Screen simply let go.
• To move an app on the Home Screen
o Tap and hold down the App icon you would like to move.
o The App icon will appear to float. A grid will appear on the
Home Screen.
o Continue to hold down the icon and drag it where you would
like it on your Home Screen.
o Once you have selected the spot simply let go.
• To Close an App that is running in the background
Apps running in the background slow down your device and drain
your battery life. To properly close your apps follow these steps:
1. Open the recent apps menu on your navigation bar
2. Find the app you wish to close and swipe it vertically off the
screen. This method will close most apps but some will still run
in the background in some capacity.
3. To make sure the app is completely closed you can open the
Settings App on your device.
4. Click on the “Apps” settings
5. Make sure you are viewing the “Running” apps by swiping the
screen until “Running” is shown at the top of the screen.
6. Tap the app you would like to close
7. Tap the “Stop” icon.
• To delete an App
o Tap and hold down the App icon you would like to delete.
o The App icon will appear to float.
o A trashcan will appear in the bottom right hand corner of
your Home Screen.
o Drag the App to the trashcan. The trashcan will turn red.
Release your finger to delete the App.
Page 19

!
19!
7.2. Widgets
A Widget is a view of an application that can be placed on your home
screen, for quick and easy access. The news and weather apps on your
device are examples of widgets. Other popular widgets you can install or
download are Facebook and Twitter. These Widgets will update in real
time showing your friend’s most recent posts or tweets.
• Adding Widgets
o Tap and hold your finger on the Home Screen. Make sure you
are not touching an App or another Widget.
o A dialog box will appear entitled “Add to Home Screen.”
o Tap the Widgets icon
o A dialog box will appear entitled “Choose Widgets”
o Tap the new widget you would like on your screen
o The new Widget will appear on the screen you are on.
• Adjusting the size of a Widget
o After you placed a new widget on your screen a blue line with
small blue blocks will surround the Widget.
o You can increase or decrease the size of the Widget by holding
your finger down on one of the blue blocks and dragging.
o When you have the Widget the size you want, just tap the
Widget to finish.
• To move a Widget on Home Screen
o Tap and hold down the Widget you would like to move.
o The Widget will appear to float. A grid will appear on the Home
Screen.
o Continue to hold down the Widget and drag it where you would
like it on your screen.
Page 20

!
20!
o You can drag it to another screen by moving the widget to the
left or right side of the screen. Hold and wait until it moves to
the next screen.
o Once you have selected the spot you would like to have the
Widget sit on your screen simply let go.
• Removing Widgets
o Tap and hold down the Widget you would like to delete.
o The Widget will appear to float. A trashcan will appear in the
bottom right hand corner of your Home Screen.
o Drag the Widget to the trashcan. The Widget and Trashcan will
turn red. Release your finger to delete the Widget.
7.3. Favorite Bar
• Customizing Favorite Bar
o You can customize your Favorite Bar so all your favorite Apps
are just a tap away.
• To move an App to your Favorite Bar
o Open the Application Drawer
o Tap and hold down the App icon you would like to move until it
appears to float.
o Continue to hold down the icon and drag it to the Favorite Bar.
! Note: You can only have 8 apps in your Favorite Bar.
• If you try to add too many Apps on the Favorite
Bar the last app on the bar will move back to the
Application Drawer.
o Once you have selected where you want it to be on the
Favorite Bar simply let go.
Page 21

!
21!
• To move an App off your Favorite Bar
o Tap and hold down the App icon you would like to move until it
appears to float.
o An arrow will appear in the bottom right hand corner of
your Home Screen.
o Drag the App to the arrow. The arrow will turn green. Release
your finger and the App will return to the App Drawer.
7.4. Setting Wallpaper
• To change the wallpaper on your Home Screen
o Tap and hold your finger on the Home Screen. Make sure you
are not touching an App or another Widget.
o A dialog box will appear entitled “Add to Home Screen.”
o Tap the Wallpapers icon
o A dialog box will appear entitled “Select wallpaper from”
o Tap the different type of wallpapers from the different styles
presented.
o Select the wallpaper you would like and tap the “Set wallpaper”
button to confirm your choice.
7.5. Display Rotation
• By default your screen will automatically rotate if you turn your device.
• If you do not like this functionality you can turn it off in the Quick
Settings or in the full Settings App.
• Go to Settings > Accessibility > Auto-rotate screen.
• Uncheck the box to have the screen stop from automatically rotating
when you change the tablet’s orientation.
8. Using your Camera
The Camera app is a combination camera and camcorder. You can view
photos and videos you take with the Camera in the Gallery app. To take
pictures and videos, first touch the Camera app icon located in the
Application Drawer.
• Switching cameras
o Your device comes with a rear and front facing camera
o To switch between cameras, tap the circle in the top right hand
corner of the screen
o Tap the to switch between the front and rear cameras.
Page 22

!
22!
• Taking Still Images
o Touch the camera icon
o A list of available cameras will be displayed:
Panorama camera, Video camera and Still Camera
o Tap the third icon to select the Still Camera
o Point the camera lens at the object to be photographed until the
object appears on the screen.
o To take a photo, tap the blue circle on the right side of the
screen.
• Taking a Panorama Photo
The Camera app can be used to take a panorama photo, automatically
stitching multiple images together while you pan the camera across a scene.
o Tap the camera icon
o A list of available cameras will be displayed:
Panorama camera, Video camera and Still Camera
o Tap the first icon to select the Panorama camera
o Holding the tablet horizontally, frame the image on either the
left or the right side of where you want the panorama photo to
begin.
o Tap the blue circle on the right side of the screen, and slowly
move the tablet horizontally to the right or to the left, keeping
the tablet level.
o A blue progress bar appears at the bottom of the screen,
showing how much of the panorama has been recorded. The
camera notifies you if you are moving too quickly.
NOTE: For best results, hold the tablet with both hands, keep it as level as
possible, and move the tablet very slowly. When the panorama is finished
recording, wait a moment for the image to be processed and saved.
• Recording videos
The Camera app can also be used to take videos.
o Tap the camera icon
o A list of available cameras will be displayed:
Panorama camera, Video camera and Still Camera
Page 23

!
23!
o Tap the second icon to select the video camera
o Once you have pointed the camera lens at the object you would
like to record, tap the red circle on the right side of the screen
to begin recording.
NOTE: While recording a video, you can take photos by
tapping the screen. The screen is momentarily outlined in
red when the photo is taken. The video recording is not
interrupted.
o Tap the red circle with a white square located on the right side
of the screen to stop the recording.
• Viewing your photos and videos in the Gallery app
o When you take a picture or record a video on your tablet, the
file is saved in the Gallery app.
9. Viewing Photos and Video on your TV
The Mini HDMI Port on your device allows you to output your photos, video and
even games through a HDMI cable (Not included) to your TV, or any video or
audio device that supports a HDMI connection.
o Connect a HDMI cable to your device
o Connect the other end of the HDMI cable to your TV
o Turn on your TV and switch the TV to your HDMI input
o Turn on and unlock your device
o Your device screen will now be displayed on the TV, so any
photos or videos on your device’s screen will also appear on
your TV
10. Firmware Update
• This tablet is capable of receiving over the air updates. These
updates can be Android operating system updates, user interface
improvements, and product upgrade offers.
• Your purchase includes a limited number of operating system updates
and user interface updates through December 31, 2014.
• You will continue to receive available update notifications beyond
December 31, 2014 but the updates will not be free of charge.
NOTE: Not all Android operating system updates may be compatible with
your specific device. You will only receive notifications with the updates that
are workable with your tablet.
!
!
!
!
!
!
Page 24

!
24!
11. Troubleshooting
• No Power
o Make sure the device is properly charged (Section 1.3)
• Screen is Frozen/Not Responding
o Restart the device by turning the Power OFF and then ON
again.
! If the device will not respond to the Power button, insert
a thin, straight object (such as a paper clip) in the
manual reset hole to perform a soft reset on your device.
• Tablet is Slow
o Close any unused Apps that may be running in the background
(Section 7.1)
• Music/Movie file will not play
o Make sure the file format you are attempting to play is shown in
the Compatible Audio/Video Format list in the Technical
Specifications section of the manual (Section 13)
• Tablet storage is full
o Add more storage by inserting a microSD card (Section 1.2)
o Transfer or Delete unused files using the FileManager App
(Section 4)
• Wi-Fi reception is poor
o Make sure you are not too far from the Wi-Fi router/hotspot. We
recommend a distance between 0 – 65 Feet.
o Restart your Wi-Fi router.
• Backup & Reset
o Do not enable Factory Data Reset unless you have spoken to a
customer support person first. Doing so could result in losing all
your data stored on your device.
12. Customer Support
If you are having a problem with the operation of this Tablet – Do not return it to
the retailer!
Your Touchscreen Tablet includes Free Technical Support by Phone or Internet
and we are glad to help you with any problems.
For Technical Support by Internet, simply touch the Customer Help icon on the lower
right–side of the home screen to immediately be directed to our Technical Support
website. For Technical Support by Phone, please call 855-850-3832, Monday to
Saturday 10:00 AM to 7:00PM.
!
!
!
!
!
!
!
!
Page 25

!
25!!!"##$%&'("%)*)+,'
!
• This! product! uses! a! rechargeable! Lithium>Ion! battery.! ! Only! us e! the! supplied! battery! and!
charger!for!this!device.!!Use!of!a!battery!or!charger!that!is!not!m ade! for!this!de vice!can! result!in!
serious!injury!and/or!damage!to!the!product.!
• This! device! must! be!disposed! of!properly,! according! to! local!laws! and!regulations.! !Contact!
your!local!authorities!to!learn!about!the!correct !recy clin g!a nd !d ispo sa l!op tion s.!
!
-./ #01234156',7014841594:3;''
,1<003'
9.0!(inches)!
(800x480)!
Capacitive!touch!screen,!5!point!
touch!
!5990<=' '
Lithium>ion!polymer!battery!(3.7V!
4500mAh)!
Standby!Time:!~100!hours!
Play!video!Time:!~!3!hours!
>5?0<5!
2!Mega!Pixel!Rear!Facing!camera!
0.3!Mega!Pixel!Front!Facing!camera!
Video!
Panorama!!
@0?:<='
16!GB!
!
>AB'
Allwinner!A20!Cortex!A7!at!1.1GHz,
512KB!L2!Cache,!GPU!Mali400,HD!
Video!Decoding!
+AB'
Mali400!
%"@'
1!GB!
(4CD4' '
802.11!b/g/n!
%0?:E5F60';9:<5G0'
microSD!Card!max!64!GB!SDHC>SDXC!
>:330194E49='B,!'
@434'B,!'
"HI4:'J'205I72:30'K51L'
MN@*!
USB!2.0!
USB!2.0!
3.5mm!!
"3I<:4I'O,'P0<;4:3' '
Android!4.2!(Jellybean)'
>O@A"#"!*Q*#&'D*Q$'#&A$,!
'
P4I0:'D:<?59'
MEPG!1/2/4,H.263/H.264,!RMVB,!
WMV/VC>1,!MVC,!AVS,!MJPEG.!(UP!
TO!2160P)!
!
"HI4:'D:<?59'
MP3,!WMA,!WAV,OGG,!FLAC,!ALAC,!
APE,!AAC,!AC>3!
!
Page 26

!
26!
'
LIMITED ONE-YEAR WARRANTY
We warrant this product to be free from defects in material and workmanship under normal use
for a one-year period from the original date of purchase from an authorized VIDAO dealer.
We will repair or replace the unit free of charge should it become defective under this warranty,
providing you, the original purchaser, have your original dated sales receipt.
To obtain warranty service or replacement within the one-year warranty period, please return the
product with all parts and accessories along with your original dated store receipt to the original
place of purchase and the unit will be exchanged at no charge. It is not necessary to contact the
manufacturer for warranty replacement.
Our Customer Support Center is available Monday - Saturday (10:00AM to 7:00PM EST) for
technical assistance or troubleshooting. To contact us, please call 1-855-850-3832.
This warranty applies only under conditions of normal use.
This warranty does not cover any product which has been subject to damage due to an act of
nature, misuse, neglect, accident, abuse, commercial use, or modification of, or to, any part of the
product, including rooting the operating system and other software. Damage to any external
media such as SD, microSD, USB devices, and/or other memory devices, or loss of data are not
covered nor is the cost incurred in shipping the unit for warranty repair or exchange. Under no
circumstances shall VIDAO be liable for any loss (direct, indirect, incidental, foreseen,
unforeseen, special or consequential) or for any damage arising out of, or in connection with, the
use of this product.
VIDAO makes no guarantee, express or implied, as to the capability, performance, or quality of
any third-party software or equipment used with this product.
UNDER NO CIRCUMSTANCES WILL VIDAO BE LIABLE FOR ANY INCIDENTAL OR
CONSEQUENTIAL DAMAGES.
This warranty does not cover re-manufactured, refurbished, or repaired units, or any products
sold 'As Is'.
This warranty is valid only to the original purchaser of the Product in the United States and
Canada and grants specific legal rights.
© Schoenfeld International Inc.
PN V9TAB16D Version 1.0 August 2013
Page 27

!
27!
!
 Loading...