

Page 1

!!
7”!HD!Touchscreen!Tablet!
With!Bluetooth
User Manual!
Model: V7TAB16BT
If you are experiencing a problem with the operation of this
Tablet – Do not return it to the retailer!
Your Touchscreen Tablet includes Free Technical Support by
Phone or Internet and we are glad to help you with any Problems.
For Technical Support by Internet, simply touch the Customer Help
icon on the lower right–side of the home screen to immediately be
directed to our Technical Support website. For Technical Support by
Phone, please call 855-998-4326, Monday to Saturday 10:00 AM to
7:00PM.
!
!
Si tiene algún problema con la operación de esta tablet, no la
devuelva al comercio minorista donde la compró.
Su tablet de pantalla táctil incluye soporte técnico gratuito por
teléfono o a través de Internet y nos complacerá ayudarlo a
resolver sus problemas.
Pulse aquí para la versión en español de este manual del
usuario (página 25)
!
!
!
!
!
Page 2
!
"!
WARNINGS(
• #$!%&'()&!*+&!%,-.!$/!/,%&!$%!&0&)*%,)!-+$).1!'$!2$*!&34$-&!*+,-!5440,52)&!*$!%5,2!$%!6$,-*(%&7!
• #$! %&'()&! *+&! %,-.!$/!&0&)*%,)!-+$).1! '$! 2$*! $4&2! *+&! )58,2&*7! ! 9$! (-&%! -&%:,)&580&! 45%*-! 5%&! ,2-,'&7! ! ;&/&%! -&%:,),2<! *$!
=(50,/,&'!4&%-$22&07!
• #+,-!4%$'()*!-+$(0'!2$*!8&!&34$-&'!*$!&3)&--,:&!+&5*!-()+!5-!',%&)*!-(20,<+*1!/,%&1!$%!$*+&%!+&5*!-$(%)&-7!
• >5(*,$2?!@$!2$*! &34$-&!*+,-!5440,52)&!*$!'%,44,2<!$%! -405-+,2<!0,=(,'-7!!@$!2$*!4(*!$8A&)*-!/,00&'!B,*+!0,=(,'1!-()+!5-!:5-&-!
$2!$%!2&5%!*+&!5440,52)&7!
!
#CD!EFGC#9F9G!HEIJC!KF#C!
I;;LKCDI@!JMNOLE1!KF#CF9!
I9!DPQFEI#D;IE!#;FI9GED1!FJ!
F9#D9@D@!#L!IED;#!#CD!QJD;!
#L!#CD!R;DJD9>D!LH!9L9S
F9JQEI#D@!T@I9GD;LQJ!
ULE#IGDT!KF#CF9!#CD!
R;L@Q>#VJ!D9>ELJQ;D!#CI#!
NIM!OD!LH!JQHHF>FD9#!
NIG9F#Q@D!#L!>L9J#F#Q#D!I!
;FJW!LH!DED>#;F>!JCL>W!#L!
RD;JL9J7!
CAUTION
DO NOT OPEN
!
WARNING:!#L!;D@Q>D!#CD!;FJW!LH!
DED>#;F>!JCL>W1!@L!9L#!;DNLUD!
#CD!H;L9#!L;!;DI;!>LUD;7!9L!
QJD;!JD;UF>DIOED!RI;#J!I;D!
F9JF@D7!;DHD;!JD;UF>F9G!#L!
PQIEFHFD@!JD;UF>D!RD;JL99DE7!
!
#CD!DX>EINI#FL9!RLF9#!KF#CF9!
I9!DPQFEI#D;IE!#;FI9GED!FJ!
F9#D9@D@!#L!IED;#!#CD!QJD;!#L!
#CD!R;DJD9>D!LH!FNRL;#I9#!
LRD;I#F9G!I9@!NIF9#D9I9>D!
YJD;UF>F9GZ!F9J#;Q>#FL9J!F9!#CD!
EF#D;I#Q;D!I>>LNRI9MF9G!#CD!
IRREFI9>D7!
FCC(WARNINGS(
WARNING?!>+52<&-!$%!6$',/,)5*,$2-!*$!*+,-!(2,* !2 $* !& 34 % & -- 0[ !5 4 4 %$ : &' !,2 !* + ,-!652(50!)$(0'!:$,'!
*+&!(-&%\-!5(*+$%,*[!*$!$4&%5*&!*+&!&=(,46&2*7!
NOTE?!#+,-!&=(,46&2*!+5-!8& & 2 !*& - *& ' !5 2 ' !/$ ( 2 ' !*$ !) $640[!B,*+!*+&!0,6,*-!/$%!5!>05--!O!',<,*50!
'&:,)&1!4(%-(52*!*$!R5%*!]^!$/!*+&!H>>!;(0&-7!#+&-&!0,6,*-!5%&!'&-,<2&'!*$!4%$:,'&!%&5-$2580&!
4%$*&)*,$2!5<5,2-*!+5%6/(0!,2*&%/&%&2)&!,2!5!%&-,'&2*,50!,2-*5005*,$27!#+,-!&=(,46&2*!<&2&%5*&-1!(-&-1!
52'!)52!%5',5*&!%5',$!/%&=(&2)[!&2&%<[!52'1!,/!2$*!,2-*500&'!52'!(-&'!,2!5))$%'52)&!B,*+!*+&!
,2-*%()*,$2-1!65[!)5(-&!+5 %6/(0!,2*&%/&%&2)&!*$!%5',$!)$66(2,)5 *,$ 2 -7!C $ B&:&%1!*+&%&!,-!2$!
<(5%52*&&!*+5*!,2*&%/&%&2)&!B,00!2$*!$))(%!,2!5!45%*,)(05%!,2-*5005*,$27!F/!*+,-!&=(,46&2*!'$&-!)5(-&!
+5%6/(0!,2*&%/&%&2)&!*$!%5',$!$%!*&0&:,-,$2!%&)&4*,$21!B+,)+!)52!8&!'&*&%6,2&'!8[!*(%2,2<!*+&!
&=(,46&2*!$//!52'!$21!*+&!(-&%!,-!&2)$(%5<&'!*$!*%[!*$!)$%%&)*!*+&!,2*&%/&%&2)&!8[!$2&!$%!6$%&!$/!*+&!
/$00$B,2<!6&5-(%&-?!
• ;&$%,&2*!$%!%&0$)5*&!*+&!%&)&,:,2<!52*&2257!
• F2)%&5-&!*+&!-&45%5*,$2!8&*B&&2!*+&!&=(,4 6 &2 *!52 '!%&) &,:&% 7!
• >$22&)*!*+&!&=(,46&2*!,2*$!52!$(*0&*!$2!5!),%)(,*!',//&%&2*!/%$6!*+5*!*$!B+,)+!*+&!%&)&,:&%!,-!
)$22&)*&'7!
• >$2-(0*!*+&!'&50&%!$%!52!&34&%,&2)&'!%5',$_#U!*&)+2,),52!/$%!+&047!
IMPORTANT(SAFETY(INSTRUCTIONS(
]7 ;&5'!*+&-&!,2-*%()*,$2-7!
"7 W&&4!*+&-&!,2-*%()*,$2-7!
`7 C&&'!500!B5%2,2<-7!
a7 H$00$B!500!,2-*%()*,$2-7!
^7 @$!2$*!(-&!*+,-!5445%5*(-!2&5%!B5*&%7!
b7 >0&52!$20[!B,*+!'%[!)0$*+7!
c7 @$!2$*!80$).!52[!:&2*,05*,$2!$4&2,2<-7!F2-*500!,2!5))$%'52)&!B,*+!*+&!652(/5)*(%&%V-!,2-*%()*,$2-7!
d7 @$!2$*!405)&!2&5%!52[!+&5*!-$(%)&-!-()+!5-!%5',5*$%-1!+&5*!%&<,-*&%-1!-*$:&-1!$%!$*+&%!5445%5*(-!
Y,2)0(',2<!5640,/,&%-Z!*+5*!4%$'()&!+&5*7!
e7 @$!2$*!'&/&5*!*+&!-5/&*[!4(%4$-&!$/!*+&!4$05%,f&'!$%!<%$(2',2<S*[4&!40(<7!I!4$05%,f&'!40(<!+5-!
*B$!805'&-!B,*+!$2&!B,'&%!*+52!*+&!$*+&%7!I!<%$(2',2<!*[4& !40(<!+5 -!*B $!805' &-!52' !5!*+,%'!
<%$(2',2<!4%$2<7!#+&!B,'&!805'&!52'_$%!*+&!*+,%'!4%$2<!5%&!4%$:,'&'!/$%![$(%!-5/&*[7!F/!*+&!
4%$:,'&'!40(<!'$&-!2$*!/,*!,2*$![$(%!$(*0&*1!)$2-(0*!52!&0&)*%,),52!/$%!%&405)&6&2*!$/!*+&!$8-$0&*&!
$(*0&*7!
]g7 R%$*&)*!*+&!RLKD;!)$%'!/%$6!8&,2<!B50.&'!$2!$%!4,2)+&'!45%*,)(05%0[!5*!40(<-1!)$2:&2,&2)&!
%&)&4*5)0&-1!52'!*+&!4$,2*!B+&%&!*+&[!&3,*!/%$6!*+&!5445%5*(-7!
]]7 L20[!(-&!5**5)+6&2*-_5))&--$%,&-!-4&),/,&'!8[!*+&!652(/5)*(%&%7!
]"7 Q240(<!*+,-!5445%5*(-!'(%,2<!0,<+*2,2<!-*$%6-!$%!B+&2!(2(-&'!/$%!0$2<!4&%,$'-!$/!*,6&7!
]`7 ;&/&%!500!-&%:,),2<!*$!=(50,/,&'!-&%:,)&!4&%-$22&07!J&%:,),2<!,-!%&=(,%&'!B+&2!*+&!5445%5*(-!+5-!
8&&2!'565<&'!,2!52[!B5[1!-()+!5-!RLKD;S-(440[!)$%'!$%!40(<!,-!'565<&'1!0,=(,'!+5-!8&&2!
-4,00&'!$%!$8A&)*-!+5:&!/500&2!,2*$!*+&!5445%5*(-1!*+&!5445%5*(-!+5-!8&&2!&34$-&'!*$!%5,2!$%!
6$,-*(%&1!'$&-!2$*!$4&%5*&!2$%6500[1!$%!+5-!8&&2!'%$44&'7!
]a7 @$!2$*!(-&!*+,-!'&:,)&!B+,0&!$4&%5*,2<!5!6$*$%!:&+,)0&7!
(
Page 3

!
`!
1. Getting to know your device
Front
Back
Part Name
Description
1. Touch Screen
Use a finger to control the system & application.
2. Camera
A built-in webcam allows you to capture still images, record
videos, chat online and capture panorama pictures.
3. Charge
Indicator
A Red indicator light will appear while the device is charging.
After the device has fully charged, the light will turn off.
4. Speakers
Produces sounds from music files, movies, games, system
notifications and more.
Page 4
!
a!
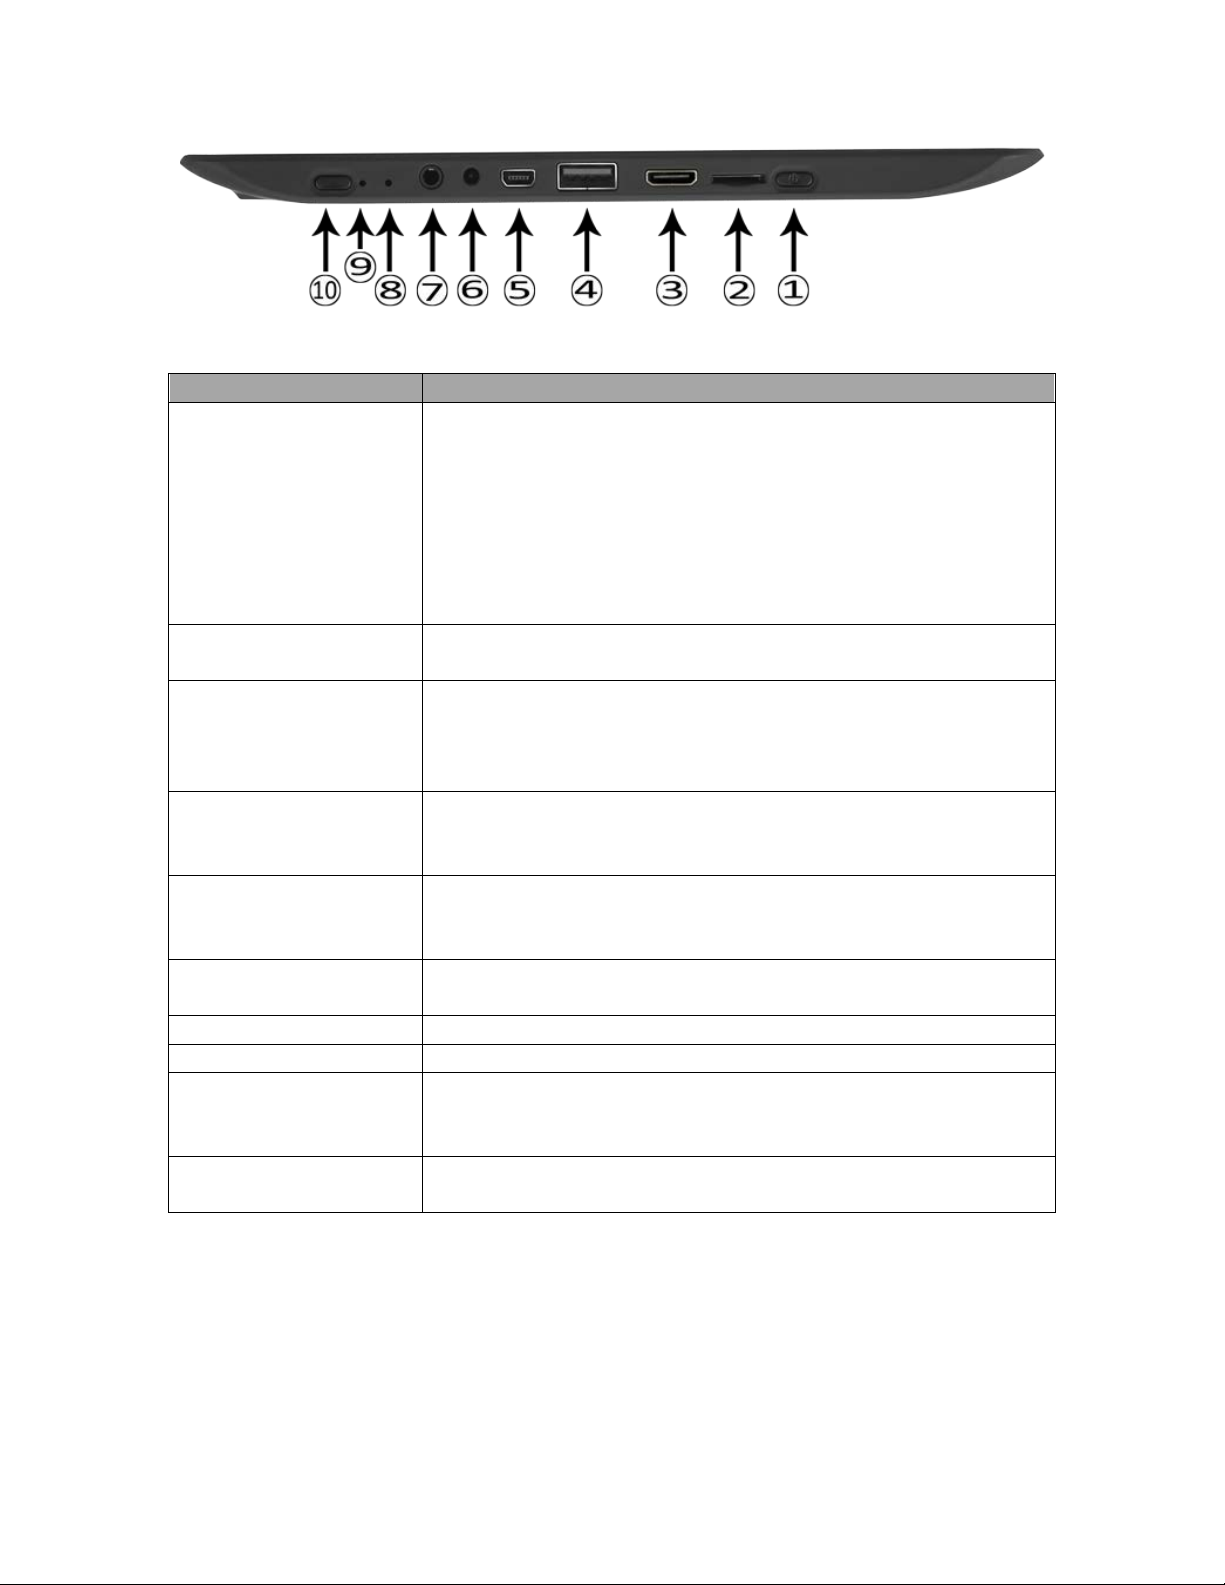
Ports and Buttons
Port & Button Name
Description
1. Power button
Press and hold the power button for 2-3 seconds to
power ON your device.
Press and hold the power button for > 3 seconds to turn
OFF the device.
Press and release the power button if you want to put the
tablet into a sleep mode.
If the tablet is in a sleep mode, press and release the
power button to wake the tablet from of sleep mode.
2. microSD® Card
Slot
Supports SDHC/SDXC cards up to 64 GB (not included)
3. Mini-HDMI port
A Mini HDMI to HDMI cable (Not included) connects to
video and audio devices, such as television, or any
compatible digital or audio component that uses a HDMI
connection.
4. USB port
Connects peripherals such as mice, digital cameras,
MP3 players and more that use a Full-size USB
connection.
5. Mini-USB port
Connects peripherals such as mice, digital cameras,
MP3 players, and more that use a Mini-USB connection.
Use to charge your tablet from a Computer
6. Power Jack
Connects AC power supply to power the device and
charge the battery.
7. Headphone Jack
For external headphone connection with a 3.5mm jack.
8. Microphone
Receives sounds and voice for recording.
9. Reset
When the system is not responding or is inoperative,
insert a thin, straight object (such as a paper clip) in the
manual reset hole to perform a soft reset on your device.
10. Home Button
Press to return to the Home screen. Press again to open
the Application Drawer.
1.1. Accessories
The carton contains a 7" HD Touchscreen Tablet, a mini USB to USB cable,
and an AC Power Adapter. If anything is missing or damaged upon opening
the box, immediately return the tablet, all accessories, and all packaging to
the dealer.
Page 5

!
^!
1.2. microSD Card
Your Tablet comes with 16GB of built-in memory for storage. Some of the
preloaded programs and the operating system will use approximately 2-3GB
of space. You can add up to an additional 64GB of storage space to your
device by using a SDHC or SDXC microSD card (not included). Data can be
saved to the built-in memory or to the microSD card. In addition files can also
be transferred to a microSD card from your personal computer and then
imported into your Tablet.
o To install the microSD card
o Insert the microSD card, making sure the gold contacts are
facing down.
o Push the microSD card in gently into the slot (2) until it locks
into place.
o To remove the microSD card
o Push in gently on the microSD card and it will pop out slightly
from the slot. Pull the card out of the slot. (2)
o Warning: Follow the instructions for safe removal of the
microSD card from the tablet. Improper removal of the microSD
card may cause data loss or unpredictable system issues. For
safe removal, tap > Settings > Storage >Unmount microSD
card.
1.3. Charging Battery
When you first receive your device the battery will only be partially charged.
To fully charge the battery, allow it to charge for 5 hours to ensure it’s fully
charged before using the tablet.
1. Connect one end of the AC adaptor to the power jack (6) of the device.
2. Plug the other end of the AC adaptor into a wall outlet to start charging.
3. The red LED on the front of the device will turn off when it is fully
charged.
Tips: To increase battery life
• Lower the screen brightness
• Reduce the time until the device enters the Sleep mode
• Turn off the Wi-Fi when an Internet connection is not required
• Close any applications when finished using them or they will
continually run in the background.
• Turn your device completely off when finished using.
1.4. Turning the Device ON or OFF
o To turn ON your device:
o Press and hold the Power button (1) for at least 2 seconds until an
image appears on the screen.
o To turn Off your device:
1. Press and hold the Power button (1) for at least 2 seconds
Page 6

!
b!
2. A pop-up window will appear, tap OK to confirm power shutdown or
tap CANCEL to return to the main screen.
o To put your device into the Sleep (Power Saving) mode:
o Press & release the Power (1) button. This will turn the display off
and put the tablet into a power saving Sleep mode.
o To wake your device from the Sleep mode, press & release the
Power button (1).
1.5. Common gestures:
o Tap - To select or activate something, lightly touch and release the
selection.
o Type - To type something, such as a name, password, or search terms,
just touch where you want to type and a keyboard pops up to let you type
into the field.
o Touch & hold - Touch & hold. Touch an item and do not lift your finger
until an action occurs.
o Drag - Touch & hold an item for a moment and then, without lifting your
finger, move your finger on the screen until the item reaches the target
position.
o Swipe or slide - Quickly move your finger across the surface of the
screen, without pausing after touching (so you don’t drag something
instead). For example, to slide the Home screen left or right to view the 4
alternative screens, just touch the home screen and move your finger left
or right to rotate through the different screens.
o Double-tap – Quickly Tap twice on a webpage, map, or other screen to
zoom. For example, double-tap a picture in Chrome to zoom in, and
double-tap again to zoom out.
o Pinch - In some apps (such as Maps, Chrome, and Gallery), you can
zoom in and out by placing two fingers on the screen at once and pinching
them together (to zoom out) or spreading them apart (to zoom in).
o Rotate the screen - The screen image of most applications will rotate with
your device as you turn it. Some apps may only display the screen image
in one mode and not allow rotating.
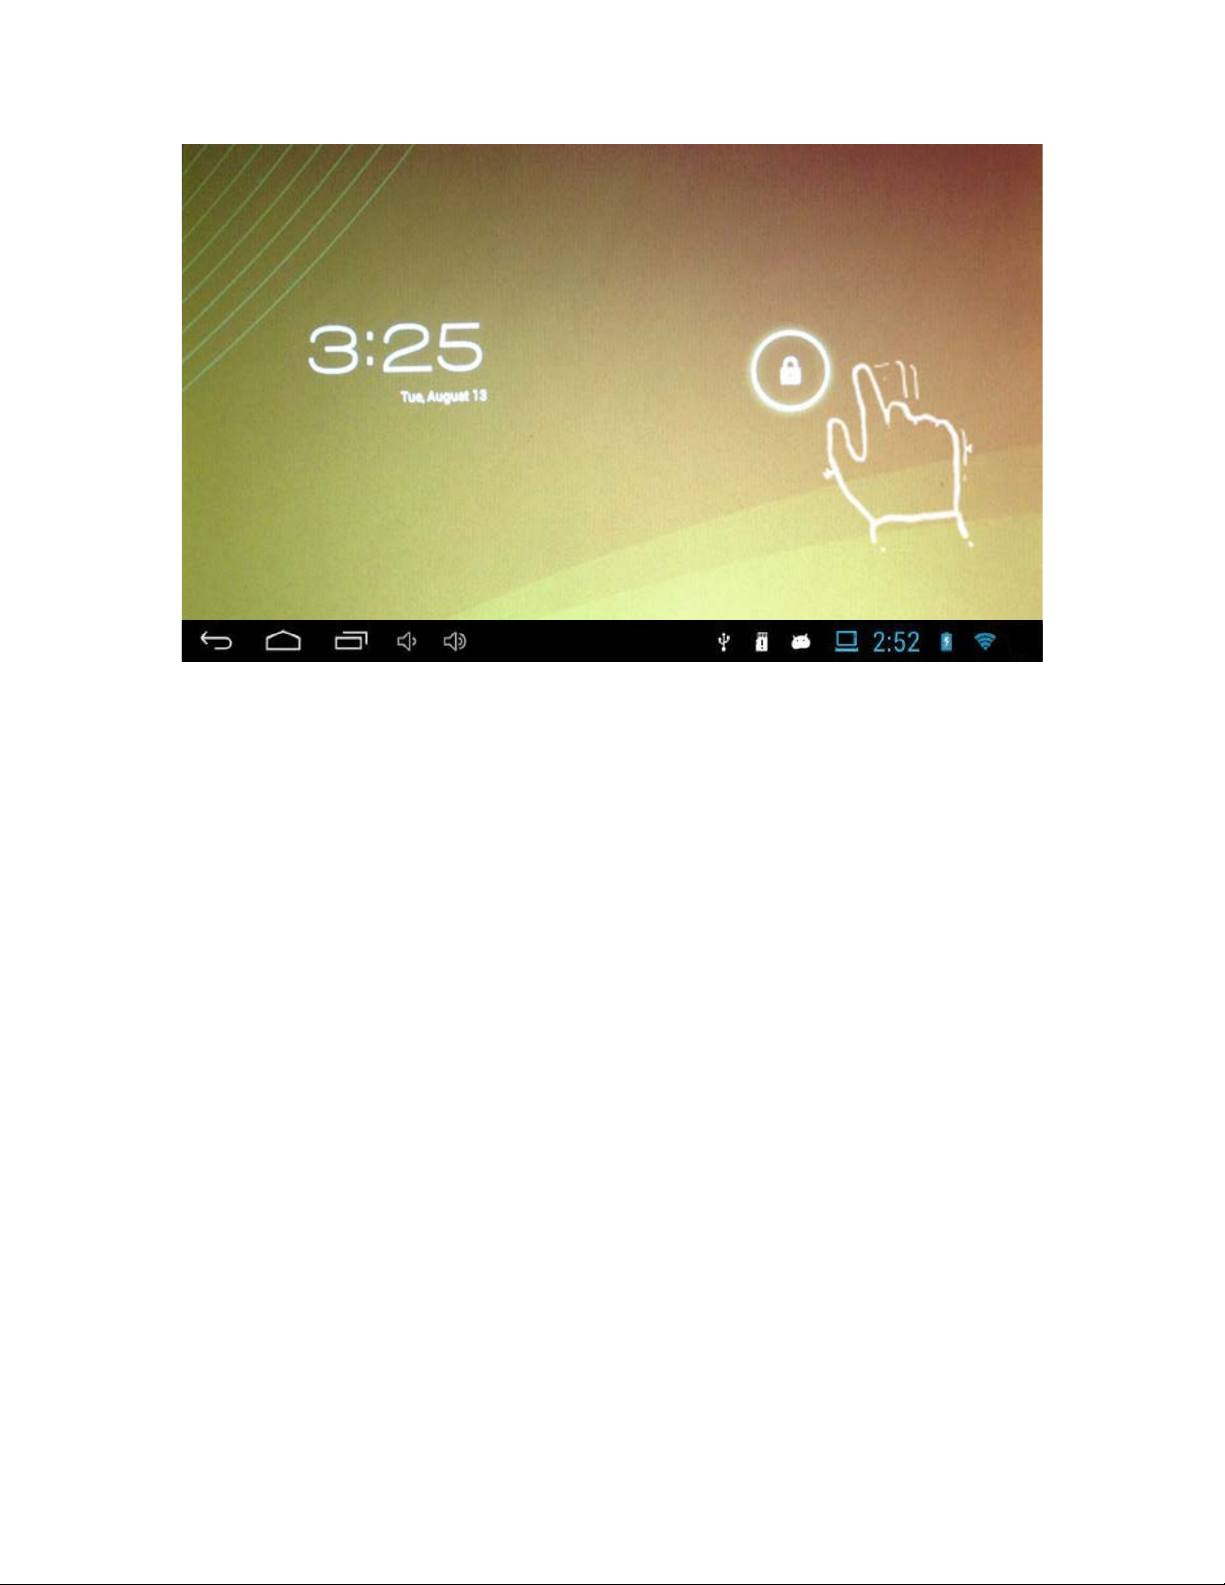
1.6. Unlocking the Screen
By default, the screen automatically locks after a period of inactivity. You can
set the length of time until the screen locks in the System Settings.
o To unlock the screen
1. Press the Power button to turn the tablet ON or to wake the tablet from
the Sleep mode.
2. Tap and hold the icon and slide it to the symbol on the right side
of the screen to unlock the device.
Page 7
!
c!
If you are having a problem with the operation of this Tablet – Do not return
it to the retailer!
Your Touchscreen Tablet includes Free Technical Support by Phone or
Internet and we are glad to help you with any problems.
For Technical Support by Internet, simply touch the Customer Help icon on the
lower right–side of the home screen to immediately be directed to our Technical
Support website. For Technical Support by Phone, please call 855-998-4326,
Monday to Saturday 10:00 AM to 7:00PM.
2. Setting up your device for the first time
Note: For proper setup, make sure you have access to a wireless network
and your device is fully charged.
Before attempting to setup your device, you will need the name and password
(if used) of your wireless network. Please have all of this information handy
before setting up your device.
Step 1 – Turn ON your Device
o Turn ON and unlock your device as described in the above
section
Step 2 - Language Selection
o Tap the Language list to scroll through the list of available
languages.
o Select the default language for your device by tapping it.
Page 8

!
d!
o Confirm your choice by tapping the Start button.
! It may take a minute to set the language.
Step 3 – Set-up your Wi-Fi
o A list of wireless networks your tablet is receiving will appear on
the screen.
o Select the name of your WI-FI wireless network from the list by
tapping it.
o If your wireless network is password protected, you will need to
enter a password and a dialog box will appear for you to enter
your password.
o Tap the password line to make the tablet keyboard appear.
! Check the “Show Password” box if you want to view your
password instead of seeing, ******
! Passwords are case-sensitive and must be typed exactly
as they were created.
o After you type your password, tap the “Connect” icon
! Wait for the network to connect as this may take 15-20
seconds. You will know the connection is good when a
blue check mark appears next to the name of your
wireless network and it displays “Connected” under your
network name.
! If you are having problems connecting to your Wi-Fi
network, contact our Customer Support Team.
o After your network is successfully connected, tap the “NEXT”
icon.
Step 4 – Got Google?
A Google Account lets you organize and access your personal
information from any computer or mobile device:
• Never lose your contacts again. When you sign in to your device
with a Google account, all the contacts you associate with that
account in the People app are automatically backed up. As a
result, they're always accessible through your Gmail account from
any computer.
• Synchronize and back up everything. Whether you draft an email,
add a contact's phone number, add an event to your calendar,
work gets backed up continuously by Google and synchronized
with any computer where you use the same Google Account.
• Access from anywhere. Check your latest calendar, email, text
messages, or social stream, wherever you are, no matter what
computer or mobile device you're using.
• Use other Google services. Your Google Account also lets you take
full advantage of any other Google apps and services that you may
want to use, such as Gmail, Google Maps, Navigation, Google
Play, YouTube, Google Talk, Messaging, and many more.
Page 9

!
e!
Note: If you do not already have a free Google account, it is strongly
recommended you set-up a free Google account when using the Setup
wizard on this device in order to get the optimum use from this tablet.
o Your device is designed to work with Google Mail (Gmail). If
you don’t have a free Google account it is recommended you
sign up for one.
o If you already have a Google account tap the “Yes” icon
o If you do not have a Google account tap the “No” icon and you
will be taken to the Make it Google screen.
Step 5 - Make it Google
o To create a free Google account, tap the “Get an Account” icon.
! On the next screen you will create a Username for your
Google account.
! Your Google account Username can also be used as a
new email address which will be
(YourUsername)@gmail.com
• Note: If you don’t want to use Google Mail (Gmail)
as your email provider, you can use a different
email account from almost any provider with this
tablet. This is explained fully in the E-mail section
of this manual.
o If you don’t want to create a Gmail account, tap the “Not Now”
icon.
o After you made your selection you will be taken to the Wi-Fi
setup.
If you are having a problem with the operation of this Tablet – Do not return
it to the retailer!
Your Touchscreen Tablet includes Free Technical Support by Phone or
Internet and we are glad to help you with any problems.
For Technical Support by Internet, simply touch the Customer Help icon on the
lower right–side of the home screen to immediately be directed to our Technical
Support website. For Technical Support by Phone, please call 855-998-4326,
Monday to Saturday 10:00 AM to 7:00PM.
Step 6- Sign in
o Type in your Gmail address and your password
o Tap the “NEXT” icon
! Note: a dialog box will appear asking you to agree to the
Google User License Agreement (ULA).
• Tap “Yes” to agree
Page 10

!
]g!
• Tap “Cancel” to not agree and you will not be able
to access the Google email system, or other
related Google Apps.
Step 7 – Entertainment
You can quickly, easily, and securely purchase items from the Google
Play store by safely storing your credit card information with 128-bit
encryption in the Google Wallet System.
o Tap the “Setup Credit Card” icon to securely & safely enter your
credit card information.
! Please review Google’s Privacy Information by tapping
the icon before entering your personal information.
o Tap the “Not Now” icon if you do not wish to use the Google
Wallet feature, and move on to the next screen.
! Note: If you do not use Google Wallet you will need to
enter your complete credit card information every time
you wish to make a purchase from the Google Play
Store.
Step 8 – Backup and restore
You can easily and automatically backup your apps, settings, music,
photos, videos, books, website bookmarks, and other data to your Google
account.
o Check the options you would like to use. You can change them
in your Settings at anytime.
o When finished tap the “Right” arrow at the right hand bottom of
the screen to continue.
Step 9 – Use Google location
You can use the Google location services to use the location data from
your Wi-Fi network to help apps determine your approximate location
when it’s available. This location data is used to: provide driving
directions, find the nearest shops, restaurants, movie theaters, & more.
o Check the options you would like to use. You can change them
in your Settings at anytime.
o When finished tap the “Next” icon at the right hand bottom of
the screen to continue.
Step 10 – Setup Complete
Your tablet is now setup and ready to use.
o Tap the “Back” arrow to make additional changes.
o Tap the “Finish” arrow to start using your tablet.
Page 11
!
]]!
If you are having a problem with the operation of this Tablet – Do not return
it to the retailer!
Your Touchscreen Tablet includes Free Technical Support by Phone or
Internet and we are glad to help you with any problems.
For Technical Support by Internet, simply touch the Customer Help icon on the
lower right–side of the home screen to immediately be directed to our Technical
Support website. For Technical Support by Phone, please call 855-998-4326,
Monday to Saturday 10:00 AM to 7:00PM.
5
6
7
8
9 10 11
4
1
2
3
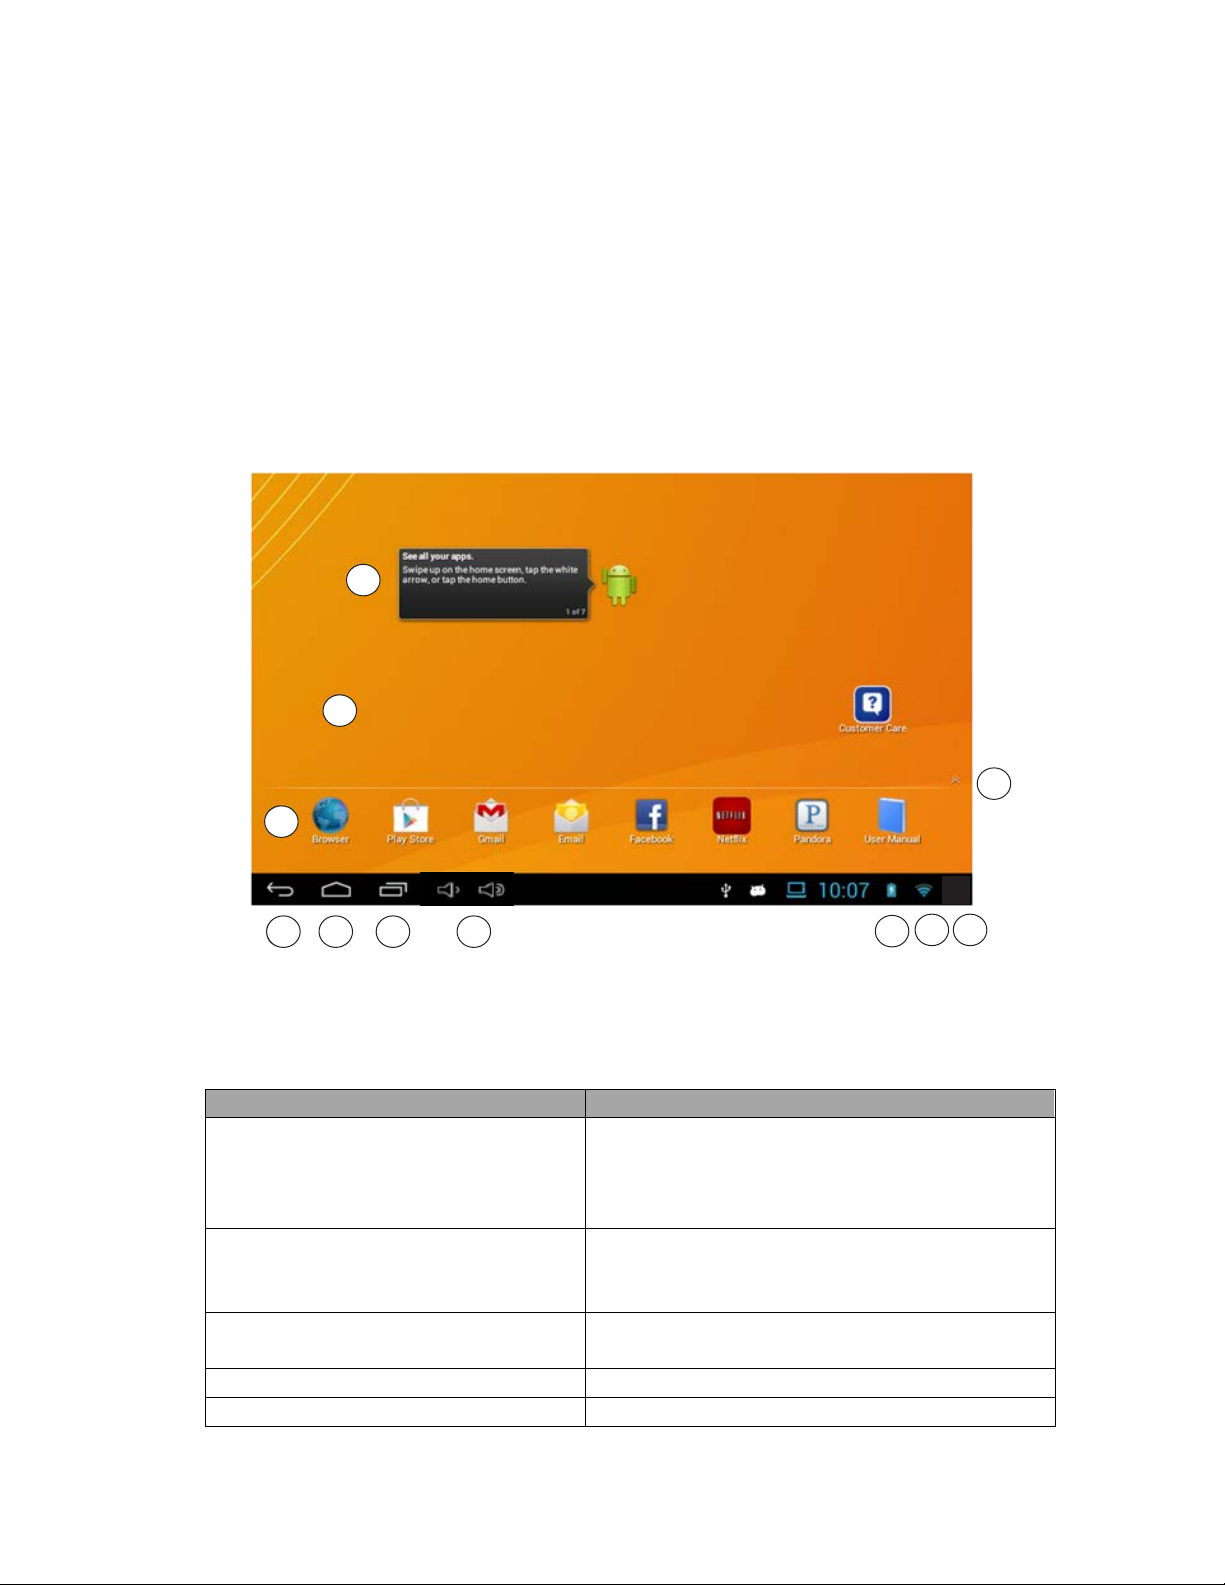
3. Identifying the Home Screen
The Home Screen consists of 5 areas, which can be customized to include
different Apps and Widgets. The image above shows the layout of the Main
Screen of the tablet. This image is labeled with many of the items on the
Home Screen that are referred to throughout this manual.
Name
Descriptions
1. Home Screen
The Main screens for adding Apps and
Widgets. There are 5 pages to the Home
Screen which are reached by swiping the
screen left or right.
2. Widget
A Widget is an application that can be
placed on any of your home screens, for
quick and easy access.
3. Application Drawer Arrow
Swipe upward, or Tap to reveal all your
applications or apps
4. Favorites Bar
Apps that remain on your Home screen
5. Back Navigation Icon
Opens the previous screen you were
Page 12
!
]"!
viewing.
6. Home Navigation Icon
Returns you to the main Home Screen
7. Recent Apps Navigation Icon
Opens a list of thumbnail images of apps
you’ve recently viewed and apps you
frequently use.
8. Volume Icons
Adjusts the Volume Up or Down
9. Battery Status Icon
Current percentage of battery charge
10. Wi-Fi Connection Status Icon
Strength of Wi-Fi signal
11. Quick Settings & Notification
Area
Tap once to view Notifications. Tap the
pop-up box again to view the Quick
Settings.
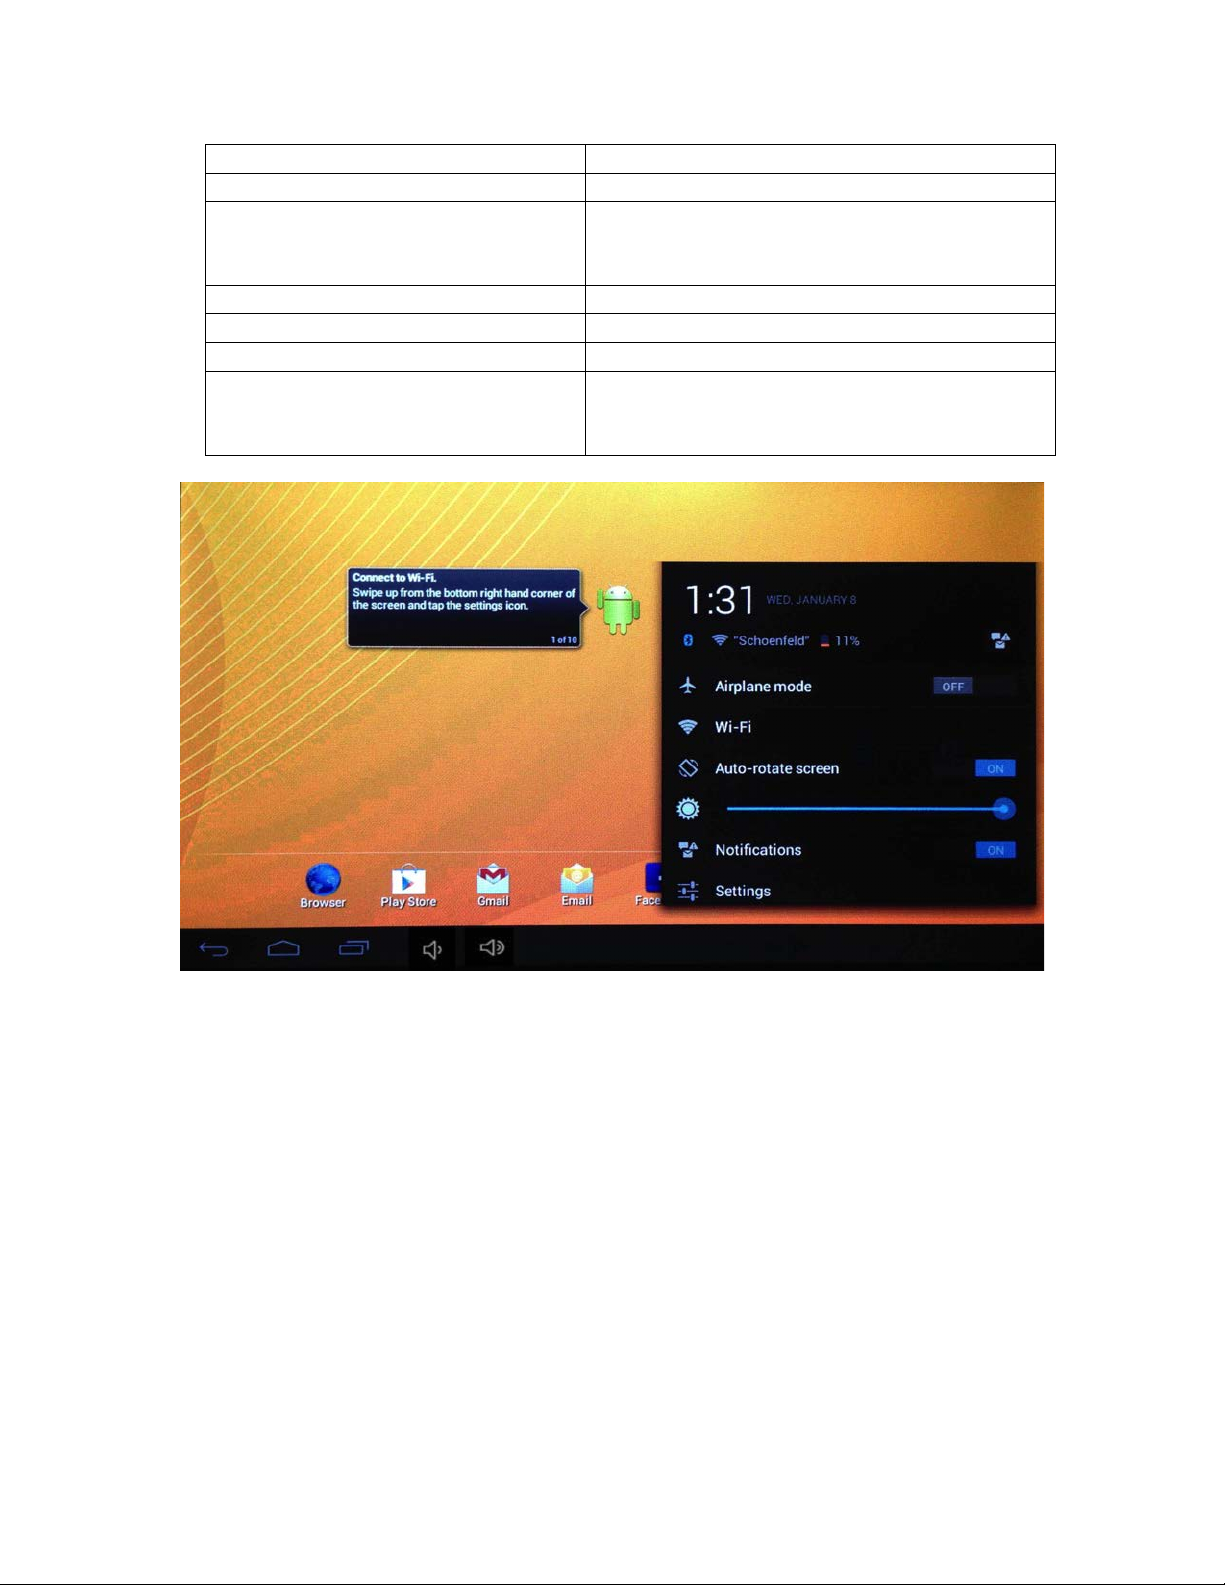
4. Quick Settings & Notification Area
The Quick Settings & Notification popups allow you to view or change your
device settings quickly right from your home screen by tapping on the Quick
Settings & Notification Area (11).
• To view your Notifications tap the Quick Settings & Notification Area (11)
once and the Notifications popup box will appear.
• To view the Quick Settings tap the Quick Settings & Notification Area (11)
once so the Notifications popup box appears, then tap the popup box to
view the Quick Settings.
o You can adjust the following items within the Quick Settings:
! Airplane Mode – Tap to turn On or Off
! Smart Wi-Fi Connect – Tap to go to the Wi-Fi section of the
Settings app
! Rotate Screen – Tap to rotate Screen
Page 13
!
]`!
! Brightness – Drag left or right to increase or decrease
screen brightness
! Notifications – Tap to turn notifications On or Off
! Settings – Tap to go to the full Settings app.
5. Using Applications
5.1. Browsing the World Wide Web on your device
Your device comes with two web browsers. A basic web browser app called,
“Browser” and Google’s own web browser called “Chrome.“
Note: Make sure the device is connected to a Wi-Fi network
1. Open either Browser or Chrome by tapping on the app’s icon. Note:
You can find the apps either on the Favorites Bar or in the App Drawer.
Open the App Drawer by tapping the Application Drawer Arrow (3)
2. To visit a website touch the web Address box to access the keyboard
and type the address of the website. You can also search for websites
using search words or phrases. After you have typed in your website
address or search word(s), tap the “Go” button on the keyboard.
3. You can scroll through the web page by dragging your finger up and
down on the touchscreen to move the web page.
4. If the web page is too large to fully fit on your tablet screen, you can
pan up, down, left, or right by dragging your finger on the touch screen
just like scrolling.
5. To Zoom IN touch and hold two fingers on the screen and move your
fingers away from each other.To Zoom OUT you can pinch the
touchscreen by touching and holding two fingers on the screen and
pinching the fingers toward each other.
6. To reload a webpage, tap the Refresh Icon on the left of the
Address box. When a webpage is loading from the Internet, an “X”
icon will replace the Refresh Icon. Tap the “X” and the page will stop
loading.
7. To “bookmark” a favorite page, tap the Favorite icon to right of the
favorite bar. The “Add Bookmark” window will appear and you can edit
the bookmark name if you’d like to make it shorter, or to use an easier
name to remember. When finished, tap the Save or OK button.
8. Setting a home web page
The home page is the first website you see when you start a web
browser app.
1. Browse to the page you want to set as your home page.
2. Touch the Menu icon.
3. Choose “Settings” and the Settings screen will appear.
4. Choose the “General” category.
5. Choose “Set Home Page” and the Set Home Page menu will
appear.
6. Touch the “Current Page” button and your home website is now
set.
Page 14

!
]a!
Note: Many places you visit on the web can be accessed directly using
specific apps. Facebook, Gmail, Twitter, YouTube, and other popular web
destinations have apps that you may find already installed on your tablet or
are otherwise available from the Google Play Store.
5.2. Google Play
With hundreds of thousands of apps, the Google Play store has the right ones
for you. When you download apps, they are delivered directly to your device.
You can also find your next book, a hot new song, or a great movie from a
catalog that includes everything from movie blockbusters and best selling ebooks to millions of songs.
5.3. E-Mail
Your device comes with two e-mail readers. A basic E-Mail app called “Email”
and Google’s own E-Mail called “Gmail.“
To get the best experience using this device, we recommend creating a free
Gmail account and using Gmail for your e-mail.
5.4. Setting up a Non Gmail Email account
The Email app is used to access web-based e-mail, or webmail, from Yahoo!
Mail, Windows Live, and others. It also lets you read e-mail provided by your
Internet Service Provider (ISP) and even your work E-mail if allowed.
Note: Before you setup your E-Mail account you will need several key pieces
of information. If you are setting up email from your work, you may need to
contact your IT department to see if there are additional instructions or
requirements you will need to follow as E-Mail settings and security will vary
from company to company.
1. The Email app is located in the Apps Drawer. You may also find
shortcuts to the apps on the Home screen or Favorite Bar.
2. Start the Email app by tapping on it.
3. The E-Mail Account Setup screen will appear.
4. Type the e-mail address you would like to setup on this device.
5. Type your password for this account.
6. Touch the Next button.
7. Select Account Type
• You will need to know if your e-mail account is a Pop3, IMAP, or
Microsoft Exchange.
• Select the correct account type and follow the onscreen
instructions to finish setting up your e-mail account.
• Changing the Inbox Checking Frequency setting to something
longer than 15 minutes will save battery life.
After tapping “Next” you will be taken to your E-Mail account inbox. Your
tablet synchronizes any pending e-mail you have in your account. Depending
on how much e-mail you have, it may take a few minutes to synchronize all
your mail.
Page 15

!
]^!
5.5. Adding more e-mail accounts
The Email app can be configured to have multiple accounts. (E.g. Personal,
Work) Follow these steps to add an additional E-Mail account:
1. Start the E-mail app.
2. Choose Add Account from the Setting icon
3. Follow the steps 4-7 from the previous section to setup the additional
E-Mail accounts.
5.6. Adding music, photos and video on to your device via a USB drive
or microSD Card
1. Copy the files you would like to transfer to a USB or microSD card.
These files can be photos, music files and video files.
Note: Your device can’t display every type of media files but it will
display the most popular formats. Please check the Technical
Specifications section to make sure the file format is supported.
2. Insert the USB or microSD card into either the USB port or the
microSD slot on the bottom of the device.
3. Open the Gallery or Explorer app to view, play, delete or copy files to
your device.
4. Un-mount the USB drive or microSD card before removing it from your
device. For safe removal, tap > Settings > Storage >Unmount
Storage. You are now safe to remove your USB drive or microSD card.
5.7. Adding music, photos and video to your device from a Windows PC
1. Connect your device to your PC using the included USB cable.
2. Once you have connected the device to your PC, an AutoPlay dialog
box will appear on the PC prompting you to choose how to add items
to your device from the Windows storage system.
3. The simplest way to move files is to select “Open device to view files.”
4. Your device will show up on the PC as a mounted drive icon.
5. Double click the mounted drive icon and simply drag and drop the files
you would like to copy from your PC, to the appropriate folder on your
Tablet. (E.g. Photos, Music, Movies, etc.)
6. After the files have completed copying to your device, you can unmount your device from your PC by following proper un-mount
procedures and then disconnect the USB cord.
Note: You can also copy files from your device to your PC following
the same steps.
5.8. Transferring files using a Mac OS
1. Connect your device to your computer with the included USB cable.
2. Tap on the Quick Settings & Notification Area (11) and tap on the “USB
Connected” notification.
3. You will arrive at the “USB Connected” screen. Tap the “Turn on USB
storage” icon on the bottom of the screen.
Page 16

!
]b!
4. After your device is connected your touchscreen will change to “USB
storage in use”.
5. Your device will now appear just like a USB thumb drive on your Mac
OS
6. Open the device in Finder just like any other USB device. Drag and
drop files to or from your device.
7. After the files have completed copying to your device, you can unmount your device from your Mac by tapping the “Turn off USB
storage” icon. Eject the drive from your Mac OS Device list and then
disconnect the USB cord.
5.9. Viewing your music, photos and video files on your device
1. Use the Gallery app to view your photo or video files
2. Open the Gallery app in the Application Drawer by tapping on it.
3. You will see your files are automatically organized into picture or
movies folders.
4. To view a photo or video just tap on the item you wish to view.
5. If you have more than one picture or video you can slide right and left
with your finger on the touchscreen to view them all.
6. To view a video, tap the “Play” icon. To pause a video, tap the video
again.
7. To delete or edit a photo or video simply tap the photo, and then tap
the setting icon that will appear in the upper right corner.
8. A series of editing features will appear. Choose the one you would like
to perform.
If you are having a problem with the operation of this Tablet – Do not return
it to the retailer!
Your Touchscreen Tablet includes Free Technical Support by Phone or
Internet and we are glad to help you with any problems.
For Technical Support by Internet, simply touch the Customer Help icon on the
lower right–side of the home screen to immediately be directed to our Technical
Support website. For Technical Support by Phone, please call 855-998-4326,
Monday to Saturday 10:00 AM to 7:00PM.
6. Using Your Device
6.1. Apps
Short for "Applications." Apps are the programs you can download to your
device from the Google Play Store. Apps can either be free, or for sale.
• To launch an App
o To start an app simply tap it to open the item or launch it.
Page 17

!
]c!
• Application Drawer
o The Application or App Drawer is where all your applications
are stored. It acts like a garage door and swings up to show
you all your stored apps. You can access it two ways:
1. Swipe upward or tap the Application drawer arrow (3) at
the bottom right side of your screen to open the
Application drawer.
2. Or double tap the Home Navigation Icon (6) on the
bottom of your screen. This will bring you back to the
Home Screen and open the App Drawer.
• To move an App from your App drawer to your Home Screen
o Open the Application drawer
o Tap and hold down the App icon you would like to move.
o The App icon will appear to float. Continue to hold down the
icon and drag it up to the home screen.
o Once you have selected the spot you would like to have the
App sit on your Home Screen simply let go.
• To move an app on the Home Screen
o Tap and hold down the App icon you would like to move.
o The App icon will appear to float. A grid will appear on the
Home Screen.
o Continue to hold down the icon and drag it where you would
like it on your Home Screen.
o Once you have selected the spot simply let go.
Page 18

!
]d!
• To Close an App that is running in the background
Apps running in the background slow down your device and drain
your battery life. To properly close your apps follow these steps:
1. Open the recent apps menu on your navigation bar
2. Find the app you wish to close and swipe it vertically off the
screen. This method will close most apps but some will still run
in the background in some capacity.
3. To make sure the app is completely closed you can open the
Settings App on your device.
4. Click on the “Apps” settings
5. Make sure you are viewing the “Running” apps by swiping the
screen until “Running” is shown at the top of the screen.
6. Tap the app you would like to close
7. Tap the “Stop” icon.
• To delete an App
o Tap and hold down the App icon you would like to delete.
o The App icon will appear to float.
o A trashcan will appear in the bottom right hand corner of
your Home Screen.
o Drag the App to the trashcan. The trashcan will turn red.
Release your finger to delete the App.
6.2. Widgets
A Widget is a view of an application that can be placed on your home
screen, for quick and easy access. The news and weather apps on your
device are examples of widgets. Other popular widgets you can install or
Page 19

!
]e!
download are Facebook and Twitter. These Widgets will update in real
time showing your friend’s most recent posts or tweets.
• Adding Widgets
o Tap and hold your finger on the Home Screen. Make sure you
are not touching an App or another Widget.
o A dialog box will appear entitled “Add to Home Screen.”
o Tap the Widgets icon
o A dialog box will appear entitled “Choose Widgets”
o Tap the new widget you would like on your screen
o The new Widget will appear on the screen you are on.
• Adjusting the size of a Widget
o After you placed a new widget on your screen a blue line with
small blue blocks will surround the Widget.
o You can increase or decrease the size of the Widget by holding
your finger down on one of the blue blocks and dragging.
o When you have the Widget the size you want, just tap the
Widget to finish.
• To move a Widget on Home Screen
o Tap and hold down the Widget you would like to move.
o The Widget will appear to float. A grid will appear on the Home
Screen.
o Continue to hold down the Widget and drag it where you would
like it on your screen.
o You can drag it to another screen by moving the widget to the
left or right side of the screen. Hold and wait until it moves to
the next screen.
o Once you have selected the spot you would like to have the
Widget sit on your screen simply let go.
• Removing Widgets
o Tap and hold down the Widget you would like to delete.
o The Widget will appear to float. A trashcan will appear in the
bottom right hand corner of your Home Screen.
o Drag the Widget to the trashcan. The Widget and Trashcan will
turn red. Release your finger to delete the Widget.
Page 20

!
"g!
6.3. Favorite Bar
• Customizing Favorite Bar
o You can customize your Favorite Bar so all your favorite Apps
are just a tap away.
• To move an App to your Favorite Bar
o Open the Application Drawer
o Tap and hold down the App icon you would like to move until it
appears to float.
o Continue to hold down the icon and drag it to the Favorite Bar.
! Note: You can only have 8 apps in your Favorite Bar.
• If you try to add too many Apps on the Favorite
Bar the last app on the bar will move back to the
Application Drawer.
o Once you have selected where you want it to be on the
Favorite Bar simply let go.
• To move an App off your Favorite Bar
o Tap and hold down the App icon you would like to move until it
appears to float.
o An arrow will appear in the bottom right hand corner of
your Home Screen.
o Drag the App to the arrow. The arrow will turn green. Release
your finger and the App will return to the App Drawer.
6.4. Setting Wallpaper
• To change the wallpaper on your Home Screen
Page 21

!
"]!
o Tap and hold your finger on the Home Screen. Make sure you
are not touching an App or another Widget.
o A dialog box will appear entitled “Add to Home Screen.”
o Tap the Wallpapers icon
o A dialog box will appear entitled “Select wallpaper from”
o Tap the different type of wallpapers from the different styles
presented.
o Select the wallpaper you would like and tap the “Set wallpaper”
button to confirm your choice.
6.5. Display Rotation
• By default your screen will automatically rotate if you turn your device.
• If you do not like this functionality you can turn it off in the Quick
Settings or in the full Settings App.
• Go to Settings > Accessibility > Auto-rotate screen.
• Uncheck the box to have the screen stop from automatically rotating
when you change the tablet’s orientation.
7. Using your Camera
The Camera app is a combination camera and camcorder. You can view
photos and videos you take with the Camera in the Gallery app. To take
pictures and videos, first touch the Camera app icon located in the
Application Drawer.
• Taking Still Images
o With the Camera app open, point the camera lens at the object
to be photographed until the object appears on the screen.
o To take a photo, tap the blue circle on the right side of the
screen.
o Note: This device has a front facing camera designed to make
video chat easy and simple. Turn the tablet around and point it
at what you want to capture and tap the blue circle on the right
side of the screen to take a still image.
• Recording videos
The Camera app can also be used to take videos.
o With the Camera app open, touch the video camera icon to
switch to video recording.
o Once you have pointed the camera lens at the object you would
like to record, tap the red circle on the right side of the screen
to begin recording.
NOTE: While recording a video, you can take photos by
touching the screen. The screen is momentarily outlined in
red when the photo is taken. The video recording is not
interrupted.
o Touch the red circle with a white square located on the right
side of the screen to stop the recording.
Page 22

!
""!
• Viewing your photos and videos in the Gallery app
o When you take a picture or record a video on your tablet, the
file is saved in the Gallery app.
8. Using Bluetooth
The Bluetooth function on this tablet allows you to wirelessly connect the tablet
with Bluetooth compatible devices such as portable speakers, headsets,
keyboards, and more.
o Open the Settings app
o Tap on Bluetooth on the left side of the screen and you will
arrive at the Bluetooth Settings page
o If necessary, turn Bluetooth ON by tapping the ON/OFF icon at
the top of the screen
o The tablet will automatically show a list of available Bluetooth
devices. If your device is not listed, make sure the device is
ON, within 30 feet of the tablet, and has the Bluetooth function
turned ON.
o Tap on the Bluetooth device you would like to pair with the
tablet.
o The tablet will automatically connect to the new Bluetooth
device.
o To stop using the connected Bluetooth device with your tablet
tap on the name of your device in the Bluetooth Settings page
and a popup box will appear asking if you want to disconnect
the device.
9. Viewing Photos and Video on your TV
The Mini HDMI Port on your device allows you to output your photos, video and
even games through a HDMI cable (Not included) to your TV, or any video or
audio device that supports a HDMI connection.
o Connect a HDMI cable to your device
o Connect the other end of the HDMI cable to your TV
o Turn on your TV and switch the input to your HDMI input
o Turn on and unlock your device
o Your device screen will now be displayed on your TV
10. Firmware Update
• This tablet is capable of receiving over the air updates. These
updates can be Android operating system updates, user interface
improvements, and product upgrade offers.
• Your purchase includes a limited number of operating system updates
and user interface updates through December 31, 2014.
Page 23

!
"`!
• You will continue to receive available update notifications beyond
December 31, 2014 but the updates will not be free of charge.
NOTE: Not all Android operating system updates may be compatible with
your specific device. You will only receive notifications with the updates that
are workable with your tablet.
11. Troubleshooting
• No Power
o Make sure the device is properly charged (Section 1.3)
• Tablet appears frozen on the Android screen after a Software
Update
o In some instances software updates can take up to an hour or
more to index all of the necessary operating system files
needed to run the tablet.
o Make sure to connect the AC adaptor during Software Updates
to insure the battery does not die during the time the files are
indexing.
• Screen is Frozen/Not Responding
o Restart the device by turning the Power OFF and then ON
again.
! If the device will not respond to the Power button, insert
a thin, straight object (such as a paper clip) in the
manual reset hole to perform a soft reset on your device.
• Tablet is Slow
o Close any unused Apps that may be running in the background
(Section 7.1)
• Music/Movie file will not play
o Make sure the file format you are attempting to play is shown in
the Compatible Audio/Video Format list in the Technical
Specifications section of the manual (Section 13)
• Tablet storage is full
o Add more storage by inserting a microSD card (Section 1.2)
o Transfer or Delete unused files using the FileManager App
(Section 4)
• Wi-Fi reception is poor
o Make sure you are not too far from the Wi-Fi router/hotspot. We
recommend a distance between 0 – 65 Feet.
o Restart your Wi-Fi router.
• Backup & Reset
o Do not enable Factory Data Reset unless you have spoken to a
customer support person first. Doing so could result in losing all
your data stored on your device.
Page 24

!
"a!
12. Customer Support
If you are having a problem with the operation of this Tablet – Do not return it to
the retailer!
Your Touchscreen Tablet includes Free Technical Support by Phone or Internet
and we are glad to help you with any problems.
For Technical Support by Internet, simply touch the Customer Help icon on the lower
right–side of the home screen to immediately be directed to our Technical Support
website. For Technical Support by Phone, please call 855-998-4326, Monday to
Saturday 10:00 AM to 7:00PM.
BATTERY WARNINGS
• This product uses a rechargeable Lithium-Ion battery. Only use the supplied battery and
charger for this device. Use of a battery or charger that is not made for this device can
result in serious injury and/or damage to the product.
• This device must be disposed of properly, according to local laws and regulations. Contact
your local authorities to learn about the correct recycling and disposal options.
Page 25

!
"^!
7” HD Pantalla Táctil
Tablet con Bluetooth
Manual del usuario
Modelo: V7TAB16BT
Si tiene algún problema con la operación de esta tablet, no la
devuelva al comercio minorista donde la compró.
Su tablet de pantalla táctil incluye soporte técnico gratuito por
teléfono o a través de Internet y nos complacerá ayudarlo a
resolver sus problemas.
Para obtener soporte técnico a través de Internet, simplemente
pulse el icono "Customer Help" (soporte al cliente) en la parte
derecha inferior de la pantalla de inicio para ser direccionado de
inmediato a nuestro sitio de soporte técnico. Para obtener soporte
técnico por teléfono, llame al 855-998-4326 de lunes a sábados de
10am a 7pm.
Tap Here to return to the English version of this User Manual
Page 26

!
"b!
1. Conociendo a su dispositivo
Parte delantera
Parte trasera
Número de parte
Descripción
1. Pantalla táctil
Use un dedo para controlar el sistema y la aplicación.
2. Cámara
La cámara incorporada le permite capturar imágenes
estáticas, grabar videos, chatear en línea y capturar
imágenes panorámicas.
3. Indicador de
carga
La luz indicadora roja se encenderá mientras el dispositivo
se esté cargando. Luego de que el dispositivo esté cargado
por completo, la luz se apagará.
4. Parlantes
Reproducen sonidos de archivos de música, películas,
juegos, notificaciones del sistema y más.
Page 27

!
"c!
Puertos y botones
Puerto y nombre de
botón
Descripción
1. Botón de
encendido/apagado
Presione y mantenga el botón de encendido/apagado de
2 a 3 segundos y el dispositivo se encenderá.
Presione y mantenga el botón de encendido/apagado
durante más de 3 segundos y el dispositivo se apagará.
Presione una vez el botón de encendido/apagado para
poner a la tablet en modo de suspensión.
Si la tablet se encuentra en modo de suspensión,
presione una vez en botón de encendido/apagado para
salir del modo de suspensión.
2. Ranura de tarjeta
microSD®
La tablet soporta tarjetas SD o SDHC de hasta 64 GB
(no incluida)
3. Puerto Mini-HDMI
A Mini cable HDMI a HDMI (no incluido) se conecta a
dispositivos de vídeo y audio, tales como la televisión, o
cualquier componente digital o de audio compatible que
utiliza una conexión HDMI.
4. Puerto USB
Conexiones periféricos como ratones, cámaras digitales,
reproductores MP3 y más que utilizan una conexión USB
de tamaño completo.
5. Puerto mini USB
Conecta periféricos como ratones, cámaras digitales,
reproductores MP3 y otros dispositivos más que usen
conexión de puerto mini USB. Utilícelo para cargar su
tablet desde un computadora.
6. Conector de
alimentación
Se conecta a una fuente de suministro eléctrico de
corriente alterna (CA) para alimentar el dispositivo y
cargar la batería.
7. Conector de
auriculares
Para conectar auriculares externos con conectores
macho de 3.5mm.
8. Micrófono
Recibe sonidos y voz para su grabación.
9. Reset (restaurar)
Cuando el sistema no responde o deja de funcionar
inserte un objeto fino y largo (como un clip) en el orificio
de restauración manual para realizar una restauración
manual del software.
10. Botón Home
(inicio)
Presione este botón para volver a la pantalla de inicio.
Presiónelo nuevamente para abrir el Application Drawer
(cajón de aplicaciones).
Page 28

!
"d!
1.1. Accesorios
La caja contiene una tablet de pantalla táctil HD de 7 pulgadas, un cable de
mini USB a USB y un adaptador de alimentación de CA. Si nota que falta
alguno de estos elementos al abrir la caja, devuelva inmediatamente la tablet,
todos los accesorios y todos los empaques al distribuidor.
1.2. Tarjeta microSD
Su Tablet viene con 16 GB de memoria incorporada para almacenamiento.
Algunos de los programas precargados y el sistema operativo utilizará
aproximadamente 2-3GB de espacio. Usted puede agregar hasta un 64 GB
adicionales de espacio de almacenamiento en el dispositivo mediante el uso
de una tarjeta SDHC o SDXC microSD (no incluida). Los datos se pueden
guardar en la memoria integrada o en la tarjeta microSD. Además archivos
también se pueden transferir a una tarjeta microSD desde tu computadora
personal y luego importados a su Tablet.
o Para instalar la tarjeta microSD
o Inserte la tarjeta microSD, asegurándose de que los contactos
dorados estén mirando hacia abajo.
o Empuje la tarjeta microSD suavemente dentro de la ranura (2)
hasta que encaje en su posición.
o Para retirar la tarjeta microSD
o Empuje levemente la tarjeta microSD hacia adentro y ésta se
eyectará parcialmente de la ranura. Retire la tarjeta de la
ranura. (2)
o Advertencia: Siga las instrucciones para retirar la tarjeta
microSD de su tablet con seguridad. El retiro incorrecto de la
tarjeta microSD puede causar pérdida de datos y problemas
impredecibles del sistema. Para un retiro seguro, pulse Settings
> Storage >Unmount microSD card
(Configuraciones>Almacenamiento>Desmontar tarjeta
microSD).
1.3 Carga de la batería
Al recibir su dispositivo por primera vez, la batería estará cargada sólo
parcialmente. Para cargar la batería por completo, déjela cargando durante 5
horas para asegurarse de que esté totalmente cargada antes de usar la
tablet.
1. Conecte un extremo del adaptador de alimentación de CA al conector
de alimentación (6) del dispositivo.
2. Enchufe el otro extremo del adaptador de alimentación de CA al
tomacorriente para comenzar a cargar.
3. La luz de LEDs roja en la parte delantera del dispositivo se apagará
cuando la batería esté totalmente cargada.
Consejos: Para aumentar la vida de la batería
• Disminuya el brillo de la pantalla
Page 29

!
"e!
• Reduzca el tiempo en que el dispositivo entra en modo de
suspensión (Sleep mode).
• Apague el Wi-Fi cuando no necesite conectarse a Internet.
• Cierre las aplicaciones cuando haya terminado de usarlas, de lo
contrario seguirán ejecutándose en segundo plano.
• Apague totalmente el dispositivo cuando haya terminado de usarlo.
1.4 Encendido y apagado del dispositivo
o Para encender su dispositivo:
o Presione y mantenga presionado el botón de encendido/apagado
(1) durante al menos 2 segundos hasta que aparezca una imagen
en la pantalla.
o Para apagar su dispositivo:
1. Presione y mantenga presionado el botón de encendido/apagado (1)
durante al menos 2 segundos.
2. A continuación, aparecerá una ventana emergente. Pulse en OK para
confirmar el apagado o pulse CANCEL (cancelar) para volver a la
pantalla principal.
o Para poner a su dispositivo en modo de suspensión (Power Saving):
o Presione una vez el botón Power (encendido/apagado). Esto
apagará la pantalla y pondrá a la tablet en modo de suspensión de
bajo consumo de energía.
o Para reactivar su dispositivo del modo de suspensión, presione una
vez el botón Power (1) de encendido/apagado.
1.5 Gestos comunes:
o Pulsar - Para seleccionar o activar algo, toque su selección suavemente
una sola vez.
o Tipear - Para tipear algo, como un nombre, una contraseña o un término
de búsqueda, simplemente toque donde desee comenzara a tipear y
aparecerá automáticamente para que comience a tipear en el campo.
o Tocar y mantener - Tocar y mantener el dedo. Toque un elemento y no
levante su dedo hasta que se produzca la acción.
o Arrastrar - Toque y mantenga el dedo sobre un elemento durante un
momento luego, sin levantar su dedo, mueva su dedo sobre la pantalla
hasta que el elemento llegue a la posición deseada.
o Deslizar - Mueva su dedo rápidamente a través de la superficie de la
pantalla, sin detenerse luego de tocar (para no arrastrar algo en cambio).
Por ejemplo, para deslizar la pantalla de Inicio a la derecha o a la
izquierda, simplemente toque la pantalla de inicio y mueva su dedo hacia
la derecho o hacia la izquierda a través de las diferentes pantallas.
o Doble toque - Haga rápidamente dos toques seguidos sobre una página
web, mapa u otra pantalla para ampliar o reducir la imagen. Por ejemplo,
toque dos veces seguidas sobre una imagen en Chrome para ampliarla y
vuelva hacerlo para reducirla.
o Pellizcar - En algunas aplicaciones, como Maps, Chrome y Gallery
(Galería), podrá ampliar o reducir las imágenes posando dos dedos
Page 30

!
`g!
separados al mismo tiempo y luego uniéndolos para reducir o posando
dos dedos juntos y luego separándolos para ampliar.
o Rotar la pantalla - La imagen de pantalla de la mayoría de las
aplicaciones pueden rotar junto con su dispositivo. Algunas aplicaciones
pueden mostrar la imagen en pantalla de una sola forma y no se pueden
rotar.
1.6 Desbloqueo de la pantalla
La pantalla se bloquea automáticamente en forma predeterminada luego de
un período de tiempo de inactividad. Puede ajustar el tiempo de bloqueo de
pantalla desde System Settings (configuraciones del sistema).
o Bloqueo de la pantalla
1.6.1 Presione el botón Power (encendido/apagado) para encender la
tablet o para sacarla del modo de suspensión.
1.6.2 Pulse y mantenga presionado el icono y deslícelo hasta el
símbolo a la derecha de la pantalla para desbloquear el
dispositivo.
Si tiene algún problema con la operación de esta tablet, no la devuelva al
comercio minorista donde la compró.
Su tablet de pantalla táctil incluye soporte técnico gratuito por teléfono o a
través de Internet y nos complacerá ayudarlo a resolver sus problemas.
Para obtener soporte técnico a través de Internet, simplemente pulse el icono
"Customer Help" (soporte al cliente) en la parte derecha inferior de la pantalla de
inicio para ser direccionado de inmediato a nuestro sitio de soporte técnico. Para
obtener soporte técnico por teléfono, llame al 855-998-4326 de lunes a sábados
de 10am a 7pm.
Page 31

!
`]!
2 Configuración de su dispositivo para su primer uso
Nota: Para una correcta configuración, asegúrese de tener acceso a una red
inalámbrica y de que su dispositivo esté totalmente cargado.
Antes de intentar de configurar su dispositivo, necesitará el nombre y la
contraseña de su red inalámbrica. Por favor, tenga esta información a mano
antes de comenzar a configurar su dispositivo.
Paso 1 - Encienda su dispositivo
o Encienda y desbloquee su dispositivo como se describe en la
sección anterior.
Paso 2 - Seleccione su idioma
o Pulse sobre la lista de idiomas (Language) y desplácese a lo
largo de la lista de idiomas disponibles.
o Seleccione el idioma predeterminado para su dispositivo
pulsándolo.
o Confirme su selección pulsando el botón Start (Inicio).
! El proceso de selección de idioma puede demorar un
minuto.
Paso 3 - Ajuste su red Wi-Fi
o En la pantalla de su tablet aparecerá una lista de las redes
inalámbricas disponibles.
o Seleccione el nombre de su red inalámbrica Wi-Fi desde la lista
pulsándola.
o Si su red inalámbrica está protegida por contraseña, necesitará
ingresar la contraseña en el campo de ingreso de contraseña
que aparecerá al intentar conectarse.
o Pulse la línea de contraseña para que aparezca el teclado de
la tablet.
! Marque la casilla "Show Password" (mostrar
contraseña) si quiere que su contraseña sea visible.
! Las contraseñas que diferencian entre mayúsculas y
minúsculas deben ser ingresadas exactamente como
fueron creadas.
o Luego de ingresar su contraseña, pulse el icono "Connect"
(conectar).
! Espere unos 15-20 segundos hasta que el dispositivo se
conecte a la red. A continuación aparecerá un tilde azul
junto al nombre de la red inalámbrica que indica que la
conexión fue exitosa, y se mostrará como "Connected"
(conectado) bajo en el nombre de red.
! Si tiene problemas para conectarse a su red Wi-Fi,
contacte a su equipo de asistencia al cliente.
o Una vez que se haya establecido la conexión, pulse el icono
"Next" (siguiente).
Page 32

!
`"!
Paso 4 - ¿Tiene una cuenta de Google?
Una cuenta de Google le permite organizar y acceder a su información
personal desde cualquier computadora o dispositivo móvil:
• Jamás vuelva a perder sus contactos. Cuando inicie sesión con su
cuenta de Google en su dispositivo, todos los contactos que haya
asociado con esa cuenta en la aplicación People (gente) serán
automáticamente respaldados. Como resultado, siempre podrá
acceder a ellos a través de su cuenta de Gmail desde cualquier
computadora.
• Sincronice y respalde todo. Ya sea que escriba un borrador de un
correo electrónico, agregue un número de teléfono de un contacto,
agregue un evento en su calendario, todo su trabajo es respaldado
continuamente por Google y es sincronizado con cualquier
computadora en la que use la misma cuenta de Google.
• Acceso desde cualquier lugar. Revise las más recientes
actividades de su calendario, correos electrónicos, mensajes de
texto o publicaciones en redes sociales en cualquier lugar, sin
importar qué computadora o dispositivo móvil esté usando.
• Use otros servicios de Google. Su cuenta de Google también le
permite provechar cualquier otra aplicación o servicio de Google
que quiera usar, como Gmail, Google Maps, Navigation, Google
Play, YouTube, Google Talk, mensajería instantánea y mucho
más.
Nota: Si todavía no tiene una cuenta gratuita de Google, le
recomendamos encarecidamente que abra una usando el asistente de
configuración (Setup wizard) en este dispositivo a fin de optimizar el uso
de su tablet.
o Su dispositivo está diseñado para funcionar con Google Mail
(Gmail). Si no tiene una cuenta gratuita de Google, le
recomendamos que abra una.
o Si ya tiene una cuenta de Google, pulse el icono "Yes" (sí).
o Si no tiene una cuenta de Google, pulse el icono "No" y seré
redireccionado a la pantalla de Make it Google (crear cuenta
de Google).
Paso 5 - Make it Google
o Para crear una cuenta de Google, pulse el icono "Get an
Account" (crear una cuenta).
! En la siguiente pantalla podrá crear su nombre de
usuario para su cuenta de Google.
! El nombre de usuario de su cuenta de Google puede
usarse como su nueva dirección de correo electrónico,
la cual tendrá el siguiente formato:
(SuNombreDeUsuario@gmail.com).
Page 33

!
``!
• Nota: Si no desea usar a Google Mail como su
proveedor de correo electrónico, podrá usar esta
tablet con una cuenta de correo electrónico de
casi cualquier otro proveedor. Esto se explica
detalladamente en la sección E-mail de este
manual.
o Si no quiere crear una cuenta de Gmail, pulse el icono "Not
Now" (ahora no).
o Luego de haber hecho su selección será redireccionado a los
ajustes de Wi-Fi.
Si tiene algún problema con la operación de esta tablet, no la devuelva al
comercio minorista donde la compró.
Su tablet de pantalla táctil incluye soporte técnico gratuito por teléfono o a
través de Internet y nos complacerá ayudarlo a resolver sus problemas.
Para obtener soporte técnico a través de Internet, simplemente pulse el icono
"Customer Help" (soporte al cliente) en la parte derecha inferior de la pantalla de
inicio para ser direccionado de inmediato a nuestro sitio de soporte técnico. Para
obtener soporte técnico por teléfono, llame al 855-998-4326 de lunes a sábados
de 10am a 7pm.
Paso 6 - Inicie sesión
o Ingrese la dirección de correo electrónico Gmail y su
contraseña.
o Pulse el icono "Next" (siguiente).
! Nota: aparecerá un diálogo que le preguntará si está de
acuerdo con el contrato de licencia para usuario final
(ULA) de Google.
• Pulse "Yes" (sí) para aceptar.
• Pulse "Cancel" (cancelar) si no acepta el
contrato, pero no podrá acceder al sistema de
correo electrónico de Google o a otras
aplicaciones relacionadas.
Paso 7 - Entretenimiento
Puede comprar aplicaciones en la tienda de Google Play en forma
rápida, sencilla y segura guardando la información de su tarjeta de
crédito en el sistema con encriptado de 128 bits de Google Wallet.
o Pulse el icono "Setup Credit Card" (configurar tarjeta de
crédito) para ingresar la información de su tarjeta de crédito en
forma segura.
! Por favor, lea la información de privacidad de Google
pulsando el icono antes de ingresar su información
personal.
Page 34

!
`a!
o Pulse el icono "Not Now" (ahora no) si no desea usar la función
Google Wallet y continúe a la siguiente pantalla.
! Nota: Si no usa Google Wallet tendrá que ingresar la
información completa de su tarjeta de crédito cada vez
que quiera comprar en la tienda de Google Play.
Paso 8 - Respaldo y restauración
Puede realizar en forma fácil y automática respaldos de sus aplicaciones,
configuraciones, fotos, vídeos libros, favoritos y otros datos en su cuenta
de Google.
o Marque las opciones que desee usar. Podrá cambiarlas desde
Settings (configuraciones) en cualquier momento.
o Cuando termine, pulse la flecha derecha en el extremo inferior
derecho de la pantalla para continuar.
Paso 9 - Use los servicios de ubicación de Google
Puede usar los servicios de ubicación de Google para utilizar los datos
de ubicación de su red Wi-Fi a fin de ayudar a las aplicaciones a
determinar su ubicación aproximada cuando esté disponible. Esta
información de ubicación es utilizada para: brindar instrucciones para
llegar a su destino mientras conduce, encontrar restaurantes, comercios
y cines cercanos, etc.
o Marque las opciones que desee usar. Podrá cambiarlas desde
Settings (configuraciones) en cualquier momento.
o Cuando termine, pulse el icono "Next" (siguiente) en el extremo
inferior derecho de la pantalla para continuar.
Paso 10 - Configuración finalizada
Su tablet está configurada y lista para usar.
o Pulse la flecha de atrás (Back) para realizar cambios
adicionales.
o Pulse la flecha "Finish" (finalizar) para comenzar a usar su
tablet.
Page 35

!
`^!
5
6
7
8
9 10 11
4
1
2
3
3 Identificación de la pantalla de Inicio
La pantalla de Inicio (Home) consiste de 5 áreas, las cuales se pueden
personalizar para incluir diferentes Apps y Widgets. La siguiente imagen
muestra el diseño de la pantalla principal de la tablet. Esta imagen muestra
varios de los elementos de la pantalla de Inicio (Home), lo cuales son
mencionados a lo largo de este manual.
Nombre
Descripciones
1. Pantalla de Inicio (Home)
La pantalla principal para agregar Apps y
Widgets. Hay 5 páginas en la pantalla de
Inicio que se acceden deslizando su dedo
a la izquierda o la derecha.
2. Widget
Un "Widget" es una aplicación que se
puede ubicar en cualquiera de las
pantallas de inicio, para un fácil y rápido
acceso.
3. Flecha del "Application
Drawer" (cajón de
aplicaciones)
Deslice su dedo hacia arriba o pulse para
revelar todas sus aplicaciones o Apps.
4. Barra de Favoritos
Apps que permanecen en su pantalla de
Inicio.
5. Icono de navegación hacia
atrás
Abre la pantalla previa que estaba
viendo.
6. Icono de navegación a inicio
Lo envía a la pantalla principal de inicio
(Home).
7. Icono de navegación a Apps
recientes
Abre una lista de imágenes en miniatura
de las Apps que usó recientemente y las
que usa con frecuencia.
Page 36

!
`b!
8. Iconos volumen
Ajusta el volumen arriba o abajo.
9. Icono de estado de batería
Muestra el porcentaje de la carga de la
batería.
10. Icono de estado de conexión
Wi-Fi
Muestra la intensidad de la señal Wi-Fi.
11. Configuración rápida y área
de notificación
Pulse una vez para ver notificaciones.
Toque el cuadro de pop-up de nuevo
para ver los ajustes rápidos.
4 Configuración rápida y área de notificación (Quick Settings)
Los ajustes rápidos y popups de notificación le permite ver o cambiar la
configuración del dispositivo de forma rápida directamente desde la pantalla
principal pulsando en los ajustes rápidos y Área de notificación (11).
• Para ver sus notificaciones toque en la Configuración rápida y Área de
notificación (11) una vez y el cuadro emergente Notificaciones
aparecerá.
• Para ver los ajustes rápidos Toque en la Configuración rápida y Área
de notificación (11) una vez para que aparezca el cuadro de diálogo
emergente de notificaciones, a continuación, toque en el cuadro
desplegable para ver los ajustes rápidos.
o Puede ajustar los siguientes elementos dentro de los Ajustes
rápidos:
! Modo avión - Toque para activar o desactivar la
! Smart Wi-Fi Connect - Toque para ir a la sección de
conexión Wi-Fi de la aplicación de configuración
! Girar pantalla - Toque para girar la pantalla
! Brillo - Arrastre hacia la izquierda o hacia la derecha para
aumentar o disminuir el brillo de la pantalla
Page 37

!
`c!
! Notificaciones - toque para activar las notificaciones Activar
o Desactivar
! Ajustes - Toque para ir a la aplicación de configuración
completa.
5 Uso de las aplicaciones
5.1. Navegación en Internet con su dispositivo
Su dispositivo viene con dos navegadores web. Un navegador web básico
llamado "Browser" (navegador) y el navegador propio de Google llamado
"Chrome".
Nota: Asegúrese de que el dispositivo esté conectado a una red Wi-Fi.
1. Abra el navegador Browser o Chrome pulsando el icono del navegador
elegido. Nota: Puede encontrar los navegadores tanto en la barra de
favoritos como en el App Drawer (cajón de aplicaciones). Abra el App
Drawer pulsando la flecha del Application Drawer (3).
2. Para visitar un sitio web, toque el campo de dirección web para
acceder al teclado y tipee la dirección del sitio web. También puede
buscar sitios web usando palabras o frases de búsqueda. Luego de
tipear su dirección web o de realizar su búsqueda, pulse el botón "Go"
(ir) en el teclado.
3. Puede desplazarse a través de la página web arrastrando su dedo de
arriba a abajo sobre la pantalla táctil para mover la página web.
4. Si la página web es muy grande para caber completamente en la
pantalla de su tablet, podrá hacer un paneo hacia arriba, abajo,
izquierda o derecha arrastrando su dedo sobre la pantalla táctil como
lo hace para desplazarse.
5. Para ampliar la imagen en pantalla, puede pellizcar la pantalla táctil
tocando la pantalla con dos dedos separados para luego unirlos. Para
reducir la imagen en pantalla, toque la pantalla con dos dedos unidos
para luego separarlos.
6. Para volver a cargar una página web, pulse el icono "Refresh"
(actualizar) a la izquierda del campo de dirección. Cuando una
página web se esté cargando desde Internet, el icono "Refresh" se
reemplazará por el icono "X". Pulse el icono "X" para detener la carga
de la página web en el navegador.
7. Para agregar una página a Favoritos, toque el icono "Favorites"
(favoritos) a la derecha de la barra de favoritos. A continuación,
aparecerá la ventana de "Add Bookmark" (agregar a favoritos) y podrá
editar el nombre de la página si desea un nombre más corto o uno
más fácil de recordar. Al finalizar, pulse el botón "Save" (guardar) u
"OK".
8. Configuración de la página de inicio
La página de inicio es el primer sitio web que verá al iniciar su
navegador.
1. Navegue a la página que desee configurar como su página de
inicio.
Page 38

!
`d!
2. Pulse el icono "Menu" (menú).
3. Elija "Settings" (configuraciones) y aparecerá la pantalla de
Settings.
4. Elija la categoría "General".
5. Elija "Set Home Page" (configurar página de inicio) y aparecerá el
menú de "Set Home Page" (página de inicio configurada).
6. Pulse el botón de "Current Page" (página actual) y su página de
inicio se habrá establecido exitosamente.
Nota: Muchas de las páginas que visita en la web se pueden acceder
directamente usando aplicaciones específicas. Facebook, Gmail, Twitter,
YouTube y otros destinos web populares disponen de sus propias
aplicaciones que podrá encontrar ya instaladas en su dispositivo o bien podrá
descargar desde la tienda Google Play.
5.2. Google Play
Con cientos de miles de aplicaciones, Google Play tiene las indicadas para
usted. Cuando descarga aplicaciones, éstas son descargadas directamente a
su dispositivo. También podrán encontrar su próximo libro, una nueva
canción o incluso una gran película en el catálogo que lo incluye todo, desde
películas de taquilla y libros de éxito editorial, hasta millones de canciones.
5.3. Correo electrónico
Su dispositivo viene con dos lectores de correo electrónico. Una aplicación
de correo electrónico básica llamada "Email" y la aplicación de correo
electrónica propia de Google llamada "Gmail".
Para obtener la mejor experiencia usando este dispositivo, le recomendamos
que cree una cuenta gratuita de Gmail y use Gmail como su aplicación de
correo electrónico.
5.4. Configuración de una cuenta de correo electrónico distinta a Gmail
La aplicación Email se usa para acceder a cuentas de correo electrónico
basadas en la web, o webmail, desde Yahoo! Mail Windows Live y otros.
También le permite acceder a su cuenta de correo electrónico provista por su
proveedor de servicios de Internet o incluso a su correo electrónico laboral, si
está permitido.
Nota: Antes de configurar su cuenta de correo electrónico necesitará varios
datos. Si está configurando una cuenta de correo electrónico laboral,
necesitará comunicarse con su departamento de informática para saber si
existen instrucciones o requerimientos adicionales para la configuración de
su cuenta, ya que las configuraciones de correo electrónico y de seguridad
pueden varias entre compañías.
1. La aplicación de correo electrónico se encuentra en el Apps Drawer
(cajón de aplicaciones). También podrá encontrar accesos directos a
la aplicación en la pantalla de inicio (Home) y en la barra de favoritos
(Favorites).
Page 39

!
`e!
2. Inicie la aplicación de correo electrónico pulsándola.
3. A continuación, aparecerá la pantalla de configuración de cuenta de
correo electrónico (E-Mail Account Setup).
4. Ingrese la dirección de correo electrónico que desee configurar en
este dispositivo.
5. Ingrese la contraseña para esta cuenta.
6. Pulse el botón "Next" (siguiente).
7. Seleccione el tipo de cuenta.
• Necesitará saber si su cuenta de correo electrónico es POP3,
IMAP o Microsoft Exchange.
• Seleccione el tipo de cuenta que corresponda y siga las
instrucciones en pantalla para finalizar la configuración de su
cuenta de correo electrónico.
• Al cambiar la frecuencia de verificación de nuevos correos
electrónicos a más de 15 minutos podrá ahorrar vida de batería.
Luego de pulsar "Next" (siguiente), se lo llevará a la bandeja de entrada de
su cuenta de correo electrónico. Su tablet sincroniza todos los correos
electrónicos pendientes en su cuenta. Dependiendo de cuantos nuevos
correos electrónico tenga, la sincronización puede demorar unas cuantos
minutos.
5.5. Agregar más cuentas de correo electrónico
La aplicación de correo electrónico Email se puede configurar para varias
cuentas. (p. ej., personal, laborar) Siga estos pasos para agregar una cuenta
de correo electrónico adicional.
1. Inicio de la aplicación de correo electrónico
2. Elija "Add Account" (agregar cuenta) desde el icono de Settings
(Configuraciones).
3. Siga los pasos 4 a 7 de las sección anterior para configurar las
cuentas de correo electrónico adicionales.
5.6. Agregar música, fotos y vídeos a su dispositivo por USB o tarjeta
microSD
1. Copie los archivos que quiera transferir a una unidad de
almacenamiento USB o una tarjeta microSD. Estos archivos pueden
ser fotos, archivos de música o archivos de vídeo.
Nota: Su dispositivos no soporta todos los tipos de archivos de
medios, por mostrará los formatos más populares. Por favor, lea la
sección de Especificaciones técnicas para asegurarse cuáles son los
formatos de archivo soportados.
Page 40

!
ag!
2. Inserte la unidad de almacenamiento USB en el puerto USB o la
tarjeta microSD en el puerto de tarjetas microSD en la parte inferior del
dispositivo.
3. Abra la aplicación "Gallery" (galería) o "Explorer " (explorador) para
ver, reproducir, eliminar o copiar archivos a su dispositivo.
4. Desmonte la unidad de almacenamiento USB o la tarjeta microSD
antes de retirarla de su dispositivo. Para un retiro seguro, pulse
Settings > Storage >Unmount Storage
(Configuraciones>Almacenamiento>Desmontar unidad de
almacenamiento). Ahora podrá proceder a retirar su unidad USD o
tarjeta microSD con seguridad.
5.7. Agregar música, fotos y video a su dispositivo desde una PC con
Windows
1. Conecte su dispositivo a su PC usando el cable USB provisto.
2. Una vez que haya conectado su dispositivo a la PC, aparecerá un
diálogo emergente en la PC que le pedirá que elija la forma de agregar
elementos a su dispositivo desde el sistema de almacenamiento de
Windows.
3. La forma más simple de mover archivos es seleccionando "Open
device to view files" (abrir dispositivo para ver los archivos).
4. Su dispositivo se mostrará en su PC como un icono de unidad de
disco montada.
5. Haga doble clic sobre el icono de la unidad de disco montada y
simplemente arrastre y suelte las archivos que desee copiar de la PC
a la carpeta de destino en su dispositivo. (P. ej., Photos (fotos), Music
(música), Movies (películas), etc.)
6. Después de que los archivos han completado la copia de su
dispositivo, puede des-montar el dispositivo de su PC siguiendo los
procedimientos des-montaje adecuados y luego desconecte el cable
USB.
Nota: También podrá copiar archivos de su dispositivo a su PC
siguiendo estos mismos pasos.
5.8. Transferencia de archivos usando Mac
1. Conecte el dispositivo al ordenador con el cable USB incluido.
2. Pulse en los ajustes rápidos y Área de notificación (11) y toque en la
notificación "USB Conectado".
3. Llegará a la pantalla "USB conectado". Toque en la "Activar
almacenamiento USB" icono en la parte inferior de la pantalla
4. Una vez conectado el dispositivo de pantalla táctil cambiará a
"almacenamiento USB en uso".
5. El dispositivo aparecerá ahora como una unidad flash USB de su Mac
OS.
6. Abra el dispositivo en el Finder como cualquier otro dispositivo USB.
Arrastre y suelte los archivos hacia o desde su dispositivo.
Page 41

!
a]!
7. Después de que los archivos hayan terminado de copiar a su
dispositivo, puede desmarcar montar el dispositivo de su Mac
pulsando sobre el icono "Desactivar almacenamiento USB". Extraiga
la unidad de su lista de dispositivos Mac OS y luego desconecte el
cable USB.
5.9. Visualización de archivos de música, imágenes y vídeo en su
dispositivo
1. Use la aplicación Gallery (galería) para visualizar sus fotos y vídeos.
2. Abra la aplicación Gallery en el Application Drawer (cajón de
aplicaciones) pulsándola.
3. Podrá ver que sus archivos estará automáticamente organizados en
las carpetas para imágenes o películas.
4. Para ver una foto o un vídeo, simplemente pulse el elemento deseado.
5. Si tiene más de una imagen o vídeo, podrá deslizarse de izquierda a
derecha con su dedo sobre la pantalla táctil para ver todos los
elementos.
6. Para ver un vídeo, pulse el icono "Play" (reproducir). Para pausar un
video, pulse el vídeo nuevamente.
7. Para eliminar o editar una foto o vídeo, simplemente pulse el elemento
y luego pulse el icono de configuración que aparecerá en la esquina
superior derecha.
8. A continuación, aparecerá una serie de opciones de edición. Elija la
que desee aplicar.
Si tiene algún problema con la operación de esta tablet, no la devuelva al
comercio minorista donde la compró.
Su tablet de pantalla táctil incluye soporte técnico gratuito por teléfono o a
través de Internet y nos complacerá ayudarlo a resolver sus problemas.
Para obtener soporte técnico a través de Internet, simplemente pulse el icono
"Customer Help" (soporte al cliente) en la parte derecha inferior de la pantalla de
inicio para ser direccionado de inmediato a nuestro sitio de soporte técnico. Para
obtener soporte técnico por teléfono, llame al 855-998-4326 de lunes a sábados
de 10am a 7pm.
6. Uso de su dispositivo
6.1. Apps
Es la abreviatura de "Applications" (aplicaciones). Las Apps son
programas que se pueden descargar a su dispositivo desde la tienda de
Google Play. Las Apps pueden ser gratuitas o pagas.
• Para abrir una App
o Para iniciar una App, simplemente púlsela para abrir el
elemento o iniciarlo.
Page 42

!
a"!
• Application Drawer (cajón de aplicaciones)
o El Application Drawer (o App Drawer) es donde se guardan
todas las aplicaciones. Este "cajón de aplicaciones" funciona
como la puerta de un garaje, la cual se levanta para mostrarle
todas sus aplicaciones almacenadas. Podrá acceder a ella de
dos maneras:
1. Deslizando su dedo hacia arriba o pulsando la flecha del
Application Drawer (3) en la parte inferior de su pantalla
para abrir el Application Drawer.
2. O puede pulsar dos veces seguidas el icono de Home
Navigation (navegación de inicio) en la parte inferior de
su pantalla. Esto lo llevara de vuelta a la pantalla de
inicio (Home) y abrirá el App Drawer.
• Para mover una App de su App Drawer a su pantalla de inicio
o Abra el Application Drawer (cajón de aplicaciones)
o Pulse y mantenga presionado el icono de la aplicación que
desea mover.
o El icono de la App parecerá flotar. Continúe manteniendo
presionado el icono y arrástrelo hasta la pantalla de inicio.
o Una vez que haya seleccionado la ubicación deseada para su
App en la pantalla de inicio, simplemente suéltela.
• Para mover una aplicación a la pantalla de inicio
o Pulse y mantenga presionado el icono de la aplicación que
desea mover.
o El icono de la App parecerá flotar. Aparecerá una cuadrícula en
la pantalla de inicio.
Page 43

!
a`!
o Continúe pulsando el icono y arrástrelo hasta donde desee
ubicarlo en su pantalla de inicio.
o Una vez que haya seleccionado la ubicación, simplemente
suelte el icono.
• Para cerrar una App activa en segundo plano
Las aplicaciones activas en segundo plano afectan el rendimiento de
su dispositivo y reducen la vida de la batería. Para cerrar sus Apps
siga los siguientes pasos:
1. Abra el menú de aplicaciones recientes en su barra de
navegación.
2. Encuentre la aplicación que desee cerrar y deslice el dedo
verticalmente hacia fuera de la pantalla. Este método
cerrará la mayoría de las aplicaciones, pero algunas
seguirán ejecutándose en segundo plano en alguna medida.
3. Para asegurarse de que la aplicación se cierre
completamente, deberá abrir la aplicación de
configuraciones (Settings) de su dispositivo.
4. Haga clic sobre las configuraciones de las "Apps"
5. Asegúrese de ver las aplicaciones en ejecución ("Running")
deslizando su dedo sobre la pantalla hasta que "Running" se
muestre en la parte superior de la pantalla.
6. Marque la aplicación que desee cerrar.
7. Pulse el icono "Stop" (detener).
• Para eliminar una App
o Pulse y mantenga presionado el icono de la aplicación que
desea eliminar.
o El icono de la App parecerá flotar.
o Una papelera aparecerá en la esquina inferior derecha se
su pantalla de inicio (Home).
o Arrastre la aplicación hasta la papelera. La papelera se pondrá
roja. Suelte su dedo para eliminar la App.
Page 44

!
aa!
6.2. Widgets
Un "Widget" es una vista de una aplicación que se puede ubicar un su
pantalla de inicio, para un fácil y rápido acceso. Las aplicaciones de
noticias y clima en su dispositivo son algunos ejemplos de Widgets. Otro
popular Widget que puede instalar o descargar es el de Facebook y
Twitter. Estos Widgets se actualizan en tiempo real, mostrándole las
publicaciones o tweets más recientes de sus amigos.
• Agregar Widgets
o Pulse y mantenga presionado su dedo en la pantalla de inicio
(Home). Asegúrese de no tocar una aplicación u otro Widget.
o Aparecerá un diálogo titulado "Agregar a la pantalla de inicio
(Add to Home Screen)".
o Pulse el icono "Widgets".
o Aparecerá un diálogo titulado "Choose Widgets" (seleccionar
Widgets).
o Pulse el nuevo Widget que desee sobre su pantalla.
o El nuevo Widget aparecerá en la pantalla en que se encuentre.
• Ajuste del tamaño del Widget
o Luego de colocar un nuevo Widget en su pantalla, una línea
con pequeños bloques azules rodeará a su Widget.
o Puede aumentar o reducir el tamaño del Widget sosteniendo
su dedo sobre uno de los bloques para luego arrastrarlo.
o Una vez que haya ajustado el Widget al tamaño deseado,
simplemente pulse el Widget para finalizar.
• Para mover un Widget a la pantalla de inicio
o Pulse y mantenga presionado el icono del Widget que desea
mover.
Page 45

!
a^!
o El icono del Widget parecerá flotar. Aparecerá una cuadrícula
en la pantalla de inicio.
o Continúe pulsando el Widget y arrástrelo hasta donde desee
ubicarlo en su pantalla.
o Podrá moverla hasta otra pantalla moviendo el Widget a la
izquierda o a la derecha de la pantalla. Mantenga el dedo
presionado y espere hasta que el Widget se mueva a la
siguiente pantalla.
o Una vez que haya seleccionado la ubicación deseada para su
Widget en su pantalla, simplemente suéltelo.
• Eliminación de Widgets
o Pulse y mantenga presionado el icono del Widget que desea
eliminar.
o El icono del Widget parecerá flotar. Una papelera aparecerá en
la esquina inferior derecha se su pantalla de inicio (Home).
o Arrastre el Widget hasta la papelera. El Widget y la papelera se
pondrán rojos. Suelte su dedo para eliminar el Widget
6.3. Barra de favoritos
• Personalización de la barra de favoritos
o Puede personalizar su barra de favoritos para que todas sus
aplicaciones favoritas se encuentren a un toque de distancia.
• Para mover una aplicación a su barra de favoritos
Page 46

!
ab!
o Abra el Application Drawer (cajón de aplicaciones)
o Pulse y mantenga presionado el icono de la aplicación que
desea mover hasta que parezca flotar.
o Siga manteniendo su dedo sobre el icono y arrástrelo hasta la
barra de favoritos (Favorite Bar).
! Nota: Sólo puede tener hasta 8 aplicaciones en su barra
de favoritos.
• Si intenta agregar demasiadas aplicaciones en su
barra de favoritos, la última aplicación en la barra
volverá al Application Drawer (cajón de
aplicaciones).
o Luego de seleccionar la ubicación deseada en la barra de
favoritos, simplemente suéltela.
• Para quitar una aplicación de su barra de favoritos
o Pulse y mantenga presionado el icono de la aplicación que
desea mover hasta que parezca flotar.
o Una flecha aparecerá en la esquina inferior derecha se su
pantalla de inicio (Home).
o Arrastre la aplicación hacia la flecha. La flecha se pondrá
verde. Suelte su dedo y la aplicación volverá al App Drawer
(cajón de aplicaciones).
6.4. Configuración del fondo de pantalla
• Para cambiar el fondo de pantalla en su pantalla de inicio (Home):
o Pulse y mantenga su dedo sobre la pantalla de inicio.
Asegúrese de no tocar una aplicación u otro Widget.
o Aparecerá un diálogo titulado "Add to Home Screen" (agregar a
la pantalla de inicio).
o Pulse el icono "Wallpapers" (fondos de pantalla).
o Aparecerá un diálogo titulado "Select wallpaper from"
(seleccionar fondo de pantalla de).
o Pulse los diferentes tipos de fondos de pantalla de los
diferentes estilos presentados.
o Seleccione el fondo de pantalla deseado y pulse el botón "Set
wallpaper" (Configurar fondo de pantalla) para confirmar su
selección.
6.5. Rotación de pantalla
• La pantalla rotará automáticamente en forma predeterminada si gira
su dispositivo.
• Si prefiere no usar esta funcionalidad, puede desactivarla desde
Quick Settings (configuraciones rápidas) o desde la aplicación
completa de Settings (configuraciones).
• Vaya a Settings (configuraciones) > Accessibility (accesibilidad) >
Auto-rotate screen (autorotar pantalla).
• Desmarque la casilla para que la pantalla no rote automáticamente
cuando cambie la orientación de la tablet.
Page 47

!
ac!
7. Uso de la cámara
La aplicación Camera (cámara) es una combinación de cámara y
videocámara. Podrá ver las fotos y los vídeos capturados con su cámara en
la aplicación Gallery (galería). Para tomar fotos y grabar vídeos, primero
toque el icono de la aplicación Camera (cámara) que se encuentra en el
Application Drawer (cajón de aplicaciones).
• Captura de imágenes estáticas
o Con la aplicación Camera (cámara) abierta, enfoque el lente de
la cámara al objeto a ser fotografiado, hasta que el objeto
aparezca en la pantalla.
o Para tomar una foto, pulse el círculo azul a la derecha de la
pantalla.
o Nota: Este dispositivo tiene una cámara frontal diseñada para
facilitar el videochat. Dé vuelta la tablet y enfoque lo que desea
capturar, pulse el círculo azul a la derecha de la pantalla para
capturar una imagen estática.
• Grabación de vídeos
La aplicación Camera (cámara) se puede usar para grabar vídeos.
o Con la aplicación Camera abierta, toque el icono de video
cámara para cambiar al modo de grabación de vídeos.
o Luego de enfocar el lente de la cámara al objeto que desea
grabar, pulse el círculo rojo a la derecha de la pantalla para
comenzar a grabar.
NOTA: Mientras graba un vídeo, puede tomar fotos tocando
la pantalla. La pantalla se enmarcará momentáneamente
con una línea roja cuando se tome una foto. la grabación del
vídeo no será interrumpida.
o Toque el círculo rojo con el cuadrado blanco que se encuentra
a la derecha de la pantalla para detener la grabación.
• Ver sus fotos y vídeos en la aplicación Gallery (galería)
o Cuando toma un foto o graba un vídeo en su tablet, el archivo
se graba en la aplicación Gallery.
8. El uso de Bluetooth
La función Bluetooth en esta tableta le permite conectar de forma
inalámbrica la tableta con dispositivos compatibles con Bluetooth tales como
altavoces portátiles, auriculares, teclados y mucho más.
o Abra la aplicación de configuración
o Pulse la opción Bluetooth en la parte izquierda de la pantalla y se llega a la
página de configuración de Bluetooth
o Si es necesario, activar Bluetooth, puntee en el icono de encendido /
apagado en la parte superior de la pantalla!
Page 48

!
ad!
o La tableta mostrará automáticamente una lista de los dispositivos Bluetooth
disponibles. Si el dispositivo no está en la lista, asegúrese de que el
dispositivo está encendido, dentro de los 30 pies de la tableta, y tiene la
función Bluetooth está conectado.
o Pulse en el dispositivo Bluetooth con el que desea asociar con la tableta.
o La tableta se conectará automáticamente con el nuevo dispositivo Bluetooth.
o Para dejar de utilizar el dispositivo Bluetooth conectado con el grifo de la
tableta en el nombre de su dispositivo en la página de configuración de
Bluetooth y un cuadro emergente que le preguntará si desea desconectar el
dispositivo.
9. Ver sus fotos y videos en su TV
El puerto HDMI Mini en su dispositivo le permite dar salida a sus fotos, videos y
hasta juegos a través de un cable HDMI (no incluido) a su TV o cualquier
dispositivo de vídeo o audio que admite una conexión HDMI.
o Conecte un cable HDMI a su dispositivo
o Conecte el otro extremo del cable HDMI al televisor
o Encienda el televisor y cambie la entrada a la entrada HDMI
o Encienda y desbloquear el dispositivo
o La pantalla de su dispositivo ahora se mostrará en el televisor
10. Actualización del Firmware
• Esta tablet puede recibir actualizaciones por aire. Estas
actualizaciones pueden ser actualizaciones del sistema operativo
Android, mejoras de la interfaz de usuario y ofertas de mejoras de
productos.
• Su compra incluye un número limitado de actualizaciones del sistema
operativo e interfaz de usuario hasta el 31 de diciembre del 2014.
• Seguirá recibiendo notificaciones de actualizaciones disponibles
pasado el 31 de diciembre del 2014, pero no serán gratis.
NOTA: No todas las actualizaciones del sistema operativo Android serán
compatibles con su dispositivo. Sólo recibirá notificaciones sobre las
actualizaciones que se puedan usar en su tablet.
11. Resolución de problemas
• Batería sin carga
o Asegúrese de que su dispositivo esté cargado correctamente
(Sección 1.3)
• Tablet aparece congelado en la pantalla de Android después de
una actualización de software.
o En algunos casos, las actualizaciones de software pueden
tomar hasta una hora o más para indexar todos los archivos
del sistema operativo necesarios necesarios para ejecutar el
tablet.
Page 49

!
ae!
o Asegúrese de conectar el adaptador de CA durante las
actualizaciones de software para asegurarse de que la batería
no muere durante el tiempo que los archivos son la indexación.
• La pantalla está inmóvil/no responde
o Reinicie el dispositivo apagándolo y luego encendiéndolo
nuevamente.
! Si el dispositivo no responde al botón de
encendido/apagado (Power), inserte un objeto fino y
largo (como un clip) en el orificio de restauración manual
para realizar una restauración manual del dispositivo.
• La Tablet está lenta
o Cierre las aplicaciones que no esté usando y que estén
ejecutándose en segundo plano (Sección 7.1).
• El archivo de música/película no se reproduce
o Asegúrese de que el formato del archivo que intenta reproducir
se encuentre en la lista de formatos compatibles de
audio/vídeo, en la sección de especificaciones técnicas del
manual (Sección 12)
• La unidad de almacenamiento de la Tablet está llena
o Agregue más espacio para almacenamiento insertando una
tarjeta microSD (Sección 1.2)
o Transfiera o elimine los archivos que no esté usando utilizando
la aplicación File Manager (gestor de aplicaciones) (Sección 6)
• La recepción Wi-Fi es débil
o Asegúrese de no estar demasiado lejos del router/punto de
acceso Wi-Fi. Recomendamos mantener una distancia de
entre 0 a 65 pies (de 0 a 20 metros).
o Reinicie el router Wi-Fi.
• Respaldo y restauración
o No active la restauración de los datos de fábrica a menos que
se haya comunicado previamente con una persona de
asistencia al cliente. Si lo hace, podría perder todos los datos
guardados en su dispositivo.
12. Asistencia al cliente
Si tiene algún problema con la operación de esta tablet, no la devuelva al
comercio minorista donde la compró.
Su tablet de pantalla táctil incluye soporte técnico gratuito por teléfono o a través
de Internet y nos complacerá ayudarlo a resolver sus problemas.
Para obtener soporte técnico a través de Internet, simplemente pulse el icono
"Customer Help" (soporte al cliente) en la parte derecha inferior de la pantalla de inicio
para ser direccionado de inmediato a nuestro sitio de soporte técnico. Para obtener
soporte técnico por teléfono, llame al 855-998-4326 de lunes a sábados de 10am a
7pm.
Page 50

!
^g!
13. Technical Specifications
Screen
7.0 (inches)
(1024x600)
Capacitive touch screen, 5 point
touch
Battery
Lithium-ion polymer battery (3.7V
2600mAh)
Standby Time: ~100 hours
Play video Time: ~ 3 hours
Camera
0.3 Mega Pixel Front Facing camera
Video
Memory
16 GB
CPU
Allwinner A13 (ARM Cortex A8 at
1.6GHz,512KB L2 Cache, GPU
Mali400,HD Video Decoding
GPU
Mali400
RAM
1 GB
Wi-Fi
802.11 b/g/n
Removable Memory Storage
microSD Card max 64 GB (not
included)
Connectivity
USB
Mini USB
Audio / headphone jack
HDMI
USB 2.0
USB 2.0
3.5mm
Android OS Version
Android 4.2 (Jellybean)
Compatibility File Types
Video Format
MEPG 1/2/4,H.263/H.264, RMVB,
WMV/VC-1, MVC, AVS, MJPEG.
(UP TO 2160P)
Audio Format
MP3, WMA, WAV,OGG, FLAC,
ALAC, APE, AAC, AC-3
(
(
Page 51

!
^]!
(
LIMITED ONE-YEAR TABLET WARRANTY
We warrant this product to be free from defects in material and workmanship under normal use
for a one-year period from the original date of purchase from an authorized VIDAO dealer.
Should you be missing any of the included accessories or other components (screws, pieces,
etc.), please contact the Customer Support Center to secure a replacement. It is not necessary to
bring the unit back to the store. When calling, please reference the parts list found in the
Instruction Manual to help us accurately identify the missing parts and promptly provide
replacements.
We will repair or replace the unit free of charge should it become defective under this warranty,
providing you, the original purchaser, have your original dated sales receipt.
To obtain warranty service or replacement within the one-year warranty period, please return the
product with all parts and accessories along with your original dated store receipt to the original
place of purchase and the unit will be exchanged at no charge. It is not necessary to contact the
manufacturer for warranty replacement.
Our Customer Support Center is available Monday - Saturday (10:00AM to 7:00PM EST) for
technical assistance or troubleshooting. To contact us, please call 1-855-998-4326.
This warranty applies only under conditions of normal use.
There are no consumer serviceable parts contained in this product and any attempt by the owner
to service or repair the unit will immediately void all warranty coverage.
This warranty does not cover any product which has been subject to damage due to an act of
nature, misuse, neglect, accident, abuse, outdoor use, commercial use, or modification of, or to,
any part of the product, including rooting the operating system and other software. Damage to
any external media such as SD, microSD, USB devices, and/or other memory devices, or loss of
data are not covered nor is the cost incurred in shipping the unit for warranty repair or exchange.
Under no circumstances shall VIDAO be liable for any loss (direct, indirect, incidental, foreseen,
unforeseen, special or consequential) or for any damage arising out of, or in connection with, the
use of this product.
VIDAO makes no guarantee, express or implied, as to the capability, performance, or quality of
any third-party software or equipment used with this product.
UNDER NO CIRCUMSTANCES WILL VIDAO BE LIABLE FOR ANY INCIDENTAL OR
CONSEQUENTIAL DAMAGES.
This warranty does not cover re-manufactured, refurbished, or repaired units, or any products
sold 'As Is'.
This warranty is valid only to the original purchaser of the Product in the United States and
Canada and grants specific legal rights.
Page 52

!
^"!
© Schoenfeld International & VIDAO
PN V7TAB16BT Version 1.0 January, 2014
 Loading...