

Page 1
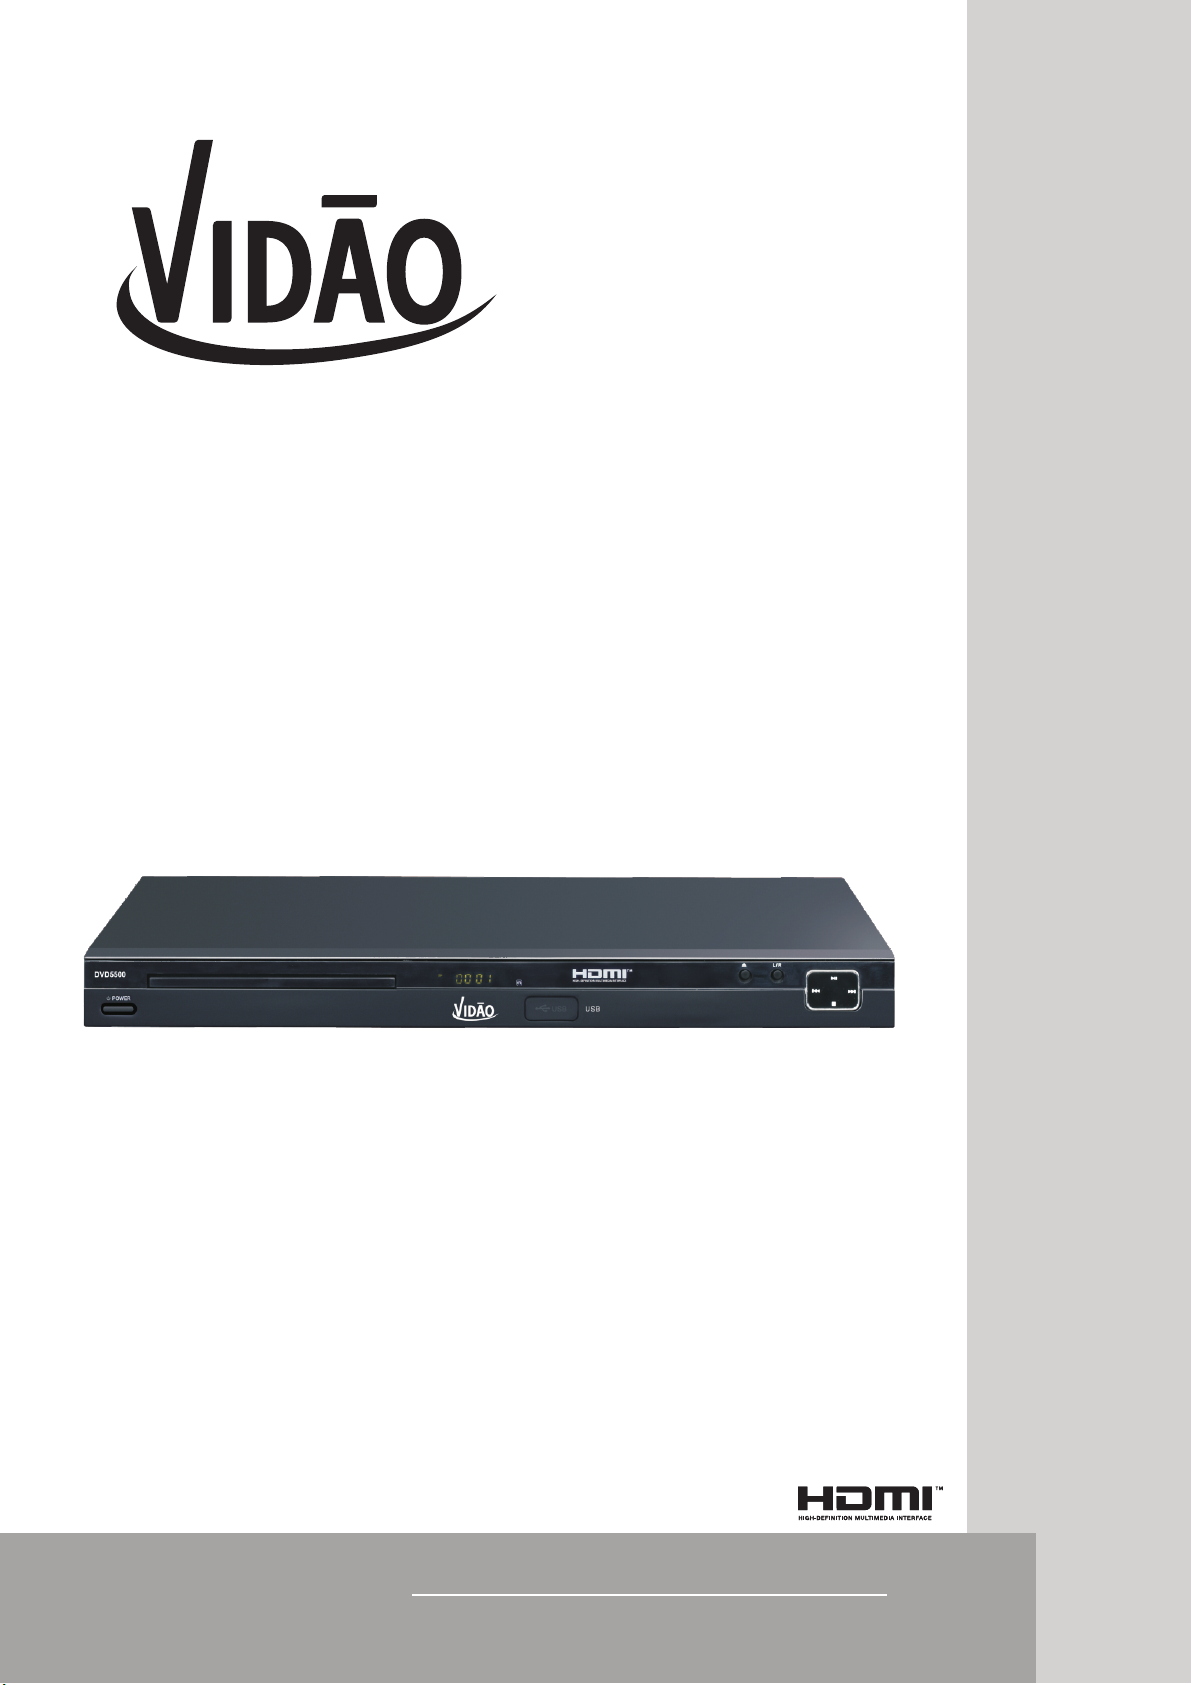
1080p UPCONVERTING HDMI
DVD PLAYER
DVD5500
INSTRUCTION MANUAL
1-11
Page 2
WARNINGS
• To reduce the risk of fire or electric shock, do not expose this appliance to rain or moisture.
FCC WARNINGS
IMPORTANT SAFETY INSTRUCTIONS
CAUTION
DO NOT OPEN
• To reduce the risk of electric shock, do not open the cabinet. No user serviceable parts are inside. Refer servicing to
qualified personnel.
• This appliance uses a Laser System. To prevent direct exposure to the laser beam do not open the cabinet. Visible and
invisible laser radiation is present when the cabinet is open. Avoid direct exposure and do not stare into the beam.
• Batteries should not be exposed to excessive heat such as dire
ct sunlight, fire, or other heat sources.
• Caution: Do not expose this appliance to dripping or splashing liquids. Do not put objects filled with liquid, such as vases on
or near the appliance.
• Caution: To turn this appliance off completely, the POWER cord must be unplugged from the wall outlet. The power cord must
be easily accessible at all times.
THE LI GHTNING FL ASH WITH
ARROWH EAD SYMBOL, WIT HIN AN
EQUILATER AL TRIANGLE, IS IN TENDED
TO ALERT TH E USER TO THE
PRESENCE OF NON-INSU LATED
"DANG EROUS VOLTA
PRODUCT'S ENCLOSURE THAT MAY BE
OF SUFFI CIENT MAGN ITUDE TO
CONST ITUTE A RISK OF EL ECTRIC
SHOCK TO PERSONS.
GE" WI THIN THE
WARNING: TO REDUCE THE RISK OF
ELECT RIC SHOCK, DO NOT REM OVE THE
FRONT OR REAR COVER . NO USER
SERVICEABLE PARTS ARE INSIDE. REF ER
SERVICING TO QUALIFIE D SERVICE
PERSONNEL .
THE EXCL AMATION POIN T WITHIN AN
EQUILATER AL TRIANGLE IS I NTENDED TO
ALERT TH E USER TO THE PRESENCE OF
IMPORTANT OPERATING AND
MAINT ENANCE (SERVI
INSTRUCTI ONS IN THE L ITERATURE
ACCOMPANY ING THE APPLIANCE.
CING)
WARNING: Changes or modifications to this unit not expressly approved in this manual could void the user’s authority to operate
the equipment.
NOTE: This equipment has been tested and found to comply with the limits for a Class B digital device, pursuant to Part 15 of the
FCC Rules. These limits are designed to provide reasonable protection against harmful interference in a residential installation.
This equipment generates, uses, and can radiate radio frequency energy and, if not installed and used in accordance with the
instructions, may cause harmful interference to radio communications. However, there is no guarantee that interference will not
occur in a particular installation. If this equipment does cause harmful interference to radio or television reception, which can be
determined by turning the equipment off and on, the user is encouraged to try to correct the interference by one or more of the
following measures:
• Reorient or relocate the receiving antenna.
• Increase the separation between the equipment and receiver.
• Connect the equipment into an outlet on a circuit different from that to which the receiver is connected.
• Consult the dealer or an experienced radio/TV technician for help.
1) Read these instructions.
2) Keep these instructions.
3) Heed all warnings.
4) Follow all instructions.
5) Do not use this apparatus near water.
6) Clean only with dry cloth.
7) Do not block any ventilation openings. Install in accordance with the manufacturer's instructions.
8) Do not install near any heat sources such as radiators, heat registers, stoves, or other apparatus (including amplifiers) that
produce heat.
9) Do not defeat the safety purpose of the polarized or grounding-type plug. A polarized plug has
the other. A grounding type plug has two blades and a third grounding prong. The wide blade and/or the third prong are
provided for your safety. If the provided plug does not fit into your outlet, consult an electrician for replacement of the obsolete
outlet.
10) Protect the POWER cord from being walked on or pinched particularly at plugs, convenience receptacles, and the point where
they exit from the apparatus.
11) Only use attachments/accessories specified by the manufacturer.
12) Use only with the cart, stand, tripod, bracket, or table specified by the manufacturer, or sold with the apparatus.
When a cart is used, use caution when moving the cart/apparatus combination to avoid injury from tip-over.
13) Unplug this apparatus during lightning storms or when unused for long periods of time.
14) Refer all servicing to qualified service personnel. Servicing is required when the apparatus has been damaged in any way,
such as POWER-supply cord or plug is damaged, liquid has been spilled or objects have fa
apparatus has been exposed to rain or moisture, does not operate normally, or has been dropped.
two blades with one wider than
llen into the apparatus, the
Page 3

QUICK GUIDE FOR HDMI FUNCTION
1. Please check t o see if your TV set has a HDMI video input.
2. If your TV set has a HDMI video input then connect the DVD player to th e TV set using an HDMI cable
(not included ). Switch on the DVD player and TV set. The DVD Player output will aut omatically be
adjusted from t he default video output of 480i to a higher-resolution setti ng to match that of your TV
screen, 720p, 1 080i, or 1080p. The TV screen will now show the "VIDAO" logo. Press the HDMI button
on the remote con trol of the DVD player and you can change the high-resolution setting of the DVD
player to, 720p , 1080i, or 1080p. Onc
high-resolution setting on the TV screen image is automatically changed.
e the high-reso lution setting of the DVD player changed, the
Page 4

IMPORTANT NOTICE
Front and Back Panels. ..................................................................................1
Front Panel. ..................................................................................................1
Back Panel.. ................................................................................................1
Remote Control... ....................................................................................... 2
Operating the Remote Control.... .................................................................... 3
Functions.......... ........................................................................................ 4-7
System Setup..................... ................................................................... . 8-10
MP3 Function .......... ................................................................................... 10
JPEG Files..... ................... ......................................................................... 10
Troubleshooting .........................................................................................11
Page 5
10
9
2
1
1.POWER
2.DISC DOOR
3.LED DISPLAY
4.USB
CONFORMS TO
UL STD 60065
CERTIFIED TO
CSA STD C22.2
AC IN
No. 60065
5.OPEN / CLOSE
6.LEFT / RIGHT
7.STOP
8. NEXT
1.HDMI Connector
2.AUDIO output
Use to connect both right and left channels
3. VIDEO output
COAXIAL output
4.
3
4
6
5
8
7
9.PREV
10.PLAY/PAUSE
DVD PLAY ER
POWER: AC 90-240V~50/60Hz
HDMI
POWER C ONSUM PTION : 15W
DVD55 00
HDMI CABLE
AV CABLE
CONFORMS TO
UL STD 60065
CERTIFIED TO
CSA STD C22.2
AC IN
No. 60065
HDMI
DVD PLAY ER
POWER: AC 90-240V~50/60Hz
POWER C ONSUM PTION : 15W
DVD55 00
Page 6
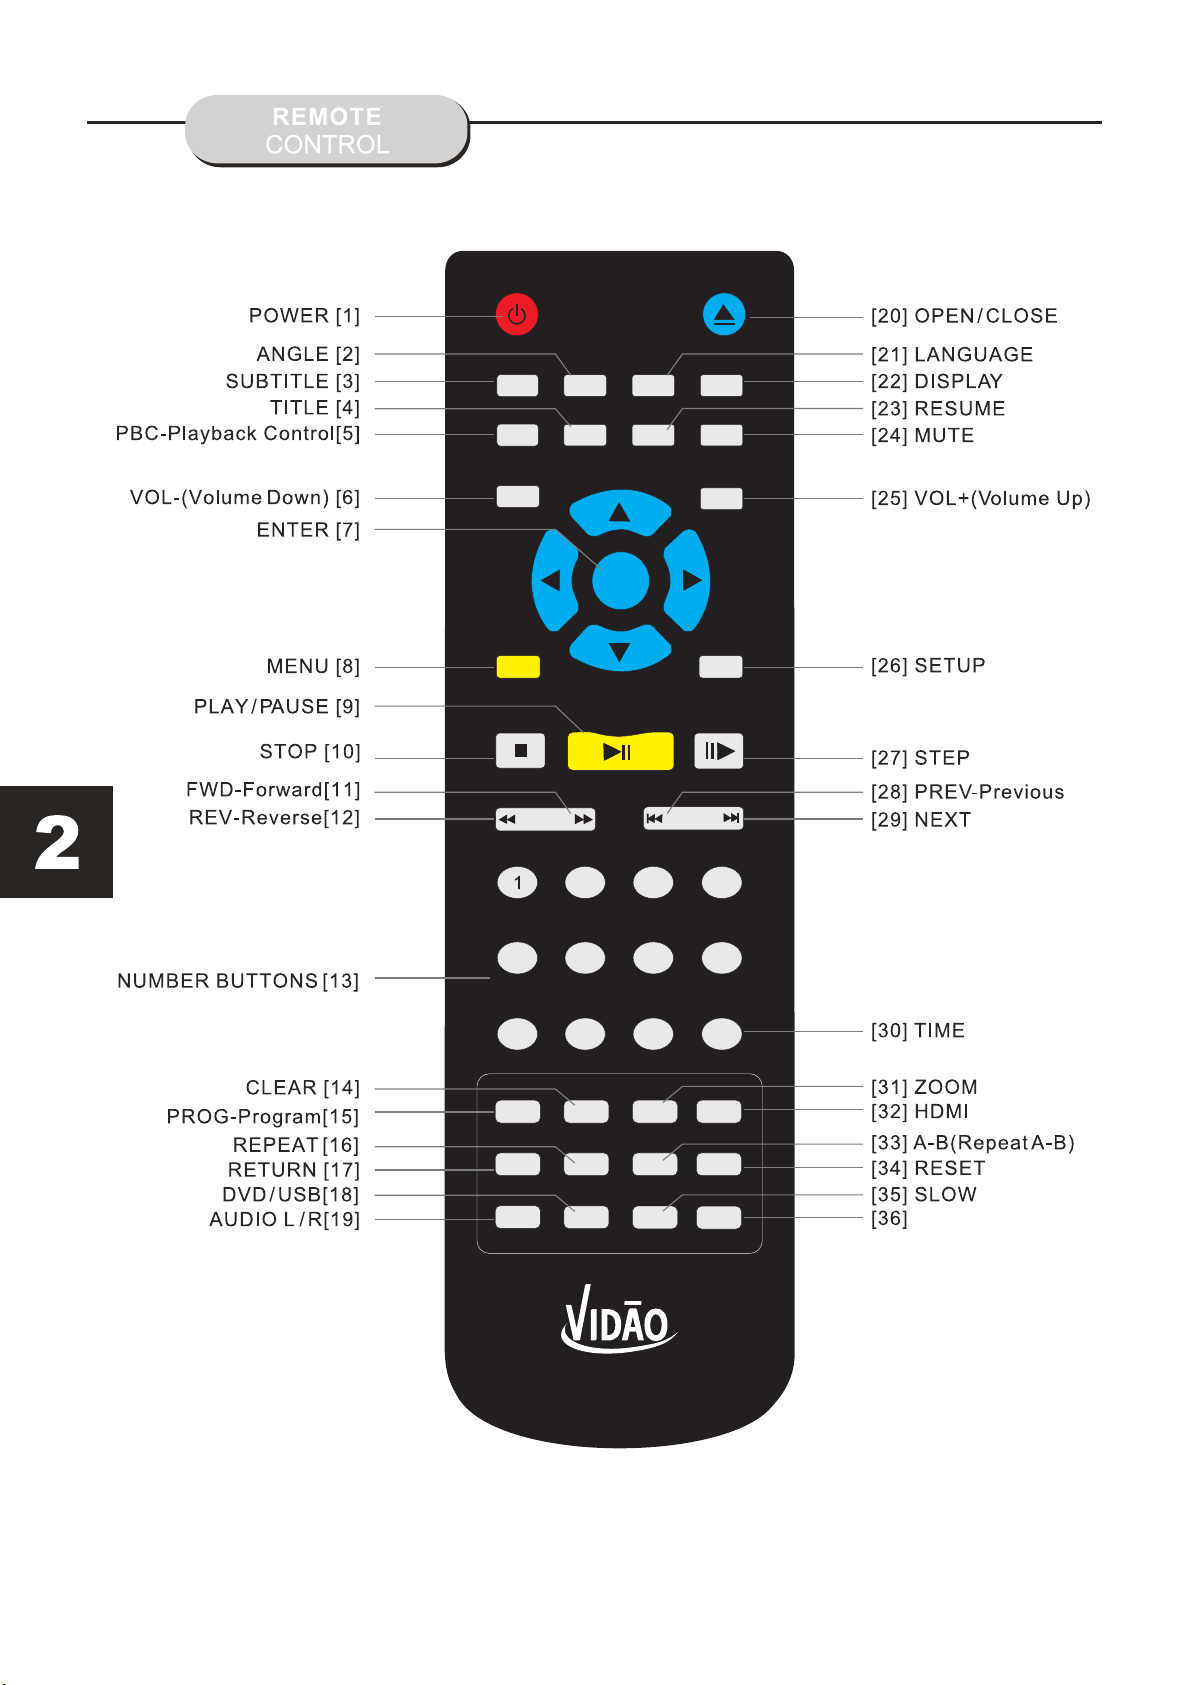
POWER OPEN / CLOSE
SUBTITLE
VOL- VOL+
MENU
STOP PLAY / PAUSE STEP
REV FW D PREV NEXT
PBC
ANGLE
TITLE
2
LANGUAGE
RESUME
ENTER
DISPLAY
MUTE
SETUP
3
4
5
6
7
8
TIME
9 10+0
PROG CLEAR ZOOM
RETURN REPEAT A-B RESET
SLOW DVD / USBAUDIO L / R
HDMI
16:9 / 4:3
DVD5500
16:9 / 4:3
Page 7

Battery Installation
1. Push down and ou t on the battery
compartment c over to remove it.
2. Insert the two " AAA" batteries into the batt ery
compartment o f the remote control, making
sure the + and - sign s on the batteries and the
inside of the bat tery compartment match up.
3. Replace the ba ttery compartment cover.
Notes:
Do not direct the r emote sensor toward any
light source, s uch as direct sunlight or stro ng
fluorescent l ight as it may cause the unit not to
operate corre ctly.
When other remo te controls are used nearby or
when the remote i s used near equipment using
infrared rays , interference may occur.
Notes:
Do not mix batter ies from different
manufacture rs, or old with new.
If the remote con trol will not be used for an
extended peri od of time, remove the batteri es
to prevent dama ge-causing corrosion.
Remove the dead b atteries immediately to
prevent damag e-causing corrosion.
If battery leak age occurs, wipe the battery
liquid from ins ide the battery compartmen t,
and then replac e both batteries.
Always replac e both batteries at the same tim e,
using new, full y charged batteries.
The life expect ancy of batteries may vary
depending on am ount of use.
Using the Remote Control
Point the remot e control at the remote sensor
on the DVD receiv er. When the signal is
received from t he remote, the unit will funct ion
accordingly .
The remote will o perate up to approximately 16'
from the remote s ensor at an angle of around
30' in each direc tion.
Placing an obje ct on the remote control may cau se
it to inadverte ntly depress a button, chang ing a
function and sh ortening battery life.
Do not cover the fr ont of the DVD receiver
with tinted gla ss, as it may cause interferen ce
with normal ope ration of the controller.
Make sure there i s no solid objects between
the remote cont rol and the remote sensor .
This could prev ent the unit from receiving
the signal.
Do not spill wate r or put wet items on the
remote contro l.
BATTERIES
INCORRECT USE O F BATTERIES MAY
CAUSE THEM TO LEA K, CORRODE,
OR EX-PLODE.
Page 8

To play a DVD video disc:
Turn on the TV set and select the A/V mode.
1. Press the POWER button on front panel,
DISC LOADING appears on screen.
If there is no disc in the player, NO DISC will
show on the screen
Note:
It is possible to damage a disc if it is not placed
correctly on the guides in the disc tray. This may
also cause the DVD player to malfunction. Do
not force or place anything other than a 5" DVD
or CD onto the disc tray.
Never move the DVD player during playback,
as this may cause damage to the disc as well as
the player. To open and close the disc tray, only
use the OPEN / CLOSE key found on both the
remote control and on the unit's front panel.
Press the PLAY / PAUSE
button.
2. Press the OPEN / CLOSE button.
The disc tray will open.
3. Place the disc on the disc tray, be sure
content (Wide-screen, Full-screen) side is face
down on the tray.
4. Press OPEN / CLOSE button to close the tray.
The disc tray will close and the disc type will appear
in the upper-left-hand corner of the screen.
Once the player has read the disc, the unit
automatically will begin playback.
5. PREV / NEXT playback
Press the PREV or NEXT buttons to play the
previous or next track. To resume normal playback,
press PLAY / PAUSE button
Press NEXTbutton
Page 9

REV
To activate eit her function, simply press the
FWD or REV button s on the remote.
The speed chang es each time the button i s
presse. To resu me normal playback, pre ss
the PLAY / PA USE button.
Stop playback
1. Press the STOP button to end the function and
the TV screen will show the Stop icon. With some
disc formats like DVD, the player can recall the
place in the movie where Stop was pressed, and
resume play from that location.
2. Press PLAY / PAUSE to resume playback from
the location where the disc was stopped or from
the beginning of the disc.
3. Press STOP twice to stop completely.
Screen Display
While a disc is playing, the status of various
functions may be checked, such as the tile,
track number, and several time categories.
1. Press the DISPLAY button once and the title
appears along with the chapter and how much
time has played.
DISPLAY
2. Press the DISPLAY button again and the
remaining time for that particular title appears.
3. Press the DISPLAY button again and the
total elapsed time for that particular chapter
appears.
STO P
PLAY/PAUSE
Slow Motion
This DVD player has the ability to play discs in
slow motion in either forward or reverse direction.
Each time the SLOW button is pressed, the forward
speed will slow to 1/2 speed, to 1/4, to 1/8, to 1/16,
and back to normal. In reverse, the speed will also
slow from 1/2 speed, to 1/4, to 1/8, to 1/16, and back
to normal. To resume normal playback at anytime,
press the PLAY / PAUSE button.
1/2
4. Press the DISPLAY button again and the
total remaining time for that particular chapter
appears.
5. Press the DISPLAY button again and the
display turns off.
Frame-By-Frame Playback
1. While in the Play mode, press STEP continuously
to move forward in the video frame by frame.
2. Press PLAY / PAUSE resume normal playback.
Page 10

Audio-L & Audio -R
Language
The default audio setup is STEREO, press
Audio-L , and the sound will be output from Left
channel only, Press Audio-R , and the sound
will be output from Right channel only.
Press Audio-L or Audio-R again, sound will
return back to Stereo.
Subtitles
The DVD Player has the capability to display
subtitles in any of 32 different languages.
1. Press the SUBTITLE button. The subtitle
menu will appear. Select the desired language
by pressing the SUBTITLE button.
2. To remove the subtitles from view, press
the SUBTITLE button until they disappear .
The unit has the capability to show movies in one
of eight languages.
1. Press the LANGUAGE button. The language
menu will appear. Select the desired language
by pressing the LANGUAGE button.
Note:
The disc being played must be multi-language
encoded.
Locating A Title
DVD discs are normally divided into titles, which are
then sub-divided into chapters. A Specific title or chapter
can easily be located. Specific titles can be found using
the title menu function if the disc contains a title menu,
or through its unique title number.
Title Function Menu
1. Press the TITLE button. The title menu will appear
on the TV screen.
2. Press the appropriate scroll button to select the
desired title. A title may also be located by pressing
its assigned number with the number buttons.
3. Press the ENTER button. This will start playback
from chapter 1 of the selected title.
Note: The disc being played must be
multi-subtitle encoded.
Camera Angle
The ability to change the camera angle allows
the viewer to play director and watch a movie
from different perspectives.
1. Press the ANGLE button on the remote
control. With each press, the camera angle
changes.
2. The button may be pressed only when the
flashing angle icon appears in the unit's display
panel.
Note:
The camera angle may be changed only in discs
with multi-angle capability encoded.
Note:
Some discs
do not respond
to this
function.
If
different
instructions appear on the TV screen, follow those
instructions. The instructions given here describe
the basic procedure. Procedures may vary depending
on the content of the DVD disc.
A-B re pea t
Press "A-B" once to set a start-point, press again to
set an end point and complete the setting. The
selected section A-B will be repeated. The third press
will cancel this function.
A-B
AB
Page 11

PBC function
With the PBC func tion on, choosing a song
on a CD can only be don e when at the main
menu. With the PB C function off, song
selections ca n be made by enteri ng the
number of the son g selection wit h the
number button s.
PBC
Repeat Play
This DVD receiver allows repeated playback of
specific titles, chapter/ tracks, or segments. It
even allows switching between two items that
are being repeated,
1. Select the item to repeat.
2. Press the REPEAT button.
ZOOM
A picture maybe enlarged up to four times during
either playback or slow motion through the unit's zoom
function. Press the ZOOM button once and it enlarges
the image 2x, press a second time and the image
enlarges 3x. A third press enlarges the image 4x.
A fourth press, shrinks the enlarged image by 1/2x ,
a fifth press shrinks the image 1/3x, a sixth press
shrinks the image 1/4x. To return to normal-size
image, press the ZOOM button a seventh time.
Enlargement takes place in the center of the picture.
Volume and Mute
The volume on this DVD player is easily controlled
with the remote control by pressing either the VOL +
button to raise the volume or the VOL- button to
lower it. By pressing the MUTE button, no audio
will be heard. To return the audio, press the MUTE
button again.
Program
The repeat mode changes each time
the REPEAT button is pressed (i.e.,from title
repeat to chapter repeat, all repeat, to repeat off.)
This function allows you to program the desired
order of play for specific tracks. Press the
button, and PROG the Program menu will appear
on the the programs play order using the screen. Set
number buttons. Then scroll to Start on the menu.
Press the ENTER button to begin program play.
To exit from the program play mode, press the
PROG button again.
DVD Menu Setup
Press the SETUP button on the remote control and
the main menu will appear .
1. After access ing the setup menu, press the
scroll button u p or down to select a desired Item.
Once an item is sel ected, press the
PLAY / PAUSE
button to confi rm your entry and then you will
have access to th e Sub-directory.
2. Use the left or ri ght scroll buttons to move
the pointer and t he up or down scroll buttons
to select the des ired option. Once an item is
selected, pre ss the ENTER button to c onfirm
your selectio n.
Page 12

General Setup
This option is used to setup the following
format and functions: TV screen format,
video functions, DVD settings, language,
parental controls, and others.
Language
Video
Audio
Rating
Misc
OSD Language
Subtitle
MPEG4 Subtitle
Audio
DVD menu
:English
:English
:WesternE uropean
:English
:English
ASPECT RATIO
There are two kinds of Aspect Ratio, 4:3 & 16:9
which can be selected according to the disc
format & TV set.
VIEW MODE
There are four choices for viewing video:
Fill: Full screen.
Original: Seen according to the contents of
the DVD.
Auto Fit: This is the DEFAULT setting. Auto
Fit will adjust the screen image automatically
Pan Scan: Will automatically edit and show a
Wide screen or other format movie/video as a
Full screen image.
Language
OSD Language:
There are 3 languages to select from:
French and Spanish.
SUBTITLE:
When playing DVD discs, the player can
support: English, French, and Spanish
subtitles. Subtitles can be set to Automatic
or OFF
MPEG4 SUBTITLE:
When playing MPEG4 discs, the player can
support Western European.
AUDIO:
When playing DVD, MPEG4, or VCD discs, the
player can support English, French and Spanish.
DVD MENU:
When playing DVD, MPEG4, or VCD discs,
the player can support English, French and
Spanish.
Video setup
Language
Video
Audio
Rating
Misc
Aspect Ratio
View Mode
TV System
Video Out
HD Resolution
:Fi ll
:Original
:Auto Fit
:Pan Scan
TV SYSTEM
This unit is specifically made for the United
States market and will only operate on the
NTSC system.
Language
Video
Audio
Rating
Misc
Aspect Ratio
View Mode
TV System
Video Out
HD Resolution
:NT SC
Follow the directions displayed in "Setup",
and press the remote control buttons based
on the TV Screen display and VIDEO
setup.
Language
Video
Audio
Rating
Misc
Aspect Ratio
View Mode
TV System
Video Out
HD Resolution :Auto
:16:9
:Fill
:NTSC
:HD
VIDEO OUTPUT
Use remote cont rol to select the output you
desire .
Language
Video
Audio
Rating
Misc
Aspect Ratio
View Mode
TV System
Video Out
HD Resolution
: HD
Page 13

HD:
This is only achieved by using a H DMI cable
(not included).
HD RESOLUTION:
Using the HDMI vi deo output requires the use
of a HDMI cable (no t included). Your TV set
must must also su pport high-definition vi deo
as well.
You can select Au to, 480p/576p, 720p, 1080i ,
1080p to make the p icture much clearer via
the HDMI cable.
Language
Video
Audio
Rating
Misc
Aspect Ratio
View Mode
TV System
Video Out
Brightness
Sharpness
HD Resolution
HD Jpeg mode
:Au to
:480p/576p
:720p
:1080i
:10 80p
Audio Setup
PARENTAL CONTROL
To restrict the viewing of certain movie ratings,
Parental Controls can be accessed on this menu.
In order to set or change these settings, the password
must first be entered. After entering the password,
make sure the password is then set to OFF on the
menu, then you can set / change Parental Controls.
Language
Video
Audio
Parental Control
Rating
Misc
SET PASSWORD:
Set Password
1.K id Safe
2.G
3.P G
4.P G-13
5.P G-R
6.R
7.N C-17
8.A dult
The default pas sword is 0000, after this corr ect
password is ent ered, you can then change the
password to one o f your choice. Your password
is needed to chan ge the Parental Control
settings.
Includes the setup of speakers and Dolby
Digital.
Language
Video
Audio
Rating
Misc
Digital Output
:PCM
DIGITAL OUTPUT
Connect the COXIAL jack on the rear panel to an
External Amplifier unit. Select the PCM setting
and the output signal will be digital 5.1 Channel
MISC Setup
USE THE DEFAULT S ETTINGS:
During use, if yo u want to return to the factory
default setti ngs, please select USE DEFAU LT
SETTINGS, and the player will automatical ly
return to the fac tory settings.
Language
Video
Audio
Rating
Misc
Use Default Settings
Page 14

OPERATION OF MP3 FUNCTION
MP3 using is an audio compression mode
Level 3 of the international standard MPEG.
The audio signal is compressed in a rate of
12:1. A MP3 disc can contain over 600 minutes
of music that rivals Compact Discs in sound
quality.
Files Menu of MP3 play
When playing a MP3 disc, 2 file menus can be
selected by pressing the PROG button: 1) Folder
List and 2) File List.
1. FOLDER LIST
Display the menu first, then press the UP / DOWN,
LEFT / RIGHT arrows and ENTER button to select
the subdirectory and music.
2.FILE LIST
This menu is where you may select the files (or
song numbers) to be played by pressing UP /
DOWN, LEFT / RIGHT arrow buttons combined
with ENTER button. The number buttons and
ENTER can also be used to make the play selection.
If a track number entered, is incorrect,
the screen will display "INPUT INVALID".
Play Modes
There are 4 kinds of play modes: FOLDER,
SINGLE, REPEAT ONE, REPEAT FOLDER.
Press the REPEAT button to make available
the 4 modes:
1. FOLDER: play the entire music menu in order.
2. SINGLE: play a single-track number .
3. REPEAT ONE: play a single-track number
repeatedly.
4. REPEAT FOLDER: play the entire music
menu repeatedly.
JPEG is the most ef ficient image compression
format and is wid ely used for photo / picture
storage.
Even when pictu res are compres sed 15-20
times, they sti ll maintain an excellent quality.
The JPEG format i s also supported by most
picture proce ssing softwar e. The JPEG file
uses less stora ge space and is eas y to use.
This DVD player c an read JPEG formatted
picture CD disc s.
1.Place a photo d isc in the DVD play er and
menu will appea r
2.Press the num ber buttons of the selection
you want to view.
3. Press PLAY button to view.
Using the Menu To Select Photos
1. Press PLAY / PAUSE button to view the photo on the
screen.
2. Press STOP to end viewing.
3. When in STOP mode, you can return to the
upper menu by selecting the top file item on
the right side of the screen and pressing
PLAY / PAUSE button.
Other functions:
1. When playing JPEG images. This DVD
player allows the pause, play, repeat, and
browse functions.
2. When playing JPEG images, press the
RESUME button to see different formats of
photo display.
3. Press VOL+ and VOL - buttons to select
pictures.
4. To zoom in on the image, press the ZOOM
button. Pressing the ZOOM button again will
return the picture to normal.
5. When the zoom is on, press the Fast
Forward or Fast Reverse to zoom in or out
on the image.
6. When the zoom is off, pressing the direction
arrows will cause the image to turn over
(reverse).
Page 15

TROUBLE-SHOOTING
This handy trou ble-shootin g guide is provid ed
to save you time if y ou experience a ny problems
with this DVD pla yer. If the probl em is not listed
or if the provide d solution does n ot correct the
problem, plea se call our custo mer support
department.
Possible Problems / Solution s
No power
1. Check to ensure that the power pl ug is
securely connected to the power outlet and
that the outlet i s in working cond ition (test
outlet by CAREFULLY plugging another
electrical item in to it)
No sound
1. Check the connection between the DVD player
and the TV set, ampli
connected to.
2. Check to ensur e the TV and amplif ier are in
the correct mode.
No picture
1. Check the connection between the DVD
player and the TV set or any other uni t it is
connected to.
2.Check to make sure TV is turned on.
fier, or any othe r unit it is
Disc does not play
1.Check to make sure the disc is loaded
correctly lab el side facing up o n disc tray.
2.Check that disc is clean from dirt, dust,
fingerprints, and smudges.
3.Check to ensu re the disc is inse rted between
the guides on the tray.
4.Check to see if the Parental Loc k function is on.
5.Make sure disc is for use in region ONE.
Remote does not wo
1. Check batter ies; possibly r eplace.
2. Check to ensure there aren't any obstacles
between the remote sensor on the unit's front
panel and the remote control.
3.Be sure the remote is aimed at the r emote
sensor.
Divided pictu re
1.Check that di sc is clean and has n o scratches.
2. This DVD playe r is controlled b y a
microcomputer, which may nee d to be reset.
To reset, unplu g the unit, wait 30 seconds ,
then turn the pla yer back on.
MP3 discs don't p lay
1. Use a different program to re-b urn the disc,
as the program ma y not be MP3 compat ible
with the player.
2. Use a newer edition of MP3 so
as "Audio station 4", "Easy CD Cre ator", etc.
3. Make sure MP3 fi le is not encoded w ith a
variable bit ra te, such as provi ded by Real
Networks.
rk.
ftware such
Page 16

LIMITED 90-DAY WARRANTY
We warrant this product to be free from defects in material and workmanship under normal use
for a ninety-day period from the original date of purchase from an authorized VIDAO dealer.
We will replace the unit free of charge should it become defective under this warranty,
providing you, the original purchaser, have your original dated sales receipt.
To obtain warranty service or replacement within the ninety-day warranty period, please return
the product with all parts and accessories along with your original dated store receipt to the
original place of purchase and the unit will be exchanged at no charge. It is not necessary to
contact the manufacturer for warranty replacement.
For technical support, the VIDAO Technical Support Center is available Monday to Saturday
(10:00AM to 7:00PM EST) for technical assistance or troubleshooting at 1-855-998-4326.
This warranty applies only under conditions of normal use.
This warranty does not cover any product which has been subject to damage due to an act of
nature, misuse, neglect, accident, abuse, commercial use, or modification of, or to, any part of
the product, including the antenna. Damage to any external media such as DVD & CD discs,
and/or USB or other memory devices are not covered nor is the cost incurred in shipping the
unit for warranty repair or exchange. Under no circumstances shall VIDAO be liable for any
loss (direct, indirect, incidental, foreseen, unforeseen, special or consequential) or for any
damage arising out of, or in connection with, the use of this product.
UNDER NO CIRCUMSTANCES WILL VIDAO BE LIABLE FOR ANY INCIDENTAL OR
CONSEQUENTIAL DAMAGES.
This warranty does not cover re-manufactured, refurbished, or repaired units, or any products
sold 'As Is'.
This warranty is valid only to the original purchaser of the Product in the United States and
Canada and grants specific legal rights.
Page 17

Schoenfeld International Inc and VIDAO
5001 American Boulevard West
Suite 275
Bloomington, MN 55437
©Schoenfeld International Inc, 2013
PN: DVD5500 Rev 1.3V September, 2013
 Loading...