

Page 1
Comprehensive
User’s Guide
Page 2

Page 3

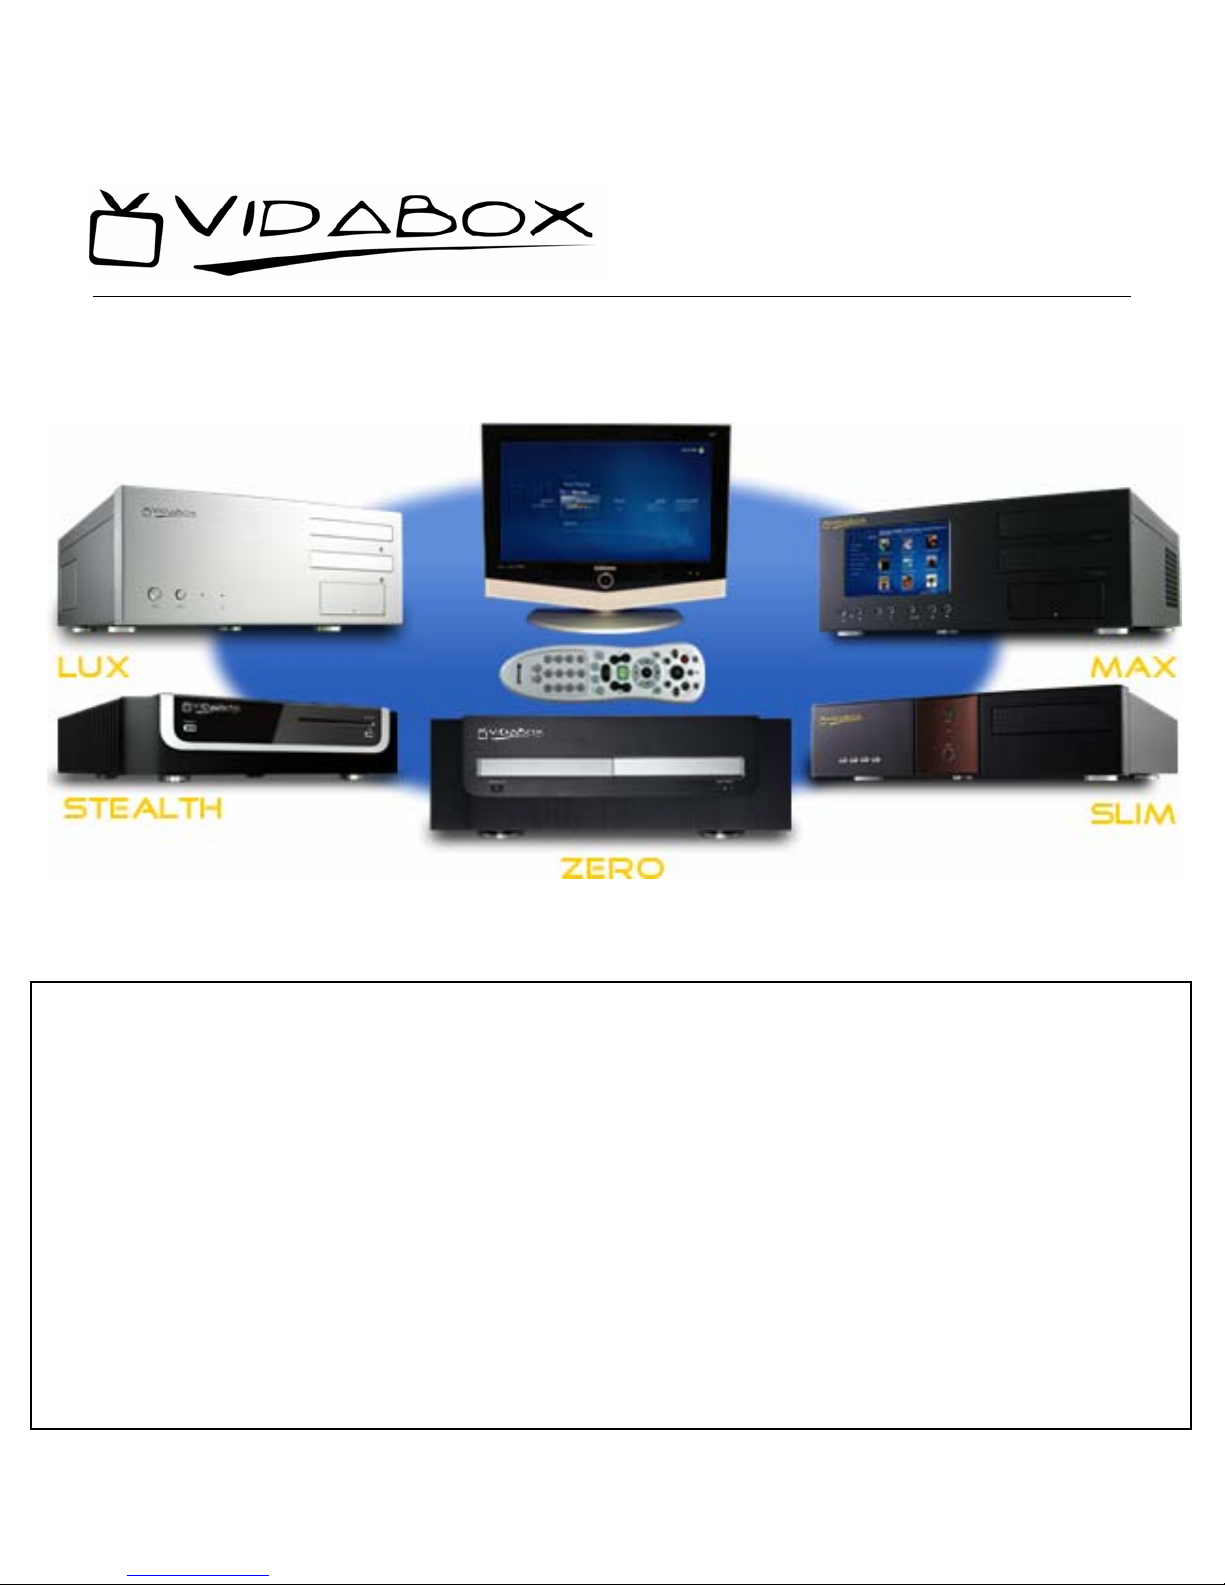
VIDABOX™
Comprehensive User’s Guide
© VidaBox LLC
172 Garden Street • Garden City, NY 11530
Support: http://www.vidabox.com/support
ii
Page 4

Table of Contents
Introduction i
CHAPTER 1
OVERVIEW
How to Best Use This Guide 1
Media Center Remotes 2
CHAPTER 2
BASIC FEATURES
Basic Features – How Do I… 3
Watch a DVD disc? 3
Play a Preloaded DVD? 3
Add a DVD to My Movies Catalog? 4
Do You Want to Copy a DVD? 4
Play a HD Movie (Blu-ray/HD DVD)? 5
See Online Spotlights? 5
See My Pictures? 6
Are Pictures Loaded on the VidaBox™? 6
Save Pictures on My VidaBox™? 6
Watch Live TV? 7
Access the Programming Guide? 7
Record a TV Show Currently On? 8
Record a TV Show Airing Later? 9
Enable Closed Captions? 9
Watch a Recorded TV Show? 10
Listen to My Music? 11
Listen to a new CD? 11
Copy music CDs to my VidaBox™? 11
See Music Visualization Effects? 12
Search My Music Collection? 12
Listen to the Radio? 12
Play My Videos? 13
Sing Karaoke Songs? 13
Check Weather? 14
Chapter 3
ADVANCED FEATURES
Advanced Features – How Do I… 15
See a Slideshow with Music? 15
Edit/Touch-up My Digital Photos? 15
Create a Music Playlist (Queue)? 16
Edit/Save a Music Playlist(Queue)? 16
Load a Music Playlist (Queue)? 17
Play All of My Music? 17
Shuffle/Play Randomly My Music? 17
Prioritize My TV Recordings? 18
See Movies Currently on TV? 19
Search for a Specific TV Show? 19
Create a Video DVD? 19
Create a DVD Picture Slideshow? 20
Add Digital Files to the VidaBox? 20
CHAPTER 4
ADDITIONAL HELP
More Resources 21
Forum 21
Email 22
Phone Support 22
Page 5

INTRODUCTION
Introduction
ongratulations on your purchase of the VidaBox™! At this point, the
VidaBox™ should have already been installed, connected to your television,
C
To get the most out of the VidaBox™, please take some time to read this
Comprehensive User’s Guide thoroughly. If your unit was professionally installed,
the technician should have went over the basic functions of the VidaBox™ with you.
Nevertheless, keep this book as a reference guide – there are a multitude of features
available, and it can be a daunting task to remember how to use them all at first.
and ready to go!
Enjoy your VidaBox™!
Sincerely,
Steven W. Cheung
Owner
Sergio DeAlbuquerque
Owner
i
Page 6
The Start Button –
Microsoft Remote
INTRODUCTION
How to Best Use This Guide
y design, the VidaBox™ was engineered to be intuitive and easy-to-use. Every
task – from playing a DVD to watching videos or from viewing photos to
B
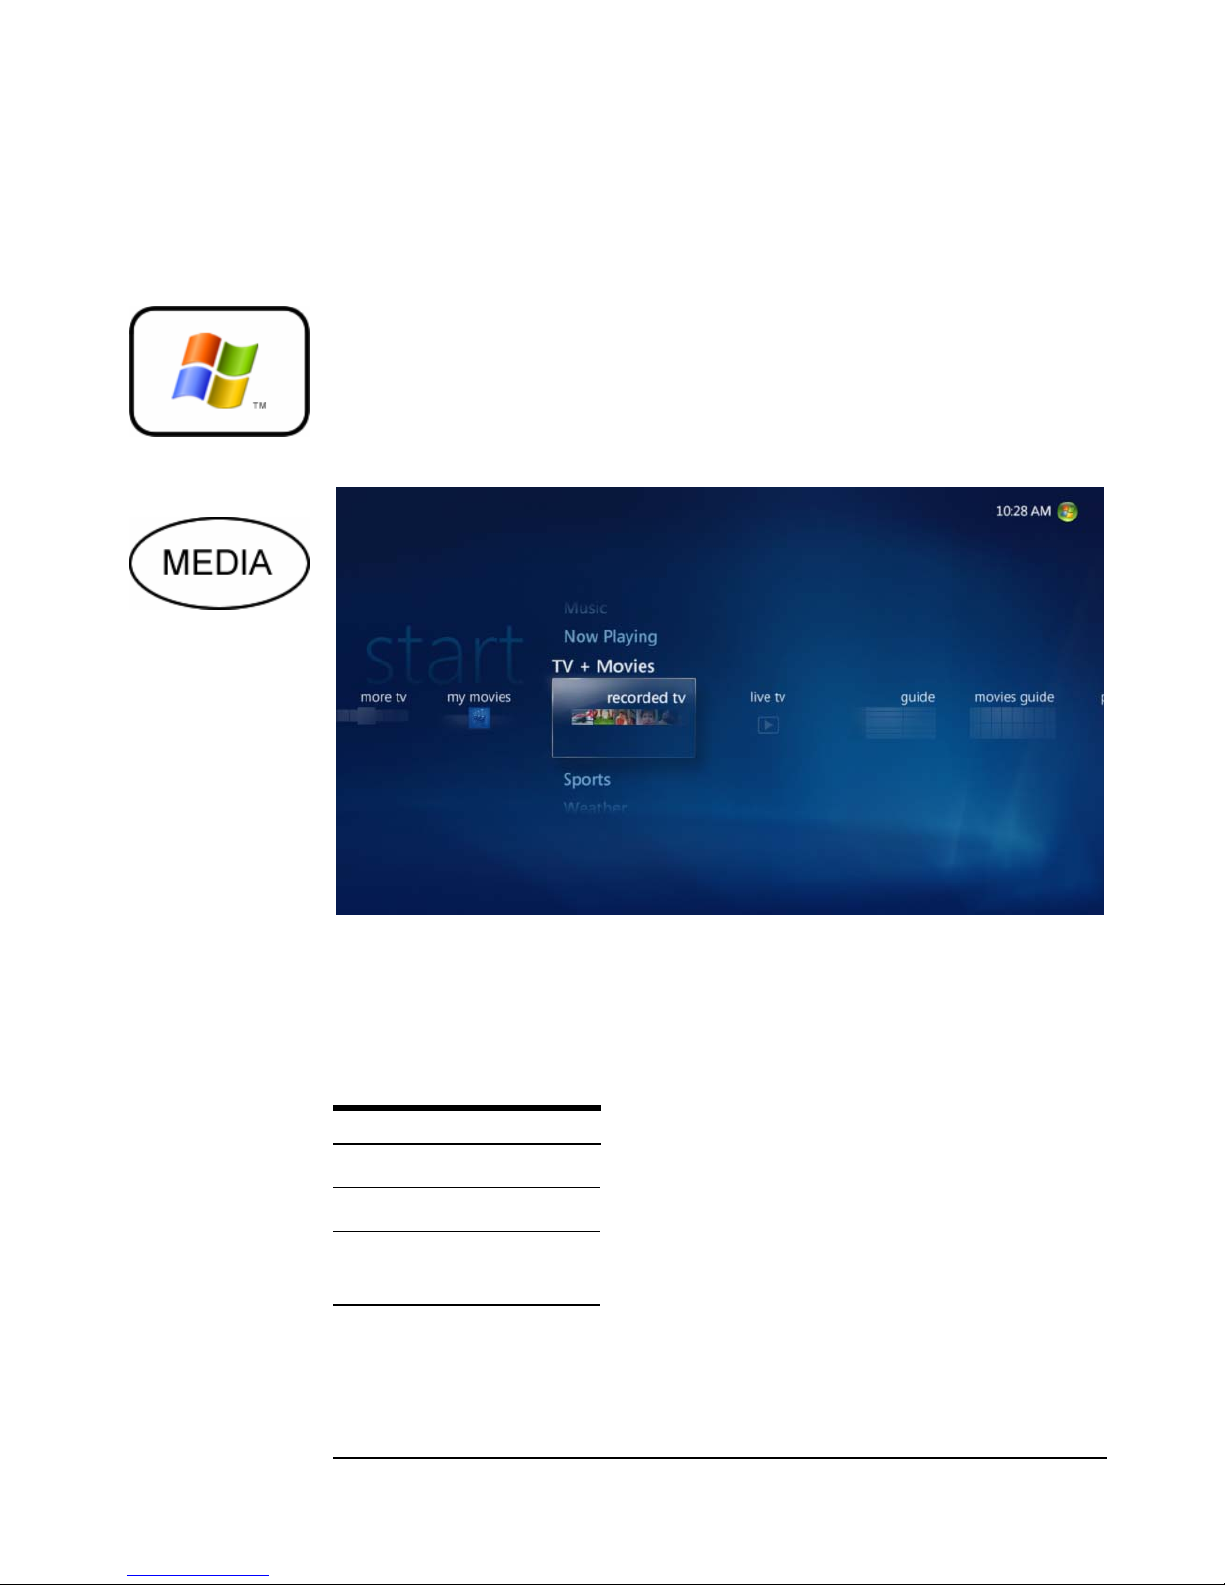
your remote, as shown. Follow this guide to learn all the capabilities of the VidaBox™
or start navigating through the menu and explore its features.
listening to music – can be accessed from the Media Center Menu. You can
get to it at any time by pressing the green Media/Start Button in the middle of
The Start Button –
Harmony® Remote
Please take some time to follow and go through all of the guide’s pages, one-by-one, so
that you are familiar with all of the functions and features available on the VidaBox™.
For those of you who are already familiar with media center machines, you may wish to
skip ahead to the Advanced Functions section to learn more about the unique features
on the VidaBox™ that may not be readily apparent on the first glance.
ICON KEY
Valuable Information
Be sure to check out our website and support forum –
new tips, tricks, features, and answers can be found
there everyday!
New Section
Answer Before
Proceeding
Please pay close attention to these icons. They alert
you to key pieces of information that are needed for a
successful installation of the VidaBox™.
1
Page 7
INTRODUCTION
p
play
p
V
y
Media Center Remotes
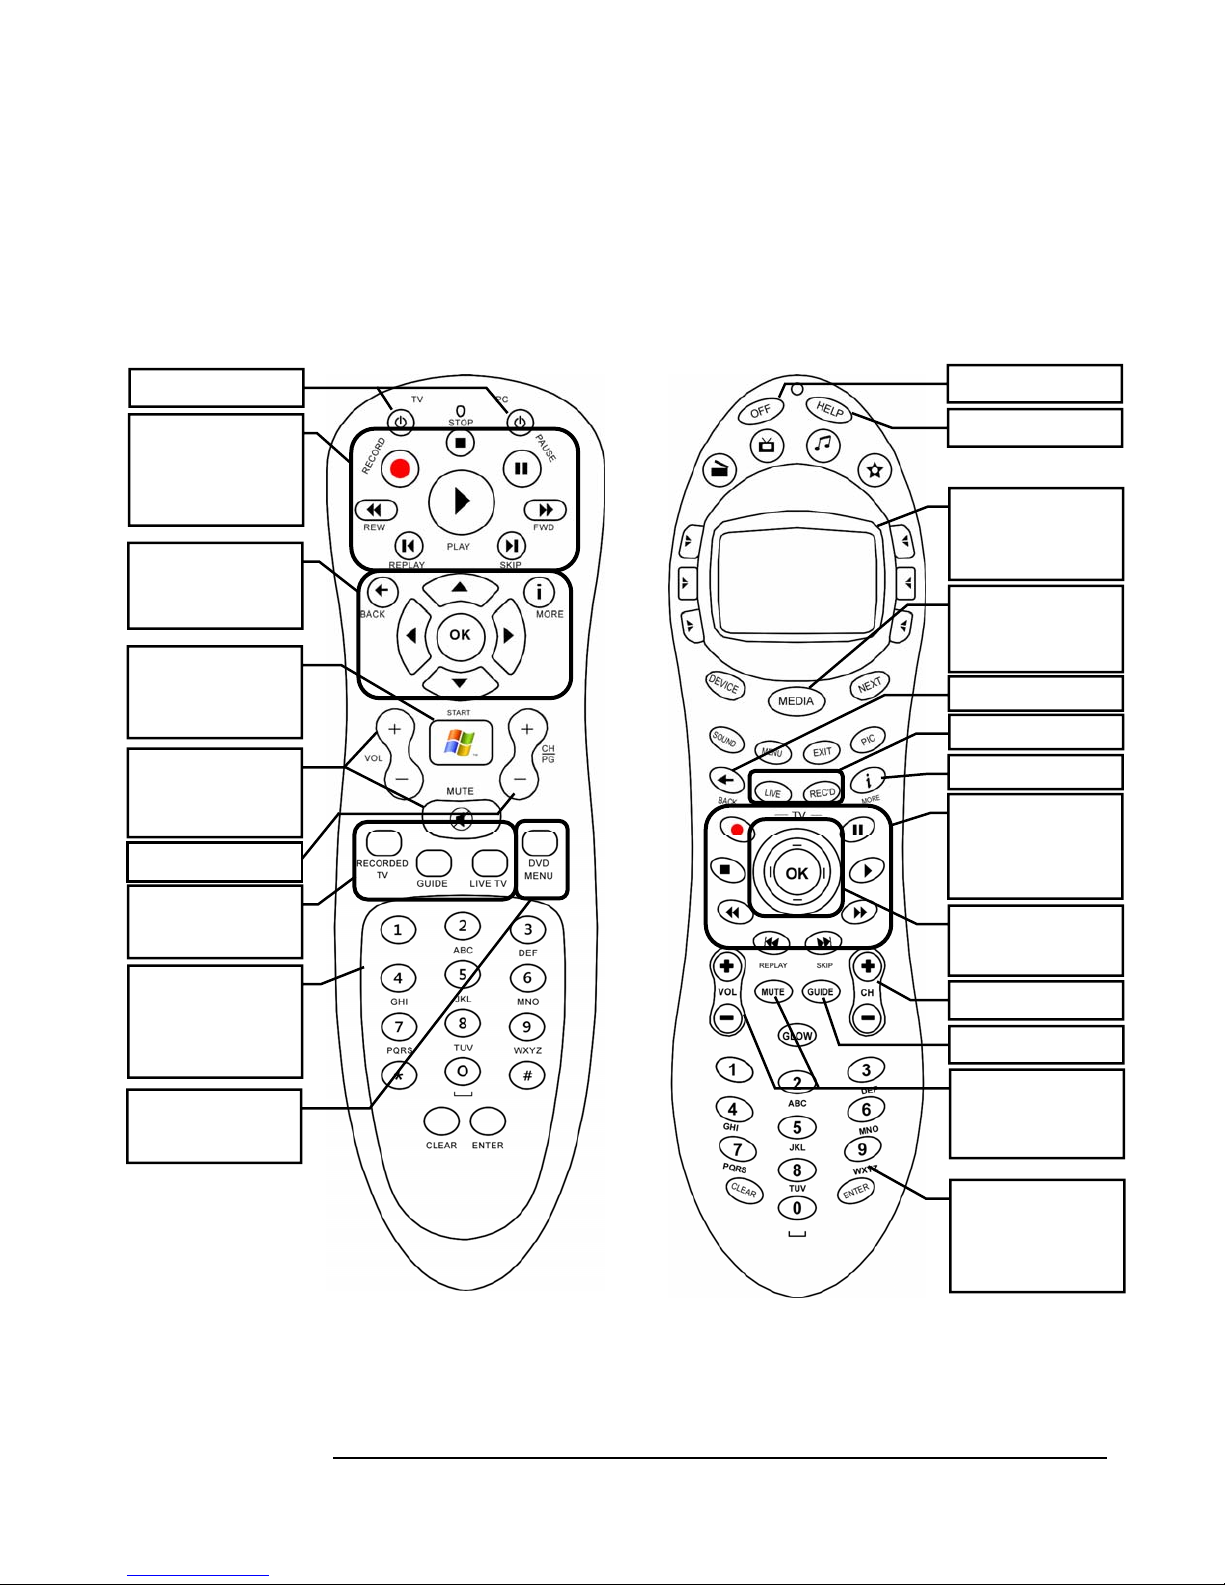
It is very important to familiarize yourself with the VidaBox™ remote. Below are
diagrams of the standard and optional remotes. Pay particular attention to the layout
of the main key buttons. You can control virtually all of the VidaBox™ system’s
functions with these keys.
Power Buttons
Playback Controls:
Stop, play, pause, record,
rewind, fast-forward, and
more for video or music
playback.
Navigation Buttons:
Up, Down, Left, Right,
& OK buttons, with Back
and More info buttons
The Green Start Button:
Press this to get to the
Main Media Center
Console Menu
Volume Control:
Controls sound
loudness/softness, with
Mute o
tion
Channel/Page Up/Down
Television Controls:
Quickly Access Recorded
TV, Guide, and Live TV
Numeric Controls:
Enter in TV channels,
radio stations, and other
controls where a numeric
input is required
DVD Menu:
Quickly access a loaded
DVD’s menu.
Power Button
Get Help
Adaptive Menu:
Control advanced options
with the built-in LCD
screen menu
The Green Media/Start
Button: Press this to get to
the Main Media Center
Console Menu
Back/Return to Previous
Access Live/Recorded T
More Info/Options Ke
Playback Controls:
Stop, play, pause, record,
rewind, fast-forward, and
more for video or music
Up, Down, Left, Right,
Channel/Page Up/Down
Quickly Access TV Guide
loudness/softness, with
back.
Navigation Buttons:
& OK buttons
Volume Control:
Controls sound
Mute o
tion
Standard Microsoft
Remote Diagram
Numeric Controls:
Enter in TV channels,
radio stations, and other
controls where a numeric
input is required
Optional Logitech®
Harmony
Remote Diagram
2
Page 8
BASIC FEATURES
Remember the
Start Button!
You can navigate to all of
the features here from
the Media Center Menu,
which you can access
from pressing
the Start Button.
My Movies Option
Watch DVD Option
Basic Features – How Do I…
This section will cover the most common features one would use on the VidaBox™.
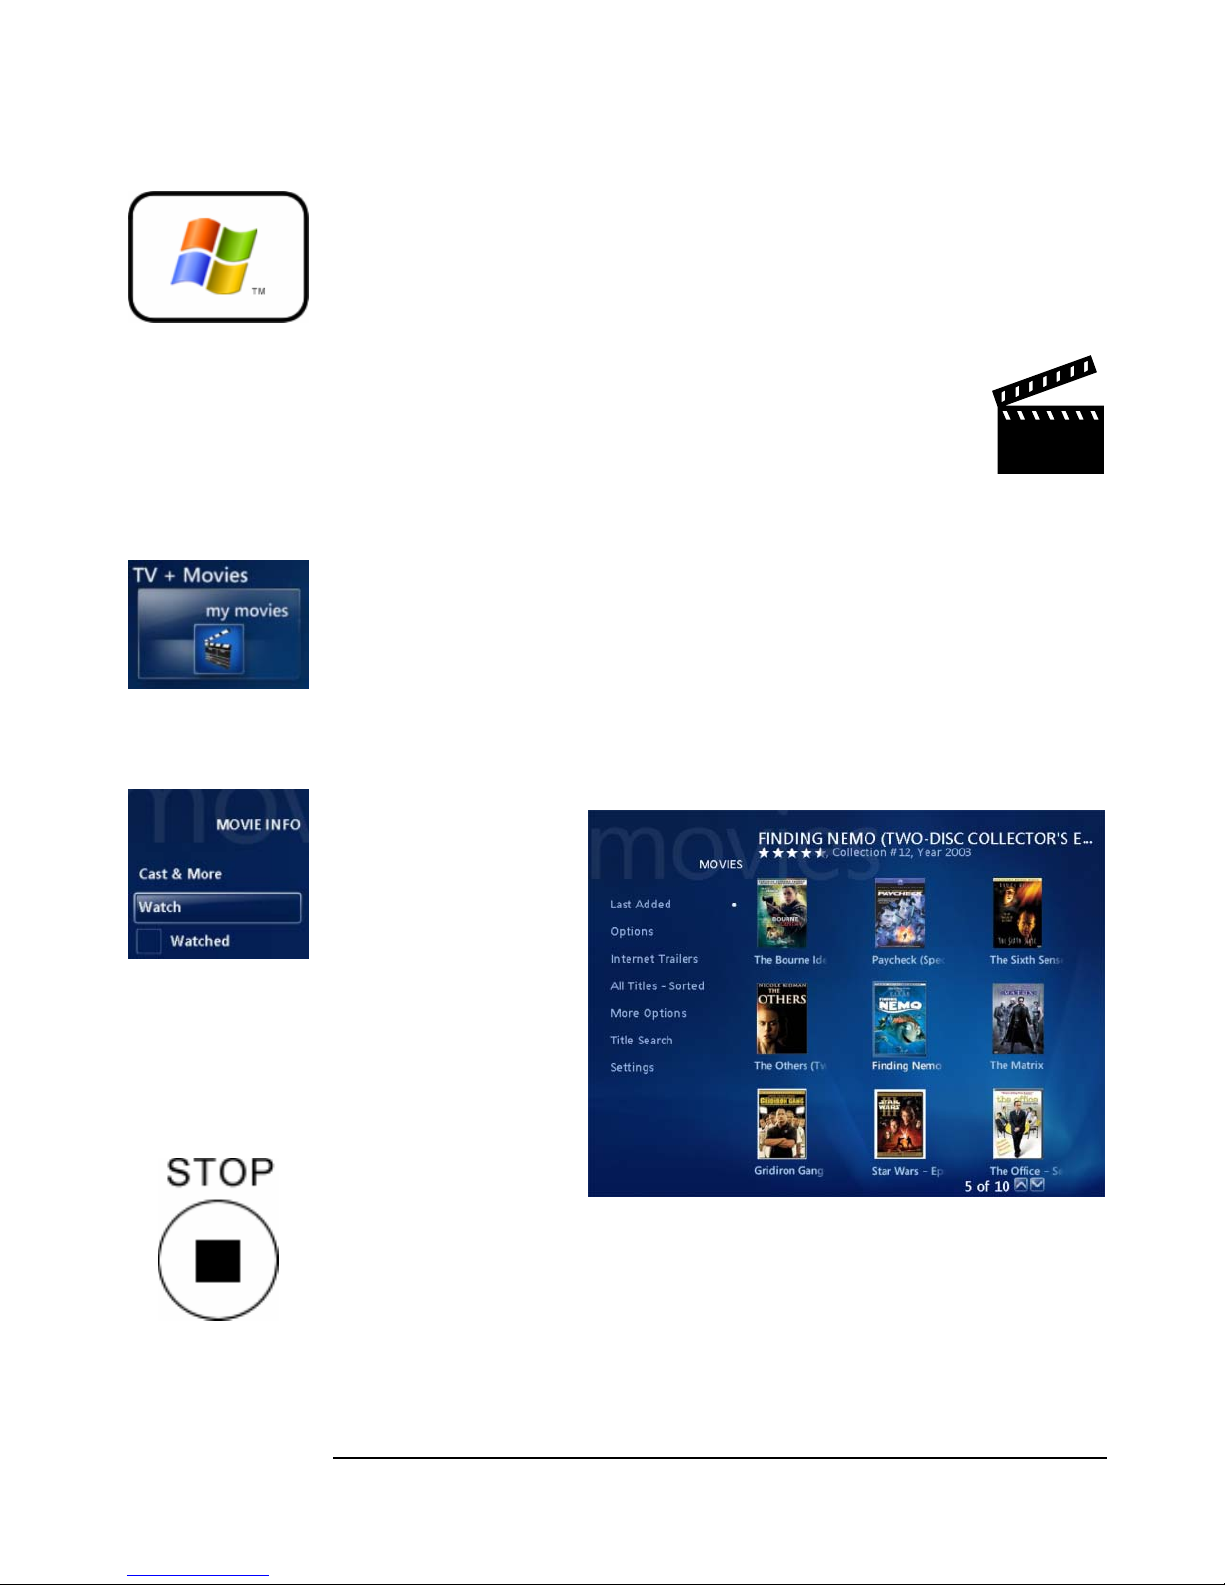
You can discover these features directly from the Media Center Start Menu, which can
be accessed by pressing the Start Button, as shown adjacent.
Watch a DVD disc?
1. Press the Load/Eject button, and the DVD tray will open. Take
out the DVD if there is one present.
2. Place a DVD on the tray, then close the tray by pressing the Load/Eject button or
by pushing the tray into the VidaBox™.
3. Wait a few moments, and a prompt for Play DVD will appear, or the DVD will
should play automatically!
4. Alternatively, if the DVD is already in the drive, select Play DVD from the main
menu.
Play a Preloaded DVD?
1. Select My Movies,
and hit OK on the
remote (as shown on
the left). The DVD
selection menu will
appear, as shown on
the right.
2. Using the arrow keys,
select which DVD
you want to play, and
hit OK.
3. The DVD Movie
Info Menu will
appear. Select Watch
to view the DVD, as
shown on the left.
My Movies Menu
Important Note: When other video or audio is being played, such as music or TV,
Stop
Remote Button
preloaded DVD movies will not play automatically. Hit the Stop button to stop
current playback, as shown on the right, and then select the movie to be viewed.
3
Page 9
BASIC FEATURES
My Movies Option
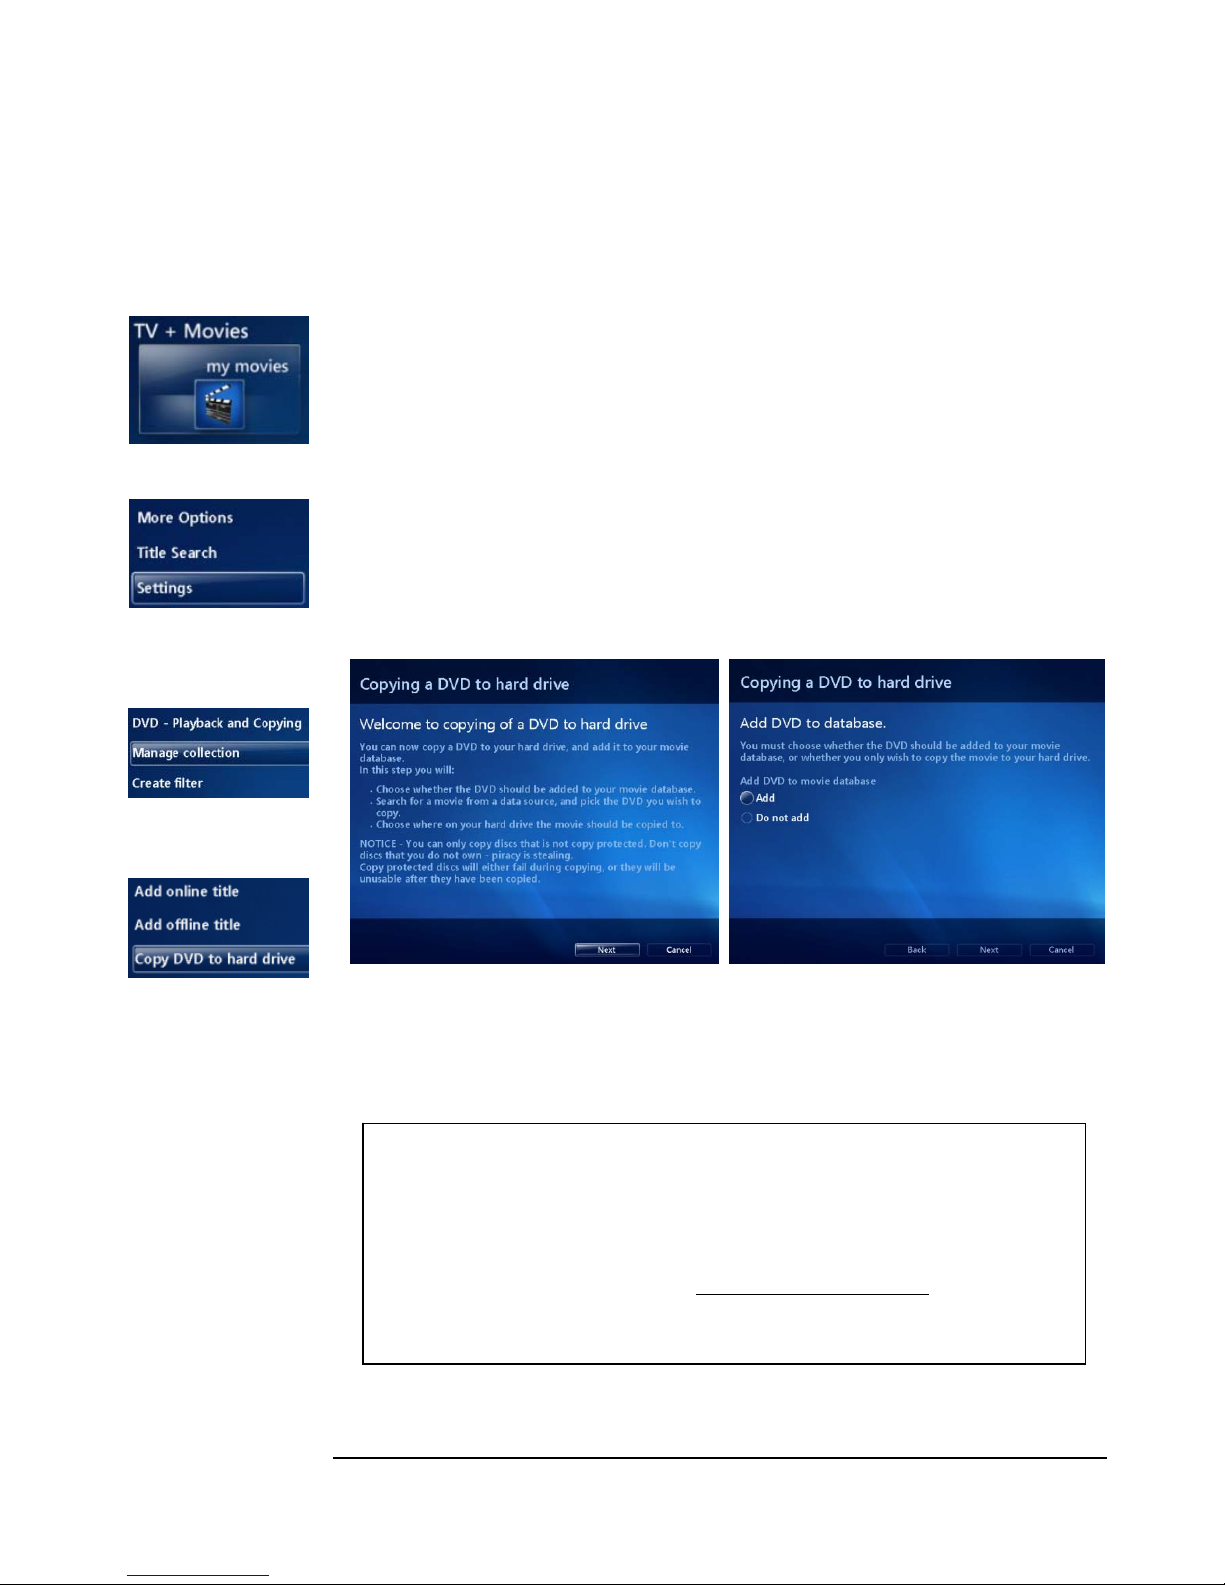
Add a DVD to My Mo vies Catalog?
1. Press the Load/Eject button, and the DVD tray will open. Take out the
DVD/CD if there is one present.
2. Place a DVD on the tray, and press the Load/Eject button again to close the tray.
3. Go to My Movies, and select that option, as shown on the left.
4. Select the Settings option under the My Movies menu (see left).
5. Select Manage Collection. Options for adding DVD movies will appear.
Do you want to cop y a DVD to the VidaBox?
Settings Option
under My Movies
Manage Collection
Option
Copy DVD to hard
drive Option
a. Yes – select the Copy DVD using My Movies option, as shown on the left.
Then, follow the onscreen instructions, as shown below!
b. No – select the Add offline title option. ‘Offline’ means that you’re simply
adding the movie title to your collection, but not copying it onto your hard
drive. Simply follow the onscreen instructions!
Note: By default, you can only copy unencrypted DVDs!
Visit the support forum at: http://www.vidabox.com/forum or
read the Troubleshooting Guide for further details
4
Page 10
BASIC FEATURES
Play HD Movie
Option on Start Menu
Online Spotlight
Option on Start Menu
Play a HD Movie (Blu-ray/HD DVD)?
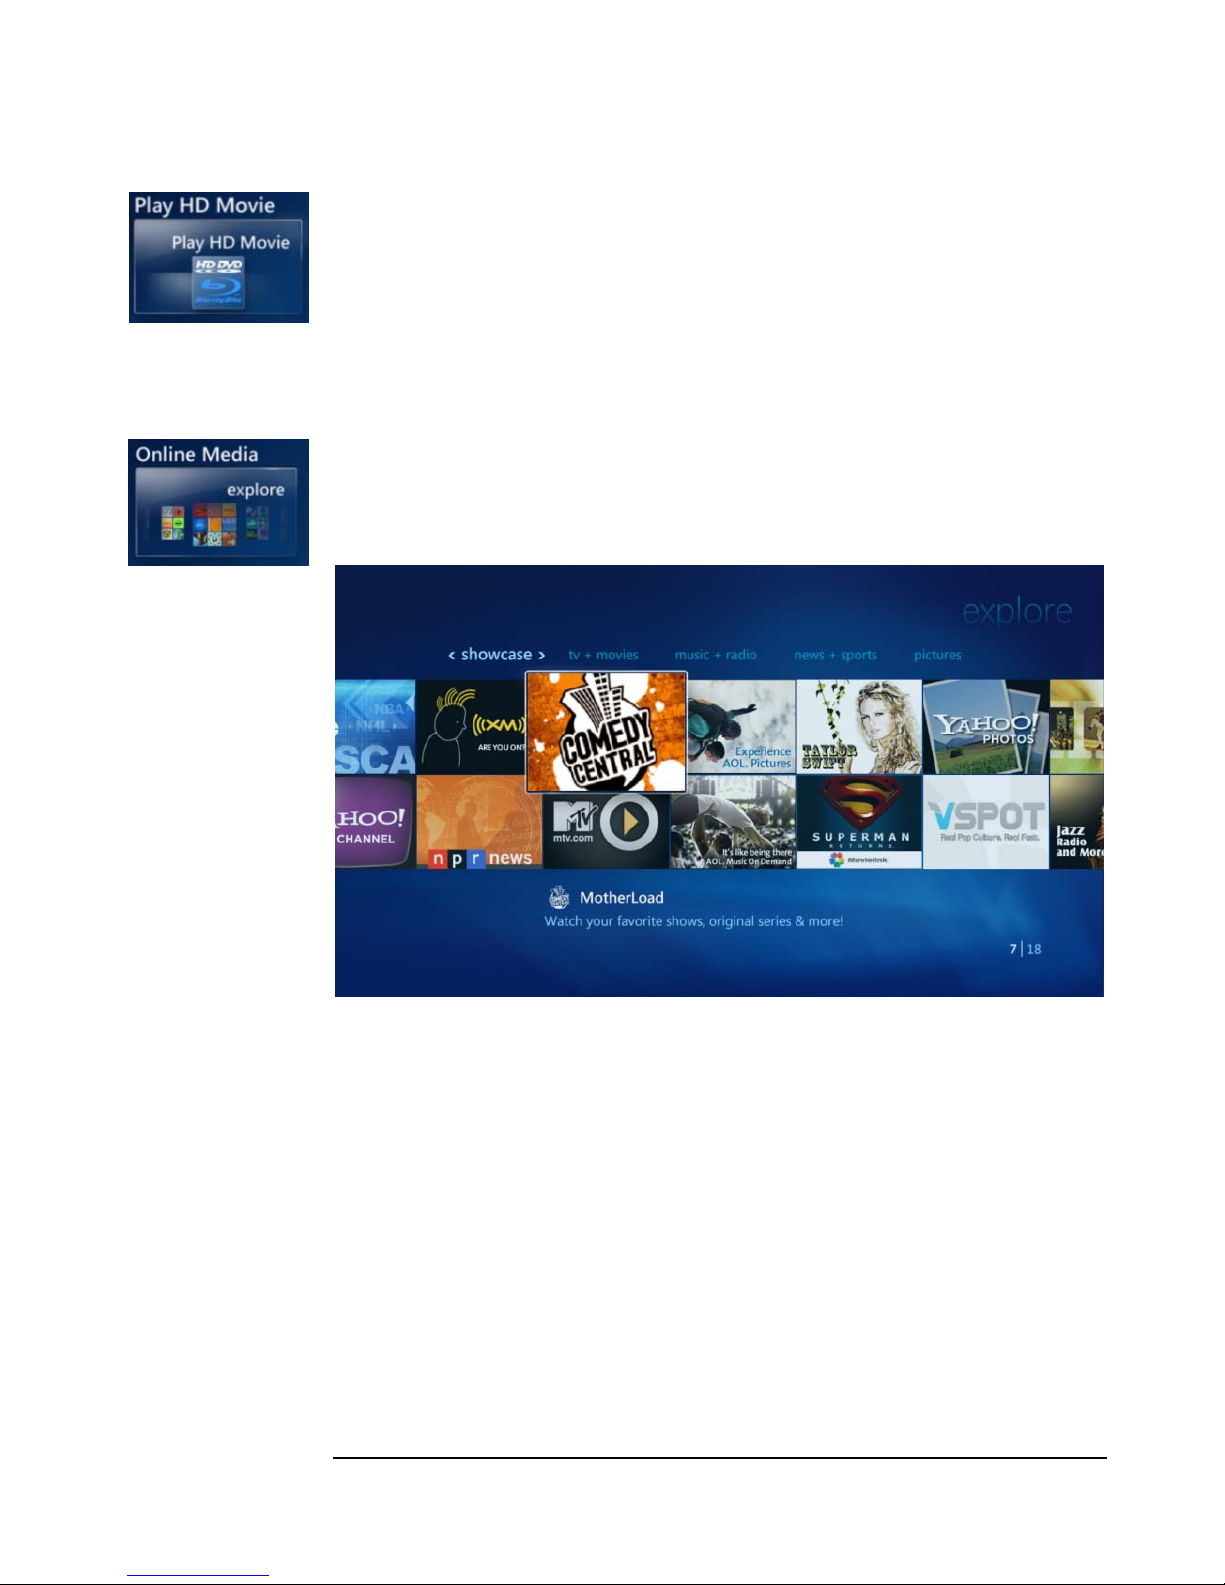
1. From the media center start menu, select Play HD Movie (shown left), and hit
OK on the remote.
2. The Media Center Console will close, and launch the appropriate software for Blu-
ray and HD DVD movie playback. Use the video controls buttons to stop, pause,
rewind, and fast forward the HD movie, just like any DVD.
See Online Spotlights?
3. From the media center start menu, select Online Media, and highlight explore.
Hit OK on the remote.
4. After loading, use the arrow keys to select which feature you want to watch, and hit
OK to select it. Each feature will have its own navigation style - simply use the
arrow keys to get around and hit OK to select. Enjoy!
5
Page 11
BASIC FEATURES
My Pictures Option
on Start Menu
See (or Import) My Pictures?
Are the pictures loaded on the VidaBox™?
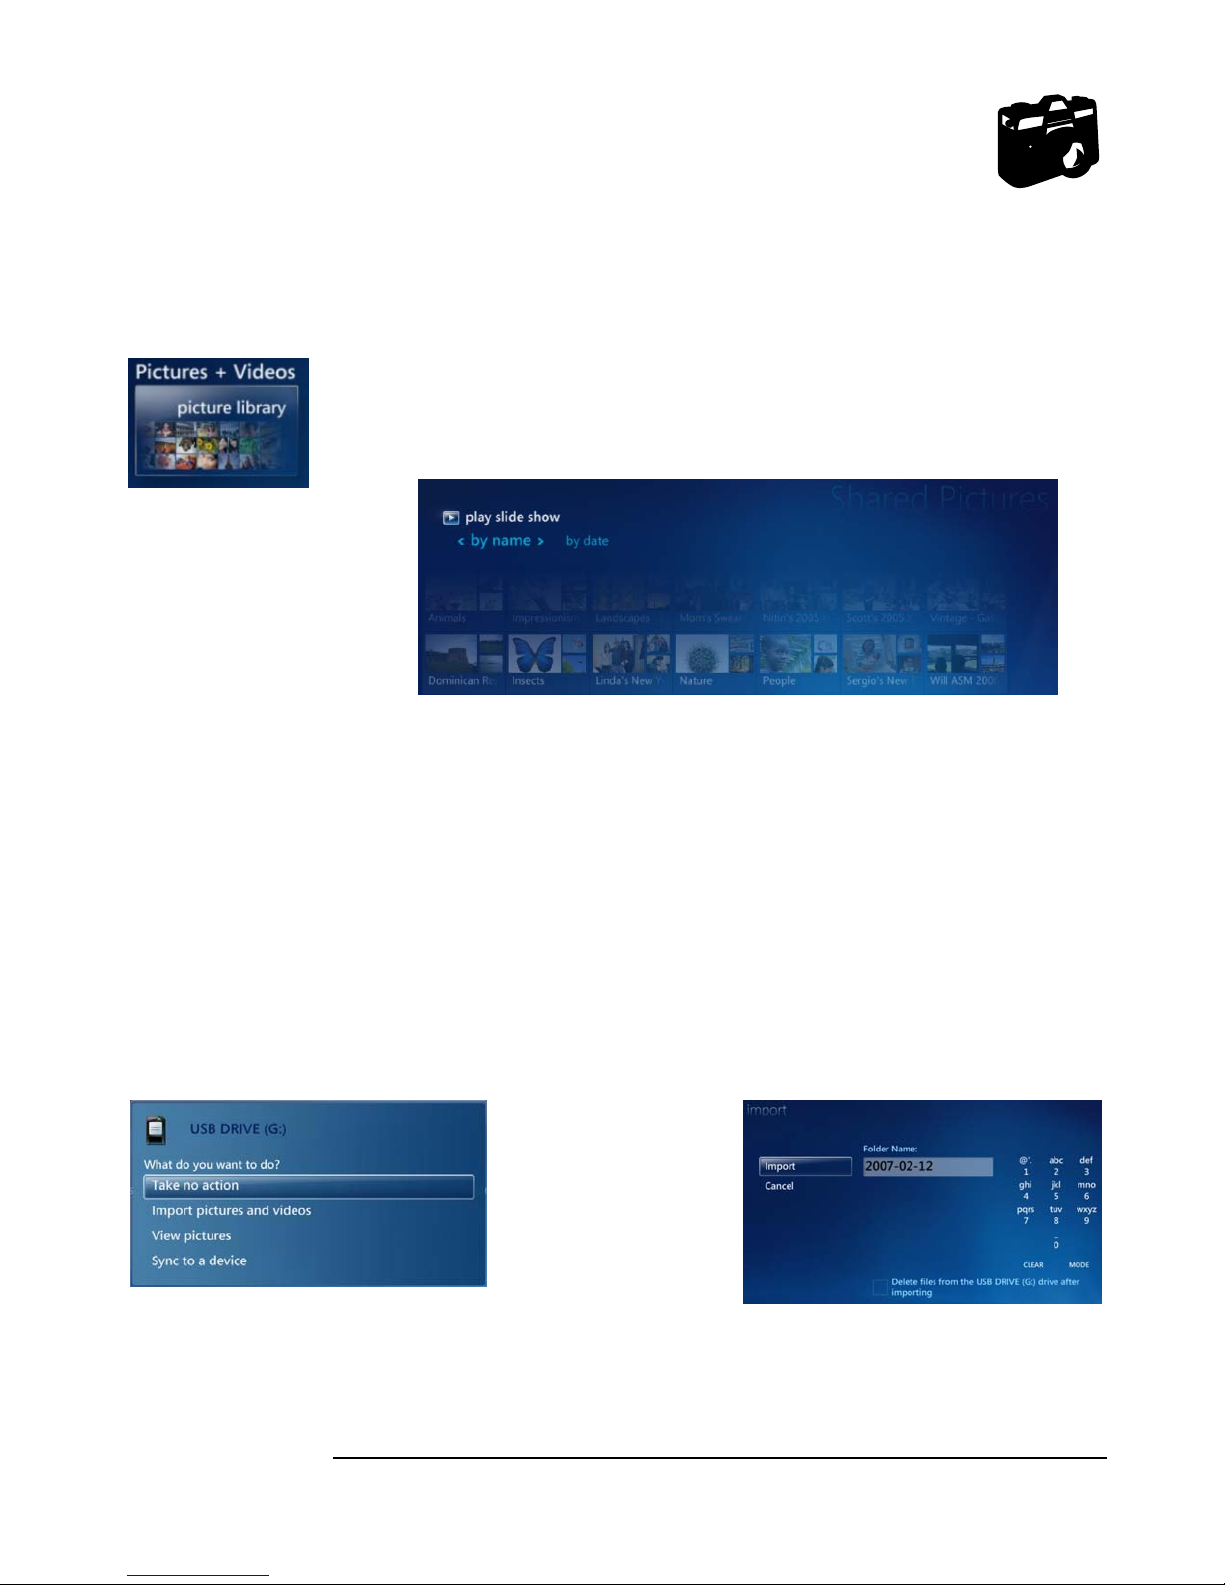
1. Yes – the photos are already loaded on your VidaBox™:
a. From the main menu, select My Pictures, and hit OK on the remote.
b. Use the arrow keys to highlight which photo album/set you want to see or
select Play Slideshow to see all of your photos as a slideshow, then hit OK.
c. Use the arrow keys again to go to the next or previous picture - enjoy!
2. No – the photos are on a CD or flash memory card / digital camera card:
a. Put your CD into the VidaBox, or memory card into the appropriate slot of a
USB card reader. Connect the USB card reader if it is an external reader.
b. A pop-up with many options will appear, as shown on the bottom right. Select
“What you want to do” and hit OK on the remote.
Note: You can copy content onto the VidaBox, and then view them afterwards.
Highlight and select the Import pictures and videos option, then follow the onscreen
instructions to copy your pictures onto the VidaBox™, as shown below.
Options Prompt
Import Pictures Screen
6
Page 12
BASIC FEATURES
Watch Live TV?
Live TV
remote button
Guide option
under My TV
Programming Guide
Remote Button
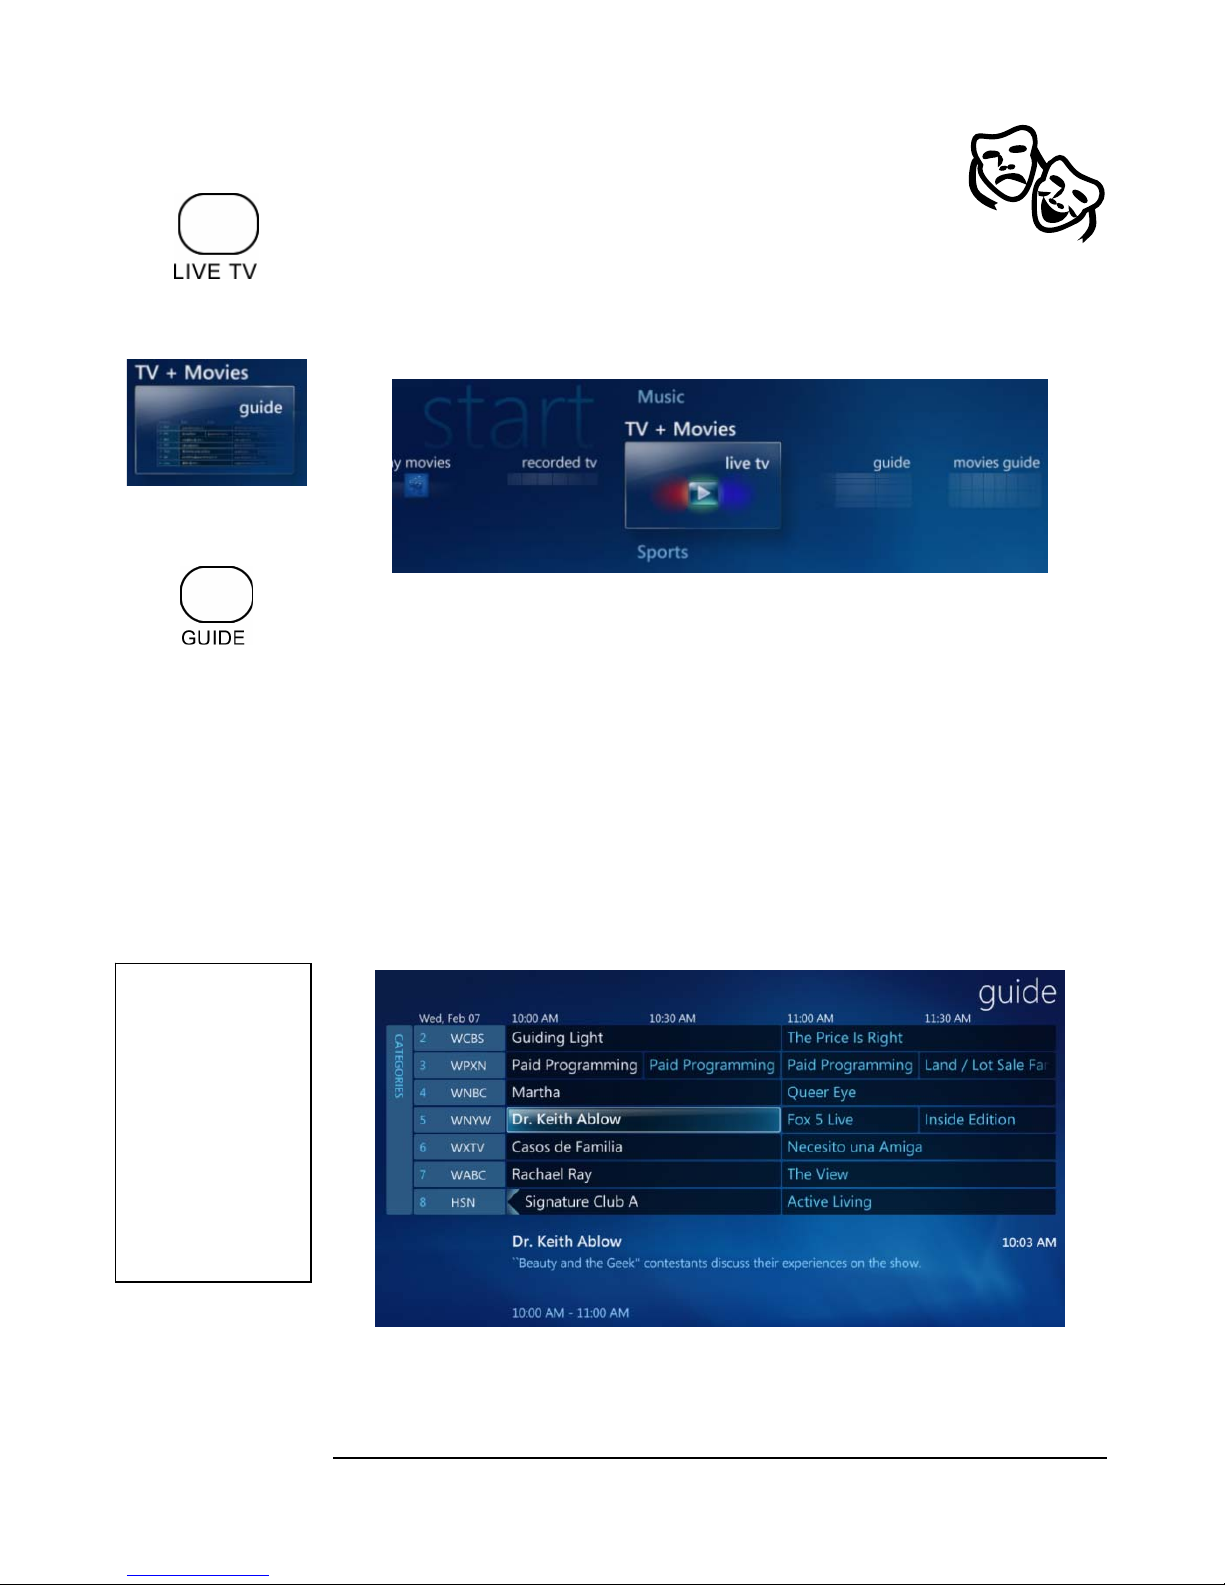
There are three ways to watch Live TV.
1. From the Media Center Start Menu, highlight TV + Movies, and then highlight
Live TV by using the right arrow key, then hit OK.
2. Using your remote, simply press the Live TV button.
3. Afterwards, use the Channel + or – buttons, or enter the channel number with
the numeric pad to change channels.
Access the Programming Guide?
There are two ways to access the programming guide.
1. From the Media Center Start Menu, select TV + Movies, and then use the right
arrow key to highlight the Guide option and hit OK. The Guide will appear, as
shown below.
Get More Info
on Shows
Using the arrow keys,
highlight the upcoming
show you are interested
in, and then hit OK
again. A description of
the show will appear.
2. Simply hit the Guide button on the remote control and it will appear, as shown.
7
Page 13
BASIC FEATURES
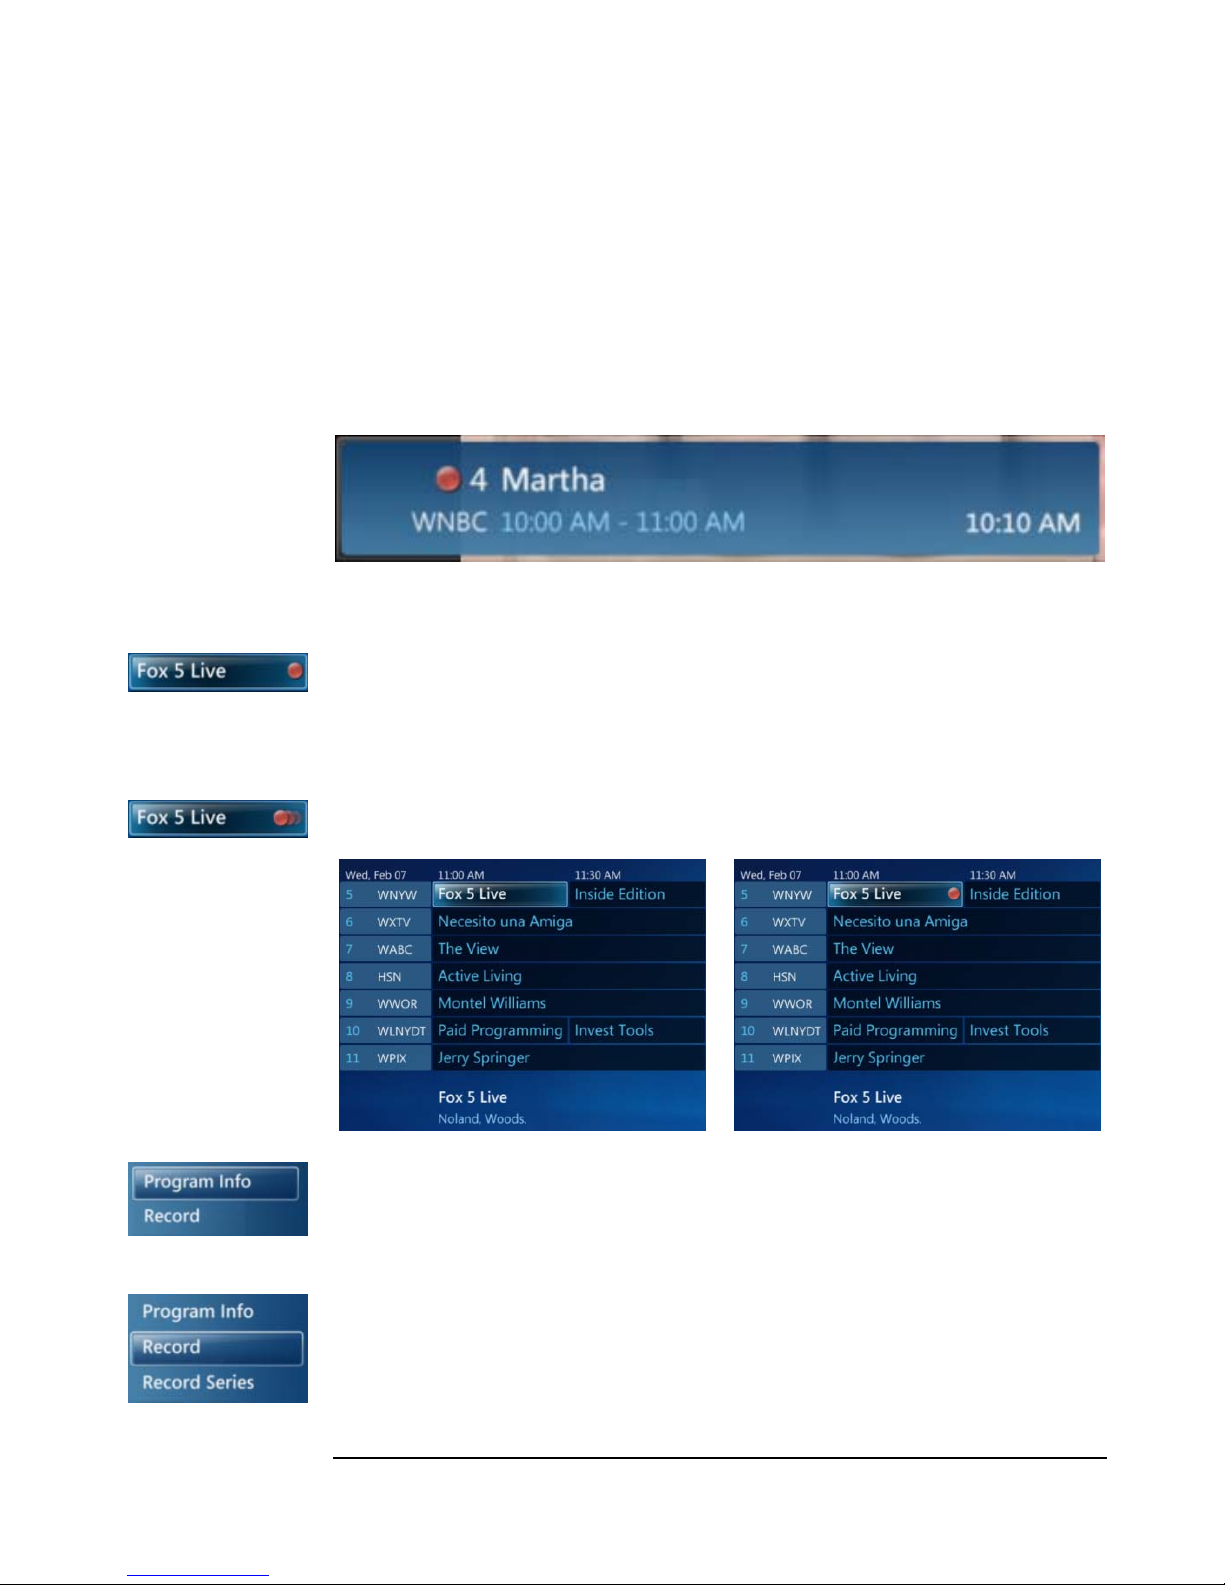
Record a TV Show Currently On?
There are two methods of recording a TV show that is currently on air.
Hit Record once, and a
red circle will appear,
indicating that a single show
will be recorded.
Hit Record again, and
multiple fading red circles
will now appear. This
indicates that every show by
this name will be recorded.
Program Info option
When Watching Live TV
1. While watching Live TV, simply hit the Record button on the remote control.
2. A notification will appear with a red circle, as shown below, that the show is being
recorded.
Using the Guide & Record button
1. Activate the programming Guide, as described in the previous section.
2. Using the arrow keys, highlight the show that you want to record, as shown below.
3. Press the Record button on the remote, and the guide will now display a red circle
next to the show, indicating that it is or will be recorded.
4. Press the Record button again to record every show by that name, similar to a
“Season Pass” function. Notice the single red circle has now changed to three
fading red circles, indicating the change, as shown adjacent.
Step 2: Highlight the show you want to record
Step 3: Hit the Record button on the remote
Note: You can use the same method to record any show – even ones that will be on
air at a later time. Simply highlight the show you want to record later and repeat the
steps.
Using the Guide & OK button
1. While using the guide, click on the More Info button on the remote, and select
Record option
Program Info. Choose Record Show, as shown on the left.
8
Page 14
BASIC FEATURES
Record a TV Show Airing Later?
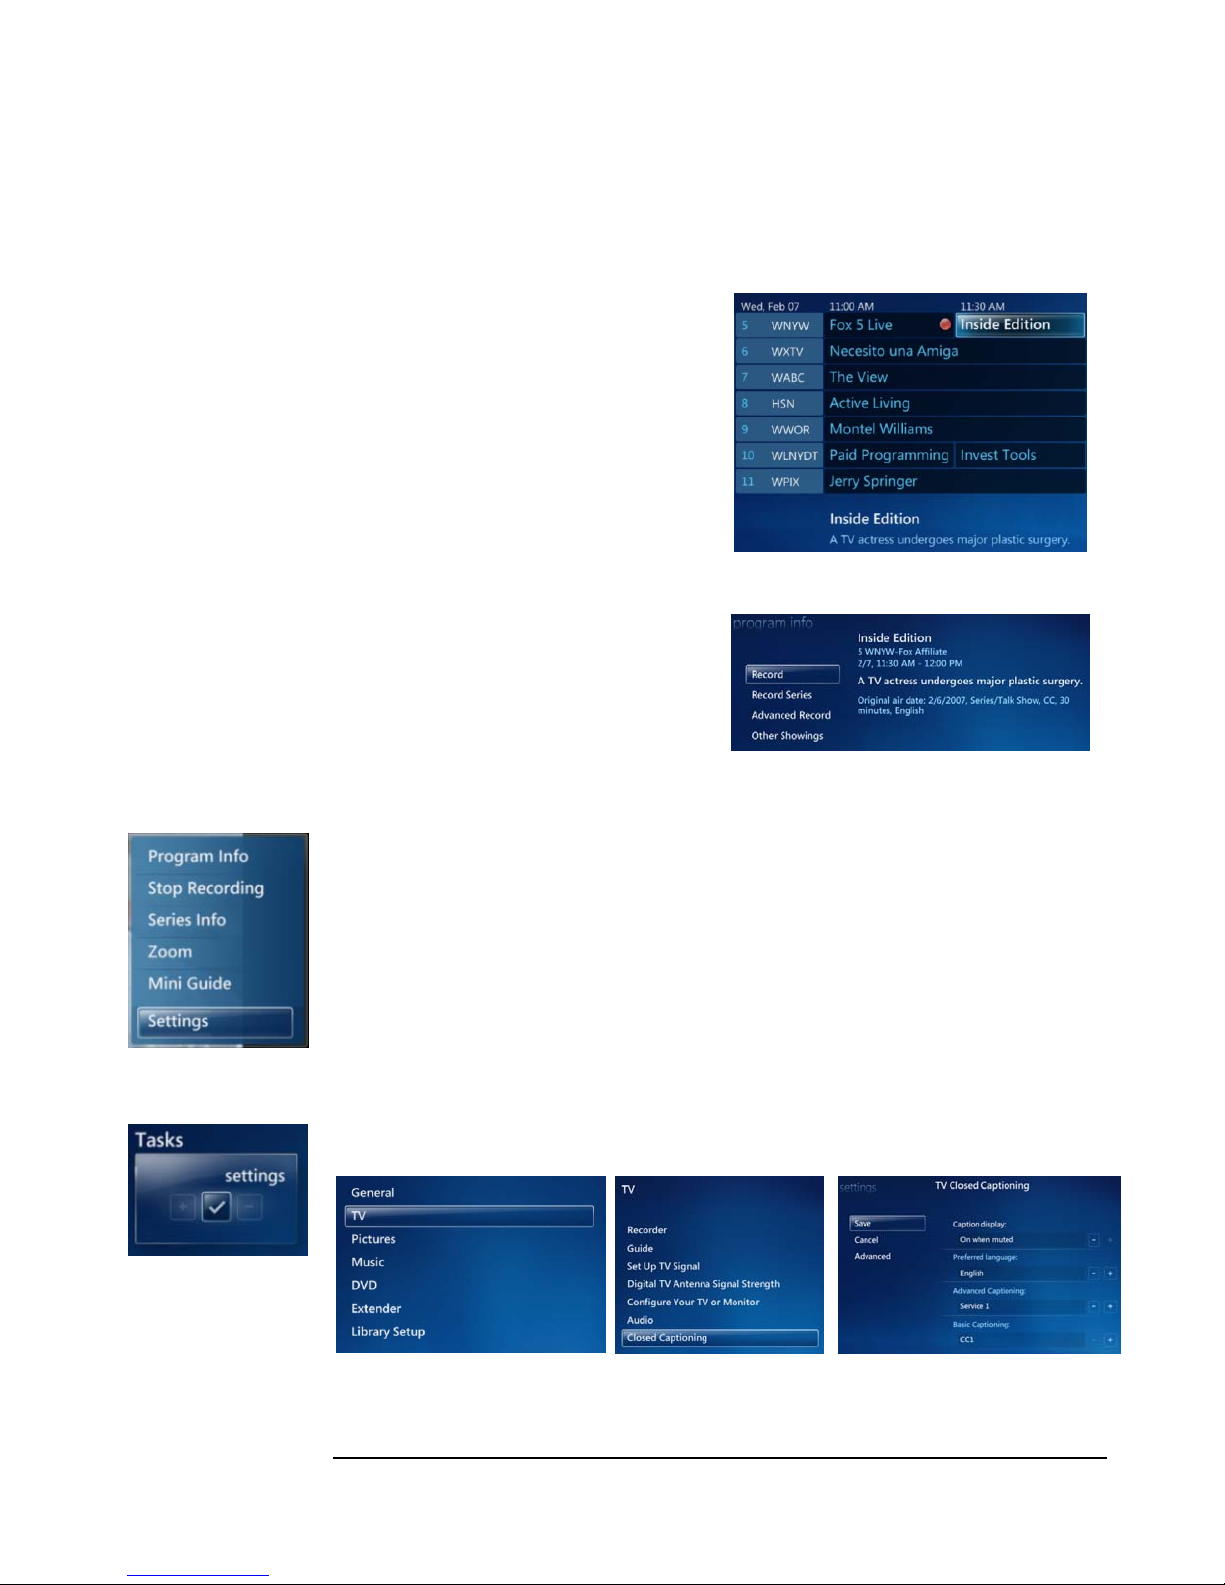
There are two main methods of recording a TV show that will air at a future time.
Using the Guide & Record button
Use the same steps, as described in the
last section.
Using the Guide & OK button
1. Activate the Guide, as described in
a previous section.
2. Using the arrow keys, highlight the
show that you want to record, as
shown below.
3. Press the OK button on the remote,
and program information will be
displayed. You can select to record
just that show, the whole series, or
advanced recording options.
Step 2: Highlight the show you want to record and hit OK.
Step 3: Program information will appear as shown.
Enable Closed Captions?
Settings option when
Settings option under
watching TV
Tasks
You can enable closed captions on TV programs.
When Watching Live or Recorded TV
1A. While watching TV, simply hit the More button. Select Settings. Go on to Step 2.
From the Media Center Menu
1B. Hit the Start button, then go to Tasks, and select Settings. Go on to Step 2.
2. Select TV, then Closed Captioning. Finally, change the options as you see fit!
TV option under Settings
Closed Captioning option
TV Closed Captioning options
9
Page 15
BASIC FEATURES
Recorded TV
Option
Recorded TV
Remote Button
Watch a Recorded TV Show?
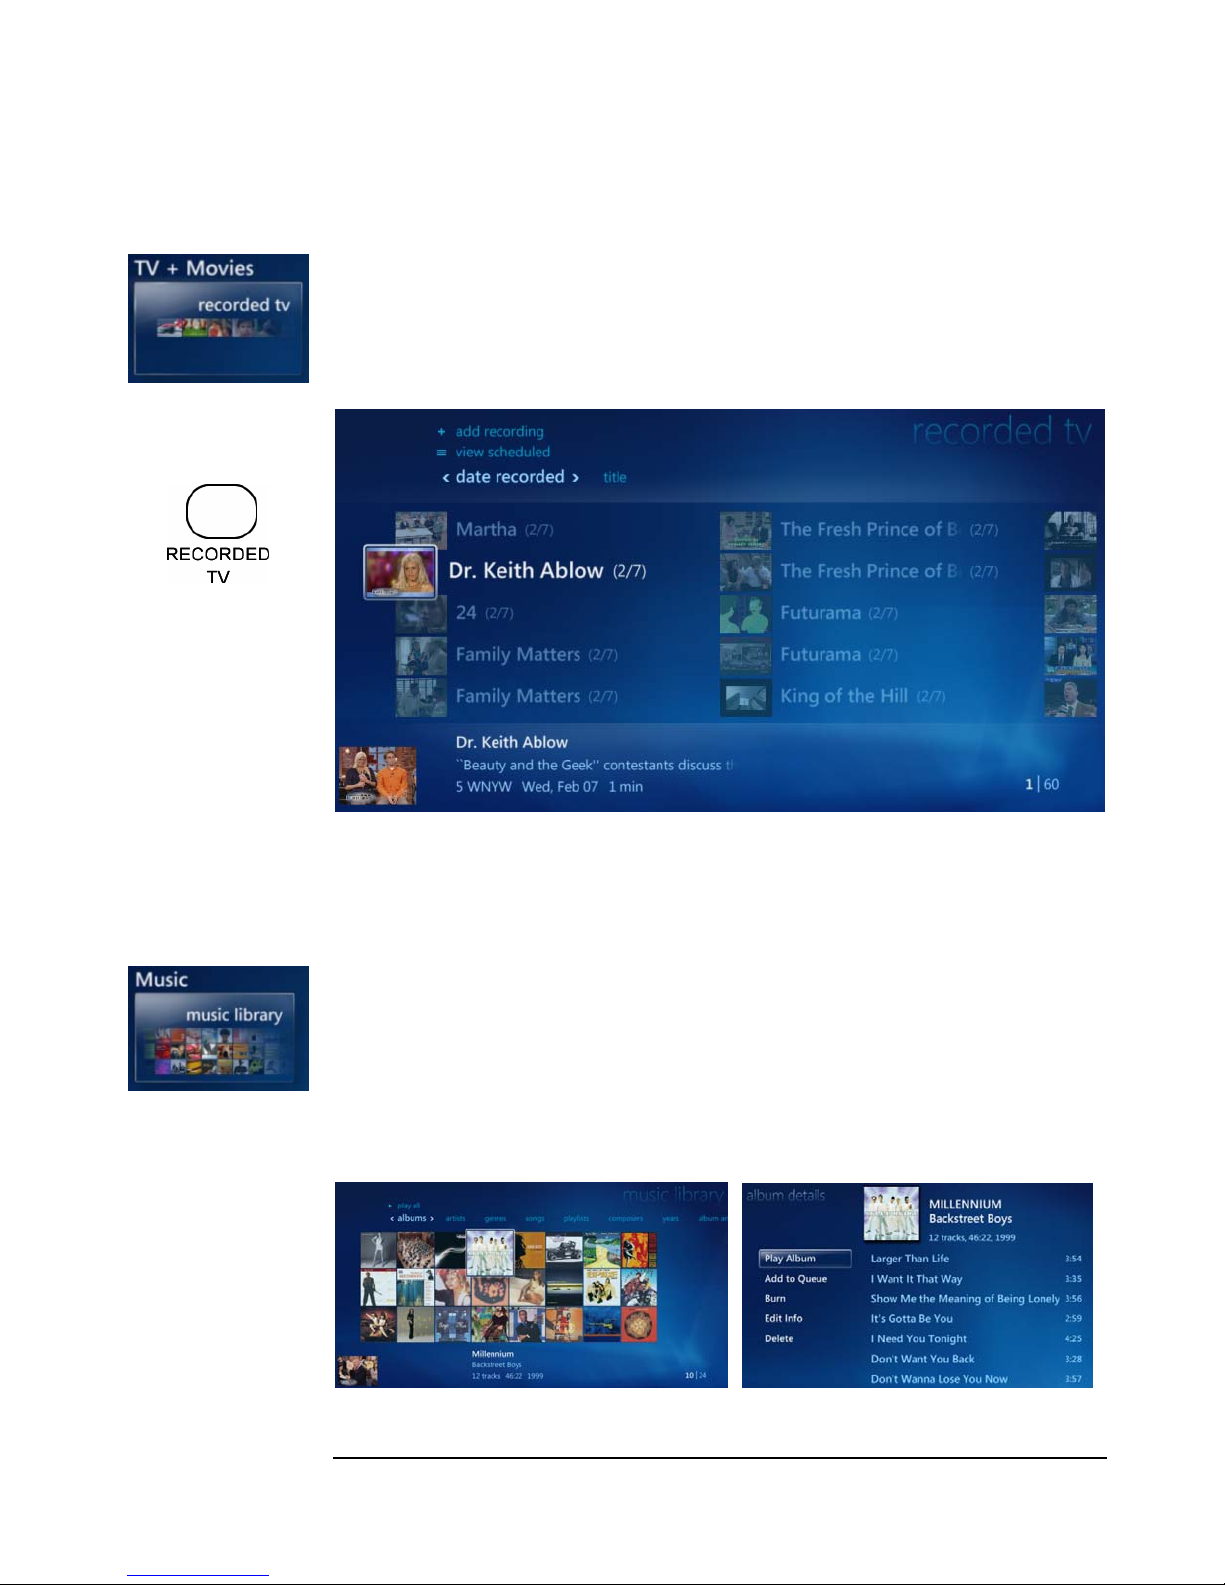
There are three ways to access the recorded TV screen.
1. From the Media Center Start Menu, select TV+ Movies, with the Recorded TV
option highlighted, hit OK.
2. Using your remote, simply press the Recorded TV button, as shown on the left.
Afterwards, use the arrow keys to highlight the recorded TV show you want to watch
& hit OK.
Listen to My Music?
1. Highlight Music from the main menu, and with Music Library highlighted, hit
OK on the remote.
2. Use the arrow keys to highlight which album/song you want. Hit Play on the
Music Library
Option
remote to play the entire album, or click OK for album details.
3. Highlight Play or specific song track, and click OK to play desired selection.
10
Page 16
BASIC FEATURES
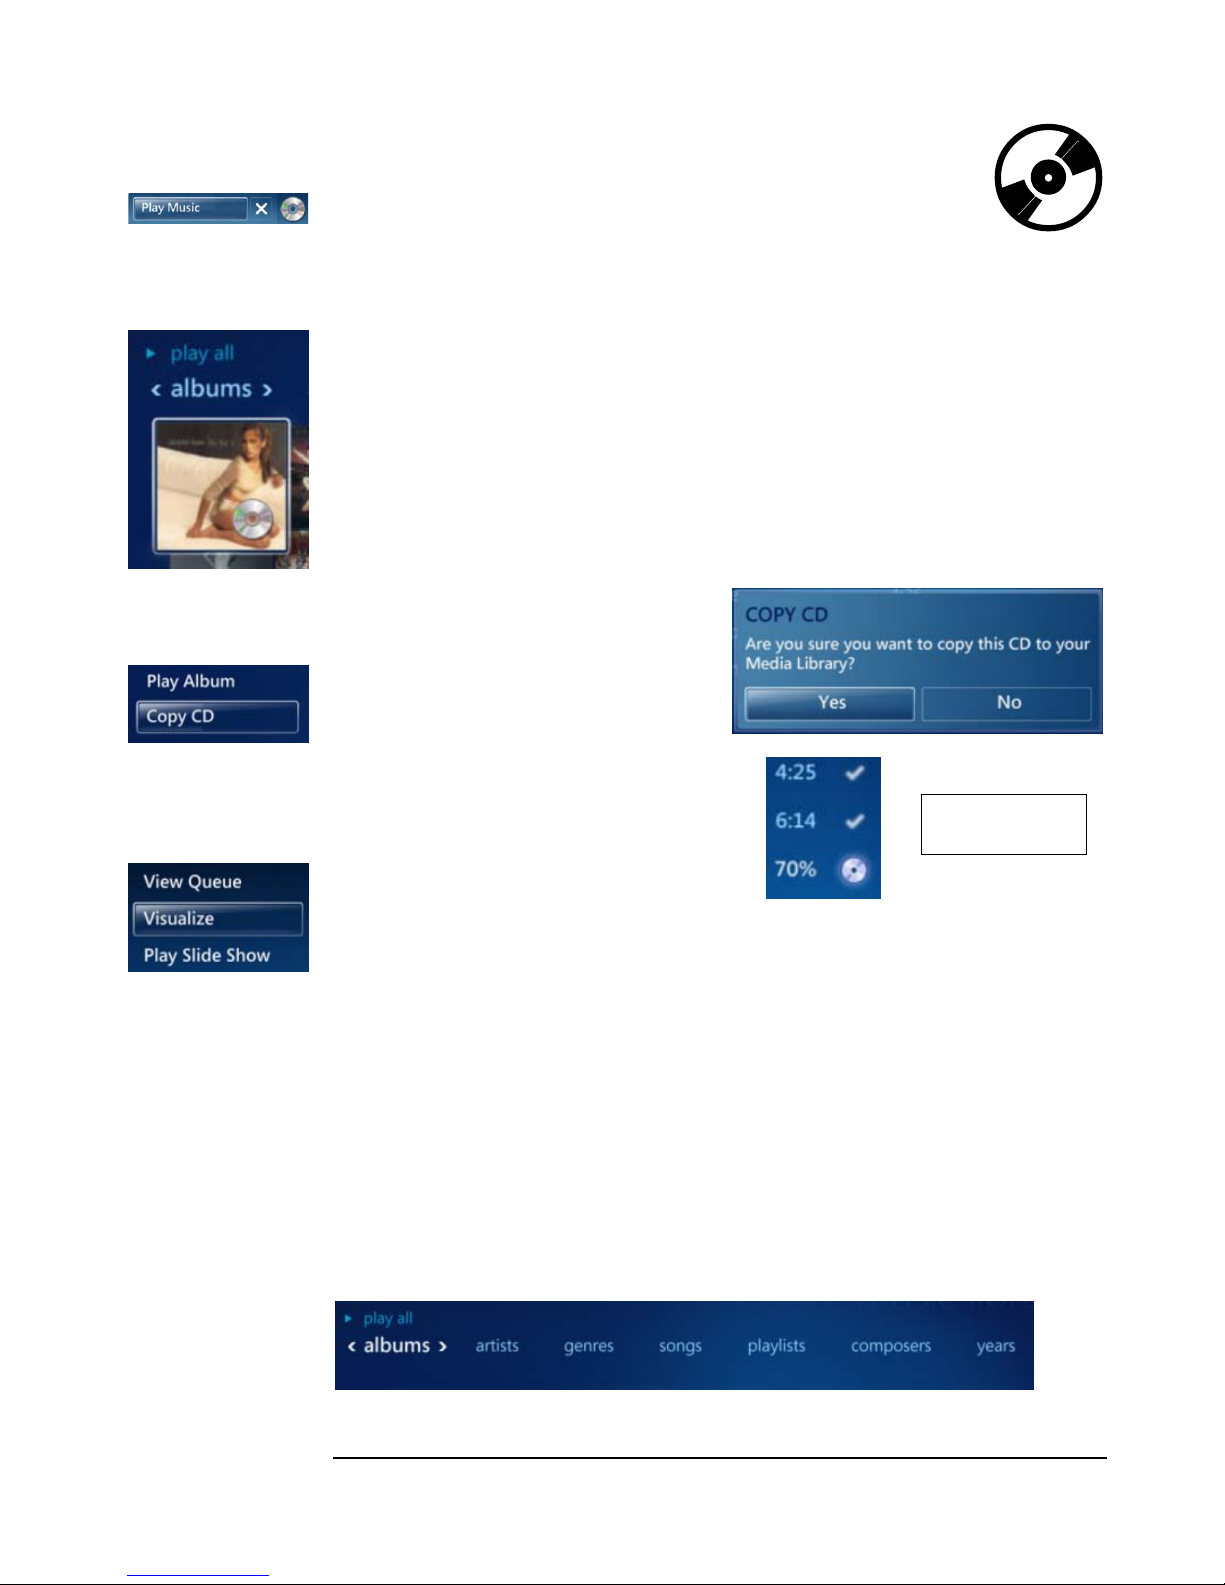
Play Music Prompt
New CD Icon
Copy CD Option
Listen to a new Music CD?
1. Press the Load/Eject button, and place the new CD inside the tray.
2. Close the tray by pressing the Load/Eject button or by pushing the tray in.
3. The CD should play automatically, or if other sounds are playing, a Play Music
prompt, as shown on the left, will appear. Highlight Play Music and click OK!
4. If it does not play immediately, highlight My Music and hit OK. Select the newly
inserted CD’s icon. Note the New CD icon has a protruding CD on its side, as
shown on the left.
Copy music CDs to my VidaBox™?
1. Load the new CD into the
VidaBox™.
2. After the CD starts playing, select
Copy CD, as shown.
3. A Copy CD prompt (shown right)
will appear.
4. Select Yes – the process will begin
automatically. You’ll see the copying
progress on-screen.
CD Copying
Progress Indicator
Visualize Option
See Music Visualization Effects?
1. Play the songs you wish to listen to.
2. While the music is playing, select the Visualize option. Enjoy the show!
Search My Music Collection?
1. After opening the Music Library, hit up on the remote control.
2. A number of search options for will appear, as shown below. Highlight the
desired field and every song will be categorized according to your selection.
11
Page 17
BASIC FEATURES
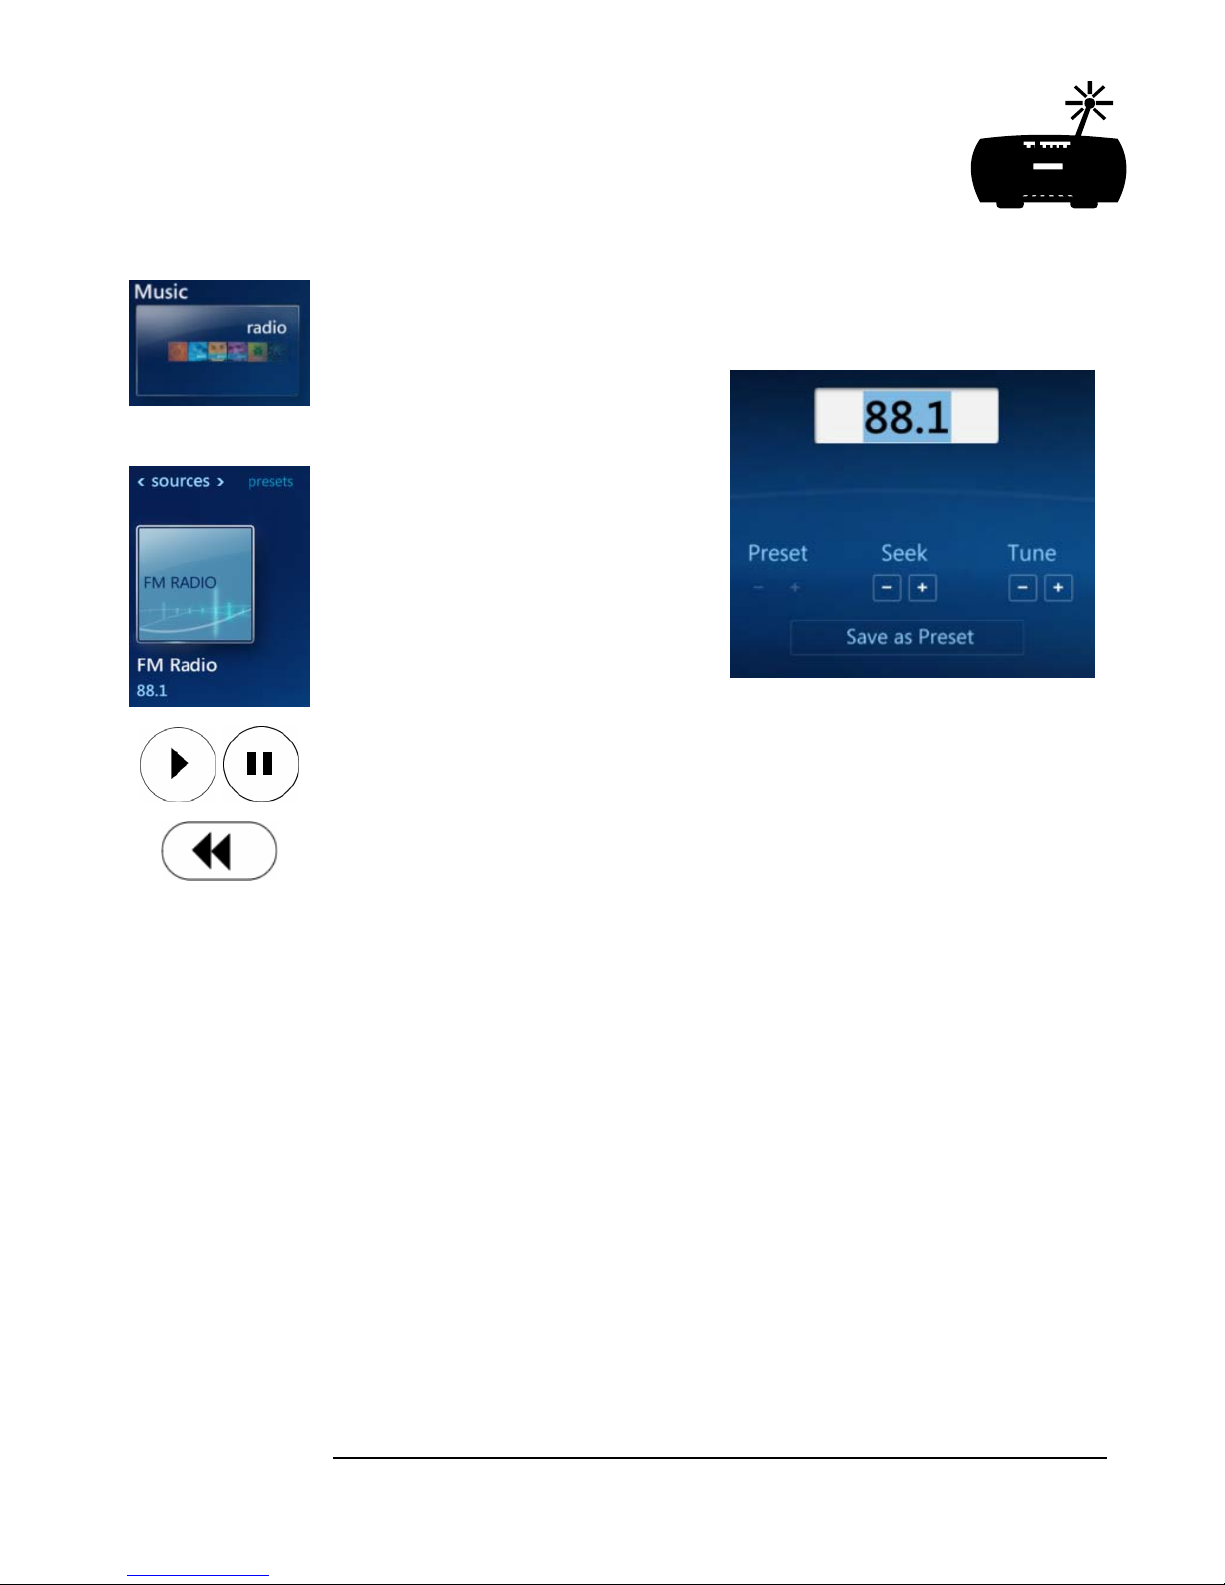
Listen to the Radio?
1. Highlight Music, then using the right arrow key, highlight Radio and hit OK on
the remote. Select FM Radio from the list of sources.
Radio Option
Play , Pause, and
Rewind FM Radio
2. You can then tune into a radio station
using one of the following methods:
a. Enter in a station’s frequency
number using the number keys
on the remote.
b. Use the Seek and Tune functions
to scan for stations.
c. If you have preset stations,
highlight the arrow keys under
Preset & hit OK to cycle through
your saved stations.
Hit Save as Preset to store the currently tuned frequency. Once tuned in, you can
also pause and rewind FM radio by using the media playback controls.
12
Page 18
BASIC FEATURES
My Videos Option
Karaoke Videos
Folder
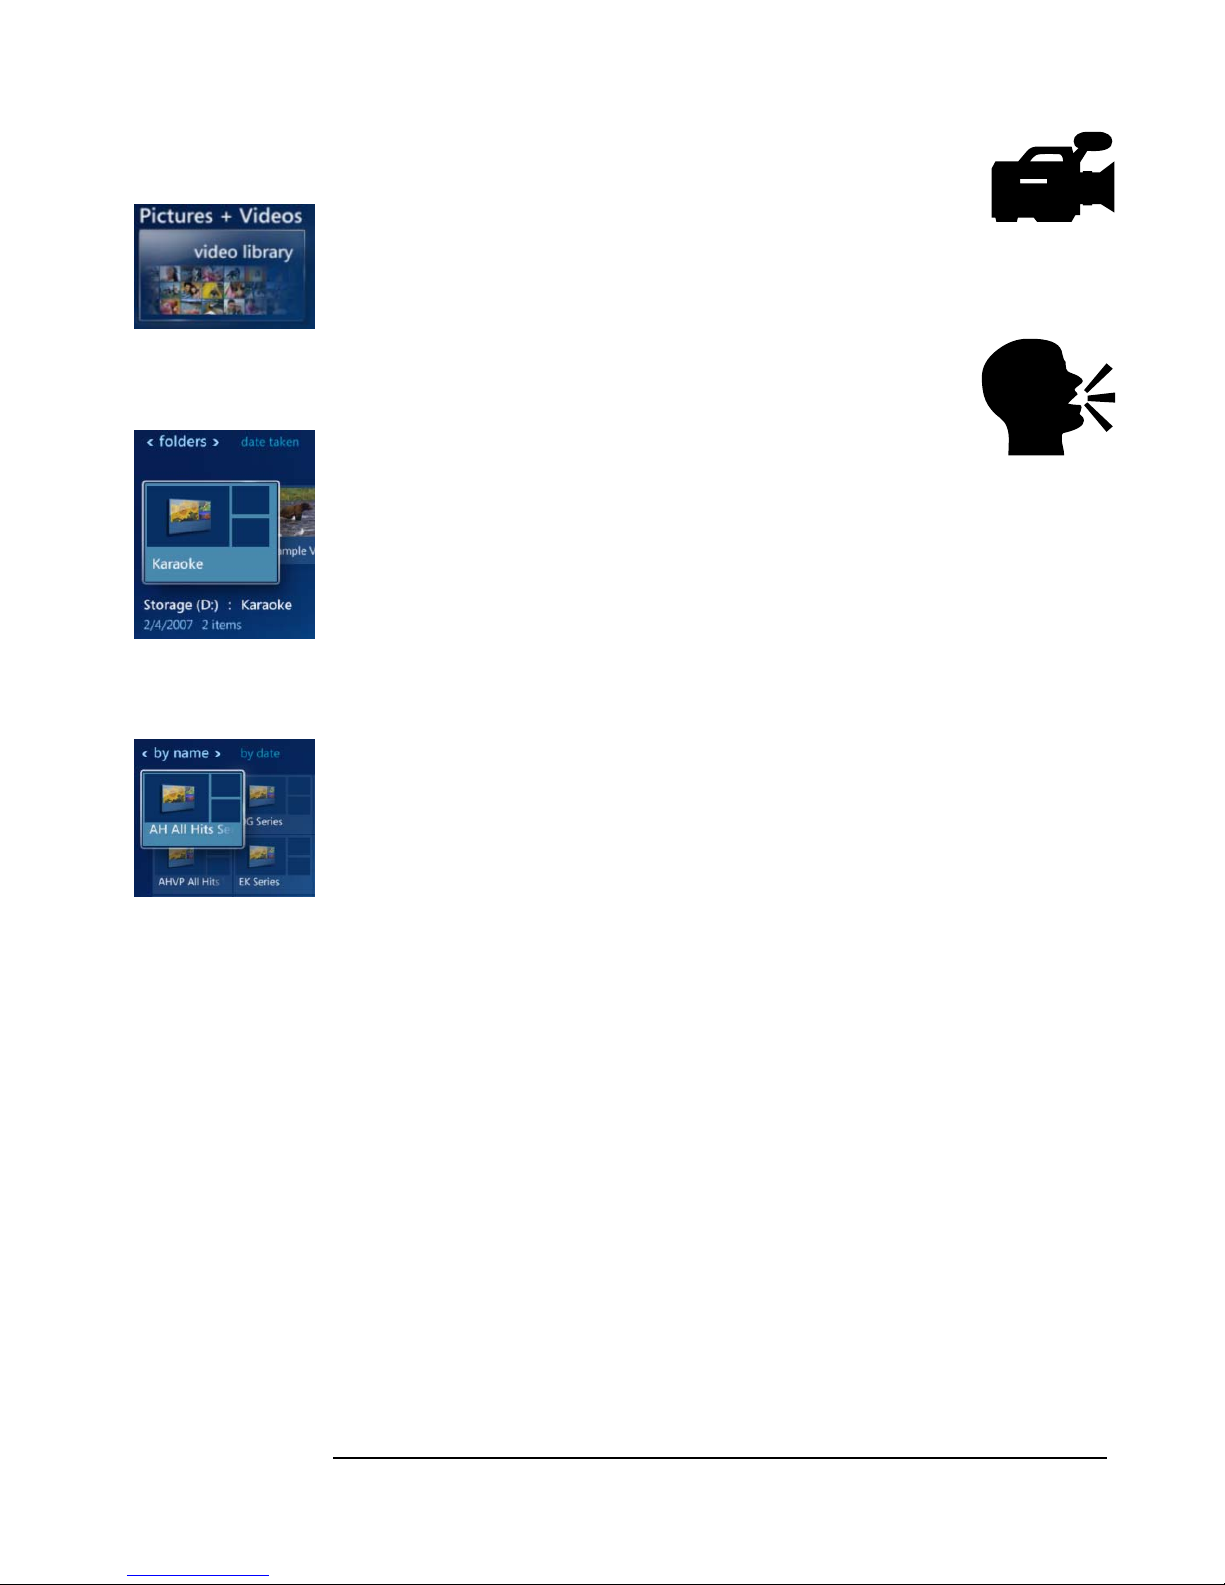
Play My Videos?
1. Select Pictures + Videos, then highlight Video Library. Hit OK on the remote.
2. Using the arrow keys, navigate through the folders and select which video you
want to play, then hit OK.
Sing Karaoke Songs?
Note: You must have purchased the optional built-in/preinstalled karaoke when
you first ordered the VidaBox. Otherwise, you can sing karaoke with
conventional CD+G discs.
1. First, find the song that you want to sing using the included songbook. Note the
album number and song number.
2. Then, using your remote, select Pictures + Videos, highlight Video Library, then
hit OK on the remote.
3. Select Karaoke, and hit OK again.
Karaoke Album
Folders
4. Using the arrow keys, select which karaoke album you wish to play from by
number, and then select the song.
13
Page 19
BASIC FEATURES
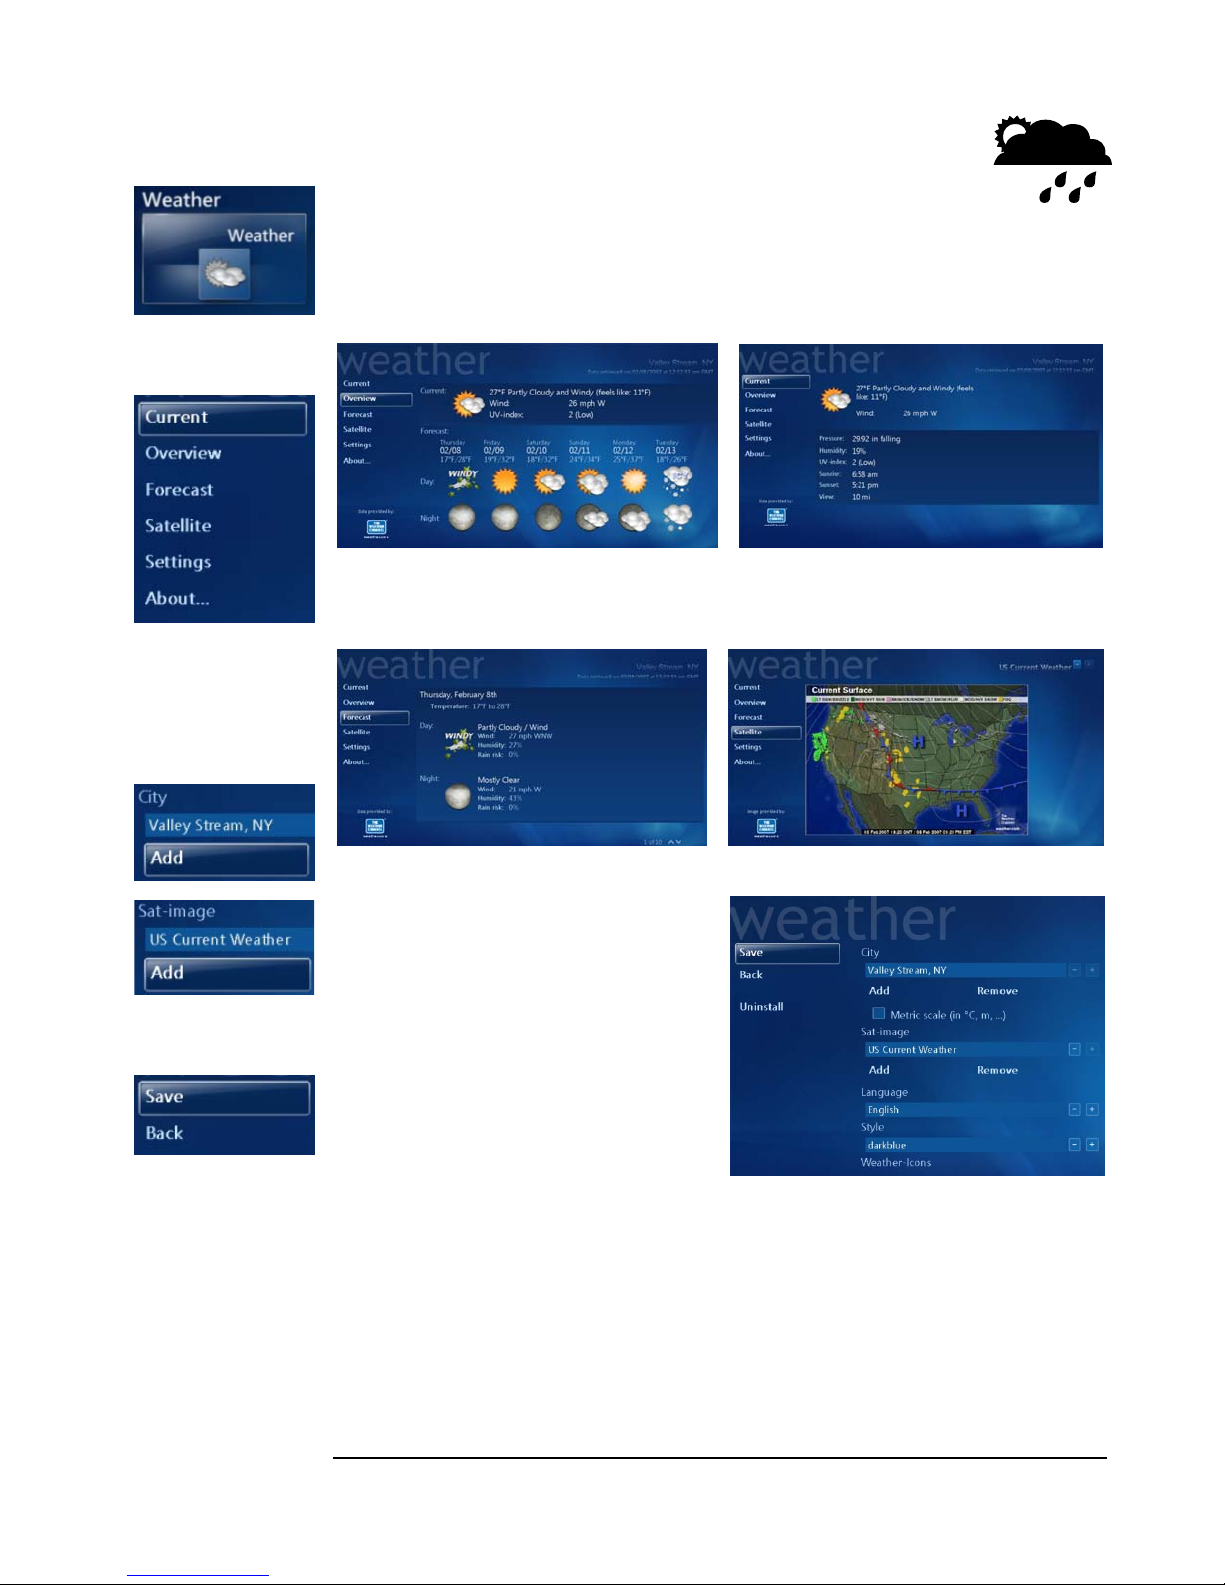
Weather Option
Weather Options
Check W eather?
1. Highlight Weather, and hit OK on the remote. The local forecast will load up, as
shown below.
2. Using the weather options menu (shown on left), you can also check Current
weather, see an Overview, or even Satellite imagery.
Add City or Satellite
image to check weather
Save changes
3. You can also add cities or pre-select
new satellite images to be displayed
under settings Options menu, as
shown on the right.
To add a new city or satellite image,
highlight the + icon and select OK, as
shown on the left. Follow the
onscreen instructions.
Remember to select Save to keep
your new changes.
14
Page 20
ADVANCED FEATURES
Advanced Features – How Do I…
This section will cover the rest of the features available on the VidaBox™. Unlike the
basic features, these features may not be readily apparent when you first use the
VidaBox™.
The Start Button –
Microsoft Remote
The Start Button –
Harmony® Remote
Picture Details
Option
Please take some time to review this section to get the most out of your VidaBox™!
Same as before, all of these features can be accessed starting from the Media Center
Menu by pressing the Start Button, as shown on the left.
See a Slideshow with Music?
1. From the Media Center Start Menu, go to My Music, My Videos, Radio, or My
TV, and start playing the song or video you would like to have in the background
during the slideshow.
2. Hit the Start button, and then go to My Pictures. Select the pictures you want to
view, and select Play Slideshow.
3. The slideshow will start, while the previously chosen music will continue playing.
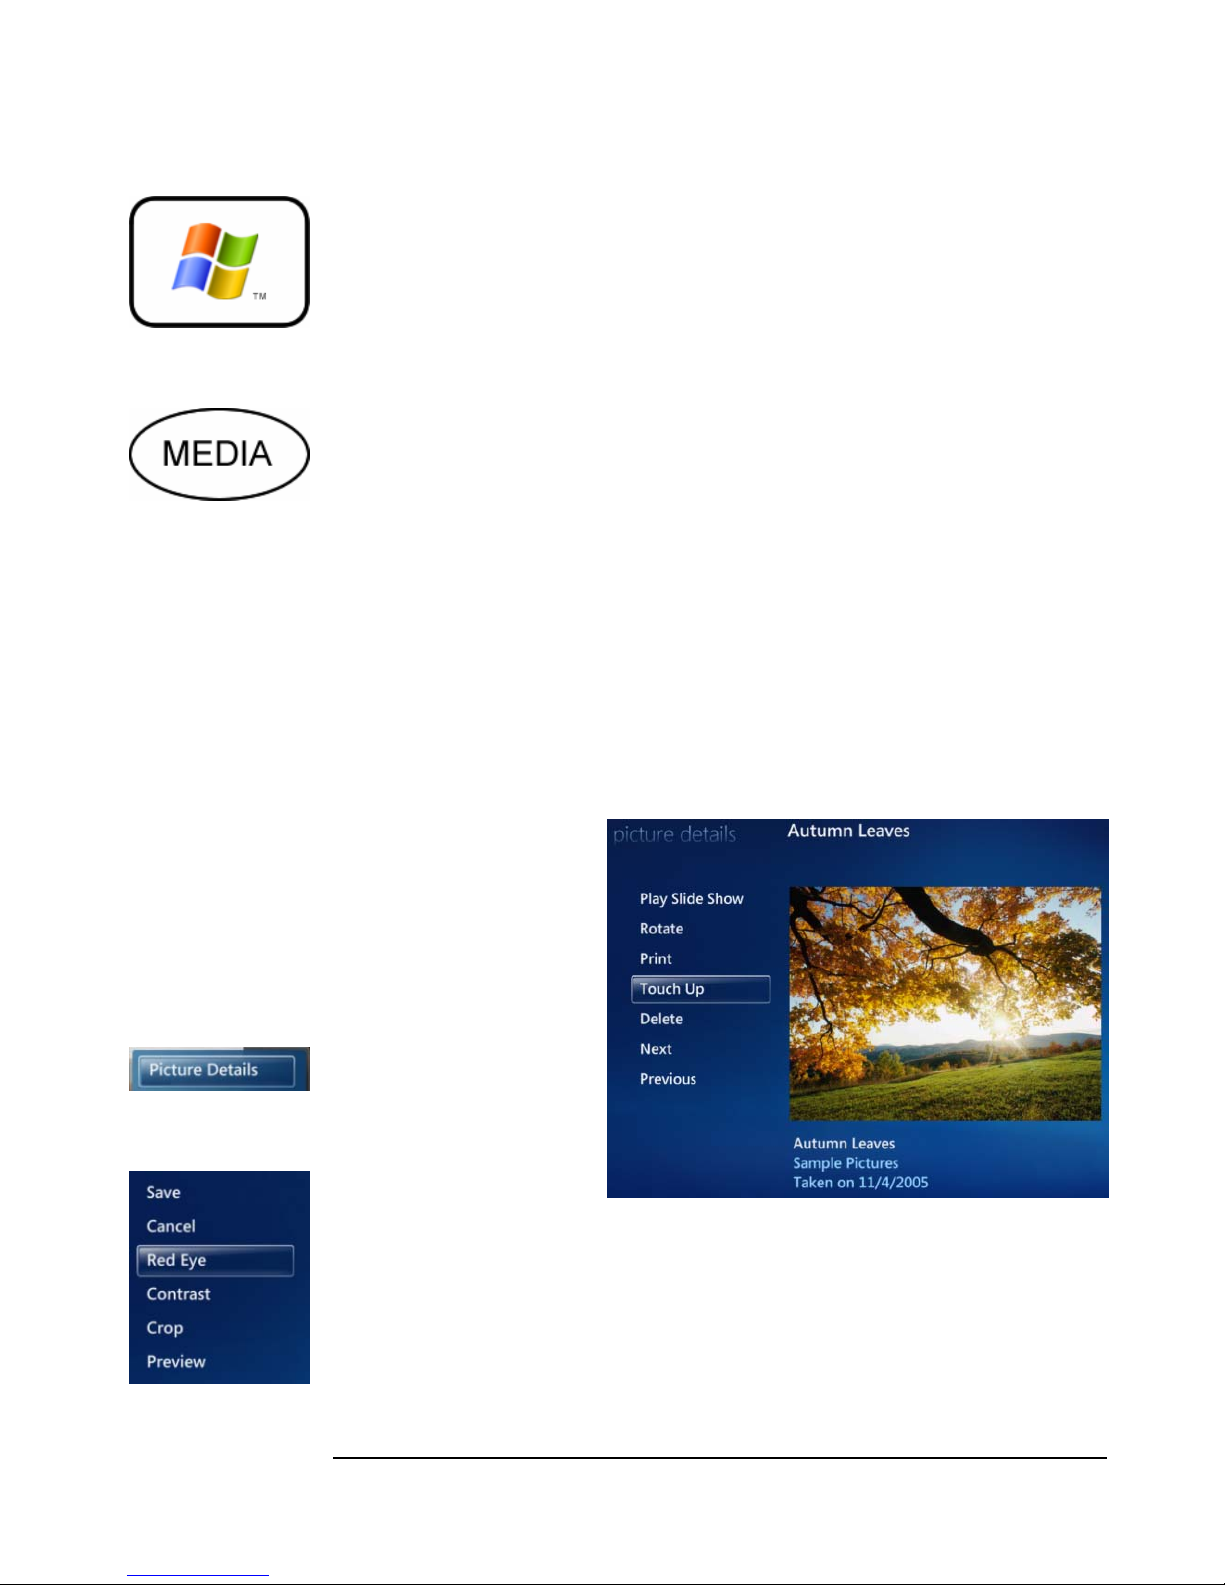
Edit/T ouch-up My Digital Photos?
1. From the Media Center
Start Menu, go to
Pictures + Videos,
select Picture Library,
and then select the
photo that you want to
edit or touch-up.
2. Hit the More button on
your remote, and an
options menu will
appear. Select Picture
Details.
3. The Picture Details
menu, as shown above,
will appear. Here, you can choose to Rotate, Print, Touch Up, even delete the
picture. After rotating your picture, choose Touch Up & fine-tune your picture.
4. The Touch Up menu will appear, as shown on the left. From here, you can apply
Red Eye and Contrast adjustments or Crop your picture. Hit Save when you
Touch Up
Menu Options
have finished.
15
Page 21
ADVANCED FEATURES
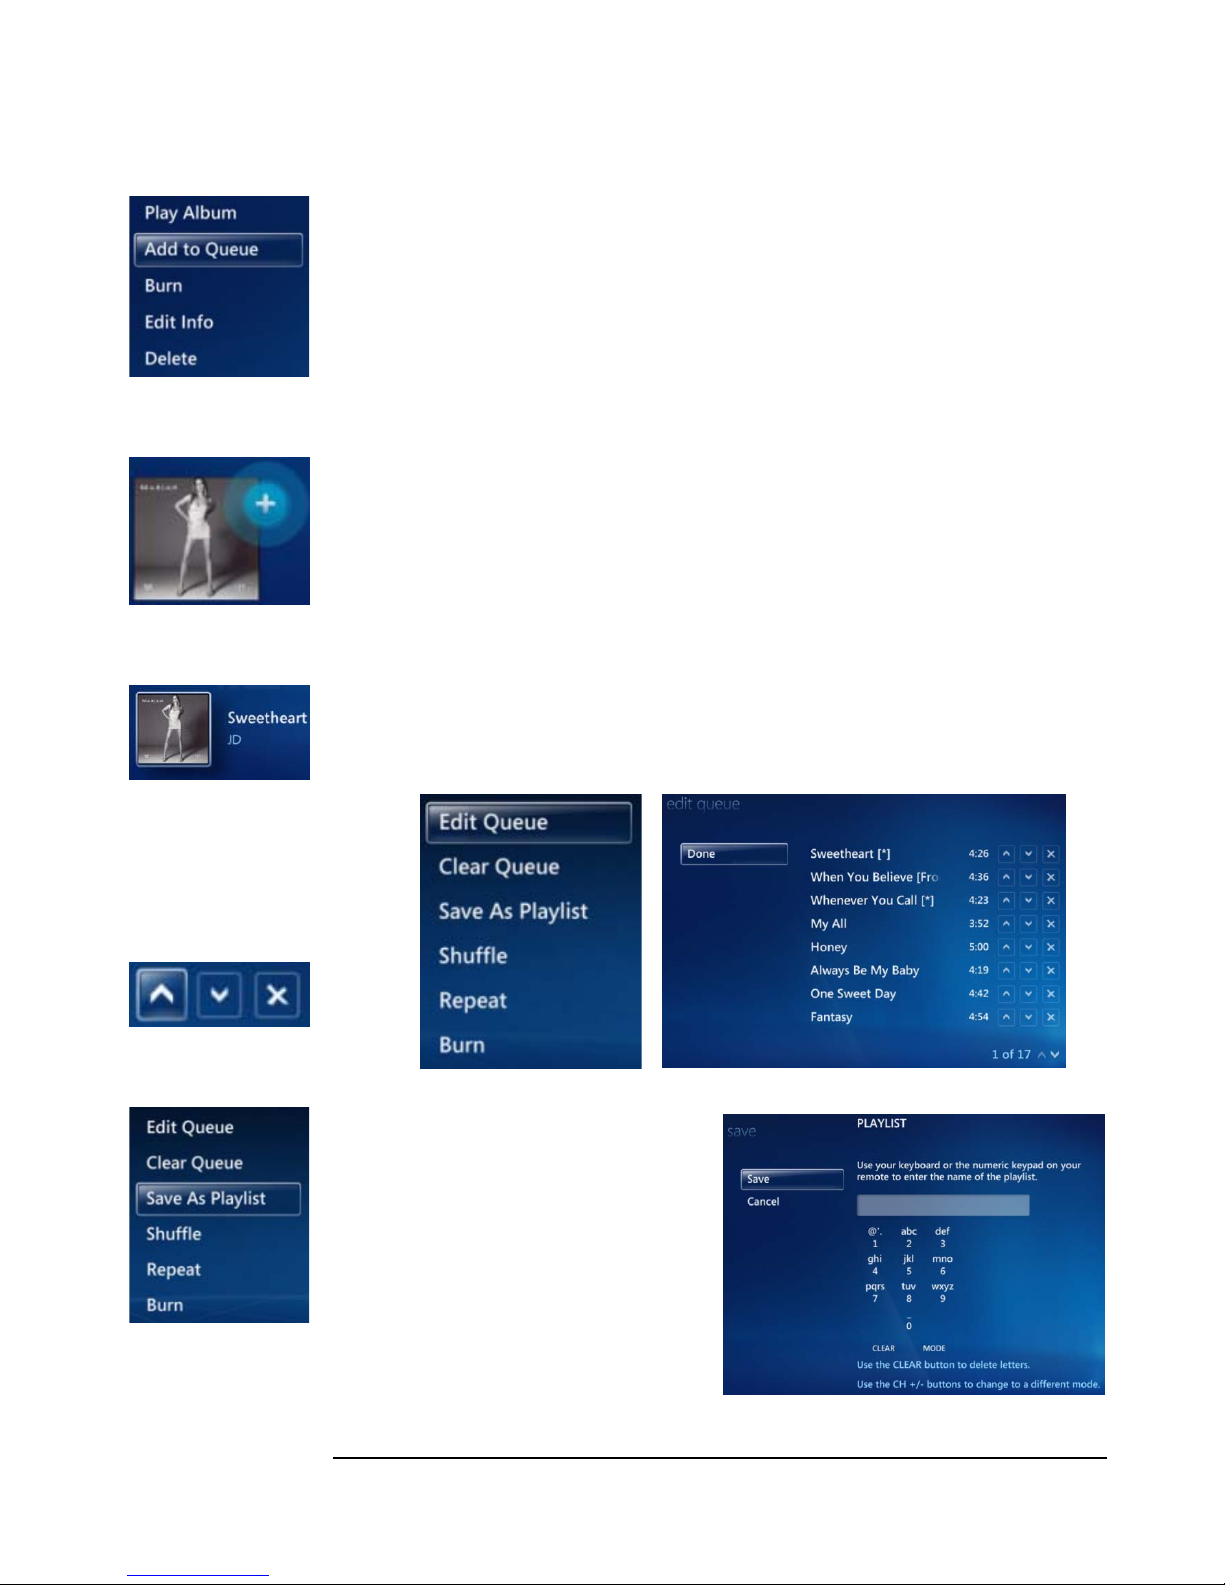
Create a Music Playlist (Queue)?
1. From the Media Center Start Menu, go to My Music.
2. Select an album or song that you want to add to the playlist & click OK.
3. Highlight Add to Queue, as shown on the left, and click OK.
Highlighting
Add to Queue
4. A pop-up notification ( + icon ) will appear, as shown on the left, confirming that
the album or song was added.
5. Repeat steps 2 through 4 to add other songs and albums.
Edit/Save a Music Playlist(Queue)?
Album / Song
Added Notification
1. First, create a music queue, as described above.
2. Next, access the music queue, by highlighting the music currently being played, as
shown on the left, and hit OK.
Highlighting music
currently being played
Queue Editing
Buttons
Queue Editing
Buttons
3. The music Queue screen is now displayed, as shown below. Highlight Edit
Queue and hit OK.
4. The music Queue is now displayed,
as shown above. Using the Queue
Editing buttons (shown on left), you
can move individual songs up, down,
or remove them from the Playlist.
5. After you’ve finished editing your
Queue, click on Save as Playlist to
save your Queue. Type in the name
of your queue, and hit OK, as shown
below.
16
Page 22
ADVANCED FEATURES
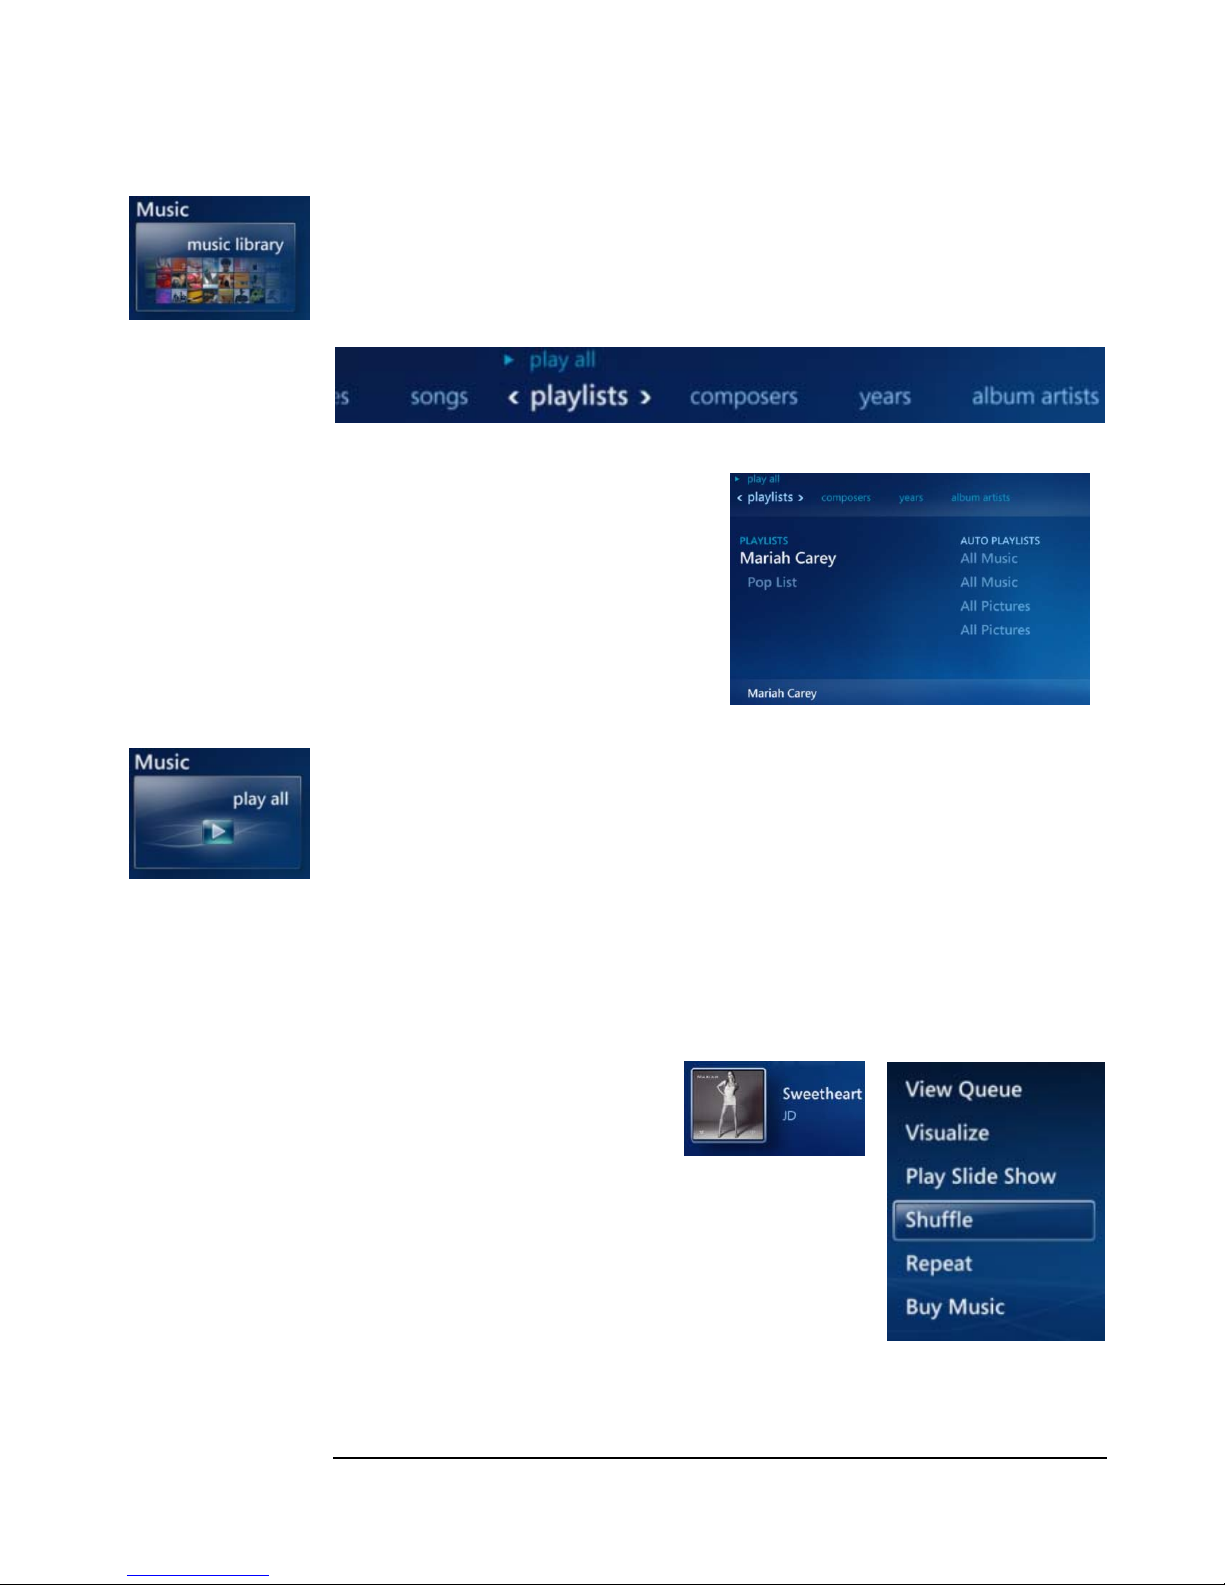
Load a Music Playlist?
1. Starting from Music, highlight and select Music Library. Press up to highlight
the search parameter, and hit the right key on the remote until Playlists is selected,
Music Library
option
as shown below.
2. Next, highlight the Playlist you want
to load, and hit OK.
3. The Playlist is now loaded!
Hint: You can play all of your music by
selecting the auto playlist All Music!
Play All of My Music?
All Music
playlist option
1. From the Media Center Start Menu, go to Music.
2. Using the arrow keys on your remote, highlight Play All, as shown on the left.
3. Hit OK on the remote. All your songs are now loaded into the queue and will play
automatically.
Shuffle/Play Randomly My Music?
1. Go to your queue/playlist. You
can access it by highlighting the
Music Now Playing icon and
hitting OK.
2. The music queue now appears.
Select Shuffle and hit OK. All
songs in the queue will now be
shuffled / played in random
Highlighting
Music Now Playing
Shuffle Option
order.
17
Page 23
ADVANCED FEATURES
Prioritize My TV Recordings?
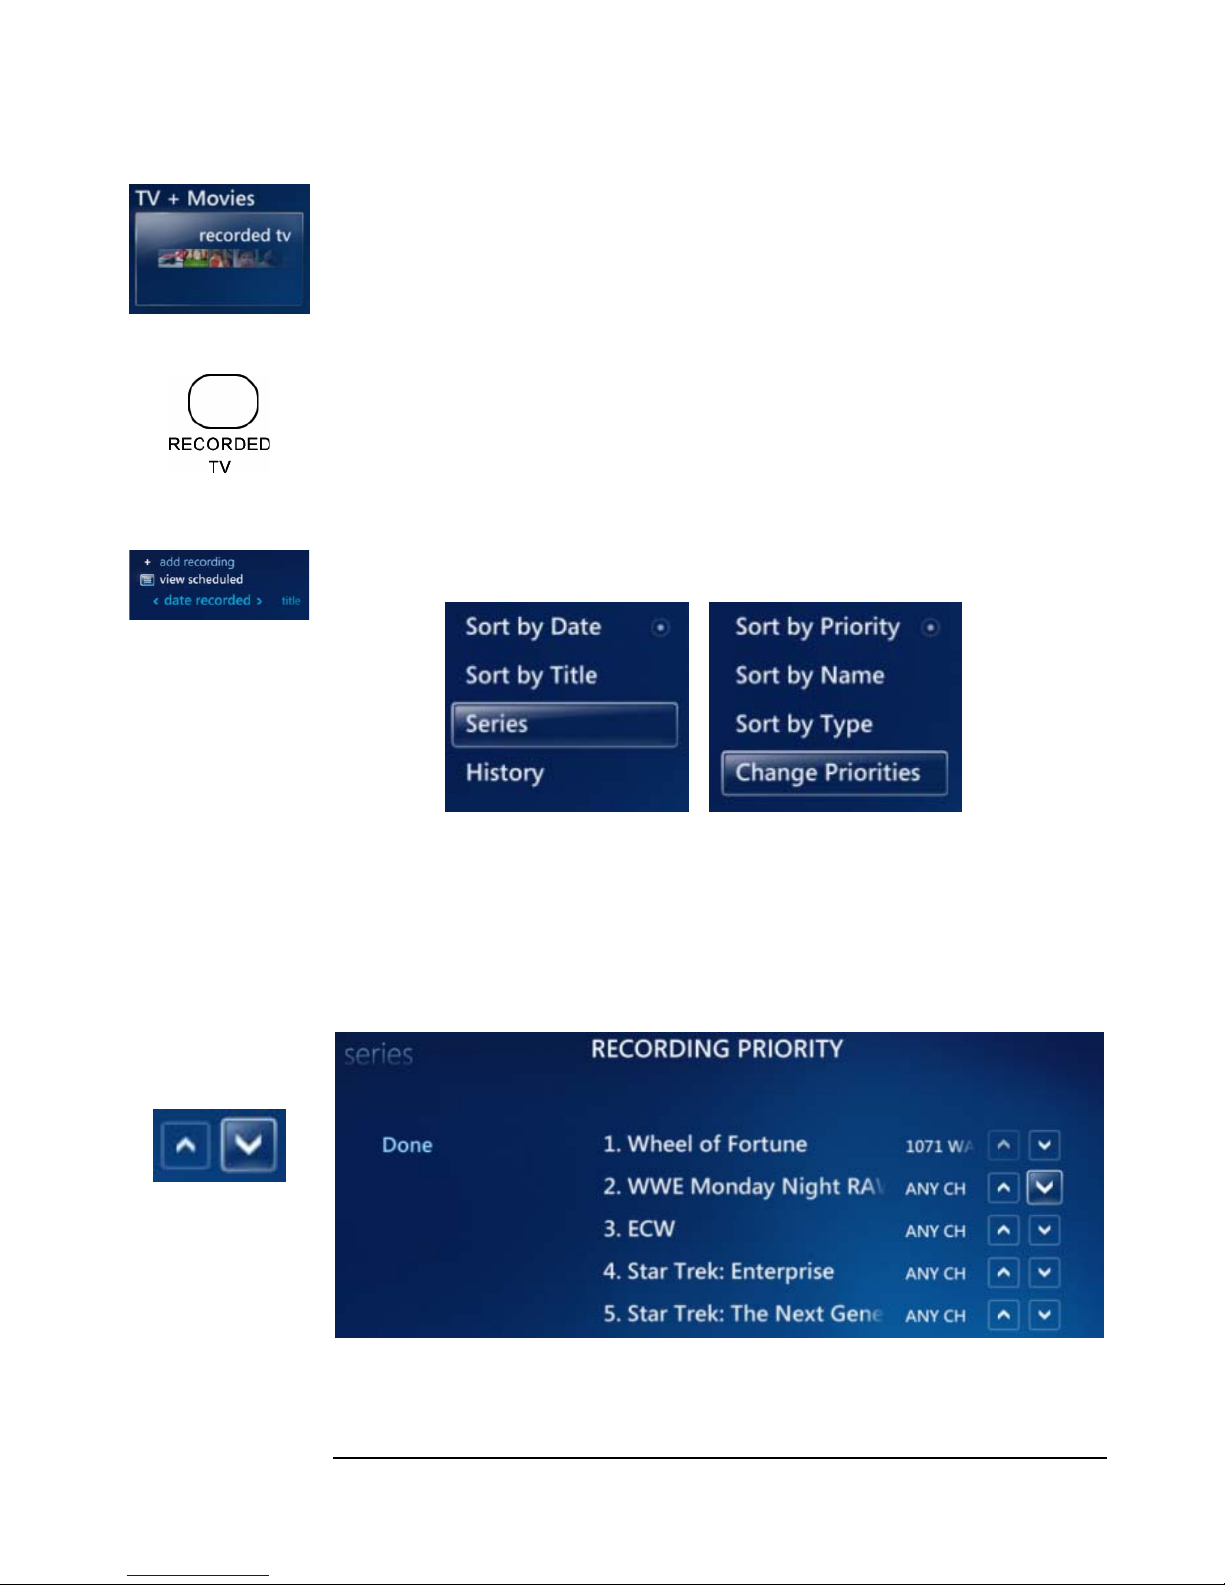
When scheduled shows conflict, they will be recorded in the order of their priority. By
default, TV series that are added first have a higher priority than those that are added
Recorded TV option
later. To change these priorities, follow the steps below.
1. First, access the Recorded TV menu. This can be done in one of two ways:
a. From the Start Menu, go to TV + Movies, and select Recorded TV.
Recorded TV
Remote Button
View Scheduled
option
b. Hit the Recorded TV button on your remote.
2. From the Recorded TV menu, select View Scheduled, and hit OK (see left).
3. On the Scheduled menu, highlight the Series option, and hit OK (see below).
Highlighting Series
Highlighting Change Priorities
4. On the Series menu, highlight Change Priorities, & hit OK (see above).
5. On the Recording Priority Menu, you can change the shows’ priorities by
moving the shows up or down in the list by clicking on the up and down arrows,
as shown on the left.
Change recording
priorities with
these buttons
18
Page 24
ADVANCED FEATURES
See Movies Currently on TV?
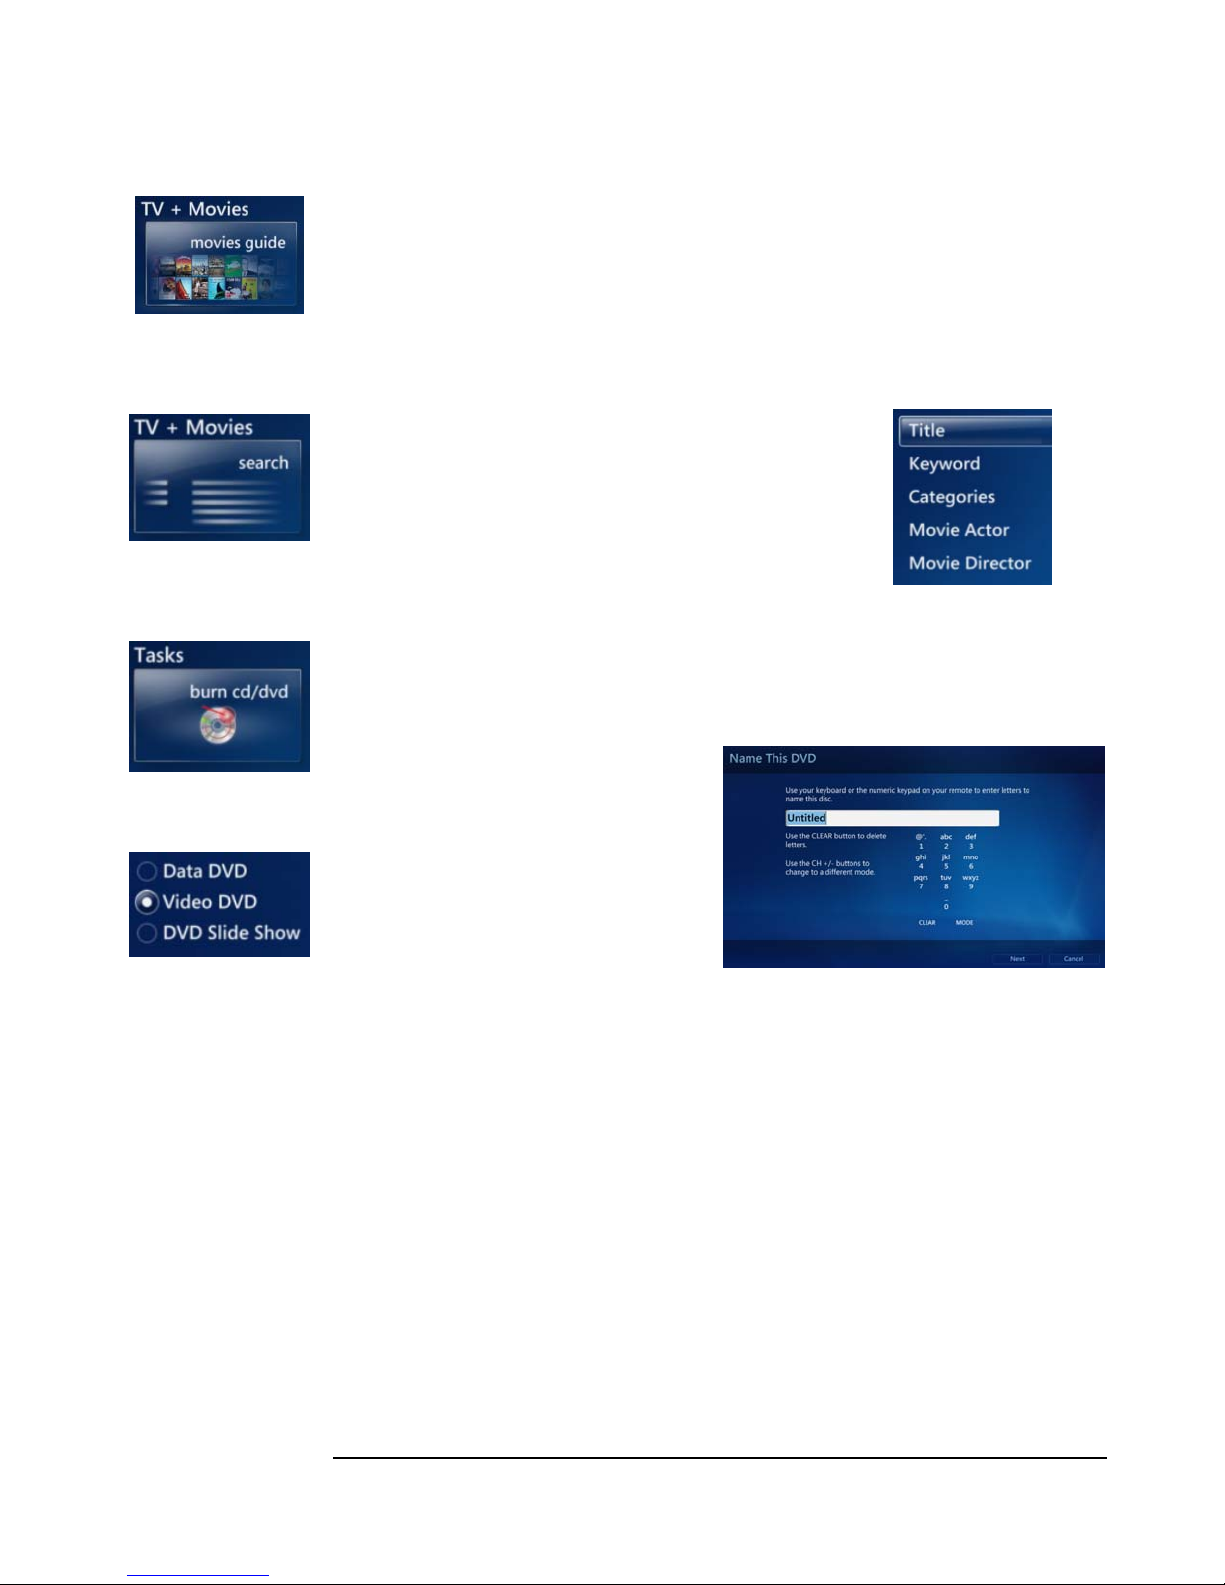
1. From the Media Center Start Menu, go to TV + Movies, then highlight and select
Movies Guide. Movies currently playing will appear, along with cover art and
Movies option
under TV + Movies
access to more information.
Search for a Specific TV Show?
1. From the Media Center Start Menu, go to TV +
Movies and highlight search.
2. Hit OK to select.
TV + Movies
search option
3. Pick which parameter you want to search by, and
then follow the onscreen instructions!
Create a Video DVD?
Title option under Search
TV + Movies
search option
DVD Creation
options
1. From the Media Center Start Menu, go to Tasks, and select Burn CD/DVD.
2. Be sure to insert writeable DVD
media if you haven’t already done so.
3. Select the Video DVD option, as
shown on left. Then, enter a name
for your new DVD (shown right).
4. From your media files, pick and
choose which videos or TV shows
you want to burn onto the DVD.
5. After you’ve finished your selections, choose View DVD to check and make sure
you have all the videos desired on the DVD. When you’re ready, click on “Create
DVD” to let VidaBox burn your new DVD. It may take up to an hour for a DVD
to be finished.
6. Note that you can also make video CDs using the VidaBox™, but for maximum
compatibility and storage space, use a blank DVD instead.
19
Page 25
ADVANCED FEATURES
g
Desktop Start Menu
Computer Option
Create a DVD Picture Slideshow?
1. From the Media Center Start Menu, go to More Programs. Be sure to insert
writeable DVD media if you haven’t already done so.
2. Select Create CD/DVD. Hit OK.
3. Choose the DVD Slide Show option & name your new Slideshow DVD.
4. From your picture and music files, pick and choose which photos and song shows
you want to burn onto the DVD.
5. After you’ve finished your selections, choose View DVD to check and make sure
you have all the videos desired on the DVD. When you’re ready, click on Create
DVD to let VidaBox burn your new DVD.
6. Note that you can also make video CDs using the VidaBox™, but for maximum
compatibility and storage space, use a blank DVD instead.
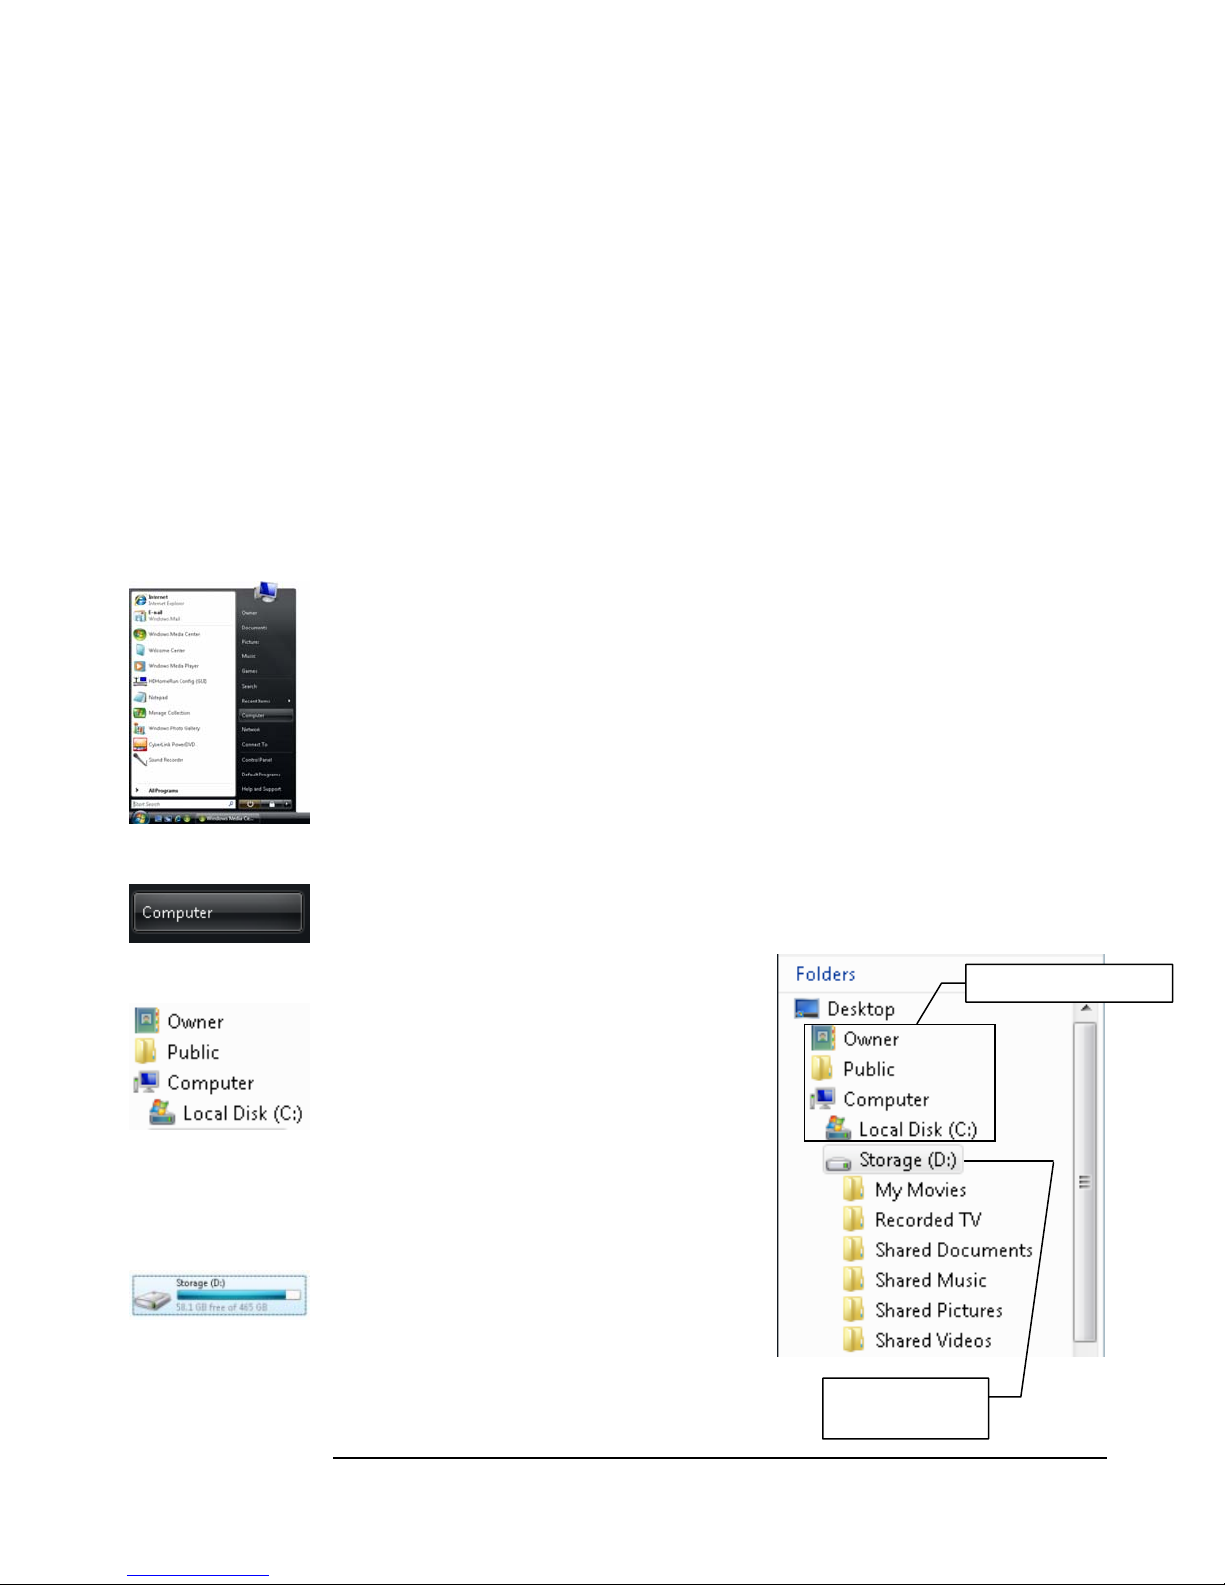
Add Digital Files to the VidaBox™?
Adding pictures, music, and videos from other sources to the VidaBox™ is easy. Place
the CDs, DVDs, or memory cards in the appropriate drives or readers. Then, go to
My Computer under the Desktop Start Menu, as shown on the left.
The D: drive, called Storage, is dedicated solely for media storage. We recommend
copying all your digital media to the Storage (D:) drive and in the following folders for
greatest convenience.
Under Storage (D:), there are five (6) main
storage folders – Movies, Documents,
Music, Pictures, TV, and Videos, as shown
in the diagram on the right.
Not Recommended
We highly recommend that you add all of your
Owner, Public,
Local Disk (C:) Avoid
storing files here – access
may be limited for other
users / extenders
digital media to Storage (D:). Everything here
is automatically shared, for everyone’s use, and
is optimally configured for media extender
usage if you plan to use extender devices.
We do not recommend storing your media
under Owner, Public, or Local Disk (C:), as
(D:) My Storage
Please store your files
here, under the Movies,
Music, Pictures, TV, &
access to these folders may be limited for other
users and extender devices, causing much
inconvenience.
20
Recommended
e Folders
Stora
Page 26
ADDITIONAL HELP
More Resources
http://www.vidabox.com/support
If you still have additional questions about how to use the VidaBox™ media center,
you can visit the address/URL above to get more help in one of the following ways.
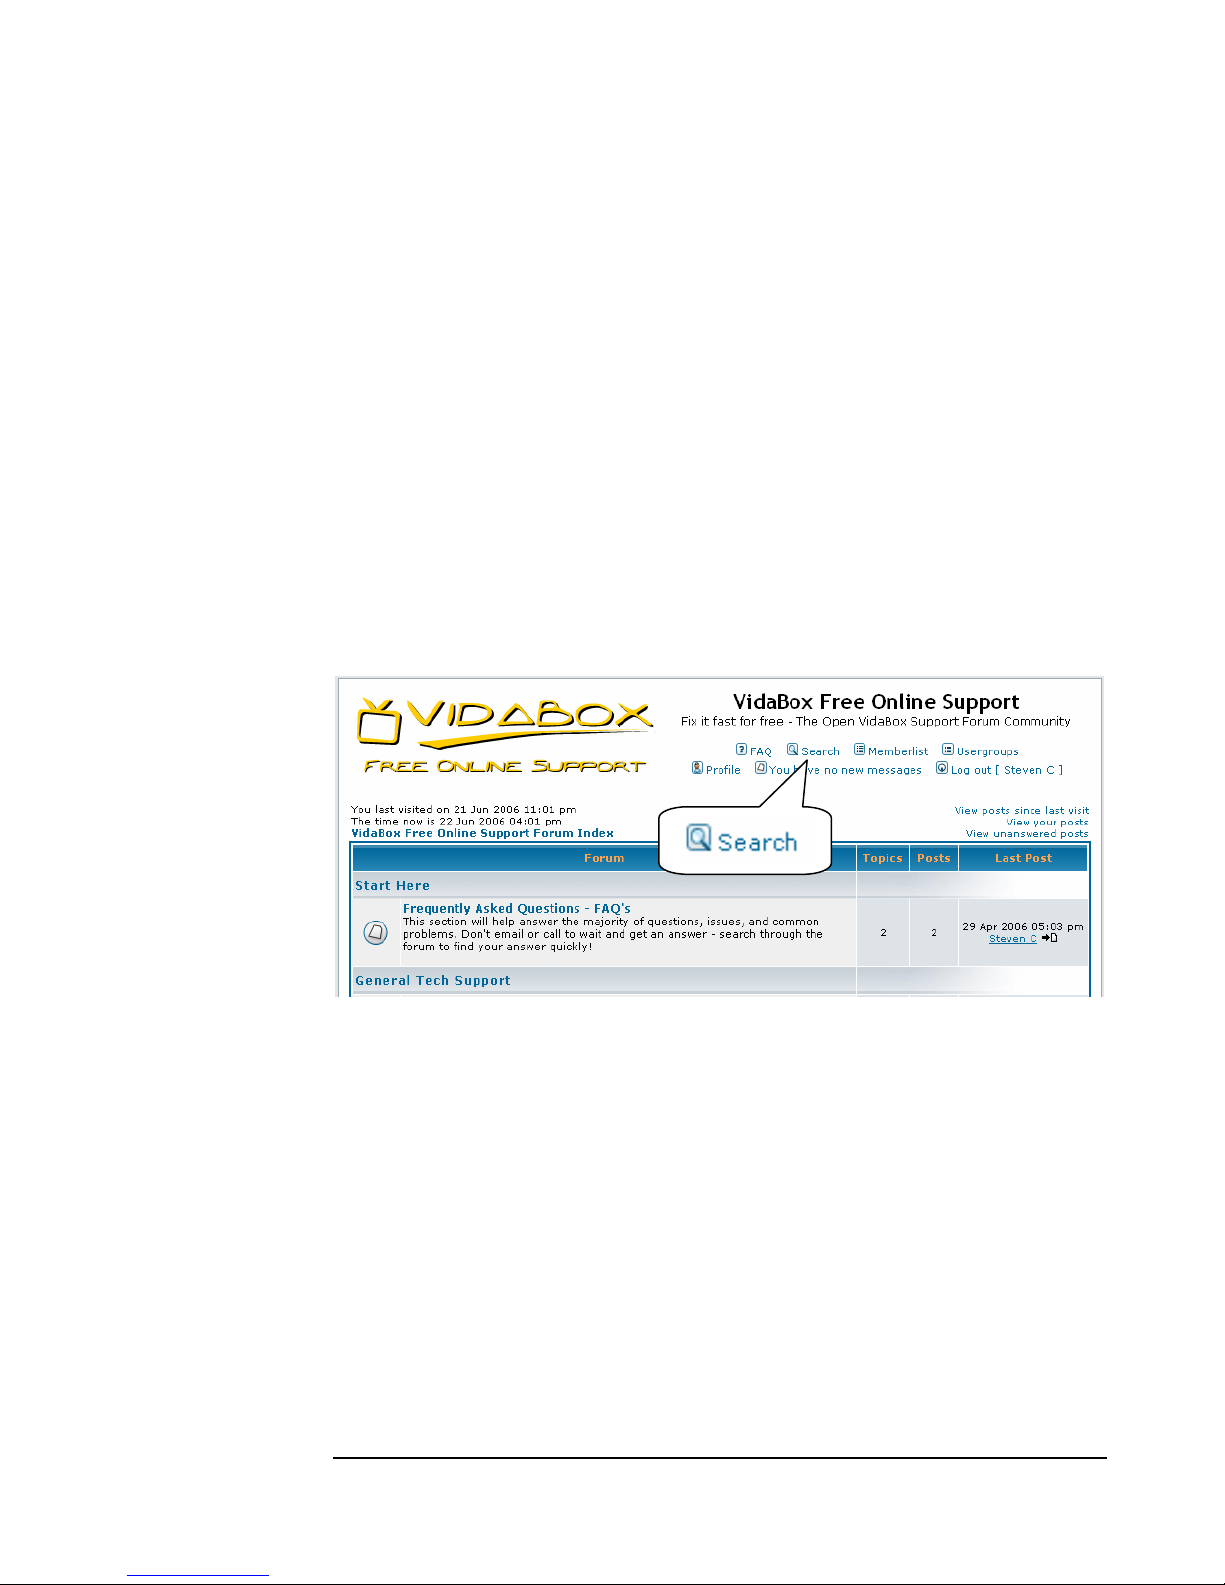
Interactive Forum
http://www.vidabox.com/forum
Very often, other users will be asking the same questions you’re asking – that’s what
our interactive forum was built for.
Visit our forum at the address/URL above. You can browse through, or search
through questions and issues not covered in these manuals.
If you have a specific question, use the Search function of the forum, as shown above.
Type in what you want an answer for, and chances are – it’ll be there! This is the
fastest way to get an answer.
If you can’t find an answer to what you’re looking for, you can always post your
question on the forum! By doing so, others in the VidaBox™ user community may be
able to get back to you quickly with the answers you need. In addition, future visitors
will be able to see your question and possibly benefit from your experience. This is, by
far, the best way to get technical support.
21
Page 27

ADDITIONAL HELP
Email Support
If you can’t find an answer to what you’re looking for, you can always email us at the
address above for help if you do not want to post on the forum. We usually respond
in less than one (1) business day.
Phone Support
Sometimes, you just need help right away. We understand – which is why we’ve
included live phone support with every purchase of a VidaBox™ for a limited time.
See the inside cover of the troubleshooting guide for the direct phone support line.
22
Page 28

VidaBox™, and its model names ROOMMATE™, SLIM™, LUX™, and MAX™ are registered t rademarks or trademarks
of VidaBox LLC. All other company, product, and trademark names mentioned herein are for identification purposes only
and are the sole property of their respective owners. This document is accurate as of July 2006. Ho wever, VidaBox LLC
reserves the right to make modifications or changes to the document without further notice. This document is not
intended to obligate VidaBox LLC or any other entity to any functionality and technology, but to merely inform the
audience. VidaBox LLC makes no warranties, expressed or implied in or by this document and specifically disclaims any
implied warranty of merchantability or fitness for a particular purpose.
Copyright ©2006 VidaBox LLC.
Version 2.0a
 Loading...