

Victron energy PPP-8, PPP-20, PPP-40, PPP-30 User Manual

Manual
EN
Handleiding
NL
Manuel
FR
Anleitung
DE
Manual
ES
Användarhandbok
SE
Peak Power Pack
PPP-8: 12,8 V / 8 Ah – 102 Wh
PPP-20:
12,8 V / 20 Ah – 256 Wh
PPP-30: 12,8 V / 30 Ah – 384 Wh
PPP-40: 12,8 V / 40 Ah – 512 Wh


1
EN NL FR DE ES SE
1. General Description
A Li-io n ba tt e ry pack with i ntr i nsically safe LiFePO4 cells, a
built-in charger and ou tstandin g peak output pow er
performance.
Nominal voltage: 12,8 V
Battery capa city range: 8 Ah to 40 Ah
Low weight and easy to install
- Ideally suited for mobile applications
Thoroughly protected against misuse
- Excellent performance in solar and other applications where
frequent de ep disc h ar ge an d ins uffi c ien t rec ha rg e would
quickly damage lead-acid batteries
Output 1: high current output for caravan movers and other
high power ap pl i cations
- Caravan mover application: automatic shutdown of the high
power output 30 minutes after enabling
- Other applic ati ons : The high power output can be switched to
“always on” mode
- Short circuit proof
- With batter y over dis ch ar ge pr otection
Output 2: auxiliary output for low power DC loads (not
available on 8 Ah model)
- Always on
- Short circ uit pr oof
- With batter y over di sch ar ge pr otection
Input 1: multi-purpose vehicle bat tery /solar char ger inp ut
- Voltage and current regulated to safely charge the Li-ion
battery. Virtually any source of DC electric power can be
connected to this input, as long as 11V < Vin < 20V
Input 2: second input to connect a 15V DC power supply
- A 3 A power supply is included (connects to 100/240 VAC
mains)
2
Fast charging possible through input 1 (high current output)
- A battery charger, inverter/charger, solar charge controller or
alternator can be connected to the high power output for fast
charging. Maximum current 80A and maximum voltage 14,4V.
Storage mode
- Reduces battery current drain to virtually zero. Prevents
damage due to battery over discharge during long term
storage.
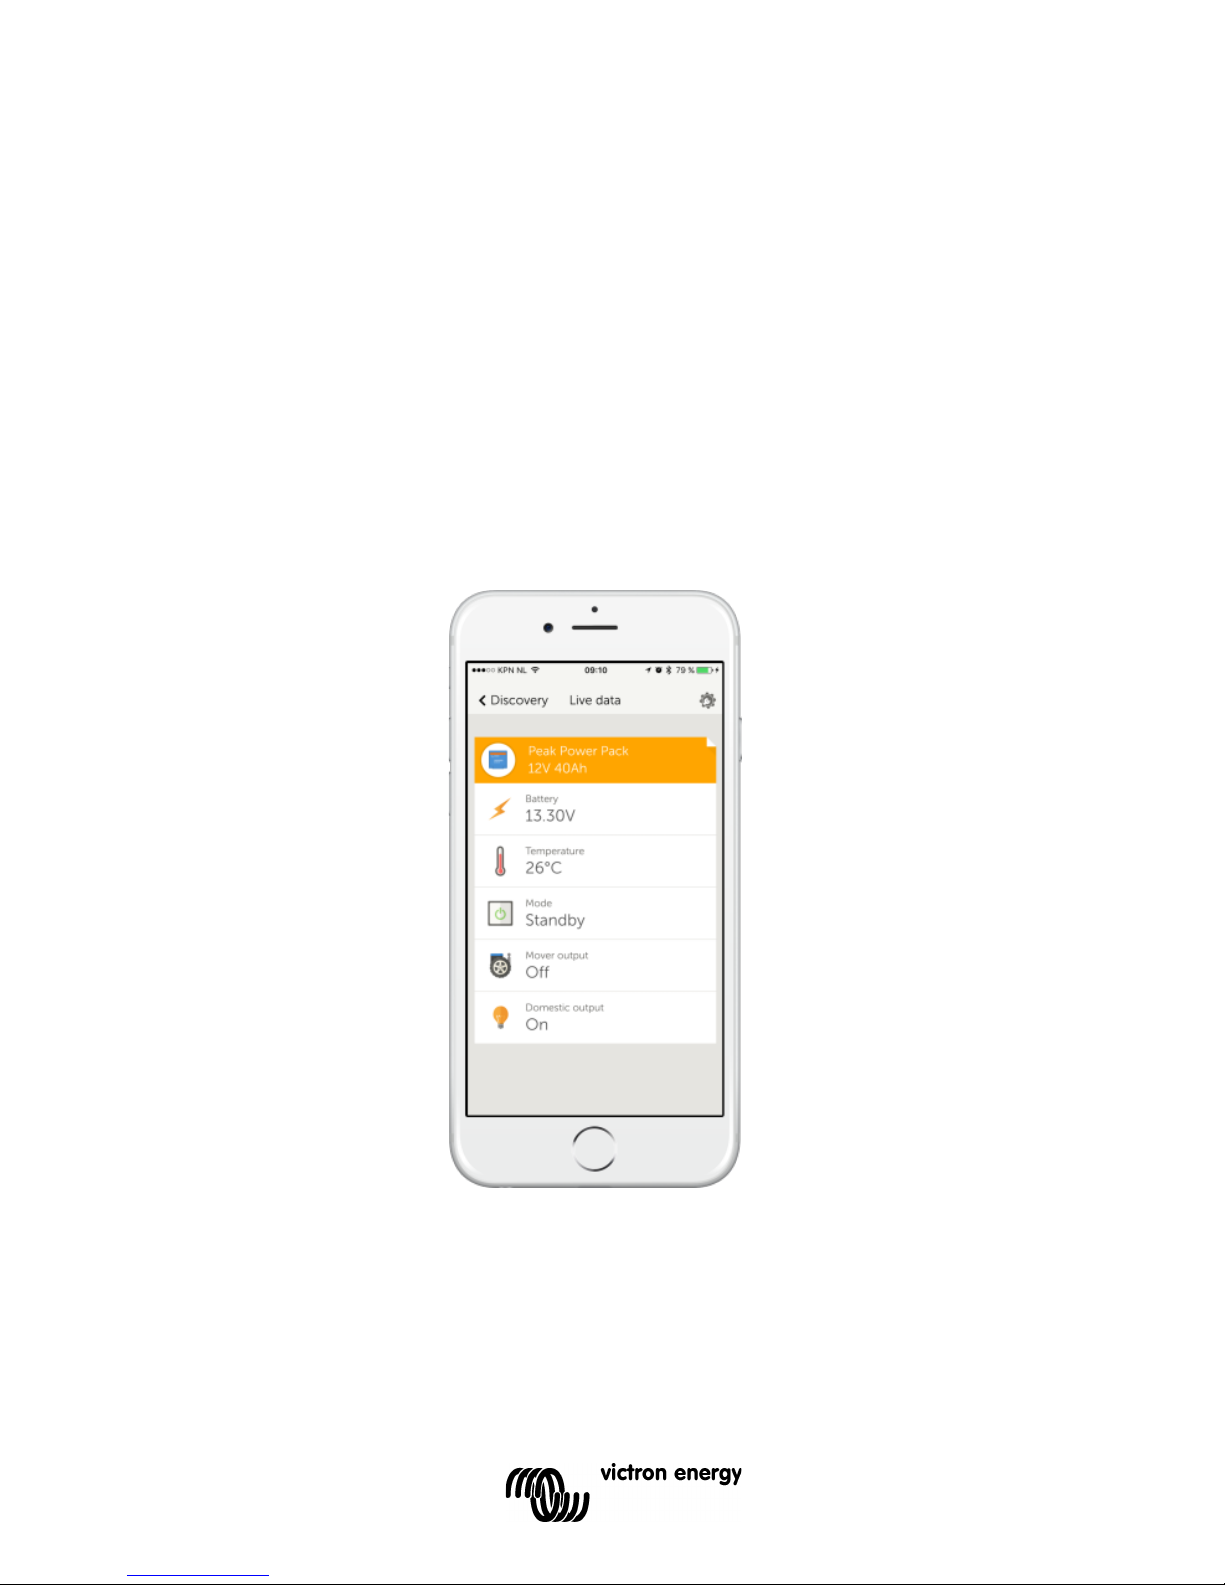
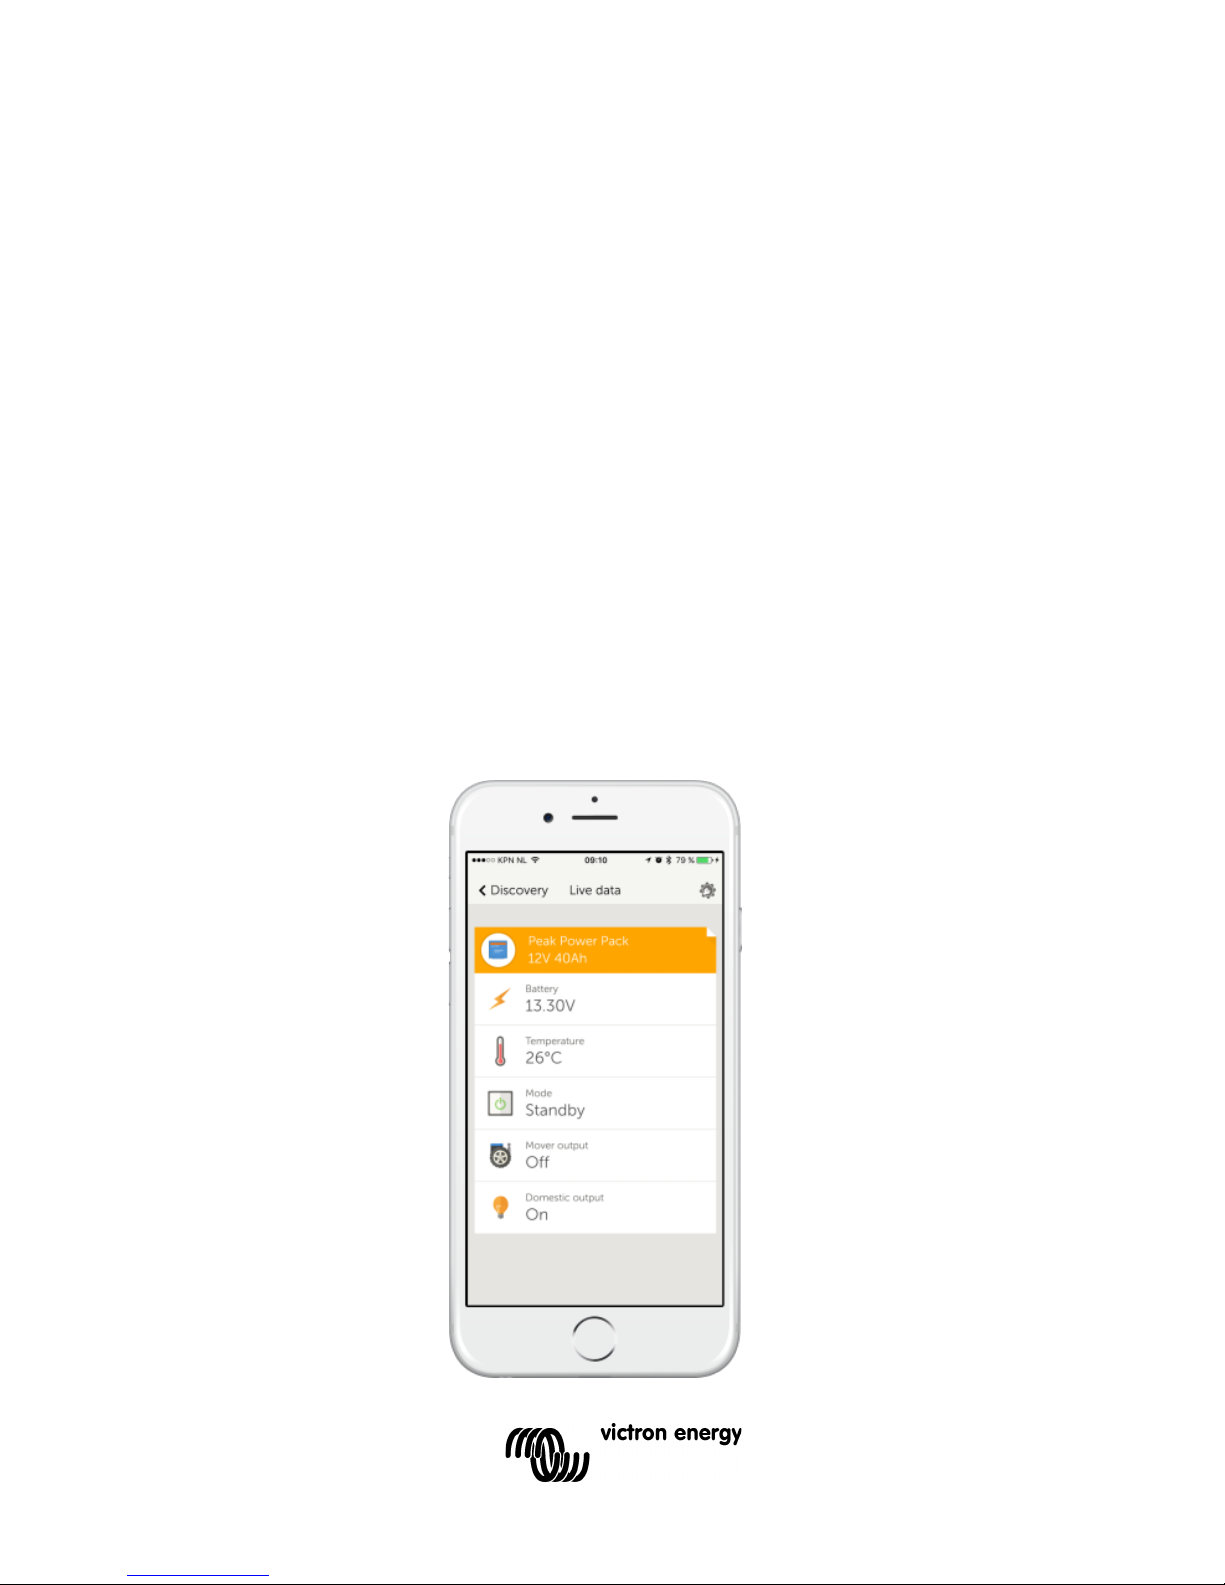
Real-tim e data displ a y on Ap pl e an d A ndroid sma rt p h on es,
tablets a n d ot her de v ic es
VE.Direct Bluetooth Smart dongle needed: see our website.
3
EN NL FR DE ES SE
2. Safety instructions
• Please read this manual carefully before the product is
installed and put into use.
• This product is designed and tested in accordance with
international standards. The equipment should be used for
the designate d appl ication onl y.
• Install the product in a heatproof environment. Ensure
therefore that there are no chemicals, plastic parts, curtains or
other textiles, etc. in the immediate vicinity of the equipment.
• Do not connect in series to get a higher voltage. (The
overload and short circuit protections might fail.)
• Ensure that the equipment is used under the correct operating
conditions. Never operate it in a wet environment.
• Never use the product at sites where gas or dust explosions
could occur.
• Ensure that there is always sufficient free space around the
product for ventilation.
• Connections must always be made in the sequence described
in section 3.5.
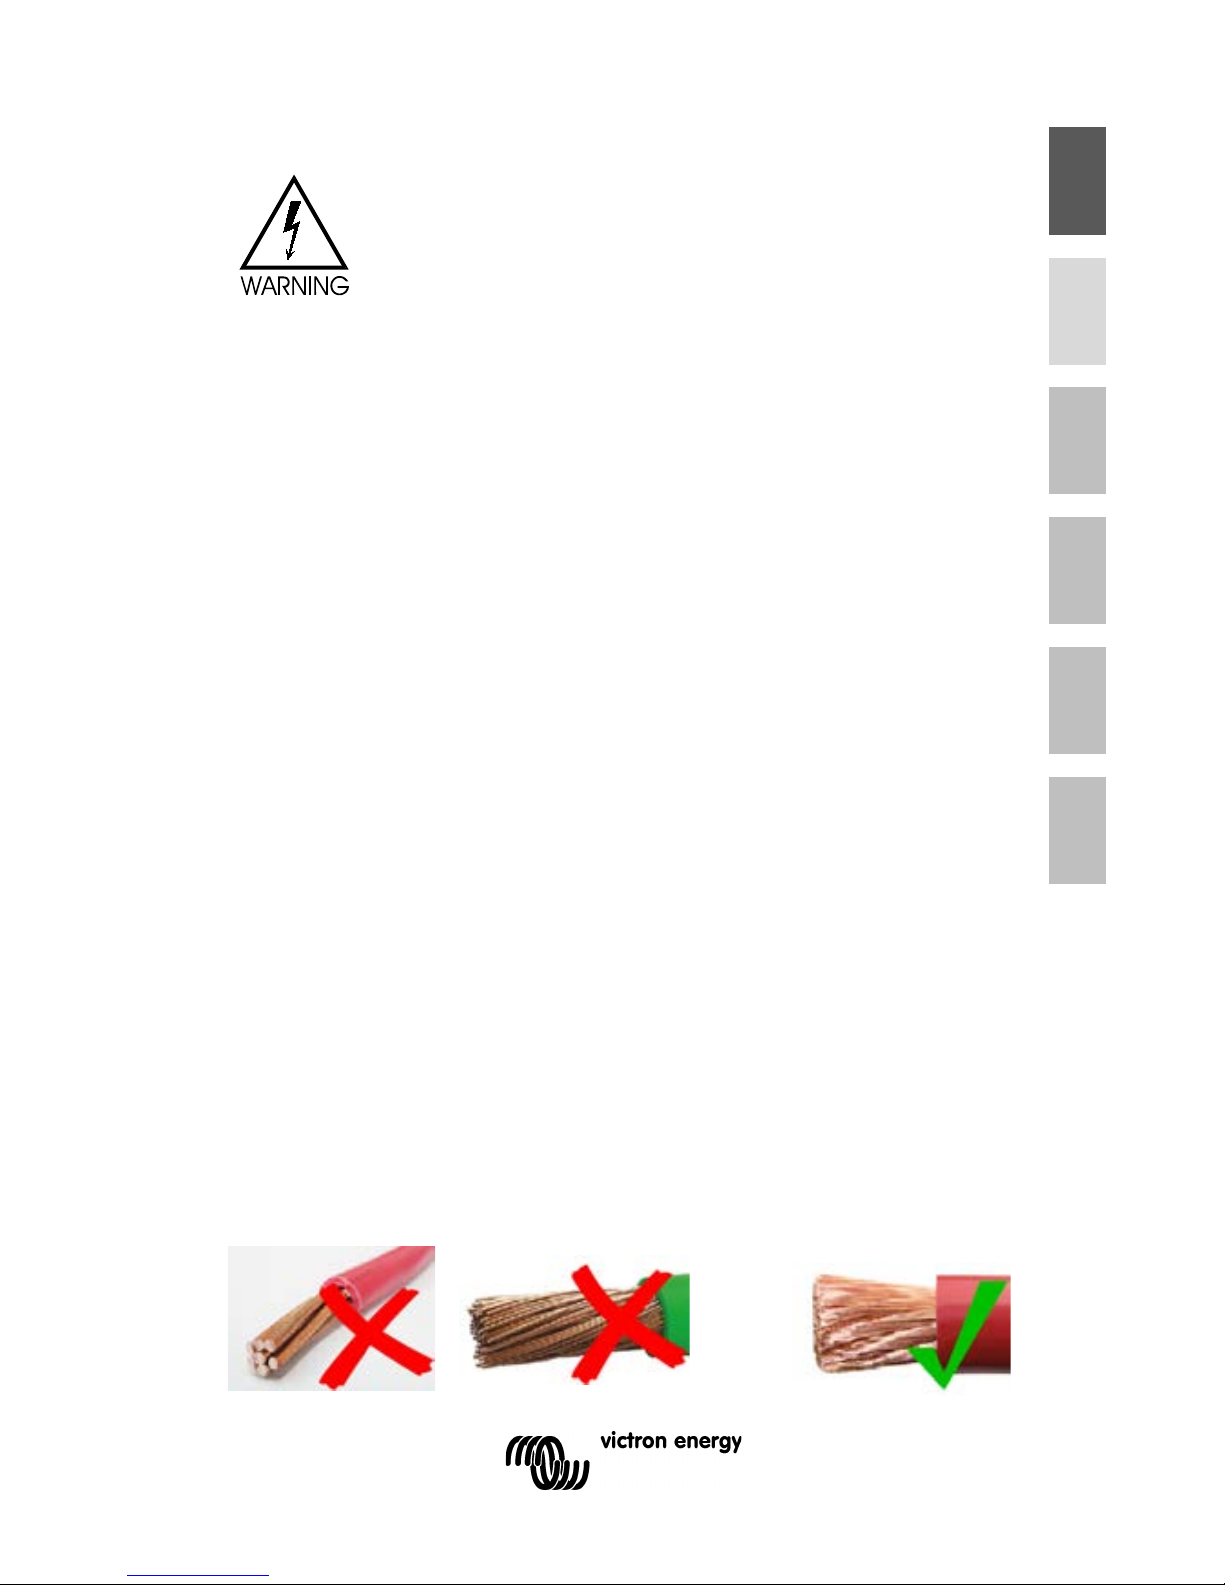
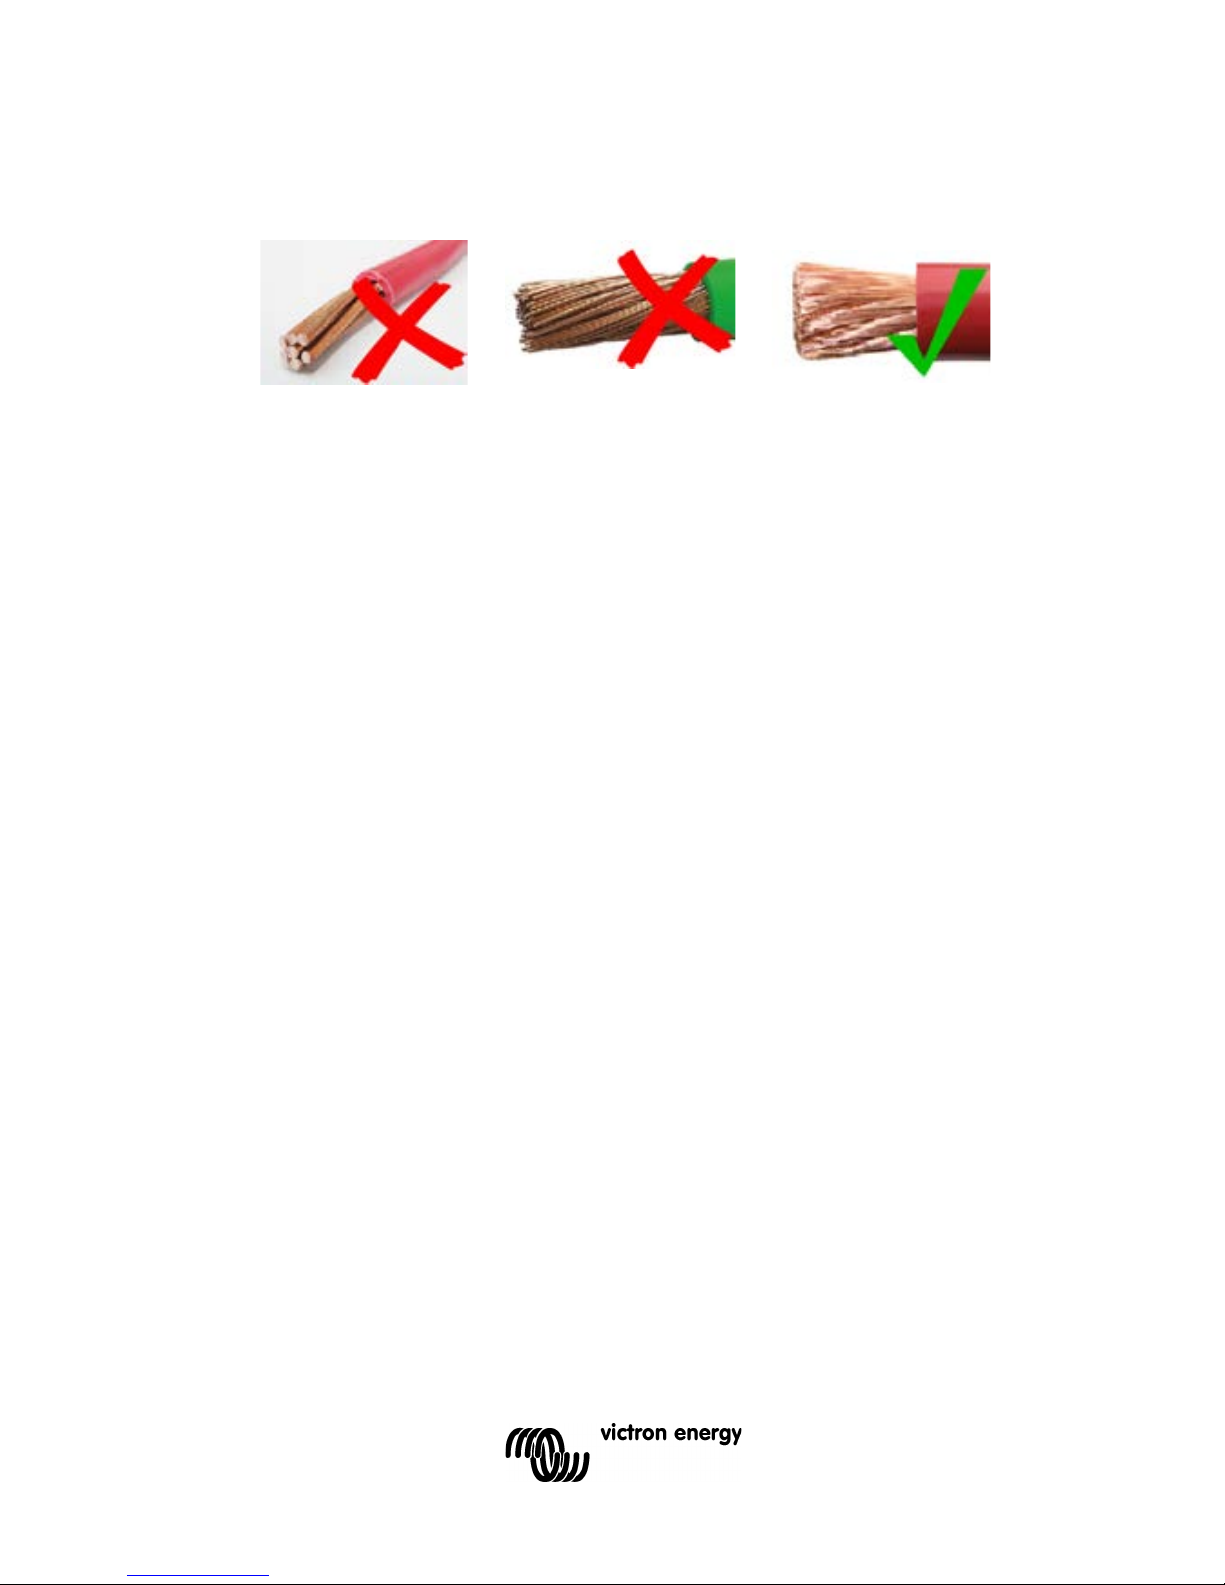
• Use flexible multistranded copper cable for the output 1 and
output 2 connections.
The maximum diameter of the individual strands is
0,4 mm/0,125 mm² (0.016 inch/AWG26).
A 25 mm² cable, for example, should have at least 196 strands
(class 5 or higher stranding according to VDE 0295, IEC 60228
and BS6360). Also known as H07V-K cable.
An AWG2 gauge cable should have at least 259/26 stranding
(259 strands of AWG26).
In case of thicker stran d s the c on ta c t area wi ll be to o small
and the resulting high contact resistance will cause severe
overheating, eventually resulting in fire.
Danger of explosion from sparking

4
3. Battery care
• The PPP must be fully charged before first use. A full charge is
indicated by the blue LED lighting continuously
• When not in use, the PPP must be switched to storage mode
and fully charged at least every 12 months
• In case of seasonal use the PPP must be at least 50% charged
before storing. Pressing the button f or 5 s will put the PPP in
storage m od e, acknowledg ed b y flashi ng bl ue .
4. Installation
When placing the Peak Power Pack it should be observed that it
has sufficient ventilation all around. A space of at least 5 cm must
be allowed.
In case of high temperature, the product will switch off, and an
error is indicated by the LED flashing red.
Installing the PPP in a caravan
The enclosure is made of plastic and must be mounted on the
caravan floor inside a cabinet or storage area using the included
strap or a suitable battery clamp.
After mounting the PPP on the caravan floor, drill an 8mm hole in
the cabinet wall for the remote button/LED. The button/LED
should be mounted in an area that is easily accessible to press
the button, and viewing the LED. Pass the 3.5mm jack plug and
the cable through the hole from the outside until the button locks
in place. The 3.5mm jack can now be connected to the remote
button socket of the PPP.
5
EN NL FR DE ES SE
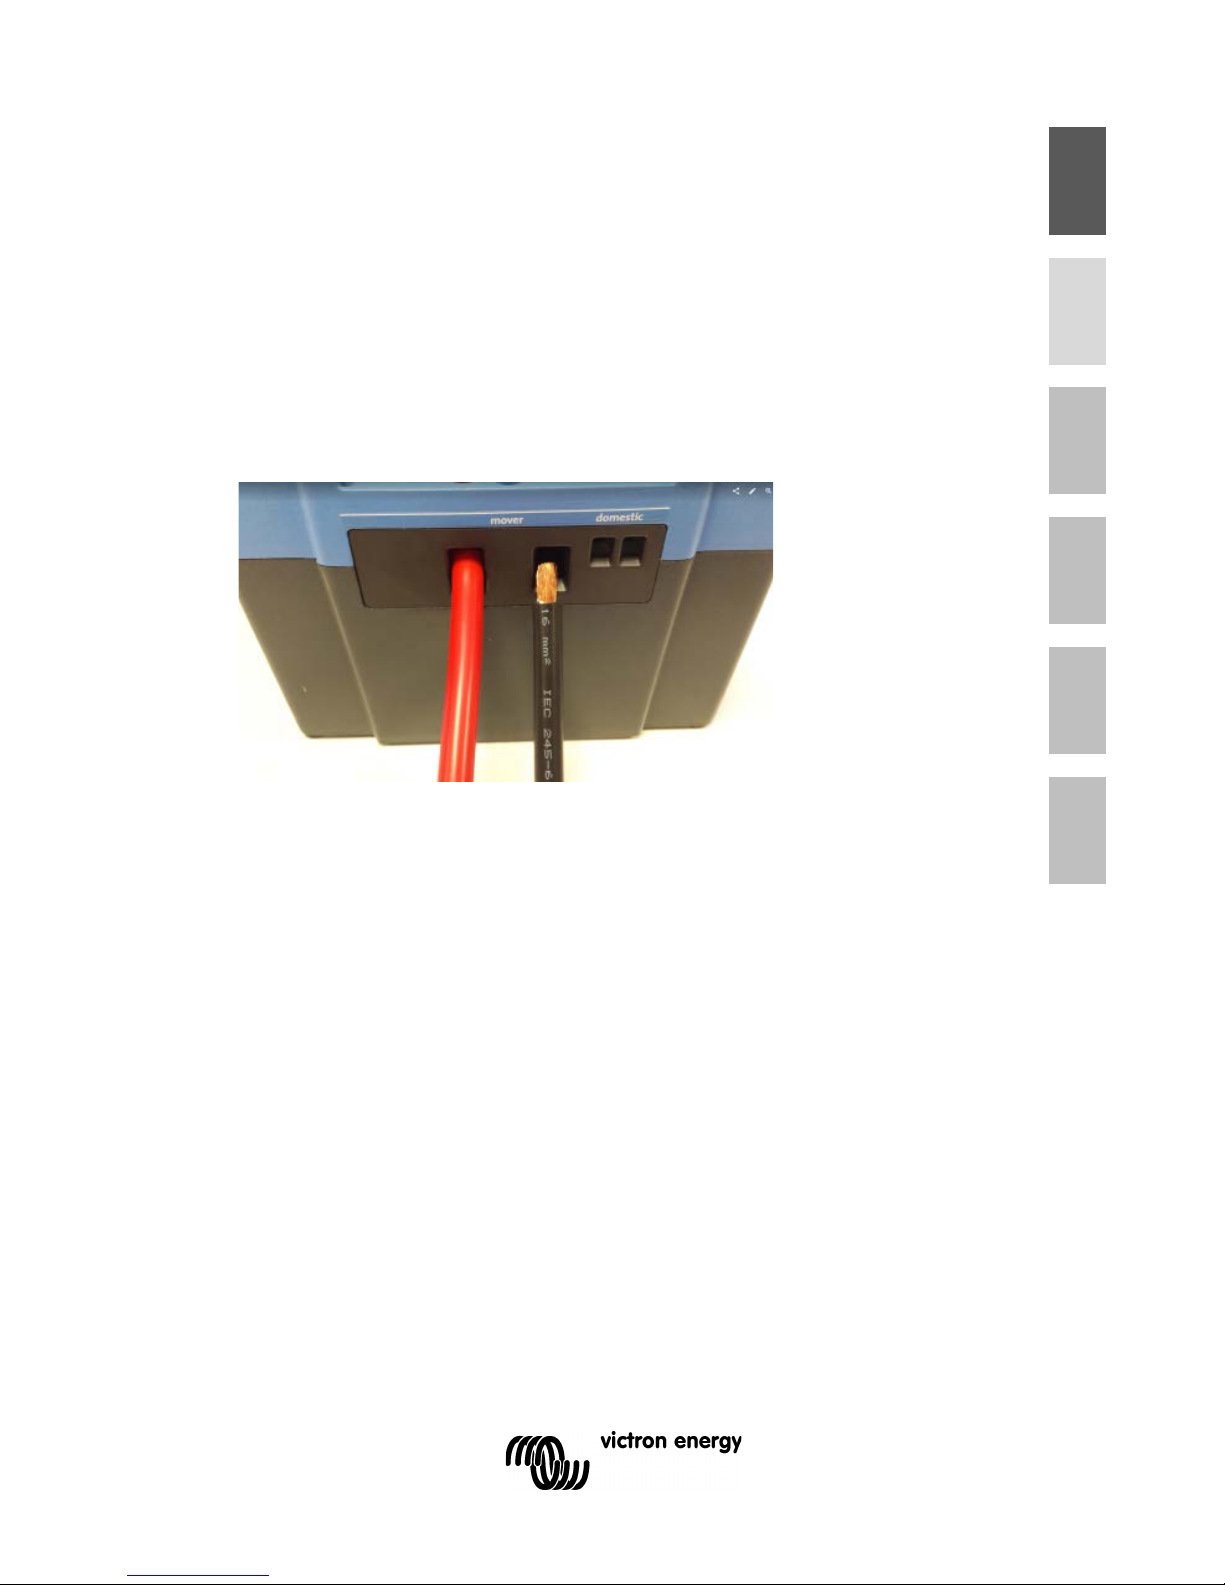
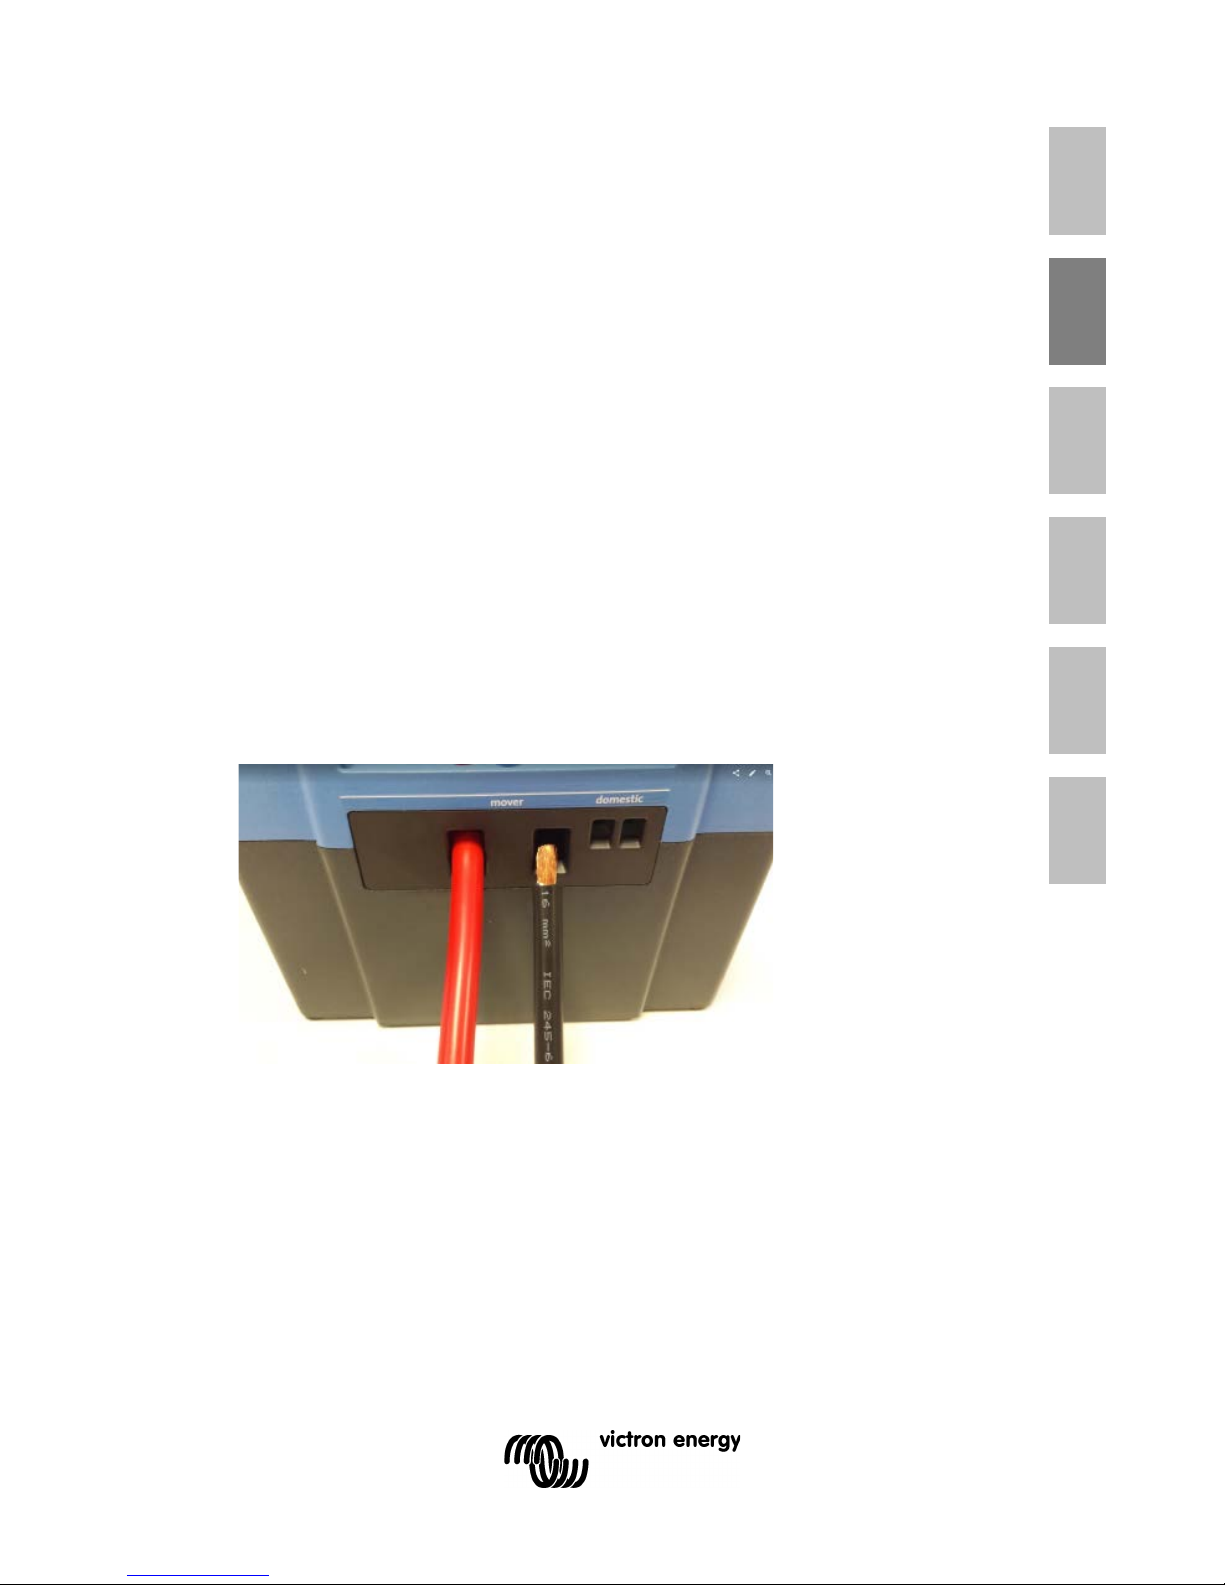
Connection of the high current output to a caravan mover
The mover control box can be connected directly to the “mover”
output of the PPP. The cable ends must be stripped for 15 mm.
Carefully insert all wire strands into the connectors, and tighten
the screws. The recommended tightening torque is 2 Nm. Be
careful to insert the wire end completely into the terminal without
clamping the plastic wire insulation, and without leaving strands
out.
Use the cables supplied with the caravan mover kit, or as
recommended by the mover manufacturer. Cable cross sections
of 10 mm² to 16 mm² are commonly used.
Because of the high currents involved when operating the
mover, a careful installation of the cables is crucial. Improper
connections of the cables can cause loss of performance,
overheating and damage. The Victron PPP is equipped with
high-power terminals that can provide a reliable connection on
fine stranded wire ends. High quality eyelets and specialist
crimping tools are therefore not needed. Solid wire or wires with
thick strands will not provide a proper connection.
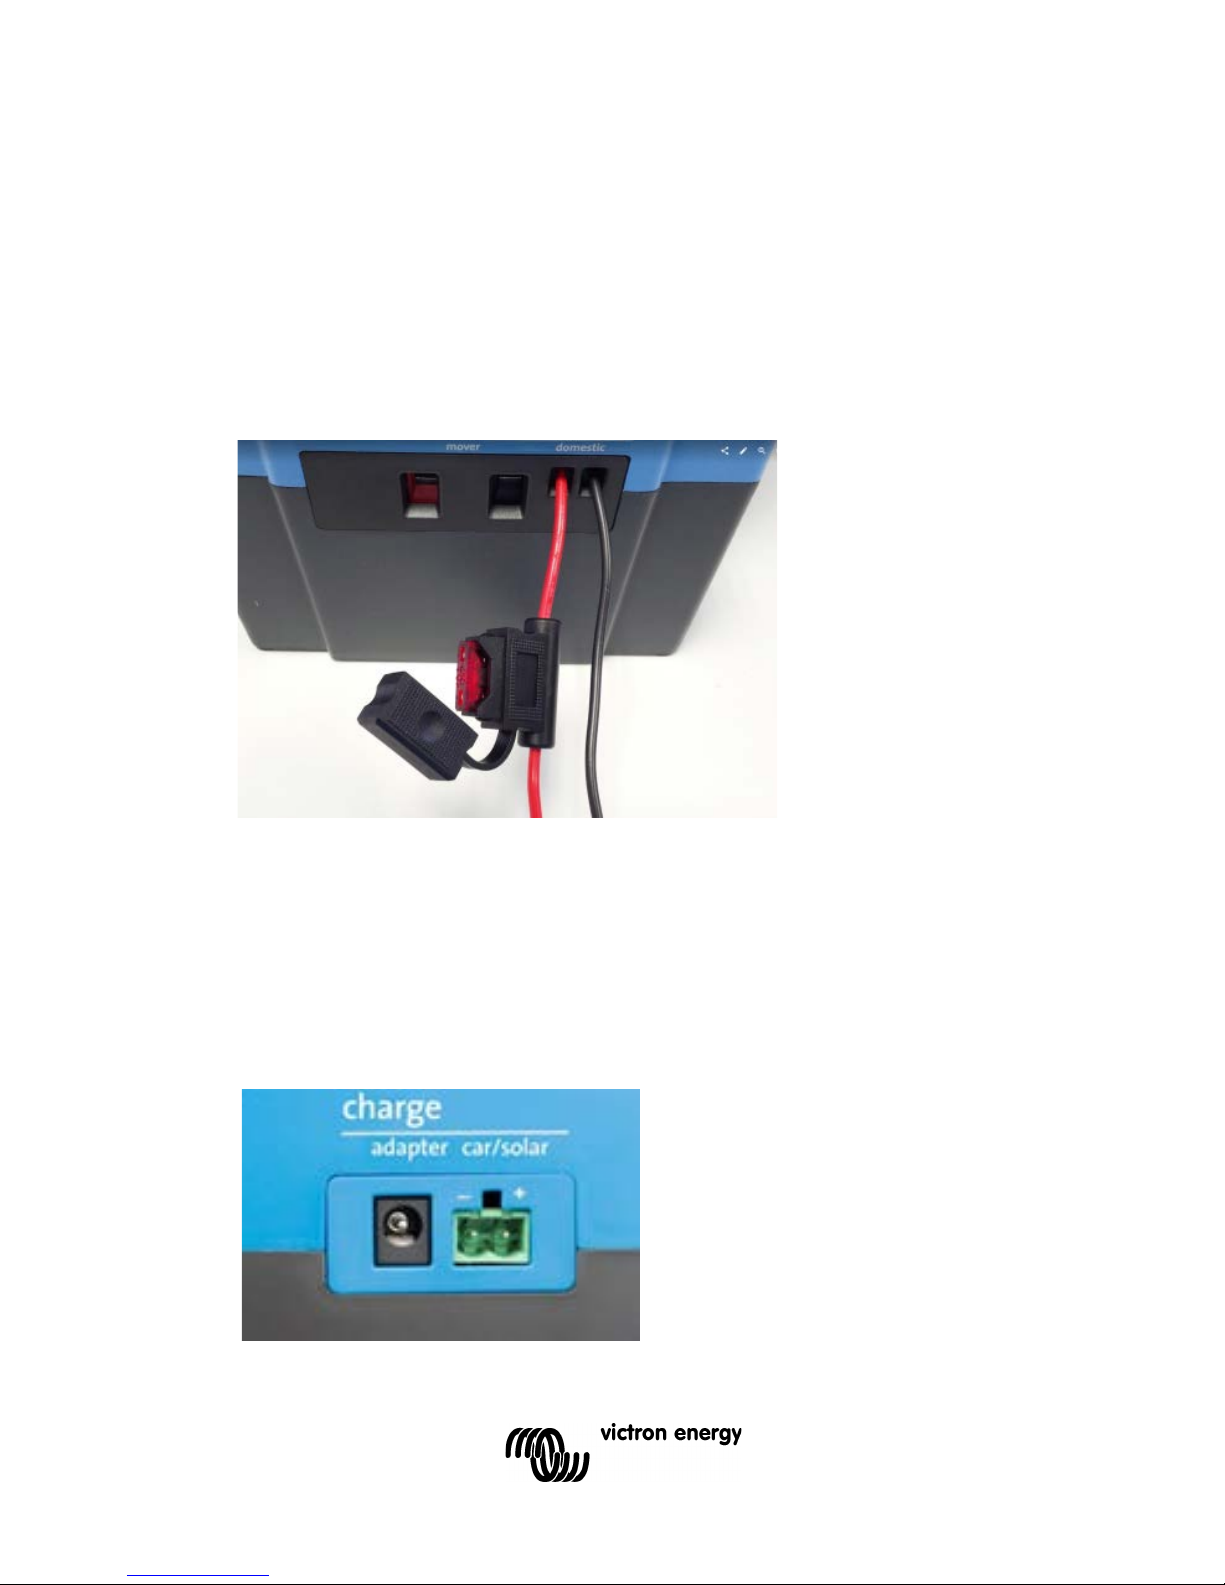
Connection of the domestic o ut pu t
A low power household load, such as LED lights, low power water
pump or a 12V LCD TV can be powered from the “domestic”
output. A properly sized in-line fuse must be connected within 10
cm of the positive battery terminal. This is to prevent
overheating/melting of the cables.
A 1,5 mm² cable should have a fuse of up to 10 A
A 2,5 mm² cable must be fused at maximum 16 A.
6
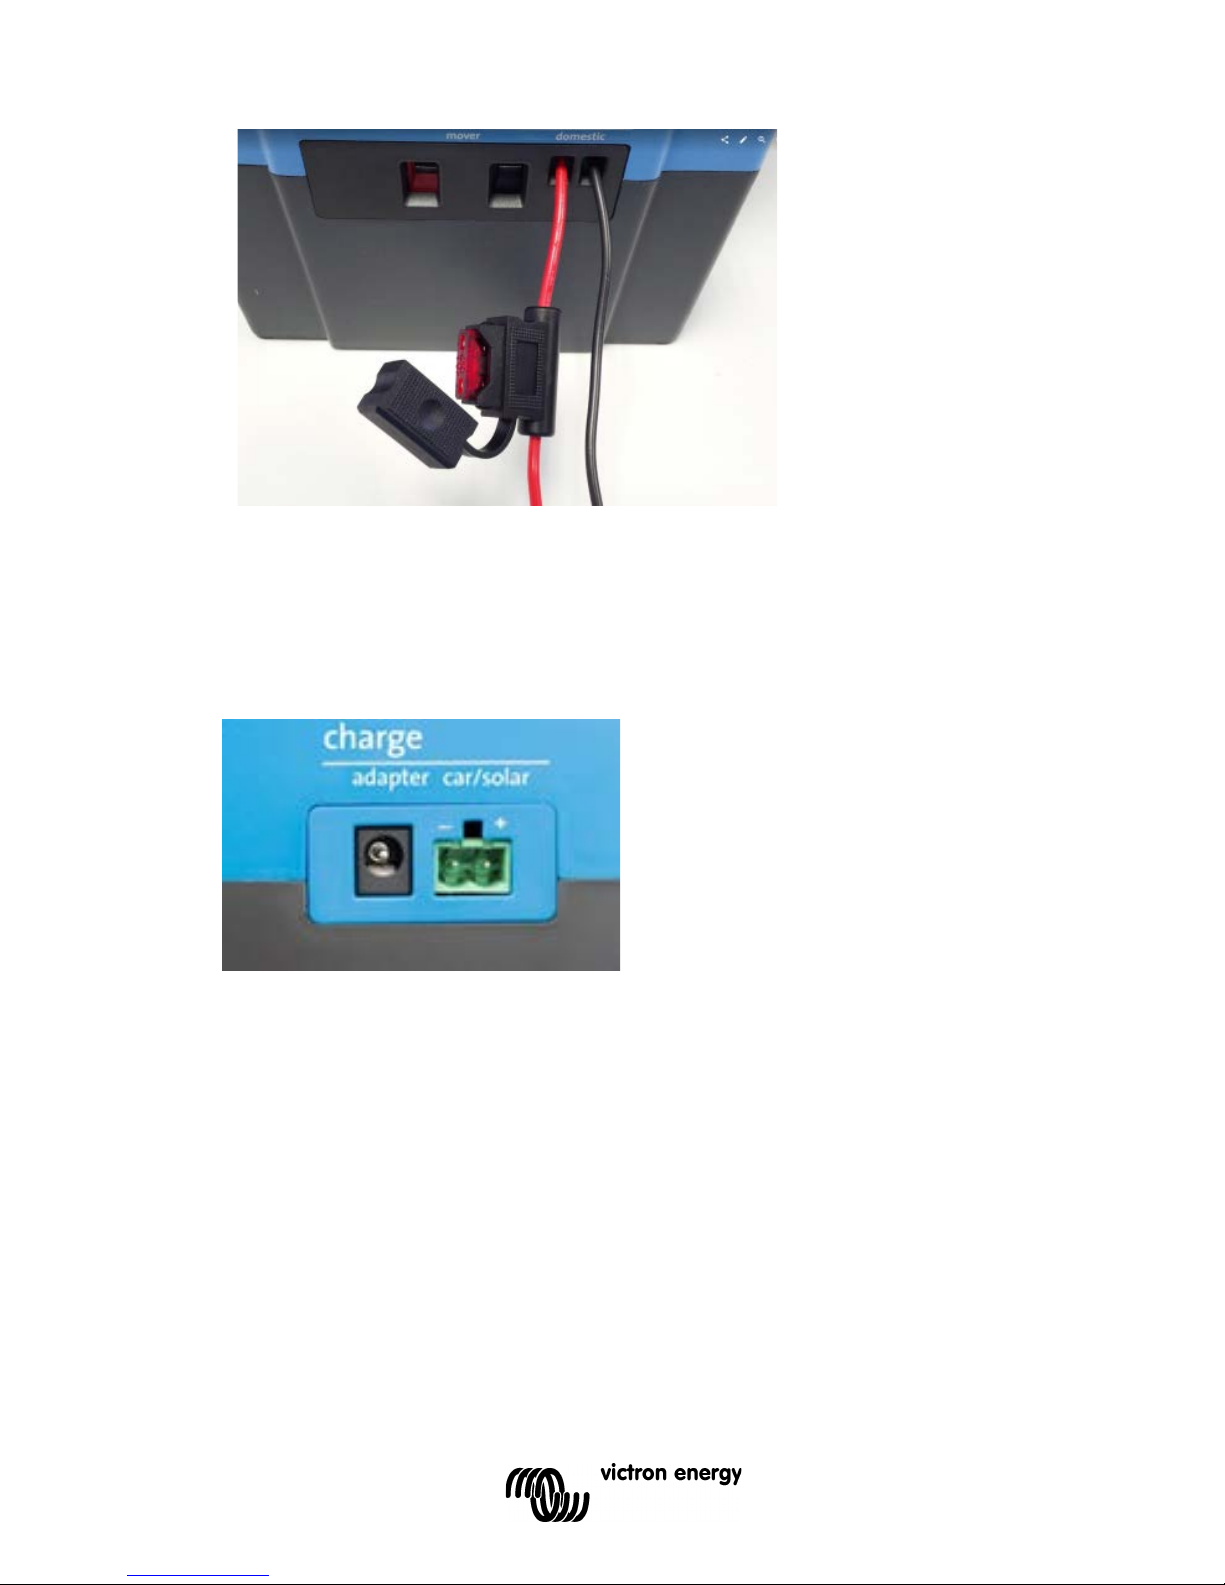
Connection of the power adapter (mains)
The “mains” jack connects to the 15 V po wer ada pt er (included).
The power adapter has to be connected to a mains outlet socket.
(100…240 VAC, 50…60 Hz)
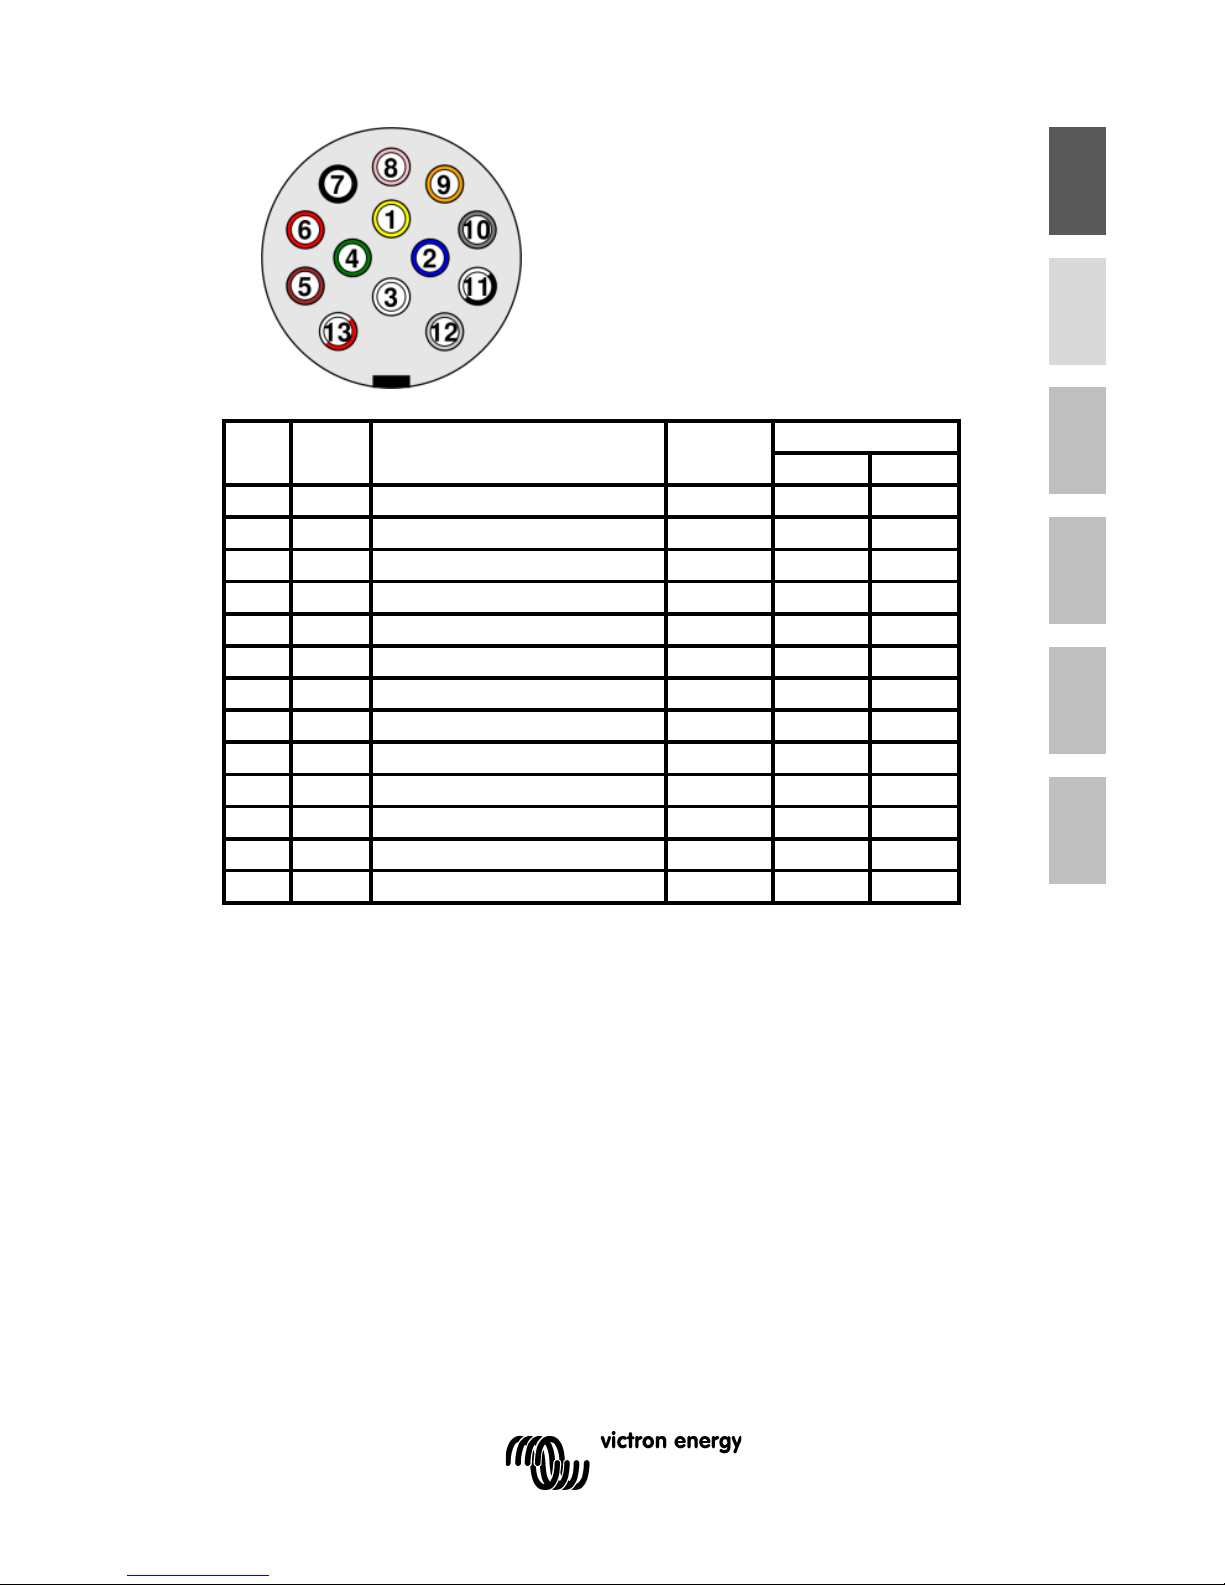
The car/solar input
A 11 to 20 VDC power source can be connected to the car/solar
input, to charge the PPP from the towing car electrical circuit, a
12 V solar panel or a 12 V battery. When connecting to a car
trailer plug, the used contact must be carefully selected, not to
overload any circuit or to over discharge the car battery.
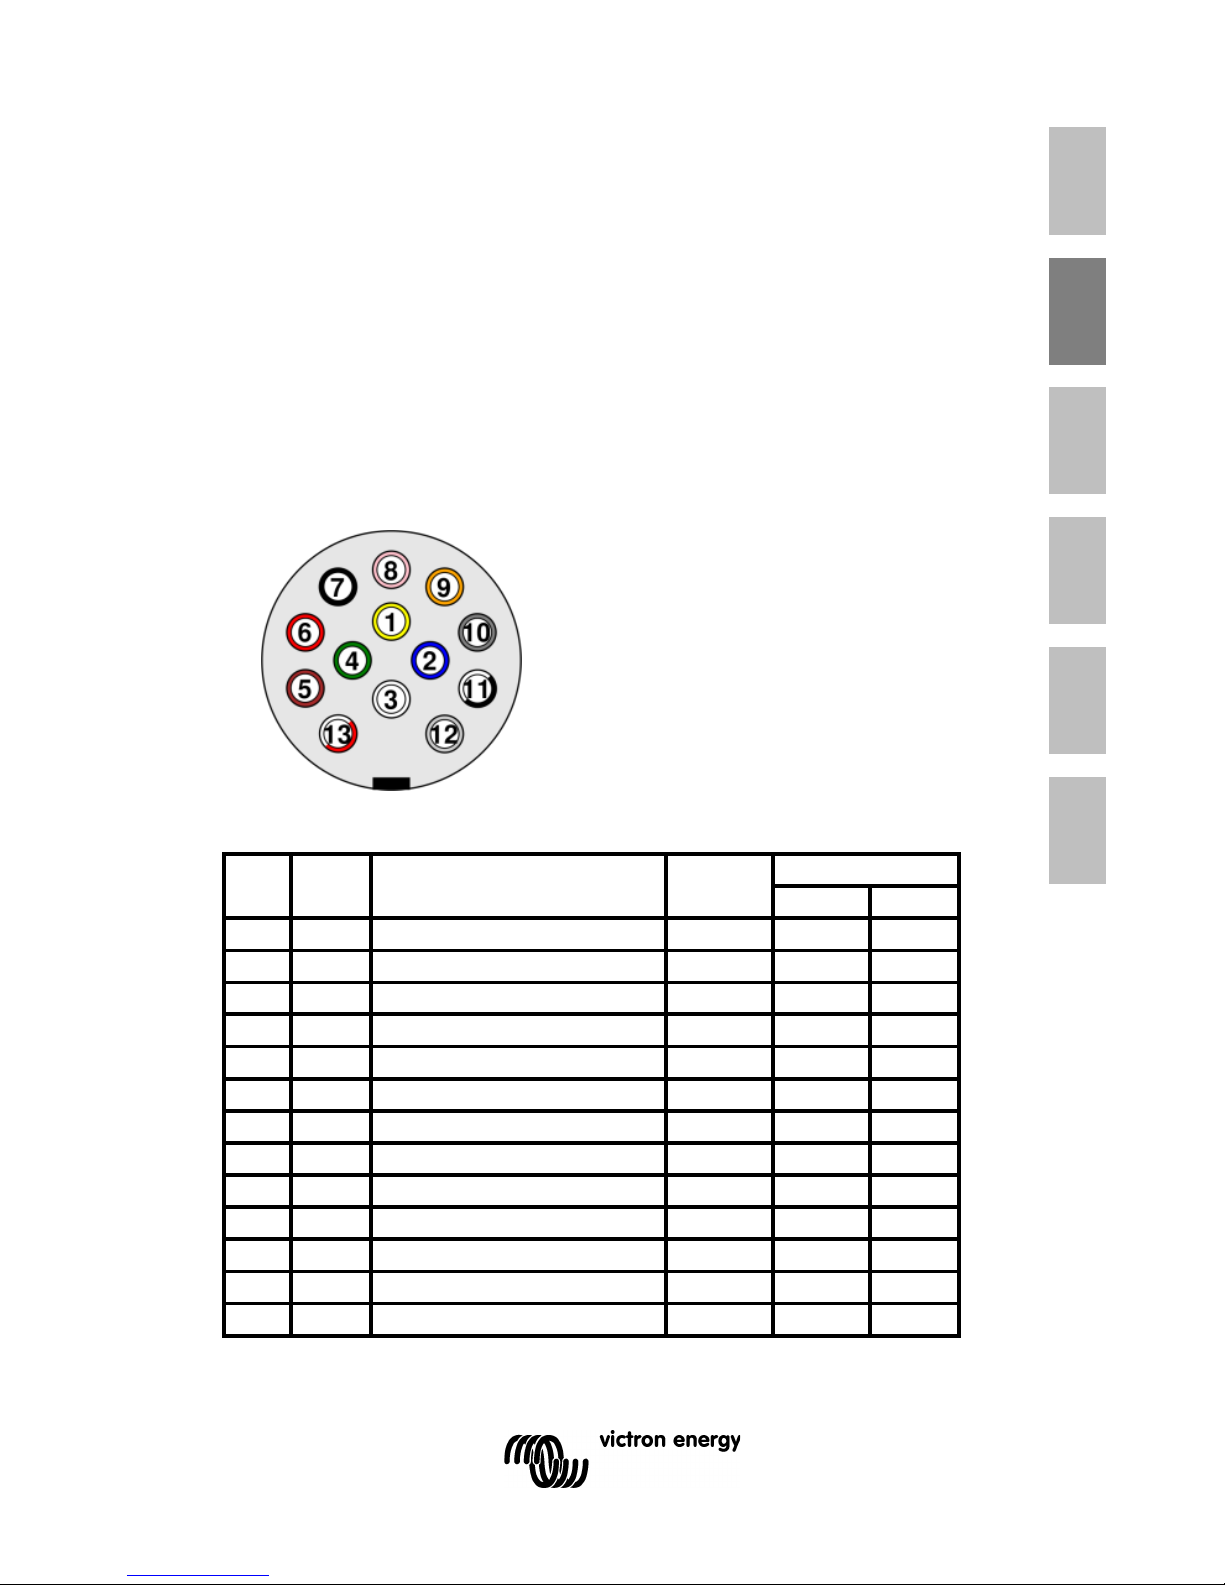
As an example, the comm only used 13p “Jae ger ” plug is
described. Th e pi n num b erin g for the “Multicon WeST” plug is the
same.
7
EN NL FR DE ES SE
Pin DIN Name
Color
Cable size
mm
2
AWG
1 L Left Turn Signal
Yellow
1.5
15
2
Rear fog lamps
Blue
1.5
15 3 31
Ground(-) for pin 1 - 8
White
2.5
13 4 R
Right Turn Signal
Green
1.5
15
5
58R
Tail, side, registration
Brown
1.5
15 6 54
Stop lamps
Red
1.5
15
7
58L
Tail, side, registration
Black
1.5
15
8
Reversing lamps
Pink
1.5
15 9 30
+12V permanent
Orange
2.5
13
10
15
+12V via ignition lock
Grey
2.5
13
11
31
Ground (-) for pin 10
Black/
2.5
13
12
Trailer present
Light
1.5
15
13
31
Ground (-) for pin 9
Red/W
2.5
13
Pins 9 or 10 with their res pective Groun d retu rns (1 1 or 13) can
be used.
Normally, pins 9 and 10 are fused at 20 A in the car’s fuse panel.
The advantage of using pin 10 is that the PPP only charges when
the ignition is on, so the car’s battery doesn’t drain when parking.
Pin 10 is a non-standard option on most car models, so please
verify it’s available.
If connected to pin 9 be careful not to drain the car battery when
the engine is not running. Disconnect the trailer plug on longer
stops.
Most absorption type refrigerators use up to 10 A. When the PPP
is added on the same circuit, the 20 A fuse is not overloaded but
there is no available power for other loads. When other loads are
used, such as the water pump or lamps, the refrigerator must be
switched to gas power.

8
9
EN NL FR DE ES SE
5. Operation
Push button :
• Press shortly:
The high power out pu t wil l be on duri ng 30min, LED lights
red. The domestic output will be on permanently (domestic
output not available on 8 Ah model).
• Press during 2s:
Both the high power output and the domestic output will be
permanently on. The red LED blinks slowly.
• Press during 5 s:
The PPP will switch off (= storage mode), LED blue, flashes
10 times.
Both the high power output an d t he do m esti c outp ut will be
off.
The adapter or car/solar input can still be used to charge the
PPP.
LED status indication:
= On
= Slow flash (2 seconds on, 2 seconds off)
= Quick flash (½ second on, ½ second off)
Red LED Blue LED
Peak Power Pack Off
High Power output ON
High Power output permanently
ON
Mover overload/short circuit/over
temperature
Charge Car/Solar.
Peak Power Pack fully charged .
Storage mode
(during 10s)
Operation of the mains charger is indicated by the green LED on
the charger.

10
6. Solving problems
Failure
description
Possible
Cause
Remedy
No power Battery
discharged
Charge
No power, LED
flashing RED
Output
shorted
Check wiring
No power, LED
flashing RED
Over
temperature
Cool down
Power output
switches off
repeatedl y wh en
driving with a
mover
Overload Use correct tire pressure
and roller engagement
force. Avoid digging of the
nose wheel. Avoid
kerbstones. Use a PPP
properly sized for the
caravan/mover.
Battery doesn’t
charge due to
freezing
temperature
Move to an are with
temperature above 0 °C
7. Maintenance
The Peak Power Pack is maintenance-free, but must be fully
charged at lea st onc e per year , an d after each use.
Important:
The PPP must be charged and switched off prior to a long
storage period.
11
EN NL FR DE ES SE
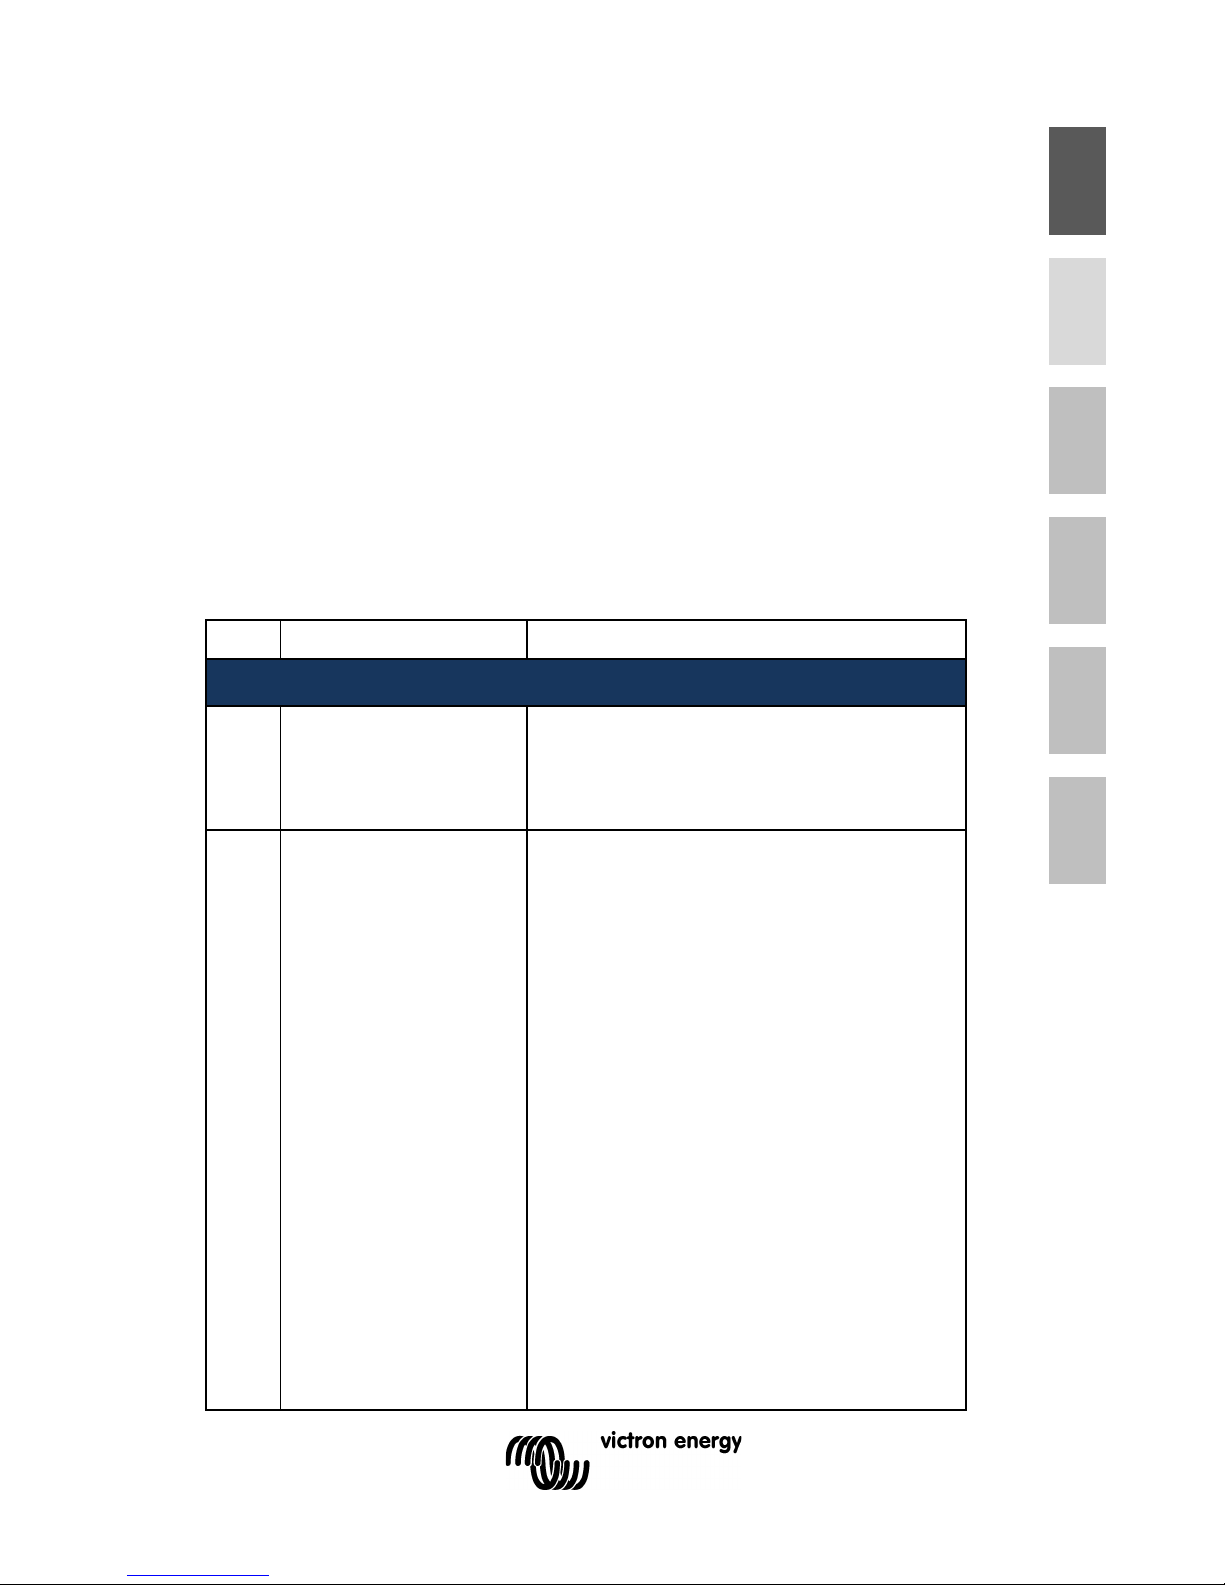
8 Peak Power Pack FAQ List
Subdivided into:
I. Charging
II. Maintenance
III. Use
IV. Technology
V. Installation/Connection
VI. Interesting facts
We obviously recommend the "future" Victron Energy Peak
Power Pack user to carefully read the manual so as to make
optimal use of the Victron Energy PPP. The following FAQ list is
to be used as a supplement to the manual.
Question
Answer
I. CHARGING
1
How much does
a PPP demand
from the car's
battery?
Max. 7 A, de pe nding on the car’s
battery volt ag e.
2
How can the
PPP be
charged?
a. With the included 110…230 V
charger (15 V, 3 A). Duration
approx. 4 hours for the 8Ah
version.
b. With a solar panel connected
to the car/solar input. The PPP
will control the charge voltage
and limit the input current to max.
7 A.
The solar panel, therefore, may
be overrate d.
c. From the car or any other 12 V
power source. The PPP wil l
control the charge voltage and
current. The charge du ration from
empty to fully charged is approx.
3 hours for the 8 Ah model.
d. The PPP can also be fast-
charged by connecting a 12V/60A

12
(max) charger to the high current
output. Max charge voltage: 14,4
V.
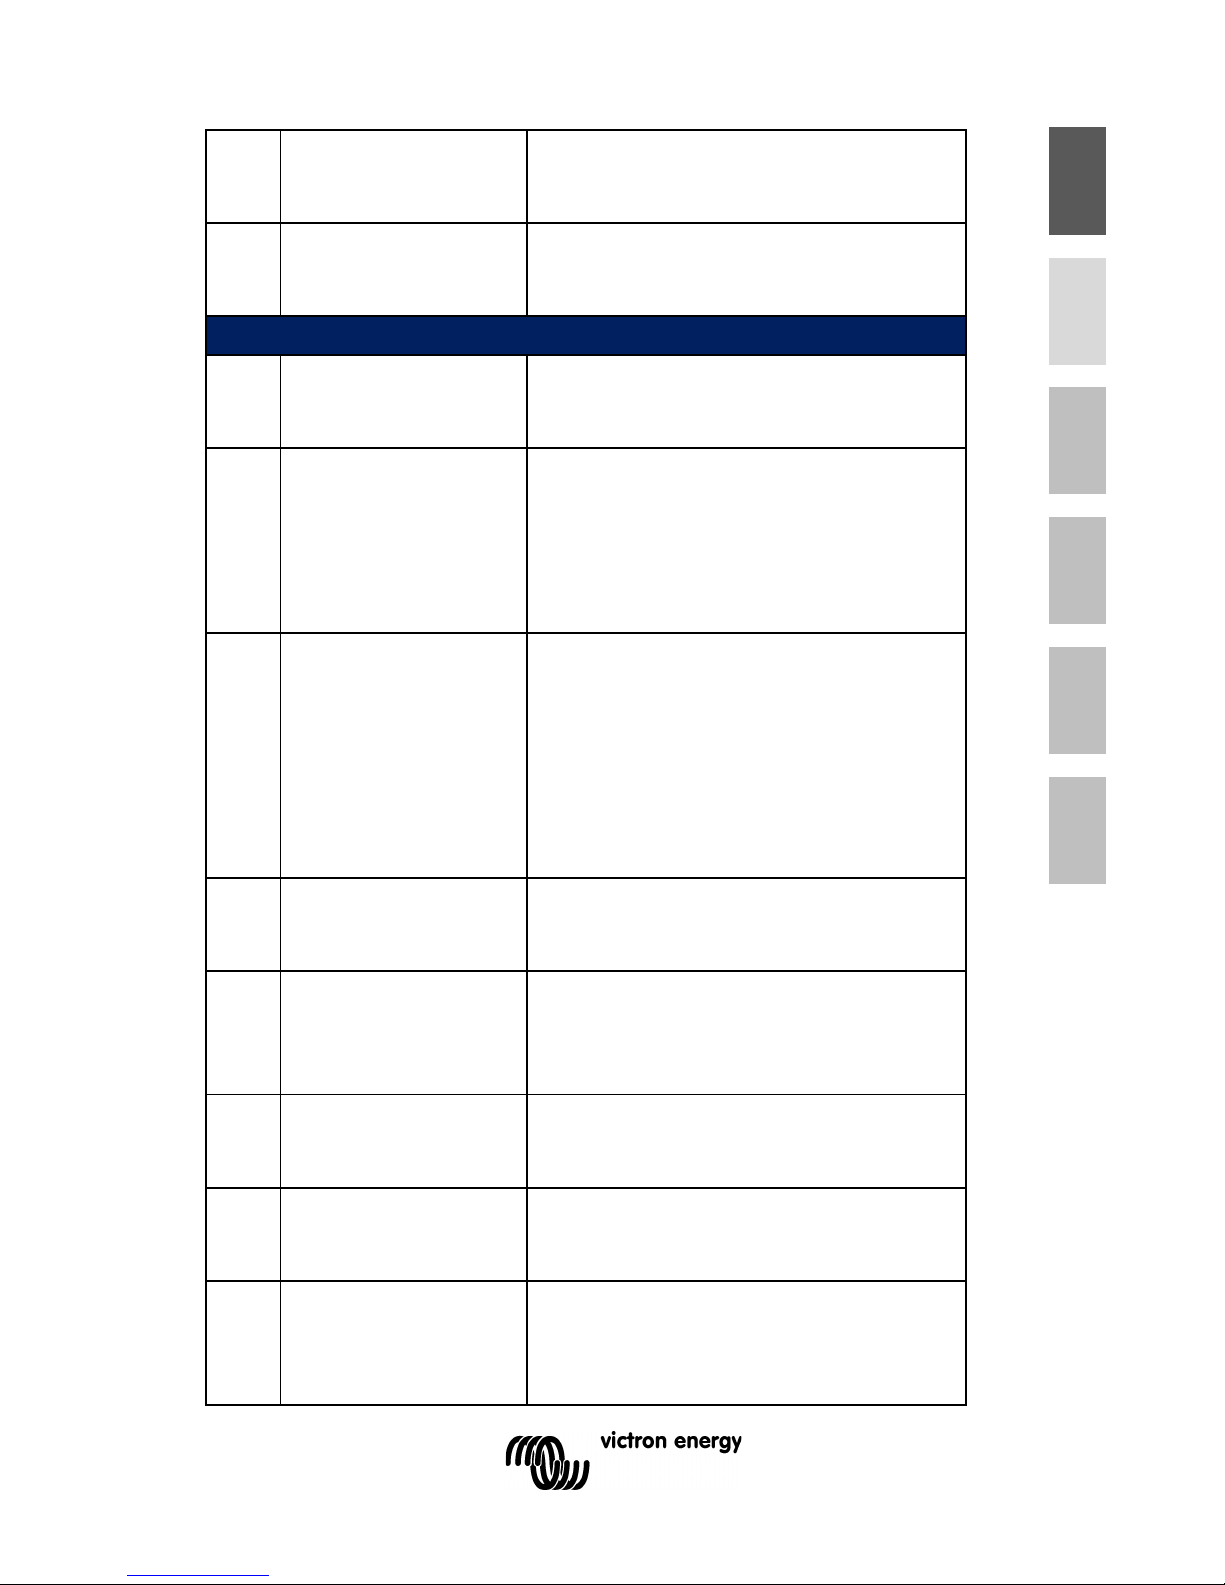
3
Is the PPP
already full y
charged at the
time of
purchase?
No, it is charged to 60%...80%.
5
How many
Amperes are at
least required in
order to charge
the PPP at the
camping site?
Any 110…230V camping site
connection will do.
6
Can the PPP be
charged both by
means of a solar
panel and a car
charger
simultaneously?
No.
Simultaneous charging from
mains and car or solar is
possible. If you wi sh to c on nect
the car charger and the solar
panel simultaneously, a diode
bridge is needed to avoid return
current.
II. MAINTENANCE
1
What should I do
when I store my
caravan for the
winter?
Fully charge before the winter
storage. When the blue LED
indicates the PPP is fully
charged, pr ess the button for 10s.
Storage mode is entered and
indicated by the LED flashing
blue.
2
What is the
service life?
Under normal use the expected
service life is 7-10 years.
3
What happens in
case of full
discharge?
The PPP switches off
automatically.
4
Is it harmful to
always charge
the PPP for just
a short time?
No, the PPP has no memory
effect.
5
What is the
influence of
temperature on
lifetime and
Storage: the colder, the longer
the service life. Use: the
performance is best around
25…35 degrees Celsius.
13
EN NL FR DE ES SE
performance?
Freezing temperatures advers el y
affect maximum current output of
any batter y.
6.
What if I
accidentally drop
the PPP?
No dangerous situation will occur,
but correct operation can no
longer be guar ant ee d.
III. USE
1
Is it possible to
start a car using
the PPP?
No.
2
Does the PPP
switch off
automatically?
Yes, The mover output switches
off after 20min. Both outputs are
switched off in case of
undercharge. Normal operation
can be resumed only after
sufficient cha rging.
3
How long can I
drive my Mover?
This depends on the type of
mover, the weight of the caravan
and the surface. As an average
value you can assume: approx.
10 minutes for a caravan of 1600
kg on a relatively level surface.
The larger versions give
proportionally more driving time.
4
How do I know
the PPP is fully
charged?
The blue LED will li ght
continuously.
5
Is the PPP also
suitable for a
double-axle
trailer?
Yes. For heavier caravans a
larger PPP is recommended. The
smallest 8Ah version is advised
for small caravans only.
Can the PPP be
used as a po wer
supply?
Yes. Using the “domestic” output,
lights and wate r pum ps c an be
supplied.
7.
Where can I take
the PPP for
disposal?
To a disposal station or the
municipal waste collection point.
8.
Does frequently
stopping and
starting the
Mover affect the
No.

14
available us age
time?
9.
Can the PPP be
used in
combinati o n wit h
a 12V fully
automatic
satellite
installation?
Yes. Use the “domestic” output to
power the system. Disconnect the
system after use to prevent
unnecessary discharge.
10. Does the nose
wheel weight
have any
importance?
Yes, the more weig ht on the
shaft/nose wheel, the deeper it
can dig into the ground. This will
cause added load for the system
leading to poor pe rformance.
11. Is there any
capacity loss
over the years?
Yes.
12
.
Is it possible to
connect the PPP
both to 12V and
230V
simultaneously?
Yes.
13
.
To what extent is
it allowed to
completely
discharge the
PPP?
This is allowed. Recharge
immediately after use to prevent
premature failure.
IV. TECHNOLOGY
1.
Is the PPP
protected
against:
a. Short circuit?
b. Overload?
a. Yes.
b. Yes, by means of electronic
switches and an internal nonreplaceable fuse.
2.
Can the PPP
catch fire in the
event of a short
circuit?
No. There is an electronic short-
circuit and ove rloa d protection.
The PPP contains LiFePO4 cells,
which in case of short circuit do
not catch fire as opposed to
lithium manganese and lithium
polymer cells used in laptops,
mobile phones and model aero
planes.
Please ensure large diameter
15
EN NL FR DE ES SE
cables are used. If cabl e s with
insufficien t cross sec ti on ar e
used, the current from the PPP
may cause the wires to glow or
catch fire.
3.
Are there any
similarities with
mobile phone,
laptop or bic ycle
batteries?
The lithium iron phosphate cells
in the PPP have no "thermal run
away" effect and will therefore not
catch fire or explode in case of
misuse. See also "Interesting
facts".
4.
Can the output of
the PPP be
connected in
parallel to
another po wer
supply or
battery?
No.
Depending on the relative
voltages
5.
Is a booster
needed to
charge the PPP
from the car’s
electrical circuit?
No. The integrated charger will
operate correctly from approx. 9V
to 20V input. The input current is
limited electronically to approx.
7A.
V. INSTALLATION/ CONNECTION
1.
How to connect
the PPP tot the
car’s electrical
system for
charging.
Connect the PPP to the trailer
connector. It can be connected to
the “perma nen t” (9) or
“refrigerator/charge” (10) pin. Do
not overload the circ ui t addi ng
many loads. Using pin 9 may
discharge the car’s battery when
parking. Please note that not all
cars have a fully wired trailer
connector, so pins may be
missing.
2.
Do I still need the
main switch for
my Mover?
No. The device switches on and
off through electronic switches. If
a main switch is already installed,
it does not have to be removed.
3.
How can the
The PPP can be installed

16
PPP be
installed?
horizontal l y on the bot tom of the
caravan.
4.
Is the length of
the cables
between the PPP
and the Mover
electronics
important?
Yes. They need to be as short as
possible (m a x. 1m); diameter
between 10 and 16 mm2. A main
power switch is allowed but not
required.
5.
My caravan is
garaged and
constantly
connected to
230V. Is this
harmful or should
the PPP be
disconnected?
The mains adapter for the PPP
can remain constantly conn ect e d
to 230V.
VI. INTERESTING FACTS
1.
PPP ageing
As with all batteries the PPP (Li-
ion battery) will lose s om e
capacity as it ages . A hig h
storage temperature will
adversely affect the lifetime.
1. The PPP contains lithium iron
phosphate cells with a longer
service life than the lithium
manganese oxide cells as used in
laptop computers.
2. Lithium iron phosphate cells
have no thermal run-away effect
like lithium manganese oxide ion
cells, avoiding the possibility of
fire or explosions in case of short
circuit, overload, perforation,
overheatin g, etc .
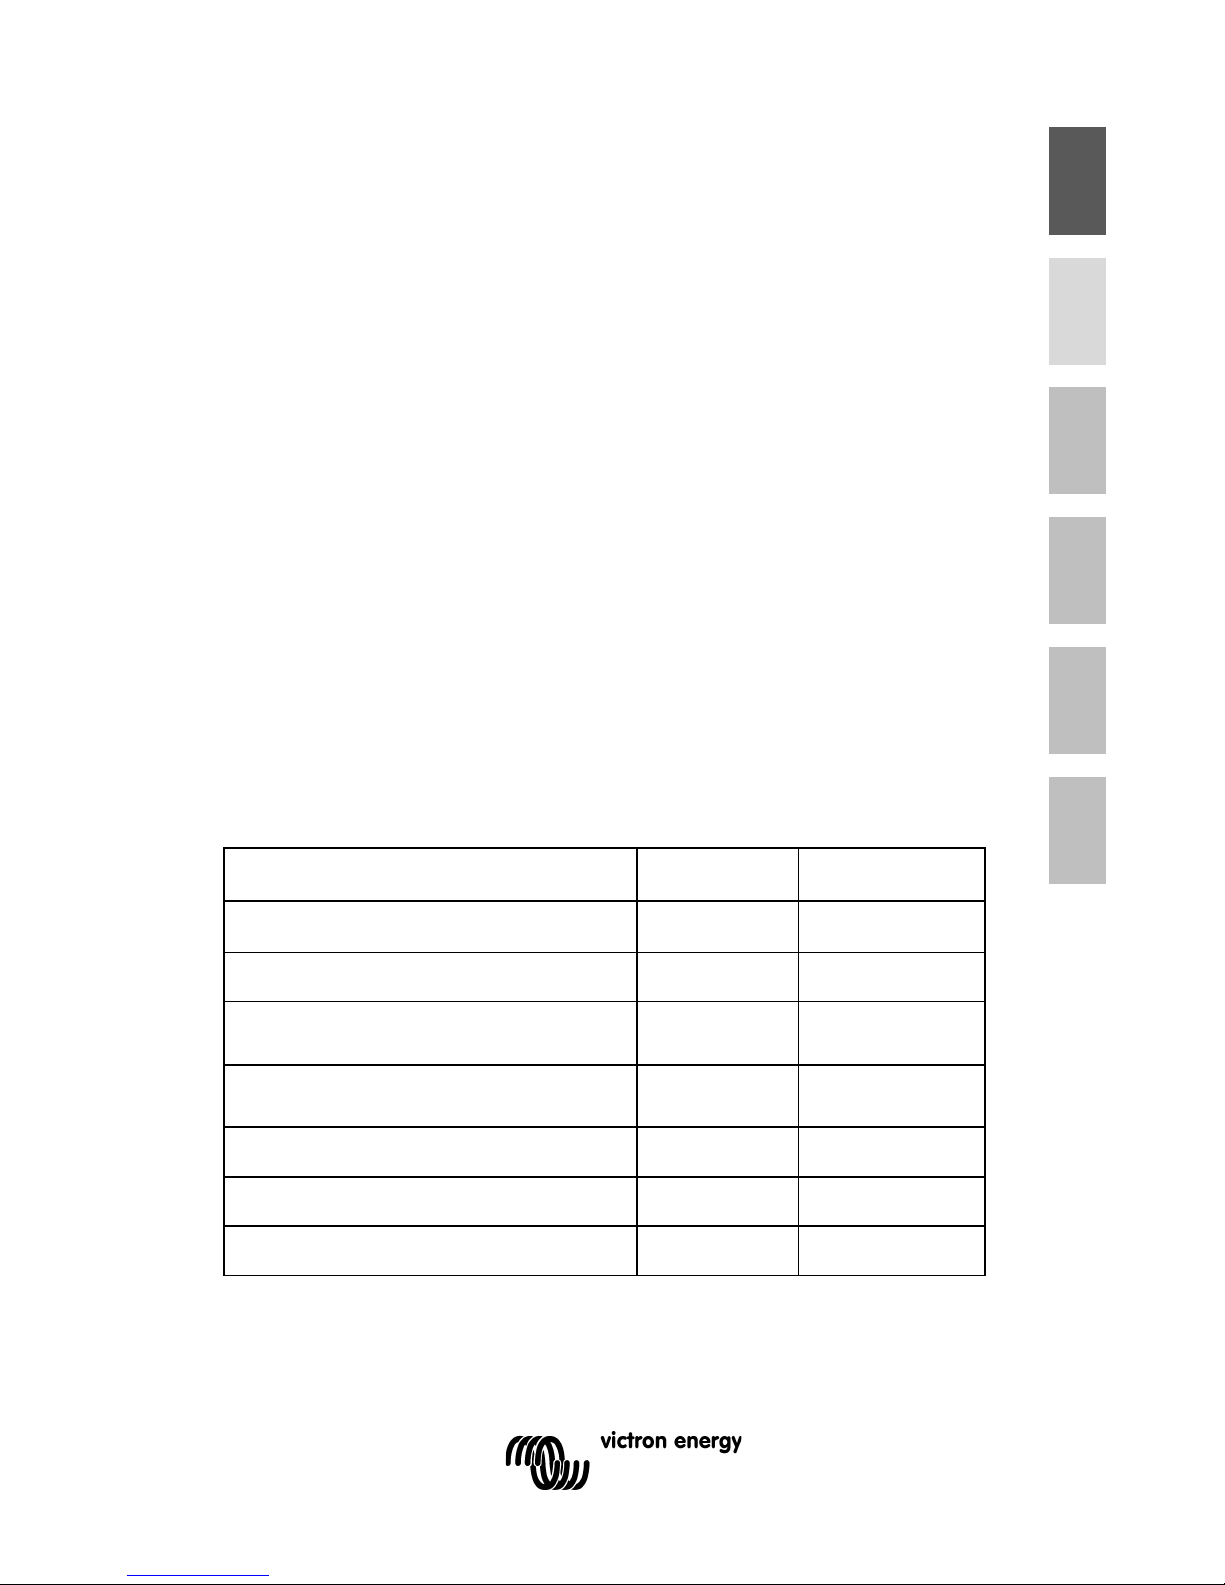
1
EN NL FR DE ES SE Appendix
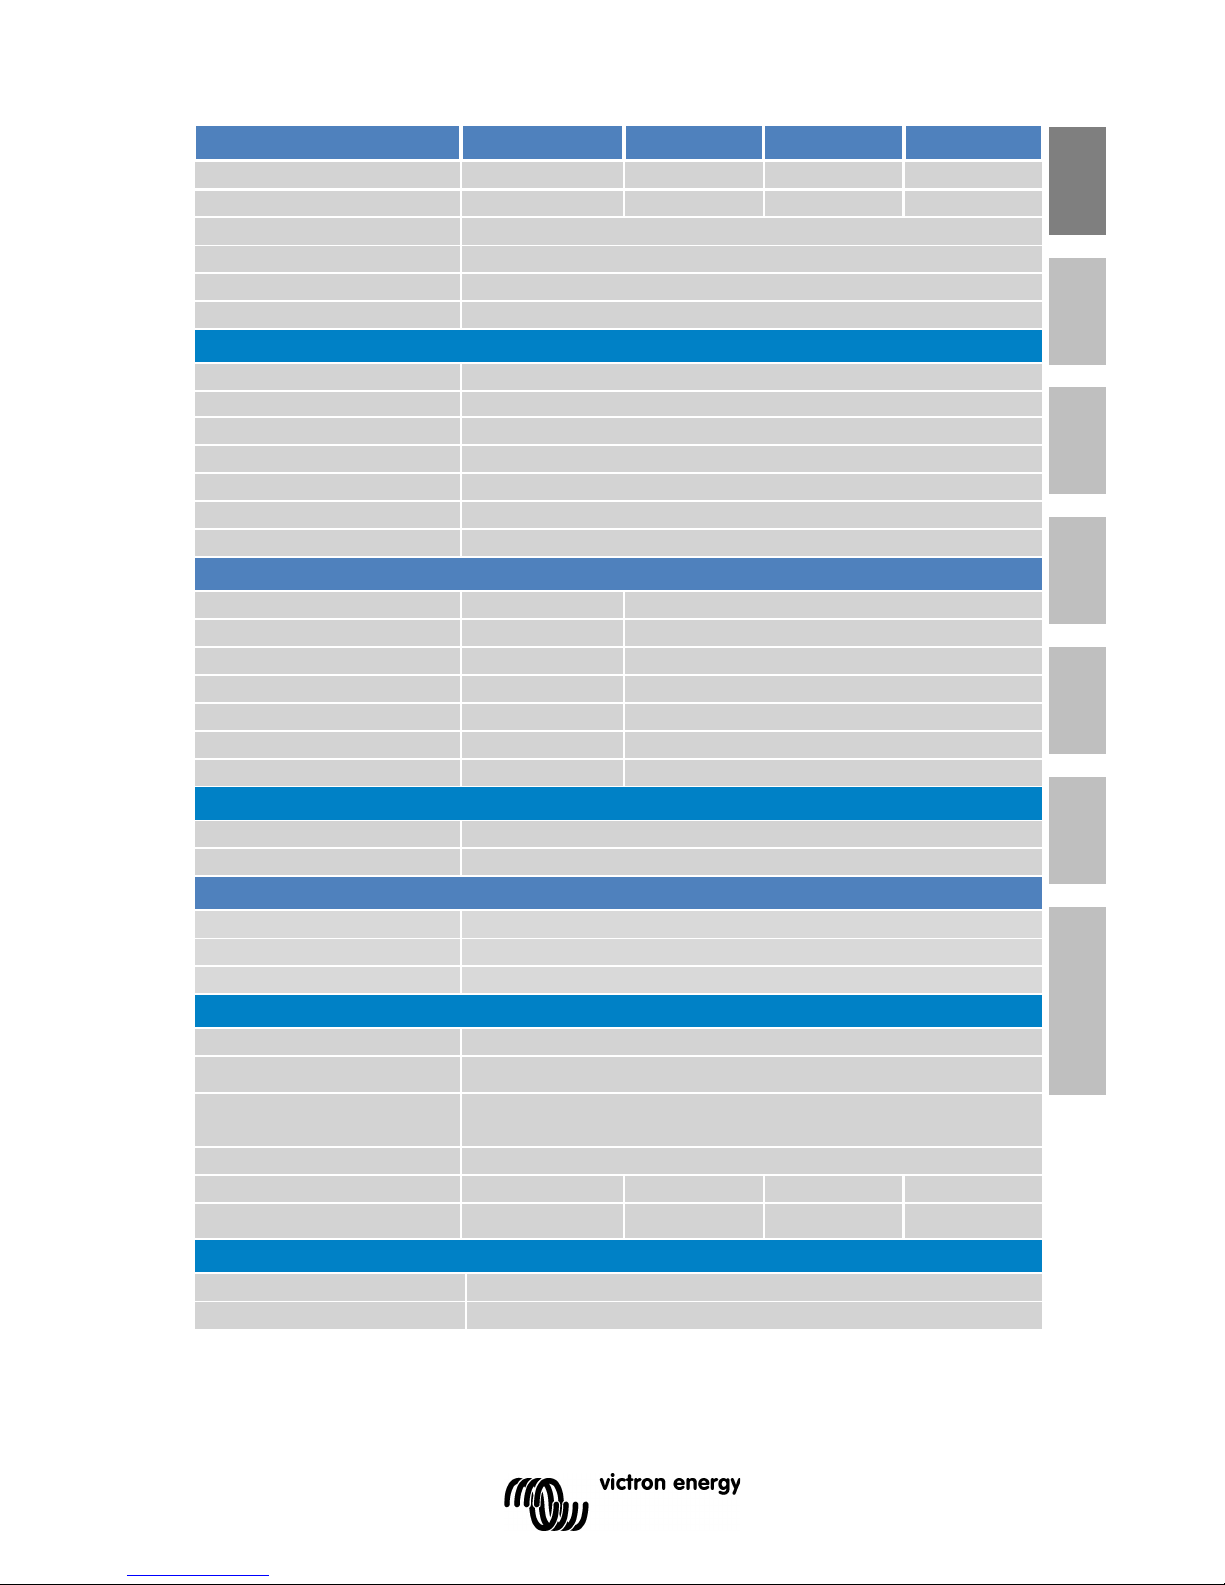
Peak Power Pack
PPP-8
PPP-20
PPP-30
PPP-40
Capacity
8 Ah
20 Ah
30 Ah
40 Ah
Stored energy 102 Wh 256 Wh 384 Wh 512 Wh
Battery type Lithium-ion ( LiFePO4)
Nominal voltage
12,8 V
No load battery drain wh en on <13 Ah / year (< 1, 4 mA )
Battery drain in storage mode
< 6,5 Ah / year (< 0,7 mA)
Output 1: high current output
Continuous output current 150 A
Maximum output current (10 s) 200 A
Short circui t trip le v el 300 A
Protections
Overl oad / short ci rc uit / over temp er at u r e / ov er dis c h ar g e
Maximum input (charge) current 40 A (not protected)
Maximum input (charge) voltage 14,4 V (not prot ect ed)
Maximum cable cross section 16 mm² (screw terminals)
Output 2: auxili ar y output
Continuous output current n.a. 30 A
Maximum output current (10 s)
n.a.
50 A
Short circui t trip le v el n.a. 80 A
Protections n.a. Overload/short circuit/ ov er t emperatu r e/ o ver dis c h ar g e
Maximum input (charge) current n.a. 10 A (not protected)
Maximum input (charge) voltage n.a. 14,4 V (not protected)
Maximum cable cross section
n.a.
6 mm² (screw terminals)
Input 1: multi-purpose vehicle battery / solar charger input
Input voltage range 11 V < Vin < 20 V
Input current limit 7 A
Input 2: power adapter
Adapter output voltage
15 V
Adapter output current 3 A
Adapter input voltage
100 /240 VAC 50 / 60 Hz
GENERAL
Monitoring and control Multi-f u nc ti onal push but ton with bi-colour LED
VE.Direct port
Connects to a computer (VE.Direct to USB cable needed) or a smart phone
(VE.Direct Bluetooth Smart dongle needed)
Operating temperature range
Batt. char g in g: 0°C to 40°C Batt. disch arg i n g: -20°C to +40°C
Storage: -20°C to +40°C
(charging / discharg ing inhibited whe n outside spec ified temperatu re range)
Humidity (non condensing) Max 95%
Weight
2,2 kg
3,8 kg
5,4 kg
8,6 kg
Dimensions (h x w x d) 190x172x90mm
190x172x130
mm
190x172x170
mm
190x172x210
mm
STANDARDS
Safety
EN/IEC 60 3 35-1, EN/IEC 60335-2-29, EN/IEC 62109
Emission, Immunity EN 55014-1, EN 5501 4-2, IEC 61000-3-2, IEC 61000-3-3, EN 50498


3
EN NL FR DE ES SE
1. Algemene beschrijving
Een lithium-ion-accupack met intrinsiek veilige LiFEPO4cellen, een ingebouwde lader en een opmerkelijk piekuitgangsvermogen.
Nominale spanning: 12,8V
Bereik accucapaciteit: 8Ah tot 40Ah
Laag gewicht en eenvoudig te installeren
- Ideaal voor mobiele toepassingen
Goed beschermd tegen misbruik
- Uitsteken de pr estaties in zonne- en andere toepassingen,
waar herhaaldelijke diepe ontlading en onvoldoende oplading
snel loodz wavelzuuracc u's zou bes c ha dige n
Uitgang 1: hoogvermogenuitgang voor caravan movers en
andere toe passingen die een ho o g verm og en verei s en
- Toepassing in een caravan mover: automatische
uitschakeling van de hoogvermogenuitgang 30 minuten na
inschakeling
- Andere toepassingen: De hoogvermogenuitgang kan worden
overgeschakeld op de ‘altijd aan’-modus
- Bestand tegen kortsluiting
- Met beveiliging tegen te diepe ontlading van de accu
Uitgang 2: hulpuitgang voor lage DC-belastingen (niet
beschikbaar bij 8Ah-model)
- Altijd aan
- Bestand tegen kortsluiting
- Met beveiliging tegen te diepe ontlading van de accu
Ingang 1: ingang voor accu van multifunctioneel
voertuig/zonnelader
- Spanning en stroom worden geregeld om de li-ionaccu veilig
op te kunnen laden. Feitelijk kan elke elektrische DCstroombron worden aangesloten op deze ingang, zolang 11V <
Vin < 20V is.
4
Ingang 2: tw ee de i n ga n g vo or aa ns l uiting van een
stroombron van 15V DC
- Een 3A-stroomvoorziening wordt meegeleverd (kan worden
aangesloten op elektriciteitsnet van 100/240 VAC )
Snel opla de n m og e lijk via ingang 1 (hoge ui tg a ng s stroom)
- Een acculad er, om vorm e r/lader, zon nel aad c on troller of
wisselstro omdynamo kan w or den aang esl ot en op de
hoogvermogenuitgang om snel te kunnen opla de n. Ma xim al e
laadstroom 80A en maximale laadspanning 14,4V.
Opslagmodus
- Verlaagt het accustroomverbruik tot vrijwel nul. Voorkomt
schade door te diep e ont l adi n g van de acc u tijdens langdu rig e
opslag.
Real time-ge ge ven sw eergave op Apple - e n A n dr oi dsmartphones, -table ts en over i ge appar a te n
'VE.Direct Bluetooth Smart dongle' vereist: zie onze website.

5
EN NL FR DE ES SE
2. Veiligheidsaanwijzingen
• Lees deze handleidin g z or gvul di g voo r dat het product wor dt
geïnstall ee rd en in geb rui k wordt genomen.
• Dit product is ontworpen en getest conform de internationale
normen. De apparatuur mag enkel worden gebruikt voor de
bedoelde toepassing.
• Installeer het product in een hittebestendige omgeving. Zorg
er daarom voor dat zich geen chemische stoffen,
kunststofonderdelen, gordijnen of andere soorten textiel enz.
in de onmiddellijke omgeving van de apparatuur bevinden.
• Niet in serie schakelen om een hogere spanning te verkrijgen.
(De overbelas ti ngs- en kortsluitingsbeveiligingen kunnen dan
falen.)
• Zorg ervoor dat de apparat u ur wordt ge brui k t ond er de j uiste
bedrijfsomstandigheden. Gebruik het product nooit in een
vochtige omgeving.
• Gebruik het product nooit op plaatsen, waar gas- of
stofexplosies kunnen optreden.
• Zorg ervoor dat er altijd voldoende vrije ruimte rondom het
product is voor ventilatie.
• De aansluitingen moeten altijd plaatsvinden in de volgorde
zoals beschreven in paragraaf 3.5.
• Gebruik flexibele meeraderige koperen kabel voor
aansluitingen van uitgang 1 en uitgang 2.
De maximale diameter van de afzonderlijke aders is
0,4mm/0, 125m m ² (0, 01 6 inch/AWG26).
Een 25mm² kabel dient bijvoorbeeld uit tenminste 196 aders te
bestaan (van klasse 5 of hoger conform VDE 0295, IEC 60228
en BS6360). Ook H07V-K kabel genoemd.
Een AWG2-kabel dient tenm inste 259/26 aders (2 59 ad ers van
AWG26) te hebben.
Kans op ont ploffin g do or vo nken
6
• In geval van dikkere aders is het co n tac t vlak te klein en zal
de resulterende hoge contactweerstand leiden tot ernstige
oververhitting, met uiteindelijk brand tot gevolg.
3. Verzorging van de accu
• Het PPP moet vóór het eerste gebruik volledig zijn opgeladen.
Dit wordt aang ege ve n met een constant brandende blauwe
LED
• Als het PPP niet in gebruik is, moet het worden overgeschakeld
op de opslagmodus en minimaal om de 12 maanden volledig
worden opgeladen
• In geval van seizoensgebruik moet het PPP minimaal 50% zijn
opgeladen voordat het wordt opgeslagen. Door de knop 5 sec.
lang ingedrukt te houden, wordt het PPP in de opslagmodus
gezet en gaat de led blauw knipperen.
4. Installatie
Bij het plaatsen van de Peak Power Pack dient erop te worden
gelet dat er voldoende ventilatiemogelijkheid rondom het
apparaat aanwezig is. Een ruimte van tenminste 5cm dient te
worden aangehouden.
In geval van hoge temperaturen, schakelt het product uit en wordt
er een storing aangegeven met een rode knipperende led.
Installatie van het PPP in een caravan
De behuizing is van kunststof en moet met het meegeleverde
bandje of een geschi k te ac c uk l em word en gem on t e erd op de
vloer van de caravan in een (opberg-) kast.
Na de montage van het PPP op de caravanvloer moet een 8mm
gat in de kast e n wand wo rde n geb oo rd voor de
afstandsbedieningsknop/-LED. De knop/LED dient te worden
7
EN NL FR DE ES SE
gemonteerd in een gedeelte dat gemakkelijk toegankelijk is,
zodat gemakkelijk op de knop kan worden gedrukt of de LED te
zien is. Voer de 3,5mm-stekkerplug en de kabel van buitenaf
door het gat tot de knop op zijn plaats zit. De 3,5mm stekker kan
nu worden aangesloten op de aansluiting voor de
afstandsbedieningsknop van het PPP.
Aansluiti n g van een h og e uit ga ngss t r oom op een car a va n
mover
De besturingsunit van de m ove r kan di r ect w orden aange slote n
op de uitgang ‘mov e r’ van het PPP. De kabeluiteinden moeten
15mm worden gestript. Voer alle aders voorzichtig in de
stekkers en draai daarna de schroeven vast. Het aanbevolen
aanhaalmoment is 2Nm. Let erop dat u het uiteinde van de ader
helemaal in de klem plaatst zonder dat de isolatiemantel
geklemd wordt en zonder dat er ader s uitsteken.
Gebruik de kabels die zijn meegeleverd met de caravan mover
kit of zoals aanbevolen door de fabrikant van de mover. Over
het algemee n wordt een kabeldoorsnede van 10mm² tot 16mm²
hiervoor gebruikt.
In verband met de hoge stromen die bij het gebruik van mover
optreden, is een voorzichtige installatie van de kabels cruciaal.
Een onjuiste aansluiting van de kabels kan leiden tot
vermogensverlies, oververhitting en beschadiging. Het Victron
PPP is voorzien van klemmen voor hoog vermogen die voor een
betrouwbare aansluiting van fijne aderuiteinden zorgen. Hoge
kwaliteit aansluitogen en speciale krimptangen zijn daarom
hiervoor niet nodig. Stevige kabels met dikke aders zorgen niet
voor een goede aansluiting.
8
Aansluiting van huishoudelijke apparatuur
Huishoudelijke apparatuur met een laag stroomverbruik, zoals
LED-lampen, een zuinige waterpomp of een 12V LCD-tv kan
worden gevoed via de uitgang ‘domestic’. Een goed bemeten inline zekering moet worden aangesloten binnen 10cm van de
positieve accuklem. Dit om oververhitting/smelten van de kabels
te voorkomen.
Een 1,5mm²-kabel dient een zekering van tot 10A te hebben.
Een 2,5mm²-kabel moet worden gezekerd met maximaal 16A.
Aansluiting van de vermogensadapter (elektriciteitsnet)
De aansluiting ‘mains’ wordt verbonden met de 15Vvermogensadapter (meegeleverd). De vermogensadapter moet
worden aangesloten op een stopcontact. (100…240 VAC, 50…60
Hz)
De ingang ‘car/solar’
9
EN NL FR DE ES SE
Een 11 tot 20 VDC-voedingsbron kan worden aangesloten op
de ingang car/solar om het PPP door het elektrisch circuit van
de sleepwagen, een 12V-zonn epa neel of een 12V-accu op te
laden. Als verbinding wordt gemaakt met een stekker van een
auto-aanhanger, moet het gebruikte contact zorgvuldig worden
gekozen, zodat het circuit niet overbelast of de accu van de auto
niet te diep ontladen raakt.
Als voorbeeld wordt de veelal gebruikte 13-polige ‘Jaeger’stekker beschreven. De pinn um m ering van de ‘Multic o n West’stekker is hetzelfde.
Pin
DIN
Naam
Kleur
Kabelmaat
mm
2
AWG
1 L Linker knipperlicht
Geel
1,5
15
2
Mistlampen achter
Blauw
1,5
15 3 31
Aarde (-) voor pin 1 - 8
Wit
2,5
13 4 R
Rechter knipperlicht
Groen
1,5
15
5
58R
Achterlichten, zijlichten,
Bruin
1,5
15 6 54
Remlichten
Rood
1,5
15
7
58L
Achterlichten, zijlichten,
Zwart
1,5
15
8
Achteruitrijlicht(en)
Pink
1,5
15 9 30
+12V permanent
Oranje
2,5
13
10
15
+12V via contactslot
Grijs
2,5
13
11
31
Aarde (-) voor pin 10
Zwart/w
2,5
13
12
Aanduiding aanhanger
Lichtgrij
1,5
15
13
31
Aarde (-) voor pin 9
Rood/w
2,5
13

10
Pin 9 of 10 met hun aardeter ugl ei d ers ( 11 of 13) ku nnen worden
gebruikt. Normaal gesproken worden pin 9 en 10 gezekerd met
20A in de zekeringenplaat van de auto.
Het voordeel van het gebruik van 10 is dat het PPP alleen
oplaadt als de au to op con tac t staat, zodat de accu van de aut o
niet wordt leeg getrokken als de auto geparkeerd staat. Pin 10 is
geen standaardoptie bij de meeste automodellen, dus controleer
of deze pin beschikbaar is.
Let er bij verbinding met 9 op dat de accu van de auto niet wordt
leeg getrokken als de motor niet loopt. Koppel de steker van de
aanhanger los als u langere tijd stilstaat.
De meeste absorptiekoelapparaten verbruiken tot 10A. Als het
PPP wordt toegevoegd aan hetzelfde circuit, wordt de 20Azekering niet overbelast, maar is er geen vermogen beschikbaar
voor andere belastingen. Als er andere belastingen worden
gebruikt, zoals de waterpomp of lampen, moet de koelkast
worden overg eschakeld op ga s.

11
EN NL FR DE ES SE
5. Bediening
Drukknop:
• Kort indrukken:
De hoogvermogenuitgang is gedurende 30 min. ingeschakeld
en de LED brandt rood. De uitgang ‘domestic’ is permanent
ingeschakeld (uitgang ‘domestic’ is niet beschikbaar bij 8Ahmodel).
• 2 seconden ingedrukt houden:
Zowel de hoogvermogenuitgang als de uitgang ‘domestic’
zullen permanent zijn ingeschakeld. De rode LED knippert
langzaam.
• 5 seconden ingedrukt houden:
Het PPP wordt uitgeschakeld (= opslagmodus), de blauwe
LED knippert 10 keer.
Zowel de hoogvermogenuitgang als de uitgang ‘domestic’ zijn
uitgeschakeld.
De adapter of ingang ‘car/solar’ kunnen nog steeds worden
gebruikt om het PPP op te laden.
LED-statusindicatie:
= aan
= knippert langzaam (2 seconden aan, 2 seconden uit)
= knippert snel (½ seconde aan, ½ seconde uit)
Rode LED Blauwe LED
Peak Power Pack UIT
Hoogvermogenuitgang AAN
Hoogvermogenuitgang
permanent AAN
Overbelasting/kortsluiting/overte
mperatuur mover
Auto/zonnepaneel opladen
Peak Power Pack volledig
opgeladen.
Opslagmodus
(gedurende
10 sec.)

12
De werking van de lad er w or dt aa nge g ev e n met de gr oen e LED
op de lader.
6. Probleem oplossing
Storingsbeschrijving
Mogelijke
oorzaak
Oplossing
Geen voeding Accu is leeg Accu opladen
Geen voeding,
LED knippert
ROOD
Kortsluiting bij
de uitgang
Controleer de bedrading
Geen voeding,
LED knippert
ROOD
Overtemperatuur
Laat het apparaat afkoelen
De
uitgangsspanning
valt herhaaldelijk
weg bij gebruik
van de mover
Overbelasting Zorg voor de juiste
bandenspanning en
inschakelkracht van de
rollen. Voorkom dat het
neuswiel zich ingraaft.
Vermijd stoepranden.
Gebruik een juist bemeten
PPP voor de
caravan/mover.
Accu laadt niet
op door vries-
temperaturen
Ga naar een gebied met
temperat ur en bov en 0°C
7. Onderhoud
Het Peak Power Pack is onderhoudsvrij, maar moet minimaal
één keer per jaar en na elk gebruik volledi g worden
opgeladen.
Belangrijke aanwijzing:
Het PPP moet word en op geladen en ui tgesc hakeld voord at het
langere tijd wordt op geslagen.
 Loading...